Wio Terminal mostrando y almacenando datos analógicos
Descripción general
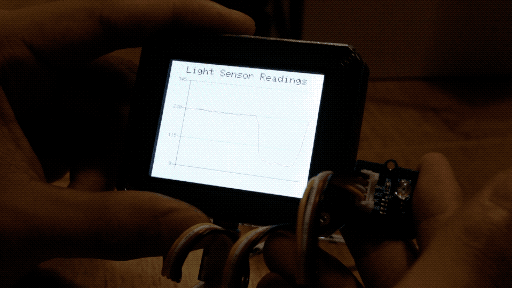
Este ejemplo demuestra el uso de las funciones de gráfico de líneas para mostrar las lecturas del sensor de luz Grove en Wio Terminal, ¡como el Serial Plotter! Para añadir más, los datos del sensor de luz se almacenan en la tarjeta SD.
Características
- Lectura de valores del sensor de luz y trazado en un gráfico de líneas
Librerías de Arduino necesarias
-
Instala la librería de gráficos de líneas
Seeed_Arduino_Linechart, por favor visita Gráficos de Líneas para más información. -
Instala la librería SD, por favor visita FS para más información.
Instrucciones de Arduino
-
Es altamente recomendable leer primero Gráficos de Líneas antes de probar este código de ejemplo.
-
Descarga el archivo
LightReadings.inoy súbelo a tu Wio Terminal a través delArduino IDE. Asegúrate de haber instalado todas las librerías. -
¡Cambia el brillo del entorno y observa los cambios en el gráfico de líneas!
-
La lectura analógica se puede encontrar en la tarjeta SD en
Readings.txt
Código
- Para inicializar LCD y puerto analógico
Como podemos ver, Wio Terminal tiene dos puertos Grove, uno es el puerto I2C predeterminado y el otro es configurable como puertos Digital D0, D1 o puertos Analógicos A0 y A1, así como puertos UART. En este caso, se necesita el puerto analógico, por lo que se define como entrada analógica.
También, inicializando la tarjeta SD como sigue:
#include <SPI.h>
#include <Seeed_FS.h>
#include "SD/Seeed_SD.h"
#include"seeed_line_chart.h" //include the library

File myFile;
TFT_eSPI tft;
TFT_eSprite spr = TFT_eSprite(&tft);  // Sprite

#define max_size 30 //maximum size of data
doubles data; //Initilising a doubles type to store data
int brightness;

void setup() {
    Serial.begin(115200);
    if (!SD.begin(SDCARD_SS_PIN, SDCARD_SPI)) {
        Serial.println("initialization failed!");
        while(1);
  }
    pinMode(A0, INPUT);
    tft.begin();
    tft.setRotation(3);
    spr.createSprite(TFT_HEIGHT,TFT_WIDTH);
}
- Lectura de valores del sensor y carga de datos
void loop() {
    spr.fillSprite(TFT_WHITE);
    brightness = analogRead(A0);
    int brightness = analogRead(LIGHT); //Reading light sensor values

    if (data.size() == max_size) {
        data.pop();//this is used to remove the first read variable
    }
    data.push(brightness); //Storing light sensor values
    saveData(); //Saving data to SD card
    ...
}
- Configuraciones de título
Por favor consulta Gráficos de Líneas para más información.
//Settings for the line graph title
auto header =  text(0, 0)
            .value("Light Sensor Readings")
            .align(center)
            .valign(vcenter)
            .width(tft.width())
            .thickness(2);

header.height(header.font_height() * 2);
header.draw(); //Header height is the twice the height of the font
- Configuraciones de gráficos de líneas
Consulte Gráficos de líneas para obtener más información.
//Settings for the line graph
auto content = line_chart(20, header.height()); //(x,y) where the line graph begins
        content
            .height(tft.height() - header.height() * 1.5) //actual height of the line chart
            .width(tft.width() - content.x() * 2) //actual width of the line chart
            .based_on(0.0) //Starting point of y-axis, must be a float
            .show_circle(false) //drawing a cirle at each point, default is on.
            .value(data) //passing through the data to line graph
            .color(TFT_RED) //Setting the color for the line
            .draw();

spr.pushSprite(0, 0);
- Escribir Datos a la Tarjeta SD
Por favor consulta Lectura/Escritura desde la Tarjeta SD para más información.
void saveData(){
     myFile = SD.open("Readings.txt",FILE_APPEND);
     brightness = analogRead(A0);
     Serial.println(brightness);
     myFile.println(brightness);
     myFile.close();
}
Código completo
##include <SPI.h>
#include <Seeed_FS.h>
#include "SD/Seeed_SD.h"
#include"seeed_line_chart.h" //include the library

File myFile;
TFT_eSPI tft;
TFT_eSprite spr = TFT_eSprite(&tft);  // Sprite

#define max_size 30 //maximum size of data
doubles data; //Initilising a doubles type to store data
int brightness;

void setup() {
    Serial.begin(115200);
    if (!SD.begin(SDCARD_SS_PIN, SDCARD_SPI)) {
        Serial.println("initialization failed!");
        while(1);
  }
    pinMode(A0, INPUT);
    tft.begin();
    tft.setRotation(3);
    spr.createSprite(TFT_HEIGHT,TFT_WIDTH);
}

void loop() {
    spr.fillSprite(TFT_WHITE);
    brightness = analogRead(A0);

    if (data.size() == max_size) {
        data.pop();//this is used to remove the first read variable
    }
    data.push(brightness); //read variables and store in data
    saveData();

    //Settings for the line graph title
    auto header =  text(0, 0)
                .value("Light Sensor Readings")
                .align(center)
                .valign(vcenter)
                .width(tft.width())
                .thickness(2);

    header.height(header.font_height() * 2);
    header.draw(); //Header height is the twice the height of the font

  //Settings for the line graph
    auto content = line_chart(20, header.height()); //(x,y) where the line graph begins
         content
                .height(tft.height() - header.height() * 1.5) //actual height of the line chart
                .width(tft.width() - content.x() * 2) //actual width of the line chart
                .based_on(0.0) //Starting point of y-axis, must be a float
                .show_circle(false) //drawing a cirle at each point, default is on.
                .value(data) //passing through the data to line graph
                .color(TFT_RED) //Setting the color for the line
                .draw();

    spr.pushSprite(0, 0);
}

void saveData(){
     myFile = SD.open("Readings.txt",FILE_APPEND);
     brightness = analogRead(A0);
     Serial.println(brightness);
     myFile.println(brightness);
     myFile.close();
}