Conectividad Wi-Fi
Este wiki presenta cómo configurar la conectividad Wi-Fi en Wio Terminal usando el núcleo Realtek RTL8720.
Asegúrate de haber seguido la descripción general de la red, actualizado el firmware más reciente en RTL8720 y descargado las librerías de Arduino dependientes.
Atención
Los siguientes ejemplos se han actualizado para funcionar con el Firmware de Marco de Estructura eRPC, por favor actualiza a la estructura eRPC. Simplemente reemplaza AtWifi.h con rpcWiFi.h.
Configuración como Modo Estación (STA)
-
Incluye la librería
rpcWifi.hen Arduino. -
Configura como modo STA:
WiFi.mode(WIFI_STA);
Código de Ejemplo para Escanear Red Wi-Fi
Este ejemplo se configurará como modo Wi-Fi STA, escaneará e imprimirá todas las redes disponibles al Serial.
#include "rpcWiFi.h"

void setup() {
    Serial.begin(115200);
    while(!Serial); // Wait for Serial to be ready
    delay(1000);

    // Set WiFi to station mode and disconnect from an AP if it was previously connected
    WiFi.mode(WIFI_STA);
    WiFi.disconnect();
    delay(100);

    Serial.println("Setup done");
}

void loop() {
    Serial.println("scan start");

    // WiFi.scanNetworks will return the number of networks found
    int n = WiFi.scanNetworks();
    Serial.println("scan done");
    if (n == 0) {
        Serial.println("no networks found");
    } else {
        Serial.print(n);
        Serial.println(" networks found");
        for (int i = 0; i < n; ++i) {
            // Print SSID and RSSI for each network found
            Serial.print(i + 1);
            Serial.print(": ");
            Serial.print(WiFi.SSID(i));
            Serial.print(" (");
            Serial.print(WiFi.RSSI(i));
            Serial.print(")");
            Serial.println((WiFi.encryptionType(i) == WIFI_AUTH_OPEN) ? " " : "*");
            delay(10);
        }
    }
    Serial.println("");

    // Wait a bit before scanning again
    delay(5000);
}
Código de Ejemplo para Conectar a una Red Específica
Este ejemplo se conecta a una red Wi-Fi específica. Cambia el ssid y password por los de tu red Wi-Fi.
#include "rpcWiFi.h"

const char* ssid = "yourNetworkName";
const char* password =  "yourNetworkPassword";

void setup() {
    Serial.begin(115200);
    while(!Serial); // Wait for Serial to be ready

    // Set WiFi to station mode and disconnect from an AP if it was previously connected
    WiFi.mode(WIFI_STA);
    WiFi.disconnect();

    Serial.println("Connecting to WiFi..");
    WiFi.begin(ssid, password);

    while (WiFi.status() != WL_CONNECTED) {
        delay(500);
        Serial.println("Connecting to WiFi..");
        WiFi.begin(ssid, password);
    }
    Serial.println("Connected to the WiFi network");
    Serial.print("IP Address: ");
    Serial.println (WiFi.localIP()); // prints out the device's IP address
    }

void loop() {

}
Código de Ejemplo WiFi Multi
- Incluye las librerías
rpcWiFi.hyWiFiMulti.hen Arduino.
Este ejemplo invoca la clase WiFiMulti, puedes usar
wifiMulti.addAP("ssid", "password");
para agregar varios AP Wi-Fi a la lista y wifiMulti.run() intentará conectarse al Wi-Fi con mejor señal.
Nota: Cambia el SSID y Password según tu Wi-Fi.
#include "rpcWiFi.h"
#include <WiFiMulti.h>

WiFiMulti wifiMulti;

void setup() {
    Serial.begin(115200);
    while(!Serial); // Wait for Serial to be ready
    delay(1000);

    wifiMulti.addAP("ssid_from_AP_1", "your_password_for_AP_1");
    wifiMulti.addAP("ssid_from_AP_2", "your_password_for_AP_2");
    wifiMulti.addAP("ssid_from_AP_3", "your_password_for_AP_3");

    Serial.println("Connecting Wifi...");
    if (wifiMulti.run() == WL_CONNECTED) {
        Serial.println("");
        Serial.println("WiFi connected");
        Serial.println("IP address: ");
        Serial.println(WiFi.localIP());
    }
}

void loop() {
    if (wifiMulti.run() != WL_CONNECTED) {
        Serial.println("WiFi not connected!");
        delay(1000);
    }
}
Código de Ejemplo de Cliente Wi-Fi
Este ejemplo demuestra cómo Wio Terminal se configura como modo STA, se conecta a un AP Wi-Fi específico y envía una solicitud HTTP GET y recibe una respuesta HTTP del servidor web en la misma red.
-
Cambia el
ssidypasswordpor tu Wi-Fi. -
Cambia el
hostpor la dirección IP del servidor Web.
Para probar simplemente el ejemplo, puedes iniciar un servidor web simple usando Python en tu PC:
- Copia y guarda lo siguiente en tu disco local, y nómbralo
index.html.
<html>
<body>
Hello World!
</body>
</html>
- En Powershell/Terminal, cambia el directorio a la ruta donde acabas de guardar
index.htmly ejecuta el siguiente código para iniciar un servidor Web simple usando Python:
Para Python 3:
python3 -m http.server 80
Para Python 2:
python -m SimpleHTTPServer 80
-
Cambia el
hosta la dirección IP de esta PC en el código de Arduino. También, cambia elssidypassworden el código de Arduino a la misma Wi-Fi que está conectada con esta PC. -
Sube el código al Wio Terminal, revisa el monitor Serie para observar los resultados.
#include <rpcWiFi.h>

const char* ssid = "yourNetworkName";
const char* password =  "yourNetworkPassword";

void setup() {
    Serial.begin(115200);
    while(!Serial); // Wait for Serial to be ready
    delay(1000);

    // Set WiFi to station mode and disconnect from an AP if it was previously connected
    WiFi.mode(WIFI_STA);
    WiFi.disconnect();
    delay(2000);

    WiFi.begin(ssid, password);

    while (WiFi.status() != WL_CONNECTED) {
        delay(500);
        Serial.println("Connecting to WiFi..");
    }
    Serial.println("Connected to the WiFi network");
    Serial.print("IP Address: ");
    Serial.println (WiFi.localIP()); // prints out the device's IP address
}


void loop() {
    const uint16_t port = 80; // Default port
    const char* host = "192.168.0.10";  // Target Server IP Address

    Serial.print("Connecting to ");
    Serial.println(host);

    // Use WiFiClient class to create TCP connections
    WiFiClient client;

    if (!client.connect(host, port)) {
        Serial.println("Connection failed.");
        Serial.println("Waiting 5 seconds before retrying...");
        delay(5000);
        return;
    }

    // This will send a request to the server
    //uncomment this line to send an arbitrary string to the server
    //client.print("Send this data to the server");
    //uncomment this line to send a basic document request to the server
    client.print("GET /index.html HTTP/1.1\n\n"); // sending HTTP GET request

    int maxloops = 0;

    //wait for the server's reply to become available
    while (!client.available() && maxloops < 1000) {
        maxloops++;
        delay(1); //delay 1 msec
    }
    if (client.available() > 0) {
        //read back one line from the server
        String line = client.readString(); // Read from the server response
        // Proceed various line-endings
        line.replace("\r\n", "\n");
        line.replace('\r', '\n');
        line.replace("\n", "\r\n");
        Serial.println(line);
    } else {
        Serial.println("client.available() timed out ");
    }

    Serial.println("Closing connection.");
    client.stop();

    Serial.println("Waiting 5 seconds before restarting...");
    delay(5000);
}
Código de Ejemplo de Conexión Wi-Fi Https
Este ejemplo demuestra cómo establecer una conexión Https usando Wio Terminal. Con esto, puedes conectarte a casi cualquier sitio web y obtener datos según tus necesidades.
- Cambia el
ssidypasswordpor los de tu Wi-Fi.
#include <rpcWiFi.h>
#include <WiFiClientSecure.h>

const char* ssid     = "yourNetworkName";     // your network SSID
const char* password = "yourNetworkPassword"; // your network password

const char*  server = "www.example.com";  // Server URL
const char* test_root_ca = \
                            "-----BEGIN CERTIFICATE-----\n"
                            "MIIDrzCCApegAwIBAgIQCDvgVpBCRrGhdWrJWZHHSjANBgkqhkiG9w0BAQUFADBh\n"
                            "MQswCQYDVQQGEwJVUzEVMBMGA1UEChMMRGlnaUNlcnQgSW5jMRkwFwYDVQQLExB3\n"
                            "d3cuZGlnaWNlcnQuY29tMSAwHgYDVQQDExdEaWdpQ2VydCBHbG9iYWwgUm9vdCBD\n"
                            "QTAeFw0wNjExMTAwMDAwMDBaFw0zMTExMTAwMDAwMDBaMGExCzAJBgNVBAYTAlVT\n"
                            "MRUwEwYDVQQKEwxEaWdpQ2VydCBJbmMxGTAXBgNVBAsTEHd3dy5kaWdpY2VydC5j\n"
                            "b20xIDAeBgNVBAMTF0RpZ2lDZXJ0IEdsb2JhbCBSb290IENBMIIBIjANBgkqhkiG\n"
                            "9w0BAQEFAAOCAQ8AMIIBCgKCAQEA4jvhEXLeqKTTo1eqUKKPC3eQyaKl7hLOllsB\n"
                            "CSDMAZOnTjC3U/dDxGkAV53ijSLdhwZAAIEJzs4bg7/fzTtxRuLWZscFs3YnFo97\n"
                            "nh6Vfe63SKMI2tavegw5BmV/Sl0fvBf4q77uKNd0f3p4mVmFaG5cIzJLv07A6Fpt\n"
                            "43C/dxC//AH2hdmoRBBYMql1GNXRor5H4idq9Joz+EkIYIvUX7Q6hL+hqkpMfT7P\n"
                            "T19sdl6gSzeRntwi5m3OFBqOasv+zbMUZBfHWymeMr/y7vrTC0LUq7dBMtoM1O/4\n"
                            "gdW7jVg/tRvoSSiicNoxBN33shbyTApOB6jtSj1etX+jkMOvJwIDAQABo2MwYTAO\n"
                            "BgNVHQ8BAf8EBAMCAYYwDwYDVR0TAQH/BAUwAwEB/zAdBgNVHQ4EFgQUA95QNVbR\n"
                            "TLtm8KPiGxvDl7I90VUwHwYDVR0jBBgwFoAUA95QNVbRTLtm8KPiGxvDl7I90VUw\n"
                            "DQYJKoZIhvcNAQEFBQADggEBAMucN6pIExIK+t1EnE9SsPTfrgT1eXkIoyQY/Esr\n"
                            "hMAtudXH/vTBH1jLuG2cenTnmCmrEbXjcKChzUyImZOMkXDiqw8cvpOp/2PV5Adg\n"
                            "06O/nVsJ8dWO41P0jmP6P6fbtGbfYmbW0W5BjfIttep3Sp+dWOIrWcBAI+0tKIJF\n"
                            "PnlUkiaY4IBIqDfv8NZ5YBberOgOzW6sRBc4L0na4UU+Krk2U886UAb3LujEV0ls\n"
                            "YSEY1QSteDwsOoBrp+uvFRTp2InBuThs4pFsiv9kuXclVzDAGySj4dzp30d8tbQk\n"
                            "CAUw7C29C79Fv1C5qfPrmAESrciIxpg0X40KPMbp1ZWVbd4=\n"
                            "-----END CERTIFICATE-----\n";

// You can use x.509 client certificates if you want
//const char* test_client_key = "";   //to verify the client
//const char* test_client_cert = "";  //to verify the client

WiFiClientSecure client;

void setup() {
    //Initialize serial and wait for port to open:
    Serial.begin(115200);
    while(!Serial); // Wait for Serial to be ready
    delay(1000);

    Serial.print("Attempting to connect to SSID: ");
    Serial.println(ssid);
    WiFi.begin(ssid, password);

    // attempt to connect to Wifi network:
    while (WiFi.status() != WL_CONNECTED) {
        Serial.print(".");
        // wait 1 second for re-trying
        delay(1000);
    }
    Serial.print("Connected to ");
    Serial.println(ssid);

    client.setCACert(test_root_ca);
    //client.setCertificate(test_client_key); // for client verification
    //client.setPrivateKey(test_client_cert); // for client verification

    Serial.println("\nStarting connection to server...");
    if (!client.connect(server, 443)) {
        Serial.println("Connection failed!");
    } else {
        Serial.println("Connected to server!");
        // Make a HTTP request:
        client.println("GET https://www.example.com HTTP/1.0");
        client.println("Host: www.example.com");
        client.println("Connection: close");
        client.println();

        while (client.connected()) {
            String line = client.readStringUntil('\n');
            if (line == "\r") {
                Serial.println("headers received");
                break;
            }
        }
        // if there are incoming bytes available
        // from the server, read them and print them:
        while (client.available()) {
            char c = client.read();
            if (c == '\n') {
                Serial.write('\r');
            }
            Serial.write(c);
        }
        client.stop();
    }
}

void loop() {
    // do nothing
}
Obtener el CA raíz del sitio web
Para obtener el CA raíz de un sitio web, puedes ejecutar el siguiente comando en Terminal (Linux Bash Shell):
openssl s_client -showcerts -verify 5 -connect www.example.com:443 < /dev/null
Reemplaza www.example.com con la URL raíz del sitio web deseado.
Para Windows, puedes usar el Subsistema de Windows para Linux (WSL) para ejecutar el mismo comando de Linux.
Nota: Asegúrate de tener las dependencias instaladas:
sudo apt update
sudo apt install openssl
Código de Ejemplo para Conectar al Servidor MQTT
Este ejemplo demuestra cómo establecer una conexión MQTT usando Wio Terminal con un servidor MQTT. Con esto, puedes usar el Wio Terminal para suscribirte y publicar mensajes al servidor MQTT. Aquí se usó un servidor MQTT gratuito: https://test.mosquitto.org/.
- Descarga e instala la Librería Arduino MQTT aquí.
#include "rpcWiFi.h"
#include <PubSubClient.h>

// Update these with values suitable for your network.
const char *ssid = "yourNetworkName";      // your network SSID
const char *password = "yourNetworkPassword"; // your network password

const char *ID = "Wio-Terminal-Client";  // Name of our device, must be unique
const char *TOPIC = "WioTerminal";  // Topic to subcribe to
const char *subTopic = "inTopic";  // Topic to subcribe to
const char *server = "test.mosquitto.org"; // Server URL


WiFiClient wifiClient;
PubSubClient client(wifiClient);

void callback(char* topic, byte* payload, unsigned int length) {
  Serial.print("Message arrived [");
  Serial.print(topic);
  Serial.print("] ");
  for (int i=0;i<length;i++) {
    Serial.print((char)payload[i]);
  }
  Serial.println();
}

void reconnect() {
  // Loop until we're reconnected
  while (!client.connected())
  {
    Serial.print("Attempting MQTT connection...");
    // Attempt to connect
    if (client.connect(ID)) {
      Serial.println("connected");
      // Once connected, publish an announcement...
      client.publish(TOPIC, "{\"message\": \"Wio Terminal is connected!\"}");
      Serial.println("Published connection message successfully!");
      // ... and resubscribe
      client.subscribe(subTopic);
      Serial.print("Subcribed to: ");
      Serial.println(subTopic);
    }
    else {
      Serial.print("failed, rc=");
      Serial.print(client.state());
      Serial.println(" try again in 5 seconds");
      // Wait 5 seconds before retrying
      delay(5000);
    }
  }
}

void setup()
{
  Serial.begin(115200);
  while (!Serial)
    ; // Wait for Serial to be ready
  Serial.print("Attempting to connect to SSID: ");
  Serial.println(ssid);
  WiFi.begin(ssid, password);

  // attempt to connect to Wifi network:
  while (WiFi.status() != WL_CONNECTED)
  {
    Serial.print(".");
    WiFi.begin(ssid, password);
    // wait 1 second for re-trying
    delay(1000);
  }

  Serial.print("Connected to ");
  Serial.println(ssid);
  delay(500);

  client.setServer(server, 1883);
  client.setCallback(callback);
}

void loop()
{
  if (!client.connected()) {
    reconnect();
  }
  client.loop();
}
Código de Ejemplo para Conectar al Servidor MQTTs
Este ejemplo demuestra cómo establecer una conexión MQTTs usando Wio Terminal. Aquí se usa un servidor MQTTs gratuito: https://test.mosquitto.org/ y se envían datos del acelerómetro a un tema.
-
Descarga e instala la Librería Arduino MQTT aquí.
-
Instala la Librería del Acelerómetro para Wio Terminal siguiendo este wiki.
-
El Wio Terminal publicará datos del acelerómetro al tema
WioTerminal/IMUy se suscribirá a mensajes del temainTopic.
# include "rpcWiFi.h"
# include <PubSubClient.h>
# include <WiFiClientSecure.h>
# include"LIS3DHTR.h"

const char *ssid = "yourNetworkName";      // your network SSID
const char*password = "yourNetworkPassword"; // your network password

const char *ID = "Wio-Terminal-Client";  // Name of our device, must be unique
const char*TOPIC = "WioTerminal/IMU";  // Topic to subcribe to
const char *subTopic = "inTopic";  // Topic to subcribe to

const char *server = "test.mosquitto.org"; // Server URL
const char*test_root_ca =
"-----BEGIN CERTIFICATE-----\n"
"MIIEAzCCAuugAwIBAgIUBY1hlCGvdj4NhBXkZ/uLUZNILAwwDQYJKoZIhvcNAQEL\n"
"BQAwgZAxCzAJBgNVBAYTAkdCMRcwFQYDVQQIDA5Vbml0ZWQgS2luZ2RvbTEOMAwG\n"
"A1UEBwwFRGVyYnkxEjAQBgNVBAoMCU1vc3F1aXR0bzELMAkGA1UECwwCQ0ExFjAU\n"
"BgNVBAMMDW1vc3F1aXR0by5vcmcxHzAdBgkqhkiG9w0BCQEWEHJvZ2VyQGF0Y2hv\n"
"by5vcmcwHhcNMjAwNjA5MTEwNjM5WhcNMzAwNjA3MTEwNjM5WjCBkDELMAkGA1UE\n"
"BhMCR0IxFzAVBgNVBAgMDlVuaXRlZCBLaW5nZG9tMQ4wDAYDVQQHDAVEZXJieTES\n"
"MBAGA1UECgwJTW9zcXVpdHRvMQswCQYDVQQLDAJDQTEWMBQGA1UEAwwNbW9zcXVp\n"
"dHRvLm9yZzEfMB0GCSqGSIb3DQEJARYQcm9nZXJAYXRjaG9vLm9yZzCCASIwDQYJ\n"
"KoZIhvcNAQEBBQADggEPADCCAQoCggEBAME0HKmIzfTOwkKLT3THHe+ObdizamPg\n"
"UZmD64Tf3zJdNeYGYn4CEXbyP6fy3tWc8S2boW6dzrH8SdFf9uo320GJA9B7U1FW\n"
"Te3xda/Lm3JFfaHjkWw7jBwcauQZjpGINHapHRlpiCZsquAthOgxW9SgDgYlGzEA\n"
"s06pkEFiMw+qDfLo/sxFKB6vQlFekMeCymjLCbNwPJyqyhFmPWwio/PDMruBTzPH\n"
"3cioBnrJWKXc3OjXdLGFJOfj7pP0j/dr2LH72eSvv3PQQFl90CZPFhrCUcRHSSxo\n"
"E6yjGOdnz7f6PveLIB574kQORwt8ePn0yidrTC1ictikED3nHYhMUOUCAwEAAaNT\n"
"MFEwHQYDVR0OBBYEFPVV6xBUFPiGKDyo5V3+Hbh4N9YSMB8GA1UdIwQYMBaAFPVV\n"
"6xBUFPiGKDyo5V3+Hbh4N9YSMA8GA1UdEwEB/wQFMAMBAf8wDQYJKoZIhvcNAQEL\n"
"BQADggEBAGa9kS21N70ThM6/Hj9D7mbVxKLBjVWe2TPsGfbl3rEDfZ+OKRZ2j6AC\n"
"6r7jb4TZO3dzF2p6dgbrlU71Y/4K0TdzIjRj3cQ3KSm41JvUQ0hZ/c04iGDg/xWf\n"
"+pp58nfPAYwuerruPNWmlStWAXf0UTqRtg4hQDWBuUFDJTuWuuBvEXudz74eh/wK\n"
"sMwfu1HFvjy5Z0iMDU8PUDepjVolOCue9ashlS4EB5IECdSR2TItnAIiIwimx839\n"
"LdUdRudafMu5T5Xma182OC0/u/xRlEm+tvKGGmfFcN0piqVl8OrSPBgIlb+1IKJE\n"
"m/XriWr/Cq4h/JfB7NTsezVslgkBaoU=\n"
"-----END CERTIFICATE-----\n";

long lastMsg = 0;

LIS3DHTR<TwoWire> lis;
WiFiClientSecure wifiClient;
PubSubClient client(wifiClient);

void callback(char *topic, byte*payload, unsigned int length)
{
  Serial.print("Message arrived [");
  Serial.print(topic);
  Serial.print("] ");
  for (int i = 0; i < length; i++)
  {
    Serial.print((char)payload[i]);
  }
  Serial.println();
}

void reconnect()
{
  // Loop until we're reconnected
  while (!client.connected())
  {
    Serial.print("Attempting MQTT connection...");
    // Attempt to connect
    if (client.connect(ID))
    {
      Serial.println("connected");
      // Once connected, publish an announcement...
      client.publish(TOPIC, "{\"message\": \"Wio Terminal is connected!\"}");
      Serial.println("Published connection message successfully!");
      // ... and resubscribe
      client.subscribe(subTopic);
      Serial.print("Subcribed to: ");
      Serial.println(subTopic);
    }
    else
    {
      Serial.print("failed, rc=");
      Serial.print(client.state());
      Serial.println(" try again in 5 seconds");
      // Wait 5 seconds before retrying
      delay(5000);
    }
  }
}

void setup()
{
  //Initialize serial and wait for port to open:
  Serial.begin(115200);
  while (!Serial)
    ; // Wait for Serial to be ready
  delay(1000);

  lis.begin(Wire1);

  if (!lis) {
    Serial.println("ERROR");
    while(1);
  }
  lis.setOutputDataRate(LIS3DHTR_DATARATE_25HZ); //Data output rate
  lis.setFullScaleRange(LIS3DHTR_RANGE_2G); //Scale range set to 2g

  Serial.print("Attempting to connect to SSID: ");
  Serial.println(ssid);
  WiFi.begin(ssid, password);

  // attempt to connect to Wifi network:
  while (WiFi.status() != WL_CONNECTED)
  {
    Serial.print(".");
    WiFi.begin(ssid, password);
    // wait 1 second for re-trying
    delay(1000);
  }
  Serial.print("Connected to ");
  Serial.println(ssid);

  wifiClient.setCACert(test_root_ca);

  client.setServer(server, 8883);
  client.setCallback(callback);
}


void loop()
{
  if (!client.connected())
  {
    reconnect();
  }

  float x_values, y_values, z_values;

  // Sending Data
  long now = millis();
  if (now - lastMsg > 5000) {
    lastMsg = now;

  x_values = lis.getAccelerationX();
  y_values = lis.getAccelerationY();
  z_values = lis.getAccelerationZ();
  String data="{\"x-axis\": "+String(x_values)+","+"\"y-axis\": "+String(y_values)+","+"\"z-axis\": "+String(z_values)+"}";

  if (!client.publish(TOPIC, data.c_str())) {
    Serial.println("Message failed to send.");
  }
  Serial.printf("Message Send [%s] ", TOPIC);
  Serial.println(data);
  }

  client.loop();
}
Código de Ejemplo de Cliente UDP

Este ejemplo se conecta a una Wi-Fi y envía paquetes UDP a un Servidor UDP que se ejecuta en tu PC.
Nota: ¡Asegúrate de que tu PC y Wio Terminal estén en la misma red!
Código del Servidor UDP en Python
-
Guarda el siguiente código como
udp_server.py. -
Ejecuta el script de python:
python udp_server.py.
# This python script listens on UDP port 3333
# for messages from the Wio Terminal board and prints them
import socket
import sys

try :
    s = socket.socket(socket.AF_INET, socket.SOCK_DGRAM)
    s.setsockopt(socket.SOL_SOCKET, socket.SO_REUSEADDR, 1)
except socket.error, msg :
    print 'Failed to create socket. Error Code : ' + str(msg[0]) + ' Message ' + msg[1]
    sys.exit()

try:
    s.bind(('', 3333))
except socket.error , msg:
    print 'Bind failed. Error: ' + str(msg[0]) + ': ' + msg[1]
    sys.exit()

print 'Server listening'

while 1:
    d = s.recvfrom(1024)
    data = d[0]

    if not data:
        break

    print data.strip()

s.close()
Código Arduino
-
Cambia el
networkNameynetworkPswda la configuración de tu Wi-Fi. -
Cambia la
udpAddressa la dirección IP de tu PC y asegúrate de que tu PC que está ejecutando el Servidor UDP esté en la misma red que Wio Terminal. -
Sube el código a Wio Terminal.
#include <rpcWiFi.h>
#include <WiFiUdp.h>

// WiFi network name and password:
const char * networkName = "your-ssid";
const char * networkPswd = "your-password";

//IP address to send UDP data to:
// either use the ip address of the server or
// a network broadcast address
const char * udpAddress = "192.168.0.255";
const int udpPort = 3333;

//Are we currently connected?
boolean connected = false;

//The udp library class
WiFiUDP udp;

void setup(){
  // Initilize hardware serial:
  Serial.begin(115200);

  //Connect to the WiFi network
  connectToWiFi(networkName, networkPswd);
}

void loop(){
  //only send data when connected
  if(connected){
    //Send a packet
    udp.beginPacket(udpAddress,udpPort);
    udp.printf("Seconds since boot: %lu", millis()/1000);
    udp.endPacket();
  }
  //Wait for 1 second
  delay(1000);
}

void connectToWiFi(const char * ssid, const char * pwd){
  Serial.println("Connecting to WiFi network: " + String(ssid));

  // delete old config
  WiFi.disconnect(true);
  //register event handler
  WiFi.onEvent(WiFiEvent);

  //Initiate connection
  WiFi.begin(ssid, pwd);

  Serial.println("Waiting for WIFI connection...");
}

//wifi event handler
void WiFiEvent(WiFiEvent_t event){
    switch(event) {
      case SYSTEM_EVENT_STA_GOT_IP:
          //When connected set
          Serial.print("WiFi connected! IP address: ");
          Serial.println(WiFi.localIP());
          //initializes the UDP state
          //This initializes the transfer buffer
          udp.begin(WiFi.localIP(),udpPort);
          connected = true;
          break;
      case SYSTEM_EVENT_STA_DISCONNECTED:
          Serial.println("WiFi lost connection");
          connected = false;
          break;
      default: break;
    }
}
Código de Ejemplo Wi-Fi NTP
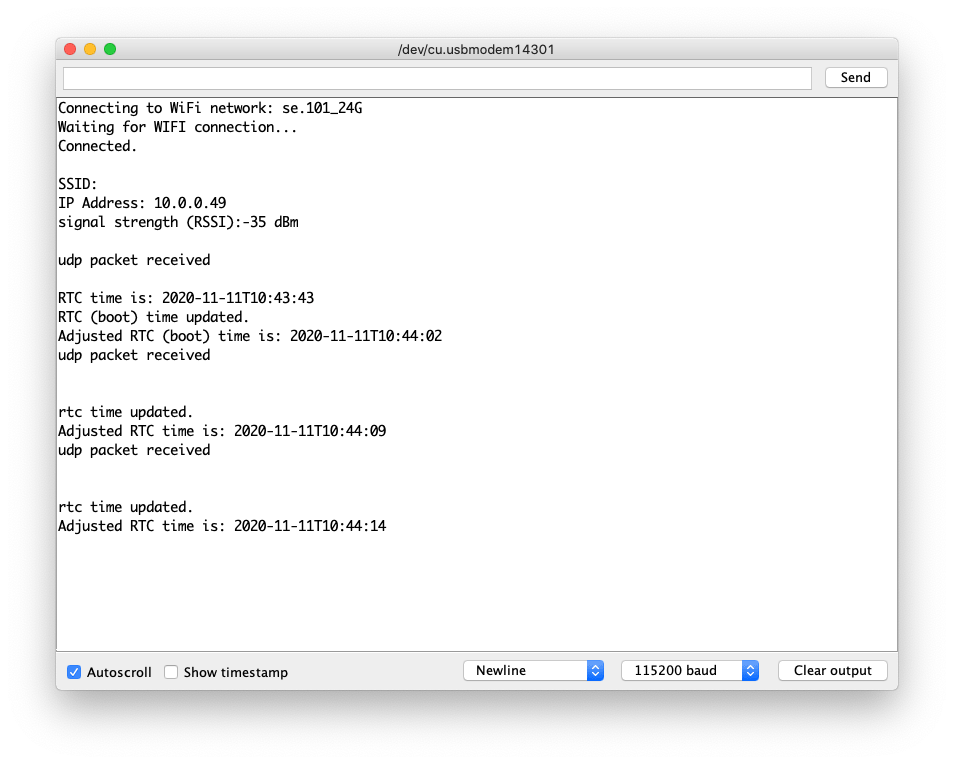
Este ejemplo utiliza UDP para obtener la hora NTP y usa el RTC integrado en el núcleo SAMD51 para mantener la hora actualizada.
-
Instala la librería Seeed_Arduino_RTC.
-
Instala la librería millisDelay.
#include <rpcWiFi.h>
#include <millisDelay.h>
#include "RTC_SAMD51.h"

const char ssid[] = "yourNetworkName"; // add your required ssid
const char password[] = "yourNetworkPassword"; // add your own netywork password

millisDelay updateDelay; // the update delay object. used for ntp periodic update.

unsigned int localPort = 2390;      // local port to listen for UDP packets
char timeServer[] = "time.nist.gov"; // extenral NTP server e.g. time.nist.gov

const int NTP_PACKET_SIZE = 48; // NTP time stamp is in the first 48 bytes of the message
byte packetBuffer[NTP_PACKET_SIZE]; //buffer to hold incoming and outgoing packets

// declare a time object
DateTime now;

// define WiFI client
WiFiClient client;

//The udp library class
WiFiUDP udp;

// localtime
unsigned long devicetime;

RTC_SAMD51 rtc;

// for use by the Adafuit RTClib library
char daysOfTheWeek[7][12] = { "Sunday", "Monday", "Tuesday", "Wednesday", "Thursday", "Friday", "Saturday" };

void setup() {

    Serial.begin(115200);

    while (!Serial); // wait for serial port to connect. Needed for native USB

    // setup network before rtc check
    connectToWiFi(ssid, password);

    // get the time via NTP (udp) call to time server
    // getNTPtime returns epoch UTC time adjusted for timezone but not daylight savings
    // time
    devicetime = getNTPtime();

    // check if rtc present
    if (devicetime == 0) {
        Serial.println("Failed to get time from network time server.");
    }

    if (!rtc.begin()) {
        Serial.println("Couldn't find RTC");
        while (1) delay(10); // stop operating
    }

    // get and print the current rtc time
    now = rtc.now();
    Serial.print("RTC time is: ");
    Serial.println(now.timestamp(DateTime::TIMESTAMP_FULL));

    // adjust time using ntp time
    rtc.adjust(DateTime(devicetime));

    // print boot update details
    Serial.println("RTC (boot) time updated.");
    // get and print the adjusted rtc time
    now = rtc.now();
    Serial.print("Adjusted RTC (boot) time is: ");
    Serial.println(now.timestamp(DateTime::TIMESTAMP_FULL));

    // start millisdelays timers as required, adjust to suit requirements
    updateDelay.start(1 * 60 * 60 * 1000); // update time via ntp every hr

}

void loop() {

    if (updateDelay.justFinished()) { // 12 hour loop
        // repeat timer
        updateDelay.repeat(); // repeat

        // update rtc time
        devicetime = getNTPtime();
        if (devicetime == 0) {
            Serial.println("Failed to get time from network time server.");
        }
        else {
            rtc.adjust(DateTime(devicetime));
            Serial.println("");
            Serial.println("rtc time updated.");
            // get and print the adjusted rtc time
            now = rtc.now();
            Serial.print("Adjusted RTC time is: ");
            Serial.println(now.timestamp(DateTime::TIMESTAMP_FULL));
        }
    }
}


void connectToWiFi(const char* ssid, const char* pwd) {
    Serial.println("Connecting to WiFi network: " + String(ssid));

    // delete old config
    WiFi.disconnect(true);

    Serial.println("Waiting for WIFI connection...");

    //Initiate connection
    WiFi.begin(ssid, pwd);

    while (WiFi.status() != WL_CONNECTED) {
        WiFi.begin(ssid, pwd);
        delay(500);
    }
    Serial.println("Connected.");
    printWifiStatus();

}

unsigned long getNTPtime() {

    // module returns a unsigned long time valus as secs since Jan 1, 1970
    // unix time or 0 if a problem encounted

    //only send data when connected
    if (WiFi.status() == WL_CONNECTED) {
        //initializes the UDP state
        //This initializes the transfer buffer
        udp.begin(WiFi.localIP(), localPort);

        sendNTPpacket(timeServer); // send an NTP packet to a time server
        // wait to see if a reply is available
        delay(1000);

        if (udp.parsePacket()) {
            Serial.println("udp packet received");
            Serial.println("");
            // We've received a packet, read the data from it
            udp.read(packetBuffer, NTP_PACKET_SIZE); // read the packet into the buffer

            //the timestamp starts at byte 40 of the received packet and is four bytes,
            // or two words, long. First, extract the two words:

            unsigned long highWord = word(packetBuffer[40], packetBuffer[41]);
            unsigned long lowWord = word(packetBuffer[42], packetBuffer[43]);
            // combine the four bytes (two words) into a long integer
            // this is NTP time (seconds since Jan 1 1900):
            unsigned long secsSince1900 = highWord << 16 | lowWord;
            // Unix time starts on Jan 1 1970. In seconds, that's 2208988800:
            const unsigned long seventyYears = 2208988800UL;
            // subtract seventy years:
            unsigned long epoch = secsSince1900 - seventyYears;

            // adjust time for timezone offset in secs +/- from UTC
            // WA time offset from UTC is +8 hours (28,800 secs)
            // + East of GMT
            // - West of GMT
            long tzOffset = 28800UL;

            // WA local time
            unsigned long adjustedTime;
            return adjustedTime = epoch + tzOffset;
        }
        else {
            // were not able to parse the udp packet successfully
            // clear down the udp connection
            udp.stop();
            return 0; // zero indicates a failure
        }
        // not calling ntp time frequently, stop releases resources
        udp.stop();
    }
    else {
        // network not connected
        return 0;
    }

}

// send an NTP request to the time server at the given address
unsigned long sendNTPpacket(const char* address) {
    // set all bytes in the buffer to 0
    for (int i = 0; i < NTP_PACKET_SIZE; ++i) {
        packetBuffer[i] = 0;
    }
    // Initialize values needed to form NTP request
    // (see URL above for details on the packets)
    packetBuffer[0] = 0b11100011;   // LI, Version, Mode
    packetBuffer[1] = 0;     // Stratum, or type of clock
    packetBuffer[2] = 6;     // Polling Interval
    packetBuffer[3] = 0xEC;  // Peer Clock Precision
    // 8 bytes of zero for Root Delay & Root Dispersion
    packetBuffer[12] = 49;
    packetBuffer[13] = 0x4E;
    packetBuffer[14] = 49;
    packetBuffer[15] = 52;

    // all NTP fields have been given values, now
    // you can send a packet requesting a timestamp:
    udp.beginPacket(address, 123); //NTP requests are to port 123
    udp.write(packetBuffer, NTP_PACKET_SIZE);
    udp.endPacket();
}

void printWifiStatus() {
    // print the SSID of the network you're attached to:
    Serial.println("");
    Serial.print("SSID: ");
    Serial.println(WiFi.SSID());

    // print your WiFi shield's IP address:
    IPAddress ip = WiFi.localIP();
    Serial.print("IP Address: ");
    Serial.println(ip);

    // print the received signal strength:
    long rssi = WiFi.RSSI();
    Serial.print("signal strength (RSSI):");
    Serial.print(rssi);
    Serial.println(" dBm");
    Serial.println("");
}
Configurando Wi-Fi como Modo Punto de Acceso (AP) / Servidor Web
-
Incluye las librerías
rpcWiFi.h,WiFiClient.hyWifiAP.hen Arduino. -
Configura el
ssidypassworddel Wi-Fi AP. -
Inicializa el Servidor Wi-Fi en el puerto 80:
WiFiServer server(80);
- Inicializar AP con el
ssidypassword:
WiFi.softAP(ssid, password);
- Iniciar el Servidor Web:
server.begin();
Código de Ejemplo para Configurar como Modo AP (Servidor Web Simple)
Este ejemplo configura Wio Terminal como un servidor web simple y te permite conectarte a su red AP y controlar el hardware basado en la respuesta en el HTTP.
/*
    WiFiAccessPoint.ino creates a WiFi access point and provides a web server on it.

    Steps:
    1. Connect to the access point "yourAp"
    2. Point your web browser to http://<This-AP-IP>/H to turn the LED on or http://<This-AP-IP>/L to turn it off
       (<This-AP-IP> should be replaced with the IP got in terminal/SerialPort, see Note 1)
     OR
     Run raw TCP "GET /H" and "GET /L" on PuTTY terminal with IP address (see Note 1) and 80 as port

    Created for arduino-esp32 on 04 July, 2018
    by Elochukwu Ifediora (fedy0)
*/

#include <rpcWiFi.h>
#include <WiFiClient.h>
#include <WiFiAP.h>

#define LED_BUILTIN 2   // Set the GPIO pin where you connected your test LED
                        // or comment this line out if your dev board has a built-in LED

// Set these to your desired credentials.
const char* ssid = "yourAP";
const char* password = "yourPassword";

WiFiServer server(80);


void setup() {
    pinMode(LED_BUILTIN, OUTPUT);

    Serial.begin(115200);
    while(!Serial); // Wait for Serial to be ready
    delay(1000);
    Serial.println();
    Serial.println("Configuring access point...");

    // You can remove the password parameter if you want the AP to be open.
    WiFi.softAP(ssid, password);
    IPAddress myIP = WiFi.softAPIP();
    /*
     * Note 1
     * Record this IP, will used by Client (such as Web Browser)
     */
    Serial.print("AP IP address: ");
    Serial.println(myIP);
    server.begin();

    Serial.println("Server started");
}

void loop() {
    WiFiClient client = server.available();   // listen for incoming clients

    if (client) {                             // if you get a client,
        Serial.println("New Client.");           // print a message out the serial port
        String currentLine = "";                // make a String to hold incoming data from the client
        while (client.connected()) {            // loop while the client's connected
            if (client.available()) {             // if there's bytes to read from the client,
                char c = client.read();             // read a byte, then
                Serial.write(c);                    // print it out the serial monitor
                if (c == '\n') {                    // if the byte is a newline character

                    // if the current line is blank, you got two newline characters in a row.
                    // that's the end of the client HTTP request, so send a response:
                    if (currentLine.length() == 0) {
                        // HTTP headers always start with a response code (e.g. HTTP/1.1 200 OK)
                        // and a content-type so the client knows what's coming, then a blank line:
                        client.println("HTTP/1.1 200 OK");
                        client.println("Content-type:text/html");
                        client.println();

                        // the content of the HTTP response follows the header:
                        client.print("Click <a href=\"/H\">here</a> to turn ON the LED.<br>");
                        client.print("Click <a href=\"/L\">here</a> to turn OFF the LED.<br>");

                        // The HTTP response ends with another blank line:
                        client.println();
                        // break out of the while loop:
                        break;
                    } else {    // if you got a newline, then clear currentLine:
                        currentLine = "";
                    }
                } else if (c != '\r') {  // if you got anything else but a carriage return character,
                    currentLine += c;      // add it to the end of the currentLine
                }

                // Check to see if the client request was "GET /H" or "GET /L":
                if (currentLine.endsWith("GET /H")) {
                    digitalWrite(LED_BUILTIN, HIGH);               // GET /H turns the LED on
                }
                if (currentLine.endsWith("GET /L")) {
                    digitalWrite(LED_BUILTIN, LOW);                // GET /L turns the LED off
                }
            }
        }
        // close the connection:
        client.stop();
        Serial.println("Client Disconnected.");
    }
}
Preguntas Frecuentes
- ¿Cómo verificar la versión del firmware RTL8720 en el código de Arduino?
#include "rpcWiFi.h"

void setup() {
    Serial.begin(115200);
    while(!Serial); // Wait to open Serial Monitor
    Serial.printf("RTL8720 Firmware Version: %s", rpc_system_version());
}

void loop() {
}
Soporte Técnico y Discusión de Productos
¡Gracias por elegir nuestros productos! Estamos aquí para brindarte diferentes tipos de soporte para asegurar que tu experiencia con nuestros productos sea lo más fluida posible. Ofrecemos varios canales de comunicación para satisfacer diferentes preferencias y necesidades.