Uso de Bluetooth (Biblioteca de Placas Habilitadas para mbed nRF52 de Seeed)
Seeed Studio XIAO nRF52840 y Seeed Studio XIAO nRF52840 Sense ambos soportan conectividad Bluetooth. Este wiki introducirá las funciones básicas de Bluetooth y proporcionará una demostración con el Módulo de Detección de Respiración Durante el Sueño de 24GHz, utilizado por la "Biblioteca de Placas Habilitadas para mbed nRF52 de Seeed".
Primeros Pasos
Hardware Requerido
- 1 x Seeed Studio XIAO nRF52840 o Seeed Studio XIAO nRF52840 Sense
- 1 x Smartphone/PC con conectividad bluetooth
- 1 x Cable USB Type-C
Software Requerido
Descripción General de la Biblioteca de Arduino
Si esta es tu primera vez usando Arduino, te recomendamos encarecidamente que consultes Primeros Pasos con Arduino.
Para usar la funcionalidad Bluetooth del Seeed Studio XIAO nRF52840, necesitamos usar la biblioteca oficial Arduino BLE.
Si quieres aplicar la Demostración con el Radar de Respiración Durante el Sueño de 24GHz, también puedes necesitar descargar la biblioteca compatible.
Función
Para una introducción a las funciones y uso de la biblioteca de código ArduinoBLE, por favor consulta el sitio web de Arduino.
Para una introducción a las funciones y uso de la biblioteca de código Seeed 24GHz Sleep Breathing Radar BLE, por favor consulta el Wiki.
Instalación
- Método Uno (Este método está disponible para ambas bibliotecas de código mencionadas anteriormente.)
Ya que has descargado la Biblioteca zip, abre tu Arduino IDE, haz clic en Sketch > Include Library > Add .ZIP Library. Elige el archivo zip que acabas de descargar, y si la biblioteca se instala correctamente, verás Library added to your libraries en la ventana de notificación. Lo que significa que la biblioteca se instaló exitosamente.

- Método Dos (Solo se puede instalar la biblioteca ArduinoBLE.)
El administrador de bibliotecas se agregó comenzando con las versiones 1.5 y superiores del Arduino IDE (1.6.x). Se encuentra en el menú 'Sketch' bajo 'Include Library', 'Manage Libraries...'
Cuando abras el Administrador de Bibliotecas encontrarás una gran lista de bibliotecas listas para instalación con un clic. Para encontrar una biblioteca para tu producto, busca el nombre del producto o una palabra clave como 'k type' o 'digitizer', y la biblioteca que quieres debería aparecer. Haz clic en la biblioteca deseada, y aparecerá el botón 'Install'. Haz clic en ese botón, y la biblioteca debería instalarse automáticamente. Cuando termine la instalación, cierra el Administrador de Bibliotecas.
Ejemplos de aplicación
Ahora que tenemos nuestra biblioteca instalada y entendemos las funciones básicas, ejecutemos algunos ejemplos para nuestro Seeed Studio XIAO nRF52840 para ver cómo se comporta.
Paso 1. Inicia la aplicación Arduino.
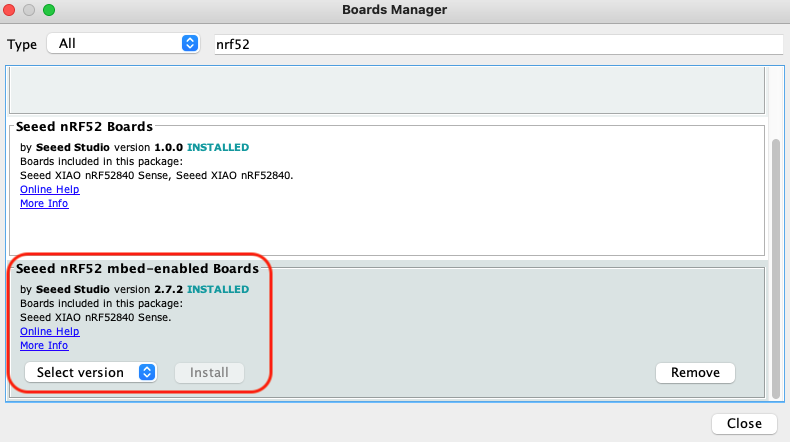
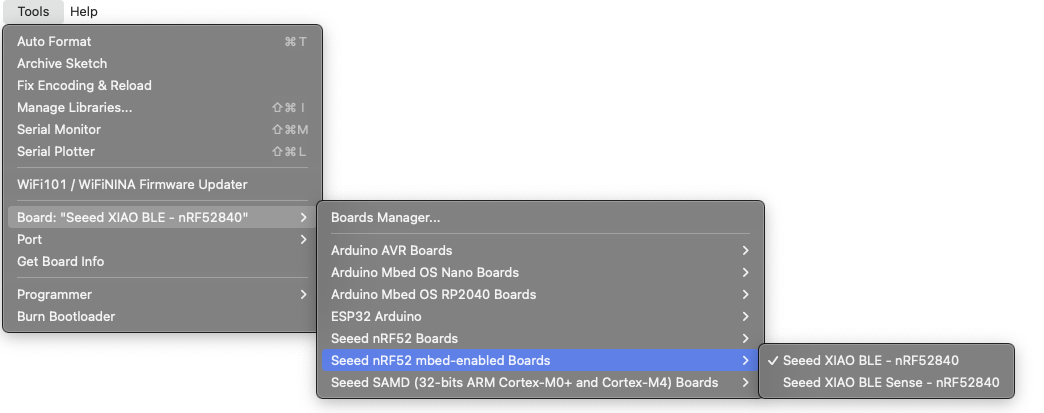
Paso 2. Selecciona tu modelo de placa de desarrollo y añádelo al IDE de Arduino. Aquí estamos usando "Seeed nrf52 mbed-enabled Boards Library".
Para la instalación de las bibliotecas de placas, por favor consulta este tutorial para completar la instalación.
Demo 1 Controlar LED integrado usando un smartphone
En este ejemplo, vamos a conectar el Seeed Studio XIAO nF52840 (Sense) y un smartphone usando Bluetooth y enviar mensajes desde el teléfono para encender/apagar el LED rojo integrado en el Seeed Studio XIAO nRF52840 (Sense).
Por favor pega este código a continuación en el IDE de Arduino y súbelo al Seeed Studio XIAO nRF52840.
#include <ArduinoBLE.h>
BLEService ledService("19B10000-E8F2-537E-4F6C-D104768A1214"); // Bluetooth® Low Energy LED Service
// Bluetooth® Low Energy LED Switch Characteristic - custom 128-bit UUID, read and writable by central
BLEByteCharacteristic switchCharacteristic("19B10001-E8F2-537E-4F6C-D104768A1214", BLERead | BLEWrite);
const int ledPin = LED_BUILTIN; // pin to use for the LED
void setup() {
Serial.begin(9600);
while (!Serial);
// set LED pin to output mode
pinMode(ledPin, OUTPUT);
// begin initialization
if (!BLE.begin()) {
Serial.println("starting Bluetooth® Low Energy module failed!");
while (1);
}
// set advertised local name and service UUID:
BLE.setLocalName("LED");
BLE.setAdvertisedService(ledService);
// add the characteristic to the service
ledService.addCharacteristic(switchCharacteristic);
// add service
BLE.addService(ledService);
// set the initial value for the characeristic:
switchCharacteristic.writeValue(0);
// start advertising
BLE.advertise();
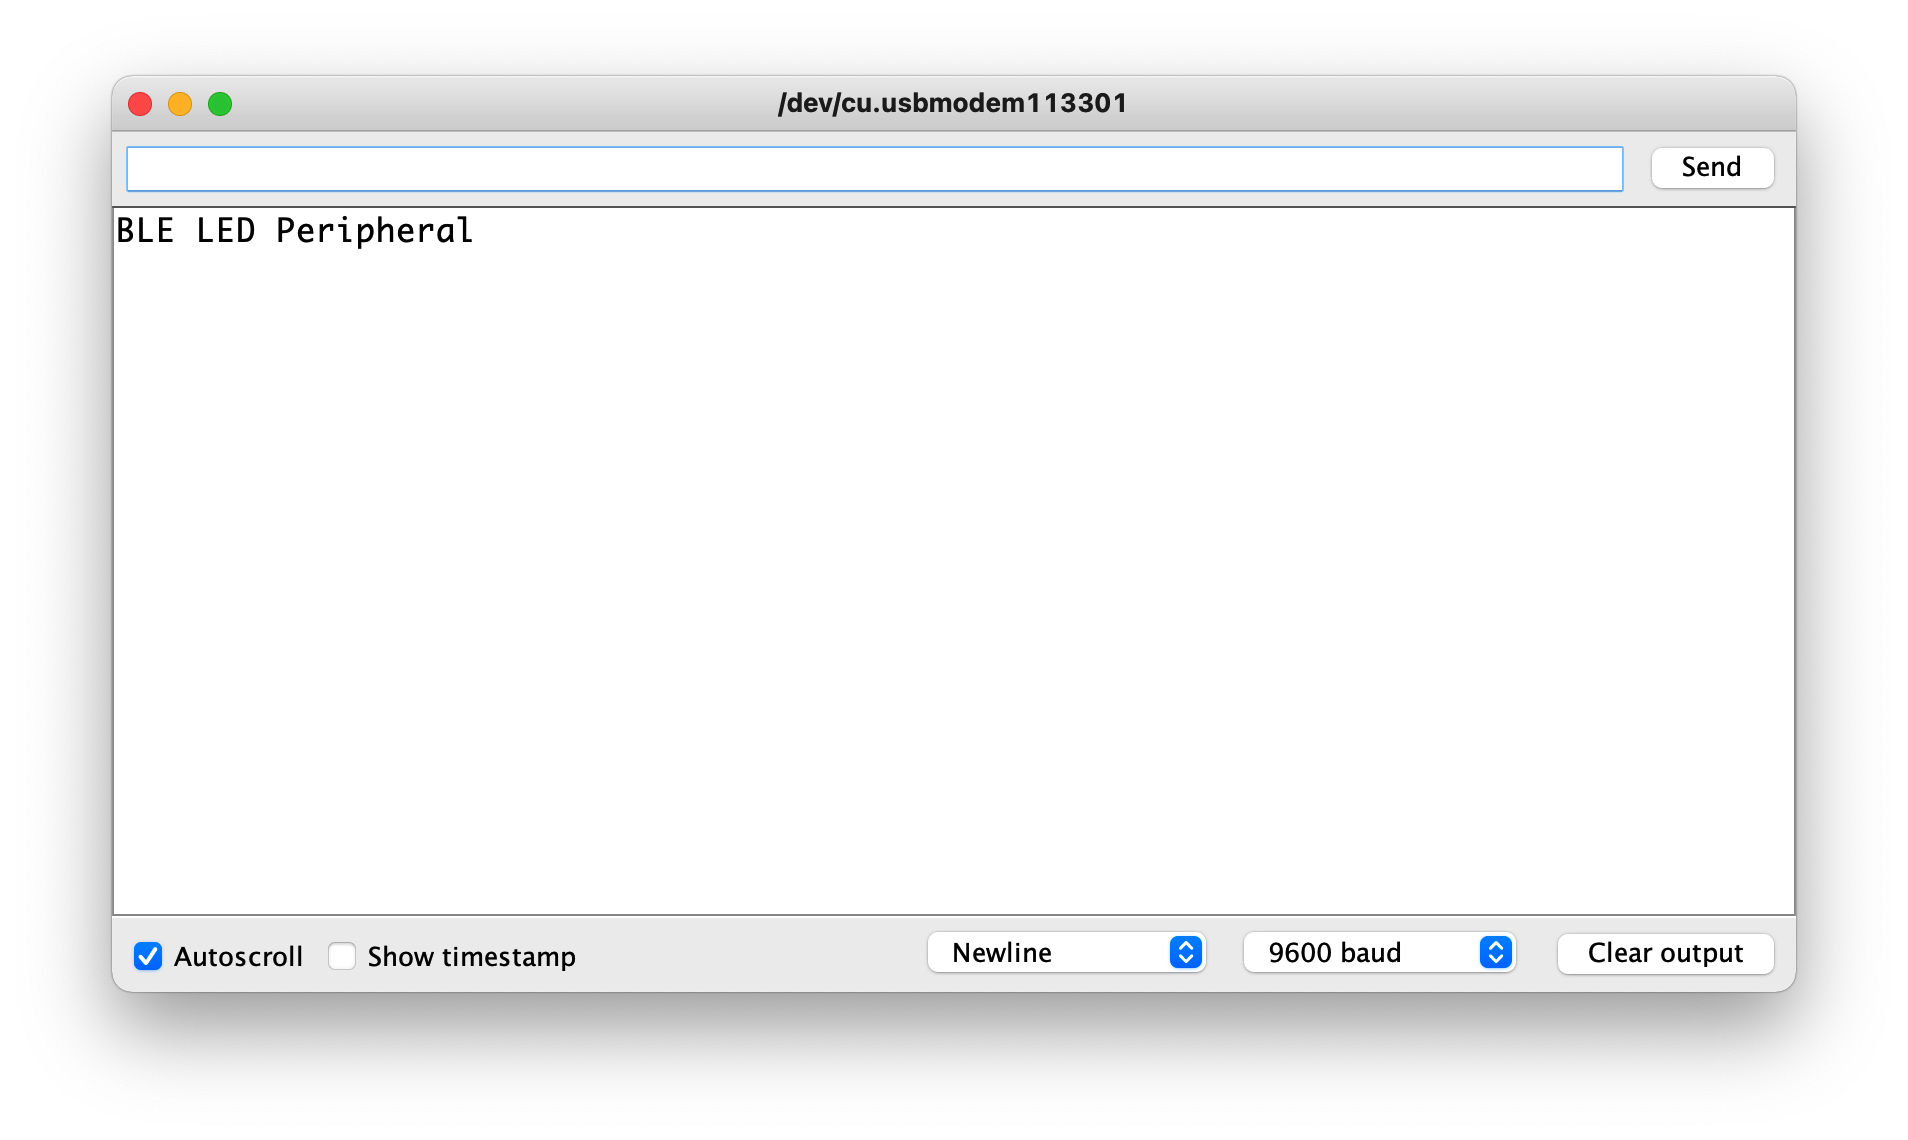
Serial.println("BLE LED Peripheral");
}
void loop() {
// listen for Bluetooth® Low Energy peripherals to connect:
BLEDevice central = BLE.central();
// if a central is connected to peripheral:
if (central) {
Serial.print("Connected to central: ");
// print the central's MAC address:
Serial.println(central.address());
// while the central is still connected to peripheral:
while (central.connected()) {
if (switchCharacteristic.written()) {
if (switchCharacteristic.value()) {
Serial.println("LED on");
digitalWrite(ledPin, LOW); // changed from HIGH to LOW
} else {
Serial.println(F("LED off"));
digitalWrite(ledPin, HIGH); // changed from LOW to HIGH
}
}
}
// when the central disconnects, print it out:
Serial.print(F("Disconnected from central: "));
Serial.println(central.address());
}
}
La clave para la implementación de este ejemplo es el siguiente párrafo.
  while (central.connected()) {
        if (switchCharacteristic.written()) {
          if (switchCharacteristic.value()) {
            Serial.println("LED on");
            digitalWrite(ledPin, LOW); // changed from HIGH to LOW
          } else {
            Serial.println(F("LED off"));
            digitalWrite(ledPin, HIGH); // changed from LOW to HIGH
          }
        }
      }
El propósito de este código es introducir un juicio cuando el Seeed Studio XIAO nRF52840 está conectado por un dispositivo Bluetooth central.connected() y recibe contenido del dispositivo Bluetooth switchCharacteristic.written(). Si el valor del juicio es distinto de cero switchCharacteristic.value(), la luz se enciende, si el valor del juicio es 0 la luz se apaga.
Abriendo tu monitor serie a una velocidad de baudios de 9600 y el led debería estar encendido o apagado. La salida debería verse algo como la imagen de abajo.
En este punto, el control de la luz del Seeed Studio XIAO nRF52840 puede completarse usando la aplicación móvil vía Bluetooth, como se describe a continuación.
| iPhone | Android | Descripción |
|---|---|---|
 |  | Abre el software, busca un dispositivo Bluetooth llamado LED y haz clic en Conectar. Algunos dispositivos pueden aparecer como Arduino. |
 |  | Ve a la interfaz Bluetooth del Seeed Studio XIAO nRF52840 y haz clic en el dispositivo para mostrar los detalles del dispositivo. |
 |  | Completa los datos a enviar al Seeed Studio XIAO nRF52840, envía 1 para encender la luz, envía 0 para apagar la luz. |
 |  | De vuelta en la interfaz de control Bluetooth, puedes ver que el valor ha cambiado y la luz roja del Seeed Studio XIAO nRF52840 está encendida (o apagada). |
 | ||
Demo 2 Usar XIAO BLE para Obtener Datos del Módulo de Detección de Sueño de 24GHz vía BLE
En este ejemplo, describiremos cómo obtener los valores de los sensores y enviar la información sobre los datos detectados por los sensores al dispositivo móvil vía Bluetooth con Seeed Studio XIAO nRF52840.
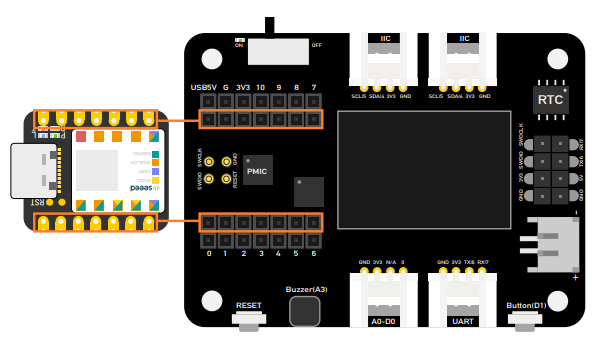
Sigue la imagen de abajo para conectar la placa Seeed Studio XIAO nRF52840 y el Módulo de Detección de Sueño Respiratorio de 24GHz. Para más información, puedes hacer clic aquí.

Por favor abre el código de ejemplo en la biblioteca y súbelo a Seeed Studio XIAO nRF52840.
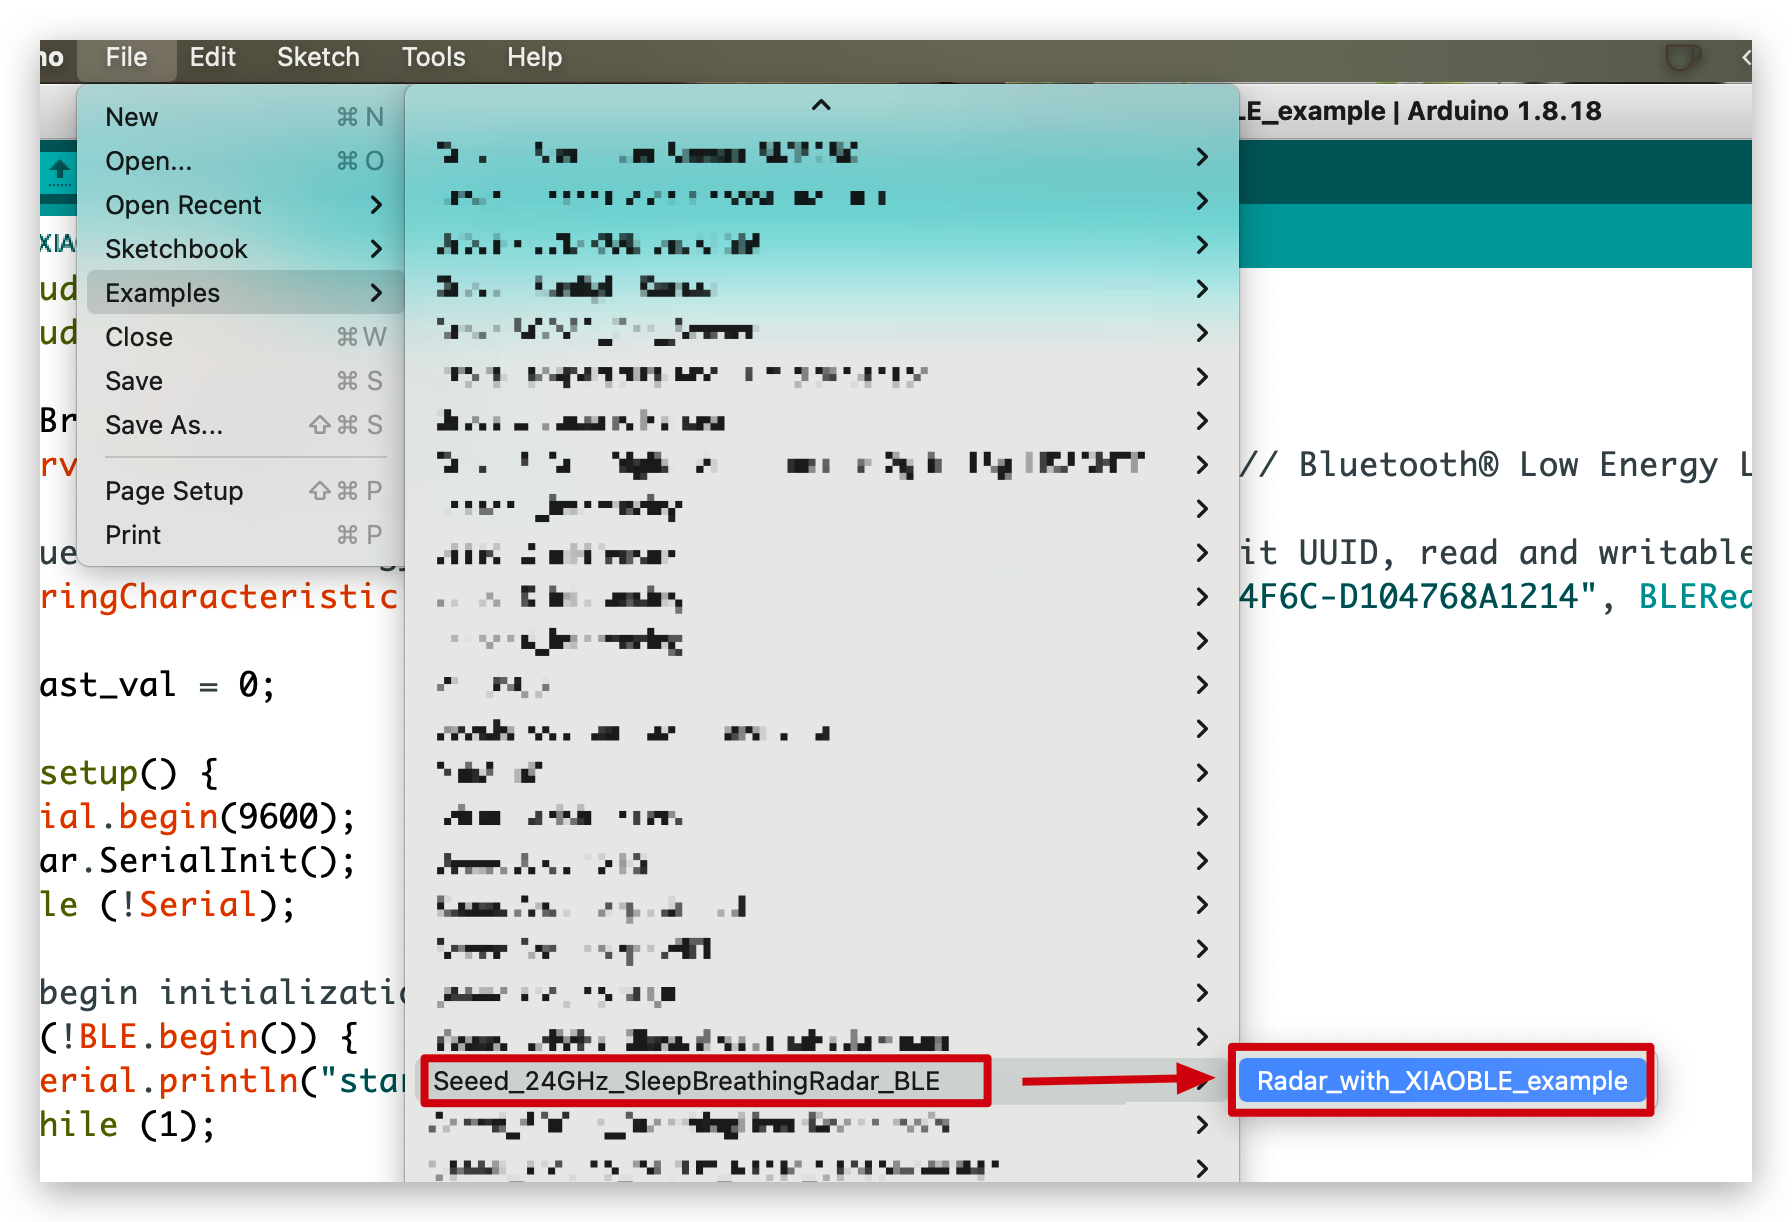
//Radar_with_XIAOBLE_example

#include <ArduinoBLE.h>
#include <sleepbreathingradarBLE.h>

SleepBreathingRadarBLE radar;
BLEService radarService("19B10000-E8F2-537E-4F6C-D104768A1214"); // Bluetooth® Low Energy LED Service

// Bluetooth® Low Energy LED Switch Characteristic - custom 128-bit UUID, read and writable by central
BLEStringCharacteristic switchCharacteristic("19B10001-E8F2-537E-4F6C-D104768A1214", BLERead | BLENotify, 20);

int last_val = 0;

void setup() {
  Serial.begin(9600);
  radar.SerialInit();
  while (!Serial);

  // begin initialization
  if (!BLE.begin()) {
    Serial.println("starting Seeed Studio XIAO nRF52840 with 60GHz radar sensor demo failed!");
    while (1);
  }

  // set advertised local name and service UUID:
  BLE.setLocalName("Seeed Studio XIAO nRF52840");
  BLE.setAdvertisedService(radarService);

  // add the characteristic to the service
  radarService.addCharacteristic(switchCharacteristic);

  // add service
  BLE.addService(radarService);

  // start advertising
  BLE.advertise();

  Serial.println("Seeed Studio XIAO nRF52840 active, waiting for connections...");
}

void loop() {
  // listen for Bluetooth® Low Energy peripherals to connect:
  BLEDevice central = BLE.central();

  // if a central is connected to peripheral:
  if (central) {
    Serial.print("Connected to central: ");
    // print the central's MAC address:
    Serial.println(central.address());

    // while the central is still connected to peripheral:
    while (central.connected()){
       radar.recvRadarBytes();                       //Receive radar data and start processing
       if (radar.newData == true) {                  //The data is received and transferred to the new list dataMsg[]
          byte dataMsg[radar.dataLen+3] = {0x00};
          dataMsg[0] = 0x53;                         //Add the header frame as the first element of the array
          for (byte n = 0; n < radar.dataLen; n++)dataMsg[n+1] = radar.Msg[n];  //Frame-by-frame transfer
          dataMsg[radar.dataLen+1] = 0x54;
          dataMsg[radar.dataLen+2] = 0x43;
          radar.newData = false;                     //A complete set of data frames is saved
          int new_val = radar.Sleep_inf(dataMsg);    //Use radar built-in algorithm to output human motion status
          if(new_val != last_val){
            radar.OutputAssignment(new_val);
            switchCharacteristic.setValue(radar.str);
            last_val = new_val;
          }
        }
    }

    // when the central disconnects, print it out:
      Serial.print(F("Disconnected from central: "));
      Serial.println(central.address());
    }
}
En este ejemplo, la función que envía datos al dispositivo móvil es setValue(). Si quieres obtener una visualización en tiempo real de los datos necesitas añadir BLENotify a este código a continuación. El último parámetro, 20, indica la longitud máxima de datos que puedes enviar.
BLEStringCharacteristic switchCharacteristic("19B10001-E8F2-537E-4F6C-D104768A1214", BLERead | BLENotify, 20);
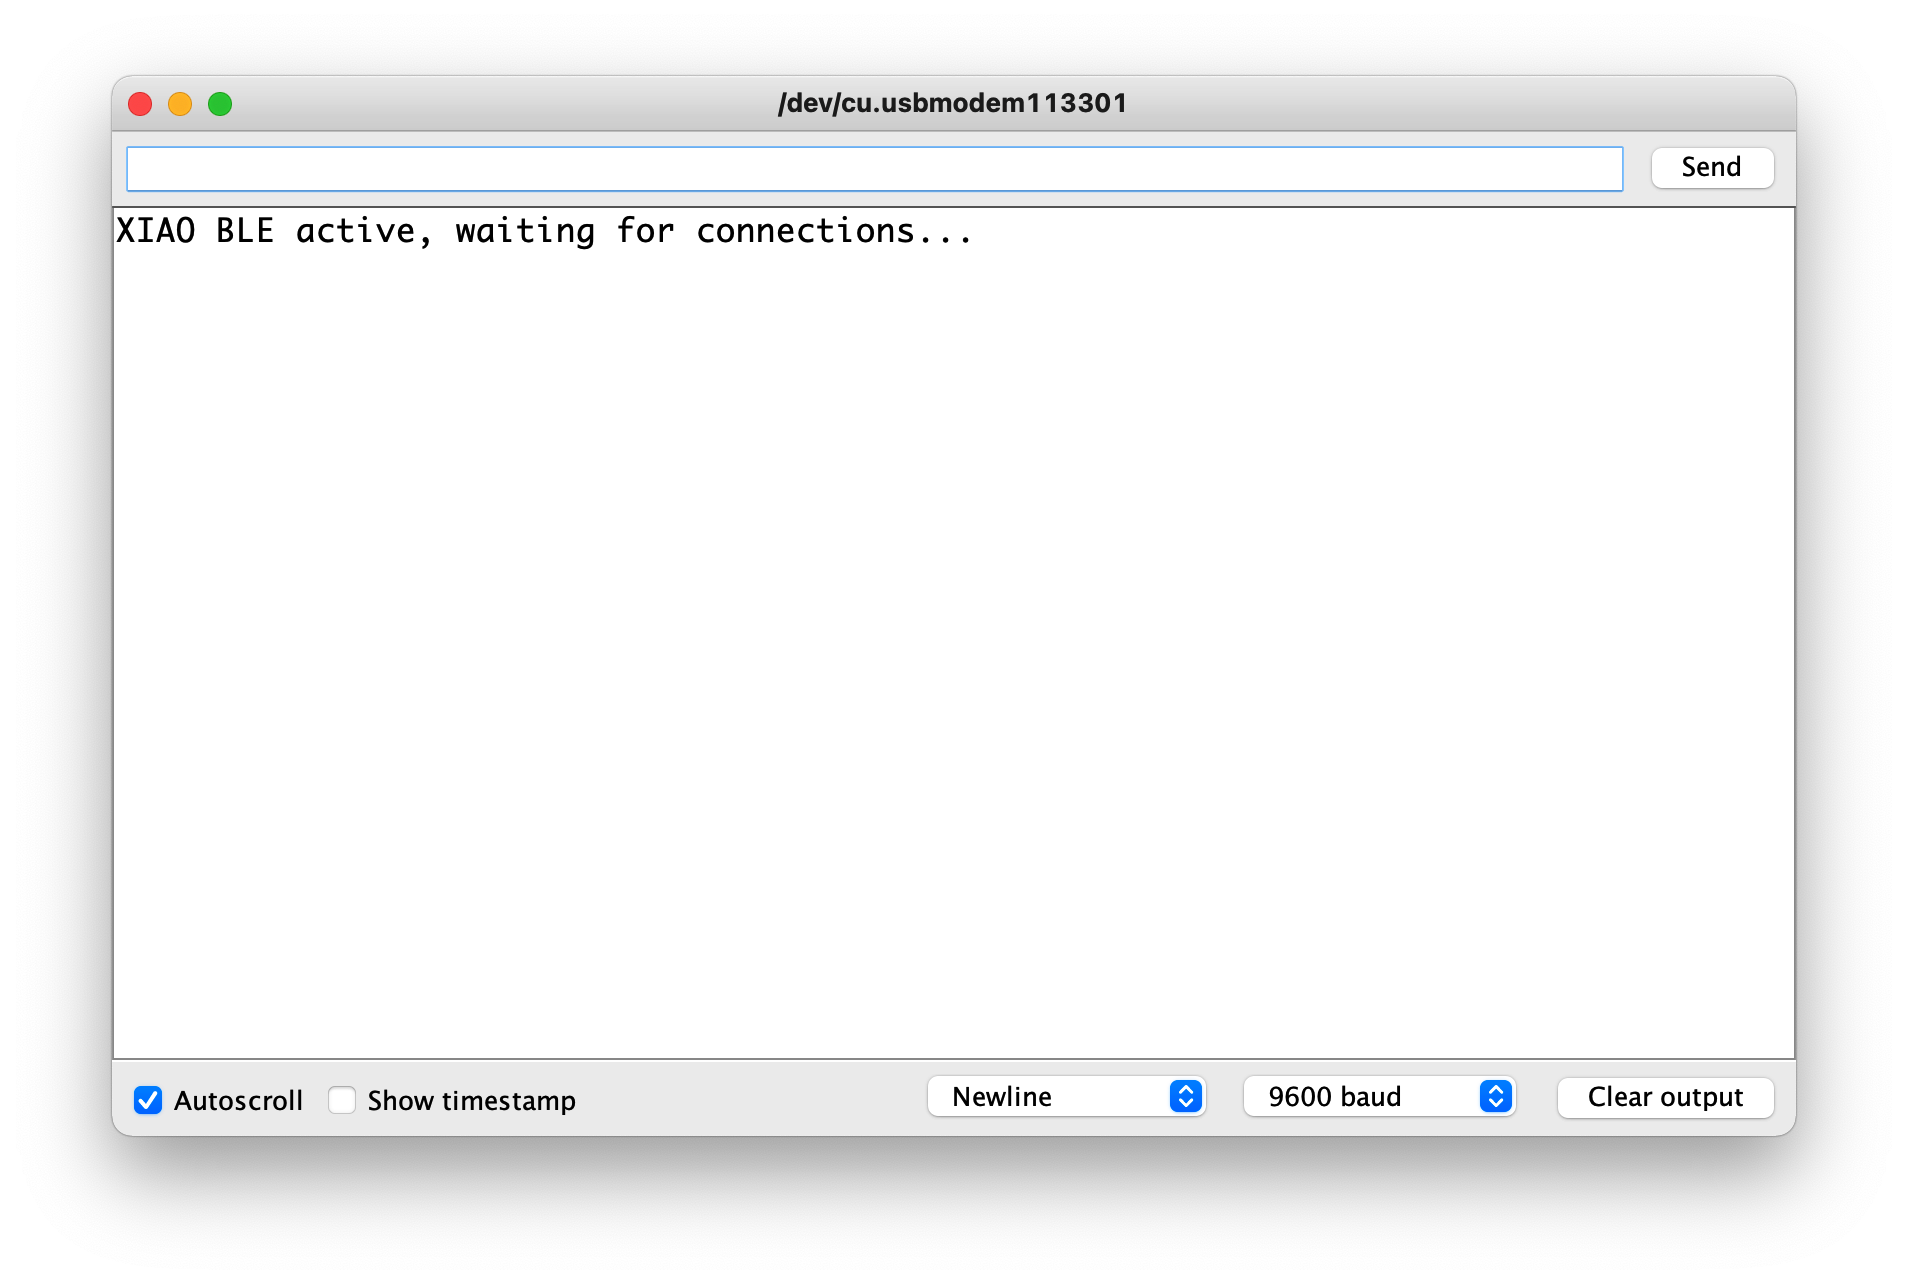
Abrir tu monitor serie a una velocidad de baudios de 9600 debería mostrar la distancia entre el sensor y el objeto al que apunta tanto en milímetros como en pies. La salida debería verse como la imagen de abajo.
A continuación, podemos obtener los datos en vivo enviados por Bluetooth siguiendo los pasos de abajo.
| iPhone | Android | Descripción |
|---|---|---|
|  | Abre el software, busca un dispositivo Bluetooth llamado Seeed Studio XIAO nRF52840 y haz clic en Conectar. Algunos dispositivos pueden aparecer como Arduino. |
| = | | Ve a la interfaz Bluetooth del Seeed Studio XIAO nRF52840 y haz clic en el dispositivo para mostrar los detalles del dispositivo. |
 |  | Abre los datos de actualización en vivo del software. |
 |  | A continuación, cada vez que el radar detecta un mensaje de sueño, se envía al teléfono a través del Bluetooth del Seeed Studio XIAO nRF52840. |
 | ||
Demo 3 Dos XIAO nRF52840 controlan LED mediante comunicación Bluetooth
En este ejemplo, usaremos dos XIAO nRF52840, utilizando sus capacidades Bluetooth para comunicarse. Uno de los XIAOs actúa como host y está conectado a la placa de expansión XIAO, enviando comandos de control a través de los botones de la placa de expansión. El otro XIAO actúa como esclavo.
Antes de comenzar, por favor prepárate para hacer lo siguiente.
 |  |
| Placa de expansión Seeed Studio XIAO | 2 x Seeed XIAO BLE nRF52840 Sense |
Por favor selecciona uno de los XIAO nRF52840, que no requiere que ningún dispositivo esté conectado, y carga el programa de abajo directamente.
#include <ArduinoBLE.h>

BLEService ledService("19B10000-E8F2-537E-4F6C-D104768A1214"); // Bluetooth® Low Energy LED Service

// Bluetooth® Low Energy LED Switch Characteristic - custom 128-bit UUID, read and writable by central
BLEByteCharacteristic switchCharacteristic("19B10001-E8F2-537E-4F6C-D104768A1214", BLERead | BLEWrite);

const int ledPin = LED_BUILTIN; // pin to use for the LED

void setup() {
  Serial.begin(9600);
  while (!Serial);

  // set LED pin to output mode
  pinMode(ledPin, OUTPUT);

  // begin initialization
  if (!BLE.begin()) {
    Serial.println("starting Bluetooth® Low Energy module failed!");

    while (1);
  }

  // set advertised local name and service UUID:
  BLE.setLocalName("XIAO");
  BLE.setAdvertisedService(ledService);

  // add the characteristic to the service
  ledService.addCharacteristic(switchCharacteristic);

  // add service
  BLE.addService(ledService);

  // set the initial value for the characeristic:
  switchCharacteristic.writeValue(0);

  // start advertising
  BLE.advertise();

  // print address
  Serial.print("Address: ");
  Serial.println(BLE.address());

  Serial.println("XIAO nRF52840 Peripheral");
}

void loop() {
  // listen for Bluetooth® Low Energy peripherals to connect:
  BLEDevice central = BLE.central();

  // if a central is connected to peripheral:
  if (central) {
    Serial.print("Connected to central: ");
    // print the central's MAC address:
    Serial.println(central.address());

    // while the central is still connected to peripheral:
    while (central.connected()) {
      // if the remote device wrote to the characteristic,
      // use the value to control the LED:
      if (switchCharacteristic.written()) {
        if (switchCharacteristic.value()) {   // any value other than 0
          Serial.println("LED on");
          digitalWrite(ledPin, HIGH);         // will turn the LED on
        } else {                              // a 0 value
          Serial.println(F("LED off"));
          digitalWrite(ledPin, LOW);          // will turn the LED off
        }
      }
    }

    // when the central disconnects, print it out:
    Serial.print(F("Disconnected from central: "));
    Serial.println(central.address());
  }
}
El propósito principal de este programa es hacer que XIAO sea un dispositivo Bluetooth llamado "XIAO" que pueda ser buscado y conectado por otros dispositivos Bluetooth. Una vez conectado, puedes controlar los LEDs en el XIAO enviando un 0 o un 1 para apagarlos o encenderlos respectivamente.
Coloca el Seeed Studio XIAO nRF52840 en la placa de expansión.
Y para este propósito el XIAO con la placa de extensión conectada carga el siguiente procedimiento.
#include <ArduinoBLE.h>
#include <U8x8lib.h>
#include <Wire.h>

// variables for button
const int buttonPin = D1;
int oldButtonState = LOW;

void setup() {
  Serial.begin(9600);
  while (!Serial);

  // configure the button pin as input
  pinMode(buttonPin, INPUT_PULLUP);

  // initialize the Bluetooth® Low Energy hardware
  BLE.begin();

  Serial.println("Bluetooth® Low Energy Central - LED control");

  // start scanning for peripherals
  BLE.scanForName("XIAO");
}

void loop() {
  // check if a peripheral has been discovered
  BLEDevice peripheral = BLE.available();
  if (peripheral) {
    // discovered a peripheral, print out address, local name, and advertised service
    Serial.print("Found ");
    Serial.print(peripheral.address());
    Serial.print(" '");
    Serial.print(peripheral.localName());
    Serial.print("' ");
    Serial.print(peripheral.advertisedServiceUuid());
    Serial.println();

    if (peripheral.localName() != "XIAO") {
      return;
    }

    // stop scanning
    BLE.stopScan();

    system_control(peripheral);

    // peripheral disconnected, start scanning again
    BLE.scanForName("XIAO");
  }
  delay(100);
}

void system_control(BLEDevice peripheral) {
  // connect to the peripheral
  Serial.println("Connecting ...");

  if (peripheral.connect()) {
    Serial.println("Connected");
  } else {
    Serial.println("Failed to connect!");
    return;
  }

  // discover peripheral attributes
  Serial.println("Discovering attributes ...");
  if (peripheral.discoverAttributes()) {
    Serial.println("Attributes discovered");
  } else {
    Serial.println("Attribute discovery failed!");
    peripheral.disconnect();
    return;
  }

  // retrieve the LED characteristic
  BLECharacteristic ledCharacteristic = peripheral.characteristic("19b10001-e8f2-537e-4f6c-d104768a1214");

  if (!ledCharacteristic) {
    Serial.println("Peripheral does not have LED characteristic!");
    peripheral.disconnect();
    return;
  } else if (!ledCharacteristic.canWrite()) {
    Serial.println("Peripheral does not have a writable LED characteristic!");
    peripheral.disconnect();
    return;
  }

  while (peripheral.connected()) {
    // while the peripheral is connected
    // read the button pin
    int buttonState = digitalRead(buttonPin);

    if (oldButtonState != buttonState) {
      // button changed
      oldButtonState = buttonState;

      if (buttonState) {
        Serial.println("button pressed");

        // button is pressed, write 0x01 to turn the LED on
        ledCharacteristic.writeValue((byte)0x01);
      } else {
        Serial.println("button released");

        // button is released, write 0x00 to turn the LED off
        ledCharacteristic.writeValue((byte)0x00);
      }
    }
  }

  Serial.println("Peripheral disconnected");
}
Una vez que hayas subido el programa, enciende el monitor serie y el programa comenzará a buscar un dispositivo Bluetooth cercano con el nombre local "XIAO" y se conectará a él (necesitarás esperar de 1 a 3 minutos).
Una vez que se muestre el mensaje de conexión exitosa en el monitor serie, puedes controlar el encendido y apagado del LED del otro XIAO nRF52840 a través de la tecla D1 de la placa de expansión.
Por supuesto, si no tienes una placa de extensión, también puedes usar tus propios botones u otros dispositivos.
¿Qué más?
Si quieres probar más ejemplos puedes navegar a File > Examples > INCOMPATIBLE > ArduinoBLE y revisar todos los ejemplos bajo ArduinoBLE
Soporte Técnico y Discusión de Productos
¡Gracias por elegir nuestros productos! Estamos aquí para brindarte diferentes tipos de soporte para asegurar que tu experiencia con nuestros productos sea lo más fluida posible. Ofrecemos varios canales de comunicación para satisfacer diferentes preferencias y necesidades.