Rastreador Wi-Fi XIAO ESP32C3 usando MicroPython
Este wiki ha sido actualizado: https://wiki.seeedstudio.com/es/xiao_esp32c3_with_micropython/
En este tutorial, proporcionaré una descripción concisa de la utilización del XIAO ESP32C3 con Micropython. Además, exploraré la aplicación práctica de un rastreador de intensidad de señal Wi-Fi, que resulta invaluable al establecer una red familiar de alta velocidad y alta calidad. En consecuencia, al seguir la orientación del rastreador Wi-Fi, podemos optimizar efectivamente la colocación del amplificador de señal Wi-Fi, asegurando una cobertura de señal óptima.
Preparación del Hardware
Estoy usando Seeed Studio XIAO ESP32C3 y Expansion Board Base para XIAO como hardware aquí.
| Seeed Studio XIAO ESP32C3 | Expansion Board Base para XIAO |
|---|---|
 |  |
Preparación del Software
| Thonny IDE | Esptool |
|---|---|
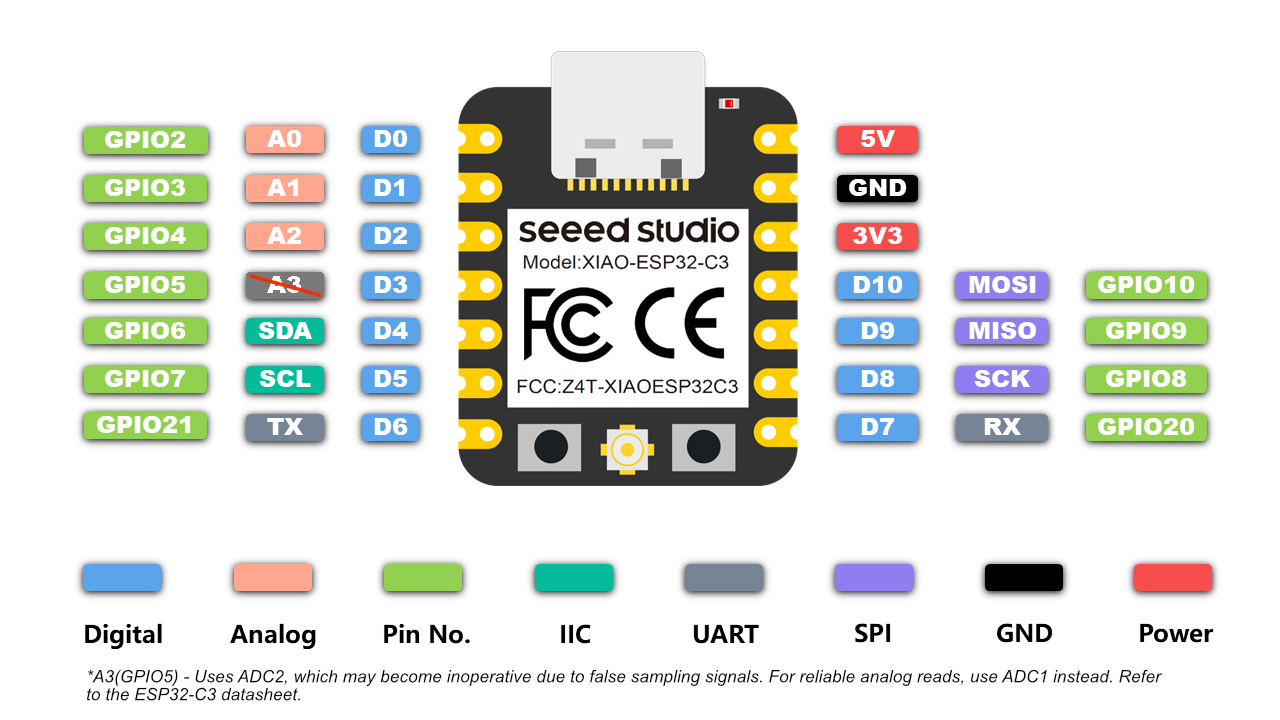
Antes de usarlo, es necesario que declare que el software/firmware que estoy usando aquí está diseñado para el chip ESP32C3. Por lo tanto, cuando intentes usar un pin, asegúrate de usar el General Purpose Input/Output en lugar del pin en la placa.
Por ejemplo, cuando intentes usar el pin en la primera fila a la izquierda. Asegúrate de que sea GPIO2 en lugar de A0 o D0.
Primeros Pasos
Se requieren dos pasos ("Configuración de Micropython en PC" y "Configuración de Micropython en XIAO ESP32C3") para que el XIAO ESP32C3 realmente pueda ser programado por MicroPython.
Después de la configuración, puedes copiar el código paso a paso de cada demostración para lograr la finalización.
Configuración de Micropython en PC
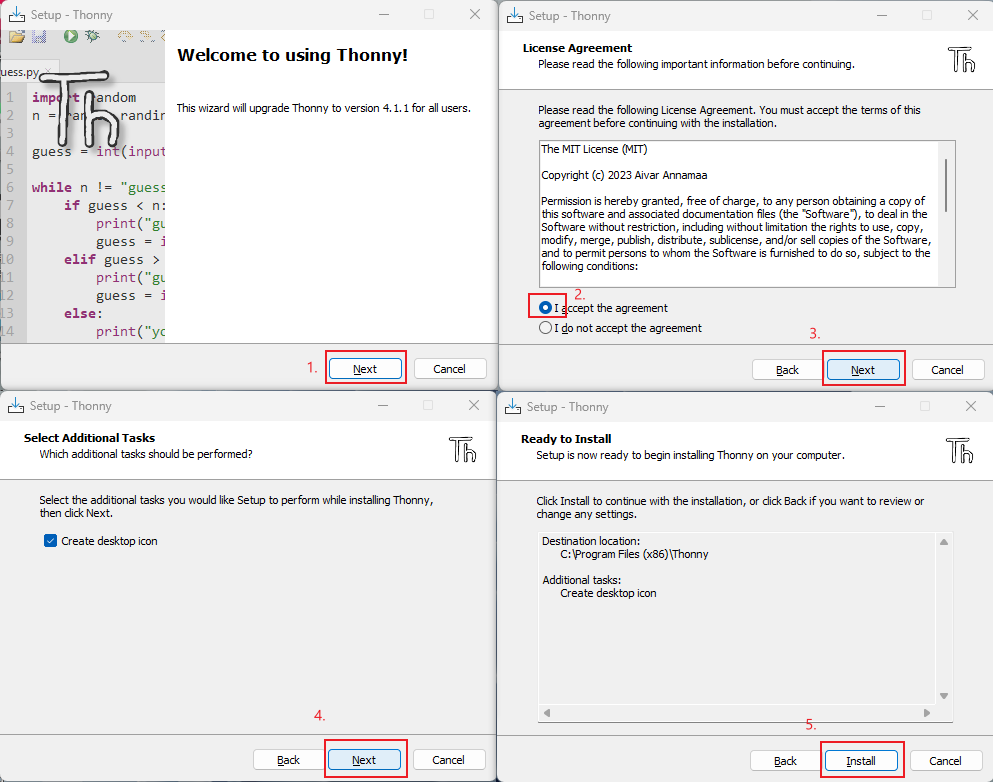
Instalar Thonny IDE (Windows)
Por favor sigue los pasos en la imagen
Actualizar el firmware usando esptool
- Abre tu propia ubicación de archivo
git clone https://github.com/espressif/esptool.git
- Download the latest firmware (This Tutorial is v1.20.0 (2023-04-26) .bin)
https://micropython.org/download/esp32c3/
- Coloca el firmware más reciente en esta ubicación de archivo y abre el archivo en CMD
your own file location\esptool-master\esptool
- Flashee el firmware introduciendo este comando en CMD (ingrese al modo bootloader antes de flashear)
esptool.exe --chip esp32c3 --port COM10 --baud 921600 --before default_reset --after hard_reset --no-stub write_flash --flash_mode dio --flash_freq 80m 0x0 esp32c3-usb-20230426-v1.20.0.bin
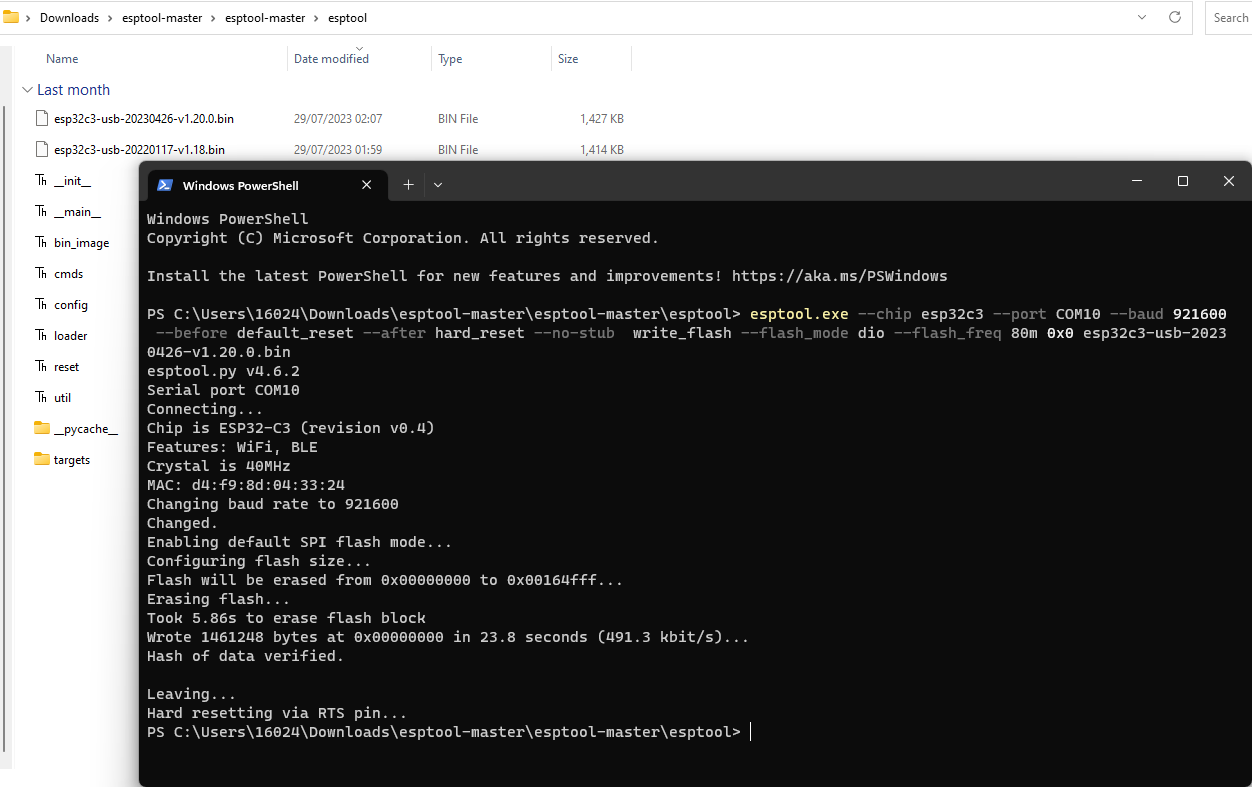
Si usas linux, cambia "esptool.exe" a "esptool.py". Cambia "COM10" a tu propio puerto serie. Cambia "esp32c3-usb-20230426-v1.20.0.bin" al nombre del firmware más reciente que descargaste.
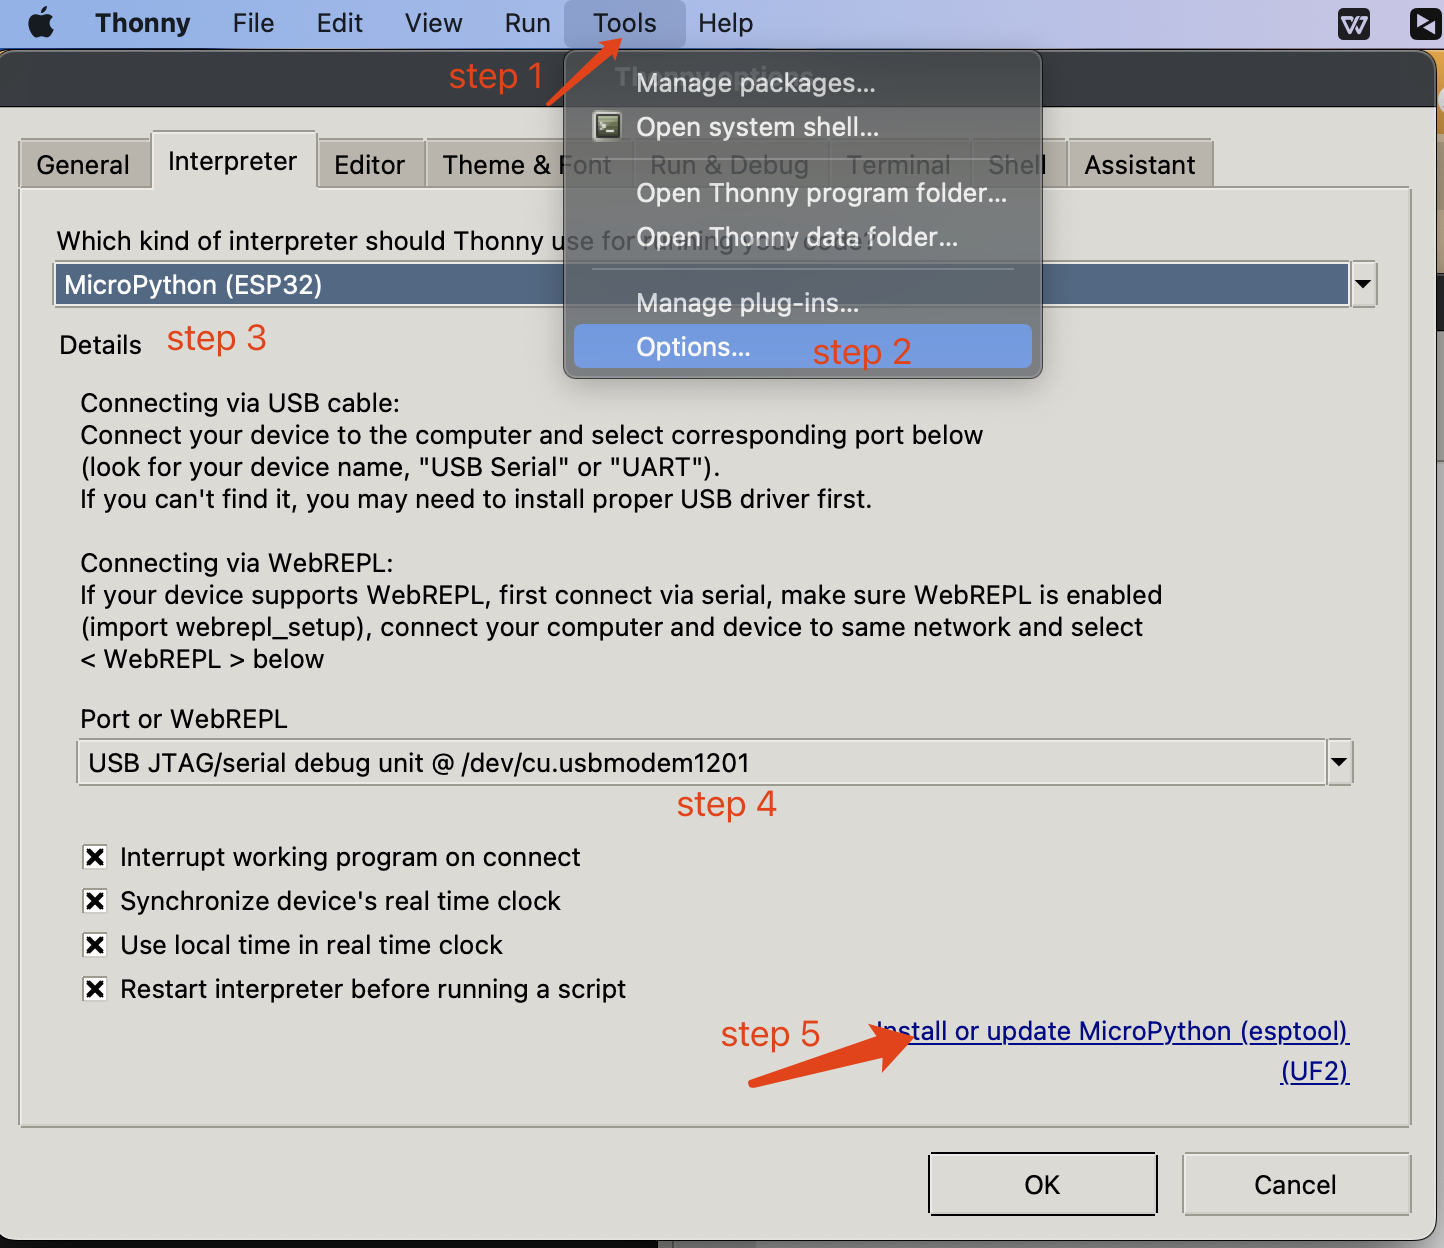
Configuración de Micropython en XIAO ESP32C3
-
Conecta tu XIAO ESP32C3, abre Thonny y haz clic en la parte inferior derecha para configurar el intérprete
-
Selecciona intérprete- Micropython (ESP32) y Puerto >>> Haz clic en OK
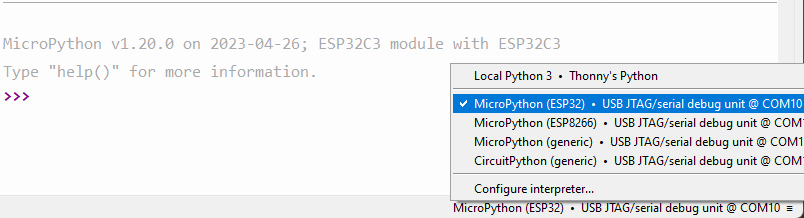
Nota: Si todo va bien, verás la salida en el shell
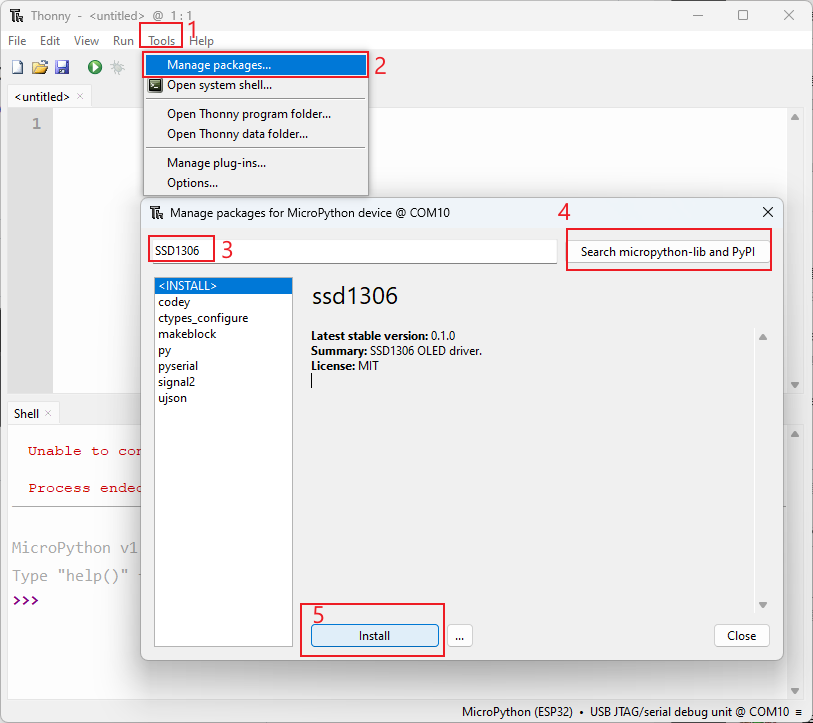
Instalar las librerías requeridas
Haz clic en "Tools" >>> Haz clic en "Management Packages" >>> Ingresa el nombre de la librería >>> Haz clic en "Search micropython-lib and PyPl"
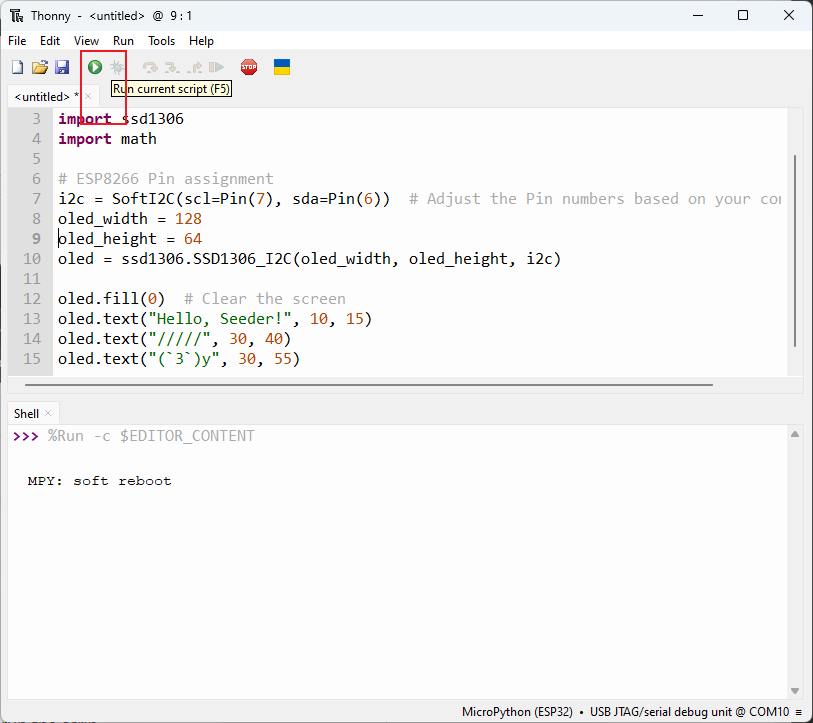
Ejecutar el script y grabarlo en la placa
- Después de terminar de codificar, haz clic en el botón verde para ejecutar el script
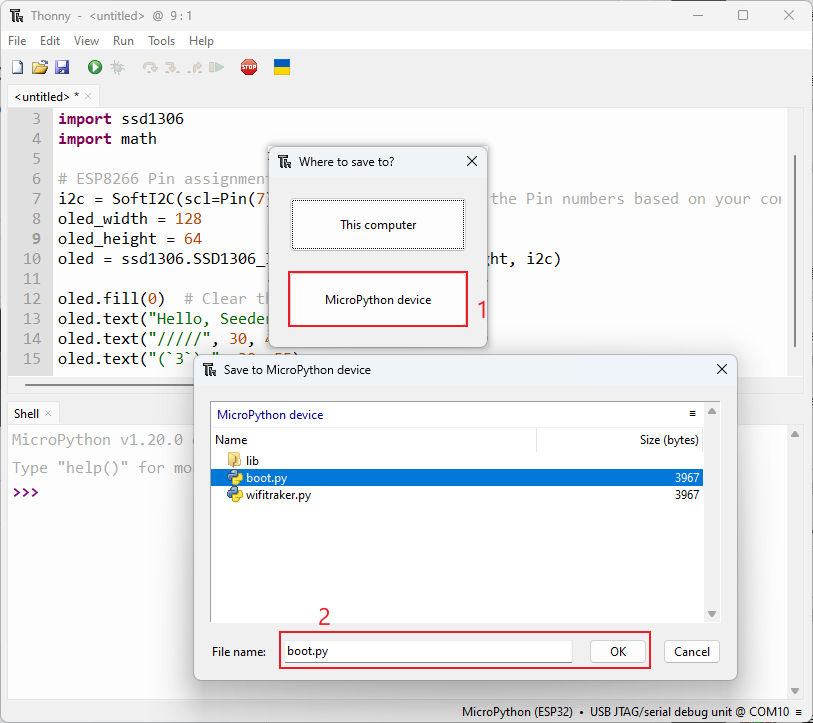
- Graba el código en la placa guardando el archivo en la placa como "boot.py"
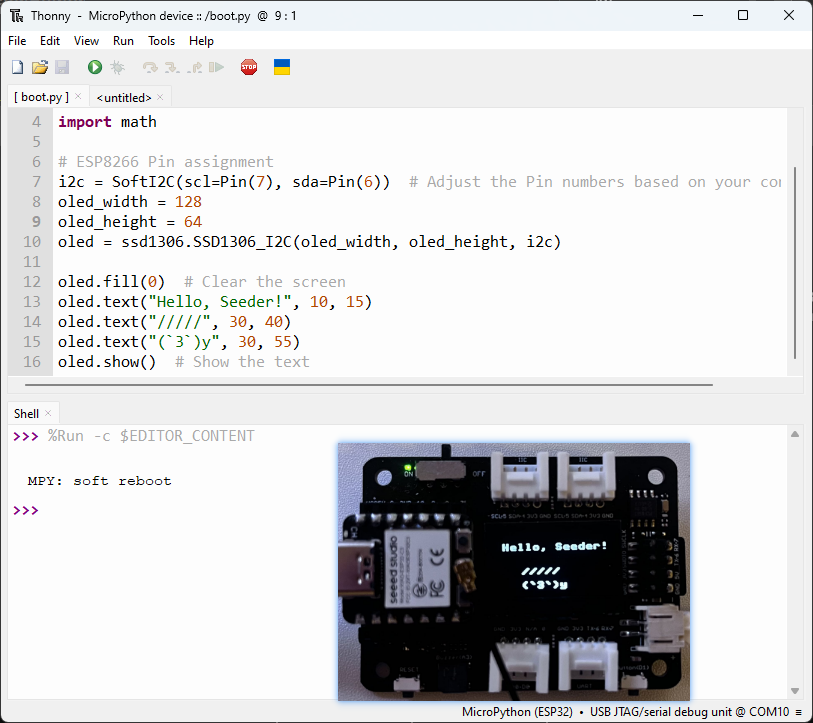
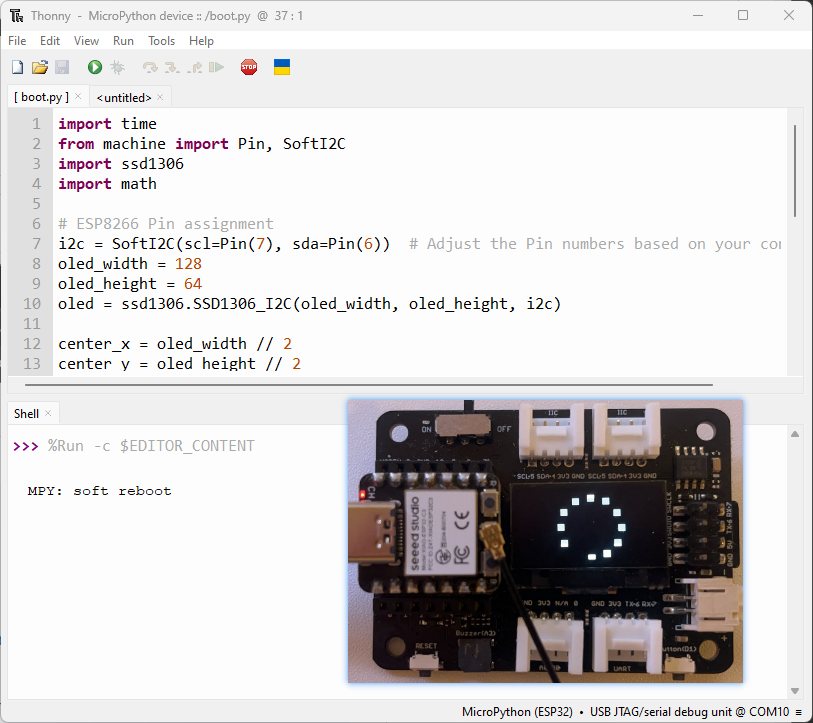
Demo 1: Encender una Pantalla OLED
1. ¡Hola Seeder!
import time
from machine import Pin, SoftI2C
import ssd1306
import math

# ESP8266 Pin assignment
i2c = SoftI2C(scl=Pin(7), sda=Pin(6))  # Adjust the Pin numbers based on your connections
oled_width = 128
oled_height = 64
oled = ssd1306.SSD1306_I2C(oled_width, oled_height, i2c)

oled.fill(0)  # Clear the screen
oled.text("Hello, Seeder!", 10, 15)
oled.text("/////", 30, 40)
oled.text("(`3`)y", 30, 55)
oled.show()  # Show the text
2. Efecto de carga dinámico
import time
from machine import Pin, SoftI2C
import ssd1306
import math

# ESP8266 Pin assignment
i2c = SoftI2C(scl=Pin(7), sda=Pin(6))  # Adjust the Pin numbers based on your connections
oled_width = 128
oled_height = 64
oled = ssd1306.SSD1306_I2C(oled_width, oled_height, i2c)

center_x = oled_width // 2
center_y = oled_height // 2
square_size = 6  # Size of each square
num_squares = 12  # Number of squares
angle_increment = 2 * math.pi / num_squares

while True:
    oled.fill(0)  # Clear the screen

    for i in range(num_squares):
        angle = i * angle_increment
        x = int(center_x + (center_x - square_size-30) * math.cos(angle))
        y = int(center_y + (center_x - square_size-30) * math.sin(angle))

        # Draw all squares
        for j in range(num_squares):
            angle_j = j * angle_increment
            x_j = int(center_x + (center_x - square_size-30) * math.cos(angle_j))
            y_j = int(center_y + (center_x - square_size-30) * math.sin(angle_j))

            oled.fill_rect(x_j, y_j, square_size, square_size, 1)  # Draw the square

        oled.fill_rect(x, y, square_size, square_size, 0)  # Erase the current square
        oled.show()
        time.sleep_ms(100)  # Pause before next iteration
Demo 2: Encender un Zumbador
1. Sonido
import time
from time import sleep
import machine
from machine import Pin, SoftI2C


# Buzzer settings

buzzer_pin = machine.Pin(5, machine.Pin.OUT)
buzzer = machine.PWM(buzzer_pin)
buzzer.freq(1047)

# Buzzer working

while True:

    buzzer.duty(10)
    time.sleep(1)
    buzzer.duty(0)
    time.sleep(1)
2. Play the Song "He's a pirate"
import machine
import time

# Buzzer settings
buzzer_pin = machine.Pin(5, machine.Pin.OUT)
buzzer = machine.PWM(buzzer_pin)
buzzer.freq(1047)

# Defining frequency of each music note
NOTE_C4 = 262
NOTE_D4 = 294
NOTE_E4 = 330
NOTE_F4 = 349
NOTE_G4 = 392
NOTE_A4 = 440
NOTE_B4 = 494
NOTE_C5 = 523
NOTE_D5 = 587
NOTE_E5 = 659
NOTE_F5 = 698
NOTE_G5 = 784
NOTE_A5 = 880
NOTE_B5 = 988

# Music notes of the song, 0 is a rest/pulse
notes = [
    NOTE_E4, NOTE_G4, NOTE_A4, NOTE_A4, 0,
    NOTE_A4, NOTE_B4, NOTE_C5, NOTE_C5, 0,
    NOTE_C5, NOTE_D5, NOTE_B4, NOTE_B4, 0,
    NOTE_A4, NOTE_G4, NOTE_A4, 0,

    NOTE_E4, NOTE_G4, NOTE_A4, NOTE_A4, 0,
    NOTE_A4, NOTE_B4, NOTE_C5, NOTE_C5, 0,
    NOTE_C5, NOTE_D5, NOTE_B4, NOTE_B4, 0,
    NOTE_A4, NOTE_G4, NOTE_A4, 0,

    NOTE_E4, NOTE_G4, NOTE_A4, NOTE_A4, 0,
    NOTE_A4, NOTE_C5, NOTE_D5, NOTE_D5, 0,
    NOTE_D5, NOTE_E5, NOTE_F5, NOTE_F5, 0,
    NOTE_E5, NOTE_D5, NOTE_E5, NOTE_A4, 0,

    NOTE_A4, NOTE_B4, NOTE_C5, NOTE_C5, 0,
    NOTE_D5, NOTE_E5, NOTE_A4, 0,
    NOTE_A4, NOTE_C5, NOTE_B4, NOTE_B4, 0,
    NOTE_C5, NOTE_A4, NOTE_B4, 0,

    NOTE_A4, NOTE_A4,
    #Repeat of first part
    NOTE_A4, NOTE_B4, NOTE_C5, NOTE_C5, 0,
    NOTE_C5, NOTE_D5, NOTE_B4, NOTE_B4, 0,
    NOTE_A4, NOTE_G4, NOTE_A4, 0,

    NOTE_E4, NOTE_G4, NOTE_A4, NOTE_A4, 0,
    NOTE_A4, NOTE_B4, NOTE_C5, NOTE_C5, 0,
    NOTE_C5, NOTE_D5, NOTE_B4, NOTE_B4, 0,
    NOTE_A4, NOTE_G4, NOTE_A4, 0,

    NOTE_E4, NOTE_G4, NOTE_A4, NOTE_A4, 0,
    NOTE_A4, NOTE_C5, NOTE_D5, NOTE_D5, 0,
    NOTE_D5, NOTE_E5, NOTE_F5, NOTE_F5, 0,
    NOTE_E5, NOTE_D5, NOTE_E5, NOTE_A4, 0,

    NOTE_A4, NOTE_B4, NOTE_C5, NOTE_C5, 0,
    NOTE_D5, NOTE_E5, NOTE_A4, 0,
    NOTE_A4, NOTE_C5, NOTE_B4, NOTE_B4, 0,
    NOTE_C5, NOTE_A4, NOTE_B4, 0,
    #End of Repeat

    NOTE_E5, 0, 0, NOTE_F5, 0, 0,
    NOTE_E5, NOTE_E5, 0, NOTE_G5, 0, NOTE_E5, NOTE_D5, 0, 0,
    NOTE_D5, 0, 0, NOTE_C5, 0, 0,
    NOTE_B4, NOTE_C5, 0, NOTE_B4, 0, NOTE_A4,

    NOTE_E5, 0, 0, NOTE_F5, 0, 0,
    NOTE_E5, NOTE_E5, 0, NOTE_G5, 0, NOTE_E5, NOTE_D5, 0, 0,
    NOTE_D5, 0, 0, NOTE_C5, 0, 0,
    NOTE_B4, NOTE_C5, 0, NOTE_B4, 0, NOTE_A4
]

# Durations (in ms) of each music note of the song
# Quarter Note is 250 ms when songSpeed = 1.0
durations = [
    125, 125, 250, 125, 125,
    125, 125, 250, 125, 125,
    125, 125, 250, 125, 125,
    125, 125, 375, 125,

    125, 125, 250, 125, 125,
    125, 125, 250, 125, 125,
    125, 125, 250, 125, 125,
    125, 125, 375, 125,

    125, 125, 250, 125, 125,
    125, 125, 250, 125, 125,
    125, 125, 250, 125, 125,
    125, 125, 125, 250, 125,

    125, 125, 250, 125, 125,
    250, 125, 250, 125,
    125, 125, 250, 125, 125,
    125, 125, 375, 375,

    250, 125,
    #Rpeat of First Part
    125, 125, 250, 125, 125,
    125, 125, 250, 125, 125,
    125, 125, 375, 125,

    125, 125, 250, 125, 125,
    125, 125, 250, 125, 125,
    125, 125, 250, 125, 125,
    125, 125, 375, 125,

    125, 125, 250, 125, 125,
    125, 125, 250, 125, 125,
    125, 125, 250, 125, 125,
    125, 125, 125, 250, 125,

    125, 125, 250, 125, 125,
    250, 125, 250, 125,
    125, 125, 250, 125, 125,
    125, 125, 375, 375,
    #End of Repeat

    250, 125, 375, 250, 125, 375,
    125, 125, 125, 125, 125, 125, 125, 125, 375,
    250, 125, 375, 250, 125, 375,
    125, 125, 125, 125, 125, 500,

    250, 125, 375, 250, 125, 375,
    125, 125, 125, 125, 125, 125, 125, 125, 375,
    250, 125, 375, 250, 125, 375,
    125, 125, 125, 125, 125, 500
]

def play_song():
    total_notes = len(notes)
    for i in range(total_notes):
        current_note = notes[i]
        wait = durations[i]
        if current_note != 0:
            buzzer.duty(512)  # Set duty cycle for sound
            buzzer.freq(current_note)  # Set frequency of the note
        else:
            buzzer.duty(0)  # Turn off the sound
        time.sleep_ms(wait)
        buzzer.duty(0)  # Turn off the sound
while True:
    # Play the song
    play_song()
Demo 3: Conectar a Wi-Fi
1. Conectar a Wi-Fi

import network
import urequests
import utime as time

# Network settings
wifi_ssid = "Your Own SSID"
wifi_password = "Your Own Password"

def scan_and_connect():
    station = network.WLAN(network.STA_IF)
    station.active(True)

    print("Scanning for WiFi networks, please wait...")
    for ssid, bssid, channel, RSSI, authmode, hidden in station.scan():
        print("* {:s}".format(ssid))
        print("   - Channel: {}".format(channel))
        print("   - RSSI: {}".format(RSSI))
        print("   - BSSID: {:02x}:{:02x}:{:02x}:{:02x}:{:02x}:{:02x}".format(*bssid))
        print()

    while not station.isconnected():
        print("Connecting...")
        station.connect(wifi_ssid, wifi_password)
        time.sleep(10)

    print("Connected!")
    print("My IP Address:", station.ifconfig()[0])


# Execute the functions
scan_and_connect()
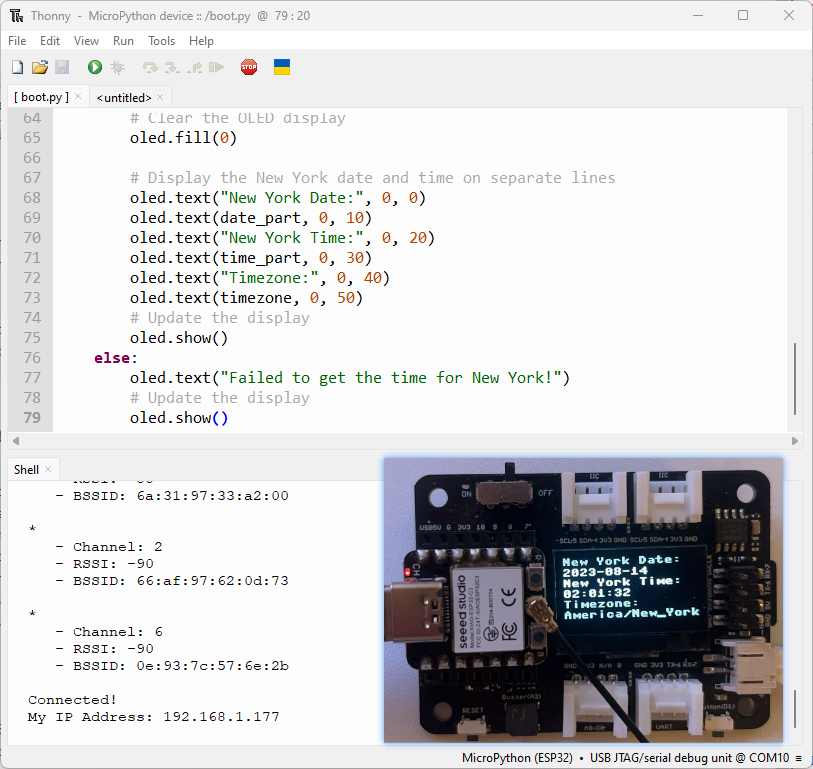
2. Solicitar la hora de Nueva York en línea
from machine import Pin, SoftI2C
import ssd1306
from time import sleep
import time
import network
import urequests
import ujson

# ESP32 Pin assignment
# i2c = SoftI2C(scl=Pin(22), sda=Pin(21))

# ESP8266 Pin assignment
i2c = SoftI2C(scl=Pin(7), sda=Pin(6))  # Adjust the Pin numbers based on your connections

oled_width = 128
oled_height = 64
oled = ssd1306.SSD1306_I2C(oled_width, oled_height, i2c)

station = network.WLAN(network.STA_IF)
station.active(True)

# Network settings
wifi_ssid = "Your wifi ssid"
wifi_password = "Your wifi password"
url = "http://worldtimeapi.org/api/timezone/America/New_York"

print("Scanning for WiFi networks, please wait...")
authmodes = ['Open', 'WEP', 'WPA-PSK' 'WPA2-PSK4', 'WPA/WPA2-PSK']
for (ssid, bssid, channel, RSSI, authmode, hidden) in station.scan():
    print("* {:s}".format(ssid))
    print("   - Channel: {}".format(channel))
    print("   - RSSI: {}".format(RSSI))
    print("   - BSSID: {:02x}:{:02x}:{:02x}:{:02x}:{:02x}:{:02x}".format(*bssid))
    print()

# Continually try to connect to WiFi access point
while not station.isconnected():
    # Try to connect to WiFi access point
    print("Connecting...")
    station.connect(wifi_ssid, wifi_password)
    time.sleep(10)

# Display connection details
print("Connected!")
print("My IP Address:", station.ifconfig()[0])


while True:
    # Perform HTTP GET request on a non-SSL web
    response = urequests.get(url)
    # Check if the request was successful
    if response.status_code == 200:
        # Parse the JSON response
        data = ujson.loads(response.text)
        # Extract the "datetime" field for New York
        ny_datetime = data["datetime"]
        # Split the date and time components
        date_part, time_part = ny_datetime.split("T")
        # Get only the first two decimal places of the time
        time_part = time_part[:8]
        # Get the timezone
        timezone = data["timezone"]

        # Clear the OLED display
        oled.fill(0)

        # Display the New York date and time on separate lines
        oled.text("New York Date:", 0, 0)
        oled.text(date_part, 0, 10)
        oled.text("New York Time:", 0, 20)
        oled.text(time_part, 0, 30)
        oled.text("Timezone:", 0, 40)
        oled.text(timezone, 0, 50)
        # Update the display
        oled.show()
    else:
        oled.text("Failed to get the time for New York!")
        # Update the display
        oled.show()
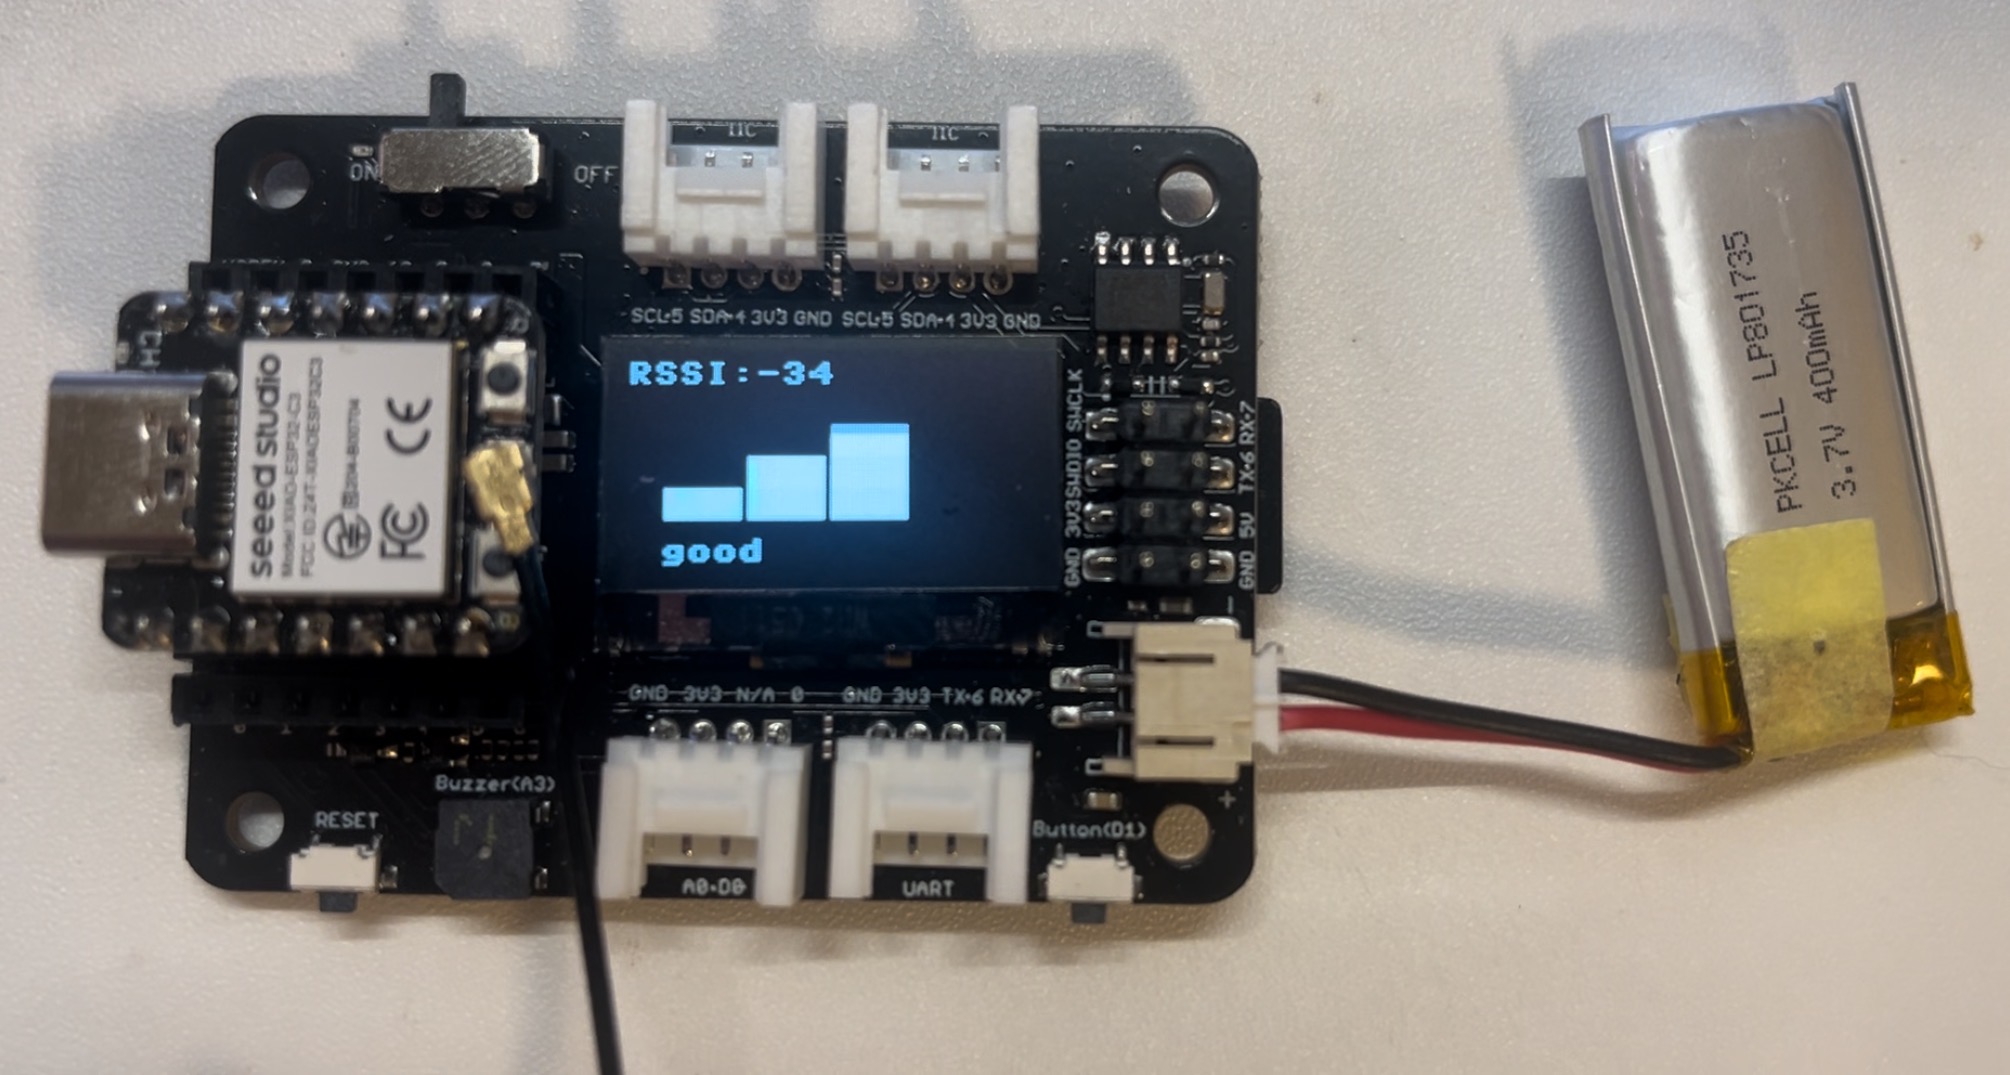
Final: Rastreador de Intensidad de Señal Wi-Fi
Esta es la tarea principal en este proyecto. A través de este código, puedes rastrear tu señal wifi en casa con un dispositivo tan sencillo.
import network
import time
from time import sleep
import machine
from machine import Pin, SoftI2C
import ssd1306
import math

# ESP32C3 Pin assignment
i2c = SoftI2C(scl=Pin(7), sda=Pin(6))  # Adjust the Pin numbers based on your connections
oled_width = 128
oled_height = 64
oled = ssd1306.SSD1306_I2C(oled_width, oled_height, i2c)

# Network settings
wifi_ssid = "Your Own SSID"
wifi_password = "Your Own Password"
machine.freq(160000000)  # Set CPU frequency to 160 MHz (ESP8266 specific)
oled.text("Starting up...", 0, 0)
oled.show()

station = network.WLAN(network.STA_IF)
station.active(True)
station.connect(wifi_ssid, wifi_password)
time.sleep(1)

while not station.isconnected():
    time.sleep(1)

oled.fill(0)
oled.text("Connecting to", 0, 0)
oled.text(wifi_ssid, 0, 20)
oled.show()
time.sleep(2)

oled.fill(0)
ip_address = station.ifconfig()[0]  # Get the IP address
oled.text("Connected! ", 0, 0)
oled.text("IP Address:", 0, 20)
oled.text(ip_address, 0, 40)
oled.show()
time.sleep(2)

# Buzzer settings
buzzer_pin = machine.Pin(5, machine.Pin.OUT)
buzzer = machine.PWM(buzzer_pin)
buzzer.freq(1047)
buzzer.duty(0)

center_x = oled_width // 2
center_y = oled_height // 2
square_size = 6  # Size of each square
num_squares = 12  # Number of squares
angle_increment = 2 * math.pi / num_squares

x_pos = [12, 38, 64, 90]
statuses = ["poor", "normal", "good", "excellent"]

def calculate_block_count(rssi):
    # Determine the number of blocks based on RSSI values
    if -80 <= rssi < -60:
        return 1
    elif -60 <= rssi < -40:
        return 2
    elif -40 <= rssi < -20:
        return 3
    elif -20 <= rssi <= 10:
        return 4

def draw_blocks(count):
    for i in range(count):
        y_pos = 50 - calculate_block_height(i)
        oled.fill_rect(x_pos[i], y_pos, 24, calculate_block_height(i), 1)
    for i in range(count, 4):  # Clear unused area
        y_pos = 50 - calculate_block_height(i)
        oled.fill_rect(x_pos[i], y_pos, 24, calculate_block_height(i), 0)

def calculate_block_height(index):
    return 10 * (index + 1)

loop_count = 0  # Initialize loop count

while loop_count < 2:  # Execute the loop 24 times
    oled.fill(0)  # Clear the screen

    for i in range(num_squares):
        angle = i * angle_increment
        x = int(center_x + (center_x - square_size-30) * math.cos(angle))
        y = int(center_y + (center_x - square_size-30) * math.sin(angle))

        # Draw all squares
        for j in range(num_squares):
            angle_j = j * angle_increment
            x_j = int(center_x + (center_x - square_size-30) * math.cos(angle_j))
            y_j = int(center_y + (center_x - square_size-30) * math.sin(angle_j))

            oled.fill_rect(x_j, y_j, square_size, square_size, 1)  # Draw the square

        oled.fill_rect(x, y, square_size, square_size, 0)  # Erase the current square
        oled.show()
        time.sleep_ms(100)  # Pause before next iteration

    loop_count += 1  # Increase loop count

oled.fill(0)  # Clear the screen after finishing the loops
oled.show()

while True:
    oled.fill(0)
    station = network.WLAN(network.STA_IF)
    time.sleep(0.1)
    rssi = station.status('rssi')
    rssi_duty = 160 + 2 * int(rssi)
    rssi_duty_2 = int(rssi_duty / 2)
    rssi_abs = abs(int(rssi)) / 100

    block_count = calculate_block_count(rssi)
    status = statuses[block_count - 1]  # Get the status text based on block count

    draw_blocks(block_count)

    oled.text(status, 11, 56)

    oled.text("RSSI:", 0, 0)
    oled.text(str(rssi), 40, 0)
    # Update the display
    oled.show()

    buzzer.duty(rssi_duty)
    time.sleep(rssi_abs)
    buzzer.duty(0)
    time.sleep(rssi_abs)
    buzzer.duty(rssi_duty_2)
    time.sleep(rssi_abs)
    buzzer.duty(0)
    time.sleep(rssi_abs)
Qué más
- También puedes flashear firmware en el XIAO ESP32C3 usando esptool integrado en Thonny que es compatible con MAC OS.
✨ Proyecto de Colaborador
- Este proyecto está respaldado por el Proyecto de Colaborador de Seeed Studio.
- Gracias a los esfuerzos de Zachary y tu trabajo será exhibido.
Soporte Técnico y Discusión de Productos
¡Gracias por elegir nuestros productos! Estamos aquí para brindarte diferentes tipos de soporte para asegurar que tu experiencia con nuestros productos sea lo más fluida posible. Ofrecemos varios canales de comunicación para satisfacer diferentes preferencias y necesidades.