Edgeimpulse
Edge Impulse
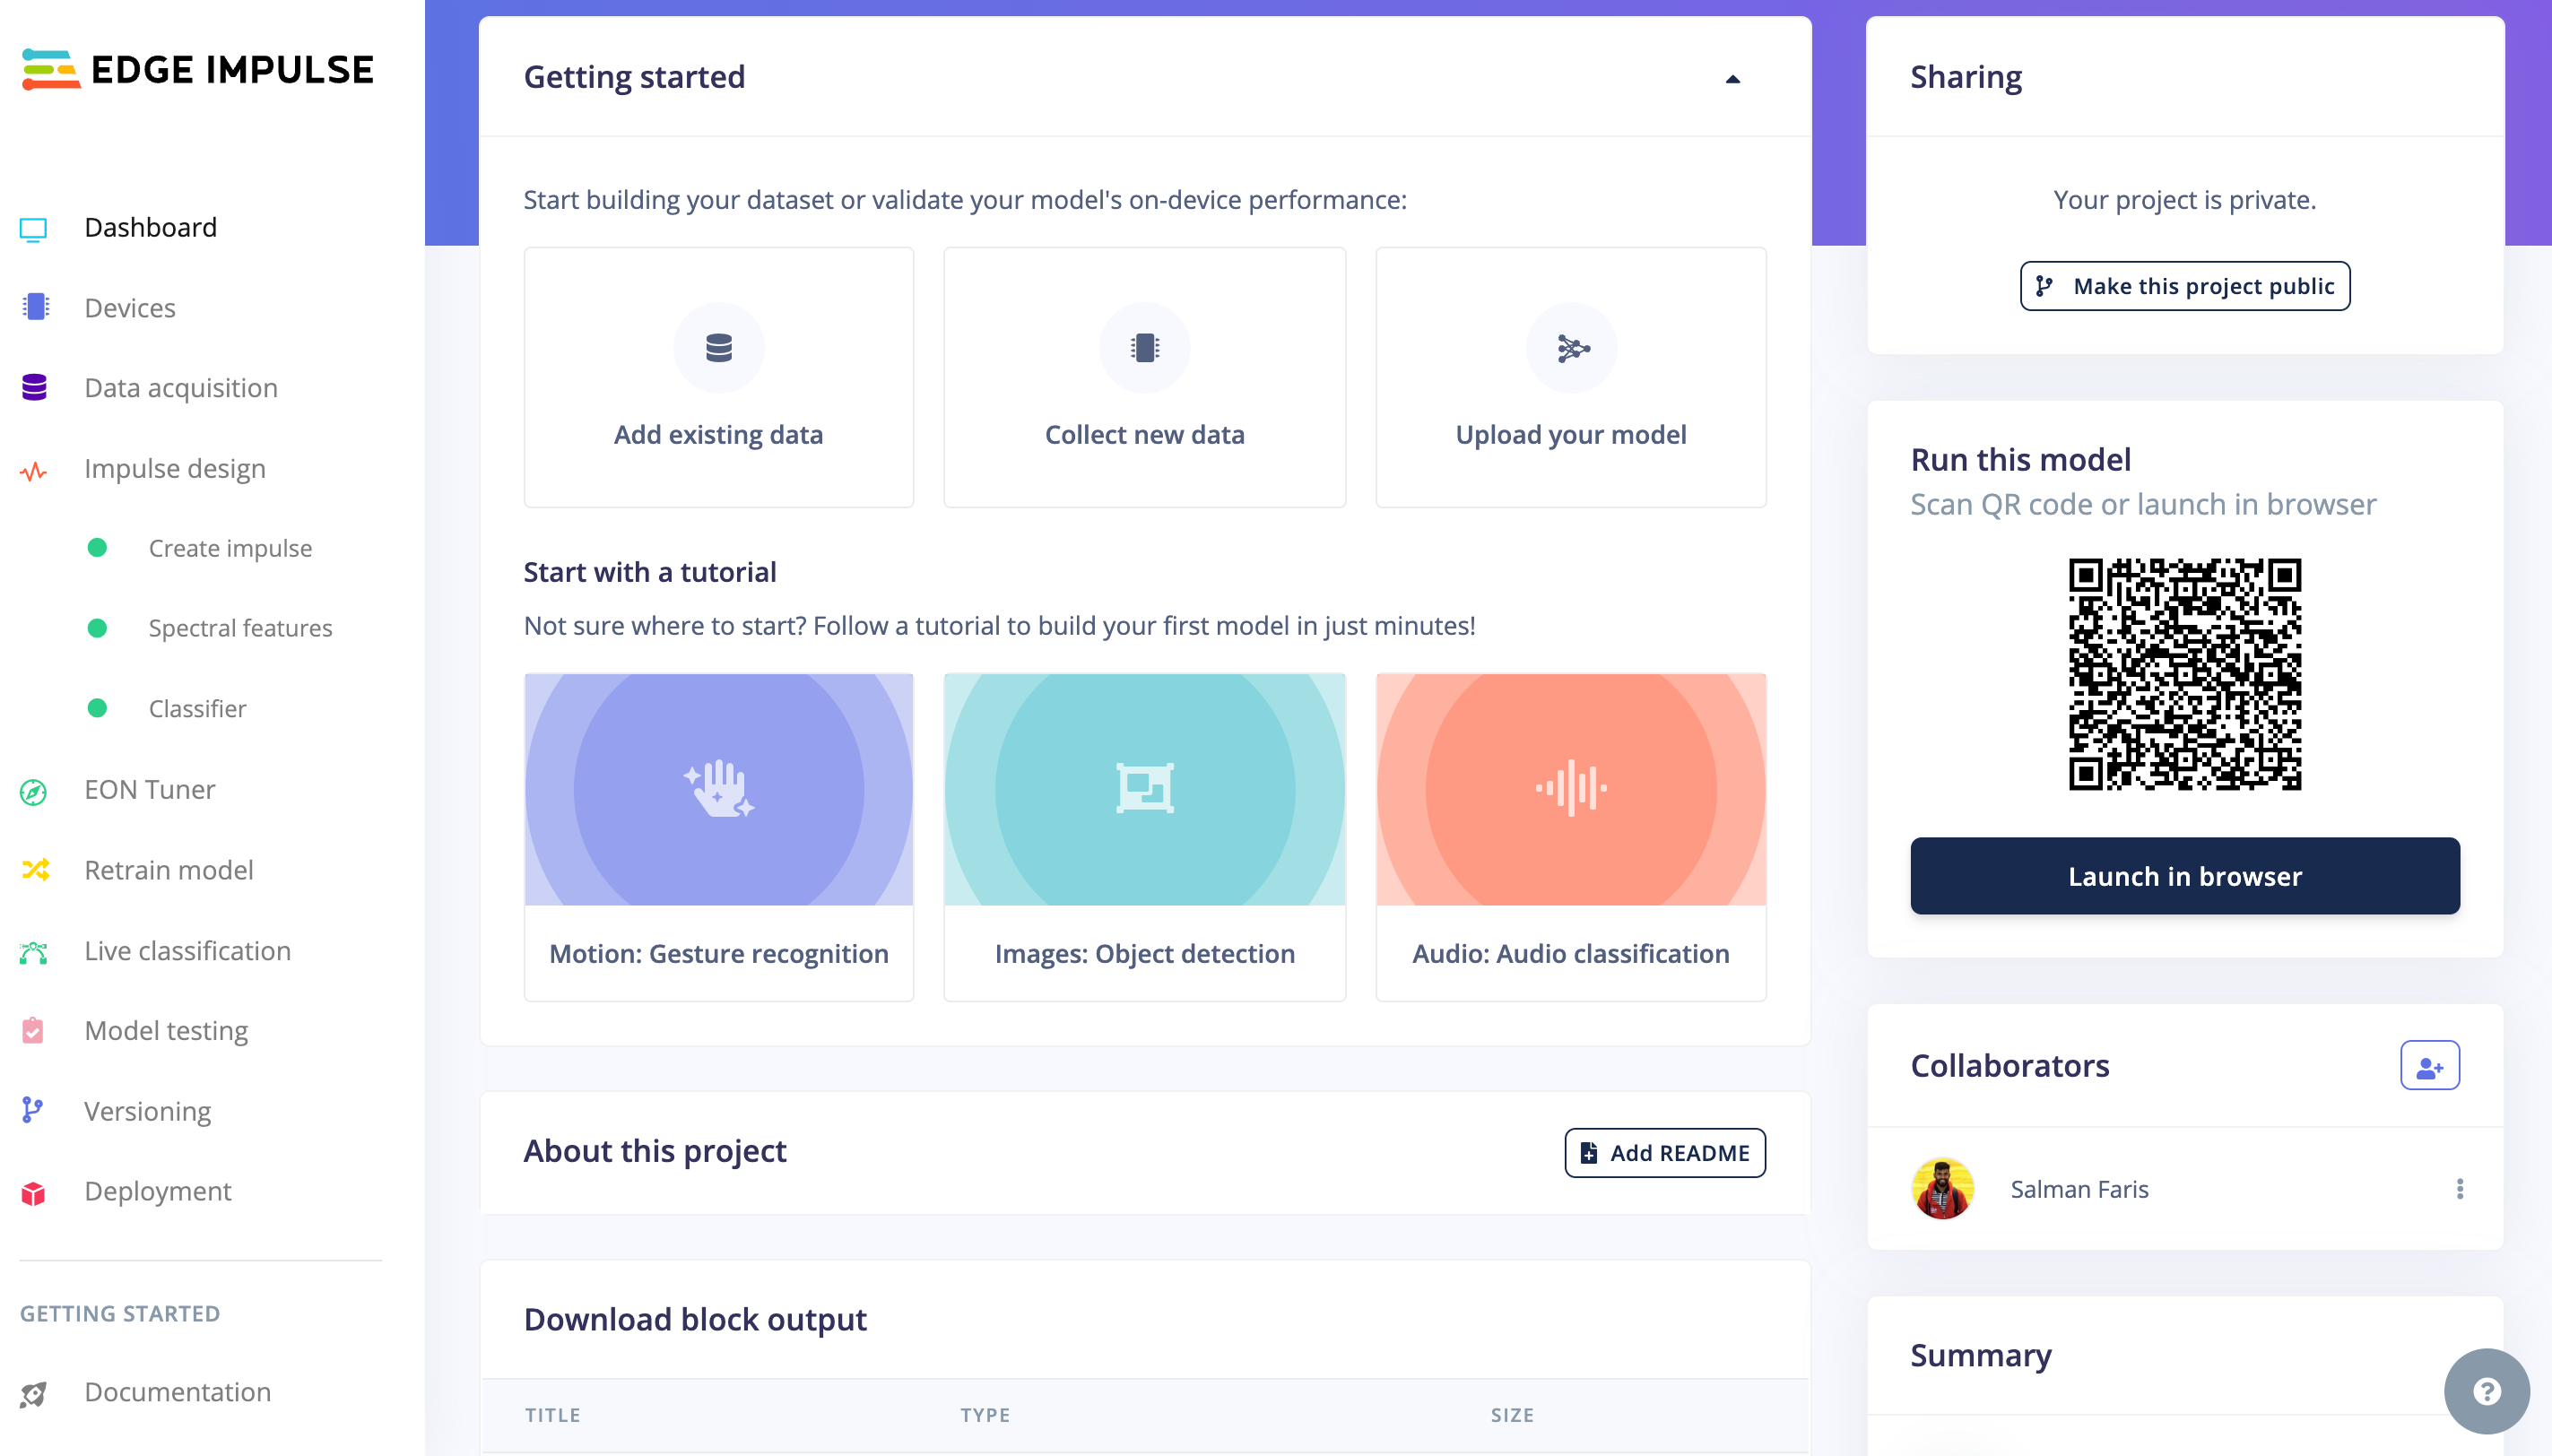
Edge Impulse es la plataforma de desarrollo líder para aprendizaje automático en dispositivos edge, gratuita para desarrolladores y confiable para empresas en todo el mundo.
- Con Edge Impulse, los desarrolladores de software, ingenieros y expertos en dominios pueden resolver problemas reales usando aprendizaje automático en dispositivos edge sin un doctorado o habilidades avanzadas de ingeniería embebida. Desde comenzar hasta MLOps en producción, Edge Impulse proporciona máxima eficiencia y velocidad en una amplia gama de hardware desde MCUs hasta CPUs.
Con EdgeImpulse podemos
- Recopilar conjunto de datos desde el dispositivo directamente
- Recopilar conjunto de datos desde otra fuente como archivo .zip, vía api u otra ingesta de nube de terceros
- Crear datos de prueba y entrenamiento y ponerlos en diferentes etiquetas
- Entrenar nuestro modelo
- Poder seleccionar algoritmos ML apropiados - EI proporciona algoritmos ML recomendados basados en nuestro conjunto de datos
- Desplegarlo en nuestro hardware
- Colaboración de proyectos TinyML con control de versiones
- y mucho más que te ayuda a construir aplicaciones tinyML.
Experiencia práctica rápida
Antes de pasar por el proceso completo de aprender Edge Impulse, proporcionamos las librerías de arduino completamente pre-generadas y puedes ver los resultados flasheando este programa de arduino desde el sketch directamente al XIAO ESP32S3 Sense.
Configurar XIAO ESPS3 Sense en Arduino
Antes de comenzar a usar las librerías de Edge impulse, necesitamos configurar XIAO ESPS3 en Arduino IDE, por favor revisa la guía aquí
Compilar y Subir Ejemplo Blink
// the setup function runs once when you press reset or power the board
void setup() {
  // initialize digital pin LED_BUILTIN as an output.
  pinMode(LED_BUILTIN, OUTPUT);
}

// the loop function runs over and over again forever
void loop() {
  digitalWrite(LED_BUILTIN, HIGH);  // turn the LED on (HIGH is the voltage level)
  delay(1000);                      // wait for a second
  digitalWrite(LED_BUILTIN, LOW);   // turn the LED off by making the voltage LOW
  delay(1000);                      // wait for a second
}
Asegúrate de seleccionar la placa correcta y el puerto correcto antes de cargar.
Tareas pendientes
- Instalar la placa XIAO ESPS3 en Arduino IDE
- Compilar y cargar el ejemplo Blink en XIAO ESPS3
Librerías de Edge Impulse disponibles
También estamos avanzando en paralelo con la creación de algunas librerías de Arduino exportadas de Edge Impulse que han sido verificadas y editadas para funcionar directamente con XIAO ESP32S3 Sense. Cuando usamos las librerías, tenemos más control en nuestro programa y podemos tomar decisiones.
- Librería de Arduino para reconocimiento de palabras clave de voz (Sí y No)
- Librería de Arduino para identificación de frutas (manzanas, plátanos, uvas)
Cómo usar las librerías de Arduino de Edge Impulse.
Es como una librería genérica de arduino, necesitamos instalarla primero en Arduino IDE y usar el código de ejemplo para ejecutar la demostración.
Librería de Arduino para reconocimiento de palabras clave de voz (Sí y No)
Demostración
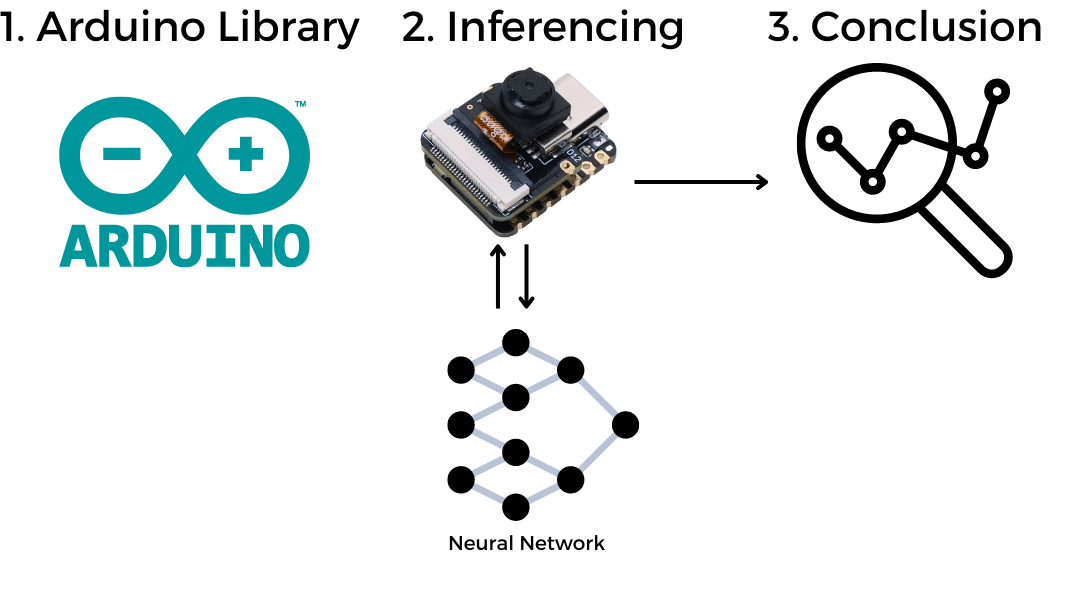
¡Cómo funciona!
/src/img/KWS_Diagram.png)
Paso 1. Descargar la librería de demostración KWS
Descarga la librería Librería de Arduino para reconocimiento de palabras clave de voz (Sí y No) como archivo .Zip.
Paso 2. Añadir librería ZIP a Arduino IDE.
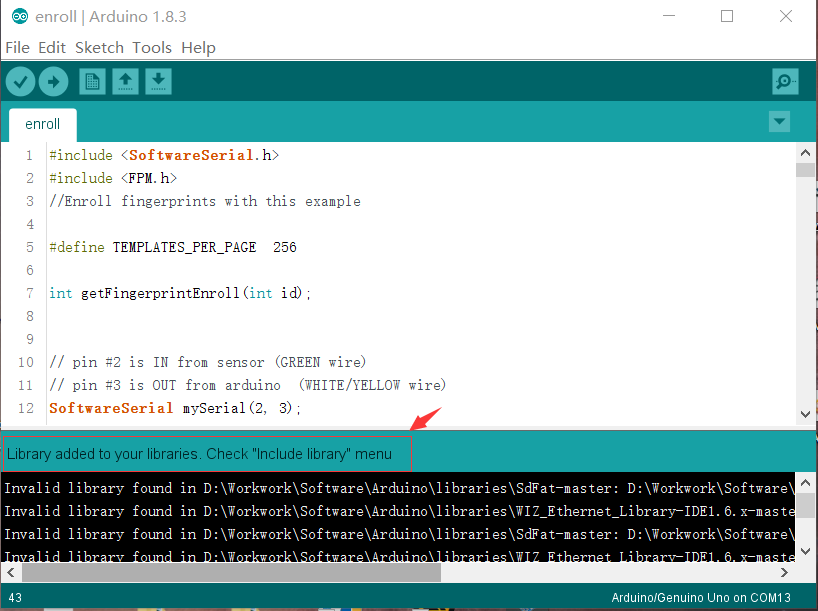
Dado que has descargado la librería zip, abre tu Arduino IDE, haz clic en Sketch > Include Library > Add .ZIP Library.

Elige el archivo zip que acabas de descargar, y si la librería se instala correctamente, verás "Library added to your libraries" en la ventana de notificación. Lo que significa que la librería se ha instalado exitosamente.
Paso 3. Ejecutar el sketch de inferencia
/* Edge Impulse Arduino examples
* Copyright (c) 2022 EdgeImpulse Inc.
*
* Permission is hereby granted, free of charge, to any person obtaining a copy
* of this software and associated documentation files (the "Software"), to deal
* in the Software without restriction, including without limitation the rights
* to use, copy, modify, merge, publish, distribute, sublicense, and/or sell
* copies of the Software, and to permit persons to whom the Software is
* furnished to do so, subject to the following conditions:
*
* The above copyright notice and this permission notice shall be included in
* all copies or substantial portions of the Software.
*
* THE SOFTWARE IS PROVIDED "AS IS", WITHOUT WARRANTY OF ANY KIND, EXPRESS OR
* IMPLIED, INCLUDING BUT NOT LIMITED TO THE WARRANTIES OF MERCHANTABILITY,
* FITNESS FOR A PARTICULAR PURPOSE AND NONINFRINGEMENT. IN NO EVENT SHALL THE
* AUTHORS OR COPYRIGHT HOLDERS BE LIABLE FOR ANY CLAIM, DAMAGES OR OTHER
* LIABILITY, WHETHER IN AN ACTION OF CONTRACT, TORT OR OTHERWISE, ARISING FROM,
* OUT OF OR IN CONNECTION WITH THE SOFTWARE OR THE USE OR OTHER DEALINGS IN THE
* SOFTWARE.
*
* This code was adapted by Marcelo Rovai to run on a XIAO ESP32S3
* 29May23
* Modified by Salman Faris
* 14Aug23
*
*/
// If your target is limited in memory remove this macro to save 10K RAM
#define EIDSP_QUANTIZE_FILTERBANK 0
/*
** NOTE: If you run into TFLite arena allocation issue.
**
** This may be due to may dynamic memory fragmentation.
** Try defining "-DEI_CLASSIFIER_ALLOCATION_STATIC" in boards.local.txt (create
** if it doesn't exist) and copy this file to
** `<ARDUINO_CORE_INSTALL_PATH>/arduino/hardware/<mbed_core>/<core_version>/`.
**
** See
** (https://support.arduino.cc/hc/en-us/articles/360012076960-Where-are-the-installed-cores-located-)
** to find where Arduino installs cores on your machine.
**
** If the problem persists then there's not enough memory for this model and application.
*/
/* Includes ---------------------------------------------------------------- */
#include <XIAO_esp32S3_YesNo_inferencing.h>
#include <I2S.h>
#define SAMPLE_RATE 16000U
#define SAMPLE_BITS 16
/** Audio buffers, pointers and selectors */
typedef struct {
int16_t *buffer;
uint8_t buf_ready;
uint32_t buf_count;
uint32_t n_samples;
} inference_t;
static inference_t inference;
static const uint32_t sample_buffer_size = 2048;
static signed short sampleBuffer[sample_buffer_size];
static bool debug_nn = false; // Set this to true to see e.g. features generated from the raw signal
static bool record_status = true;
/**
* @brief Arduino setup function
*/
void setup() {
// put your setup code here, to run once:
Serial.begin(115200);
pinMode(LED_BUILTIN, OUTPUT);
// comment out the below line to cancel the wait for USB connection (needed for native USB)
while (!Serial)
;
Serial.println("Edge Impulse Inferencing Demo");
I2S.setAllPins(-1, 42, 41, -1, -1);
if (!I2S.begin(PDM_MONO_MODE, SAMPLE_RATE, SAMPLE_BITS)) {
Serial.println("Failed to initialize I2S!");
while (1)
;
}
// summary of inferencing settings (from model_metadata.h)
ei_printf("Inferencing settings:\n");
ei_printf("\tInterval: ");
ei_printf_float((float)EI_CLASSIFIER_INTERVAL_MS);
ei_printf(" ms.\n");
ei_printf("\tFrame size: %d\n", EI_CLASSIFIER_DSP_INPUT_FRAME_SIZE);
ei_printf("\tSample length: %d ms.\n", EI_CLASSIFIER_RAW_SAMPLE_COUNT / 16);
ei_printf("\tNo. of classes: %d\n", sizeof(ei_classifier_inferencing_categories) / sizeof(ei_classifier_inferencing_categories[0]));
ei_printf("\nStarting continious inference in 2 seconds...\n");
ei_sleep(2000);
if (microphone_inference_start(EI_CLASSIFIER_RAW_SAMPLE_COUNT) == false) {
ei_printf("ERR: Could not allocate audio buffer (size %d), this could be due to the window length of your model\r\n", EI_CLASSIFIER_RAW_SAMPLE_COUNT);
return;
}
ei_printf("Recording...\n");
}
/**
* @brief Arduino main function. Runs the inferencing loop.
*/
void loop() {
bool m = microphone_inference_record();
if (!m) {
ei_printf("ERR: Failed to record audio...\n");
return;
}
signal_t signal;
signal.total_length = EI_CLASSIFIER_RAW_SAMPLE_COUNT;
signal.get_data = µphone_audio_signal_get_data;
ei_impulse_result_t result = { 0 };
EI_IMPULSE_ERROR r = run_classifier(&signal, &result, debug_nn);
if (r != EI_IMPULSE_OK) {
ei_printf("ERR: Failed to run classifier (%d)\n", r);
return;
}
int pred_index = 0; // Initialize pred_index
float pred_value = 0; // Initialize pred_value
 // print the predictions
  ei_printf("Predictions ");
  ei_printf("(DSP: %d ms., Classification: %d ms., Anomaly: %d ms.)",
            result.timing.dsp, result.timing.classification, result.timing.anomaly);
  ei_printf(": \n");
  for (size_t ix = 0; ix < EI_CLASSIFIER_LABEL_COUNT; ix++) {
    ei_printf("    %s: ", result.classification[ix].label);
    ei_printf_float(result.classification[ix].value);
    ei_printf("\n");

    if (result.classification[ix].value > pred_value) {
      pred_index = ix;
      pred_value = result.classification[ix].value;
    }
  }

    // Display inference result
    if ((pred_index == 0 && (pred_value > 0.8))) {
      digitalWrite(LED_BUILTIN, HIGH);  //Turn on
    } else if ((pred_index == 2) && (pred_value > 0.8)) {
      digitalWrite(LED_BUILTIN, LOW);  //Turn off
    } else {
      //nothing to do.
    }
#if EI_CLASSIFIER_HAS_ANOMALY == 1
ei_printf(" anomaly score: ");
ei_printf_float(result.anomaly);
ei_printf("\n");
#endif
}
static void audio_inference_callback(uint32_t n_bytes) {
for (int i = 0; i < n_bytes >> 1; i++) {
inference.buffer[inference.buf_count++] = sampleBuffer[i];
if (inference.buf_count >= inference.n_samples) {
inference.buf_count = 0;
inference.buf_ready = 1;
}
}
}
static void capture_samples(void *arg) {
const int32_t i2s_bytes_to_read = (uint32_t)arg;
size_t bytes_read = i2s_bytes_to_read;
while (record_status) {
/* read data at once from i2s */
esp_i2s::i2s_read(esp_i2s::I2S_NUM_0, (void *)sampleBuffer, i2s_bytes_to_read, &bytes_read, 100);
if (bytes_read <= 0) {
ei_printf("Error in I2S read : %d", bytes_read);
} else {
if (bytes_read < i2s_bytes_to_read) {
ei_printf("Partial I2S read");
}
// scale the data (otherwise the sound is too quiet)
for (int x = 0; x < i2s_bytes_to_read / 2; x++) {
sampleBuffer[x] = (int16_t)(sampleBuffer[x]) * 8;
}
if (record_status) {
audio_inference_callback(i2s_bytes_to_read);
} else {
break;
}
}
}
vTaskDelete(NULL);
}
/**
* @brief Init inferencing struct and setup/start PDM
*
* @param[in] n_samples The n samples
*
* @return { description_of_the_return_value }
*/
static bool microphone_inference_start(uint32_t n_samples) {
inference.buffer = (int16_t *)malloc(n_samples * sizeof(int16_t));
if (inference.buffer == NULL) {
return false;
}
inference.buf_count = 0;
inference.n_samples = n_samples;
inference.buf_ready = 0;
// if (i2s_init(EI_CLASSIFIER_FREQUENCY)) {
// ei_printf("Failed to start I2S!");
// }
ei_sleep(100);
record_status = true;
xTaskCreate(capture_samples, "CaptureSamples", 1024 * 32, (void *)sample_buffer_size, 10, NULL);
return true;
}
/**
* @brief Wait on new data
*
* @return True when finished
*/
static bool microphone_inference_record(void) {
bool ret = true;
while (inference.buf_ready == 0) {
delay(10);
}
inference.buf_ready = 0;
return ret;
}
/**
* Get raw audio signal data
*/
static int microphone_audio_signal_get_data(size_t offset, size_t length, float *out_ptr) {
numpy::int16_to_float(&inference.buffer[offset], out_ptr, length);
return 0;
}
/**
* @brief Stop PDM and release buffers
*/
static void microphone_inference_end(void) {
free(sampleBuffer);
ei_free(inference.buffer);
}
#if !defined(EI_CLASSIFIER_SENSOR) || EI_CLASSIFIER_SENSOR != EI_CLASSIFIER_SENSOR_MICROPHONE
#error "Invalid model for current sensor."
#endif
Copia el código anterior o descárgalo desde aquí y luego sube el código al XIAO.
// print the predictions
ei_printf("Predictions ");
ei_printf("(DSP: %d ms., Classification: %d ms., Anomaly: %d ms.)",
result.timing.dsp, result.timing.classification, result.timing.anomaly);
ei_printf(": \n");
for (size_t ix = 0; ix < EI_CLASSIFIER_LABEL_COUNT; ix++) {
ei_printf(" %s: ", result.classification[ix].label);
ei_printf_float(result.classification[ix].value);
ei_printf("\n");
if (result.classification[ix].value > pred_value) {
pred_index = ix;
pred_value = result.classification[ix].value;
}
}
// Display inference result
if ((pred_index == 0 && (pred_value > 0.8))) {
digitalWrite(LED_BUILTIN, HIGH); //Turn on
} else if ((pred_index == 2) && (pred_value > 0.8)) {
digitalWrite(LED_BUILTIN, LOW); //Turn off
} else {
//nothing to do.
}
En el código anterior, podemos ver dónde tomamos las decisiones para ENCENDER el LED, y APAGARLO. También podemos poner otra lógica aquí y hacer que KWS controle nuestros proyectos.
Librería Arduino de identificación de frutas (manzanas, plátanos, uvas)
Paso 1. Descargar la librería de identificación de frutas
Descarga la librería Identificación de frutas (manzanas, plátanos, uvas) Arduino Library como .Zip.
Paso 2. Agregar librería ZIP al IDE de Arduino.
Ya que has descargado la librería zip, abre tu IDE de Arduino, haz clic en Sketch > Include Library > Add .ZIP Library.
Elige el archivo zip que acabas de descargar, y si la librería se instala correctamente, verás Library added to your libraries en la ventana de notificación. Lo que significa que la librería se instaló exitosamente.
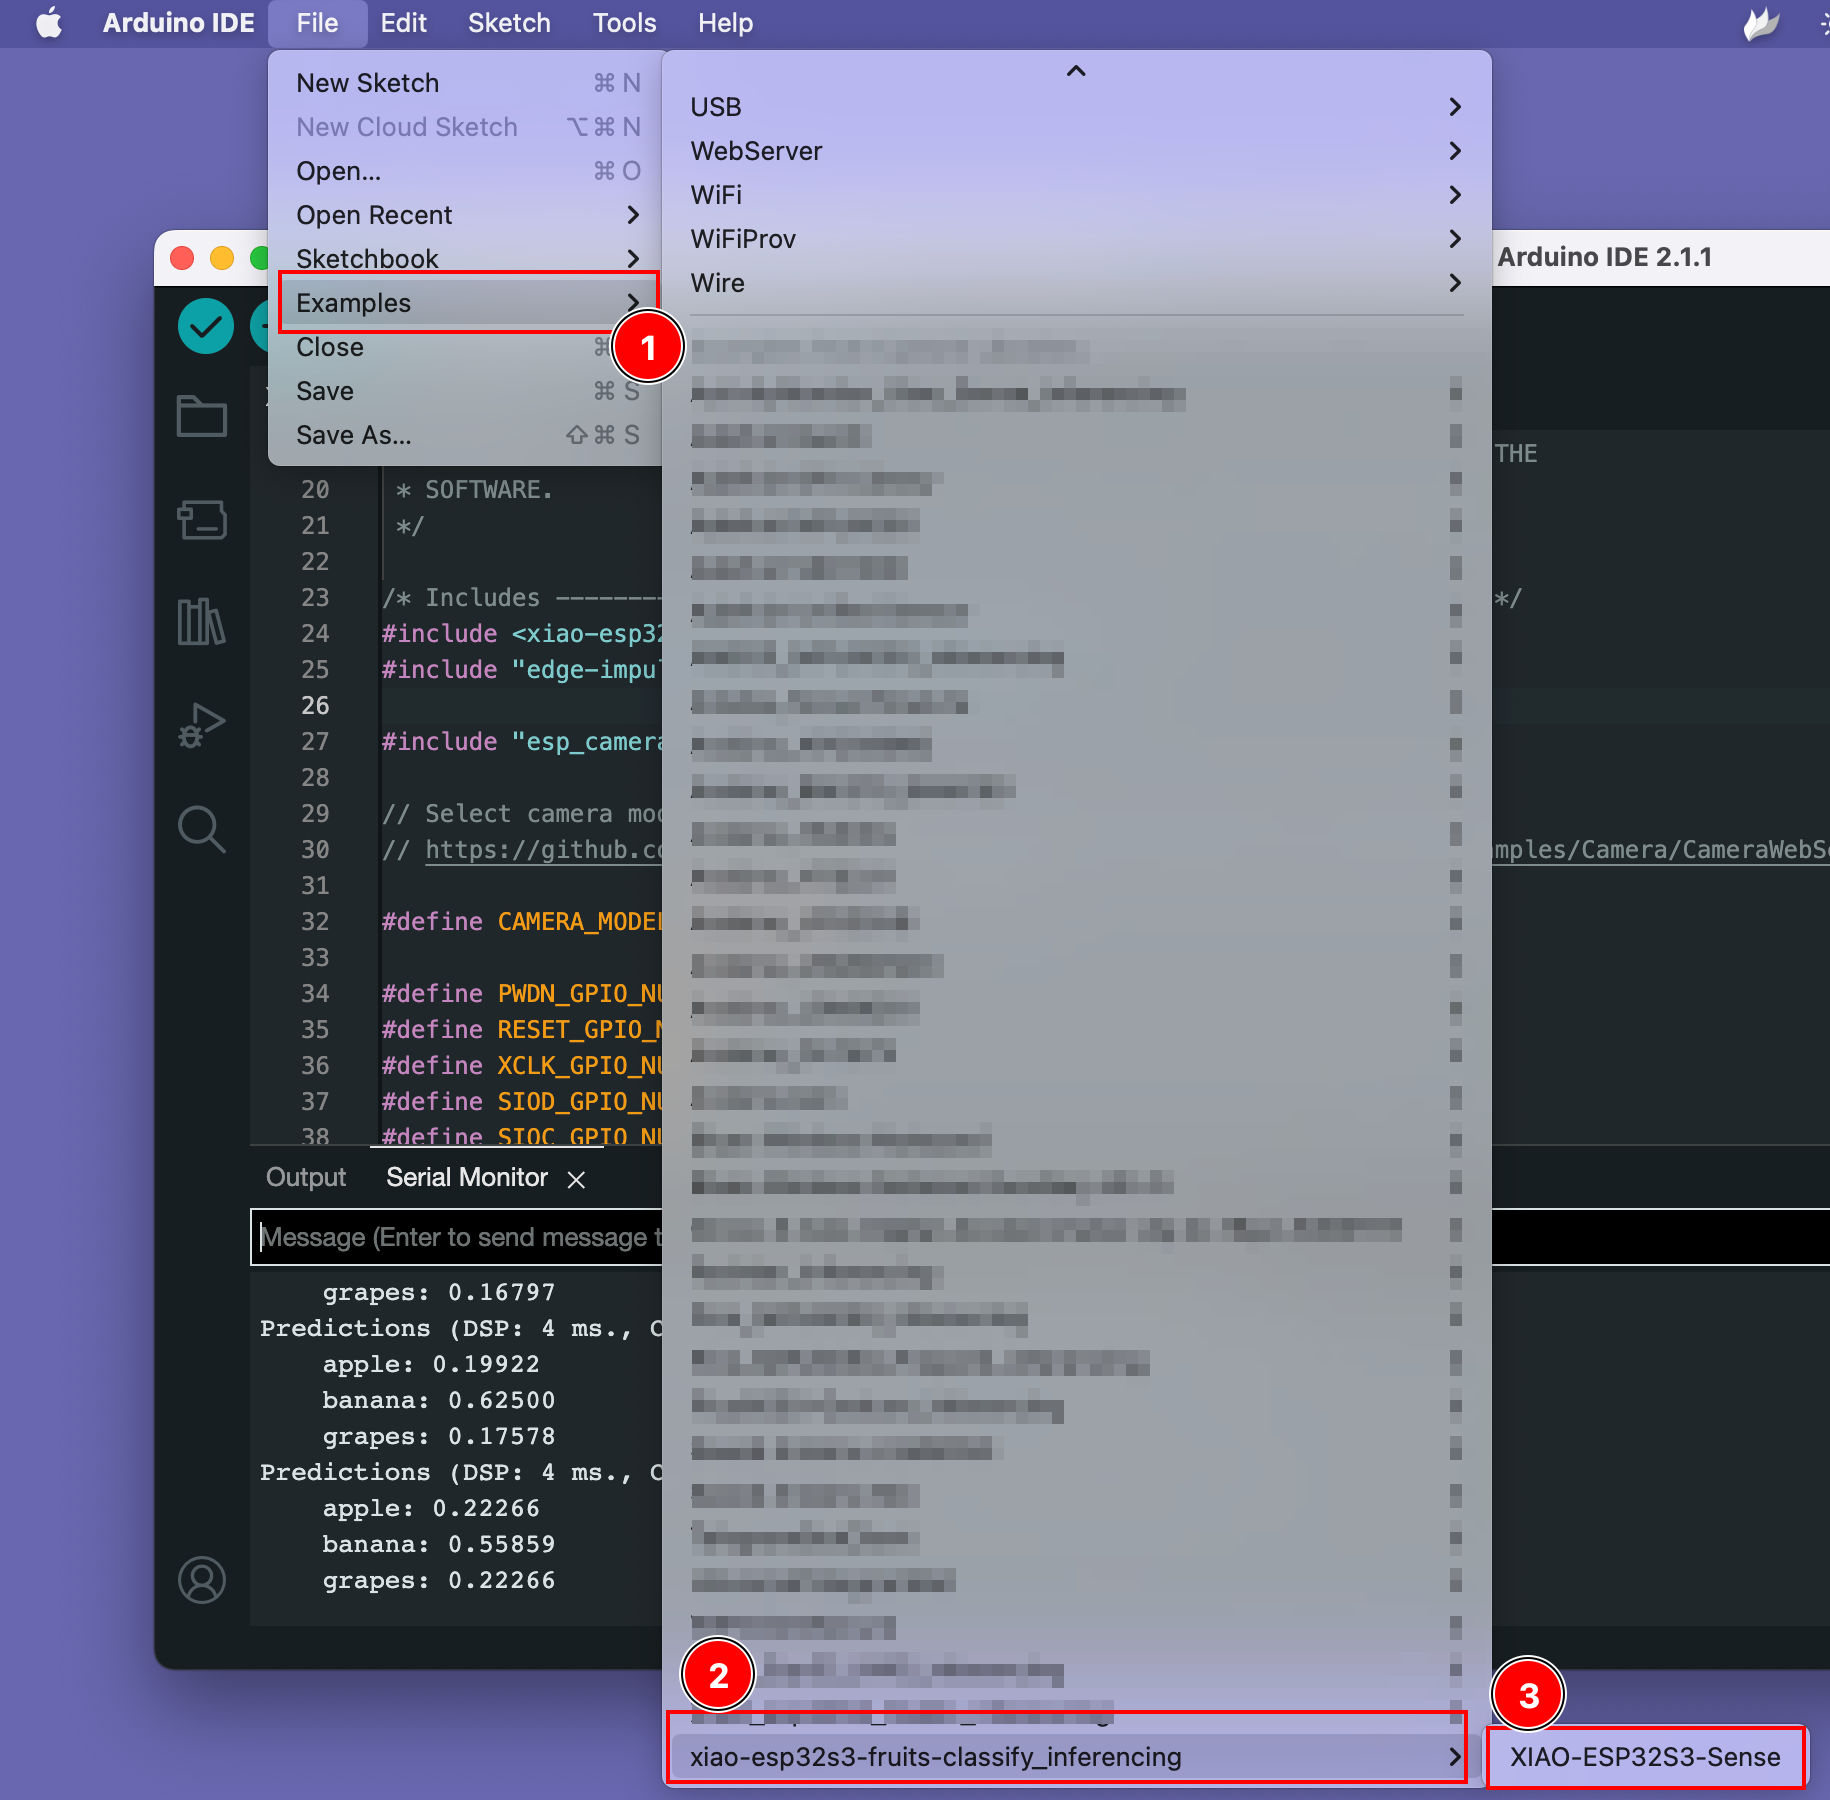
Paso 3. Ejecutar el sketch de ejemplo
Puedes encontrar el sketch de ejemplo bajo Files -> Examples -> xiao-esp323-fruits-classify_inferencing -> XIAO-ESP32S3-Sense
Prueba la demostración.
Abre la página de muestra del conjunto de datos desde aquí y abre la imagen de fruta, luego apunta la cámara del XIAO ESP32S3 hacia la imagen de fruta y ve los resultados en la pantalla.
Por hacer
- Instalar XIAO ESPS3 en Arduino
- Compilar y subir
- Instalar librería Arduino KWS y ejecutar ejemplo.
- Instalar librería de reconocimiento de imágenes y ejecutar ejemplo.
Recursos
- [GITHUB] Modelos de SenseCraft Model Assistant
- [GITHUB] Github del proyecto
- [EDGE-IMPULSE] demo KWS de edge impulse
- [EDGE-IMPULSE] demo de clasificación de frutas de edge impulse