Transmisión RS485 de datos de Vision AI V2
Si necesitas usar la placa de expansión RS485 junto con Vision AI V2, necesitarás volver a soldar nuevos pines de cabecera en la parte posterior de la placa de expansión RS485.
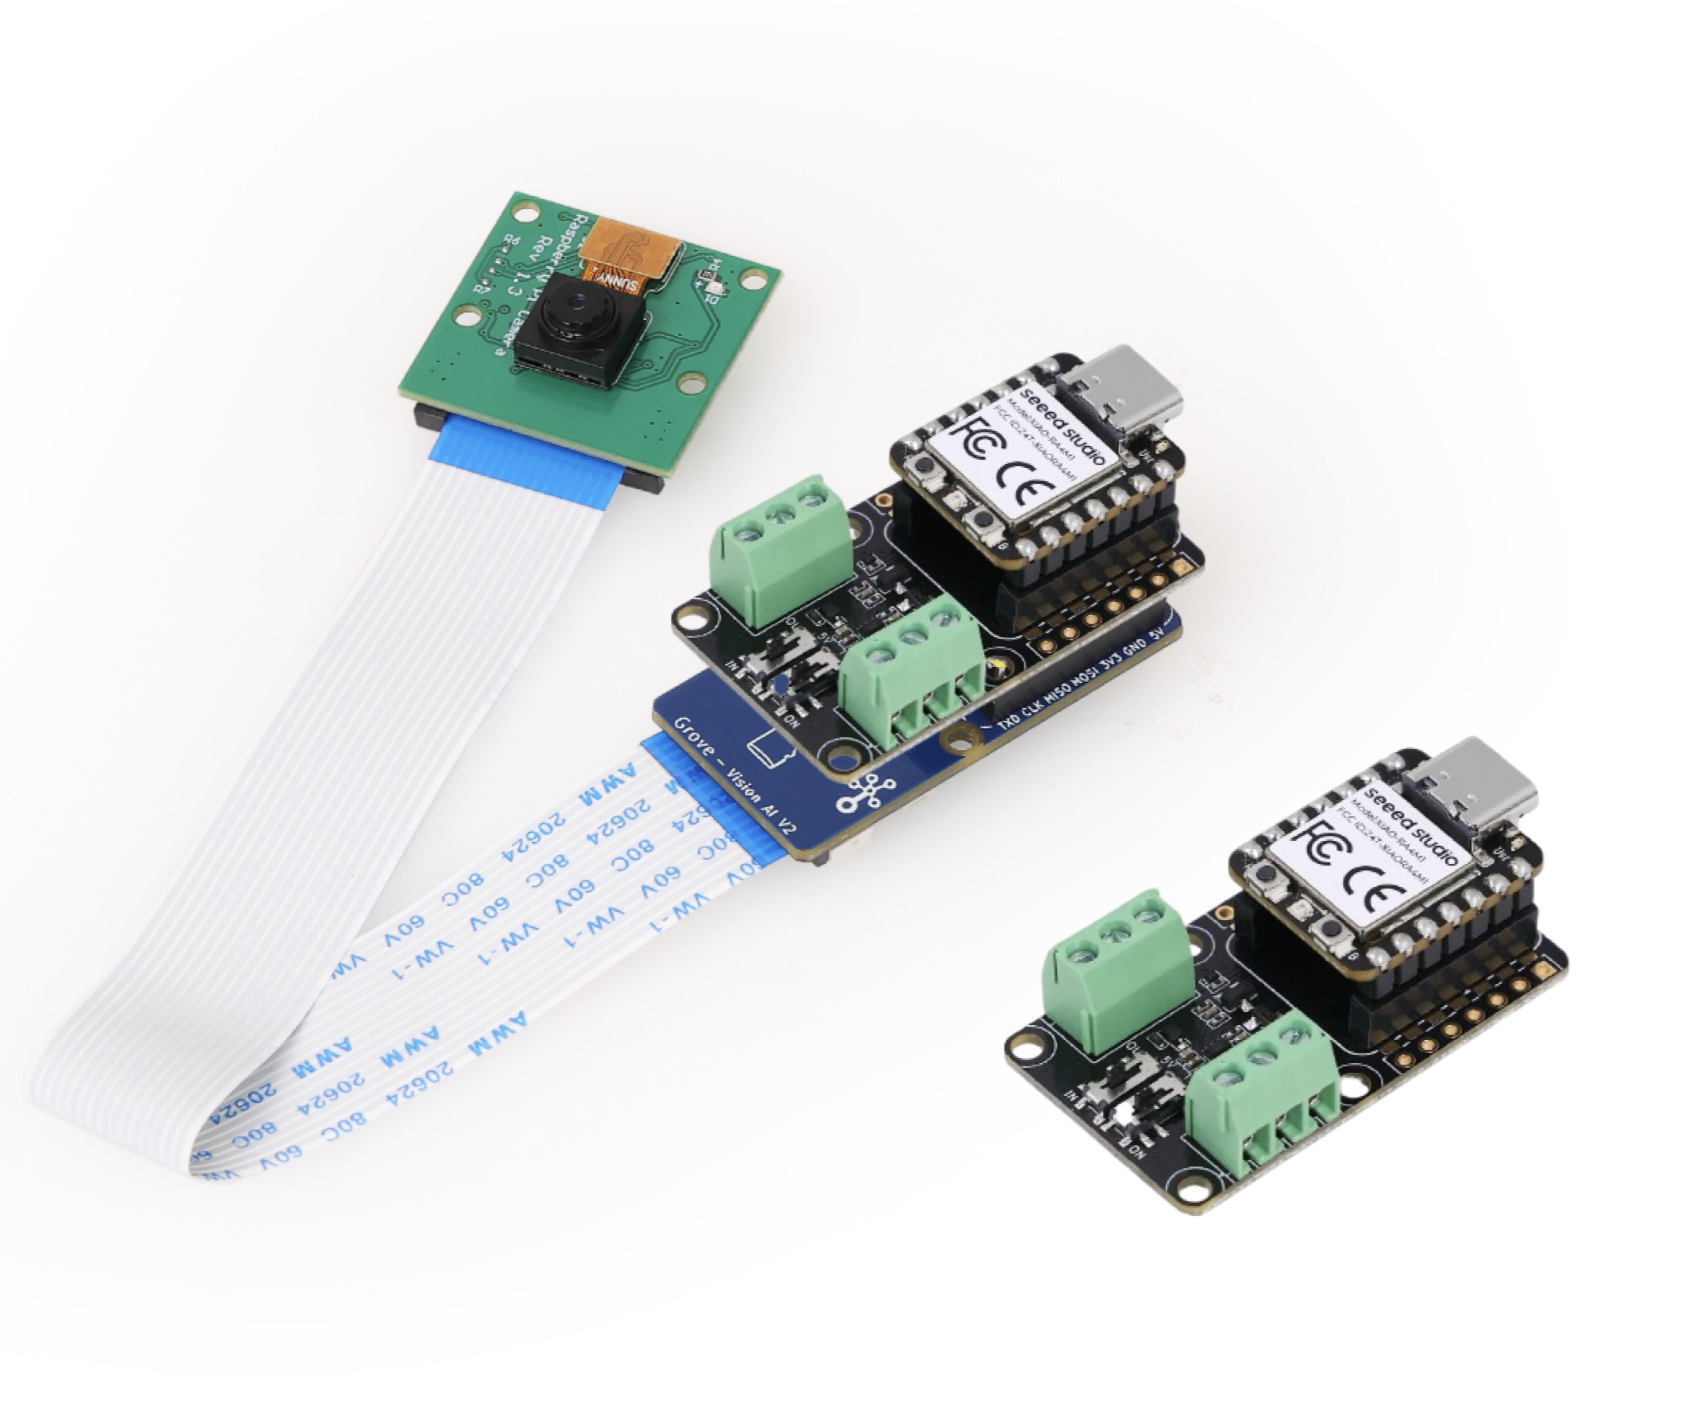
Preparación de Hardware
| Seeed Studio XIAO ESP32S3 | Grove Vision AI V2 | Módulo de Cámara OV5647-62 FOV para Raspberry Pi 3B+4B | Seeed Studio XIAO RS485-Expansion-Board |
|---|---|---|---|
 |  |  |  |
Método de conexión
En primer lugar, prepara dos placas de expansión, dos placas de desarrollo de la serie XIAO y un Vision AI V2, y conecta los pines correspondientes según el diagrama. Esta rutina utiliza el XIAO ESP32C3 como demostración.
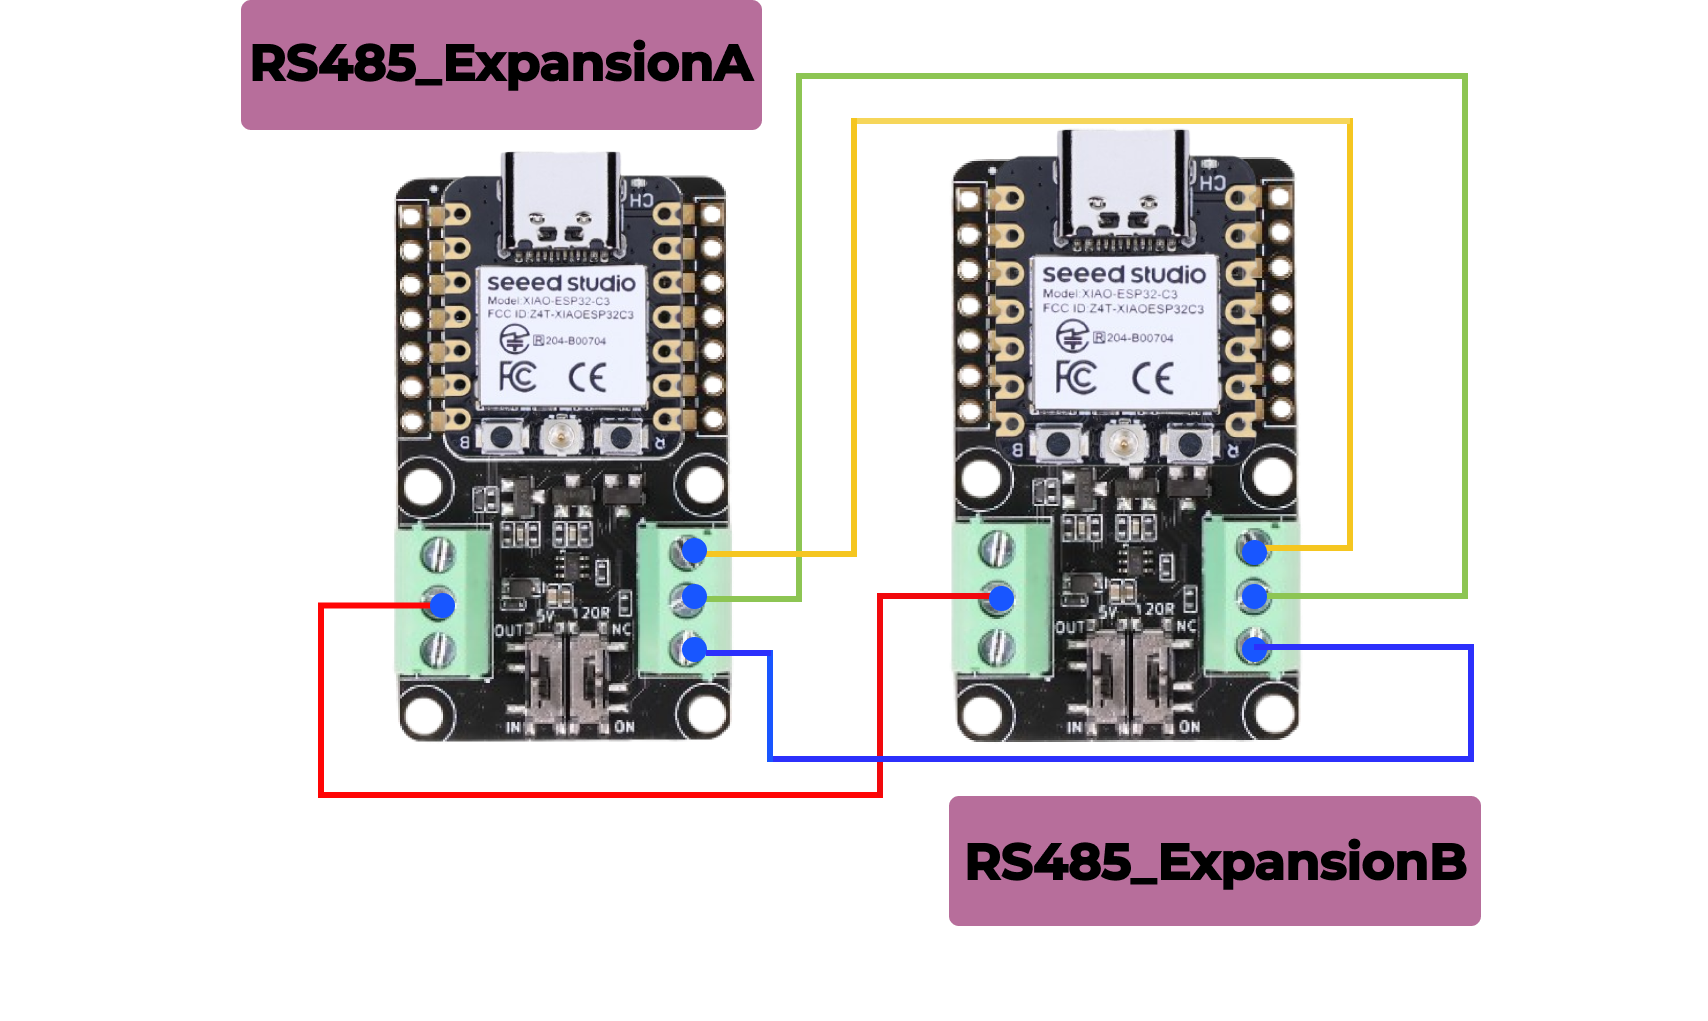
Paso 1. Prepara dos placas de expansión RS485 y dos placas de desarrollo de la serie XIAO y conecta los pines según la siguiente figura
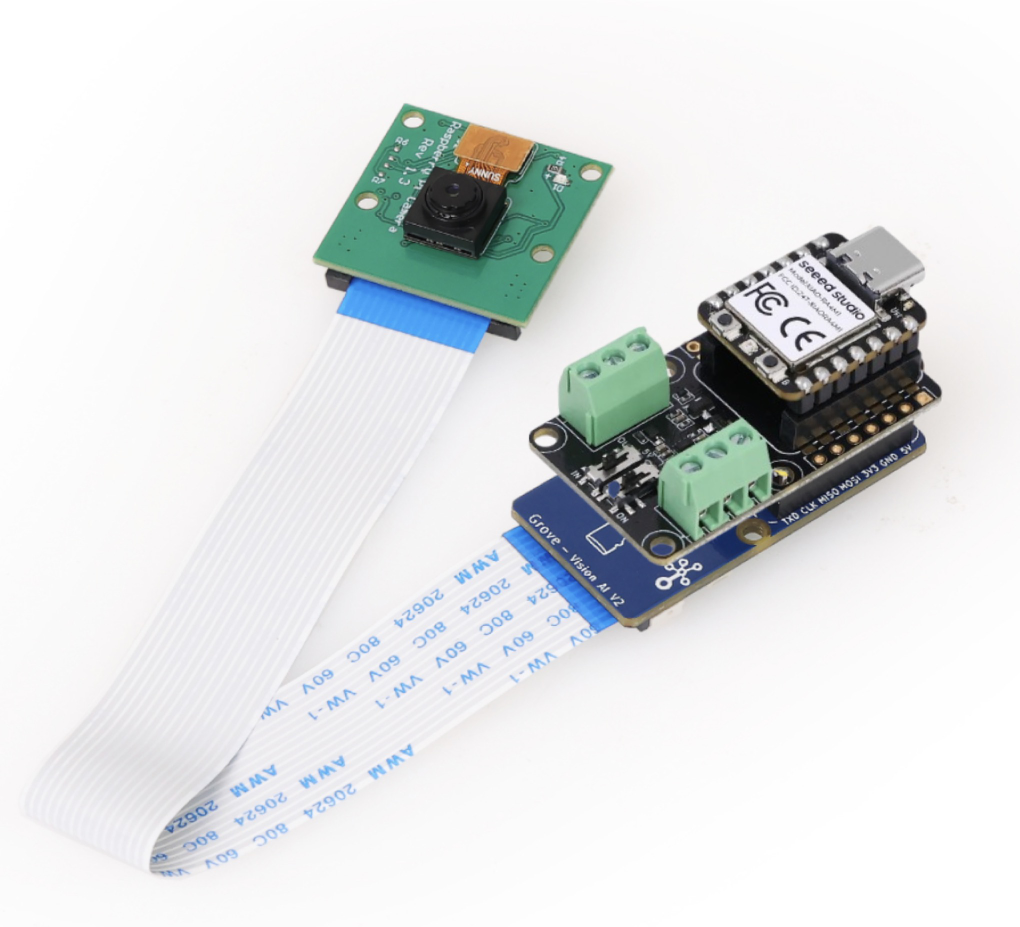
Paso 2. Prepara Vision AI V2 para montarlo en el lado reverso de una de las dos placas de expansión RS485 como emisor
Si estás usando una placa de expansión RS485 por primera vez y no estás seguro de cómo cablearla, haz clic en este enlace(https://wiki.seeedstudio.com/es/XIAO-RS485-Expansion-Board/)
Si no sabes cómo grabar el modelo y agregar el código de salida del modelo, haz clic en este enlace(https://wiki.seeedstudio.com/es/grove_vision_ai_v2_software_support/), que te dirá cada paso en detalle
Para un mejor uso posterior, ¡no te saltes estos dos pasos!
Preparación de Software
Código del Emisor
#include <Seeed_Arduino_SSCMA.h>

#ifdef ESP32
#include <HardwareSerial.h>

HardwareSerial Serial3(1);

// Define two Serial devices mapped to the two internal UARTs
HardwareSerial atSerial(0);

#else
#define atSerial Serial1
#endif

#define enable_pin D2 // Define the enable pin as D2

SSCMA AI;

void setup()
{
    Serial3.begin(115200, SERIAL_8N1, 7, 6); // Initialize Serial3 with 115200 baud rate, 8 data bits, no parity, 1 stop bit
    Serial.begin(9600); // Initialize Serial for debugging output
    AI.begin(&atSerial); // Initialize the AI module with the AT serial

    pinMode(enable_pin, OUTPUT); // Set the enable pin as an output
    digitalWrite(enable_pin, HIGH); // Set the enable pin to high to enable the AI module
}

void loop()
{
    if (!AI.invoke(1, false, true)) { // Invoke the AI to start processing

        Serial.println("invoke success"); // Print success message

        // Print performance metrics
        Serial.print("perf: prepocess=");
        Serial.print(AI.perf().prepocess);
        Serial.print(", inference=");
        Serial.print(AI.perf().inference);
        Serial.print(", postpocess=");
        Serial.println(AI.perf().postprocess);

        // Loop through detected boxes
        for (int i = 0; i < AI.boxes().size(); i++) {
            Serial.print("Box[");
            Serial.print(i);
            Serial.print("] target=");
            Serial.print(AI.boxes()[i].target);
            Serial.print(", score=");
            Serial.print(AI.boxes()[i].score);
            Serial.print(", x=");
            Serial.print(AI.boxes()[i].x);
            Serial.print(", y=");
            Serial.print(AI.boxes()[i].y);
            Serial.print(", w=");
            Serial.print(AI.boxes()[i].w);
            Serial.print(", h=");
            Serial.println(AI.boxes()[i].h);
        }

        // Loop through detected classes
        for (int i = 0; i < AI.classes().size(); i++) {
            Serial.print("Class[");
            Serial.print(i);
            Serial.print("] target=");
            Serial.println(AI.classes()[i].target);

            // Check the target class and send corresponding status
            if (AI.classes()[i].target == 0) {
                String status_a = "no people detected"; // Define status for no people detected
                Serial3.println(status_a); // Send status to Serial3
                Serial.println(status_a); // Print status to Serial monitor
            } else if (AI.classes()[i].target == 1) {
                String status_b = "people detected"; // Define status for people detected
                Serial3.println(status_b); // Send status to Serial3
                Serial.println(status_b); // Print status to Serial monitor
            }
        }
        delay(1000); // Wait for 1 second before the next loop iteration
    }
}
Funciones Detalladas del Código
-
Inclusión de Librerías
- Incluye la librería
HardwareSerialpara usar la funcionalidad de serie por hardware. - Incluye la librería
Seeed_Arduino_SSCMApara el control del módulo AI.
- Incluye la librería
-
Creación de Objeto Serial
HardwareSerial Serial3(1);
HardwareSerial atSerial(0);
Crea objetos Serial3 y atSerial para comunicación serie.
-
Creación de Objeto AI
SSCMA AI;Crea una instancia de la clase SSCMA para procesamiento AI.
-
Métricas de Rendimiento
Serial.print("perf: prepocess=");
Serial.print(AI.perf().prepocess);
Serial.print(", inference=");
Serial.print(AI.perf().inference);
Serial.print(", postpocess=");
Serial.println(AI.perf().postprocess);
Imprime las métricas de rendimiento de las etapas de procesamiento AI: preprocesamiento, inferencia y postprocesamiento.
-
Bucle de Cajas Detectadas
for (int i = 0; i < AI.boxes().size(); i++) {
    Serial.print("Box[");
    Serial.print(i);
    Serial.print("] target=");
    Serial.print(AI.boxes()[i].target);
    Serial.print(", score=");
    Serial.print(AI.boxes()[i].score);
    Serial.print(", x=");
    Serial.print(AI.boxes()[i].x);
    Serial.print(", y=");
    Serial.print(AI.boxes()[i].y);
    Serial.print(", w=");
    Serial.print(AI.boxes()[i].w);
    Serial.print(", h=");
    Serial.println(AI.boxes()[i].h);
}
Recorre las cajas detectadas e imprime sus detalles, incluyendo objetivo, puntuación y coordenadas del cuadro delimitador.
-
Bucle de Clases Detectadas
for (int i = 0; i < AI.classes().size(); i++) {
   Serial.print("Class[");
   Serial.print(i);
   Serial.print("] target=");
   Serial.println(AI.classes()[i].target);
Recorre las clases detectadas e imprime sus objetivos.
-
Definición de Macro
pinMode(enable_pin, OUTPUT); // Set the enable pin as an output
digitalWrite(enable_pin, LOW);
Define el pin de habilitación como D2.
-
Enviar Mensaje
// Check the target class and send corresponding status
if (AI.classes()[i].target == 0) {
    String status_a = "no people detected"; // Define status for no people detected
    Serial3.println(status_a); // Send status to Serial3
    Serial.println(status_a); // Print status to Serial monitor
} else if (AI.classes()[i].target == 1) {
    String status_b = "people detected"; // Define status for people detected
    Serial3.println(status_b); // Send status to Serial3
    Serial.println(status_b); // Print status to Serial monitor
}
Determina si se detecta una persona, si se detecta una persona se envía al receptor PEOPLE DETECTED, si no se detecta ninguna persona se envía al receptor NO PEOPLE DETECTED.
Código del Receptor
#include <HardwareSerial.h>

HardwareSerial Serial3(1); // Use UART2
#define enable_pin D2 // Define the enable pin as D2


void setup() {
  Serial.begin(115200); // Initialize the hardware serial with a baud rate of 115200
  Serial3.begin(115200, SERIAL_8N1, 7, 6); // Initialize Serial3 with 115200 baud rate, 8 data bits, no parity, 1 stop bit (RX=D4(GPIO4), TX=D5(GPIO5))

  // Wait for the hardware serial to be ready
  while(!Serial3);
  while(!Serial); // This line is generally unnecessary as Serial.begin() is ready immediately

  pinMode(enable_pin, OUTPUT); // Set the enable pin as an output
  digitalWrite(enable_pin, LOW); // Set the enable pin to low to enable the device
}

void loop() {
    delay(100); // Delay for 100 milliseconds
    // Check if there is data available from the hardware serial
    if (Serial3.available()) {
        String receivedData = Serial3.readStringUntil('\n'); // Read string until newline character
        Serial.print("Received data: "); // Print label for received data
        Serial.println(receivedData); // Directly print the received data
    }
}
Funciones Detalladas del Código
-
Inclusión de Biblioteca
- Incluir la biblioteca
HardwareSerialpara usar la funcionalidad de serie por hardware.
- Incluir la biblioteca
-
Creación de Objeto Serial
- Crear un objeto
Serial3usando UART2.
- Crear un objeto
-
Definición de Macro
pinMode(enable_pin, OUTPUT); // Set the enable pin as an output
digitalWrite(enable_pin, LOW);
Definir el pin de habilitación como D2.
-
Función Setup
Serial3.begin(115200, SERIAL_8N1, 7, 6);Inicializar el puerto serie principal y Serial3, configurando la velocidad de baudios, bits de datos, etc. Este es el puerto serie que se comunica con el vision ai v2 para transferir datos.
while(!Serial3);
while(!Serial);
Esperar a que todos los puertos serie estén listos, configurar el pin de habilitación como salida y ponerlo en bajo para habilitar el dispositivo.
-
Función Loop
if (Serial3.available());: Verificar cada 100 milisegundos si hay datos disponibles en Serial3.String receivedData = Serial3.readStringUntil('\n');: Si hay datos disponibles, leerlos hasta un carácter de nueva línea e imprimir los datos recibidos al puerto serie principal.
-
Imprimir resultados
Serial.print("Received data: ");
Serial.println(receivedData);
Imprimir el mensaje del remitente
Gráfico de Resultados
Sin embargo, la cámara enviará "people detected" cuando reconozca a una persona y "no people detected" cuando no reconozca a una persona, y el receptor mostrará el resultado del reconocimiento del remitente en el puerto serie.

Soporte Técnico y Discusión del Producto
¡Gracias por elegir nuestros productos! Estamos aquí para brindarle diferentes tipos de soporte para asegurar que su experiencia con nuestros productos sea lo más fluida posible. Ofrecemos varios canales de comunicación para satisfacer diferentes preferencias y necesidades.