Añade interacción por voz a tu robot LeKiwi con reSpeaker
Descripción general

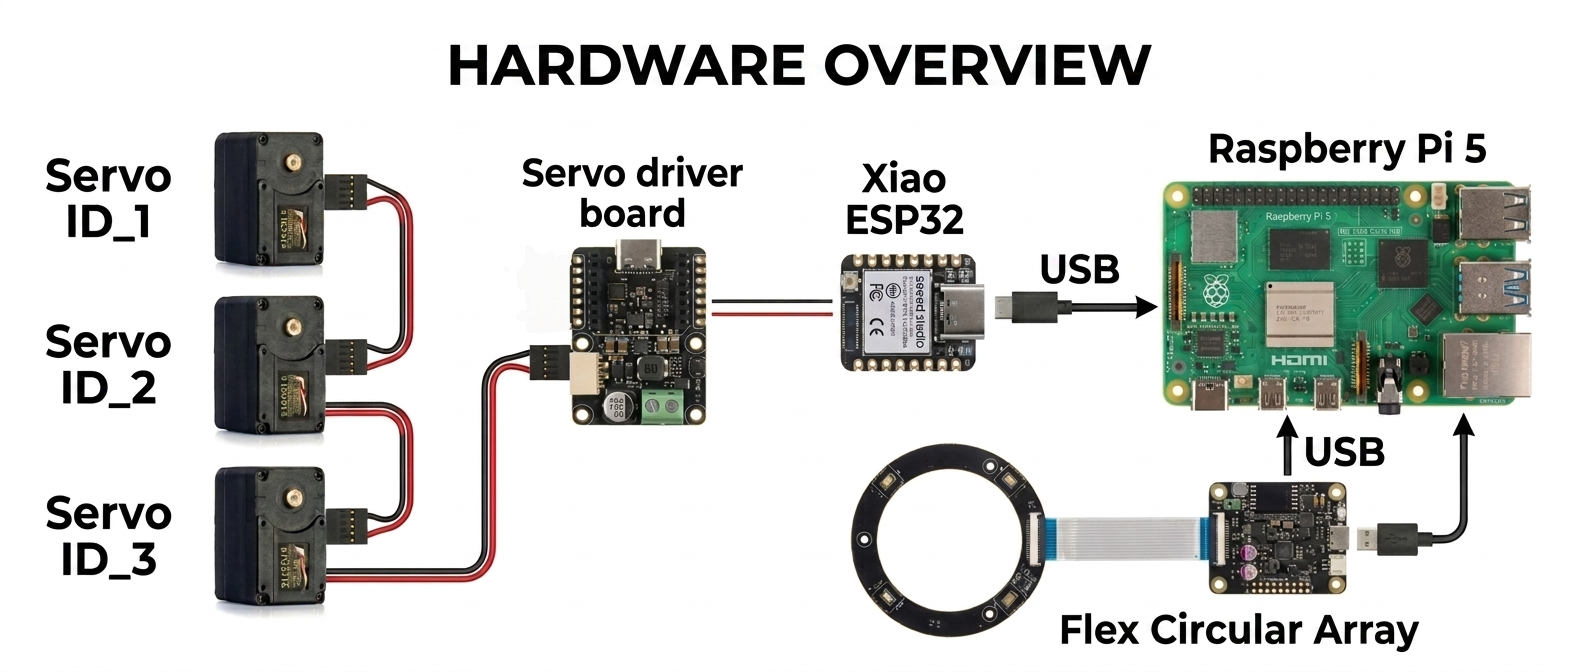
¡Controla un robot Kiwi-drive de 3 ruedas con tu voz! Este proyecto combina un Seeed Studio XIAO ESP32 (controlador de motor) con una Raspberry Pi (cerebro de procesamiento de voz), mejorado por el reSpeaker para una captura de audio de alta calidad y Voice Embeddings para una interacción por voz más inteligente y personalizada. Usando comandos en lenguaje natural, puedes conducir, girar y controlar el robot completamente manos libres con mayor precisión y capacidad de respuesta.
Hardware necesario
| Kit LeKiwi | XIAO ESP32S3 | Raaspberry pi 5 |
|---|---|---|
 |  |  |
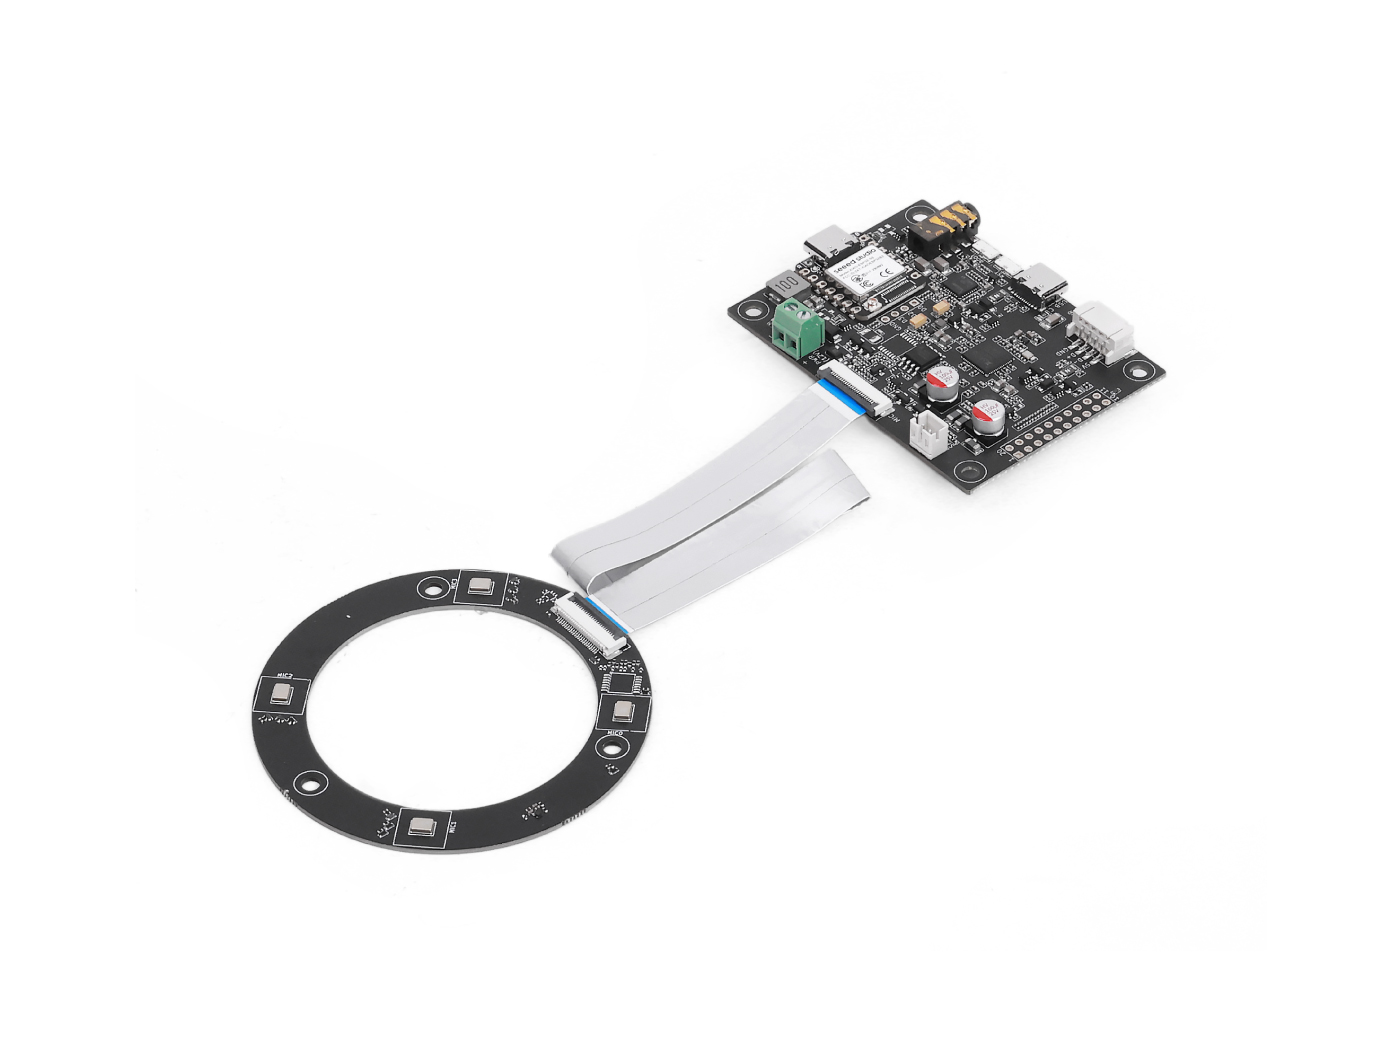
| reSpeaker Flex XVF3800 Circular | reSpeaker XVF3800 | |
|---|---|---|
 | O | 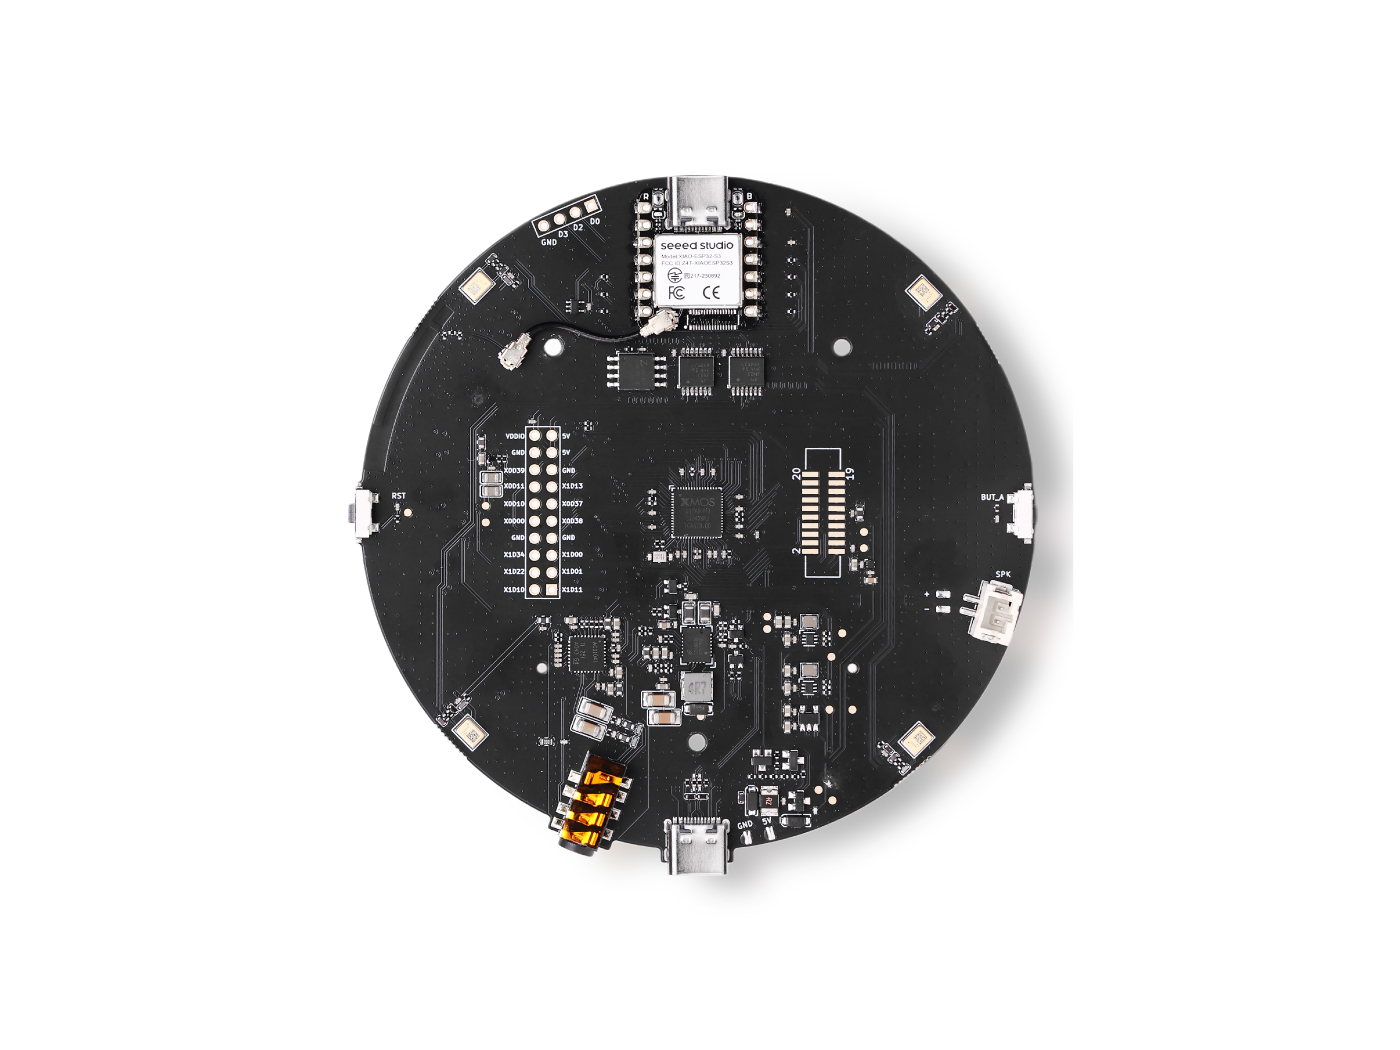 |
Servicios
- Groq cuenta: el nivel gratuito es suficiente para empezar
Cómo funciona
You speak → Wake word detected → Audio recorded → Whisper STT → LLaMA LLM → Orpheus TTS speaks back → ESP32 moves the robot
- Dices la palabra de activación (predeterminado: "Hey Jarvis")
- La Raspberry Pi graba tu comando
- Groq Whisper transcribe tu voz a texto
- LLaMA 3 decide qué acción debe realizar el robot
- Groq Orpheus TTS pronuncia una respuesta en voz alta
- Se envía un comando serie al ESP32, que acciona los motores
Preparar el XIAO ESP32 (controlador de motor)
El ESP32 ejecuta el sketch de Arduino que mueve físicamente las tres ruedas usando cinemática Kiwi-drive. Recibe comandos serie de un solo carácter (w, s, a, d, etc.) desde la Raspberry Pi y los traduce en velocidades de motor coordinadas.
Paso 1 — Configurar los ID de los motores
El sketch espera servos con ID 1, 2, 3. Antes de montar tu robot, conecta cada servo individualmente y asigna el ID correcto usando la herramienta de configuración de Feetech.
Paso 2 — Montar el LeKiwi
Sigue el vídeo tutorial oficial de Seeed Studio para montar el chasis, colocar las ruedas y cablear los servos:
Solo necesitas completar el montaje físico; omite cualquier paso sobre clonar el repositorio de GitHub de LeRobot, ya que este proyecto utiliza una configuración diferente.
Paso 3 — Cargar el sketch de Arduino
El sketch (lekiwi_motor_control.ino) hace lo siguiente:
- Inicializa los tres servos en modo de posición, los centra y luego cambia al modo rueda (rotación continua)
- Escucha en el puerto serie USB comandos de un solo carácter
- Usa cinemática Kiwi-drive para calcular la velocidad correcta para cada rueda
- Solo admite modo empuje (impulso corto y luego parada automática) Referencia de comandos serie:
| Tecla | Acción |
|---|---|
w | Empuje hacia delante |
s | Empuje hacia atrás |
a | Empuje giro a la izquierda |
d | Empuje giro a la derecha |
q | Empuje desplazamiento lateral a la izquierda |
e | Empuje desplazamiento lateral a la derecha |
x / Espacio | Parada de emergencia |
+ / - | Aumentar / disminuir la duración del empuje |
* / / | Aumentar / disminuir la velocidad del empuje |
Carga el sketch mediante el IDE de Arduino con la biblioteca SCServo instalada. Abre el Monitor Serie a 115200 baudios para verificar que los tres servos respondan con OK.
Código de Arduino
#include <SCServo.h>
#include <math.h>

// Serial port selection
#if defined(CONFIG_IDF_TARGET_ESP32C3) || \
    defined(CONFIG_IDF_TARGET_ESP32C6) || \
    defined(CONFIG_IDF_TARGET_ESP32S3)
  #define COMSerial Serial0
#else
  #define COMSerial Serial1
#endif

#define S_RXD D7
#define S_TXD D6

SMS_STS st;
#define SERVO_NUM 3
byte ID[SERVO_NUM] = {1, 2, 3};

// Kiwi drive wheel angles (90°, 210°, 330°)
const float WHEEL_ANGLE_DEG[SERVO_NUM] = {90.0f, 210.0f, 330.0f};

// Base speed (0-3000 for STS3215 in wheel mode)
int BASE_SPEED = 1000;

// Nudge parameters
int NUDGE_DURATION = 1500;  // milliseconds to move
int NUDGE_SPEED = 800;     // speed during nudge

#define REG_OPERATING_MODE 33

void enableWheelMode(byte servoID) {
  // Unlock EEPROM
  st.unLockEprom(servoID);
  delay(10);

  // Set wheel mode (value 1 for continuous rotation mode)
  st.writeByte(servoID, REG_OPERATING_MODE, 1);
  delay(10);

  // Lock EEPROM
  st.LockEprom(servoID);
  delay(10);

  // IMPORTANT: Enable torque after mode change
  st.EnableTorque(servoID, 1);
  delay(10);

  Serial.print("Servo "); Serial.print(servoID);
  Serial.println(" configured for wheel mode with torque enabled");
}

void setWheelSpeeds(float vx, float vy, float omega) {
  for (int i = 0; i < SERVO_NUM; i++) {
    float rad = WHEEL_ANGLE_DEG[i] * (PI / 180.0f);

    // Kiwi kinematics formula
    float speed = -sin(rad) * vx + cos(rad) * vy + omega;

    // Scale to servo speed range (-3000 to +3000)
    int spdInt = (int)(speed * BASE_SPEED);

    // Clamp to valid range
    if (spdInt > 3000) spdInt = 3000;
    if (spdInt < -3000) spdInt = -3000;

    // WriteSpe expects (id, speed) - only 2 parameters!
    st.WriteSpe(ID[i], spdInt);
  }
}

void nudgeRobot(float vx, float vy, float omega) {
  // Calculate temporary speeds using nudge speed instead of base speed
  int originalBaseSpeed = BASE_SPEED;
  BASE_SPEED = NUDGE_SPEED;

  // Apply movement
  setWheelSpeeds(vx, vy, omega);

  // Wait for nudge duration
  delay(NUDGE_DURATION);

  // Stop all motors
  stopAll();

  // Restore original base speed
  BASE_SPEED = originalBaseSpeed;
}

void stopAll() {
  for (int i = 0; i < SERVO_NUM; i++) {
    st.WriteSpe(ID[i], 0);
  }
  Serial.println("Motors stopped");
}

void initializeServosToPositionMode() {
  Serial.println(F("Setting servos to position mode for initial positioning..."));

  for (int i = 0; i < SERVO_NUM; i++) {
    // Unlock EEPROM
    st.unLockEprom(ID[i]);
    delay(10);

    // Set position mode (value 0)
    st.writeByte(ID[i], REG_OPERATING_MODE, 0);
    delay(10);

    // Lock EEPROM
    st.LockEprom(ID[i]);
    delay(10);

    // Enable torque
    st.EnableTorque(ID[i], 1);
    delay(10);
  }

  delay(500);

  Serial.println(F("Moving all servos to center position (2048)..."));

  // Move all servos to center position
  u16 Speed[SERVO_NUM] = {1500, 1500, 1500};
  byte ACC[SERVO_NUM] = {50, 50, 50};
  s16 Pos[SERVO_NUM] = {2048, 2048, 2048};

  st.SyncWritePosEx(ID, SERVO_NUM, Pos, Speed, ACC);
  delay(2000); // Wait for movement to complete

  Serial.println(F("Servos positioned. Switching to wheel mode..."));

  // Now switch to wheel mode
  for (int i = 0; i < SERVO_NUM; i++) {
    enableWheelMode(ID[i]);
    delay(50);
  }
}

void printHelp() {
  Serial.println(F("\n====== LeKiwi Nudge Control ======"));
  Serial.println(F("Each key press gives a short 'nudge' movement"));
  Serial.println(F(" w = Forward nudge"));
  Serial.println(F(" s = Backward nudge"));
  Serial.println(F(" a = Turn LEFT nudge"));
  Serial.println(F(" d = Turn RIGHT nudge"));
  Serial.println(F(" q = Strafe LEFT nudge"));
  Serial.println(F(" e = Strafe RIGHT nudge"));
  Serial.println(F(" x = STOP (emergency)"));
  Serial.println(F(""));
  Serial.println(F("Continuous movement mode:"));
  Serial.println(F(" SHIFT + key = Continuous movement"));
  Serial.println(F(" Example: Press 'W' (uppercase) = continuous forward"));
  Serial.println(F(""));
  Serial.println(F("Settings:"));
  Serial.println(F(" + = Increase nudge duration"));
  Serial.println(F(" - = Decrease nudge duration"));
  Serial.println(F(" * = Increase nudge speed"));
  Serial.println(F(" / = Decrease nudge speed"));
  Serial.println(F(" ? = Show this help"));
  Serial.println(F(""));
  Serial.print(F("Current nudge duration: "));
  Serial.print(NUDGE_DURATION);
  Serial.println(F(" ms"));
  Serial.print(F("Current nudge speed: "));
  Serial.println(NUDGE_SPEED);
  Serial.println(F("==================================="));
}

void setup() {
  Serial.begin(115200);
  delay(1500);
  Serial.println(F("LeKiwi Nudge Control boot..."));

  // Start servo bus with explicit pins
  COMSerial.begin(1000000, SERIAL_8N1, S_RXD, S_TXD);
  st.pSerial = &COMSerial;
  delay(500);

  Serial.println(F("Checking servos..."));
  bool allServosFound = true;

  for (int i = 0; i < SERVO_NUM; i++) {
    if (st.Ping(ID[i]) != -1) {
      Serial.print(F("Servo "));
      Serial.print(ID[i]);
      Serial.println(F(" OK"));
    } else {
      Serial.print(F("ERROR: Servo "));
      Serial.print(ID[i]);
      Serial.println(F(" not found!"));
      allServosFound = false;
    }
    delay(100);
  }

  if (!allServosFound) {
    Serial.println(F("Some servos not found. Check connections and power!"));
    while(1) { delay(1000); } // Halt if servos not found
  }

  // Initialize servos to center position, then switch to wheel mode
  initializeServosToPositionMode();

  Serial.println(F("\nSystem ready! Press keys for nudge movement."));
  Serial.println(F("(Each key press moves the robot a short distance)\n"));

  printHelp();
}

void loop() {
  if (!Serial.available()) return;

  char cmd = (char)Serial.read();
  bool isShifted = false;

  // Check for uppercase (SHIFT key in terminal)
  if (cmd >= 'A' && cmd <= 'Z') {
    isShifted = true;
  }

  // Flush any trailing characters
  while (Serial.available() && (Serial.peek() == '\n' || Serial.peek() == '\r')) {
    Serial.read();
  }

  // Process movement commands
  switch (cmd) {
    case 'w':
      if (isShifted) {
        setWheelSpeeds(0, 1, 0);
        Serial.println(F("Continuous Forward"));
      } else {
        Serial.println(F("Nudge Forward"));
        nudgeRobot(0, 1, 0);
      }
      break;

    case 's':
      if (isShifted) {
        setWheelSpeeds(0, -1, 0);
        Serial.println(F("Continuous Backward"));
      } else {
        Serial.println(F("Nudge Backward"));
        nudgeRobot(0, -1, 0);
      }
      break;

    case 'q':
      if (isShifted) {
        setWheelSpeeds(-1, 0, 0);
        Serial.println(F("Continuous Strafe Left"));
      } else {
        Serial.println(F("Nudge Strafe Left"));
        nudgeRobot(-1, 0, 0);
      }
      break;

    case 'e':
      if (isShifted) {
        setWheelSpeeds(1, 0, 0);
        Serial.println(F("Continuous Strafe Right"));
      } else {
        Serial.println(F("Nudge Strafe Right"));
        nudgeRobot(1, 0, 0);
      }
      break;

    case 'a':
      if (isShifted) {
        setWheelSpeeds(0, 0, 1);
        Serial.println(F("Continuous Turn Left"));
      } else {
        Serial.println(F("Nudge Turn Left"));
        nudgeRobot(0, 0, 1);
      }
      break;

    case 'd':
      if (isShifted) {
        setWheelSpeeds(0, 0, -1);
        Serial.println(F("Continuous Turn Right"));
      } else {
        Serial.println(F("Nudge Turn Right"));
        nudgeRobot(0, 0, -1);
      }
      break;

    case 'x': case 'X': case ' ':
      stopAll();
      Serial.println(F("Emergency Stop"));
      break;

    case '+':
      NUDGE_DURATION = min(NUDGE_DURATION + 50, 1000);
      Serial.print(F("Nudge duration: "));
      Serial.print(NUDGE_DURATION);
      Serial.println(F(" ms"));
      break;

    case '-':
      NUDGE_DURATION = max(NUDGE_DURATION - 50, 50);
      Serial.print(F("Nudge duration: "));
      Serial.print(NUDGE_DURATION);
      Serial.println(F(" ms"));
      break;

    case '*':
      NUDGE_SPEED = min(NUDGE_SPEED + 100, 2000);
      Serial.print(F("Nudge speed: "));
      Serial.println(NUDGE_SPEED);
      break;

    case '/':
      NUDGE_SPEED = max(NUDGE_SPEED - 100, 200);
      Serial.print(F("Nudge speed: "));
      Serial.println(NUDGE_SPEED);
      break;

    case '?':
      printHelp();
      break;
  }
}
Preparar la Raspberry Pi (Cerebro de Voz)
Paso 1 — Obtén una clave de API de Groq
- Regístrate en console.groq.com
- Crea una nueva clave de API y cópiala — la necesitarás en el Paso 4
Paso 2 — Clona este repositorio
git clone https://github.com/KasunThushara/Lekiwi-voice
cd Lekiwi-voice
Paso 3 — Crea un entorno virtual
python3 -m venv venv
source venv/bin/activate
Ejecuta
source venv/bin/activatecada vez que abras una nueva terminal antes de usar este proyecto.
Paso 4 — Instala las dependencias
pip install -r requirements.txt
Luego descarga el modelo de palabra de activación:
python3 download_model.py
Esto descarga el modelo preentrenado "Hey Jarvis" (y otros) desde openwakeword en ~/.openwakeword/.
Paso 5 — Encuentra el índice de tu micrófono
Conecta tu reSpeaker por USB y luego ejecuta:
python3 list_mics.py
Verás una lista como:
Available audio INPUT devices:

  [0] bcm2835 Headphones  (rate=44100Hz)
  [1] ReSpeaker 4 Mic Array  (rate=16000Hz)
  [2] USB PnP Sound Device  (rate=16000Hz)
Anota el número entre corchetes junto a tu ReSpeaker — ese es tu MIC_INDEX.
Paso 6 — Encuentra el puerto serie de tu ESP32
Conecta el XIAO ESP32 a la Pi por USB y luego ejecuta:
python3 list_ports.py
Salida de ejemplo:
Available serial ports:

  /dev/ttyACM0         USB Serial Device
  /dev/ttyUSB0         CP2102 USB to UART Bridge
Anota la ruta del dispositivo (normalmente /dev/ttyACM0 para XIAO).
Paso 7 — Configura el proyecto
Copia la configuración de ejemplo y completa tus valores:
cp config.env.example config.env
nano config.env
Los ajustes clave que debes actualizar:
# Your Groq API key (required)
GROQ_API_KEY=gsk_xxxxxxxxxxxxxxxxxxxxxxxx

# The number from list_mics.py
MIC_INDEX=1

# The port from list_ports.py
SERIAL_PORT=/dev/ttyACM0
Todo lo demás se puede dejar con su valor predeterminado para comenzar.
Ejecutar el robot
Asegúrate de que tu entorno virtual esté activo y luego:
python3 pipeline.py
Deberías ver:
======================================================
  LeKiwi Voice Controller — Ready
  Wake word  : hey jarvis
  LLM model  : llama-3.1-8b-instant
  STT model  : whisper-large-v3-turbo
  TTS voice  : autumn
  Serial     : /dev/ttyACM0 @ 115200
======================================================
[WakeWord] Listening for 'hey jarvis' ...
Ahora di "Hey Jarvis" y da una orden de movimiento.
Comandos de ejemplo
"Hey Jarvis, move forward"
"Hey Jarvis, turn left"
"Hey Jarvis, strafe right"
"Hey Jarvis, stop"
"Hey Jarvis, what can you do?"
Soporte técnico y debate sobre el producto
Gracias por elegir nuestros productos. Estamos aquí para ofrecerte diferentes tipos de soporte y garantizar que tu experiencia con nuestros productos sea lo más fluida posible. Ofrecemos varios canales de comunicación para adaptarnos a distintas preferencias y necesidades.