Control de Voz para Hogar Inteligente con Home Assistant
Descripción General
Habla con espacios inteligentes con el nuevo ReSpeaker XMOS XVF3800 con XIAO ESP32S3 enciende las luces, sube el volumen de la música, o incluso pregunta sobre el clima usando la voz
En este capítulo usaremos el ReSpeaker XMOS XVF3800 con XIAO ESP32S3 HA Voice Assistant para conectar el interruptor inteligente Sonoff y realizar control de voz del interruptor de luz.
Hardware Requerido
| ReSpeaker XVF3800 con XIAO ESP32S3 | Dispositivo Home Assistant | Sonoff BASICR2 |
|---|---|---|
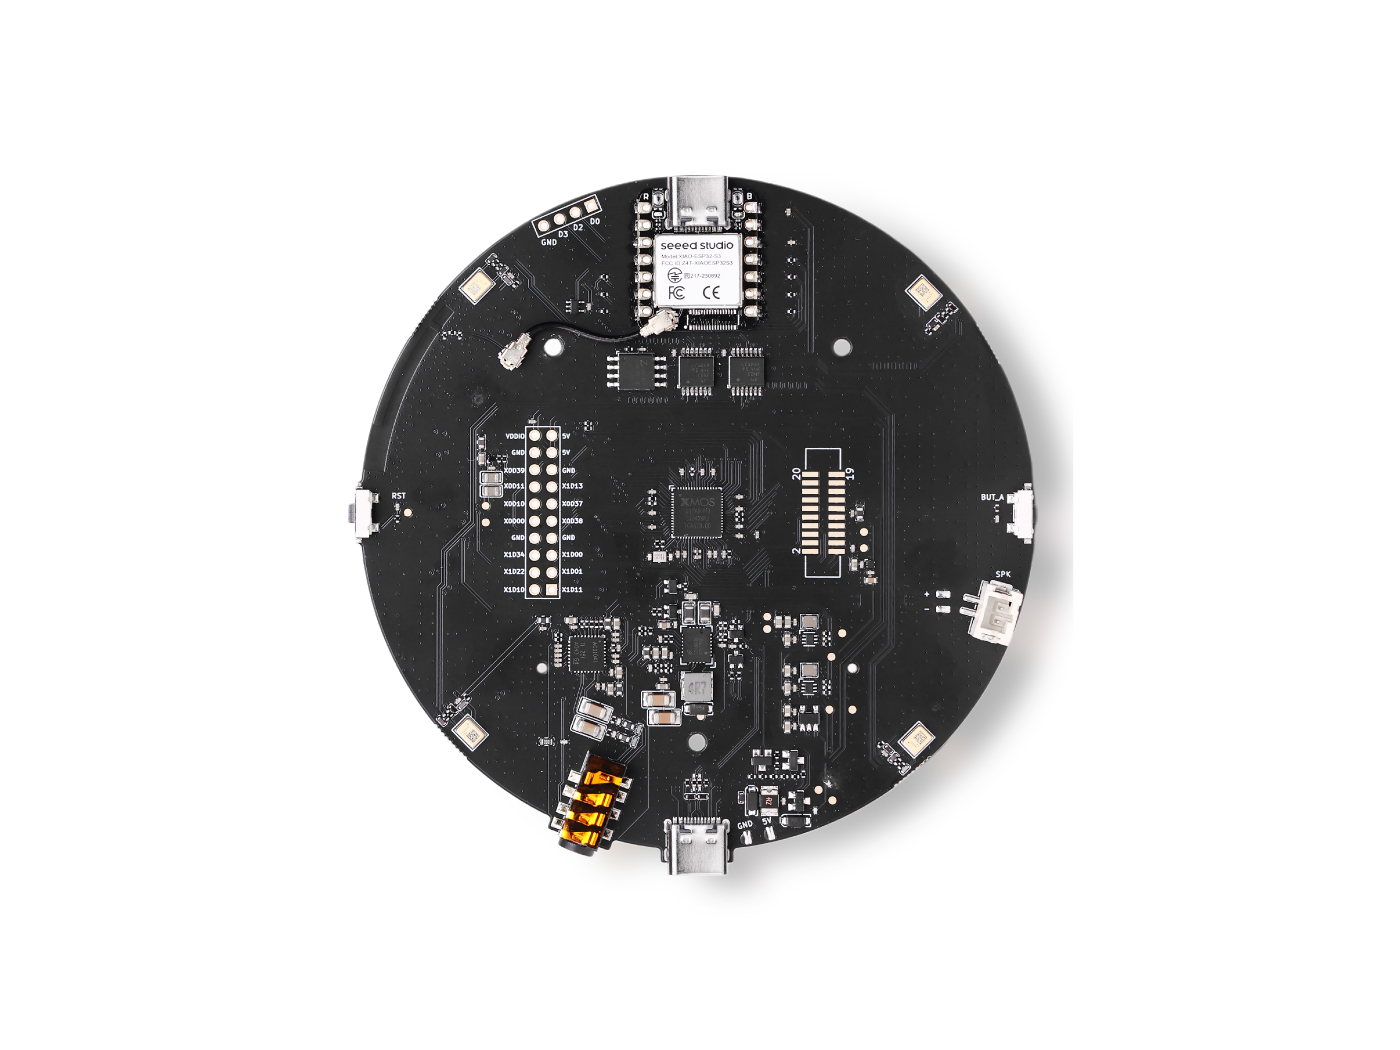 |  |  |
Actualización de Firmware
Para obtener la mejor experiencia de reproducción, necesitamos actualizar el firmware XMOS a Descarga el firmware desde aquí. En tu computadora, conecta el ReSpeaker XMOS XVF3800 con XIAO ESP32S3 y ejecuta el en nuestra guía:
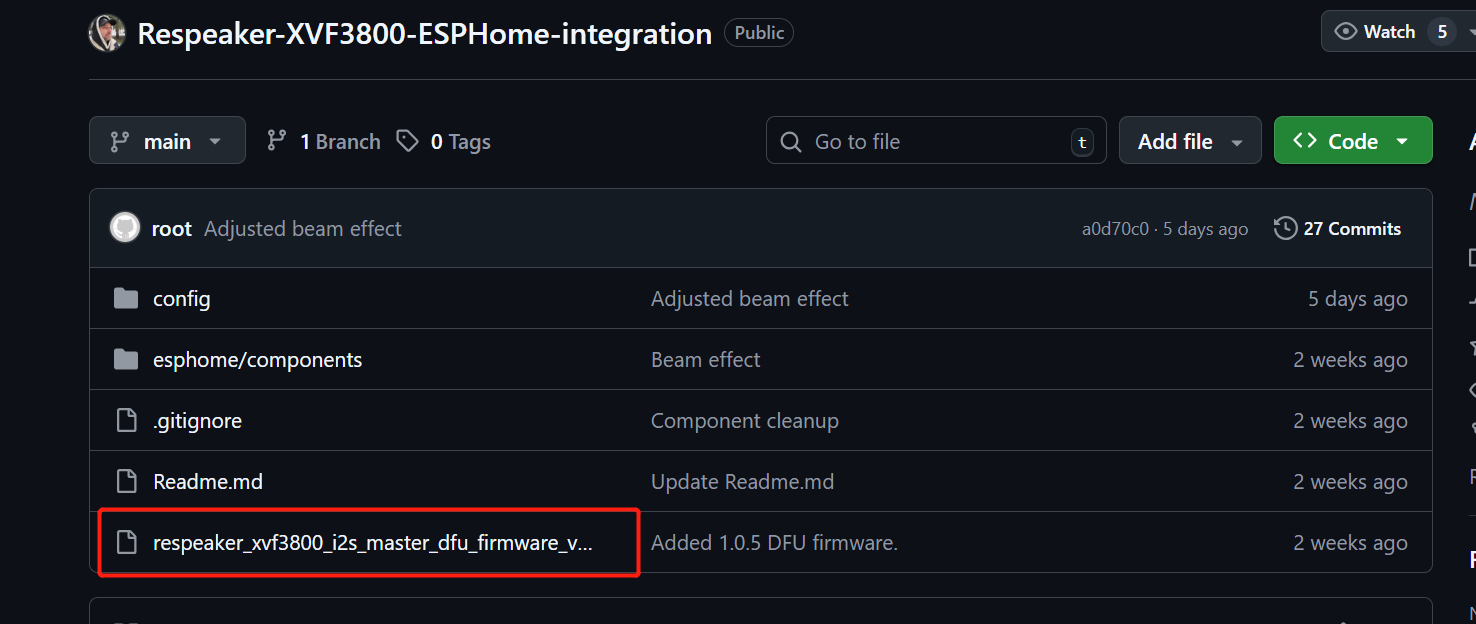
El arreglo de micrófonos XVF3800 necesita un MCLK de 12.288 MHz para funcionar, pero ESPHome (usado en Home Assistant) no puede generarlo debido a limitaciones del API. Este firmware hace que el XVF3800 actúe como el maestro I2S en su lugar, para que pueda generar sus propios relojes sin necesitar MCLK del ESP32. Nuestro firmware soluciona esta limitación, por lo que el micrófono funciona correctamente con Home Assistant.
Puedes descargar el Firmware desde Aquí
La guía de instalación está Aquí
Preparar ReSpeaker XMOS XVF3800 con XIAO ESP32S3
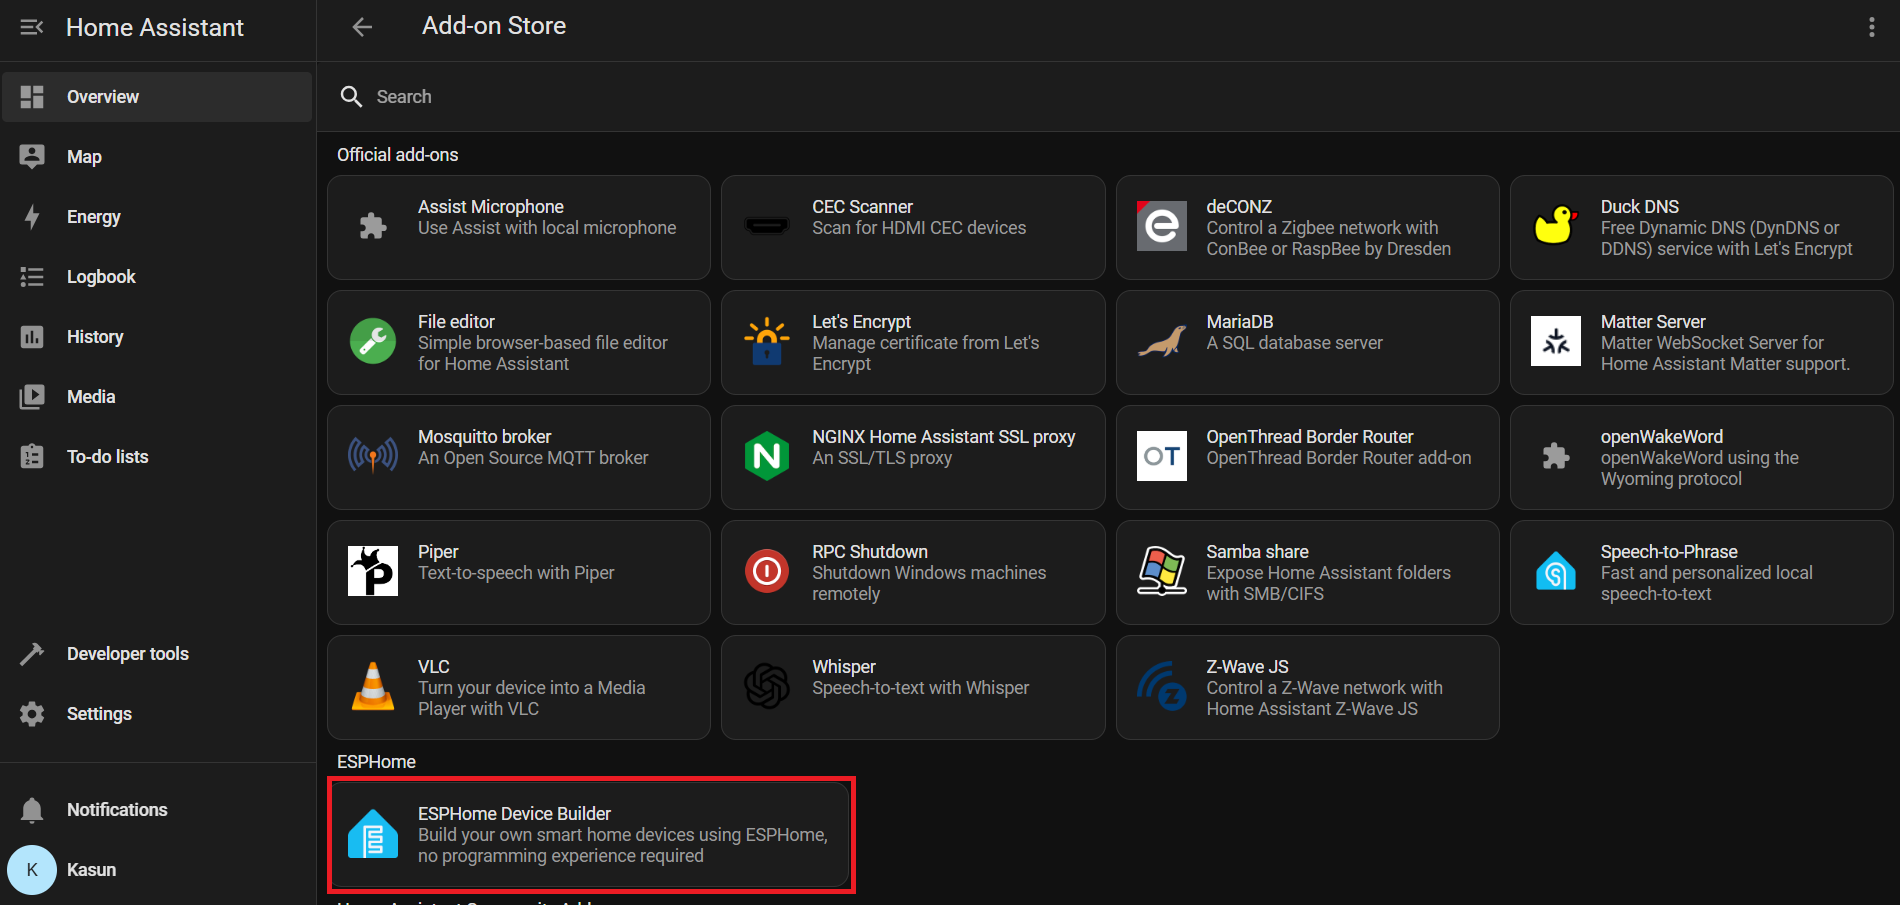
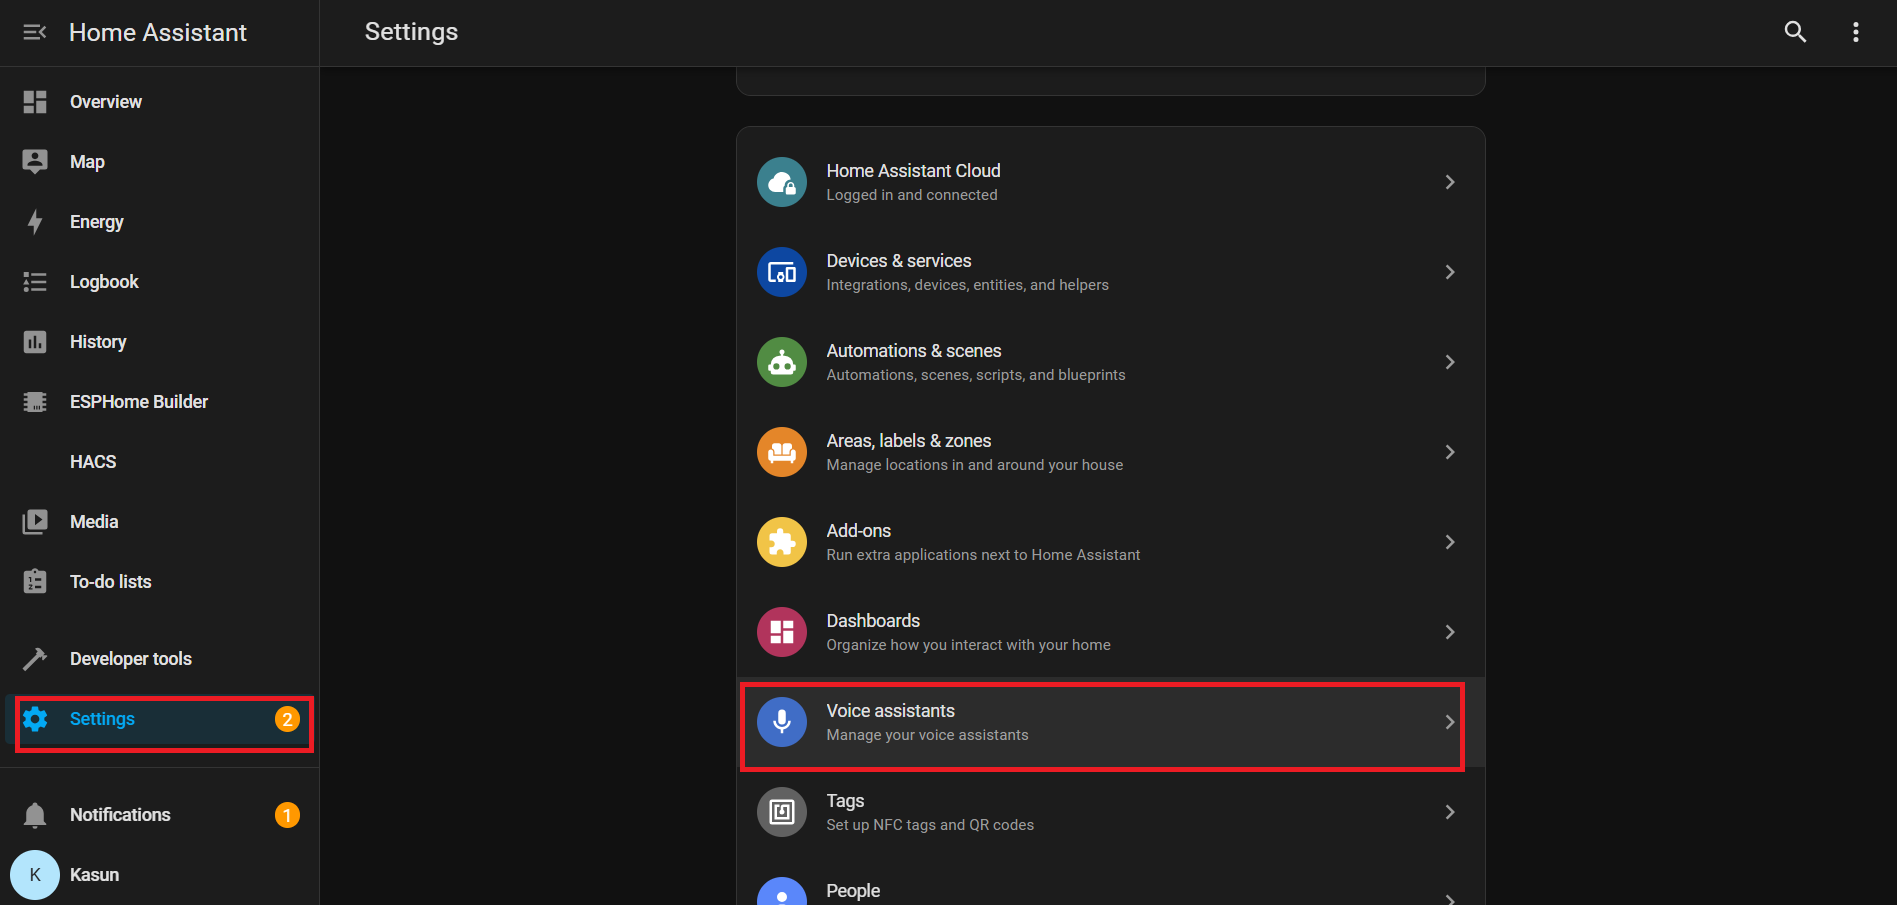
Ve a Home Assistant > Configuración > Complementos.
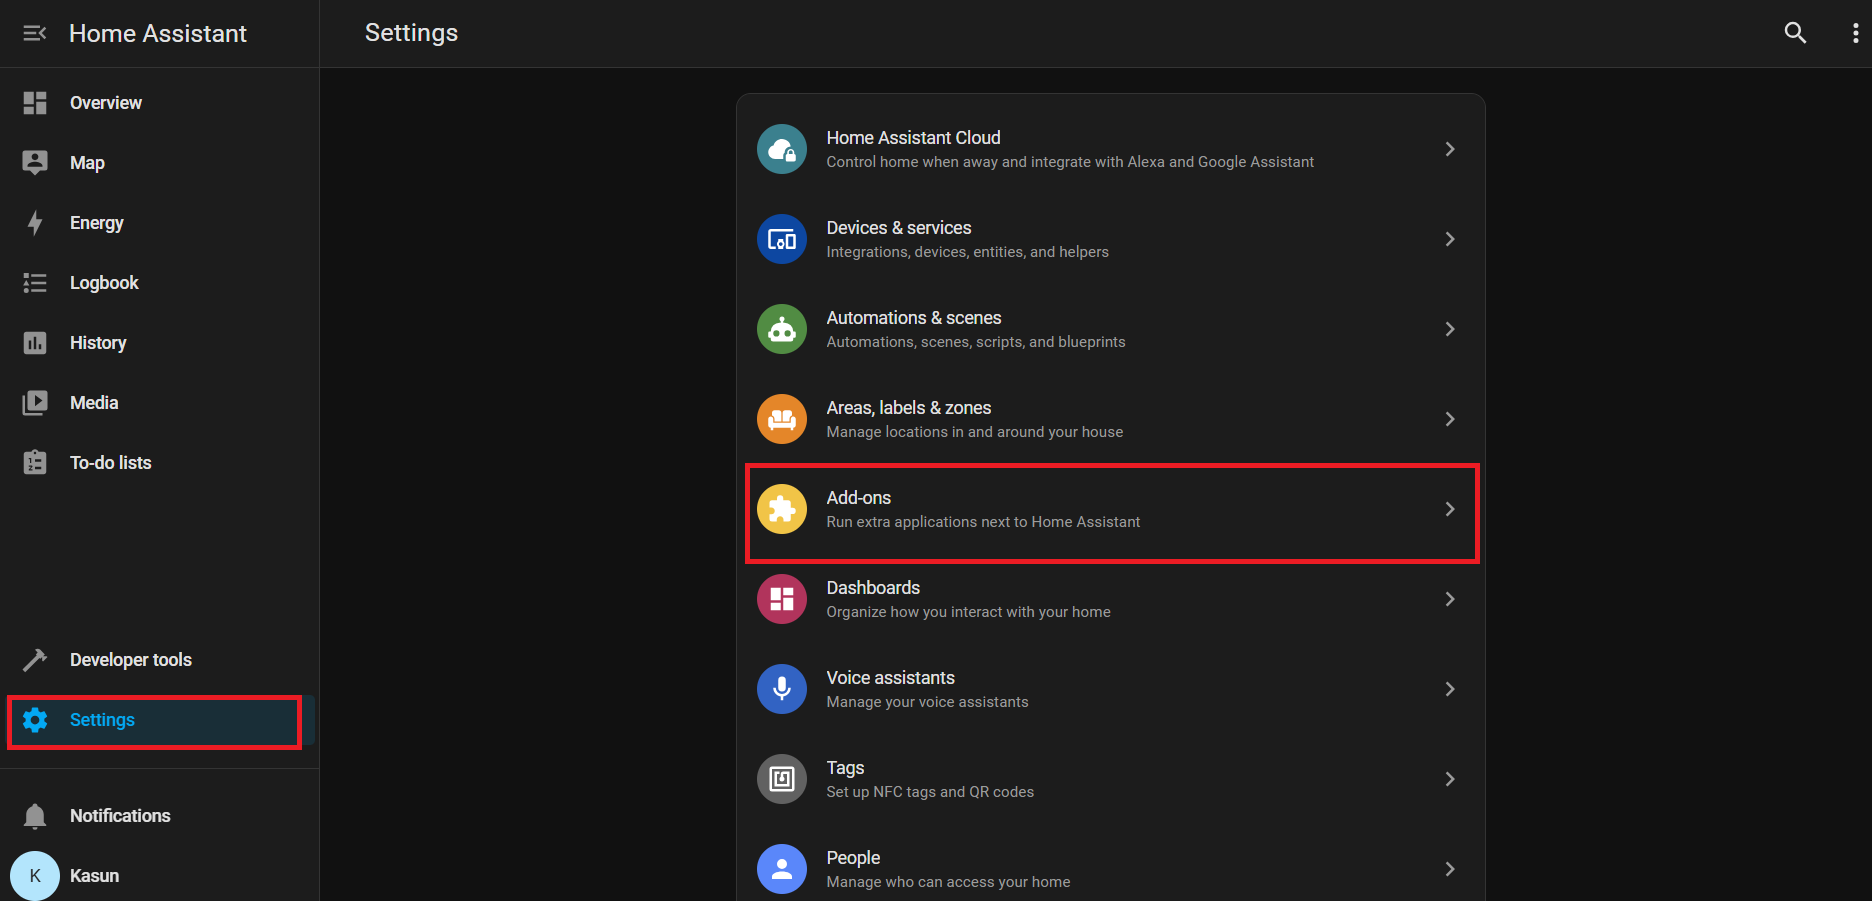
Haz clic en Tienda de Complementos (generalmente en la parte inferior derecha)
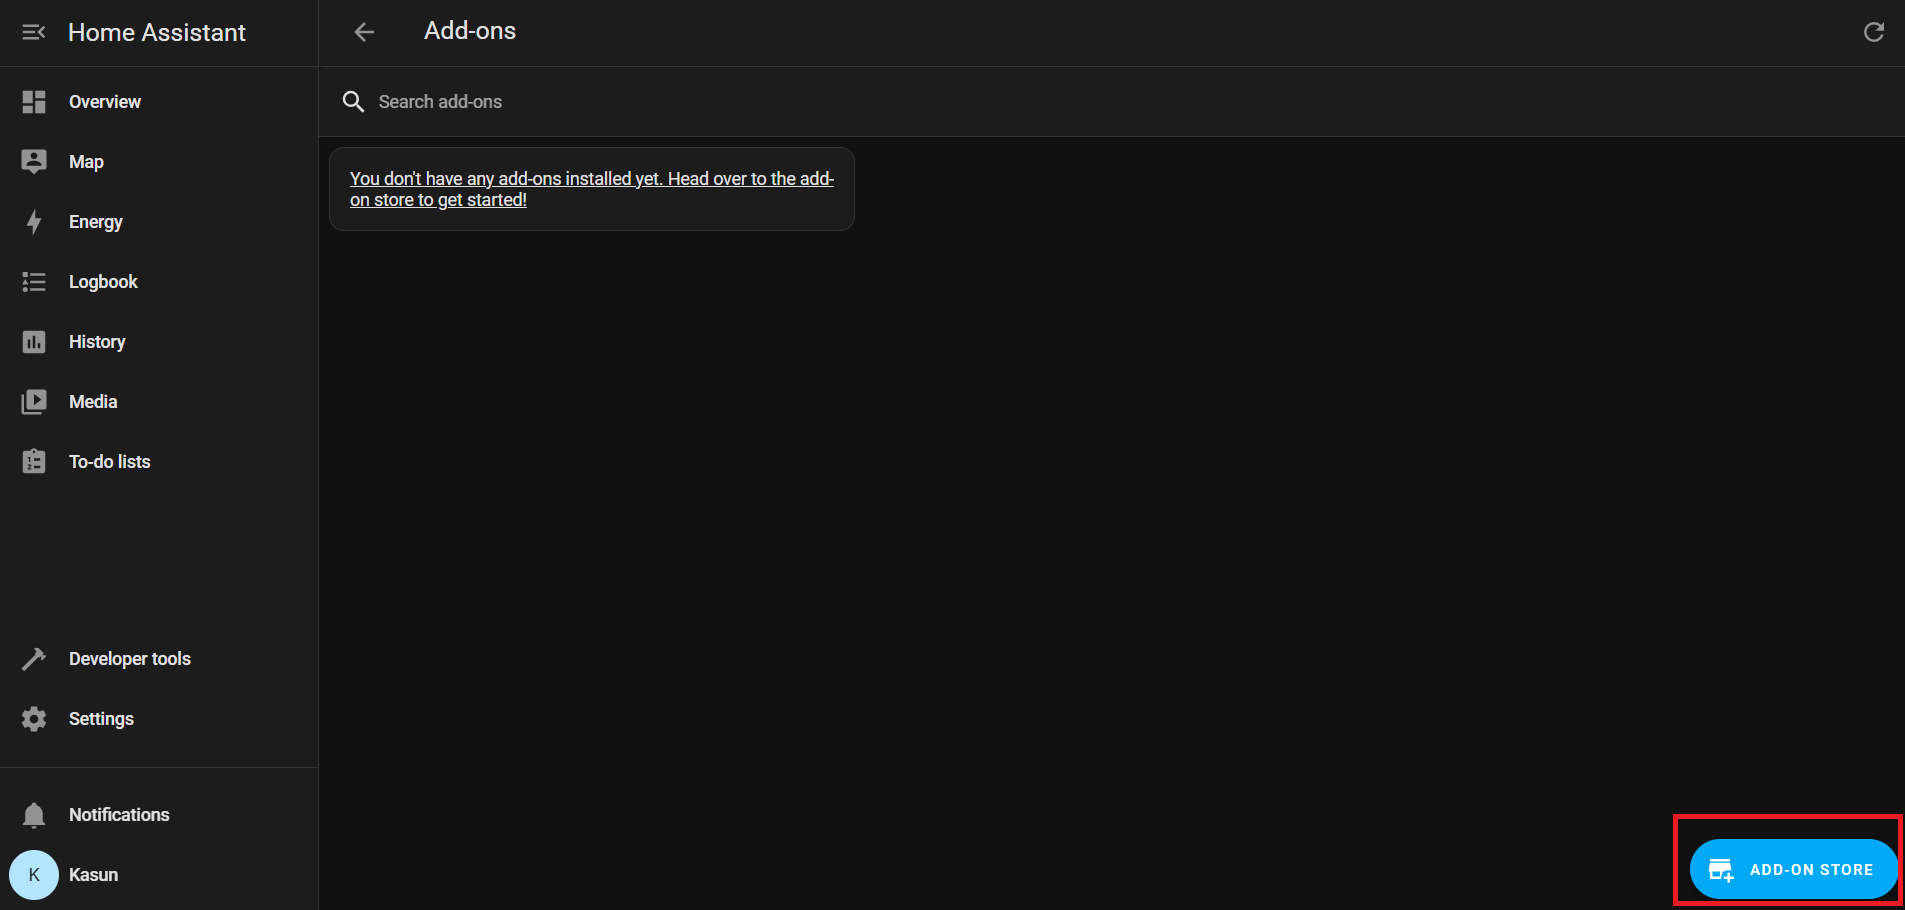
Bajo Complementos oficiales, busca e instala ESPHome Device Builder.
Después de la instalación, haz clic en Iniciar para ejecutar el complemento ESPHome.
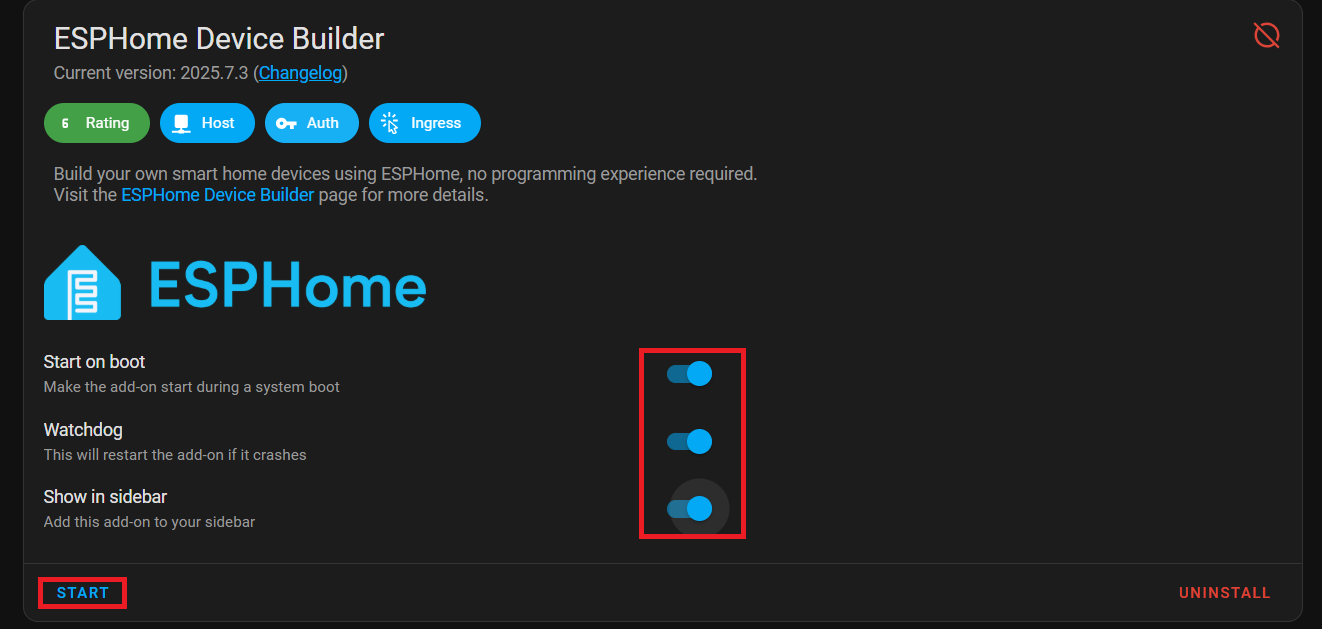
Habilita Iniciar al arrancar, Watchdog y Mostrar en la barra lateral para un acceso más fácil.
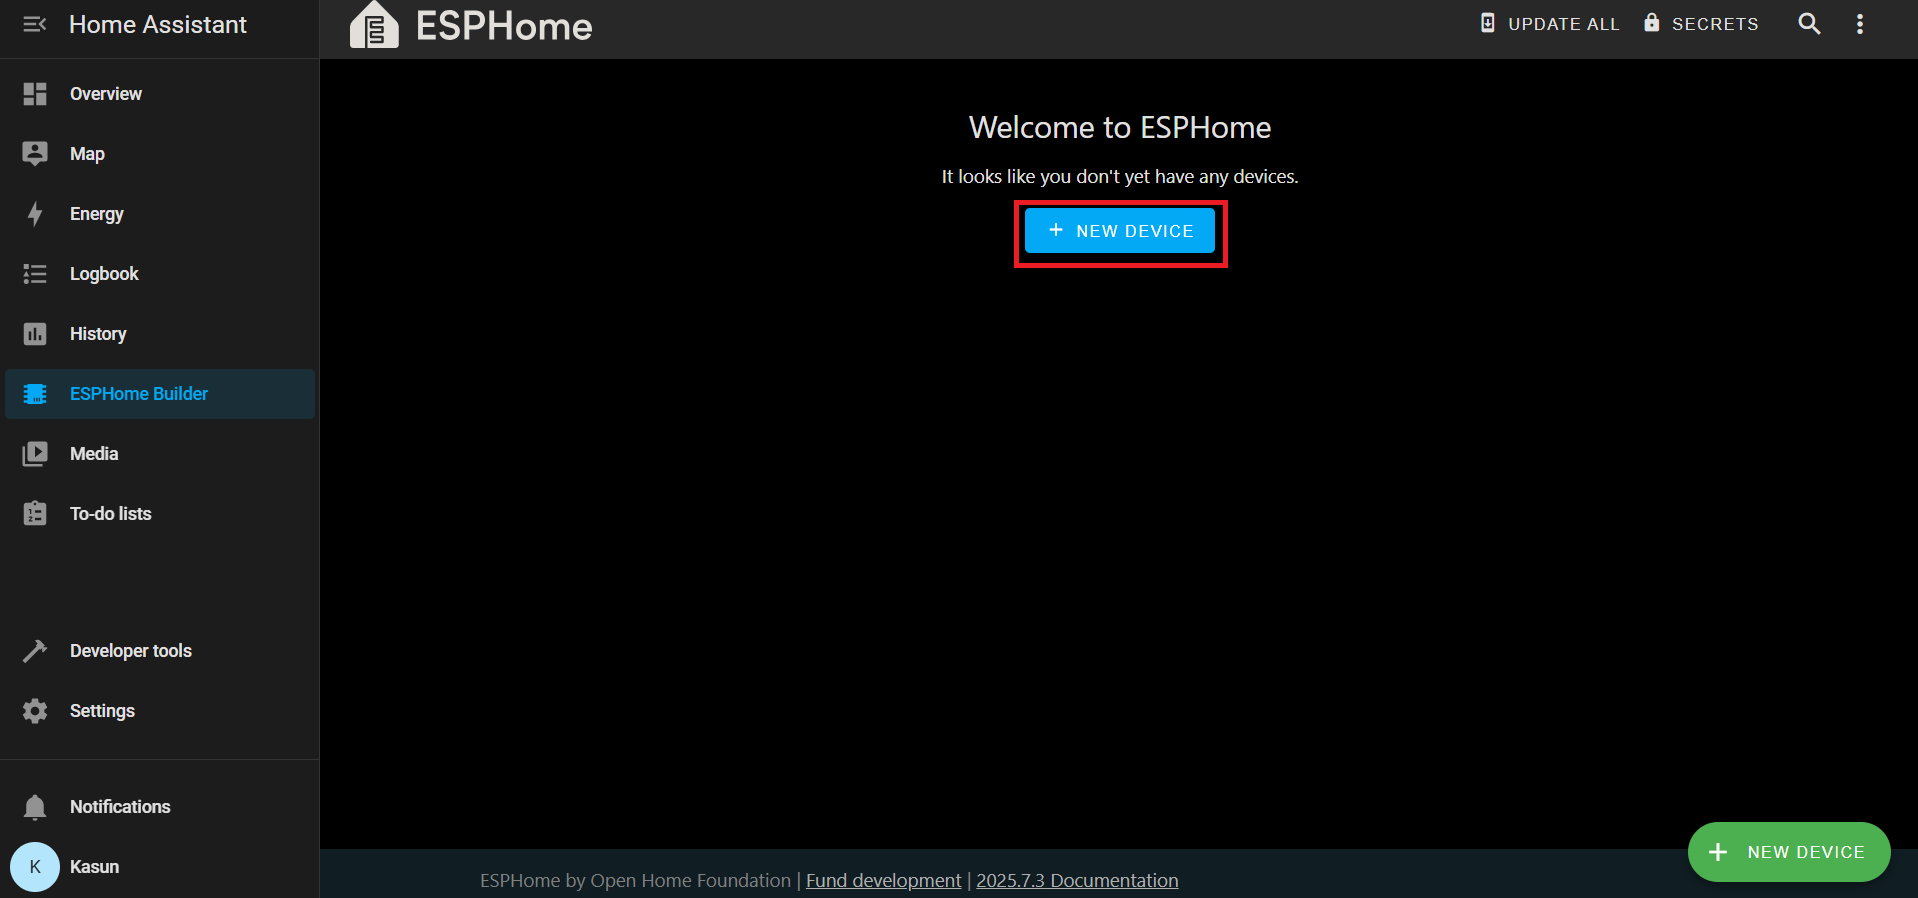
Desde la barra lateral de Home Assistant, ve a ESPHome Builder.
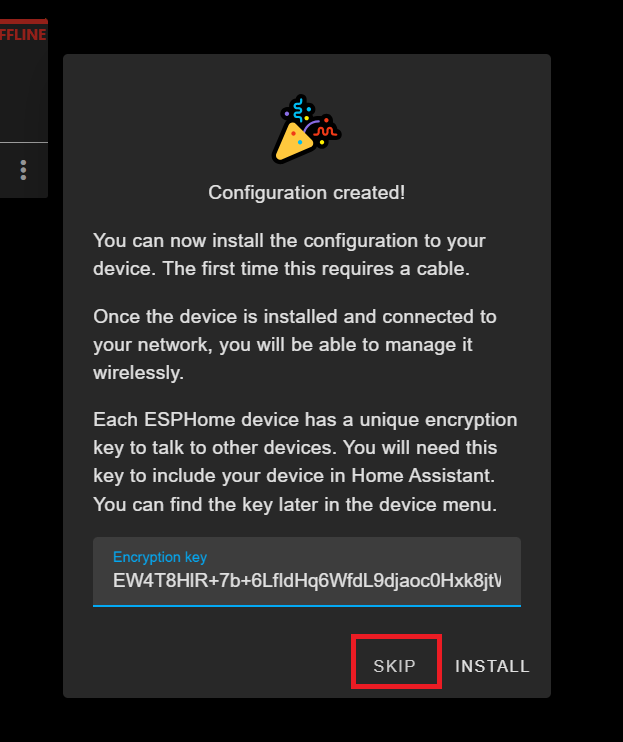
Haz clic en + NUEVO DISPOSITIVO.
Cuando se te solicite, haz clic en OMITIR – crearemos la configuración manualmente.
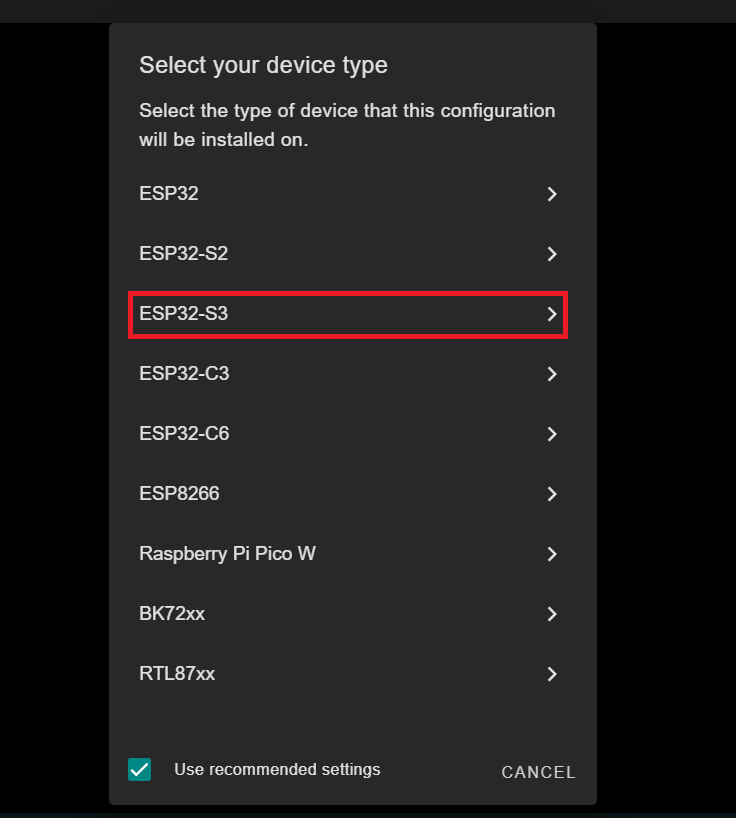
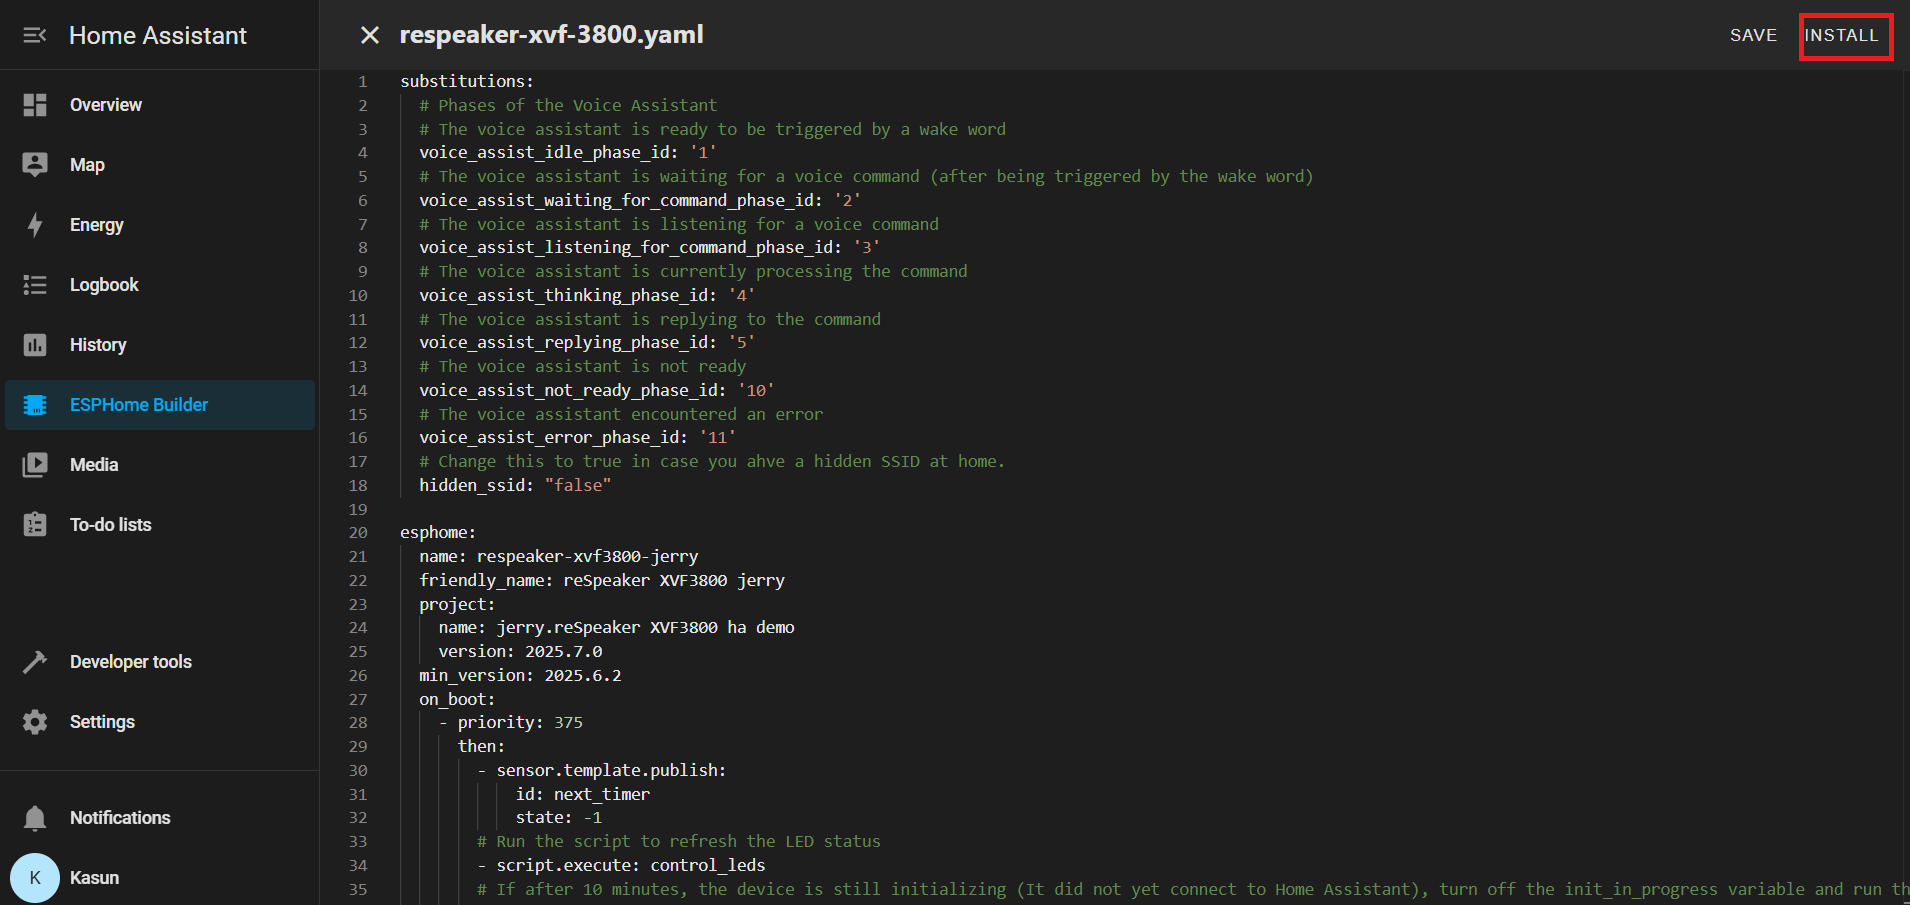
Selecciona tu nueva entrada de dispositivo y haz clic en EDITAR.

Reemplaza el contenido con tu configuración YAML personalizada
Puedes encontrar el archivo YAML desde Aquí
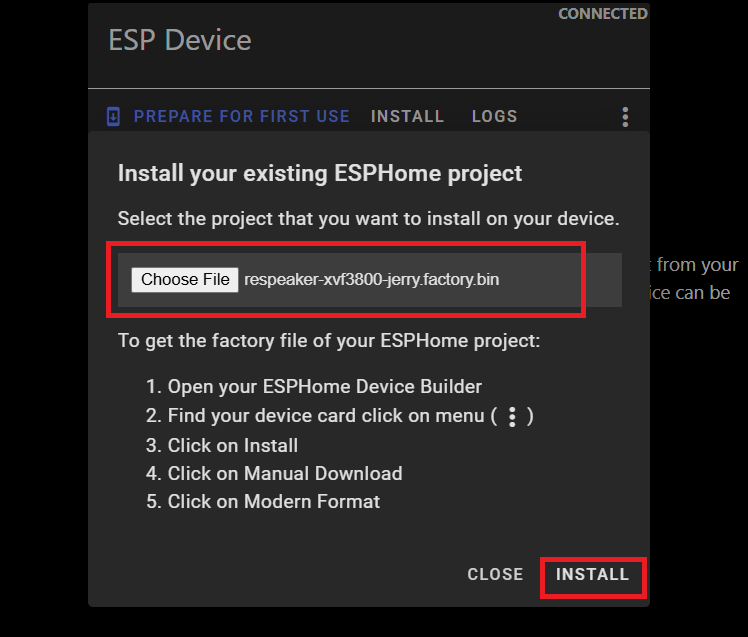
Una vez que tu YAML esté guardado, haz clic en INSTALAR.
Elige Descarga Manual
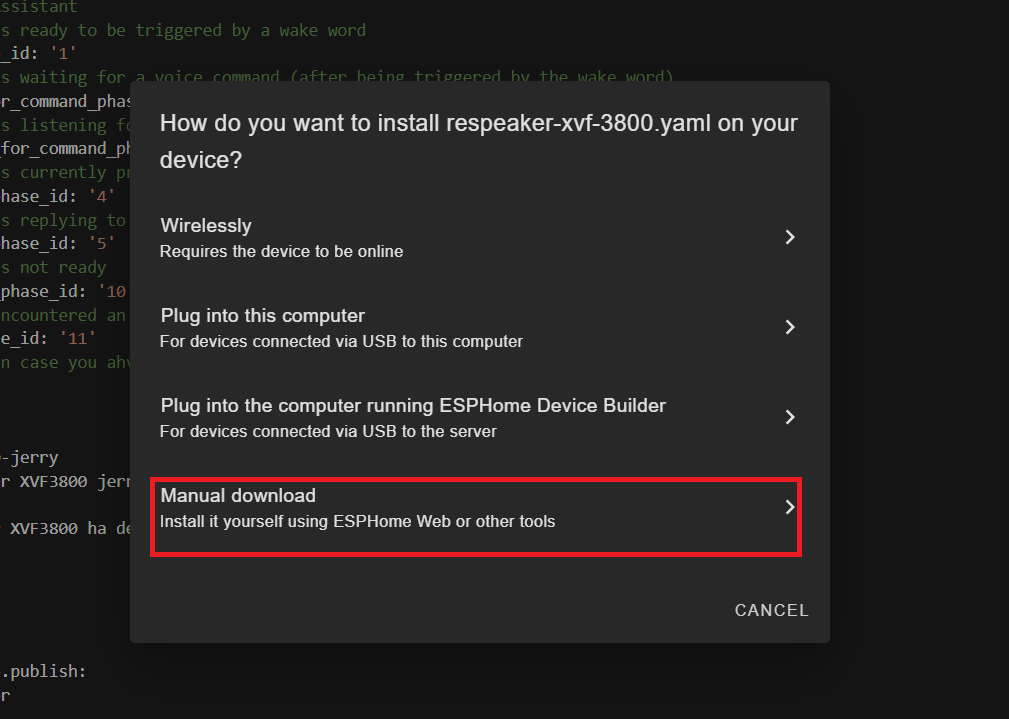
Espera a que el firmware se compile.
Descarga el archivo de firmware .bin generado a tu computadora.

Conecta la placa ESP32-S3 (con XVF3800 conectado) a tu PC usando un cable USB Tipo-C.
Abre Web-ESPHome en Chrome o Edge.
Haz clic en CONECTAR y elige el puerto serie apropiado

Una vez conectado, haz clic en INSTALAR
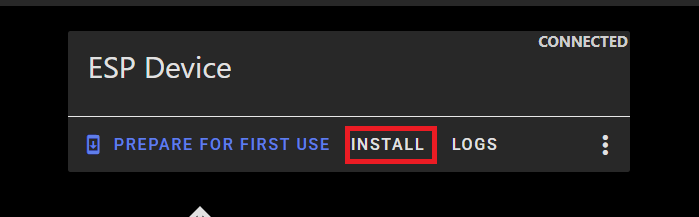
Selecciona el archivo .bin que acabas de descargar.
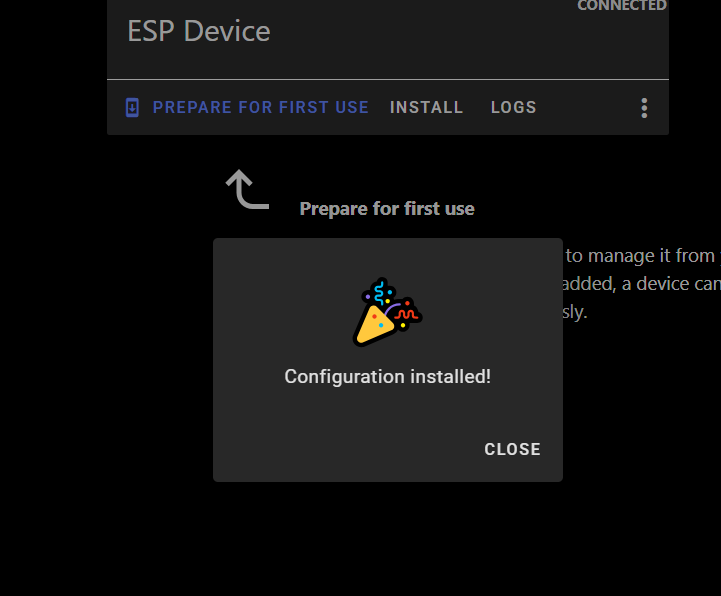
Espera a que la instalación se complete (puede tomar unos minutos).
Después del éxito, verás un mensaje de confirmación.
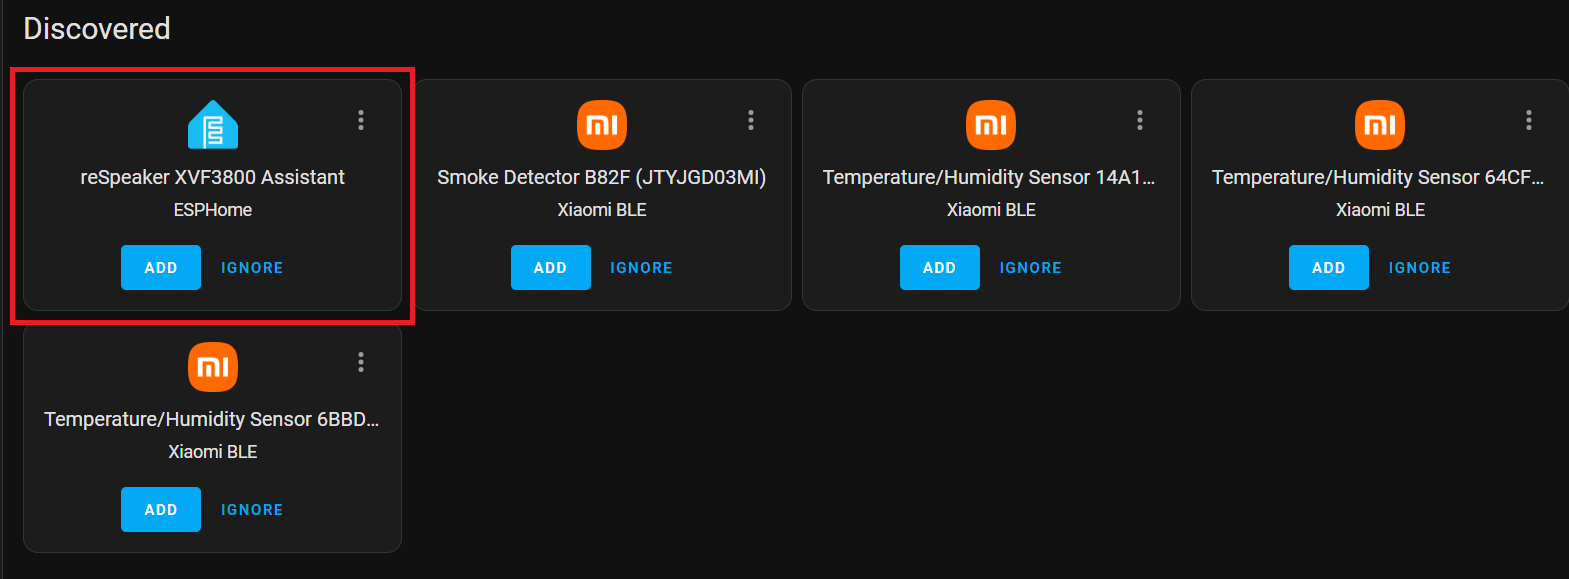
Regresa a Home Assistant > Configuración > Dispositivos y Servicios.
Deberías ver ESPHome listado como una integración descubierta.
Haz clic en CONFIGURAR, luego Enviar para finalizar la configuración.
Agregar tu dispositivo inteligente
Configura el dispositivo Sonoff BASICR2 según el manual del usuario del fabricante. Necesitarás crear una cuenta eWELink.
Instalar HACS
Si no está ya instalado, sigue la guía oficial para configurar la Tienda de la Comunidad de Home Assistant:
Abre HACS desde la barra lateral. Busca Sonoff LAN en la sección de Búsqueda.
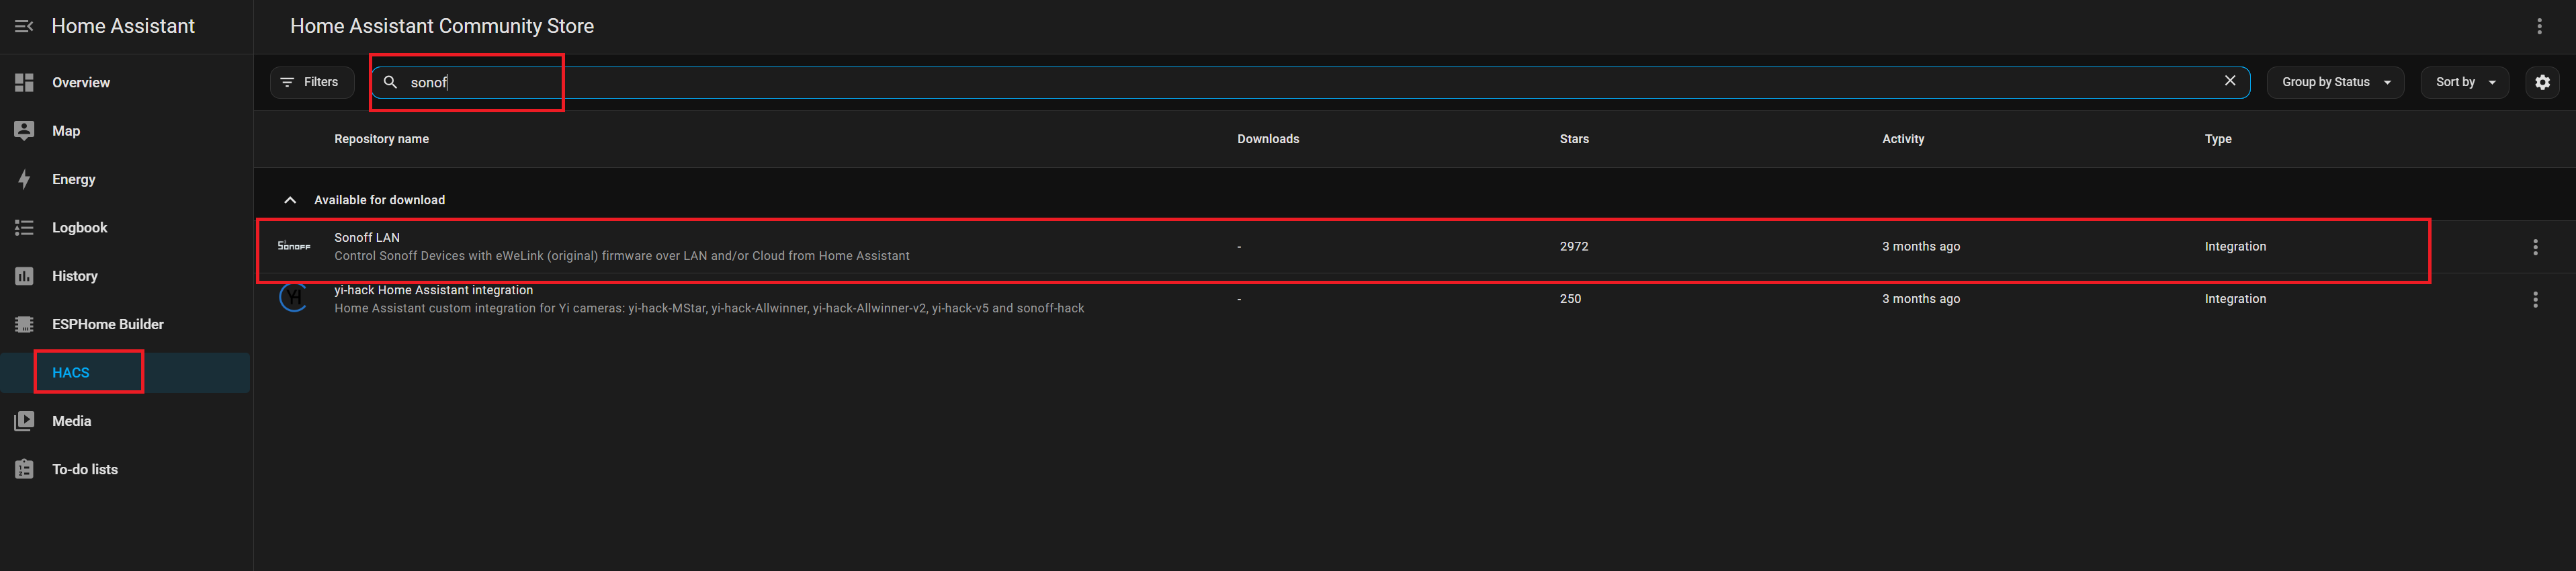
Haz clic en Instalar para agregar la integración. Reinicia Home Assistant para aplicar los cambios.
Sonoff
Navega a Configuración → Dispositivos y Servicios. Haz clic en Agregar Integración. Busca y selecciona Sonoff.
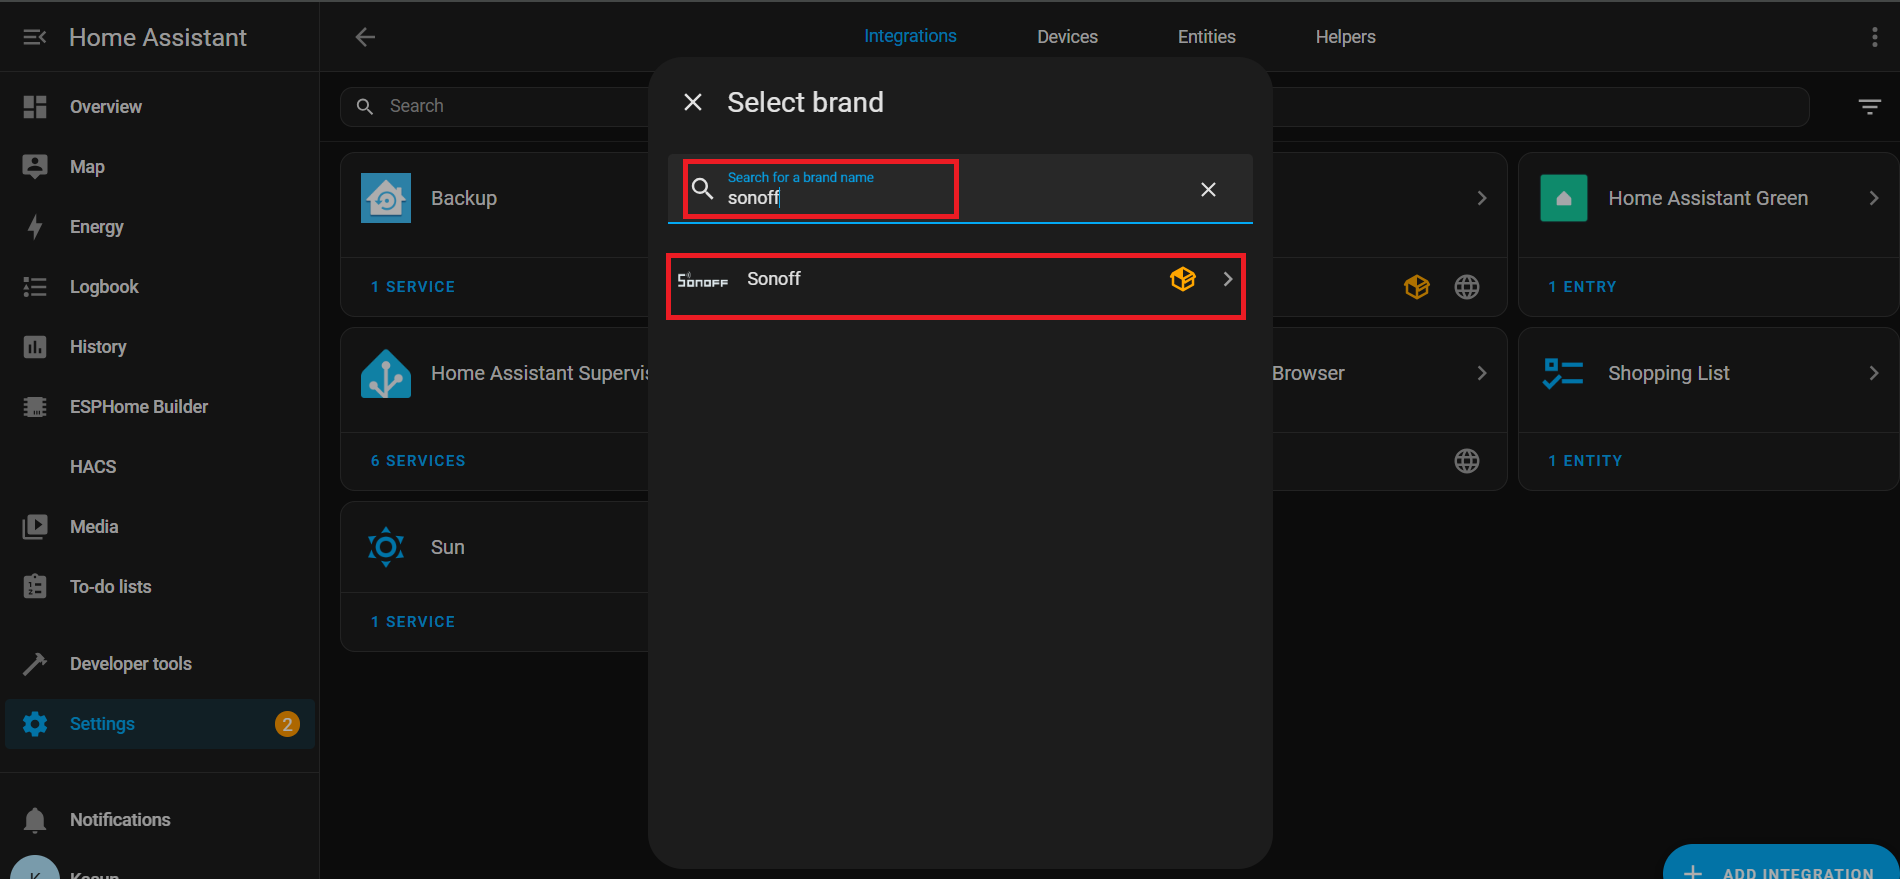
Ingresa las credenciales de tu cuenta eWeLink para autenticarte.

Una vez conectado exitosamente, verás las entidades asociadas listadas bajo: Configuración → Dispositivos y Servicios → Entidades

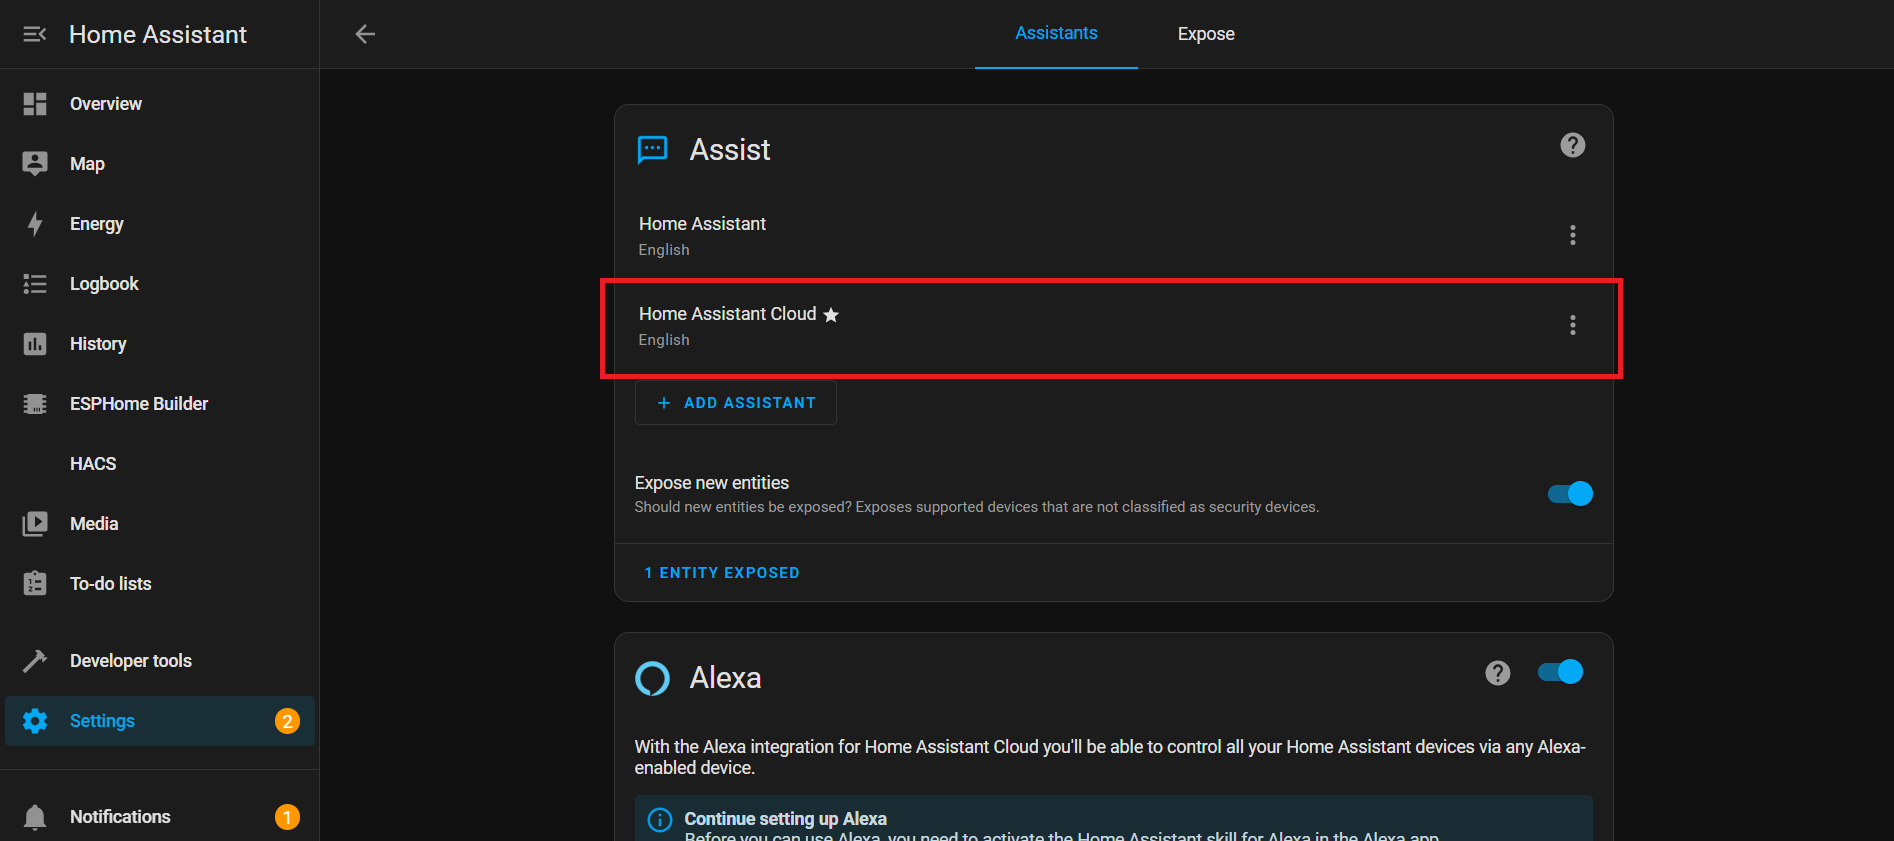
Asistente de Voz con Nabu Cloud
En esta demostración, estamos mostrando cómo conectar con Home Assistant Cloud (Nabu Casa) usando voz. La configuración es simple, y puedes aprovechar una prueba gratuita de un mes para explorar todas sus capacidades. Con la palabra de activación incorporada: "Okay Nabu", puedes activar comandos de voz sin esfuerzo e integrarte perfectamente con dispositivos y servicios en cualquier lugar, en cualquier momento — todo sin configuraciones complejas.
Descripción YAML
WiFi
Esta sección configura cómo tu dispositivo se conecta a Wi-Fi.
wifi:
  ssid: !secret wifi_ssid
  password: !secret wifi_password
- ssid & password: Tomados de tu archivo secrets.yaml para que tu contraseña no sea visible en texto plano.
- Events: Ejecuta acciones cuando Wi-Fi se conecta o desconecta:
-
on_connect:
- Detiene la configuración BLE improv.
- Ejecuta el script control_leds (efecto LED para Wi-Fi conectado).
-
on_disconnect:
- Ejecuta el script control_leds (efecto LED para Wi-Fi desconectado).
-
Bus I²C
I²C es una línea de comunicación que permite a tu ESP32 hablar con otros chips como el micrófono o el códec de audio.
i2c:
  id: internal_i2c
  sda: GPIO5
  scl: GPIO6
  scan: true
  frequency: 100kHz
- id: Un nombre para referenciar este bus en otro lugar.
- sda / scl: Pines utilizados para datos y reloj.
- scan: Verifica dispositivos conectados al inicio.
- frequency: Velocidad de comunicación (100kHz es estándar).
Interruptores
Interruptores
switch:
  # Mute Sound Switch.
  - platform: template
    id: mute_sound
    name: Mute/unmute sound
    icon: "mdi:bullhorn"
    entity_category: config
    optimistic: true
    restore_mode: RESTORE_DEFAULT_ON
  # Wake Word Sound Switch.
  - platform: template
    id: wake_sound
    name: Wake sound
    icon: "mdi:bullhorn"
    entity_category: config
    optimistic: true
    restore_mode: RESTORE_DEFAULT_ON
  # Internal switch to track when a timer is ringing on the device.
  - platform: template
    id: timer_ringing
    optimistic: true
    internal: true
    restore_mode: ALWAYS_OFF
    on_turn_off:
      # Disable stop wake word
      - micro_wake_word.disable_model: stop
      - script.execute: disable_repeat
      # Stop any current annoucement (ie: stop the timer ring mid playback)
      - if:
          condition:
            media_player.is_announcing:
          then:
            media_player.stop:
              announcement: true
      # Set back ducking ratio to zero
      - mixer_speaker.apply_ducking:
          id: media_mixing_input
          decibel_reduction: 0
          duration: 1.0s
      # Refresh the LED ring
      - script.execute: control_leds
    on_turn_on:
      # Duck audio
      - mixer_speaker.apply_ducking:
          id: media_mixing_input
          decibel_reduction: 20
          duration: 0.0s
      # Enable stop wake word
      - micro_wake_word.enable_model: stop
      # Ring timer
      - script.execute: ring_timer
      # Refresh LED
      - script.execute: control_leds
      # If 15 minutes have passed and the timer is still ringing, stop it.
      - delay: 15min
      - switch.turn_off: timer_ringing
  # Defines if alarm is active
  - platform: template
    optimistic: true
    restore_mode: RESTORE_DEFAULT_OFF
    id: alarm_on
    icon: mdi:bell-badge
    name: "Alarm on"
    on_turn_on:
      - script.execute: control_leds
    on_turn_off:
      - script.execute: control_leds
Los interruptores son "botones" controlados por software en Home Assistant. Controlan características como sonido, temporizadores o alarmas.
Interruptor de Sonido de Palabra de Activación: Controla el audio de la palabra de activación.
# Wake Word Sound Switch.
  - platform: template
    id: wake_sound
    name: Wake sound
    icon: "mdi:bullhorn"
    entity_category: config
    optimistic: true
    restore_mode: RESTORE_DEFAULT_ON
Interruptor Interno de Temporizador Sonando:
- Rastrea si un temporizador está activo.
- on_turn_on: Reduce otro audio en -20dB, inicia sonido del temporizador, actualiza LED, se detiene automáticamente después de 15 min.
- on_turn_off: Detiene temporizador, restaura volumen, actualiza LED.
# Internal switch to track when a timer is ringing on the device.
  - platform: template
    id: timer_ringing
    optimistic: true
    internal: true
    restore_mode: ALWAYS_OFF
    ...
    ...
Interruptor de Alarma Activada:
# Defines if alarm is active
  - platform: template
    optimistic: true
    restore_mode: RESTORE_DEFAULT_OFF
    id: alarm_on
    ...
    ...
- Rastrea el estado de la alarma.
- Ejecuta script LED cuando está encendido/apagado.
Sensores
Sensores
number:
  - platform: template
    id: led_ring_brightness
    name: "LED Ring Brightness"
    icon: mdi:brightness-6
    entity_category: config
    optimistic: true
    restore_value: true
    min_value: 0.4
    max_value: 1.0
    step: 0.05
    initial_value: 0.8
    mode: slider

sensor:
  - platform: template
    id: next_timer
    name: "Next timer"
    update_interval: never
    disabled_by_default: true
    device_class: duration
    unit_of_measurement: s
    icon: "mdi:timer"
    accuracy_decimals: 0

text_sensor:
  - platform: template
    id: next_timer_name
    name: "Next timer name"
    icon: "mdi:timer"
    disabled_by_default: true
  - platform: template
    name: "Alarm time"
    id: alarm_time
    icon: mdi:bell-ring
  - platform: template
    name: "Current device time"
    id: current_time
    icon: mdi:clock
Este bloque YAML añade controles y sensores para temporizadores, alarmas y brillo LED. Te permite ajustar el brillo del anillo LED con un deslizador, rastrear el próximo temporizador (tiempo + nombre), y mostrar la hora de la alarma y la hora actual del dispositivo en Home Assistant.
Brillo del Anillo LED:
number:
  - platform: template
    id: led_ring_brightness
    name: "LED Ring Brightness"
    icon: mdi:brightness-6
    ...
- Permite al usuario ajustar el brillo con un deslizador.
- min_value / max_value definen límites.
- restore_value mantiene la configuración anterior después del reinicio.
Próximo Temporizador
sensor:
  - platform: template
    id: next_timer
    name: "Next timer"
    update_interval: never
    ...
- Muestra el tiempo restante para el próximo temporizador.
- Se actualiza solo cuando un temporizador cambia (ahorra recursos).
Hora de Alarma y Hora del Dispositivo
text_sensor:
  - platform: template
    id: next_timer_name
    name: "Next timer name"
    icon: "mdi:timer"
    ...
- Muestra la alarma actual y la hora del sistema ESP32.
Efectos LED en intervalo
interval:
  - interval: 50ms
    id: led_animation_interval
    then:
      - lambda: |-
          if (id(volume_display_active)) {
            id(update_volume_display_effect).execute();
            return;
          }
          std::string effect = id(current_led_effect);
          if (effect == "off") {
            return;
          } else if (effect == "breathe") {
            id(update_breathe_effect).execute();
          } else if (effect == "rainbow") {
            id(update_rainbow_effect).execute();
          } else if (effect == "comet_cw") {
            id(update_comet_cw_effect).execute();
          } else if (effect == "comet_ccw") {
            id(update_comet_ccw_effect).execute();
          } else if (effect == "twinkle") {
            id(update_twinkle_effect).execute();
          } else if (effect == "timer_tick") {
            id(update_timer_tick_effect).execute();
          } else if (effect == "led_beam") {
            id(update_led_beam_effect).execute();
          }
- Los intervalos ejecutan código repetidamente en segundo plano.
- 50ms: Ejecuta código 20 veces por segundo.
- Controla animaciones LED basadas en el estado del sistema o efecto seleccionado.
Control LED
Control LED
script:
# =========================================================================
# == Centralized script to control all LED effects ==
# =========================================================================
- id: led_set_effect
mode: restart
parameters:
effect: std::string
r: float
g: float
b: float
speed: float
then:
- lambda: |-
// Update global variables with the new parameters
id(led_ring_color_r) = r;
id(led_ring_color_g) = g;
id(led_ring_color_b) = b;
id(led_ring_speed) = speed;
id(current_led_effect) = effect;
// Handle the two types of effects: Off and Animated
if (effect == "off") {
uint32_t colors[12] = {0};
id(respeaker).set_led_ring(colors);
} else {
id(last_led_update_time) = millis(); // Reset timer for smooth animation start
}
# Individual update scripts for each animated effect
- id: update_breathe_effect
then:
- lambda: |-
static float phase = 0.0f;
uint32_t now = millis();
float dt = (now - id(last_led_update_time)) / 1000.0f;
id(last_led_update_time) = now;
phase += dt * id(led_ring_speed);
while (phase >= 1.0f) phase -= 1.0f;
float master_brightness = id(led_ring_brightness).state;
float breath_brightness = 0.5f * (1.0f + sinf(phase * 2.0f * M_PI)) * master_brightness;
uint8_t r = (uint8_t)(id(led_ring_color_r) * 255.0f * breath_brightness);
uint8_t g = (uint8_t)(id(led_ring_color_g) * 255.0f * breath_brightness);
uint8_t b = (uint8_t)(id(led_ring_color_b) * 255.0f * breath_brightness);
uint32_t current_color = (r << 16) | (g << 8) | b;
uint32_t colors[12];
for (int i = 0; i < 12; i++) colors[i] = current_color;
id(respeaker).set_led_ring(colors);
- id: update_rainbow_effect
then:
- lambda: |-
static float hue_offset = 0.0f;
uint32_t now = millis();
float dt = (now - id(last_led_update_time)) / 1000.0f;
id(last_led_update_time) = now;
hue_offset += dt * id(led_ring_speed);
if (hue_offset >= 1.0f) hue_offset -= 1.0f;
constexpr int NUM_LEDS = 12;
constexpr float HUE_STEP = 1.0f / NUM_LEDS;
uint32_t colors[NUM_LEDS];
float brightness = id(led_ring_brightness).state;
float current_hue = hue_offset;
for (int i = 0; i < NUM_LEDS; i++) {
float r, g, b;
if (current_hue >= 1.0f) current_hue -= 1.0f;
hsv_to_rgb((int)(current_hue * 360.0f), 1.0f, brightness, r, g, b);
colors[i] = ((uint8_t)(r * 255.0f) << 16) | ((uint8_t)(g * 255.0f) << 8) | ((uint8_t)(b * 255.0f));
current_hue += HUE_STEP;
}
id(respeaker).set_led_ring(colors);
- id: update_comet_cw_effect
then:
- lambda: |-
static float comet_pos = 0.0f;
uint32_t now = millis();
float dt = (now - id(last_led_update_time)) / 1000.0f;
id(last_led_update_time) = now;
constexpr int NUM_LEDS = 12;
constexpr int BASE_TAIL = 3;
float leds_per_sec = id(led_ring_speed) * NUM_LEDS;
comet_pos += dt * leds_per_sec;
while (comet_pos >= NUM_LEDS) comet_pos -= NUM_LEDS;
int head_index = (int)comet_pos;
int tail_length = BASE_TAIL + (int)(id(led_ring_speed));
if (tail_length > NUM_LEDS - 1) tail_length = NUM_LEDS - 1;
uint32_t colors[NUM_LEDS] = {0};
float brightness = id(led_ring_brightness).state;
uint8_t head_r = (uint8_t)(id(led_ring_color_r) * 255.0f * brightness);
uint8_t head_g = (uint8_t)(id(led_ring_color_g) * 255.0f * brightness);
uint8_t head_b = (uint8_t)(id(led_ring_color_b) * 255.0f * brightness);
colors[head_index % NUM_LEDS] = (head_r << 16) | (head_g << 8) | head_b;
for (int i = 1; i <= tail_length; i++) {
float tail_factor = (float)i / (tail_length + 1);
float tail_brightness = (1.0f - tail_factor) * brightness;
uint8_t r = (uint8_t)(id(led_ring_color_r) * 255.0f * tail_brightness);
uint8_t g = (uint8_t)(id(led_ring_color_g) * 255.0f * tail_brightness);
uint8_t b = (uint8_t)(id(led_ring_color_b) * 255.0f * tail_brightness);
int tail_index = (head_index - i + NUM_LEDS) % NUM_LEDS;
colors[tail_index] = (r << 16) | (g << 8) | b;
}
id(respeaker).set_led_ring(colors);
- id: update_comet_ccw_effect
then:
- lambda: |-
static float comet_pos = 0.0f;
uint32_t now = millis();
float dt = (now - id(last_led_update_time)) / 1000.0f;
id(last_led_update_time) = now;
constexpr int NUM_LEDS = 12;
constexpr int BASE_TAIL = 3;
float leds_per_sec = id(led_ring_speed) * NUM_LEDS;
comet_pos -= dt * leds_per_sec;
while (comet_pos < 0.0f) comet_pos += NUM_LEDS;
int head_index = (int)comet_pos;
int tail_length = BASE_TAIL + (int)(id(led_ring_speed));
if (tail_length > NUM_LEDS - 1) tail_length = NUM_LEDS - 1;
uint32_t colors[NUM_LEDS] = {0};
float brightness = id(led_ring_brightness).state;
uint8_t head_r = (uint8_t)(id(led_ring_color_r) * 255.0f * brightness);
uint8_t head_g = (uint8_t)(id(led_ring_color_g) * 255.0f * brightness);
uint8_t head_b = (uint8_t)(id(led_ring_color_b) * 255.0f * brightness);
colors[head_index % NUM_LEDS] = (head_r << 16) | (head_g << 8) | head_b;
for (int i = 1; i <= tail_length; i++) {
float tail_factor = (float)i / (tail_length + 1);
float tail_brightness = (1.0f - tail_factor) * brightness;
uint8_t r = (uint8_t)(id(led_ring_color_r) * 255.0f * tail_brightness);
uint8_t g = (uint8_t)(id(led_ring_color_g) * 255.0f * tail_brightness);
uint8_t b = (uint8_t)(id(led_ring_color_b) * 255.0f * tail_brightness);
int tail_index = (head_index + i) % NUM_LEDS;
colors[tail_index] = (r << 16) | (g << 8) | b;
}
id(respeaker).set_led_ring(colors);
- id: update_twinkle_effect
then:
- lambda: |-
constexpr int NUM_LEDS = 12;
static float led_brightness[NUM_LEDS] = {0.0f};
static float led_fade_speed[NUM_LEDS] = {0.0f};
uint32_t now = millis();
float dt = (now - id(last_led_update_time)) / 1000.0f;
id(last_led_update_time) = now;
// Update existing twinkles
for (int i = 0; i < NUM_LEDS; i++) {
if (led_fade_speed[i] != 0.0f) {
led_brightness[i] += led_fade_speed[i] * dt;
if (led_fade_speed[i] > 0.0f && led_brightness[i] >= 1.0f) {
led_brightness[i] = 1.0f;
led_fade_speed[i] *= -1.0f;
} else if (led_fade_speed[i] < 0.0f && led_brightness[i] <= 0.0f) {
led_brightness[i] = 0.0f;
led_fade_speed[i] = 0.0f;
}
}
}
// Start new twinkles
float twinkle_chance = dt * id(led_ring_speed);
if (random_float() < twinkle_chance) {
int led_to_start = (int)(random_float() * NUM_LEDS);
if (led_fade_speed[led_to_start] == 0.0f) {
led_brightness[led_to_start] = 0.0f;
float min_speed = 1.5f, max_speed = 3.0f;
led_fade_speed[led_to_start] = min_speed + (random_float() * (max_speed - min_speed));
}
}
// Render colors
uint32_t colors[NUM_LEDS];
float master_brightness = id(led_ring_brightness).state;
uint8_t base_r = (uint8_t)(id(led_ring_color_r) * 255.0f);
uint8_t base_g = (uint8_t)(id(led_ring_color_g) * 255.0f);
uint8_t base_b = (uint8_t)(id(led_ring_color_b) * 255.0f);
for (int i = 0; i < NUM_LEDS; i++) {
float current_led_brightness = led_brightness[i] * master_brightness;
uint8_t r = (uint8_t)(base_r * current_led_brightness);
uint8_t g = (uint8_t)(base_g * current_led_brightness);
uint8_t b = (uint8_t)(base_b * current_led_brightness);
colors[i] = (r << 16) | (g << 8) | b;
}
id(respeaker).set_led_ring(colors);
- id: update_timer_tick_effect
then:
- lambda: |-
constexpr int NUM_LEDS = 12;
static int tick_index = 0;
uint32_t now = millis();
// Only update tick position every 100ms to reduce I2C traffic
static uint32_t last_tick_update = 0;
if (now - last_tick_update >= 100) {
tick_index = (tick_index - 1 + NUM_LEDS) % NUM_LEDS;
last_tick_update = now;
}
uint32_t colors[NUM_LEDS] = {0};
uint32_t seconds_left = id(first_active_timer).seconds_left;
uint32_t total_seconds = id(first_active_timer).total_seconds;
float timer_ratio = (float)NUM_LEDS * seconds_left / std::max(total_seconds, (uint32_t)1);
float master_brightness = id(led_ring_brightness).state;
uint8_t base_r = (uint8_t)(id(led_ring_color_r) * 255.0f);
uint8_t base_g = (uint8_t)(id(led_ring_color_g) * 255.0f);
uint8_t base_b = (uint8_t)(id(led_ring_color_b) * 255.0f);
for (int i = 0; i < NUM_LEDS; i++) {
float bar_brightness = clamp(timer_ratio - i, 0.0f, 1.0f);
if (bar_brightness > 0.0f) {
float tick_dip = (i == tick_index) ? 0.9f : 1.0f;
float final_brightness = bar_brightness * tick_dip * master_brightness;
uint8_t r = (uint8_t)(base_r * final_brightness);
uint8_t g = (uint8_t)(base_g * final_brightness);
uint8_t b = (uint8_t)(base_b * final_brightness);
colors[i] = (r << 16) | (g << 8) | b;
}
}
id(respeaker).set_led_ring(colors);
- id: update_volume_display_effect
then:
- lambda: |-
constexpr int NUM_LEDS = 12;
uint32_t colors[NUM_LEDS] = {0};
if (id(external_media_player).is_ready()) {
bool is_muted = id(external_media_player).is_muted();
float volume = id(external_media_player).volume;
if (is_muted || volume == 0.0f) {
uint32_t mute_color = (255 << 16); // Red
colors[0] = mute_color;
colors[6] = mute_color;
} else {
float num_leds_on = volume * NUM_LEDS;
float master_brightness = id(led_ring_brightness).state;
uint8_t base_r = (uint8_t)(id(led_ring_color_r) * 255.0f);
uint8_t base_g = (uint8_t)(id(led_ring_color_g) * 255.0f);
uint8_t base_b = (uint8_t)(id(led_ring_color_b) * 255.0f);
for (int i = 0; i < NUM_LEDS; i++) {
float brightness = clamp(num_leds_on - i, 0.0f, 1.0f);
if (brightness > 0.0f) {
uint8_t r = (uint8_t)(base_r * brightness * master_brightness);
uint8_t g = (uint8_t)(base_g * brightness * master_brightness);
uint8_t b = (uint8_t)(base_b * brightness * master_brightness);
colors[i] = (r << 16) | (g << 8) | b;
}
}
}
}
id(respeaker).set_led_ring(colors);
- id: update_led_beam_effect
then:
- lambda: |-
constexpr int NUM_LEDS = 12;
constexpr int FADE_LEDS = 3;
constexpr float TRANSITION_DURATION = 0.5f; // Duration of the smooth transition
uint32_t colors[NUM_LEDS] = {0};
uint32_t now = millis();
float dt = (now - id(last_led_update_time)) / 1000.0f;
id(last_led_update_time) = now;
if (id(beam_direction).has_state()) {
// CORRECTING THE OFFSET: add 5 from the sensor reading
float target_pos = ((int)id(beam_direction).state + 5) % NUM_LEDS;
float current_pos = id(animated_beam_position);
// Calculate the shortest path around the circle
float diff = target_pos - current_pos;
if (diff > NUM_LEDS / 2.0f) {
diff -= NUM_LEDS;
} else if (diff < -NUM_LEDS / 2.0f) {
diff += NUM_LEDS;
}
// Move current position towards target
if (abs(diff) > 0.01f) {
float move_speed = diff / TRANSITION_DURATION;
current_pos += move_speed * dt;
} else {
current_pos = target_pos;
}
// Handle wrap-around for the animated position
if (current_pos >= NUM_LEDS) current_pos -= NUM_LEDS;
if (current_pos < 0.0f) current_pos += NUM_LEDS;
id(animated_beam_position) = current_pos;
// Render the smoothed beam
float master_brightness = id(led_ring_brightness).state;
uint8_t base_r = (uint8_t)(id(led_ring_color_r) * 255.0f);
uint8_t base_g = (uint8_t)(id(led_ring_color_g) * 255.0f);
uint8_t base_b = (uint8_t)(id(led_ring_color_b) * 255.0f);
for (int i = 0; i < NUM_LEDS; i++) {
// Calculate circular distance from current LED to the animated position
float dist = abs(i - current_pos);
if (dist > NUM_LEDS / 2.0f) {
dist = NUM_LEDS - dist;
}
// Calculate brightness based on distance (linear falloff)
float brightness_factor = 1.0f - (dist / (FADE_LEDS + 1.0f));
brightness_factor = std::max(0.0f, brightness_factor);
if (brightness_factor > 0.0f) {
float final_brightness = brightness_factor * master_brightness;
uint8_t r = (uint8_t)(base_r * final_brightness);
uint8_t g = (uint8_t)(base_g * final_brightness);
uint8_t b = (uint8_t)(base_b * final_brightness);
colors[i] = (r << 16) | (g << 8) | b;
}
}
}
id(respeaker).set_led_ring(colors);
# Master script controlling the LEDs, based on different conditions : initialization in progress, wifi and api connected and voice assistant phase.
# For the sake of simplicity and re-usability, the script calls child scripts defined below.
# This script will be called every time one of these conditions is changing.
- id: control_leds
mode: single # Prevent multiple simultaneous executions
then:
- lambda: |
// Cache expensive component checks
static bool last_respeaker_failed = false;
static bool last_wifi_connected = false;
static bool last_api_connected = false;
static int last_voice_phase = -1;
static bool last_timer_ringing = false;
static bool last_timer_active = false;
static bool last_improv_ble = false;
static bool last_init_progress = false;
bool respeaker_failed = id(respeaker).is_failed();
bool wifi_connected = id(wifi_id).is_connected();
bool api_connected = id(api_id).is_connected();
int voice_phase = id(voice_assistant_phase);
bool new_timer_ringing = id(timer_ringing).state;
bool improv_ble = id(improv_ble_in_progress);
bool init_progress = id(init_in_progress);
// Only update if something actually changed
bool needs_update = (
respeaker_failed != last_respeaker_failed ||
wifi_connected != last_wifi_connected ||
api_connected != last_api_connected ||
voice_phase != last_voice_phase ||
new_timer_ringing != last_timer_ringing ||
improv_ble != last_improv_ble ||
init_progress != last_init_progress
);
if (!needs_update) return;
// Update cache
last_respeaker_failed = respeaker_failed;
last_wifi_connected = wifi_connected;
last_api_connected = api_connected;
last_voice_phase = voice_phase;
last_timer_ringing = new_timer_ringing;
last_improv_ble = improv_ble;
last_init_progress = init_progress;
if (respeaker_failed) {
id(control_leds_respeaker_startup_failed).execute();
return;
}
// Only check timers if we need to
id(check_if_timers_active).execute();
if (id(is_timer_active)){
id(fetch_first_active_timer).execute();
}
// Continue with existing logic...
if (improv_ble) {
id(control_leds_improv_ble_state).execute();
} else if (init_progress) {
id(control_leds_init_state).execute();
} else if (!wifi_connected || !api_connected){
id(control_leds_no_ha_connection_state).execute();
} else if (new_timer_ringing) {
id(control_leds_timer_ringing).execute();
} else if (voice_phase == ${voice_assist_waiting_for_command_phase_id}) {
id(control_leds_voice_assistant_waiting_for_command_phase).execute();
} else if (voice_phase == ${voice_assist_listening_for_command_phase_id}) {
id(control_leds_voice_assistant_listening_for_command_phase).execute();
} else if (voice_phase == ${voice_assist_thinking_phase_id}) {
id(control_leds_voice_assistant_thinking_phase).execute();
} else if (voice_phase == ${voice_assist_replying_phase_id}) {
id(control_leds_voice_assistant_replying_phase).execute();
} else if (voice_phase == ${voice_assist_error_phase_id}) {
id(control_leds_voice_assistant_error_phase).execute();
} else if (voice_phase == ${voice_assist_not_ready_phase_id}) {
id(control_leds_voice_assistant_not_ready_phase).execute();
} else if (id(is_timer_active)) {
id(control_leds_timer_ticking).execute();
} else if (voice_phase == ${voice_assist_idle_phase_id}) {
id(control_leds_voice_assistant_idle_phase).execute();
}
# Script executed if respeaker startup failed
- id: control_leds_respeaker_startup_failed
then:
- script.execute:
id: led_set_effect
effect: "breathe"
r: 0.7
g: 0.0
b: 0.0
speed: 0.5
# Script executed during Improv BLE
- id: control_leds_improv_ble_state
then:
- script.execute:
id: led_set_effect
effect: "twinkle"
r: 1.0
g: 0.89
b: 0.71
speed: 10.0
# Script executed during initialization
- id: control_leds_init_state
then:
- if:
condition:
wifi.connected:
then:
- script.execute:
id: led_set_effect
effect: "twinkle"
r: 0.09
g: 0.73
b: 0.95
speed: 20.0
else:
- script.execute:
id: led_set_effect
effect: "twinkle"
r: 0.09
g: 0.73
b: 0.95
speed: 4.0
# Script executed when the device has no connection to Home Assistant
- id: control_leds_no_ha_connection_state
then:
- script.execute:
id: led_set_effect
effect: "twinkle"
r: 1.0
g: 0.0
b: 0.0
speed: 10.0
# Script executed when the voice assistant is waiting for a command (After the wake word)
- id: control_leds_voice_assistant_waiting_for_command_phase
then:
- lambda: |
id(animated_beam_position) = id(beam_direction).state;
- script.execute:
id: led_set_effect
effect: "led_beam"
r: 0.5
g: 0.0
b: 0.5
speed: 0.0
# Script executed when the voice assistant is listening to a command
- id: control_leds_voice_assistant_listening_for_command_phase
then:
- script.execute:
id: led_set_effect
effect: "led_beam"
r: 0.8
g: 0.0
b: 0.8
speed: 0.0
# Script executed when the voice assistant is thinking to a command
- id: control_leds_voice_assistant_thinking_phase
then:
- script.execute:
id: led_set_effect
effect: "breathe"
r: 0.6
g: 0.0
b: 0.6
speed: 1.0
# Script executed when the voice assistant is replying to a command
- id: control_leds_voice_assistant_replying_phase
then:
- script.execute:
id: led_set_effect
effect: "comet_ccw"
r: 0.6
g: 0.0
b: 0.6
speed: 1.0
# Script executed when the voice assistant is in error
- id: control_leds_voice_assistant_error_phase
then:
- script.execute:
id: led_set_effect
effect: "breathe"
r: 1.0
g: 0.0
b: 0.0
speed: 3.0
# Script executed when the voice assistant is not ready
- id: control_leds_voice_assistant_not_ready_phase
then:
- script.execute:
id: led_set_effect
effect: "twinkle"
r: 1.0
g: 0.0
b: 0.0
speed: 5.0
# Script executed when the volume is changed
- id: control_leds_volume_changed
mode: restart
then:
- lambda: |-
id(volume_display_active) = true;
- delay: 2s
- lambda: |-
id(volume_display_active) = false;
# Script executed when the timer is ringing, to control the LEDs
- id: control_leds_timer_ringing
then:
- script.execute:
id: led_set_effect
effect: "breathe"
r: 0.6
g: 0.0
b: 0.6
speed: 5.0
# Script executed when the timer is ticking, to control the LEDs
- id: control_leds_timer_ticking
then:
- script.execute:
id: led_set_effect
effect: "timer_tick"
r: 0.6
g: 0.0
b: 0.6
speed: 1.0
# Script executed when the voice assistant is idle (waiting for a wake word)
- id: control_leds_voice_assistant_idle_phase
then:
- script.execute:
id: led_set_effect
effect: "off"
r: 0.0
g: 0.0
b: 0.0
speed: 0.0
# Script executed when the timer is ringing, to playback sounds.
- id: ring_timer
then:
- script.execute: enable_repeat_one
- script.execute:
id: play_sound
priority: true
sound_file: !lambda return id(timer_finished_sound);
# Script executed when the timer is ringing, to repeat the timer finished sound.
- id: enable_repeat_one
then:
# Turn on the repeat mode and pause for 500 ms between playlist items/repeats
- lambda: |-
id(external_media_player)
->make_call()
.set_command(media_player::MediaPlayerCommand::MEDIA_PLAYER_COMMAND_REPEAT_ONE)
.set_announcement(true)
.perform();
id(external_media_player)->set_playlist_delay_ms(speaker::AudioPipelineType::ANNOUNCEMENT, 500);
# Script execute when the timer is done ringing, to disable repeat mode.
- id: disable_repeat
then:
# Turn off the repeat mode and pause for 0 ms between playlist items/repeats
- lambda: |-
id(external_media_player)
->make_call()
.set_command(media_player::MediaPlayerCommand::MEDIA_PLAYER_COMMAND_REPEAT_OFF)
.set_announcement(true)
.perform();
id(external_media_player)->set_playlist_delay_ms(speaker::AudioPipelineType::ANNOUNCEMENT, 0);
# Script executed when we want to play sounds on the device.
- id: play_sound
parameters:
priority: bool
sound_file: "audio::AudioFile*"
then:
- lambda: |-
if (priority) {
id(external_media_player)
->make_call()
.set_command(media_player::MediaPlayerCommand::MEDIA_PLAYER_COMMAND_STOP)
.set_announcement(true)
.perform();
}
if ( (id(external_media_player).state != media_player::MediaPlayerState::MEDIA_PLAYER_STATE_ANNOUNCING ) || priority) {
id(external_media_player)
->play_file(sound_file, true, false);
}
# Script used to fetch the first active timer (Stored in global first_active_timer)
- id: fetch_first_active_timer
mode: single
then:
- lambda: |
static uint32_t last_fetch_time = 0;
uint32_t now = millis();
// Only fetch every 500ms to reduce overhead
if (now - last_fetch_time < 500) return;
last_fetch_time = now;
const auto timers = id(va).get_timers();
if (timers.empty()) return;
auto output_timer = timers.begin()->second;
for (auto &iterable_timer : timers) {
if (iterable_timer.second.is_active &&
iterable_timer.second.seconds_left <= output_timer.seconds_left) {
output_timer = iterable_timer.second;
}
}
id(first_active_timer) = output_timer;
# Script used to check if a timer is active (Stored in global is_timer_active)
- id: check_if_timers_active
then:
- lambda: |
const auto timers = id(va).get_timers();
bool output = false;
if (timers.size() > 0) {
for (auto &iterable_timer : timers) {
if(iterable_timer.second.is_active) {
output = true;
}
}
}
id(is_timer_active) = output;
# Script used activate the stop word if the TTS step is long.
# Why is this wrapped on a script?
# Becasue we want to stop the sequence if the TTS step is faster than that.
# This allows us to prevent having the deactivation of the stop word before its own activation.
- id: activate_stop_word_once
then:
- delay: 1s
# Enable stop wake word
- if:
condition:
switch.is_off: timer_ringing
then:
- micro_wake_word.enable_model: stop
- wait_until:
not:
media_player.is_announcing:
- if:
condition:
switch.is_off: timer_ringing
then:
- micro_wake_word.disable_model: stop
- id: check_alarm
then:
- lambda: |-
id(publish_current_time).execute();
// Check alarm
if (id(alarm_on).state && id(alarm_time).has_state()) {
// Get the stored alarm time from the sensor
auto set_alarm_time = id(alarm_time).state;
if (set_alarm_time.length() == 5 &&
isdigit(set_alarm_time[0]) && isdigit(set_alarm_time[1]) &&
isdigit(set_alarm_time[3]) && isdigit(set_alarm_time[4])) {
auto alarm_hour = std::stoi(set_alarm_time.substr(0, 2));
auto alarm_minute = std::stoi(set_alarm_time.substr(3, 2));
// Trigger action if current time matches alarm time
auto time_now = id(homeassistant_time).now();
if (time_now.hour == alarm_hour && time_now.minute == alarm_minute) {
auto action = id(alarm_action).state;
if (action == "Play sound") {
id(timer_ringing).turn_on();
} else if (action == "Send event") {
id(send_alarm_event).execute();
} else if (action == "Sound and event") {
id(timer_ringing).turn_on();
id(send_alarm_event).execute();
}
}
} else {
ESP_LOGW("alarm", "Incorrect alarm time setting");
}
}
- id: send_alarm_event
then:
- homeassistant.event:
event: esphome.alarm_ringing
- id: send_tts_uri_event
parameters:
tts_uri: string
then:
- homeassistant.event:
event: esphome.tts_uri
data:
uri: !lambda return tts_uri;
- id: send_stt_text_event
parameters:
stt_text: string
then:
- homeassistant.event:
event: esphome.stt_text
data:
text: !lambda return stt_text;
- id: publish_current_time
mode: single
then:
- lambda: |-
static std::string last_time_string = "";
auto time_now = id(homeassistant_time).now();
std::string current_time_string = time_now.strftime("%H:%M");
// Only publish if time actually changed
if (current_time_string != last_time_string) {
id(current_time).publish_state(current_time_string);
last_time_string = current_time_string;
}
Controlador Central (led_set_effect)
script:
  # =========================================================================
  # == Centralized script to control all LED effects ==
  # =========================================================================
  - id: led_set_effect
    mode: restart
    parameters:
      effect: std::string
      r: float
      g: float
      b: float
      speed: float
      ....
- Gestiona todos los efectos LED en un solo lugar.
- Puede establecer dinámicamente el tipo de efecto, color (R/G/B) y velocidad.
- Utiliza scripts de actualización para movimiento suave.
- El efecto apagado inmediatamente apaga los LEDs.
Scripts Individuales
- Cada animación (respirar, arcoíris, cometa, parpadeo, tic de temporizador, visualización de volumen, haz LED) tiene su propio script.
- Hace que el sistema sea modular y fácil de mantener.
- Se activa periódicamente por led_animation_interval o por el controlador central.
| Estado del Dispositivo | Efecto LED |
|---|---|
| Fallo de inicio | Respirar rojo |
| Modo Improv BLE | Parpadeo cálido |
| Inicialización | Parpadeo azul |
| Sin conexión HA | Parpadeo rojo |
| Asistente de voz esperando | Haz púrpura |
| Asistente de voz escuchando | Haz púrpura brillante |
| Asistente de voz pensando | Respirar púrpura |
| Asistente de voz respondiendo | Cometa púrpura |
| Error del asistente de voz | Respirar rojo |
| Asistente de voz inactivo | LEDs apagados |
| Temporizador sonando | Respirar púrpura rápido |
| Cambio de volumen | Visualización temporal |
Cómo Funciona el Control LED (Resumen del Flujo)
-
Activar un Efecto
-
Cuando algo sucede (ej., fallo de inicio, asistente de voz escuchando, temporizador sonando), se ejecuta un script.
-
Ese script llama al controlador LED central (
led_set_effect) y le dice:- qué efecto ejecutar (ej., respirar, arcoíris, cometa)
- qué color (valores R, G, B)
- qué tan rápido (velocidad).
Si el inicio falla →
led_set_effectse llama con efecto = respirar, color = rojo. -
-
Controlador Central (bucle de intervalo)
-
Cada 50ms (20 veces por segundo), el bucle
led_animation_intervalverifica cuál es el efecto actual. -
Basado en ese nombre de efecto, reenvía el control al script de actualización correspondiente.
- Si efecto = respirar → ejecuta
update_breathe_effect. - Si efecto = arcoíris → ejecuta
update_rainbow_effect. - Y así sucesivamente para parpadeo, cometa, tic de temporizador, haz LED, etc.
- Si efecto = respirar → ejecuta
-
Este bucle actúa como un despachador: decide qué script de animación ejecutar a continuación.
interval:
  - interval: 50ms
    id: led_animation_interval
    then:
      - lambda: |-
          if (id(volume_display_active)) {
            id(update_volume_display_effect).execute();
            return;
          }
          std::string effect = id(current_led_effect);
          if (effect == "off") {
            return;
          } else if (effect == "breathe") {
            id(update_breathe_effect).execute();
          } else if (effect == "rainbow") {
            id(update_rainbow_effect).execute();
          } else if (effect == "comet_cw") {
            id(update_comet_cw_effect).execute();
          } else if (effect == "comet_ccw") {
            id(update_comet_ccw_effect).execute();
          } else if (effect == "twinkle") {
            id(update_twinkle_effect).execute();
          } else if (effect == "timer_tick") {
            id(update_timer_tick_effect).execute();
          } else if (effect == "led_beam") {
            id(update_led_beam_effect).execute();
          }
-
Script de Actualización de Efecto
-
Cada efecto tiene su propio script que calcula los colores LED fotograma por fotograma.
-
Ejemplo: efecto respirar
- Usa una onda sinusoidal para desvanecer el brillo hacia arriba y hacia abajo suavemente.
- Multiplica el brillo por la configuración global del anillo LED (velocidad, deslizador de brillo, color R/G/B).
- Construye un array de colores para los 12 LEDs.
- Envía los colores al anillo LED Respeaker.
-
Ejemplo:
 # Individual update scripts for each animated effect
  - id: update_breathe_effect
    then:
      - lambda: |-
          static float phase = 0.0f;
          uint32_t now = millis();
          float dt = (now - id(last_led_update_time)) / 1000.0f;
          id(last_led_update_time) = now;

          phase += dt * id(led_ring_speed);
          while (phase >= 1.0f) phase -= 1.0f;

          float master_brightness = id(led_ring_brightness).state;
          float breath_brightness = 0.5f * (1.0f + sinf(phase * 2.0f * M_PI)) * master_brightness;

          uint8_t r = (uint8_t)(id(led_ring_color_r) * 255.0f * breath_brightness);
          uint8_t g = (uint8_t)(id(led_ring_color_g) * 255.0f * breath_brightness);
          uint8_t b = (uint8_t)(id(led_ring_color_b) * 255.0f * breath_brightness);
          uint32_t current_color = (r << 16) | (g << 8) | b;

          uint32_t colors[12];
          for (int i = 0; i < 12; i++) colors[i] = current_color;
          id(respeaker).set_led_ring(colors);
Esto hace que las animaciones sean suaves, dinámicas y personalizables.
Configuración de Audio
Entrada / Salida I²S
I²S (Inter-IC Sound) es una conexión digital que permite al ESP32 enviar y recibir audio de alta calidad a chips como códecs, micrófonos y altavoces.
i2s_audio:
  - id: i2s_output
    i2s_lrclk_pin:
      number: GPIO7
      allow_other_uses: true
    i2s_bclk_pin:
      number: GPIO8
      allow_other_uses: true
    # i2s_mclk_pin:
    #   number: GPIO9
    #   allow_other_uses: true

  - id: i2s_input
    i2s_lrclk_pin:
      number: GPIO7
      allow_other_uses: true
    i2s_bclk_pin:
      number: GPIO8
      allow_other_uses: true
    # i2s_mclk_pin:
    #   number: GPIO9
    #   allow_other_uses: true
Micrófono
- Captura audio del array de micrófonos I²S / códec.
- GPIO43: Pin donde entra los datos de audio del micrófono.
- Frecuencia de muestreo 48 kHz, 32-bit: Grabación de alta calidad (estéreo, 2 canales).
- adc_type: external: Usa el códec externo (no el ADC integrado del ESP32).
- i2s_mode: secondary: ESP32 sigue el reloj del códec (modo esclavo).
microphone:
  - platform: i2s_audio
    id: i2s_mics
    i2s_din_pin: GPIO43
    adc_type: external
    pdm: false
    sample_rate: 48000
    bits_per_sample: 32bit
    i2s_mode: secondary
    i2s_audio_id: i2s_input
    channel: stereo
Altavoz
- Envía audio al altavoz a través del códec (AIC3104 DAC).
- GPIO44: Pin donde sale el audio digital.
- 48 kHz, 32-bit estéreo: Reproducción de alta calidad.
- buffer_duration 100ms: Mantiene el audio suave (previene fallos).
- timeout: never: Mantiene el canal del altavoz activo (no se apagará).
speaker:
  # Hardware speaker output
  - platform: i2s_audio
    id: i2s_audio_speaker
    sample_rate: 48000
    i2s_mode: secondary
    i2s_dout_pin: GPIO44
    bits_per_sample: 32bit
    i2s_audio_id: i2s_output
    dac_type: external
    channel: stereo
    timeout: never
    buffer_duration: 100ms
    audio_dac: aic3104_dac
Mezclador
- Combina múltiples flujos de audio (medios + anuncios) en una salida.
  # Virtual speakers to combine the announcement and media streams together into one output
  - platform: mixer
    id: mixing_speaker
    output_speaker: i2s_audio_speaker
    num_channels: 2
    source_speakers:
      - id: announcement_mixing_input
        timeout: never
      - id: media_mixing_input
        timeout: never
Remuestreadores
- Asegura que todas las fuentes de audio coincidan en frecuencia de muestreo y profundidad de bits.
  # Vritual speakers to resample each pipelines' audio, if necessary, as the mixer speaker requires the same sample rate
  - platform: resampler
    id: announcement_resampling_speaker
    output_speaker: announcement_mixing_input
    sample_rate: 48000
    bits_per_sample: 16
  - platform: resampler
    id: media_resampling_speaker
    output_speaker: media_mixing_input
    sample_rate: 48000
    bits_per_sample: 16
Reproductor de Medios
- Controla volumen, silencio, reproducción y ducking (reduce el volumen de medios durante anuncios).
- Sonidos precargados para eventos (temporizador, palabra de activación, errores).
media_player:
  - platform: speaker
    id: external_media_player
    name: None
    internal: False
    volume_increment: 0.05
    volume_min: 0.0
    volume_max: 1.0
    ...
    ...
Integración Respeaker XVF3800
- dirección i2c: 0x2C
- ID: respeaker
- Interruptor de Silencio del Micrófono: Se actualiza cada 1 segundo, reproduce sonido al alternar.
- Reporte de Versión DFU: Reporta firmware cada 120s.
- Sensor de Dirección del Haz: Rastrea el haz de voz (solo interno).
- Gestión de Firmware: Auto-flashea firmware XVF3800 si es necesario.
respeaker_xvf3800:
  id: respeaker
  address: 0x2C
  mute_switch:
    id: mic_mute_switch
    name: "Microphone Mute"
    update_interval: 1s
    on_turn_on:
    ...
    ...
Referencias / Repositorios
external_components:
  - source:
      type: git
      url: https://github.com/formatBCE/esphome
      ref: respeaker_microphone
    components:
      - i2s_audio
    refresh: 0s
  - source:
      type: git
      url: https://github.com/formatBCE/Respeaker-XVF3800-ESPHome-integration
      ref: main
    components:
      - respeaker_xvf3800
      - aic3104
    refresh: 0s
- formatBCE/esphome: Componente de audio I²S personalizado.
- formatBCE/Respeaker-XVF3800-ESPHome-integration:
- Controlador XVF3800
- Controlador de códec de audio AIC3104
- refresh: 0s: Siempre obtiene el código más reciente de los repositorios.
Micro Wake Word
micro_wake_word:
  id: mww
  microphone:
    microphone: i2s_mics
    channels: 1
    # gain_factor: 4
  stop_after_detection: false
  ....
  ....
Detecta tus palabras de activación (como "Okay Nabu") e inicia el asistente de voz.
- id: mww → Nombre de referencia.
- microphone: i2s_mics, 1 canal.
- stop_after_detection: false → Mantiene la escucha continua.
- okay_nabu, kenobi, hey_jarvis, hey_mycroft, stop (comando de parada interno; puedes agregar el tuyo propio).
- vad probability_cutoff: 0.05 → Sensibilidad del habla.
En Detección (si el micrófono no está silenciado)
- Detiene temporizadores, anuncios o asistente de voz si están activos.
- Reproduce sonido de activación (si está habilitado).
- Inicia el asistente de voz para comandos.
Asistente de Voz
voice_assistant:
  id: va
  microphone:
    microphone: i2s_mics
    channels: 0
  media_player: external_media_player
  micro_wake_word: mww
  use_wake_word: false
  noise_suppression_level: 0
  ....
  ....
Controla el comportamiento e interacciones de tu asistente de voz (VA).
- Micrófono y medios: Usa i2s_mics y un reproductor de medios externo.
- Palabra de activación: Vinculado a mww pero la palabra de activación no es requerida (use_wake_word: false).
- Configuración de audio: Supresión de ruido desactivada, ganancia automática 0 dB, volumen normal.
Eventos / Qué sucede
- on_client_connected: Inicia VA, actualiza LEDs, desmutea micrófono si es necesario.
- on_client_disconnected: Detiene VA, reinicia LEDs.
- on_error: Muestra estado de error en LEDs; reproduce sonido local si falla la autenticación en la nube.
- on_start: Reduce el volumen de medios (ducking) cuando inicia VA.
- on_listening / on_stt_vad_start / on_stt_vad_end: Actualiza la fase de VA y LEDs durante la escucha y el procesamiento.
- on_intent_progress / on_tts_start / on_tts_end: Maneja el habla, actualiza LEDs, puede activar script de palabra de parada.
- on_stt_end: Envía evento de texto reconocido.
- on_end: Detiene VA, reinicia LEDs, termina ducking.
Eventos de temporizador
- on_timer_started / on_timer_updated / on_timer_cancelled / on_timer_finished / on_timer_tick:
- Actualiza estados y nombres de temporizadores.
- Actualiza LEDs.
- Reduce las actualizaciones de LED a cada 5 segundos para temporizador en funcionamiento.
Agradecimientos Especiales
Queremos agradecer a FormatBCE por crear este increíble archivo YAML para el Seeed Studio ReSpeaker XVF3800. Apóyalo en su GitHub
Soporte Técnico y Discusión de Productos
¡Gracias por elegir nuestros productos! Estamos aquí para brindarte diferentes tipos de soporte para asegurar que tu experiencia con nuestros productos sea lo más fluida posible. Ofrecemos varios canales de comunicación para satisfacer diferentes preferencias y necesidades.