Conectar el Botón IoT de Seeed Studio a Home Assistant vía Zigbee
En este tutorial, te mostraremos cómo conectar el Botón IoT de Seeed Studio a Home Assistant usando Zigbee. El Botón IoT de Seeed Studio cuenta con un chip ESP32-C6 integrado con funcionalidad Zigbee, lo que lo convierte en un dispositivo versátil para tu hogar inteligente. Aprenderás cómo flashear el firmware Zigbee, emparejarlo con Home Assistant e incluso personalizar el comportamiento del botón a través del desarrollo con Arduino.
Materiales Requeridos
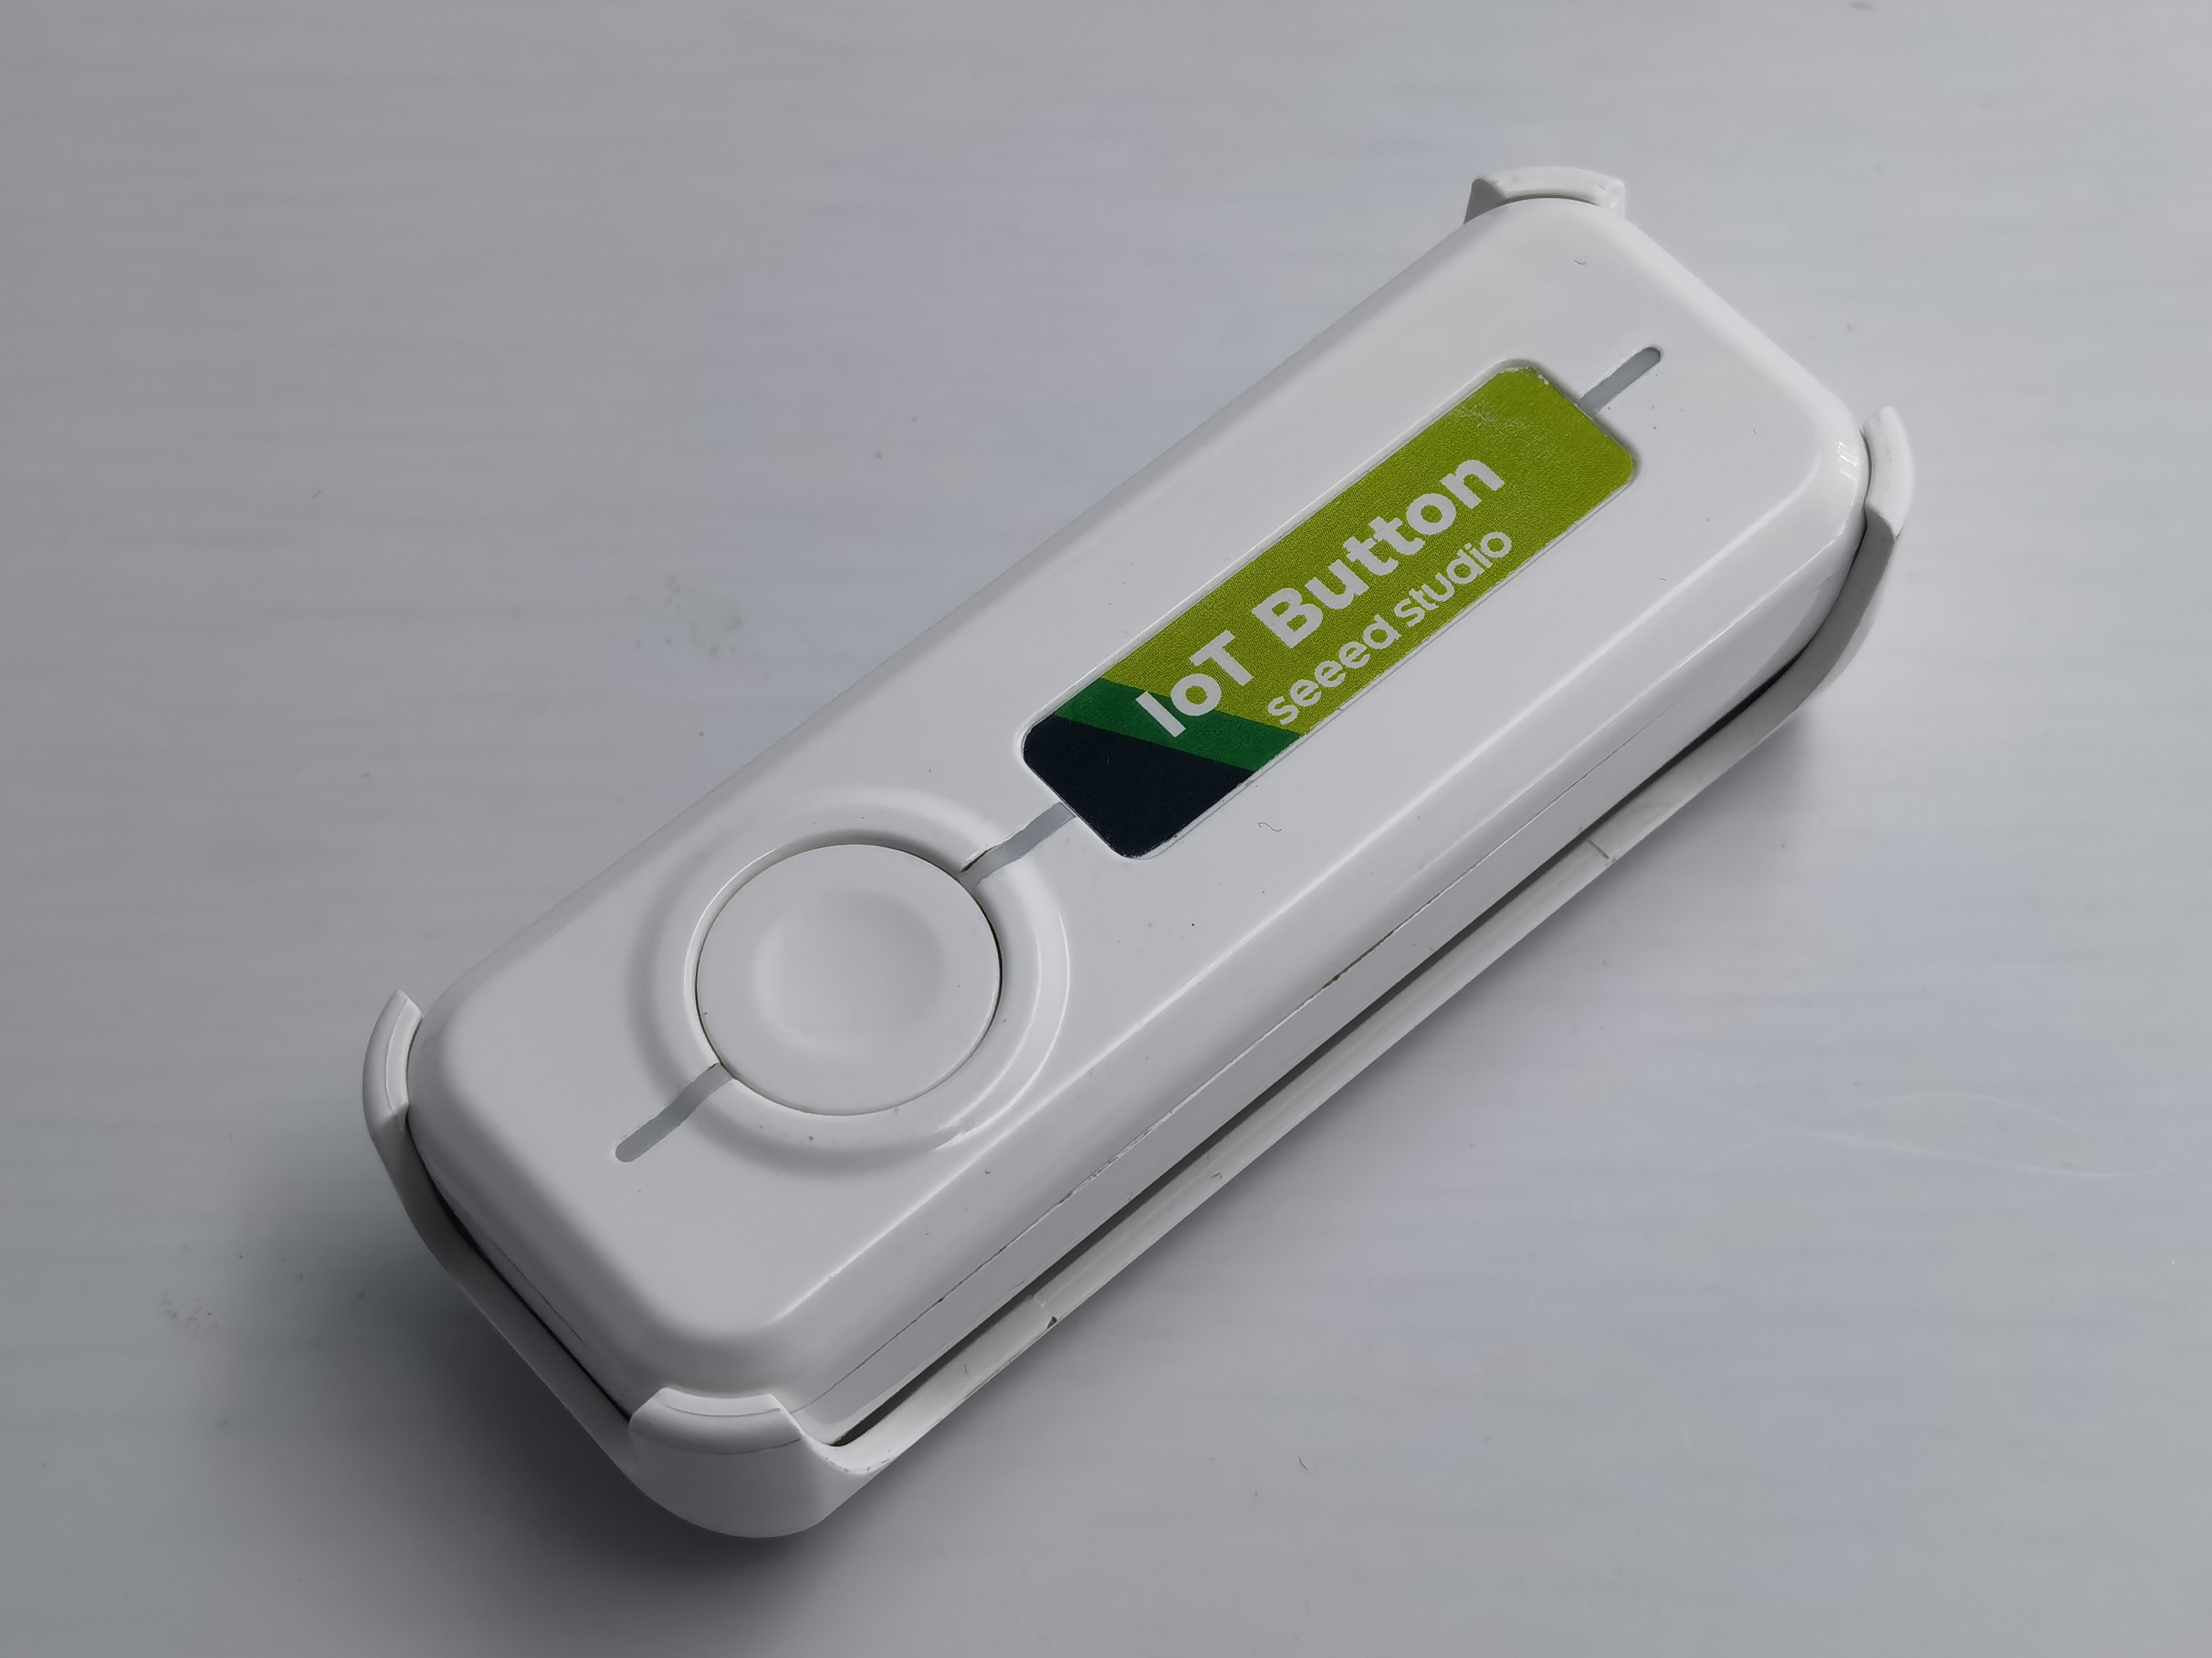
| Botón IoT de Seeed Studio | Coordinador Zigbee (ej., Home Assistant Connect ZBT-1) |
|---|---|
|  |
El Botón IoT de Seeed Studio es un botón inteligente versátil con un chip ESP32-C6 integrado. Es un dispositivo completo e independiente que puede integrarse con Home Assistant vía Zigbee para controlar varios dispositivos y activar automatizaciones. Con su chip ESP32-C6, ofrece bajo consumo de energía y conectividad confiable.
Descripción Funcional (basada en el firmware más reciente)
-
Detección de botón multi-acción
- Clic simple, doble y triple.
- Pulsación larga corta (mantener presionado por 1-5 segundos).
- Pulsación larga (mantener presionado por > 5 segundos) activa un restablecimiento de fábrica Zigbee.
- Los eventos de presión y liberación inmediatos se reportan para automatizaciones en tiempo real.
-
Cuatro Endpoints Zigbee
- Endpoint 10: Un sensor binario principal que refleja el estado en tiempo real del botón físico (encendido cuando está presionado, apagado cuando se libera).
- Endpoint 11: Un interruptor virtual activado por un clic simple.
- Endpoint 12: Un interruptor virtual activado por un doble clic.
- Endpoint 13: Un interruptor virtual activado por una pulsación larga corta.
-
Monitoreo de Batería (solo Botón IoT V2)
- Lee el voltaje de la batería vía ADC y aplica un filtro de Media Móvil Exponencial (EMA) para lecturas suaves y estables.
- Reporta tanto el voltaje (en unidades de 0.01V) como el porcentaje de batería a Zigbee.
- Un estado de batería baja (< 20%) activa el indicador LED rojo.
-
Retroalimentación LED
- Un LED RGB WS2812 proporciona retroalimentación visual (respiración, parpadeo, efectos arcoíris) para acciones de clic.
- Un LED de estado azul indica el estado de conexión Zigbee.
- Un LED de estado rojo (solo V2) indica una condición de batería baja.
-
Gestión de Energía
- Entra automáticamente en modo de suspensión después de 2 minutos de inactividad para conservar energía.
- Utiliza suspensión ligera para V1 y suspensión profunda con retención de estado RTC para V2, asegurando que los estados de clic del botón no se pierdan.
- Se despierta instantáneamente de la suspensión al presionar el botón.
Desarrollando Firmware Zigbee Personalizado con Arduino
Si quieres personalizar el comportamiento de tu Botón IoT, puedes desarrollar tu propio firmware Zigbee usando Arduino.
Paso 1: Configurar Arduino IDE para ESP32-C6
- Instala la versión más reciente de Arduino IDE.
- Agrega soporte para placas ESP32:
- Ve a Archivo > Preferencias.
- Agrega
https://raw.githubusercontent.com/espressif/arduino-esp32/gh-pages/package_esp32_index.jsonal campo "URLs adicionales del Gestor de Placas". - Ve a Herramientas > Placa > Gestor de Placas.
- Busca "esp32" e instala la versión más reciente (asegúrate de que sea versión 3.2.1 o superior).
Paso 2: Instalar Librerías Requeridas
El firmware del Botón IoT usa la librería FastLED para efectos RGB y el SDK Zigbee de Espressif, que está incluido en el paquete Arduino ESP32. La librería FastLED puede instalarse vía el Gestor de Librerías de Arduino.
-
Ve a Programa > Incluir Librería > Gestionar Librerías....
-
Busca "FastLED" e instala la librería de Daniel Garcia.
Paso 3: Configurar Arduino IDE para Desarrollo Zigbee
-
Selecciona la placa correcta:
- Herramientas > Placa > ESP32 Arduino > XIAO ESP32C6
-
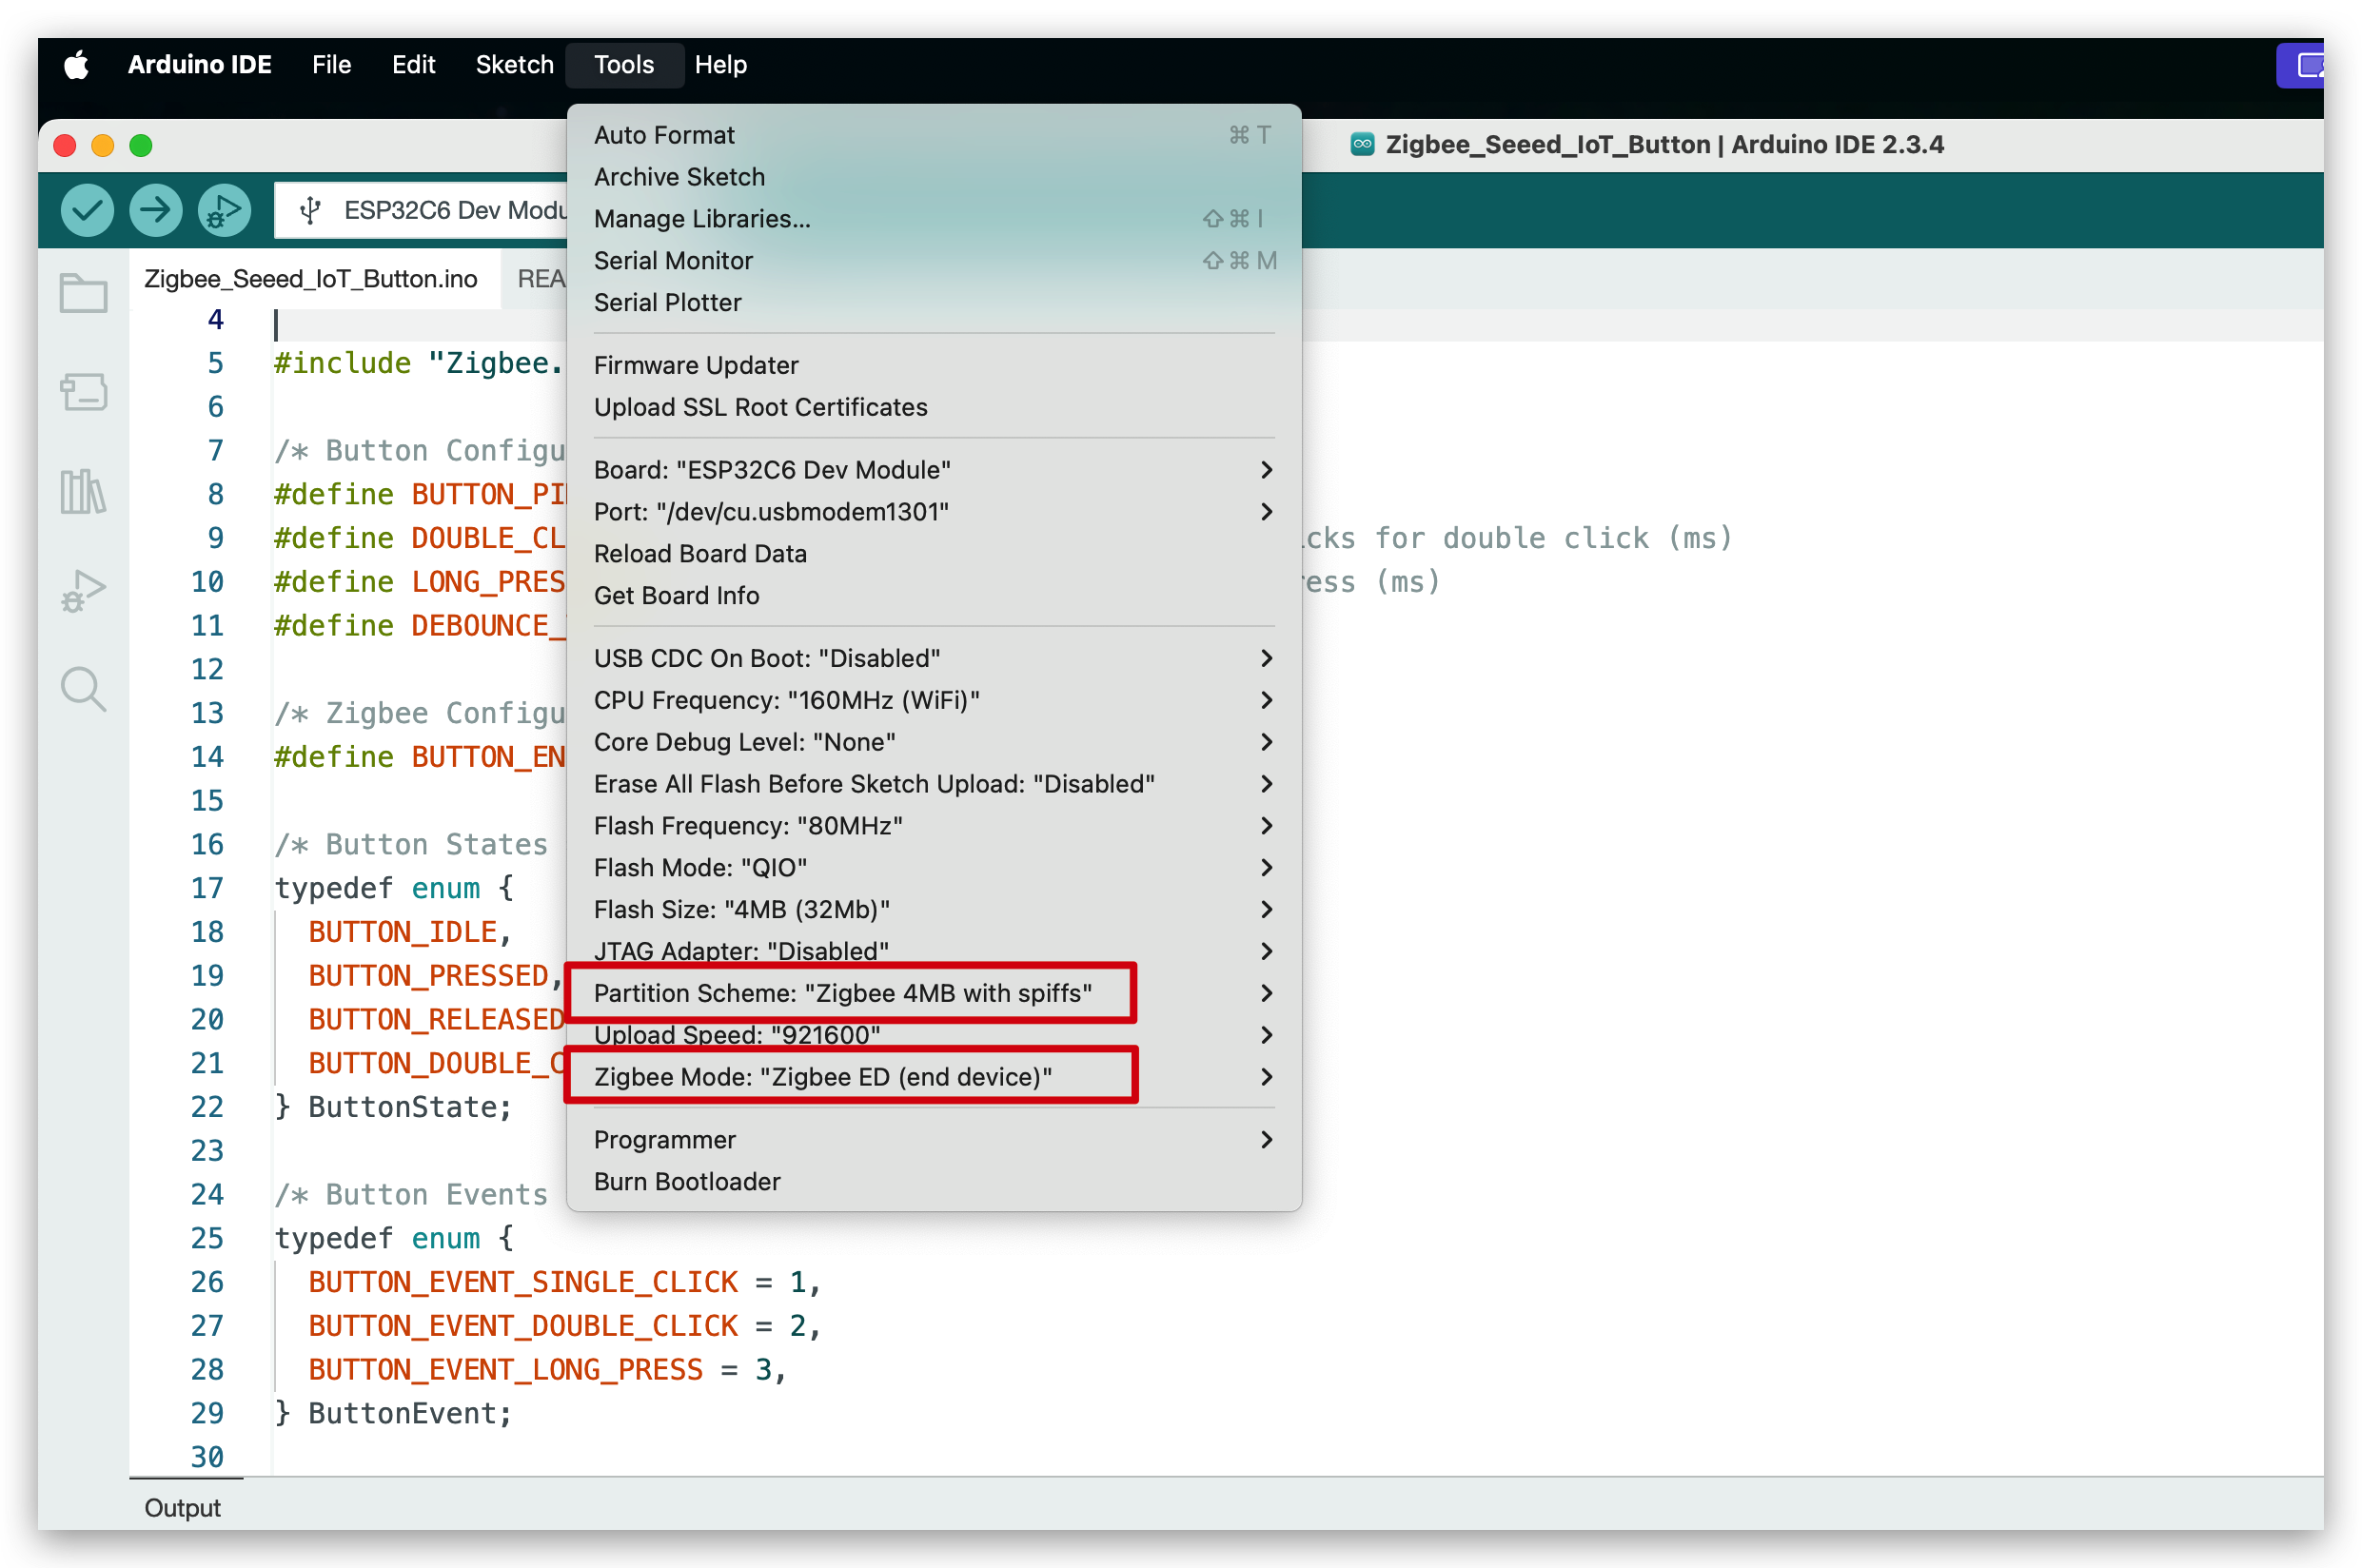
Configura los ajustes de Zigbee:
- Herramientas > Modo Zigbee > Zigbee End Device
- Herramientas > Esquema de Partición > Zigbee 4MB with spiffs
Paso 4: Crear Tu Firmware Personalizado
El nuevo firmware es un sketch de Arduino autocontenido. Soporta tanto el hardware del Botón IoT V1 como V2, detección avanzada de eventos de botón (clic simple, doble, triple, pulsación corta/larga), monitoreo de batería (V2), retroalimentación LED rica e integración Zigbee robusta usando tareas FreeRTOS.
Selección de Versión de Hardware
El código se compila para Botón IoT V2 por defecto. Para compilar para V1, debes descomentar la línea correspondiente en la parte superior del código:
Por favor verifica la versión correcta del dispositivo. Todos los Botones IoT actualmente disponibles en el mercado son V1.
Haz clic aquí para previsualizar el código completo
#ifndef ZIGBEE_MODE_ED
#error "Zigbee end device mode is not selected in Tools->Zigbee mode"
#endif

#include "Zigbee.h"
#include <FastLED.h>
#include <freertos/FreeRTOS.h>
#include <freertos/task.h>
#include <freertos/queue.h>
#include <esp_sleep.h>
#include "driver/rtc_io.h"

// Logging macro switch
#define ENABLE_LOGGING // Comment out to disable logging

#ifdef ENABLE_LOGGING
#define LOG_PRINTLN(x) Serial.println(x)
#define LOG_PRINTF(x, ...) Serial.printf(x, __VA_ARGS__)
#else
#define LOG_PRINTLN(x)
#define LOG_PRINTF(x, ...)
#endif

#define IOT_BUTTON_V1  //Uncomment this line to select to compile the iot button v1 version
// #define IOT_BUTTON_V2  //Uncomment this line to select to compile the iot button v2 version

#if !defined(IOT_BUTTON_V1) && !defined(IOT_BUTTON_V2)
#define IOT_BUTTON_V2
#endif

#define BUTTON_PIN_BITMASK(GPIO) (1ULL << GPIO)

/* Hardware Configuration */
#if defined(IOT_BUTTON_V1)
const uint8_t BUTTON_PIN = 9;
const uint8_t BLUE_LED_PIN = 2;
const uint8_t RGB_ENABLE_PIN = 18;
const uint8_t RGB_PIN = 19;
const uint8_t NUM_RGBS = 1;
#elif defined(IOT_BUTTON_V2)
const uint8_t BUTTON_PIN = 2;
const uint8_t BLUE_LED_PIN = 3;
const uint8_t RED_LED_PIN = 14;
const uint8_t RGB_ENABLE_PIN = 18;
const uint8_t RGB_PIN = 19;
const uint8_t NUM_RGBS = 1;
const uint8_t BATTERY_ADC_PIN = 1;
const uint8_t BATTERY_ENABLE_PIN = 0;
const int SAMPLE_COUNT = 10;
const float MIN_VOLTAGE = 2.75;
const float MAX_VOLTAGE = 4.2;
const float ALPHA = 0.1; // Smoothing factor for EMA
#endif

/* Button Configuration */
const uint32_t MULTI_CLICK_TIME = 300;             // Maximum time between clicks for multi-click (ms)
const uint32_t SHORT_LONG_PRESS_TIME = 1000;       // Minimum time for short long press (1 second)
const uint32_t LONG_PRESS_TIME = 5000;             // Minimum time for long press (5 seconds)
const uint32_t DEBOUNCE_TIME = 20;                 // Debounce time (ms)
const uint32_t INACTIVITY_TIMEOUT = 2 * 60 * 1000; // 2 minutes inactivity timeout (ms)

/* LED Configuration */
CRGB rgbs[NUM_RGBS];

/* Button Events */
enum class ButtonEvent
{
  PRESS,            // Pressed
  RELEASE,          // Released
  SINGLE_CLICK,     // Single click
  DOUBLE_CLICK,     // Double click
  TRIPLE_CLICK,     // Triple click
  SHORT_LONG_PRESS, // Short long press (1-5 seconds)
  LONG_PRESS        // Long press (>5 seconds)
};

/* Zigbee Configuration */
#define BUTTON_ENDPOINT 10
#define SWITCH1_ENDPOINT 11
#define SWITCH2_ENDPOINT 12
#define SWITCH3_ENDPOINT 13
ZigbeeBinary zbIoTButton = ZigbeeBinary(BUTTON_ENDPOINT);
ZigbeeBinary zbSwitch1 = ZigbeeBinary(SWITCH1_ENDPOINT);
ZigbeeBinary zbSwitch2 = ZigbeeBinary(SWITCH2_ENDPOINT);
ZigbeeBinary zbSwitch3 = ZigbeeBinary(SWITCH3_ENDPOINT);
bool buttonStatus = false;
RTC_DATA_ATTR bool switch1Status = false;
RTC_DATA_ATTR bool switch2Status = false;
RTC_DATA_ATTR bool switch3Status = false;

/* Global Variables */
QueueHandle_t eventQueue;

uint32_t pressStartTime = 0;
uint32_t lastReleaseTime = 0;
uint8_t clickCount = 0;
bool longPressTriggered = false;
bool clickSequenceActive = false; // Tracks if a click sequence is in progress
TaskHandle_t clickTimeoutTaskHandle = NULL;
uint32_t lastActivityTime = 0;  // Tracks last button activity for sleep
volatile bool isAwake = true;   // Tracks device awake/sleep state
bool lastConnected = false;     // Track previous Zigbee connection state
bool zigbeeInitialized = false; // Track Zigbee initialization status

#if defined(IOT_BUTTON_V2)
// RTC variables for button state persistence
RTC_DATA_ATTR uint32_t pressStartTimeRTC = 0;
RTC_DATA_ATTR uint32_t lastReleaseTimeRTC = 0;
RTC_DATA_ATTR uint8_t clickCountRTC = 0;
RTC_DATA_ATTR bool longPressTriggeredRTC = false;
RTC_DATA_ATTR bool clickSequenceActiveRTC = false;

float emaVoltage = 0.0;
float batteryPercentage = 100.0;
#endif

#if defined(IOT_BUTTON_V2)
/********************* Battery Functions **************************/
void measureBattery()
{
  digitalWrite(BATTERY_ENABLE_PIN, HIGH);
  vTaskDelay(10 / portTICK_PERIOD_MS); // Wait for stabilization

  // Take multiple samples and compute average
  float adcSum = 0;
  for (int i = 0; i < SAMPLE_COUNT; i++)
  {
    adcSum += analogRead(BATTERY_ADC_PIN);
    vTaskDelay(5 / portTICK_PERIOD_MS); // Small delay between samples
  }
  digitalWrite(BATTERY_ENABLE_PIN, LOW);

  float adcAverage = adcSum / SAMPLE_COUNT;
  float voltage = (adcAverage / 4095.0) * 3.3 * 3.0; // Apply divider ratio

  if (voltage < MIN_VOLTAGE)
  {
    emaVoltage = 0.0;
    batteryPercentage = 0.0;
    LOG_PRINTF("Battery voltage: %.2fV (too low or not connected), EMA voltage: %.2fV, Percentage: %.2f%%\n",
               voltage, emaVoltage, batteryPercentage);
  }
  else
  {
    // Update EMA
    if (emaVoltage == 0.0)
    {
      emaVoltage = voltage;
    }
    else
    {
      emaVoltage = ALPHA * voltage + (1 - ALPHA) * emaVoltage;
    }

    // Calculate battery percentage from emaVoltage
    float localBatteryPercentage = (emaVoltage - MIN_VOLTAGE) / (MAX_VOLTAGE - MIN_VOLTAGE) * 100;
    if (localBatteryPercentage < 0)
      localBatteryPercentage = 0;
    if (localBatteryPercentage > 100)
      localBatteryPercentage = 100;

    // Update global battery percentage
    batteryPercentage = localBatteryPercentage;

    LOG_PRINTF("Battery voltage: %.2fV, EMA voltage: %.2fV, Percentage: %.2f%%\n",
               voltage, emaVoltage, localBatteryPercentage);
  }
}
#endif

/********************* FreeRTOS Tasks **************************/
void breathingLedTask(void *pvParameters)
{
  LOG_PRINTLN("Breathing LED");
  uint8_t hue = random8();    // Random color hue
  for (int i = 0; i < 1; i++) // one breathing cycle
  {
    // Brighten
    for (int brightness = 0; brightness <= 255; brightness += 5)
    {
      rgbs[0] = CHSV(hue, 255, brightness);
      FastLED.show();
      vTaskDelay(20 / portTICK_PERIOD_MS);
    }
    // Dim
    for (int brightness = 255; brightness >= 0; brightness -= 5)
    {
      rgbs[0] = CHSV(hue, 255, brightness);
      FastLED.show();
      vTaskDelay(20 / portTICK_PERIOD_MS);
    }
  }
  rgbs[0] = CRGB::Black;
  FastLED.show();
  vTaskDelete(NULL);
}

void blinkLedTask(void *pvParameters)
{
  LOG_PRINTLN("Blink LED");
  uint8_t rand = random8();
  for (int i = 0; i < 2; i++)
  {
    rgbs[0] = CHSV(rand, 255, 255); // Random color
    FastLED.show();
    vTaskDelay(200 / portTICK_PERIOD_MS);
    rgbs[0] = CRGB::Black;
    FastLED.show();
    vTaskDelay(200 / portTICK_PERIOD_MS);
  }
  vTaskDelete(NULL);
}

void rainbowLedTask(void *pvParameters)
{
  LOG_PRINTLN("Rainbow LED");
  for (int hue = 0; hue < 128; hue += 10)
  {
    rgbs[0] = CHSV(hue, 255, 255);
    FastLED.show();
    vTaskDelay(100 / portTICK_PERIOD_MS);
  }
  rgbs[0] = CRGB::Black;
  FastLED.show();
  vTaskDelete(NULL);
}

void clickTimeoutTask(void *pvParameters)
{
  uint32_t localClickCount = clickCount;
  uint32_t localLastReleaseTime = lastReleaseTime;

  while (millis() - localLastReleaseTime < MULTI_CLICK_TIME)
  {
    vTaskDelay(10 / portTICK_PERIOD_MS);
  }

  ButtonEvent event;
  switch (localClickCount)
  {
  case 1:
    event = ButtonEvent::SINGLE_CLICK;
    break;
  case 2:
    event = ButtonEvent::DOUBLE_CLICK;
    break;
  case 3:
    event = ButtonEvent::TRIPLE_CLICK;
    break;
  default:
    vTaskDelete(NULL);
    return;
  }
  xQueueSend(eventQueue, &event, 0);

  clickCount = 0;
  clickSequenceActive = false;
  clickTimeoutTaskHandle = NULL;

  vTaskDelete(NULL);
}

// --- Button Task Refactor ---
static bool debounceButton(bool currentState, uint32_t currentTime, uint32_t &lastDebounceTime)
{
  if (currentTime - lastDebounceTime < DEBOUNCE_TIME)
  {
    vTaskDelay(1 / portTICK_PERIOD_MS);
    return true;
  }
  return false;
}

static void handleButtonPress(uint32_t currentTime)
{
  pressStartTime = currentTime;
  ButtonEvent event = ButtonEvent::PRESS;
  xQueueSend(eventQueue, &event, 0);
  lastActivityTime = millis();

  if (clickSequenceActive && (currentTime - lastReleaseTime <= MULTI_CLICK_TIME))
  {
    clickCount++;
    if (clickTimeoutTaskHandle != NULL)
    {
      vTaskDelete(clickTimeoutTaskHandle);
      clickTimeoutTaskHandle = NULL;
    }
  }
  else
  {
    clickCount = 1;
    clickSequenceActive = true;
  }
  longPressTriggered = false;
}

static void handleButtonRelease(uint32_t currentTime)
{
  uint32_t pressDuration = currentTime - pressStartTime;
  ButtonEvent event = ButtonEvent::RELEASE;
  xQueueSend(eventQueue, &event, 0);
  lastActivityTime = millis();

  if (!longPressTriggered)
  {
    if (pressDuration >= LONG_PRESS_TIME)
    {
      event = ButtonEvent::LONG_PRESS;
      longPressTriggered = true;
      clickSequenceActive = false;
      clickCount = 0;
      xQueueSend(eventQueue, &event, 0);
      if (clickTimeoutTaskHandle != NULL)
      {
        vTaskDelete(clickTimeoutTaskHandle);
        clickTimeoutTaskHandle = NULL;
      }
    }
    else if (pressDuration >= SHORT_LONG_PRESS_TIME)
    {
      event = ButtonEvent::SHORT_LONG_PRESS;
      longPressTriggered = true;
      clickSequenceActive = false;
      clickCount = 0;
      xQueueSend(eventQueue, &event, 0);
      if (clickTimeoutTaskHandle != NULL)
      {
        vTaskDelete(clickTimeoutTaskHandle);
        clickTimeoutTaskHandle = NULL;
      }
    }
    else
    {
      lastReleaseTime = currentTime;
      if (clickTimeoutTaskHandle != NULL)
      {
        vTaskDelete(clickTimeoutTaskHandle);
        clickTimeoutTaskHandle = NULL;
      }
      xTaskCreate(clickTimeoutTask, "ClickTimeout", 2048, NULL, 1, &clickTimeoutTaskHandle);
    }
  }
}

static void checkLongPress(uint32_t currentTime)
{
  if (currentTime - pressStartTime >= LONG_PRESS_TIME)
  {
    ButtonEvent event = ButtonEvent::LONG_PRESS;
    longPressTriggered = true;
    clickSequenceActive = false;
    clickCount = 0;
    xQueueSend(eventQueue, &event, 0);
    lastActivityTime = millis();
    if (clickTimeoutTaskHandle != NULL)
    {
      vTaskDelete(clickTimeoutTaskHandle);
      clickTimeoutTaskHandle = NULL;
    }
  }
}

void buttonTask(void *pvParameters)
{
  uint32_t lastDebounceTime = 0;
  bool lastState = false;

  // Check if woken up by button press
  if (esp_sleep_get_wakeup_cause() == ESP_SLEEP_WAKEUP_EXT1)
  {
    bool currentState = (digitalRead(BUTTON_PIN) == LOW);
    if (currentState)
    {
      handleButtonPress(millis());
    }
  }

  while (1)
  {
    bool currentState = (digitalRead(BUTTON_PIN) == LOW);
    uint32_t currentTime = millis();

    if (debounceButton(currentState, currentTime, lastDebounceTime))
      continue;

    if (currentState != lastState)
    {
      lastDebounceTime = currentTime;
      lastState = currentState;
      if (currentState)
      {
        handleButtonPress(currentTime);
      }
      else
      {
        handleButtonRelease(currentTime);
      }
    }
    else if (currentState && !longPressTriggered)
    {
      checkLongPress(currentTime);
    }

    vTaskDelay(10 / portTICK_PERIOD_MS);
  }
}

void mainTask(void *pvParameters)
{
  ButtonEvent event;
  while (1)
  {
    if (xQueueReceive(eventQueue, &event, portMAX_DELAY) == pdTRUE)
    {
      switch (event)
      {
      case ButtonEvent::PRESS:
        if (buttonStatus == false)
        {
          buttonStatus = true;
          LOG_PRINTLN("Button Pressed");
          if (zigbeeInitialized && Zigbee.connected())
          {
            zbIoTButton.setBinaryInput(buttonStatus);
            zbIoTButton.reportBinaryInput();
          }
        }
        break;

      case ButtonEvent::RELEASE:
        if (buttonStatus == true)
        {
          buttonStatus = false;
          LOG_PRINTLN("Button Released");
          if (zigbeeInitialized && Zigbee.connected())
          {
            zbIoTButton.setBinaryInput(buttonStatus);
            zbIoTButton.reportBinaryInput();
          }
        }
        break;

      case ButtonEvent::SINGLE_CLICK:
        LOG_PRINTLN("Single Click");
        switch1Status = !switch1Status;
        if (zigbeeInitialized && Zigbee.connected())
        {
          zbSwitch1.setBinaryInput(switch1Status);
          zbSwitch1.reportBinaryInput();
        }
        xTaskCreate(breathingLedTask, "BreathingLed", 2048, NULL, 1, NULL);
        break;

      case ButtonEvent::DOUBLE_CLICK:
        LOG_PRINTLN("Double Click");
        switch2Status = !switch2Status;
        if (zigbeeInitialized && Zigbee.connected())
        {
          zbSwitch2.setBinaryInput(switch2Status);
          zbSwitch2.reportBinaryInput();
        }
        xTaskCreate(blinkLedTask, "BlinkLed", 2048, NULL, 1, NULL);
        break;

      case ButtonEvent::TRIPLE_CLICK:
        LOG_PRINTLN("Triple Click");
        if (zigbeeInitialized && Zigbee.connected())
        {
          // Add any specific Zigbee action here if needed
        }
        break;

      case ButtonEvent::SHORT_LONG_PRESS:
        LOG_PRINTLN("Short Long Press");
        switch3Status = !switch3Status;
        if (zigbeeInitialized && Zigbee.connected())
        {
          zbSwitch3.setBinaryInput(switch3Status);
          zbSwitch3.reportBinaryInput();
        }
        xTaskCreate(rainbowLedTask, "RainbowLed", 2048, NULL, 1, NULL);
        break;

      case ButtonEvent::LONG_PRESS:
        LOG_PRINTLN("Long Press\nReset Zigbee");
        vTaskDelay(1000 / portTICK_PERIOD_MS);
        if (zigbeeInitialized)
        {
          Zigbee.factoryReset();
        }
        break;
      }
    }
  }
}

#if defined(IOT_BUTTON_V1)
void ledTask(void *pvParameters)
{
  pinMode(BLUE_LED_PIN, OUTPUT);
  while (1)
  {
    if (isAwake)
    {
      if (!zigbeeInitialized || !Zigbee.connected()) // Blink when not connected or not initialized
      {
        digitalWrite(BLUE_LED_PIN, LOW); // On
        vTaskDelay(500 / portTICK_PERIOD_MS);
        digitalWrite(BLUE_LED_PIN, HIGH); // Off
        vTaskDelay(500 / portTICK_PERIOD_MS);
      }
      else
      {
        digitalWrite(BLUE_LED_PIN, LOW); // On when connected
      }
    }
    else
    {
      digitalWrite(BLUE_LED_PIN, HIGH); // Off during sleep
    }
    vTaskDelay(10 / portTICK_PERIOD_MS);
  }
}
#elif defined(IOT_BUTTON_V2)
void ledTask(void *pvParameters)
{
  pinMode(BLUE_LED_PIN, OUTPUT);
  pinMode(RED_LED_PIN, OUTPUT);
  bool ledState = false;

  while (1)
  {
    if (isAwake)
    {
      bool isLowBattery = (batteryPercentage < 20.0);
      bool isConnected = zigbeeInitialized && Zigbee.connected();
      uint8_t activeLedPin = isLowBattery ? RED_LED_PIN : BLUE_LED_PIN;
      uint8_t inactiveLedPin = isLowBattery ? BLUE_LED_PIN : RED_LED_PIN;

      if (isConnected)
      {
        digitalWrite(activeLedPin, LOW);
        digitalWrite(inactiveLedPin, HIGH);
      }
      else
      {
        ledState = !ledState;
        digitalWrite(activeLedPin, ledState ? LOW : HIGH);
        digitalWrite(inactiveLedPin, HIGH);
      }
    }
    else
    {
      digitalWrite(BLUE_LED_PIN, HIGH);
      digitalWrite(RED_LED_PIN, HIGH);
    }
    vTaskDelay(500 / portTICK_PERIOD_MS);
  }
}
#endif

#if defined(IOT_BUTTON_V2)
void batteryTask(void *pvParameters)
{
  pinMode(BATTERY_ENABLE_PIN, OUTPUT);

  while (1)
  {
    measureBattery();
    if (zigbeeInitialized && Zigbee.connected())
    {
      zbIoTButton.setBatteryVoltage((uint8_t)(emaVoltage * 100)); // Unit: 0.01V
      zbIoTButton.setBatteryPercentage((uint8_t)batteryPercentage);
      zbIoTButton.reportBatteryPercentage();
    }
    vTaskDelay(30000 / portTICK_PERIOD_MS); // Check every 30 seconds
  }
}
#endif

void sleepTask(void *pvParameters)
{
  while (1)
  {
    if (isAwake && (millis() - lastActivityTime > INACTIVITY_TIMEOUT))
    {
      LOG_PRINTLN("Entering sleep due to inactivity");
#if defined(IOT_BUTTON_V1)
      isAwake = false;
      digitalWrite(BLUE_LED_PIN, HIGH);
      esp_sleep_enable_gpio_wakeup();
      digitalWrite(BLUE_LED_PIN, HIGH); // Turn off LED
      gpio_wakeup_enable((gpio_num_t)BUTTON_PIN, GPIO_INTR_LOW_LEVEL);
      digitalWrite(RGB_ENABLE_PIN, LOW);
      esp_light_sleep_start();
      digitalWrite(RGB_ENABLE_PIN, HIGH);
      LOG_PRINTLN("Woke up from light sleep");
      isAwake = true;
      digitalWrite(BLUE_LED_PIN, LOW); // Turn on LED
#elif defined(IOT_BUTTON_V2)
      // Save button state to RTC memory
      pressStartTimeRTC = pressStartTime;
      lastReleaseTimeRTC = lastReleaseTime;
      clickCountRTC = clickCount;
      longPressTriggeredRTC = longPressTriggered;
      clickSequenceActiveRTC = clickSequenceActive;

      digitalWrite(BLUE_LED_PIN, HIGH);
      digitalWrite(RED_LED_PIN, HIGH);
      digitalWrite(RGB_PIN, LOW);
      digitalWrite(RGB_ENABLE_PIN, LOW);
      static gpio_num_t WAKEUP_GPIO = (gpio_num_t)BUTTON_PIN;
      esp_sleep_enable_ext1_wakeup_io(BUTTON_PIN_BITMASK(WAKEUP_GPIO), ESP_EXT1_WAKEUP_ANY_LOW);
      esp_deep_sleep_start();
#endif
    }
    vTaskDelay(10000 / portTICK_PERIOD_MS); // Check every 10 seconds
  }
}

/********************* Zigbee Functions **************************/
void onZigbeeConnected()
{
  if (!zigbeeInitialized)
  {
    return;
  }
#if defined(IOT_BUTTON_V2)
  measureBattery();                                           // Ensure latest battery data
  zbIoTButton.setBatteryVoltage((uint8_t)(emaVoltage * 100)); // Unit: 0.01V
  zbIoTButton.setBatteryPercentage((uint8_t)batteryPercentage);
  zbIoTButton.reportBatteryPercentage();
#endif
  zbSwitch1.setBinaryInput(switch1Status);
  zbSwitch1.reportBinaryInput();
  zbSwitch2.setBinaryInput(switch2Status);
  zbSwitch2.reportBinaryInput();
  zbSwitch3.setBinaryInput(switch3Status);
  zbSwitch3.reportBinaryInput();
}

void zigbeeSetupTask(void *pvParameters)
{
  zbIoTButton.addBinaryInput();
  zbIoTButton.setBinaryInputApplication(BINARY_INPUT_APPLICATION_TYPE_SECURITY_MOTION_DETECTION);
  zbIoTButton.setBinaryInputDescription("Button");
  zbSwitch1.addBinaryInput();
  zbSwitch1.setBinaryInputApplication(BINARY_INPUT_APPLICATION_TYPE_SECURITY_MOTION_DETECTION);
  zbSwitch1.setBinaryInputDescription("Switch1");
  zbSwitch2.addBinaryInput();
  zbSwitch2.setBinaryInputApplication(BINARY_INPUT_APPLICATION_TYPE_SECURITY_MOTION_DETECTION);
  zbSwitch2.setBinaryInputDescription("Switch2");
  zbSwitch3.addBinaryInput();
  zbSwitch3.setBinaryInputApplication(BINARY_INPUT_APPLICATION_TYPE_SECURITY_MOTION_DETECTION);
  zbSwitch3.setBinaryInputDescription("Switch3");

  // Set Zigbee device information
#if defined(IOT_BUTTON_V1)
  zbIoTButton.setManufacturerAndModel("Seeed Studio", "IoT_Button");
#elif defined(IOT_BUTTON_V2)
  zbIoTButton.setManufacturerAndModel("Seeed Studio", "IoT Button V2");
  zbIoTButton.setPowerSource(ZB_POWER_SOURCE_BATTERY, 100);
#endif

  // Add endpoint to Zigbee Core
  Zigbee.addEndpoint(&zbIoTButton);
  Zigbee.addEndpoint(&zbSwitch1);
  Zigbee.addEndpoint(&zbSwitch2);
  Zigbee.addEndpoint(&zbSwitch3);
  esp_zb_cfg_t zigbeeConfig = ZIGBEE_DEFAULT_ED_CONFIG();
  zigbeeConfig.nwk_cfg.zed_cfg.keep_alive = 10000;

  Zigbee.setTimeout(10000); // Set timeout for Zigbee Begin to 10s (default is 30s)
  LOG_PRINTLN("Starting Zigbee...");
  if (!Zigbee.begin(&zigbeeConfig, false))
  {
    LOG_PRINTLN("Zigbee failed to start!");
    LOG_PRINTLN("Please try holding down the 5S key for a long time to reset zigbee");
    zigbeeInitialized = false;
  }
  else
  {
    LOG_PRINTLN("Zigbee started successfully!");
    zigbeeInitialized = true;
  }

  vTaskDelete(NULL); // Terminate the task after completion
}

/********************* Arduino Setup **************************/
void setup()
{
  Serial.begin(115200);

  LOG_PRINTLN("Zigbee IoT Button Starting...");
#if defined(IOT_BUTTON_V2)
  // Restore button state from RTC memory
  pressStartTime = pressStartTimeRTC;
  lastReleaseTime = lastReleaseTimeRTC;
  clickCount = clickCountRTC;
  longPressTriggered = longPressTriggeredRTC;
  clickSequenceActive = clickSequenceActiveRTC;
#endif

  // Initialize button pin
  pinMode(BUTTON_PIN, INPUT_PULLUP);

  pinMode(RGB_ENABLE_PIN, OUTPUT);
  digitalWrite(RGB_ENABLE_PIN, HIGH);
#if defined(IOT_BUTTON_V2)
  pinMode(BATTERY_ENABLE_PIN, OUTPUT);
#endif

  // Initialize LED
  FastLED.addLeds<WS2812, RGB_PIN, GRB>(rgbs, NUM_RGBS);
  FastLED.setBrightness(50);

  // Create event queue
  eventQueue = xQueueCreate(10, sizeof(ButtonEvent));
  if (eventQueue == NULL)
  {
    LOG_PRINTLN("Failed to create event queue!");
    ESP.restart();
  }

#if defined(IOT_BUTTON_V2)
  // Check if woken up by button press and handle immediately
  if (esp_sleep_get_wakeup_cause() == ESP_SLEEP_WAKEUP_EXT1)
  {
    uint32_t currentTime = millis();
    if (digitalRead(BUTTON_PIN) == LOW)
    {
      handleButtonPress(currentTime);
    }
  }
#endif

  // Create FreeRTOS tasks
  xTaskCreate(buttonTask, "ButtonTask", 2048, NULL, 4, NULL);
  xTaskCreate(ledTask, "LedTask", 1024, NULL, 0, NULL);
  xTaskCreate(mainTask, "MainTask", 2048, NULL, 3, NULL);
  xTaskCreate(sleepTask, "SleepTask", 2048, NULL, 2, NULL);
  xTaskCreate(zigbeeSetupTask, "ZigbeeSetup", 2048, NULL, 1, NULL);
#if defined(IOT_BUTTON_V2)
  xTaskCreate(batteryTask, "BatteryTask", 2048, NULL, 1, NULL);
#endif
}

/********************* Arduino Loop **************************/
void loop()
{
  if (zigbeeInitialized)
  {
    bool currentConnected = Zigbee.connected();
    if (currentConnected && !lastConnected)
    {
      LOG_PRINTLN("Zigbee connected!");
      onZigbeeConnected();
    }
    else if (!currentConnected && lastConnected)
    {
      LOG_PRINTLN("Zigbee disconnected!");
    }
    lastConnected = currentConnected;
    if (!currentConnected)
    {
      LOG_PRINTLN("Zigbee not connected, retrying...");
      vTaskDelay(5000 / portTICK_PERIOD_MS);
    }
    else
    {
      vTaskDelay(1000 / portTICK_PERIOD_MS);
    }
  }
  else
  {
    vTaskDelay(1000 / portTICK_PERIOD_MS); // Keep loop running even if Zigbee fails
  }
}
La documentación puede no estar actualizada con las actualizaciones del código, también puedes hacer clic en el botón de abajo para obtener los procedimientos más recientes.
Paso 5: Cargar y Probar tu Firmware
- Conecta tu Botón IoT a tu computadora vía USB.
- Selecciona el puerto correcto en Arduino IDE.
- Haz clic en el botón Cargar.
- Abre el Monitor Serie (velocidad de baudios 115200) para ver la información de depuración.
- Una vez que la carga esté completa, el botón estará listo para ser emparejado.
Paso 6: Configurar Zigbee en Home Assistant
Antes de emparejar tu Botón IoT, necesitas configurar un coordinador Zigbee en Home Assistant:
- Instalar un Coordinador Zigbee: Conecta un coordinador Zigbee como el Home Assistant Connect ZBT-1 a tu servidor de Home Assistant.
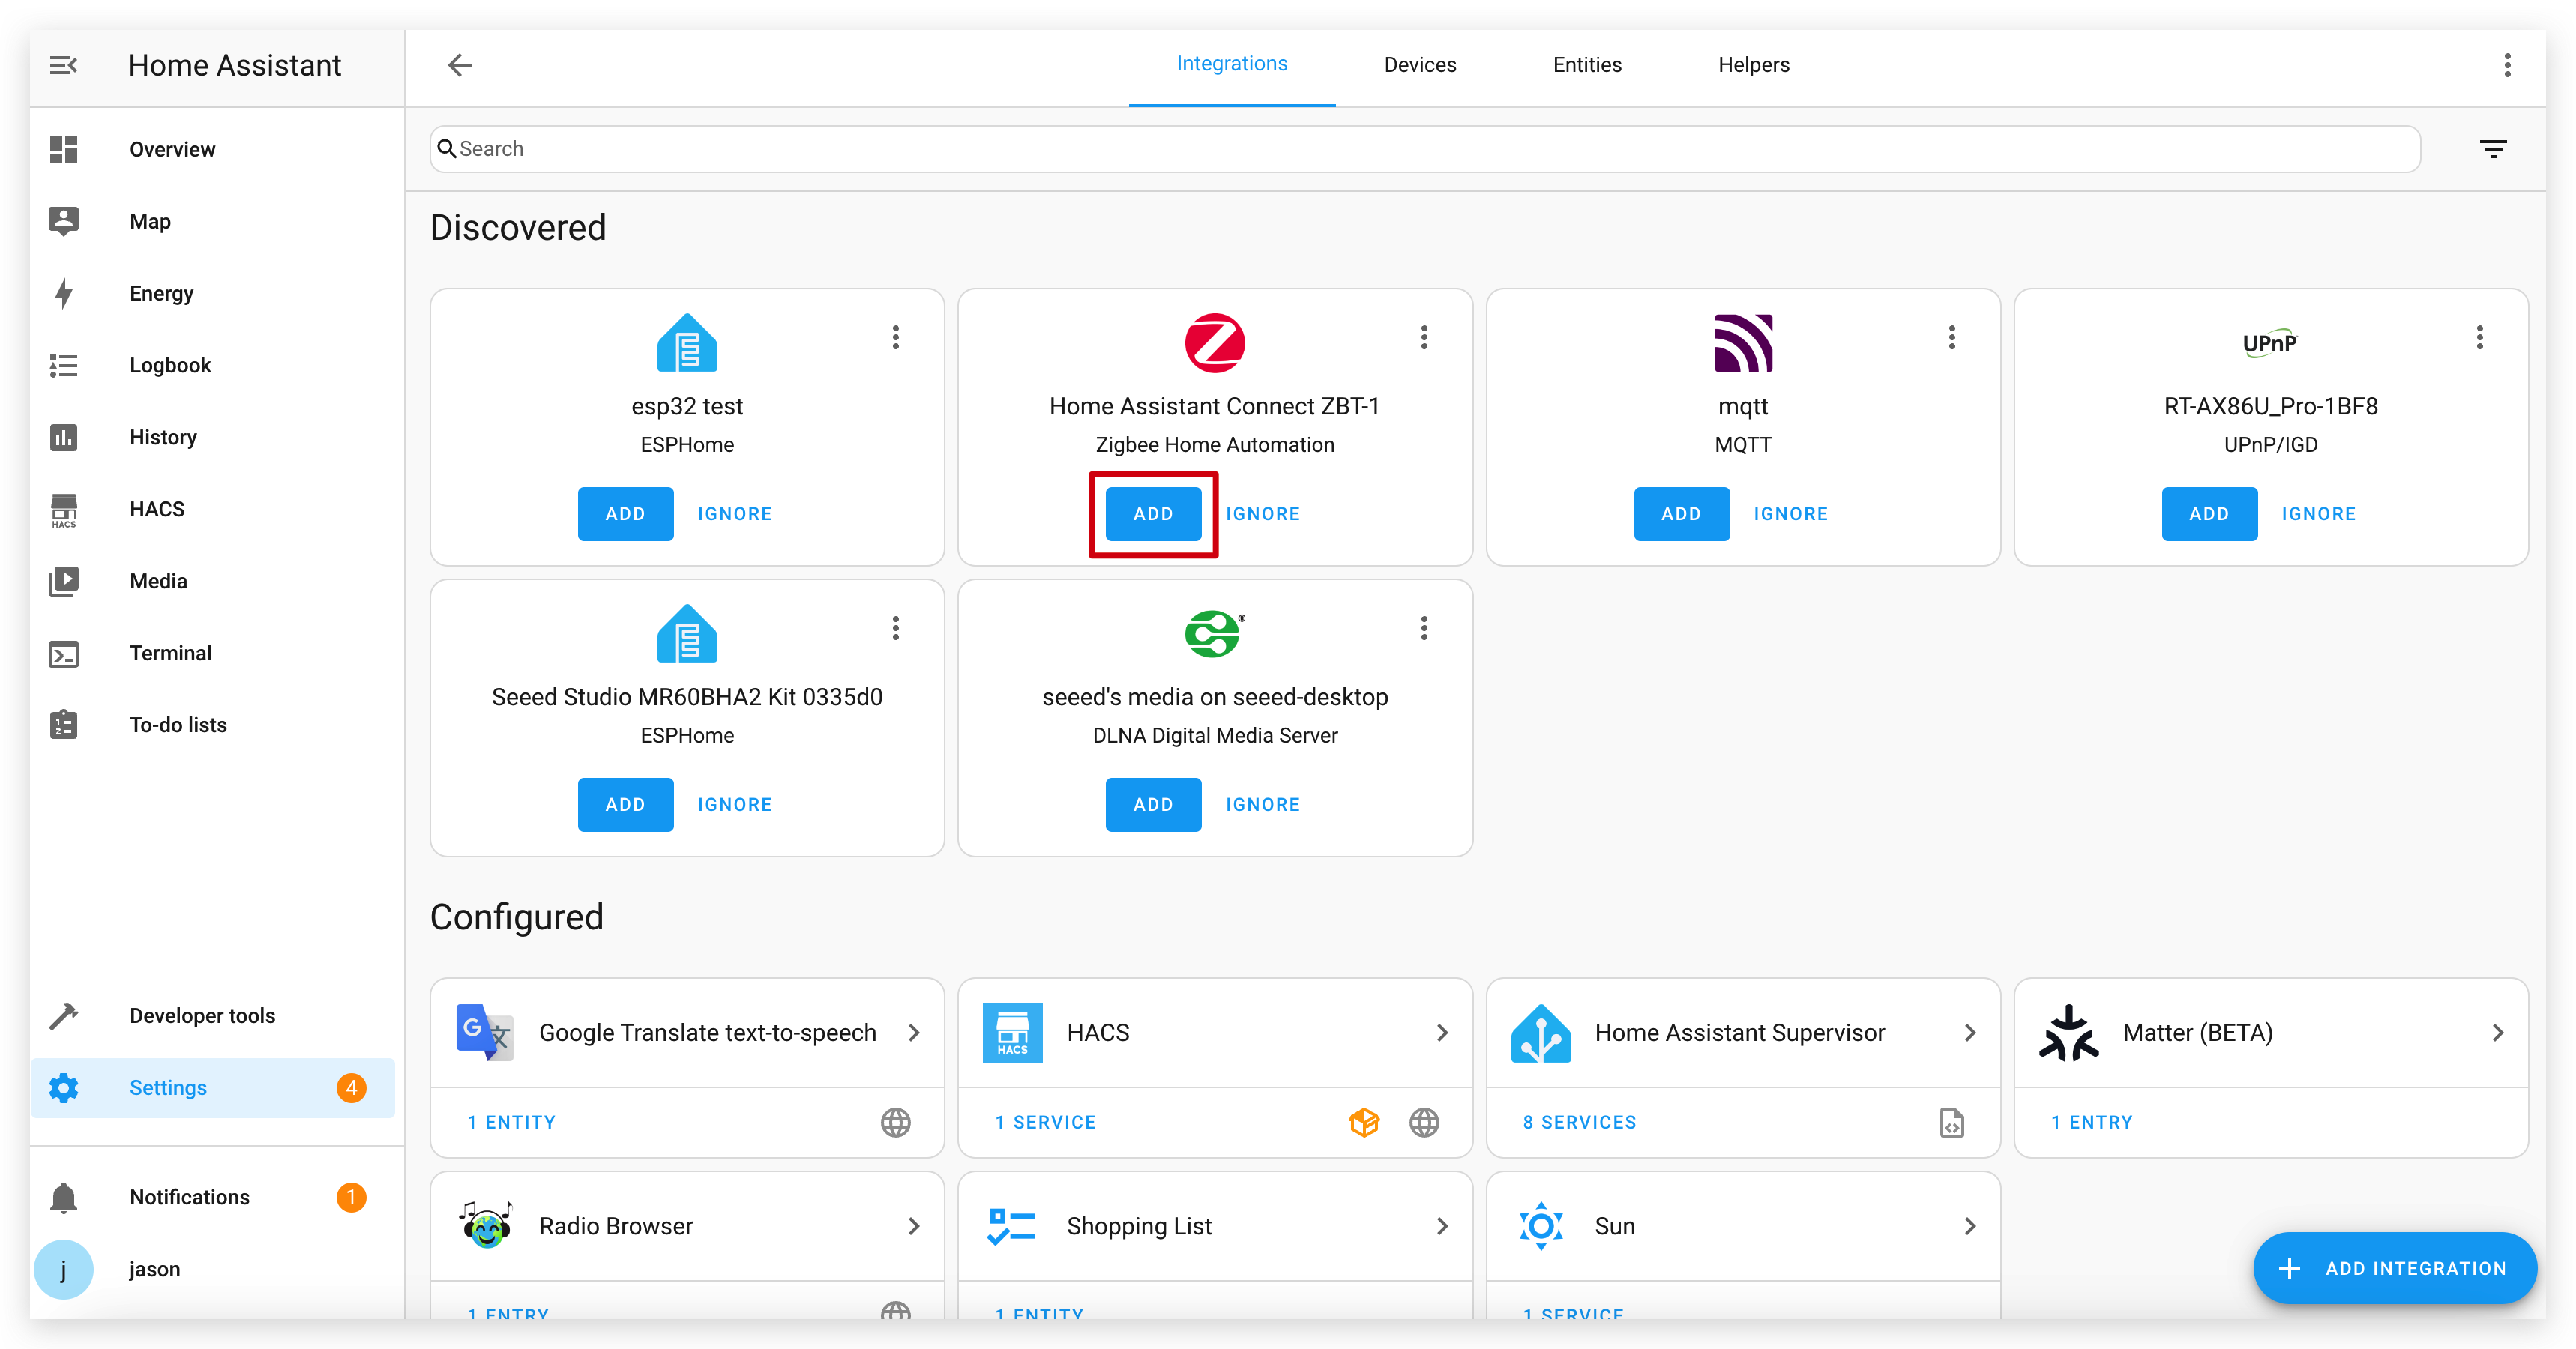
- Configurar Zigbee Home Automation (ZHA):
- Ve a Configuración > Dispositivos y Servicios.
- Haz clic en "Agregar Integración" y busca "Zigbee Home Automation".
- Sigue las indicaciones para configurar ZHA con tu coordinador.
Paso 7: Emparejar el Botón IoT con Home Assistant
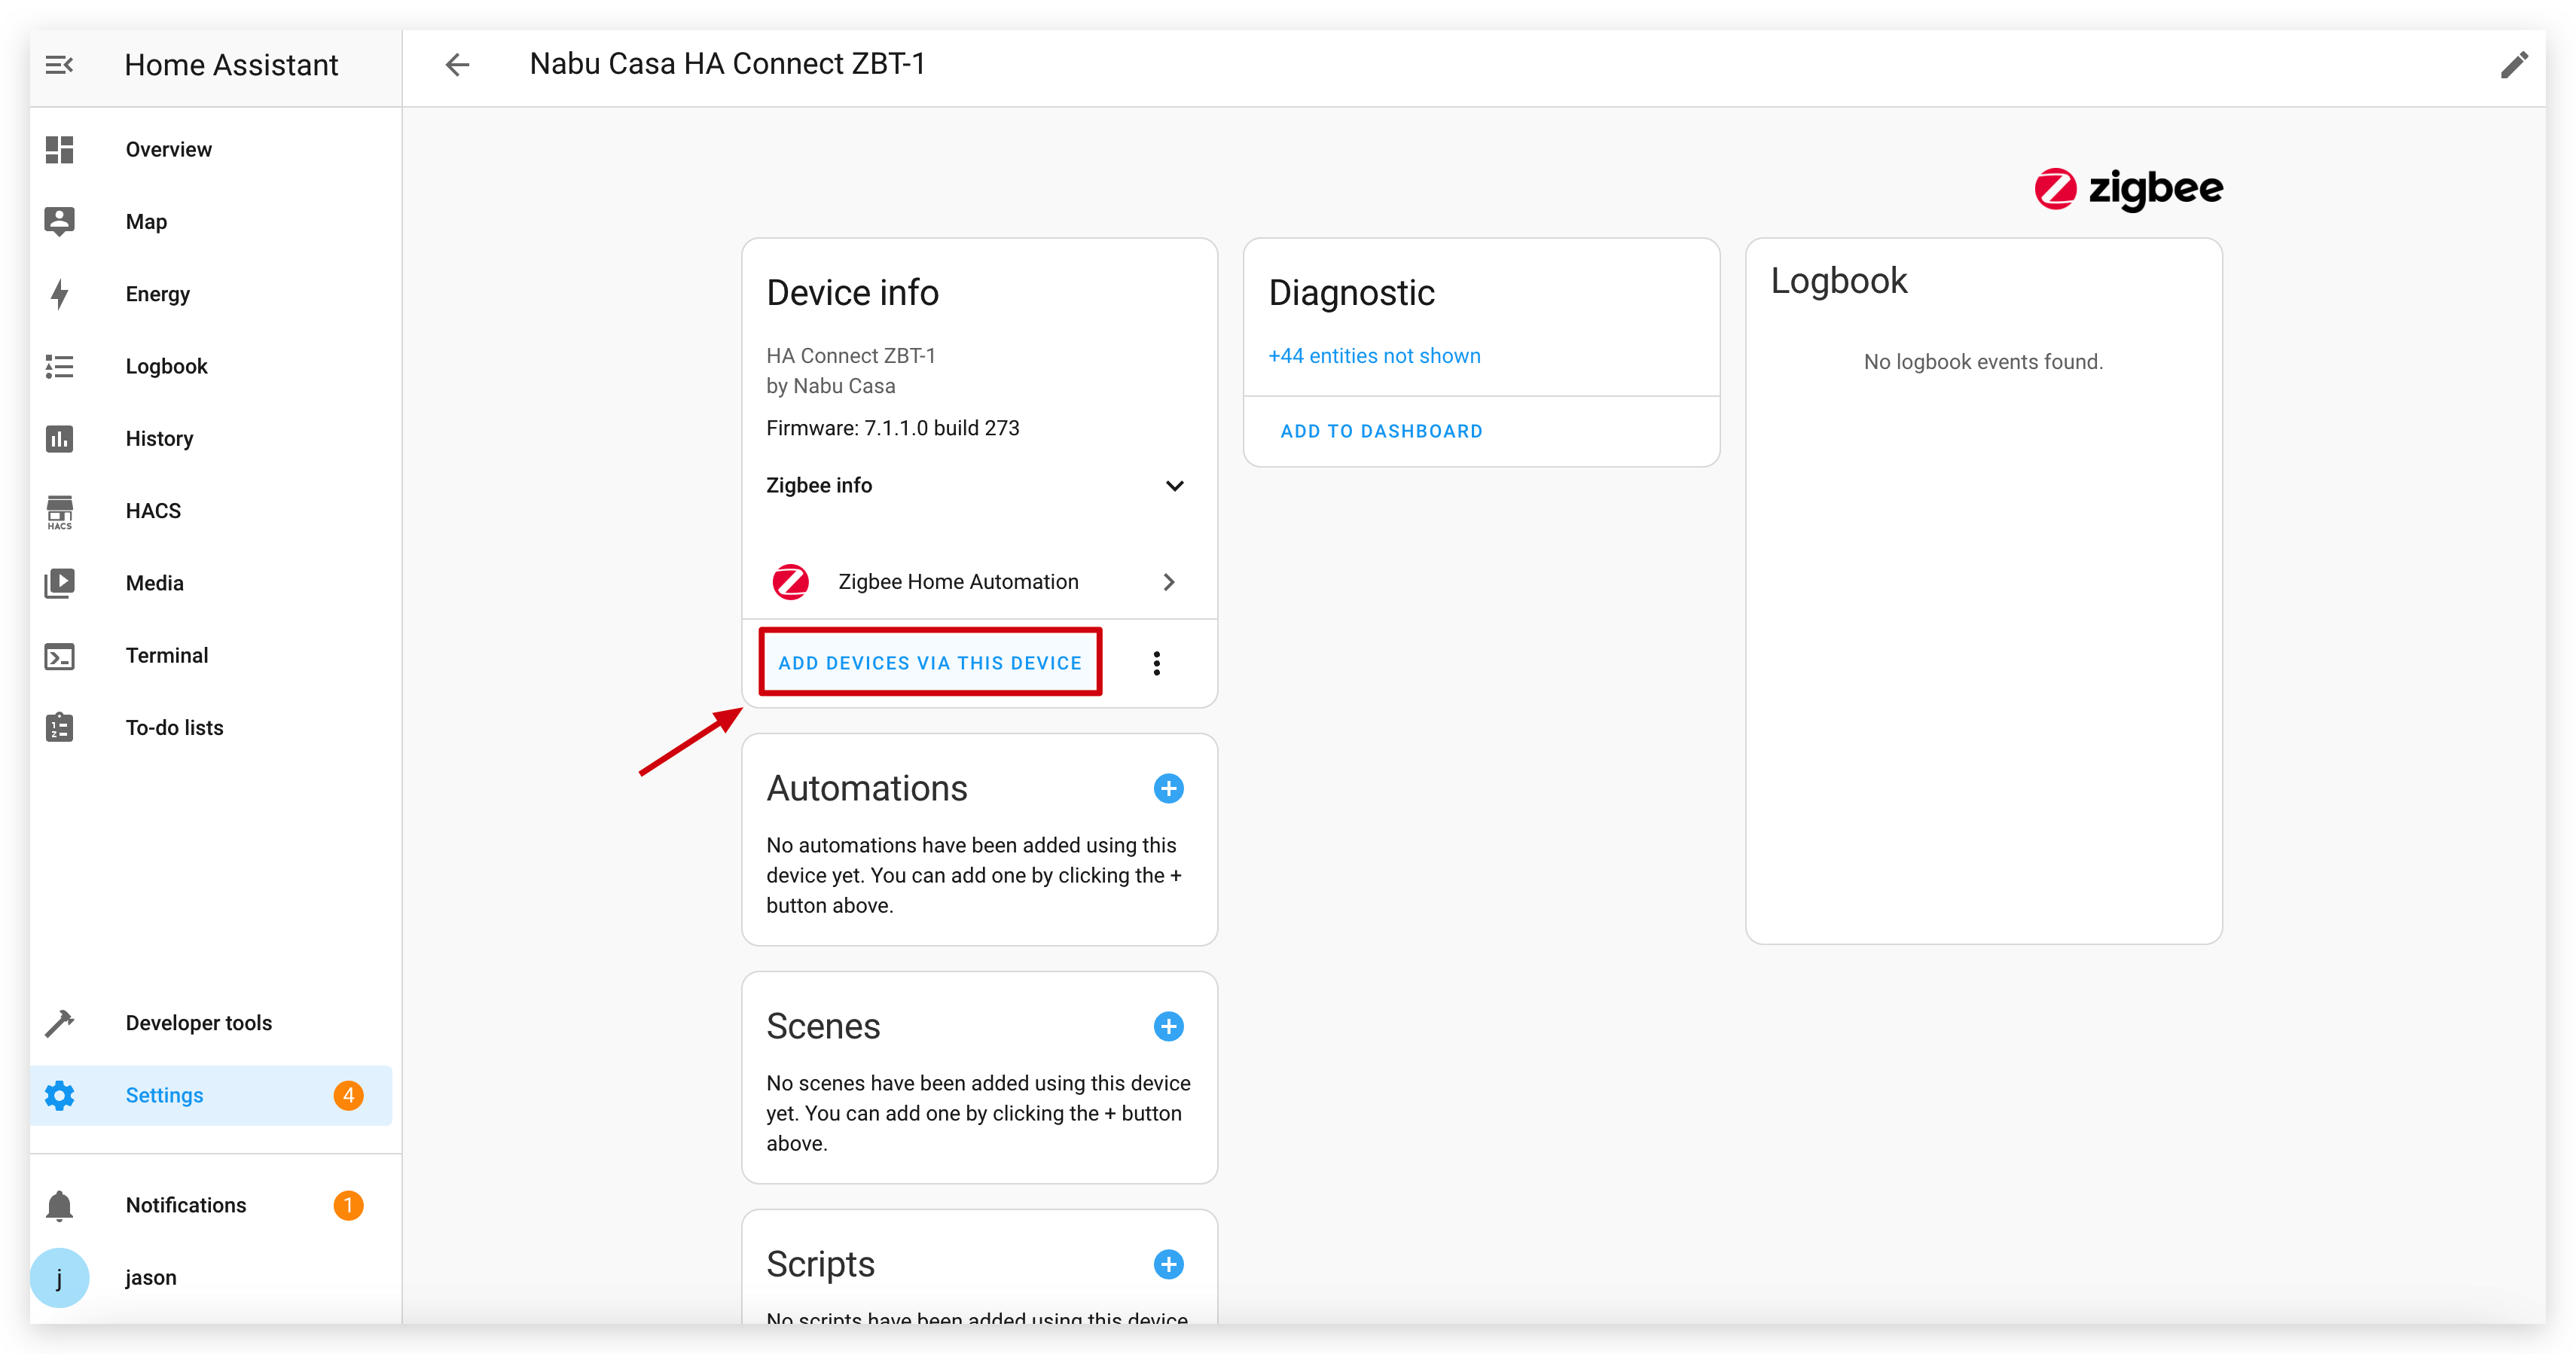
- En Home Assistant, ve a Configuración > Dispositivos y Servicios > Zigbee Home Automation.
- Haz clic en tu dispositivo coordinador Zigbee.
- Haz clic en "Agregar Dispositivo" para poner el coordinador en modo de emparejamiento.
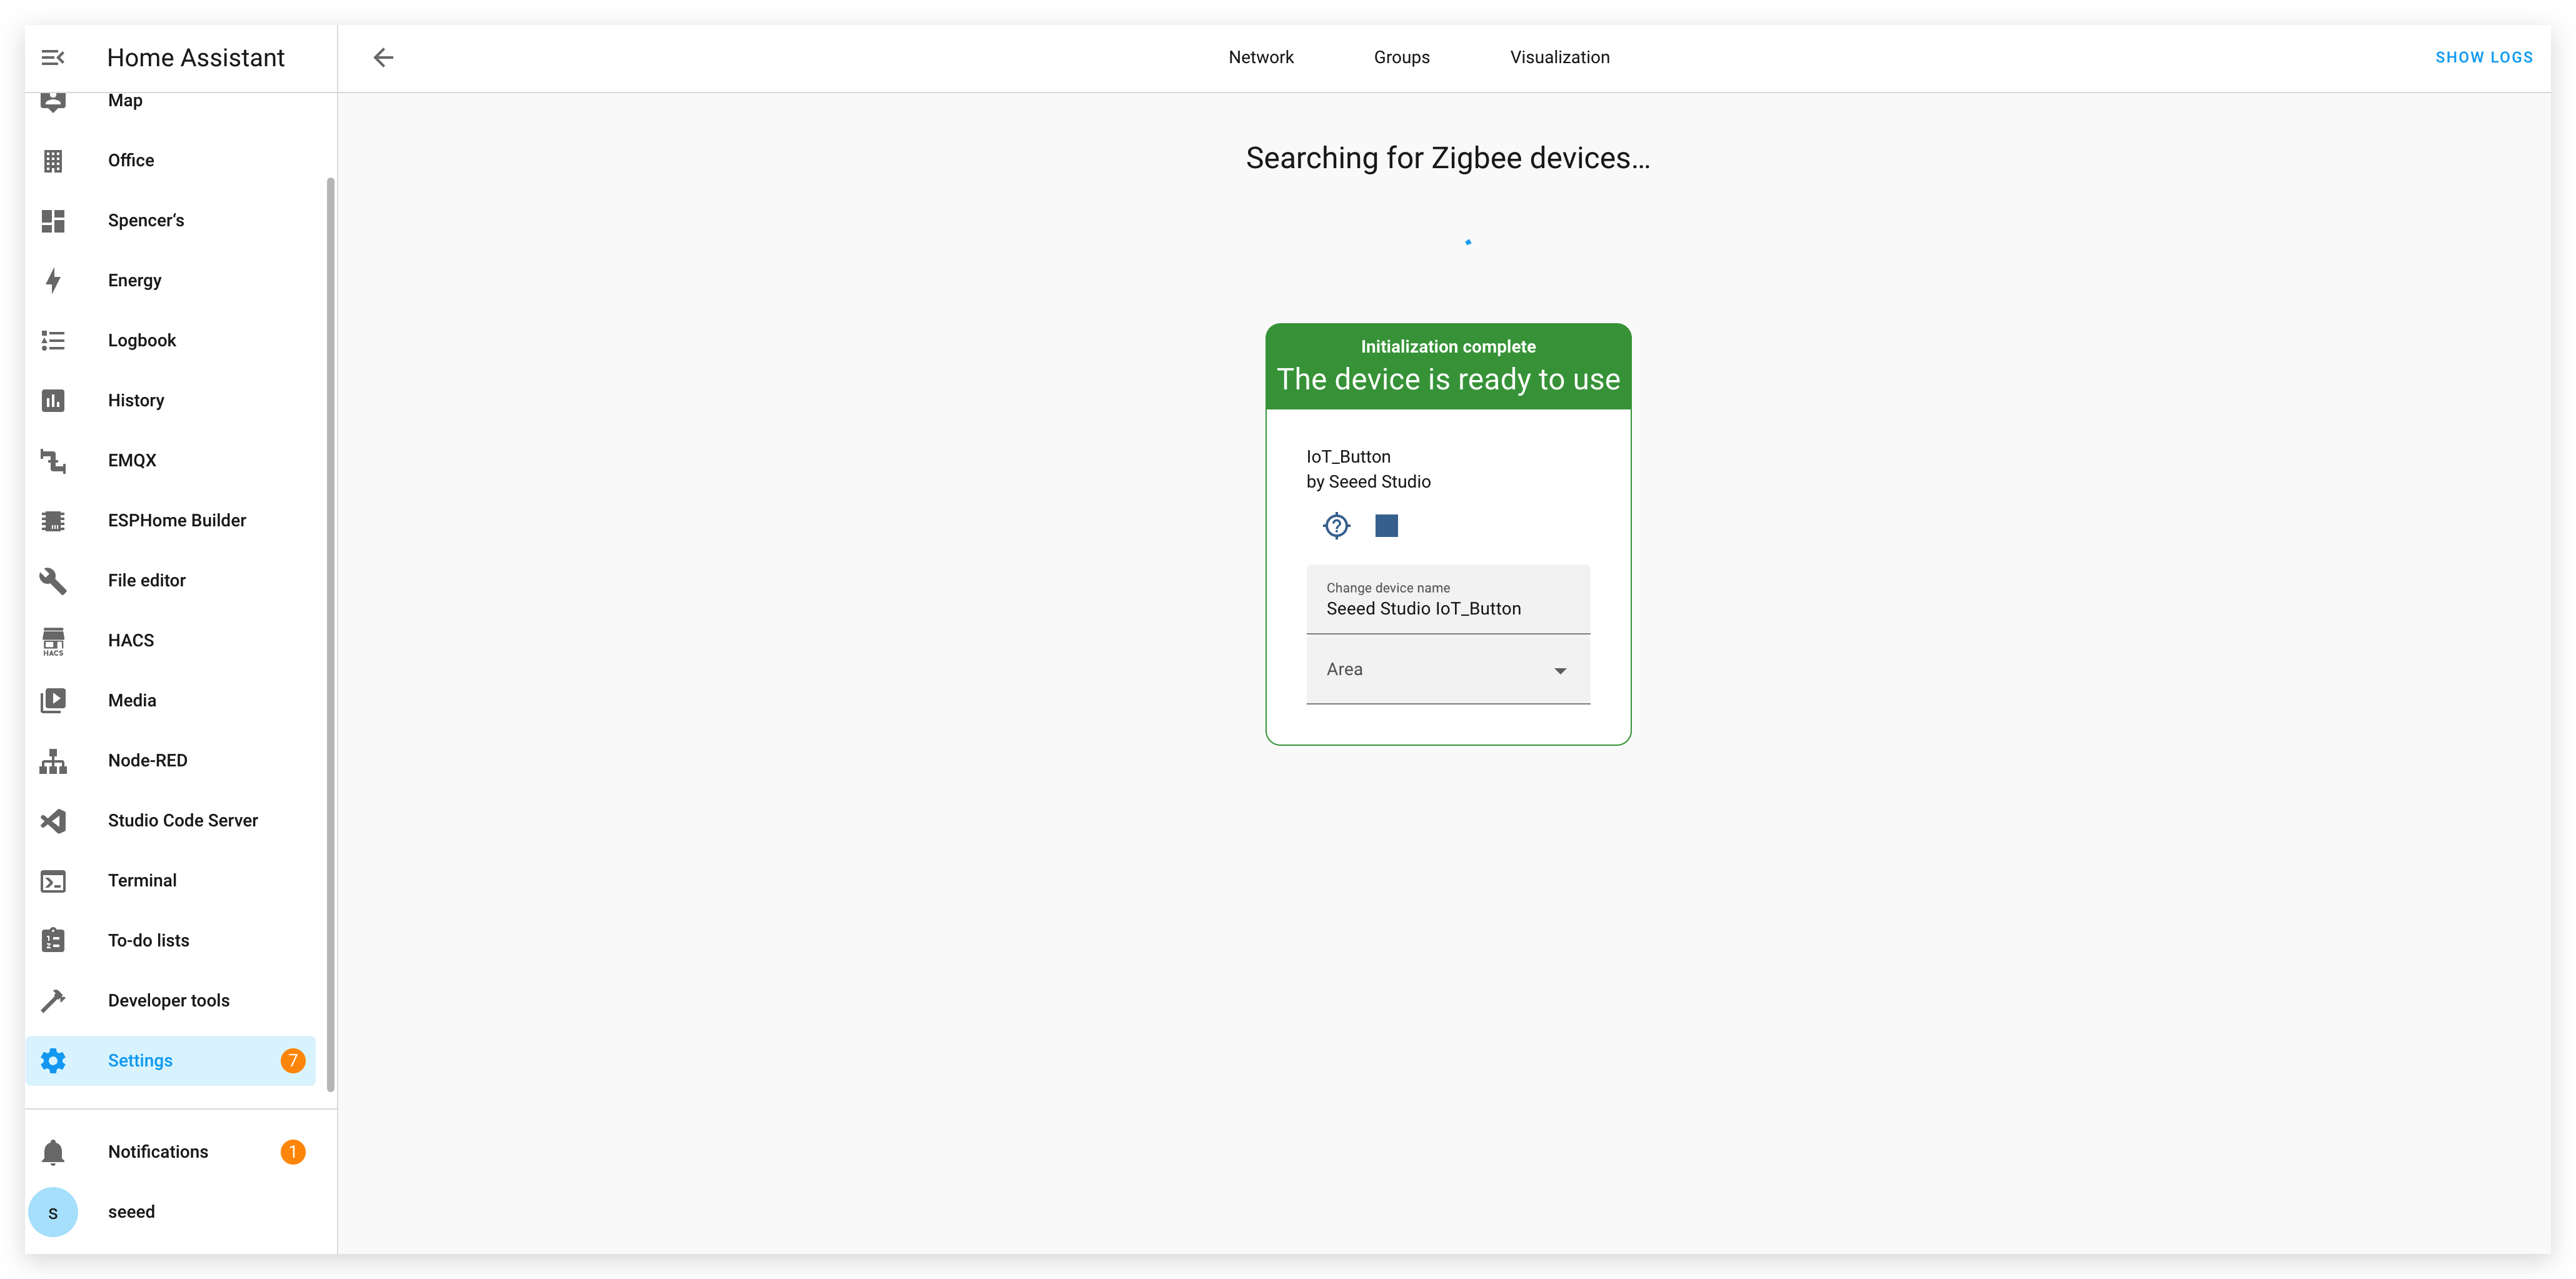
- Presiona el botón en tu Botón IoT una vez para despertarlo e iniciar el emparejamiento. Si no se empareja, intenta mantener presionado el botón por más de 5 segundos para activar un restablecimiento de fábrica, lo cual también lo pondrá en modo de emparejamiento.
- Home Assistant debería descubrir el Botón IoT como "Seeed Studio IoT_Button".
- Sigue las indicaciones para completar el proceso de emparejamiento. Verás un dispositivo con múltiples entidades (un sensor binario y tres interruptores).
Paso 8: Crear Automatizaciones en Home Assistant
Una vez emparejado, puedes crear automatizaciones basadas en las acciones del botón. El firmware expone diferentes tipos de clic como interruptores separados, haciendo la automatización simple.
- Ve a Configuración > Automatizaciones y Escenas > Crear Automatización.
- Selecciona "Dispositivo" como el tipo de disparador.
- Encuentra tu Botón IoT en la lista de dispositivos.
- Selecciona el disparador deseado de la lista. ZHA expondrá los diferentes clics como acciones del dispositivo, por ejemplo:
- "Presión simple" (del interruptor virtual en Endpoint 11)
- "Presión doble" (del interruptor virtual en Endpoint 12)
- "Presión larga" (del interruptor virtual en Endpoint 13)
- Configura las acciones que quieres realizar cuando se presione el botón.
- Guarda la automatización.
Ejemplo de automatización en YAML de Home Assistant para alternar una luz con un doble clic:
alias: IoT Button Double Click - Toggle Living Room Light
description: ""
trigger:
  - platform: device
    domain: zha
    device_id: YOUR_DEVICE_ID_HERE # Replace with your button's device ID
    type: "remote_button_double_press" # The exact type may vary, select it from the UI
action:
  - service: light.toggle
    target:
      entity_id: light.living_room
mode: single
Conclusión
El Botón IoT de Seeed Studio con funcionalidad Zigbee ofrece una forma versátil y eficiente en energía para controlar tu hogar inteligente. Ya sea que uses el firmware precompilado o desarrolles tu propia solución personalizada, el botón proporciona una interfaz simple para activar automatizaciones complejas en Home Assistant.
Al aprovechar las capacidades Zigbee integradas del ESP32-C6, el Botón IoT puede operar por períodos extendidos con energía de batería mientras mantiene conectividad confiable con tu ecosistema de hogar inteligente.
Solución de Problemas
P1: ¿Por qué mi dispositivo sigue desconectándose y no puede conectarse a internet después de reemplazar la batería? Puedo confirmar que la batería está cargada
Después de que la batería ha sido removida, debido a la estrategia de protección del chip de la batería 18650, necesita ser activada un poco por un cable de alimentación USB cargado para funcionar correctamente.
Recursos
- [GITHUB] Repositorio Github del Botón IoT de Seeed
- [PDF] PDF del Esquemático del Botón IoT de Seeed
- [SCH&PCB] Esquemático y PCB del Botón IoT de Seeed
Soporte Técnico y Discusión del Producto
¡Gracias por elegir nuestros productos! Estamos aquí para brindarte diferentes tipos de soporte para asegurar que tu experiencia con nuestros productos sea lo más fluida posible. Ofrecemos varios canales de comunicación para atender diferentes preferencias y necesidades.