Home Assistant y Módulo de Detección de Eventos de Sonido
Introducción
Una compacta placa de audio de borde ofrece detección de sonido en tiempo real con una sólida protección de privacidad de datos locales. Puede detectar cinco eventos de sonido anómalos —llanto de bebé, rotura de vidrio, disparo, alarmas T3/T4 y ronquidos— lo que permite una respuesta inmediata y una alerta temprana fiable. En este tutorial, aprenderemos cómo compilar y cargar el firmware en una placa XIAO ESP32.
Hardware necesario
| ReSpeaker XVF3800 | Kit Home Assistant Yellow | Xiao ESP32S3 |
|---|---|---|
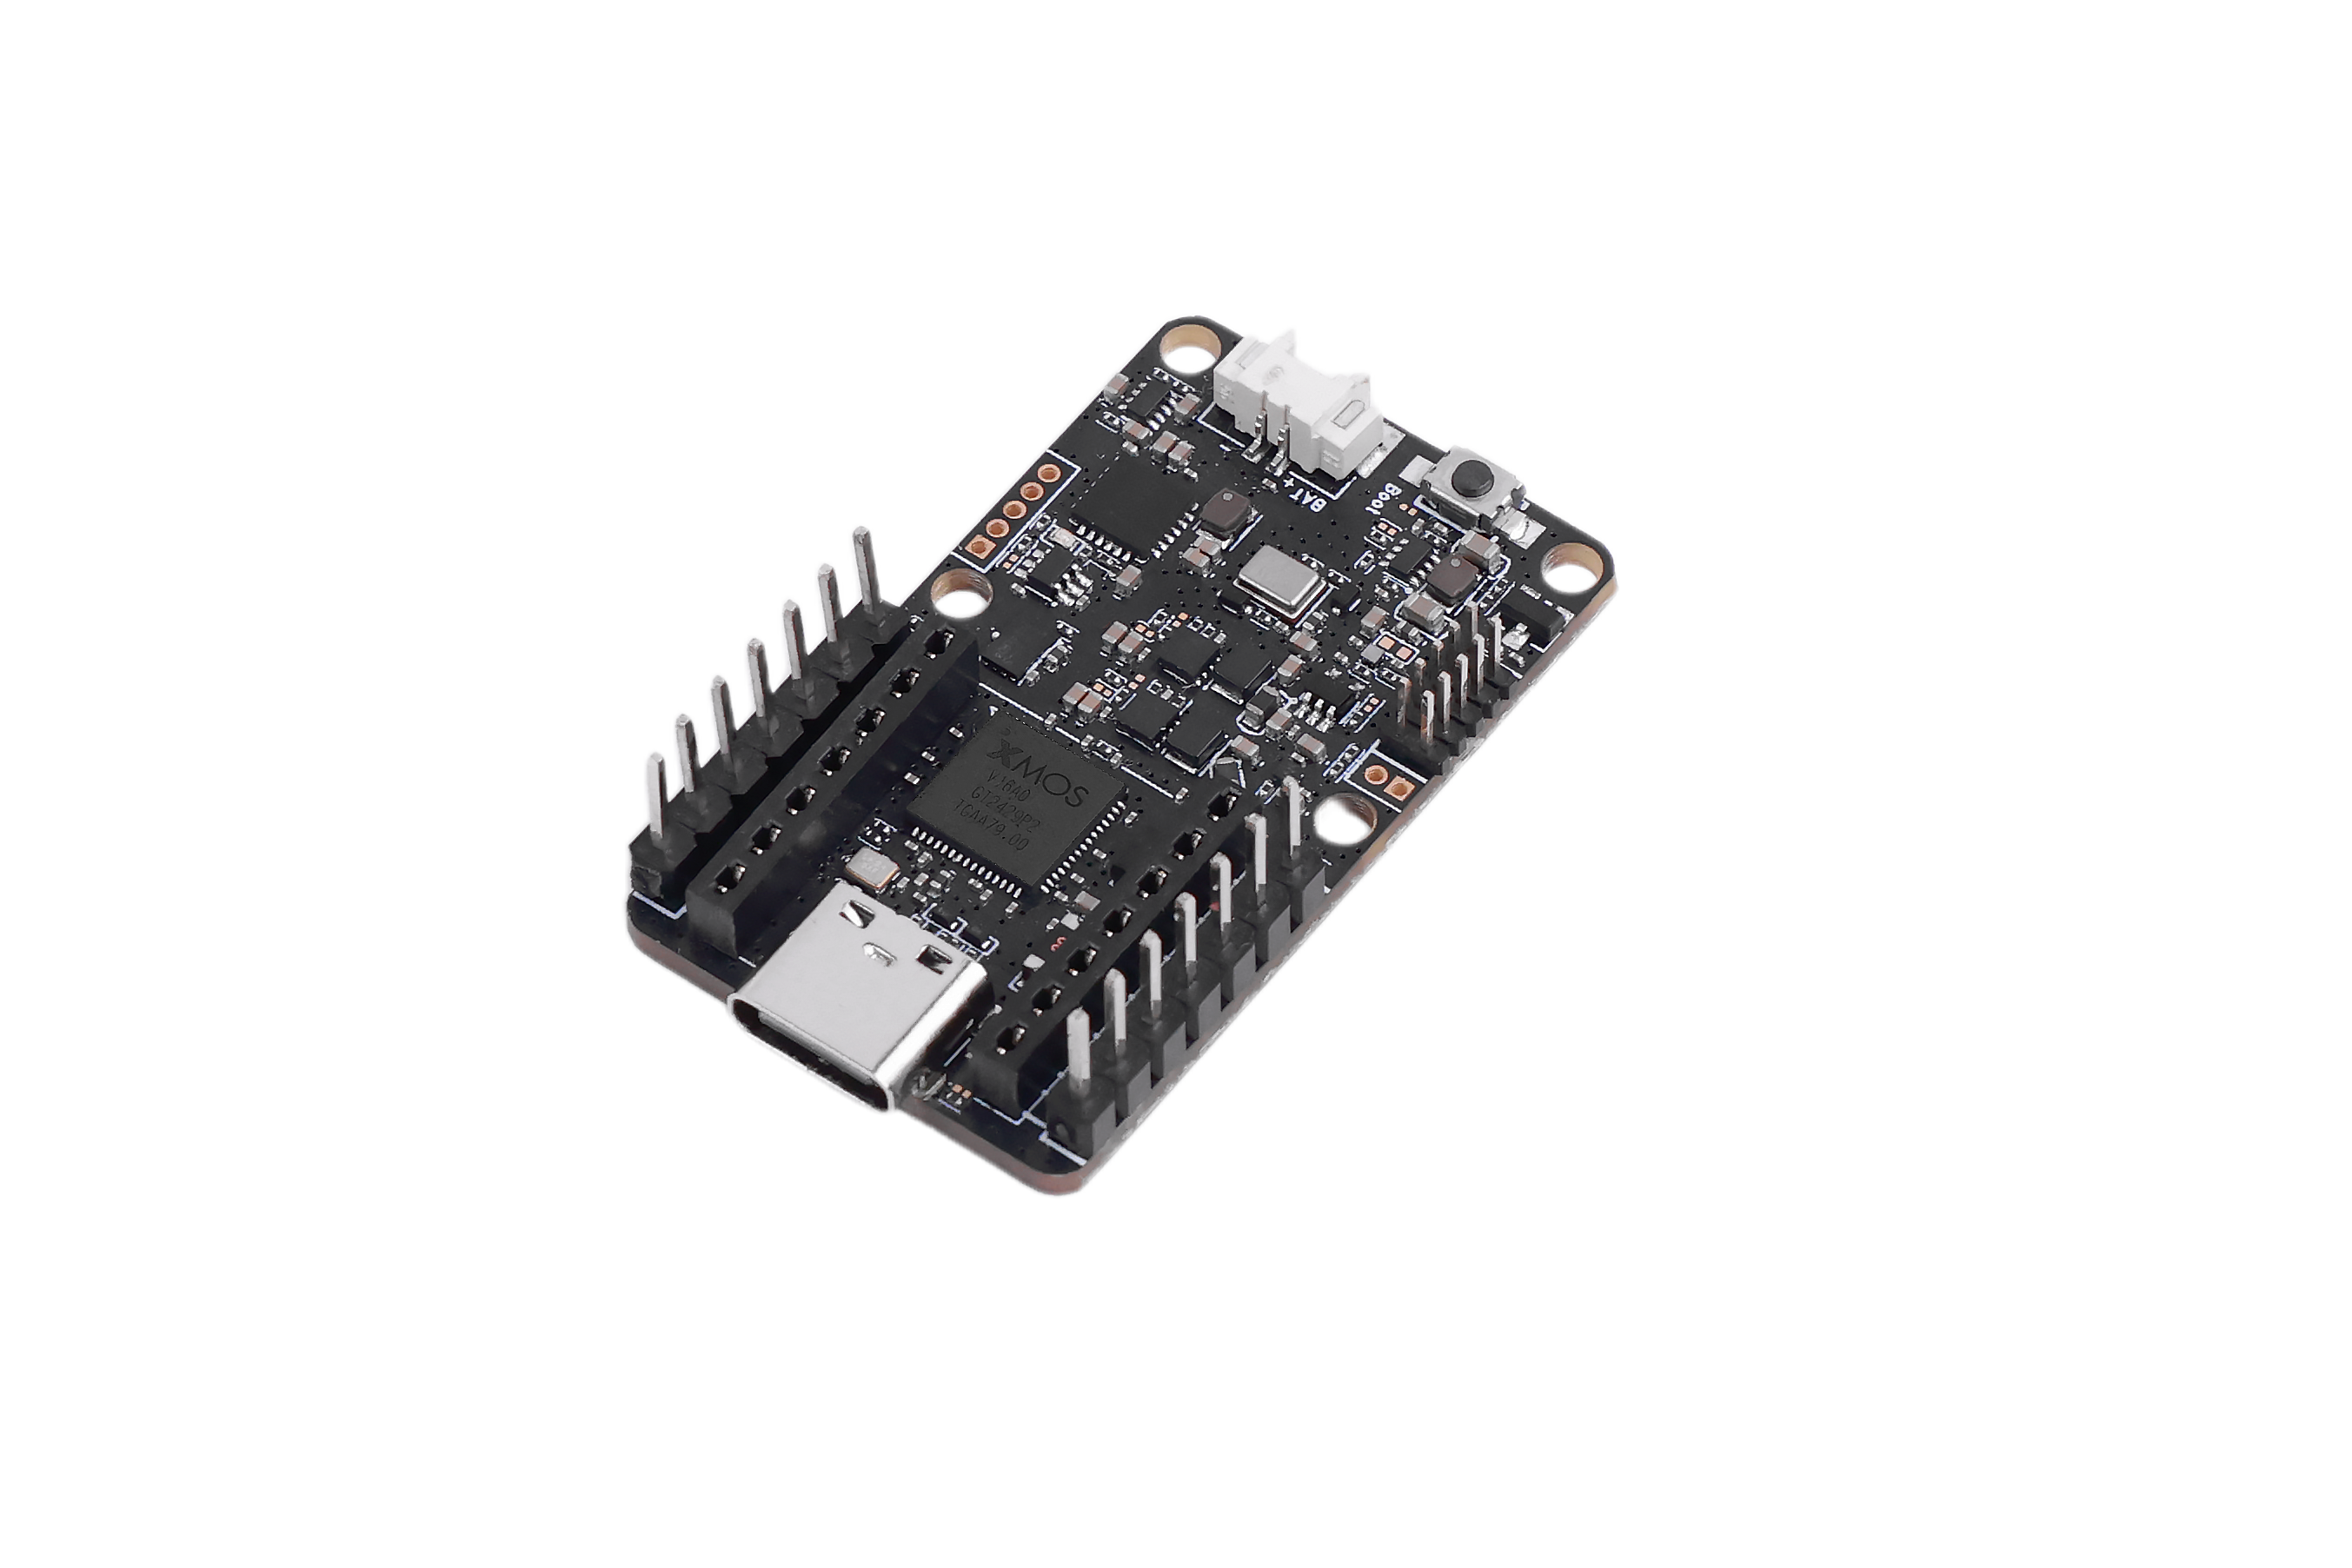 |  |  |
Instalar ESPHome Builder
Settings → Add-ons → Click on Add-on Store → Install ESPHome Device Builder add-on.
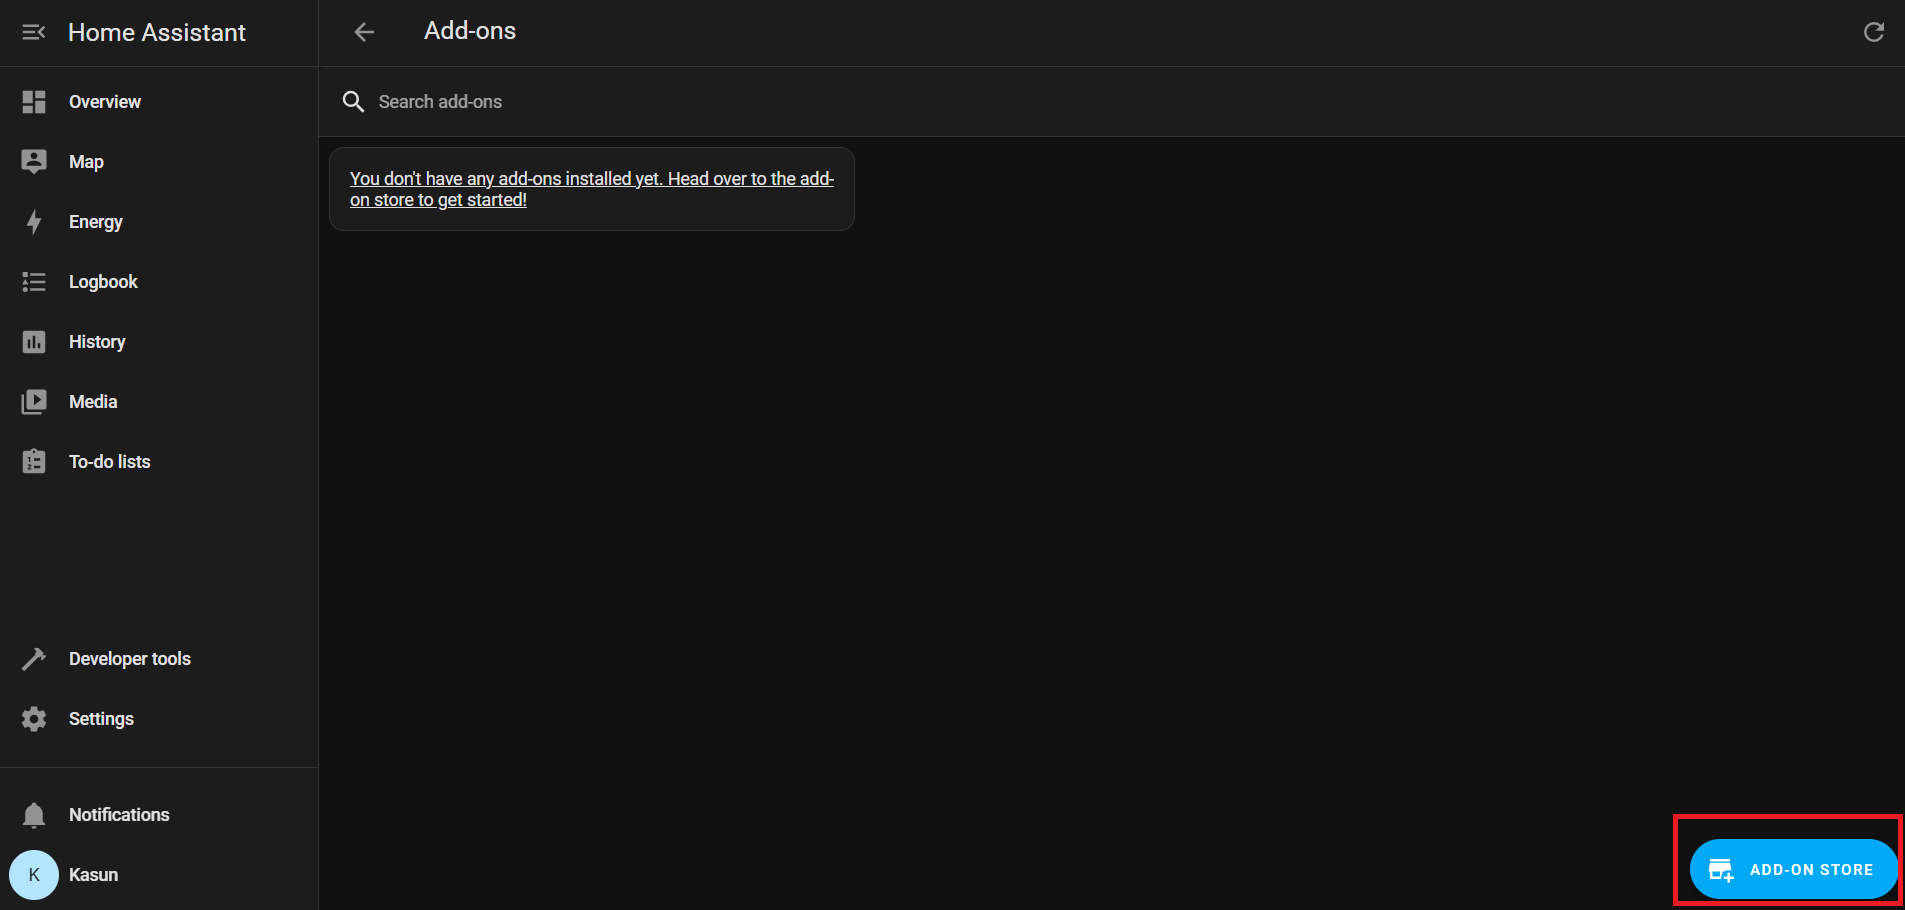
Ve a Home Assistant > Settings > Add-ons.
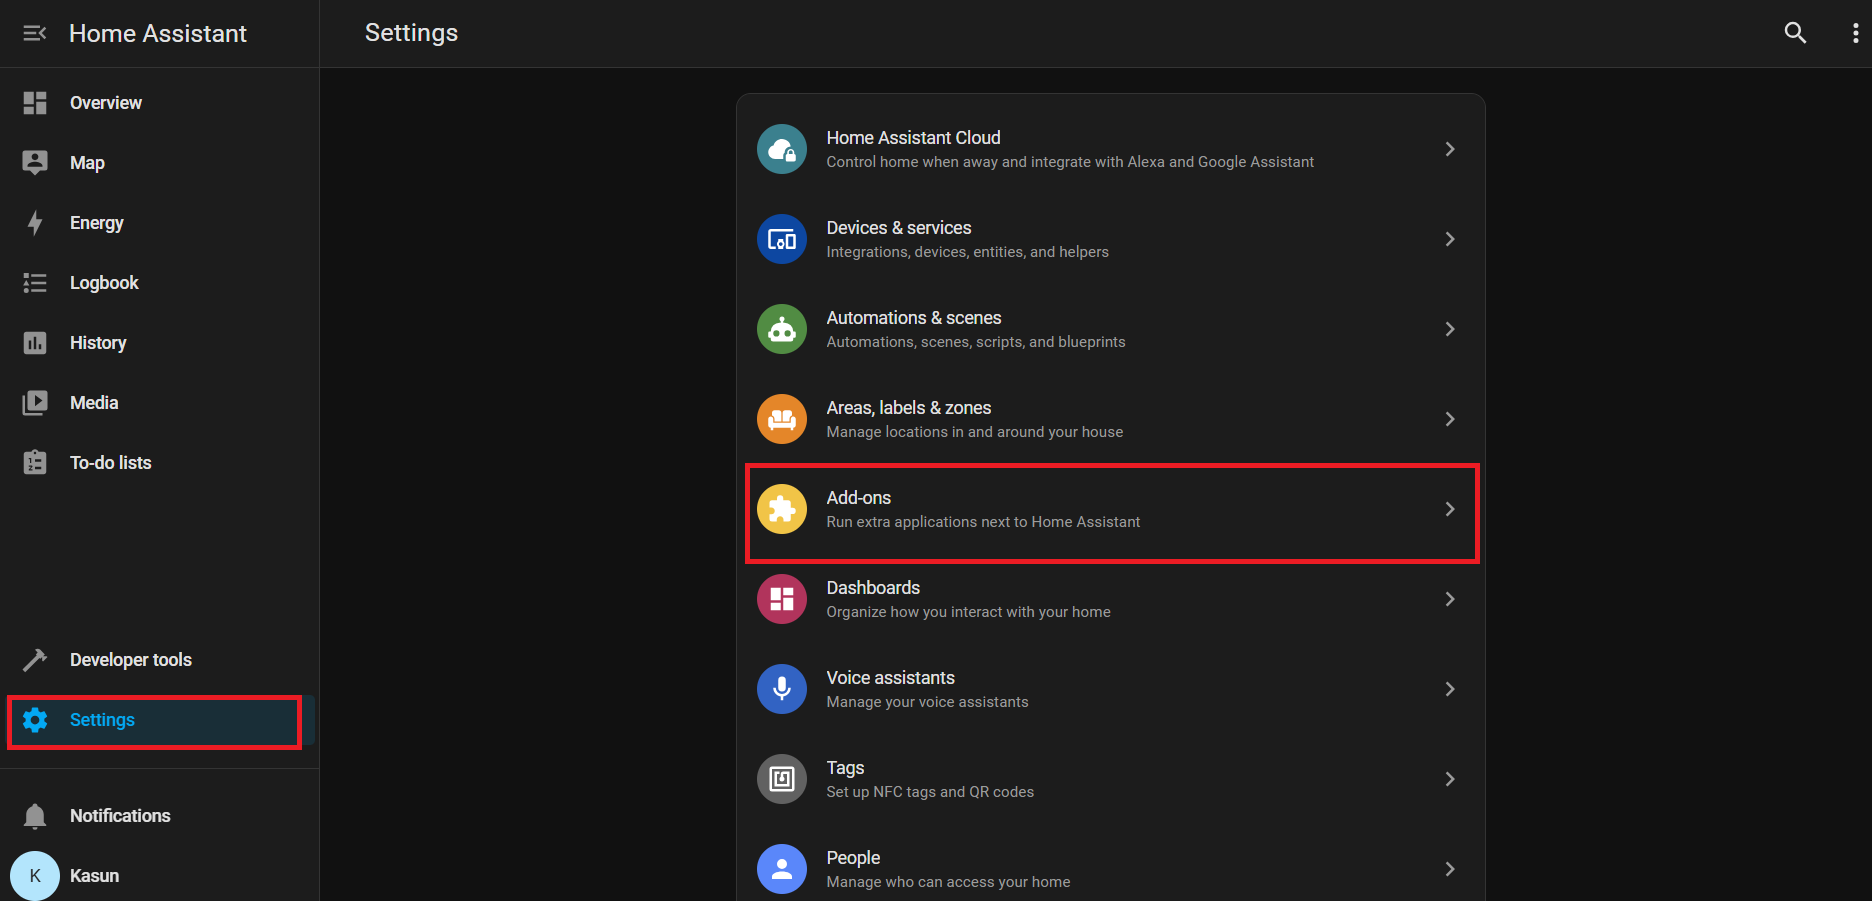
Haz clic en Add-on Store (normalmente en la parte inferior derecha)
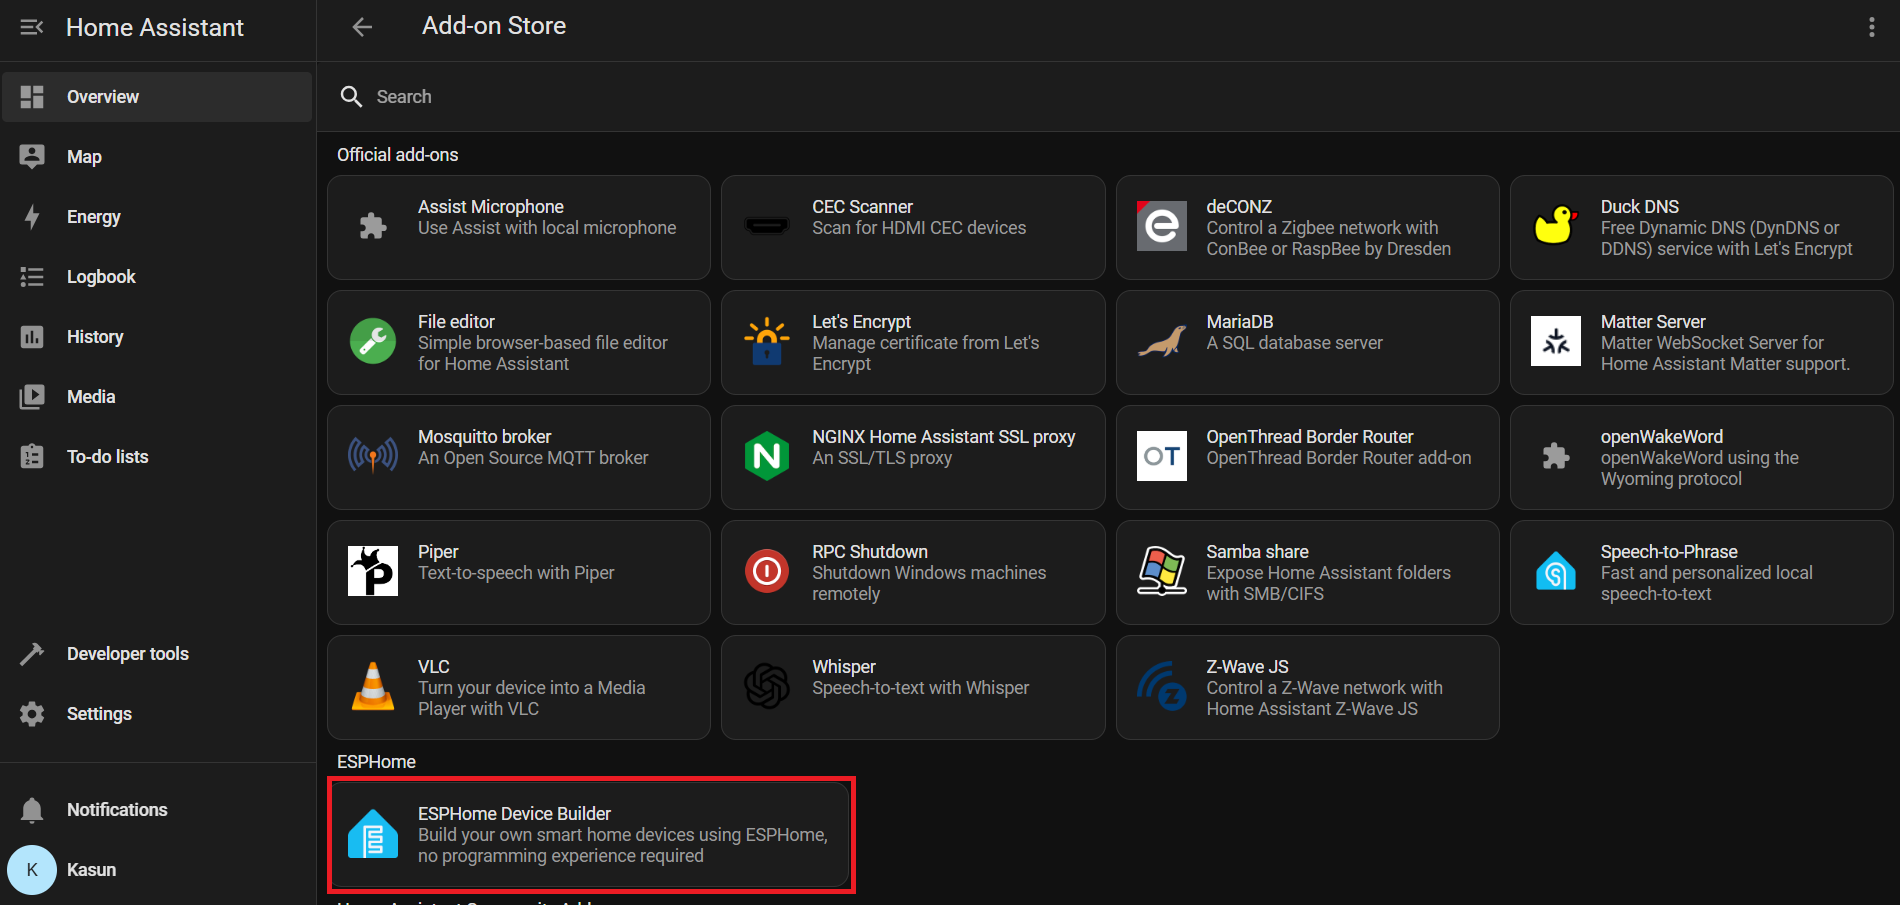
En Official add-ons, busca e instala ESPHome Device Builder.
Después de la instalación, haz clic en Start para ejecutar el complemento ESPHome.
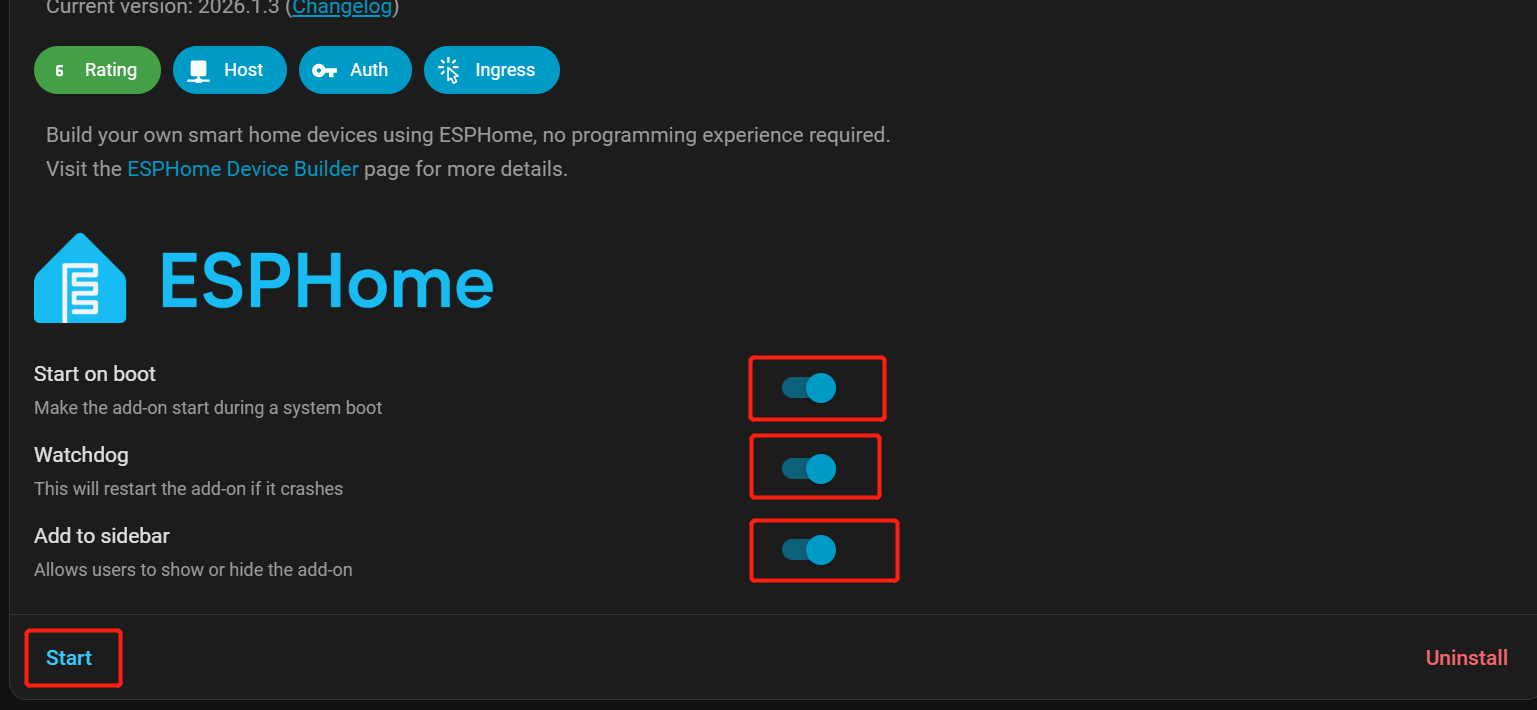
Activa Start on Boot, Watchdog, and Show in Sidebar para un acceso más sencillo.
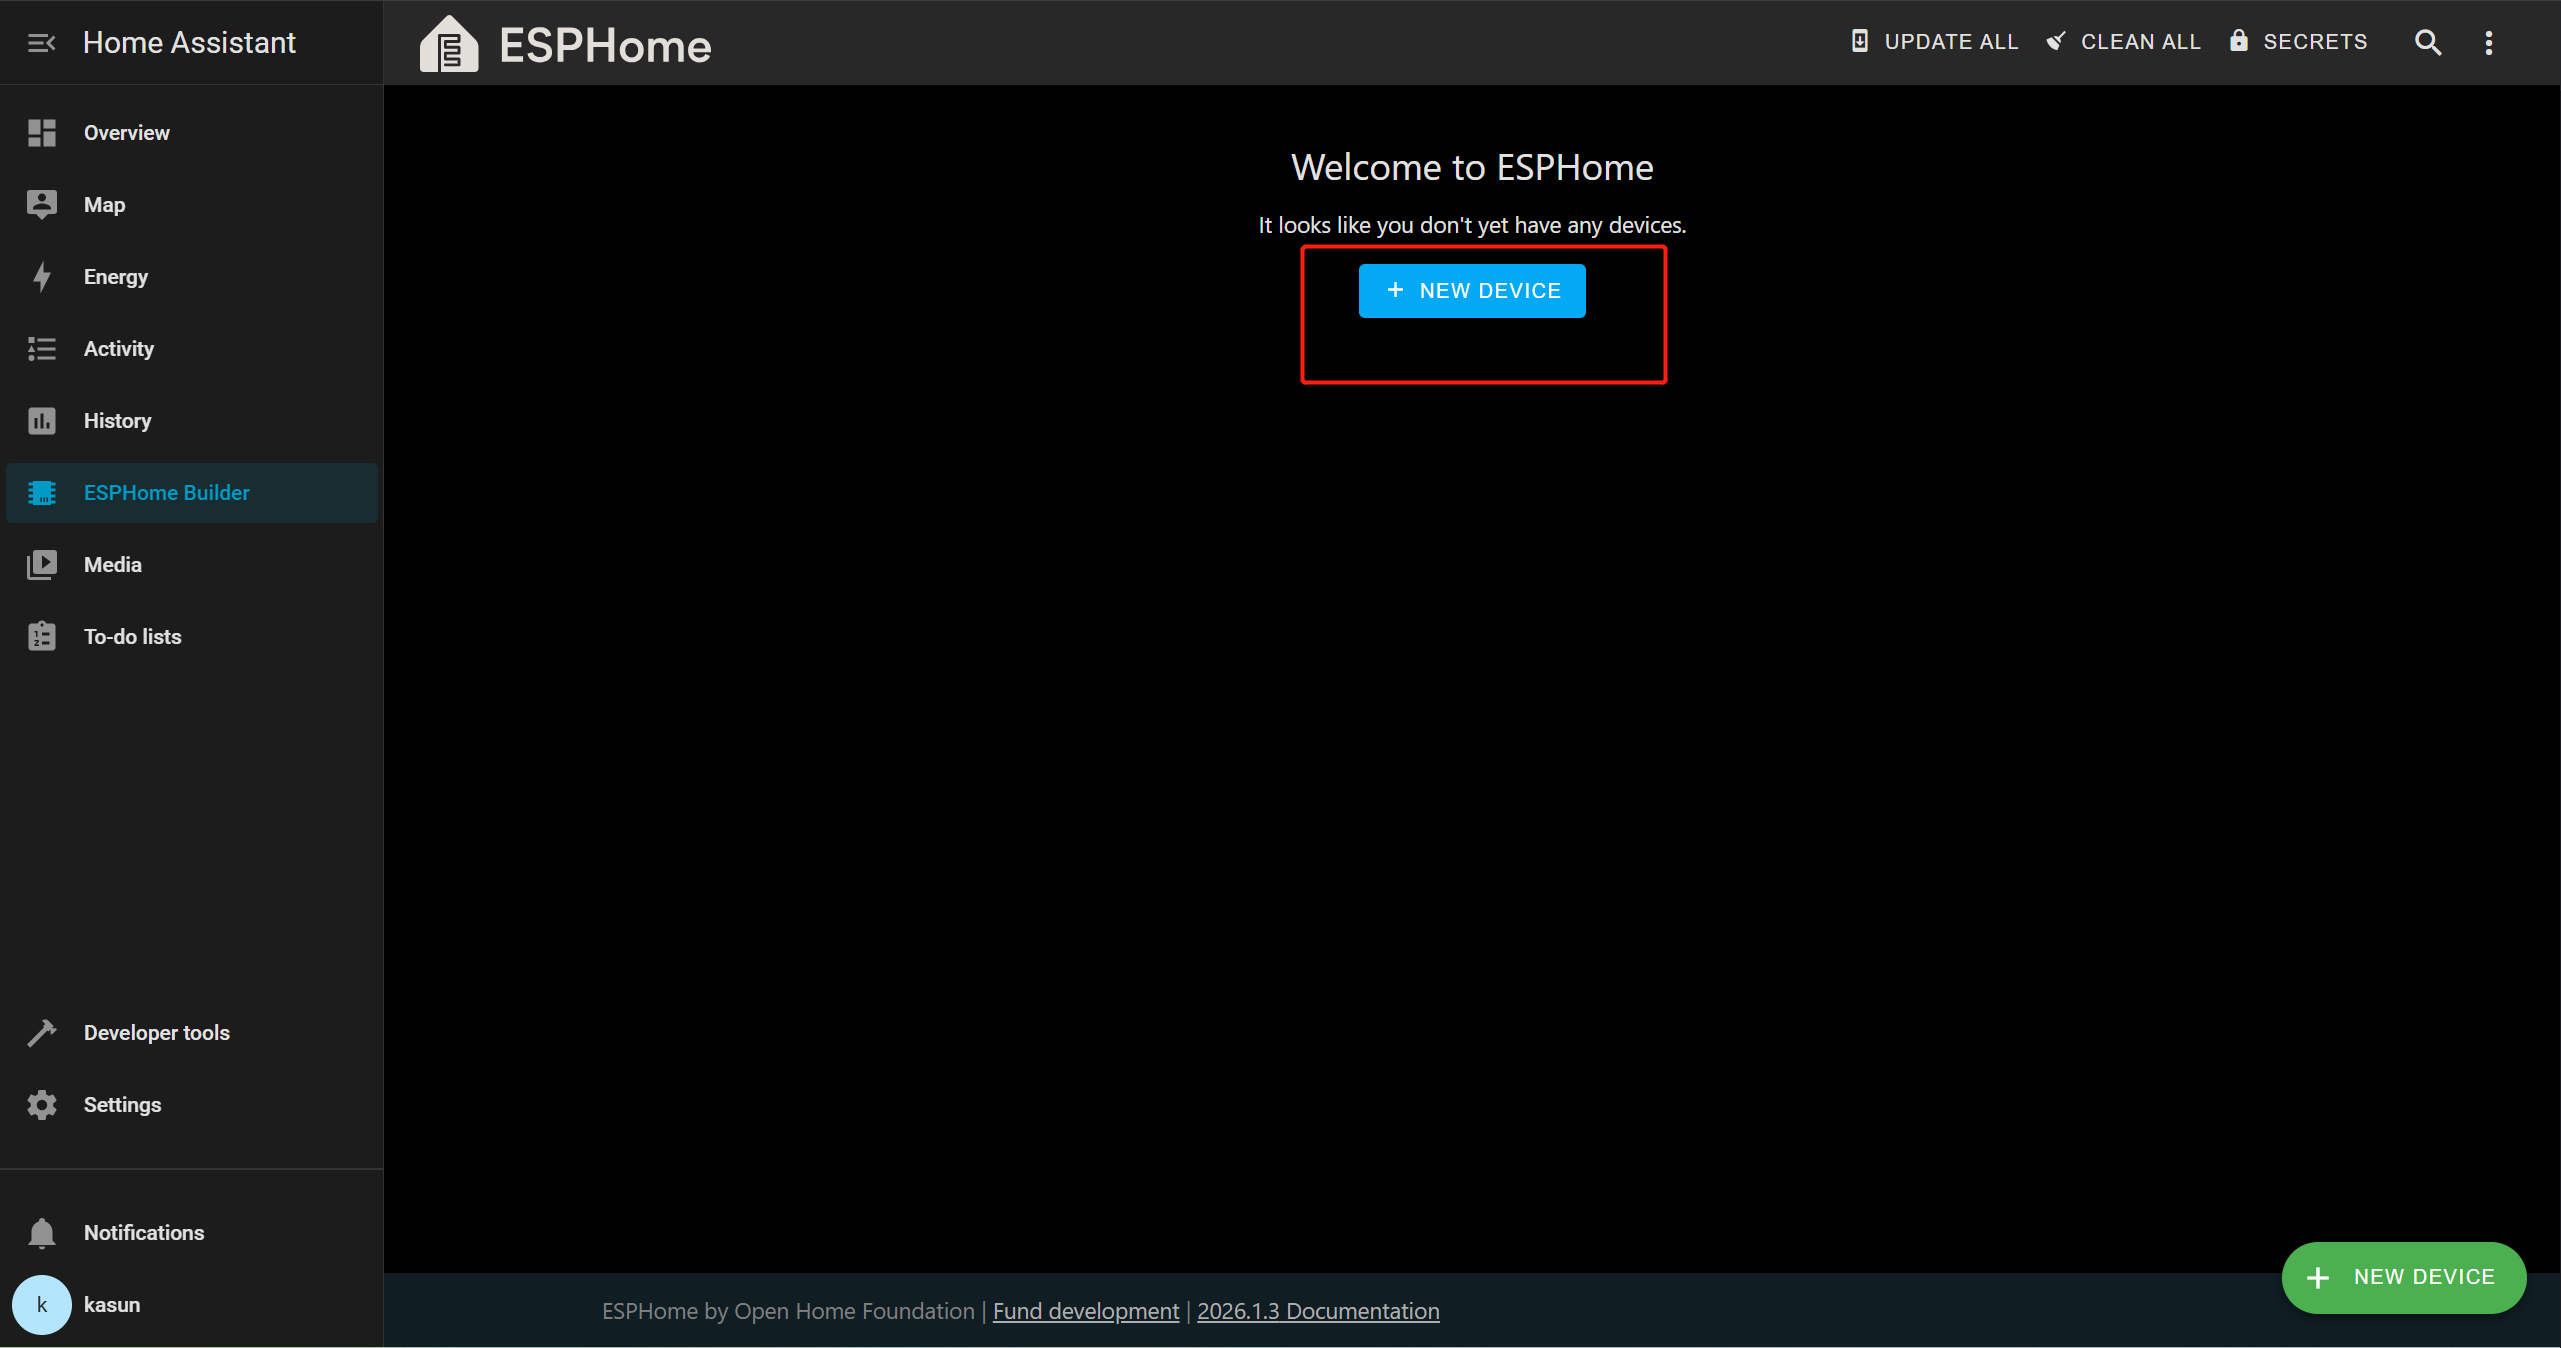
Desde la barra lateral de Home Assistant, ve a ESPHome Builder.
Añadir dispositivo de eventos de sonido
Haz clic en + NEW DEVICE.
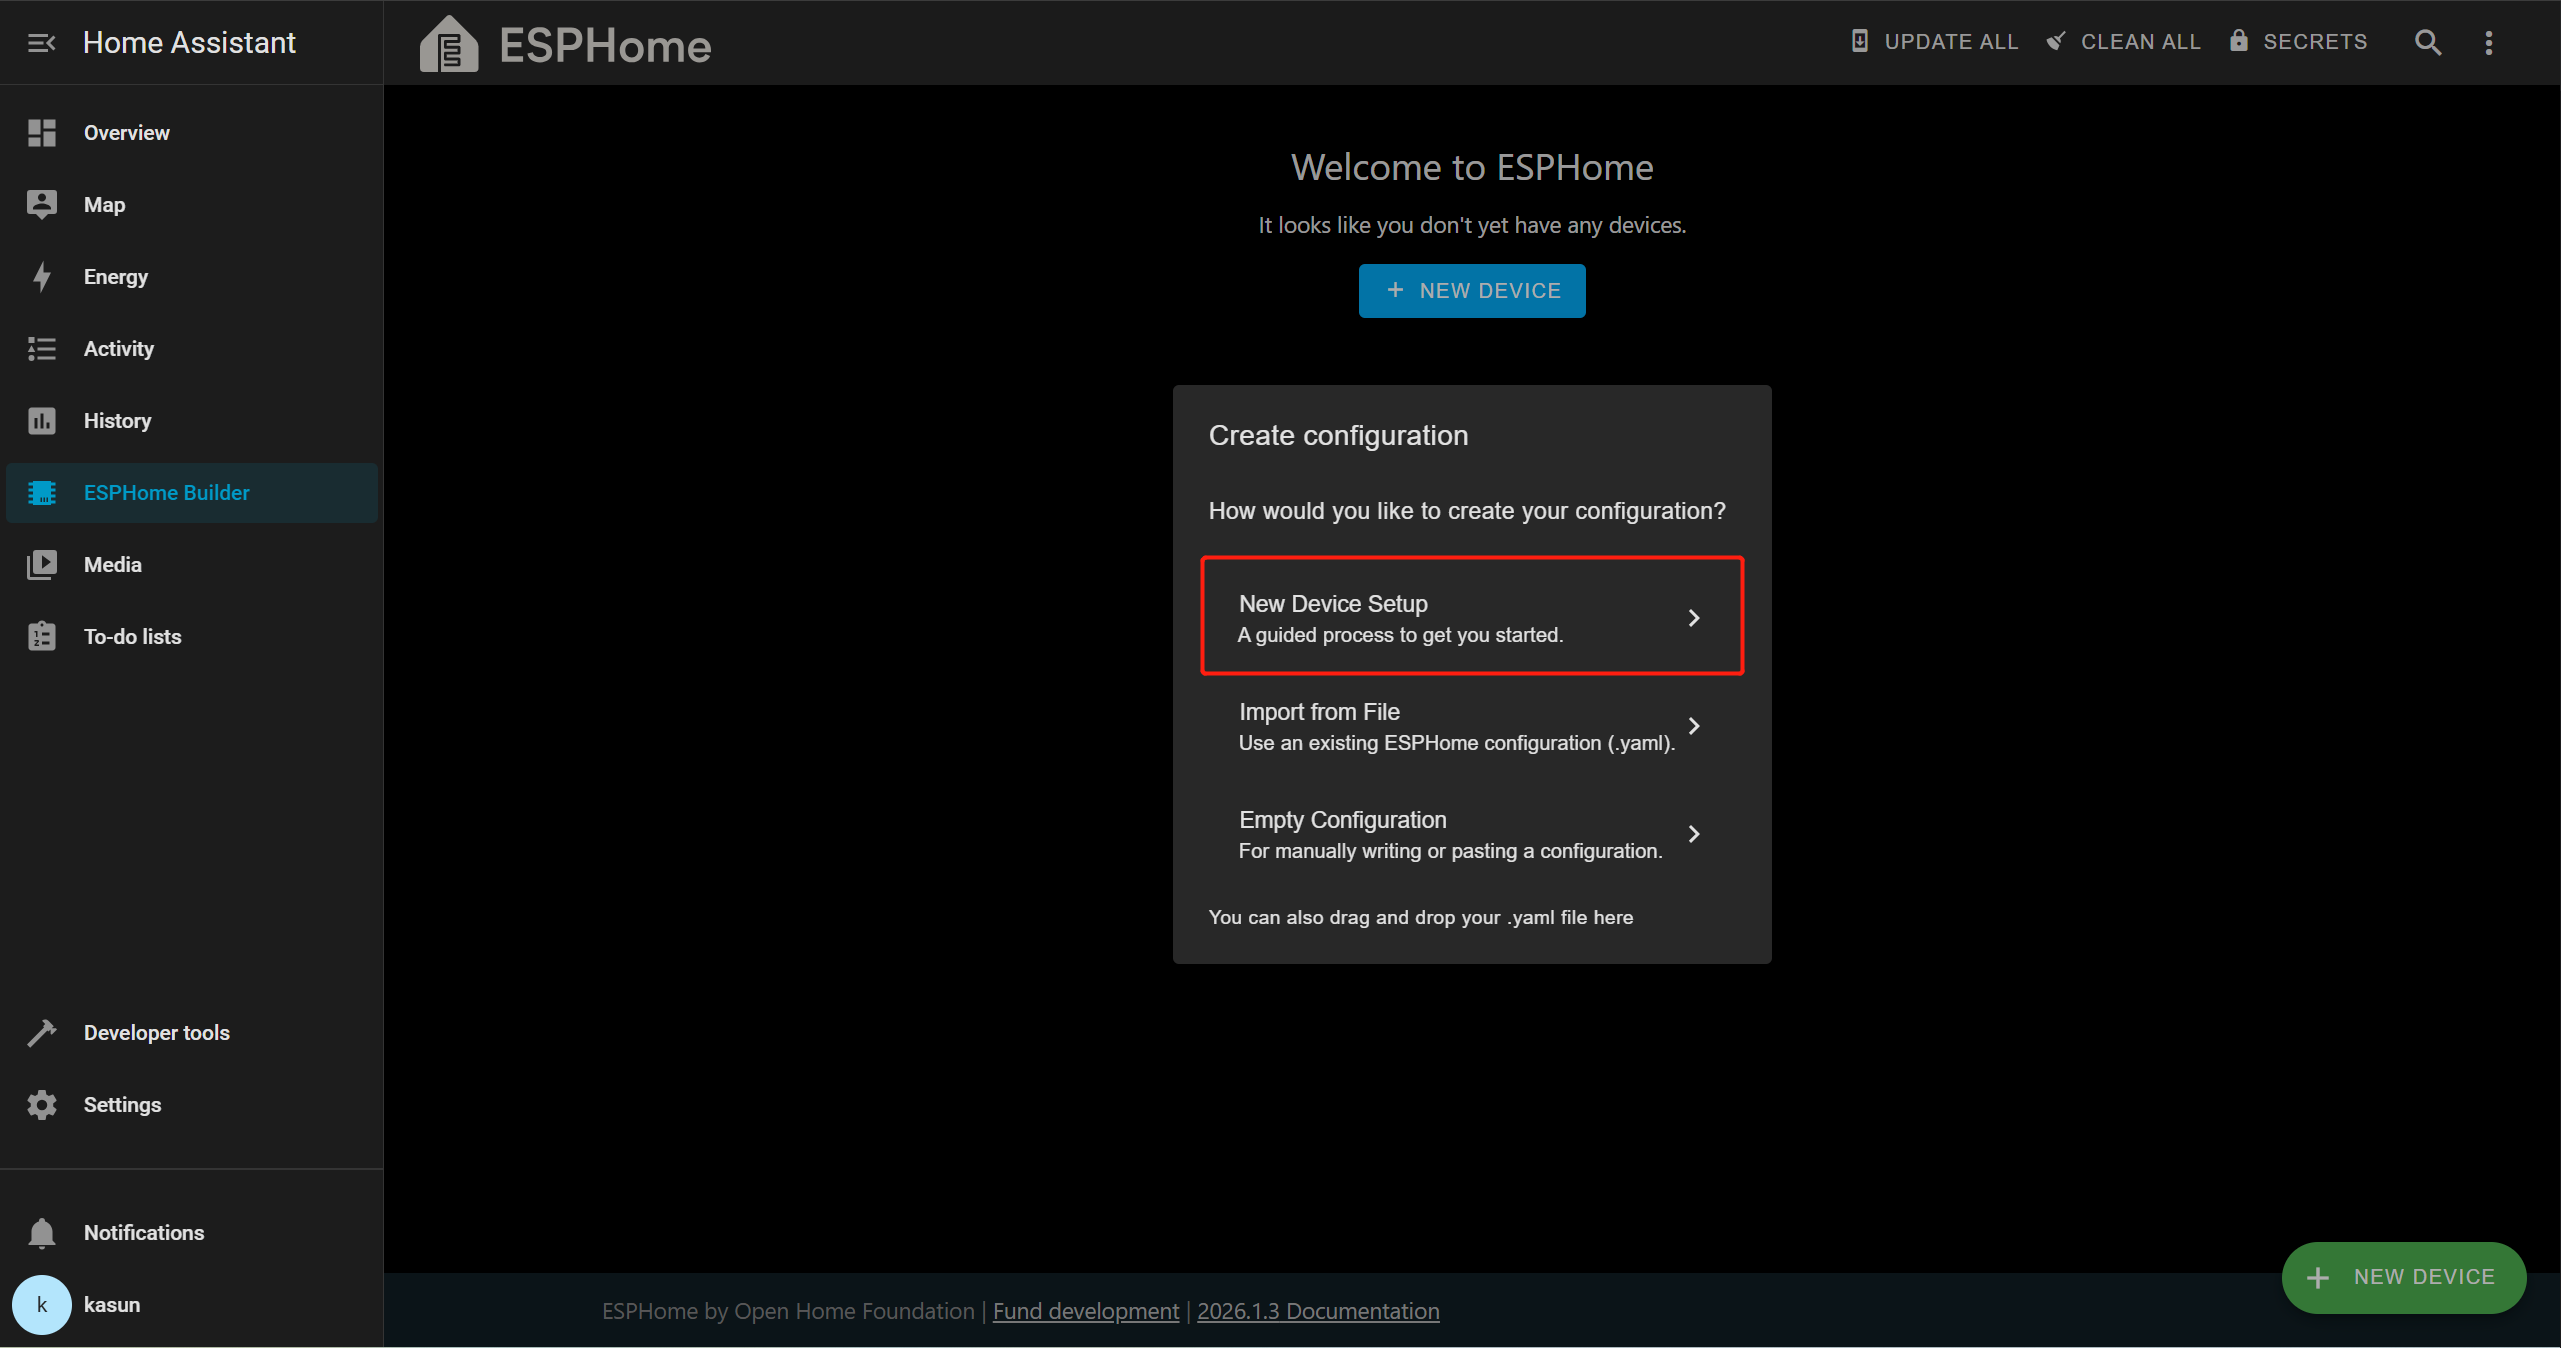
Haz clic en Continue → New Device Setup, luego proporciona un nombre apropiado para el dispositivo.
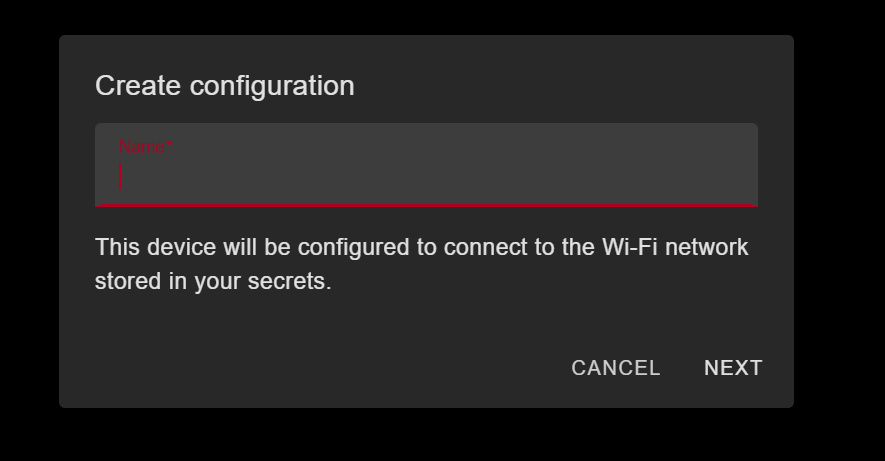
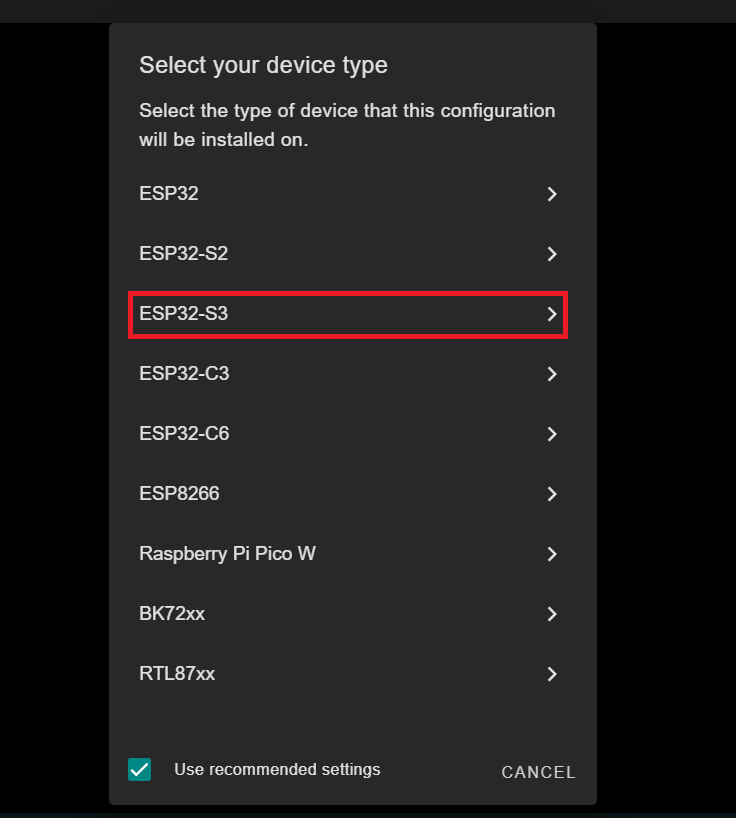
En esta demostración, estamos usando la XIAO ESP32-S3, así que seleccionaremos ESP32-S3 como la placa de destino. Esto puede variar según la placa que estés utilizando.
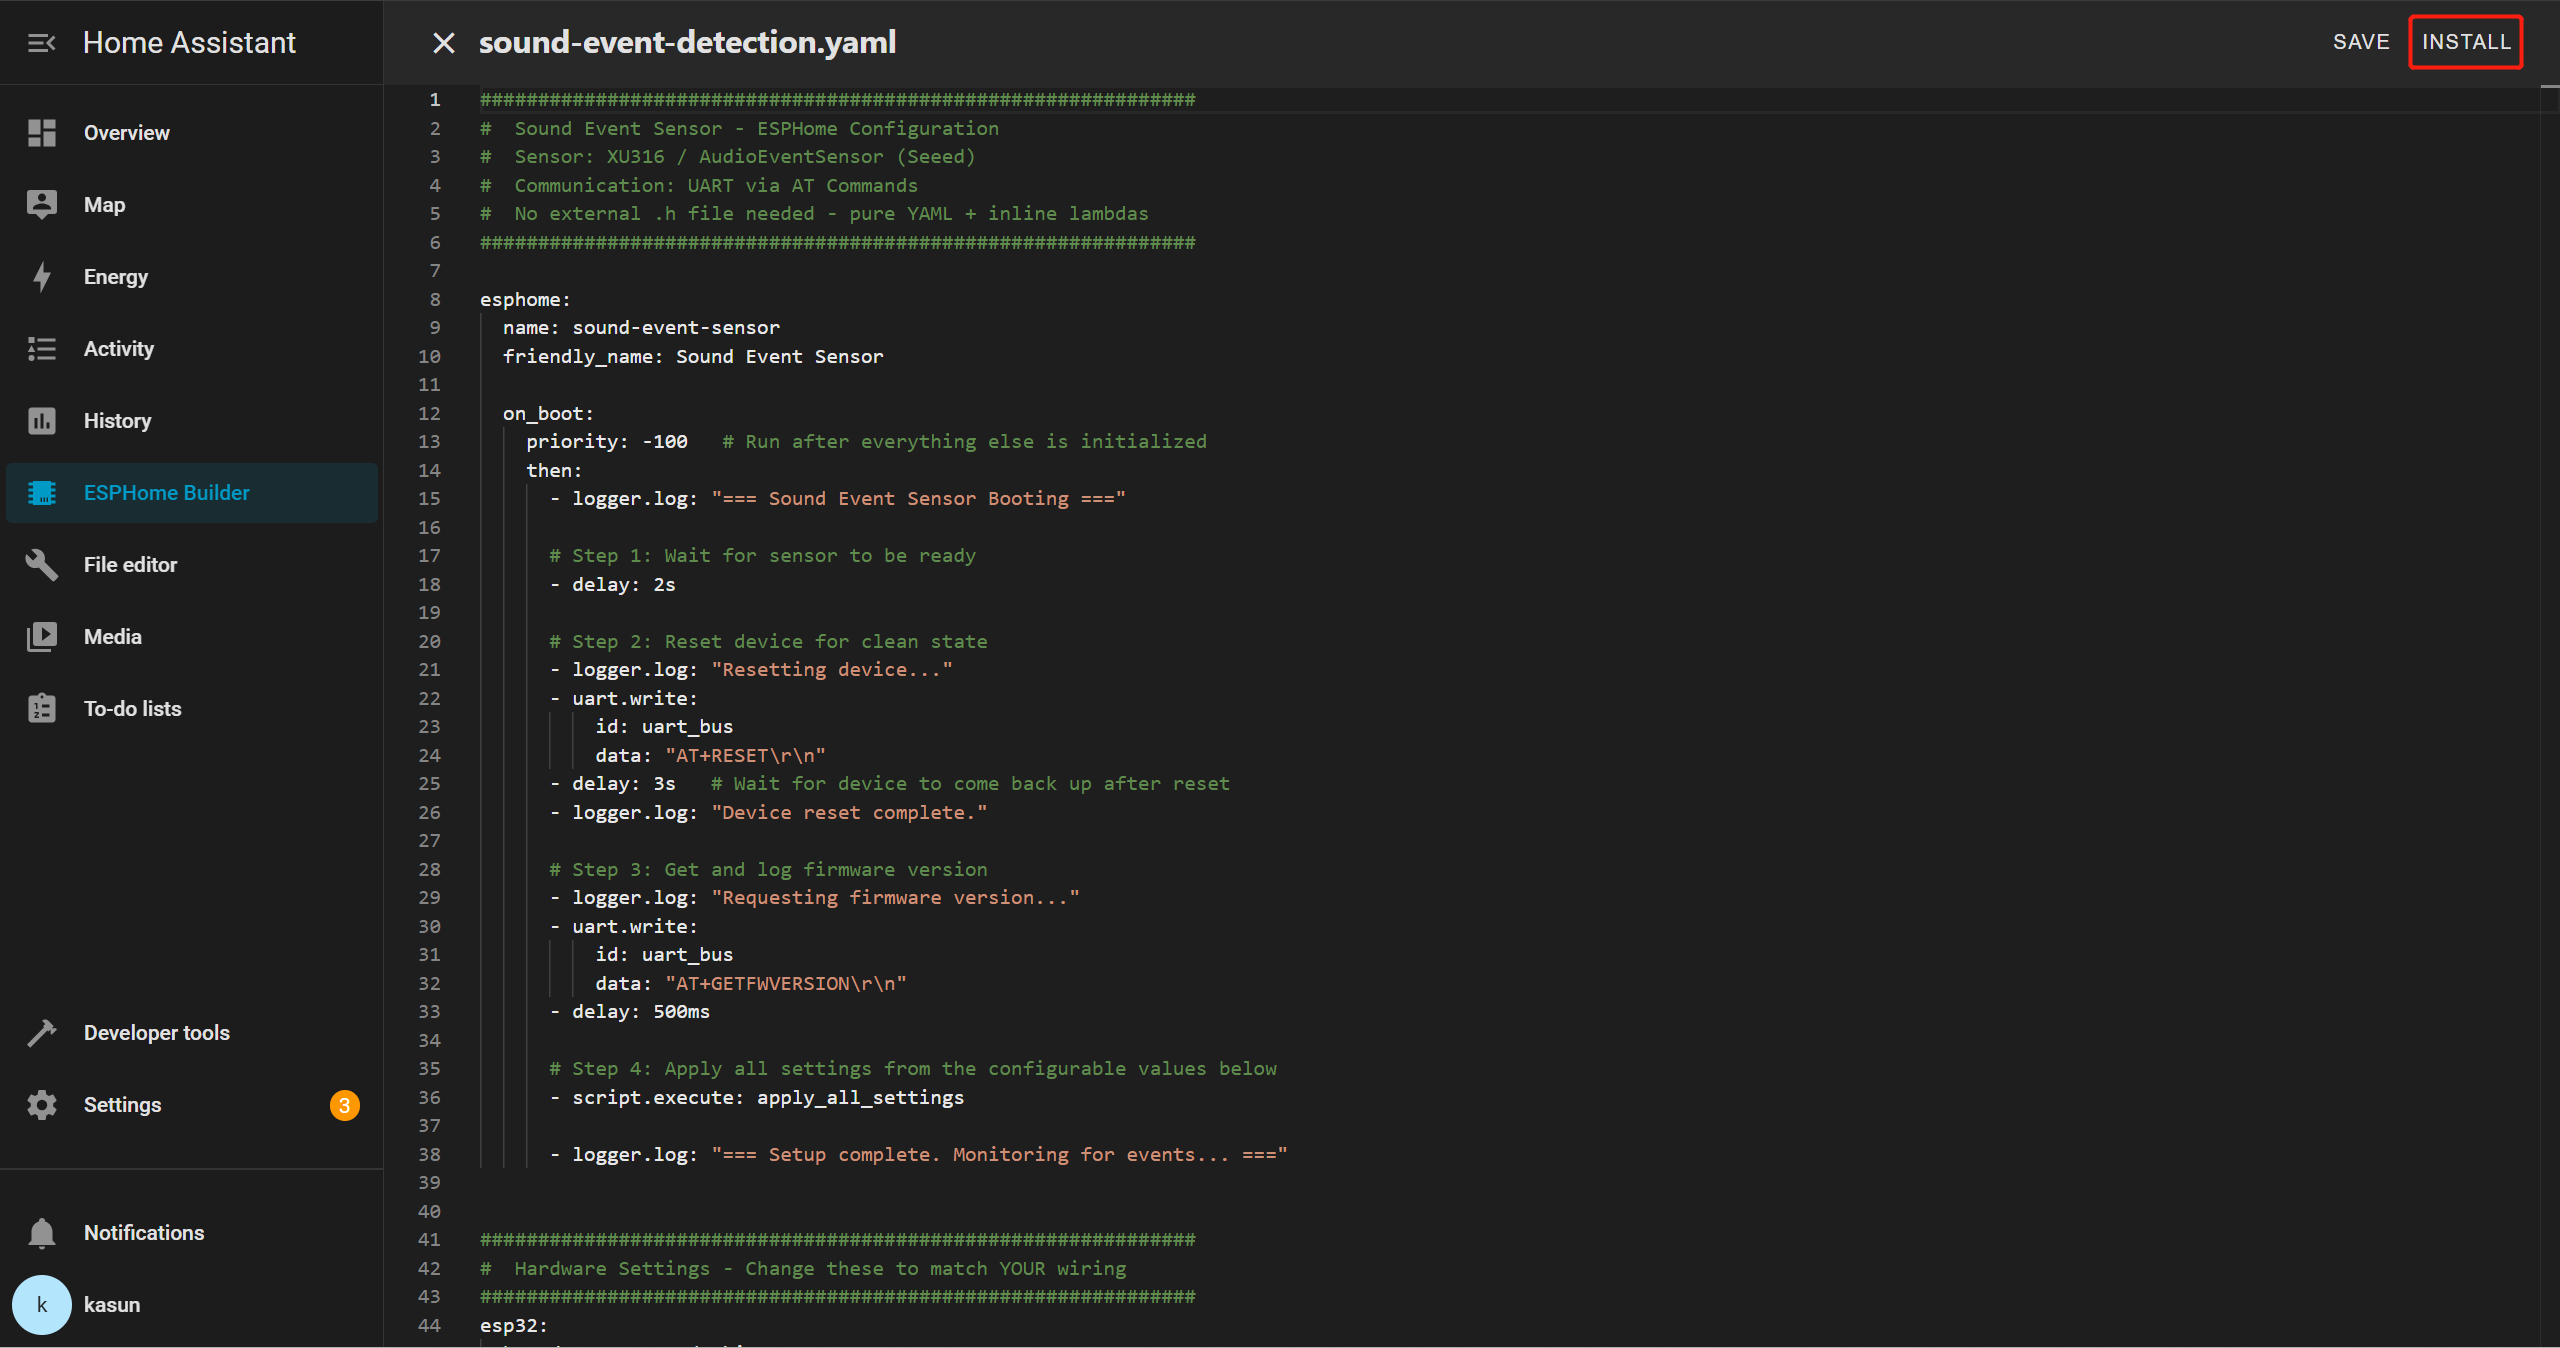
Selecciona la nueva entrada de dispositivo y haz clic en Edit. Elimina toda la plantilla YAML y luego copia y pega el archivo YAML proporcionado en el editor.
YAML de eventos de sonido
##############################################################
#  Sound Event Sensor - ESPHome Configuration
#  Sensor: XU316 / AudioEventSensor (Seeed)
#  Communication: UART via AT Commands
#  No external .h file needed - pure YAML + inline lambdas
##############################################################

esphome:
  name: sound-event-sensor
  friendly_name: Sound Event Sensor

  on_boot:
    priority: -100   # Run after everything else is initialized
    then:
      - logger.log: "=== Sound Event Sensor Booting ==="

      # Step 1: Wait for sensor to be ready
      - delay: 2s

      # Step 2: Reset device for clean state
      - logger.log: "Resetting device..."
      - uart.write:
          id: uart_bus
          data: "AT+RESET\r\n"
      - delay: 3s   # Wait for device to come back up after reset
      - logger.log: "Device reset complete."

      # Step 3: Get and log firmware version
      - logger.log: "Requesting firmware version..."
      - uart.write:
          id: uart_bus
          data: "AT+GETFWVERSION\r\n"
      - delay: 500ms

      # Step 4: Apply all settings from the configurable values below
      - script.execute: apply_all_settings

      - logger.log: "=== Setup complete. Monitoring for events... ==="


##############################################################
#  Hardware Settings - Change these to match YOUR wiring
##############################################################
esp32:
  board: esp32-s3-devkitc-1
  variant: esp32s3
  framework:
    type: arduino
    version: recommended


##############################################################
#  Network
##############################################################
wifi:
  ssid: !secret wifi_ssid
  password: !secret wifi_password
  ap:
    ssid: "SoundSensor Fallback"
    password: "soundsensor123"

captive_portal:

ota:
  - platform: esphome
    password: !secret ota_password

api:
  id: api_id

logger:
  level: DEBUG   # Set to INFO to reduce log noise after testing


##############################################################
#  UART - The serial link to your sensor
#  Adjust tx_pin / rx_pin to match your wiring
##############################################################
uart:
  id: uart_bus
  tx_pin: GPIO43    # ← CHANGE to your TX pin
  rx_pin: GPIO44    # ← CHANGE to your RX pin
  baud_rate: 115200
  debug:            # Remove this block after testing
    direction: BOTH
    dummy_receiver: false


##############################################################
#  Global Variables (internal state)
##############################################################
globals:
  # UART line receive buffer
  - id: uart_rx_buffer
    type: std::string
    restore_value: no
    initial_value: '""'


##############################################################
#  SCRIPTS
##############################################################
script:
  - id: apply_all_settings
    then:
      # ── Build detect types from whichever switches are ON ──
      - lambda: |-
          std::string types = "";
          auto add = [&](bool on, const char* name) {
            if (on) { types += (types.empty() ? "" : ","); types += name; }
          };
          add(id(sw_detect_baby_cry).state,    "baby_cry");
          add(id(sw_detect_glass_break).state, "glass_break");
          add(id(sw_detect_gunshot).state,     "gunshot");
          add(id(sw_detect_snore).state,       "snore");
          add(id(sw_detect_t3).state,          "T3");
          add(id(sw_detect_t4).state,          "T4");
          if (types.empty()) types = "gunshot";   // safety fallback
          std::string cmd = "AT+SETDETECT=" + types + "\r\n";
          ESP_LOGI("sound", "Setting detect types: %s", types.c_str());
          id(uart_bus).write_array((const uint8_t*)cmd.c_str(), cmd.length());

      - delay: 400ms

      # ── Set thresholds for all 6 event types ──────────────
      - lambda: |-
          int val = (int) id(num_thr_baby_cry).state;
          std::string cmd = "AT+SETEVENTTHRESHOLD=baby_cry," + std::to_string(val) + "\r\n";
          ESP_LOGI("sound", "baby_cry threshold -> %d", val);
          id(uart_bus).write_array((const uint8_t*)cmd.c_str(), cmd.length());
      - delay: 400ms

      - lambda: |-
          int val = (int) id(num_thr_glass_break).state;
          std::string cmd = "AT+SETEVENTTHRESHOLD=glass_break," + std::to_string(val) + "\r\n";
          ESP_LOGI("sound", "glass_break threshold -> %d", val);
          id(uart_bus).write_array((const uint8_t*)cmd.c_str(), cmd.length());
      - delay: 400ms

      - lambda: |-
          int val = (int) id(num_thr_gunshot).state;
          std::string cmd = "AT+SETEVENTTHRESHOLD=gunshot," + std::to_string(val) + "\r\n";
          ESP_LOGI("sound", "gunshot threshold -> %d", val);
          id(uart_bus).write_array((const uint8_t*)cmd.c_str(), cmd.length());
      - delay: 400ms

      - lambda: |-
          int val = (int) id(num_thr_snore).state;
          std::string cmd = "AT+SETEVENTTHRESHOLD=snore," + std::to_string(val) + "\r\n";
          ESP_LOGI("sound", "snore threshold -> %d", val);
          id(uart_bus).write_array((const uint8_t*)cmd.c_str(), cmd.length());
      - delay: 400ms

      - lambda: |-
          int val = (int) id(num_thr_t3).state;
          std::string cmd = "AT+SETEVENTTHRESHOLD=T3," + std::to_string(val) + "\r\n";
          ESP_LOGI("sound", "T3 threshold -> %d", val);
          id(uart_bus).write_array((const uint8_t*)cmd.c_str(), cmd.length());
      - delay: 400ms

      - lambda: |-
          int val = (int) id(num_thr_t4).state;
          std::string cmd = "AT+SETEVENTTHRESHOLD=T4," + std::to_string(val) + "\r\n";
          ESP_LOGI("sound", "T4 threshold -> %d", val);
          id(uart_bus).write_array((const uint8_t*)cmd.c_str(), cmd.length());
      - delay: 400ms

      # ── Save to sensor flash ───────────────────────────────
      - logger.log: "Saving config to sensor..."
      - uart.write:
          id: uart_bus
          data: "AT+SAVECONFIG\r\n"
      - delay: 500ms
      - logger.log: "Settings applied and saved!"


##############################################################
#  INTERVAL - Parse incoming UART lines every 50ms
##############################################################
interval:
  - interval: 50ms
    then:
      - lambda: |-
          while (id(uart_bus).available()) {
            uint8_t b;
            id(uart_bus).read_byte(&b);
            char c = (char)b;

            if (c == '\n') {
              std::string line = id(uart_rx_buffer);
              id(uart_rx_buffer) = "";
              if (!line.empty() && line.back() == '\r') line.pop_back();
              if (line.empty()) continue;

              ESP_LOGD("uart_rx", "<- %s", line.c_str());

              // ── +EVENT: id,confidence ─────────────────────
              if (line.size() > 7 && line.substr(0, 7) == "+EVENT:") {
                std::string payload = line.substr(7);
                while (!payload.empty() && payload[0] == ' ') payload.erase(0,1);

                size_t comma = payload.find(',');
                if (comma != std::string::npos) {
                  int event_id = std::stoi(payload.substr(0, comma));
                  int pct      = (int) std::stof(payload.substr(comma + 1));

                  // ID map matches AudioEventSensor.cpp
                  const char* label_map[] = {"", "baby_cry", "glass_break", "gunshot", "snore", "T3", "T4"};
                  std::string name = (event_id >= 1 && event_id <= 6) ? label_map[event_id] : "unknown";
                  std::string full = name + " " + std::to_string(pct) + "% confidence";

                  id(txt_last_event_full).publish_state(full);
                  id(txt_last_event_name).publish_state(name);
                  id(sen_confidence).publish_state((float)pct);
                  ESP_LOGI("sound", "EVENT: %s", full.c_str());
                }
              }

              // ── +GETFWVERSION:1.0.0 ───────────────────────
              else if (line.size() > 14 && line.substr(0, 14) == "+GETFWVERSION:") {
                std::string ver = line.substr(14);
                while (!ver.empty() && ver[0] == ' ') ver.erase(0,1);
                id(txt_firmware_version).publish_state(ver);
                ESP_LOGI("sound", "Firmware: %s", ver.c_str());
              }

              else if (line == "OK") {
                ESP_LOGD("sound", "<- OK");
              } else if (line.size() >= 5 && line.substr(0, 5) == "ERROR") {
                ESP_LOGW("sound", "<- ERROR: %s", line.c_str());
              }

            } else if (c != '\r') {
              id(uart_rx_buffer) += c;
            }
          }


##############################################################
#  SWITCHES
#  All 6 events ON by default — user can disable any in HA
#  After changing: press the "Apply Settings" button
##############################################################
switch:
  - platform: template
    name: "Detect Baby Cry"          # Class ID 1
    id: sw_detect_baby_cry
    icon: mdi:baby-face-outline
    optimistic: true
    restore_mode: RESTORE_DEFAULT_ON  # ← ON by default

  - platform: template
    name: "Detect Glass Break"       # Class ID 2
    id: sw_detect_glass_break
    icon: mdi:glass-fragile
    optimistic: true
    restore_mode: RESTORE_DEFAULT_ON  # ← ON by default

  - platform: template
    name: "Detect Gunshot"           # Class ID 3
    id: sw_detect_gunshot
    icon: mdi:target
    optimistic: true
    restore_mode: RESTORE_DEFAULT_ON  # ← ON by default

  - platform: template
    name: "Detect Snore"             # Class ID 4
    id: sw_detect_snore
    icon: mdi:sleep
    optimistic: true
    restore_mode: RESTORE_DEFAULT_ON  # ← ON by default

  - platform: template
    name: "Detect T3"                # Class ID 5 (custom event)
    id: sw_detect_t3
    icon: mdi:waveform
    optimistic: true
    restore_mode: RESTORE_DEFAULT_ON  # ← ON by default

  - platform: template
    name: "Detect T4"                # Class ID 6 (custom event)
    id: sw_detect_t4
    icon: mdi:waveform
    optimistic: true
    restore_mode: RESTORE_DEFAULT_ON  # ← ON by default


##############################################################
#  NUMBER SLIDERS - Confidence thresholds
#  All default to 80% — adjust per event in HA
#  After changing: press the "Apply Settings" button
##############################################################
number:
  - platform: template
    name: "Baby Cry Threshold"
    id: num_thr_baby_cry
    icon: mdi:tune
    unit_of_measurement: "%"
    min_value: 0
    max_value: 100
    step: 5
    initial_value: 80             # ← Default 80%
    restore_value: true
    optimistic: true

  - platform: template
    name: "Glass Break Threshold"
    id: num_thr_glass_break
    icon: mdi:tune
    unit_of_measurement: "%"
    min_value: 0
    max_value: 100
    step: 5
    initial_value: 80             # ← Default 80%
    restore_value: true
    optimistic: true

  - platform: template
    name: "Gunshot Threshold"
    id: num_thr_gunshot
    icon: mdi:tune
    unit_of_measurement: "%"
    min_value: 0
    max_value: 100
    step: 5
    initial_value: 80             # ← Default 80%
    restore_value: true
    optimistic: true

  - platform: template
    name: "Snore Threshold"
    id: num_thr_snore
    icon: mdi:tune
    unit_of_measurement: "%"
    min_value: 0
    max_value: 100
    step: 5
    initial_value: 80             # ← Default 80%
    restore_value: true
    optimistic: true

  - platform: template
    name: "T3 Threshold"
    id: num_thr_t3
    icon: mdi:tune
    unit_of_measurement: "%"
    min_value: 0
    max_value: 100
    step: 5
    initial_value: 80             # ← Default 80%
    restore_value: true
    optimistic: true

  - platform: template
    name: "T4 Threshold"
    id: num_thr_t4
    icon: mdi:tune
    unit_of_measurement: "%"
    min_value: 0
    max_value: 100
    step: 5
    initial_value: 80             # ← Default 80%
    restore_value: true
    optimistic: true


##############################################################
#  BUTTONS
##############################################################
button:
  - platform: template
    name: "Apply Settings"
    id: btn_apply_settings
    icon: mdi:content-save-cog
    on_press:
      - script.execute: apply_all_settings

  - platform: template
    name: "Reset Sensor"
    id: btn_reset
    icon: mdi:restart
    on_press:
      - logger.log: "Manual reset triggered"
      - uart.write:
          id: uart_bus
          data: "AT+RESET\r\n"
      - delay: 3s
      - script.execute: apply_all_settings

  - platform: template
    name: "Save Sensor Config"
    id: btn_save_config
    icon: mdi:content-save
    on_press:
      - uart.write:
          id: uart_bus
          data: "AT+SAVECONFIG\r\n"

  - platform: template
    name: "Get Firmware Version"
    id: btn_get_fw
    icon: mdi:information
    on_press:
      - uart.write:
          id: uart_bus
          data: "AT+GETFWVERSION\r\n"

  - platform: restart
    name: "Restart ESP32"
    icon: mdi:restart-alert
    entity_category: config


##############################################################
#  TEXT SENSORS
##############################################################
text_sensor:
  - platform: template
    name: "Last Sound Event"
    id: txt_last_event_full
    icon: mdi:ear-hearing
    # Example: "glass_break 87% confidence"

  - platform: template
    name: "Event Type"
    id: txt_last_event_name
    icon: mdi:waveform
    # Example: "gunshot"
    # Use this in HA automations → trigger when state = "gunshot"

  - platform: template
    name: "Firmware Version"
    id: txt_firmware_version
    icon: mdi:chip
    entity_category: diagnostic

  - platform: wifi_info
    ip_address:
      name: "IP Address"
      icon: mdi:ip-network
      entity_category: diagnostic
    ssid:
      name: "Connected SSID"
      icon: mdi:wifi
      entity_category: diagnostic


##############################################################
#  SENSORS
##############################################################
sensor:
  - platform: template
    name: "Event Confidence"
    id: sen_confidence
    icon: mdi:percent
    unit_of_measurement: "%"
    accuracy_decimals: 0

  - platform: wifi_signal
    name: "WiFi Signal"
    update_interval: 60s
    entity_category: diagnostic
    icon: mdi:wifi-strength-2
En este ejemplo, estamos utilizando la XIAO ESP32S3, por lo que es posible que debas actualizar los siguientes parámetros en el archivo YAML según tu placa y la configuración del cableado
board: esp32-s3-devkitc-1   # your board name
tx_pin: GPIO43             # your TX pin connection
rx_pin: GPIO44             # your RX pin connection
Una vez que hayas guardado tu archivo YAML, haz clic en INSTALL.
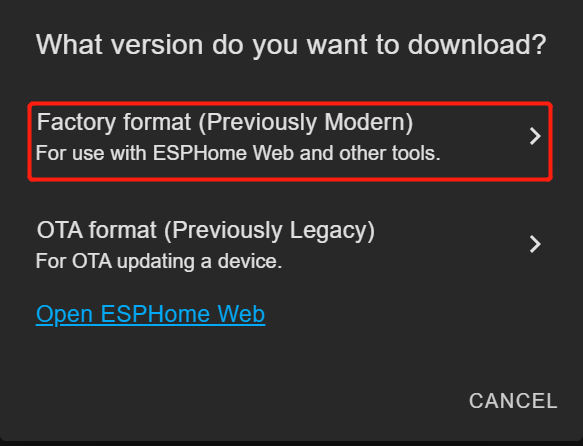
Elige Manual Download

Espera a que el firmware se compile.
Descarga el archivo de firmware .bin generado a tu ordenador desde Factory Format.
Conecta la placa ESP32-S3 del sensor de sonido integrado a tu PC usando un cable USB Type-C.
Abre Web ESPHome en Google Chrome.
Haz clic en Connect y elige el puerto serie correcto de la lista.
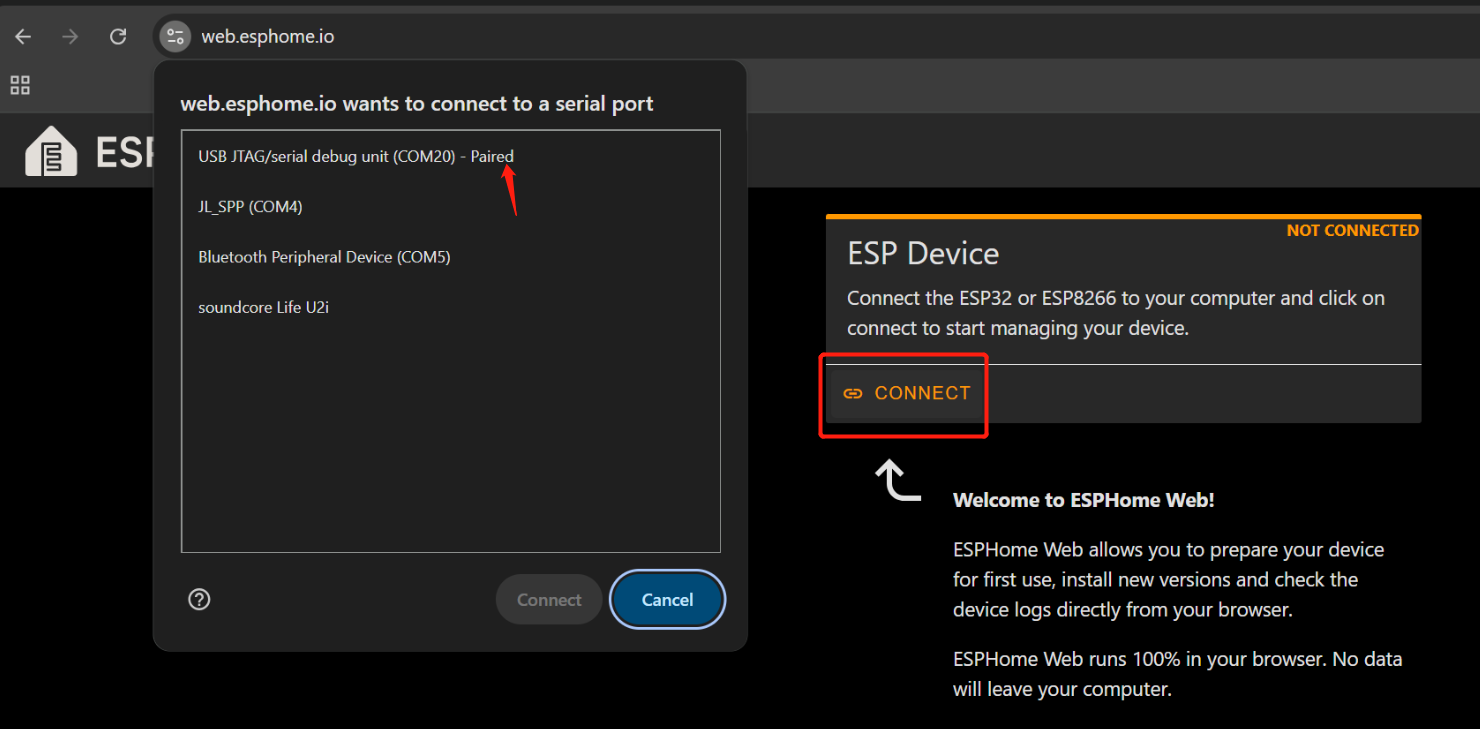
Una vez conectado, haz clic en INSTALL
Selecciona el archivo .bin que acabas de descargar.
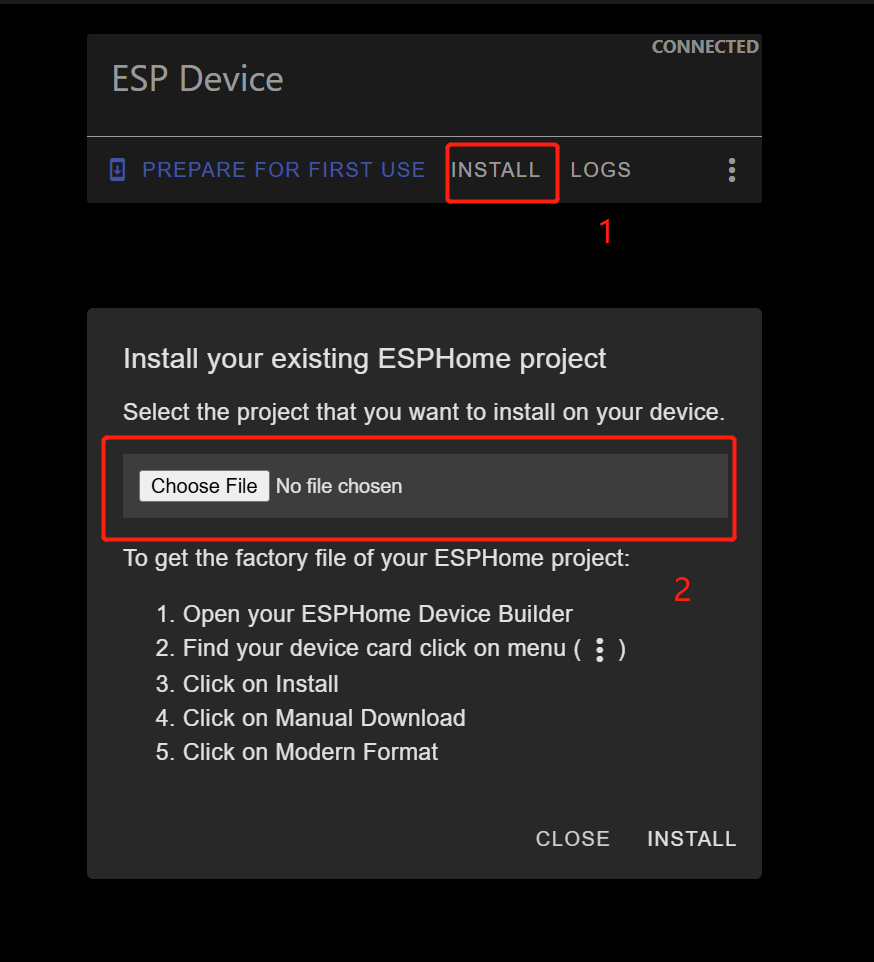
Espera a que la instalación se complete (puede tardar unos minutos).
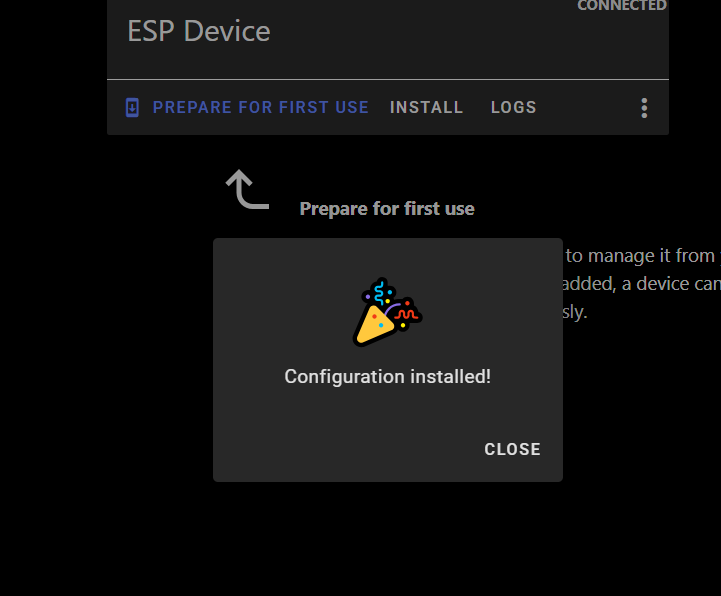
Cuando finalice correctamente, verás un mensaje de confirmación.
Vuelve a Home Assistant > Settings > Devices & Services.
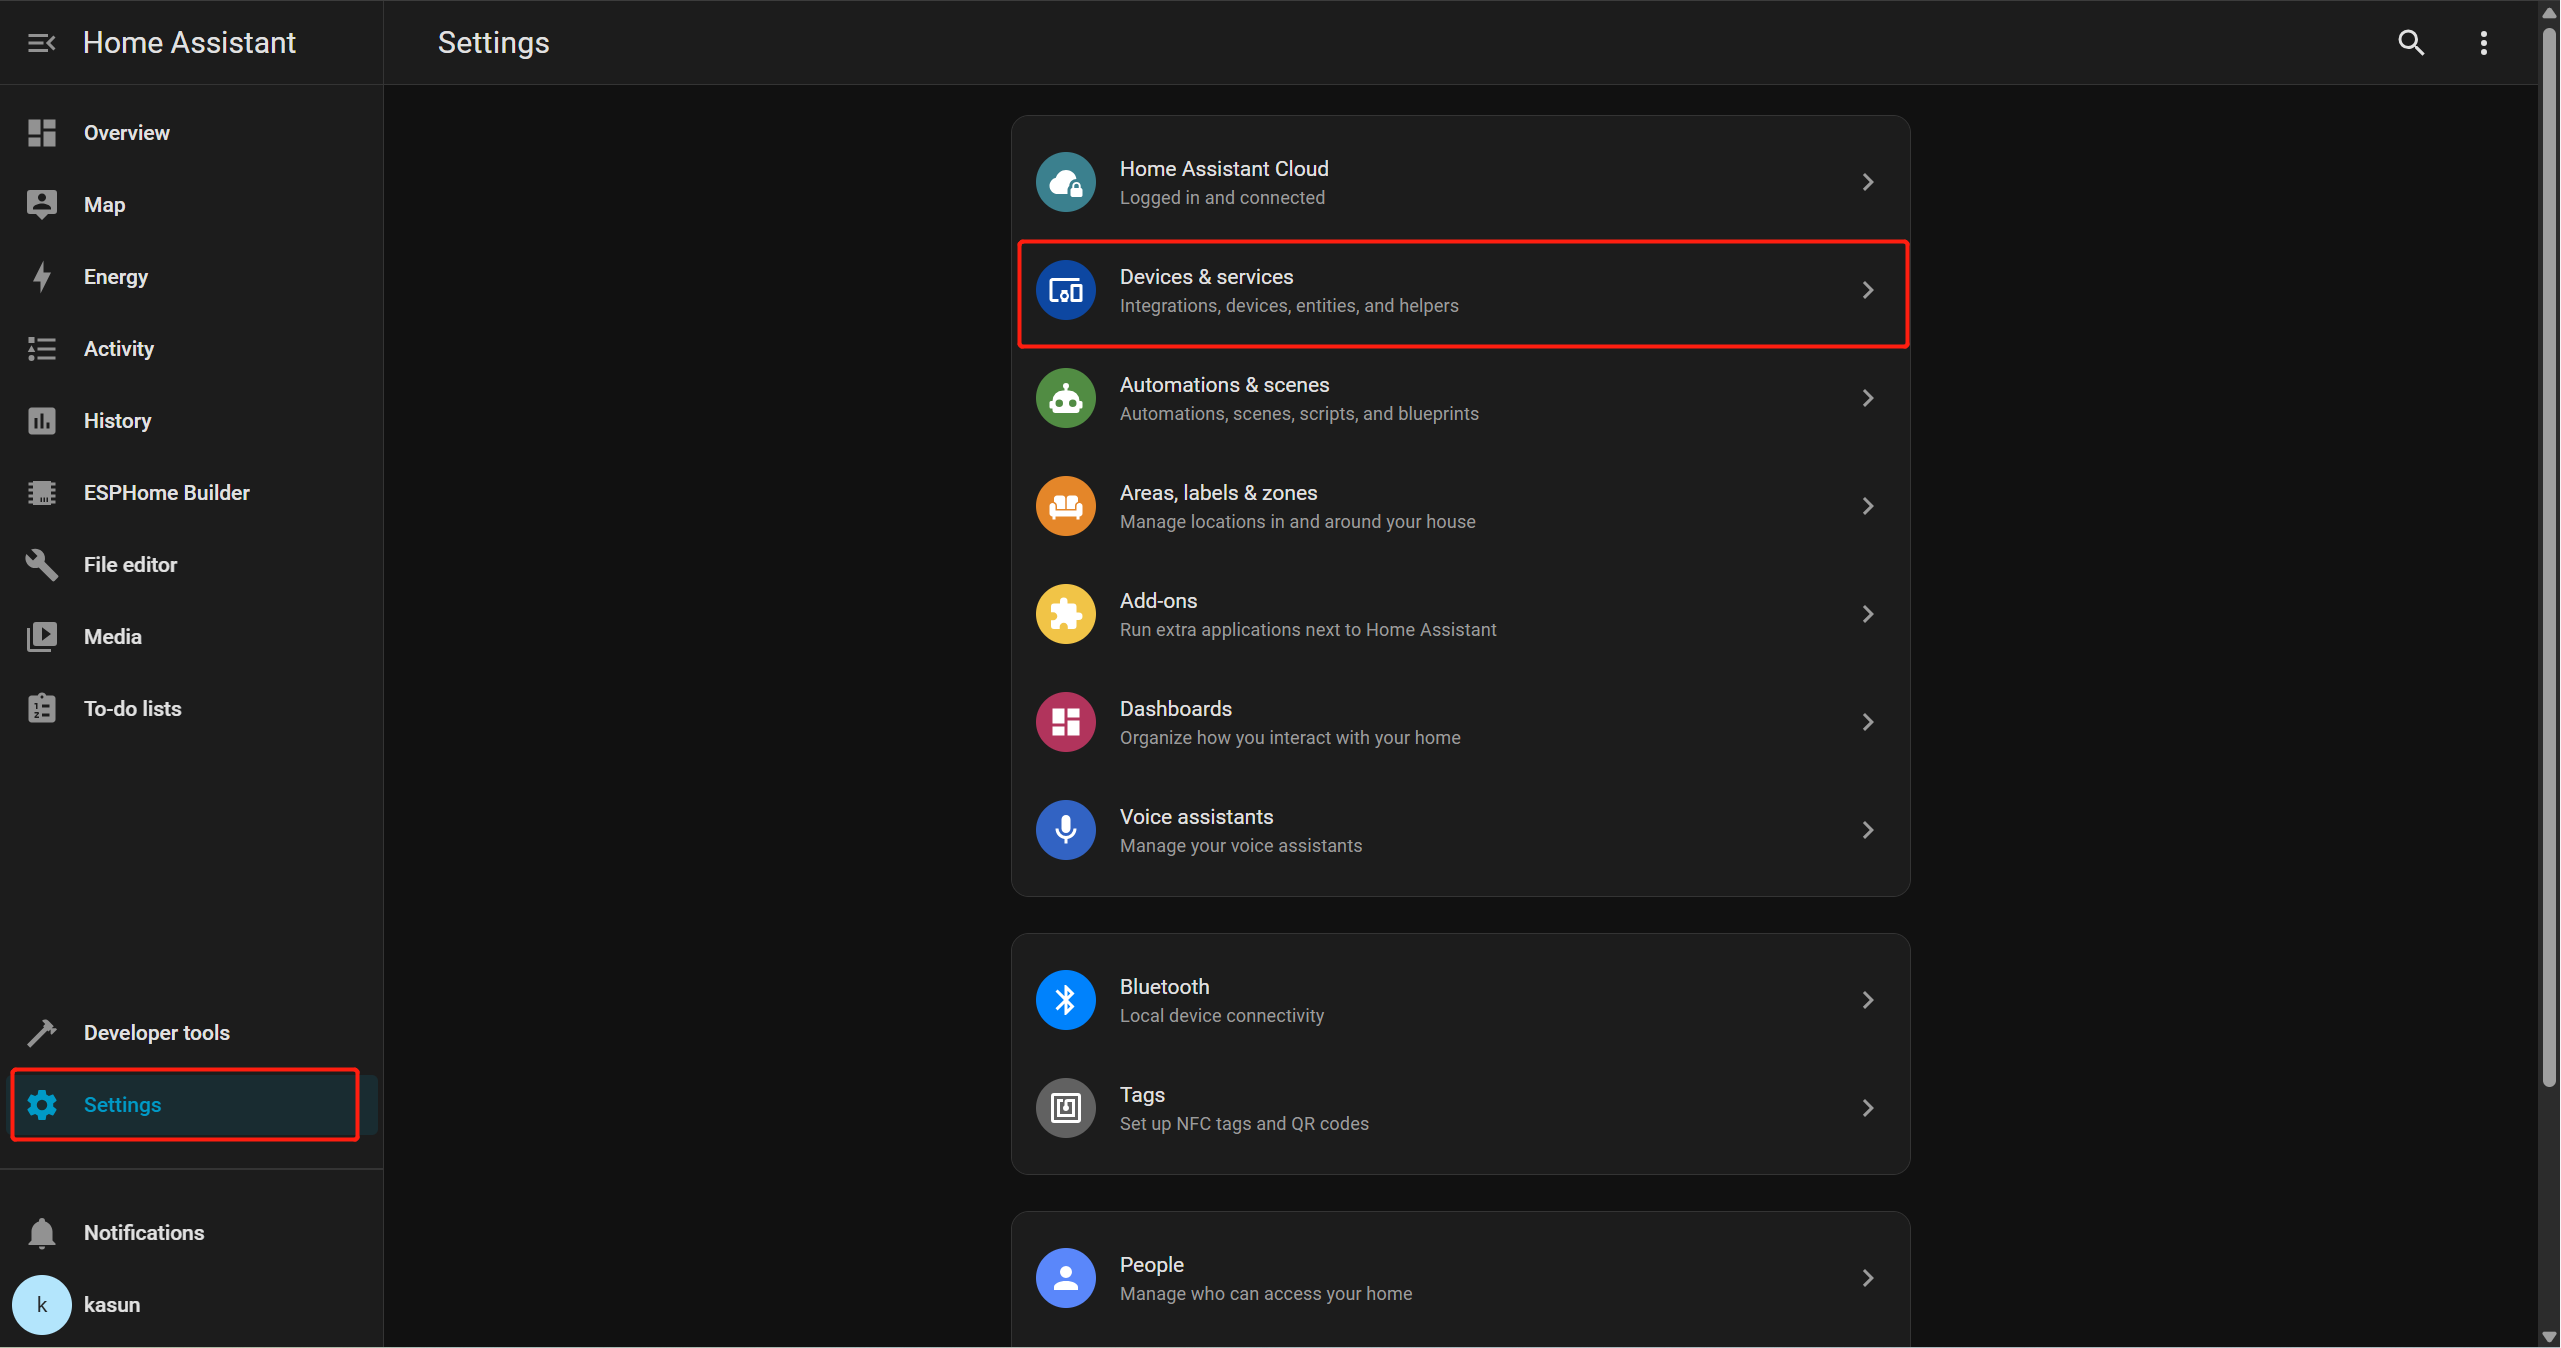
Deberías ver ESPHome listado como una integración detectada.
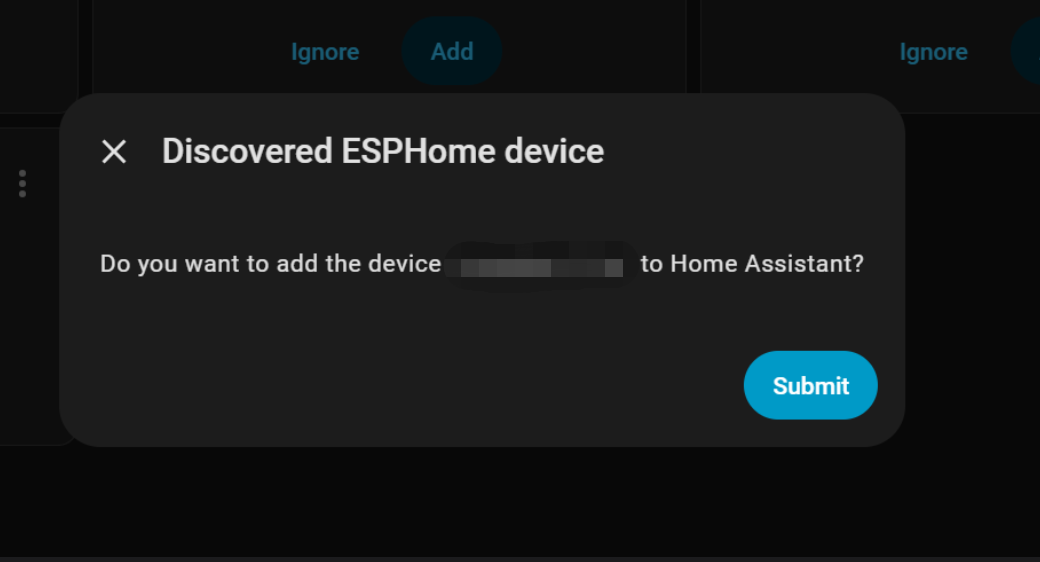
Haz clic en Add y luego en Submit para finalizar la configuración.
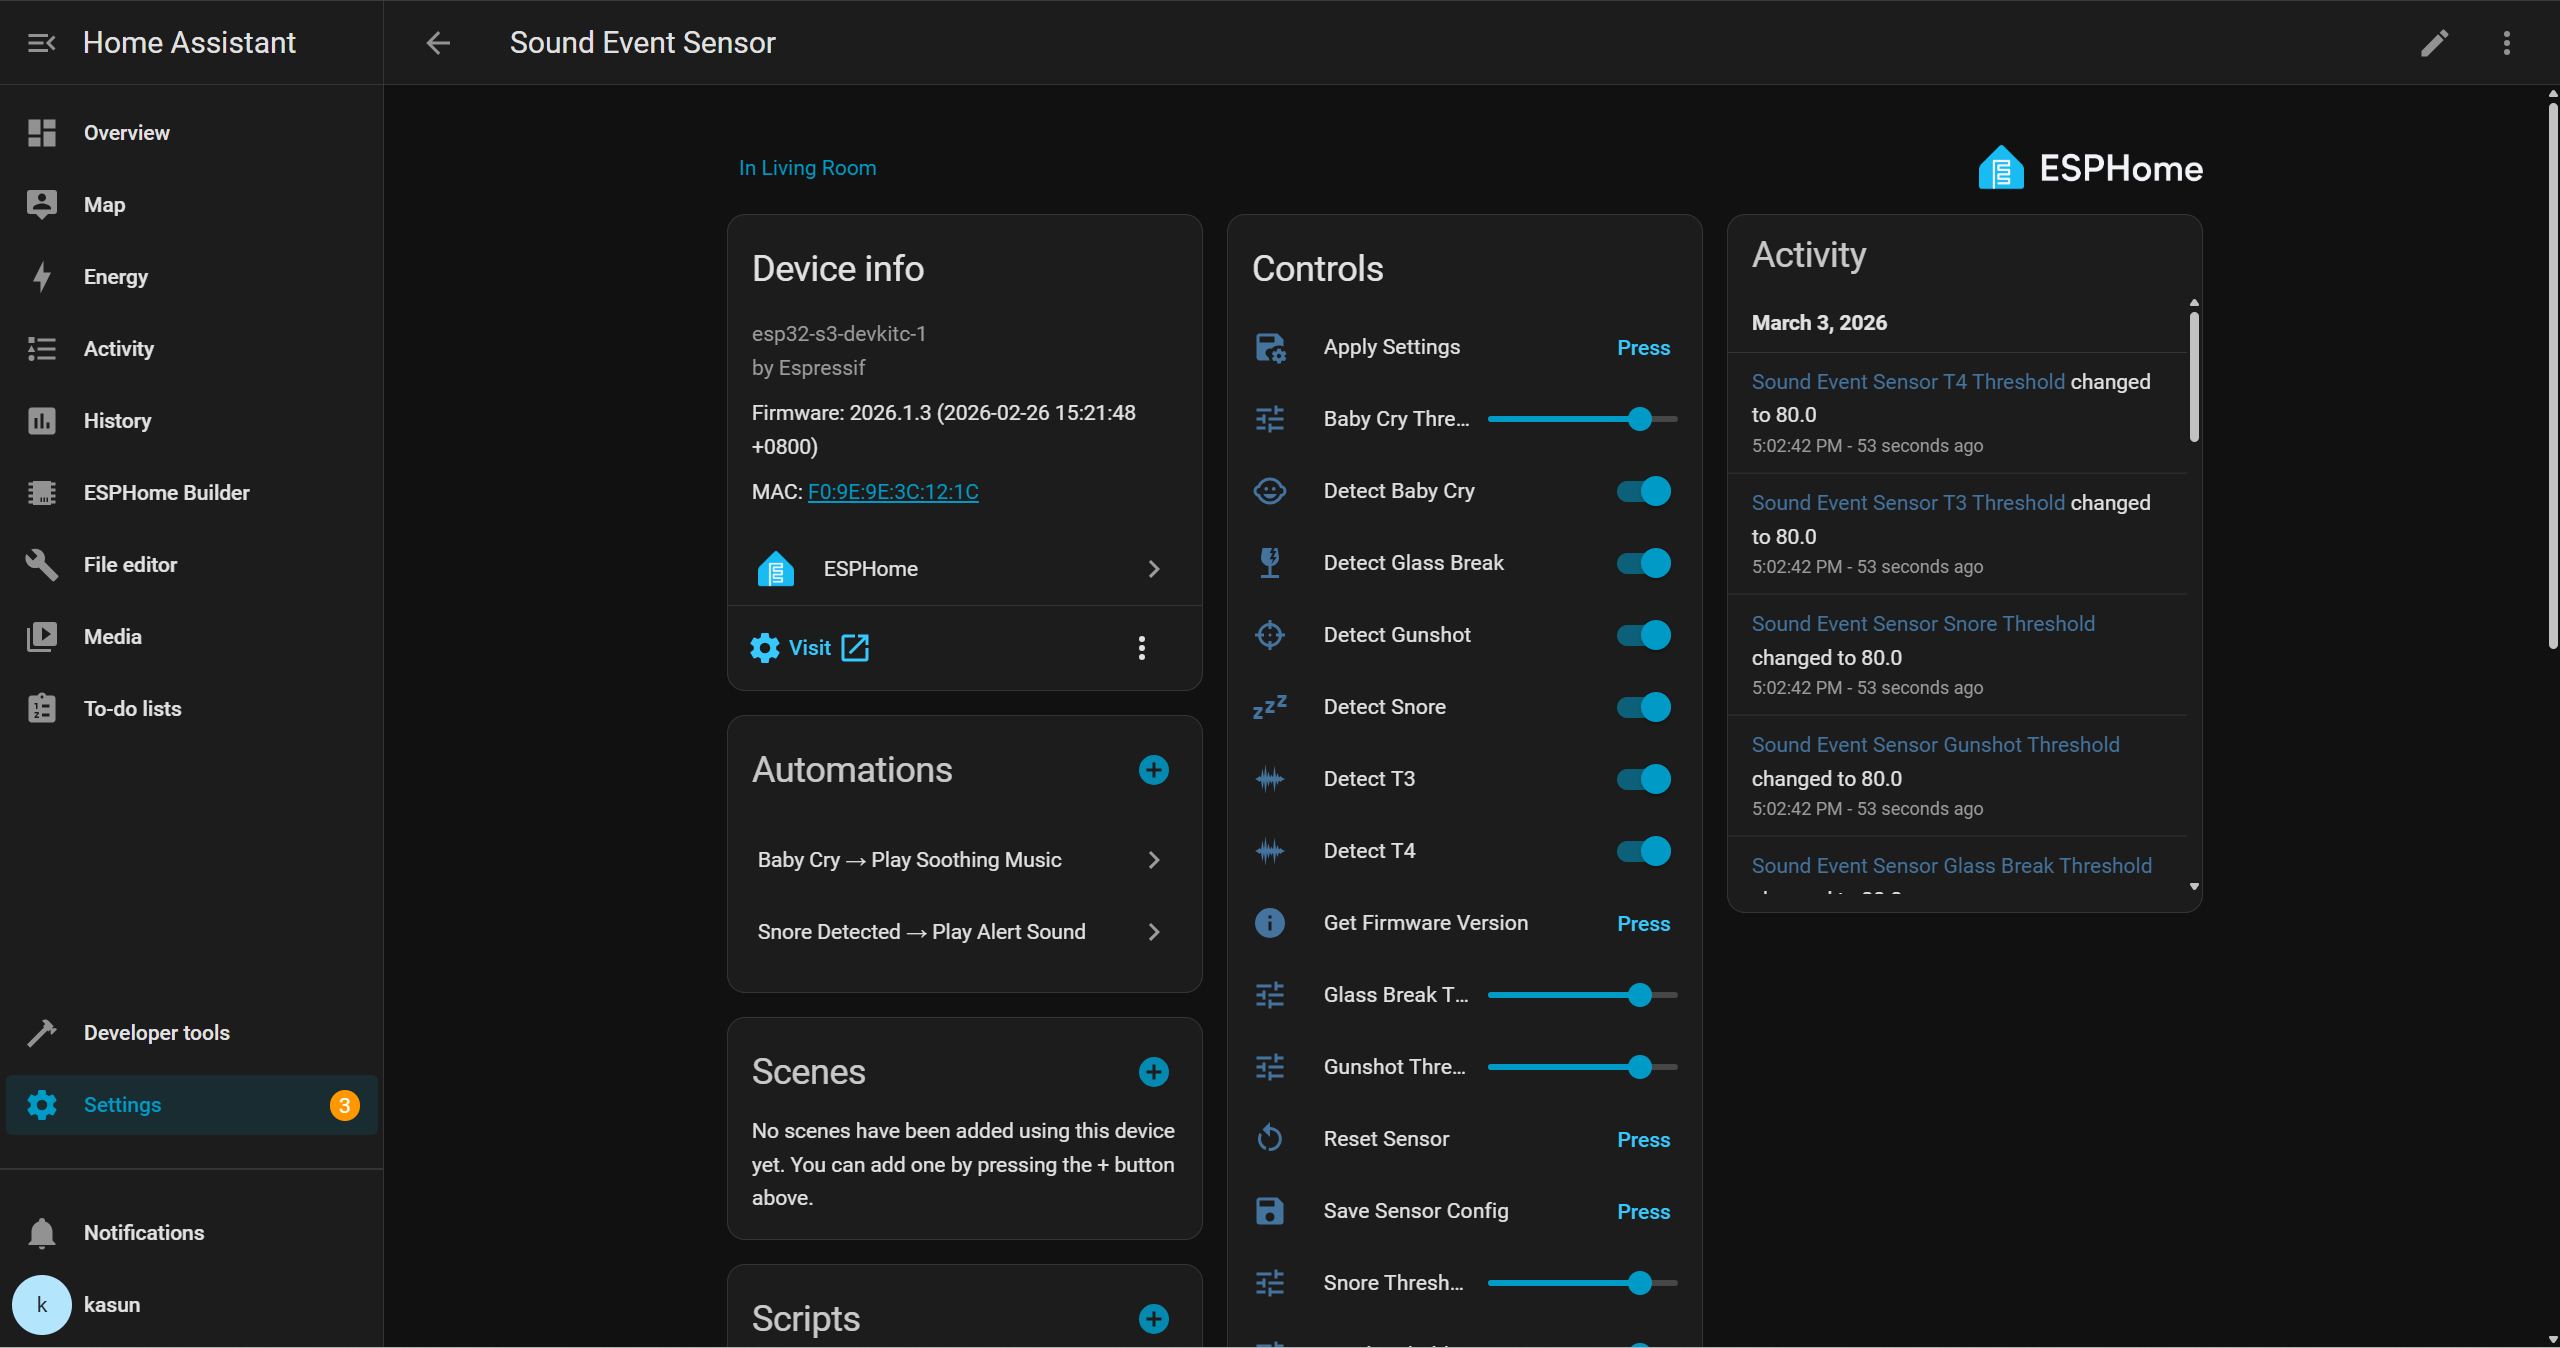
Después, podrás interactuar con el dispositivo a través de la interfaz de Home Assistant y crear tus propias automatizaciones con otros periféricos. Por ejemplo, puedes activar un zumbador cuando se detecte rotura de cristal, o reproducir automáticamente música de cuna relajante en un altavoz inteligente cuando se detecte el llanto de un bebé.
Demostración
Soporte técnico y debate sobre el producto
Gracias por elegir nuestros productos. Estamos aquí para ofrecerte diferentes tipos de soporte y garantizar que tu experiencia con nuestros productos sea lo más fluida posible. Ofrecemos varios canales de comunicación para adaptarnos a distintas preferencias y necesidades.