Usar docker en reComputer
Introducción

Este wiki explica cómo usar docker en la caja reComputer. Docker es una plataforma de código abierto utilizada para automatizar el despliegue, escalado y gestión de aplicaciones dentro de contenedores ligeros y portátiles. Los contenedores permiten a los desarrolladores empaquetar aplicaciones y sus dependencias juntas en un entorno consistente, asegurando que funcionen sin problemas en diferentes entornos de computación.
Preparar Hardware
| reComputer R1125 | reComputer AI R2130 | reComputer AI Industrial R2145 |
|---|---|---|
 |  |  |
| reComputer Industrial R20xx | reComputer Industrial R21xx |
|---|---|
 |  |
Preparar software
actualizar el sistema
sudo date -s "$(wget -qSO- --max-redirect=0 google.com 2>&1 | grep Date: | cut -d' ' -f5-8)Z"
sudo apt update
sudo apt full-upgrade
Instalar docker
curl -fsSL https://get.docker.com -o get-docker.sh
sudo sh get-docker.sh
Agregar el usuario actual al grupo docker
sudo usermod -aG docker $USER
reboot
Verificar la versión de docker
docker --version
El resultado es el siguiente:

Usar docker
Crear tu proyecto
Aquí, usamos my_app como ejemplo para demostrar el uso de docker.
mkdir my_app
cd my_app
Crear carpeta src y crear main.py
mkdir src && cd src
nano main.py
main.py
from fastapi import FastAPI, Request
from fastapi.responses import HTMLResponse
from fastapi.staticfiles import StaticFiles
from fastapi.templating import Jinja2Templates
import os

app = FastAPI()

# Create directories if they don't exist
os.makedirs("static", exist_ok=True)
os.makedirs("templates", exist_ok=True)

# Mount static files directory
app.mount("/static", StaticFiles(directory="static"), name="static")

# Set up Jinja2 templates
templates = Jinja2Templates(directory="templates")

@app.get("/", response_class=HTMLResponse)
async def read_root(request: Request):
    return templates.TemplateResponse("index.html", {"request": request})

@app.get("/items/{item_id}")
async def read_item(item_id: int, q: str = None):
    return {"item_id": item_id, "q": q}
Crear carpeta static
cd .. && mkdir static
cd static
mkdir css && mkdir js
Crear archivo css:
cd css
nano style.css
style.css
body {
    font-family: 'Roboto', sans-serif;
    margin: 0;
    padding: 0;
    background: linear-gradient(135deg, #667eea 0%, #764ba2 100%);
    min-height: 100vh;
    color: #333;
}

.container {
    max-width: 800px;
    margin: 0 auto;
    padding: 20px;
}

header {
    text-align: center;
    padding: 40px 0;
    color: white;
}

header h1 {
    font-size: 2.5rem;
    margin-bottom: 10px;
}

header p {
    font-size: 1.2rem;
    font-weight: 300;
}

main {
    display: flex;
    flex-direction: column;
    gap: 20px;
}

.card {
    background: white;
    border-radius: 10px;
    box-shadow: 0 4px 20px rgba(0, 0, 0, 0.1);
    padding: 25px;
    transition: transform 0.3s ease, box-shadow 0.3s ease;
}

.card:hover {
    transform: translateY(-5px);
    box-shadow: 0 6px 25px rgba(0, 0, 0, 0.15);
}

.card h2 {
    margin-top: 0;
    color: #667eea;
    display: flex;
    align-items: center;
    gap: 10px;
}

.card ul {
    padding-left: 20px;
}

.card li {
    margin-bottom: 10px;
    display: flex;
    align-items: center;
    gap: 10px;
}

.endpoint {
    display: flex;
    justify-content: space-between;
    align-items: center;
    background: #f8f9fa;
    padding: 15px;
    border-radius: 5px;
    margin-top: 10px;
}

.endpoint code {
    background: #e9ecef;
    padding: 5px 10px;
    border-radius: 3px;
    font-family: 'Courier New', monospace;
}

.button {
    background: #667eea;
    color: white;
    padding: 10px 20px;
    border-radius: 5px;
    text-decoration: none;
    font-weight: bold;
    transition: background 0.3s ease;
}

.button:hover {
    background: #5a6fd8;
}

footer {
    text-align: center;
    padding: 30px 0;
    color: white;
    font-weight: 300;
}

footer p {
    margin: 0;
}

footer i {
    color: #ff6b6b;
}
Luego crear archivo js:
cd .. && mkdir js
cd js
nano main.js
main.js
// Simple JavaScript to add interactivity to the UI
document.addEventListener('DOMContentLoaded', function() {
    // Add a click event listener to the "Try it" button
    const tryButton = document.querySelector('.button');
    if (tryButton) {
        tryButton.addEventListener('click', function(e) {
            // Add a simple animation effect
            this.style.transform = 'scale(0.95)';
            setTimeout(() => {
                this.style.transform = '';
            }, 100);
        });
    }

    // Add a hover effect to the cards
    const cards = document.querySelectorAll('.card');
    cards.forEach(card => {
        card.addEventListener('mouseenter', function() {
            this.style.transform = 'translateY(-5px)';
        });

        card.addEventListener('mouseleave', function() {
            this.style.transform = '';
        });
    });
});
Crear archivo html
cd ../../
mkdir templates
nano index.html
index.html
<!DOCTYPE html>
<html lang="en">
<head>
    <meta charset="UTF-8">
    <meta name="viewport" content="width=device-width, initial-scale=1.0">
    <title>FastAPI App</title>
    <style>
        body {
            font-family: 'Segoe UI', Tahoma, Geneva, Verdana, sans-serif;
            max-width: 800px;
            margin: 0 auto;
            padding: 20px;
            background: linear-gradient(135deg, #667eea 0%, #764ba2 100%);
            min-height: 100vh;
            color: #333;
        }
        .container {
            background: white;
            border-radius: 10px;
            padding: 30px;
            box-shadow: 0 4px 20px rgba(0, 0, 0, 0.1);
            text-align: center;
        }
        h1 {
            color: #667eea;
        }
        .card {
            background: #f8f9fa;
            border-radius: 8px;
            padding: 20px;
            margin: 20px 0;
            box-shadow: 0 2px 10px rgba(0, 0, 0, 0.05);
            transition: transform 0.3s ease;
        }
        .endpoint {
            display: flex;
            justify-content: space-between;
            align-items: center;
            background: #e9ecef;
            padding: 15px;
            border-radius: 5px;
            margin-top: 10px;
        }
        code {
            background: #dee2e6;
            padding: 5px 10px;
            border-radius: 3px;
            font-family: 'Courier New', monospace;
        }
        .button {
            background: #667eea;
            color: white;
            padding: 10px 20px;
            border-radius: 5px;
            text-decoration: none;
            font-weight: bold;
            transition: all 0.2s ease;
        }
        .button:hover {
            background: #5a6fd8;
            transform: scale(1.05);
        }
    </style>
</head>
<body>
    <div class="container">
        <h1>FastAPI Application</h1>
        <p>A modern, high-performance web application</p>

        <div class="card">
            <h2>About This App</h2>
            <p>This is a simple yet elegant web application built with FastAPI. It demonstrates how to create a beautiful UI with minimal code.</p>
        </div>

        <div class="card">
            <h2>Features</h2>
            <ul>
                <li>Fast and lightweight</li>
                <li>Responsive design</li>
                <li>Modern UI components</li>
                <li>RESTful API endpoints</li>
            </ul>
        </div>

        <div class="card">
            <h2>Try the API</h2>
            <p>You can access the API endpoints directly:</p>
            <div class="endpoint">
                <code>GET /items/{item_id}</code>
                <a href="/items/42" class="button">Try it</a>
            </div>
        </div>
    </div>

    <script src="/static/js/main.js"></script>
</body>
</html>
Crear Dockerfile
cd ..
nano Dockerfile
Dockerfile
# Use the official Python image as the base image
FROM python:3.9-slim

# Set the working directory in the container
WORKDIR /app

# Copy the requirements file into the container
COPY requirements.txt .

# Install the required packages
RUN pip install --no-cache-dir -r requirements.txt

# Create directories for templates and static files
RUN mkdir -p templates static

# Copy the source code into the container
COPY src/ ./src

# Copy the templates and static files into the container
COPY templates/ ./templates
COPY static/ ./static

# Expose the port that the application will run on
EXPOSE 8000

# Define the command to run the application
CMD ["uvicorn", "src.main:app", "--host", "0.0.0.0", "--port", "8000"]
Crear requirements.txt
nano requirements.txt
requirements.txt
fastapi
uvicorn[standard]
jinja2
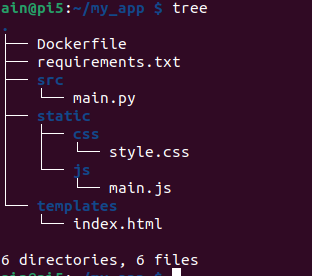
El directorio del proyecto es el siguiente
tree
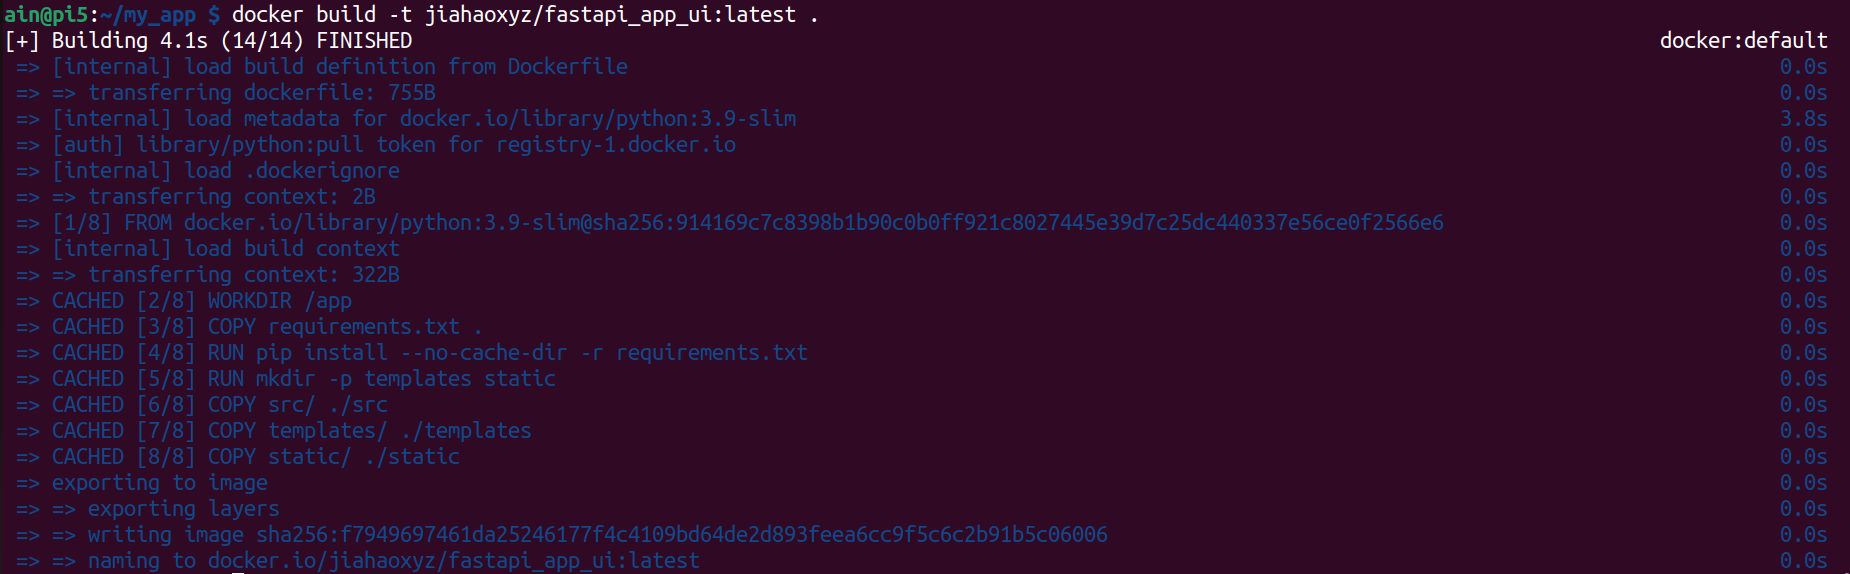
Construir y publicar imagen
Construir imagen
Nota: Si no tienes una cuenta en dockerhub, por favor registra una cuenta.
xxxes tu nombre de usuario de docker hub.
docker build -t xxx/fastapi_app_ui:latest .
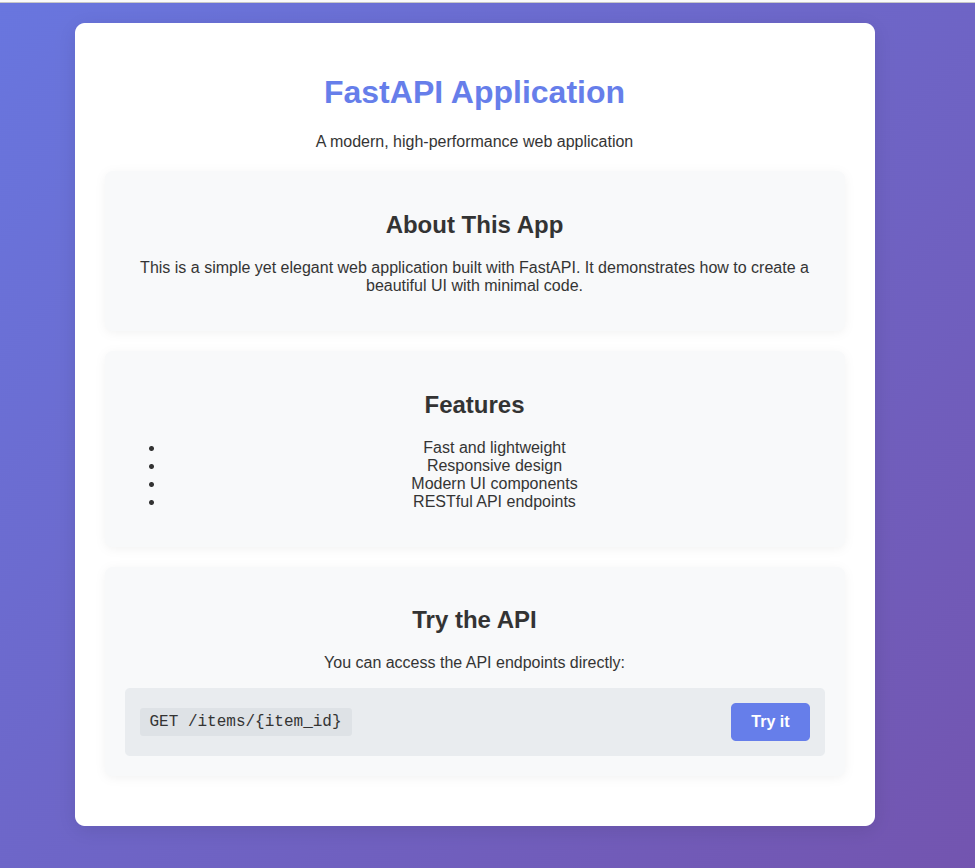
Probar la imagen
docker image ls -a

docker run -d -p 8000:8000 jiahaoxyz/fastapi_app_ui
El resultado se muestra a continuación:
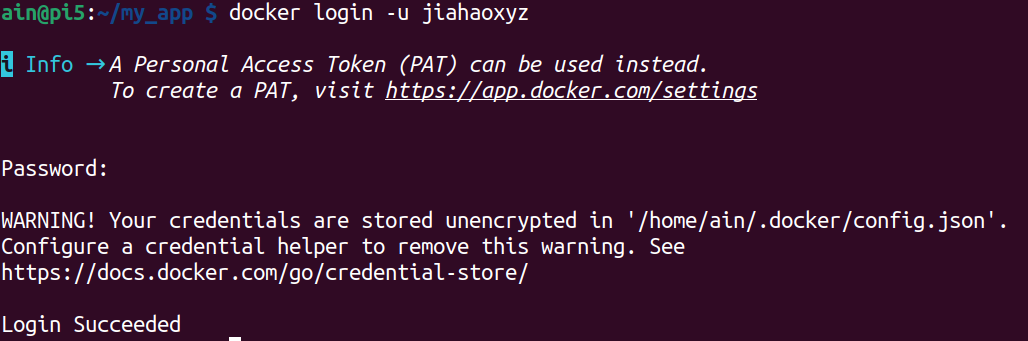
Publicar la imagen
y crear tu propio token.
Nota:
xxxes tu propio nombre de usuario de dockerhub
docker login -u xxx
Nota:
xxxes tu propio nombre de usuario de dockerhub
docker push xxx/fastapi_app_ui:latest
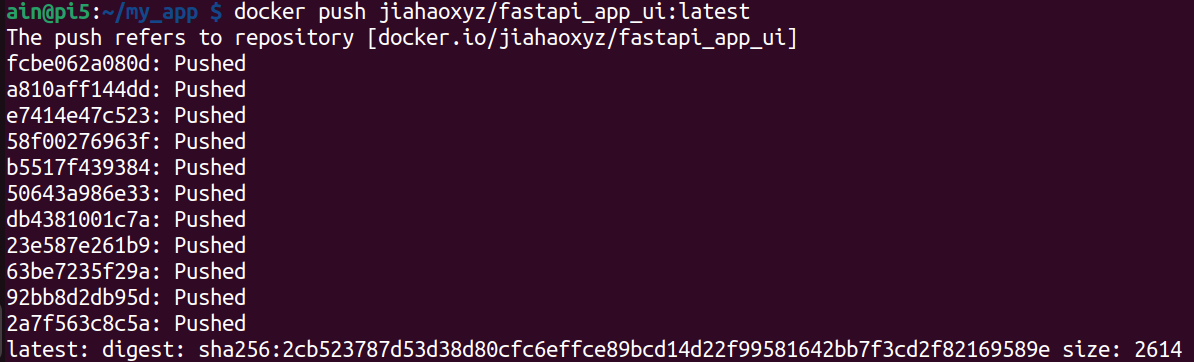
Resultado
Puedes ver que la imagen empaquetada usando Docker ha sido subida a Docker Hub, y está disponible para que cualquiera la use.
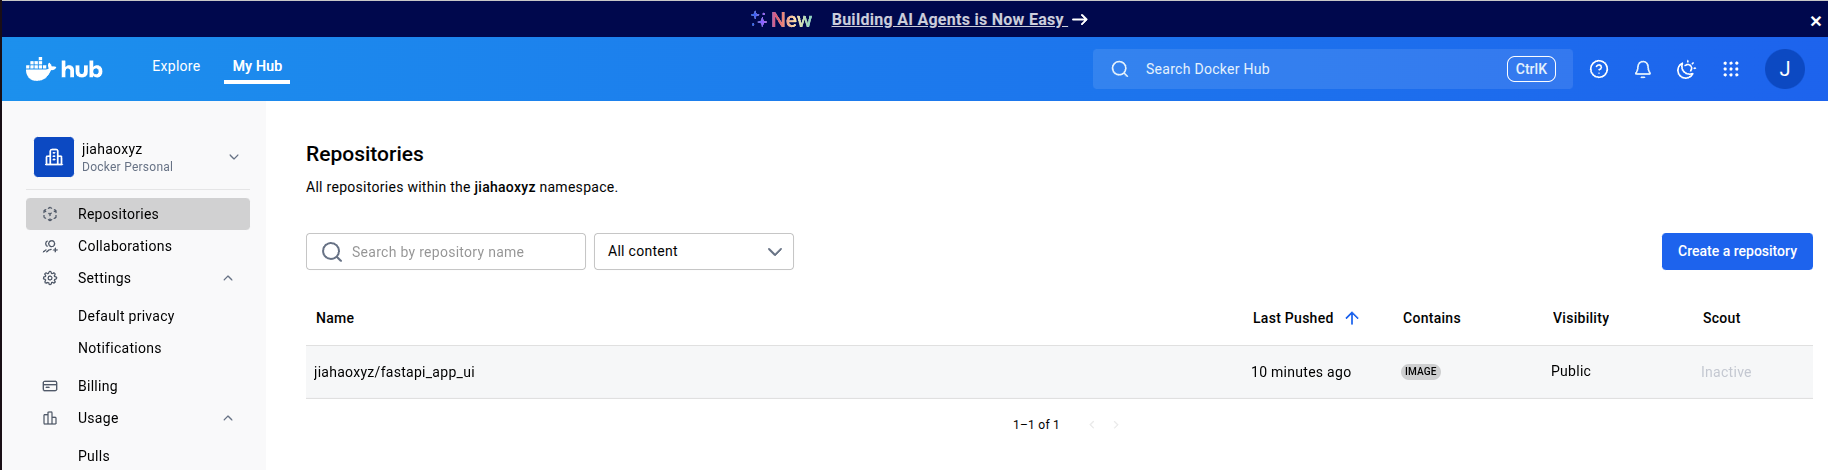
Puedes usar mis imágenes como se muestra a continuación, y aquí está la página de github del proyecto:
docker pull jiahaoxyz/fastapi_app_ui
Soporte Técnico y Discusión del Producto
¡Gracias por elegir nuestros productos! Estamos aquí para brindarte diferentes tipos de soporte para asegurar que tu experiencia con nuestros productos sea lo más fluida posible. Ofrecemos varios canales de comunicación para satisfacer diferentes preferencias y necesidades.