XIAO ESP32-C5 Con FreeRTOS
Descripción General
FreeRTOS es una colección de bibliotecas de C compuesta por un kernel en tiempo real y un conjunto de bibliotecas modulares que implementan funcionalidad complementaria. El kernel de FreeRTOS es un kernel en tiempo real (o planificador en tiempo real) que permite a las aplicaciones construidas sobre FreeRTOS cumplir con sus requisitos de tiempo real estrictos. Permite que las aplicaciones se organicen como una colección de hilos de ejecución independientes.

Referencia : Mastering the FreeRTOS Real Time Kernel
Puertos de FreeRTOS
FreeRTOS es un kernel RTOS de código abierto que está preintegrado en el Arduino ESP32 Core (que está construido sobre ESP-IDF). Por lo tanto, cada sketch de Arduino que se ejecuta en un ESP32 está realmente utilizando FreeRTOS en segundo plano. El kernel de FreeRTOS está portado a todas las arquitecturas de chips ESP, incluyendo Xtensa y RISC-V (por ejemplo, XIAO ESP32-C5).
Por lo tanto, este tutorial está escrito basado en el framework de Arduino para proporcionar una experiencia de desarrollo más accesible.
Preparación del Hardware
| Seeed Studio XIAO ESP32-C5 |
|---|
 |
Preparación del Software
Si aún no has usado el IDE de Arduino, consulta Introducción a Seeed Studio XIAO ESP32-C5.
Introducción a las Tareas
Las tareas son pequeñas funciones/trabajos que se solicita al procesador que realice con un conjunto de configuraciones. Las tareas pueden variar desde pequeñas funciones hasta funciones de bucle infinito.
Las tareas son las unidades fundamentales de ejecución en una aplicación FreeRTOS. Son esencialmente funciones que se ejecutan concurrentemente con otras tareas. Esto permite una multitarea eficiente y capacidad de respuesta.
Propiedades de las tareas
- TaskFunction: Esta es la función que contiene la lógica real de la tarea. Es el punto de entrada para la ejecución de la tarea.
- StackSize: Esto especifica la cantidad de memoria asignada para la pila de la tarea. La pila se usa para almacenar variables locales, direcciones de retorno de funciones y datos temporales.
- TaskPriority: Esto determina la importancia relativa de la tarea en comparación con otras tareas. Las tareas de mayor prioridad tienen una mayor probabilidad de ser ejecutadas antes que las de menor prioridad.
- TaskParameters: Estos son argumentos opcionales que se pueden pasar a la función de la tarea cuando se crea. Se pueden usar para proporcionar contexto adicional o configuración a la tarea.
- CoreAffinity: Esto especifica a qué núcleo de CPU debe asignarse la tarea. En sistemas con múltiples núcleos, esto se puede usar para optimizar el rendimiento o equilibrar la carga de trabajo.
Crear una Tarea
Para crear una tarea en FreeRTOS, se usa la función xTaskCreate. Esta función toma varios parámetros, incluyendo la función de la tarea, el nombre de la tarea, el tamaño de la pila, los parámetros, la prioridad y un manejador para la tarea creada.
TaskHandle_t task;
xTaskCreate(
        taskFunction,             /* Function that implements the task. */
        "taskName",               /* Text name for the task. */
        configMINIMAL_STACK_SIZE, /* Stack size in words, or bytes. */
        NULL,                     /* Parameter passed into the task. */
        tskIDLE_PRIORITY,         /* Priority at which the task is created. */
        &task                     /* Used to pass out the created task's handle. */
        );
Función de tarea
La función de tarea es el código real que será ejecutado por la tarea.
void taskFunction(void * pvParameters) {
  /*
  Function definition goes here
  */
}
Visualización de tareas
Crear cuatro tareas simples para visualizar cómo funciona FreeRTOS.
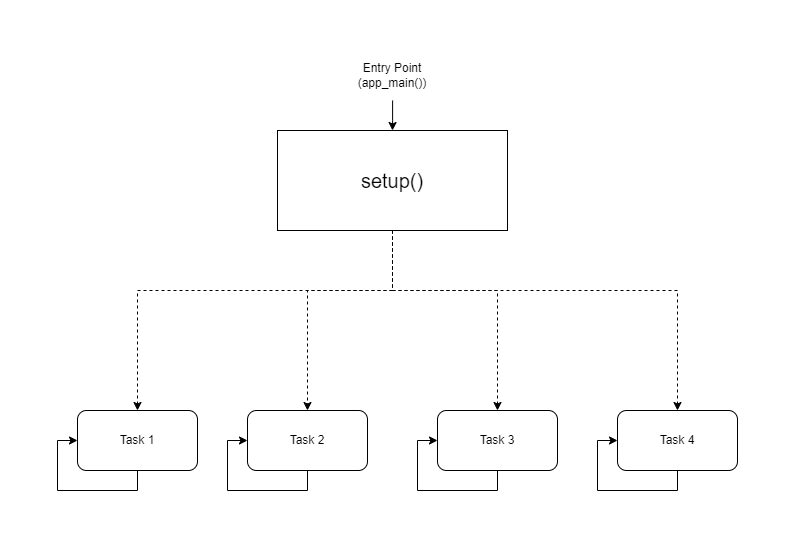
- Representación Visual
taskFunction1 (1000ms delay)
taskFunction2 (500ms delay)
taskFunction3 (500ms delay)
taskFunction4 (500ms delay)
- Código de Referencia
freertos.ino
#include <Arduino.h>

// Task handles
TaskHandle_t task1, task2, task3, task4;

// ---------------------- Task Function Definitions ----------------------

void taskFunction1(void * pvParameters) {
    for (;;) { // Infinite loop, equivalent to while(true)
        // Print Task 1 and Hello message
        Serial.println("Task 1: Hello from task 1");

        // Delay 1000ms (1 second)
        vTaskDelay(pdMS_TO_TICKS(1000));
    }
}

void taskFunction2(void * pvParameters) {
    for (;;) {
        Serial.println("Task 2: Hello from task 2");
        vTaskDelay(pdMS_TO_TICKS(500)); // Delay 500ms
    }
}

void taskFunction3(void * pvParameters) {
    for (;;) {
        Serial.println("Task 3: Hello from task 3");
        vTaskDelay(pdMS_TO_TICKS(500));
    }
}

void taskFunction4(void * pvParameters) {
    for (;;) {
        Serial.println("Task 4: Hello from task 4");
        vTaskDelay(pdMS_TO_TICKS(500));
    }
}

// ---------------------- Main Program Entry ----------------------

void setup() {
    // 1. Initialize serial port (C5 typically uses USB CDC)
    Serial.begin(115200);

    // Give the serial port some startup time to prevent loss of initial prints
    delay(2000);
    Serial.println("--- ESP32-C5 FreeRTOS Tasks Demo ---");

    // 2. Create tasks
    // Use xTaskCreate, no need to specify core - the system will automatically schedule on the only Core 0
    // Important: Set stack size to 4096 bytes to prevent Stack Overflow

    xTaskCreate(
        taskFunction1,    /* Task function */
        "task_1",         /* Task name */
        4096,             /* Stack size (Bytes) - Do NOT use configMINIMAL_STACK_SIZE */
        NULL,             /* Parameters */
        1,                /* Priority */
        &task1            /* Handle */
    );

    xTaskCreate(
        taskFunction2,
        "task_2",
        4096,
        NULL,
        1,
        &task2
    );

    xTaskCreate(
        taskFunction3,
        "task_3",
        4096,
        NULL,
        1,
        &task3
    );

    xTaskCreate(
        taskFunction4,
        "task_4",
        4096,
        NULL,
        1,
        &task4
    );
}

void loop() {
    // Main loop is idle, reserved for task execution
    // To prove the main loop is still active, you can print occasionally or leave it empty
    delay(1000);
}
configMINIMAL_STACK_SIZE se puede cambiar en sdkconfig.
- Cuatro Tareas: El código define cuatro tareas: taskFunction1, taskFunction2, taskFunction3 y taskFunction4.
- Prioridades de Tareas: Todas las tareas se crean con tskIDLE_PRIORITY. Esto significa que tienen la misma prioridad.
- Retrasos de Tareas: taskFunction1 tiene un retraso de 1000ms, mientras que las otras tres tienen un retraso de 500ms.
El XIAO ESP32-C5 es un microcontrolador RISC-V de alta frecuencia y núcleo único, por lo que el cambio de núcleo no es posible; de lo contrario, causará un desbordamiento de pila.
Sensores y FreeRTOS
A continuación, implementaré un Sistema Inteligente de Bienvenida en la Entrada usando el XIAO ESP32-C5, FreeRTOS y varios sensores.
Este sistema simula un escenario de entrada en un hogar inteligente:
-
Monitoreo Ambiental: Monitoreo en tiempo real de la temperatura y humedad en la entrada (usando un sensor DHT11) y mostrando los datos en la pantalla.
-
Detección de Cuerpo Humano: Utilizando un sensor ultrasónico para detectar si alguien se está acercando.
-
Bienvenida Inteligente:
-
Cuando no hay nadie presente (la distancia es lejana): El LED está apagado, la pantalla muestra datos ambientales, y el sistema entra en una interfaz de ahorro de energía/espera.
-
Cuando alguien se acerca (la distancia es cercana, por ejemplo, < 30cm): El LED se enciende automáticamente (simulando una luz de porche), y la pantalla muestra ¡Bienvenido!.
-
Preparación del Hardware
Necesitarás preparar una placa XIAO ESP32-C5 y los siguientes sensores.
| Seeed Studio XIAO ESP32-C5 | Seeed Studio Expansion Board Base para XIAO | Grove - LED Púrpura | Grove - Sensor de Temperatura y Humedad (DHT11) | Grove - Sensor de Distancia Ultrasónico |
|---|---|---|---|---|
|  |  |  |  |
Software
Descarga la biblioteca y colócala en la ruta de bibliotecas de Arduino.
-
Grove - Sensor de Temperatura y Humedad (DHT11)
-
Grove - Sensor de Distancia Ultrasónico
-
Código de Referencia
Smart_Entrance_Welcome_System.ino
#include <Arduino.h>
#include <Wire.h>
#include <Adafruit_GFX.h>
#include <Adafruit_SSD1306.h>
#include "Ultrasonic.h"
#include "Grove_Temperature_And_Humidity_Sensor.h"

// ---------------- Configuration Area ----------------
// Pin Definitions
#define PIN_DHT         D6   // DHT11 connection pin
#define PIN_ULTRASONIC  D7   // Ultrasonic sensor connection pin
#define PIN_LED         D2   // LED light pin
#define PIN_SDA         D4   // OLED SDA pin
#define PIN_SCL         D5   // OLED SCL pin

// Sensor Type Definition
#define DHTTYPE DHT11

// OLED Parameters
#define SCREEN_WIDTH 128
#define SCREEN_HEIGHT 64
#define OLED_RESET    -1

// Logic Parameters
#define DIST_THRESHOLD 30 // Person detected if within 30cm
#define DHT_READ_INTERVAL 3000 // DHT11 reading interval (milliseconds)
#define DHT_TIMEOUT 250 // DHT11 reading timeout (milliseconds)

// ---------------- Object Initialization ----------------
Ultrasonic ultrasonic(PIN_ULTRASONIC);
DHT dht(PIN_DHT, DHTTYPE);
Adafruit_SSD1306 display(SCREEN_WIDTH, SCREEN_HEIGHT, &Wire, OLED_RESET);

// ---------------- Shared Data Structure ----------------
struct SystemState {
    float temperature;
    float humidity;
    long distanceCm;
    bool personDetected;
    bool dhtValid; // Whether DHT data is valid
    unsigned long lastDHTUpdate; // Last DHT update time
};

// Global State Variable
SystemState currentState = {0.0, 0.0, 0, false, false, 0};

// Mutex: Protect shared data access
SemaphoreHandle_t xMutex;

// I2C Mutex: Protect I2C bus access
SemaphoreHandle_t xI2CMutex;

// Task Handles
TaskHandle_t taskDHTHandle, taskUltraHandle, taskOLEDHandle, taskLogicHandle;

// ---------------- Task Function Implementations ----------------

// Task 1: DHT Temperature & Humidity Reading (Optimized - Non-blocking)
void taskDHT(void *pvParameters) {
    dht.begin();

    float temp_hum_val[2] = {0};
    unsigned long lastReadTime = 0;

    for (;;) {
        unsigned long currentTime = millis();

        // Control reading frequency to avoid frequent reads
        if (currentTime - lastReadTime >= DHT_READ_INTERVAL) {

            // Release CPU before sensor reading to allow other tasks to run
            // Read sensor without holding mutex
            bool readSuccess = !dht.readTempAndHumidity(temp_hum_val);

            if (readSuccess) {
                // Only acquire lock and update data quickly after successful reading
                if (xSemaphoreTake(xMutex, pdMS_TO_TICKS(100)) == pdTRUE) {
                    currentState.humidity = temp_hum_val[0];
                    currentState.temperature = temp_hum_val[1];
                    currentState.dhtValid = true;
                    currentState.lastDHTUpdate = currentTime;
                    xSemaphoreGive(xMutex);
                }

                Serial.printf("[DHT] Temp: %.1f°C, Humi: %.1f%%\n",
                             temp_hum_val[1], temp_hum_val[0]);
            } else {
                Serial.println("[DHT] Read failed");

                // Mark data as invalid
                if (xSemaphoreTake(xMutex, pdMS_TO_TICKS(100)) == pdTRUE) {
                    currentState.dhtValid = false;
                    xSemaphoreGive(xMutex);
                }
            }

            lastReadTime = currentTime;
        }

        // Use longer delay to yield CPU time
        vTaskDelay(pdMS_TO_TICKS(500));
    }
}

// Task 2: Ultrasonic Distance Measurement (Optimized)
void taskUltrasonic(void *pvParameters) {
    for (;;) {
        // Perform measurement without holding mutex
        long RangeInCentimeters = ultrasonic.MeasureInCentimeters();

        // Update data quickly
        if (xSemaphoreTake(xMutex, pdMS_TO_TICKS(50)) == pdTRUE) {
            currentState.distanceCm = RangeInCentimeters;

            // Determine if person is present
            if (RangeInCentimeters > 0 && RangeInCentimeters < DIST_THRESHOLD) {
                currentState.personDetected = true;
            } else {
                currentState.personDetected = false;
            }
            xSemaphoreGive(xMutex);
        }

        // Appropriate delay to avoid excessive frequency
        vTaskDelay(pdMS_TO_TICKS(100));
    }
}

// Task 3: LED Logic Control (Optimized)
void taskLogic(void *pvParameters) {
    pinMode(PIN_LED, OUTPUT);
    bool isPerson = false;
    bool lastState = false;

    for (;;) {
        // Read state quickly
        if (xSemaphoreTake(xMutex, pdMS_TO_TICKS(10)) == pdTRUE) {
            isPerson = currentState.personDetected;
            xSemaphoreGive(xMutex);
        }

        // Perform operation only when state changes
        if (isPerson != lastState) {
            digitalWrite(PIN_LED, isPerson ? HIGH : LOW);
            Serial.printf("[Logic] LED %s\n", isPerson ? "ON" : "OFF");
            lastState = isPerson;
        }

        vTaskDelay(pdMS_TO_TICKS(50));
    }
}

// Task 4: OLED Display (Optimized - Using I2C Mutex)
void taskOLED(void *pvParameters) {
    // Initialize I2C
    Wire.begin(PIN_SDA, PIN_SCL);
    Wire.setClock(400000); // Set I2C to fast mode 400kHz

    // Protect initialization with I2C mutex
    if (xSemaphoreTake(xI2CMutex, portMAX_DELAY) == pdTRUE) {
        if(!display.begin(SSD1306_SWITCHCAPVCC, 0x3C)) {
            Serial.println(F("[OLED] Init failed"));
            xSemaphoreGive(xI2CMutex);
            vTaskDelete(NULL);
        }
        display.clearDisplay();
        display.setTextColor(SSD1306_WHITE);
        display.display();
        xSemaphoreGive(xI2CMutex);
    }

    SystemState localState;
    unsigned long lastUpdate = 0;
    const unsigned long UPDATE_INTERVAL = 250; // Reduce refresh rate to 4Hz

    for (;;) {
        unsigned long currentTime = millis();

        // Control refresh rate
        if (currentTime - lastUpdate < UPDATE_INTERVAL) {
            vTaskDelay(pdMS_TO_TICKS(50));
            continue;
        }

        // Copy data quickly
        if (xSemaphoreTake(xMutex, pdMS_TO_TICKS(50)) == pdTRUE) {
            localState = currentState;
            xSemaphoreGive(xMutex);
        } else {
            // Skip update if mutex acquisition fails
            vTaskDelay(pdMS_TO_TICKS(50));
            continue;
        }

        // Protect display operations with I2C mutex
        if (xSemaphoreTake(xI2CMutex, pdMS_TO_TICKS(100)) == pdTRUE) {
            display.clearDisplay();

            if (localState.personDetected) {
                // --- Person Approaching Mode ---
                display.setTextSize(2);
                display.setCursor(10, 10);
                display.println(F("WELCOME!"));

                display.setTextSize(1);
                display.setCursor(10, 35);
                display.print(F("Distance: "));
                display.print(localState.distanceCm);
                display.println(F(" cm"));

                // Display temperature and humidity (if valid)
                if (localState.dhtValid) {
                    display.setCursor(10, 50);
                    display.print(localState.temperature, 1);
                    display.print(F("C "));
                    display.print(localState.humidity, 0);
                    display.println(F("%"));
                }
            } else {
                // --- Environment Monitoring Mode ---
                display.setTextSize(1);
                display.setCursor(0, 0);
                display.println(F("-- Home Monitor --"));

                if (localState.dhtValid) {
                    display.setCursor(0, 20);
                    display.print(F("Temperature: "));
                    display.print(localState.temperature, 1);
                    display.println(F(" C"));

                    display.setCursor(0, 35);
                    display.print(F("Humidity:    "));
                    display.print(localState.humidity, 0);
                    display.println(F(" %"));

                    // Display data age
                    unsigned long dataAge = (millis() - localState.lastDHTUpdate) / 1000;
                    display.setCursor(0, 50);
                    display.print(F("Updated: "));
                    display.print(dataAge);
                    display.println(F("s ago"));
                } else {
                    display.setCursor(0, 28);
                    display.println(F("Sensor reading..."));
                }
            }

            display.display();
            xSemaphoreGive(xI2CMutex);
        }

        lastUpdate = currentTime;
        vTaskDelay(pdMS_TO_TICKS(50));
    }
}

// ---------------- Setup & Loop ----------------

void setup() {
    Serial.begin(115200);
    delay(1000);
    Serial.println("\n=== System Starting ===");

    // Create mutexes
    xMutex = xSemaphoreCreateMutex();
    xI2CMutex = xSemaphoreCreateMutex();

    if (xMutex == NULL || xI2CMutex == NULL) {
        Serial.println("[ERROR] Failed to create mutex!");
        while(1) delay(1000);
    }

    // Create tasks - adjust priority and stack size
    // Priority: Higher number = higher priority
    // DHT task: lowest priority (1) - slow reading and non-urgent
    xTaskCreate(taskDHT, "DHT_Task", 4096, NULL, 1, &taskDHTHandle);

    // Ultrasonic task: medium priority (2) - requires fast response
    xTaskCreate(taskUltrasonic, "Ultra_Task", 3072, NULL, 2, &taskUltraHandle);

    // Logic task: medium priority (2) - same level as ultrasonic
    xTaskCreate(taskLogic, "Logic_Task", 2048, NULL, 2, &taskLogicHandle);

    // OLED task: low priority (1) - display does not require real-time performance
    xTaskCreate(taskOLED, "OLED_Task", 4096, NULL, 1, &taskOLEDHandle);

    Serial.println("=== FreeRTOS Tasks Started ===");
    Serial.printf("Free heap: %d bytes\n", ESP.getFreeHeap());
}

void loop() {
    // Monitor system status
    static unsigned long lastReport = 0;
    unsigned long now = millis();

    if (now - lastReport > 10000) { // Report every 10 seconds
        Serial.printf("\n[System] Uptime: %lu s, Free heap: %d bytes\n",
                     now / 1000, ESP.getFreeHeap());
        lastReport = now;
    }

    vTaskDelay(pdMS_TO_TICKS(1000));
}
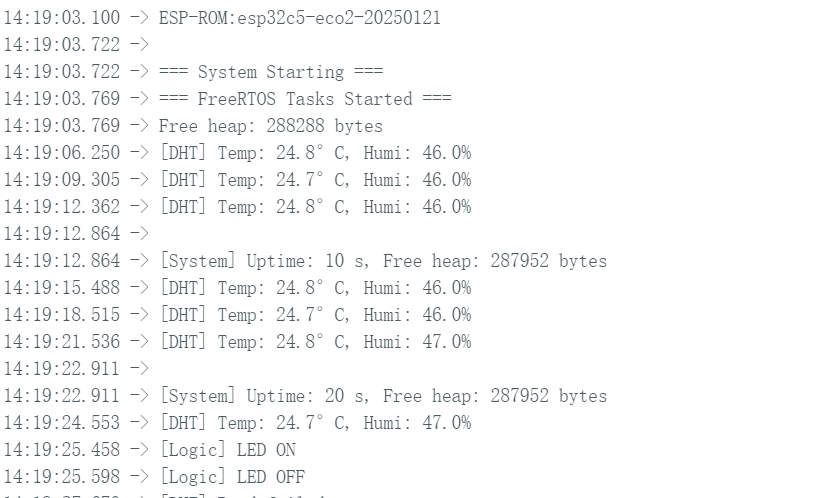
Resultado
- Después de cargar el código, puedes observar los resultados a través del Monitor Serie.
- Efecto de la Pantalla
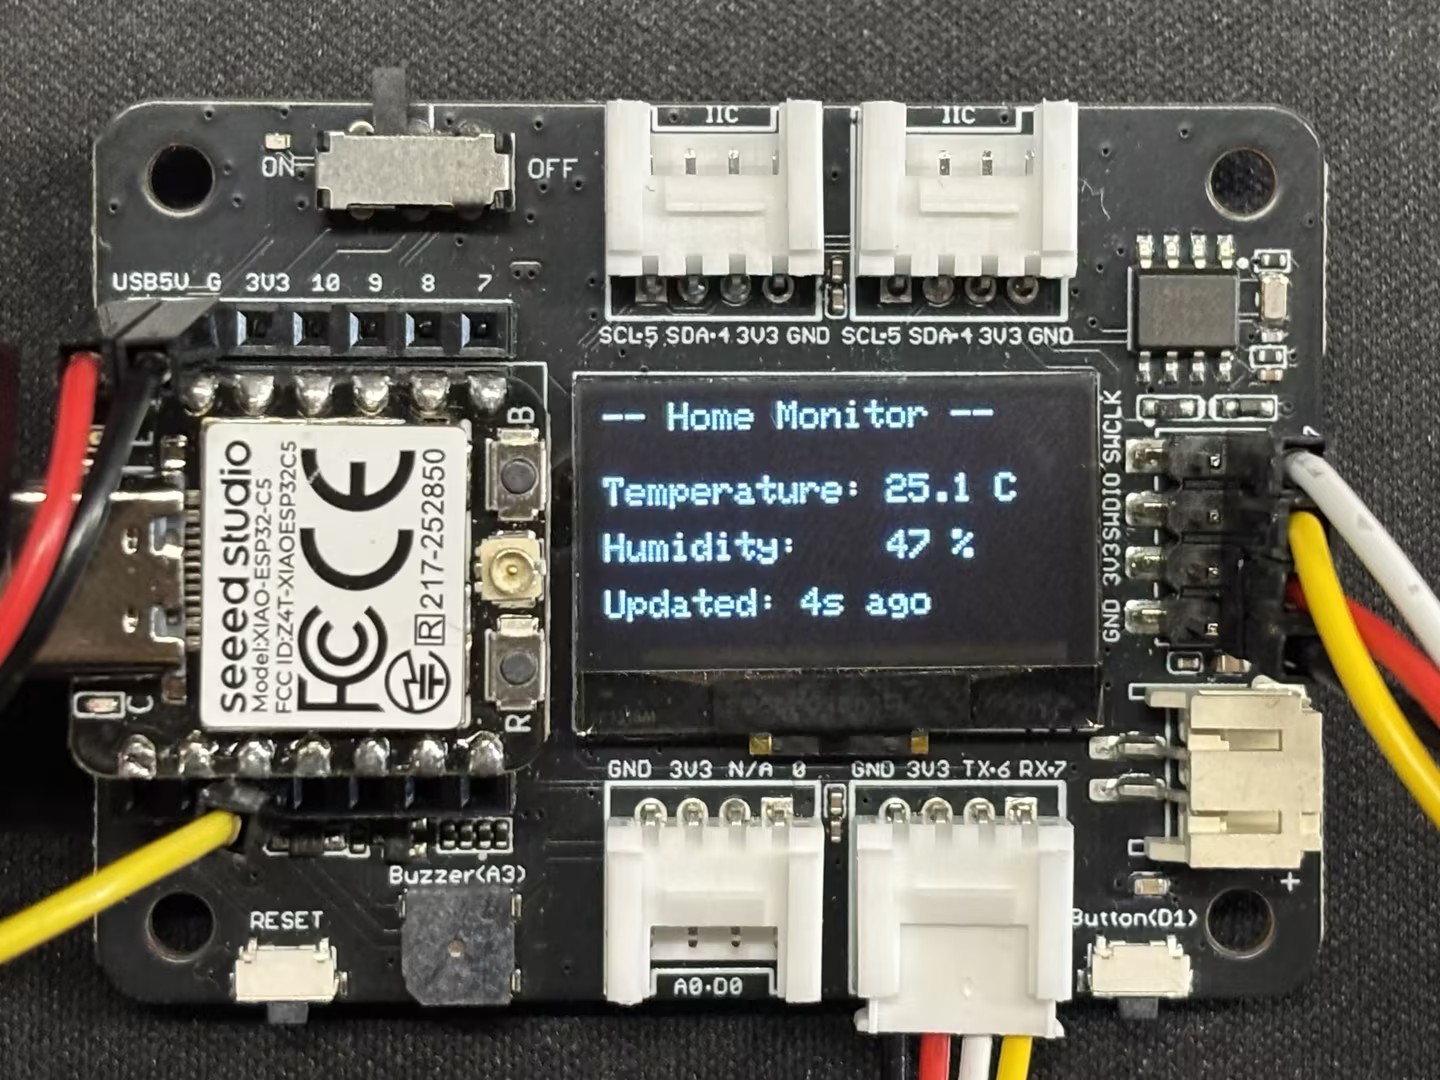 | 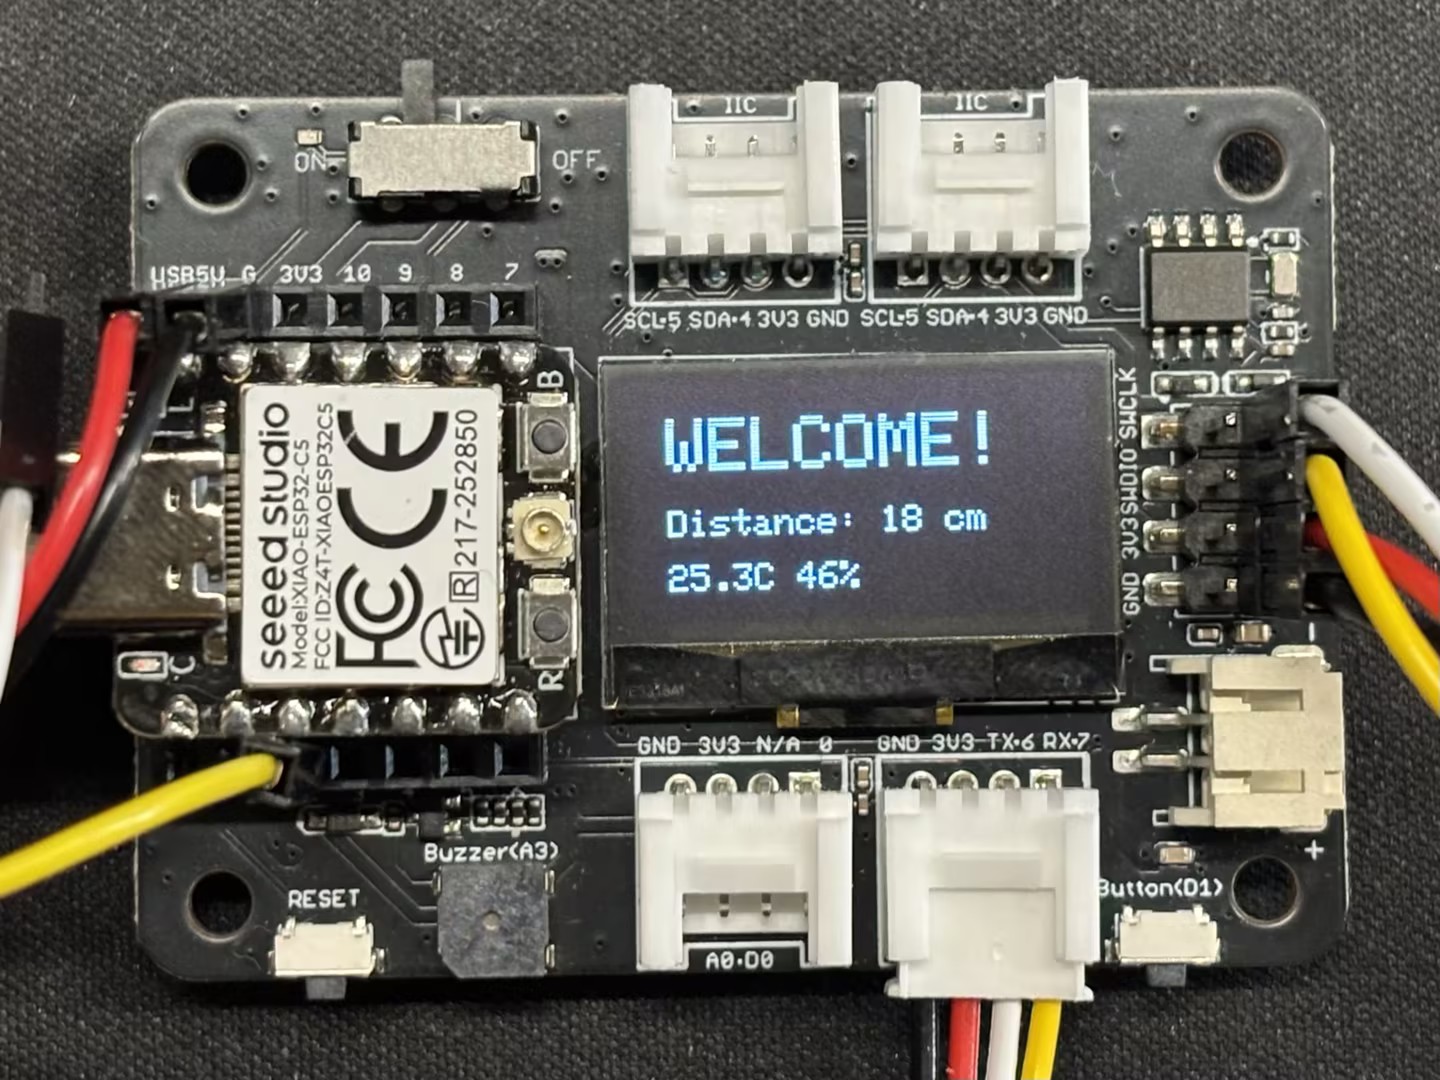 |
- Efecto Real
Conclusión
Confío en que a través de esta guía, hayas obtenido un dominio sólido del XIAO ESP32-C5 y FreeRTOS. ¡Espero ver tus creaciones e invenciones innovadoras en una amplia gama de aplicaciones!
Soporte Técnico y Discusión de Productos
¡Gracias por elegir nuestros productos! Estamos aquí para brindarte diferentes tipos de soporte para asegurar que tu experiencia con nuestros productos sea lo más fluida posible. Ofrecemos varios canales de comunicación para satisfacer diferentes preferencias y necesidades.