XIAO ESP32S3 Sense & Edge Impulse Detección de Palabras Clave

Este tutorial te guiará a través de la implementación de un sistema de Detección de Palabras Clave (KWS) usando TinyML en la placa microcontroladora XIAO ESP32S3 Sense, con la ayuda de Edge Impulse para la recolección de datos y entrenamiento del modelo. KWS es esencial para sistemas de reconocimiento de voz, y con el poder de TinyML, es alcanzable en dispositivos más pequeños y de bajo consumo. ¡Construyamos nuestro propio sistema KWS usando Edge Impulse y XIAO ESP32S3 Sense!
Comenzando
Antes de iniciar este proyecto, por favor sigue los pasos de preparación a continuación para preparar el software y hardware necesarios para este proyecto.
Hardware
Para llevar a cabo este proyecto exitosamente, necesitas preparar el siguiente hardware.
- XIAO ESP32S3 Sense
- tarjeta microSD (No mayor a 32GB)
- lector de tarjeta microSD
- cable de datos USB-C
Al instalar la placa de expansión con XIAO ESP32S3 Sense, puedes usar el micrófono en la placa de expansión.
Instalar la placa de expansión es muy simple, solo necesitas alinear el conector en la placa de expansión con el conector B2B en el XIAO ESP32S3, presionarlo fuerte y escuchar un "clic", la instalación está completa.
XIAO ESP32S3 Sense soporta tarjetas microSD de hasta 32GB, así que si estás listo para comprar una tarjeta microSD para XIAO, por favor consulta esta especificación. Y formatea la tarjeta microSD a formato FAT32 antes de usar la tarjeta microSD.
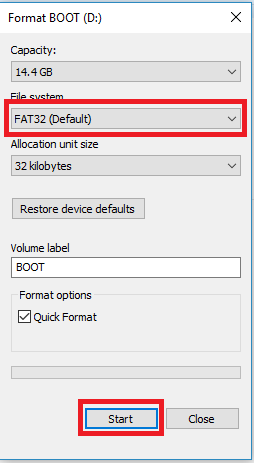
Después del formateo, puedes insertar la tarjeta microSD en la ranura de la tarjeta microSD. Por favor nota la dirección de inserción, el lado con el contacto dorado debe mirar hacia adentro.

Software
Si esta es tu primera vez usando XIAO ESP32S3 Sense, entonces antes de comenzar, te sugerimos que leas los siguientes dos Wiki's para aprender cómo usarlo.
Capturando Datos de Audio (fuera de línea)
Paso 1. Guardar muestras de sonido grabadas como archivos de audio .wav en una tarjeta microSD
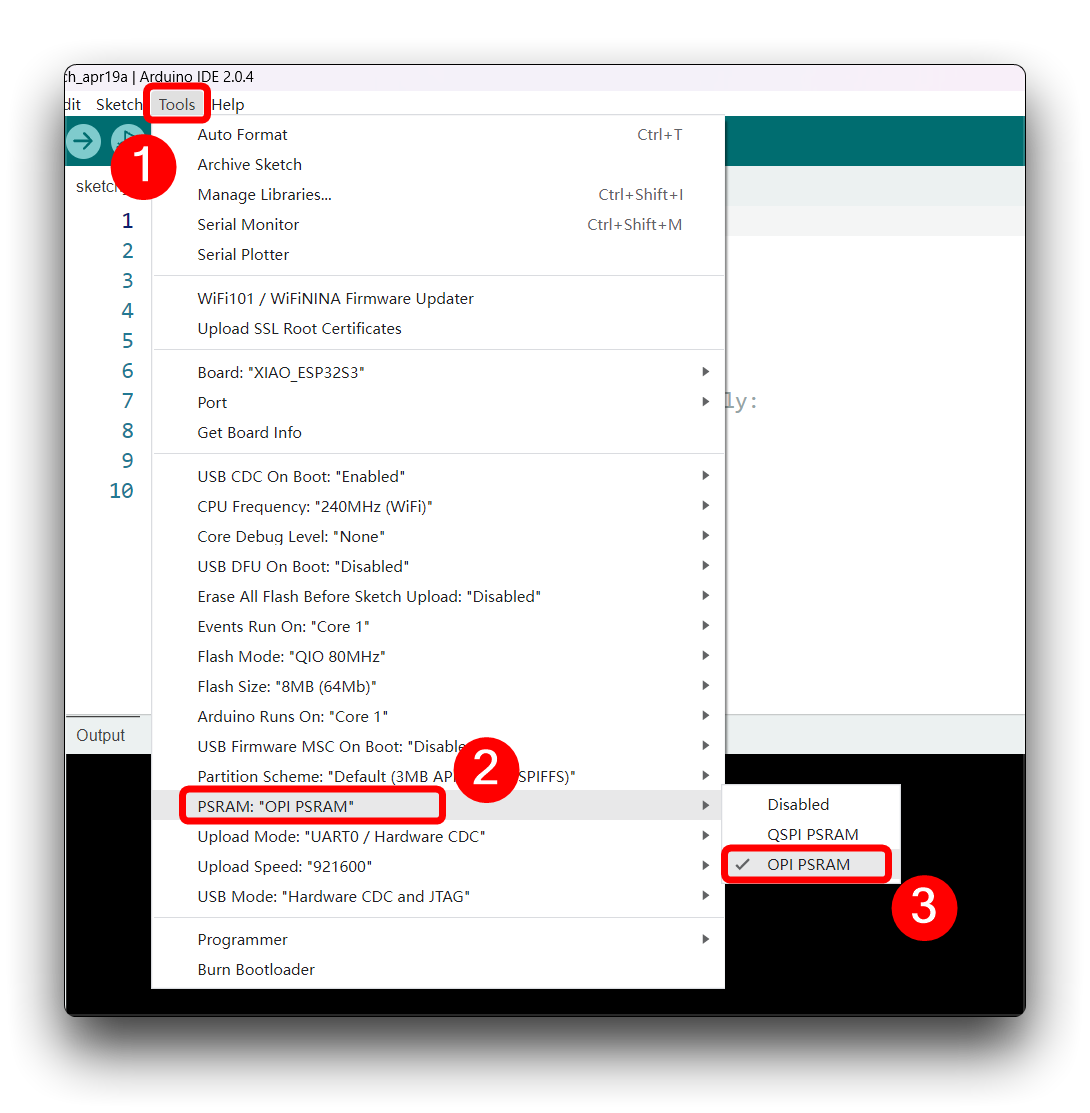
Usemos el lector de tarjeta SD integrado para guardar archivos de audio .wav, necesitamos habilitar primero la PSRAM del XIAO.
Luego compila y sube el siguiente programa al XIAO ESP32S3.
Este código graba audio usando la interfaz I2S de la placa Seeed XIAO ESP32S3 Sense, guarda la grabación como un archivo .wav en una tarjeta SD, y permite el control del proceso de grabación a través de comandos enviados desde el monitor serial. El nombre del archivo de audio es personalizable (debería ser las etiquetas de clase a usar con el entrenamiento), y se pueden hacer múltiples grabaciones, cada una guardada en un archivo nuevo. El código también incluye funcionalidad para aumentar el volumen de las grabaciones.
Si tu versión de ESP32 es 2.0.x. Haz clic aquí para previsualizar el programa completo
/*
 * WAV Recorder for Seeed XIAO ESP32S3 Sense
 *
 * NOTE: To execute this code, we will need to use the PSRAM
 * function of the ESP-32 chip, so please turn it on before uploading.
 * Tools>PSRAM: "OPI PSRAM"
 *
 * Adapted by M.Rovai @May23 from original Seeed code
*/

#include <I2S.h>
#include "FS.h"
#include "SD.h"
#include "SPI.h"

// make changes as needed
#define RECORD_TIME   10  // seconds, The maximum value is 240
#define WAV_FILE_NAME "data"

// do not change for best
#define SAMPLE_RATE 16000U
#define SAMPLE_BITS 16
#define WAV_HEADER_SIZE 44
#define VOLUME_GAIN 2

int fileNumber = 1;
String baseFileName;
bool isRecording = false;

void setup() {
  Serial.begin(115200);
  while (!Serial) ;

  I2S.setAllPins(-1, 42, 41, -1, -1);
  if (!I2S.begin(PDM_MONO_MODE, SAMPLE_RATE, SAMPLE_BITS)) {
    Serial.println("Failed to initialize I2S!");
    while (1) ;
  }
  if(!SD.begin(21)){
    Serial.println("Failed to mount SD Card!");
    while (1) ;
  }
  Serial.printf("Enter with the label name\n");
  //record_wav();
}

void loop() {
  if (Serial.available() > 0) {
    String command = Serial.readStringUntil('\n');
    command.trim();
    if (command == "rec") {
      isRecording = true;
    } else {
      baseFileName = command;
      fileNumber = 1; // reset file number each time a new base file name is set
      Serial.printf("Send rec for starting recording label \n");
    }
  }
  if (isRecording && baseFileName != "") {
    String fileName = "/" + baseFileName + "." + String(fileNumber) + ".wav";
    fileNumber++;
    record_wav(fileName);
    delay(1000); // delay to avoid recording multiple files at once
    isRecording = false;
  }
}

void record_wav(String fileName)
{
  uint32_t sample_size = 0;
  uint32_t record_size = (SAMPLE_RATE * SAMPLE_BITS / 8) * RECORD_TIME;
  uint8_t *rec_buffer = NULL;
  Serial.printf("Start recording ...\n");

  File file = SD.open(fileName.c_str(), FILE_WRITE);
  // Write the header to the WAV file
  uint8_t wav_header[WAV_HEADER_SIZE];
  generate_wav_header(wav_header, record_size, SAMPLE_RATE);
  file.write(wav_header, WAV_HEADER_SIZE);

  // PSRAM malloc for recording
  rec_buffer = (uint8_t *)ps_malloc(record_size);
  if (rec_buffer == NULL) {
    Serial.printf("malloc failed!\n");
    while(1) ;
  }
  Serial.printf("Buffer: %d bytes\n", ESP.getPsramSize() - ESP.getFreePsram());

  // Start recording
  esp_i2s::i2s_read(esp_i2s::I2S_NUM_0, rec_buffer, record_size, &sample_size, portMAX_DELAY);
  if (sample_size == 0) {
    Serial.printf("Record Failed!\n");
  } else {
    Serial.printf("Record %d bytes\n", sample_size);
  }

  // Increase volume
  for (uint32_t i = 0; i < sample_size; i += SAMPLE_BITS/8) {
    (*(uint16_t *)(rec_buffer+i)) <<= VOLUME_GAIN;
  }

  // Write data to the WAV file
  Serial.printf("Writing to the file ...\n");
  if (file.write(rec_buffer, record_size) != record_size)
    Serial.printf("Write file Failed!\n");

  free(rec_buffer);
  file.close();
  Serial.printf("Recording complete: \n");
  Serial.printf("Send rec for a new sample or enter a new label\n\n");
}

void generate_wav_header(uint8_t *wav_header, uint32_t wav_size, uint32_t sample_rate)
{
  // See this for reference: http://soundfile.sapp.org/doc/WaveFormat/
  uint32_t file_size = wav_size + WAV_HEADER_SIZE - 8;
  uint32_t byte_rate = SAMPLE_RATE * SAMPLE_BITS / 8;
  const uint8_t set_wav_header[] = {
    'R', 'I', 'F', 'F', // ChunkID
    file_size, file_size >> 8, file_size >> 16, file_size >> 24, // ChunkSize
    'W', 'A', 'V', 'E', // Format
    'f', 'm', 't', ' ', // Subchunk1ID
    0x10, 0x00, 0x00, 0x00, // Subchunk1Size (16 for PCM)
    0x01, 0x00, // AudioFormat (1 for PCM)
    0x01, 0x00, // NumChannels (1 channel)
    sample_rate, sample_rate >> 8, sample_rate >> 16, sample_rate >> 24, // SampleRate
    byte_rate, byte_rate >> 8, byte_rate >> 16, byte_rate >> 24, // ByteRate
    0x02, 0x00, // BlockAlign
    0x10, 0x00, // BitsPerSample (16 bits)
    'd', 'a', 't', 'a', // Subchunk2ID
    wav_size, wav_size >> 8, wav_size >> 16, wav_size >> 24, // Subchunk2Size
  };
  memcpy(wav_header, set_wav_header, sizeof(set_wav_header));
}
If your ESP32 version is 3.0.x. Click here to preview the full program
/*
 * WAV Recorder for Seeed XIAO ESP32S3 Sense
 *
 * NOTE: To execute this code, we will need to use the PSRAM
 * function of the ESP-32 chip, so please turn it on before uploading.
 * Tools>PSRAM: "OPI PSRAM"
 *
 * Adapted by M.Rovai @May23 from original Seeed code
*/

#include <ESP_I2S.h>
#include "FS.h"
#include "SD.h"
#include "SPI.h"

// make changes as needed
#define RECORD_TIME   10  // seconds, The maximum value is 240
#define WAV_FILE_NAME "data"

// do not change for best
#define SAMPLE_RATE 16000U
#define SAMPLE_BITS 16
#define WAV_HEADER_SIZE 44
#define VOLUME_GAIN 2

I2SClass I2S;
String baseFileName;

int fileNumber = 1;
bool isRecording = false;

void setup() {
  Serial.begin(115200);
  while (!Serial) ;

  // setup 42 PDM clock and 41 PDM data pins
  I2S.setPinsPdmRx(42, 41);
  if (!I2S.begin(I2S_MODE_PDM_RX, 16000, I2S_DATA_BIT_WIDTH_16BIT, I2S_SLOT_MODE_MONO)) {
    Serial.println("Failed to initialize I2S!");
    while (1) ;
  }
  if(!SD.begin(21)){
    Serial.println("Failed to mount SD Card!");
    while (1) ;
  }
  Serial.printf("Enter with the label name\n");
  //record_wav();
}

void loop() {
  if (Serial.available() > 0) {
    String command = Serial.readStringUntil('\n');
    command.trim();
    if (command == "rec") {
      isRecording = true;
    } else {
      baseFileName = command;
      fileNumber = 1; // reset file number each time a new base file name is set
      Serial.printf("Send rec for starting recording label \n");
    }
  }
  if (isRecording && baseFileName != "") {
    String fileName = "/" + baseFileName + "." + String(fileNumber) + ".wav";
    fileNumber++;
    record_wav(fileName);
    delay(1000); // delay to avoid recording multiple files at once
    isRecording = false;
  }
}

void record_wav(String fileName)
{
  uint32_t sample_size = 0;
  uint32_t record_size = (SAMPLE_RATE * SAMPLE_BITS / 8) * RECORD_TIME;
  uint8_t *rec_buffer = NULL;
  Serial.printf("Start recording ...\n");

  File file = SD.open(fileName.c_str(), FILE_WRITE);
  // Write the header to the WAV file
  uint8_t wav_header[WAV_HEADER_SIZE];
  generate_wav_header(wav_header, record_size, SAMPLE_RATE);
  file.write(wav_header, WAV_HEADER_SIZE);

  // PSRAM malloc for recording
  rec_buffer = (uint8_t *)ps_malloc(record_size);
  if (rec_buffer == NULL) {
    Serial.printf("malloc failed!\n");
    while(1) ;
  }
  Serial.printf("Buffer: %d bytes\n", ESP.getPsramSize() - ESP.getFreePsram());

  // Start recording
  esp_i2s::i2s_read(esp_i2s::I2S_NUM_0, rec_buffer, record_size, &sample_size, portMAX_DELAY);
  if (sample_size == 0) {
    Serial.printf("Record Failed!\n");
  } else {
    Serial.printf("Record %d bytes\n", sample_size);
  }

  // Increase volume
  for (uint32_t i = 0; i < sample_size; i += SAMPLE_BITS/8) {
    (*(uint16_t *)(rec_buffer+i)) <<= VOLUME_GAIN;
  }

  // Write data to the WAV file
  Serial.printf("Writing to the file ...\n");
  if (file.write(rec_buffer, record_size) != record_size)
    Serial.printf("Write file Failed!\n");

  free(rec_buffer);
  file.close();
  Serial.printf("Recording complete: \n");
  Serial.printf("Send rec for a new sample or enter a new label\n\n");
}

void generate_wav_header(uint8_t *wav_header, uint32_t wav_size, uint32_t sample_rate)
{
  // See this for reference: http://soundfile.sapp.org/doc/WaveFormat/
  uint32_t file_size = wav_size + WAV_HEADER_SIZE - 8;
  uint32_t byte_rate = SAMPLE_RATE * SAMPLE_BITS / 8;
  const uint8_t set_wav_header[] = {
    'R', 'I', 'F', 'F', // ChunkID
    file_size, file_size >> 8, file_size >> 16, file_size >> 24, // ChunkSize
    'W', 'A', 'V', 'E', // Format
    'f', 'm', 't', ' ', // Subchunk1ID
    0x10, 0x00, 0x00, 0x00, // Subchunk1Size (16 for PCM)
    0x01, 0x00, // AudioFormat (1 for PCM)
    0x01, 0x00, // NumChannels (1 channel)
    sample_rate, sample_rate >> 8, sample_rate >> 16, sample_rate >> 24, // SampleRate
    byte_rate, byte_rate >> 8, byte_rate >> 16, byte_rate >> 24, // ByteRate
    0x02, 0x00, // BlockAlign
    0x10, 0x00, // BitsPerSample (16 bits)
    'd', 'a', 't', 'a', // Subchunk2ID
    wav_size, wav_size >> 8, wav_size >> 16, wav_size >> 24, // Subchunk2Size
  };
  memcpy(wav_header, set_wav_header, sizeof(set_wav_header));
}
Ahora, sube el código al XIAO y obtén muestras de las palabras clave (hello y stop). También puedes capturar ruido y otras palabras. El Monitor Serie te pedirá que recibas la etiqueta a grabar.
Envía la etiqueta (por ejemplo, hello). El programa esperará otro comando: rec.
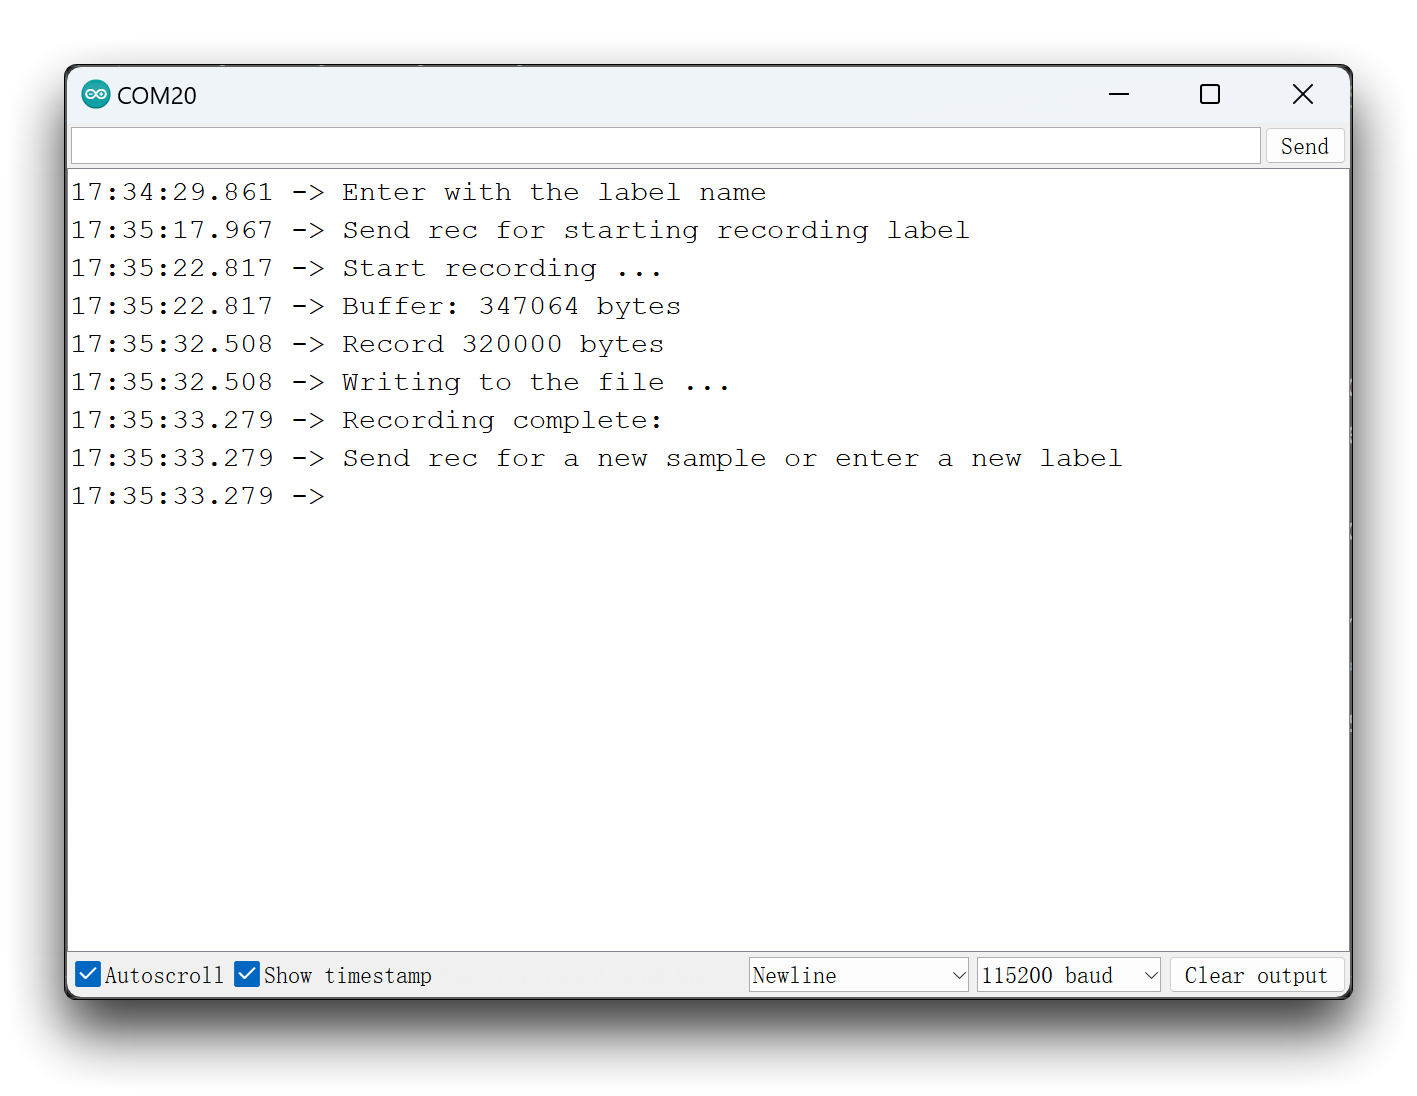
Y el programa comenzará a grabar nuevas muestras cada vez que se envíe un comando rec. Los archivos se guardarán como hello.1.wav, hello.2.wav, hello.3.wav, etc. hasta que se envíe una nueva etiqueta (por ejemplo, stop). En este caso, debes enviar el comando rec para cada nueva muestra, que se guardará como stop.1.wav, stop.2.wav, stop.3.wav, etc.
Finalmente, obtendremos los archivos guardados en la tarjeta SD.
Recomendamos que tengas suficientes sonidos para cada muestra de etiqueta. Puedes repetir tus palabras clave varias veces durante cada sesión de grabación de diez segundos, y segmentaremos las muestras en pasos posteriores. Pero debe haber algo de espacio entre las palabras clave.
Adquisición de datos de entrenamiento
Paso 2. Subir datos de sonido recopilados
Cuando el conjunto de datos sin procesar esté definido y recopilado, debemos iniciar un nuevo proyecto en Edge Impulse. Una vez creado el proyecto, selecciona la herramienta Upload Existing Data en la sección Data Acquisition. Elige los archivos a subir.
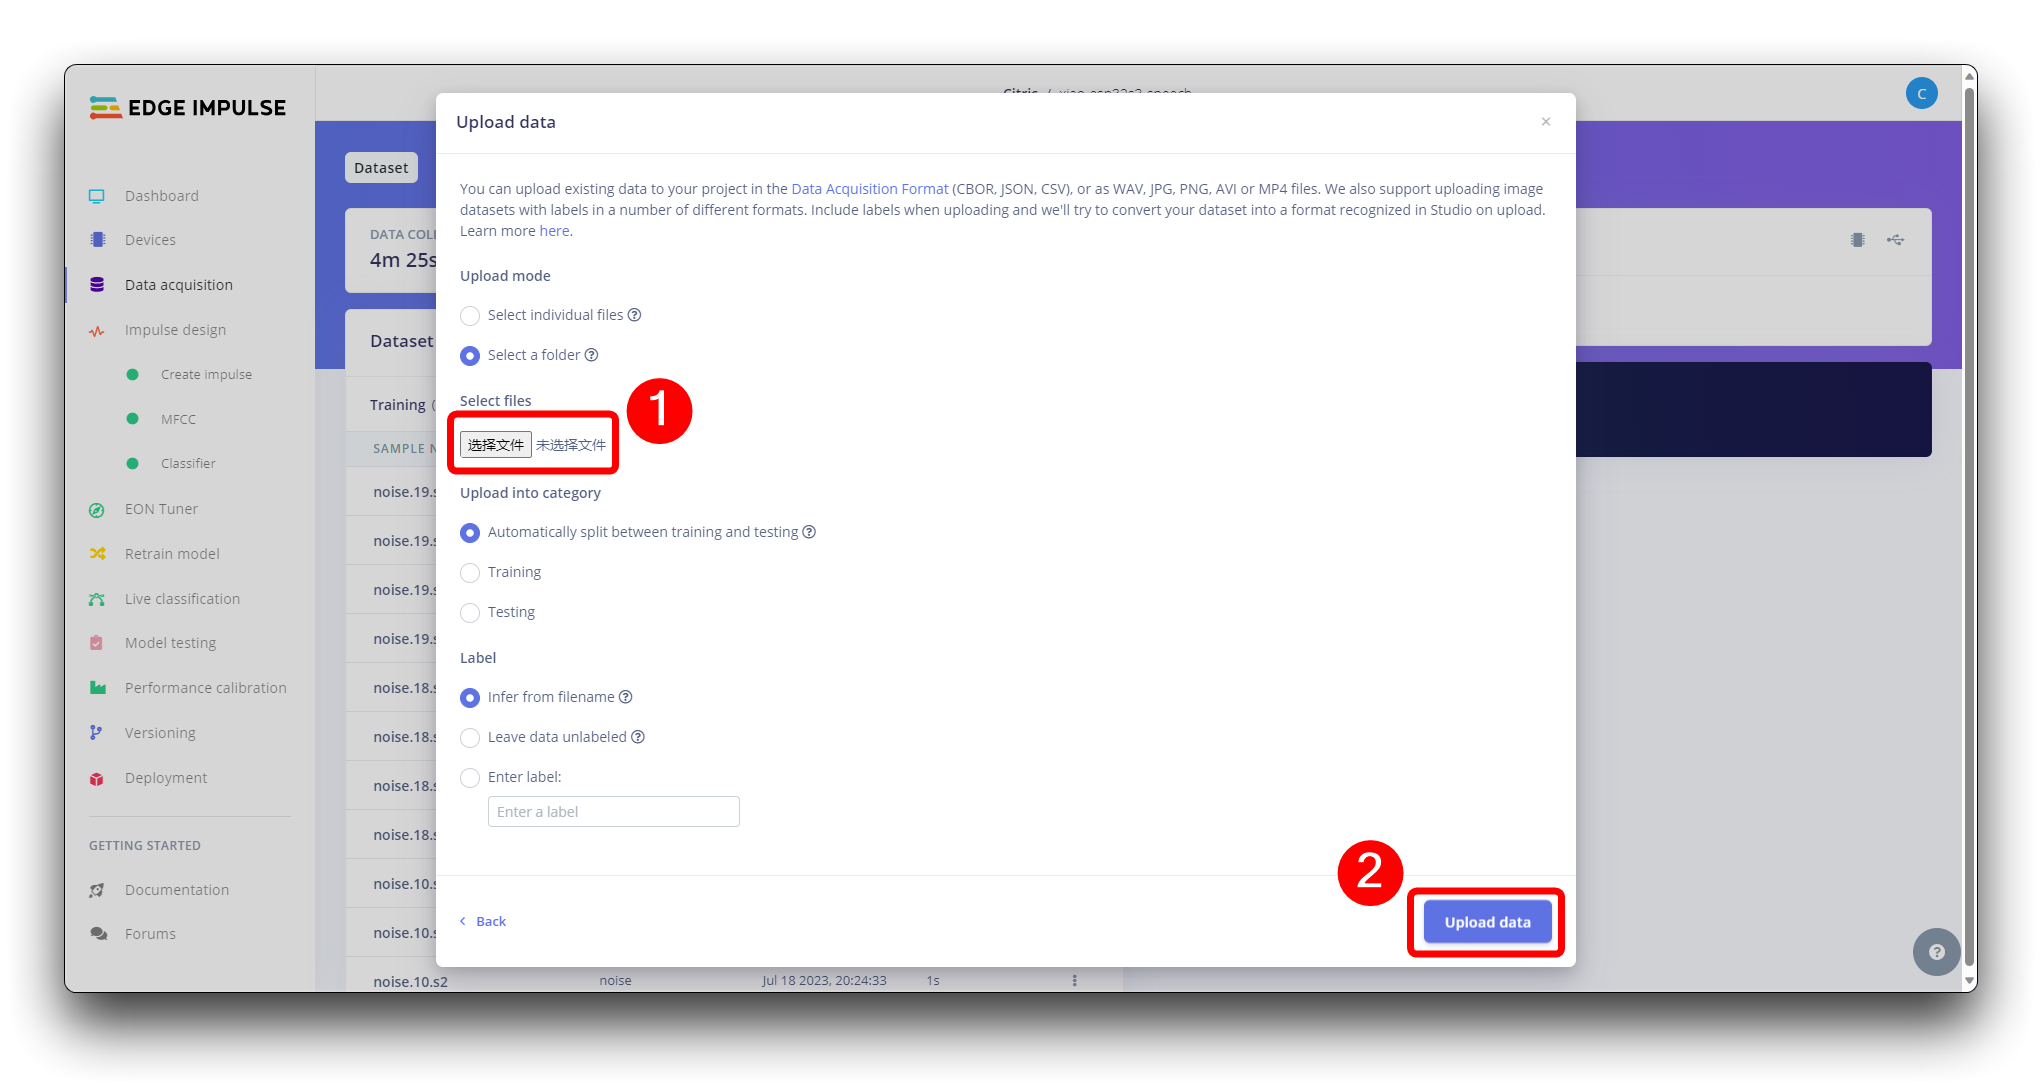
Y súbelos al Studio (Puedes dividir automáticamente los datos en entrenamiento/prueba). Repite para todas las clases y todos los datos sin procesar.
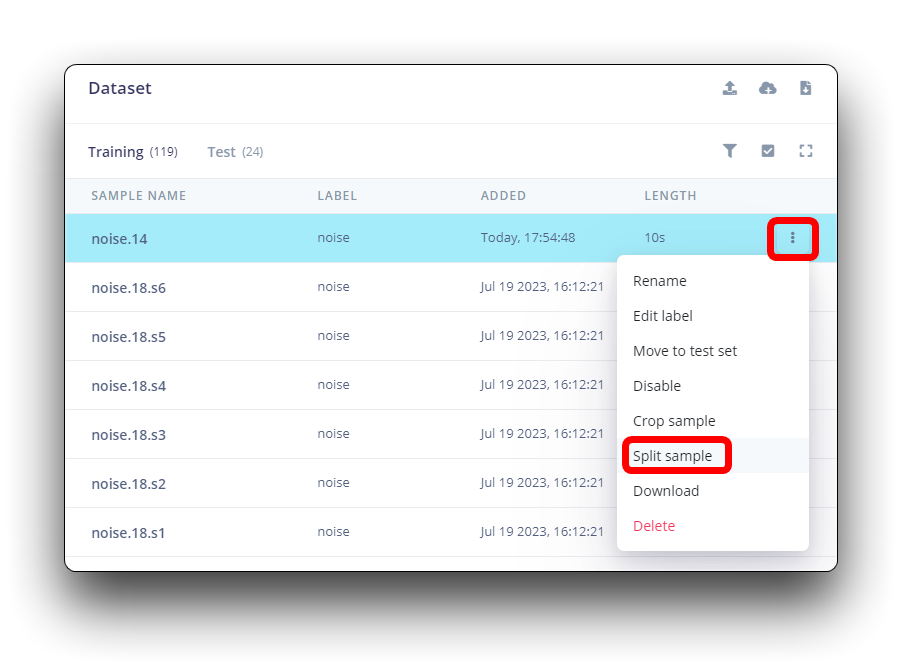
Todos los datos en el conjunto de datos tienen una duración de 1s, pero las muestras grabadas en la sección anterior tienen 10s y deben dividirse en muestras de 1s para ser compatibles. Haz clic en los tres puntos después del nombre de la muestra y selecciona Split sample.
Una vez dentro de la herramienta, divide los datos en registros de 1 segundo. Si es necesario, añade o elimina segmentos.
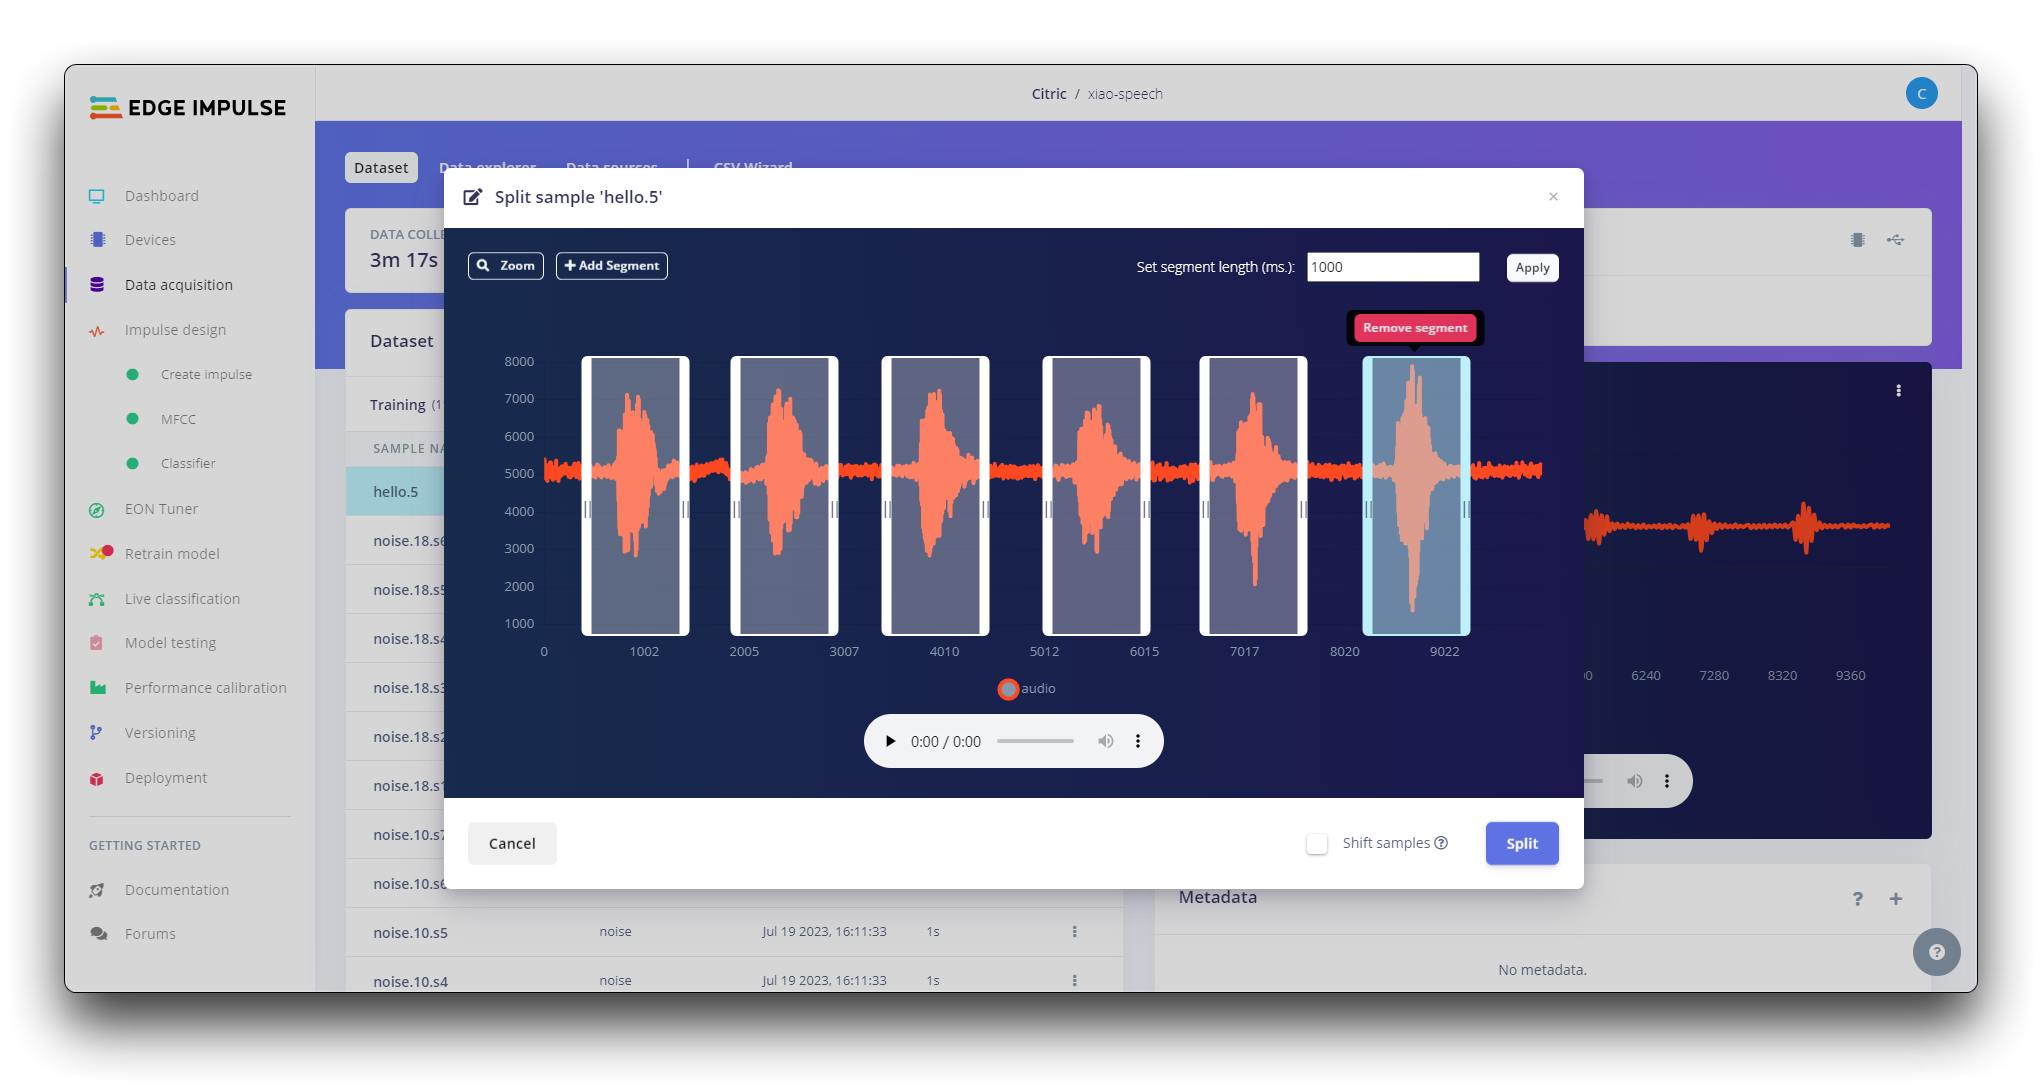
Este procedimiento debe repetirse para todas las muestras.
Paso 3. Crear Impulse (Pre-Procesamiento / Definición del modelo)
Un impulse toma datos sin procesar, usa procesamiento de señales para extraer características, y luego usa un bloque de aprendizaje para clasificar nuevos datos.
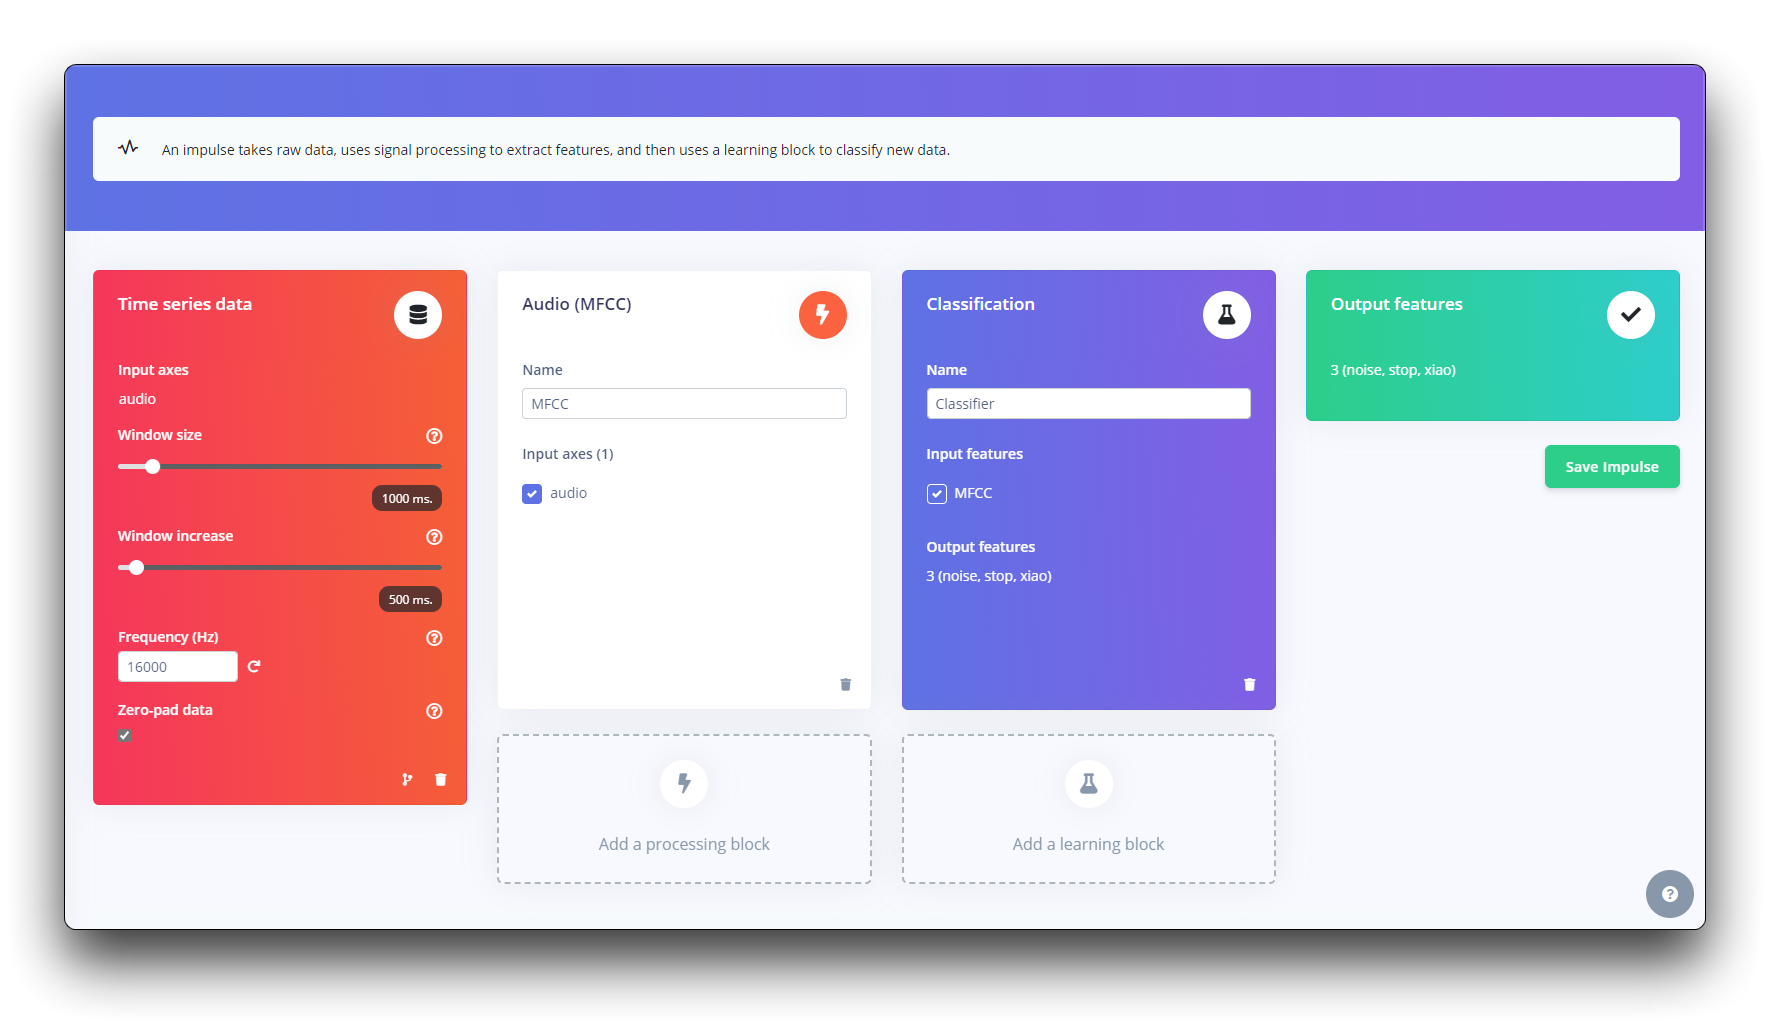
Primero, tomaremos los puntos de datos con una ventana de 1 segundo, aumentando los datos, deslizando esa ventana cada 500ms. Nota que la opción zero-pad data está configurada. Esto es importante para rellenar con ceros las muestras menores a 1 segundo (en algunos casos, reduje la ventana de 1000 ms en la herramienta de división para evitar ruidos y picos).
Cada muestra de audio de 1 segundo debe ser pre-procesada y convertida a una imagen (por ejemplo, 13 x 49 x 1). Usaremos MFCC, que extrae características de señales de audio usando Coeficientes Cepstrales de Frecuencia Mel, que son excelentes para la voz humana.
A continuación, seleccionamos KERAS para clasificación que construye nuestro modelo desde cero haciendo Clasificación de Imágenes usando Red Neuronal Convolucional.
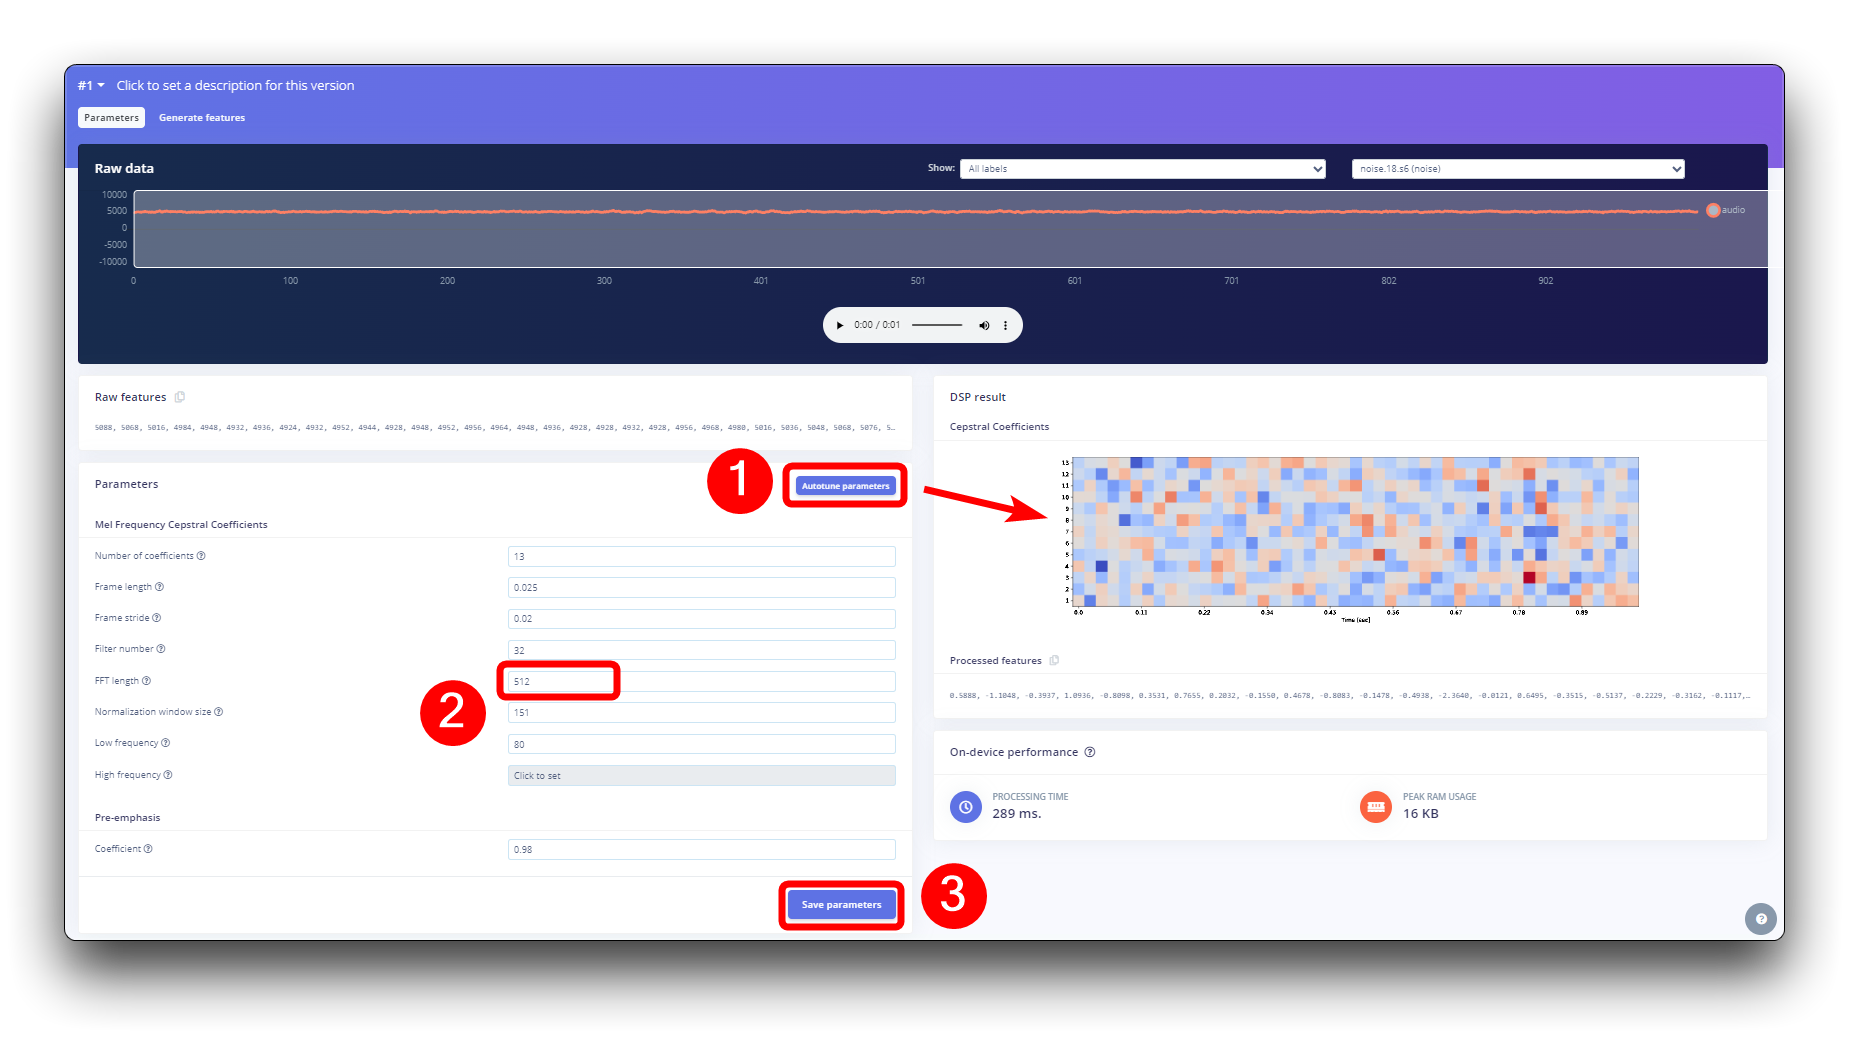
Paso 4. Pre-Procesamiento (MFCC)
El siguiente paso es crear las imágenes a entrenar en la siguiente fase. Podemos mantener los valores de parámetros predeterminados o aprovechar la opción Autotuneparameters de DSP, que es lo que haremos.
Construyendo un modelo de aprendizaje automático
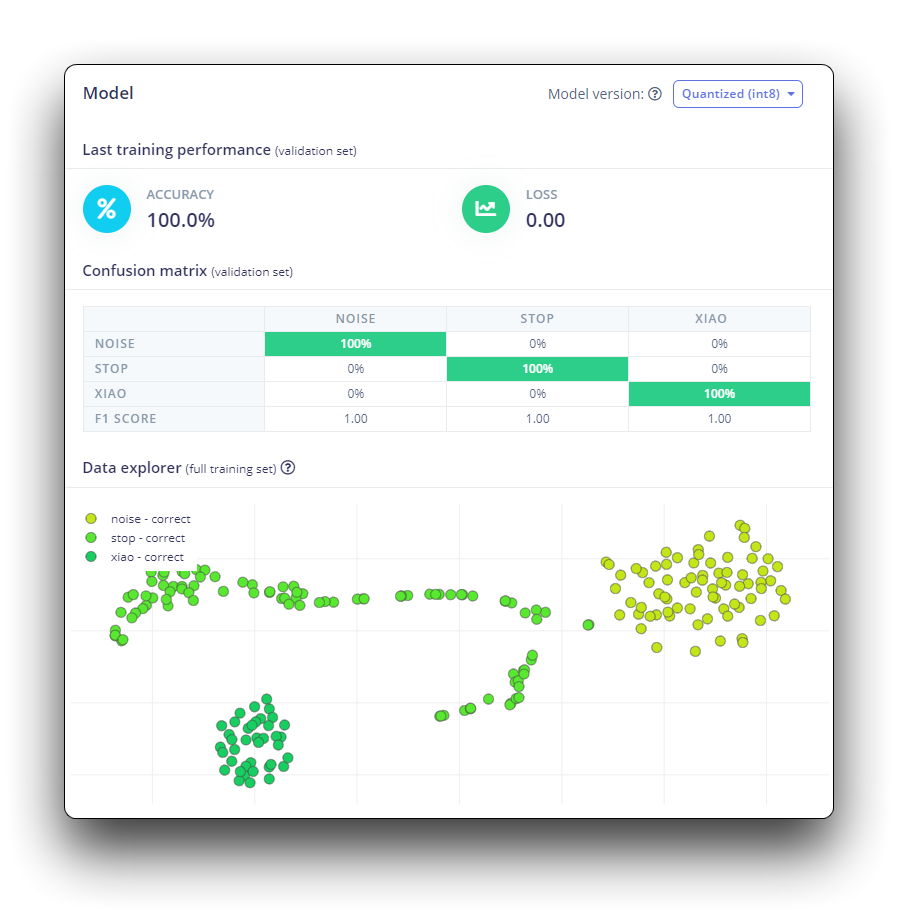
Paso 5. Diseño y Entrenamiento del Modelo
Utilizaremos un modelo de Red Neuronal Convolucional (CNN). La arquitectura básica se define con dos bloques de Conv1D + MaxPooling (con 8 y 16 neuronas, respectivamente) y un Dropout de 0.25. Y en la última capa, después de Aplanar cuatro neuronas, una para cada clase.
Como hiperparámetros, tendremos una Tasa de Aprendizaje de 0.005 y un modelo que será entrenado por 100 épocas. También incluiremos aumento de datos, como algo de ruido. El resultado parece estar bien.
Desplegando en XIAO ESP32S3 Sense
Paso 6. Desplegando en XIAO ESP32S3 Sense
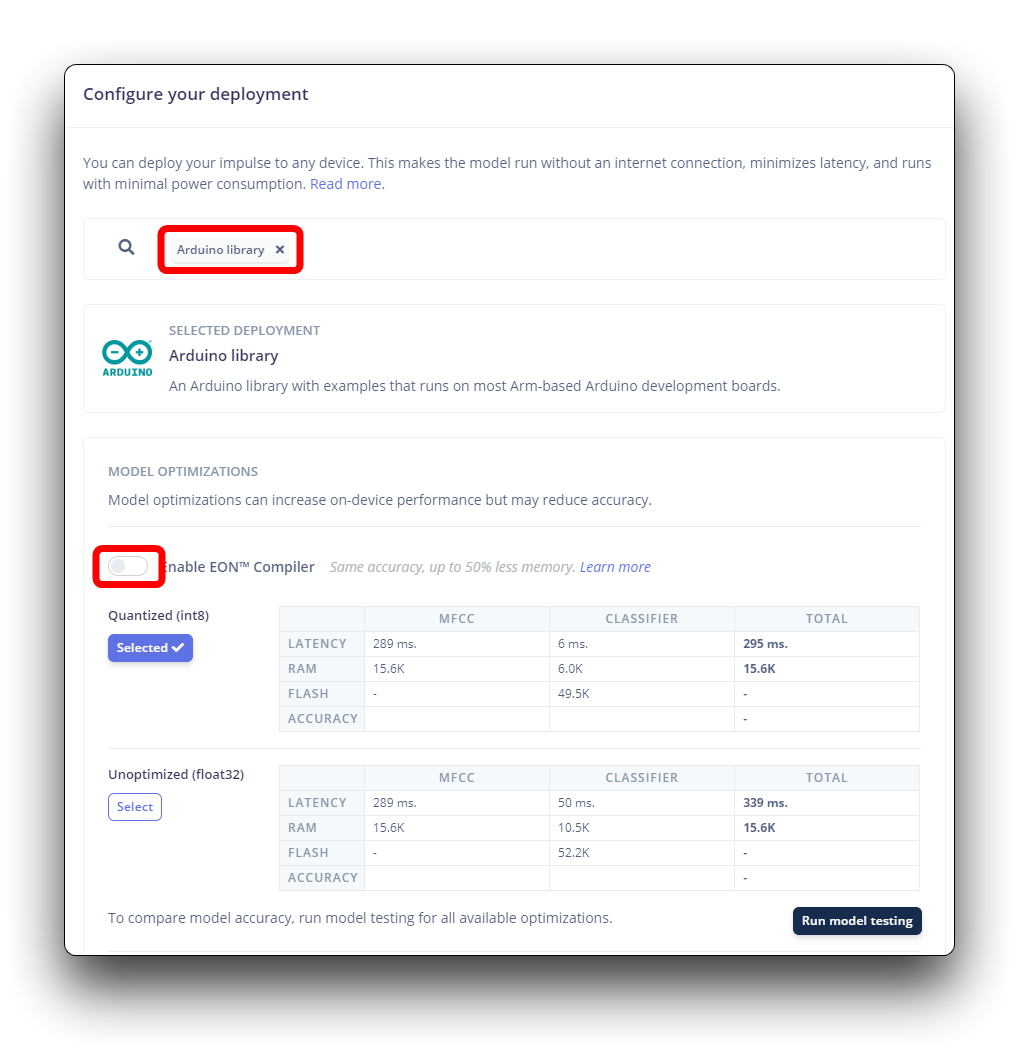
Edge Impulse empaquetará todas las librerías necesarias, funciones de preprocesamiento y modelos entrenados, descargándolos a tu computadora. Debes seleccionar la opción Arduino Library y en la parte inferior, seleccionar Quantized (Int8) y presionar el botón Build.
Aunque Edge Impulse no ha lanzado su SDK para ESP32S3 usando el acelerador ESP NN, gracias a Dmitry Maslov, podemos tener sus optimizaciones de ensamblado restauradas y corregidas para ESP32-S3. Esta solución aún no es oficial, y EI la incluirá en el SDK de EI una vez que arreglen los conflictos con otras placas.
Por ahora, esto solo funciona con la versión no-EON. Por lo tanto, también debes mantener la opción Enable EON Compiler no seleccionada.
Cuando se selecciona el botón Build, se creará un archivo Zip y se descargará a tu computadora.
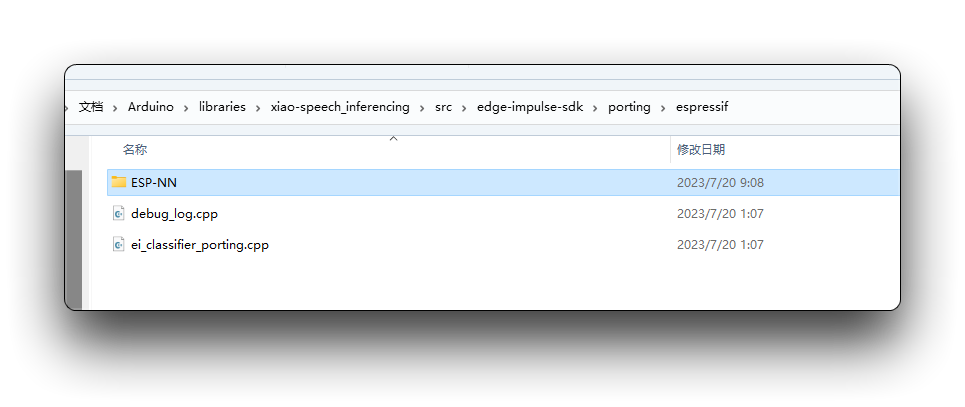
Antes de usar la librería descargada, necesitamos habilitar el Acelerador ESP NN. Para eso, puedes descargar una versión preliminar desde el GitHub del proyecto, descomprimirla, y reemplazar la carpeta ESP NN con ella bajo:src/edge-impulse-sdk/porting/espressif/ESP-NN, en tu carpeta de librerías de Arduino.
En tu IDE de Arduino, ve a la pestaña Sketch y selecciona la opción Add .ZIP Library, y Elige el archivo .zip descargado por Edge Impulse.
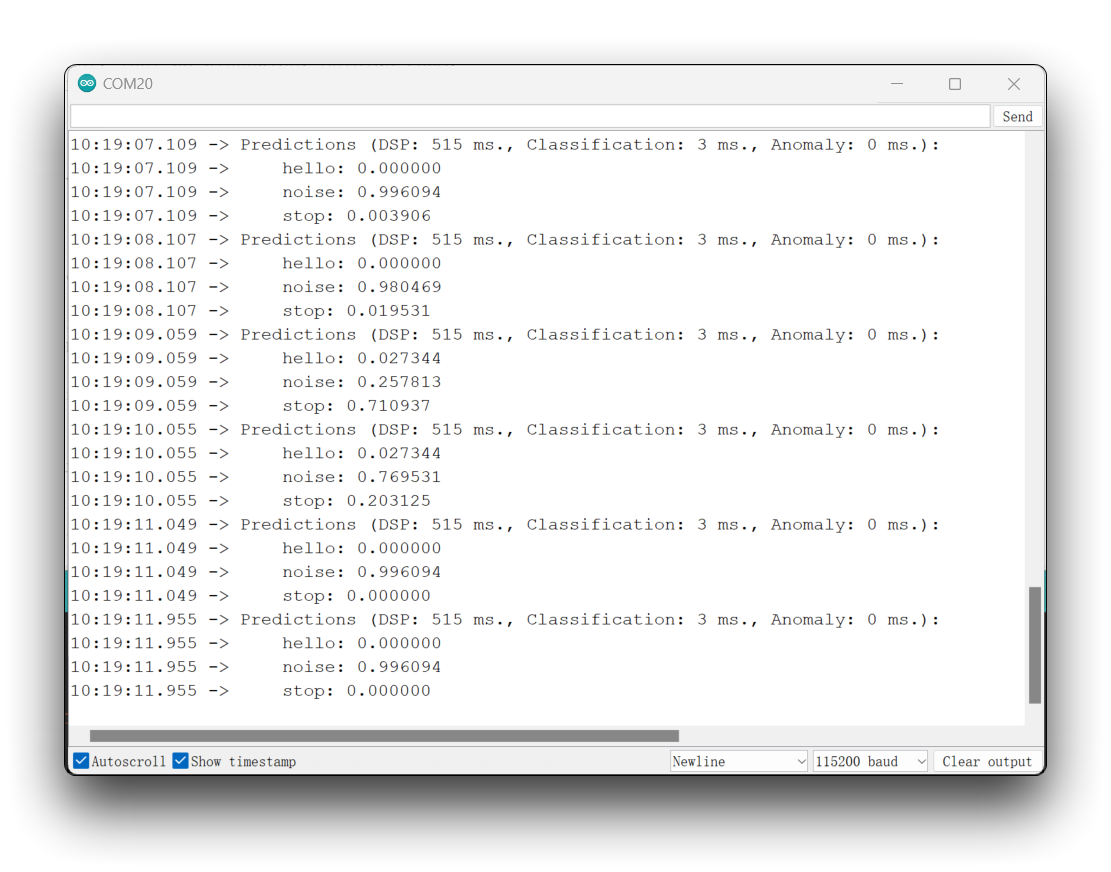
Puedes encontrar el código completo en el GitHub del proyecto. Sube el sketch a tu placa y prueba algunas inferencias reales.
La librería importada en el código necesita ser actualizada con el nombre de tu librería. La lógica para encender también necesita ser modificada basándose en el orden de las etiquetas en las que realmente entrenaste.
Si tu versión de ESP32 es 2.0.x. Haz clic aquí para previsualizar el programa completo
/* Edge Impulse Arduino examples
* Copyright (c) 2022 EdgeImpulse Inc.
*
* Permission is hereby granted, free of charge, to any person obtaining a copy
* of this software and associated documentation files (the "Software"), to deal
* in the Software without restriction, including without limitation the rights
* to use, copy, modify, merge, publish, distribute, sublicense, and/or sell
* copies of the Software, and to permit persons to whom the Software is
* furnished to do so, subject to the following conditions:
*
* The above copyright notice and this permission notice shall be included in
* all copies or substantial portions of the Software.
*
* THE SOFTWARE IS PROVIDED "AS IS", WITHOUT WARRANTY OF ANY KIND, EXPRESS OR
* IMPLIED, INCLUDING BUT NOT LIMITED TO THE WARRANTIES OF MERCHANTABILITY,
* FITNESS FOR A PARTICULAR PURPOSE AND NONINFRINGEMENT. IN NO EVENT SHALL THE
* AUTHORS OR COPYRIGHT HOLDERS BE LIABLE FOR ANY CLAIM, DAMAGES OR OTHER
* LIABILITY, WHETHER IN AN ACTION OF CONTRACT, TORT OR OTHERWISE, ARISING FROM,
* OUT OF OR IN CONNECTION WITH THE SOFTWARE OR THE USE OR OTHER DEALINGS IN THE
* SOFTWARE.
*/
// If your target is limited in memory remove this macro to save 10K RAM
#define EIDSP_QUANTIZE_FILTERBANK 0
/*
** NOTE: If you run into TFLite arena allocation issue.
**
** This may be due to may dynamic memory fragmentation.
** Try defining "-DEI_CLASSIFIER_ALLOCATION_STATIC" in boards.local.txt (create
** if it doesn't exist) and copy this file to
** `<ARDUINO_CORE_INSTALL_PATH>/arduino/hardware/<mbed_core>/<core_version>/`.
**
** See
** (https://support.arduino.cc/hc/en-us/articles/360012076960-Where-are-the-installed-cores-located-)
** to find where Arduino installs cores on your machine.
**
** If the problem persists then there's not enough memory for this model and application.
*/
/* Includes ---------------------------------------------------------------- */
#include <XIAO-ESP32S3-KWS_inferencing.h>
#include <I2S.h>
#define SAMPLE_RATE 16000U
#define SAMPLE_BITS 16
#define LED_BUILT_IN 21
/** Audio buffers, pointers and selectors */
typedef struct {
int16_t *buffer;
uint8_t buf_ready;
uint32_t buf_count;
uint32_t n_samples;
} inference_t;
static inference_t inference;
static const uint32_t sample_buffer_size = 2048;
static signed short sampleBuffer[sample_buffer_size];
static bool debug_nn = false; // Set this to true to see e.g. features generated from the raw signal
static bool record_status = true;
/**
* @brief Arduino setup function
*/
void setup()
{
// put your setup code here, to run once:
Serial.begin(115200);
// comment out the below line to cancel the wait for USB connection (needed for native USB)
while (!Serial);
Serial.println("Edge Impulse Inferencing Demo");
pinMode(LED_BUILT_IN, OUTPUT); // Set the pin as output
digitalWrite(LED_BUILT_IN, HIGH); //Turn off
I2S.setAllPins(-1, 42, 41, -1, -1);
if (!I2S.begin(PDM_MONO_MODE, SAMPLE_RATE, SAMPLE_BITS)) {
Serial.println("Failed to initialize I2S!");
while (1) ;
}
// summary of inferencing settings (from model_metadata.h)
ei_printf("Inferencing settings:\n");
ei_printf("\tInterval: ");
ei_printf_float((float)EI_CLASSIFIER_INTERVAL_MS);
ei_printf(" ms.\n");
ei_printf("\tFrame size: %d\n", EI_CLASSIFIER_DSP_INPUT_FRAME_SIZE);
ei_printf("\tSample length: %d ms.\n", EI_CLASSIFIER_RAW_SAMPLE_COUNT / 16);
ei_printf("\tNo. of classes: %d\n", sizeof(ei_classifier_inferencing_categories) / sizeof(ei_classifier_inferencing_categories[0]));
ei_printf("\nStarting continious inference in 2 seconds...\n");
ei_sleep(2000);
if (microphone_inference_start(EI_CLASSIFIER_RAW_SAMPLE_COUNT) == false) {
ei_printf("ERR: Could not allocate audio buffer (size %d), this could be due to the window length of your model\r\n", EI_CLASSIFIER_RAW_SAMPLE_COUNT);
return;
}
ei_printf("Recording...\n");
}
/**
* @brief Arduino main function. Runs the inferencing loop.
*/
void loop()
{
bool m = microphone_inference_record();
if (!m) {
ei_printf("ERR: Failed to record audio...\n");
return;
}
signal_t signal;
signal.total_length = EI_CLASSIFIER_RAW_SAMPLE_COUNT;
signal.get_data = µphone_audio_signal_get_data;
ei_impulse_result_t result = { 0 };
EI_IMPULSE_ERROR r = run_classifier(&signal, &result, debug_nn);
if (r != EI_IMPULSE_OK) {
ei_printf("ERR: Failed to run classifier (%d)\n", r);
return;
}
int pred_index = 0; // Initialize pred_index
float pred_value = 0; // Initialize pred_value
// print the predictions
ei_printf("Predictions ");
ei_printf("(DSP: %d ms., Classification: %d ms., Anomaly: %d ms.)",
result.timing.dsp, result.timing.classification, result.timing.anomaly);
ei_printf(": \n");
for (size_t ix = 0; ix < EI_CLASSIFIER_LABEL_COUNT; ix++) {
ei_printf(" %s: ", result.classification[ix].label);
ei_printf_float(result.classification[ix].value);
ei_printf("\n");
if (result.classification[ix].value > pred_value){
pred_index = ix;
pred_value = result.classification[ix].value;
}
}
// Display inference result
if (pred_index == 3){
digitalWrite(LED_BUILT_IN, LOW); //Turn on
}
else{
digitalWrite(LED_BUILT_IN, HIGH); //Turn off
}
#if EI_CLASSIFIER_HAS_ANOMALY == 1
ei_printf(" anomaly score: ");
ei_printf_float(result.anomaly);
ei_printf("\n");
#endif
}
static void audio_inference_callback(uint32_t n_bytes)
{
for(int i = 0; i < n_bytes>>1; i++) {
inference.buffer[inference.buf_count++] = sampleBuffer[i];
if(inference.buf_count >= inference.n_samples) {
inference.buf_count = 0;
inference.buf_ready = 1;
}
}
}
static void capture_samples(void* arg) {
const int32_t i2s_bytes_to_read = (uint32_t)arg;
size_t bytes_read = i2s_bytes_to_read;
while (record_status) {
/* read data at once from i2s - Modified for XIAO ESP2S3 Sense and I2S.h library */
// i2s_read((i2s_port_t)1, (void*)sampleBuffer, i2s_bytes_to_read, &bytes_read, 100);
esp_i2s::i2s_read(esp_i2s::I2S_NUM_0, (void*)sampleBuffer, i2s_bytes_to_read, &bytes_read, 100);
if (bytes_read <= 0) {
ei_printf("Error in I2S read : %d", bytes_read);
}
else {
if (bytes_read < i2s_bytes_to_read) {
ei_printf("Partial I2S read");
}
// scale the data (otherwise the sound is too quiet)
for (int x = 0; x < i2s_bytes_to_read/2; x++) {
sampleBuffer[x] = (int16_t)(sampleBuffer[x]) * 8;
}
if (record_status) {
audio_inference_callback(i2s_bytes_to_read);
}
else {
break;
}
}
}
vTaskDelete(NULL);
}
/**
* @brief Init inferencing struct and setup/start PDM
*
* @param[in] n_samples The n samples
*
* @return { description_of_the_return_value }
*/
static bool microphone_inference_start(uint32_t n_samples)
{
inference.buffer = (int16_t *)malloc(n_samples * sizeof(int16_t));
if(inference.buffer == NULL) {
return false;
}
inference.buf_count = 0;
inference.n_samples = n_samples;
inference.buf_ready = 0;
// if (i2s_init(EI_CLASSIFIER_FREQUENCY)) {
// ei_printf("Failed to start I2S!");
// }
ei_sleep(100);
record_status = true;
xTaskCreate(capture_samples, "CaptureSamples", 1024 * 32, (void*)sample_buffer_size, 10, NULL);
return true;
}
/**
* @brief Wait on new data
*
* @return True when finished
*/
static bool microphone_inference_record(void)
{
bool ret = true;
while (inference.buf_ready == 0) {
delay(10);
}
inference.buf_ready = 0;
return ret;
}
/**
* Get raw audio signal data
*/
static int microphone_audio_signal_get_data(size_t offset, size_t length, float *out_ptr)
{
numpy::int16_to_float(&inference.buffer[offset], out_ptr, length);
return 0;
}
/**
* @brief Stop PDM and release buffers
*/
static void microphone_inference_end(void)
{
free(sampleBuffer);
ei_free(inference.buffer);
}
#if !defined(EI_CLASSIFIER_SENSOR) || EI_CLASSIFIER_SENSOR != EI_CLASSIFIER_SENSOR_MICROPHONE
#error "Invalid model for current sensor."
#endif
Si tu versión de ESP32 es 3.0.x. Haz clic aquí para previsualizar el programa completo
/* Edge Impulse Arduino examples
* Copyright (c) 2022 EdgeImpulse Inc.
*
* Permission is hereby granted, free of charge, to any person obtaining a copy
* of this software and associated documentation files (the "Software"), to deal
* in the Software without restriction, including without limitation the rights
* to use, copy, modify, merge, publish, distribute, sublicense, and/or sell
* copies of the Software, and to permit persons to whom the Software is
* furnished to do so, subject to the following conditions:
*
* The above copyright notice and this permission notice shall be included in
* all copies or substantial portions of the Software.
*
* THE SOFTWARE IS PROVIDED "AS IS", WITHOUT WARRANTY OF ANY KIND, EXPRESS OR
* IMPLIED, INCLUDING BUT NOT LIMITED TO THE WARRANTIES OF MERCHANTABILITY,
* FITNESS FOR A PARTICULAR PURPOSE AND NONINFRINGEMENT. IN NO EVENT SHALL THE
* AUTHORS OR COPYRIGHT HOLDERS BE LIABLE FOR ANY CLAIM, DAMAGES OR OTHER
* LIABILITY, WHETHER IN AN ACTION OF CONTRACT, TORT OR OTHERWISE, ARISING FROM,
* OUT OF OR IN CONNECTION WITH THE SOFTWARE OR THE USE OR OTHER DEALINGS IN THE
* SOFTWARE.
*/
// If your target is limited in memory remove this macro to save 10K RAM
#define EIDSP_QUANTIZE_FILTERBANK 0
/*
** NOTE: If you run into TFLite arena allocation issue.
**
** This may be due to may dynamic memory fragmentation.
** Try defining "-DEI_CLASSIFIER_ALLOCATION_STATIC" in boards.local.txt (create
** if it doesn't exist) and copy this file to
** `<ARDUINO_CORE_INSTALL_PATH>/arduino/hardware/<mbed_core>/<core_version>/`.
**
** See
** (https://support.arduino.cc/hc/en-us/articles/360012076960-Where-are-the-installed-cores-located-)
** to find where Arduino installs cores on your machine.
**
** If the problem persists then there's not enough memory for this model and application.
*/
/* Includes ---------------------------------------------------------------- */
#include <XIAO-ESP32S3-KWS_inferencing.h>
#include <ESP_I2S.h>
I2SClass I2S;
#define SAMPLE_RATE 16000U
#define SAMPLE_BITS 16
#define LED_BUILT_IN 21
/** Audio buffers, pointers and selectors */
typedef struct {
int16_t *buffer;
uint8_t buf_ready;
uint32_t buf_count;
uint32_t n_samples;
} inference_t;
static inference_t inference;
static const uint32_t sample_buffer_size = 2048;
static signed short sampleBuffer[sample_buffer_size];
static bool debug_nn = false; // Set this to true to see e.g. features generated from the raw signal
static bool record_status = true;
/**
* @brief Arduino setup function
*/
void setup()
{
// put your setup code here, to run once:
Serial.begin(115200);
// comment out the below line to cancel the wait for USB connection (needed for native USB)
while (!Serial);
Serial.println("Edge Impulse Inferencing Demo");
pinMode(LED_BUILT_IN, OUTPUT); // Set the pin as output
digitalWrite(LED_BUILT_IN, HIGH); //Turn off
// setup 42 PDM clock and 41 PDM data pins
I2S.setPinsPdmRx(42, 41);
if (!I2S.begin(I2S_MODE_PDM_RX, 16000, I2S_DATA_BIT_WIDTH_16BIT, I2S_SLOT_MODE_MONO)) {
Serial.println("Failed to initialize I2S!");
while (1) ;
}
// summary of inferencing settings (from model_metadata.h)
ei_printf("Inferencing settings:\n");
ei_printf("\tInterval: ");
ei_printf_float((float)EI_CLASSIFIER_INTERVAL_MS);
ei_printf(" ms.\n");
ei_printf("\tFrame size: %d\n", EI_CLASSIFIER_DSP_INPUT_FRAME_SIZE);
ei_printf("\tSample length: %d ms.\n", EI_CLASSIFIER_RAW_SAMPLE_COUNT / 16);
ei_printf("\tNo. of classes: %d\n", sizeof(ei_classifier_inferencing_categories) / sizeof(ei_classifier_inferencing_categories[0]));
ei_printf("\nStarting continious inference in 2 seconds...\n");
ei_sleep(2000);
if (microphone_inference_start(EI_CLASSIFIER_RAW_SAMPLE_COUNT) == false) {
ei_printf("ERR: Could not allocate audio buffer (size %d), this could be due to the window length of your model\r\n", EI_CLASSIFIER_RAW_SAMPLE_COUNT);
return;
}
ei_printf("Recording...\n");
}
/**
* @brief Arduino main function. Runs the inferencing loop.
*/
void loop()
{
bool m = microphone_inference_record();
if (!m) {
ei_printf("ERR: Failed to record audio...\n");
return;
}
signal_t signal;
signal.total_length = EI_CLASSIFIER_RAW_SAMPLE_COUNT;
signal.get_data = µphone_audio_signal_get_data;
ei_impulse_result_t result = { 0 };
EI_IMPULSE_ERROR r = run_classifier(&signal, &result, debug_nn);
if (r != EI_IMPULSE_OK) {
ei_printf("ERR: Failed to run classifier (%d)\n", r);
return;
}
int pred_index = 0; // Initialize pred_index
float pred_value = 0; // Initialize pred_value
// print the predictions
ei_printf("Predictions ");
ei_printf("(DSP: %d ms., Classification: %d ms., Anomaly: %d ms.)",
result.timing.dsp, result.timing.classification, result.timing.anomaly);
ei_printf(": \n");
for (size_t ix = 0; ix < EI_CLASSIFIER_LABEL_COUNT; ix++) {
ei_printf(" %s: ", result.classification[ix].label);
ei_printf_float(result.classification[ix].value);
ei_printf("\n");
if (result.classification[ix].value > pred_value){
pred_index = ix;
pred_value = result.classification[ix].value;
}
}
// Display inference result
if (pred_index == 3){
digitalWrite(LED_BUILT_IN, LOW); //Turn on
}
else{
digitalWrite(LED_BUILT_IN, HIGH); //Turn off
}
#if EI_CLASSIFIER_HAS_ANOMALY == 1
ei_printf(" anomaly score: ");
ei_printf_float(result.anomaly);
ei_printf("\n");
#endif
}
static void audio_inference_callback(uint32_t n_bytes)
{
for(int i = 0; i < n_bytes>>1; i++) {
inference.buffer[inference.buf_count++] = sampleBuffer[i];
if(inference.buf_count >= inference.n_samples) {
inference.buf_count = 0;
inference.buf_ready = 1;
}
}
}
static void capture_samples(void* arg) {
const int32_t i2s_bytes_to_read = (uint32_t)arg;
size_t bytes_read = i2s_bytes_to_read;
while (record_status) {
/* read data at once from i2s - Modified for XIAO ESP2S3 Sense and I2S.h library */
// i2s_read((i2s_port_t)1, (void*)sampleBuffer, i2s_bytes_to_read, &bytes_read, 100);
esp_i2s::i2s_read(esp_i2s::I2S_NUM_0, (void*)sampleBuffer, i2s_bytes_to_read, &bytes_read, 100);
if (bytes_read <= 0) {
ei_printf("Error in I2S read : %d", bytes_read);
}
else {
if (bytes_read < i2s_bytes_to_read) {
ei_printf("Partial I2S read");
}
// scale the data (otherwise the sound is too quiet)
for (int x = 0; x < i2s_bytes_to_read/2; x++) {
sampleBuffer[x] = (int16_t)(sampleBuffer[x]) * 8;
}
if (record_status) {
audio_inference_callback(i2s_bytes_to_read);
}
else {
break;
}
}
}
vTaskDelete(NULL);
}
/**
* @brief Init inferencing struct and setup/start PDM
*
* @param[in] n_samples The n samples
*
* @return { description_of_the_return_value }
*/
static bool microphone_inference_start(uint32_t n_samples)
{
inference.buffer = (int16_t *)malloc(n_samples * sizeof(int16_t));
if(inference.buffer == NULL) {
return false;
}
inference.buf_count = 0;
inference.n_samples = n_samples;
inference.buf_ready = 0;
// if (i2s_init(EI_CLASSIFIER_FREQUENCY)) {
// ei_printf("Failed to start I2S!");
// }
ei_sleep(100);
record_status = true;
xTaskCreate(capture_samples, "CaptureSamples", 1024 * 32, (void*)sample_buffer_size, 10, NULL);
return true;
}
/**
* @brief Wait on new data
*
* @return True when finished
*/
static bool microphone_inference_record(void)
{
bool ret = true;
while (inference.buf_ready == 0) {
delay(10);
}
inference.buf_ready = 0;
return ret;
}
/**
* Get raw audio signal data
*/
static int microphone_audio_signal_get_data(size_t offset, size_t length, float *out_ptr)
{
numpy::int16_to_float(&inference.buffer[offset], out_ptr, length);
return 0;
}
/**
* @brief Stop PDM and release buffers
*/
static void microphone_inference_end(void)
{
free(sampleBuffer);
ei_free(inference.buffer);
}
#if !defined(EI_CLASSIFIER_SENSOR) || EI_CLASSIFIER_SENSOR != EI_CLASSIFIER_SENSOR_MICROPHONE
#error "Invalid model for current sensor."
#endif
La idea es que el LED se encienda cada vez que se detecte la palabra clave HELLO. De la misma manera, en lugar de encender un LED, esto podría ser un "disparador" para un dispositivo externo, como vimos en la introducción.
Agradecimientos Especiales
Agradecimientos especiales a MJRoBot (Marcelo Rovai) por el contenido del tutorial sobre el acceso del XIAO ESP32S3 Sense a Edge Impulse. El artículo original es muy detallado y contiene mucho conocimiento sobre aprendizaje automático.
Si deseas leer el contenido original de este artículo, puedes ir directamente al artículo original desplazándote hacia abajo.
MJRoBot también tiene muchos proyectos interesantes sobre el XIAO ESP32S3.
Recursos
- [GITHUB] Project Github
- [EDGE-IMPULSE] edge impulse demo
Soporte Técnico y Discusión del Producto
¡Gracias por elegir nuestros productos! Estamos aquí para brindarle diferentes tipos de soporte para asegurar que su experiencia con nuestros productos sea lo más fluida posible. Ofrecemos varios canales de comunicación para satisfacer diferentes preferencias y necesidades.