Asistente de voz mini ChatGPT basado en XIAO ESP32S3 Sense
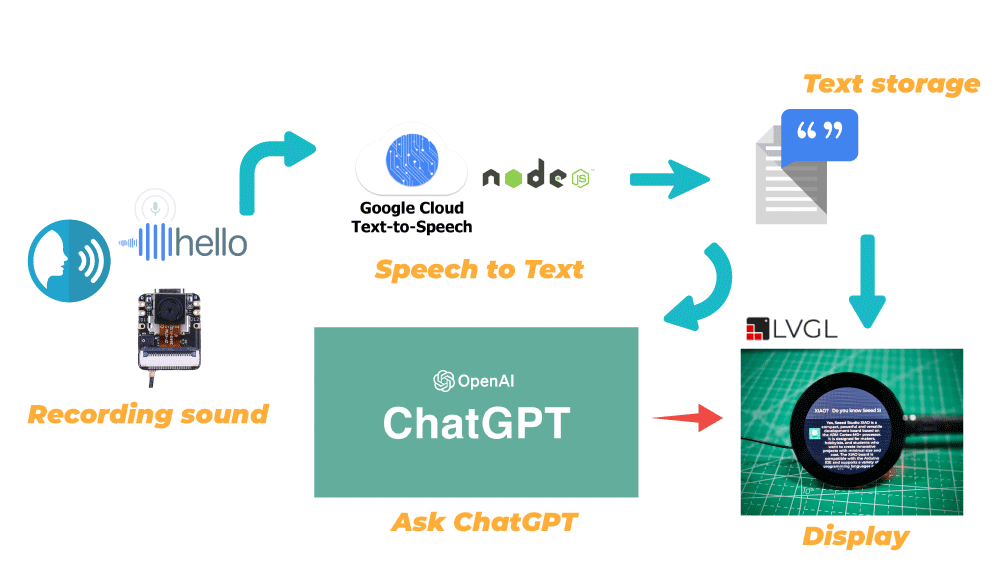
¡Nos complace presentarte hoy un proyecto totalmente nuevo usando la XIAO ESP32S3 Sense y la Round Display for XIAO! El objetivo es primero construir un sistema de reconocimiento de voz usando el micrófono de la XIAO ESP32S3 Sense y el servicio de Speech-to-Text de Google Cloud. El texto reconocido se usa luego para llamar a la interfaz de OpenAI y hacerle preguntas a ChatGPT y obtener respuestas. Por último, mostramos en pantalla tanto el texto reconocido como el contenido de las respuestas.
¡Este es nuestro asistente inteligente “XIAO”!
Echemos un vistazo a los pasos generales necesarios para completar este proyecto.
- Registrarse y habilitar el servicio Google Cloud Speech to Text
- Desplegar servicios de speech-to-text en el host local
- Subir a Google Cloud los archivos de sonido grabados por la XIAO ESP32S3 Sense para su reconocimiento
- Desplegar ChatGPT en la XIAO ESP32S3 Sense
- Diseño del contenido de la pantalla e integración de programas
La estructura general del marco puede verse en el siguiente diagrama.
Primeros pasos
Antes de empezar este proyecto, quizá necesites preparar tu hardware y software como se describe aquí.
Preparación de hardware
Si quieres vivir toda la experiencia del programa, necesitas al menos el siguiente equipo:
| Seeed Studio XIAO ESP32S3 Sense | Seeed Studio Round Display for XIAO |
|---|---|
 | 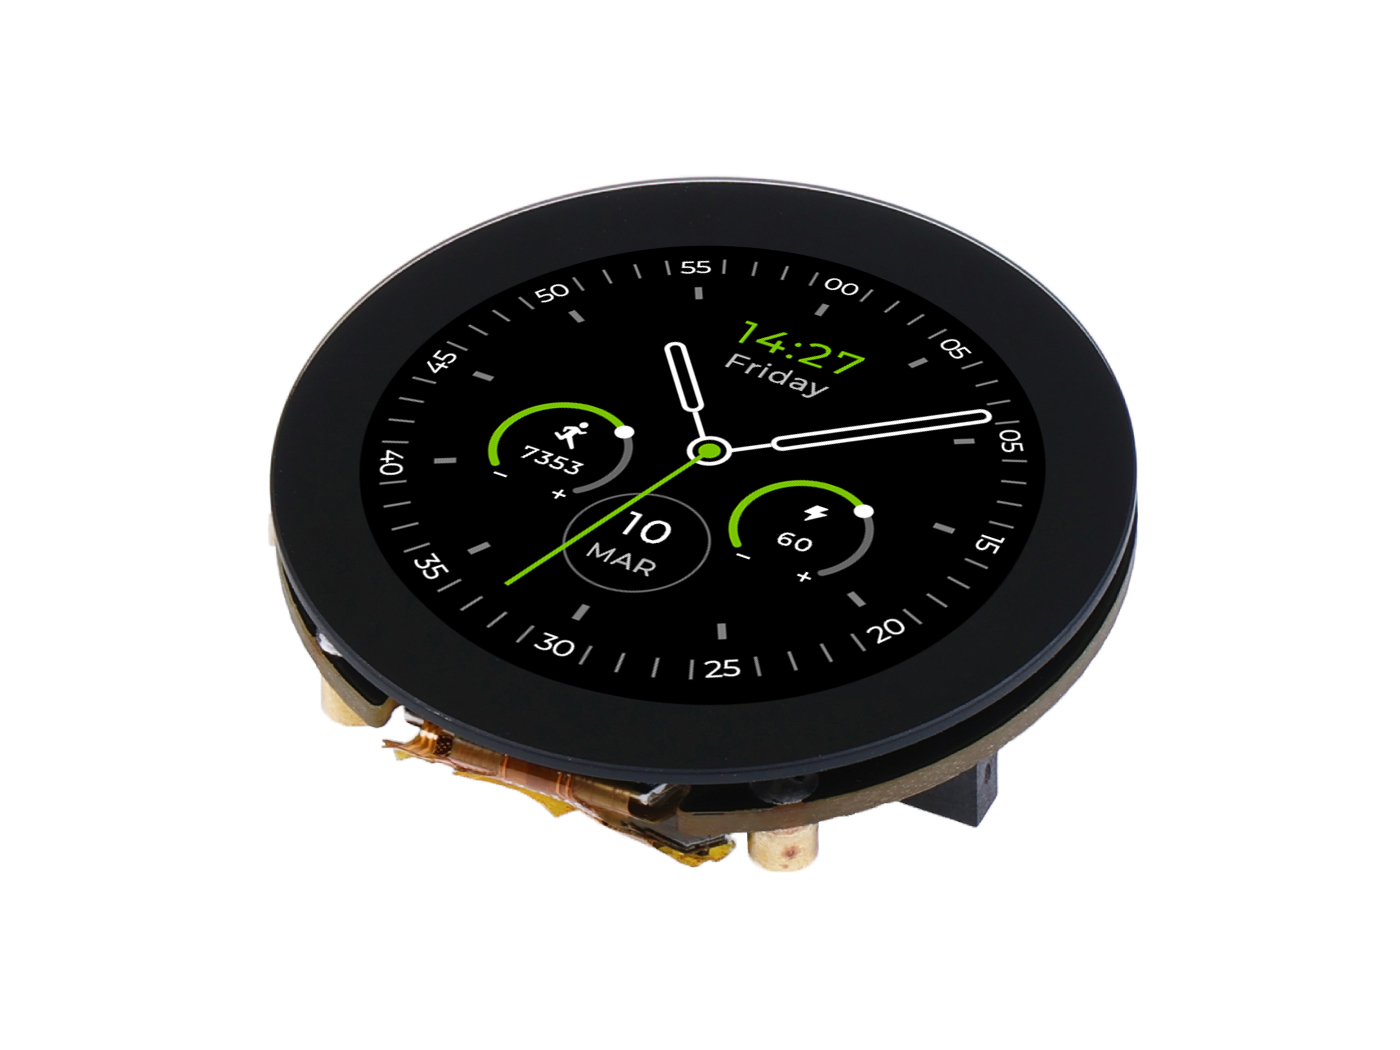 |
Además, necesitamos una tarjeta microSD en formato FAT32 de no más de 32 GB para almacenar los archivos de grabación.
Como la XIAO ESP32S3 Sense está diseñada con tres resistencias pull-up R4~R6 conectadas a la ranura SD, y la pantalla redonda también tiene resistencias pull-up, la tarjeta SD no puede leerse cuando se usan ambas a la vez. Para resolverlo, debemos cortar J3 en la placa de expansión de la XIAO ESP32S3 Sense.
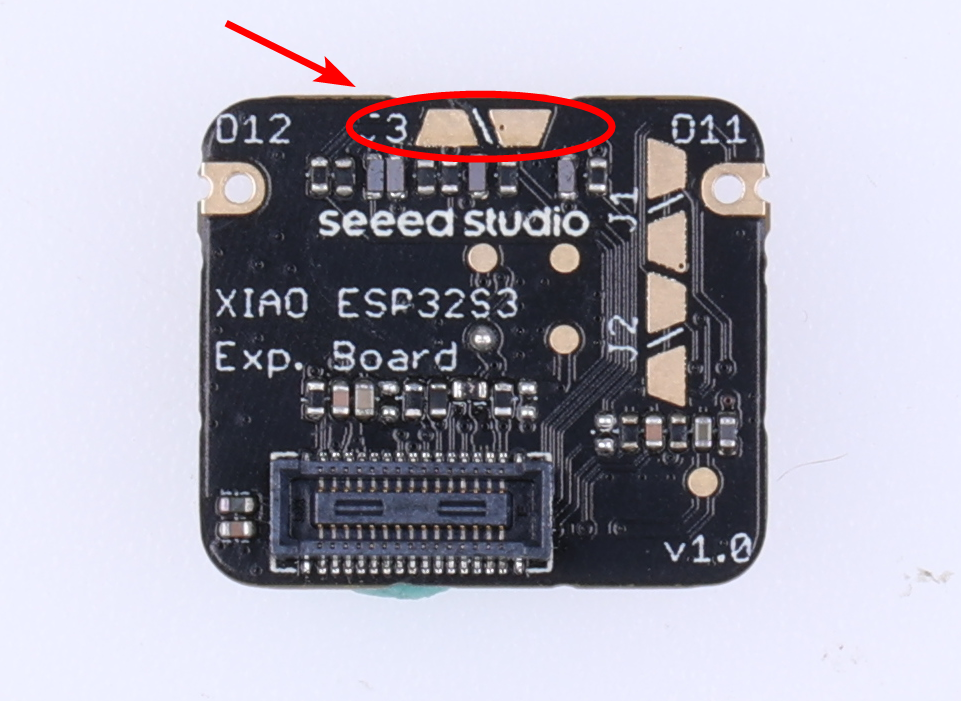
Tras desconectar J3, la ranura SD de la XIAO ESP32S3 Sense dejará de funcionar, por lo que deberás insertar la microSD en la ranura de la Round Display.
A continuación, instala la microSD, la XIAO ESP32S3 Sense y la Round Display en orden.
Recomendamos quitar primero el módulo de cámara para evitar rayarlo cuando cortes la conexión J3 con la cuchilla.
Preparación de software
Como se usa la XIAO ESP32S3, instala el paquete de placas de la XIAO ESP32S3 según las instrucciones del Wiki antes de empezar.
Además, como usamos la Round Display for XIAO, también necesitarás preparar la librería para la placa de expansión según el Wiki.
Durante el proyecto también usaremos algunas librerías de terceros, como la librería de ChatGPT y ArduinoJSON, que puedes descargar y añadir al entorno de Arduino aquí:
Además de las librerías básicas, también necesitaremos usar un servicio Node, así que tendrás que instalar Node.js por tu cuenta (puedes descargarlo desde la web oficial).
Con todo listo, empecemos con el tutorial de hoy.
Sign up and enable Google Cloud Speech to Text service
También puedes consultar directamente el tutorial oficial de Google Cloud para registrar y activar el servicio de Speech-to-Text y configurarlo.
Speech-to-Text es una API impulsada por la tecnología de IA de Google. Envías tus datos de audio a Speech-to-Text y recibes como respuesta la transcripción en texto. Antes de poder enviar solicitudes, debes habilitar la API en la consola de Google Cloud.
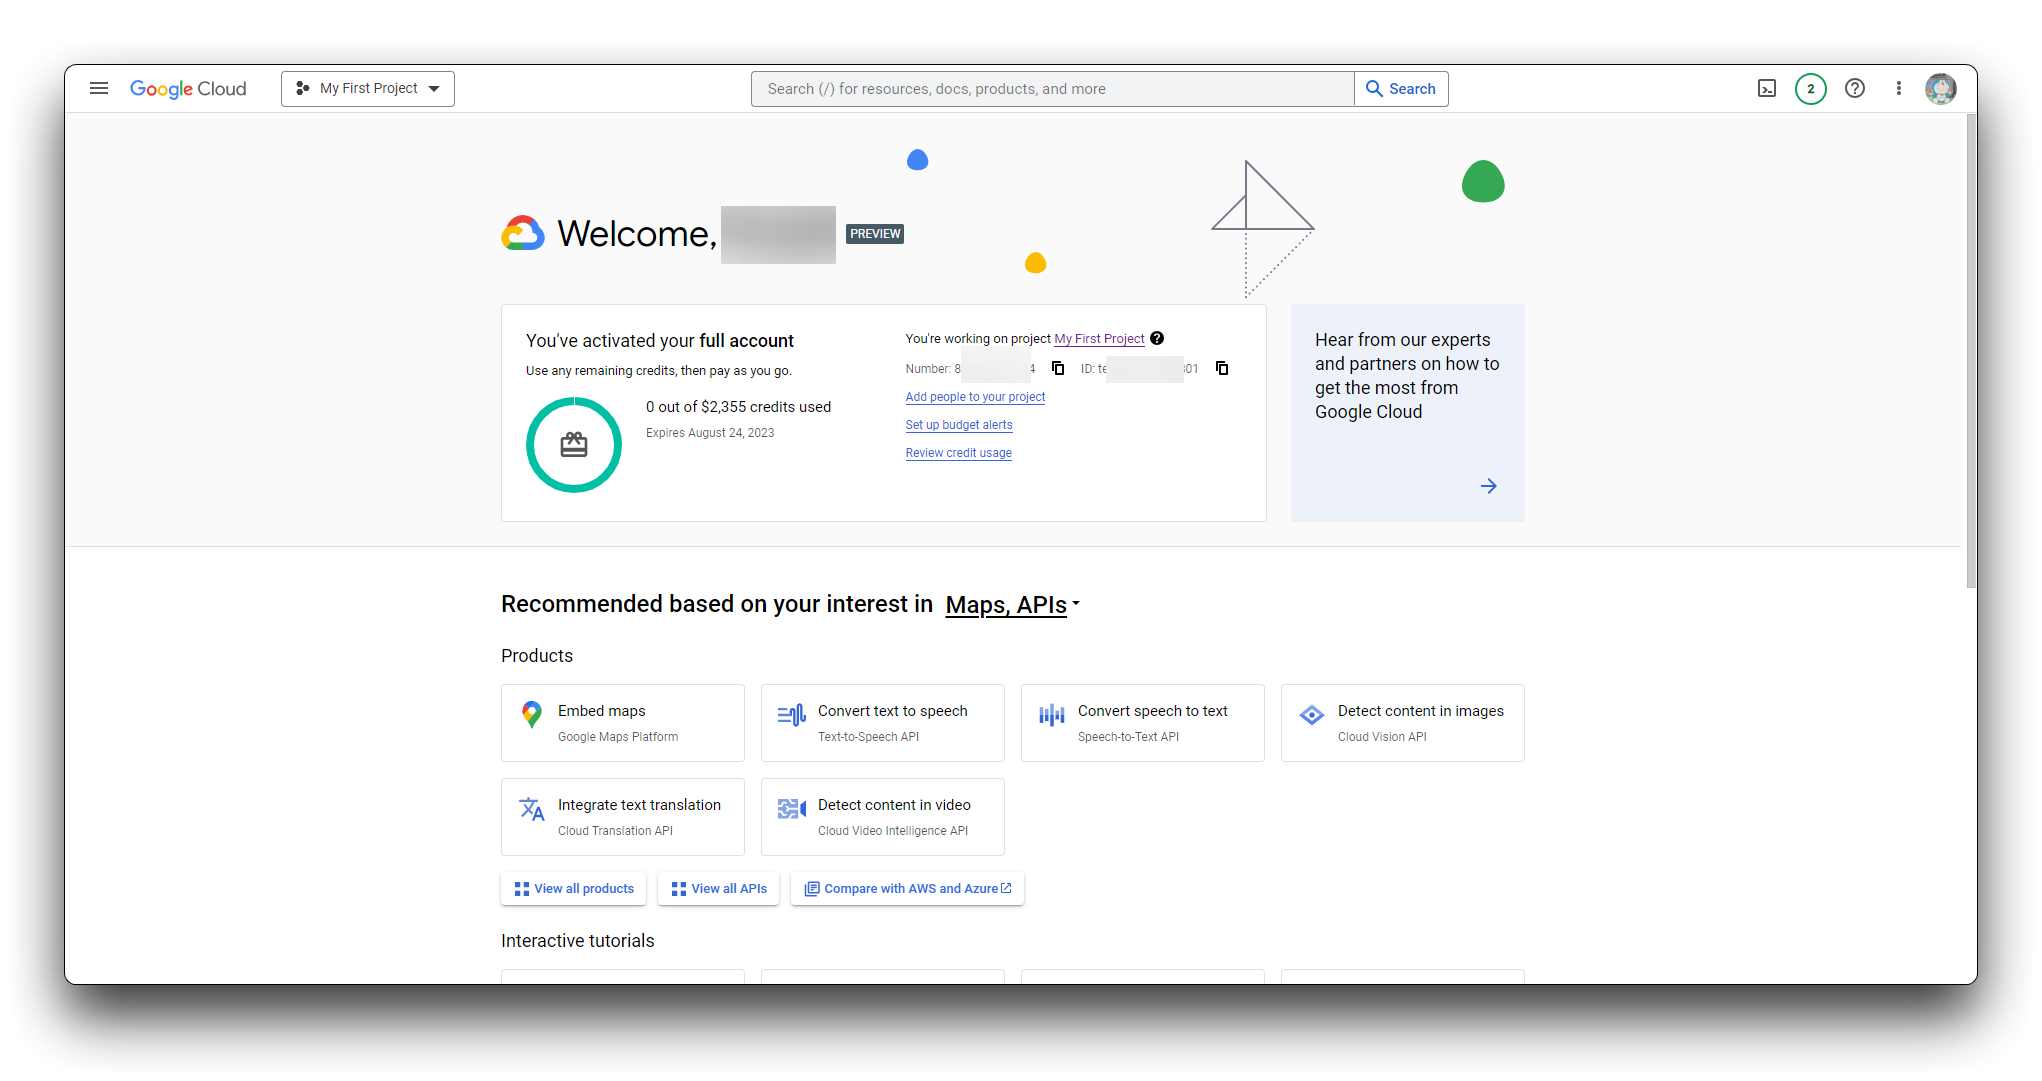
Paso 1. Iniciar sesión en la consola de Google Cloud
Puedes ir a la consola de Google Cloud haciendo clic aquí y, si aún no te has registrado, puedes hacerlo aquí.
Paso 2. Ir a la página del selector de proyecto
Puedes elegir un proyecto existente o crear uno nuevo. Para más información, consulta Crear y gestionar proyectos.
Si creas un proyecto nuevo, se te pedirá vincular una cuenta de facturación. Si usas un proyecto existente, asegúrate de que la facturación esté habilitada.
Debes habilitar la facturación para usar la API de Speech-to-Text, aunque no se te cobrará a menos que superes la cuota gratuita. Consulta la tarificación para más detalles.

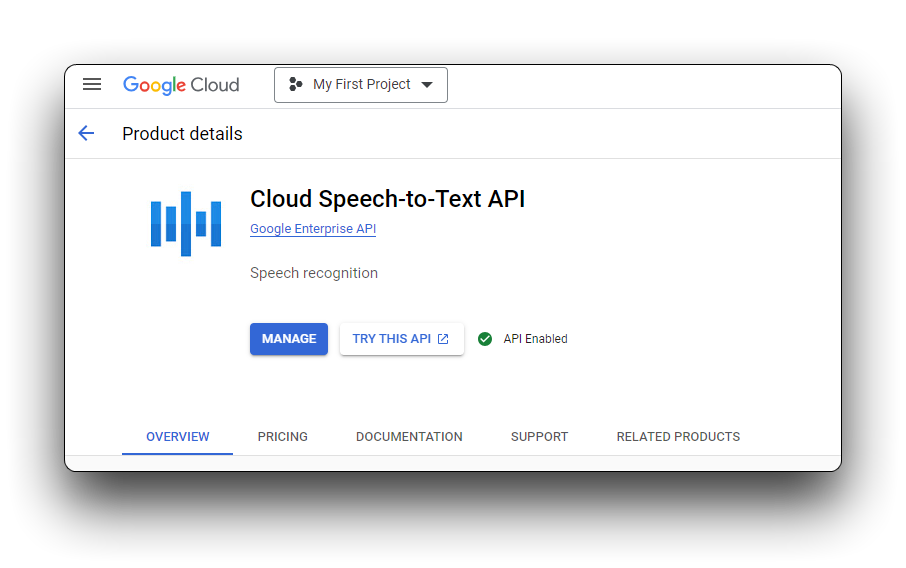
Paso 3. Activar el servicio Speech-to-Text
Una vez que hayas seleccionado un proyecto y lo hayas vinculado a una cuenta de facturación, puedes habilitar la API. Ve a la barra Search products and resources en la parte superior, escribe speech y selecciona Cloud Speech-to-Text API.
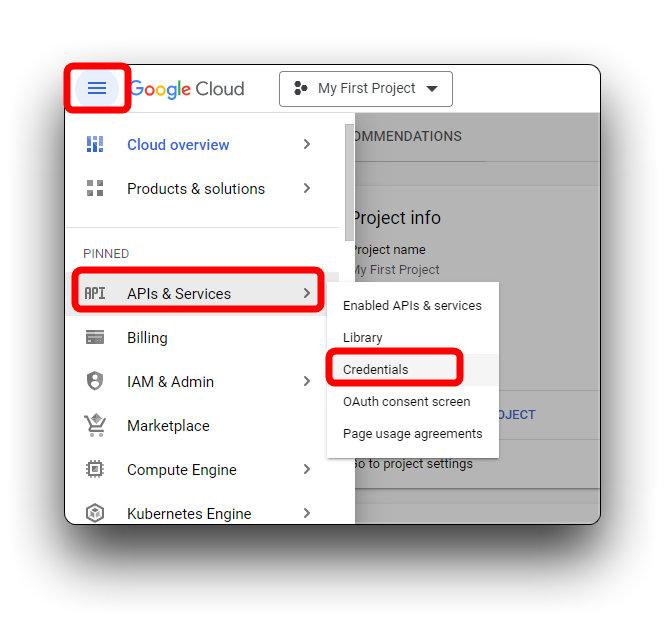
Paso 4. Crear una cuenta de servicio
Crea una nueva cuenta de servicio si tu proyecto aún no tiene una. Debes crearla para poder usar Speech-to-Text.
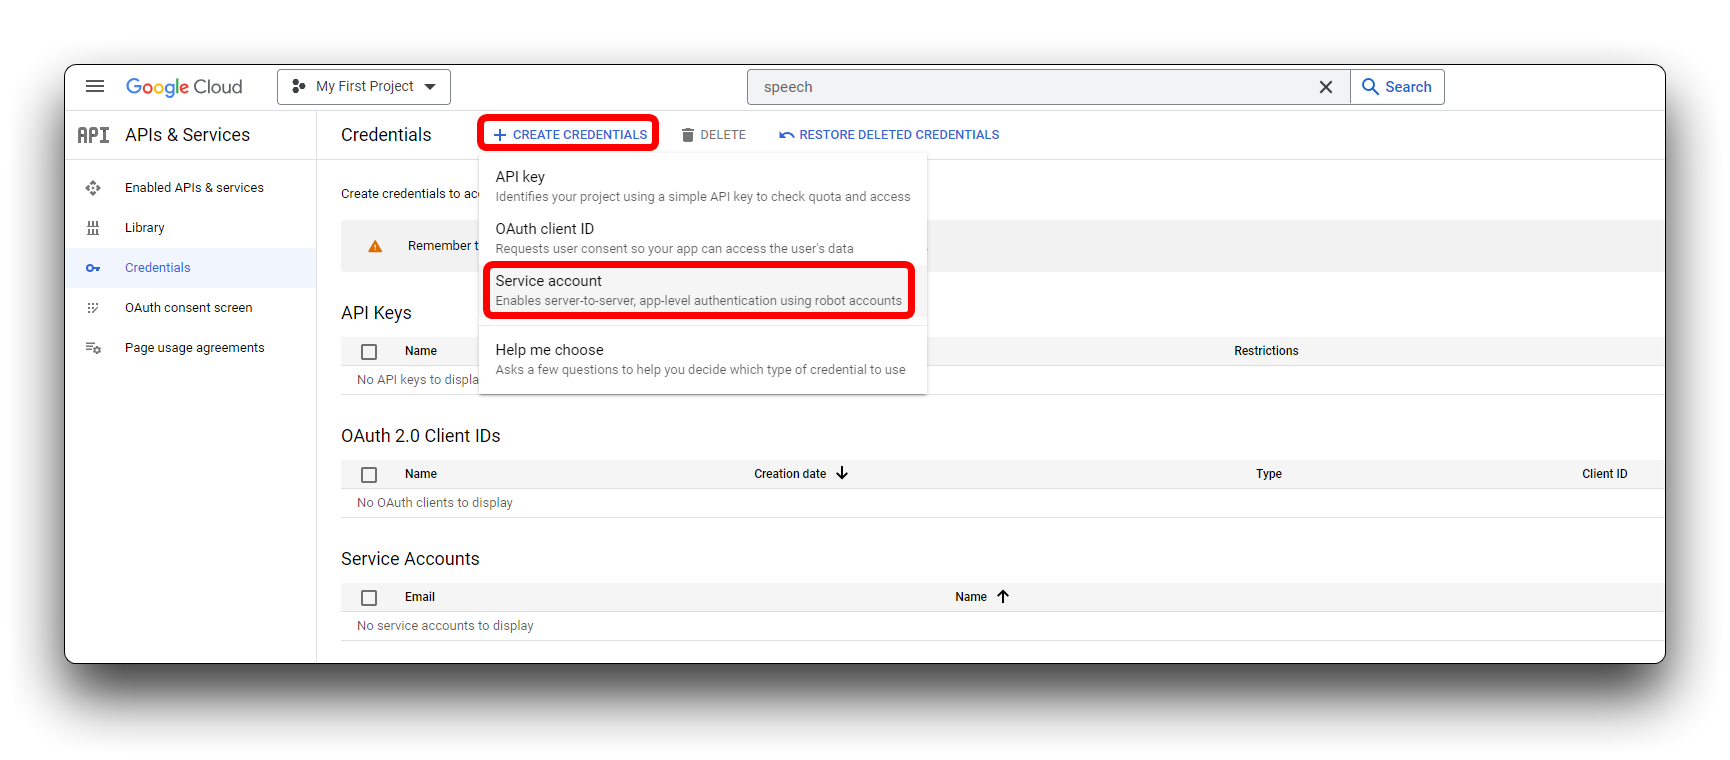
En la nueva ventana emergente, selecciona Service account bajo CREATE CREDENTIALS.
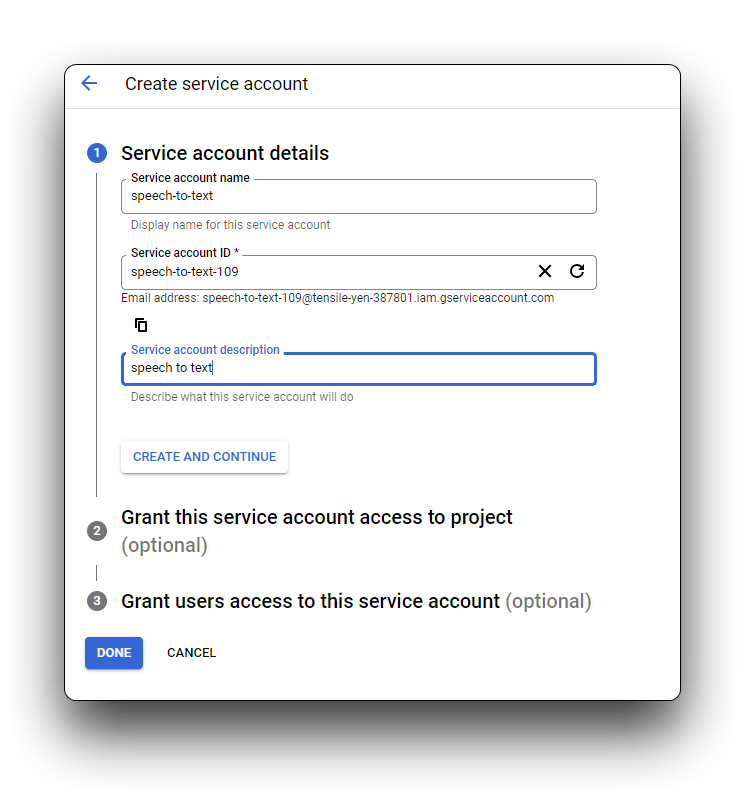
En Service account name, escribe un nombre único. El Service account ID se rellenará automáticamente. La descripción es opcional pero recomendada si planeas asociar múltiples cuentas de servicio. Escribe una breve descripción y haz clic en CREATE AND CONTINUE.
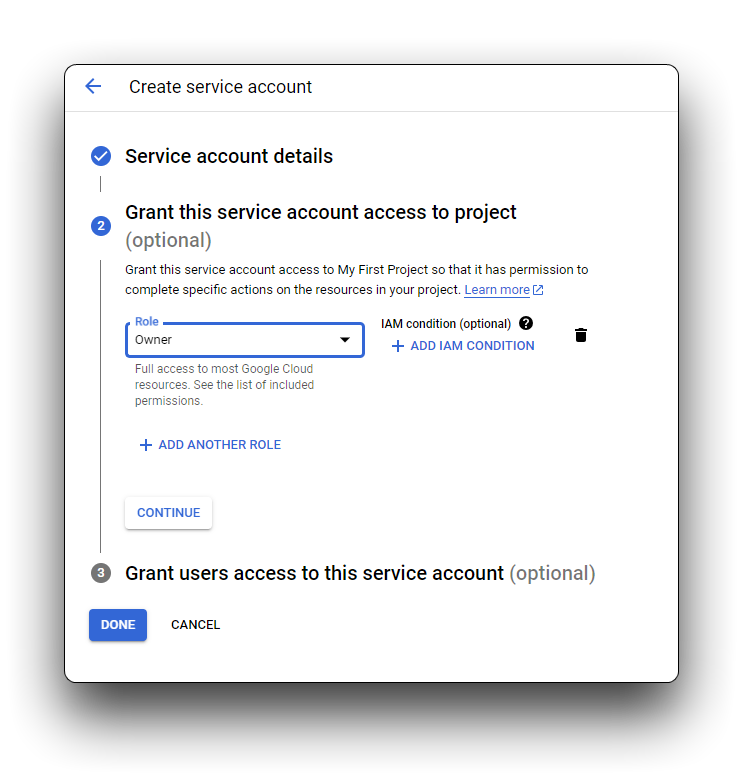
Recomendamos asignar uno de los roles IAM básicos. Puedes asignar varios si es necesario. Consulta IAM roles para detalles. Haz clic en el menú de roles y elige Owner, luego CONTINUE.
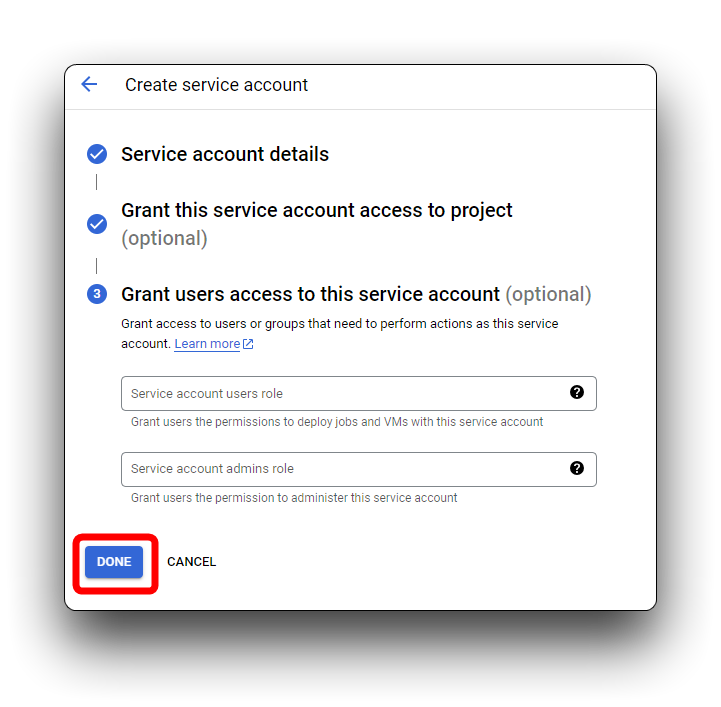
El paso final permite otorgar acceso opcional a otras entidades (individuos, grupos de Google, etc.). Si no necesitas conceder acceso adicional, haz clic en DONE.
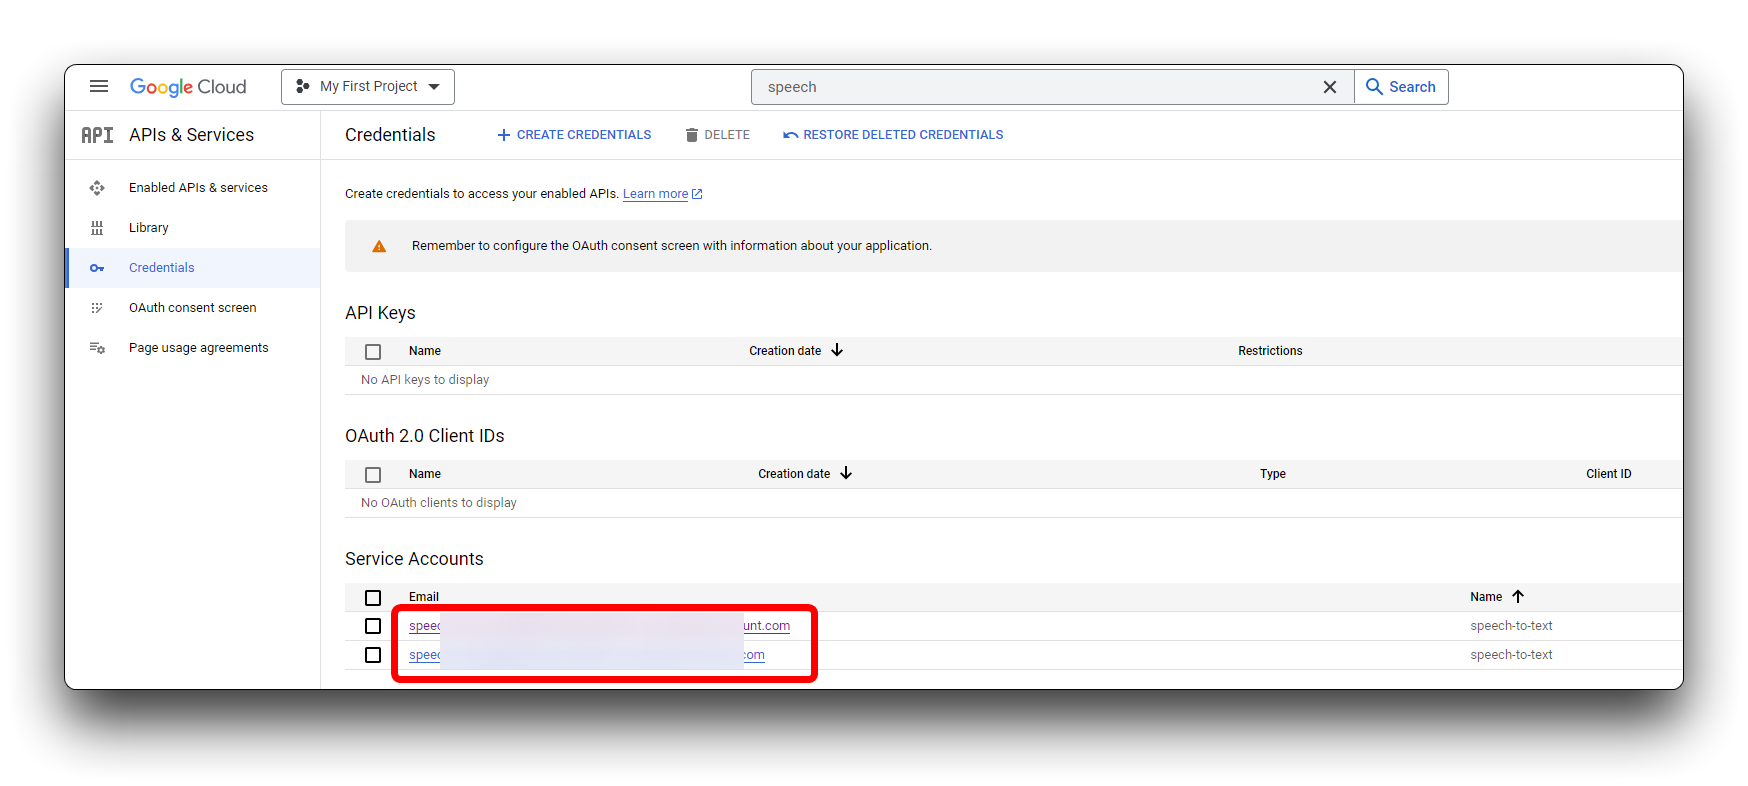
La cuenta de servicio aparecerá ahora en Service Accounts. Puedes cambiar permisos, añadir o generar claves y otorgar accesos en cualquier momento.
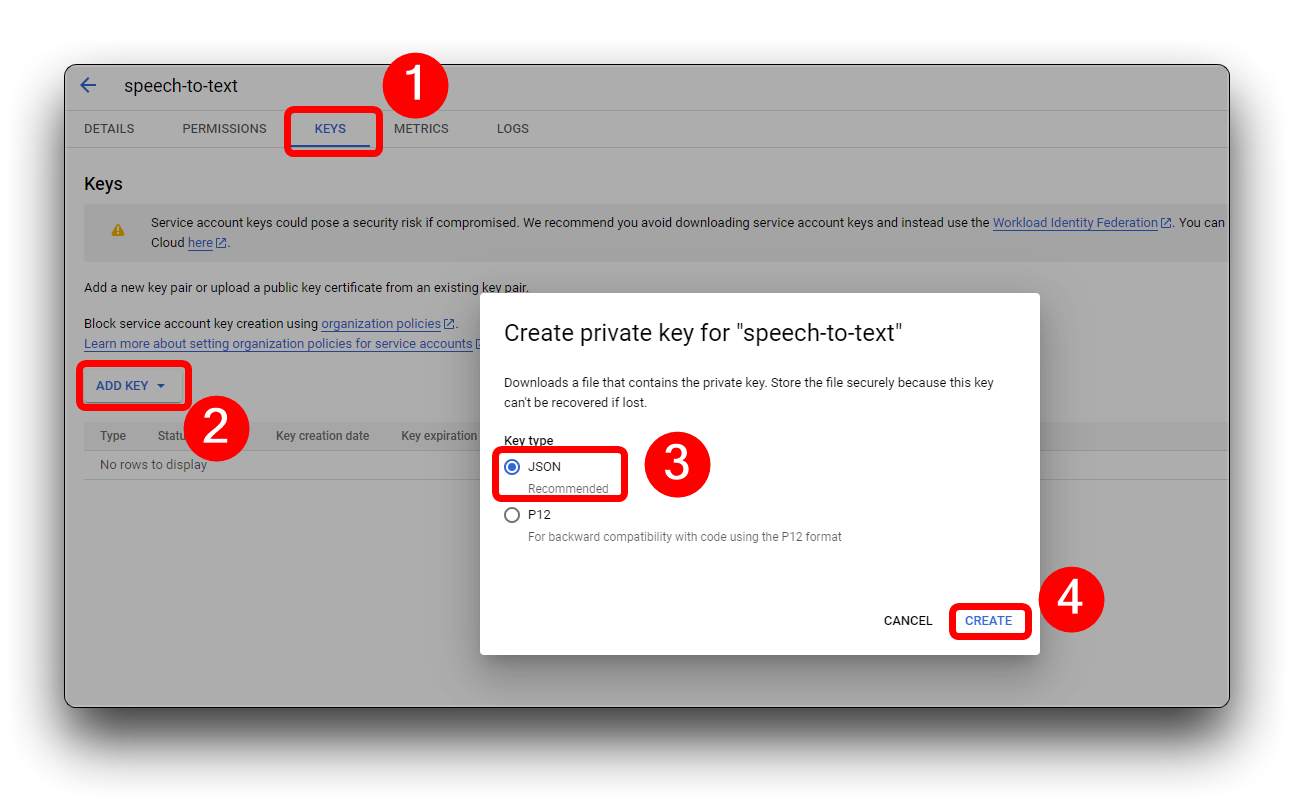
Paso 5. Crear una clave JSON para tu cuenta de servicio
Necesitarás esta clave privada durante el proceso de autenticación cuando envíes una solicitud a Speech-to-Text.
Para crear una clave, haz clic en la cuenta de servicio y ve a la pestaña KEYS. Haz clic en ADD KEY -> Create new key. Se recomienda formato JSON.
Se descargará automáticamente la nueva clave en el formato elegido. Guarda este archivo en un lugar seguro y toma nota de la ruta. Tendrás que apuntar la variable de entorno GOOGLE_APPLICATION_CREDENTIALS a este archivo al principio de cada sesión. Este paso es esencial para autenticar las solicitudes. El ID único de la clave aparece junto al nombre de la cuenta de servicio.
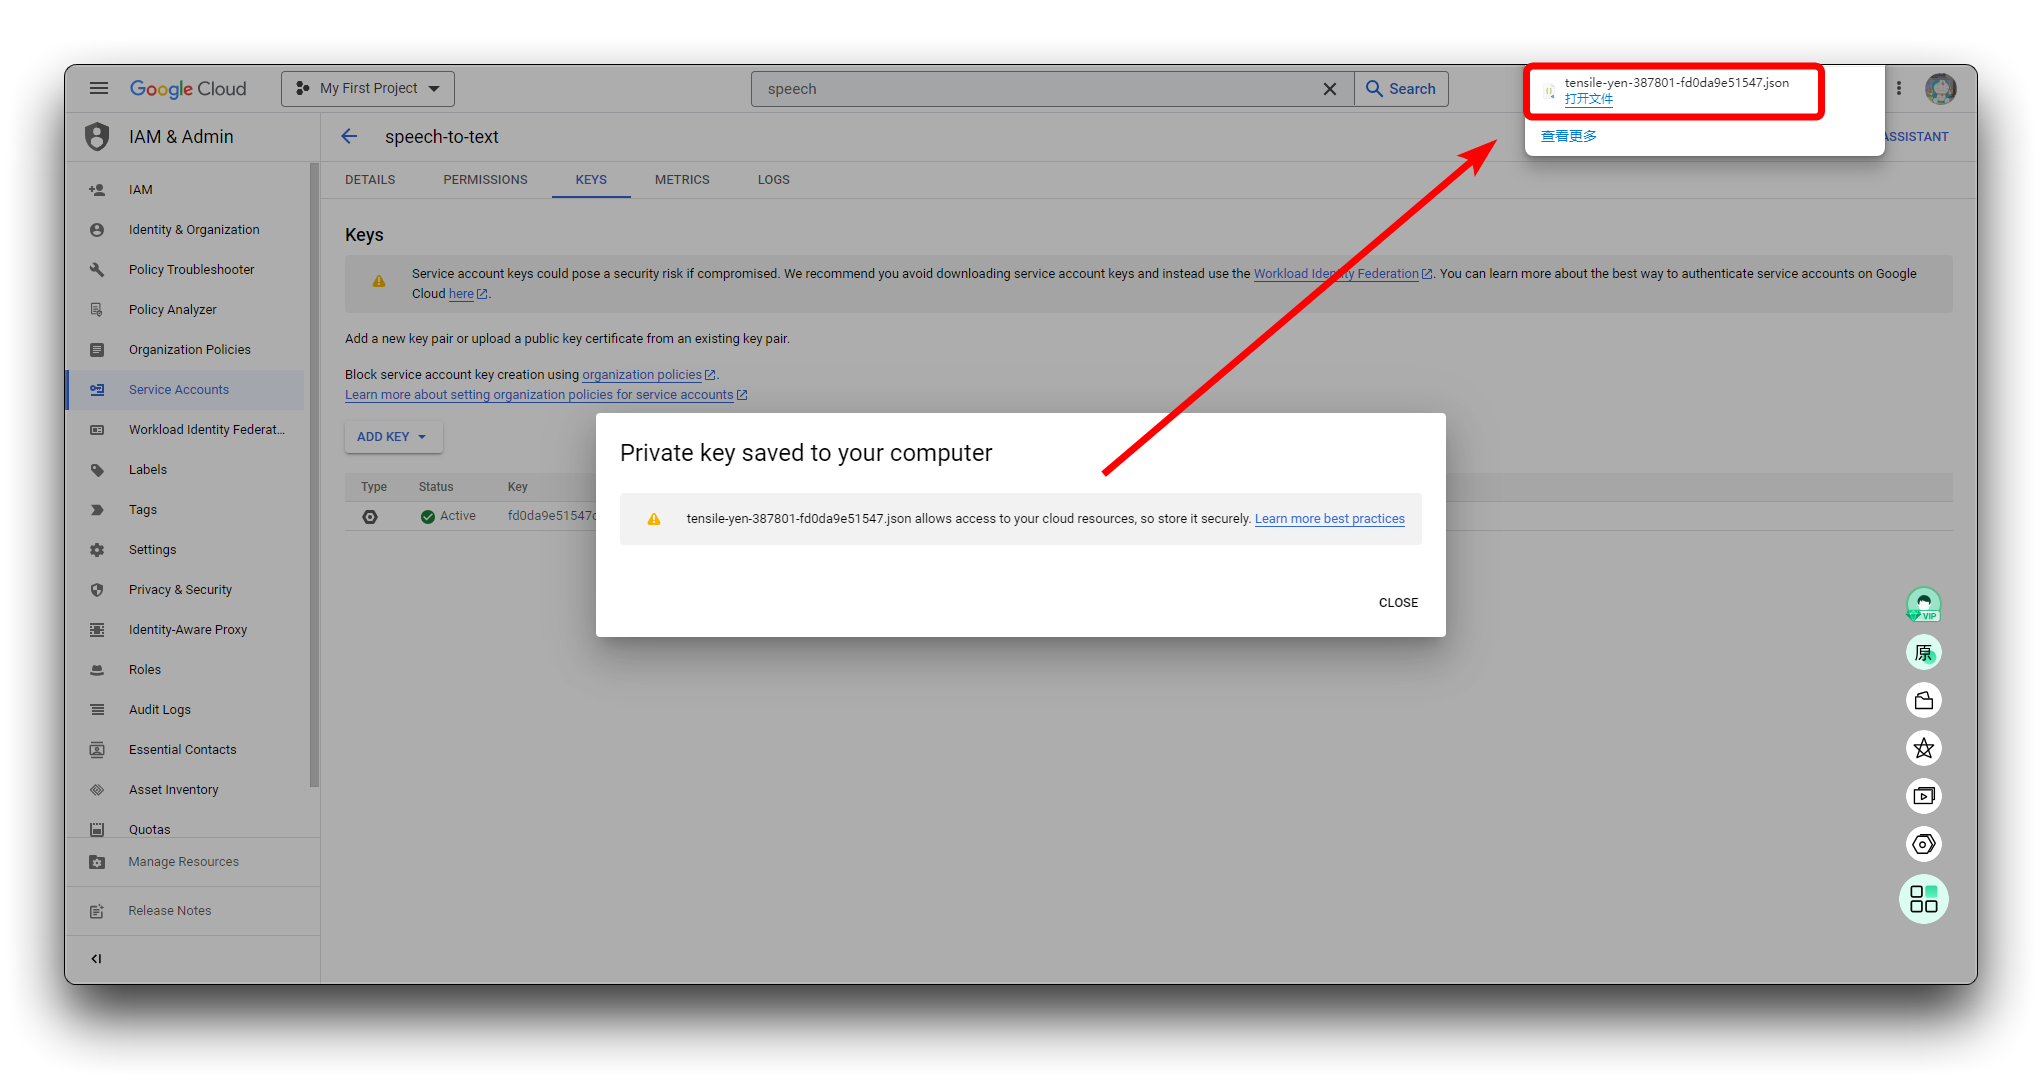
Conserva la clave en formato JSON porque la usaremos más adelante.
Deploy speech-to-text services on local hosts
Paso 6. Descargar el archivo del proyecto
Hemos empaquetado el proyecto necesario y puedes descargarlo desde GitHub con el botón de abajo, o con Git:
git clone https://github.com/limengdu/XIAO-ESP32S3Sense-Speech2ChatGPT.git
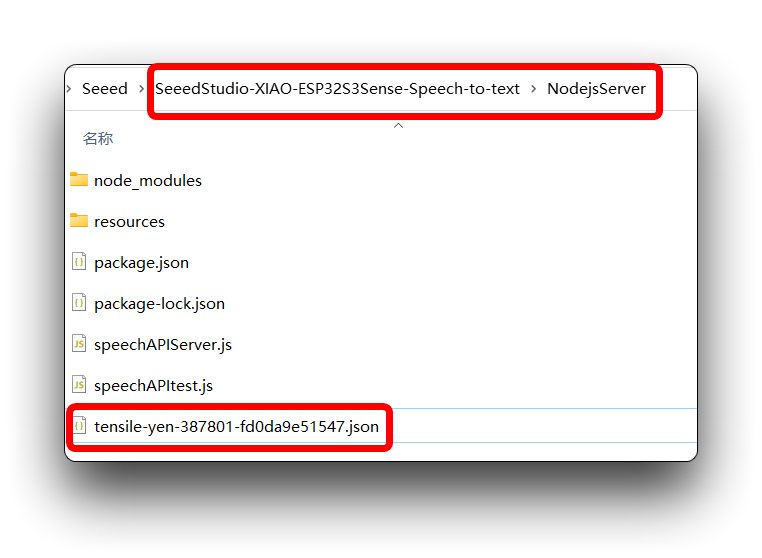
Mientras tanto, copia el archivo JSON que preparamos en el paso 5 a la carpeta NodejsServer; lo usaremos luego.
Paso 7. Configurar tu variable de entorno de autenticación
Para configurar GOOGLE_APPLICATION_CREDENTIALS, debes tener una cuenta de servicio asociada a tu proyecto y acceso a su clave JSON.
Proporciona credenciales a tu aplicación estableciendo la variable de entorno GOOGLE_APPLICATION_CREDENTIALS.
- Windows
- macOS o Linux
Para PowerShell:
$env:GOOGLE_APPLICATION_CREDENTIALS="KEY_PATH"
Sustituye KEY_PATH por la ruta del archivo JSON con tu clave.
Ejemplo:
$env:GOOGLE_APPLICATION_CREDENTIALS="C:\Users\username\Downloads\service-account-file.json"
Para el símbolo del sistema:
set GOOGLE_APPLICATION_CREDENTIALS=KEY_PATH
Sustituye KEY_PATH por la ruta del archivo JSON con tu clave.
export GOOGLE_APPLICATION_CREDENTIALS="KEY_PATH"
Sustituye KEY_PATH por la ruta del archivo JSON con tu clave.
Ejemplo:
export GOOGLE_APPLICATION_CREDENTIALS="/home/user/Downloads/service-account-file.json"
En el paso anterior, colocamos el JSON en la carpeta NodejsServer, así que puedes ir directamente a esa carpeta, clic derecho y Open in PowerShell para abrir la terminal de Windows.
Luego ejecuta:
$env:GOOGLE_APPLICATION_CREDENTIALS="tensile-yen-3xxxxx-fdxxxxxxxxxx.json"
Usa el nombre de tu archivo JSON al ejecutar el comando.
Si reiniciaste el PC o cerraste PowerShell, es posible que debas volver a configurar la variable de entorno.
Paso 8. Probar el despliegue local del servicio de Speech-to-Text
Con todo listo, podemos usar un audio grabado junto con un programa JSON para comprobar que el despliegue funciona y que la grabación se convierte en texto.
Abre una ventana de PowerShell en NodejsServer (dentro del proyecto).
Luego ejecuta este comando. Ejecutará speechAPItest.js y usará el archivo de audio en la carpeta resources como entrada para enviar a Google Cloud y devolver el texto reconocido.
node ./speechAPItest.js
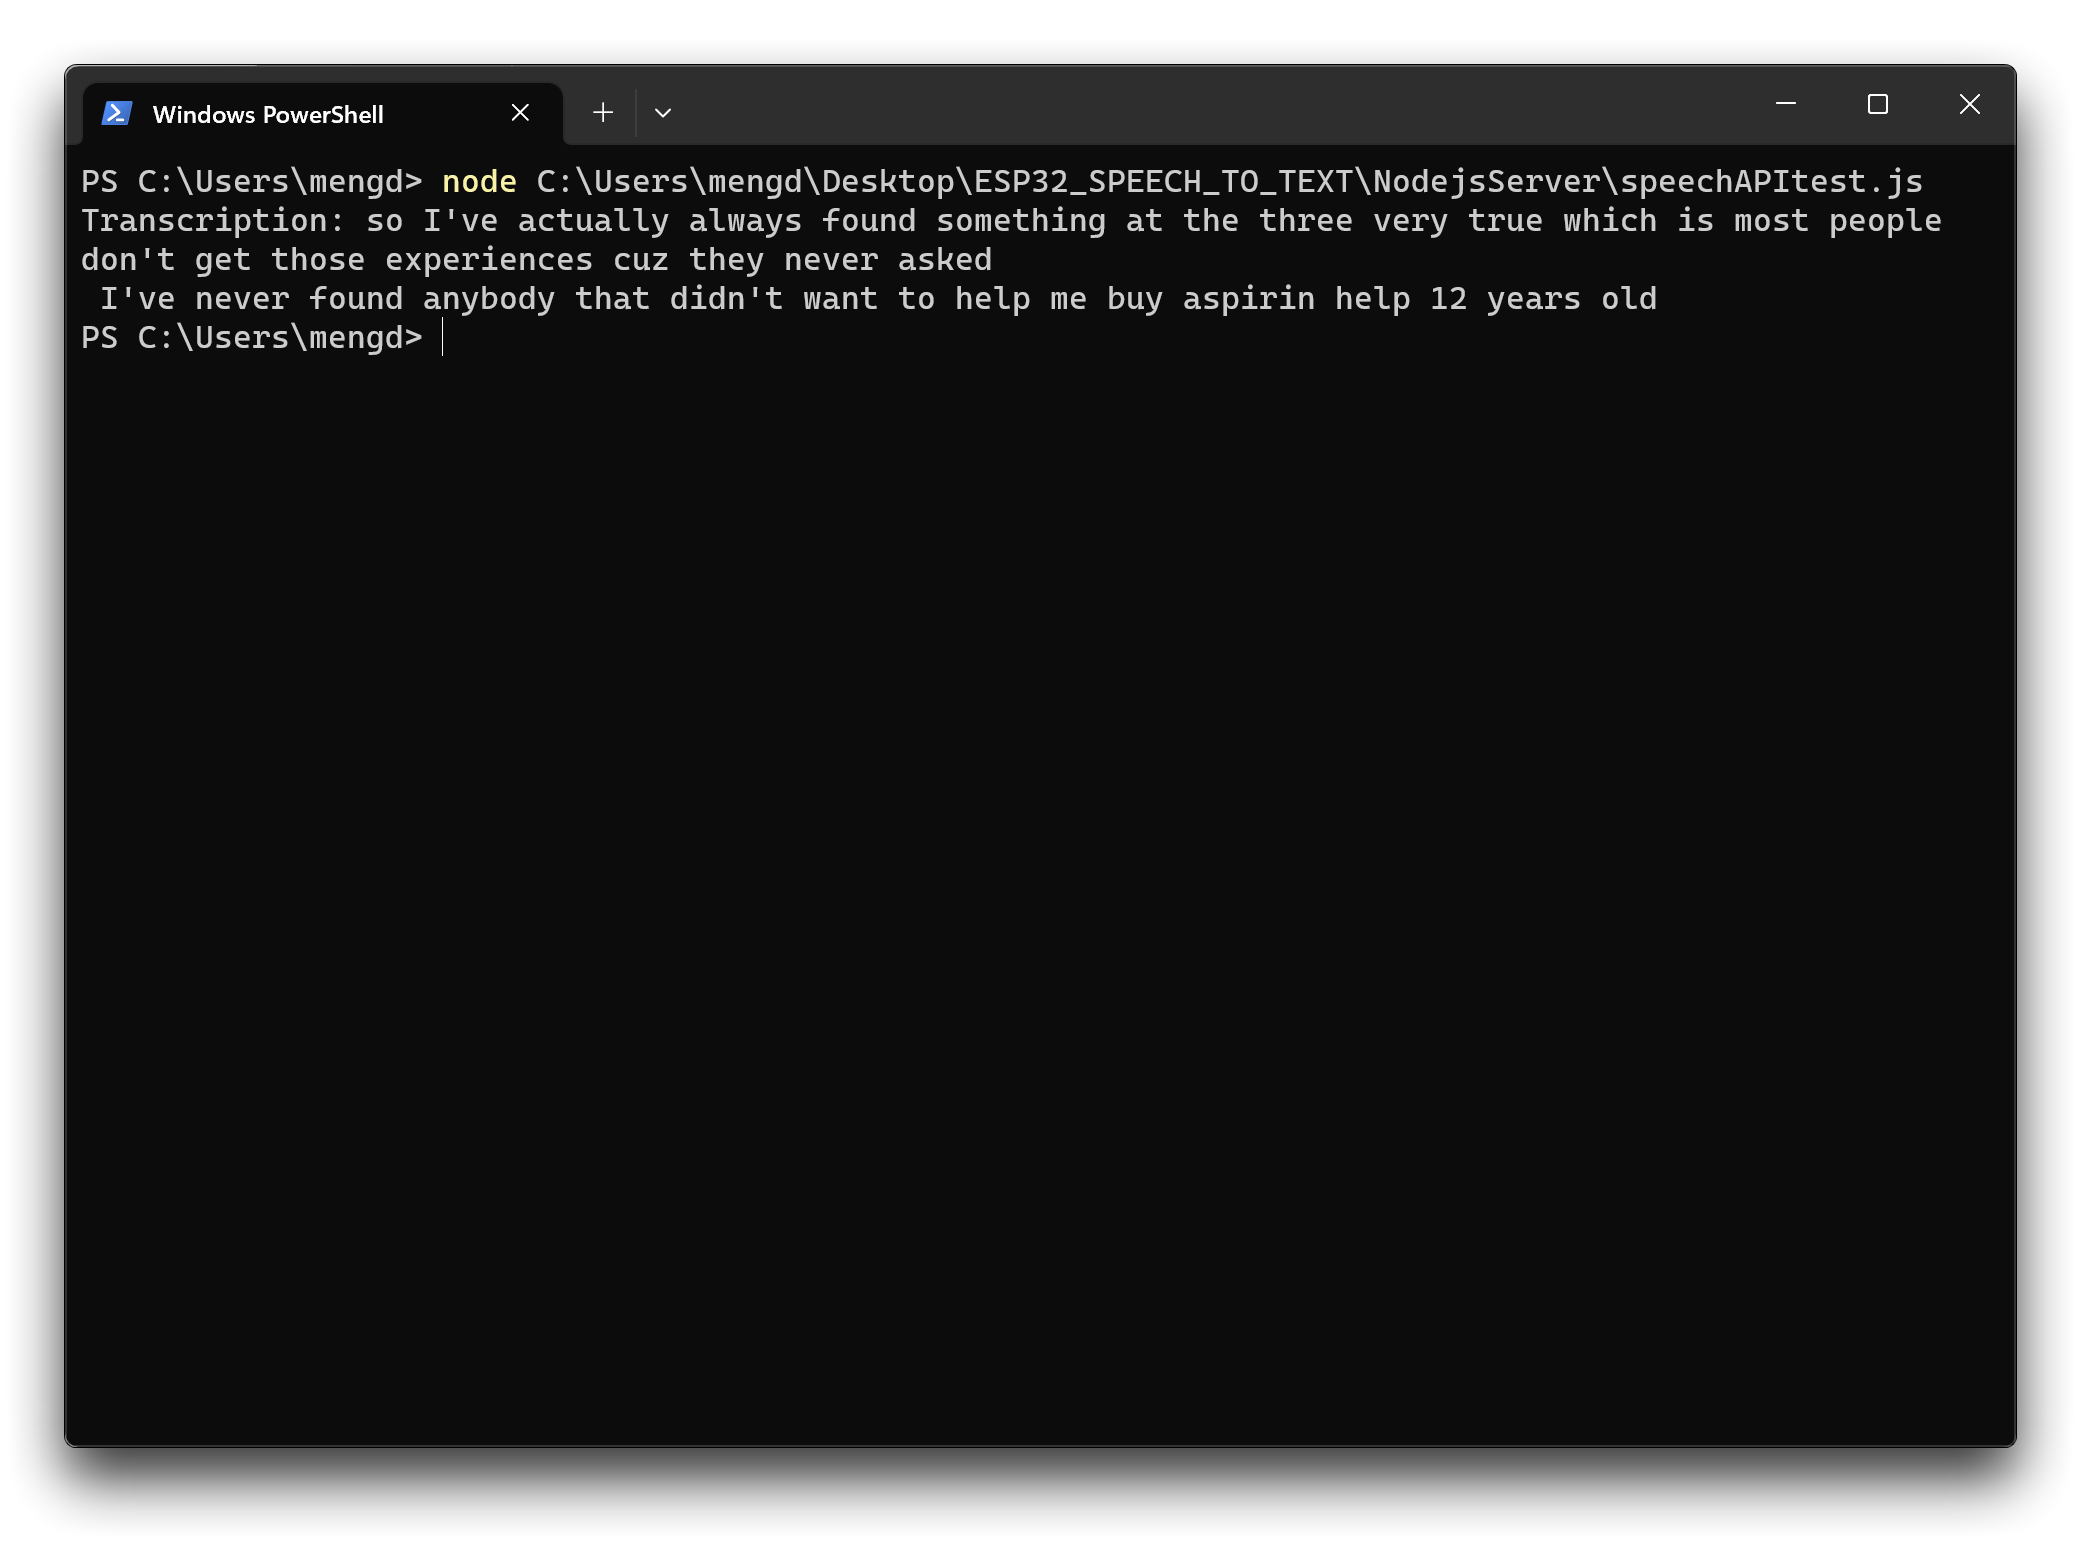
Si ves algo como lo de arriba, significa que desplegaste correctamente el servicio de Google Cloud en tu host local y puedes seguir al siguiente paso.
Si hay problemas, consulta las instrucciones oficiales de Google Cloud para verificar errores u omisiones.
Subir XIAO ESP32S3 archivos de sonido grabados de Sense a Google Cloud para reconocimiento
Ahora cambiaremos la ruta del archivo de audio cargado: de una carga local a una carga desde la grabación de la XIAO ESP32S3 Sense. Los archivos se guardan primero en la microSD y luego se transfieren a Google Cloud a través del puerto del host local.
Paso 9. Activar escucha de puerto para el servicio de reconocimiento de voz de Google Cloud
Del mismo modo, en la carpeta NodejsServer, usa PowerShell y ejecuta:
node ./speechAPIServer.js
Una vez ejecutado, el programa speechAPIServer.js escuchará continuamente localhost:8888. Cuando llegue un archivo a este puerto, se llamará al servicio de Google Cloud.
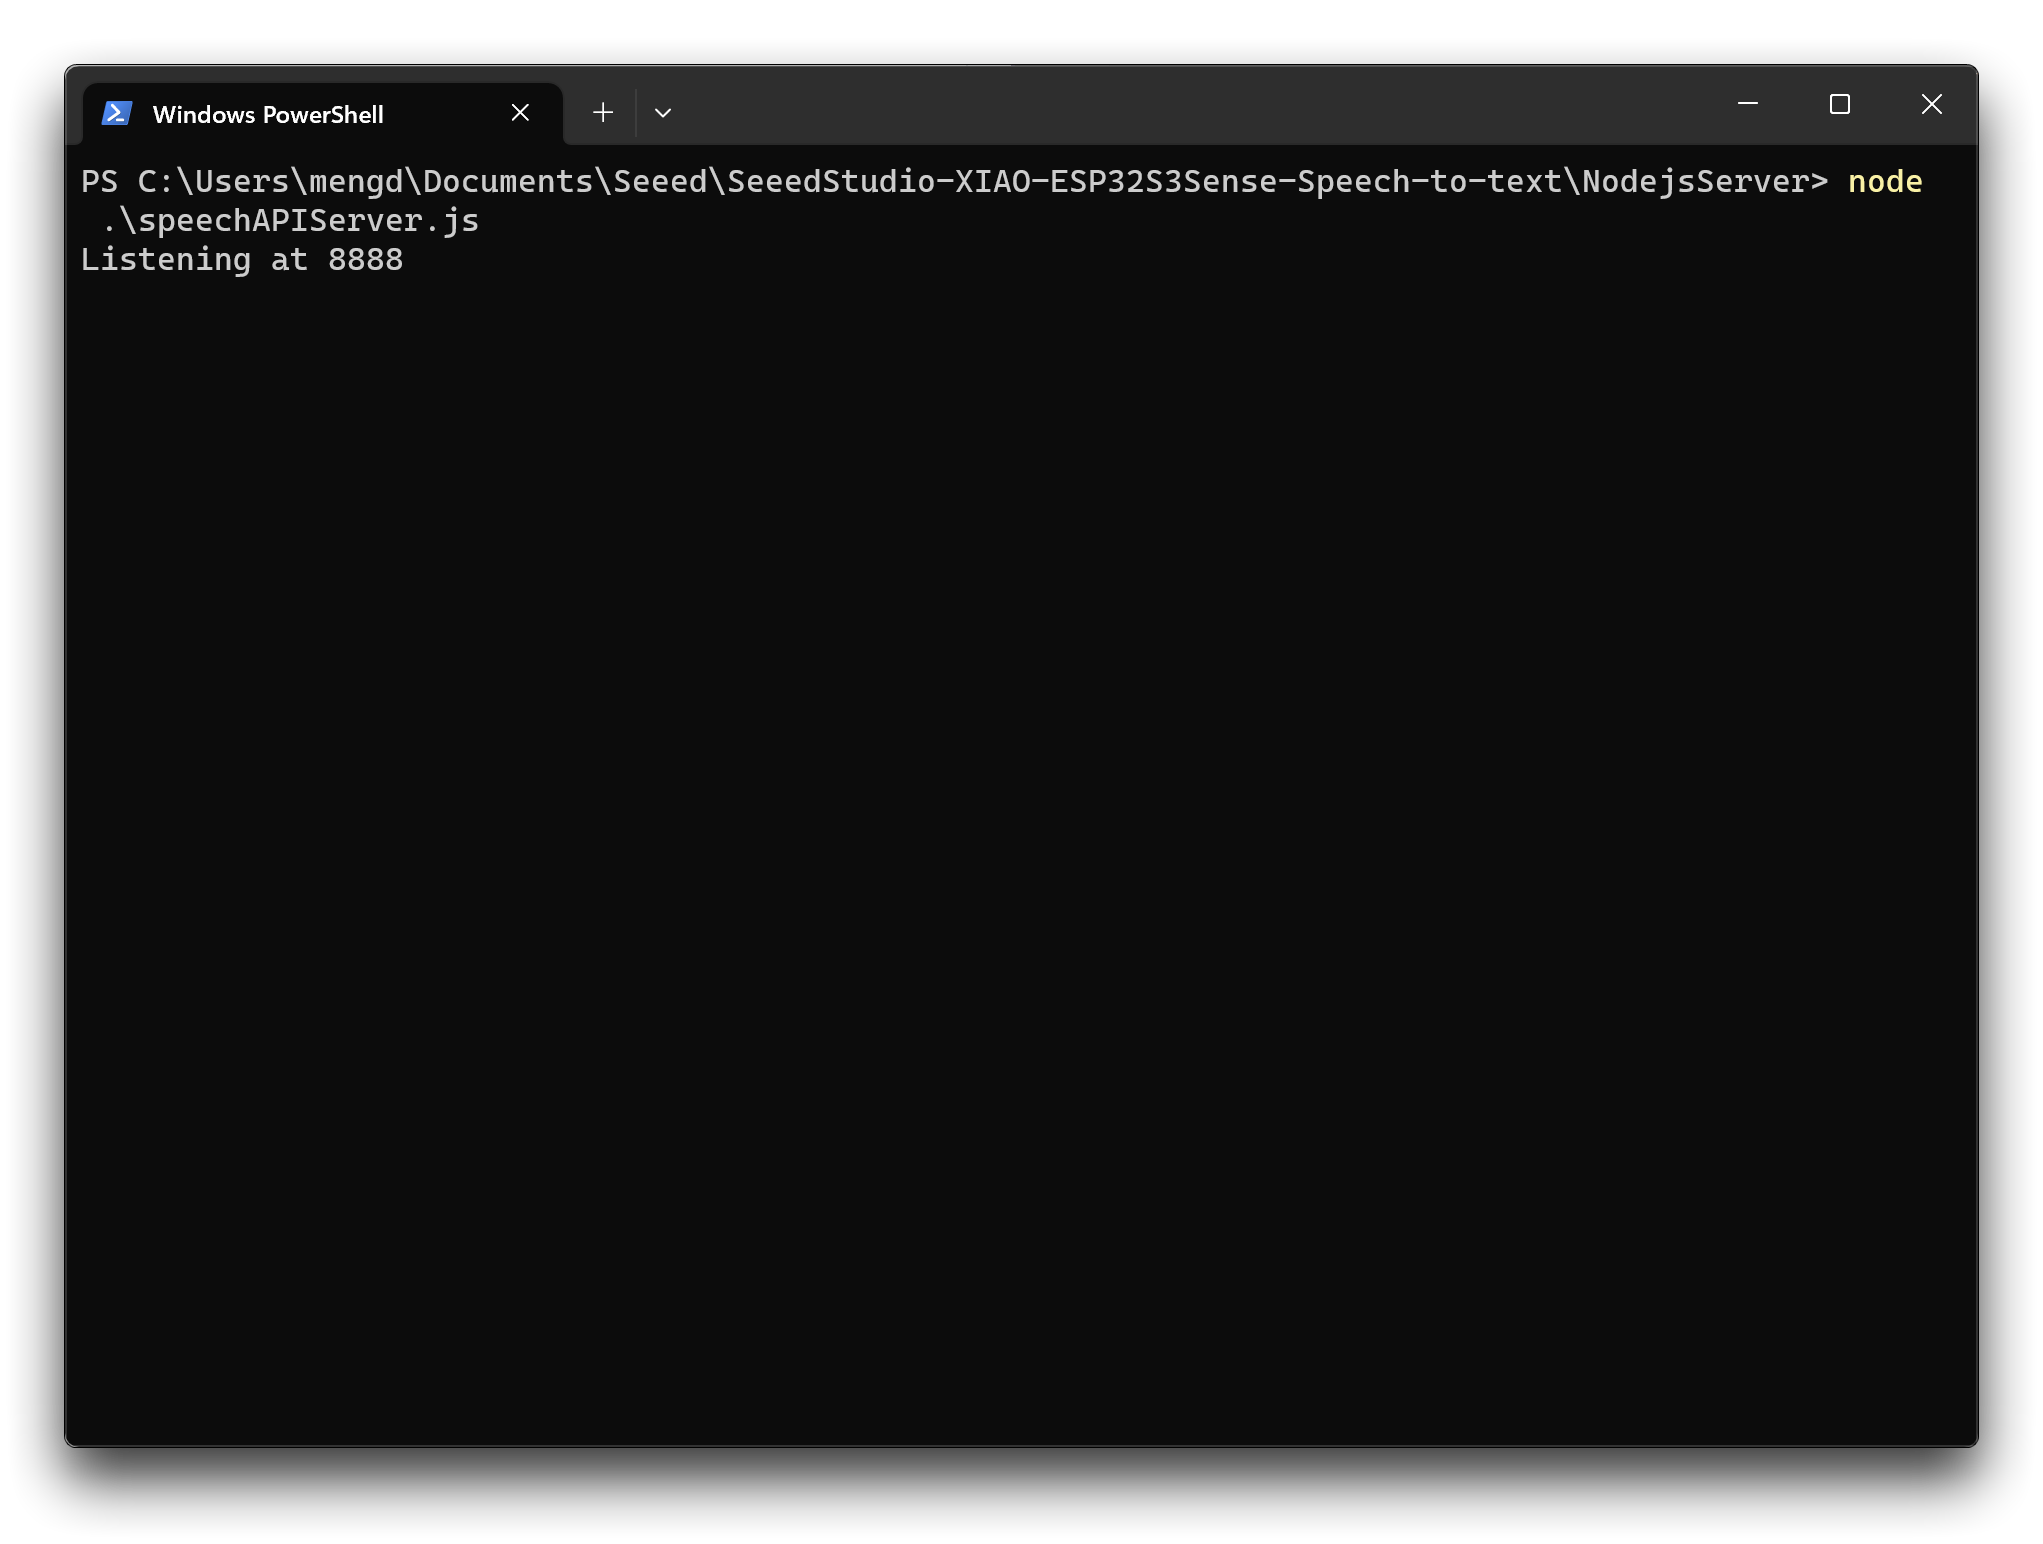
Déjalo abierto para mantener el servicio activo.
Paso 10. Comprobar la dirección IP del host
Como los archivos grabados por la XIAO deberán subir a Google Cloud a través del puerto del host, necesitamos conocer la IP de tu equipo.
- Windows
- macOS o Linux
Ejecuta en PowerShell:
ipcofig
Ejecuta en la shell:
ifconfig
Anota tu dirección IP; la usaremos luego.
Paso 11. Subir el programa a la XIAO ESP32S3 Sense
En la carpeta del proyecto XIAOESP32S3-RECORD-UPLOAD hemos preparado el programa para este ejemplo.
Si tu ESP32 es versión 2.0.x. Clic para ver el programa completo
#include <I2S.h>
#include <WiFi.h>
#include <HTTPClient.h>
#include "FS.h"
#include "SD.h"
#include "SPI.h"

//Variables to be used in the recording program, do not change for best
#define SAMPLE_RATE 16000U
#define SAMPLE_BITS 16
#define WAV_HEADER_SIZE 44
#define VOLUME_GAIN 2
#define RECORD_TIME 10      // seconds, The maximum value is 240

// Number of bytes required for the recording buffer
uint32_t record_size = (SAMPLE_RATE * SAMPLE_BITS / 8) * RECORD_TIME;

File file;
const char filename[] = "/recording.wav";

bool isWIFIConnected;

void setup() {
  // put your setup code here, to run once:
  Serial.begin(115200);
  while (!Serial) ;

  I2S.setAllPins(-1, 42, 41, -1, -1);

  //The transmission mode is PDM_MONO_MODE, which means that PDM (pulse density modulation) mono mode is used for transmission
  if (!I2S.begin(PDM_MONO_MODE, SAMPLE_RATE, SAMPLE_BITS)) {
    Serial.println("Failed to initialize I2S!");
    while (1) ;
  }

  if(!SD.begin(D2)){
    Serial.println("Failed to mount SD Card!");
    while (1) ;
  }

  xTaskCreate(i2s_adc, "i2s_adc", 1024 * 8, NULL, 1, NULL);
  delay(500);
  xTaskCreate(wifiConnect, "wifi_Connect", 4096, NULL, 0, NULL);
}

void loop() {
  // put your main code here, to run repeatedly:
}

void i2s_adc(void *arg)
{
  uint32_t sample_size = 0;

  //This variable will be used to point to the actual recording buffer
  uint8_t *rec_buffer = NULL;
  Serial.printf("Ready to start recording ...\n");

  File file = SD.open(filename, FILE_WRITE);

  // Write the header to the WAV file
  uint8_t wav_header[WAV_HEADER_SIZE];

  //Write the WAV file header information to the wav_header array
  generate_wav_header(wav_header, record_size, SAMPLE_RATE);

  //Call the file.write() function to write the data in the wav_header array to the newly created WAV file
  file.write(wav_header, WAV_HEADER_SIZE);

  // This code uses the ESP32's PSRAM (external cache memory) to dynamically allocate a section of memory to store the recording data.
  rec_buffer = (uint8_t *)ps_malloc(record_size);
  if (rec_buffer == NULL) {
    Serial.printf("malloc failed!\n");
    while(1) ;
  }
  Serial.printf("Buffer: %d bytes\n", ESP.getPsramSize() - ESP.getFreePsram());

  // Start recording
  // I2S port number (in this case I2S_NUM_0),
  // a pointer to the buffer to which the data is to be written (i.e. rec_buffer),
  // the size of the data to be read (i.e. record_size),
  // a pointer to a variable that points to the actual size of the data being read (i.e. &sample_size),
  // and the maximum time to wait for the data to be read (in this case portMAX_DELAY, indicating an infinite wait time).
  esp_i2s::i2s_read(esp_i2s::I2S_NUM_0, rec_buffer, record_size, &sample_size, portMAX_DELAY);
  if (sample_size == 0) {
    Serial.printf("Record Failed!\n");
  } else {
    Serial.printf("Record %d bytes\n", sample_size);
  }

  // Increase volume
  for (uint32_t i = 0; i < sample_size; i += SAMPLE_BITS/8) {
    (*(uint16_t *)(rec_buffer+i)) <<= VOLUME_GAIN;
  }

  // Write data to the WAV file
  Serial.printf("Writing to the file ...\n");
  if (file.write(rec_buffer, record_size) != record_size)
    Serial.printf("Write file Failed!\n");

  free(rec_buffer);
  rec_buffer = NULL;
  file.close();
  Serial.printf("The recording is over.\n");

  listDir(SD, "/", 0);

  if(isWIFIConnected){
    uploadFile();
  }

  vTaskDelete(NULL);
}


void generate_wav_header(uint8_t *wav_header, uint32_t wav_size, uint32_t sample_rate)
{
  // See this for reference: http://soundfile.sapp.org/doc/WaveFormat/
  uint32_t file_size = wav_size + WAV_HEADER_SIZE - 8;
  uint32_t byte_rate = SAMPLE_RATE * SAMPLE_BITS / 8;
  const uint8_t set_wav_header[] = {
    'R', 'I', 'F', 'F', // ChunkID
    file_size, file_size >> 8, file_size >> 16, file_size >> 24, // ChunkSize
    'W', 'A', 'V', 'E', // Format
    'f', 'm', 't', ' ', // Subchunk1ID
    0x10, 0x00, 0x00, 0x00, // Subchunk1Size (16 for PCM)
    0x01, 0x00, // AudioFormat (1 for PCM)
    0x01, 0x00, // NumChannels (1 channel)
    sample_rate, sample_rate >> 8, sample_rate >> 16, sample_rate >> 24, // SampleRate
    byte_rate, byte_rate >> 8, byte_rate >> 16, byte_rate >> 24, // ByteRate
    0x02, 0x00, // BlockAlign
    0x10, 0x00, // BitsPerSample (16 bits)
    'd', 'a', 't', 'a', // Subchunk2ID
    wav_size, wav_size >> 8, wav_size >> 16, wav_size >> 24, // Subchunk2Size
  };
  memcpy(wav_header, set_wav_header, sizeof(set_wav_header));
}


void listDir(fs::FS &fs, const char * dirname, uint8_t levels){
    Serial.printf("Listing directory: %s\n", dirname);

    File root = fs.open(dirname);
    if(!root){
        Serial.println("Failed to open directory");
        return;
    }
    if(!root.isDirectory()){
        Serial.println("Not a directory");
        return;
    }

    File file = root.openNextFile();
    while(file){
        if(file.isDirectory()){
            Serial.print("  DIR : ");
            Serial.println(file.name());
            if(levels){
                listDir(fs, file.path(), levels -1);
            }
        } else {
            Serial.print("  FILE: ");
            Serial.print(file.name());
            Serial.print("  SIZE: ");
            Serial.println(file.size());
        }
        file = root.openNextFile();
    }
}

void wifiConnect(void *pvParameters){
  isWIFIConnected = false;
  char* ssid = "wifi-ssid";
  char* password = "wifi-password";
  Serial.print("Try to connect to ");
  Serial.println(ssid);
  WiFi.begin(ssid, password);
  while(WiFi.status() != WL_CONNECTED){
    vTaskDelay(500);
    Serial.print(".");
  }
  Serial.println("Wi-Fi Connected!");
  isWIFIConnected = true;
  while(true){
    vTaskDelay(1000);
  }
}

void uploadFile(){
  file = SD.open(filename, FILE_READ);
  if(!file){
    Serial.println("FILE IS NOT AVAILABLE!");
    return;
  }

  Serial.println("===> Upload FILE to Node.js Server");

  HTTPClient client;
  client.begin("http://192.168.1.208:8888/uploadAudio");
  client.addHeader("Content-Type", "audio/wav");
  int httpResponseCode = client.sendRequest("POST", &file, file.size());
  Serial.print("httpResponseCode : ");
  Serial.println(httpResponseCode);

  if(httpResponseCode == 200){
    String response = client.getString();
    Serial.println("==================== Transcription ====================");
    Serial.println(response);
    Serial.println("====================      End      ====================");
  }else{
    Serial.println("Error");
  }
  file.close();
  client.end();
}
Si tu ESP32 es versión 3.0.x. Clic para ver el programa completo
#include <ESP_I2S.h>
#include <WiFi.h>
#include <HTTPClient.h>
#include "FS.h"
#include "SD.h"
#include "SPI.h"

//Variables to be used in the recording program, do not change for best
#define SAMPLE_RATE 16000U
#define SAMPLE_BITS 16
#define WAV_HEADER_SIZE 44
#define VOLUME_GAIN 2
#define RECORD_TIME 10      // seconds, The maximum value is 240

//define I2S
I2SClass I2S;

// Number of bytes required for the recording buffer
uint32_t record_size = (SAMPLE_RATE * SAMPLE_BITS / 8) * RECORD_TIME;

File file;
const char filename[] = "/recording.wav";

bool isWIFIConnected;

void setup() {
  // put your setup code here, to run once:
  Serial.begin(115200);
  while (!Serial) ;

  // setup 42 PDM clock and 41 PDM data pins
  I2S.setPinsPdmRx(42, 41);

  //The transmission mode is PDM_MONO_MODE, which means that PDM (pulse density modulation) mono mode is used for transmission
  if (!I2S.begin(I2S_MODE_PDM_RX, 16000, I2S_DATA_BIT_WIDTH_16BIT, I2S_SLOT_MODE_MONO)) {
    Serial.println("Failed to initialize I2S!");
    while (1) ;
  }

  if(!SD.begin(D2)){
    Serial.println("Failed to mount SD Card!");
    while (1) ;
  }

  xTaskCreate(i2s_adc, "i2s_adc", 1024 * 8, NULL, 1, NULL);
  delay(500);
  xTaskCreate(wifiConnect, "wifi_Connect", 4096, NULL, 0, NULL);
}

void loop() {
  // put your main code here, to run repeatedly:
}

void i2s_adc(void *arg)
{
  uint32_t sample_size = 0;

  //This variable will be used to point to the actual recording buffer
  uint8_t *rec_buffer = NULL;
  Serial.printf("Ready to start recording ...\n");

  File file = SD.open(filename, FILE_WRITE);

  // Write the header to the WAV file
  uint8_t wav_header[WAV_HEADER_SIZE];

  //Write the WAV file header information to the wav_header array
  generate_wav_header(wav_header, record_size, SAMPLE_RATE);

  //Call the file.write() function to write the data in the wav_header array to the newly created WAV file
  file.write(wav_header, WAV_HEADER_SIZE);

  // This code uses the ESP32's PSRAM (external cache memory) to dynamically allocate a section of memory to store the recording data.
  rec_buffer = (uint8_t *)ps_malloc(record_size);
  if (rec_buffer == NULL) {
    Serial.printf("malloc failed!\n");
    while(1) ;
  }
  Serial.printf("Buffer: %d bytes\n", ESP.getPsramSize() - ESP.getFreePsram());

  // Start recording
  // I2S port number (in this case I2S_NUM_0),
  // a pointer to the buffer to which the data is to be written (i.e. rec_buffer),
  // the size of the data to be read (i.e. record_size),
  // a pointer to a variable that points to the actual size of the data being read (i.e. &sample_size),
  // and the maximum time to wait for the data to be read (in this case portMAX_DELAY, indicating an infinite wait time).
  esp_i2s::i2s_read(esp_i2s::I2S_NUM_0, rec_buffer, record_size, &sample_size, portMAX_DELAY);
  if (sample_size == 0) {
    Serial.printf("Record Failed!\n");
  } else {
    Serial.printf("Record %d bytes\n", sample_size);
  }

  // Increase volume
  for (uint32_t i = 0; i < sample_size; i += SAMPLE_BITS/8) {
    (*(uint16_t *)(rec_buffer+i)) <<= VOLUME_GAIN;
  }

  // Write data to the WAV file
  Serial.printf("Writing to the file ...\n");
  if (file.write(rec_buffer, record_size) != record_size)
    Serial.printf("Write file Failed!\n");

  free(rec_buffer);
  rec_buffer = NULL;
  file.close();
  Serial.printf("The recording is over.\n");

  listDir(SD, "/", 0);

  if(isWIFIConnected){
    uploadFile();
  }

  vTaskDelete(NULL);
}


void generate_wav_header(uint8_t *wav_header, uint32_t wav_size, uint32_t sample_rate)
{
  // See this for reference: http://soundfile.sapp.org/doc/WaveFormat/
  uint32_t file_size = wav_size + WAV_HEADER_SIZE - 8;
  uint32_t byte_rate = SAMPLE_RATE * SAMPLE_BITS / 8;
  const uint8_t set_wav_header[] = {
    'R', 'I', 'F', 'F', // ChunkID
    file_size, file_size >> 8, file_size >> 16, file_size >> 24, // ChunkSize
    'W', 'A', 'V', 'E', // Format
    'f', 'm', 't', ' ', // Subchunk1ID
    0x10, 0x00, 0x00, 0x00, // Subchunk1Size (16 for PCM)
    0x01, 0x00, // AudioFormat (1 for PCM)
    0x01, 0x00, // NumChannels (1 channel)
    sample_rate, sample_rate >> 8, sample_rate >> 16, sample_rate >> 24, // SampleRate
    byte_rate, byte_rate >> 8, byte_rate >> 16, byte_rate >> 24, // ByteRate
    0x02, 0x00, // BlockAlign
    0x10, 0x00, // BitsPerSample (16 bits)
    'd', 'a', 't', 'a', // Subchunk2ID
    wav_size, wav_size >> 8, wav_size >> 16, wav_size >> 24, // Subchunk2Size
  };
  memcpy(wav_header, set_wav_header, sizeof(set_wav_header));
}


void listDir(fs::FS &fs, const char * dirname, uint8_t levels){
    Serial.printf("Listing directory: %s\n", dirname);

    File root = fs.open(dirname);
    if(!root){
        Serial.println("Failed to open directory");
        return;
    }
    if(!root.isDirectory()){
        Serial.println("Not a directory");
        return;
    }

    File file = root.openNextFile();
    while(file){
        if(file.isDirectory()){
            Serial.print("  DIR : ");
            Serial.println(file.name());
            if(levels){
                listDir(fs, file.path(), levels -1);
            }
        } else {
            Serial.print("  FILE: ");
            Serial.print(file.name());
            Serial.print("  SIZE: ");
            Serial.println(file.size());
        }
        file = root.openNextFile();
    }
}

void wifiConnect(void *pvParameters){
  isWIFIConnected = false;
  char* ssid = "wifi-ssid";
  char* password = "wifi-password";
  Serial.print("Try to connect to ");
  Serial.println(ssid);
  WiFi.begin(ssid, password);
  while(WiFi.status() != WL_CONNECTED){
    vTaskDelay(500);
    Serial.print(".");
  }
  Serial.println("Wi-Fi Connected!");
  isWIFIConnected = true;
  while(true){
    vTaskDelay(1000);
  }
}

void uploadFile(){
  file = SD.open(filename, FILE_READ);
  if(!file){
    Serial.println("FILE IS NOT AVAILABLE!");
    return;
  }

  Serial.println("===> Upload FILE to Node.js Server");

  HTTPClient client;
  client.begin("http://192.168.1.208:8888/uploadAudio");
  client.addHeader("Content-Type", "audio/wav");
  int httpResponseCode = client.sendRequest("POST", &file, file.size());
  Serial.print("httpResponseCode : ");
  Serial.println(httpResponseCode);

  if(httpResponseCode == 200){
    String response = client.getString();
    Serial.println("==================== Transcription ====================");
    Serial.println(response);
    Serial.println("====================      End      ====================");
  }else{
    Serial.println("Error");
  }
  file.close();
  client.end();
}
Antes de compilar y subir, debes ajustar lo siguiente a tu entorno:
- Tiempo de grabación – En la línea 13 el valor por defecto es 10 s; puedes ajustarlo (máximo 240 s).
- Nombre del archivo grabado – En la línea 19 puedes cambiar el nombre del archivo.
- Nombre de la red WiFi – Cambia en la línea 172 al SSID de la LAN donde desplegaste Google Cloud Services.
- Contraseña WiFi – En la línea 173.
- Dirección IP del host – En la línea 198 cambia la IP por la de tu host y mantén el puerto 8888.
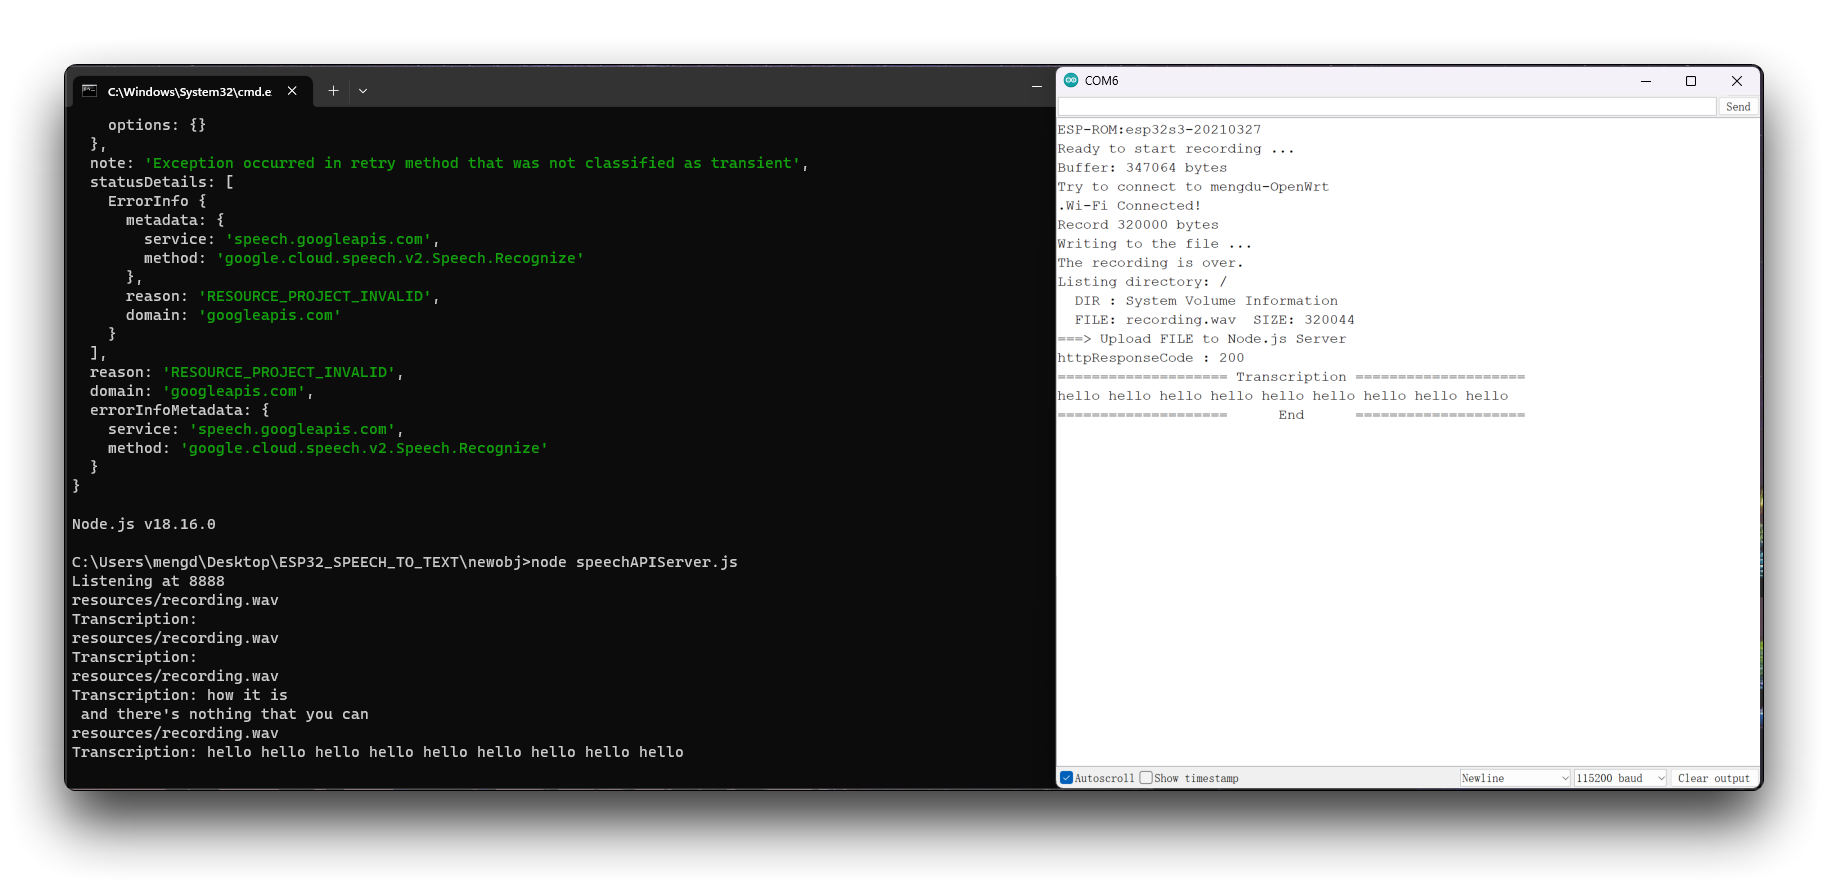
Una vez subido el programa, abre el monitor serie y prepárate para grabar. Tras los 10 s, Google Cloud analizará el archivo y devolverá el resultado.
Implementar ChatGPT en XIAO ESP32S3 Sense
A continuación, aumentamos la dificultad: añadimos llamadas a ChatGPT en el código.
Paso 12. Preguntar a ChatGPT usando el texto reconocido
En la carpeta XIAOESP32S3-SPEECH-TO-CHATGPT tienes el programa de este ejemplo.
Si tu ESP32 es versión 2.0.x. Clic para ver el programa completo
#include <I2S.h>
#include <WiFi.h>
#include <HTTPClient.h>
#include <WiFiClientSecure.h>
#include <ArduinoJson.h>
#include <ChatGPT.hpp>
#include "FS.h"
#include "SD.h"
#include "SPI.h"

// Variables to be used in the recording program, do not change for best
#define SAMPLE_RATE 16000U
#define SAMPLE_BITS 16
#define WAV_HEADER_SIZE 44
#define VOLUME_GAIN 2
#define RECORD_TIME 5  // seconds, The maximum value is 240

const char* ssid = "wifi-ssid";
const char* password = "wifi-password";


// Number of bytes required for the recording buffer
uint32_t record_size = (SAMPLE_RATE * SAMPLE_BITS / 8) * RECORD_TIME;

File file;
const char filename[] = "/recording.wav";
bool isWIFIConnected;

String chatgpt_Q;

TaskHandle_t chatgpt_handle;
WiFiClientSecure client;
ChatGPT<WiFiClientSecure> chat_gpt(&client, "v1", "OpenAI-TOKEN");

//*****************************************Arduino Base******************************************//

void setup() {
  // put your setup code here, to run once:
  Serial.begin(115200);
  while (!Serial) ;

  I2S.setAllPins(-1, 42, 41, -1, -1);

  // The transmission mode is PDM_MONO_MODE, which means that PDM (pulse density modulation) mono mode is used for transmission
  if (!I2S.begin(PDM_MONO_MODE, SAMPLE_RATE, SAMPLE_BITS)) {
    Serial.println("Failed to initialize I2S!");
    while (1) ;
  }

  if(!SD.begin(D2)){
    Serial.println("Failed to mount SD Card!");
    while (1) ;
  }

  xTaskCreate(wifiConnect, "wifi_Connect", 4096, NULL, 0, NULL);
  delay(500);
  xTaskCreate(i2s_adc, "i2s_adc", 1024 * 8, NULL, 1, NULL);
  xTaskCreate(chatgpt, "chatgpt", 1024 * 8, NULL, 2, &chatgpt_handle);
}

void loop() {
  // put your main code here, to run repeatedly:
}

//*****************************************RTOS TASK******************************************//

void i2s_adc(void *arg)
{
  while(1){
    uint32_t sample_size = 0;

    // This variable will be used to point to the actual recording buffer
    uint8_t *rec_buffer = NULL;
    Serial.printf("Ready to start recording ...\n");

    File file = SD.open(filename, FILE_WRITE);

    // Write the header to the WAV file
    uint8_t wav_header[WAV_HEADER_SIZE];

    // Write the WAV file header information to the wav_header array
    generate_wav_header(wav_header, record_size, SAMPLE_RATE);

    // Call the file.write() function to write the data in the wav_header array to the newly created WAV file
    file.write(wav_header, WAV_HEADER_SIZE);

    // This code uses the ESP32's PSRAM (external cache memory) to dynamically allocate a section of memory to store the recording data
    rec_buffer = (uint8_t *)ps_malloc(record_size);
    if (rec_buffer == NULL) {
      Serial.printf("malloc failed!\n");
      while(1) ;
    }
    Serial.printf("Buffer: %d bytes\n", ESP.getPsramSize() - ESP.getFreePsram());

    // Start recording
    // I2S port number (in this case I2S_NUM_0),
    // a pointer to the buffer to which the data is to be written (i.e. rec_buffer),
    // the size of the data to be read (i.e. record_size),
    // a pointer to a variable that points to the actual size of the data being read (i.e. &sample_size),
    // and the maximum time to wait for the data to be read (in this case portMAX_DELAY, indicating an infinite wait time).
    esp_i2s::i2s_read(esp_i2s::I2S_NUM_0, rec_buffer, record_size, &sample_size, portMAX_DELAY);
    if (sample_size == 0) {
      Serial.printf("Record Failed!\n");
    } else {
      Serial.printf("Record %d bytes\n", sample_size);
    }

    // Increase volume
    for (uint32_t i = 0; i < sample_size; i += SAMPLE_BITS/8) {
      (*(uint16_t *)(rec_buffer+i)) <<= VOLUME_GAIN;
    }

    // Write data to the WAV file
    Serial.printf("Writing to the file ...\n");
    if (file.write(rec_buffer, record_size) != record_size)
      Serial.printf("Write file Failed!\n");

    free(rec_buffer);
    rec_buffer = NULL;
    file.close();
    Serial.printf("The recording is over.\n");

    listDir(SD, "/", 0);

    bool uploadStatus = false;

    if(isWIFIConnected){
      uploadStatus = uploadFile();
    }

    if(uploadStatus)
      xTaskNotifyGive(chatgpt_handle);
    vTaskDelay(10000);       // Each recording is spaced 10s apart
  }
//  vTaskDelete(NULL);
}

void wifiConnect(void *pvParameters){
  isWIFIConnected = false;
  Serial.print("Try to connect to ");
  Serial.println(ssid);
  WiFi.begin(ssid, password);
  while(WiFi.status() != WL_CONNECTED){
    vTaskDelay(500);
    Serial.print(".");
  }
  Serial.println("Wi-Fi Connected!");
  isWIFIConnected = true;
  // Ignore SSL certificate validation
  client.setInsecure();
  while(true){
    vTaskDelay(1000);
  }
}

void chatgpt(void *pvParameters){
  while(1){
    // Waiting for notification signal from Task 1
    ulTaskNotifyTake(pdTRUE, portMAX_DELAY);

    String result;
    if (chat_gpt.simple_message("gpt-3.5-turbo-0301", "user", chatgpt_Q, result)) {
      Serial.println("===OK===");
      Serial.println(result);
    } else {
      Serial.println("===ERROR===");
      Serial.println(result);
    }

  }
}

//*****************************************Audio Process******************************************//

void generate_wav_header(uint8_t *wav_header, uint32_t wav_size, uint32_t sample_rate)
{
  // See this for reference: http://soundfile.sapp.org/doc/WaveFormat/
  uint32_t file_size = wav_size + WAV_HEADER_SIZE - 8;
  uint32_t byte_rate = SAMPLE_RATE * SAMPLE_BITS / 8;
  const uint8_t set_wav_header[] = {
    'R', 'I', 'F', 'F', // ChunkID
    file_size, file_size >> 8, file_size >> 16, file_size >> 24, // ChunkSize
    'W', 'A', 'V', 'E', // Format
    'f', 'm', 't', ' ', // Subchunk1ID
    0x10, 0x00, 0x00, 0x00, // Subchunk1Size (16 for PCM)
    0x01, 0x00, // AudioFormat (1 for PCM)
    0x01, 0x00, // NumChannels (1 channel)
    sample_rate, sample_rate >> 8, sample_rate >> 16, sample_rate >> 24, // SampleRate
    byte_rate, byte_rate >> 8, byte_rate >> 16, byte_rate >> 24, // ByteRate
    0x02, 0x00, // BlockAlign
    0x10, 0x00, // BitsPerSample (16 bits)
    'd', 'a', 't', 'a', // Subchunk2ID
    wav_size, wav_size >> 8, wav_size >> 16, wav_size >> 24, // Subchunk2Size
  };
  memcpy(wav_header, set_wav_header, sizeof(set_wav_header));
}

//*****************************************File Process******************************************//

void listDir(fs::FS &fs, const char * dirname, uint8_t levels){
    Serial.printf("Listing directory: %s\n", dirname);

    File root = fs.open(dirname);
    if(!root){
        Serial.println("Failed to open directory");
        return;
    }
    if(!root.isDirectory()){
        Serial.println("Not a directory");
        return;
    }

    File file = root.openNextFile();
    while(file){
        if(file.isDirectory()){
            Serial.print("  DIR : ");
            Serial.println(file.name());
            if(levels){
                listDir(fs, file.path(), levels -1);
            }
        } else {
            Serial.print("  FILE: ");
            Serial.print(file.name());
            Serial.print("  SIZE: ");
            Serial.println(file.size());
        }
        file = root.openNextFile();
    }
}

bool uploadFile(){
  file = SD.open(filename, FILE_READ);
  if(!file){
    Serial.println("FILE IS NOT AVAILABLE!");
    return false;
  }

  Serial.println("===> Upload FILE to Node.js Server");

  HTTPClient client;
  client.begin("http://192.168.1.208:8888/uploadAudio");
  client.addHeader("Content-Type", "audio/wav");
  int httpResponseCode = client.sendRequest("POST", &file, file.size());
  Serial.print("httpResponseCode : ");
  Serial.println(httpResponseCode);

  if(httpResponseCode == 200){
    String response = client.getString();
    Serial.println("==================== Transcription ====================");
    Serial.println(response);
    chatgpt_Q = response;
    Serial.println("====================      End      ====================");
    file.close();
    client.end();
    return true;
  }else{
    Serial.println("Error");
    return false;
  }

}
Si tu ESP32 es versión 3.0.x. Clic para ver el programa completo
#include <ESP_I2S.h>
#include <WiFi.h>
#include <HTTPClient.h>
#include <WiFiClientSecure.h>
#include <ArduinoJson.h>
#include <ChatGPT.hpp>
#include "FS.h"
#include "SD.h"
#include "SPI.h"

// Variables to be used in the recording program, do not change for best
#define SAMPLE_RATE 16000U
#define SAMPLE_BITS 16
#define WAV_HEADER_SIZE 44
#define VOLUME_GAIN 2
#define RECORD_TIME 5  // seconds, The maximum value is 240

const char* ssid = "wifi-ssid";
const char* password = "wifi-password";

//define I2S
I2SClass I2S;


// Number of bytes required for the recording buffer
uint32_t record_size = (SAMPLE_RATE * SAMPLE_BITS / 8) * RECORD_TIME;

File file;
const char filename[] = "/recording.wav";
bool isWIFIConnected;

String chatgpt_Q;

TaskHandle_t chatgpt_handle;
WiFiClientSecure client;
ChatGPT<WiFiClientSecure> chat_gpt(&client, "v1", "OpenAI-TOKEN");

//*****************************************Arduino Base******************************************//

void setup() {
  // put your setup code here, to run once:
  Serial.begin(115200);
  while (!Serial) ;

  // setup 42 PDM clock and 41 PDM data pins
  I2S.setPinsPdmRx(42, 41);

  // The transmission mode is PDM_MONO_MODE, which means that PDM (pulse density modulation) mono mode is used for transmission
  if (!I2S.begin(I2S_MODE_PDM_RX, 16000, I2S_DATA_BIT_WIDTH_16BIT, I2S_SLOT_MODE_MONO)) {
    Serial.println("Failed to initialize I2S!");
    while (1) ;
  }

  if(!SD.begin(D2)){
    Serial.println("Failed to mount SD Card!");
    while (1) ;
  }

  xTaskCreate(wifiConnect, "wifi_Connect", 4096, NULL, 0, NULL);
  delay(500);
  xTaskCreate(i2s_adc, "i2s_adc", 1024 * 8, NULL, 1, NULL);
  xTaskCreate(chatgpt, "chatgpt", 1024 * 8, NULL, 2, &chatgpt_handle);
}

void loop() {
  // put your main code here, to run repeatedly:
}

//*****************************************RTOS TASK******************************************//

void i2s_adc(void *arg)
{
  while(1){
    uint32_t sample_size = 0;

    // This variable will be used to point to the actual recording buffer
    uint8_t *rec_buffer = NULL;
    Serial.printf("Ready to start recording ...\n");

    File file = SD.open(filename, FILE_WRITE);

    // Write the header to the WAV file
    uint8_t wav_header[WAV_HEADER_SIZE];

    // Write the WAV file header information to the wav_header array
    generate_wav_header(wav_header, record_size, SAMPLE_RATE);

    // Call the file.write() function to write the data in the wav_header array to the newly created WAV file
    file.write(wav_header, WAV_HEADER_SIZE);

    // This code uses the ESP32's PSRAM (external cache memory) to dynamically allocate a section of memory to store the recording data
    rec_buffer = (uint8_t *)ps_malloc(record_size);
    if (rec_buffer == NULL) {
      Serial.printf("malloc failed!\n");
      while(1) ;
    }
    Serial.printf("Buffer: %d bytes\n", ESP.getPsramSize() - ESP.getFreePsram());

    // Start recording
    // I2S port number (in this case I2S_NUM_0),
    // a pointer to the buffer to which the data is to be written (i.e. rec_buffer),
    // the size of the data to be read (i.e. record_size),
    // a pointer to a variable that points to the actual size of the data being read (i.e. &sample_size),
    // and the maximum time to wait for the data to be read (in this case portMAX_DELAY, indicating an infinite wait time).
    esp_i2s::i2s_read(esp_i2s::I2S_NUM_0, rec_buffer, record_size, &sample_size, portMAX_DELAY);
    if (sample_size == 0) {
      Serial.printf("Record Failed!\n");
    } else {
      Serial.printf("Record %d bytes\n", sample_size);
    }

    // Increase volume
    for (uint32_t i = 0; i < sample_size; i += SAMPLE_BITS/8) {
      (*(uint16_t *)(rec_buffer+i)) <<= VOLUME_GAIN;
    }

    // Write data to the WAV file
    Serial.printf("Writing to the file ...\n");
    if (file.write(rec_buffer, record_size) != record_size)
      Serial.printf("Write file Failed!\n");

    free(rec_buffer);
    rec_buffer = NULL;
    file.close();
    Serial.printf("The recording is over.\n");

    listDir(SD, "/", 0);

    bool uploadStatus = false;

    if(isWIFIConnected){
      uploadStatus = uploadFile();
    }

    if(uploadStatus)
      xTaskNotifyGive(chatgpt_handle);
    vTaskDelay(10000);       // Each recording is spaced 10s apart
  }
//  vTaskDelete(NULL);
}

void wifiConnect(void *pvParameters){
  isWIFIConnected = false;
  Serial.print("Try to connect to ");
  Serial.println(ssid);
  WiFi.begin(ssid, password);
  while(WiFi.status() != WL_CONNECTED){
    vTaskDelay(500);
    Serial.print(".");
  }
  Serial.println("Wi-Fi Connected!");
  isWIFIConnected = true;
  // Ignore SSL certificate validation
  client.setInsecure();
  while(true){
    vTaskDelay(1000);
  }
}

void chatgpt(void *pvParameters){
  while(1){
    // Waiting for notification signal from Task 1
    ulTaskNotifyTake(pdTRUE, portMAX_DELAY);

    String result;
    if (chat_gpt.simple_message("gpt-3.5-turbo-0301", "user", chatgpt_Q, result)) {
      Serial.println("===OK===");
      Serial.println(result);
    } else {
      Serial.println("===ERROR===");
      Serial.println(result);
    }

  }
}

//*****************************************Audio Process******************************************//

void generate_wav_header(uint8_t *wav_header, uint32_t wav_size, uint32_t sample_rate)
{
  // See this for reference: http://soundfile.sapp.org/doc/WaveFormat/
  uint32_t file_size = wav_size + WAV_HEADER_SIZE - 8;
  uint32_t byte_rate = SAMPLE_RATE * SAMPLE_BITS / 8;
  const uint8_t set_wav_header[] = {
    'R', 'I', 'F', 'F', // ChunkID
    file_size, file_size >> 8, file_size >> 16, file_size >> 24, // ChunkSize
    'W', 'A', 'V', 'E', // Format
    'f', 'm', 't', ' ', // Subchunk1ID
    0x10, 0x00, 0x00, 0x00, // Subchunk1Size (16 for PCM)
    0x01, 0x00, // AudioFormat (1 for PCM)
    0x01, 0x00, // NumChannels (1 channel)
    sample_rate, sample_rate >> 8, sample_rate >> 16, sample_rate >> 24, // SampleRate
    byte_rate, byte_rate >> 8, byte_rate >> 16, byte_rate >> 24, // ByteRate
    0x02, 0x00, // BlockAlign
    0x10, 0x00, // BitsPerSample (16 bits)
    'd', 'a', 't', 'a', // Subchunk2ID
    wav_size, wav_size >> 8, wav_size >> 16, wav_size >> 24, // Subchunk2Size
  };
  memcpy(wav_header, set_wav_header, sizeof(set_wav_header));
}

//*****************************************File Process******************************************//

void listDir(fs::FS &fs, const char * dirname, uint8_t levels){
    Serial.printf("Listing directory: %s\n", dirname);

    File root = fs.open(dirname);
    if(!root){
        Serial.println("Failed to open directory");
        return;
    }
    if(!root.isDirectory()){
        Serial.println("Not a directory");
        return;
    }

    File file = root.openNextFile();
    while(file){
        if(file.isDirectory()){
            Serial.print("  DIR : ");
            Serial.println(file.name());
            if(levels){
                listDir(fs, file.path(), levels -1);
            }
        } else {
            Serial.print("  FILE: ");
            Serial.print(file.name());
            Serial.print("  SIZE: ");
            Serial.println(file.size());
        }
        file = root.openNextFile();
    }
}

bool uploadFile(){
  file = SD.open(filename, FILE_READ);
  if(!file){
    Serial.println("FILE IS NOT AVAILABLE!");
    return false;
  }

  Serial.println("===> Upload FILE to Node.js Server");

  HTTPClient client;
  client.begin("http://192.168.1.208:8888/uploadAudio");
  client.addHeader("Content-Type", "audio/wav");
  int httpResponseCode = client.sendRequest("POST", &file, file.size());
  Serial.print("httpResponseCode : ");
  Serial.println(httpResponseCode);

  if(httpResponseCode == 200){
    String response = client.getString();
    Serial.println("==================== Transcription ====================");
    Serial.println(response);
    chatgpt_Q = response;
    Serial.println("====================      End      ====================");
    file.close();
    client.end();
    return true;
  }else{
    Serial.println("Error");
    return false;
  }

}
De nuevo, antes de usar este programa, realiza estos cambios:
- SSID de la red WiFi – Cambia la línea 18.
- Contraseña WiFi – Cambia la línea 19.
- IP del host – Cambia en la línea 241.
- Token de la API de OpenAI – Debes preparar tu token de OpenAI y rellenarlo en la línea 33. Si es tu primera vez, consulta este Wiki.
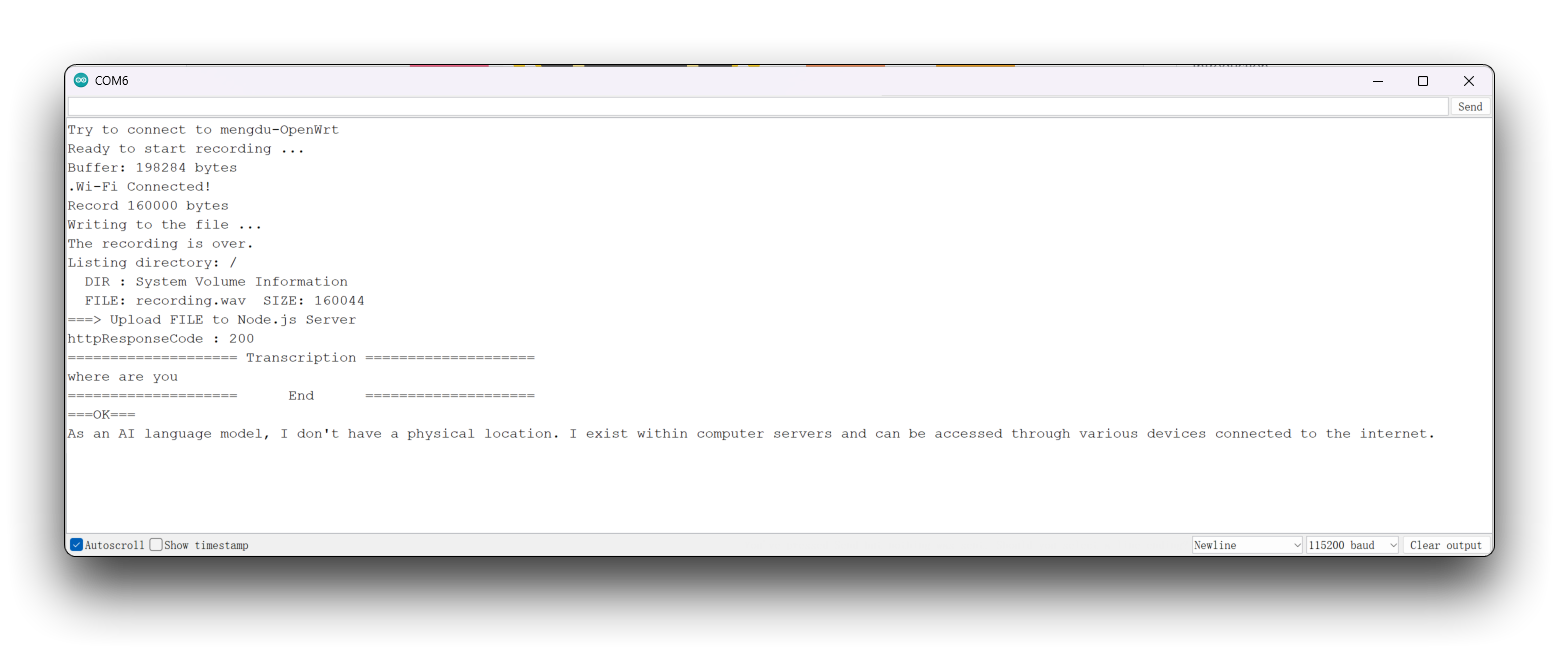
Una vez modificado y subido, abre el monitor serie. Tras la grabación verás la respuesta de ChatGPT a tu pregunta.
Diseño del contenido de visualización en pantalla e Integración de programas
Por último, añadimos un poco de “magia”. En lugar del monitor serie, usaremos una pantalla táctil para las funciones de toque y clic.
Paso 13. Usar SquareLine Studio para diseñar las pantallas
SquareLine Studio es una herramienta de diseño GUI desarrollada por LVGL, una librería gráfica para sistemas embebidos. Permite crear interfaces rápidamente mediante arrastrar-y-soltar, con soporte para varios widgets y temas.
Recomendamos usarla para diseñar interfaces simples. Si quieres saber más sobre el uso de la Round Display en SquareLine Studio, visita nuestro Wiki.
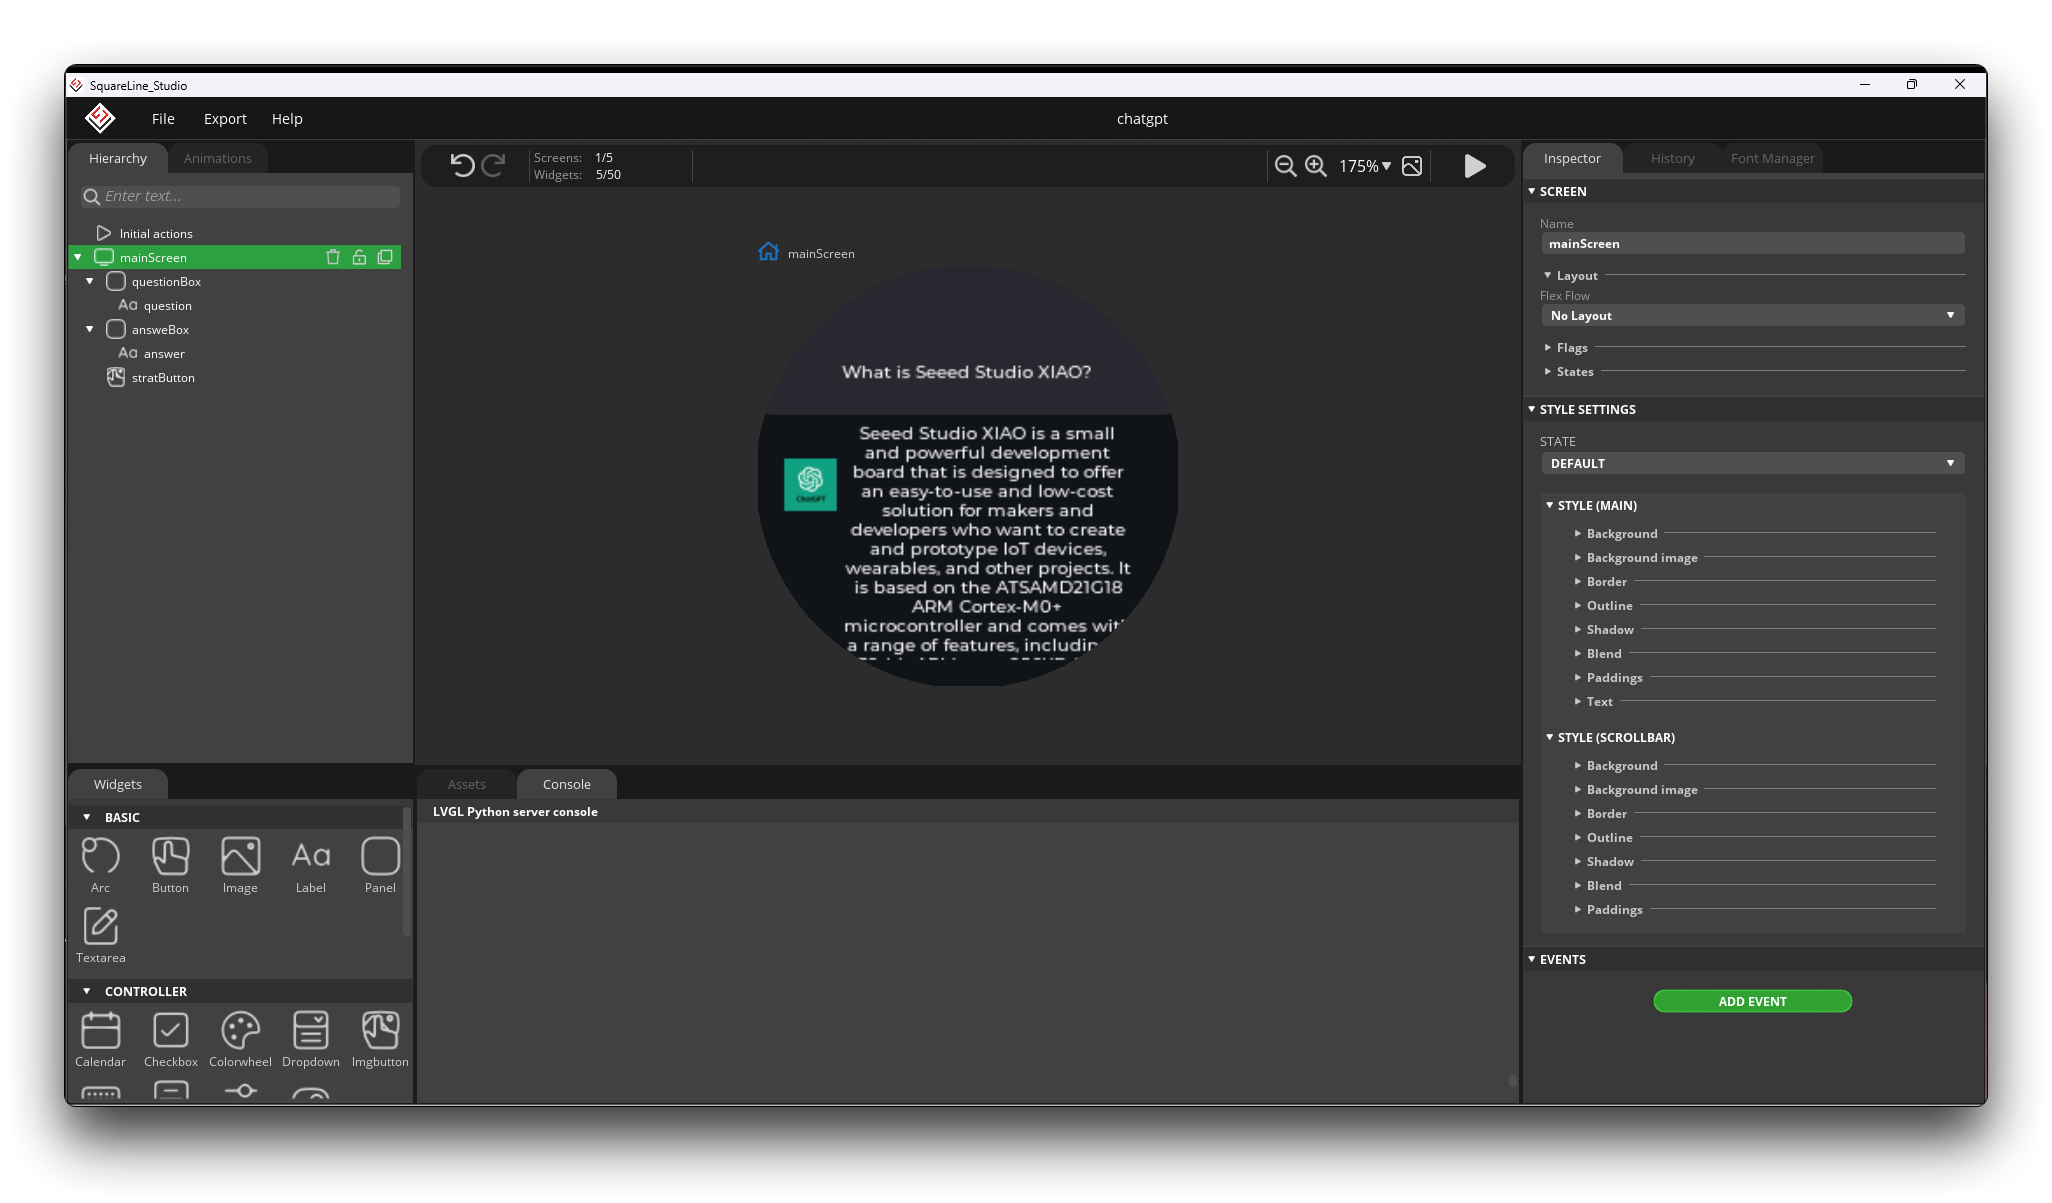
Por espacio, no entraremos en detalle sobre el diseño, pero proporcionamos el código exportado que puedes usar. Está en la carpeta ui de ese repositorio.
Le recomendamos usar la versión v1.2.3 de SquareLine Studio. Después de realizar pruebas, se ha comprobado que la versión v1.3.0 puede tener problemas de compatibilidad con la librería tft_eSPI.
Paso 14. Integración
El código final del proyecto completo está en XIAOESP32S3-SPEECH-CHATGPT-COMPLETE.
Si tu ESP32 es versión 2.0.x. Clic para ver el programa completo
#include <lvgl.h>
#include <TFT_eSPI.h>
#include "ui.h"
#include <WiFi.h>
#include <WiFiClientSecure.h>
#include <ArduinoJson.h>
#include <ChatGPT.hpp>
#include <I2S.h>
#include <HTTPClient.h>
#include "FS.h"
#include "SD.h"
#include "SPI.h"


// Import the library for the round display and define the frame used as the TFT display frame
#define USE_TFT_ESPI_LIBRARY
#include "lv_xiao_round_screen.h"


/*Change to your screen resolution*/
static const uint16_t screenWidth  = 240;
static const uint16_t screenHeight = 240;


// Variables to be used in the recording program, do not change for best
#define SAMPLE_RATE 16000U
#define SAMPLE_BITS 16
#define WAV_HEADER_SIZE 44
#define VOLUME_GAIN 2
#define RECORD_TIME 5  // seconds, The maximum value is 240


// Number of bytes required for the recording buffer
uint32_t record_size = (SAMPLE_RATE * SAMPLE_BITS / 8) * RECORD_TIME;


// Name of the file in which the recording is saved
File file;
const char filename[] = "/recording.wav";


// Network connection status flag
bool isWIFIConnected;


// Answers to the questions chatgpt replied to
String response;


// Flags for different task starts
bool recordTask = false;
bool chatgptTask = false;

WiFiClientSecure client;
ChatGPT<WiFiClientSecure> chat_gpt(&client, "v1", "OpenAI-TOKEN");   // Please fill in your OpenAI key


// Please change to your network
const char* ssid = "wifi-ssid";
const char* password = "wifi-password";

static lv_disp_draw_buf_t draw_buf;
static lv_color_t buf[ screenWidth * screenHeight / 10 ];


//****************************************LVGL****************************************************//

#if LV_USE_LOG != 0
/* Serial debugging */
void my_print(const char * buf)
{
    Serial.printf(buf);
    Serial.flush();
}
#endif

/* Display flushing */
void my_disp_flush( lv_disp_drv_t *disp, const lv_area_t *area, lv_color_t *color_p )
{
    uint32_t w = ( area->x2 - area->x1 + 1 );
    uint32_t h = ( area->y2 - area->y1 + 1 );

    tft.startWrite();
    tft.setAddrWindow( area->x1, area->y1, w, h );
    tft.pushColors( ( uint16_t * )&color_p->full, w * h, true );
    tft.endWrite();

    lv_disp_flush_ready( disp );
}

/*Read the touchpad*/
void my_touchpad_read( lv_indev_drv_t * indev_driver, lv_indev_data_t * data )
{
    // uint16_t touchX = 0, touchY = 0;
    // bool touched = false;//tft.getTouch( &touchX, &touchY, 600 );

    lv_coord_t touchX, touchY;
    chsc6x_get_xy(&touchX, &touchY);

    // if( !touched )
    if(!chsc6x_is_pressed())
    {
        data->state = LV_INDEV_STATE_REL;
    }
    else
    {
        data->state = LV_INDEV_STATE_PR;

        /*Set the coordinates*/
        data->point.x = touchX;
        data->point.y = touchY;

//        Serial.print( "Data x " );
//        Serial.println( touchX );
//
//        Serial.print( "Data y " );
//        Serial.println( touchY );

        // You can also start recording by uncommenting and configuring by clicking on the logo
//        if((touchX < 240 && touchX > 230) && (touchY < 120 && touchY > 100)){
          recordTask = true;
//        }
    }
}

//****************************************Arduino Base****************************************************//

void setup()
{
    Serial.begin( 115200 ); /* prepare for possible serial debug */
//    while(!Serial);

    pinMode(TOUCH_INT, INPUT_PULLUP);
    Wire.begin();

    String LVGL_Arduino = "Hello Arduino! ";
    LVGL_Arduino += String('V') + lv_version_major() + "." + lv_version_minor() + "." + lv_version_patch();

    Serial.println( LVGL_Arduino );
    Serial.println( "I am LVGL_Arduino" );

    lv_init();

#if LV_USE_LOG != 0
    lv_log_register_print_cb( my_print ); /* register print function for debugging */
#endif

    tft.begin();          /* TFT init */
    tft.setRotation( 0 ); /* Landscape orientation, flipped */

    lv_disp_draw_buf_init( &draw_buf, buf, NULL, screenWidth * screenHeight / 10 );

    /*Initialize the display*/
    static lv_disp_drv_t disp_drv;
    lv_disp_drv_init( &disp_drv );
    /*Change the following line to your display resolution*/
    disp_drv.hor_res = screenWidth;
    disp_drv.ver_res = screenHeight;
    disp_drv.flush_cb = my_disp_flush;
    disp_drv.draw_buf = &draw_buf;
    lv_disp_drv_register( &disp_drv );

    /*Initialize the (dummy) input device driver*/
    static lv_indev_drv_t indev_drv;
    lv_indev_drv_init( &indev_drv );
    indev_drv.type = LV_INDEV_TYPE_POINTER;
    indev_drv.read_cb = my_touchpad_read;
    lv_indev_drv_register( &indev_drv );

    ui_init();

    I2S.setAllPins(-1, 42, 41, -1, -1);

    //The transmission mode is PDM_MONO_MODE, which means that PDM (pulse density modulation) mono mode is used for transmission
    if (!I2S.begin(PDM_MONO_MODE, SAMPLE_RATE, SAMPLE_BITS)) {
        Serial.println("Failed to initialize I2S!");
        while (1) ;
    }

    if(!SD.begin(D2)){
        Serial.println("Failed to mount SD Card!");
        while (1) ;
    }

    Serial.println( "Setup done" );

    // Create a FreeRTOS task to check the connection status of the network at regular intervals.
    xTaskCreate(wifiConnect, "wifi_Connect", 4096, NULL, 0, NULL);
}

void loop()
{
    lv_timer_handler(); /* let the GUI do its work */
    record();
    chatgpt();
    delay(5);
}

//*****************************************Audio Process******************************************//

void generate_wav_header(uint8_t *wav_header, uint32_t wav_size, uint32_t sample_rate)
{
  // See this for reference: http://soundfile.sapp.org/doc/WaveFormat/
  uint32_t file_size = wav_size + WAV_HEADER_SIZE - 8;
  uint32_t byte_rate = SAMPLE_RATE * SAMPLE_BITS / 8;
  const uint8_t set_wav_header[] = {
    'R', 'I', 'F', 'F', // ChunkID
    file_size, file_size >> 8, file_size >> 16, file_size >> 24, // ChunkSize
    'W', 'A', 'V', 'E', // Format
    'f', 'm', 't', ' ', // Subchunk1ID
    0x10, 0x00, 0x00, 0x00, // Subchunk1Size (16 for PCM)
    0x01, 0x00, // AudioFormat (1 for PCM)
    0x01, 0x00, // NumChannels (1 channel)
    sample_rate, sample_rate >> 8, sample_rate >> 16, sample_rate >> 24, // SampleRate
    byte_rate, byte_rate >> 8, byte_rate >> 16, byte_rate >> 24, // ByteRate
    0x02, 0x00, // BlockAlign
    0x10, 0x00, // BitsPerSample (16 bits)
    'd', 'a', 't', 'a', // Subchunk2ID
    wav_size, wav_size >> 8, wav_size >> 16, wav_size >> 24, // Subchunk2Size
  };
  memcpy(wav_header, set_wav_header, sizeof(set_wav_header));
}

//*****************************************File Process******************************************//

void listDir(fs::FS &fs, const char * dirname, uint8_t levels){
    Serial.printf("Listing directory: %s\n", dirname);

    File root = fs.open(dirname);
    if(!root){
        Serial.println("Failed to open directory");
        return;
    }
    if(!root.isDirectory()){
        Serial.println("Not a directory");
        return;
    }

    File file = root.openNextFile();
    while(file){
        if(file.isDirectory()){
            Serial.print("  DIR : ");
            Serial.println(file.name());
            if(levels){
                listDir(fs, file.path(), levels -1);
            }
        } else {
            Serial.print("  FILE: ");
            Serial.print(file.name());
            Serial.print("  SIZE: ");
            Serial.println(file.size());
        }
        file = root.openNextFile();
    }
}

bool uploadFile(){
  file = SD.open(filename, FILE_READ);
  if(!file){
    Serial.println("FILE IS NOT AVAILABLE!");
    return false;
  }

  Serial.println("===> Upload FILE to Node.js Server");

  HTTPClient client;
  client.begin("http://192.168.1.208:8888/uploadAudio");
  client.addHeader("Content-Type", "audio/wav");
  int httpResponseCode = client.sendRequest("POST", &file, file.size());
  Serial.print("httpResponseCode : ");
  Serial.println(httpResponseCode);

  if(httpResponseCode == 200){
    response = client.getString();
    Serial.println("==================== Transcription ====================");
    Serial.println(response);
    const char* chatgpt_Q = response.c_str();
    lv_label_set_text(ui_question, chatgpt_Q);
    Serial.println("====================      End      ====================");
    file.close();
    client.end();
    recordTask = false;
    chatgptTask = true;
    return true;
  }else{
    Serial.println("Error");
    lv_label_set_text(ui_question, "Error");
    recordTask = false;
    chatgptTask = false;
    return false;
  }
}


//*****************************************Main Functions******************************************//

void record(){
  if(recordTask){
    Serial.println("Record Task Begin!!!");
    lv_label_set_text(ui_question, "Recording ...");
    lv_timer_handler();
    uint32_t sample_size = 0;

    // This variable will be used to point to the actual recording buffer
    uint8_t *rec_buffer = NULL;
    Serial.printf("Ready to start recording ...\n");

    File file = SD.open(filename, FILE_WRITE);

    // Write the header to the WAV file
    uint8_t wav_header[WAV_HEADER_SIZE];

    // Write the WAV file header information to the wav_header array
    generate_wav_header(wav_header, record_size, SAMPLE_RATE);

    // Call the file.write() function to write the data in the wav_header array to the newly created WAV file
    file.write(wav_header, WAV_HEADER_SIZE);

    // This code uses the ESP32's PSRAM (external cache memory) to dynamically allocate a section of memory to store the recording data.
    rec_buffer = (uint8_t *)ps_malloc(record_size);
    if (rec_buffer == NULL) {
      Serial.printf("malloc failed!\n");
      while(1) ;
    }
    Serial.printf("Buffer: %d bytes\n", ESP.getPsramSize() - ESP.getFreePsram());

    // Start recording
    // I2S port number (in this case I2S_NUM_0),
    // a pointer to the buffer to which the data is to be written (i.e. rec_buffer),
    // the size of the data to be read (i.e. record_size),
    // a pointer to a variable that points to the actual size of the data being read (i.e. &sample_size),
    // and the maximum time to wait for the data to be read (in this case portMAX_DELAY, indicating an infinite wait time).
    esp_i2s::i2s_read(esp_i2s::I2S_NUM_0, rec_buffer, record_size, &sample_size, portMAX_DELAY);
    if (sample_size == 0) {
      Serial.printf("Record Failed!\n");
    } else {
      Serial.printf("Record %d bytes\n", sample_size);
    }

    // Increase volume
    for (uint32_t i = 0; i < sample_size; i += SAMPLE_BITS/8) {
      (*(uint16_t *)(rec_buffer+i)) <<= VOLUME_GAIN;
    }

    // Write data to the WAV file
    Serial.printf("Writing to the file ...\n");
    if (file.write(rec_buffer, record_size) != record_size)
      Serial.printf("Write file Failed!\n");

    free(rec_buffer);
    rec_buffer = NULL;
    file.close();
    Serial.printf("The recording is over.\n");
    lv_label_set_text(ui_question, "Identifying ...");
    lv_timer_handler();
    listDir(SD, "/", 0);

    bool uploadStatus = false;

    if(isWIFIConnected){
      uploadStatus = uploadFile();
    }
  }
}

void chatgpt(){
  if(chatgptTask){
    Serial.println("ChatGPT Task Begin!!!");
    lv_label_set_text(ui_answer,"Answering ...");
    lv_timer_handler();
    String result;
    if (chat_gpt.simple_message("gpt-3.5-turbo-0301", "user", response, result)) {
      Serial.println("===OK===");
      Serial.println(result);
      const char* chatgpt_A = result.c_str();
      lv_label_set_text(ui_answer, chatgpt_A);
    } else {
      Serial.println("===ERROR===");
      Serial.println(result);
      lv_label_set_text(ui_answer, "ERROR");
      lv_timer_handler();
    }
    recordTask = false;
    chatgptTask = false;
  }
}

//*****************************************RTOS******************************************//

void wifiConnect(void *pvParameters){
  isWIFIConnected = false;
  Serial.print("Try to connect to ");
  Serial.println(ssid);
  WiFi.begin(ssid, password);
  while(WiFi.status() != WL_CONNECTED){
    vTaskDelay(500);
    Serial.print(".");
  }
  Serial.println("Wi-Fi Connected!");
  isWIFIConnected = true;
  // Ignore SSL certificate validation
  client.setInsecure();
  while(true){
    vTaskDelay(1000);
  }
}
Si tu ESP32 es versión 3.0.x. Clic para ver el programa completo
#include <lvgl.h>
#include <TFT_eSPI.h>
#include "ui.h"
#include <WiFi.h>
#include <WiFiClientSecure.h>
#include <ArduinoJson.h>
#include <ChatGPT.hpp>
#include <ESP_I2S.h>
#include <HTTPClient.h>
#include "FS.h"
#include "SD.h"
#include "SPI.h"


// Import the library for the round display and define the frame used as the TFT display frame
#define USE_TFT_ESPI_LIBRARY
#include "lv_xiao_round_screen.h"


/*Change to your screen resolution*/
static const uint16_t screenWidth  = 240;
static const uint16_t screenHeight = 240;


// Variables to be used in the recording program, do not change for best
#define SAMPLE_RATE 16000U
#define SAMPLE_BITS 16
#define WAV_HEADER_SIZE 44
#define VOLUME_GAIN 2
#define RECORD_TIME 5  // seconds, The maximum value is 240


// Number of bytes required for the recording buffer
uint32_t record_size = (SAMPLE_RATE * SAMPLE_BITS / 8) * RECORD_TIME;

//define I2S
I2SClass I2S;

// Name of the file in which the recording is saved
File file;
const char filename[] = "/recording.wav";


// Network connection status flag
bool isWIFIConnected;


// Answers to the questions chatgpt replied to
String response;


// Flags for different task starts
bool recordTask = false;
bool chatgptTask = false;

WiFiClientSecure client;
ChatGPT<WiFiClientSecure> chat_gpt(&client, "v1", "OpenAI-TOKEN");   // Please fill in your OpenAI key


// Please change to your network
const char* ssid = "wifi-ssid";
const char* password = "wifi-password";

static lv_disp_draw_buf_t draw_buf;
static lv_color_t buf[ screenWidth * screenHeight / 10 ];


//****************************************LVGL****************************************************//

#if LV_USE_LOG != 0
/* Serial debugging */
void my_print(const char * buf)
{
    Serial.printf(buf);
    Serial.flush();
}
#endif

/* Display flushing */
void my_disp_flush( lv_disp_drv_t *disp, const lv_area_t *area, lv_color_t *color_p )
{
    uint32_t w = ( area->x2 - area->x1 + 1 );
    uint32_t h = ( area->y2 - area->y1 + 1 );

    tft.startWrite();
    tft.setAddrWindow( area->x1, area->y1, w, h );
    tft.pushColors( ( uint16_t * )&color_p->full, w * h, true );
    tft.endWrite();

    lv_disp_flush_ready( disp );
}

/*Read the touchpad*/
void my_touchpad_read( lv_indev_drv_t * indev_driver, lv_indev_data_t * data )
{
    // uint16_t touchX = 0, touchY = 0;
    // bool touched = false;//tft.getTouch( &touchX, &touchY, 600 );

    lv_coord_t touchX, touchY;
    chsc6x_get_xy(&touchX, &touchY);

    // if( !touched )
    if(!chsc6x_is_pressed())
    {
        data->state = LV_INDEV_STATE_REL;
    }
    else
    {
        data->state = LV_INDEV_STATE_PR;

        /*Set the coordinates*/
        data->point.x = touchX;
        data->point.y = touchY;

//        Serial.print( "Data x " );
//        Serial.println( touchX );
//
//        Serial.print( "Data y " );
//        Serial.println( touchY );

        // You can also start recording by uncommenting and configuring by clicking on the logo
//        if((touchX < 240 && touchX > 230) && (touchY < 120 && touchY > 100)){
          recordTask = true;
//        }
    }
}

//****************************************Arduino Base****************************************************//

void setup()
{
    Serial.begin( 115200 ); /* prepare for possible serial debug */
//    while(!Serial);

    pinMode(TOUCH_INT, INPUT_PULLUP);
    Wire.begin();

    String LVGL_Arduino = "Hello Arduino! ";
    LVGL_Arduino += String('V') + lv_version_major() + "." + lv_version_minor() + "." + lv_version_patch();

    Serial.println( LVGL_Arduino );
    Serial.println( "I am LVGL_Arduino" );

    lv_init();

#if LV_USE_LOG != 0
    lv_log_register_print_cb( my_print ); /* register print function for debugging */
#endif

    tft.begin();          /* TFT init */
    tft.setRotation( 0 ); /* Landscape orientation, flipped */

    lv_disp_draw_buf_init( &draw_buf, buf, NULL, screenWidth * screenHeight / 10 );

    /*Initialize the display*/
    static lv_disp_drv_t disp_drv;
    lv_disp_drv_init( &disp_drv );
    /*Change the following line to your display resolution*/
    disp_drv.hor_res = screenWidth;
    disp_drv.ver_res = screenHeight;
    disp_drv.flush_cb = my_disp_flush;
    disp_drv.draw_buf = &draw_buf;
    lv_disp_drv_register( &disp_drv );

    /*Initialize the (dummy) input device driver*/
    static lv_indev_drv_t indev_drv;
    lv_indev_drv_init( &indev_drv );
    indev_drv.type = LV_INDEV_TYPE_POINTER;
    indev_drv.read_cb = my_touchpad_read;
    lv_indev_drv_register( &indev_drv );

    ui_init();

    // setup 42 PDM clock and 41 PDM data pins
    I2S.setPinsPdmRx(42, 41);

    //The transmission mode is PDM_MONO_MODE, which means that PDM (pulse density modulation) mono mode is used for transmission
    if (!I2S.begin(I2S_MODE_PDM_RX, 16000, I2S_DATA_BIT_WIDTH_16BIT, I2S_SLOT_MODE_MONO)) {
        Serial.println("Failed to initialize I2S!");
        while (1) ;
    }

    if(!SD.begin(D2)){
        Serial.println("Failed to mount SD Card!");
        while (1) ;
    }

    Serial.println( "Setup done" );

    // Create a FreeRTOS task to check the connection status of the network at regular intervals.
    xTaskCreate(wifiConnect, "wifi_Connect", 4096, NULL, 0, NULL);
}

void loop()
{
    lv_timer_handler(); /* let the GUI do its work */
    record();
    chatgpt();
    delay(5);
}

//*****************************************Audio Process******************************************//

void generate_wav_header(uint8_t *wav_header, uint32_t wav_size, uint32_t sample_rate)
{
  // See this for reference: http://soundfile.sapp.org/doc/WaveFormat/
  uint32_t file_size = wav_size + WAV_HEADER_SIZE - 8;
  uint32_t byte_rate = SAMPLE_RATE * SAMPLE_BITS / 8;
  const uint8_t set_wav_header[] = {
    'R', 'I', 'F', 'F', // ChunkID
    file_size, file_size >> 8, file_size >> 16, file_size >> 24, // ChunkSize
    'W', 'A', 'V', 'E', // Format
    'f', 'm', 't', ' ', // Subchunk1ID
    0x10, 0x00, 0x00, 0x00, // Subchunk1Size (16 for PCM)
    0x01, 0x00, // AudioFormat (1 for PCM)
    0x01, 0x00, // NumChannels (1 channel)
    sample_rate, sample_rate >> 8, sample_rate >> 16, sample_rate >> 24, // SampleRate
    byte_rate, byte_rate >> 8, byte_rate >> 16, byte_rate >> 24, // ByteRate
    0x02, 0x00, // BlockAlign
    0x10, 0x00, // BitsPerSample (16 bits)
    'd', 'a', 't', 'a', // Subchunk2ID
    wav_size, wav_size >> 8, wav_size >> 16, wav_size >> 24, // Subchunk2Size
  };
  memcpy(wav_header, set_wav_header, sizeof(set_wav_header));
}

//*****************************************File Process******************************************//

void listDir(fs::FS &fs, const char * dirname, uint8_t levels){
    Serial.printf("Listing directory: %s\n", dirname);

    File root = fs.open(dirname);
    if(!root){
        Serial.println("Failed to open directory");
        return;
    }
    if(!root.isDirectory()){
        Serial.println("Not a directory");
        return;
    }

    File file = root.openNextFile();
    while(file){
        if(file.isDirectory()){
            Serial.print("  DIR : ");
            Serial.println(file.name());
            if(levels){
                listDir(fs, file.path(), levels -1);
            }
        } else {
            Serial.print("  FILE: ");
            Serial.print(file.name());
            Serial.print("  SIZE: ");
            Serial.println(file.size());
        }
        file = root.openNextFile();
    }
}

bool uploadFile(){
  file = SD.open(filename, FILE_READ);
  if(!file){
    Serial.println("FILE IS NOT AVAILABLE!");
    return false;
  }

  Serial.println("===> Upload FILE to Node.js Server");

  HTTPClient client;
  client.begin("http://192.168.1.208:8888/uploadAudio");
  client.addHeader("Content-Type", "audio/wav");
  int httpResponseCode = client.sendRequest("POST", &file, file.size());
  Serial.print("httpResponseCode : ");
  Serial.println(httpResponseCode);

  if(httpResponseCode == 200){
    response = client.getString();
    Serial.println("==================== Transcription ====================");
    Serial.println(response);
    const char* chatgpt_Q = response.c_str();
    lv_label_set_text(ui_question, chatgpt_Q);
    Serial.println("====================      End      ====================");
    file.close();
    client.end();
    recordTask = false;
    chatgptTask = true;
    return true;
  }else{
    Serial.println("Error");
    lv_label_set_text(ui_question, "Error");
    recordTask = false;
    chatgptTask = false;
    return false;
  }
}


//*****************************************Main Functions******************************************//

void record(){
  if(recordTask){
    Serial.println("Record Task Begin!!!");
    lv_label_set_text(ui_question, "Recording ...");
    lv_timer_handler();
    uint32_t sample_size = 0;

    // This variable will be used to point to the actual recording buffer
    uint8_t *rec_buffer = NULL;
    Serial.printf("Ready to start recording ...\n");

    File file = SD.open(filename, FILE_WRITE);

    // Write the header to the WAV file
    uint8_t wav_header[WAV_HEADER_SIZE];

    // Write the WAV file header information to the wav_header array
    generate_wav_header(wav_header, record_size, SAMPLE_RATE);

    // Call the file.write() function to write the data in the wav_header array to the newly created WAV file
    file.write(wav_header, WAV_HEADER_SIZE);

    // This code uses the ESP32's PSRAM (external cache memory) to dynamically allocate a section of memory to store the recording data.
    rec_buffer = (uint8_t *)ps_malloc(record_size);
    if (rec_buffer == NULL) {
      Serial.printf("malloc failed!\n");
      while(1) ;
    }
    Serial.printf("Buffer: %d bytes\n", ESP.getPsramSize() - ESP.getFreePsram());

    // Start recording
    // I2S port number (in this case I2S_NUM_0),
    // a pointer to the buffer to which the data is to be written (i.e. rec_buffer),
    // the size of the data to be read (i.e. record_size),
    // a pointer to a variable that points to the actual size of the data being read (i.e. &sample_size),
    // and the maximum time to wait for the data to be read (in this case portMAX_DELAY, indicating an infinite wait time).
    esp_i2s::i2s_read(esp_i2s::I2S_NUM_0, rec_buffer, record_size, &sample_size, portMAX_DELAY);
    if (sample_size == 0) {
      Serial.printf("Record Failed!\n");
    } else {
      Serial.printf("Record %d bytes\n", sample_size);
    }

    // Increase volume
    for (uint32_t i = 0; i < sample_size; i += SAMPLE_BITS/8) {
      (*(uint16_t *)(rec_buffer+i)) <<= VOLUME_GAIN;
    }

    // Write data to the WAV file
    Serial.printf("Writing to the file ...\n");
    if (file.write(rec_buffer, record_size) != record_size)
      Serial.printf("Write file Failed!\n");

    free(rec_buffer);
    rec_buffer = NULL;
    file.close();
    Serial.printf("The recording is over.\n");
    lv_label_set_text(ui_question, "Identifying ...");
    lv_timer_handler();
    listDir(SD, "/", 0);

    bool uploadStatus = false;

    if(isWIFIConnected){
      uploadStatus = uploadFile();
    }
  }
}

void chatgpt(){
  if(chatgptTask){
    Serial.println("ChatGPT Task Begin!!!");
    lv_label_set_text(ui_answer,"Answering ...");
    lv_timer_handler();
    String result;
    if (chat_gpt.simple_message("gpt-3.5-turbo-0301", "user", response, result)) {
      Serial.println("===OK===");
      Serial.println(result);
      const char* chatgpt_A = result.c_str();
      lv_label_set_text(ui_answer, chatgpt_A);
    } else {
      Serial.println("===ERROR===");
      Serial.println(result);
      lv_label_set_text(ui_answer, "ERROR");
      lv_timer_handler();
    }
    recordTask = false;
    chatgptTask = false;
  }
}

//*****************************************RTOS******************************************//

void wifiConnect(void *pvParameters){
  isWIFIConnected = false;
  Serial.print("Try to connect to ");
  Serial.println(ssid);
  WiFi.begin(ssid, password);
  while(WiFi.status() != WL_CONNECTED){
    vTaskDelay(500);
    Serial.print(".");
  }
  Serial.println("Wi-Fi Connected!");
  isWIFIConnected = true;
  // Ignore SSL certificate validation
  client.setInsecure();
  while(true){
    vTaskDelay(1000);
  }
}
Antes de compilar y subir el ejemplo, ajusta lo siguiente:
- SSID de la red WiFi – Cambia la línea 18.
- Contraseña WiFi – Cambia la línea 19.
- IP del host – Cambia en la línea 241.
- Token de OpenAI – Rellena en la línea 33. Si es tu primera vez, revisa este Wiki.
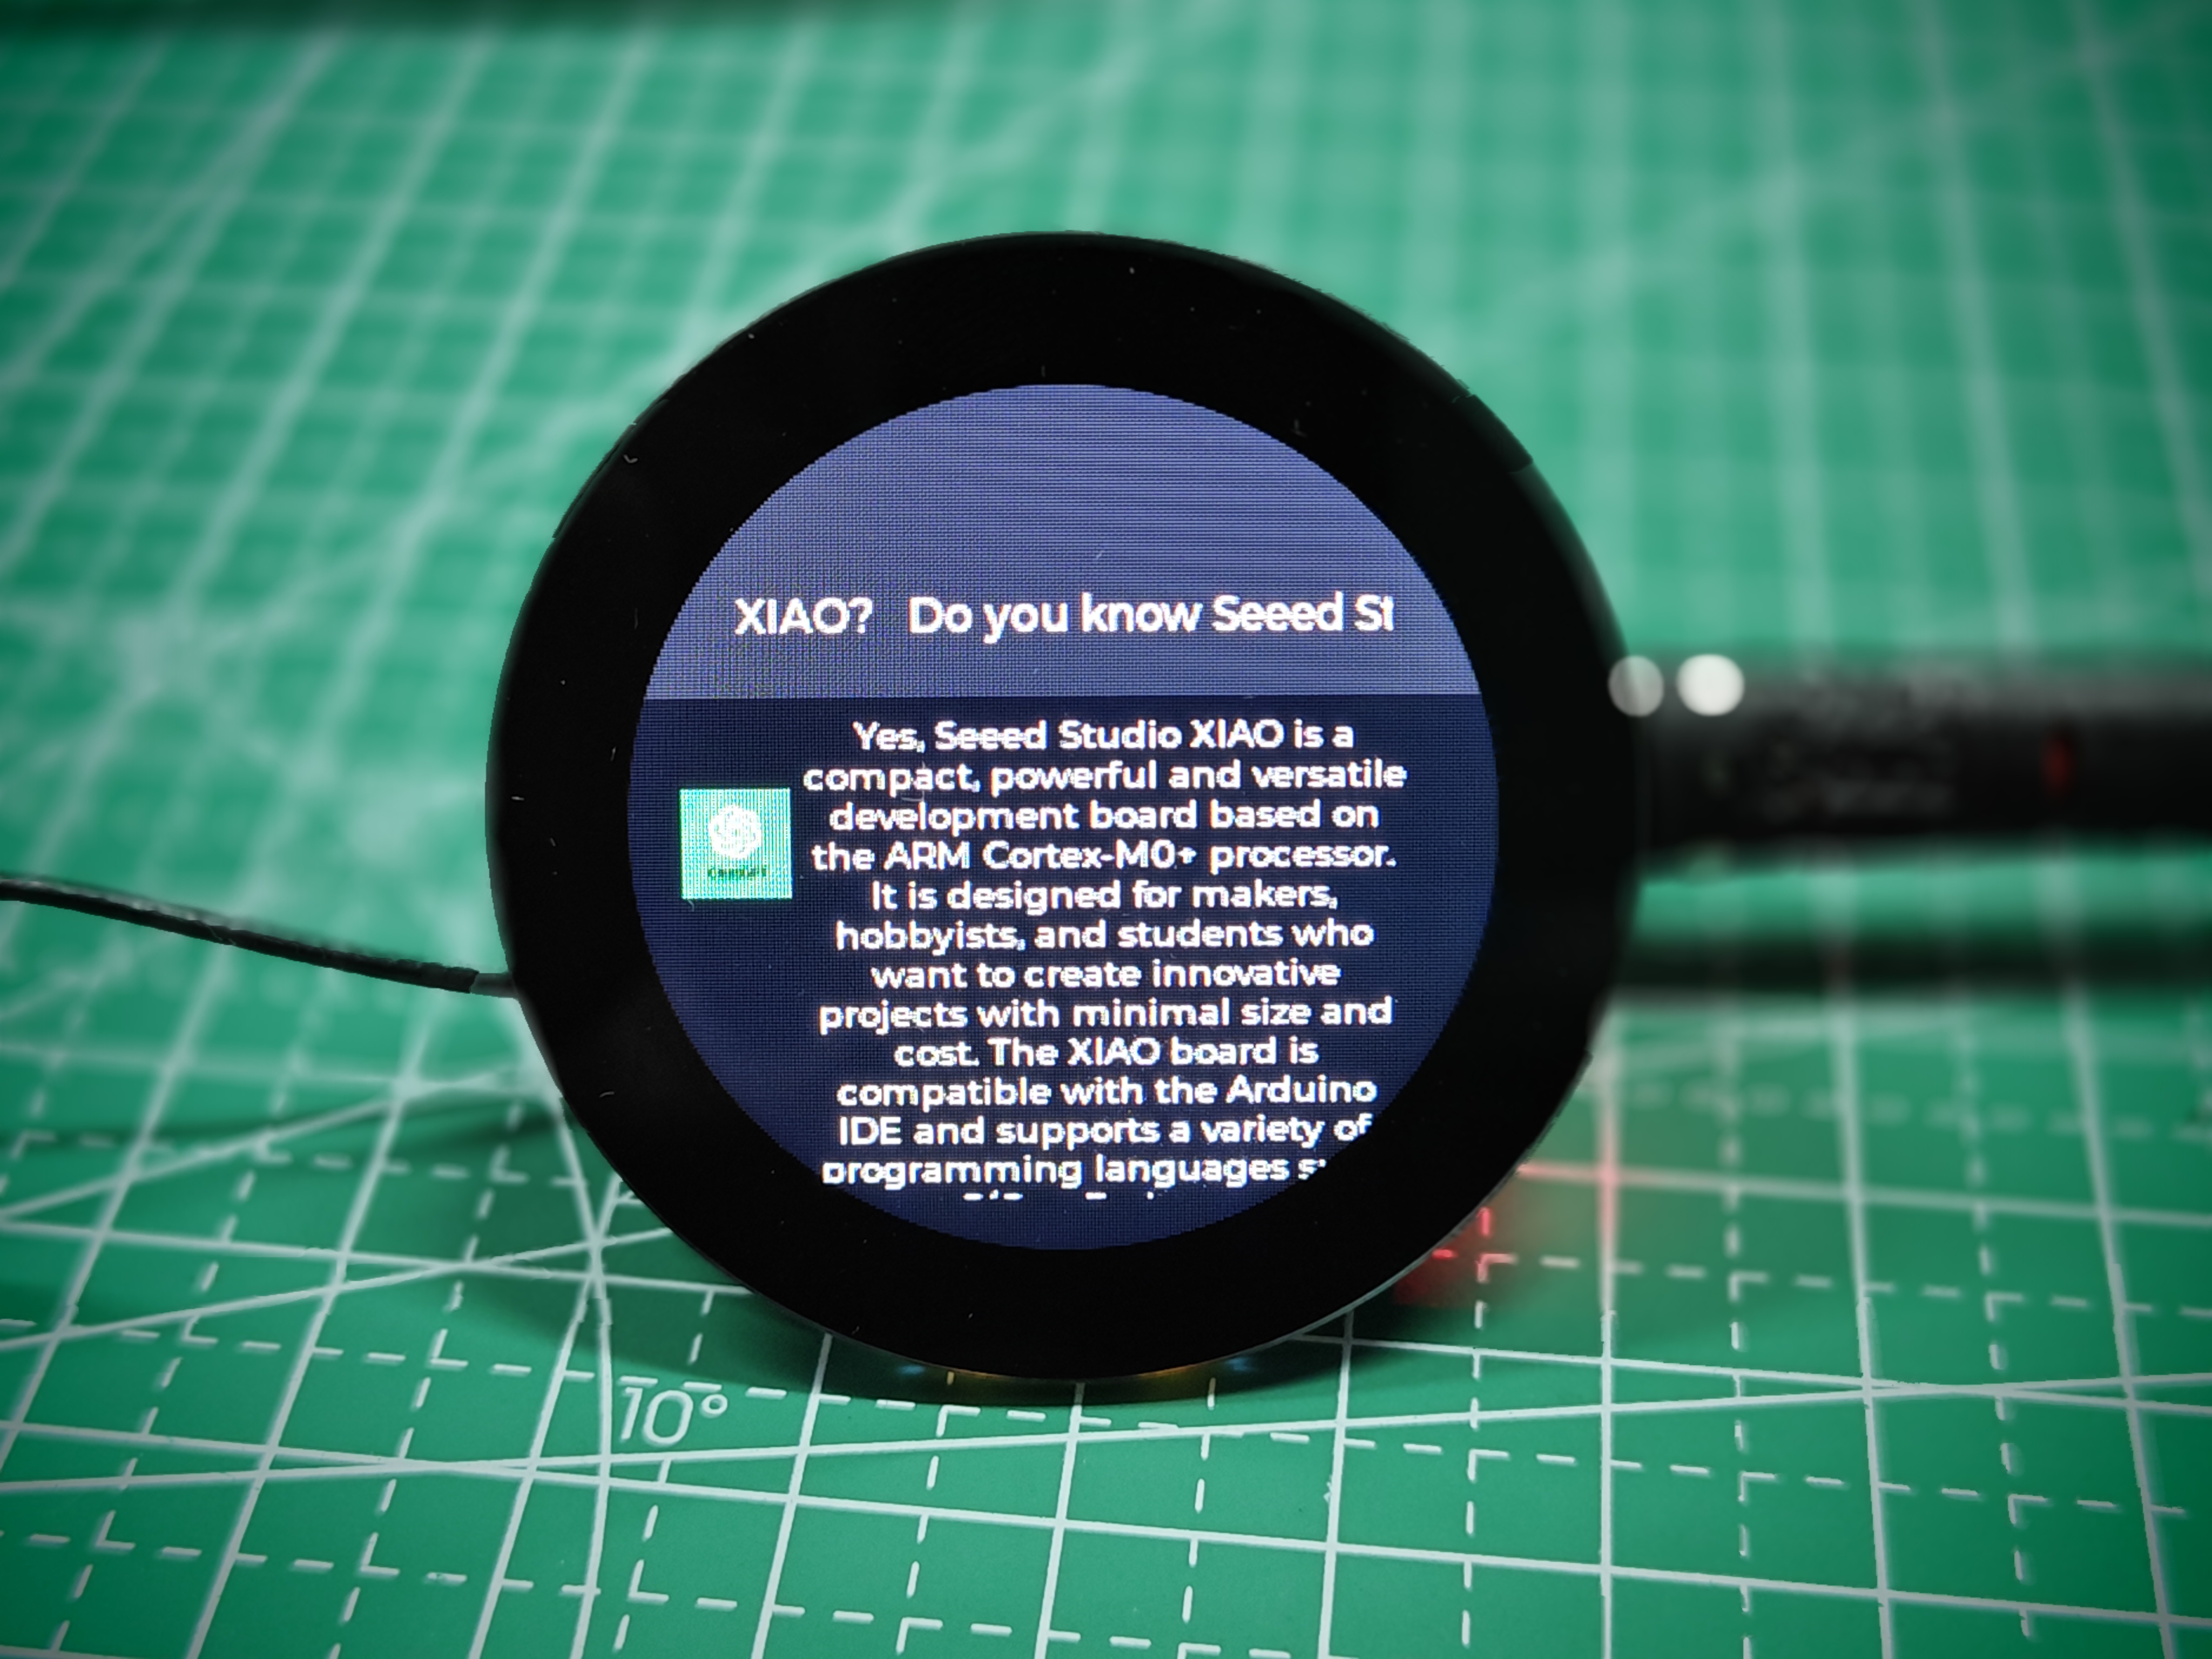
Una vez subido el programa y tocada la pantalla, comenzará la tarea de grabación; habla hacia el micrófono la pregunta que desees. Tras el reconocimiento, la pregunta se mostrará en la mitad superior de la pantalla. Inmediatamente después, obtendremos la respuesta de ChatGPT y se mostrará en la mitad inferior.
Soporte técnico y debate sobre el producto
¡Gracias por elegir nuestros productos! Estamos aquí para brindarte distintos canales de soporte para que tu experiencia sea lo más fluida posible.