Introducción al Sintetizador MIDI XIAO

Introducción
El Sintetizador MIDI XIAO es un dispositivo compacto y todo en uno para la creación musical, impulsado por el XIAO ESP32-C3 y el chip MIDI SAM2695 de grado profesional. A pesar de su pequeño tamaño, ofrece un sonido rico y expresivo, soporta hasta 64 voces de polifonía y ofrece cientos de timbres de instrumentos. Ya seas un desarrollador experimentando con sonido o un músico componiendo nuevas melodías, este sintetizador está diseñado para hacer que la creación musical sea fluida e inspiradora.
Características
- Creación Sin Barreras, Perfecto para Principiantes en Música
- Todo en Uno MIDI + Metrónomo -- Flujo de Trabajo Más Inteligente y Fluido
- Rendimiento de Grado Profesional para Jugadores Avanzados
- Ultra-Portátil y Completamente Hackeable
Descripción del Hardware
El Sintetizador MIDI XIAO integra los siguientes componentes:
| Módulo Principal | |
|---|---|
| MCU | XIAO ESP32-C3 |
| Generación de Sonido | |
| Chip MIDI | SAM2695 |
| Polifonía | Hasta 64 voces |
| Presets de Instrumentos | Más de 100 sonidos de instrumentos diferentes disponibles |
| Interfaces y Conectividad | |
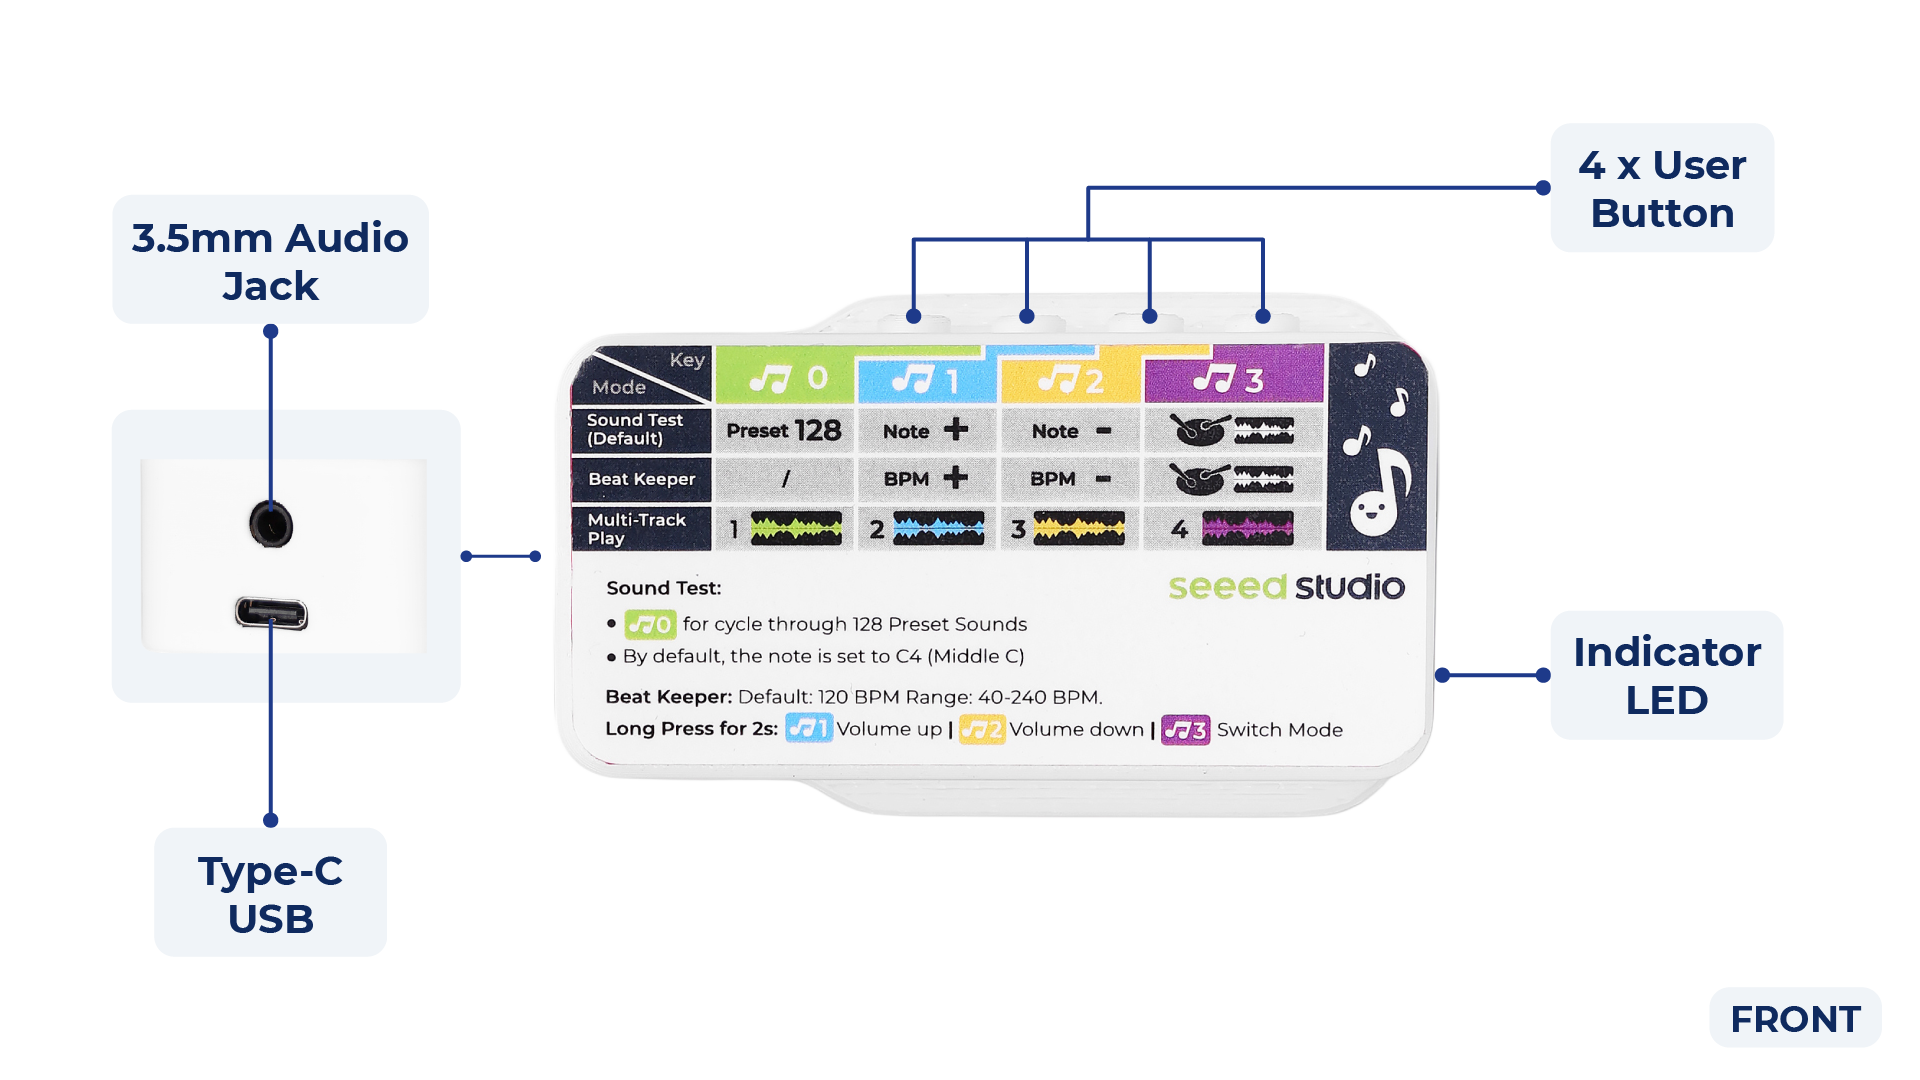
| Jack de Audio de 3.5mm | Usado para conectar dispositivos de audio externos (ej., altavoces o auriculares) Cuenta con desactivación automática del amplificador Clase D cuando se inserta un cable y reactivación cuando se retira |
| Botones Físicos | Cuatro botones físicos montados en los lados para interacción del usuario |
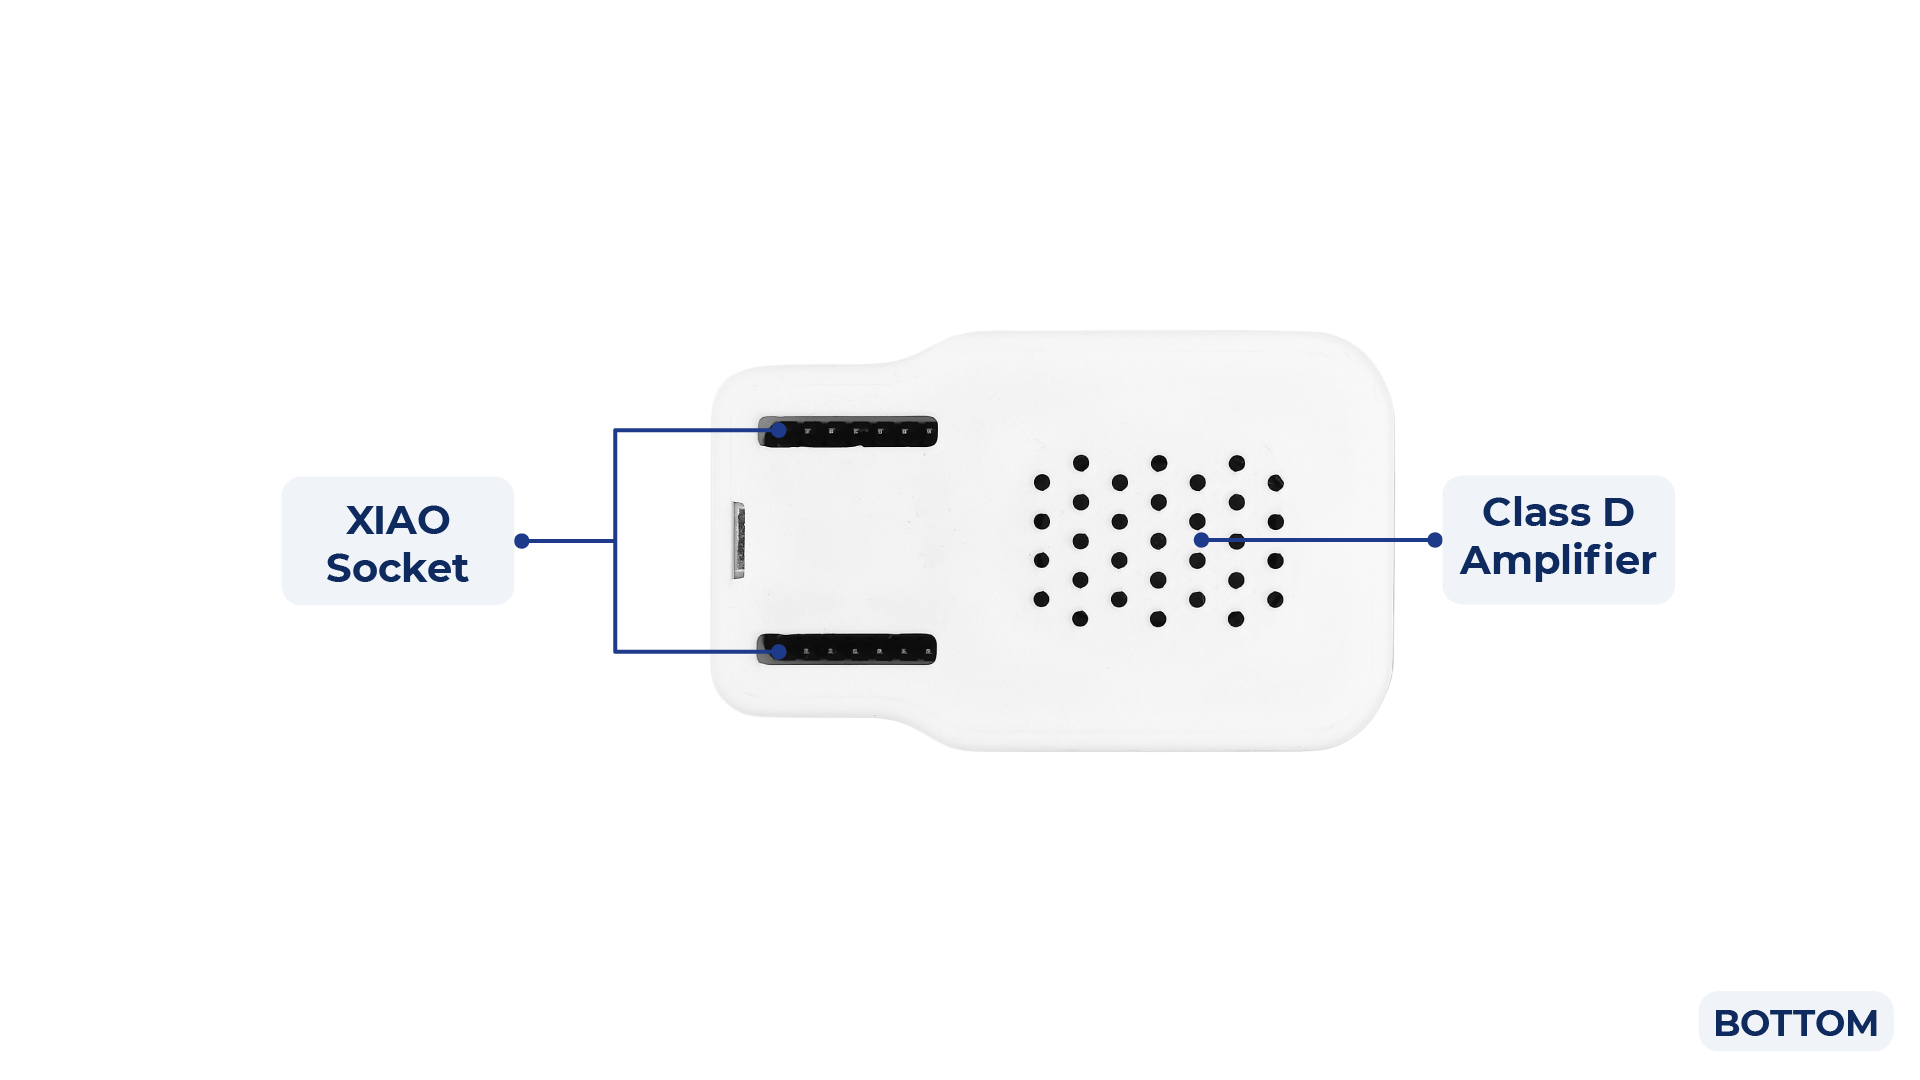
| Socket XIAO | Un socket dedicado diseñado para el módulo XIAO, con capacidad de expansión a través de conectores laterales adicionales |
| Amplificador Clase D | Altavoz Integrado |
| Alimentación e Indicadores | |
| Fuente de Alimentación | 5V Type-C |
| LED Indicador | Un LED de un solo color usado para indicar el estado de alimentación y proporcionar retroalimentación al usuario |
Introducción
Esta sección te guiará a través de la configuración de tu Sintetizador MIDI XIAO por primera vez.
Uso del Firmware de Fábrica
El Sintetizador MIDI XIAO viene pre-cargado con un firmware de fábrica versátil, permitiéndote explorar múltiples características de sonido y ritmo directamente desde la caja. A continuación se presenta una guía rápida de las funciones predeterminadas y operaciones clave.
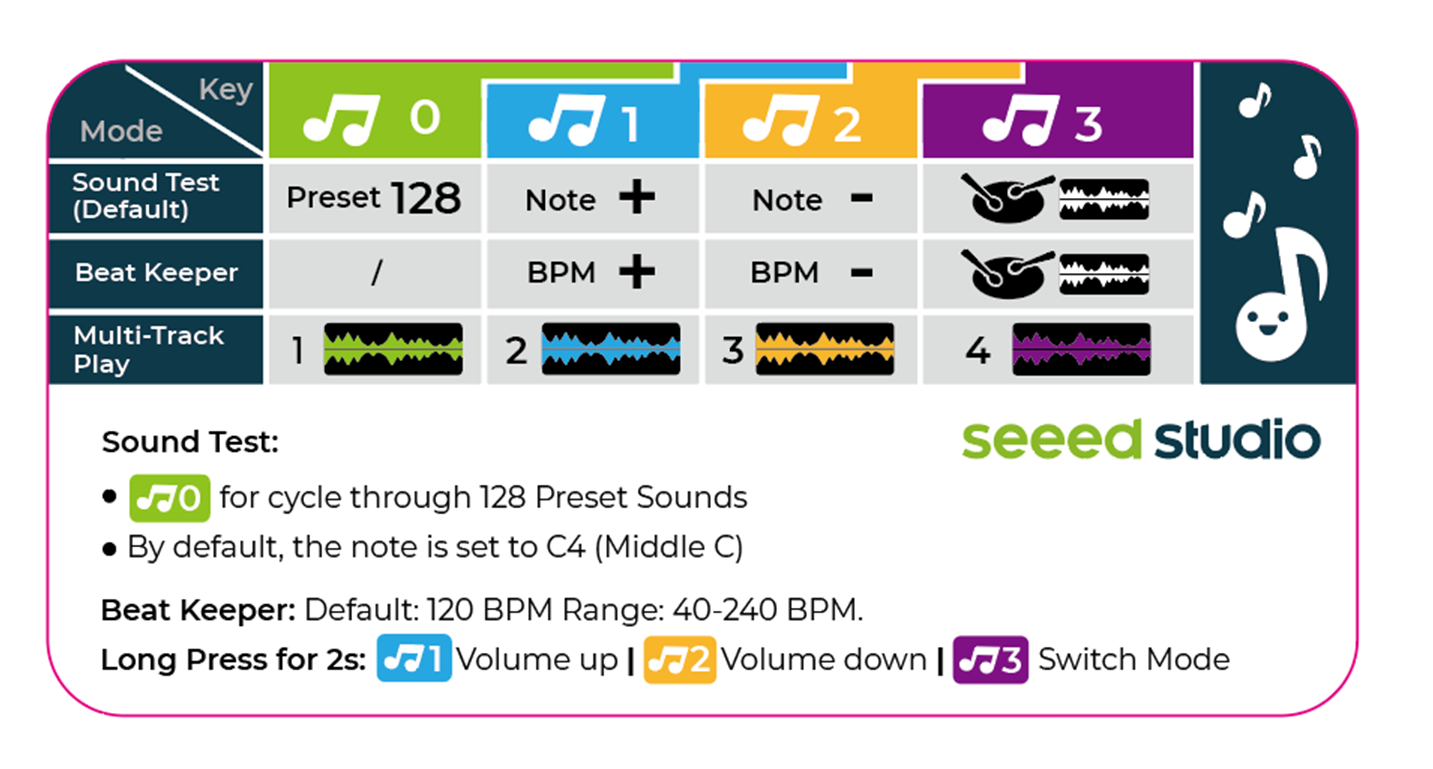
Funciones Detalladas de las Teclas
-
Prueba de Sonido (Modo Predeterminado):
- 🎵0: Cicla a través de 128 sonidos de instrumentos preestablecidos. Cada pulsación cambia al siguiente sonido.
- 🎵1: Aumenta el tono de la nota (ej., de C4 a D4).
- 🎵2: Disminuye el tono de la nota (ej., de C4 a B3).
- 🎵3: Clic para iniciar/detener el metrónomo.
-
Modo Mantenedor de Ritmo:
- 🎵0: (Sin función en este modo)
- 🎵1: Aumenta BPM (tempo) en 1 paso (solo funciona cuando el metrónomo está activo).
- 🎵2: Disminuye BPM (tempo) en 1 paso (solo funciona cuando el metrónomo está activo).
- 🎵3: Clic para iniciar/detener el metrónomo (predeterminado: 120 BPM, rango: 40–240 BPM).
-
Modo Reproducción Multi-Pista:
- 🎵0: Reproduce Pista 1 (sonido o secuencia precargada)
- 🎵1: Reproduce Pista 2
- 🎵2: Reproduce Pista 3
- 🎵3: Reproduce Pista 4
Funciones de Pulsación Larga (Cualquier Modo):
- 🎵1 (mantener 2s): Subir volumen
- 🎵2 (mantener 2s): Bajar volumen
- 🎵3 (mantener 2s): Cambiar al siguiente modo (cicla a través de Prueba de Sonido → Mantenedor de Ritmo → Reproducción Multi-Pista → ...)
Puedes experimentar con todas las características sin ninguna configuración adicional. Para personalización avanzada o para re-flashear el firmware, consulta el código de ejemplo StateMachine.
Modo BootLoader
En algunos casos, puedes encontrar que el Sintetizador MIDI XIAO no puede ser programado a través del puerto serie (por ejemplo, si el dispositivo no es reconocido o la carga falla). En estas situaciones, necesitas entrar al modo Bootloader (BOOT) para re-flashear el firmware.
¿Por qué Entrar al Modo BOOT?
- Para recuperar el dispositivo cuando no puede ser programado normalmente vía USB/serie
- Para re-flashear firmware después de una carga fallida o corrupción del firmware
Cómo Entrar al Modo BOOT
Primero, abre la cubierta trasera del mini sintetizador para acceder a los botones BOOT y RESET en el módulo XIAO ESP32-C3. Hay dos métodos:

-
Método 1: Secuencia de Botones
- Con el dispositivo encendido, presiona y mantén el botón BOOT (no lo sueltes).
- Mientras mantienes BOOT, presiona el botón RESET una vez.
- Suelta el botón BOOT.
-
Método 2: Ciclo de Alimentación
- Desconecta la alimentación (desenchufa el cable USB-C).
- Presiona y mantén el botón BOOT.
- Mientras mantienes BOOT, reconecta la alimentación (enchufa el cable USB-C).
- Suelta el botón BOOT.
Después de entrar al modo BOOT, el dispositivo estará listo para la carga de firmware a través del Arduino IDE u otras herramientas.
Reset
Para resetear el dispositivo, simplemente presiona el botón RESET en el módulo XIAO ESP32-C3. El dispositivo se reiniciará.
Descripción de la Librería Arduino
Si esta es tu primera vez usando Arduino, te recomendamos encarecidamente que consultes Introducción a Arduino.
El Sintetizador MIDI XIAO está soportado por la librería Seeed_Arduino_MIDIMaster, que proporciona capacidades completas de control MIDI y síntesis de sonido.
Función
Antes de comenzar a desarrollar un sketch, veamos las funciones disponibles de la librería.
static SAM2695Synth& getInstance() – Devuelve la instancia singleton de la clase SAM2695Synth.
- Parámetros de entrada: Ninguno.
- Valor de retorno: Referencia al objeto singleton SAM2695Synth.
void begin(T& serial, int baud) – Inicializa el sintetizador con la interfaz serie especificada y la velocidad de baudios.
- Parámetros de entrada:
T& serial: El objeto del puerto serie (serie por hardware o software) usado para comunicación MIDI.int baud: La velocidad de baudios para comunicación MIDI (típicamente 31250 para MIDI estándar).
- Valor de retorno: Ninguno.
void setInstrument(uint8_t bank, uint8_t channel, uint8_t value) – Establece el instrumento (timbre) para un canal MIDI específico y banco.
- Parámetros de entrada:
uint8_t bank: El número de banco de instrumentos (0–127).uint8_t channel: El número de canal MIDI (0–15).uint8_t value: El número de instrumento (programa) (0–127).
- Valor de retorno: Ninguno.
void setNoteOn(uint8_t channel, uint8_t pitch, uint8_t velocity) – Activa un evento note-on en el canal especificado con el tono y velocidad dados.
- Parámetros de entrada:
uint8_t channel: El número de canal MIDI (0–15).uint8_t pitch: El número de nota MIDI (0–127).uint8_t velocity: La velocidad (volumen) de la nota (0–127).
- Valor de retorno: Ninguno.
void setNoteOff(uint8_t channel, uint8_t pitch) – Activa un evento note-off en el canal especificado para el tono dado.
- Parámetros de entrada:
uint8_t channel: El número de canal MIDI (0–15).uint8_t pitch: El número de nota MIDI (0–127).
- Valor de retorno: Ninguno.
void setAllNotesOff(uint8_t channel) – Apaga todas las notas que están sonando actualmente en el canal especificado.
- Parámetros de entrada:
uint8_t channel: El número de canal MIDI (0–15).
- Valor de retorno: Ninguno.
void playChord(const musicData& chord) – Reproduce un acorde enviando eventos note-on para todas las notas en la estructura de acorde proporcionada.
- Parámetros de entrada:
const musicData& chord: Una estructura que contiene información de canal, notas, velocidad y tiempo para el acorde.
- Valor de retorno: Ninguno.
void setPitch(uint8_t pitch) – Establece el valor de tono predeterminado para eventos de nota posteriores.
- Parámetros de entrada:
uint8_t pitch: El número de nota MIDI (0–127) a establecer como tono predeterminado.
- Valor de retorno: Ninguno.
uint8_t getPitch() const – Recupera el valor de tono predeterminado actual.
- Parámetros de entrada: Ninguno.
- Valor de retorno: El número de nota MIDI predeterminado actual (0–127).
void setVolume(uint8_t channel, uint8_t level) – Establece el volumen para un canal MIDI específico.
- Parámetros de entrada:
uint8_t channel: El número de canal MIDI (0–15).uint8_t level: El nivel de volumen (0–127).
- Valor de retorno: Ninguno.
void increasePitch() – Aumenta el valor de tono predeterminado en un semitono.
- Parámetros de entrada: Ninguno.
- Valor de retorno: Ninguno.
void decreasePitch() – Disminuye el valor de tono predeterminado en un semitono.
- Parámetros de entrada: Ninguno.
- Valor de retorno: Ninguno.
void increaseVelocity() – Aumenta la velocidad predeterminada (volumen) para eventos de nota.
- Parámetros de entrada: Ninguno.
- Valor de retorno: Ninguno.
void decreaseVelocity() – Disminuye la velocidad predeterminada (volumen) para eventos de nota.
- Parámetros de entrada: Ninguno.
- Valor de retorno: Ninguno.
void increaseBpm() – Aumenta el tempo actual (pulsaciones por minuto) en un paso predefinido.
- Parámetros de entrada: Ninguno.
- Valor de retorno: Ninguno.
void decreaseBpm() – Disminuye el tempo actual (pulsaciones por minuto) en un paso predefinido.
- Parámetros de entrada: Ninguno.
- Valor de retorno: Ninguno.
void setBpm(uint8_t bpm) – Establece el tempo (pulsaciones por minuto) al valor especificado.
- Parámetros de entrada:
uint8_t bpm: El tempo deseado en pulsaciones por minuto (típicamente 40–240).
- Valor de retorno: Ninguno.
uint8_t getBpm() const – Recupera el tempo actual (pulsaciones por minuto).
- Parámetros de entrada: Ninguno.
- Valor de retorno: El valor BPM actual.
Variables Predeterminadas
El siguiente código muestra algunos de los valores predefinidos en la biblioteca, como tipo de instrumento, nota, etc., para ser consultados.
Haz clic aquí para previsualizar el código completo
#define MIDI_SERIAL_BAUD_RATE           31250   //MIDI serial baud rate
#define USB_SERIAL_BAUD_RATE            115200  //USB  serial baud rate
#define MIDI_COMMAND_ON                 0x90    //MIDI Control Switch - On
#define MIDI_COMMAND_OFF                0x80    //MIDI Control Switch - Off
#define BPM_DEFAULT                     120     //default bpm
#define BPM_MIN                         40      //min bpm
#define BPM_MAX                         240     //max bpm
#define BPM_STEP                        10      //step of bpm
#define MIDI_CMD_CONTROL_CHANGE \
0xB0                              // Control Change (or Channel Mode
                                      // Message)
#define MIDI_CMD_PROGRAM_CHANGE 0xC0  // Program Change

#define VELOCITY_MIN                    0       //min velocity(0~127) 0
#define VELOCITY_MAX                    127     //max velocity(0~127) 127
#define VELOCITY_STEP                   10      //step velocity
#define VELOCITY_DEFAULT                64      //default velocity(0~127) 64
#define BASIC_TIME                      60000   //The number of milliseconds corresponding to 1 minute
#define QUATER_NOTE                     0       //Quarter note
#define EIGHTH_NOTE                     1       //Eighth note
#define SIXTEENTH_NOTE                  2       //sixteenth note
#define BEATS_BAR_DEFAULT               4       //default beat - 4/4 beat
#define BEATES_BAR_2                    2       //2/4 beat
#define BEATS_BAR_3                     3       //3/4 beat
#define BEATS_BAR_4                     4       //4/4 beat
#define NOTE_COUNT_DEFAULT              4       //default note count
#define NOTE_COUNT_MIN                  1       //min note count
#define NOTE_COUNT_MAX                  16      //max note count


/* define channel begin */
#define CHANNEL_0                       0
#define CHANNEL_1                       1
#define CHANNEL_2                       2
#define CHANNEL_3                       3
#define CHANNEL_4                       4
#define CHANNEL_5                       5
#define CHANNEL_6                       6
#define CHANNEL_7                       7
#define CHANNEL_8                       8
#define CHANNEL_9                       9
#define CHANNEL_10                      10
#define CHANNEL_11                      11
#define CHANNEL_12                      12
#define CHANNEL_13                      13
#define CHANNEL_14                      14
#define CHANNEL_15                      15


#define NOTE_B0                         23
#define NOTE_C1                         24
#define NOTE_CS1                        25
#define NOTE_D1                         26
#define NOTE_DS1                        27
#define NOTE_E1                         28
#define NOTE_F1                         29
#define NOTE_FS1                        30
#define NOTE_G1                         31
#define NOTE_GS1                        32
#define NOTE_A1                         33
#define NOTE_AS1                        34
#define NOTE_B1                         35
#define NOTE_C2                         36
#define NOTE_CS2                        37
#define NOTE_D2                         38
#define NOTE_DS2                        39
#define NOTE_E2                         40
#define NOTE_F2                         41
#define NOTE_FS2                        42
#define NOTE_G2                         43
#define NOTE_GS2                        44
#define NOTE_A2                         45
#define NOTE_AS2                        46
#define NOTE_B2                         47
#define NOTE_C3                         48
#define NOTE_CS3                        49
#define NOTE_D3                         50
#define NOTE_DS3                        51
#define NOTE_E3                         52
#define NOTE_F3                         53
#define NOTE_FS3                        54
#define NOTE_G3                         55
#define NOTE_GS3                        56
#define NOTE_A3                         57
#define NOTE_AS3                        58
#define NOTE_B3                         59
#define NOTE_C4                         60
#define NOTE_CS4                        61
#define NOTE_D4                         62
#define NOTE_DS4                        63
#define NOTE_E4                         64
#define NOTE_F4                         65
#define NOTE_FS4                        66
#define NOTE_G4                         67
#define NOTE_GS4                        68
#define NOTE_A4                         69
#define NOTE_AS4                        70
#define NOTE_B4                         71
#define NOTE_C5                         72
#define NOTE_CS5                        73
#define NOTE_D5                         74
#define NOTE_DS5                        75
#define NOTE_E5                         76
#define NOTE_F5                         77
#define NOTE_FS5                        78
#define NOTE_G5                         79
#define NOTE_GS5                        80
#define NOTE_A5                         81
#define NOTE_AS5                        82
#define NOTE_B5                         83
#define NOTE_C6                         84
#define NOTE_CS6                        85
#define NOTE_D6                         86
#define NOTE_DS6                        87
#define NOTE_E6                         88
#define NOTE_F6                         89
#define NOTE_FS6                        90
#define NOTE_G6                         91
#define NOTE_GS6                        92
#define NOTE_A6                         93
#define NOTE_AS6                        94
#define NOTE_B6                         95
#define NOTE_C7                         96
#define NOTE_CS7                        97
#define NOTE_D7                         98
#define NOTE_DS7                        99
#define NOTE_E7                         100
#define NOTE_F7                         101
#define NOTE_FS7                        102
#define NOTE_G7                         103
#define NOTE_GS7                        104
#define NOTE_A7                         105
#define NOTE_AS7                        106
#define NOTE_B7                         107
#define NOTE_C8                         108
#define NOTE_CS8                        109
#define NOTE_D8                         110
#define NOTE_DS8                        111
#define REST                            0


typedef enum {
    GrandPiano_1 = 0,
    BrightPiano_2,
    ElGrdPiano_3,
    HonkyTonkPiano,
    ElPiano1,
    ElPiano2,
    Harpsichord,
    Clavi,
    Celesta,
    Glockenspiel,
    MusicBox,
    Vibraphone,
    Marimba,
    Xylophone,
    TubularBells,
    Santur,
    DrawbarOrgan,
    PercussiveOrgan,
    RockOrgan,
    ChurchOrgan,
    ReedOrgan,
    AccordionFrench,
    Harmonica,
    TangoAccordion,
    AcGuitarNylon,
    AcGuitarSteel,
    AcGuitarJazz,
    AcGuitarClean,
    AcGuitarMuted,
    OverdrivenGuitar,
    DistortionGuitar,
    GuitarHarmonics,
    AcousticBass,
    FingerBass,
    PickedBass,
    FretlessBass,
    SlapBass1,
    SlapBass2,
    SynthBass1,
    SynthBass2,
    Violin,
    Viola,
    Cello,
    Contrabass,
    TremoloStrings,
    PizzicatoStrings,
    OrchestralHarp,
    Timpani,
    StringEnsemble1,
    StringEnsemble2,
    SynthStrings1,
    SynthStrings2,
    ChoirAahs,
    VoiceOohs,
    SynthVoice,
    OrchestraHit,
    Trumpet,
    Trombone,
    Tuba,
    MutedTrumpet,
    FrenchHorn,
    BrassSection,
    SynthBrass1,
    SynthBrass2,
    SopranoSax,
    AltoSax,
    TenorSax,
    BaritoneSax,
    Oboe,
    EnglishHorn,
    Bassoon,
    Clarinet,
    Piccolo,
    Flute,
    Recorder,
    PanFlute,
    BlownBottle,
    Shakuhachi,
    Whistle,
    Ocarina,
    Lead1Square,
    Lead2Sawtooth,
    Lead3Calliope,
    Lead4Chiff,
    Lead5Charang,
    Lead6Voice,
    Lead7Fifths,
    Lead8BassLead,
    Pad1Fantasia,
    Pad2Warm,
    Pad3PolySynth,
    Pad4Choir,
    Pad5Bowed,
    Pad6Metallic,
    Pad7Halo,
    Pad8Sweep,
    FX1Rain,
    FX2Soundtrack,
    FX3Crystal,
    FX4Atmosphere,
    FX5Brightness,
    FX6Goblins,
    FX7Echoes,
    FX8SciFi,
    Sitar,
    Banjo,
    Shamisen,
    Koto,
    Kalimba,
    BagPipe,
    Fiddle,
    Shanai,
    TinkleBell,
    Agogo,
    SteelDrums,
    Woodblock,
    TaikoDrum,
    MelodicTom,
    SynthDrum,
    ReverseCymbal,
    GtFretNoise,
    BreathNoise,
    Seashore,
    BirdTweet,
    TelephRing,
    Helicopter,
    Applause,
    Gunshot,
} unit_synth_instrument_t;
Instalación
Paso 1. Descarga la librería Seeed_Arduino_MIDIMaster como un archivo ZIP.
Paso 2. En Arduino IDE, haz clic en Sketch > Include Library > Add .ZIP Library y selecciona el archivo ZIP descargado.

Ejemplo del Sintetizador MIDI XIAO
Ahora que tenemos nuestra librería instalada y entendemos las funciones básicas, ejecutemos algunos ejemplos para nuestro Sintetizador MIDI XIAO para ver cómo se comporta.
Paso 1. Inicia la aplicación Arduino.
Paso 2. Selecciona tu modelo de placa de desarrollo y agrégala al Arduino IDE.
- El Sintetizador MIDI XIAO está integrado con XIAO ESP32-C3, por favor consulta este tutorial para completar la adición.
Demo 1: Reproducción Básica de Notas MIDI
Esta demostración muestra cómo reproducir una sola nota usando el Sintetizador MIDI XIAO.
Materiales Requeridos
| Sintetizador MIDI XIAO |
|---|
 |
Programa de Referencia
#include <Arduino.h>
#include "SAM2695Synth.h"

#ifdef __AVR__
    #include <SoftwareSerial.h>
    SoftwareSerial SSerial(2, 3); // RX, TX
    #define COM_SERIAL SSerial
    #define SHOW_SERIAL Serial
    SAM2695Synth<SoftwareSerial> synth = SAM2695Synth<SoftwareSerial>::getInstance();
#endif

#if defined(ARDUINO_ARCH_RP2040) || defined(ARDUINO_ARCH_RP2350) ||  defined(ARDUINO_XIAO_RA4M1)
    #include <SoftwareSerial.h>
    SoftwareSerial SSerial(D7, D6); // RX, TX
    #define COM_SERIAL SSerial
    #define SHOW_SERIAL Serial
    SAM2695Synth<SoftwareSerial> synth = SAM2695Synth<SoftwareSerial>::getInstance();
#endif

#if  defined(CONFIG_IDF_TARGET_ESP32C3) || defined(CONFIG_IDF_TARGET_ESP32C6) || defined(CONFIG_IDF_TARGET_ESP32S3)
    #define COM_SERIAL Serial0
    #define SHOW_SERIAL Serial
    SAM2695Synth<HardwareSerial> synth = SAM2695Synth<HardwareSerial>::getInstance();
#endif

#ifdef SEEED_XIAO_M0
    #define COM_SERIAL Serial1
    #define SHOW_SERIAL Serial
    SAM2695Synth<Uart> synth = SAM2695Synth<Uart>::getInstance();
#elif defined(ARDUINO_SAMD_VARIANT_COMPLIANCE)
    #define COM_SERIAL Serial1
    #define SHOW_SERIAL SerialUSB
    SAM2695Synth<Uart> synth = SAM2695Synth<Uart>::getInstance();
#endif

#if defined(NRF52840_XXAA)
    #ifdef USE_TINYUSB
    #include <Adafruit_TinyUSB.h>
    #endif
    #define COM_SERIAL Serial1
    #define SHOW_SERIAL Serial

    SAM2695Synth<Uart> synth = SAM2695Synth<Uart>::getInstance();
#endif


void setup()
{
  //serial init to usb
  SHOW_SERIAL.begin(USB_SERIAL_BAUD_RATE);
  // Synth initialization. Since a hardware serial port is used here, the software serial port is commented out.
  synth.begin(COM_SERIAL, MIDI_SERIAL_BAUD_RATE);
  synth.setInstrument(0,CHANNEL_0,unit_synth_instrument_t::GrandPiano_1);
  delay(1000);
}

void loop()
{
  synth.setNoteOn(CHANNEL_0,NOTE_E4,VELOCITY_DEFAULT);
  delay(1000);
  synth.setNoteOff(CHANNEL_0,NOTE_E4);
  delay(1000);
}
Este código reproducirá la nota E4 en el sintetizador integrado, alternando encendido y apagado cada segundo. Puedes cambiar la nota, instrumento o tiempo según sea necesario.
Anotación del programa
Este código representa la funcionalidad central del Sintetizador MIDI XIAO, una solución compacta de síntesis de audio basada en el chip sintetizador SAM2695. La implementación de software demuestra cómo el sintetizador se interfaz con varias variantes de la plataforma XIAO a través de diferentes métodos de comunicación serie.
El Sintetizador MIDI XIAO soporta múltiples plataformas de microcontroladores en el ecosistema XIAO a través de compilación condicional:
- Placas basadas en AVR: Utiliza SoftwareSerial para comunicación con el chip sintetizador
- RP2040/RP2350 y XIAO RA4M1: Implementa SoftwareSerial en pines designados (D7, D6)
- Variantes ESP32: Aprovecha las capacidades nativas de Hardware Serial a través de Serial0
- Placas basadas en SAMD (incluyendo XIAO M0): Usa la interfaz UART de hardware
- nRF52840: Implementa comunicación UART con soporte opcional TinyUSB
Este enfoque versátil asegura que el módulo sintetizador funcione consistentemente en toda la familia de productos XIAO.
La implementación del sintetizador establece dos vías de comunicación:
  SHOW_SERIAL.begin(USB_SERIAL_BAUD_RATE);
  synth.begin(COM_SERIAL, MIDI_SERIAL_BAUD_RATE);
- Una conexión serie dedicada al chip SAM2695 para comandos MIDI
- Una conexión serie separada de interfaz de depuración/usuario para monitoreo y control
Durante el inicio, el Sintetizador MIDI XIAO:
- Establece comunicación serie a la velocidad de baudios apropiada
- Inicializa el motor sintetizador SAM2695
- Configura el instrumento predeterminado (Piano de Cola) en el Canal 0
synth.setInstrument(0,CHANNEL_0,unit_synth_instrument_t::GrandPiano_1);
- Permite estabilización con un retraso de tiempo
El bucle de demostración muestra la capacidad fundamental de generación de sonido mediante:
void loop()
{
  synth.setNoteOn(CHANNEL_0,NOTE_E4,VELOCITY_DEFAULT);
  delay(1000);
  synth.setNoteOff(CHANNEL_0,NOTE_E4);
  delay(1000);
}
- Activar la nota E4 con velocidad estándar
- Mantener la nota durante un segundo
- Liberar la nota
- Pausar antes del siguiente ciclo
Esta implementación representa la base sobre la cual se pueden construir aplicaciones musicales más complejas usando la plataforma Sintetizador MIDI XIAO, ya sea para propósitos educativos, prototipado musical o proyectos de audio embebido.
Demo 2: Secuenciador de Ritmo con Control de Botones
Esta demostración muestra cómo usar los botones físicos del Sintetizador MIDI XIAO para controlar un secuenciador de ritmo simple. Puedes iniciar/detener el ritmo y ajustar el tempo en tiempo real usando los botones.
Materiales Requeridos
| Sintetizador MIDI XIAO |
|---|
|
Programa de Referencia
#include <Arduino.h>
#include "SAM2695Synth.h"
#include "Button.h"

#ifdef __AVR__
    #include <SoftwareSerial.h>
    SoftwareSerial SSerial(2, 3); // RX, TX
    #define COM_SERIAL SSerial
    #define SHOW_SERIAL Serial
    SAM2695Synth<SoftwareSerial> synth = SAM2695Synth<SoftwareSerial>::getInstance();
#endif

#if defined(ARDUINO_ARCH_RP2040) || defined(ARDUINO_ARCH_RP2350) ||  defined(ARDUINO_XIAO_RA4M1)
    #include <SoftwareSerial.h>
    SoftwareSerial SSerial(D7, D6); // RX, TX
    #define COM_SERIAL SSerial
    #define SHOW_SERIAL Serial
    SAM2695Synth<SoftwareSerial> synth = SAM2695Synth<SoftwareSerial>::getInstance();
#endif

#if  defined(CONFIG_IDF_TARGET_ESP32C3) || defined(CONFIG_IDF_TARGET_ESP32C6) || defined(CONFIG_IDF_TARGET_ESP32S3)
    #define COM_SERIAL Serial0
    #define SHOW_SERIAL Serial
    SAM2695Synth<HardwareSerial> synth = SAM2695Synth<HardwareSerial>::getInstance();
#endif

#ifdef SEEED_XIAO_M0
    #define COM_SERIAL Serial1
    #define SHOW_SERIAL Serial
    SAM2695Synth<Uart> synth = SAM2695Synth<Uart>::getInstance();
#elif defined(ARDUINO_SAMD_VARIANT_COMPLIANCE)
    #define COM_SERIAL Serial1
    #define SHOW_SERIAL SerialUSB
    SAM2695Synth<Uart> synth = SAM2695Synth<Uart>::getInstance();
#endif


#if defined(NRF52840_XXAA)
    #ifdef USE_TINYUSB
    #include <Adafruit_TinyUSB.h>
    #endif
    #define COM_SERIAL Serial1
    #define SHOW_SERIAL Serial

    SAM2695Synth<Uart> synth = SAM2695Synth<Uart>::getInstance();
#endif

#if defined(CONFIG_IDF_TARGET_ESP32S3)
    #define BUTTON_A_PIN 4
    #define BUTTON_B_PIN 3
    #define BUTTON_C_PIN 2
    #define BUTTON_D_PIN 1
#elif defined(CONFIG_IDF_TARGET_ESP32C3)
    #define BUTTON_A_PIN 5
    #define BUTTON_B_PIN 4
    #define BUTTON_C_PIN 3
    #define BUTTON_D_PIN 2
#elif defined(CONFIG_IDF_TARGET_ESP32C6)
    #define BUTTON_A_PIN 21
    #define BUTTON_B_PIN 2
    #define BUTTON_C_PIN 1
    #define BUTTON_D_PIN 0
#else //You need to refer to the corresponding manual...
    #define BUTTON_A_PIN 0 //You need to refer to the corresponding manual...
    #define BUTTON_B_PIN 1 //You need to refer to the corresponding manual...
    #define BUTTON_C_PIN 2 //You need to refer to the corresponding manual...
    #define BUTTON_D_PIN 3 //You need to refer to the corresponding manual...
#endif

//Define the structure needed for the button
BtnState btnA = {HIGH, HIGH, 0, 0, false};
BtnState btnB = {HIGH, HIGH, 0, 0, false};
BtnState btnC = {HIGH, HIGH, 0, 0, false};


bool music_on_off_flag = false;
int bpm = BPM_DEFAULT;                            // init BPM,BPM_DEFAULT = 120
int beatsPerBar = BEATS_BAR_DEFAULT;              // Beats per measure, which can be 2, 3, or 4
int noteType = QUATER_NOTE;                       // Note type selection: 0 (quarter note), 1 (eighth note), 2 (sixteenth note)
int beatCount = 0;                                // Beat counter
unsigned long previousMillis = 0;                 // Record the time of the last MIDI signal sent


void setup()
{
    //serial init to usb
    SHOW_SERIAL.begin(USB_SERIAL_BAUD_RATE);
    // Synth initialization. Since a hardware serial port is used here, the software serial port is commented out.
    synth.begin(COM_SERIAL, MIDI_SERIAL_BAUD_RATE);
    synth.setInstrument(0,CHANNEL_0,unit_synth_instrument_t::GrandPiano_1);
    initButtons(BUTTON_A_PIN);
    initButtons(BUTTON_B_PIN);
    initButtons(BUTTON_C_PIN);

    delay(1000);
}

void loop()
{
    detectButtonEvents(BUTTON_A_PIN, btnA, shortPressFlag_A, longPressFlag_A, releaseFlag_A);
    detectButtonEvents(BUTTON_B_PIN, btnB, shortPressFlag_B, longPressFlag_B, releaseFlag_B);
    detectButtonEvents(BUTTON_C_PIN, btnC, shortPressFlag_C, longPressFlag_C, releaseFlag_C);
    if(shortPressFlag_A){
        shortPressFlag_A = false;
        music_on_off_flag = !music_on_off_flag;
    }
    if(shortPressFlag_B){
        shortPressFlag_B = false;
        synth.increaseBpm();
    }
    if(shortPressFlag_C){
        shortPressFlag_C = false;
        synth.decreaseBpm();
    }
    play();
}

void play()
{
    // Calculate the interval between each beat (quarter note) in milliseconds
    // 60,000 milliseconds equals 1 minute
    // Adjust interval based on note type
    unsigned long interval = (BASIC_TIME / synth.getBpm()) / (noteType + 1);

    if(music_on_off_flag)
    {
        unsigned long currentMillis = millis();
        if (currentMillis - previousMillis >= interval)
        {
            previousMillis = currentMillis;
            if (beatCount == 0)
                synth.setNoteOn(CHANNEL_9, NOTE_D2, VELOCITY_DEFAULT);
            else
                synth.setNoteOn(CHANNEL_9, NOTE_C2, VELOCITY_DEFAULT);

            // Increment beat count
            beatCount++;

            // Every four beats, indicating the end of a measure
            if (beatCount >= beatsPerBar)
            {
                // Reset count
                beatCount = 0;
            }
        }
    }
}
Este código demuestra un secuenciador de ritmo simple. El Botón A activa/desactiva el ritmo, el Botón B aumenta el tempo (BPM), y el Botón C disminuye el tempo. El secuenciador reproduce un patrón de batería básico usando notas MIDI en el Canal 9. Puedes expandir este ejemplo para agregar ritmos más complejos o funciones de botón adicionales.
Anotación del programa
Este programa expande la demostración básica de notas MIDI introduciendo interacción del usuario en tiempo real a través de botones físicos. El código utiliza tres botones:
- Botón A: Iniciar/detener la secuencia de ritmo
- Botón B: Aumentar el tempo (BPM)
- Botón C: Disminuir el tempo (BPM)
La función play() calcula el intervalo entre beats basado en el BPM actual y el tipo de nota, y activa sonidos de batería (usando notas MIDI D2 y C2 en el Canal 9) en un patrón repetitivo. El conteo de beats se reinicia cada compás, creando un efecto simple de metrónomo o caja de ritmos.
Este ejemplo demuestra cómo:
- Integrar entrada de botones para control en tiempo real
- Ajustar dinámicamente el tempo y el estado de reproducción
- Usar el Sintetizador MIDI XIAO como un generador de ritmo programable
Puedes mejorar aún más esta demostración agregando más botones, soportando diferentes sonidos de batería, o implementando lógica de secuenciador más avanzada.
Demo 3: Reproducción de Acordes Multi-Pista con Control de Botones
Esta demostración muestra cómo usar el Sintetizador MIDI XIAO para reproducir acordes multi-pista, con cada acorde activado por un botón. Puedes iniciar/detener independientemente dos patrones de acordes diferentes usando dos botones físicos.
Materiales Requeridos
| Sintetizador MIDI XIAO |
|---|
|
Programa de Referencia
#include <Arduino.h>
#include "SAM2695Synth.h"
#include "Button.h"

#ifdef __AVR__
    #include <SoftwareSerial.h>
    SoftwareSerial SSerial(2, 3); // RX, TX
    #define COM_SERIAL SSerial
    #define SHOW_SERIAL Serial
    SAM2695Synth<SoftwareSerial> synth = SAM2695Synth<SoftwareSerial>::getInstance();
#endif

#if defined(ARDUINO_ARCH_RP2040) || defined(ARDUINO_ARCH_RP2350) ||  defined(ARDUINO_XIAO_RA4M1)
    #include <SoftwareSerial.h>
    SoftwareSerial SSerial(D7, D6); // RX, TX
    #define COM_SERIAL SSerial
    #define SHOW_SERIAL Serial
    SAM2695Synth<SoftwareSerial> synth = SAM2695Synth<SoftwareSerial>::getInstance();
#endif

#if  defined(CONFIG_IDF_TARGET_ESP32C3) || defined(CONFIG_IDF_TARGET_ESP32C6) || defined(CONFIG_IDF_TARGET_ESP32S3)
    #define COM_SERIAL Serial0
    #define SHOW_SERIAL Serial
    SAM2695Synth<HardwareSerial> synth = SAM2695Synth<HardwareSerial>::getInstance();
#endif

#ifdef SEEED_XIAO_M0
    #define COM_SERIAL Serial1
    #define SHOW_SERIAL Serial
    SAM2695Synth<Uart> synth = SAM2695Synth<Uart>::getInstance();
#elif defined(ARDUINO_SAMD_VARIANT_COMPLIANCE)
    #define COM_SERIAL Serial1
    #define SHOW_SERIAL SerialUSB
    SAM2695Synth<Uart> synth = SAM2695Synth<Uart>::getInstance();
#endif

#if defined(NRF52840_XXAA)
    #ifdef USE_TINYUSB
    #include <Adafruit_TinyUSB.h>
    #endif
    #define COM_SERIAL Serial1
    #define SHOW_SERIAL Serial

    SAM2695Synth<Uart> synth = SAM2695Synth<Uart>::getInstance();
#endif

#if defined(CONFIG_IDF_TARGET_ESP32S3)
    #define BUTTON_A_PIN 4
    #define BUTTON_B_PIN 3
    #define BUTTON_C_PIN 2
    #define BUTTON_D_PIN 1
#elif defined(CONFIG_IDF_TARGET_ESP32C3)
    #define BUTTON_A_PIN 5
    #define BUTTON_B_PIN 4
    #define BUTTON_C_PIN 3
    #define BUTTON_D_PIN 2
#elif defined(CONFIG_IDF_TARGET_ESP32C6)
    #define BUTTON_A_PIN 21
    #define BUTTON_B_PIN 2
    #define BUTTON_C_PIN 1
    #define BUTTON_D_PIN 0
#else //You need to refer to the corresponding manual...
    #define BUTTON_A_PIN 0 //You need to refer to the corresponding manual...
    #define BUTTON_B_PIN 1 //You need to refer to the corresponding manual...
    #define BUTTON_C_PIN 2 //You need to refer to the corresponding manual...
    #define BUTTON_D_PIN 3 //You need to refer to the corresponding manual...
#endif

//Define the structure needed for the button
BtnState btnA = {HIGH, HIGH, 0, 0, false};
BtnState btnB = {HIGH, HIGH, 0, 0, false};

//Example of multi-track chord data definition
// This structure controls playback on channel 9, with only two notes being played.
// The sound is set to the default sound, and the duration can be adjusted as needed.
const musicData chordTwoNotes =
{
    CHANNEL_1,                          //play on channel 9
    {
        {NOTE_C2, true},                //NOTE_C2 on
        {NOTE_FS2, true},               //NOTE_FS2 on
        {NOTE_E6, false},               //NOTE_E6 off
        {NOTE_CS5, false},              //NOTE_CS5 off
    },
    VELOCITY_DEFAULT ,                  //default velocity(64)
    0,                                  // index Not used here
    BPM_DEFAULT*8,                      //interval time
};

const musicData chordFourNotes =
{
    CHANNEL_2,                          // play on channel 0
    {
        {NOTE_F2, true},                // NOTE_F2 on
        {NOTE_B2, true},                // NOTE_B2 on
        {NOTE_E6, true},                // NOTE_E6 on
        {NOTE_CS5, true},               // NOTE_CS5 on
    },
    VELOCITY_DEFAULT ,                  // default velocity(64)
    0,                                  // index Not used here
    BPM_DEFAULT*4,                      // interval time
};

bool chordTwoNotesFlag = false;         // on or off chord_twoNotes
bool chordFourNotesFlag = false;        // on or off chord_fourNotes
unsigned long preMillisTwoNotes = 0;    // Record the time of the last MIDI signal sent on chord_twoNotes
unsigned long preMillisFourNotes= 0;    // Record the time of the last MIDI signal sent on const musicData chord_fourNotes =


void setup()
{
    //serial init to usb
    SHOW_SERIAL.begin(USB_SERIAL_BAUD_RATE);
    // Synth initialization. Since a hardware serial port is used here, the software serial port is commented out.
    synth.begin(COM_SERIAL, MIDI_SERIAL_BAUD_RATE);
    synth.setInstrument(0,CHANNEL_0,unit_synth_instrument_t::GrandPiano_1);
    // Initialize the buttons you are using.
    initButtons(BUTTON_A_PIN);
    initButtons(BUTTON_B_PIN);

    delay(1000);
}

void loop()
{
    detectButtonEvents(BUTTON_A_PIN, btnA, shortPressFlag_A, longPressFlag_A, releaseFlag_A);
    detectButtonEvents(BUTTON_B_PIN, btnB, shortPressFlag_B, longPressFlag_B, releaseFlag_B);
    if(shortPressFlag_A)
    {
        shortPressFlag_A = false;
        chordTwoNotesFlag = !chordTwoNotesFlag;
    }
    if(shortPressFlag_B)
    {
        shortPressFlag_B = false;
        chordFourNotesFlag = !chordFourNotesFlag;
    }
    play();
}

void play()
{
    unsigned long currentMillis = millis();
    if(chordTwoNotesFlag)
    {
        if (currentMillis - preMillisTwoNotes >= chordTwoNotes.delay)
        {
            preMillisTwoNotes = currentMillis;
            synth.playChord(chordTwoNotes);
        }
    }

    if(chordFourNotesFlag)
    {
        if (currentMillis - preMillisFourNotes >= chordFourNotes.delay)
        {
            preMillisFourNotes = currentMillis;
            synth.playChord(chordFourNotes);
        }
    }
}
Este código demuestra cómo activar dos acordes multi-nota diferentes usando dos botones. El Botón A activa/desactiva la reproducción de un acorde de dos notas, y el Botón B activa/desactiva la reproducción de un acorde de cuatro notas. Cada acorde se reproduce en un canal MIDI diferente y con su propio tiempo.
Anotación del programa
Este programa demuestra la reproducción de acordes multi-pista con control de botones en tiempo real. El código define dos patrones de acordes (chordTwoNotes y chordFourNotes), cada uno con su propio canal MIDI, notas y tiempo. Se utilizan dos botones:
- Botón A: Iniciar/detener la secuencia de acordes de dos notas
- Botón B: Iniciar/detener la secuencia de acordes de cuatro notas
La función play() verifica el tiempo para cada acorde y activa la reproducción si la bandera correspondiente está habilitada. Esto permite la reproducción independiente y superpuesta de diferentes patrones de acordes, simulando un secuenciador multi-pista simple.
Este ejemplo demuestra cómo:
- Definir y reproducir estructuras de acordes personalizadas
- Usar múltiples botones para control musical independiente
- Construir interpretaciones musicales más complejas y en capas con el Sintetizador MIDI XIAO
Puedes expandir esta demostración agregando más patrones de acordes, soportando botones adicionales, o sincronizando la reproducción para efectos musicales más avanzados.
Demo 4: Reproducción de una Secuencia de Melodía Completa
Esta demostración muestra cómo usar el Sintetizador MIDI XIAO para reproducir una secuencia de melodía completa (como una canción) almacenando datos de nota, duración y retraso en un array. El ejemplo demuestra cómo reproducir una melodía pre-programada usando el instrumento Violín incorporado.
Materiales Requeridos
| Sintetizador MIDI XIAO |
|---|
|
Programa de Referencia
#include <SAM2695Synth.h>

#ifdef __AVR__
    #include <SoftwareSerial.h>
    SoftwareSerial SSerial(2, 3); // RX, TX
    #define COM_SERIAL SSerial
    #define SHOW_SERIAL Serial
    SAM2695Synth<SoftwareSerial> synth = SAM2695Synth<SoftwareSerial>::getInstance();
#endif

#if defined(ARDUINO_ARCH_RP2040) || defined(ARDUINO_ARCH_RP2350) ||  defined(ARDUINO_XIAO_RA4M1)
    #include <SoftwareSerial.h>
    SoftwareSerial SSerial(D7, D6); // RX, TX
    #define COM_SERIAL SSerial
    #define SHOW_SERIAL Serial
    SAM2695Synth<SoftwareSerial> synth = SAM2695Synth<SoftwareSerial>::getInstance();
#endif

#if  defined(CONFIG_IDF_TARGET_ESP32C3) || defined(CONFIG_IDF_TARGET_ESP32C6) || defined(CONFIG_IDF_TARGET_ESP32S3)
    #define COM_SERIAL Serial0
    #define SHOW_SERIAL Serial
    SAM2695Synth<HardwareSerial> synth = SAM2695Synth<HardwareSerial>::getInstance();
#endif

#ifdef SEEED_XIAO_M0
    #define COM_SERIAL Serial1
    #define SHOW_SERIAL Serial
    SAM2695Synth<Uart> synth = SAM2695Synth<Uart>::getInstance();
#elif defined(ARDUINO_SAMD_VARIANT_COMPLIANCE)
    #define COM_SERIAL Serial1
    #define SHOW_SERIAL SerialUSB
    SAM2695Synth<Uart> synth = SAM2695Synth<Uart>::getInstance();
#endif


#if defined(NRF52840_XXAA)
    #ifdef USE_TINYUSB
    #include <Adafruit_TinyUSB.h>
    #endif
    #define COM_SERIAL Serial1
    #define SHOW_SERIAL Serial

    SAM2695Synth<Uart> synth = SAM2695Synth<Uart>::getInstance();
#endif

// Can be moved in header file i.e notes.h
#define ARRAY_LEN(array) (sizeof(array) / sizeof(array[0]))

const int midi1[453][3] = {
 {NOTE_D4, 300, 0},
 {NOTE_C4, 300, 0},
 {NOTE_F4, 600, 0},
 {NOTE_F4, 600, 0},
 {NOTE_G4, 600, 0},
 {NOTE_G4, 600, 0},
 {NOTE_A4, 600, 0},
 {NOTE_F4, 600, 0},
 {NOTE_C4, 600, 0},
 {NOTE_D4, 300, 0},
 {NOTE_C4, 300, 0},
 {NOTE_F4, 600, 0},
 {NOTE_F4, 600, 0},
 {NOTE_G4, 600, 0},
 {NOTE_G4, 600, 0},
 {NOTE_A4, 600, 0},
 {NOTE_F4, 1500, 0},
 {NOTE_D4, 300, 0},
 {NOTE_C4, 300, 0},
 {NOTE_F4, 600, 0},
 {NOTE_F4, 600, 0},
 {NOTE_G4, 600, 0},
 {NOTE_G4, 600, 0},
 {NOTE_A4, 600, 0},
 {NOTE_F4, 600, 0},
 {NOTE_C4, 600, 0},
 {NOTE_D4, 300, 0},
 {NOTE_C4, 300, 0},
 {NOTE_F4, 600, 0},
 {NOTE_F4, 600, 0},
 {NOTE_G4, 600, 0},
 {NOTE_F4, 2000, 500},


 {NOTE_F4, 300, 0},
 {NOTE_E4, 300, 0},
 {NOTE_C4, 300, 0},
 {NOTE_A3, 300, 0},
 {NOTE_D4, 300, 0},
 {NOTE_C4, 300, 0},
 {NOTE_F4, 600, 0},
 {NOTE_F4, 600, 0},
 {NOTE_G4, 600, 0},
 {NOTE_G4, 600, 0},
 {NOTE_A4, 600, 0},
 {NOTE_F4, 600, 0},
 {NOTE_E4, 600, 0},
 {NOTE_D4, 1200, 0},
 {NOTE_E4, 600, 0},
 {NOTE_F4, 300, 0},
 {NOTE_E4, 600, 0},
 {NOTE_F4, 2000, 500},


 {NOTE_C4, 1200, 0},
 {NOTE_E4, 400, 0},
 {NOTE_F4, 2000, 500},
 {NOTE_C4, 1500, 0},
 {NOTE_F4, 600, 0},
 {NOTE_G4, 1600, 0},
 {NOTE_G4, 300, 0},
 {NOTE_A4, 300, 0},
 {NOTE_AS4, 600, 0},
 {NOTE_A4, 1200, 0},
 {NOTE_G4, 500, 0},
 {NOTE_F4, 300, 0},
 {NOTE_G4, 1000, 500},
 {NOTE_F4, 400, 0},
 {NOTE_E4, 300, 0},
 {NOTE_F4, 3000, 0},
 {NOTE_C4, 1200, 0},
 {NOTE_E4, 400, 0},
 {NOTE_F4, 2000, 500},
 {NOTE_C4, 1500, 0},
 {NOTE_F4, 600, 0},
 {NOTE_G4, 1600, 0},
 {NOTE_G4, 300, 0},
 {NOTE_A4, 300, 0},
 {NOTE_AS4, 600, 0},
 {NOTE_A4, 1200, 0},
 {NOTE_G4, 500, 0},
 {NOTE_F4, 800, 0},
 {NOTE_G4, 800, 0},
 {NOTE_AS4, 400, 0},
 {NOTE_A4, 300, 0},
 {NOTE_F4, 3000, 0},

 {NOTE_AS4, 1200, 0},
 {NOTE_F4, 600, 0},
 {NOTE_G4, 300, 0},
 {NOTE_A4, 2000, 500},
 {NOTE_AS4, 1200, 0},
 {NOTE_F4, 600, 0},
 {NOTE_G4, 300, 0},
 {NOTE_A4, 2000, 500},
 {NOTE_G4, 300, 0},
 {NOTE_F4, 300, 0},
 {NOTE_D4, 600, 0},
 {NOTE_E4, 600, 0},
 {NOTE_F4, 600, 0},
 {NOTE_F4, 600, 0},
 {NOTE_C4, 600, 0},
 {NOTE_C4, 300, 0},
 {NOTE_F4, 1100, 500},
 {NOTE_F4, 300, 0},
 {NOTE_AS4, 300, 0},
 {NOTE_A4, 600, 0},
 {NOTE_G4, 600, 0},
 {NOTE_F4, 300, 0},
 {NOTE_G4, 1800, 500},
 {NOTE_C4, 300, 0},
 {NOTE_E4, 300, 0},
 {NOTE_F4, 300, 0},
 {NOTE_G4, 300, 0},
 {NOTE_F4, 1000, 500},


 {NOTE_G4, 400, 0},
 {NOTE_G4, 600, 0},
 {NOTE_F4, 300, 0},
 {NOTE_D4, 600, 0},
 {NOTE_F4, 300, 0},
 {NOTE_G4, 300, 0},
 {NOTE_A4, 300, 0},
 {NOTE_B4, 300, 0},
 {NOTE_G4, 300, 0},
 {NOTE_A4, 700, 0},
 {NOTE_F4, 300, 0},
 {NOTE_C4, 300, 0},
 {NOTE_F4, 300, 0},
 {NOTE_G4, 300, 0},
 {NOTE_G4, 600, 0},
 {NOTE_F4, 300, 0},
 {NOTE_D4, 600, 0},
 {NOTE_G4, 300, 0},
 {NOTE_F4, 300, 0},
 {NOTE_B4, 300, 0},
 {NOTE_A4, 1500, 500},


 {NOTE_C4, 300, 0},
 {NOTE_F4, 300, 0},
 {NOTE_G4, 300, 0},
 {NOTE_G4, 600, 0},
 {NOTE_F4, 300, 0},
 {NOTE_D4, 600, 0},
 {NOTE_F4, 300, 0},
 {NOTE_G4, 300, 0},
 {NOTE_A4, 300, 0},
 {NOTE_B4, 300, 0},
 {NOTE_G4, 300, 0},
 {NOTE_A4, 600, 0},
 {NOTE_F4, 600, 0},
 {NOTE_E4, 600, 0},
 {NOTE_D4, 1200, 0},
 {NOTE_E4, 600, 0},
 {NOTE_F4, 300, 0},
 {NOTE_E4, 600, 0},
 {NOTE_F4, 1200, 500},


 {NOTE_G4, 300, 0},
 {NOTE_G4, 600, 0},
 {NOTE_F4, 300, 0},
 {NOTE_D4, 600, 0},
 {NOTE_F4, 300, 0},
 {NOTE_G4, 300, 0},
 {NOTE_A4, 300, 0},
 {NOTE_B4, 300, 0},
 {NOTE_G4, 300, 0},
 {NOTE_A4, 600, 0},
 {NOTE_F4, 300, 0},
 {NOTE_C4, 300, 0},
 {NOTE_F4, 300, 0},
 {NOTE_G4, 300, 0},
 {NOTE_G4, 600, 0},
 {NOTE_F4, 300, 0},
 {NOTE_D4, 600, 0},
 {NOTE_G4, 300, 0},
 {NOTE_F4, 300, 0},
 {NOTE_B4, 300, 57},
 {NOTE_A4, 1000, 0},

 {NOTE_G3, 300, 0},
 {NOTE_C4, 300, 0},
 {NOTE_F4, 300, 0},
 {NOTE_G4, 300, 0},
 {NOTE_G4, 600, 0},
 {NOTE_F4, 300, 0},
 {NOTE_D4, 600, 0},
 {NOTE_F4, 300, 0},
 {NOTE_G4, 300, 0},
 {NOTE_A4, 300, 0},
 {NOTE_B4, 300, 0},
 {NOTE_G4, 300, 0},
 {NOTE_A4, 600, 0},
 {NOTE_F4, 600, 0},
 {NOTE_E4, 600, 0},
 {NOTE_D4, 1000, 0},
 {NOTE_E4, 600, 0},
 {NOTE_F4, 300, 0},
 {NOTE_E4, 600, 0},
 {NOTE_F4, 1000, 0},


 {NOTE_G3, 300, 0},
 {NOTE_C4, 300, 0},
 {NOTE_F4, 300, 0},
 {NOTE_G4, 300, 0},
 {NOTE_G4, 600, 0},
 {NOTE_F4, 300, 0},
 {NOTE_D4, 600, 0},
 {NOTE_F4, 300, 0},
 {NOTE_G4, 300, 0},
 {NOTE_A4, 300, 0},
 {NOTE_B4, 300, 0},
 {NOTE_G4, 300, 0},
 {NOTE_A4, 600, 0},
 {NOTE_F4, 300, 0},
 {NOTE_C4, 300, 0},
 {NOTE_F4, 300, 0},
 {NOTE_G4, 300, 0},
 {NOTE_G4, 600, 0},
 {NOTE_F4, 300, 0},
 {NOTE_D4, 600, 0},
 {NOTE_G4, 300, 0},
 {NOTE_F4, 300, 0},
 {NOTE_B4, 300, 26},
 {NOTE_A4, 1200, 0},


 {NOTE_G3, 300, 0},
 {NOTE_C4, 300, 0},
 {NOTE_F4, 300, 0},
 {NOTE_G4, 300, 0},
 {NOTE_G4, 600, 0},
 {NOTE_F4, 300, 0},
 {NOTE_D4, 600, 0},
 {NOTE_F4, 300, 0},
 {NOTE_G4, 300, 0},
 {NOTE_A4, 300, 0},
 {NOTE_B4, 300, 0},
 {NOTE_G4, 300, 0},
 {NOTE_A4, 600, 0},
 {NOTE_F4, 600, 0},
 {NOTE_E4, 600, 0},
 {NOTE_D4, 1000, 0},
 {NOTE_E4, 1000, 0},
 {NOTE_F4, 300, 0},
 {NOTE_E4, 600, 0},


 {NOTE_C4, 800, 0},
 {NOTE_C4, 300, 0},
 {NOTE_C4, 300, 0},
 {NOTE_DS4, 300, 0},
 {NOTE_D4, 300, 0},
 {NOTE_C4, 600, 0},
 {NOTE_AS3, 600, 0},
 {NOTE_C4, 2000, 0},
 {NOTE_C4, 800, 0},
 {NOTE_C4, 800, 0},
 {NOTE_DS4, 300, 0},
 {NOTE_F4, 300, 0},
 {NOTE_G4, 600, 0},
 {NOTE_F4, 600, 0},
 {NOTE_GS4, 600, 0},
 {NOTE_G4, 1200, 0},
 {NOTE_C4, 800, 0},
 {NOTE_C4, 800, 0},
 {NOTE_DS4, 300, 0},
 {NOTE_D4, 300, 0},
 {NOTE_C4, 300, 0},
 {NOTE_C4, 300, 0},
 {NOTE_AS3, 600, 0},
 {NOTE_C4, 1200, 0},
 {NOTE_C4, 300, 0},
 {NOTE_F4, 300, 0},
 {NOTE_G4, 600, 0},
 {NOTE_F4, 600, 0},
 {NOTE_F4, 600, 0},
 {NOTE_GS4, 300, 0},
 {NOTE_G4, 300, 0},
 {NOTE_F4, 300, 0},
 {NOTE_F4, 300, 0},
 {NOTE_DS4, 600, 1200},


 {NOTE_G3, 300, 0},
 {NOTE_C4, 300, 0},
 {NOTE_F4, 500, 100},
 {NOTE_G4, 500, 0},
 {NOTE_F4, 300, 0},
 {NOTE_D4, 600, 0},
 {NOTE_F4, 300, 0},
 {NOTE_G4, 300, 0},
 {NOTE_A4, 300, 0},
 {NOTE_B4, 300, 0},
 {NOTE_G4, 300, 0},
 {NOTE_A4, 500, 0},
 {NOTE_F4, 300, 0},
 {NOTE_C4, 300, 0},
 {NOTE_F4, 300, 0},
 {NOTE_G4, 300, 0},
 {NOTE_G4, 600, 0},
 {NOTE_F4, 300, 0},
 {NOTE_D4, 500, 100},
 {NOTE_G4, 300, 0},
 {NOTE_F4, 300, 0},
 {NOTE_B4, 300, 57},
 {NOTE_A4, 1000, 0},


 {NOTE_G3, 300, 0},
 {NOTE_C4, 300, 0},
 {NOTE_F4, 300, 0},
 {NOTE_G4, 300, 0},
 {NOTE_G4, 600, 0},
 {NOTE_F4, 300, 0},
 {NOTE_D4, 600, 0},
 {NOTE_F4, 300, 0},
 {NOTE_G4, 300, 0},
 {NOTE_A4, 300, 0},
 {NOTE_B4, 300, 0},
 {NOTE_G4, 300, 0},
 {NOTE_A4, 600, 0},
 {NOTE_F4, 600, 0},
 {NOTE_E4, 600, 0},
 {NOTE_D4, 1000, 0},
 {NOTE_E4, 600, 0},
 {NOTE_F4, 300, 0},
 {NOTE_E4, 600, 0},
 {NOTE_F4, 1500, 0},


 {NOTE_G3, 300, 0},
 {NOTE_C4, 300, 0},
 {NOTE_F4, 300, 0},
 {NOTE_G4, 300, 0},
 {NOTE_G4, 600, 0},
 {NOTE_F4, 300, 0},
 {NOTE_D4, 600, 0},
 {NOTE_F4, 300, 0},
 {NOTE_G4, 300, 0},
 {NOTE_A4, 300, 0},
 {NOTE_B4, 300, 0},
 {NOTE_G4, 300, 0},
 {NOTE_A4, 600, 0},
 {NOTE_F4, 300, 0},
 {NOTE_C4, 300, 0},
 {NOTE_F4, 300, 0},
 {NOTE_G4, 300, 0},
 {NOTE_G4, 600, 0},
 {NOTE_F4, 300, 0},
 {NOTE_D4, 600, 0},
 {NOTE_G4, 300, 0},
 {NOTE_F4, 300, 10},
 {NOTE_B4, 300, 10},
 {NOTE_A4, 1500, 0},
 {NOTE_G3, 300, 0},
 {NOTE_C4, 300, 0},
 {NOTE_F4, 300, 0},
 {NOTE_G4, 300, 0},
 {NOTE_G4, 600, 0},
 {NOTE_F4, 300, 0},
 {NOTE_D4, 600, 0},
 {NOTE_F4, 300, 0},
 {NOTE_G4, 300, 0},
 {NOTE_A4, 300, 0},
 {NOTE_B4, 300, 0},
 {NOTE_G4, 300, 0},
 {NOTE_A4, 600, 0},
 {NOTE_F4, 600, 0},
 {NOTE_E4, 600, 0},
 {NOTE_D4, 1200, 0},
 {NOTE_E4, 600, 0},
 {NOTE_F4, 300, 0},
 {NOTE_E4, 600, 0},
 {NOTE_F4, 1500, 0},


 {NOTE_G3, 300, 0},
 {NOTE_C4, 300, 0},
 {NOTE_F4, 300, 0},
 {NOTE_G4, 300, 0},
 {NOTE_G4, 600, 0},
 {NOTE_F4, 300, 0},
 {NOTE_D4, 600, 0},
 {NOTE_F4, 300, 0},
 {NOTE_G4, 300, 0},
 {NOTE_A4, 300, 0},
 {NOTE_B4, 300, 0},
 {NOTE_G4, 300, 0},
 {NOTE_A4, 600, 0},
 {NOTE_F4, 300, 0},
 {NOTE_C4, 300, 0},
 {NOTE_F4, 300, 0},
 {NOTE_G4, 300, 0},
 {NOTE_G4, 600, 0},
 {NOTE_F4, 300, 0},
 {NOTE_D4, 600, 0},
 {NOTE_G4, 300, 0},
 {NOTE_F4, 300, 0},
 {NOTE_B4, 300, 57},
 {NOTE_A4, 1200, 0},
 {NOTE_G3, 300, 0},
 {NOTE_C4, 300, 0},
 {NOTE_F4, 300, 0},
 {NOTE_G4, 300, 0},
 {NOTE_G4, 600, 0},
 {NOTE_F4, 300, 0},
 {NOTE_D4, 600, 0},
 {NOTE_F4, 300, 0},
 {NOTE_G4, 300, 0},
 {NOTE_A4, 300, 0},
 {NOTE_B4, 300, 0},
 {NOTE_G4, 300, 0},
 {NOTE_A4, 600, 0},
 {NOTE_F4, 600, 0},
 {NOTE_E4, 600, 0},
 {NOTE_D4, 1200, 0},
 {NOTE_E4, 600, 0},
 {NOTE_F4, 300, 0},
 {NOTE_E4, 600, 0},
 {NOTE_F4, 2000, 0},


 {NOTE_G4, 600, 0},
 {NOTE_F4, 300, 0},
 {NOTE_D4, 600, 0},
 {NOTE_F4, 300, 0},
 {NOTE_G4, 300, 0},
 {NOTE_A4, 300, 0},
 {NOTE_B4, 300, 0},
 {NOTE_G4, 300, 0},
 {NOTE_A4, 600, 0},
 {NOTE_F4, 300, 0},
 {NOTE_C4, 300, 0},
 {NOTE_F4, 300, 0},
 {NOTE_G4, 300, 0},
 {NOTE_G4, 600, 0},
 {NOTE_F4, 300, 0},
 {NOTE_D4, 600, 0},
 {NOTE_G4, 300, 0},
 {NOTE_F4, 300, 0},
 {NOTE_B4, 300, 0},
 {NOTE_A4, 1200, 0},
 {NOTE_G3, 300, 0},
 {NOTE_C4, 300, 0},
 {NOTE_F4, 300, 0},
 {NOTE_G4, 300, 0},
 {NOTE_G4, 600, 0},
 {NOTE_F4, 300, 0},
 {NOTE_D4, 600, 0},
 {NOTE_F4, 300, 0},
 {NOTE_G4, 300, 0},
 {NOTE_A4, 300, 0},
 {NOTE_B4, 300, 0},
 {NOTE_G4, 300, 0},
 {NOTE_A4, 600, 0},
 {NOTE_F4, 600, 0},
 {NOTE_E4, 600, 0},
 {NOTE_D4, 1200, 0},
 {NOTE_E4, 600, 0},
 {NOTE_F4, 300, 0},
 {NOTE_E4, 600, 0},
 {NOTE_F4, 1500, 0},
};

void playMidi(const int notes[][3], size_t len) {
    for (int i = 0; i < len; i++) {
        // Play note
        synth.setNoteOn(CHANNEL_0, notes[i][0], 110);
        delay(notes[i][1]);
        // Stop note
        synth.setNoteOff(CHANNEL_0, notes[i][0]);
        delay(notes[i][2]);
    }
}

void setup() {
    // Initialize USB serial port
    SHOW_SERIAL.begin(USB_SERIAL_BAUD_RATE);
    // Initialize MIDI synthesizer
    synth.begin(COM_SERIAL, MIDI_SERIAL_BAUD_RATE);
    // Set instrument sound to Violin
    synth.setInstrument(0, CHANNEL_0, unit_synth_instrument_t::Violin);
    delay(1000);

    // Play MIDI notes
    playMidi(midi1, ARRAY_LEN(midi1));
}

void loop() {
    // Main loop is empty because the music only plays once
}
Este código demuestra cómo reproducir una secuencia de melodía completa iterando a través de un gran array de notas, duraciones y retrasos. La melodía se reproducirá una vez después del encendido o reinicio. Puedes modificar el array para reproducir diferentes canciones o agregar arreglos más complejos.
Anotación del programa
Este programa demuestra cómo:
- Almacenar una melodía completa como un array de valores de nota, duración y retraso
- Usar una función auxiliar (
playMidi) para iterar a través de la melodía y reproducir cada nota en secuencia - Seleccionar un instrumento específico (Violín) para la reproducción
- Reproducir una canción automáticamente al inicio
Puedes expandir esta demostración:
- Cambiando el instrumento o los datos de notas para reproducir diferentes canciones
- Agregando controles de botón para iniciar/detener o repetir la reproducción
- Implementando reproducción multipista o polifónica para efectos musicales más avanzados
Para aquellos que buscan convertir archivos MIDI a código Arduino, pueden probar herramientas como Midi2ArduinoTone. Sin embargo, ten en cuenta que los valores de nota generados por tales herramientas pueden necesitar ser modificados para funcionar con el Sintetizador MIDI XIAO, ya que usan diferentes mapeos de notas. Estas herramientas aún pueden ser útiles como punto de partida para convertir archivos MIDI a un formato que puedas adaptar para este sintetizador.
Recursos
- [PDF] XIAO MIDI Synthesizer SCH
- [ZIP] XIAO MIDI Synthesizer SCH&PCB
- [GitHub] Seeed_Arduino_MIDIMaster Library
Solución de problemas
P1: ¿Cómo puedo convertir un archivo MIDI en código Arduino para el Sintetizador MIDI XIAO?
Para convertir un archivo MIDI en código Arduino que pueda usarse con el Sintetizador MIDI XIAO, puedes seguir estos pasos:
-
Obtener un archivo MIDI
Puedes descargar archivos MIDI gratuitos de los siguientes sitios web:
-
Convertir el archivo MIDI a texto
Usa la herramienta de código abierto midicomp para convertir tu archivo MIDI a un formato de texto legible por humanos.
-
Convertir el texto MIDI a código reproducible
Después de convertir tu archivo MIDI a formato de texto usando
midicomp, necesitas procesar este texto en un array de C/C++ que el Sintetizador MIDI XIAO pueda reproducir. Seeed proporciona scripts de Python para automatizar esta conversión:- Ritmo rápido, pista única (cada inicio de nota como intervalo):
change_fast.py - Ritmo más lento, pista única (cada final de nota como intervalo):
change_shuqing.py - Procesamiento multipista:
change_mutich.py
Ejemplo de uso:
- Coloca tu archivo de texto MIDI (ej.,
1.txt) en el mismo directorio que el script. - Ejecuta el script en tu terminal:
python change_fast.pyEsto generará un archivo de encabezado (ej.,
track_from_miditext.h) que contiene el array de notas.- Copia el array generado en tu sketch de Arduino, reemplazando los datos de melodía.
tip- Los scripts mapean automáticamente los números de nota MIDI a las definiciones de nota del Sintetizador MIDI XIAO.
- Puedes ajustar el script o el array generado para arreglos personalizados o para ajustarse a las limitaciones de memoria.
- Integrar el código generado
- Abre el archivo
.hgenerado y copia el arraymusicData. - Pégalo en tu proyecto Arduino, reemplazando el array de melodía existente.
- Actualiza tu lógica de reproducción si es necesario para coincidir con la nueva estructura del array.
- Ritmo rápido, pista única (cada inicio de nota como intervalo):
P2: ¿Por qué a veces es imposible cargar programas al Sintetizador MIDI XIAO?
Dado que el programa del ESP32-C3 se flashea vía UART, los fallos ocasionales del programa pueden resultar en errores que impiden la carga de programas al XIAO. Además, debido a que XIAO y la placa MIDI se comunican directamente a través de UART, los métodos de arranque tradicionales pueden no funcionar directamente con XIAO. Puedes probar el siguiente enfoque:
- Enciende el Sintetizador MIDI XIAO y retira la placa de desarrollo XIAO ESP32-C3.
- Desconecta el cable USB.
- Mantén presionado el botón B en la placa XIAO ESP32-C3 sin soltarlo.
- Reconecta el cable USB, luego suelta el botón B.
- Carga el programa.
Este procedimiento debería permitir una carga exitosa del programa.
Soporte técnico y discusión de productos
¡Gracias por elegir nuestros productos! Estamos aquí para brindarte diferentes tipos de soporte para asegurar que tu experiencia con nuestros productos sea lo más fluida posible. Ofrecemos varios canales de comunicación para satisfacer diferentes preferencias y necesidades.