MicroPython para Seeed Studio XIAO nRF54L15
Entender MicroPython
Este tutorial tiene como objetivo introducir cómo usar MicroPython en Thonny basado en XIAO nRF54L15.
MicroPython es un intérprete de Python con una función parcial de compilación de código nativo. Proporciona un subconjunto de las funciones de Python 3.5, implementado para procesadores embebidos y sistemas con recursos limitados. Es diferente de CPython y puedes leer más sobre las diferencias aquí.Si necesitas colecciones más interesantes, puedes consultarlas aquí
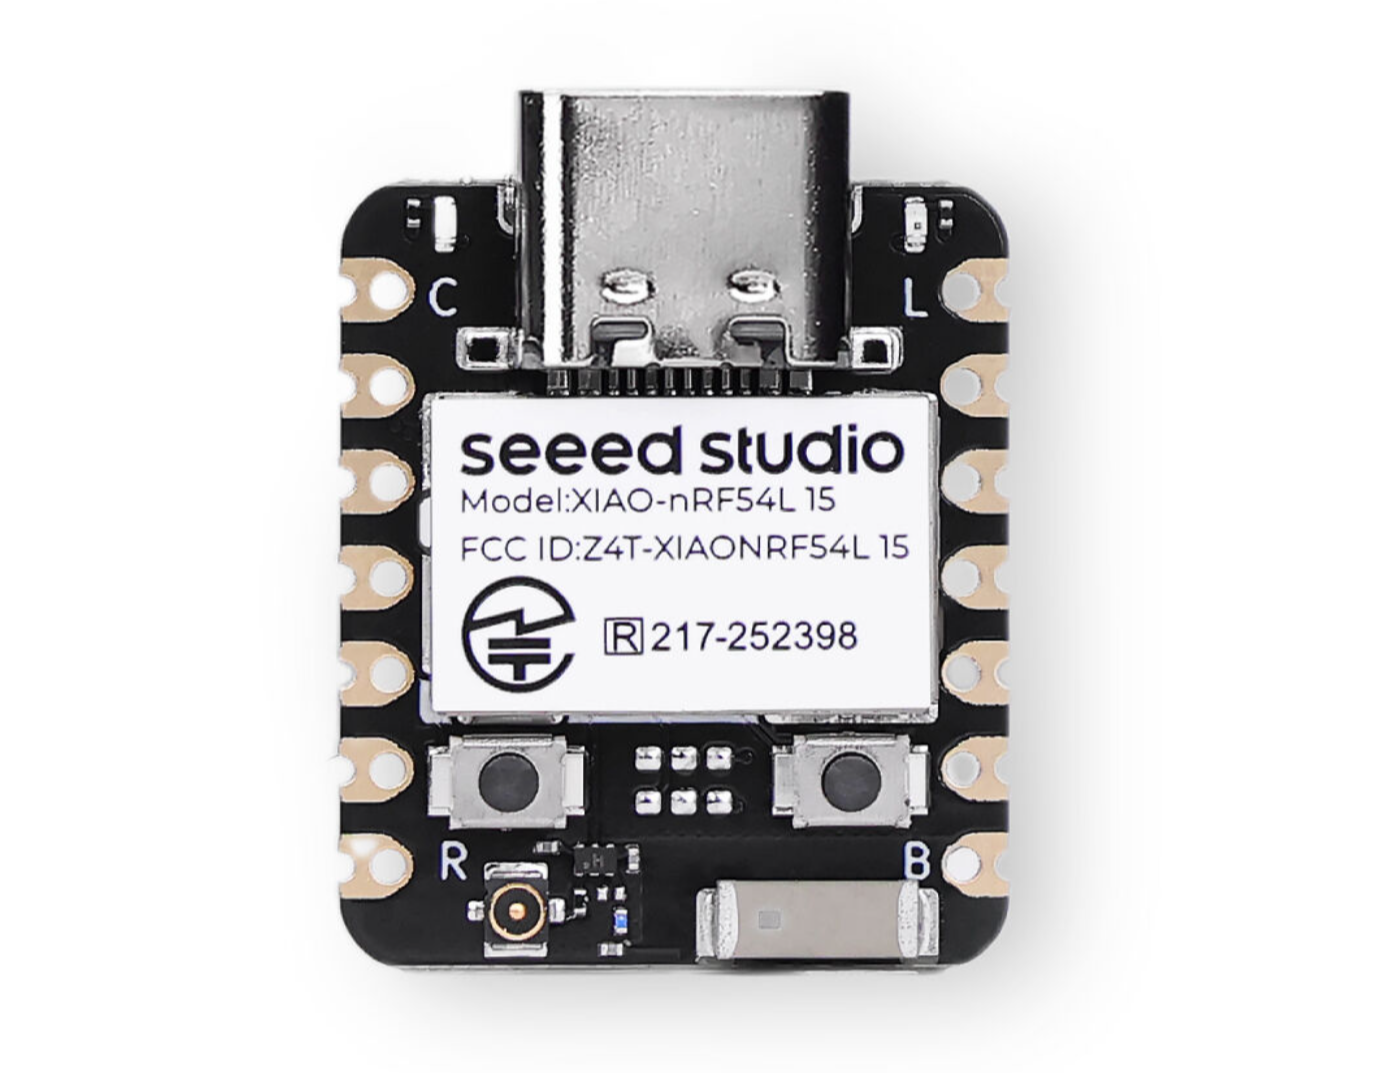
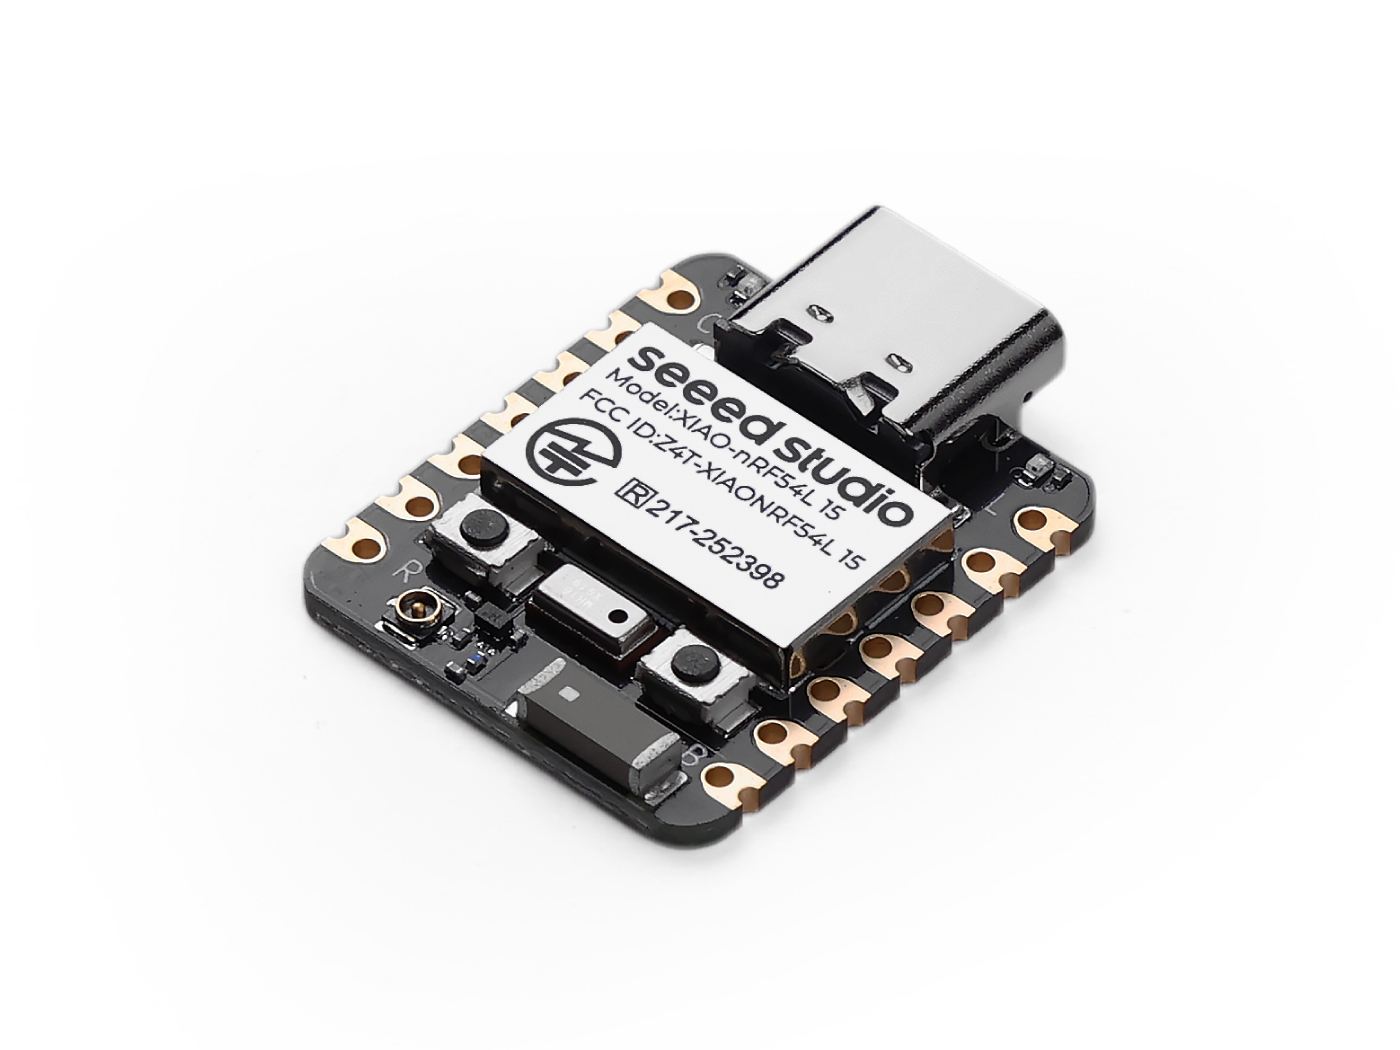
Preparar el hardware.
| Seeed Studio XIAO nRF54L15 | Seeed Studio XIAO nRF54L15 Sense |
|---|---|
 |  |
Instalar Thonny IDE
Elige la versión adecuada para la instalación. Aquí lo estoy instalando en un sistema Windows, así que he seleccionado la versión para Windows.
Sigue las instrucciones para la versión de Python deseada.
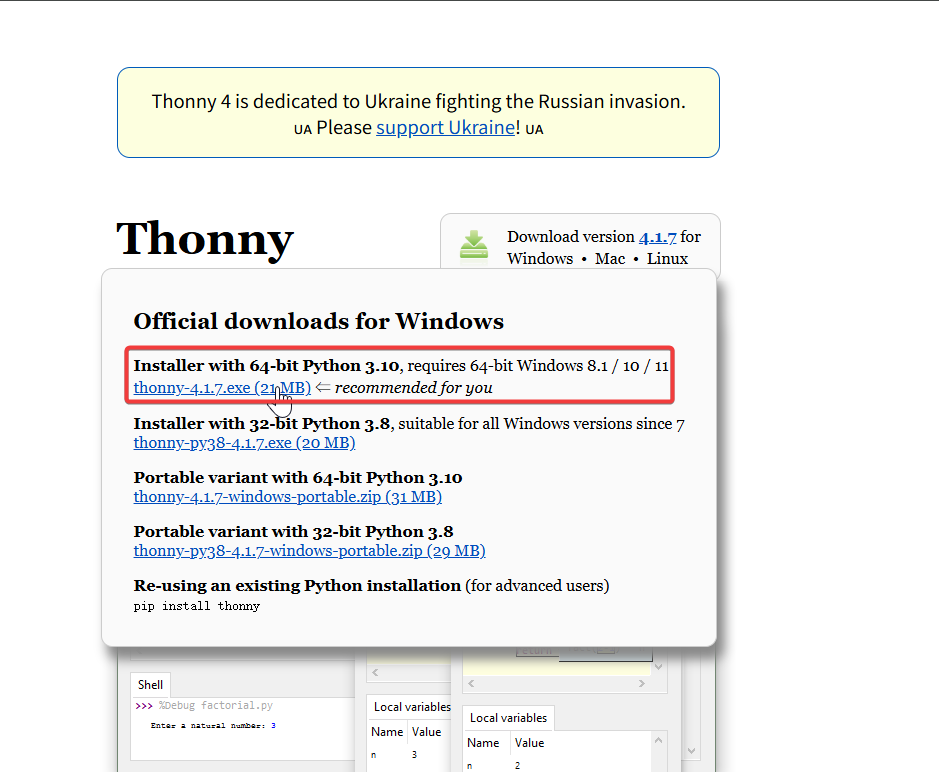
Luego, simplemente sigue los pasos predeterminados para la configuración.
Descargar el repositorio
Clónalo en la máquina local y luego recuerda la ruta donde se almacena este MicroPython de XIAO nRF54L15. Esta ruta se utilizará más adelante.
git clone https://github.com/Seeed-Studio/micropython-seeed-boards.git

Subir archivo de la placa
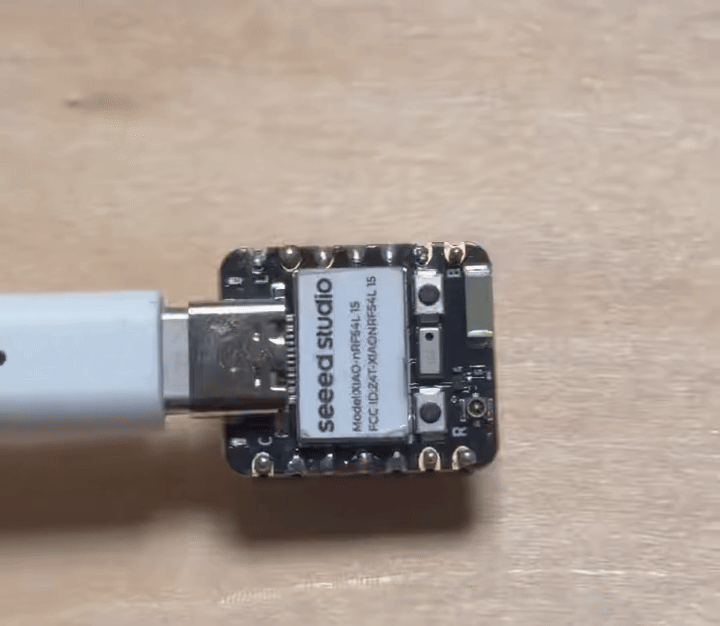
Paso 0. Conecta XIAO NRF54L15 al ordenador usando un cable USB
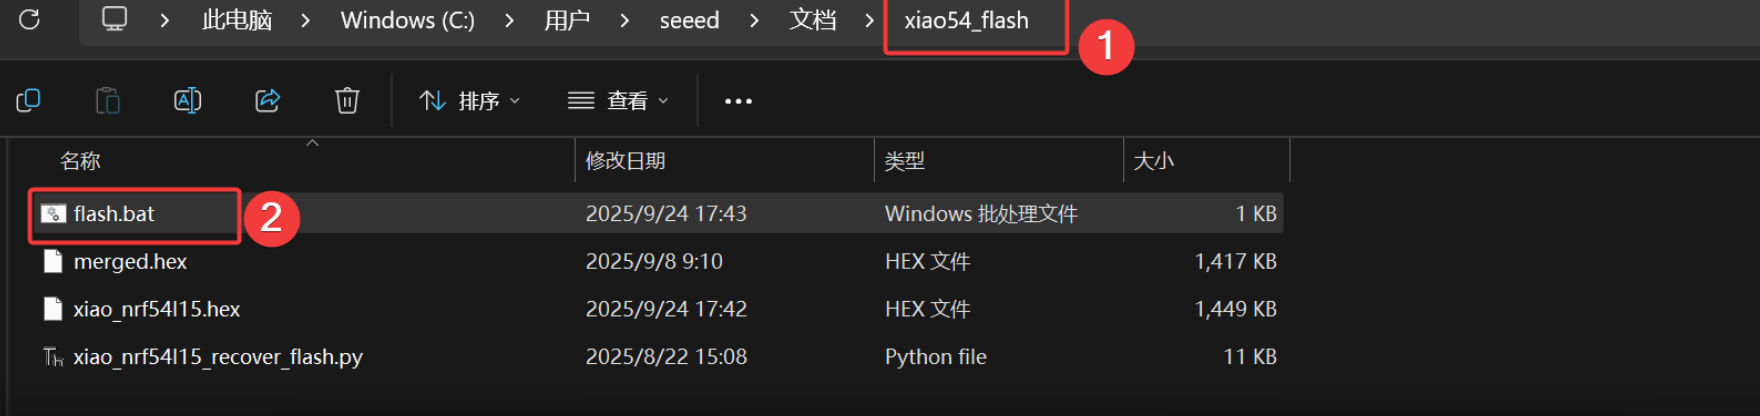
Paso 1. Flashea el firmware de MicroPython para XIAO nRF54L15
-
Descarga el paquete de firmware y extráelo en la ubicación adecuada. Luego haz clic en flash.bat y flasheará automáticamente el firmware por ti.
[Firmware] XIAO nRF54L15 MicroPython Firmware
El resultado es el siguiente
Este script tiene preconfigurados los comandos de la cadena de herramientas de flasheo. Si lo usas por primera vez, puede llevar un poco de tiempo.Se cerrará automáticamente después de la descarga. Si el XIAO NRF54L15 no está conectado, se producirá un error '200' durante el flasheo.
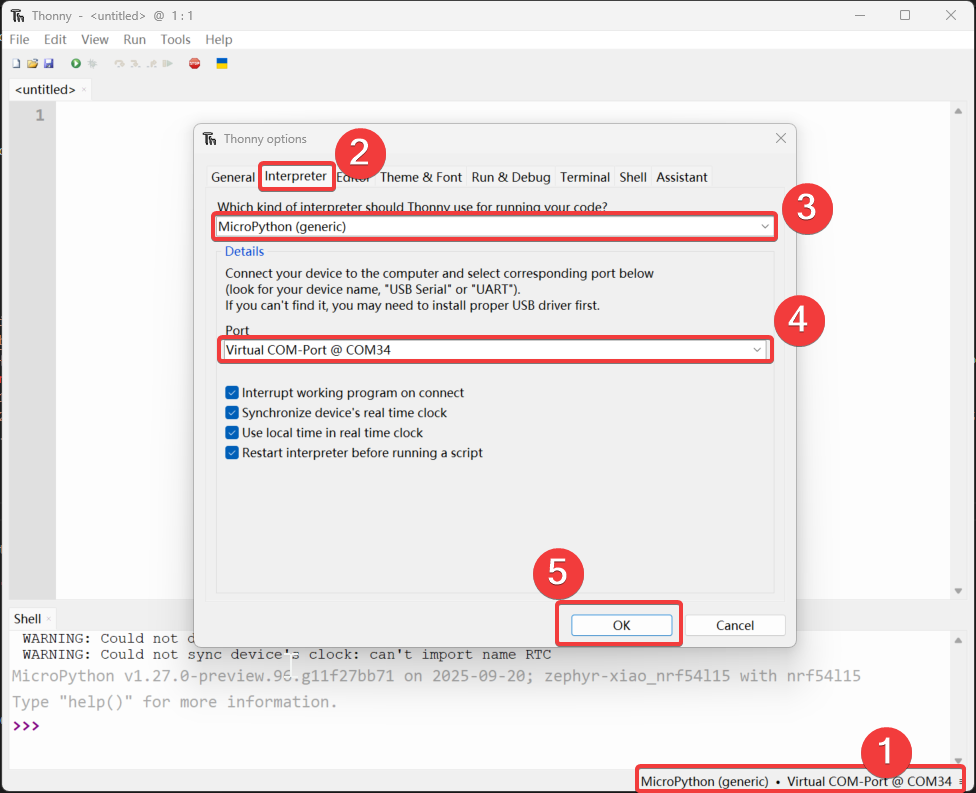
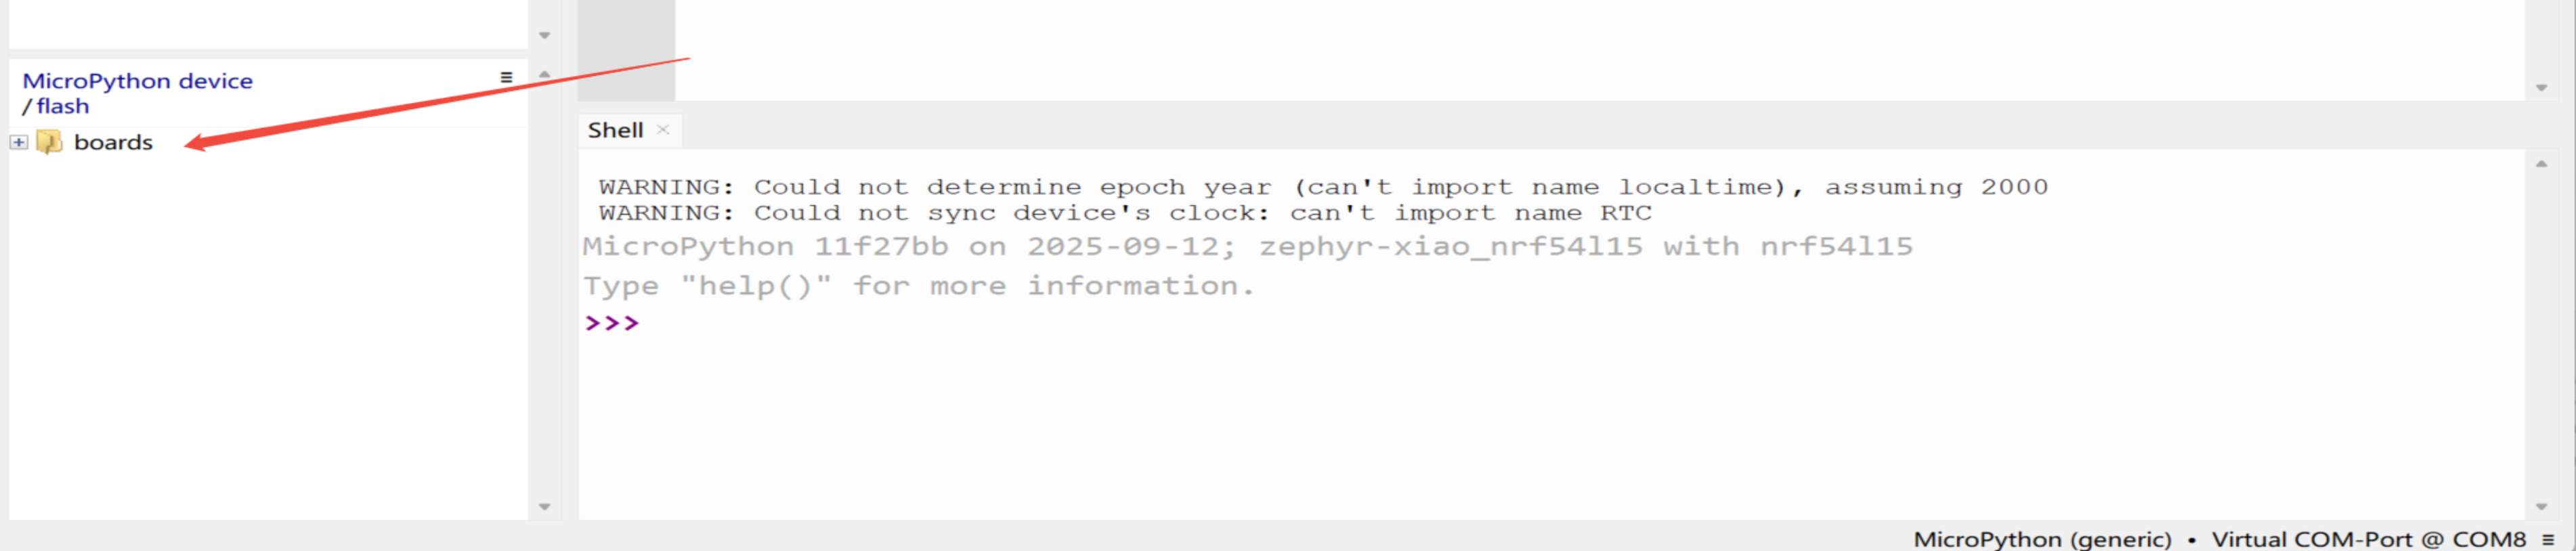
Paso 2. Abre Thonny IDE, luego haz clic en la esquina inferior derecha de la interfaz para configurar las opciones del intérprete. Selecciona MicroPython (generic) y Port
Paso 3. Sube el archivo de las placas
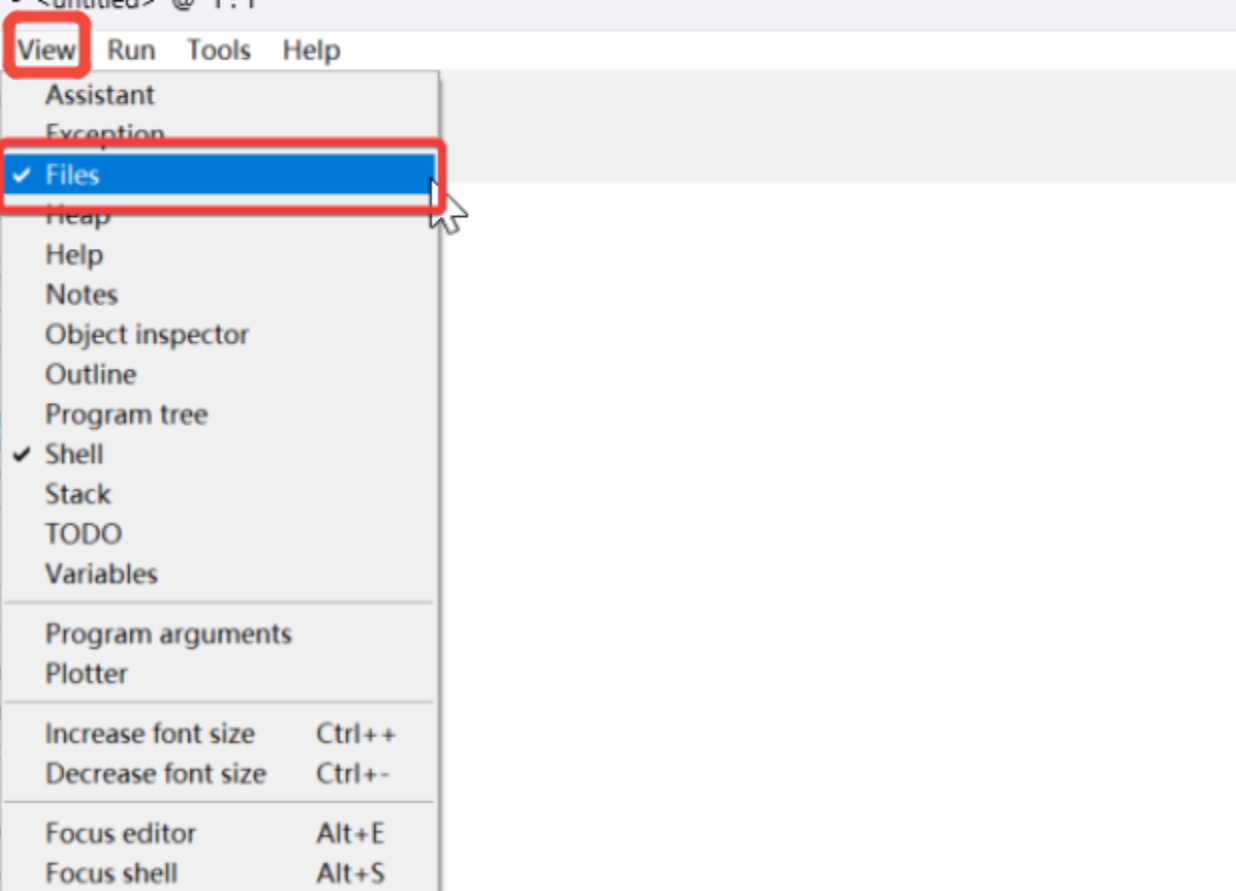
- Abre “view”, selecciona "File", y la ruta del administrador de archivos se mostrará en la barra lateral izquierda.
- Abre la ruta del archivo clonado o descargado y abre
micropython-seeed-boards\examples-Haz clic derecho en la carpeta "boards" y súbela a la flash. Luego podrás ver el archivo subido en el dispositivo/flash de MicroPython.
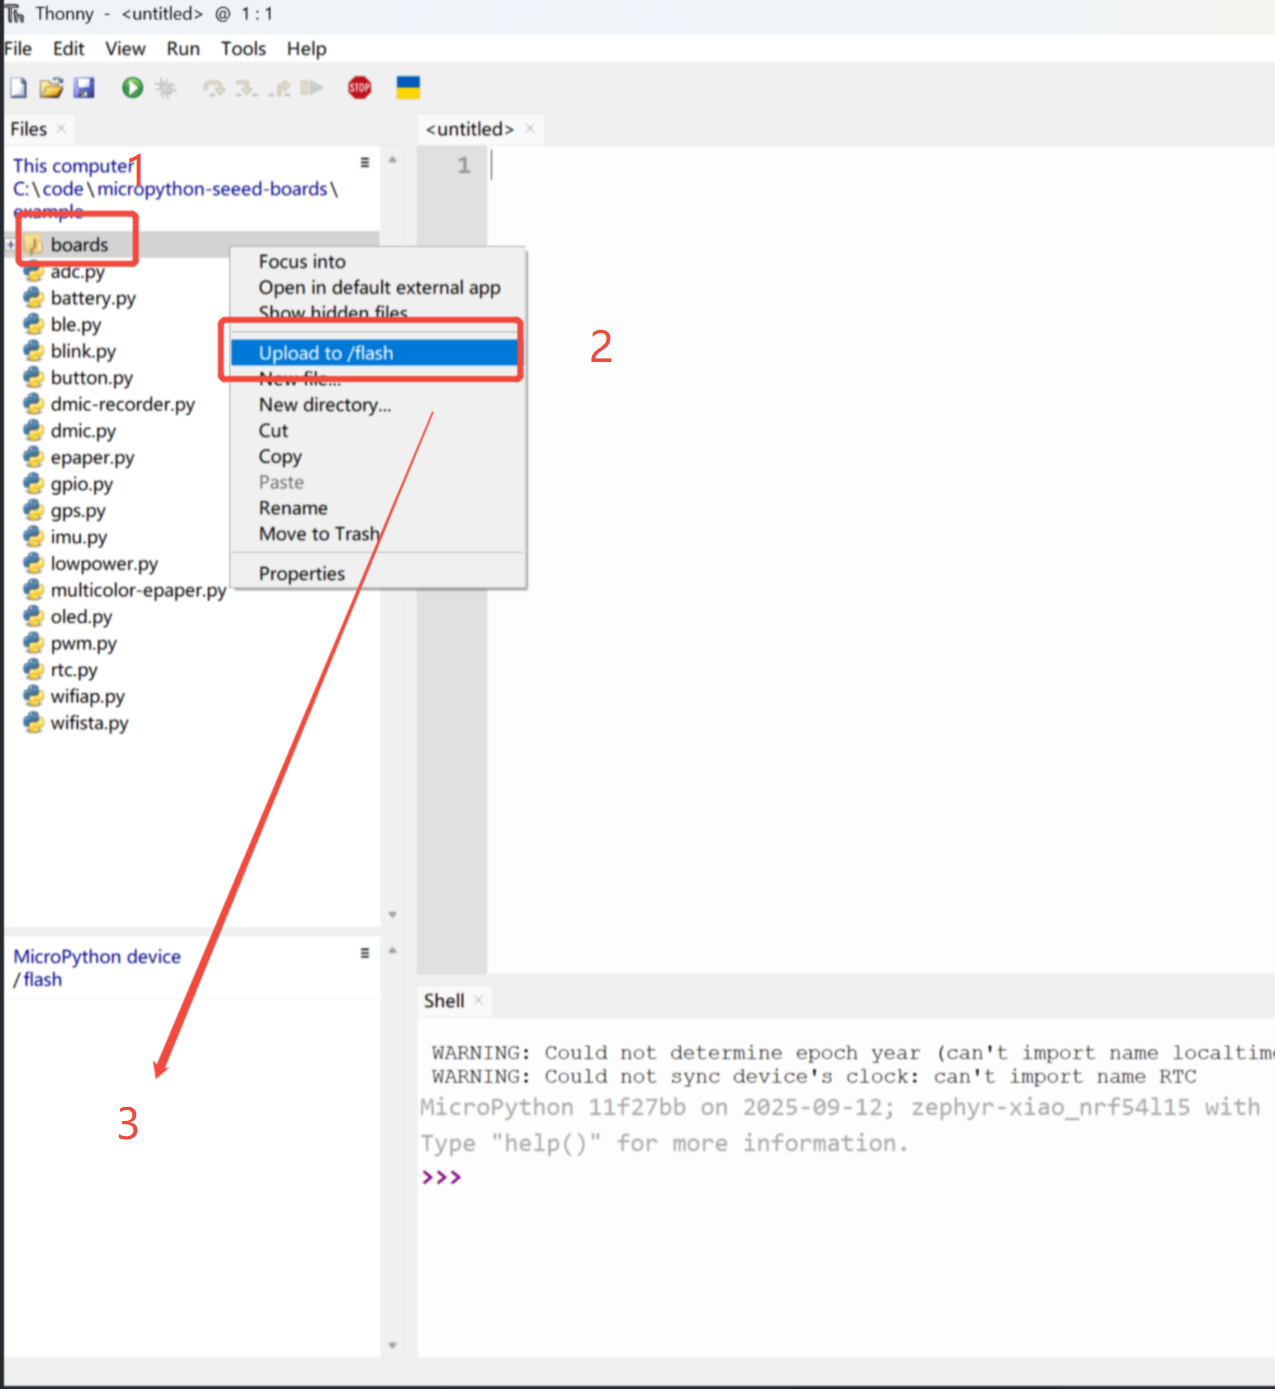
Cuando sea normal, aparecerá un icono en la posición '3'
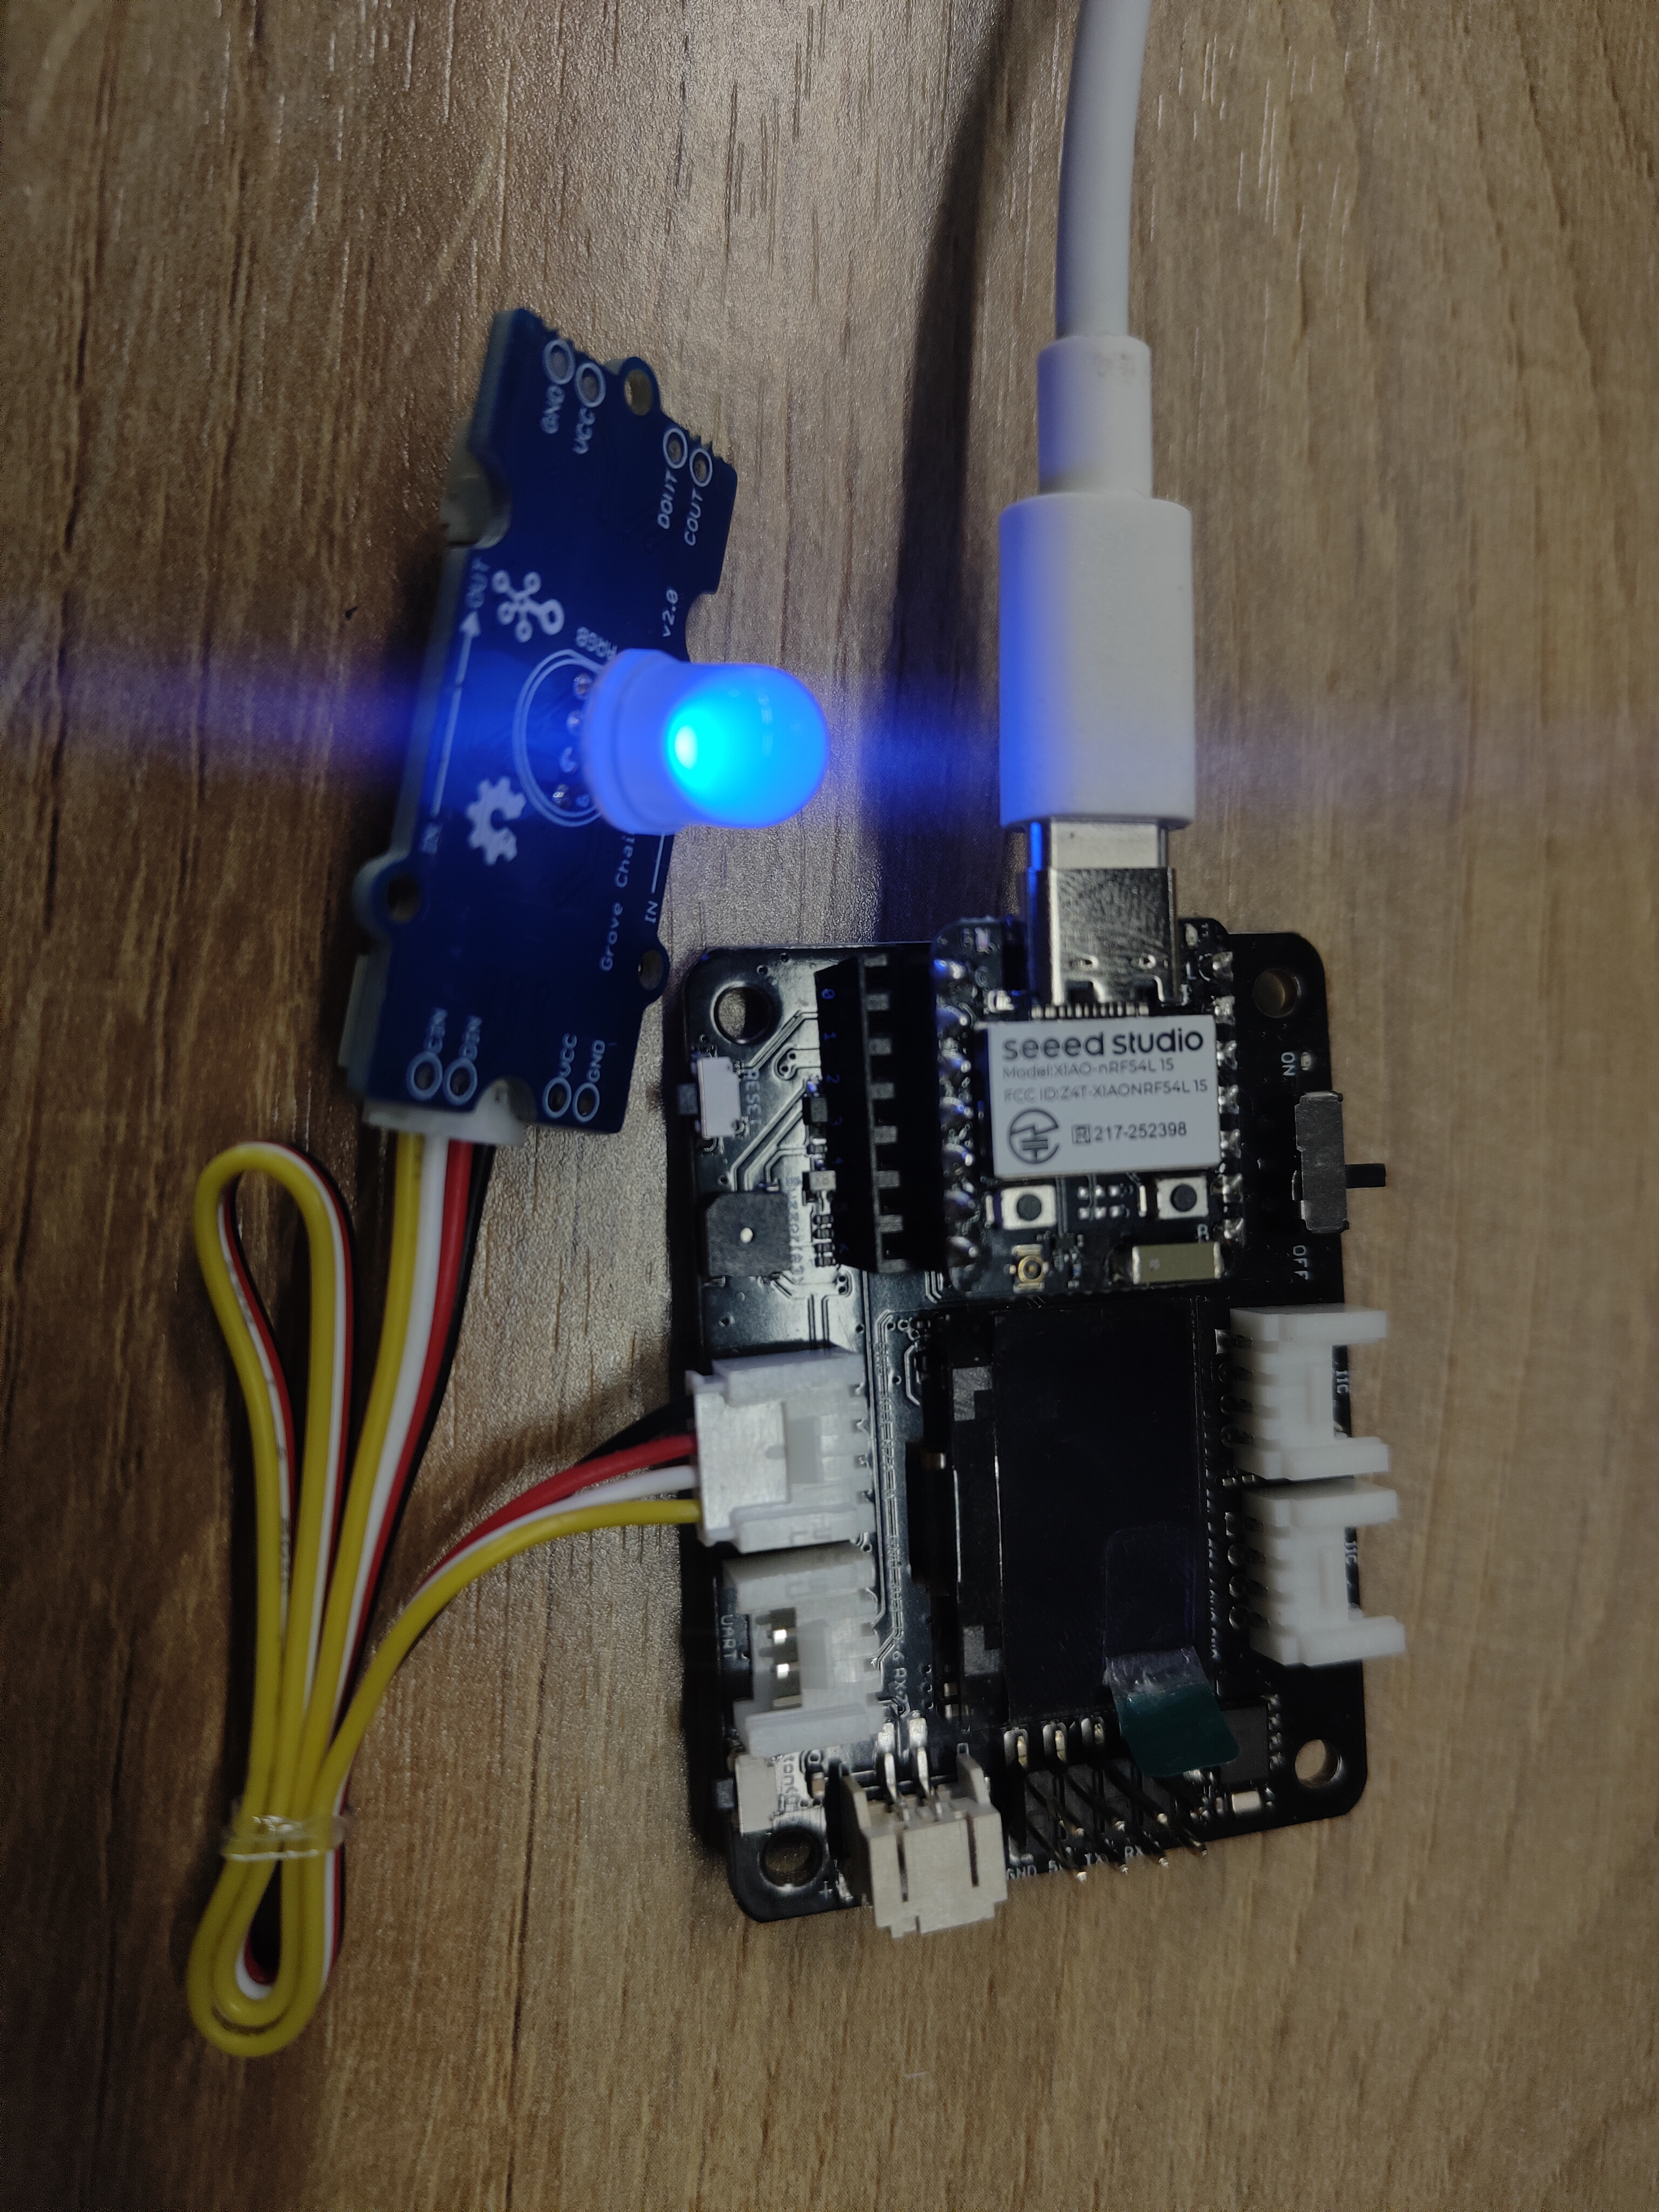
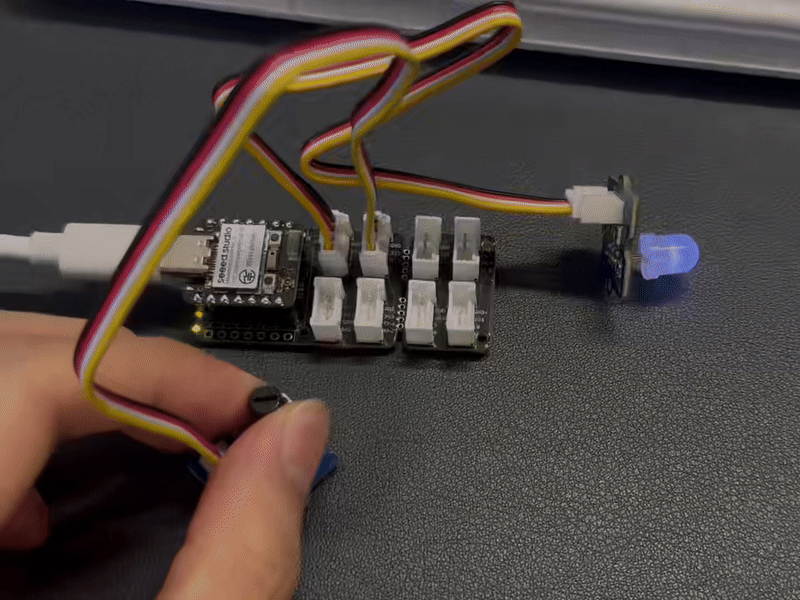
Paso 4. Encender el LED
Abre un archivo nuevo (XX.py) o ve a la página de inicio, luego copia el código y presiona F5 para ejecutarlo.
import time
from boards.xiao import XiaoPin

led = "led"

try:
    # Initialize LED
    led = XiaoPin(led, XiaoPin.OUT)
    while True:
        # LED 0.5 seconds on, 0.5 seconds off
        led.value(1)
        time.sleep(0.5)
        led.value(0)
        time.sleep(0.5)
except KeyboardInterrupt:
    print("\nProgram interrupted by user")
except Exception as e:
    print("\nError occurred: %s" % {e})
finally:
    led.value(1)
El resultado es el siguiente:
Digital
Hardware
| Seeed Studio XIAO nRF54L15 Sense | Seeed Studio Expansion Base for XIAO with Grove OLED | Grove - Relay |
|---|---|---|
|  |  |
Software
from machine import Pin
from boards.xiao_nrf54l15 import xiao_nrf54l15 as xiao

# Define a function to get the GPIO information corresponding to pin A0
def get_a0_pin():
    # Get the information of pin A0 through the pin method of the xiao module
    # According to the definition in xiao_nrf54l15.py, A0 corresponds to digital pin 0
    pin_info = xiao.pin(0)  # Get the information of digital pin 0, the return value is a tuple, such as ("gpio1", 4)
    return pin_info

# Define a function to set pin A0 to high level
def set_a0_high():
    # Get the GPIO information of pin A0
    gpio_port, gpio_pin = get_a0_pin()  # Get the port and pin number
    # Create a Pin object, specify the pin as output mode, and set it to high level
    pin = Pin((gpio_port, gpio_pin), Pin.OUT)  # Initialize the pin as output mode
    pin.value(1)  # Set the pin to high level

# Main program
if __name__ == "__main__":
    set_a0_high()  # Call the function to set pin A0 to high level
    print("Pin A0 has been set to high level")  # Output prompt information
Explicación del código: Este código tiene cuatro partes, como la importación de módulos, una función para obtener la información GPIO del pin A0, una función para establecer el pin A0 a nivel alto y la función principal, donde en el programa principal se llama a la operación para establecer el pin A0 a nivel alto.
Resultado
Analógico
Hardware
| Seeed Studio XIAO nRF54L15 Sense | Grove-Variable Color LED | Grove-Rotary Angle Sensor | Seeed Studio Grove Base for XIAO |
|---|---|---|---|
|  |  |  |
Software
import time
from boards.xiao import XiaoPin, XiaoADC, XiaoPWM

adc = 0    #D0
pwm = 1    #D1

try:
    # Initialize ADC for potentiometer
    adc = XiaoADC(adc)
    # Initialize PWM for LED control
    pwm = XiaoPWM(pwm)
    FREQ = 1000
    PERIOD_NS = 1000000
    pwm.init(freq=FREQ, duty_ns=0)
    # Potentiometer parameters
    MIN_VOLTAGE = 0.0
    MAX_VOLTAGE = 3.3
    DEAD_ZONE = 0.05
    last_duty = -1
    while True:
        # Read ADC voltage value
        voltage = adc.read_uv() / 1000000

        # Ensure voltage is within valid range
        if voltage < MIN_VOLTAGE:
            voltage = MIN_VOLTAGE
        elif voltage > MAX_VOLTAGE:
            voltage = MAX_VOLTAGE

        duty_percent = (voltage - MIN_VOLTAGE) / (MAX_VOLTAGE - MIN_VOLTAGE)

        # Apply dead zone to prevent tiny fluctuations
        if abs(duty_percent - last_duty) < DEAD_ZONE / 100:
            time.sleep(0.05)
            continue

        # Calculate duty cycle time (nanoseconds)
        duty_ns = int(duty_percent * PERIOD_NS)

        # Set PWM duty cycle
        pwm.duty_ns(duty_ns)

        # Print current status
        print("Voltage: {:.2f}V, Duty Cycle: {:.1f}%".format(voltage, duty_percent * 100))

        # Update last duty cycle value
        last_duty = duty_percent

        # Short delay
        time.sleep(0.05)
except KeyboardInterrupt:
    print("\nProgram interrupted by user")
except Exception as e:
    print("\nError occurred: %s" % {e})
finally:
    pwm.deinit()
Code Explain: This code can be divided into four parts:
- importing modules:including the time module for delay operations, as well as the XiaoADC and XiaoPWM modules
- initializing the hardware:defining the ADC and PWM pins, and initializing the ADC to read the voltage of the potentiometer, and initializing the PWM to control the LED brightness.
- The main program logic:in an infinite loop, reads the voltage of the potentiometer, converts it to a PWM duty cycle, and adjusts the LED brightness according to the voltage.
- Exception handling and cleanup:capturing user interruptions (such as pressing Ctrl+C) and other exceptions to ensure the program exits safely.
Resultado
I2C
Hardware
| Seeed Studio XIAO nRF54L15 Sense | Placa base de expansión Seeed Studio para XIAO |
|---|---|
| |
Software
import time
from boards.xiao import XiaoI2C
sda = 4 #D4
scl = 5 #D5
i2c = "i2c0"
frq = 400000
i2c = XiaoI2C(i2c, sda, scl, frq)
# --- SSD1306 I2C address and command definitions ---
SSD1306_I2C_ADDR = 0x3C
SSD1306_SET_CONTRAST = 0x81
SSD1306_DISPLAY_ALL_ON_RESUME = 0xA4
SSD1306_DISPLAY_ALL_ON = 0xA5
SSD1306_NORMAL_DISPLAY = 0xA6
SSD1306_INVERT_DISPLAY = 0xA7
SSD1306_DISPLAY_OFF = 0xAE
SSD1306_DISPLAY_ON = 0xAF
SSD1306_SET_DISPLAY_OFFSET = 0xD3
SSD1306_SET_COM_PINS = 0xDA
SSD1306_SET_VCOM_DETECT = 0xDB
SSD1306_SET_DISPLAY_CLOCK_DIV = 0xD5
SSD1306_SET_PRECHARGE = 0xD9
SSD1306_SET_MULTIPLEX = 0xA8
SSD1306_SET_LOW_COLUMN = 0x00
SSD1306_SET_HIGH_COLUMN = 0x10
SSD1306_SET_START_LINE = 0x40
SSD1306_MEMORY_MODE = 0x20
SSD1306_COLUMN_ADDR = 0x21
SSD1306_PAGE_ADDR = 0x22
SSD1306_COM_SCAN_INC = 0xC0
SSD1306_COM_SCAN_DEC = 0xC8
SSD1306_SEG_REMAP = 0xA0
SSD1306_CHARGE_PUMP = 0x8D
# Display dimensions
SSD1306_WIDTH = 128
SSD1306_HEIGHT = 64
SSD1306_PAGES = 8
# Basic 8x8 font
font_data = {
' ': [0x00,0x00,0x00,0x00,0x00,0x00,0x00,0x00],
'A': [0x18,0x24,0x42,0x7E,0x42,0x42,0x42,0x00],
'B': [0x7C,0x42,0x42,0x7C,0x42,0x42,0x7C,0x00],
'C': [0x3C,0x42,0x40,0x40,0x40,0x42,0x3C,0x00],
'D': [0x78,0x44,0x42,0x42,0x42,0x44,0x78,0x00],
'E': [0x7C,0x40,0x40,0x78,0x40,0x40,0x7C,0x00],
'F': [0x7C,0x40,0x40,0x78,0x40,0x40,0x40,0x00],
'G': [0x3C,0x42,0x40,0x4E,0x42,0x42,0x3C,0x00],
'H': [0x44,0x44,0x44,0x7C,0x44,0x44,0x44,0x00],
'I': [0x38,0x10,0x10,0x10,0x10,0x10,0x38,0x00],
'J': [0x1C,0x08,0x08,0x08,0x08,0x48,0x30,0x00],
'K': [0x44,0x48,0x50,0x60,0x50,0x48,0x44,0x00],
'L': [0x40,0x40,0x40,0x40,0x40,0x40,0x7C,0x00],
'M': [0x42,0x66,0x5A,0x42,0x42,0x42,0x42,0x00],
'N': [0x42,0x62,0x52,0x4A,0x46,0x42,0x42,0x00],
'O': [0x3C,0x42,0x42,0x42,0x42,0x42,0x3C,0x00],
'P': [0x7C,0x42,0x42,0x7C,0x40,0x40,0x40,0x00],
'Q': [0x3C,0x42,0x42,0x42,0x4A,0x44,0x3A,0x00],
'R': [0x7C,0x42,0x42,0x7C,0x48,0x44,0x42,0x00],
'S': [0x3C,0x42,0x40,0x3C,0x02,0x42,0x3C,0x00],
'T': [0x7C,0x10,0x10,0x10,0x10,0x10,0x10,0x00],
'U': [0x42,0x42,0x42,0x42,0x42,0x42,0x3C,0x00],
'V': [0x42,0x42,0x42,0x42,0x42,0x24,0x18,0x00],
'W': [0x42,0x42,0x42,0x42,0x5A,0x66,0x42,0x00],
'X': [0x42,0x24,0x18,0x18,0x18,0x24,0x42,0x00],
'Y': [0x44,0x44,0x28,0x10,0x10,0x10,0x10,0x00],
'Z': [0x7E,0x04,0x08,0x10,0x20,0x40,0x7E,0x00],
'0': [0x3C,0x42,0x46,0x4A,0x52,0x62,0x3C,0x00],
'1': [0x10,0x30,0x10,0x10,0x10,0x10,0x38,0x00],
'2': [0x3C,0x42,0x02,0x0C,0x30,0x40,0x7E,0x00],
'3': [0x3C,0x42,0x02,0x1C,0x02,0x42,0x3C,0x00],
'4': [0x08,0x18,0x28,0x48,0x7E,0x08,0x08,0x00],
'5': [0x7E,0x40,0x7C,0x02,0x02,0x42,0x3C,0x00],
'6': [0x1C,0x20,0x40,0x7C,0x42,0x42,0x3C,0x00],
'7': [0x7E,0x42,0x04,0x08,0x10,0x10,0x10,0x00],
'8': [0x3C,0x42,0x42,0x3C,0x42,0x42,0x3C,0x00],
'9': [0x3C,0x42,0x42,0x3E,0x02,0x04,0x38,0x00],
'!': [0x10,0x10,0x10,0x10,0x10,0x00,0x10,0x00],
'?': [0x3C,0x42,0x02,0x0C,0x10,0x00,0x10,0x00],
'.': [0x00,0x00,0x00,0x00,0x00,0x00,0x10,0x00],
',': [0x00,0x00,0x00,0x00,0x00,0x10,0x10,0x20],
':': [0x00,0x10,0x00,0x00,0x00,0x10,0x00,0x00],
';': [0x00,0x10,0x00,0x00,0x00,0x10,0x10,0x20],
'-': [0x00,0x00,0x00,0x7C,0x00,0x00,0x00,0x00],
'_': [0x00,0x00,0x00,0x00,0x00,0x00,0x7E,0x00],
'+': [0x00,0x10,0x10,0x7C,0x10,0x10,0x00,0x00],
'*': [0x00,0x24,0x18,0x7E,0x18,0x24,0x00,0x00],
'/': [0x02,0x04,0x08,0x10,0x20,0x40,0x00,0x00],
'\\': [0x40,0x20,0x10,0x08,0x04,0x02,0x00,0x00],
'=': [0x00,0x00,0x7E,0x00,0x7E,0x00,0x00,0x00],
'\'': [0x10,0x10,0x20,0x00,0x00,0x00,0x00,0x00],
'"': [0x24,0x24,0x00,0x00,0x00,0x00,0x00,0x00],
'(': [0x08,0x10,0x20,0x20,0x20,0x10,0x08,0x00],
')': [0x20,0x10,0x08,0x08,0x08,0x10,0x20,0x00],
'[': [0x1C,0x10,0x10,0x10,0x10,0x10,0x1C,0x00],
']': [0x38,0x08,0x08,0x08,0x08,0x08,0x38,0x00],
'{': [0x0C,0x10,0x10,0x60,0x10,0x10,0x0C,0x00],
'}': [0x30,0x08,0x08,0x06,0x08,0x08,0x30,0x00],
'<': [0x08,0x10,0x20,0x40,0x20,0x10,0x08,0x00],
'>': [0x20,0x10,0x08,0x04,0x08,0x10,0x20,0x00],
'|': [0x10,0x10,0x10,0x10,0x10,0x10,0x10,0x00],
'@': [0x3C,0x42,0x5A,0x5A,0x5C,0x40,0x3C,0x00],
'#': [0x24,0x24,0x7E,0x24,0x7E,0x24,0x24,0x00],
'$': [0x10,0x3C,0x50,0x3C,0x12,0x3C,0x10,0x00],
'%': [0x62,0x64,0x08,0x10,0x26,0x46,0x00,0x00],
'^': [0x10,0x28,0x44,0x00,0x00,0x00,0x00,0x00],
'&': [0x30,0x48,0x50,0x20,0x54,0x48,0x34,0x00],
'~': [0x00,0x00,0x34,0x4C,0x00,0x00,0x00,0x00]
}
# --- Helper functions ---
# Write a single command byte to SSD1306 via I2C
def ssd1306_write_command(cmd):
i2c.writeto(SSD1306_I2C_ADDR, bytes([0x00, cmd]))
# Write multiple command bytes to SSD1306 via I2C
def ssd1306_write_commands(cmds):
data = bytearray([0x00] + list(cmds))
i2c.writeto(SSD1306_I2C_ADDR, data)
# Write display data bytes to SSD1306 via I2C
def ssd1306_write_data(data):
buffer = bytearray(len(data) + 1)
buffer[0] = 0x40
buffer[1:] = data
i2c.writeto(SSD1306_I2C_ADDR, buffer)
# Clear the entire SSD1306 display
def ssd1306_clear():
ssd1306_write_commands(bytearray([SSD1306_COLUMN_ADDR, 0, SSD1306_WIDTH - 1]))
ssd1306_write_commands(bytearray([SSD1306_PAGE_ADDR, 0, SSD1306_PAGES - 1]))
empty_data = bytearray(SSD1306_WIDTH)
for _ in range(SSD1306_PAGES):
ssd1306_write_data(empty_data)
ssd1306_write_commands([SSD1306_COLUMN_ADDR, 0, SSD1306_WIDTH - 1])
# Initialize SSD1306 display with recommended settings
def ssd1306_init():
commands = [
bytearray([SSD1306_DISPLAY_OFF]),
bytearray([SSD1306_SET_DISPLAY_CLOCK_DIV, 0x80]),
bytearray([SSD1306_SET_MULTIPLEX, SSD1306_HEIGHT - 1]),
bytearray([SSD1306_SET_DISPLAY_OFFSET, 0x00]),
bytearray([SSD1306_SET_START_LINE | 0x00]),
bytearray([SSD1306_CHARGE_PUMP, 0x14]),
bytearray([SSD1306_MEMORY_MODE, 0x00]),
bytearray([SSD1306_SEG_REMAP | 0x01]),
bytearray([SSD1306_COM_SCAN_DEC]),
bytearray([SSD1306_SET_COM_PINS, 0x12]),
bytearray([SSD1306_SET_CONTRAST, 0xCF]),
bytearray([SSD1306_SET_PRECHARGE, 0xF1]),
bytearray([SSD1306_SET_VCOM_DETECT, 0x40]),
bytearray([SSD1306_DISPLAY_ALL_ON_RESUME]),
bytearray([SSD1306_NORMAL_DISPLAY]),
bytearray([SSD1306_DISPLAY_ON])
]
for cmd in commands:
ssd1306_write_commands(cmd)
ssd1306_clear()
print("SSD1306 initialized successfully.")
ssd1306_write_commands([SSD1306_COLUMN_ADDR, 0, SSD1306_WIDTH - 1])
# Draw a string of text at specified column and page (row) on SSD1306
def ssd1306_draw_text(text, x, y):
ssd1306_write_commands(bytearray([SSD1306_COLUMN_ADDR, x, x + len(text) * 8 - 1]))
ssd1306_write_commands(bytearray([SSD1306_PAGE_ADDR, y, y + 0]))
display_data = bytearray()
for char in text:
font_bytes = font_data.get(char.upper(), font_data[' '])
for col in range(7, -1, -1):
val = 0
for row in range(8):
if font_bytes[row] & (1 << col):
val |= (1 << row)
display_data.append(val)
ssd1306_write_data(display_data)
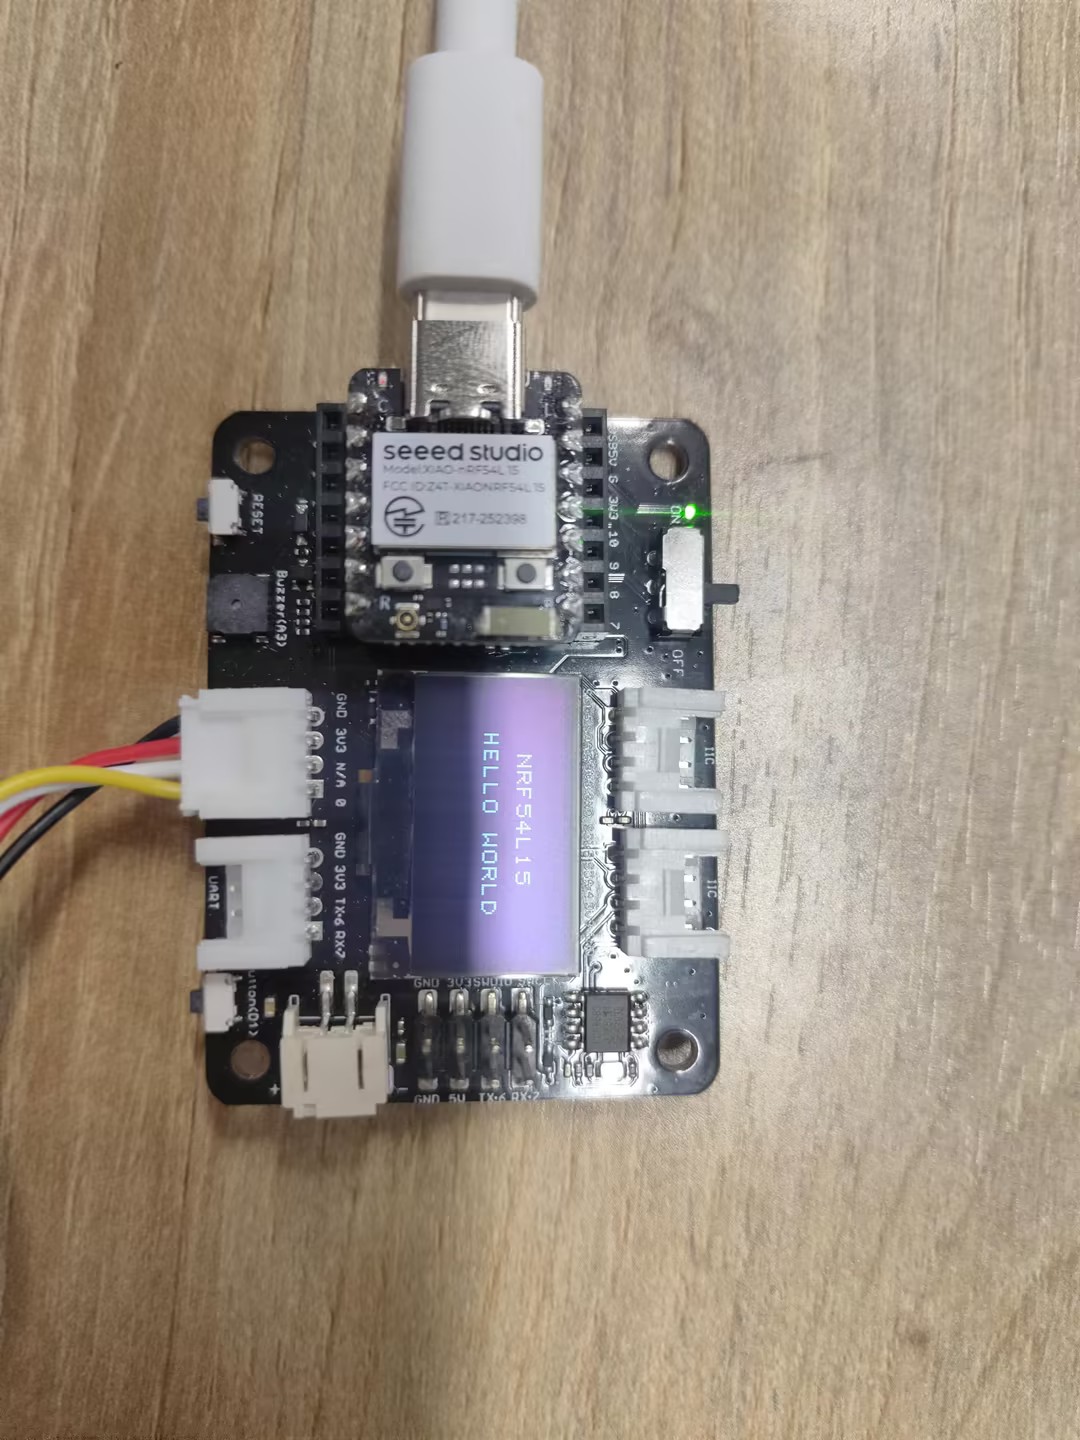
i2c_addr = i2c.scan()
if SSD1306_I2C_ADDR not in i2c_addr:
raise Exception("SSD1306 not found on I2C bus")
else:
print("SSD1306 found on I2C bus: 0x{:02X}".format(SSD1306_I2C_ADDR))
# Initialize display
ssd1306_init()
ssd1306_draw_text("NRF54L15", 30, 2)
ssd1306_draw_text("HELLO WORLD", 20, 4)
Explicación del código:
Este código inicializa y controla una pantalla OLED SSD1306 mediante comunicación I2C, define los comandos y parámetros de la pantalla e implementa funciones para limpiar la pantalla, inicializarla y mostrar texto.
-
Importar módulos e inicializar la comunicación I2C: Se importó el módulo time para operaciones de retardo y se importó el módulo XiaoI2C para inicializar la comunicación I2C. Se definieron los pines SDA y SCL del I2C y se configuró la frecuencia de I2C. Luego, se creó un objeto XiaoI2C para la comunicación con dispositivos I2C, como una pantalla OLED.
-
Definir las instrucciones y parámetros de la pantalla SSD1306: Se define la dirección I2C de la pantalla SSD1306 y una serie de comandos de control (como configurar el contraste, encender/apagar la pantalla, etc.). También se definen los parámetros de tamaño de la pantalla (ancho, alto y número de páginas) y una sencilla biblioteca de fuentes de matriz de puntos de 8x8 para mostrar caracteres en la pantalla.
-
Definir función auxiliar: Se define una serie de funciones auxiliares para enviar comandos y datos al SSD1306.
-
Lógica principal del programa: Primero, se comprueba si la pantalla SSD1306 está conectada al bus I2C realizando un escaneo I2C. Si se encuentra la pantalla, se llama a la función ssd1306_init para inicializarla. Luego, se llama a la función ssd1306_draw_text para mostrar en la pantalla las dos líneas de texto "NRF54L15" y "HELLO WORLD".
Resultado
SPI
Hardware
| Seeed Studio XIAO nRF54L15 Sense | ePaper Driver Board for Seeed Studio XIAO |
|---|---|
|  |
Software
import time
from boards.xiao import XiaoPin, XiaoSPI
# -------- Pins & SPI --------
RST = 0; CS = 1; DC = 3; BUSY = 5
sck = 9; mosi = 10; miso = 8; spi_id = "spi0"
RST = XiaoPin(RST, XiaoPin.OUT)
CS = XiaoPin(CS, XiaoPin.OUT)
DC = XiaoPin(DC, XiaoPin.OUT)
BUSY = XiaoPin(BUSY, XiaoPin.IN, XiaoPin.PULL_UP)
spi = XiaoSPI(spi_id, 20_000_000, sck, mosi, miso)
# -------- ePaper basics --------
def reset():
RST.value(0); time.sleep_ms(10)
RST.value(1); time.sleep_ms(10)
def send_command(cmd):
DC.value(0); CS.value(0)
spi.write(bytearray([cmd & 0xFF]))
CS.value(1)
def send_data(data):
DC.value(1); CS.value(0)
if isinstance(data, int):
spi.write(bytearray([data & 0xFF]))
else:
spi.write(data)
CS.value(1)
def wait_until_idle():
# If BUSY = 0, it indicates that the device is busy. You can then switch back to polling.
# while BUSY.value() == 0: time.sleep_ms(1)
time.sleep_ms(1)
def init_display():
reset()
send_command(0x00); send_data(0x1F)
send_command(0x04); time.sleep_ms(100); wait_until_idle()
send_command(0x50); send_data(0x21); send_data(0x07)
def clear_screen():
CS.value(0)
DC.value(0); spi.write(b'\x10'); DC.value(1)
for _ in range(48000): spi.write(b'\xFF')
DC.value(0); spi.write(b'\x13'); DC.value(1)
for _ in range(48000): spi.write(b'\xFF')
DC.value(0); spi.write(b'\x12'); CS.value(1)
wait_until_idle()
# -------- Geometry --------
WIDTH, HEIGHT = 800, 480
BYTES_PER_ROW = WIDTH // 8
linebuf = bytearray(BYTES_PER_ROW)
# -------- Minimal 5x7 glyphs (columns, LSB=top) --------
FONT_W, FONT_H = 5, 7
G = {
' ':[0x00,0x00,0x00,0x00,0x00],
# Digits
'0':[0x3E,0x51,0x49,0x45,0x3E],
'1':[0x00,0x42,0x7F,0x40,0x00],
'2':[0x42,0x61,0x51,0x49,0x46],
'3':[0x21,0x41,0x45,0x4B,0x31],
'4':[0x18,0x14,0x12,0x7F,0x10],
'5':[0x27,0x45,0x45,0x45,0x39],
'6':[0x3C,0x4A,0x49,0x49,0x30],
'7':[0x01,0x71,0x09,0x05,0x03],
'8':[0x36,0x49,0x49,0x49,0x36],
'9':[0x06,0x49,0x49,0x29,0x1E],
# Uppercase
'A':[0x7E,0x11,0x11,0x11,0x7E],
'F':[0x7F,0x09,0x09,0x09,0x01],
'H':[0x7F,0x08,0x08,0x08,0x7F],
'I':[0x00,0x41,0x7F,0x41,0x00],
'L':[0x7F,0x40,0x40,0x40,0x40],
'M':[0x7F,0x02,0x0C,0x02,0x7F],
'O':[0x3E,0x41,0x41,0x41,0x3E],
'P':[0x7F,0x09,0x09,0x09,0x06],
'R':[0x7F,0x09,0x19,0x29,0x46],
'T':[0x01,0x01,0x7F,0x01,0x01],
'X':[0x63,0x14,0x08,0x14,0x63],
'Y':[0x07,0x08,0x70,0x08,0x07],
# Lowercase
'a':[0x20,0x54,0x54,0x54,0x78],
'c':[0x38,0x44,0x44,0x44,0x20],
'e':[0x38,0x54,0x54,0x54,0x18],
'h':[0x7F,0x08,0x04,0x04,0x78],
'i':[0x00,0x44,0x7D,0x40,0x00],
'l':[0x00,0x41,0x7F,0x40,0x00],
'n':[0x7C,0x08,0x04,0x04,0x78],
'o':[0x38,0x44,0x44,0x44,0x38],
'p':[0x7C,0x14,0x14,0x14,0x08],
'r':[0x7C,0x08,0x04,0x04,0x08],
't':[0x04,0x3F,0x44,0x40,0x20],
'y':[0x0C,0x50,0x50,0x50,0x3C],
}
def glyph(ch):
return G.get(ch, G[' '])
# -------- Text helpers --------
def text_size(text, scale=1, spacing=1):
w = 0
for _ in text:
w += (FONT_W * scale + spacing)
if w: w -= spacing
return w, FONT_H * scale
def text_pixel(x, y, text, sx, sy, scale=1, spacing=1):
# Return 0 = Black, 1 = White
if y < sy or y >= sy + FONT_H * scale:
return 1
lx = x - sx
if lx < 0:
return 1
cursor = 0
for ch in text:
cw = FONT_W * scale
if cursor <= lx < cursor + cw:
cx_scaled = lx - cursor
cy_scaled = y - sy
cx = cx_scaled // scale
cy = cy_scaled // scale
col = glyph(ch)[cx]
bit = (col >> cy) & 1
return 0 if bit else 1
cursor += cw + spacing
return 1
# -------- Stream update --------
def epaper_update_lines(lines):
CS.value(0)
# The old picture is completely white.
DC.value(0); spi.write(b'\x10'); DC.value(1)
for _ in range(HEIGHT * BYTES_PER_ROW):
spi.write(b'\xFF')
# New image: Generated row by row
DC.value(0); spi.write(b'\x13'); DC.value(1)
for y in range(HEIGHT):
bi = 0; bitpos = 7; linebuf[:] = b'\x00' * BYTES_PER_ROW
for x in range(WIDTH):
val = 1 # Default white
for (txt, tx, ty, scale) in lines:
if text_pixel(x, y, txt, tx, ty, scale) == 0:
val = 0
break
if val:
linebuf[bi] |= (1 << bitpos) # 1 = white
bitpos -= 1
if bitpos < 0:
bitpos = 7; bi += 1
spi.write(linebuf)
# Redresh
DC.value(0); spi.write(b'\x12'); CS.value(1)
wait_until_idle()
# -------- Main --------
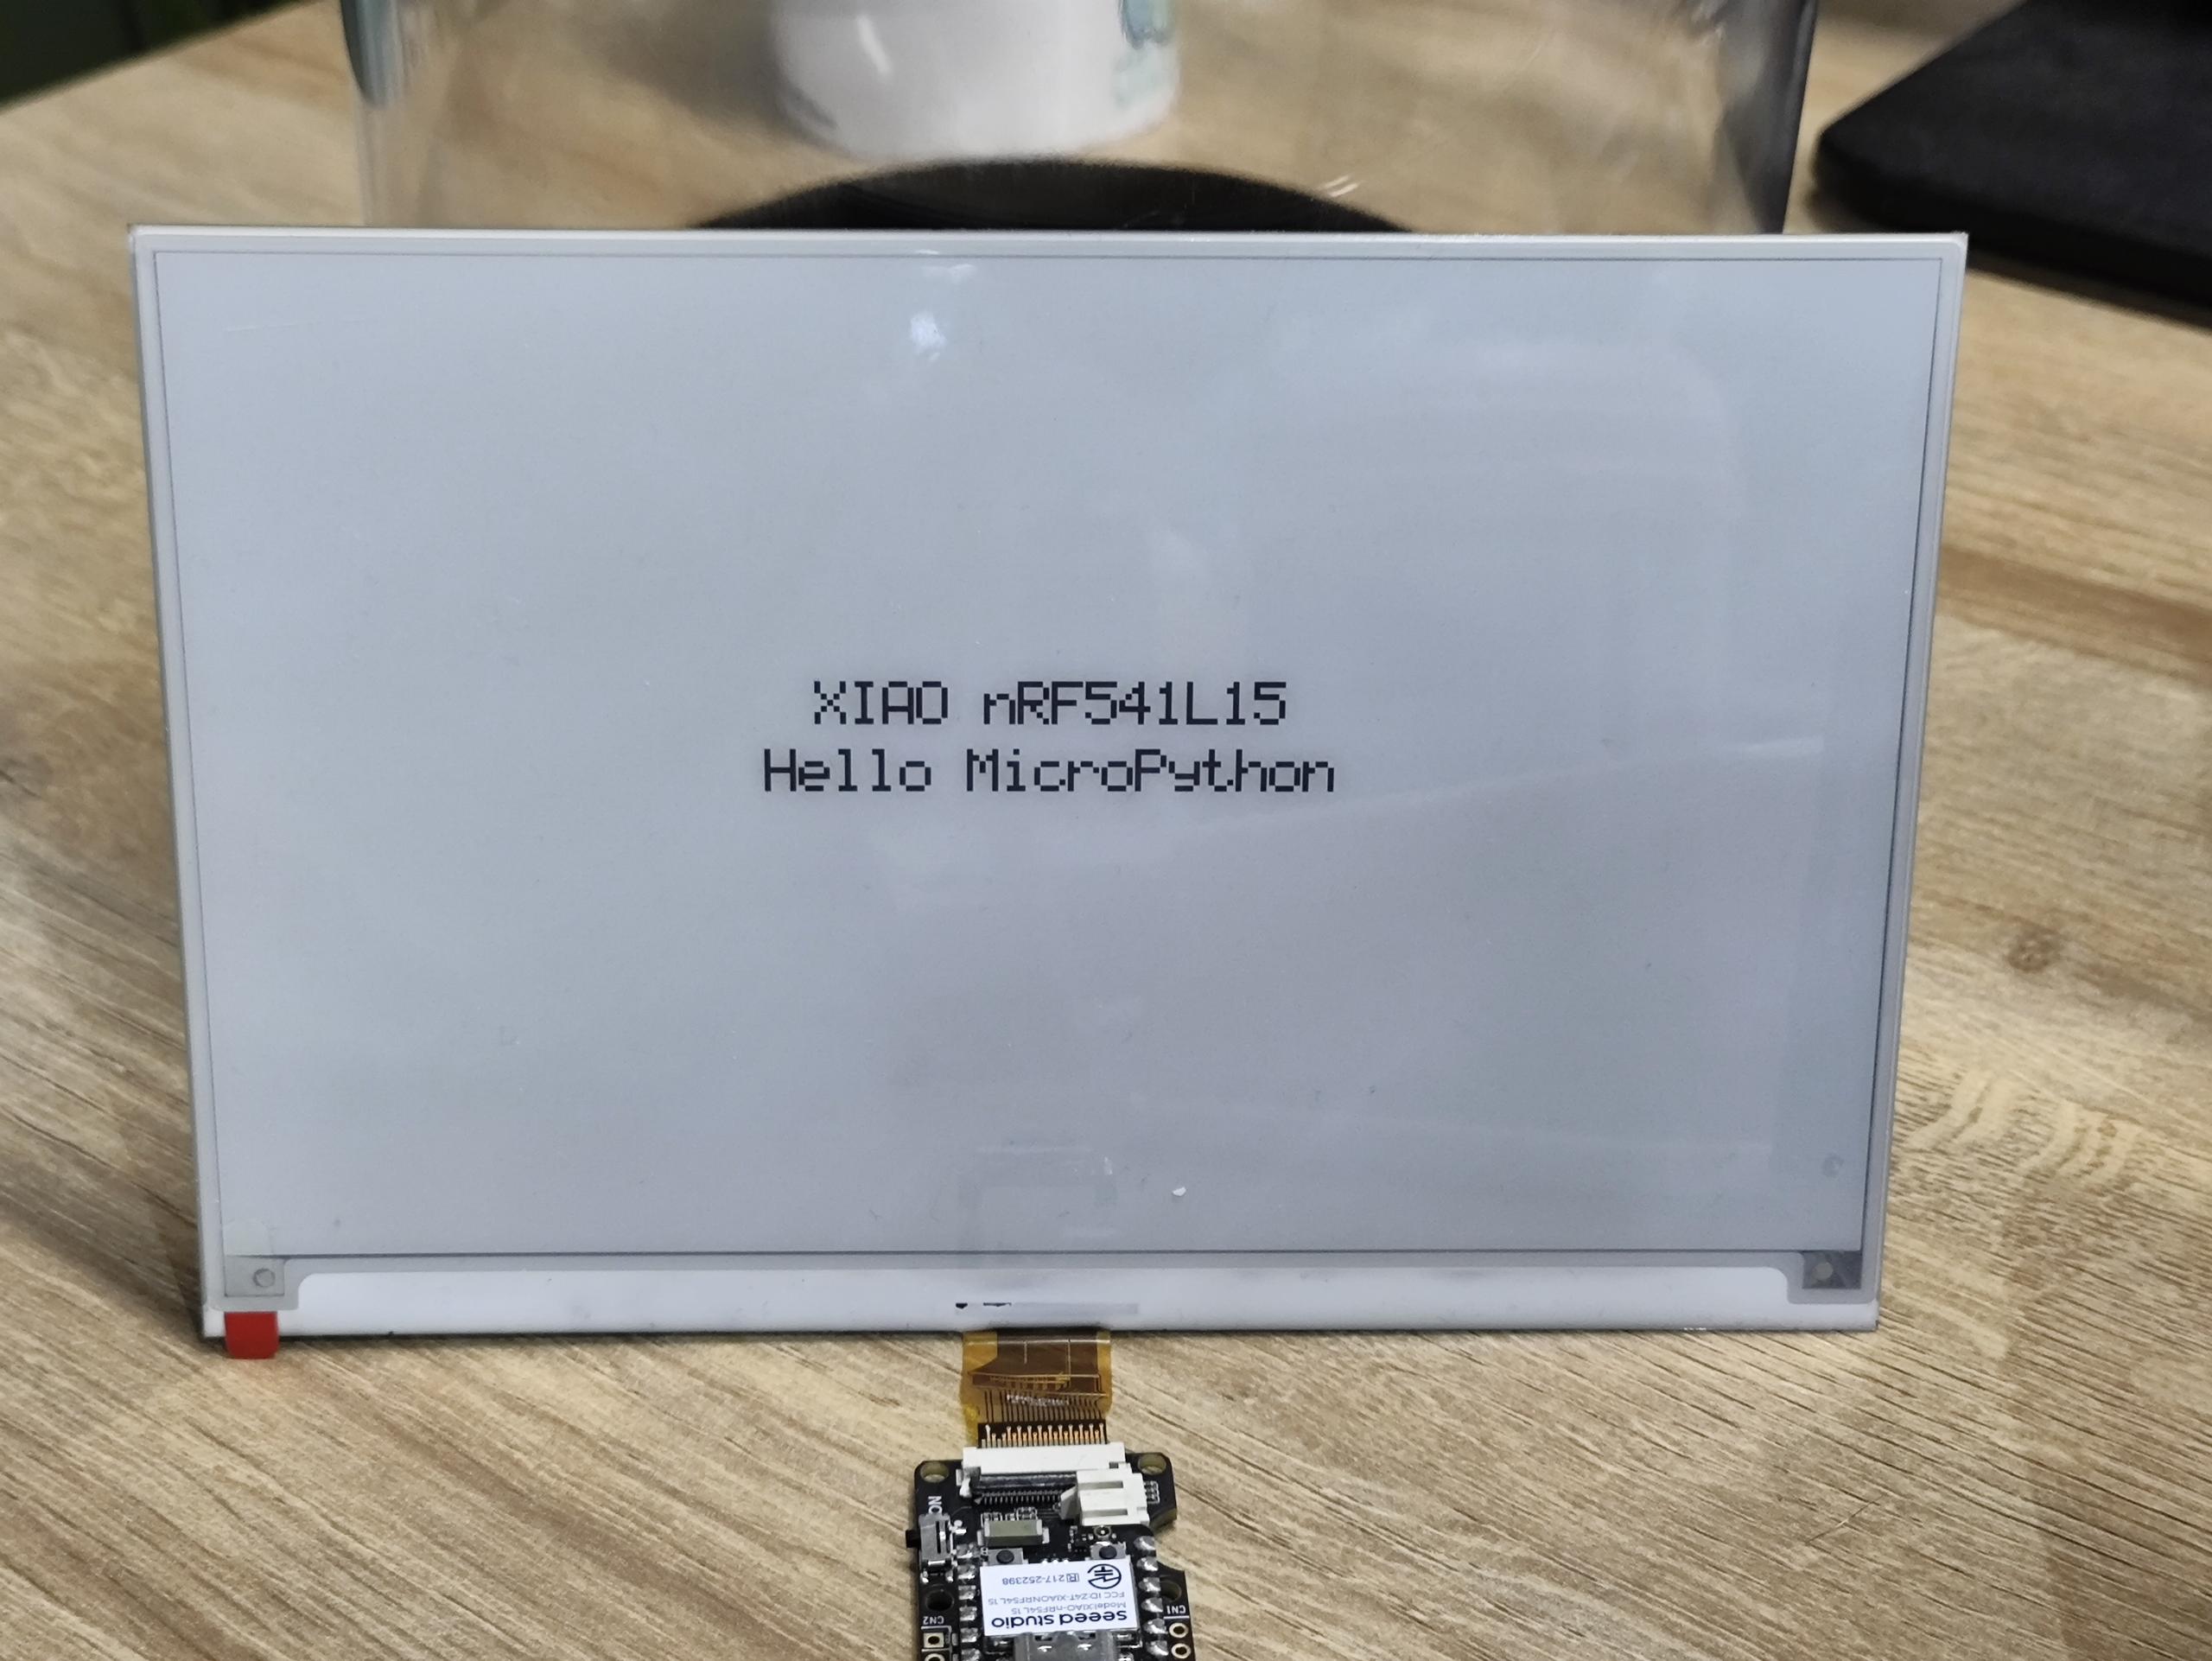
LINE1 = "XIAO nRF541L15"
LINE2 = "Hello MicroPython"
SCALE1 = 3
SCALE2 = 3
def main():
init_display()
clear_screen()
# Centered layout
w1, h1 = text_size(LINE1, SCALE1)
w2, h2 = text_size(LINE2, SCALE2)
total_h = h1 + 12 + h2 # Line spacing: 12 px
y0 = (HEIGHT - total_h) // 2
x1 = (WIDTH - w1) // 2
x2 = (WIDTH - w2) // 2
y1 = y0
y2 = y0 + h1 + 12
lines = [
(LINE1, x1, y1, SCALE1),
(LINE2, x2, y2, SCALE2),
]
epaper_update_lines(lines)
while True:
time.sleep(1_000_000)
if __name__ == "__main__":
main()
Explicación del código:
-
Importación de módulos
time: Habilita funciones relacionadas con el tiempo, como retardos.XiaoPin and XiaoSPI: Importados desdeboards.xiao; XiaoPin se utiliza para controlar los pines GPIO, mientras que XiaoSPI gestiona la comunicación SPI.
-
Configuración de pines y SPI
- Se definieron pines específicos: Reset (RST), Chip Select (CS), Data/Command (DC) y Busy (BUSY).
- Se configuraron los pines relacionados con SPI (SCK, MOSI, MISO) y el controlador SPI.
- Se inicializó el modo de trabajo (entrada/salida) para todos los pines GPIO.
- Se creó una instancia SPI con una frecuencia establecida de 20 MHz.
-
Funciones básicas de ePaper
reset(): Ejecuta una operación de reinicio por hardware en la pantalla.send_command(cmd): Transmite un comando de un solo byte.send_data(data): Envía datos, que pueden ser un solo byte o múltiples bytes.wait_until_idle(): Espera a que la pantalla entre en estado inactivo (actualmente implementado con un retardo simple).init_display(): Realiza los procedimientos de inicialización de la pantalla.clear_screen(): Limpia la pantalla, estableciéndola en un estado completamente blanco.
-
Parámetros de la pantalla
WIDTH, HEIGHT = 800, 480: Especifica la resolución de la pantalla.BYTES_PER_ROW: Indica el número de bytes necesarios para cada fila de píxeles.linebuf: Un búfer de línea que almacena temporalmente los datos de píxeles de una sola fila.
-
Sistema de fuentes
- Se definió una fuente sencilla de 5x7 píxeles, almacenada en el diccionario
G. glyph(ch): Recupera los datos de píxeles correspondientes a un carácter dado.text_size(): Calcula las dimensiones del texto cuando se muestra con una relación de escala especificada.text_pixel(): Determina si se debe dibujar un píxel en una posición específica (se usa en el renderizado de texto).
- Se definió una fuente sencilla de 5x7 píxeles, almacenada en el diccionario
-
Actualización de la pantalla
- epaper_update_lines(lines): La función principal para actualizar la pantalla.
- Primero, envía datos para establecer un fondo completamente blanco.
- Luego, calcula y transmite los nuevos datos de imagen fila por fila.
- Finalmente, activa una actualización de pantalla para mostrar el nuevo contenido.
- Admite la visualización de texto en varias líneas, donde cada línea puede tener posiciones y relaciones de escala distintas.
-
Función main()
- Inicializa la pantalla.
- Calcula la posición centrada para el texto.
- Crea una lista de configuración para las líneas de texto.
- Llama a
epaper_update_lines()para actualizar el contenido de la pantalla. - Entra en un bucle de suspensión infinito.
Resultado
Ejecutar el programa automáticamente
Si quieres que tu programa de abreviatura pueda ejecutarse automáticamente, puedes seguir estos pasos:
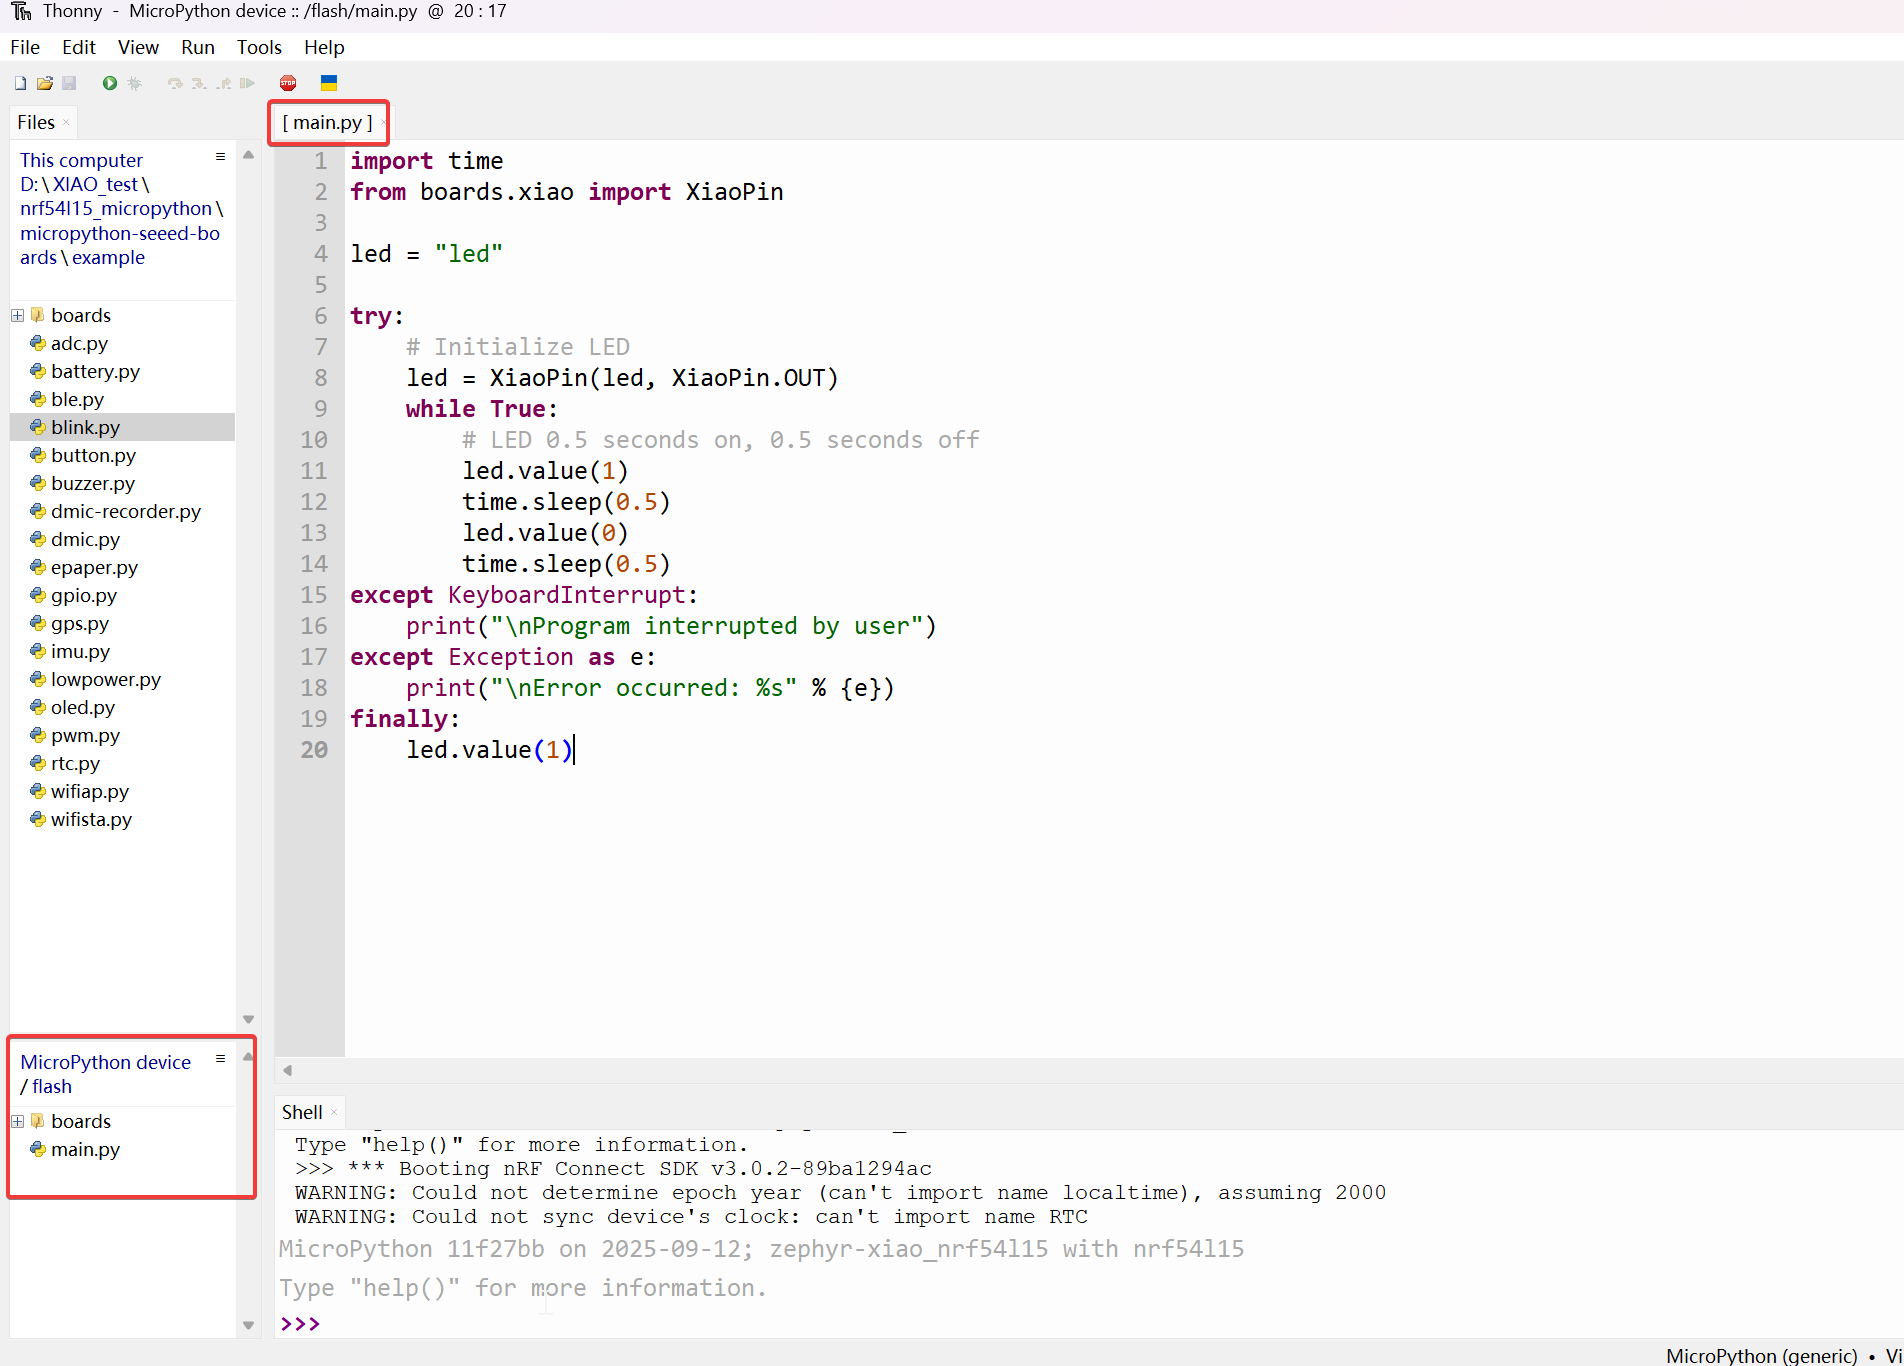
Paso 1. Crea un nuevo archivo de programa y usa Ctrl + S para guardarlo en la memoria flash del dispositivo MicroPython, y ponle el nombre main.py.
Tomemos el programa de parpadeo como ejemplo aquí
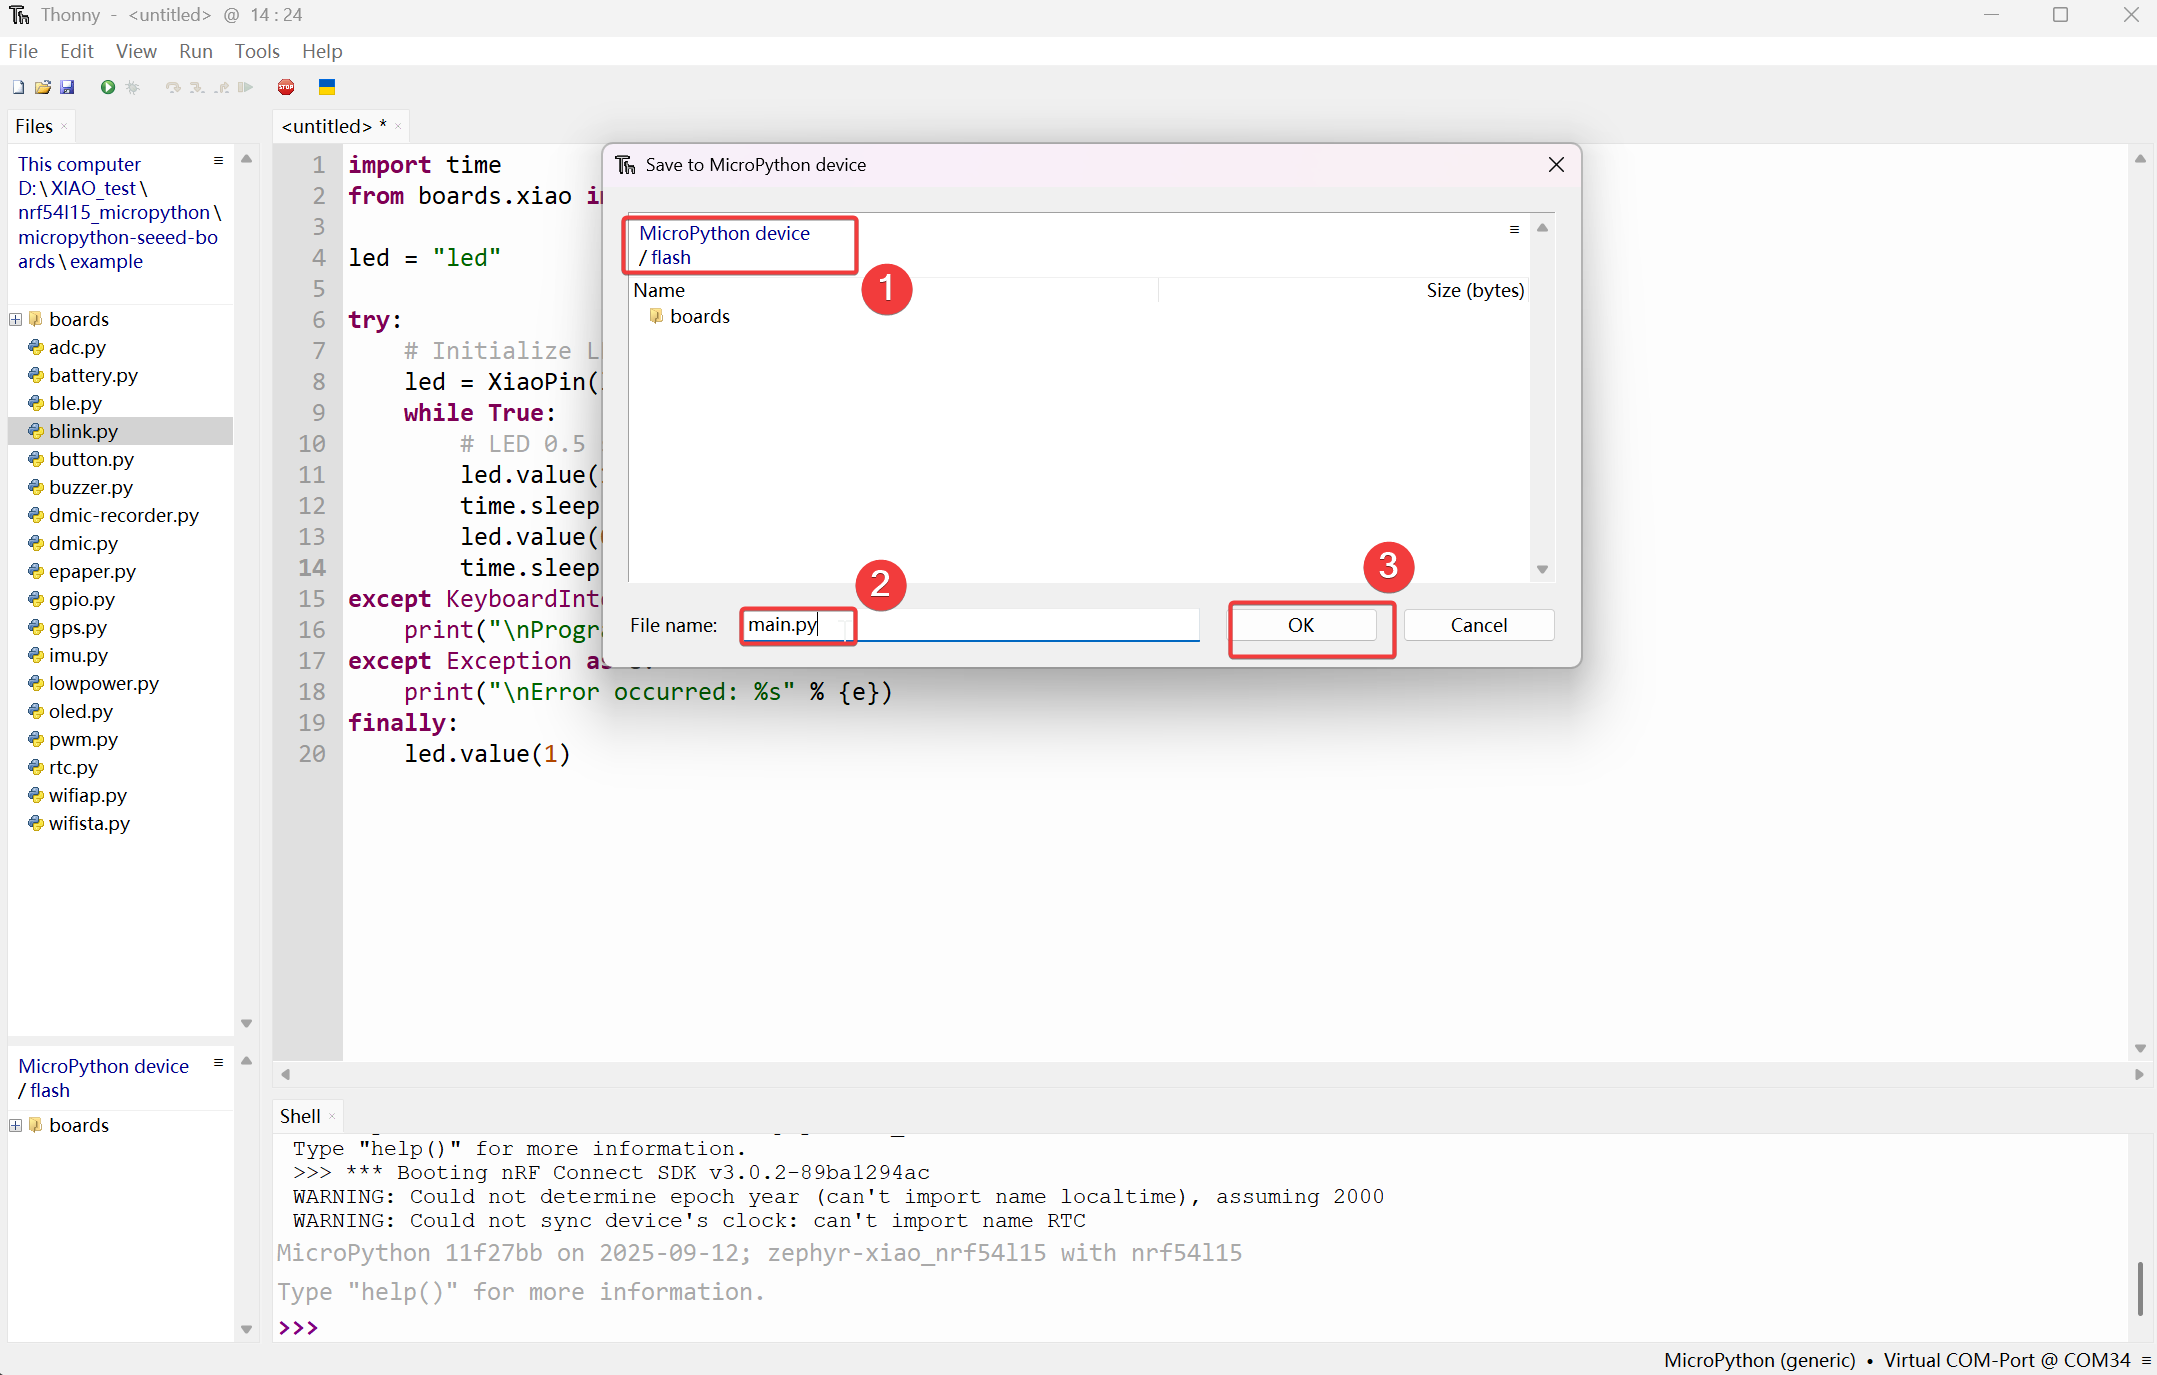
Entonces se mostrará en la sección MicroPython device/flash.
Paso 2. Pulsando el botón Reset integrado se puede lograr el efecto de ejecución automática.
efecto:
Preguntas frecuentes (FAQ)
Actualización del Bootloader
Si te encuentras con una situación en la que no puedes subir programas MicroPython usando Thonny, puede ser porque el Bootloader utilizado durante la producción en fábrica era de una versión antigua.
Paso 1. Cableado
| OpenOCD / JTAG / SWD | XIAO nRF54L15 |
|---|---|
| 5V | 5V |
| GND | GND |
| SWDIO | SWDIO2 |
| SWDCLK | SWDCLK2 |
| RST | RST |
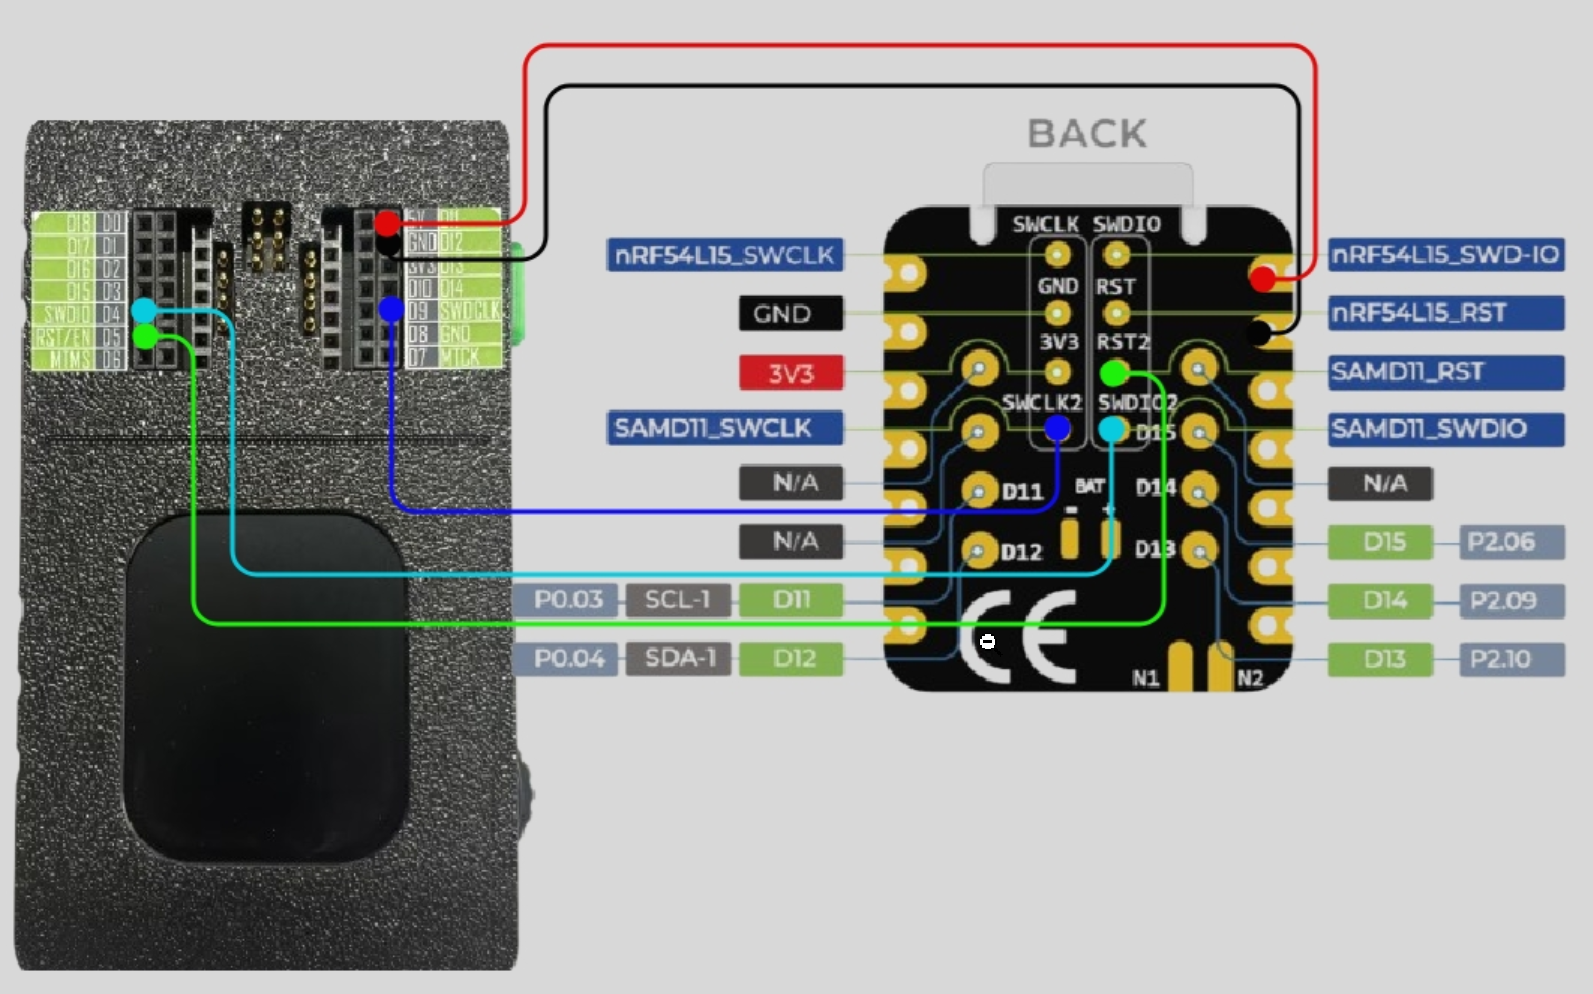
Asegúrate de que las conexiones de los pines sean correctas para evitar que falle el proceso de grabación.
Paso 2. Descargar el programa de grabación del firmware
Paso 3. Ejecutar el script
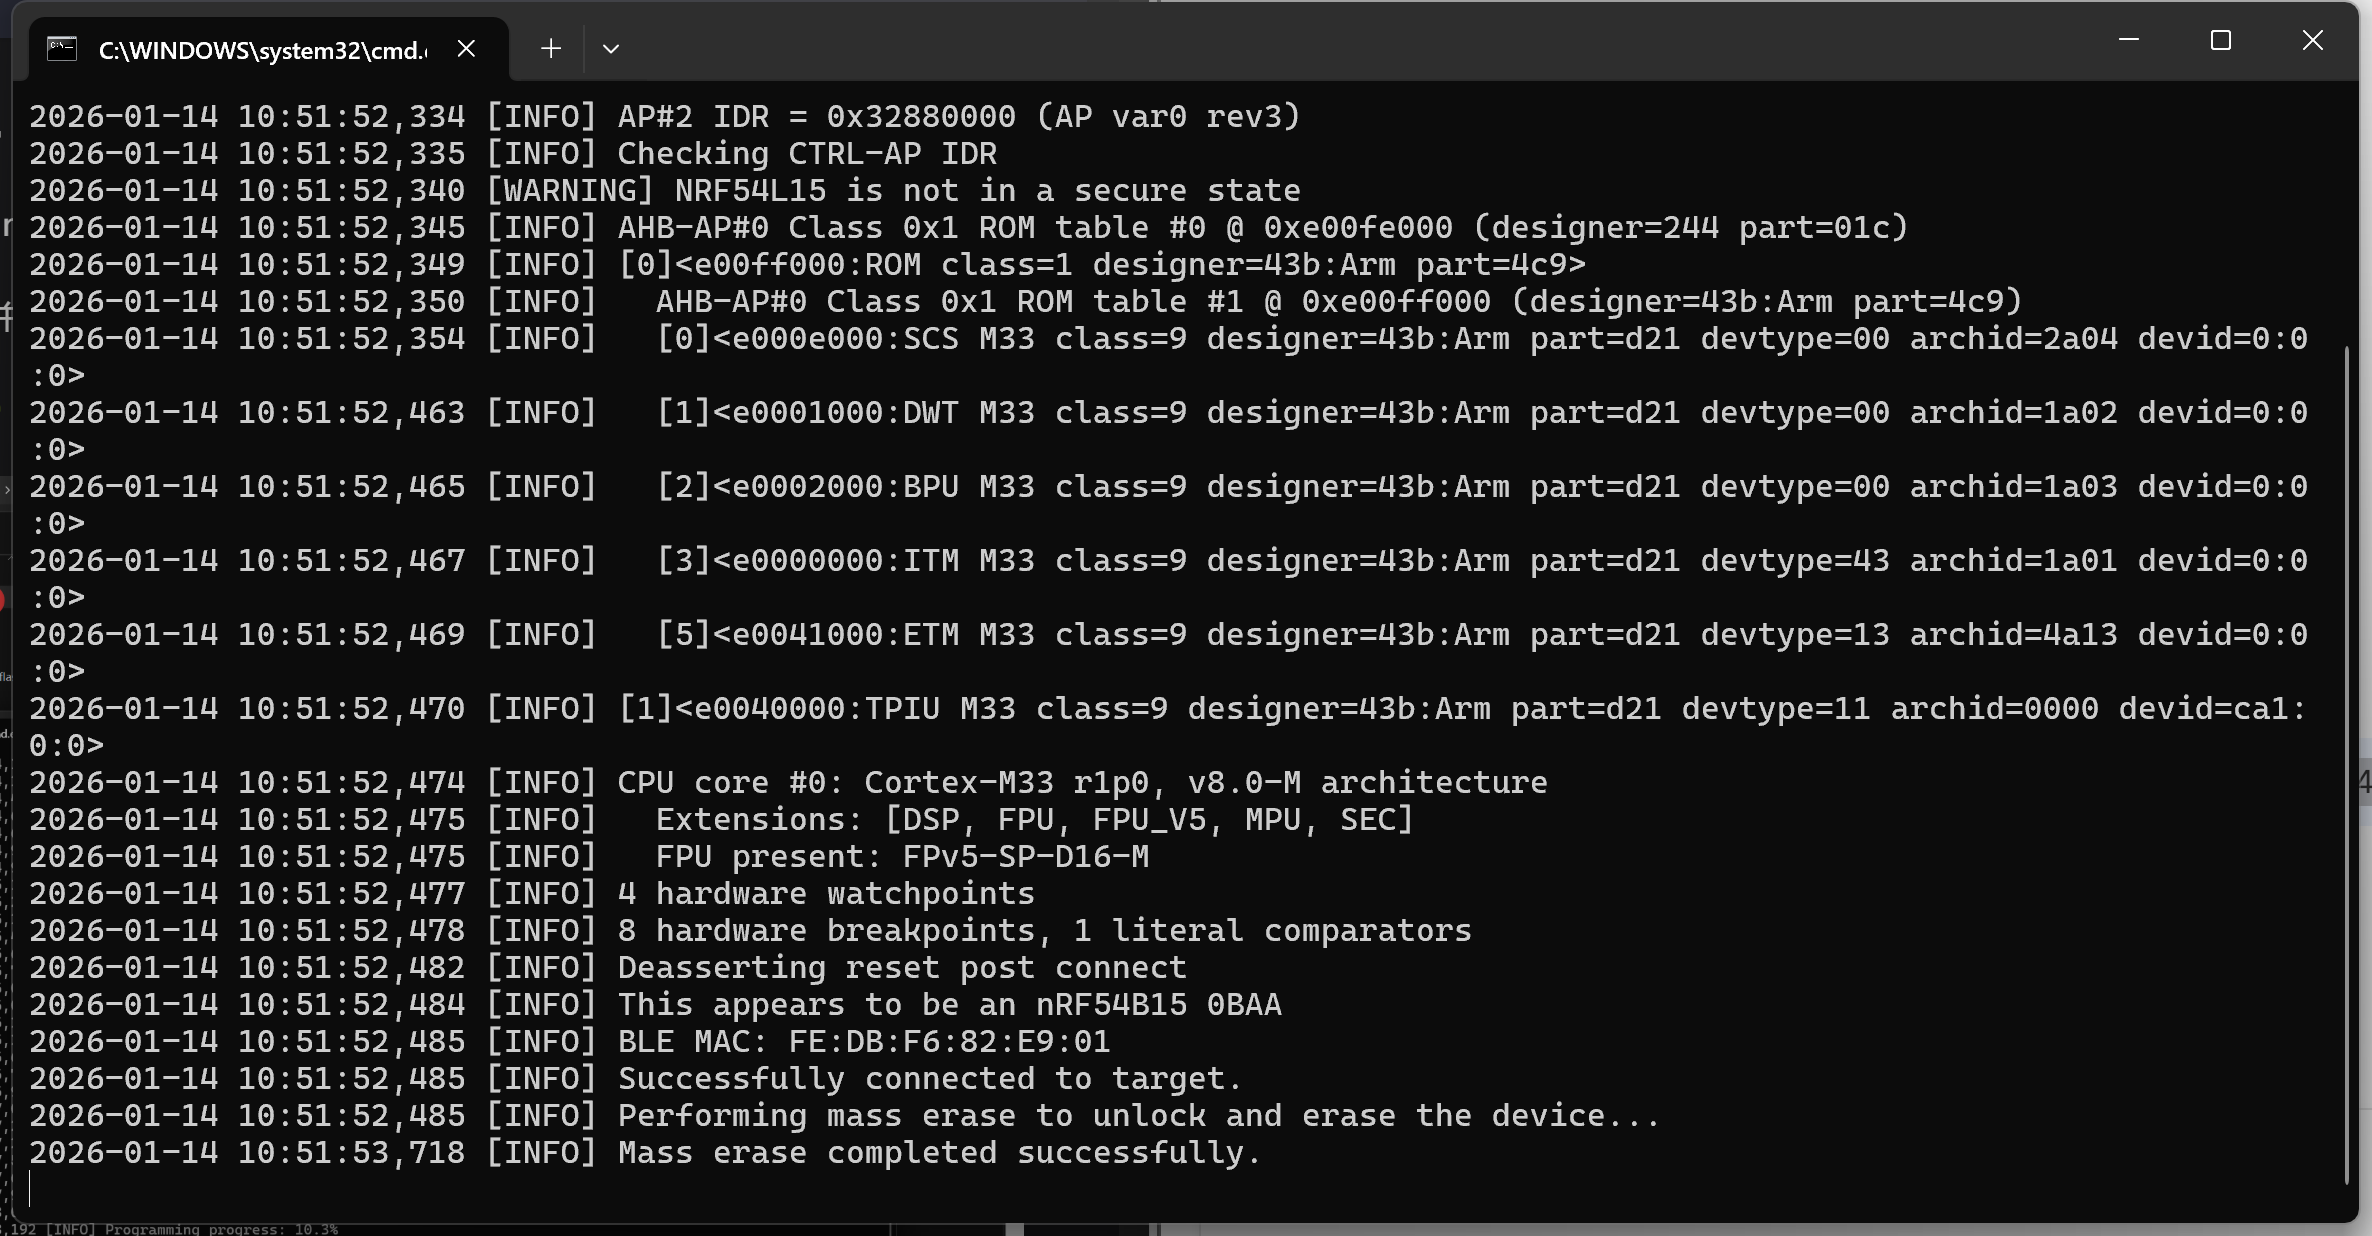
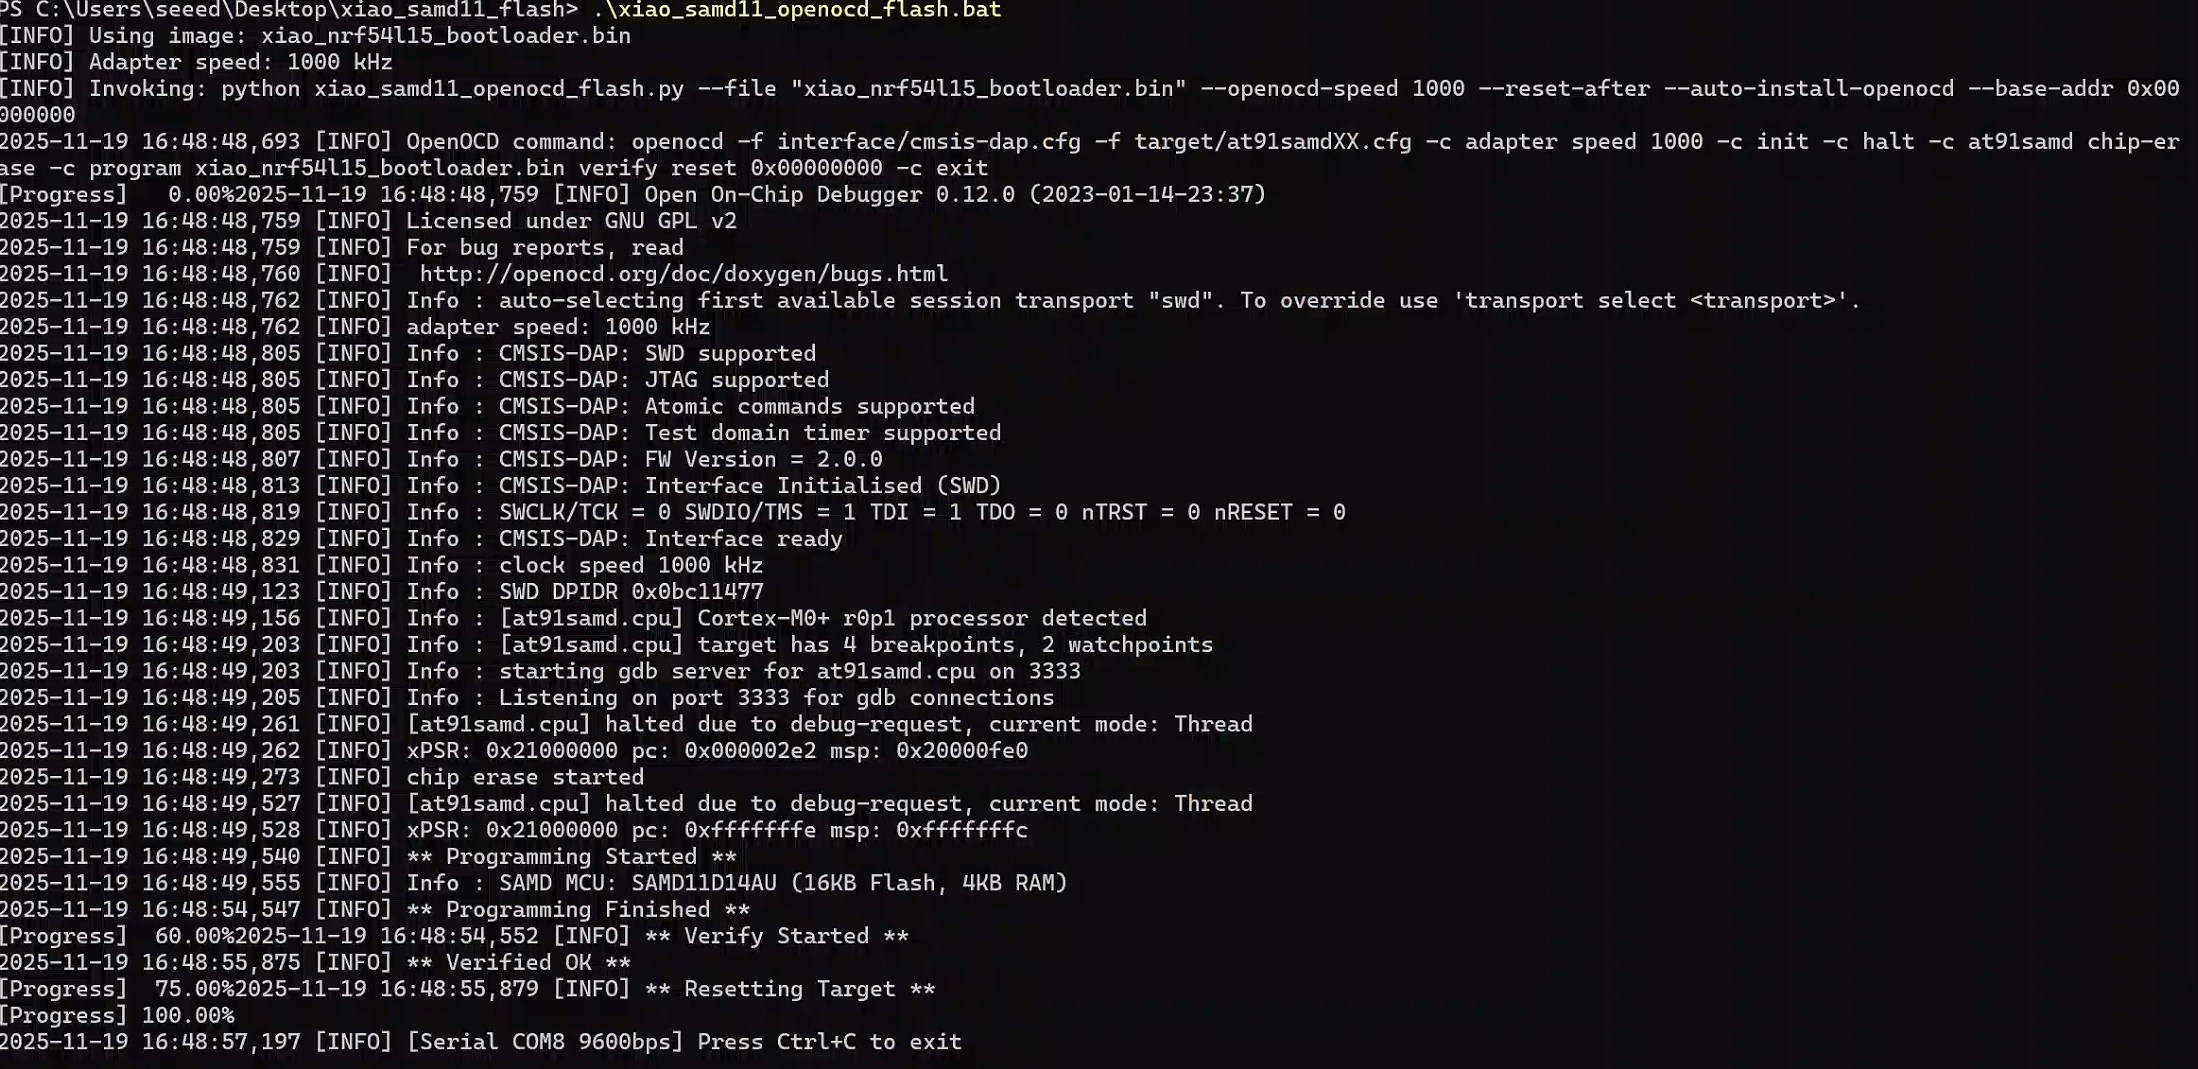
Tomando el sistema Windows como ejemplo. Descomprime el archivo descargado, haz clic derecho en la carpeta y abre el terminal. Ejecuta .\xiao_samd11_openocd_flash.bat. Si tu cableado es correcto, el resultado será como se muestra en la siguiente imagen.
En sistemas Mac/Linux, necesitas cambiar .bat por .sh
Soporte técnico y debate sobre el producto
Gracias por elegir nuestros productos. Estamos aquí para ofrecerte diferentes tipos de soporte y garantizar que tu experiencia con nuestros productos sea lo más fluida posible. Ofrecemos varios canales de comunicación para adaptarnos a diferentes preferencias y necesidades.