Flash a PREEMPT_RT Linux Real-Time Kernel on Seeed reComputer Jetson with JetPack 6.2.1
A real-time kernel, also known as a PREEMPT_RT kernel, is a Linux kernel variant with enhanced real-time scheduling capabilities. Its main purpose is to reduce scheduling latency and improve task execution determinism, rather than increase raw computing performance.
Compared with a standard Linux kernel, a real-time kernel allows high-priority tasks to preempt CPU resources more quickly and reduces timing jitter caused by interrupts and thread scheduling. This helps control tasks run stably at fixed cycles. In robotics, industrial automation, motion control, autonomous driving, and edge computing scenarios, a real-time kernel can significantly improve the stability and reliability of real-time workloads such as motor control, sensor data acquisition, and industrial bus communication, including CAN and EtherCAT.
This guide is based on the official NVIDIA Jetson Linux R36.4.4 BSP. It merges the Seeed R36.4.4 BSP, cross-compiles the PREEMPT_RT kernel, and flashes the system to the NVMe SSD of a Seeed Jetson device.
References
- NVIDIA Jetson Linux R36.4.4 Quick Start
- NVIDIA Jetson Linux R36.4.4 Kernel Customization
- CSDN reference article
Hardware Requirements
- An x86 Ubuntu host PC
- A Seeed reComputer or reServer device to be flashed
Create a Workspace and Download System Files
Create a workspace on the host PC:
mkdir ~/RT_ws
cd ~/RT_ws
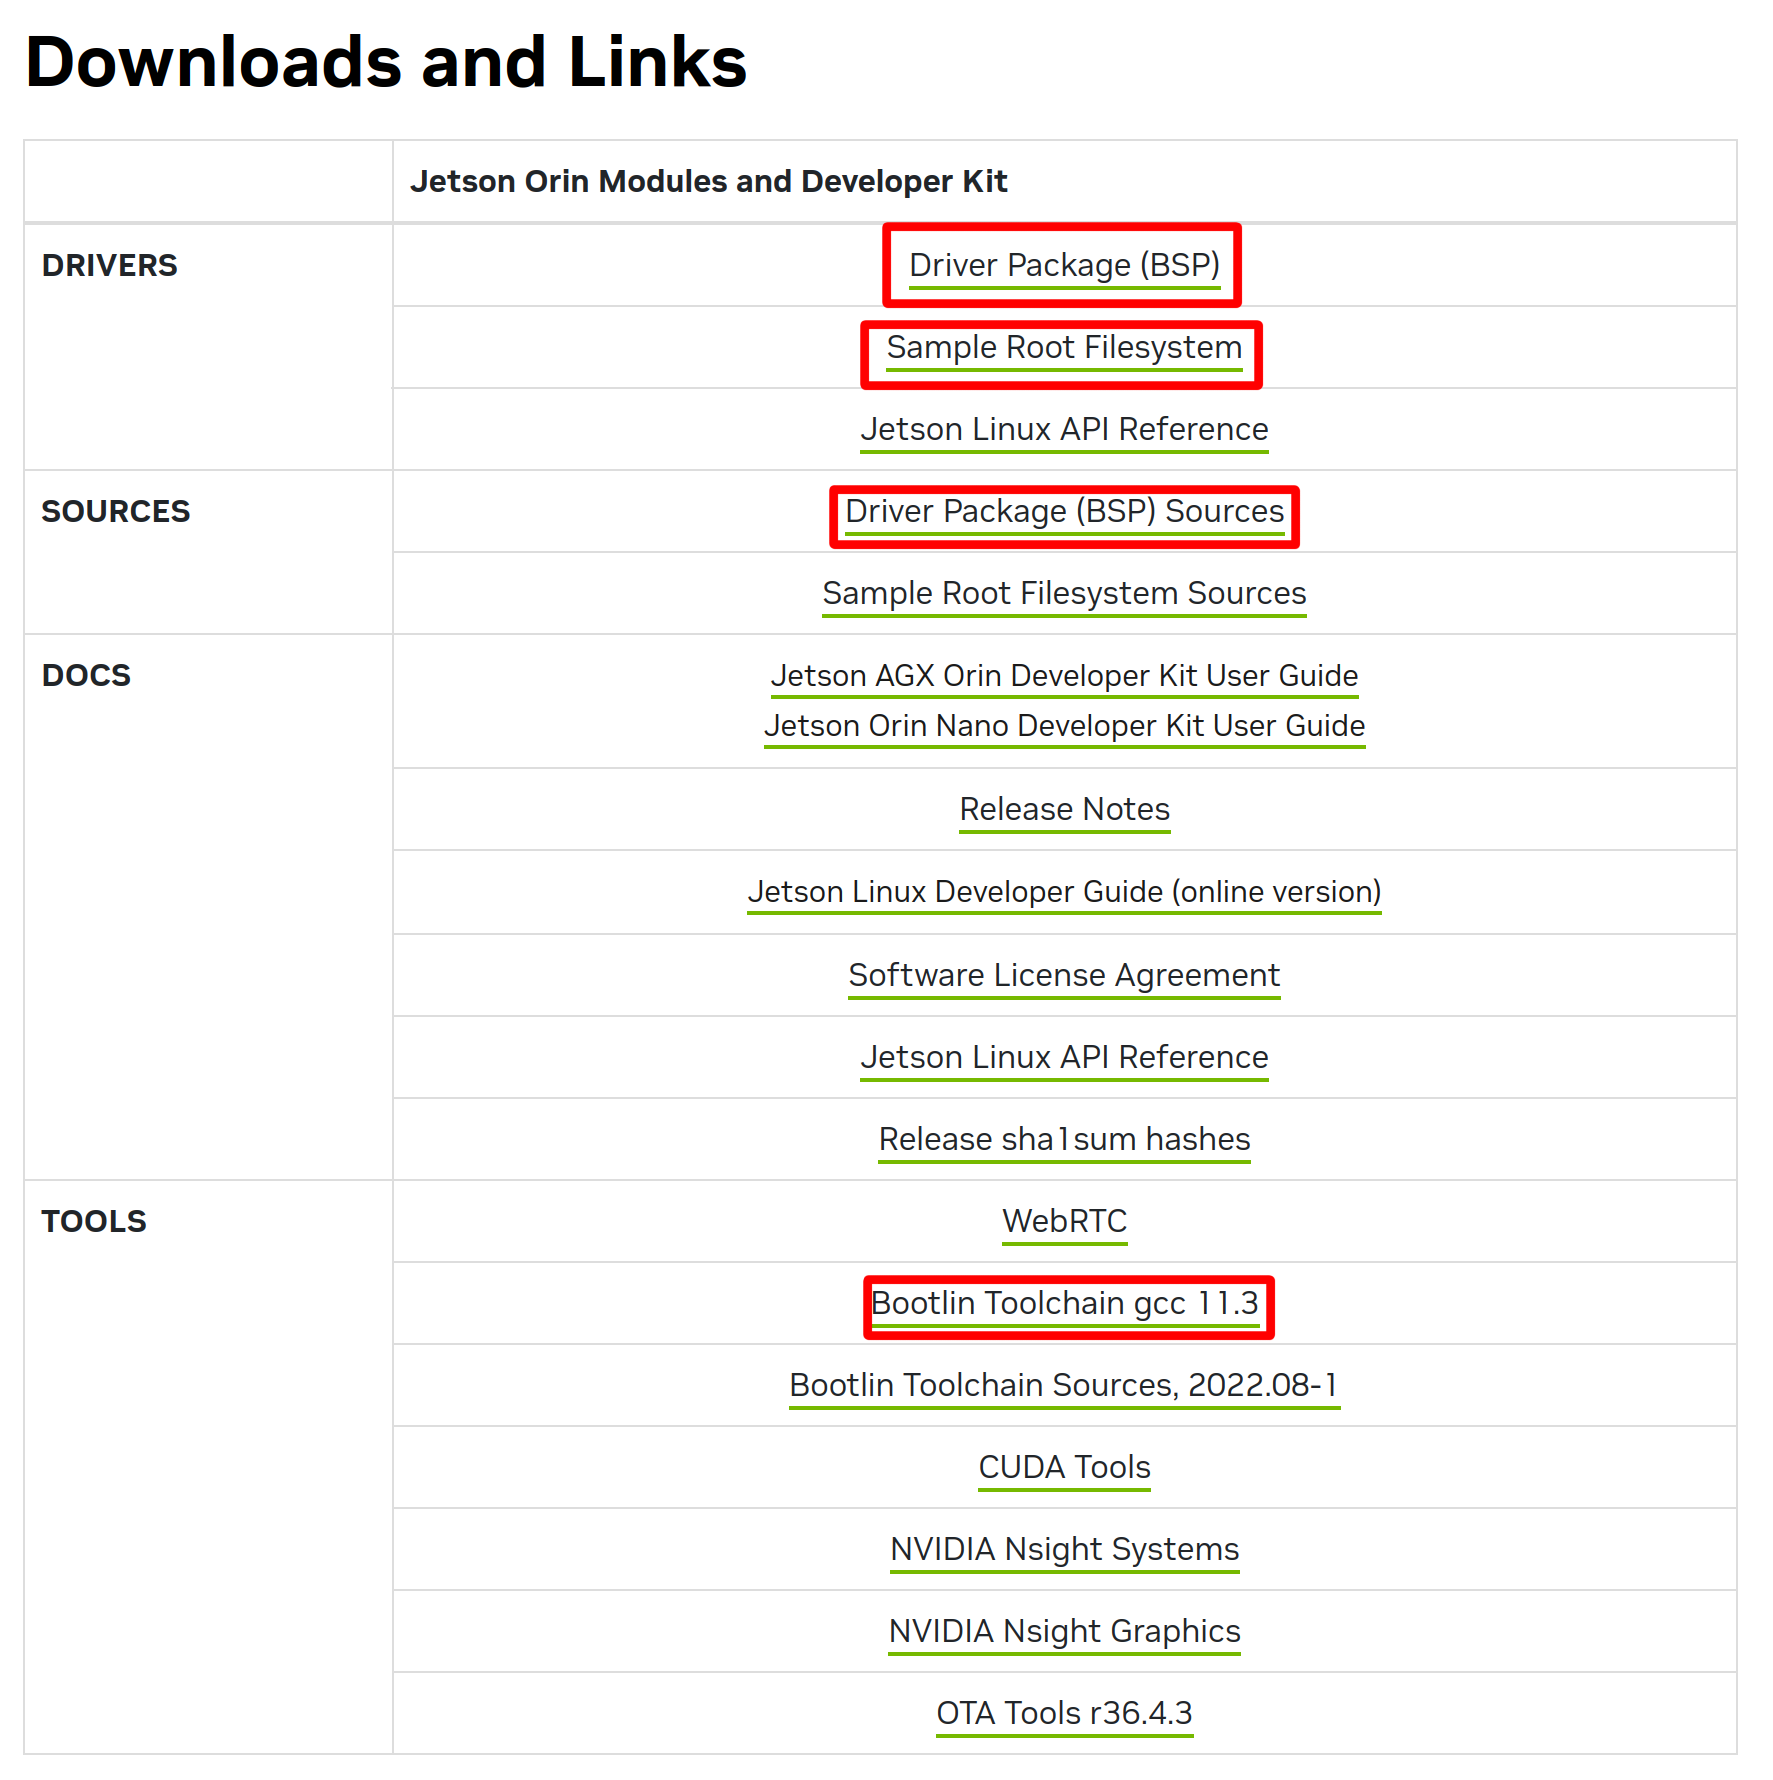
Go to NVIDIA Jetson Linux R36.4.4, download the four files highlighted in the image below, and place them in the ~/RT_ws workspace.
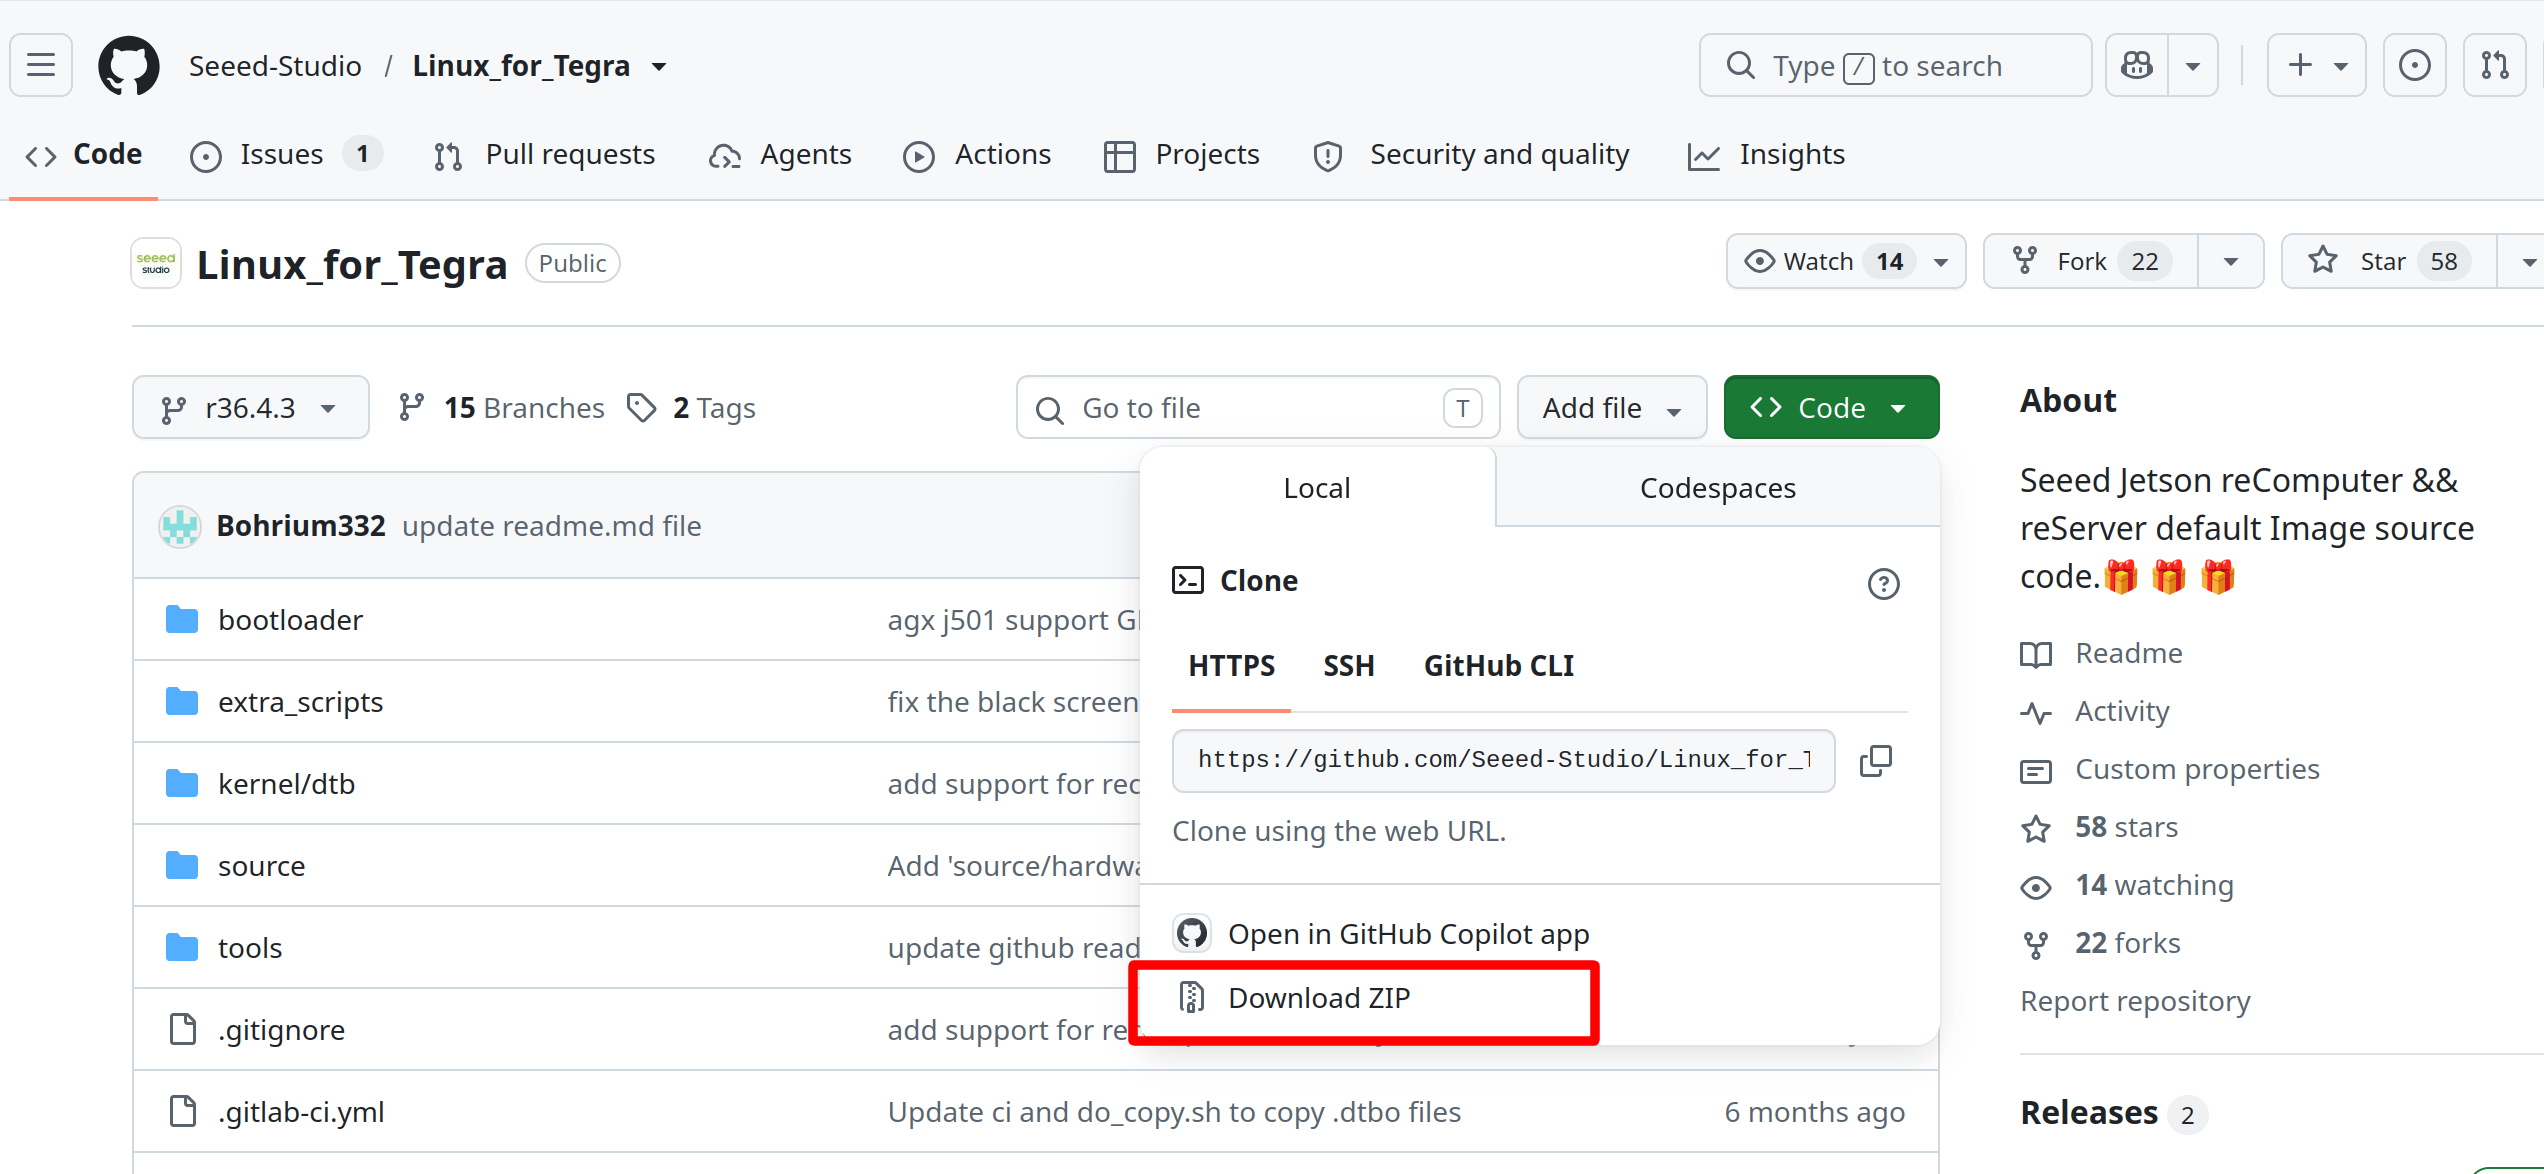
Download the source code ZIP package from Seeed-Studio/Linux_for_Tegra, or clone the repository:
git clone https://github.com/Seeed-Studio/Linux_for_Tegra.git
Because this directory name may conflict with the official NVIDIA directory name, it is recommended to download the ZIP package and extract it according to the steps in this guide.
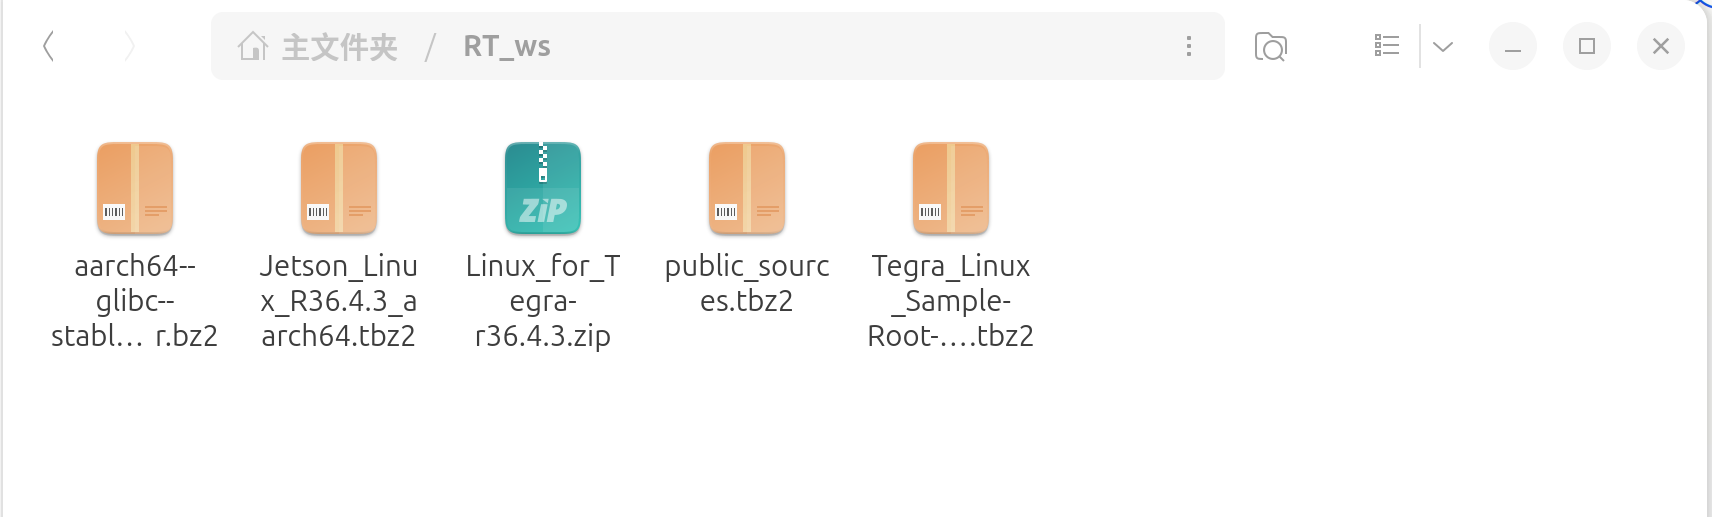
Check that the following files exist under ~/RT_ws:
ls -lh \
  Jetson_Linux_R36.4.4_aarch64.tbz2 \
  Tegra_Linux_Sample-Root-Filesystem_R36.4.4_aarch64.tbz2 \
  public_sources.tbz2 \
  aarch64--glibc--stable-2022.08-1.tar.bz2 \
  Linux_for_Tegra-r36.4.4.zip
Install Host Dependencies
cd ~/RT_ws

sudo apt-get update

sudo apt-get install -y \
  qemu-user-static \
  python3-pip \
  device-tree-compiler \
  flex \
  bison \
  libncurses-dev \
  libssl-dev \
  build-essential \
  sshpass \
  abootimg \
  nfs-kernel-server \
  libxml2-utils
Extract the Official BSP, Rootfs, Sources, Toolchain, and Seeed Overlay
cd ~/RT_ws

mkdir -p l4t-gcc

tar xf aarch64--glibc--stable-2022.08-1.tar.bz2 -C l4t-gcc

tar xf Jetson_Linux_R36.4.4_aarch64.tbz2

tar xf public_sources.tbz2 -C .

unzip -q Linux_for_Tegra-r36.4.4.zip -d seeed_overlay

sudo tar xpf Tegra_Linux_Sample-Root-Filesystem_R36.4.4_aarch64.tbz2 -C Linux_for_Tegra/rootfs/
The rootfs must be extracted with sudo tar xpf. Do not use regular tar, otherwise file ownership and permissions will be incorrect. If you have already extracted it, you can continue using the existing directory. Clean the old directory only when you want to start over completely.
Extract the NVIDIA Sources
cd ~/RT_ws/Linux_for_Tegra/source

tar xf kernel_src.tbz2

tar xf kernel_oot_modules_src.tbz2

tar xf nvidia_kernel_display_driver_source.tbz2
Merge the Seeed BSP Overlay
cd ~/RT_ws

cp -a seeed_overlay/Linux_for_Tegra-r36.4.4/. Linux_for_Tegra/
This step must be completed before building. The Seeed overlay modifies the kernel, OOT modules, hardware/nvidia/t23x/nv-public DTS and Makefile files, and bootloader/generic/BCT. If this step is skipped, only the official NVIDIA development kit configuration will be available during flashing, and Seeed carrier board information will not be included.
Apply NVIDIA Binaries to Rootfs and Install Flash Prerequisites
cd ~/RT_ws/Linux_for_Tegra

sudo ./apply_binaries.sh

sudo ./tools/l4t_flash_prerequisites.sh
Build the PREEMPT_RT Kernel, OOT Modules, and DTB
cd ~/RT_ws/Linux_for_Tegra/source

export ARCH=arm64

export CROSS_COMPILE=~/RT_ws/l4t-gcc/aarch64--glibc--stable-2022.08-1/bin/aarch64-buildroot-linux-gnu-

./nvbuild.sh -r
The -r option enables the official NVIDIA PREEMPT_RT configuration. The build output directory is ~/RT_ws/Linux_for_Tegra/source/kernel_out. After a successful build, the kernel version suffix should include -rt-tegra.
Deploy Image, DTB, and DTBO with Seeed do_copy.sh
cd ~/RT_ws/Linux_for_Tegra/source

./do_copy.sh

# Additional checks:
ls -lh ../kernel/Image

ls ../kernel/dtb/tegra234-j401-p3768-0000+p3767-0000-recomputer.dtb

ls ../kernel/dtb/tegra234-j201-p3768-0000+p3767-0000-recomputer-indu.dtb
do_copy.sh is the deployment entry point in the Seeed BSP. It copies the built reComputer and reServer DTBs, camera and GMSL DTBOs, and the new kernel/Image.
If do_copy.sh reports that a Seeed DTB cannot be found, it usually means the Seeed overlay was not merged completely, or the build did not use the Seeed-overlaid source/Makefile.
Install Kernel Modules into Rootfs
cd ~/RT_ws/Linux_for_Tegra/source

export ARCH=arm64

export CROSS_COMPILE=~/RT_ws/l4t-gcc/aarch64--glibc--stable-2022.08-1/bin/aarch64-buildroot-linux-gnu-

export INSTALL_MOD_PATH=~/RT_ws/Linux_for_Tegra/rootfs/

sudo -E ./nvbuild.sh -i
Copy Common Seeed DTBOs to rootfs/boot and Update Initrd
cd ~/RT_ws/Linux_for_Tegra

sudo cp -a kernel/dtb/tegra234-p3767-camera-p3768-imx219-dual-seeed.dtbo rootfs/boot/ 2>/dev/null || true

sudo cp -a kernel/dtb/tegra234-p3767-camera-p3768-imx219-quad-seeed.dtbo rootfs/boot/ 2>/dev/null || true

sudo cp -a kernel/dtb/tegra234-p3767-camera-p3768-imx477-dual-seeed.dtbo rootfs/boot/ 2>/dev/null || true

sudo cp -a kernel/dtb/tegra234-p3767-camera-p3768-imx219-imx477-seeed.dtbo rootfs/boot/ 2>/dev/null || true

sudo cp -a kernel/dtb/tegra234-p3767-camera-p3768-imx477-imx219-seeed.dtbo rootfs/boot/ 2>/dev/null || true

sudo cp -a kernel/dtb/tegra234-seeed-gmsl*.dtbo rootfs/boot/ 2>/dev/null || true

sudo cp -a kernel/dtb/tegra234-seeed-orbbec-335lg-overlay.dtbo rootfs/boot/ 2>/dev/null || true

sudo ./tools/l4t_update_initrd.sh
Copying DTBO files to rootfs/boot allows the system to continue using Seeed camera and GMSL overlays after boot. l4t_update_initrd.sh writes the new module dependencies into the initrd. Do not skip this step for NVMe boot.
Check the Build Output
cd ~/RT_ws/Linux_for_Tegra

ls -lh kernel/Image

ls kernel/dtb/tegra234-j*.dtb

find rootfs/lib/modules -maxdepth 1 -type d -name '*-rt-tegra' -print
If you are flashing a reComputer J401, at least the following files should exist:
kernel/dtb/tegra234-j401-p3768-0000+p3767-0000-recomputer.dtb
kernel/dtb/tegra234-j401-p3768-0000+p3767-0001-recomputer.dtb
kernel/dtb/tegra234-j401-p3768-0000+p3767-0003-recomputer.dtb
kernel/dtb/tegra234-j401-p3768-0000+p3767-0004-recomputer.dtb
Enter Force Recovery Mode and Check the USB Connection
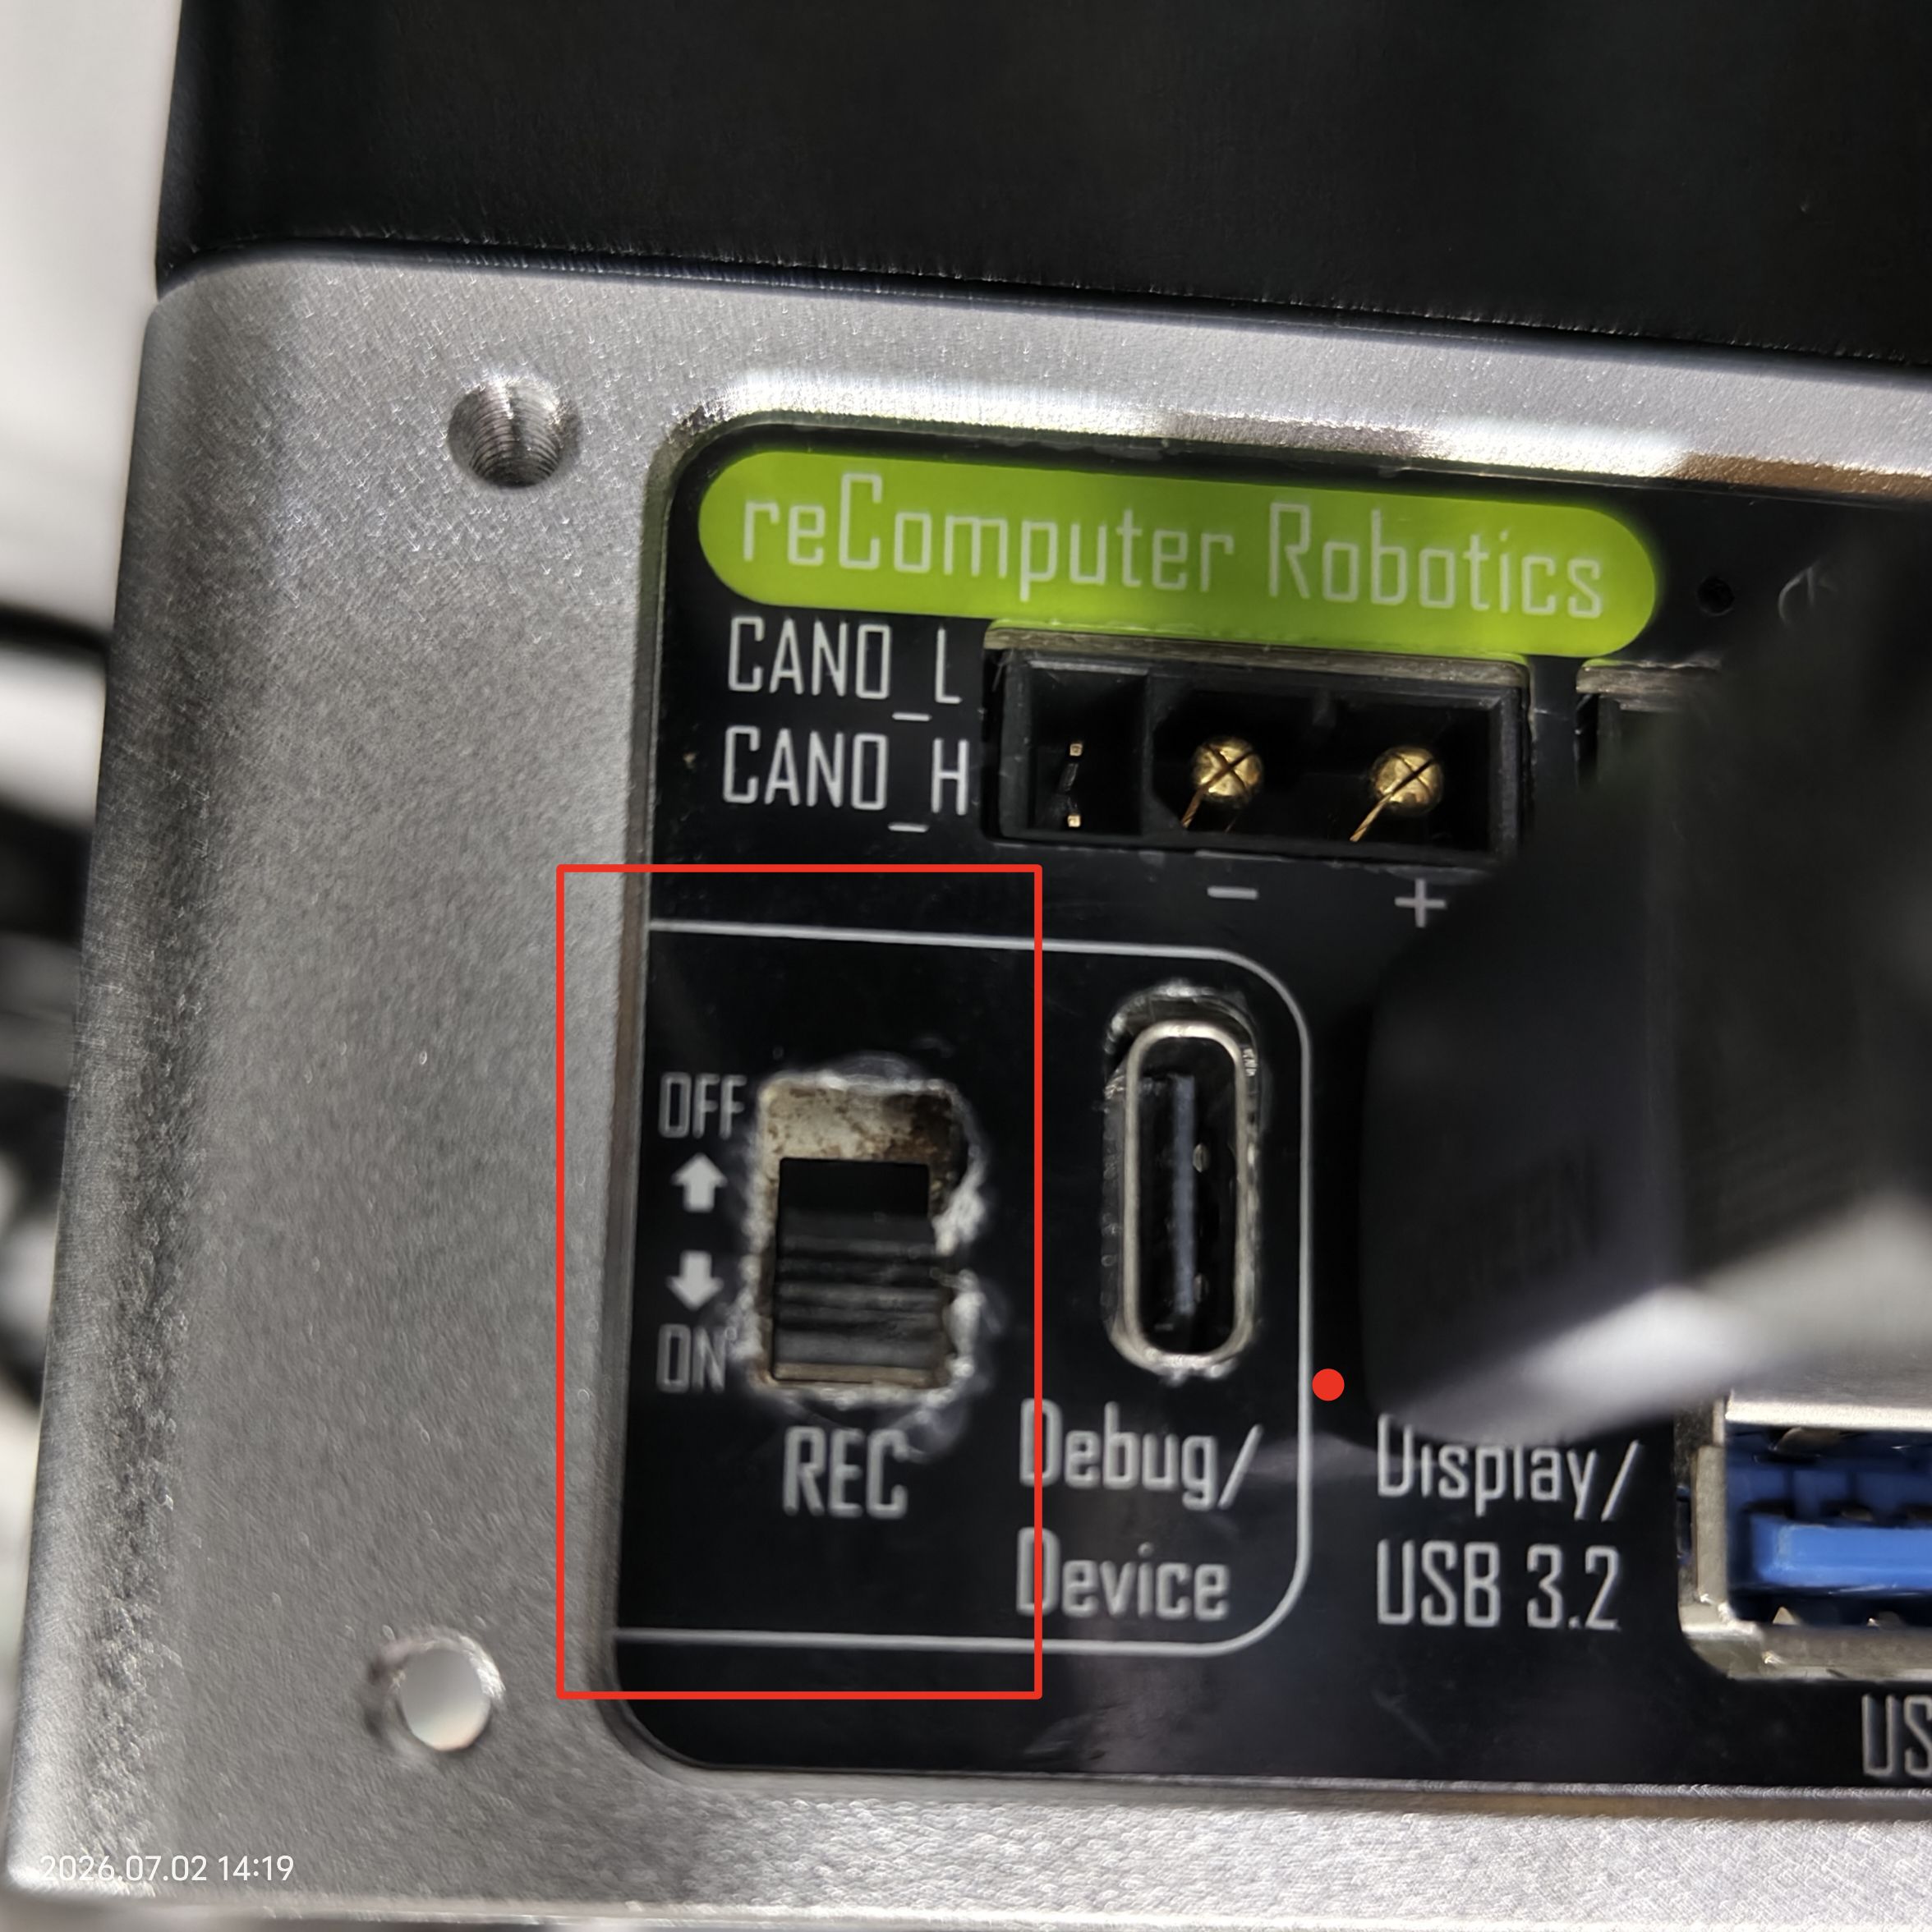
Set the REC switch on the device to ON, and connect the x86 host PC to the Debug/Device port next to it with a USB cable.
On the host PC, run:
cd ~/RT_ws/Linux_for_Tegra

lsusb
You should see output similar to:
Bus <bbb> Device <ddd>: ID 0955:<nnnn> NVIDIA Corp.
If 0955 is not shown, check the REC/GND jumper or recovery-mode button flow, confirm that the Type-C cable supports data transmission, and make sure the NVIDIA USB device has been passed through to Ubuntu if you are using a virtual machine.
Select the Seeed Board Configuration Name
cd ~/RT_ws/Linux_for_Tegra

export SEEED_BOARD_CONF=recomputer-orin-j401

test -f "${SEEED_BOARD_CONF}.conf"
Available configuration names:
recomputer-orin-j401
recomputer-industrial-orin-j201
reserver-industrial-orin-j401
recomputer-orin-j40mini
recomputer-orin-super-j401
recomputer-orin-robotics-j401
recomputer-orin-robotics-j401-gmsl
reserver-agx-orin-j501x
reserver-agx-orin-j501x-gmsl
The following table maps product models to configuration names:
| Product model | Configuration name |
|---|---|
| reComputer classic J3010/J3011/J4011/J4012 | recomputer-orin-j401 |
| reComputer Industrial J3010/J3011/J4011/J4012 | recomputer-industrial-orin-j201 |
| reServer Industrial J3010/J3011/J4011/J4012 | reserver-industrial-orin-j401 |
| reComputer Mini J40 Series | recomputer-orin-j40mini |
| reComputer Super J401 Series | recomputer-orin-super-j401 |
| reComputer Robotics J401 Series | recomputer-orin-robotics-j401 or recomputer-orin-robotics-j401-gmsl |
| reServer AGX Orin J501x | reserver-agx-orin-j501x or reserver-agx-orin-j501x-gmsl |
Fill in Module EEPROM and Board Information Variables
When flashing directly online and USB EEPROM reading works normally, the NVIDIA tools can usually read this information automatically.
If you encounter an error about missing module or board information, fill in the variables below according to the actual module model before flashing.
Orin NX / Orin Nano common values:
| Module | BOARDID | BOARDSKU | FAB | BOARDREV | CHIP_SKU |
|---|---|---|---|---|---|
| Orin Nano 4GB | 3767 | 0004 | 300 | N.2 | 00:00:00:D6 |
| Orin Nano 8GB | 3767 | 0003 | 300 | N.2 | 00:00:00:D6 |
| Orin NX 16GB | 3767 | 0000 | 300 | G.3 | 00:00:00:D3 |
| Orin NX 8GB | 3767 | 0001 | 300 | M.3 | 00:00:00:D4 |
AGX Orin J501x common values:
| Module | BOARDID | BOARDSKU | FAB | BOARDREV | CHIP_SKU |
|---|---|---|---|---|---|
| AGX Orin 32GB | 3701 | 0004 | 500 | J.0 | 00:00:00:D2 |
| AGX Orin 64GB | 3701 | 0005 | 500 | M.0 | 00:00:00:D0 |
Example for reComputer J4012 / Orin NX 16GB:
export BOARDID=3767
export BOARDSKU=0000
export FAB=300
export BOARDREV=G.3
export CHIP_SKU=00:00:00:D3
Example for reComputer J3011 / Orin Nano 8GB:
export BOARDID=3767
export BOARDSKU=0003
export FAB=300
export BOARDREV=N.2
export CHIP_SKU=00:00:00:D6
Check the variables:
echo "CONF=${SEEED_BOARD_CONF} BOARDID=${BOARDID} BOARDSKU=${BOARDSKU} FAB=${FAB} BOARDREV=${BOARDREV} CHIP_SKU=${CHIP_SKU}"
The Seeed configuration file selects DTB_FILE according to the board_sku that maps to BOARDSKU. If BOARDSKU is incorrect, flashing may succeed, but the device may boot with the wrong DTB. In that case, peripherals, Ethernet, M.2, cameras, or GPIO may not work correctly.
Flash to NVMe
cd ~/RT_ws/Linux_for_Tegra

sudo -E BOARDID="${BOARDID}" BOARDSKU="${BOARDSKU}" FAB="${FAB}" BOARDREV="${BOARDREV}" CHIP_SKU="${CHIP_SKU}" \
  ./tools/kernel_flash/l4t_initrd_flash.sh \
  --external-device nvme0n1p1 \
  -c tools/kernel_flash/flash_l4t_t234_nvme.xml \
  -p "-c bootloader/generic/cfg/flash_t234_qspi.xml --no-systemimg" \
  --showlogs \
  --network usb0 \
  "${SEEED_BOARD_CONF}" \
  external
This command flashes the NVMe SSD and handles the QSPI boot configuration for Orin NX and Orin Nano. The final external argument means the system rootfs boots from the external NVMe. If the device has two NVMe SSDs, it is still recommended to use external so that the rootfs uses PARTUUID.
After Flashing
After flashing succeeds, power off the device, remove the REC/GND jumper or release the recovery-mode button, and power the Jetson device on again.
Verify the Real-Time Kernel and DTB
Check the kernel version:
uname -a
The output should include the -rt suffix.
Check the kernel configuration:
zcat /proc/config.gz | grep PREEMPT
The output should include:
CONFIG_PREEMPT_RT=y
Use cyclictest to test scheduling jitter:
sudo apt install -y rt-tests
sudo cyclictest -Sp90-i1000-l100000
After waiting for a period of time, check whether the Avg value is lower than 20 microseconds. Example output:
T: 0 (  1290) P:99 I:1000 C:100000 Min: 5  Act:10 Avg: 7  Max: 18
T: 1 (  1291) P:99 I:1000 C:100000 Min: 4  Act: 9 Avg: 7  Max: 20
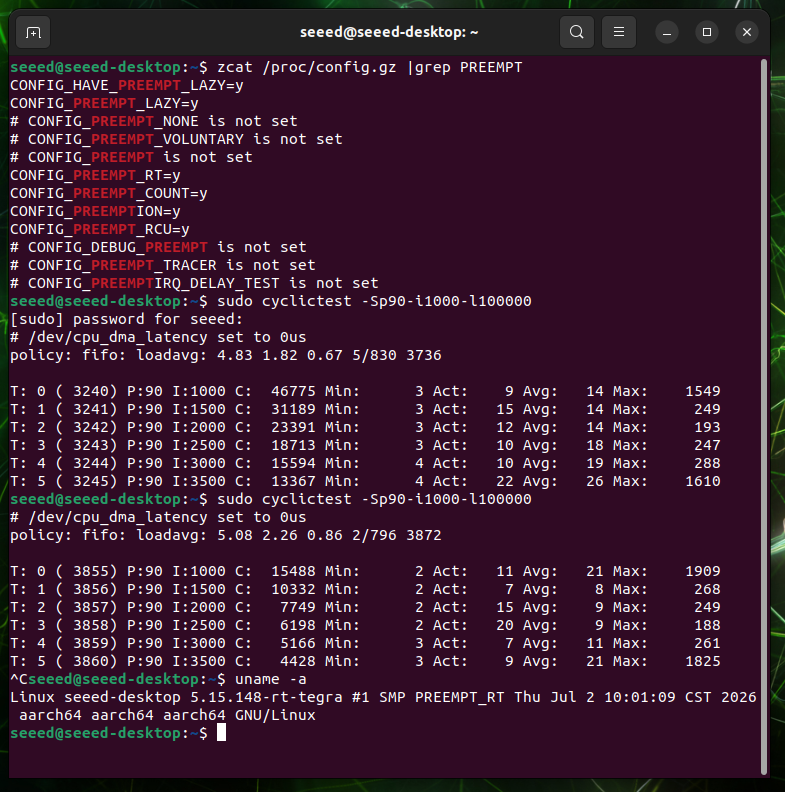
If the checks above pass, the PREEMPT_RT real-time kernel has been installed successfully.
Tech Support & Product Discussion
Thank you for choosing our products! We are here to provide you with different support to ensure that your experience with our products is as smooth as possible. We offer several communication channels to cater to different preferences and needs.