Frigate NVR with Raspberry Pi 5/CM5
Introduction
Frigate NVR is an open-source network video recorder designed for real-time object detection with AI models. Paired with the Raspberry Pi 5/CM5, it enables efficient video surveillance at the edge. This guide will walk you through the installation and configuration process for an optimal setup.
Official Frigate
Prepare Hardware
Recommended Components
| reComputer AI R2130 | reComputer AI Industrial R2145 | reComputer Industrial R20xx | reComputer Industrial R21xx |
|---|---|---|---|
 |  |  |  |
Alternatively, you also need at least one camera for video streaming. You can refer to Recommended hardware to see the recommended cameras.
Install Hailo PCIe Driver
Step 1: Enable PCIe Gen 3
Open a terminal and run the following command.
sudo apt update
sudo raspi-config
In the dialog, select 6 Advanced Options and then A8 PCIe Speed.
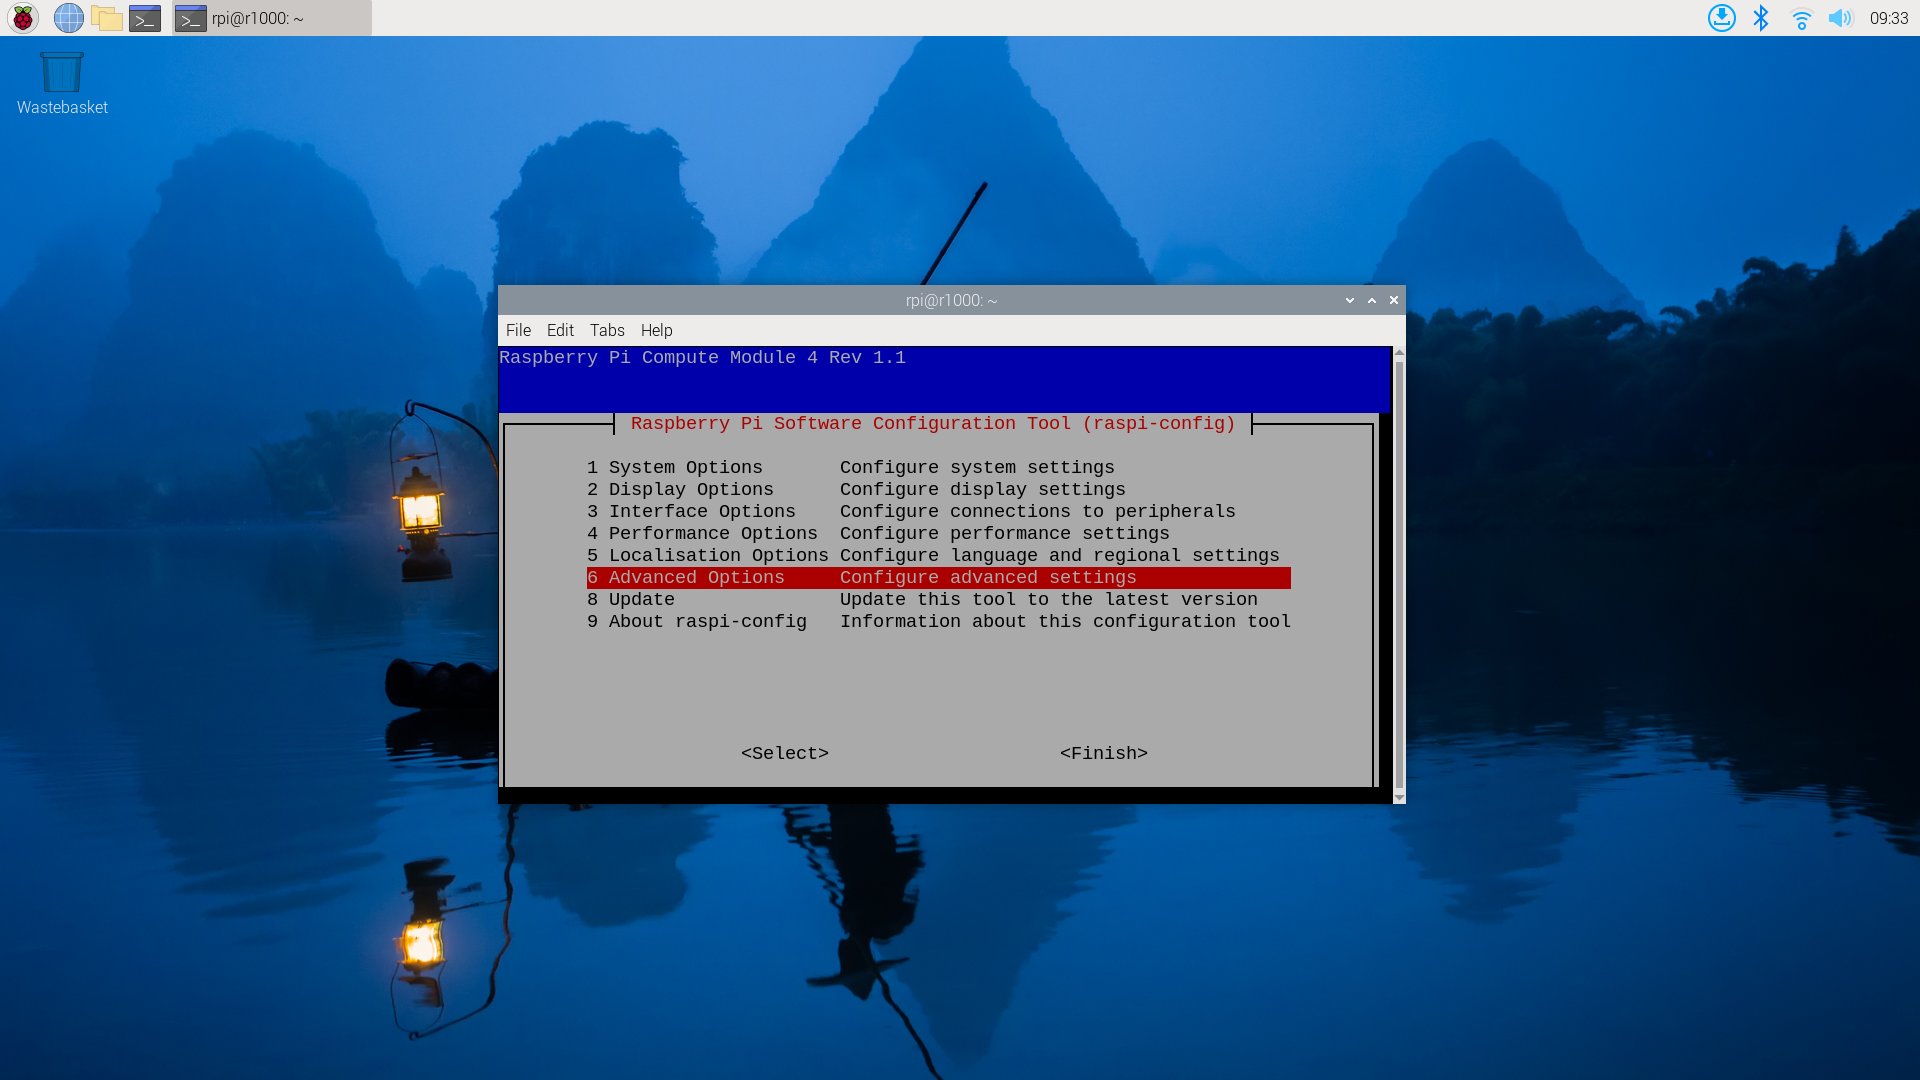
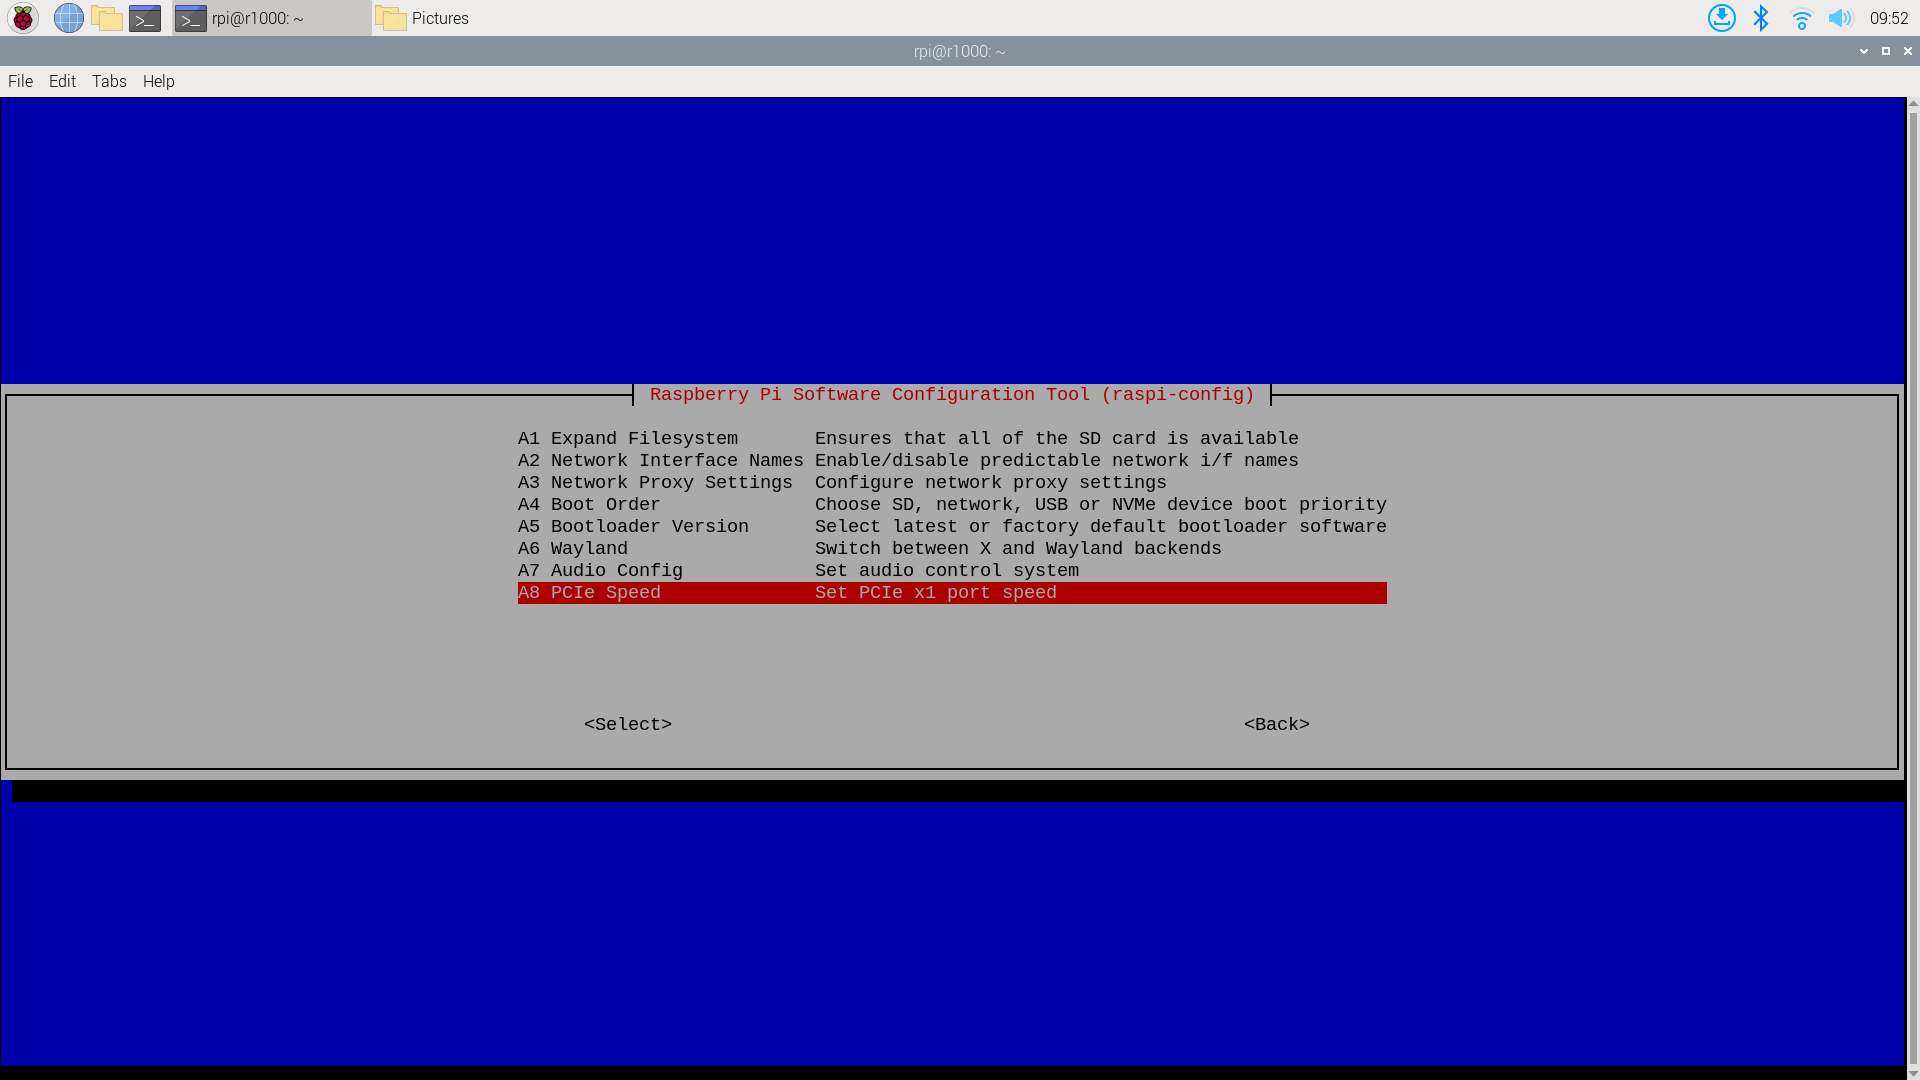
Choose "Yes" to enable PCIe Gen 3 mode.
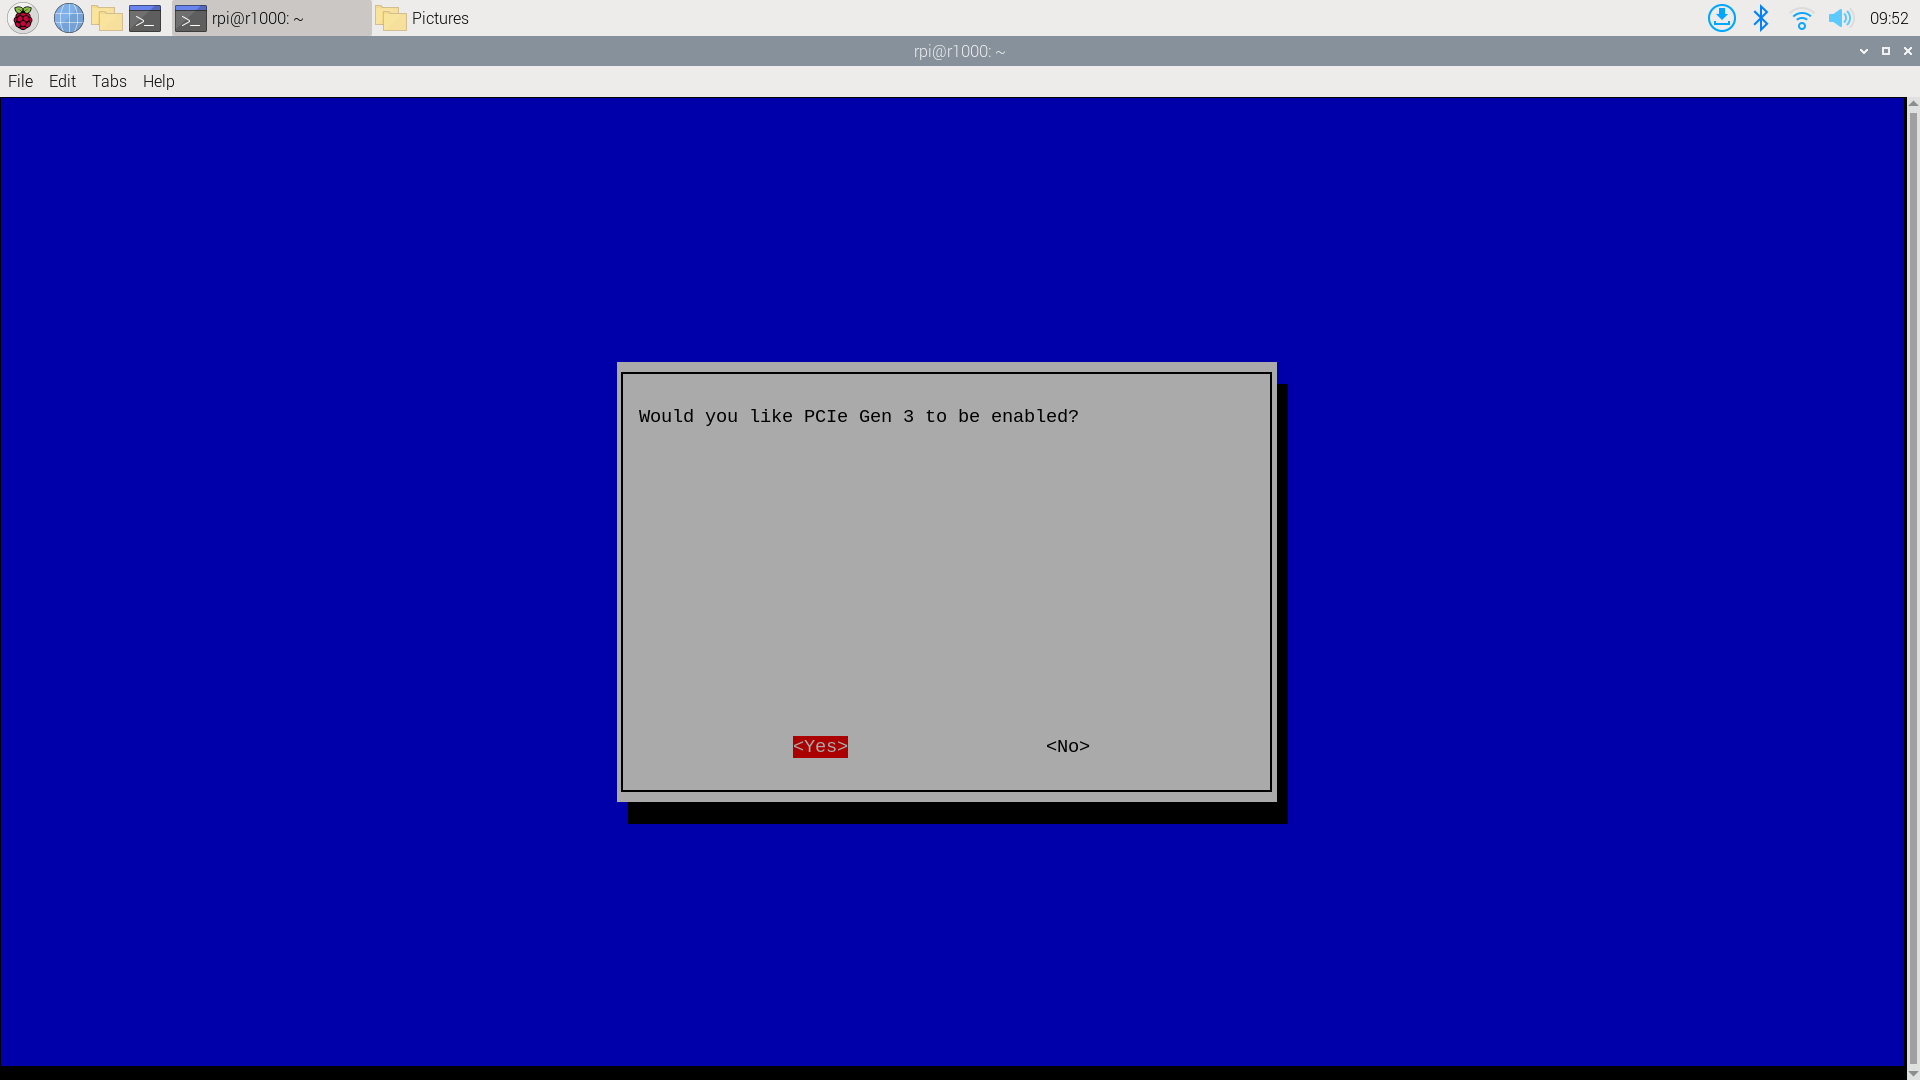
Afterward, click "Finish" to exit.
Edit /boot/firmware/config.txt, append the following line at the end of the file.
dtoverlay=pciex1-compat-pi5,no-mip
Step 2: Install Hailo PCIe Driver
Install the dkms package. This package is required to install the Hailo PCIe driver.
sudo apt update
sudo apt install dkms
Get Hailo PCIe Driver from GitHub.
git clone https://github.com/hailo-ai/hailort-drivers
cd hailort-drivers/linux/pcie
git checkout 24e7ff2fb58fab7029024c1a1d3f2d1914f56d7b
Then, install the Hailo PCIe driver.
sudo make install_dkms
After installation, download firmware for Hailo and copy it to the /lib/firmware/hailo directory.
cd ../..
./download_firmware.sh
sudo mkdir -p /lib/firmware/hailo
sudo cp hailo8_fw*.bin /lib/firmware/hailo/hailo8_fw.bin
To avoid PCIe max_desc_page_size issue, we also need to create a rule in /etc/modprobe.d/hailo_pci.conf with the following content.
options hailo_pci force_desc_page_size=4096
Restart the system to take effect.
sudo reboot
After the system is restarted, the Hailo PCIe driver is installed successfully. The /dev/hailo0 device will be created. Check the device by running the following command.
$ ls /dev/hailo*
/dev/hailo0
Install Frigate NVR
In this part, we assume you have your camera set up and ready to stream with RTSP protocol in 1920x1080 resolution.
- Example RTSP URL:
rtsp://admin:[email protected]:554/cam/realmonitor?channel=1&subtype=0
Step 1: Prepare the Environment
-
Update your system:
sudo apt update -
Install Docker:
curl -fsSL get.docker.com | bash
sudo usermod -aG docker $USER -
Reboot the system:
sudo reboot
Step 2: Deploying Frigate
-
Pull the Frigate Image:
Go to Package frigate, choose one image with
-h8lsuffix. In this example, we chooseghcr.io/blakeblackshear/frigate:0.15.0-rc2-h8l.docker pull ghcr.io/blakeblackshear/frigate:0.15.0-rc2-h8l -
Create Docker Compose File:
Here is an example of the
frigate.ymlfile, thehailo0device is the one you created in the previous step, configuration files are in the./configdirectory and data files are in the./datadirectory.:services:
frigate-hailo:
container_name: frigate-hailo
privileged: true
restart: unless-stopped
image: ghcr.io/blakeblackshear/frigate:0.15.0-rc2-h8l
shm_size: 1024mb
devices:
- /dev/hailo0:/dev/hailo0
volumes:
- /etc/localtime:/etc/localtime:ro
- ./config/:/config
- ./data/db/:/data/db
- ./data/storage:/media/frigate
- type: tmpfs
target: /tmp/cache
tmpfs:
size: 1g
ports:
- 5000:5000 -
Edit Frigate Config:
Here is an example of the
config/config.ymlfile, which is for the Frigate application:database:
path: /data/db/frigate.db
go2rtc:
streams:
home:
- rtsp://admin:[email protected]:554/cam/realmonitor?channel=1&subtype=0
cameras:
home:
ffmpeg:
inputs:
- path: rtsp://admin:[email protected]:554/cam/realmonitor?channel=1&subtype=0
roles:
- record
- detect
mqtt:
enabled: False
objects:
track:
- person
- cat
detectors:
hailo8l:
type: hailo8l
device: PCIe
model:
width: 300
height: 300
model_type: ssd
path: /config/model_cache/h8l_cache/ssd_mobilenet_v1.hef
version: 0.15-1 -
Start Docker Instance:
docker compose -f frigate.yml up -dAfter the Frigate is up and running, you can access the Frigate web UI at
http://<your-raspberry-pi-ip>:5000to check the camera stream.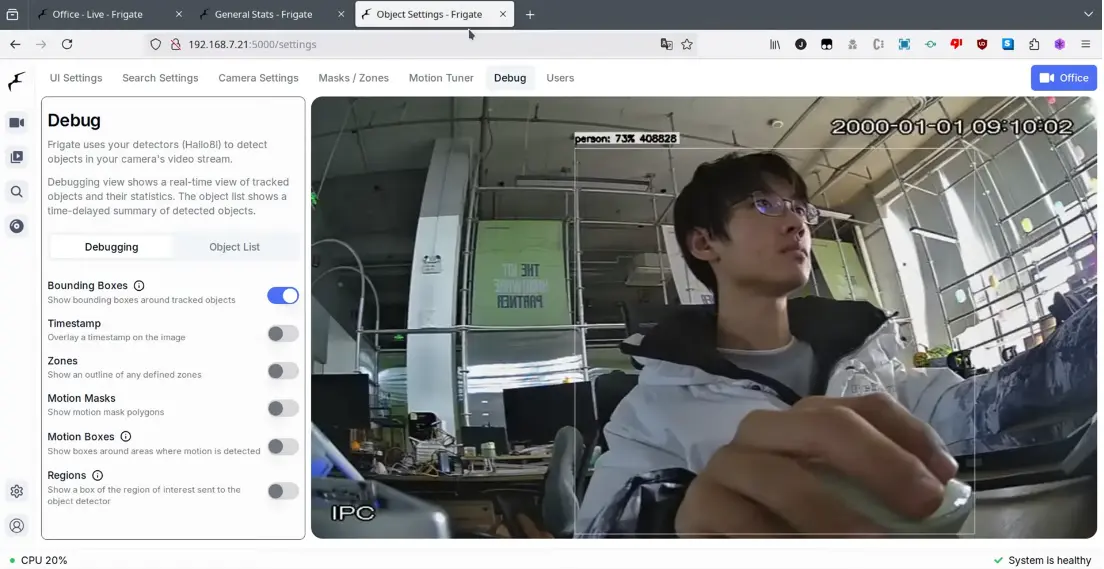
Seeed Frigate
Modify PCIe settings
Open config.txt
sudo nano /boot/firmware/config.txt
Add the following text to config.txt
dtparam=pciex1_gen=3
dtoverlay=pciex1-compat-pi5,no-mip
Then use Ctrl+x to save the file and reboot the AI box
Install docker and hailo-all
sudo apt update
sudo apt install hailo-all
curl -fsSL https://get.docker.com -o get-docker.sh
sudo sh get-docker.sh
sudo usermod -aG docker $USER
sudo apt install docker-compose-plugin
Create yml file
Create frigate.yml for docker compose to run frigate
cd ~
sudo nano frigate.yml
Here is an example of frigate.yml
version: "3.9"
services:
    frigate-hailo:
        container_name: frigate-hailo
        privileged: true
        restart: unless-stopped
        image: mjqx2023/frigate_seeed:latest
        shm_size: 1024mb
        environment:
            - HAILO_MONITOR=1
        devices:
            - /dev/hailo0:/dev/hailo0
        volumes:
            - /etc/localtime:/etc/localtime:ro
            - ./config/:/config
            - ./data/db/:/data/db
            - ./data/storage:/media/frigate
            - type: tmpfs
              target: /tmp/cache
              tmpfs:
                  size: 1000000000
        ports:
            - 5000:5000
            - 1984:1984
            - 5002:5002
            - 5003:5003
Download yolo model and create config.yml.
mkdir config && cd config && mkdir model_cache
cd model_cache && wget https://hailo-model-zoo.s3.eu-west-2.amazonaws.com/ModelZoo/Compiled/v2.14.0/hailo8/yolov8n.hef

cd .. && nano config.yml
Here is an example of config.yml
database:
  path: /data/db/frigate.db

go2rtc:
  streams:
    home:
      - rtsp://admin:[email protected]:554/cam/realmonitor?channel=1&subtype=1
    home1:
      - rtsp://admin:[email protected]:554/cam/realmonitor?channel=1&subtype=1
    yard:
      - rtsp://admin:[email protected]:554/cam/realmonitor?channel=1&subtype=1
    yard1:
      - rtsp://admin:[email protected]:554/cam/realmonitor?channel=1&subtype=1

cameras:
  home:
    ffmpeg:
      inputs:
        - path: rtsp://127.0.0.1:8554/home
          roles:
            - detect

    motion:
      threshold: 45
      contour_area: 60
      improve_contrast: true

  yard:
    ffmpeg:
      inputs:
        - path: rtsp://127.0.0.1:8554/yard
          roles:
            - detect

    motion:
      threshold: 45
      contour_area: 60
      improve_contrast: true

  home1:
    ffmpeg:
      inputs:
        - path: rtsp://127.0.0.1:8554/home1
          roles:
            - detect


    motion:
      threshold: 45
      contour_area: 60
      improve_contrast: true

  yard1:
    ffmpeg:
      inputs:
        - path: rtsp://127.0.0.1:8554/yard1
          roles:
            - detect

    motion:
      threshold: 45
      contour_area: 60
      improve_contrast: true
mqtt:
  enabled: false

objects:
  track:
    - person
    - cat

detectors:
  hailo8l:
    type: hailo8l
    device: PCIe

model:
  width: 640
  height: 640
  path: /config/model_cache/yolov8n.hef

version: 0.16-0

camera_groups:
  test:
    order: 1
    icon: LuAlignEndHorizontal
    cameras:
      - home
      - home1
      - yard
      - yard1
Pull docker image and run frigate
Pull frigate_seeed image
cd ~
docker pull mjqx2023/frigate_seeed
docker compose -f frigate.yml start
Then open localhost:5000 on your AI box web browser:

Tech Support & Product Discussion
Thank you for choosing our products! We are here to provide you with different support to ensure that your experience with our products is as smooth as possible. We offer several communication channels to cater to different preferences and needs.