Get Started with MeshCore Remote Terminal
This wiki will introduce Remote Terminal for MeshCore (RemoteTerm) to provide an interface for MeshCore devices to transmit messages. This tutorial provides a fundamental setup for running RemoteTerm on a Raspberry Pi using the Seeed XIAO ESP32S3 & SX1262 Kit as a companion radio and Raspberry Pi Zero 2W for a compact, all-in-one MeshCore solution for power users!
Introduction for RemoteTerm
RemoteTerm is an open-source application that runs on a server with a connected MeshCore device.
It provides an interface to the local MeshCore network, allowing any device on the same local network (even if off-grid) to send and receive messages via the radio. RemoteTerm is extremely mobile-friendly. It enables additional abilities such as:
- Caching all received packets
- Running multiple Python bots
- Monitoring unlimited contacts and channels
- Accessing your radio remotely over your network or VPN
- Forwarding packets to MQTT, SQS, Apprise, etc.
- Visualize the mesh node map
Setup
Hardware
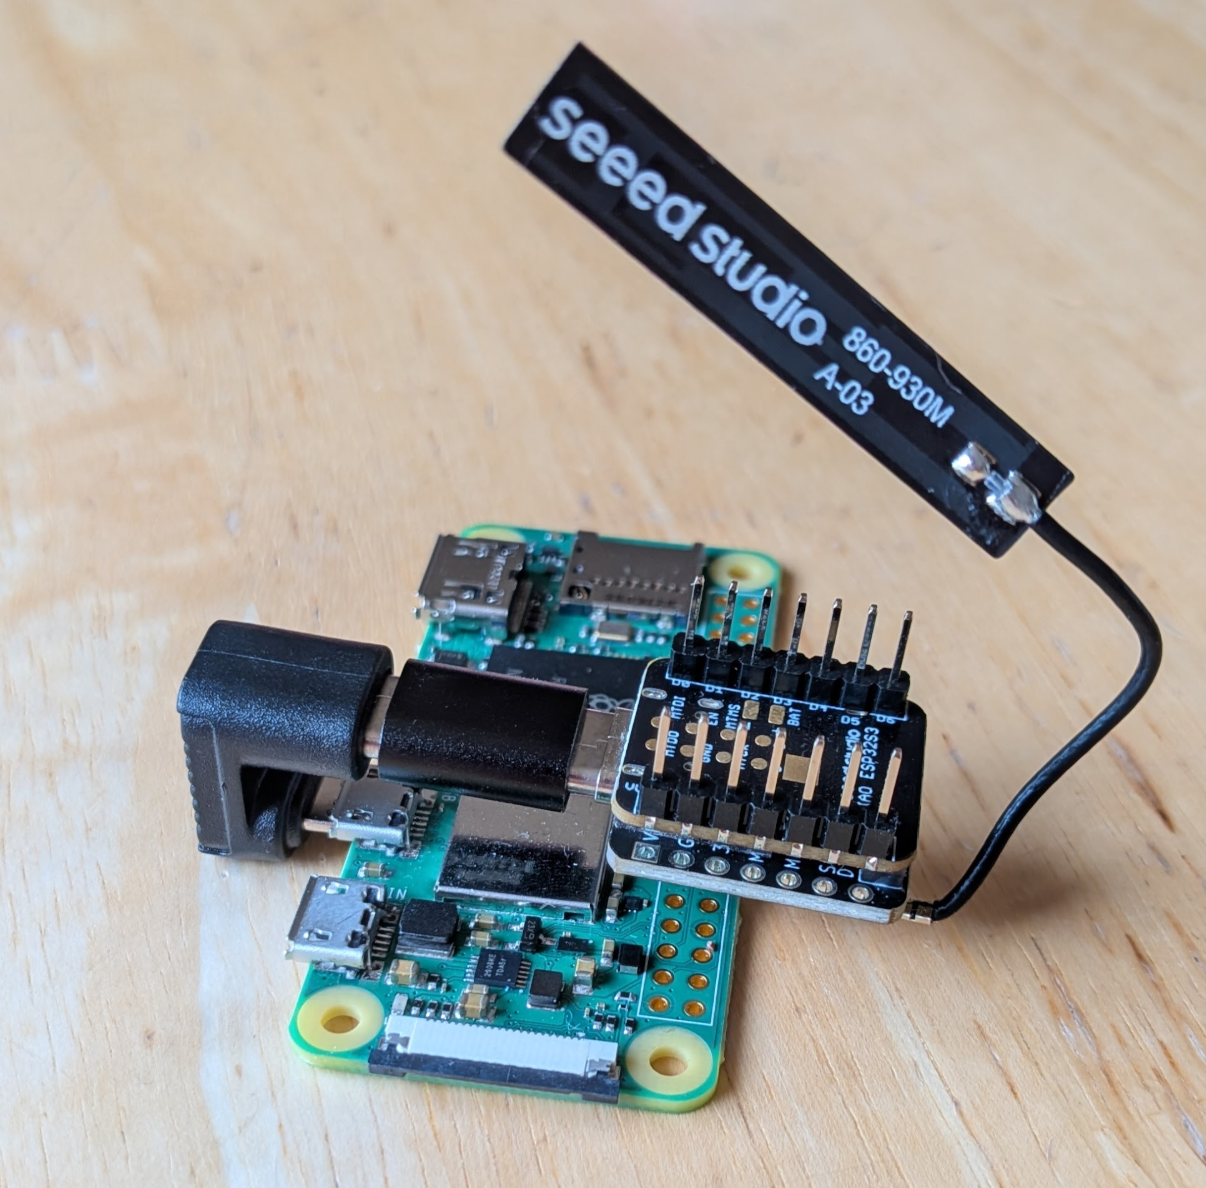
| XIAO ESP32S3 & Wio-SX1262 Kit | Raspberry Pi Zero 2W |
|---|---|
 | 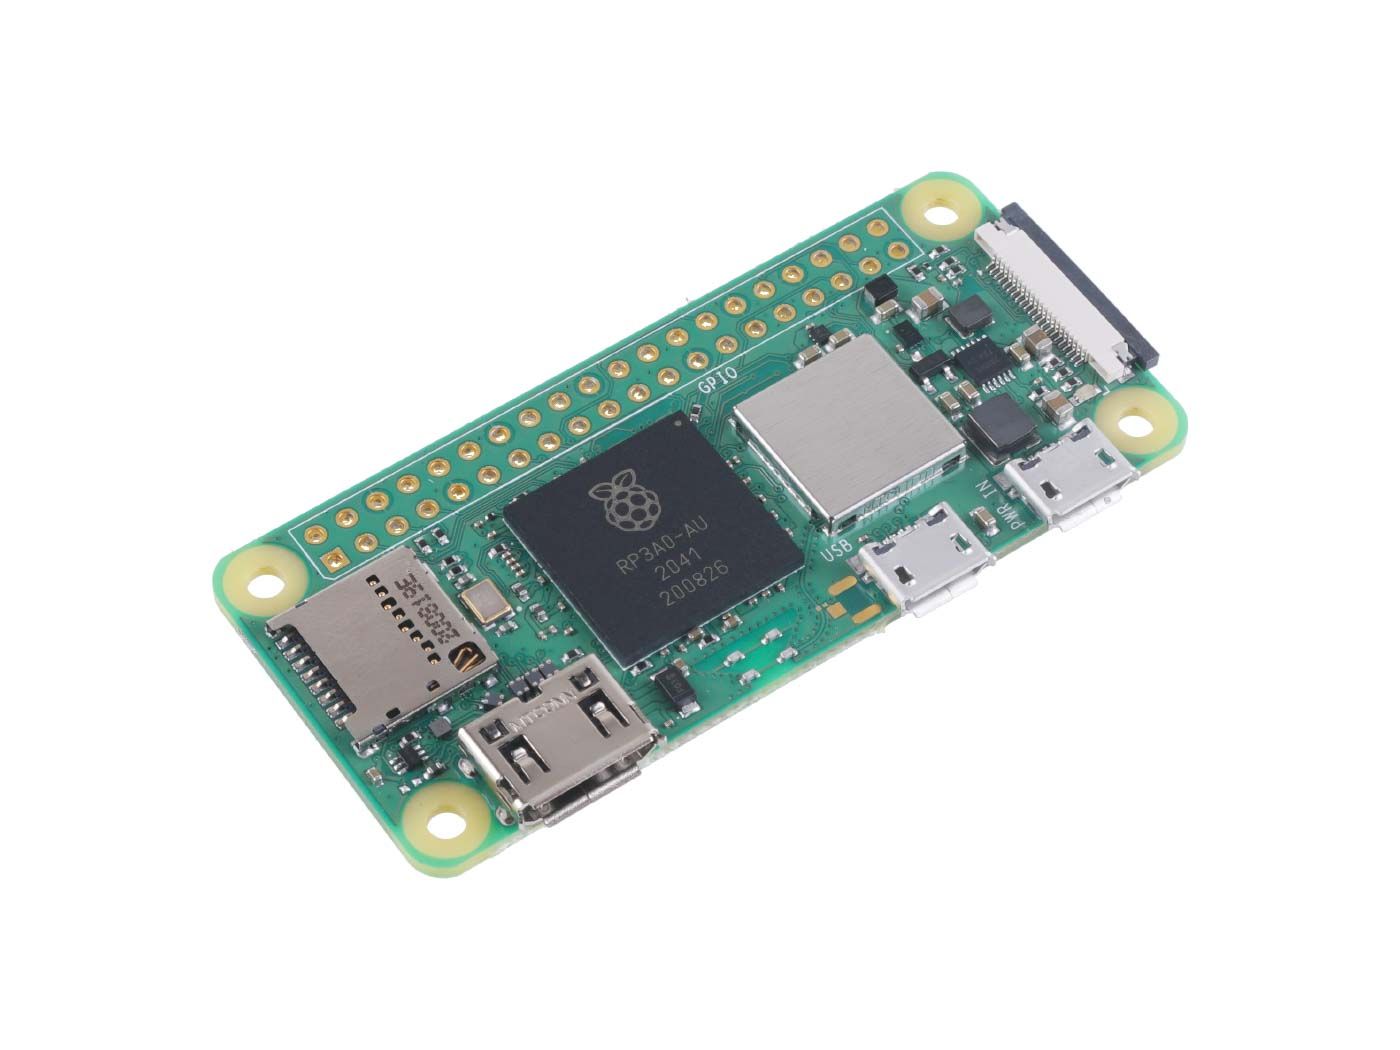 |
Beside the main hardware, here are the neccessary accessories:
- 16GB or larger MicroSD card
- USB Micro to USB-C cable (to connect the radio)
- USB Micro to USB-A or USB-C (to power the Raspberry Pi)
- Reliable power source for the Raspberry Pi (5V 2.5A recommended)
Radio Setup
- Combine the Seeed XIAO ESP32S3 board and the SX1262 module using the B2B coupler.
- Attach the LoRa Antenna to the SX1262.
- Plug into your computer and flash with "Seeed Studio Xiao S3 WIO" (Serial Companion) via web flasher.
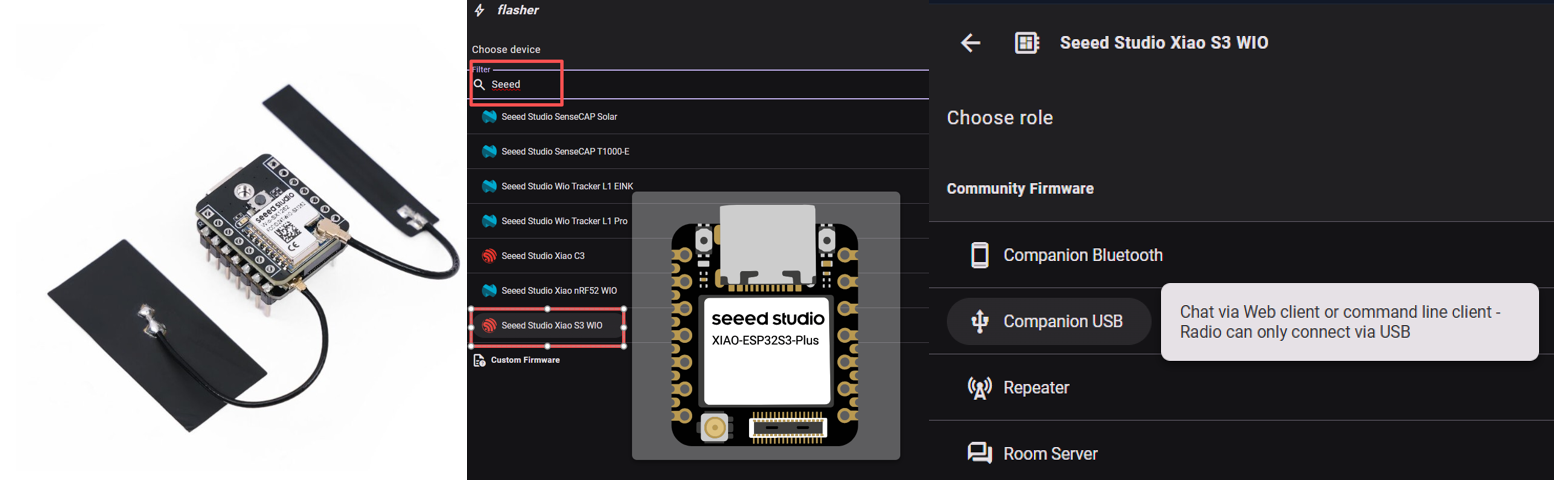
This tutorial instructs you to set up a serial companion. TCP and Bluetooth companions are supported by RemoteTerm, but are slightly more complicated to set up.
Pi Setup
- Click here to download the Raspberry Pi Imager
- Open the imager and select your Raspberry Pi model, and select "Raspberry Pi OS Lite (64 bit)"
- Configure SSH with a password, or key if desired, and configure for wifi connection
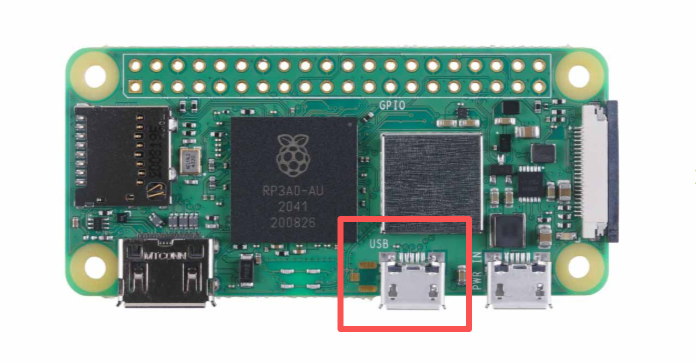
- Connect the ESP32 MeshCore to the Raspberry Pi
ensuring the ESP32 LoRa Mesh node is connected to the USB, not the POWER port
A complete installation (with right angle adapter) may look like this:
- Connect power to the Pi
POWERport - Use your home router's admin interface to determine the address assigned to the Raspberry Pi. Consider allocating a DHCP reservation to prevent IP address changes.
Pi Configuration
- Open an SSH session to the Raspberry Pi
- Validate that the radio appears.
find /dev/serial/by-id -maxdepth 1 -type l -print | sortshould show a listing like/dev/serial/by-id/usb-Espressif_USB_JTAG_serial_debug_unit_XX:XX:XX:XX:XX:XX-if00 - Update and upgrade
sudo apt update                        # update package repositories
sudo apt upgrade -y                    # upgrade packages
sudo apt-get install -y git            # install git
curl -fsSL https://get.docker.com | sh # install docker - Clone & Launch
git clone https://github.com/jkingsman/Remote-Terminal-for-MeshCore.git
cd Remote-Terminal-for-MeshCore/

# configure the docker setup
./scripts/setup/install_docker.sh
Configuration Option Walkthrough
The README and blog provide more detailed setup instructions
Booting the Server
Configuration
After you've configured your dockerfile via the setup script, run
sudo docker compose up -d
to start the server. The following commands may also be helpful:
sudo docker compose up -d    # start RemoteTerm in the background
sudo docker compose logs -f  # follow the container logs live
sudo docker compose down     # stop and remove the running container
sudo docker compose restart  # restart the container without changing the image
sudo docker compose pull && sudo docker compose up -d   # upgrade to the latest published image and restart
RemoteTerm does full management of the radio, meaning that once a radio is connected to RemoteTerm, all contacts/channels will be imported and offloaded to RemoteTerm, and the contacts actually synced to the device will be governed by RemoteTerm.
Hotspot Configuration(optional)
This is optional and recommended only for radios that will be used away from your home. This configuration will disconnect the radio from your home wifi but set it to begin broadcasting its own wifi so it can be accessible without an internet connection.
-
Set up a hotspot
sudo nmcli device wifi hotspot ssid <hotspot name> password <hotspot password> ifname wlan0 -
You will likely need to connect to the new Wi-Fi network and SSH into the Pi again. The URL of your Pi will be the "default gateway" in the wifi configuration of the new network when you connect to it.
-
Configure the hotspot to broadcast on boot
nmcli connection
# grab the UUID of the Hotspot connection
sudo nmcli connection modify <hotspot UUID> connection.autoconnect yes connection.autoconnect-priority 100
Getting Started with RemoteTerm
Main Screen
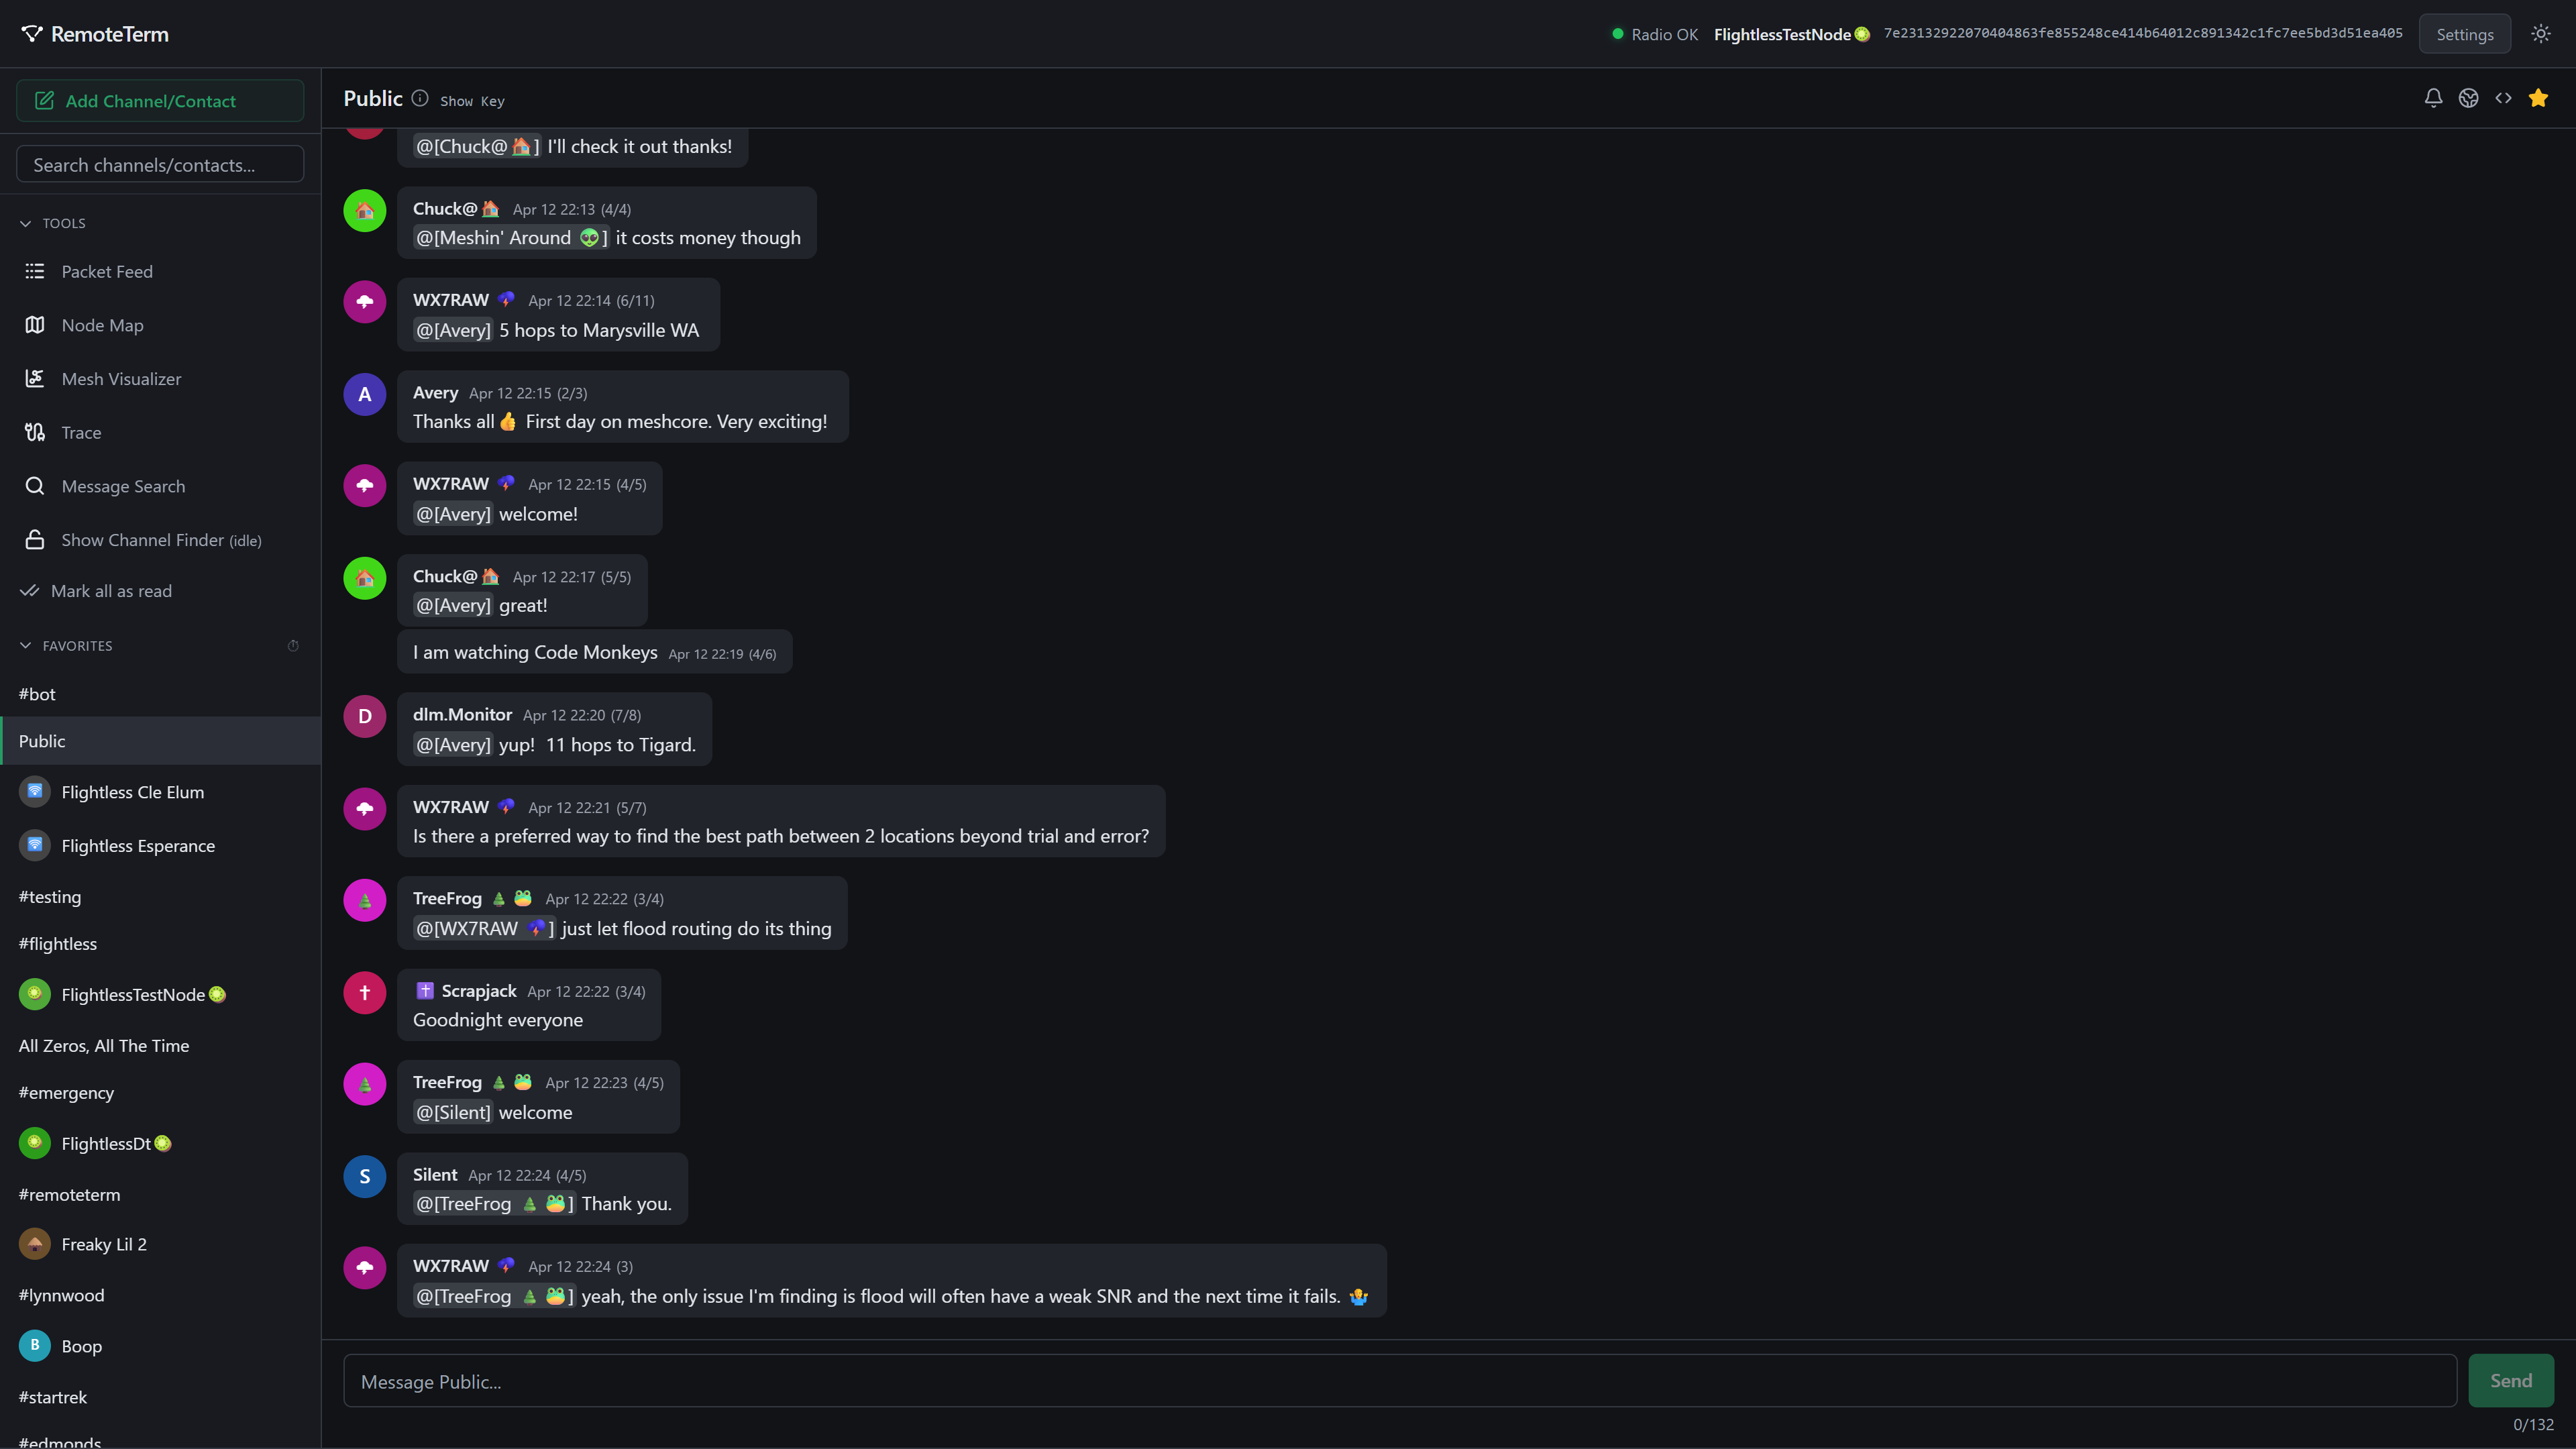
The main RemoteTerm screen shows a list of known channels, repeaters, and room servers, with a space for Favorites on top. Click on any contact or channel to begin messaging, or click on a repeater to log in and view the administration interface. You can add channels or contacts with the green button at the top.
Above the contact list are a set of tools:
| General Item | Function |
|---|---|
| Packet Feed | A display of raw, incoming packets as they arrive |
| Node Map | Visualize node location |
| Mesh Visualizer | A customizable 3D representation of nodes and traffic in real-time |
| Trace | Run multi-hop traces between repeaters for signal strength information |
| Message Search | Search channel and message history for words or phrases |
| Channel Finder | Channel finder findS channel names for heard-but-not decrypted packets |
Messaging (Chanels)
To create or join a channel, click the 'Add Channel/Contact” button in the top-left corner of the app's main menu. Private channels, identified only by their key, or Hashtag channels, identified by their name as a #hashtag, can be joined from the menu that appears.
The Public channel is added automatically to all new RemoteTerm instances. Your local mesh will likely have its share of active channels: Public, #test or #testing, and #bots or #bot can be good places to get started or find people who can point you to good local rooms for newcomers.
When a channel is selected, the screen will look something like this:

In the status bar:
| Icon | Function |
|---|---|
 | Configures notifications, either as desktop notifications (which require the browser to be open) or Web Push (which can deliver even when the browser is closed). These require a trusted HTTPS context (the snakeoil certificates available from the installer may or may not be sufficient to allow notifications, depending on your operating system and browser) |
 | Enables regional routing overrides, which limit the radio's regional scope when it sends messages only in this channel. Users with corresponding or different region settings will be able to see or auto-ignore your messages, respectively |
| Allows for per-channel hop width overrides separate from your radio default | |
 | Adds or removes a channel to your favorites |
 | Deletes the channel, but retains historical messages if you choose to add it back later |
| Room Key | Provides the MeshCore key for the given room |
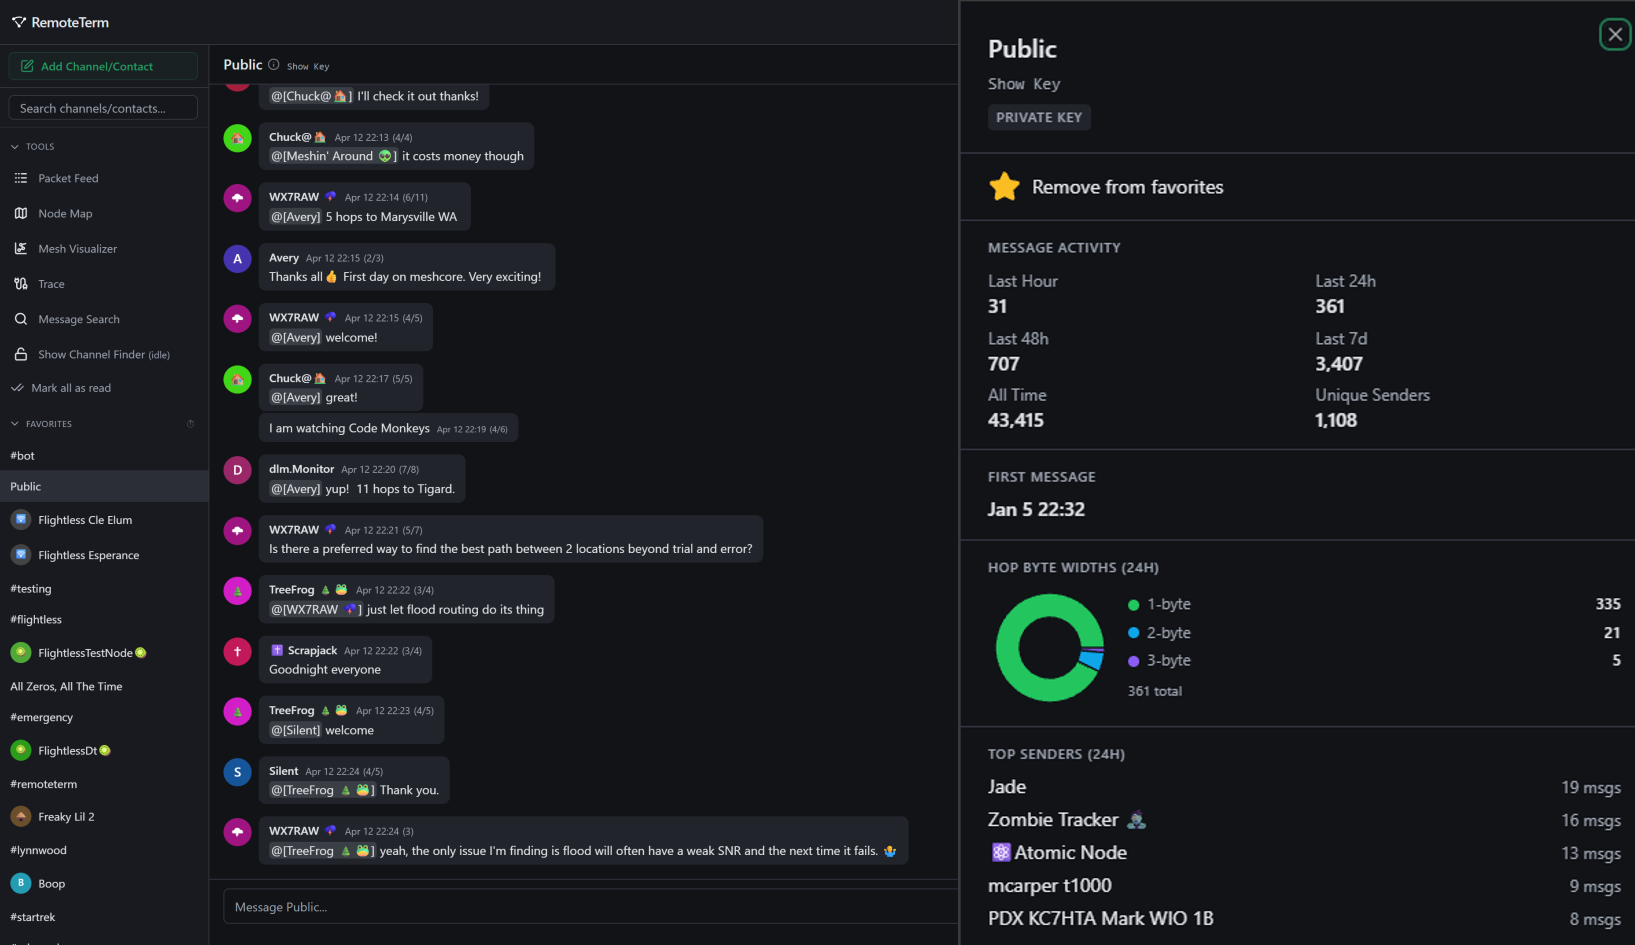
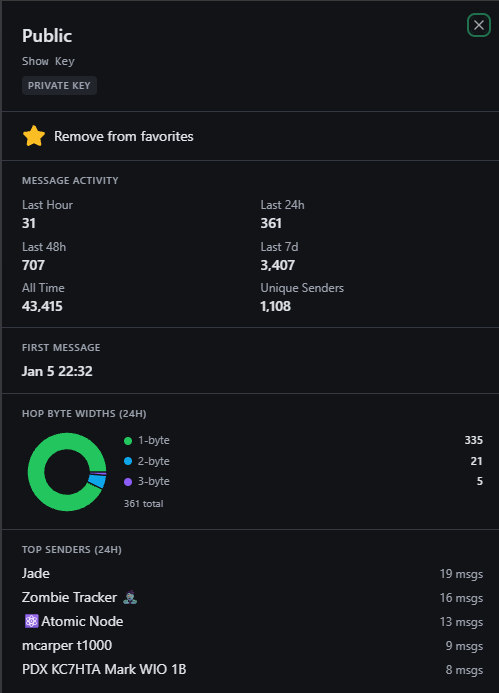
In the upper left corner is the channel name with an info icon; you can click this to see information about the channel, like how active it is, who is sending messages, and its key (which you can also see by clicking the "Show key" text in the top status bar):
Messaging (Direct Messages)
Sending direct messages works similarly to channel messages, with a few different options.
| Icon | Function |
|---|---|
 | Sends a routed probe to the contact to discover a more ideal routing path for messages to follow |
 | Sends a direct trace to the contact, with remote and local SNR data |
| Configures notifications, either as desktop notifications (which require the browser to be open) or Web Push (which can deliver even when the browser is closed). These require a trusted HTTPS context (the snakeoil certificates available from the installer may or may not be sufficient to allow notifications, depending on your operating system and browser) |
| Adds or removes a contact to your favorites |
| Deletes the covnersation, but retains historical messages if you choose to add it back later |
| Contact Key | Provides the MeshCore key for the given contact and information about when they were last heard (advert, message, etc.), and the method (direct, or what path the packet took) |
Similarly to channels, you can click the info icon or the name in the top bar of a selected contact to see analytics for the contact
MQTT & Automation
RemoteTerm shines in providing rich integrations for automated systems. Integrations perform actions when packets of certain types are heard (for example, when a message is sent in a channel or a DM is received). These include:
- MQTT, forwarding packets over MQTT to:
- Private brokers
- Community aggregators
- Home Assistant
- Webhooks, sending GET or POST requests to a specific URL with message data
- Apprise, a flexible notification fanout tool that can forward to Discord, Telegram, SMS, email etc.
- Enqueueing packets or messages in Amazon SQS queues
- Python bots
Set Up for Community Mesh Mapping
Showing MeshCore nodes location, messages flowing patterns and connectivity breakdowns, etc. — can be helpful to the community in buiding the MeshCore network. To provide this debug view, community aggregators ingest a feed of raw packets from observers.
RemoteTerm makes it easy to use the same radio you use to send and receive messages to contribute to these community mapping and visibility efforts as an observer node.
MeshCore does not allow for messages to enter the mesh via MQTT nodes; the community observability efforts are read-only.
There are many community observer platforms, but LetsMesh is one of the more popular, and that's what we'll set up.
- Click here to visit LetsMesh, log in to the LetsMesh analyzer.
- In RemoteTerm, navigate to "Settings", then click "MQTT & Automation".
- Click "Add Integration," and choose "LetsMesh (US)" from the list on the left.
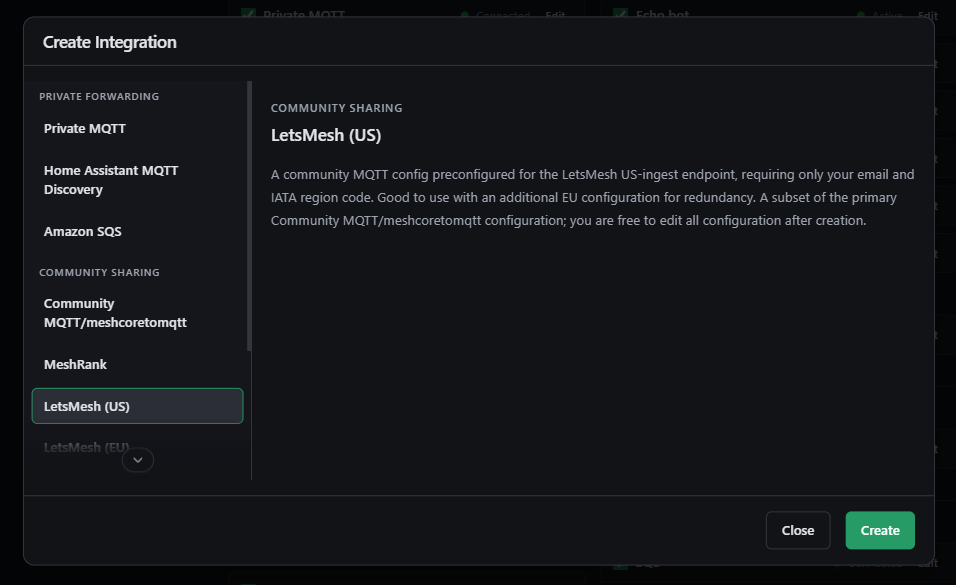
- Click "Create".
- Fill in the same email you used to sign up with LetsMesh, and enter the nearest airport's IATA code
- Click "Save as Enabled".
You should see a green dot and a "Connected" status; a healthy integration should look like this:
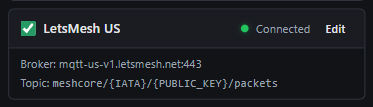
If you instead see an amber dot, click the "ⓘ" symbol by the Edit button to see the error.
Now, navigate to this link. Within about 15 minutes, you should see your radio appear green there, and your own telemetry and packets being forwarded to LetsMesh!
Bot
RemoteTerm provides an interface to program your own bots. Bots consist of simple Python code that is run whenever a message is received from a contact or channel.
Bots generate automated traffic in response to other messages. This means it is your responsibility to ensure that bots are carefully written to prevent flooding the mesh or infinitely looping.
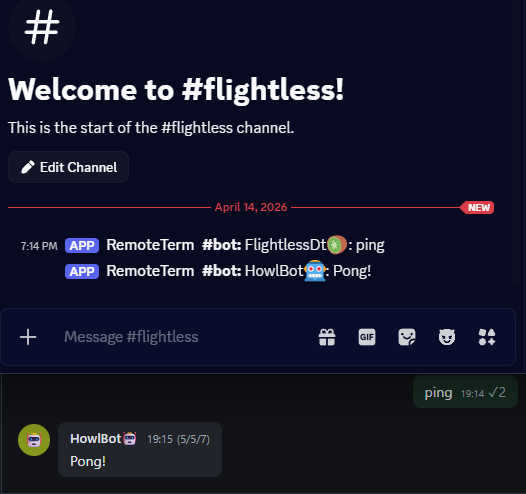
Set Up a Simple Dice Rolling Bot
Here is a tutorial guiding you to build a bot with simple dice-rolling capabilities, requested in standard form (e.g., "3d6" means roll 3 six-sided dice). Here are the simple steps:
- In RemoteTerm, navigate to "Settings", then click "MQTT & Automation".
- Click "Add Integration," and choose "Python Bot" from the list on the left.
- Click "Create".
- Name the bot something descriptive, like "Dice Bot".
- Erase the code from the editor, and paste the following code instead:
import random
import re

def bot(**kwargs) -> str | list[str] | None:
    """Dice roller — responds to !dice NdS in #bot only."""
    sender_name = kwargs.get("sender_name")
    message_text = kwargs.get("message_text", "")
    channel_name = kwargs.get("channel_name")
    is_outgoing = kwargs.get("is_outgoing", False)

    if is_outgoing or channel_name != "#bot":
        return None

    match = re.match(r"^!dice\s+(\d+)d(\d+)$", message_text.strip())
    if not match:
        return None

    count, sides = int(match.group(1)), int(match.group(2))
    if count < 1 or count > 20 or sides < 2 or sides > 100:
        return "I don't know how to roll that! [1-20]d[2-100]"

    rolls = [random.randint(1, sides) for _ in range(count)]
    parts = " + ".join(str(r) for r in rolls)
    name = sender_name or "Someone"
    return f"@[{name}] rolled {parts} = {sum(rolls)}"
- Click "Save as Enabled".
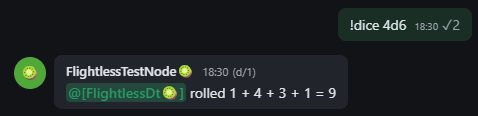
Using another radio, navigate to the #bot room and request a dice roll (e.g. "3d6"). The output should look something like this:
If you don't see the response as expected, you can check the server logs from your Docker container to see if there is an error reported when the Python code is executed.
Set Up a Path Width Bot
MeshCore firmware v1.14+ brought big changes to how messages traverse the mesh; packets traversing compatible routers can now carry multibyte hop identifiers.
We can make a bot to help people determine whether a multibyte path is associated with their message. This script uses the ability to send multiple messages in response by providing a hop-width message and the packet hop data itself.
def bot(**kwargs) -> str | list[str] | None:
    """Report the sender's path hop width in #bot."""
    sender_name = kwargs.get("sender_name")
    message_text = kwargs.get("message_text", "")
    channel_name = kwargs.get("channel_name")
    is_outgoing = kwargs.get("is_outgoing", False)
    path = kwargs.get("path")
    path_bytes_per_hop = kwargs.get("path_bytes_per_hop")

    if is_outgoing or channel_name != "#bot":
        return None

    if "!hopwidth" not in message_text.lower():
        return None

    name = sender_name or "Someone"

    if path_bytes_per_hop is None or not path:
        return f"@[{name}]'s hop width is unknown (no path data)"

    hop_count = (len(path) // 2) // path_bytes_per_hop

    if path_bytes_per_hop == 1:
        msg = f"@[{name}]'s hops are 1 byte wide; they might not be on 1.14+ or there may be incompatible repeaters in the path."
    else:
        msg = f"@[{name}]'s hops are {path_bytes_per_hop} bytes wide; they are using firmware v1.14+!"

    return [msg, f"Heard via {hop_count} hop{'s' if hop_count != 1 else ''}"]
Forward MeshCore Channel Messages to Discord
Apprise is a flexible notification service supported by RemoteTerm. Apprise lets you choose one or many of hundreds of notification services to send channel or direct messages to, from Discord to Telegram to SMS, email, and much more.

As an example, we'll use Apprise to forward all messages in a particular MeshCore channel to Discord via RemoteTerm.
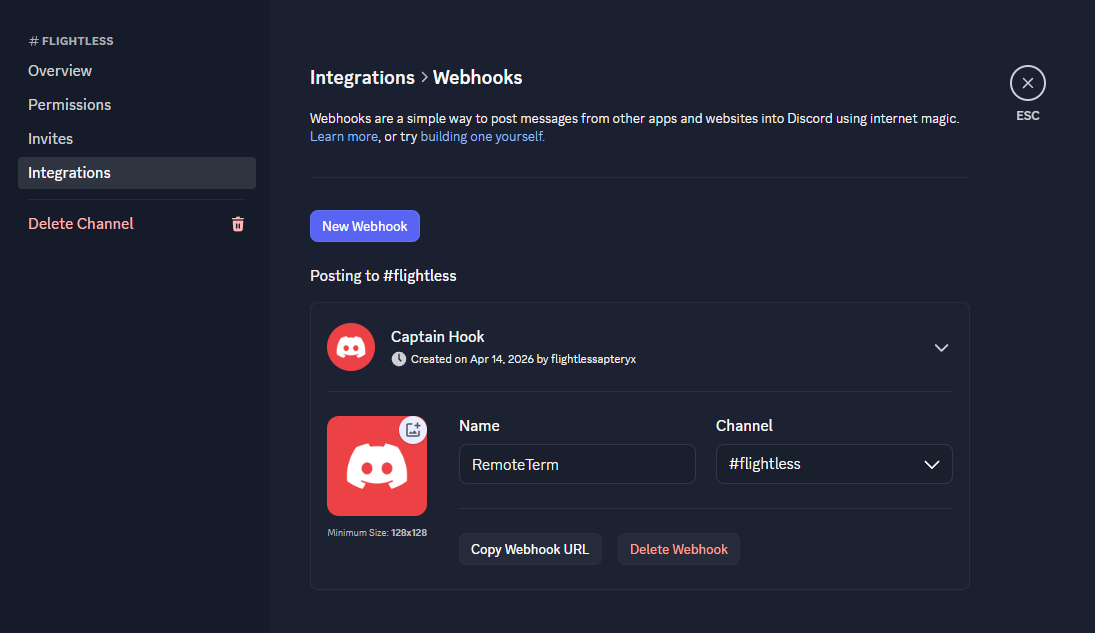
- Open Discord to a channel you have administrator privileges in.
- Right-click the channel name and click "Edit Channel".
- Click "Integrations" in the left menu, then click "Create Webhook".
- Name the webhook appropriately and copy the webhook URL. The webhook should take the form of
https://discord.com/api/webhooks/<WebhookID>/<WebhookToken>
- In RemoteTerm, navigate to "Settings", then click "MQTT & Automation".
- Click "Add Integration," and choose "Apprise" from the list on the left.
- Click "Create".
- Add a notification URL to the input. Per Apprise's Discord documentation, this should take the form of
discord://{WebhookID}/{WebhookToken}/. Use the WebhookID and WebhookToken from the copied URL. - Choose whether to preserve the user's identity by using their configured name and avatar when available.
- Choose whether to include routing path data in the message (suggested to disable)
- Select the contacts/channels you would like forwarded to Discord, and "Save as Enabled".
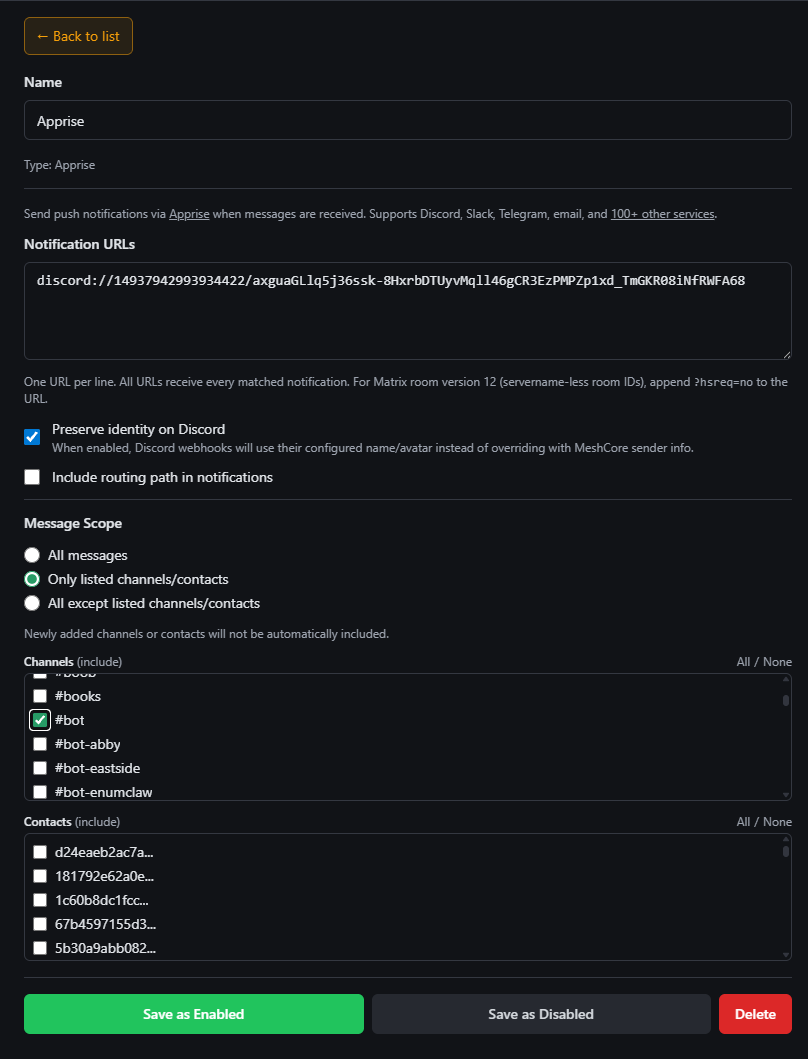
Once enabled, you should see messages begin to flow! If you have trouble or don't see messages you expect, check the server logs for any reported errors, or try enabling all channels to ensure that at least the RemoteTerm ↔ Discord linkage is working.
Integrate RemoteTerm with Home Assistant
Home Assistant provides a framework for simple-to-use, powerful home automation. RemoteTerm offers integration with Home Assistant via the built-in MQTT integration. With this integration, you can trigger automations based on messages, monitor repeaters and local radio telemetry, and track contacts via GPS in their advertisements.
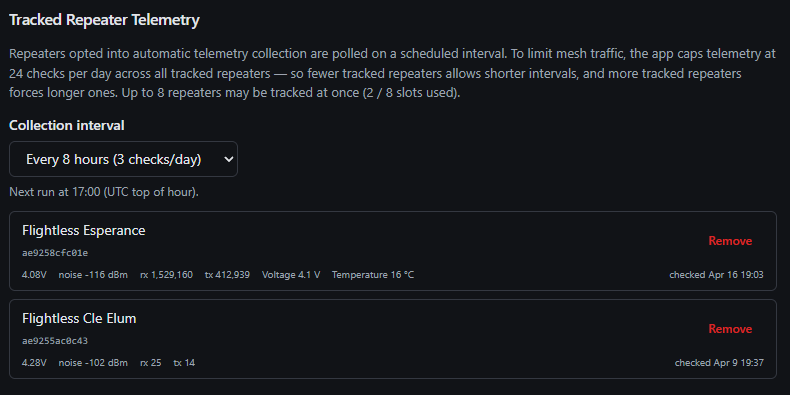
In order to take advantage of repeater telemetry tracking, you will need to enroll the desired repeaters in automatic telemetry fetch. Once enrolled, RemoteTerm will request telemetry at a configurable interval, retaining historical values and making up-to-date values visible in Home Assistant.
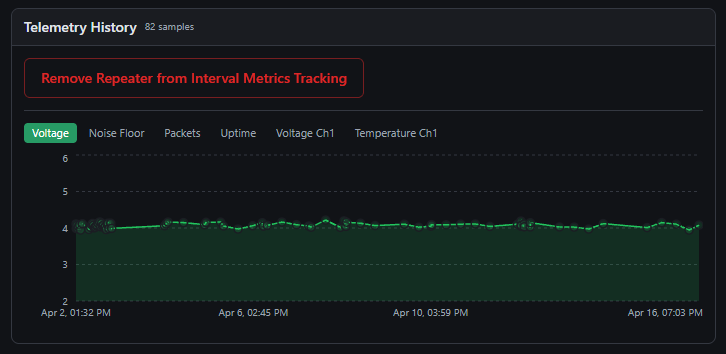
Automated repeater telemetry fetch has a customizable interval; you may choose a frequency ranging from once hourly to once daily, with the restriction that automated fetches may not exceed 24 in one 24-hour period.
Once you have configured your tracked repeaters as desired and MQTT Discovery is enabled in Home Assistant, you can configure an integration in RemoteTerm to start the data flow.
- In RemoteTerm, navigate to "Settings", then click "MQTT & Automation".
- Click "Add Integration," and choose "Home Assistant MQTT Discovery" from the list on the left.
- Click "Create".
- Enter your MQTT broker information, including host and port, and username/password/TLS configuration, if applicable.
- Choose contacts to track via advertisement GPS location in Home Assistant.
- Select your telemetry-tracked repeaters you wish to see in Home Assistant.
- Choose the message scope for triggers within Home Assistant.
- Click "Save as Enabled".
Note that the RemoteTerm integration config screen provides the exact created topics/entities in the dropdowns "What gets created in Home Assistant" and "Published Topic Summary".
Tracked contacts and repeaters will create entities in Home Assistant; you may wish to limit your selection to only the contacts you care about to avoid cluttering Home Assistant.
Message events do not create entities and are only used for triggers; there is generally no concern with allowing all messages to flow to Home Assistant.
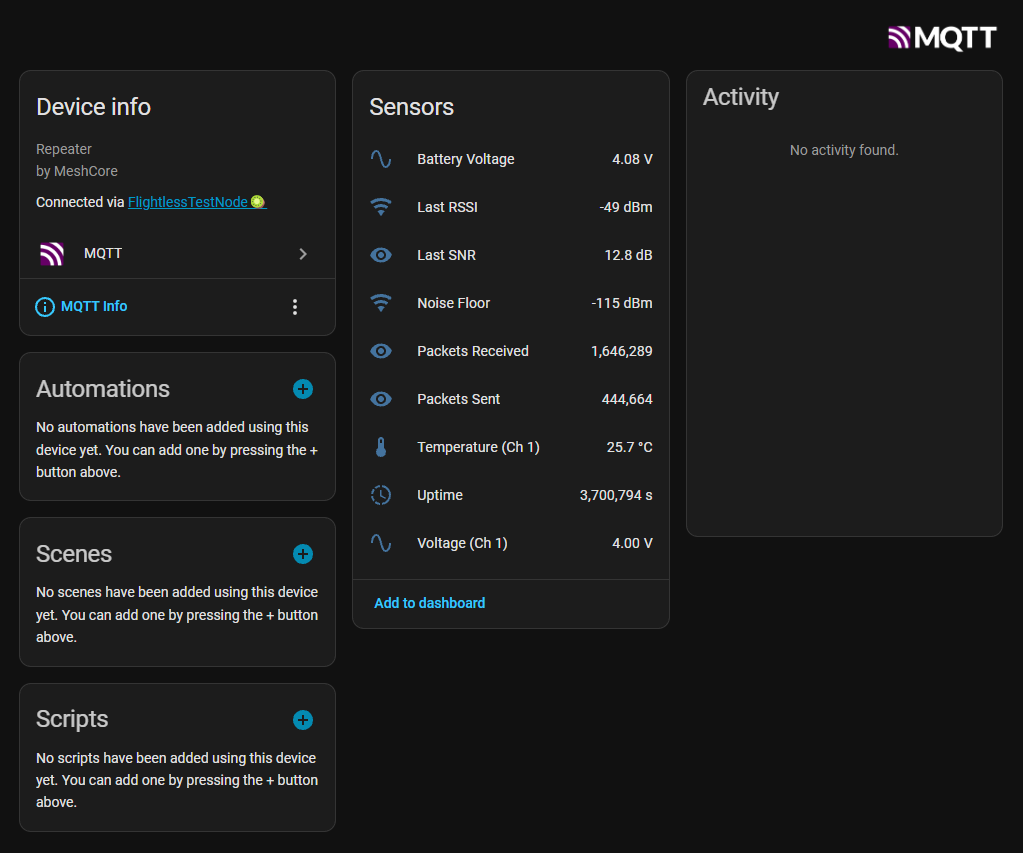
To view the new entities, log in to your Home Assistant web interface. Click Settings, then Devices & Services, then MQTT. You should see your tracked entities displayed.
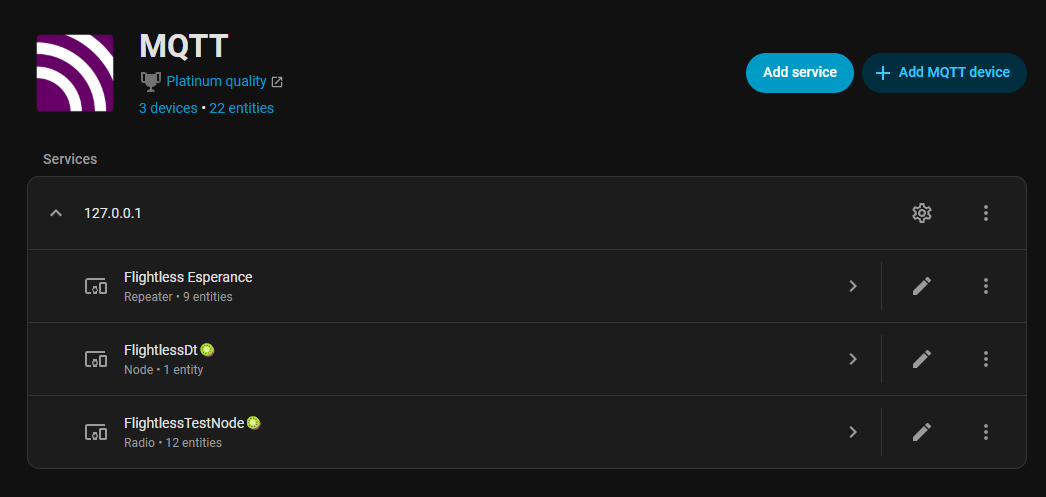
Click on them to view their available metrics. For repeaters, the most recently available non-stale metrics will be displayed; if you have only recently enabled automated telemetry fetch, you may need to wait up to eight hours for all repeater and radio telemetry fields to populate within Home Assistant.
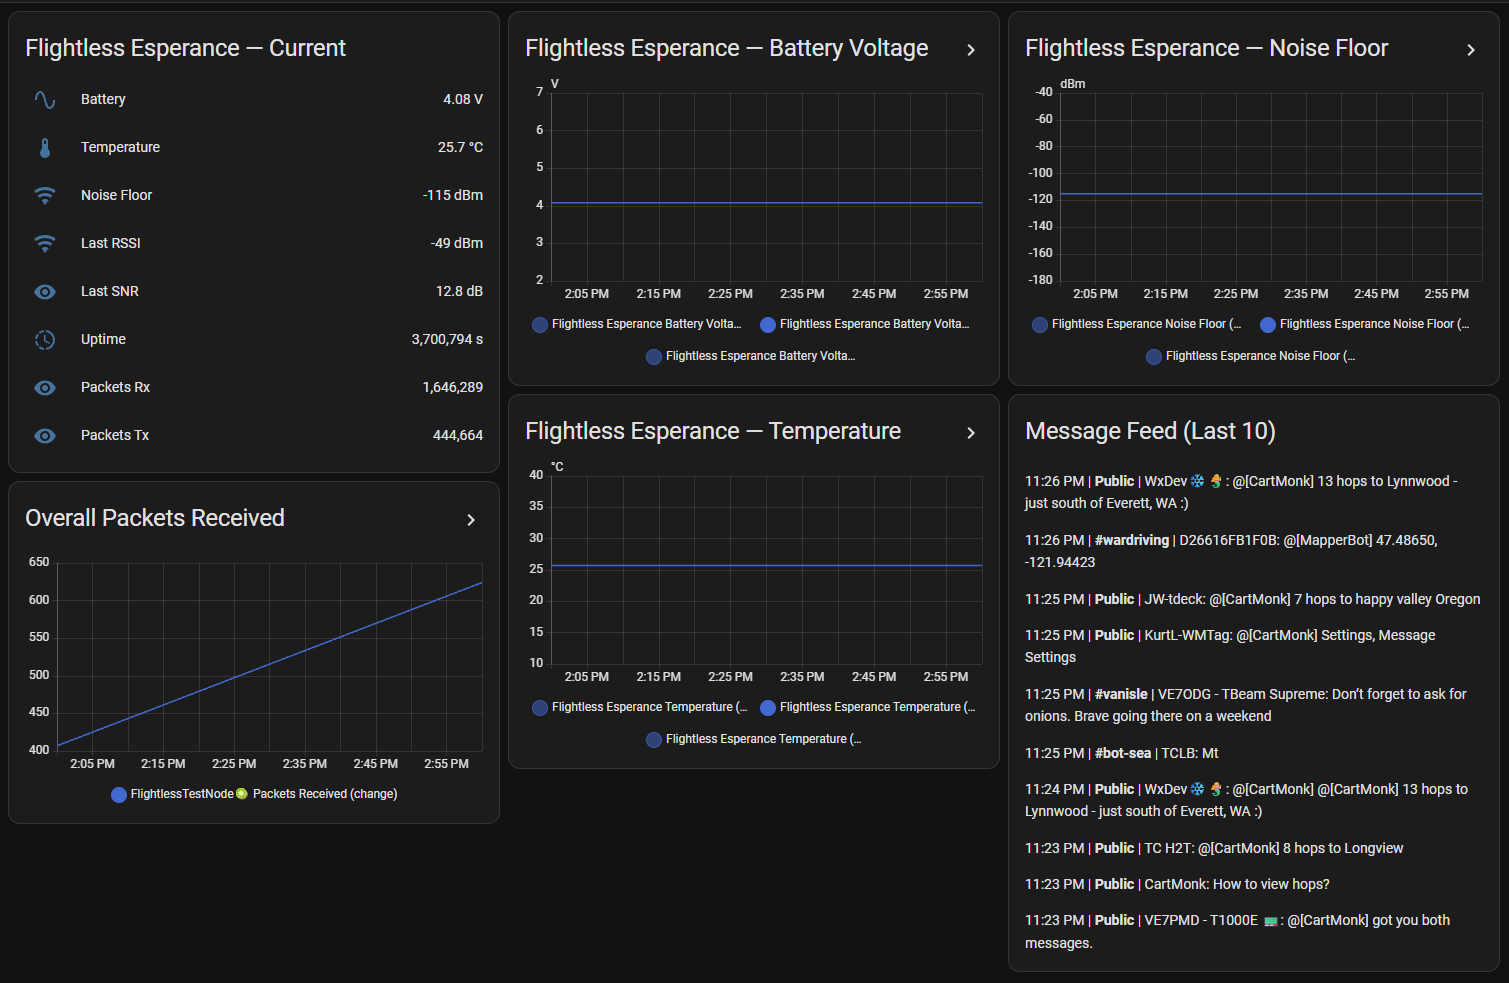
For additional configuration guidance, review README_HA.md in the RemoteTerm repository. For example, following the instructions in "Full monitoring dashboard with message feed" will provide a dashboard like this:
Next Steps
Keep up to date with RemoteTerm’s development or ask questions by joining the official MeshCore Discord, then following RemoteTerm’s development thread. The codebase updates often and you can catch the latest release in the Changelog, and, of course, RemoteTerm is free, ad-free, and open source forever — give it a star on GitHub.