Get Started with MeshCore
When the device is in the states below, please don't manually reboot or turn off it. Or else the device can be dead.
- Not finishing the message transmission process
- Being configured
Firmware Flashing
Method1 via Web Flasher
Connect your device with a USB cable to the computer. Please make sure the cable supports data transmission.
Please keep the USB cable connected while the data transmission, or else the device can be damaged.
Go to the Meshcore Web Flasher.
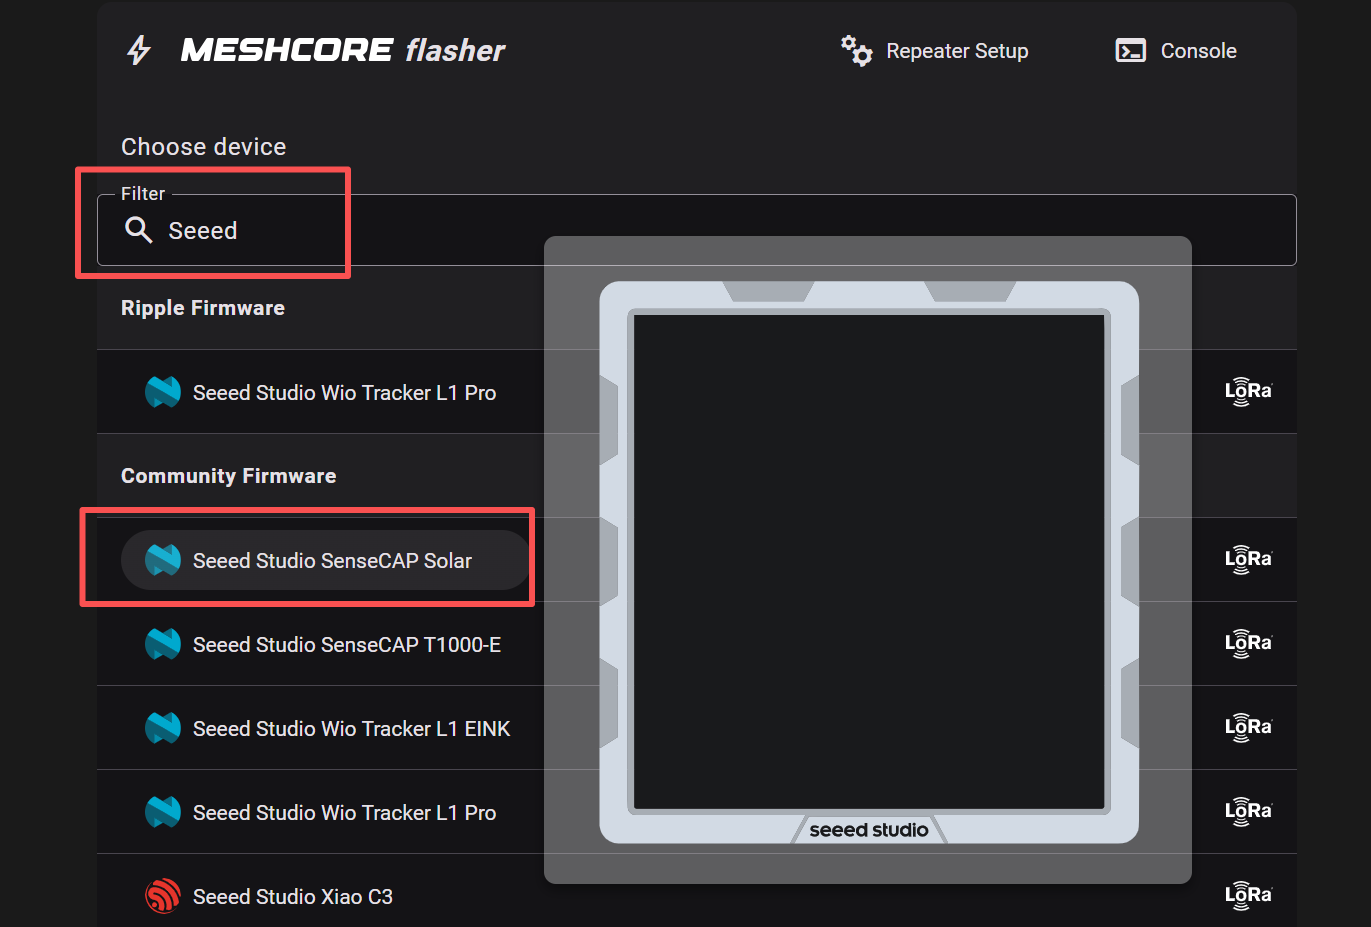
Choose Seeed Studio SenseCAP Solar in the Community Firmware group.
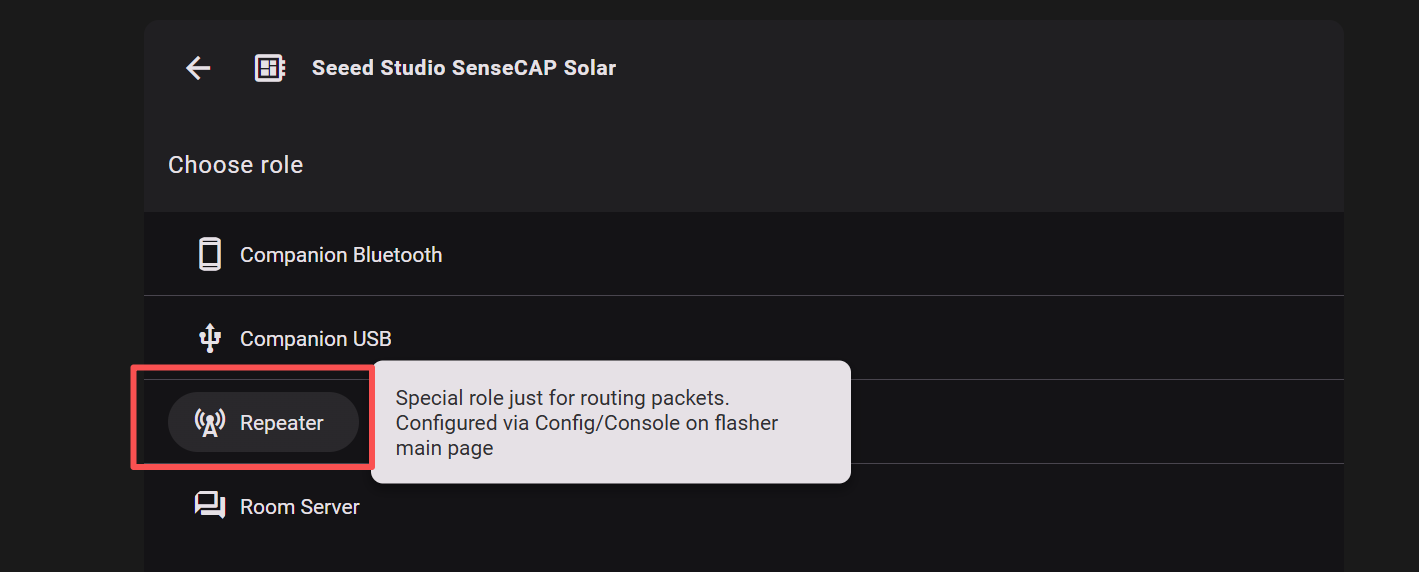
Choose Repeater. If you want to flash other firmware, please click here to see the tutorial.
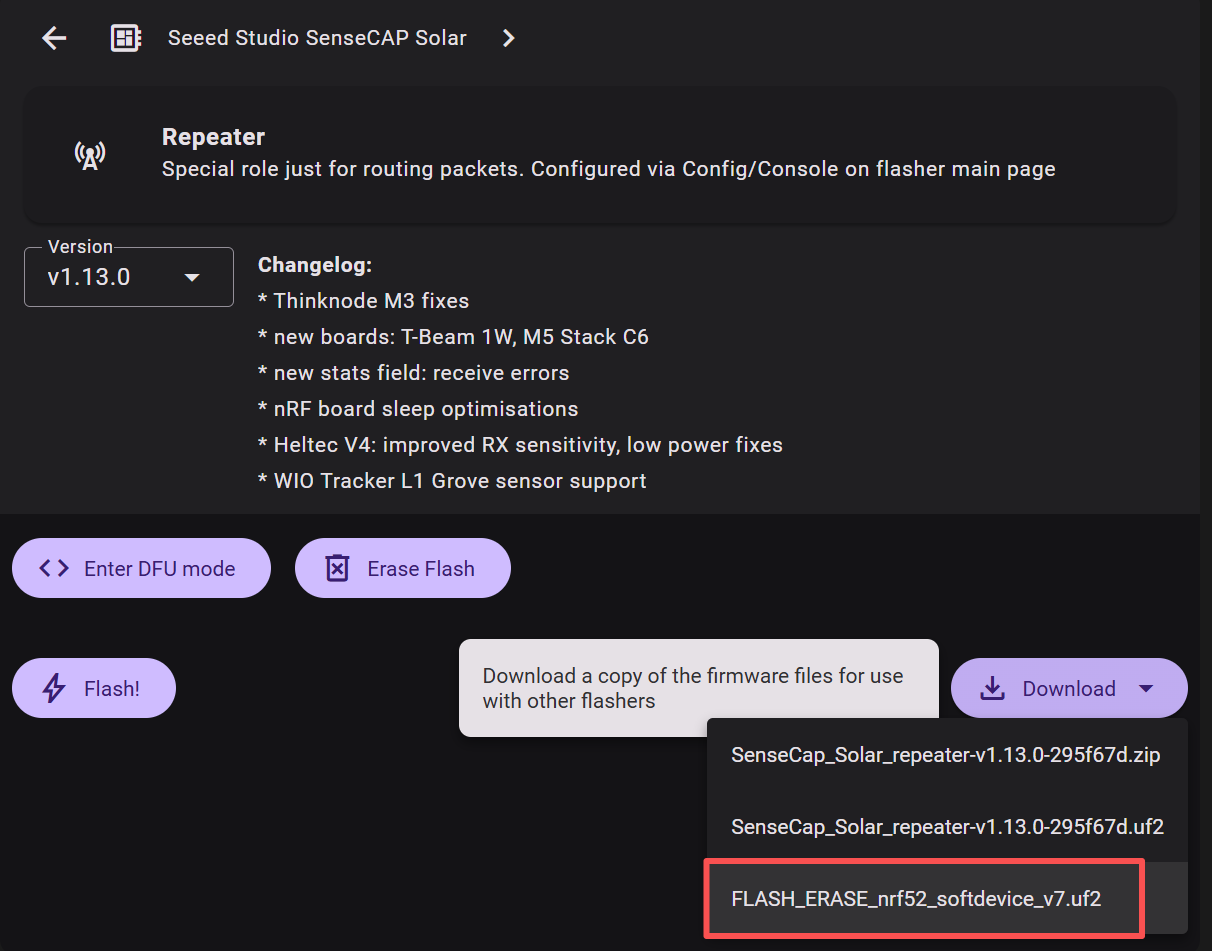
Flash Erase
Click Enter DFU Mode, choose the serial port named "Solar Node" or "TinyUSB serial". Then click Erase Flash and choose the serial port.
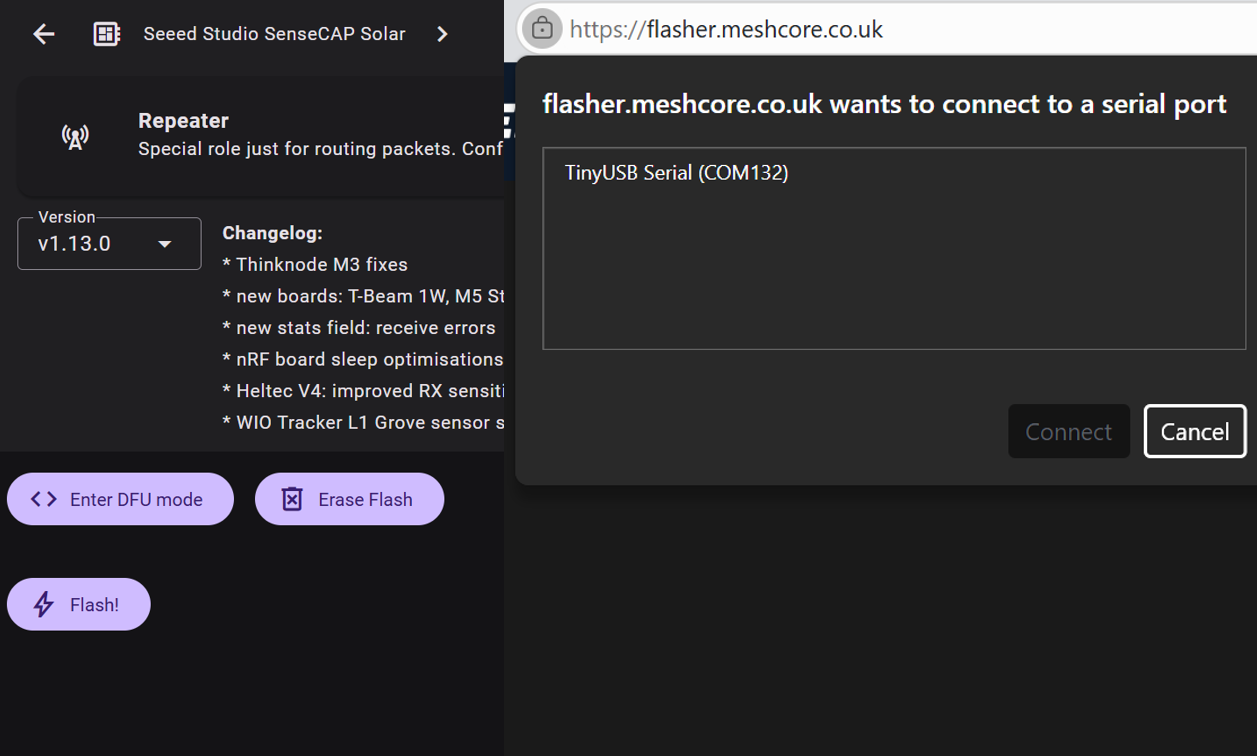
If you have clicked Erase Flash but there is no response, click Enter DFU again and then click Erase Flash to make sure you have successfully entered DFU.
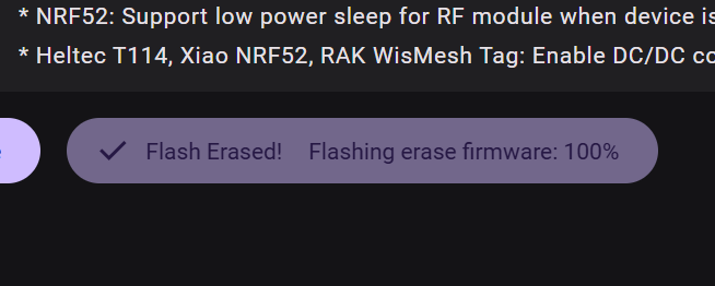
If you see "Flashing erase firmware:100%", the device has been successfully erased.
Flash Firmware
Select the firmware version.
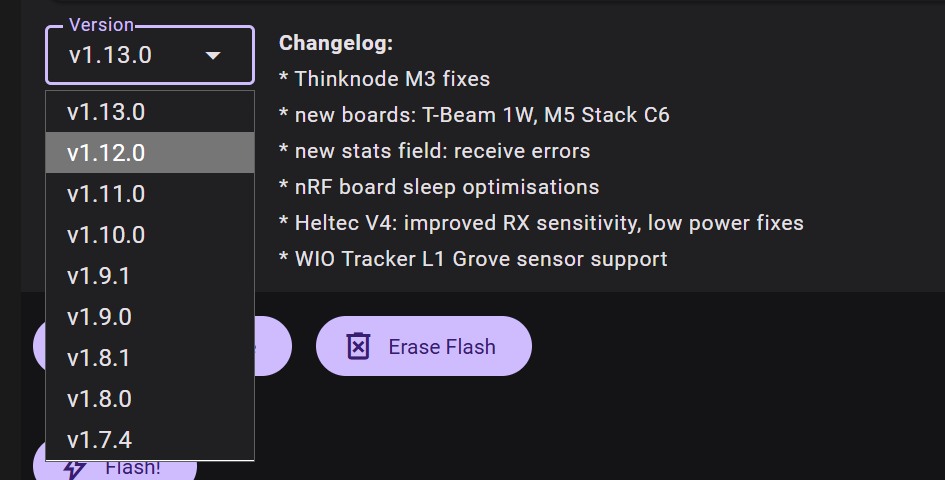
Different versions of the MeshCore firmware differ in the LoRa TX indicator and Power button behavior. Before judging the device status, please confirm the firmware version you are currently using.
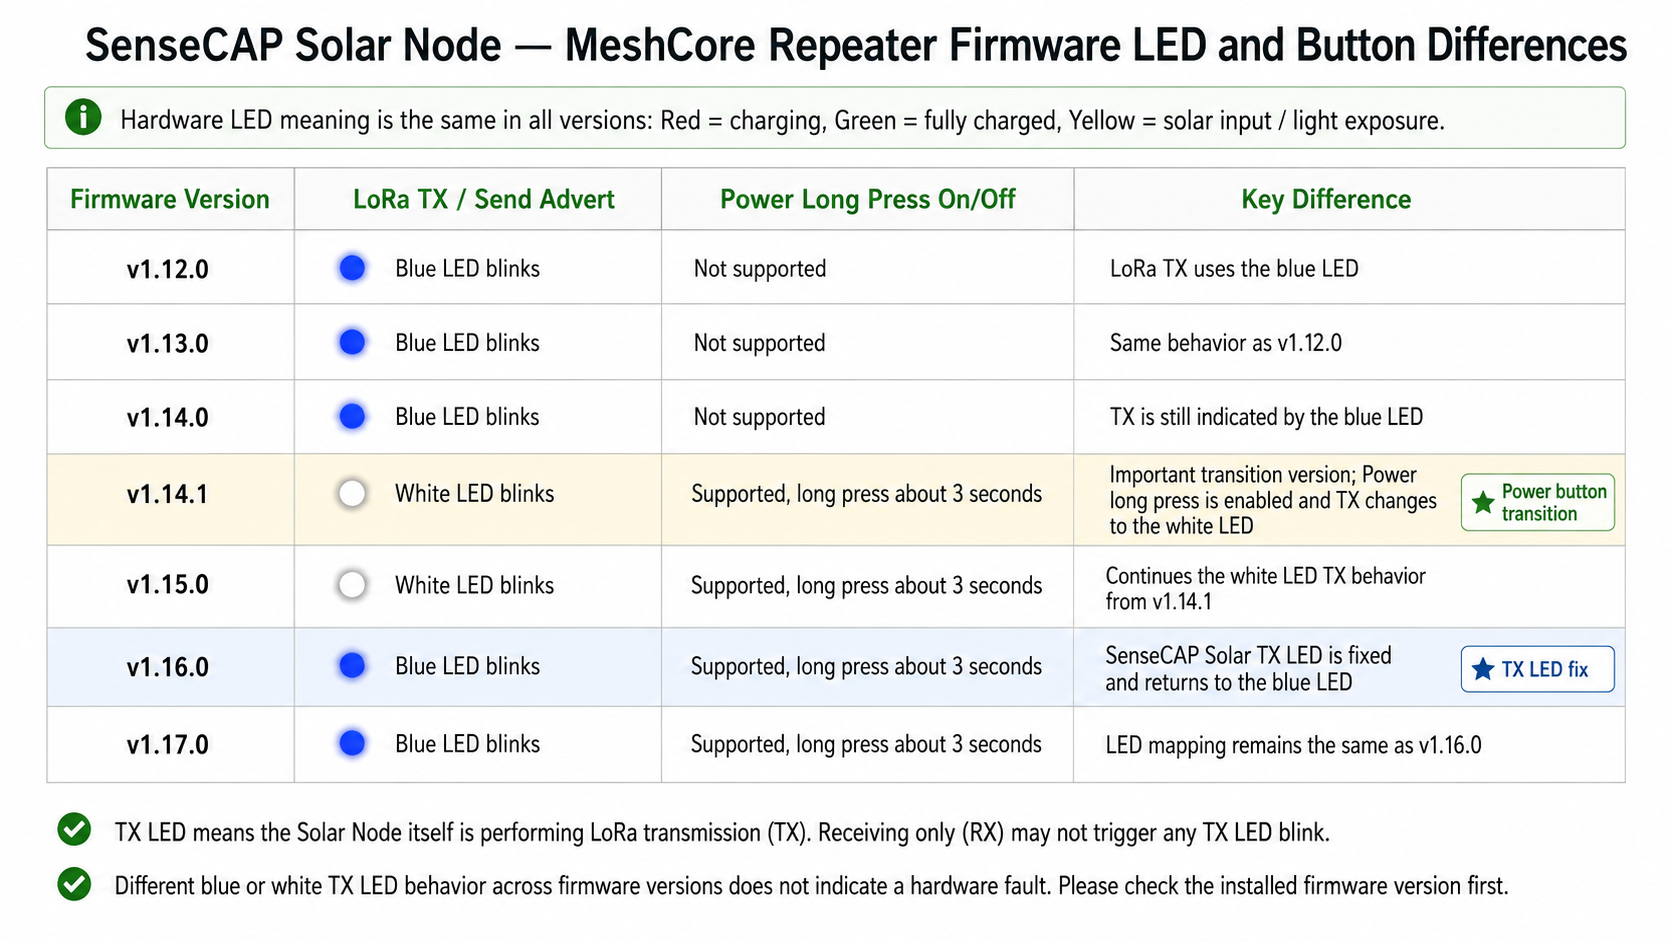
Firmware version differences (LoRa TX indicator)
The indicator LEDs are numbered in the picture below, so you can easily identify which LED the color descriptions refer to:

- No.12 - Yellow LED: solar input / light status indicator.
- No.13 - Blue LED: LoRa TX indicator.
- No.14 - White LED: LoRa TX indicator.
Different MeshCore firmware versions light up different physical LEDs for LoRa TX:
- v1.12.0 ~ v1.14.0: the blue LED (No.13) flashes during LoRa TX.
- v1.14.1 ~ v1.15.x: the white LED (No.14) flashes during LoRa TX.
- v1.16.0 and later: the blue LED (No.13) flashes again during LoRa TX.
- Seeing a blue or white flash on different versions does not indicate a hardware fault.
The red, green and yellow LEDs are mainly hardware power status indicators and are not related to the MeshCore TX indicator version differences:
- Red: mainly indicates the device is charging.
- Green: mainly indicates charging is complete.
- Yellow (No.12): mainly indicates solar input / light status.
Click Enter DFU Mode, choose the serial port named "P1 Pro" or "TinyUSB" serial. Then click Flash and choose the serial port.
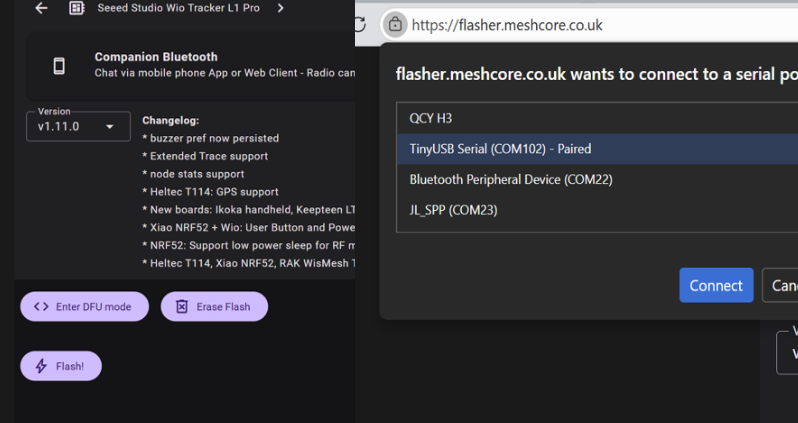
If you have clicked Flash but there is no response, click Enter DFU again and then click Flash to make sure you have successfully entered DFU.
When the progress bar is completely filled, it indicates that Flash has completed. Then the device will automatically reboot.
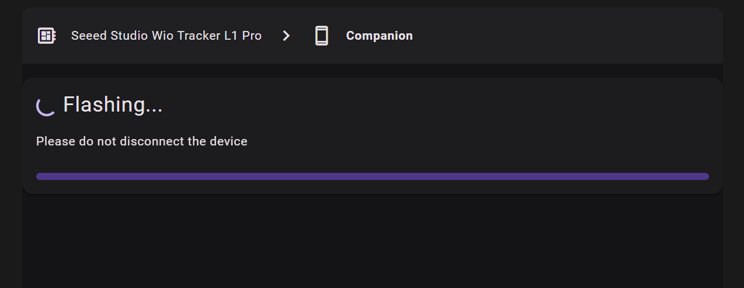
Method2 Drag and Drop
Connect your device with a USB cable to the computer. Please make sure the cable supports data transmission.
Please keep the USB cable connected while the data transmission, or else the device can be damaged.
Go to the Meshcore Web Flasher.
Choose Seeed Studio SenseCAP Solar in the Community Firmware group.
Choose Repeater. If you want to flash other firmware, please click here to see the tutorial.
Flash Erase
Download the UF2 file.
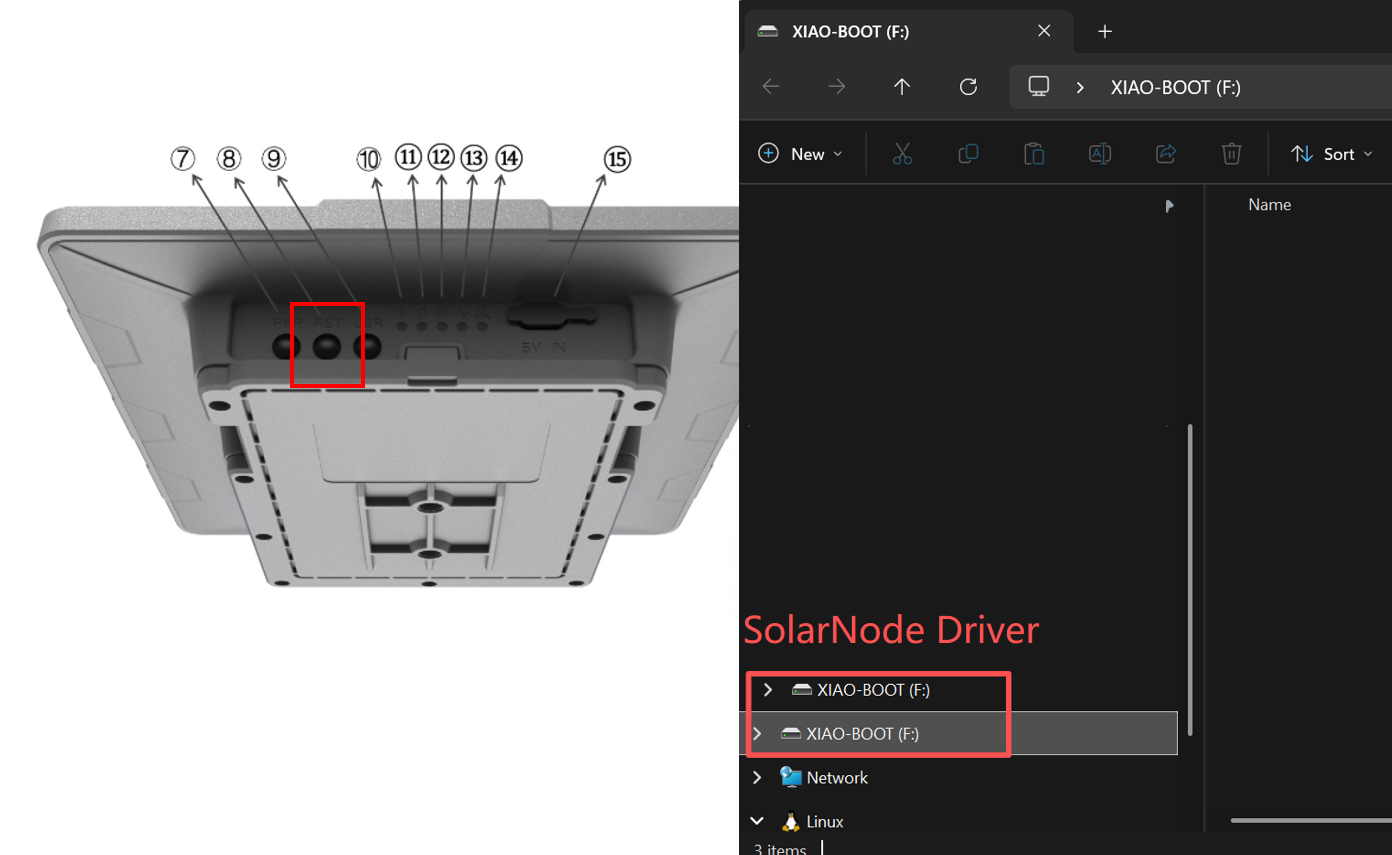
Double click the RST button to manually enter DFU mode. You can see a disk named Xiao-Boot or Solar Node will pop out after 10~15 s.
Drag the downloaded UF2 file to the pop-out disk.
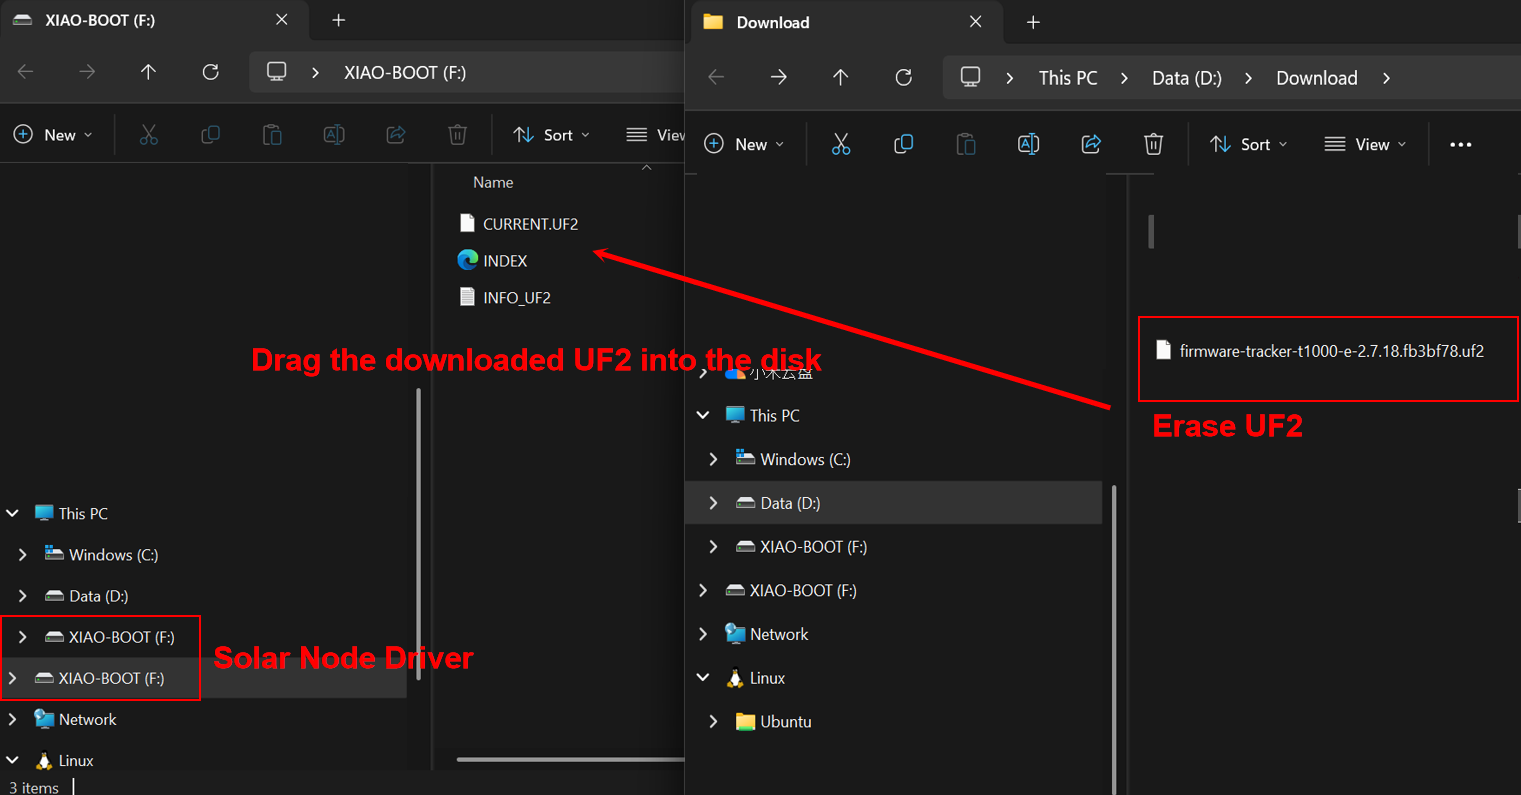
The disk will disappear after the firmware is successfully flashed. At this point there is no firmware in the device, so the device will NOT automatically reboot.
Flash Firmware
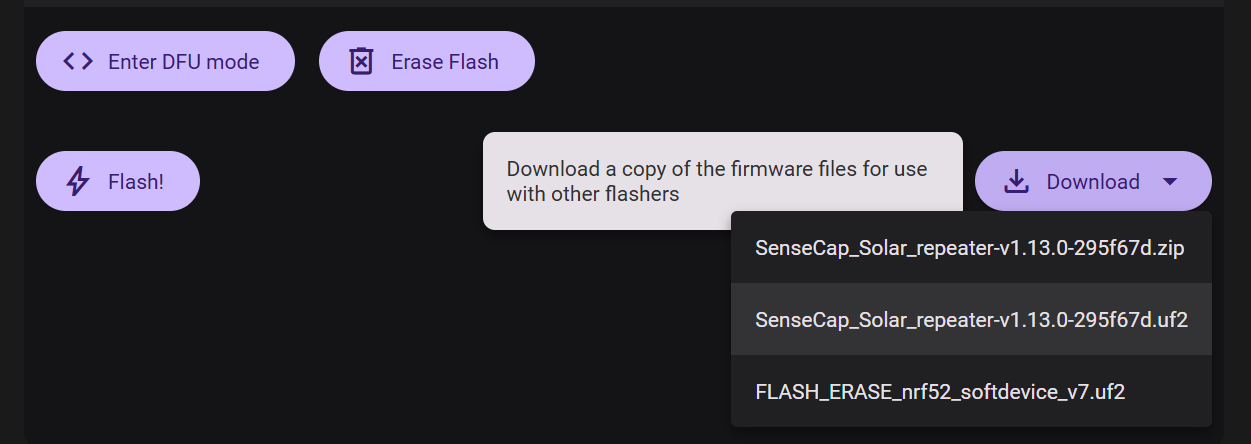
Choose the latest firmware version.
Download the UF2 file.
Double click the RST button to manually enter DFU mode. You can see a disk named Xiao-Boot or Solar Node will pop out after 10~15 s.
Drag the downloaded UF2 file to the pop-out disk.
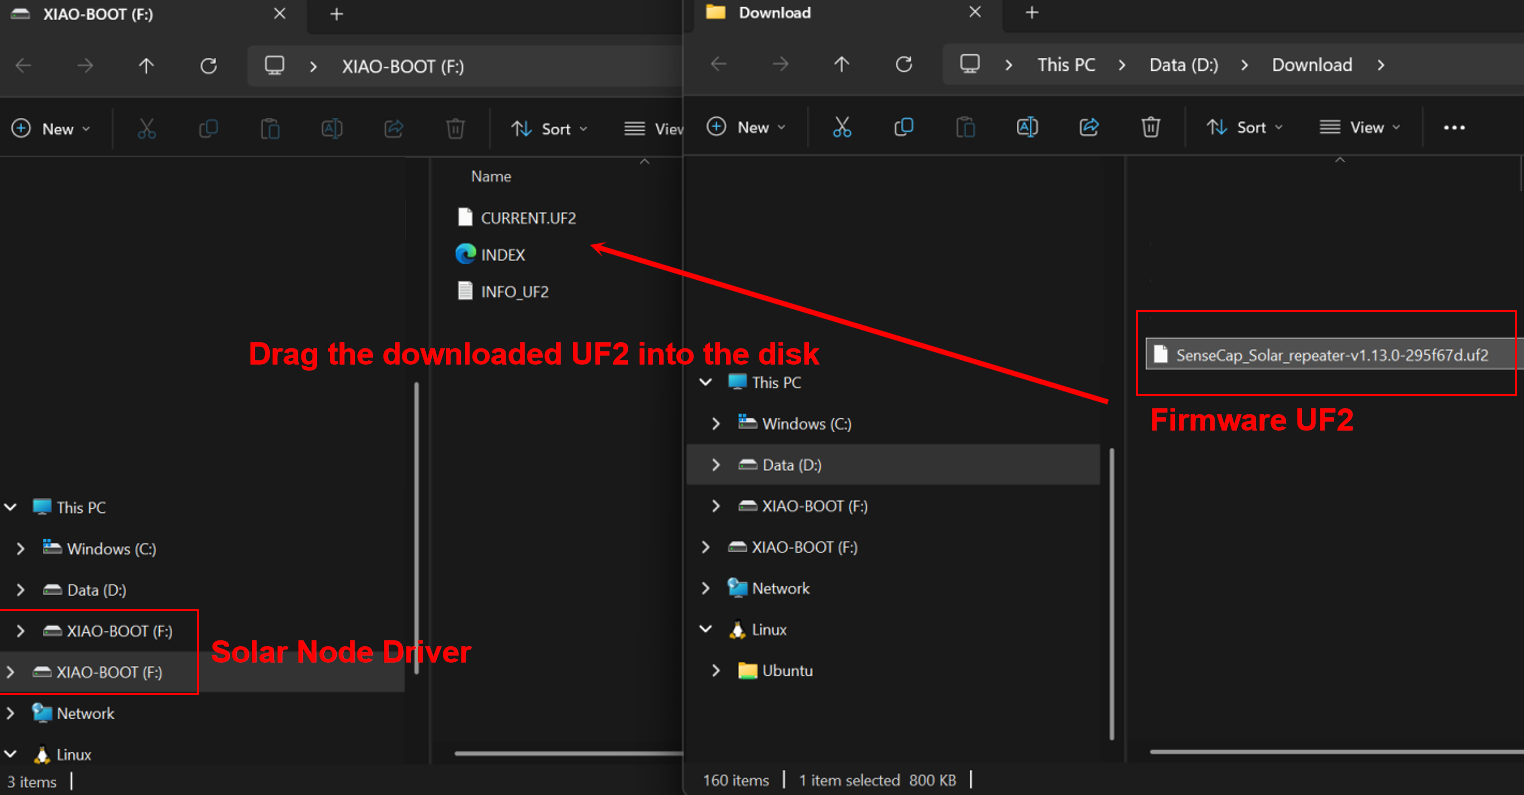
The disk will disappear after the firmware is successfully flashed. At this point there is no firmware in the device, so the device will NOT automatically reboot.
Get Started
Before formal deployment, please test and configure the node first.
Installation
Assemble the Device
Since the device will be used outdoors for extended periods, please avoid installing the panel in a horizontal position. A tilted or diagonal installation is recommended to prevent water accumulation. Additionally, ensure that all screws are securely tightened and the cover is properly installed. For enhanced waterproof protection, you may also consider applying extra sealing measures.
- Part List

- Step1: Connect part 1 to the bottom of the device using washers and screws.
- Step2: Connect the universal joint(part 2) and the bracket(part 3) with screws.
- Step3: Connect the RF cable(part 4) and antenna(part 5) .
- Step4: Install the hoop ring in the appropriate position.
- Step5: Connect the universal joint bracket.
- Step6: Loosen the screws, adjust the universal joint to the appropriate position, and then tighten the screws.
- Step7: Connect the antenna to the device.
Install Battery and GPS Module(Optional)
When you need to install or replace the battery, use Button-top 18650(3.6V) battery.

P1-Pro version has built-in battery and GPS module, for P1 version, user needs to install the battery and GPS module manually if needed.
- Step 1: Remove all the screws and the cover.

- Step 2: Install battery and the GPS module.


- Step 3: Assemble the shell.
Ensure that the shell is properly mounted and the screws are firmly tightened to maintain the device’s waterproof integrity.
(Optional) Upgrade Antenna
- You can replace the antenna with a fiberglass one by watching this video.
If you need an antenna with higher gain, we recommend the 860-930MHz 3dBi fiberglass antenna and the 902-928MHz 5.8dBi fiberglass antenna.
Power on the device
The device needs to be activated by connecting the USB cable. On startup, the blue LED lights up for about 3s, which means that the device has been successfully turned on.
The TX LED only blinks when the Solar Node itself transmits LoRa data (for example, when sending an advert). Receiving data does not turn on the TX LED. During LoRa TX, the LED color depends on the firmware version - see the firmware version differences above.
Power button (power on/off)
- MeshCore v1.14.0 and earlier: long-pressing the Power button to power on/off is
NOTsupported. If long-pressing Power has no response, this is the normal firmware version behavior, not a button fault. - MeshCore v1.14.1 and later: long-press the Power button for about
3sto turn the device on/off. You will see a white light blink shortly, which indicates the device is successfully turning on/off.
Button reference
- Power Button: power on/off (supported from v1.14.1).
- Reset Button: restart the device / enter DFU or Bootloader mode.
Please do not confuse long-pressing Power with double-clicking Reset.
Configuration
- Step1 Initial Configuration
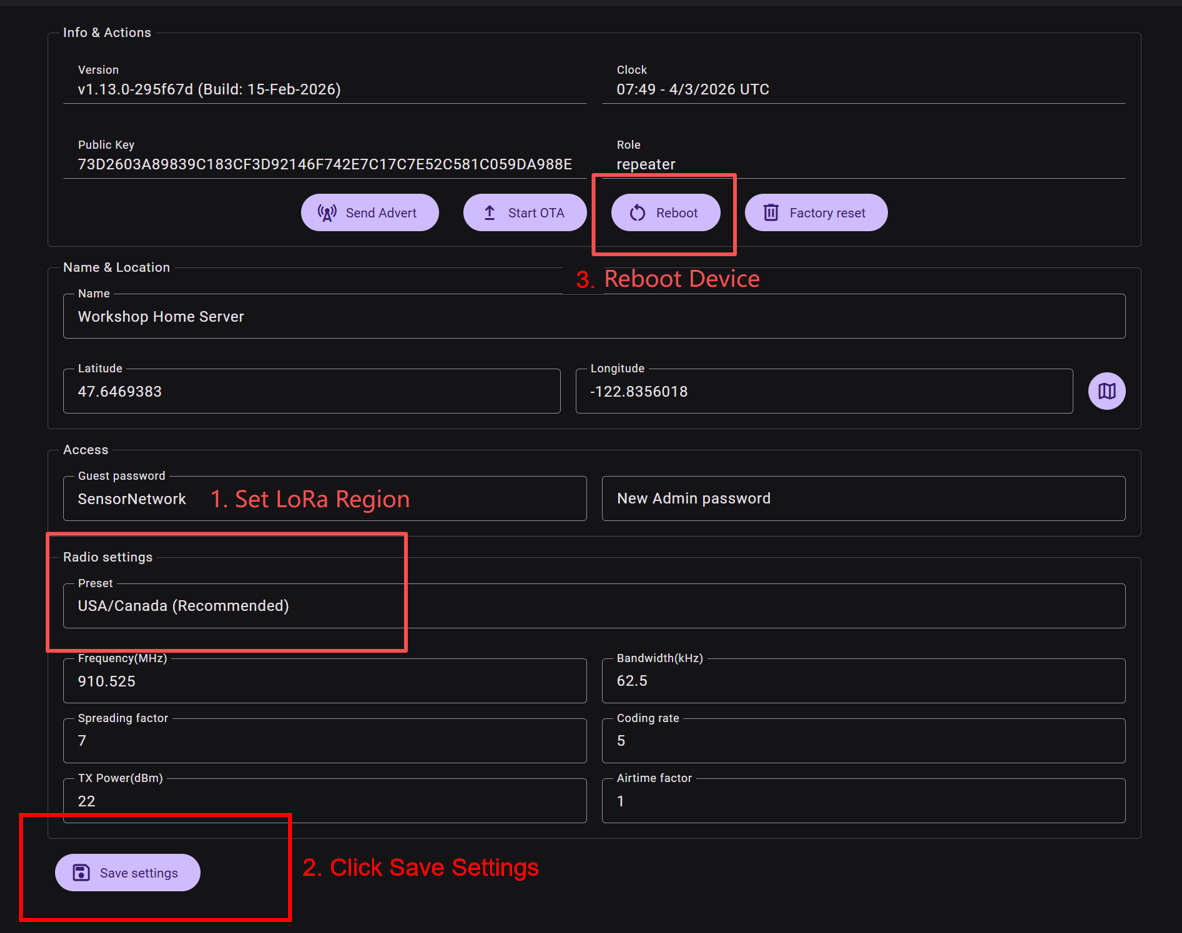
When MeshCore is flashed onto a LoRa device is for the first time, it is necessary to set the server device's frequency to make it utilize the frequency that is legal in your country or region.
Click here to configure the repeater.
Change the LoRa region and save setting. Then Reboot the device, or else the setting will not take effect.
Region List
| Region Code | Description | Frequency Range (MHz) | Duty Cycle (%) | Power Limit (dBm) |
|---|---|---|---|---|
| UNSET | Unset | N/A | N/A | N/A |
| US | United States | 902.0 - 928.0 | 100 | 30 |
| EU_868 | European Union 868MHz | 869.4 - 869.65 | 10 | 27 |
EU_868 has to adhere to an hourly duty cycle limitation of 10%, calculated every minute on a rolling 1-hour basis. Your device will stop transmitting if you reach it, until it is allowed again.
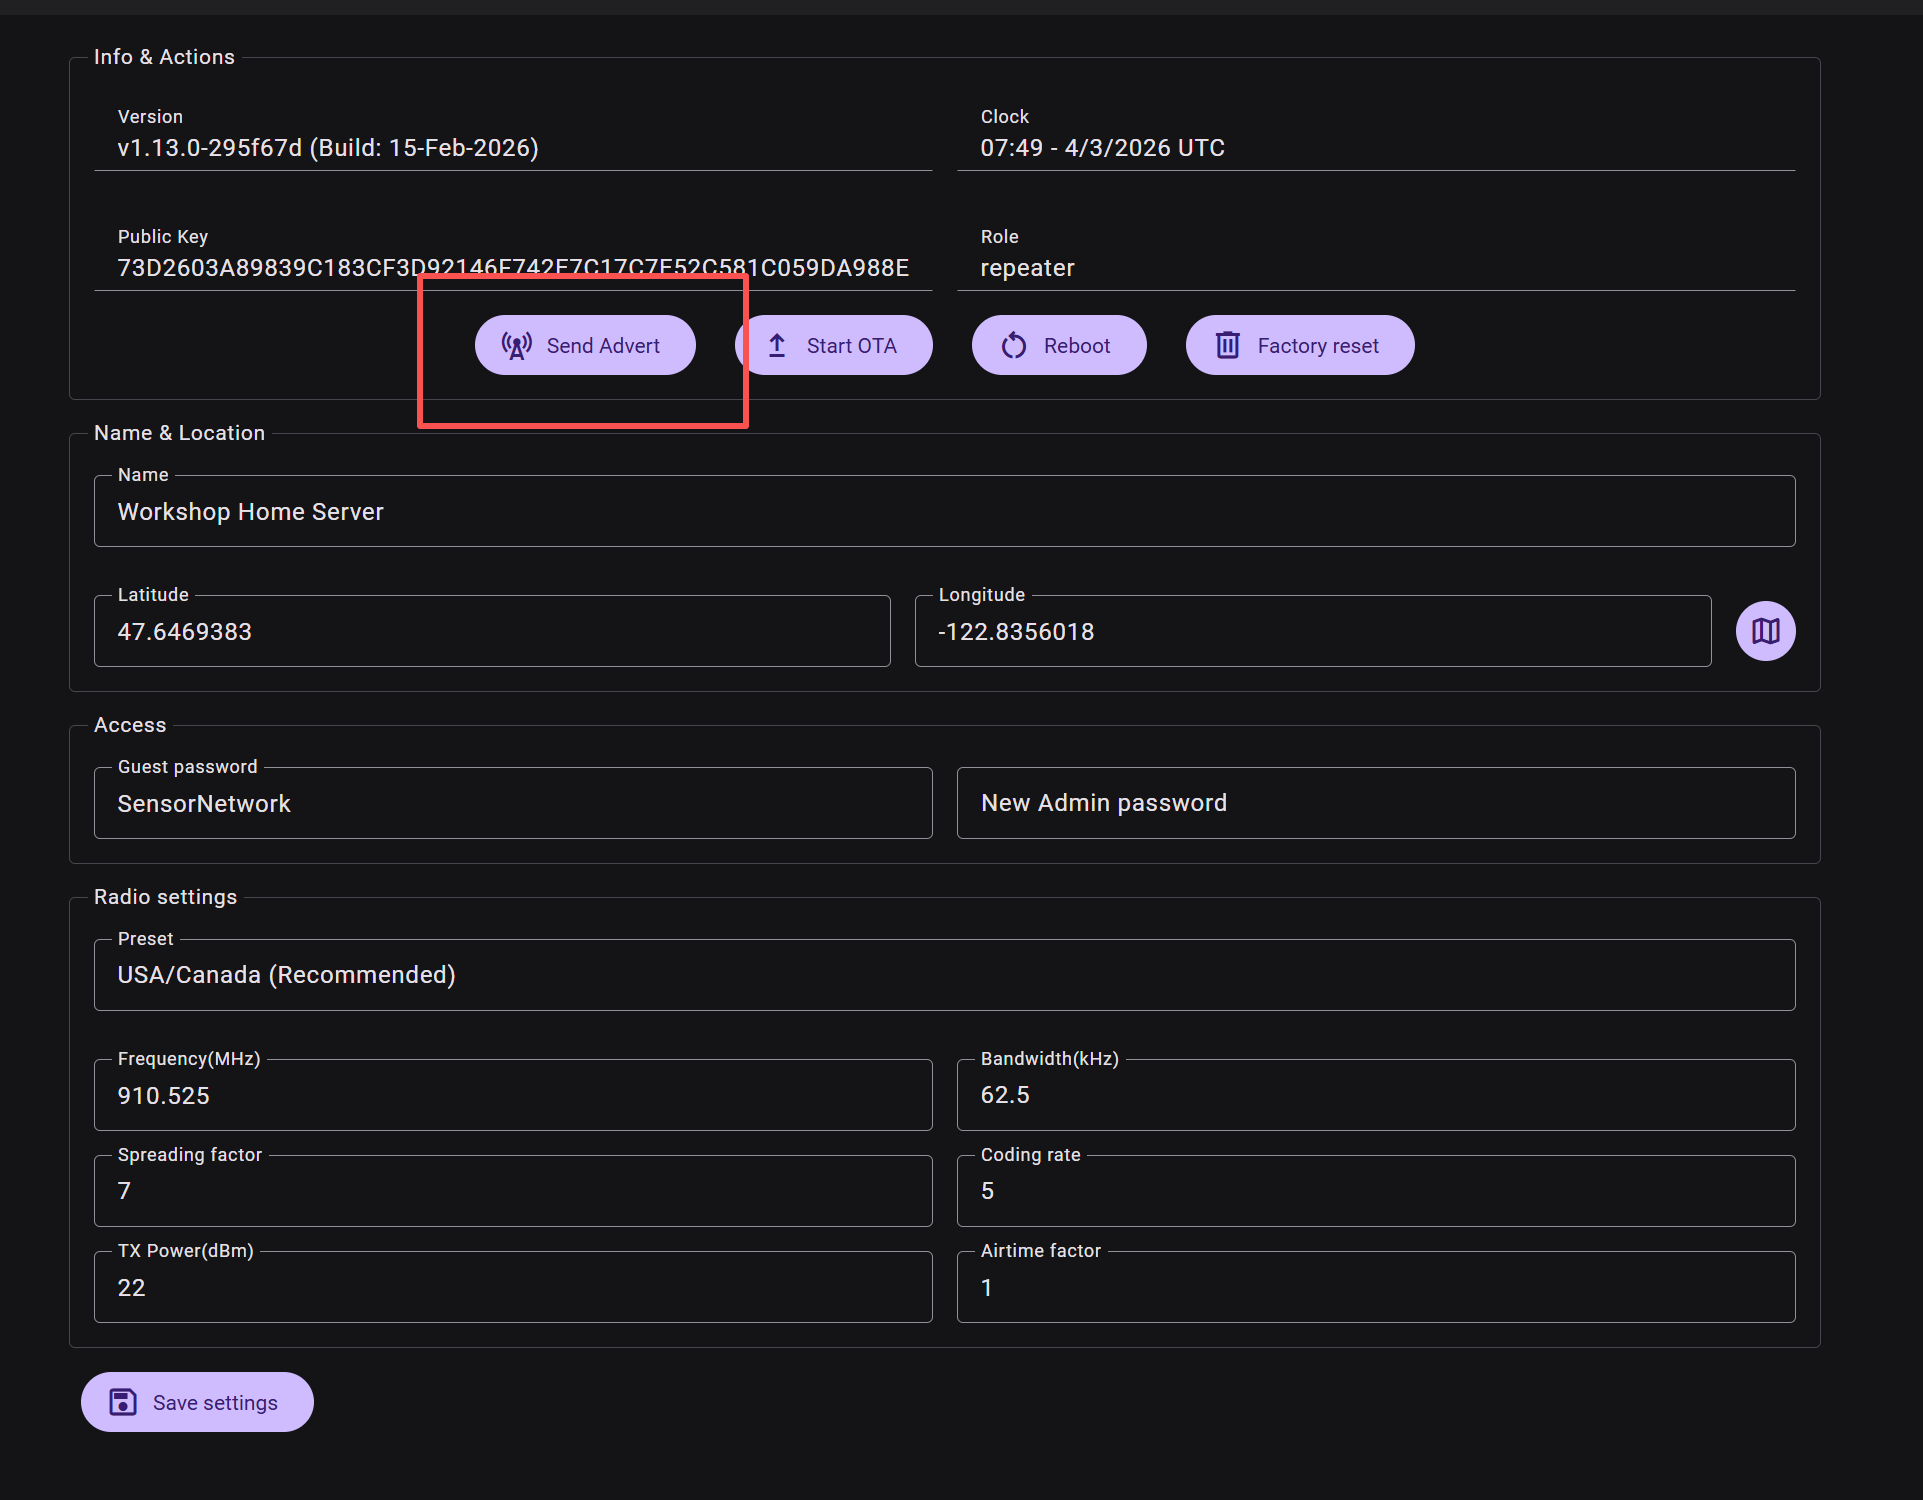
- Step2 Send Advert
Click "send advert" to enable other Meshcore devices to see this repeater. Then the repeater can be seen in the device list.
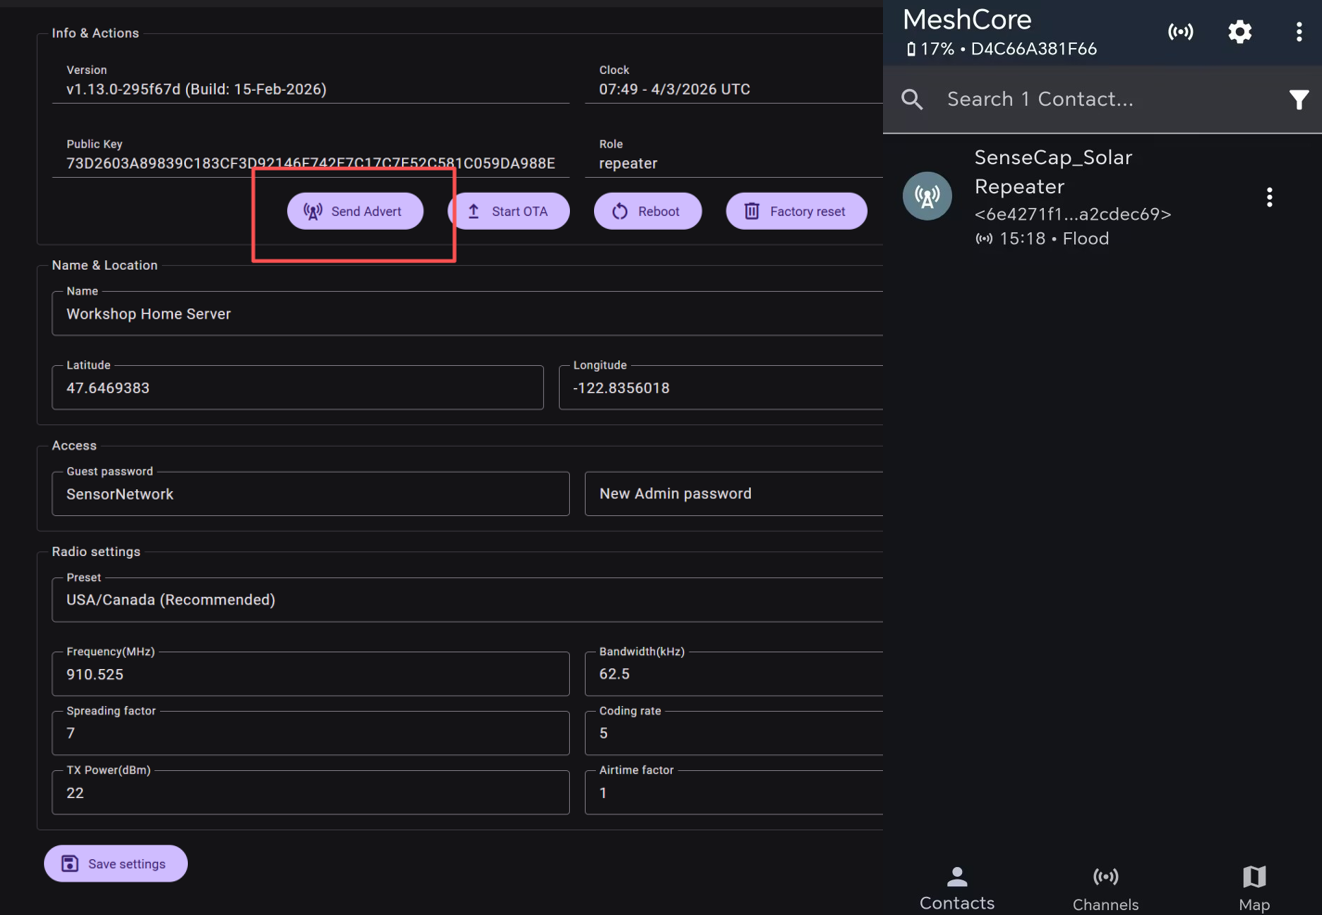
Clicking Send Advert makes the Solar Node actively perform one LoRa TX, so the TX LED of the corresponding firmware version should blink shortly:
- v1.12.0 ~ v1.14.0: blue LED blinks
- v1.14.1 ~ v1.15.x: white LED blinks
- v1.16.0 and later: blue LED blinks
The TX LED indicates that the Solar Node itself is transmitting LoRa data (TX). It is not a receive (RX) indicator.
- Step3(Optional) Admin Log in
The default admin password to a repeater is password.
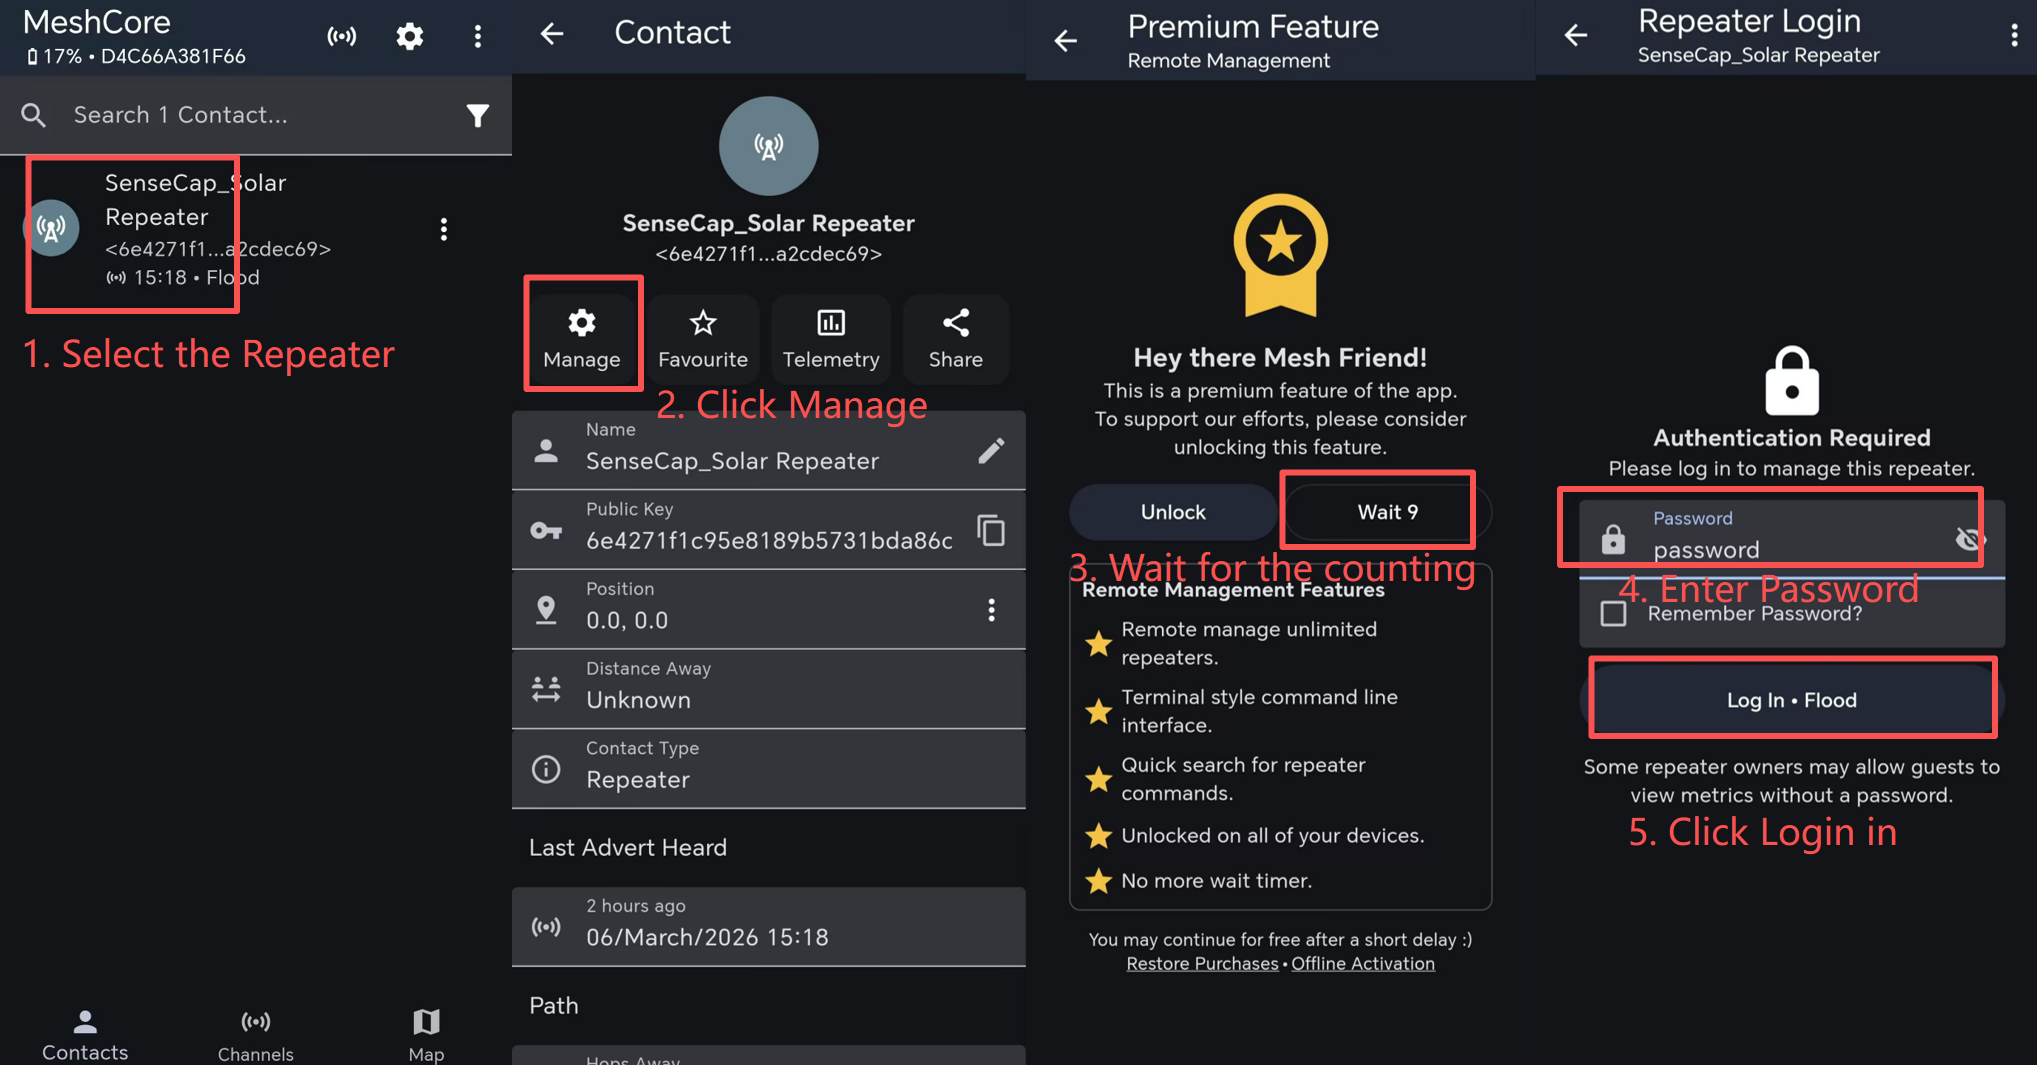
After logging in, you can see the configuration page. You can now adjust the configuration for the repeater.
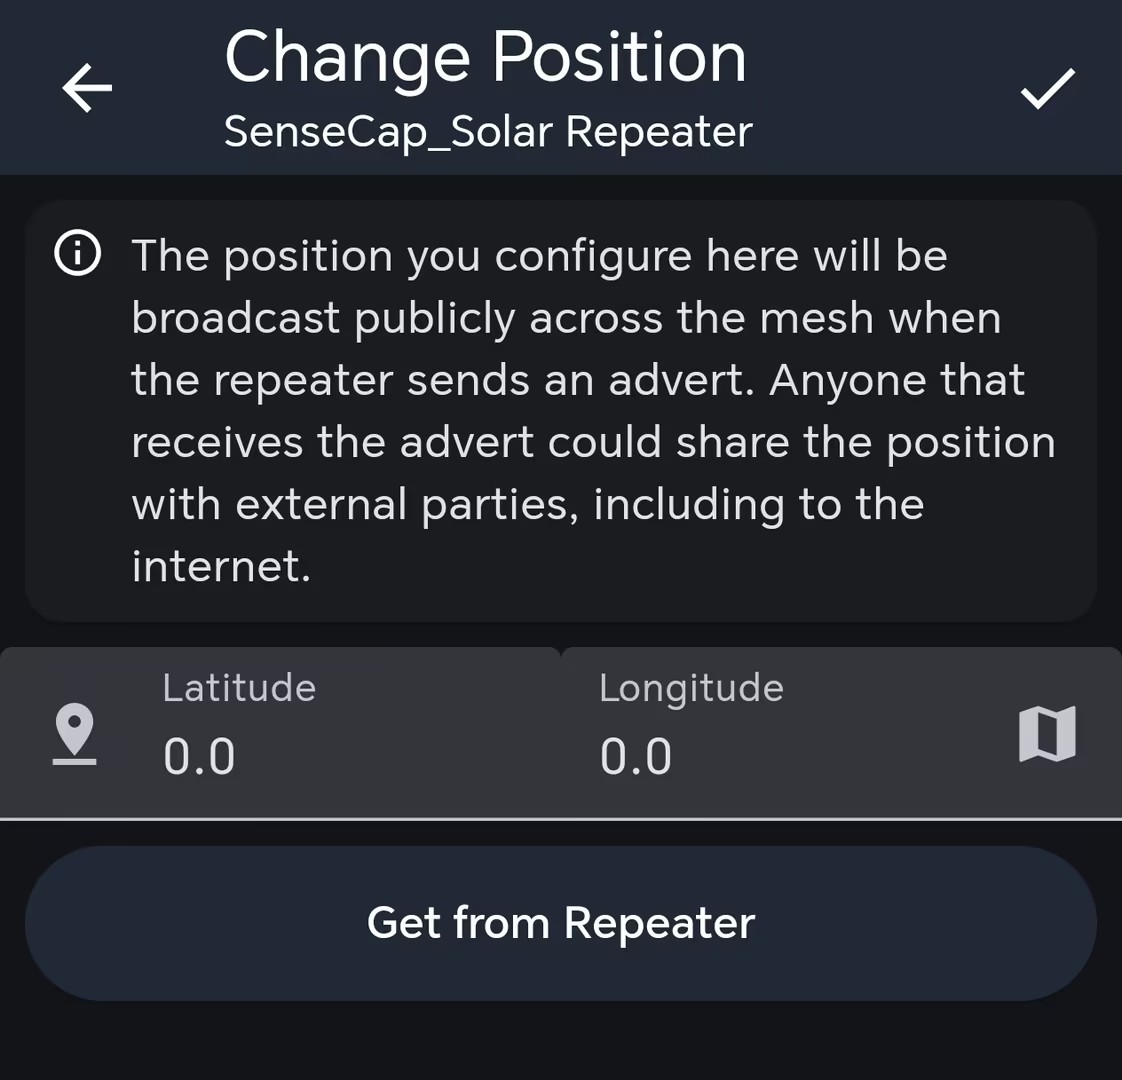
If you want to show the position of the repeater, you can enable the GPS.
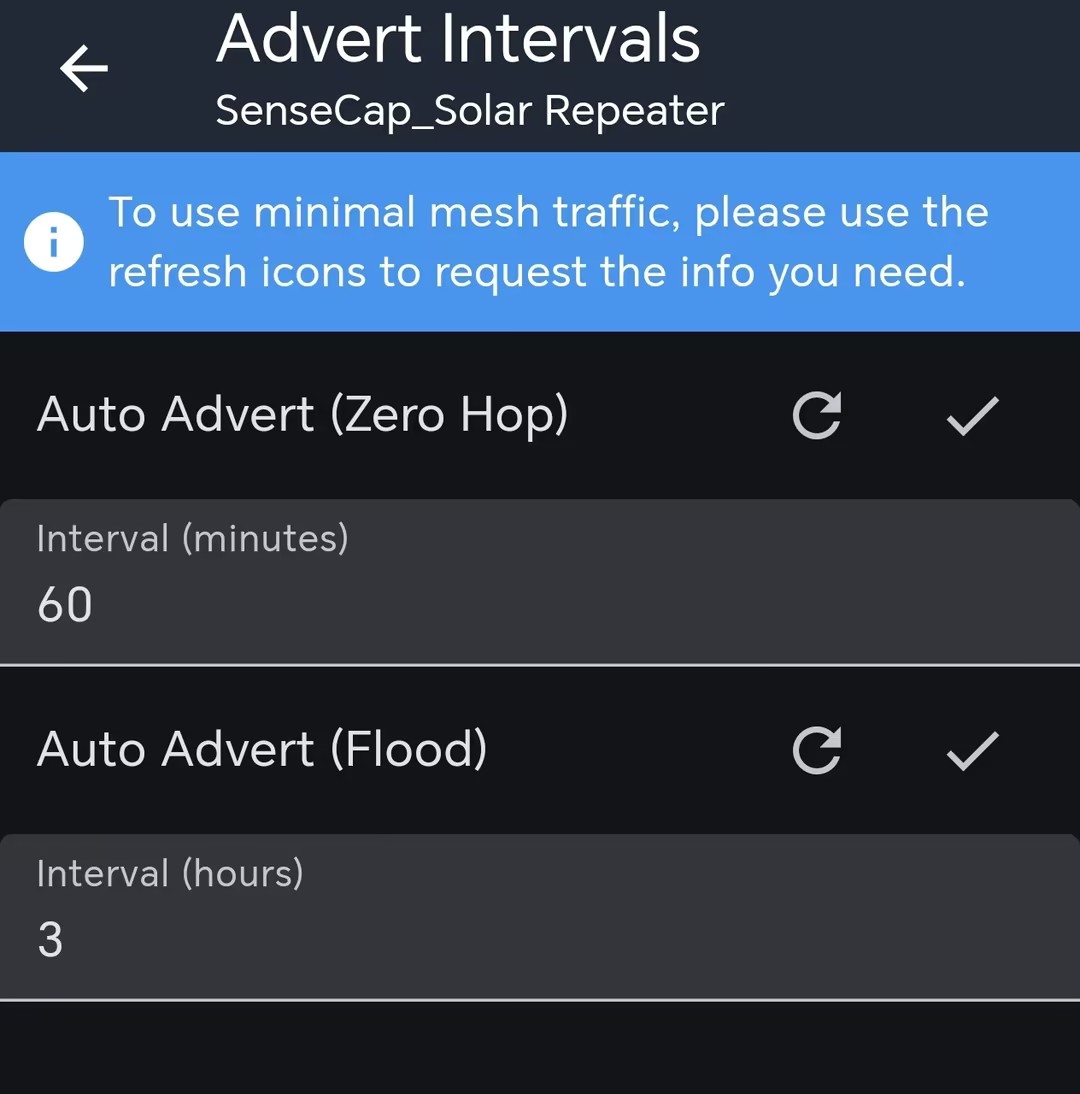
Also, you can adjust the advert broadcast interval:
- Advert interval: the sending interval of the Local / zero-hop Advert. The interval range is 60-240 mins.
- Flood advert interval: the sending interval of the Flood Advert. The interval range is 3-168 hours.
The actual advert period depends on the current firmware version and the configuration saved on the device, so please always refer to the actual values of Advert interval and Flood advert interval on the configuration page. If an interval is set to 0, the corresponding automatic advert is disabled.
Note: Since MeshCore v1.16.0, the default Flood advert interval has been changed from 12 hours to 47 hours. Therefore we do not recommend verifying the device by waiting for the automatic advert. To verify TX and LED, click Send Advert to actively trigger one LoRa TX.
Set Path
Before adding the repeater to your route, you may need to use the repeater to send advert first. The repeater automatically sends adverts at regular intervals according to the Advert interval and Flood advert interval saved on the device. The intervals depend on the firmware version and the current device configuration, and can be several hours long. We recommend clicking Send Advert to trigger it immediately instead of waiting for the automatic advert.
You can manually set the message sending path. Connect you Bluetooth companion device to your phone APP. Open a private message window. Then you can choose the discovered repeater to form your path.
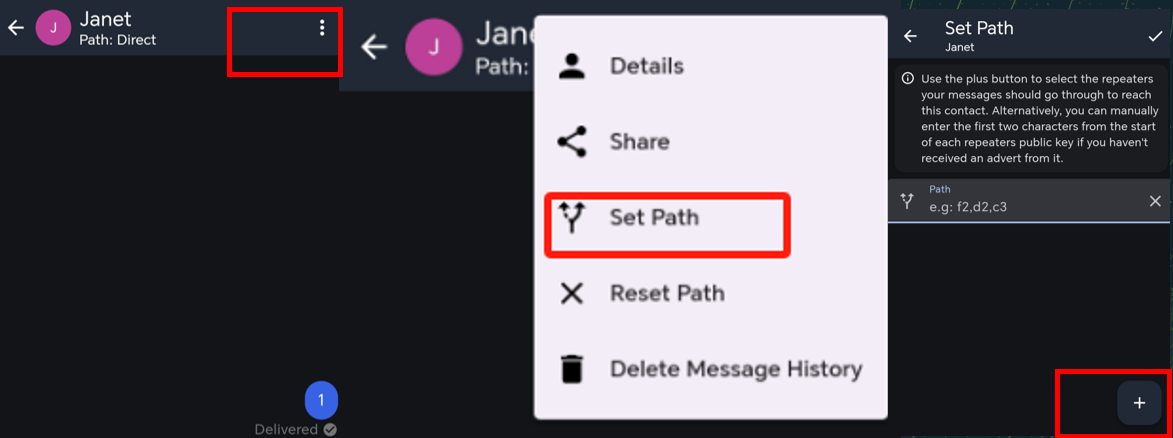
After setting the path, the transmission method will be changed to "n hop". For example, if you add 1 repeater in your route, it will change to 1 hop.

The MeshCore Repeater does not re-send every LoRa packet it receives.
- Case 1: A Companion sends data → the Solar Node receives it (RX) → no reply or forwarding is needed → the Solar Node does not perform a TX → the TX LED does not blink. This is normal.
- Case 2: The Solar Node receives data → a reply or forward is needed → the Solar Node performs a LoRa TX → the TX LED flashes in the color of the corresponding firmware version.
The Solar Node successfully receiving LoRa data does not mean the TX LED will blink. The TX LED only indicates that the Solar Node itself is transmitting LoRa data.
For example, when there is only one Companion and one Solar Node Repeater in the network, after the Companion sends data, the Solar Node may successfully receive the packet without needing to re-send it. In this case, not seeing the TX LED blink cannot be used to directly judge the Repeater as abnormal.
Verify That the Device Works Properly
Before verification, confirm whether you are using only one Solar Node device or whether you also have other MeshCore Companion devices in your setup.
For Repeater mode, the following behavior is expected:
- When the device is connected via USB, it can appear online and be configured.
- After unplugging USB power, the device switches to battery mode and continues working as a repeater.
- When the Solar Node itself transmits LoRa data, the TX LED blinks shortly in the color of the corresponding firmware version. This is normal and indicates LoRa activity.
- The Solar Node Repeater is not expected to behave like a standalone phone-connected device unless it is used together with a Companion device.
To properly verify that the repeater is working, follow the two active verification steps below. Do not rely on waiting for the automatic advert as the main verification method.
Step 1: Verify Solar Node TX
- Connect the Solar Node via USB.
- Open the MeshCore configuration page: https://config.meshcore.io/.
- Click Send Advert.
- Observe the TX LED on the Solar Node.
When the Solar Node sends the advert, the TX LED should blink shortly in the color of the corresponding firmware version:
- v1.12.0 ~ v1.14.0: blue LED
- v1.14.1 ~ v1.15.x: white LED
- v1.16.0 and later: blue LED
The Companion should be able to receive the Solar Node's advert. This actively verifies the LoRa TX in the direction of Solar Node → Companion.
Step 2: Use Ping to Verify Two-Way Communication
- On the Companion device, open the Solar Node Repeater contact and use the Ping function.
If the ping succeeds, both directions of the communication are verified at the same time:
- Companion → Solar Node: RX
- Solar Node → Companion: TX reply
When the Solar Node sends the ping reply, the TX LED should blink shortly in the color of the corresponding firmware version.
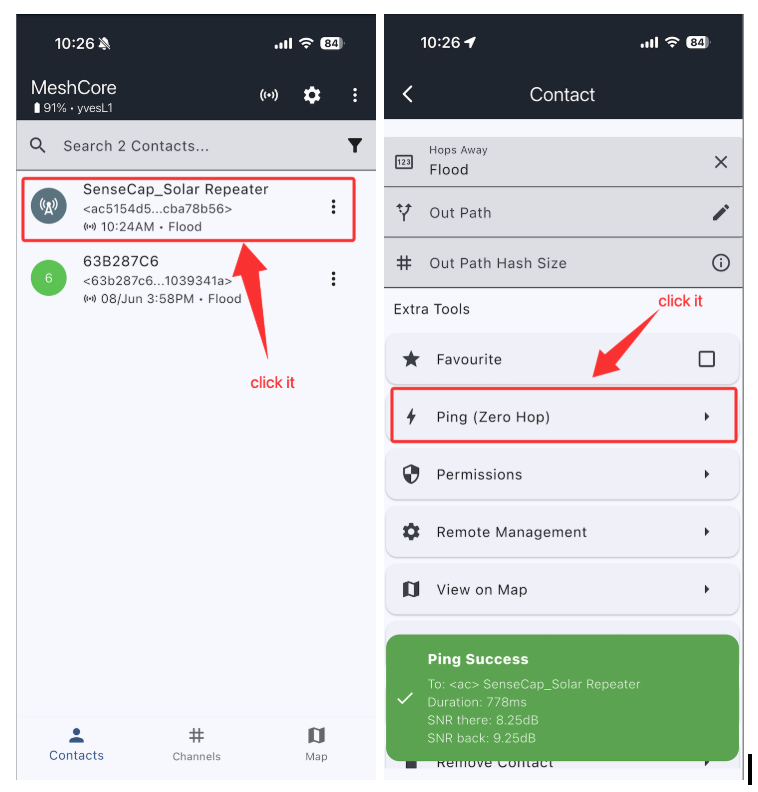
The TX LED is not an RX indicator. If the Solar Node only receives a packet without the need to reply or forward, the LED may not blink at all.
We do not recommend waiting for the automatic advert to verify whether the device works, because the advert interval can be very long. Use Send Advert to actively trigger a TX immediately.
The mobile app is mainly used with a Companion device, not directly with a Repeater. The repeater itself will not behave like a normal Bluetooth-connected phone accessory.
If the LED behavior and USB connection state match the description above, this usually indicates normal repeater behavior.
FAQ
Boot Loop
- Reason
This is usually caused by the firmware flashing failure. When flashing the firmware, please maintain a stable connection.
- Troubleshoot
Click here to re-flash the firmware.
Device bricked
Description
The device not responding, no LED, can not pair with your App.
1) Device can still enter the DFU mode, then try to flash the bootloader.
Flash the Bootloader
When you are flashing the bootloader, please make sure the cable connection is stable and DO NOT disconnect it during the flash process.
Step1: Adafruit-nrfutil Installation
For window user, press "Win" key and "r" key, then enter "cmd" in the pop-oyt window, click "Enter". This can open the command line.
For MAC user, press "Command" key and "Space" key, so that you can open Spotlight. Then enter "termial", click "Return". This can open the command line.
Prerequisites
Check in your command line that whether or not the python and pip are installed successfully.
python --version
python -m pip --version
Then "Python xxx" and "pip xxx" should appear. If it does not, please try install python again.
- Installing from PyPI
- Installing from Source
This is recommended method, to install latest version:
pip3 install --user adafruit-nrfutil
Check the installation path:
python -m pip show adafruit-nrfutil
This is the installation location:
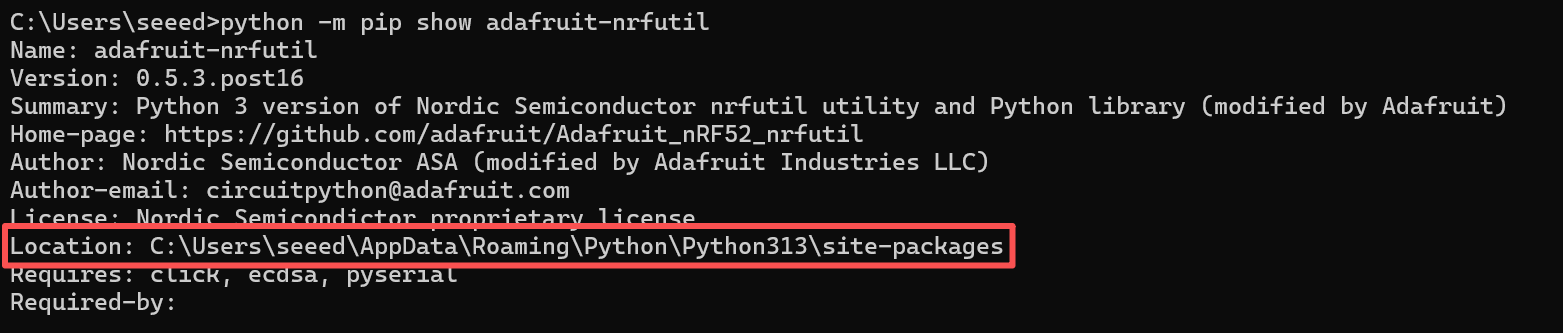
For window user, you may need to add the path manually. Copy the installation location showed in the last step. Then add it as followed:

Use this method if you have issue installing with PyPi or want to modify the tool. First clone this repo and go into its folder.
git clone https://github.com/adafruit/Adafruit_nRF52_nrfutil.git
cd Adafruit_nRF52_nrfutil
Note: following commands use python3, however if you are on Windows, you may need to change it to python since windows installation of python 3.x still uses the name python.exe
To install in user space in your home directory:
pip3 install -r requirements.txt
python3 setup.py install
If you get permission errors when running pip3 install, your pip3 is older or is set to try to install in the system directories. In that case use the --user flag:
pip3 install -r --user requirements.txt
python3 setup.py install
If you want to install in system directories (generally not recommended):
sudo pip3 install -r requirements.txt
sudo python3 setup.py install
To generate a self-contained executable binary of the utility (Windows and MacOS), run these commands:
pip3 install pyinstaller
cd Adafruit_nRF52_nrfutil
pip3 install -r requirements.txt
cd Adafruit_nRF52_nrfutil\nordicsemi
pyinstaller __main__.py --onefile --clean --name adafruit-nrfutil
You will find the .exe in Adafruit_nRF52_nrfutil\nordicsemi\dist\adafruit-nrfutil ( with .exe if you are on windows).
Copy or move it elsewhere for your convenience, such as directory in your %PATH%.
Step2: Check your port number
Connect your device to your PC, and check the port number.
For Window user, for example:
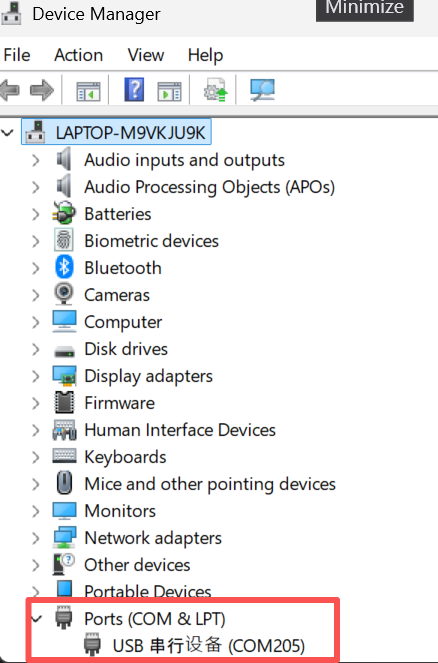
For Mac user, for example:

Step3: Flash the bootloader
In the terminal or command prompt, navigate to the directory where you downloaded the bootloader zip package and execute the following command, replacing the correct port for your device:
- For Windows:
adafruit-nrfutil --verbose dfu serial --package xiao_nrf52840_ble_bootloader.zip -p COMXX -b 115200 --singlebank --touch 1200
Please change COMXX to your com number. For example, if your device is on com6, change the command to be:
adafruit-nrfutil --verbose dfu serial --package xiao_nrf52840_ble_bootloader.zip -p COM6 -b 115200 --singlebank --touch 1200
Some of the device will change their port number after you enter this command. So if the installation fail, check the port number again.
- For others:
adafruit-nrfutil --verbose dfu serial --package xiao_nrf52840_ble_bootloader.zip -p /dev/tty.SLAB_USBtoUART -b 115200 --singlebank --touch 1200
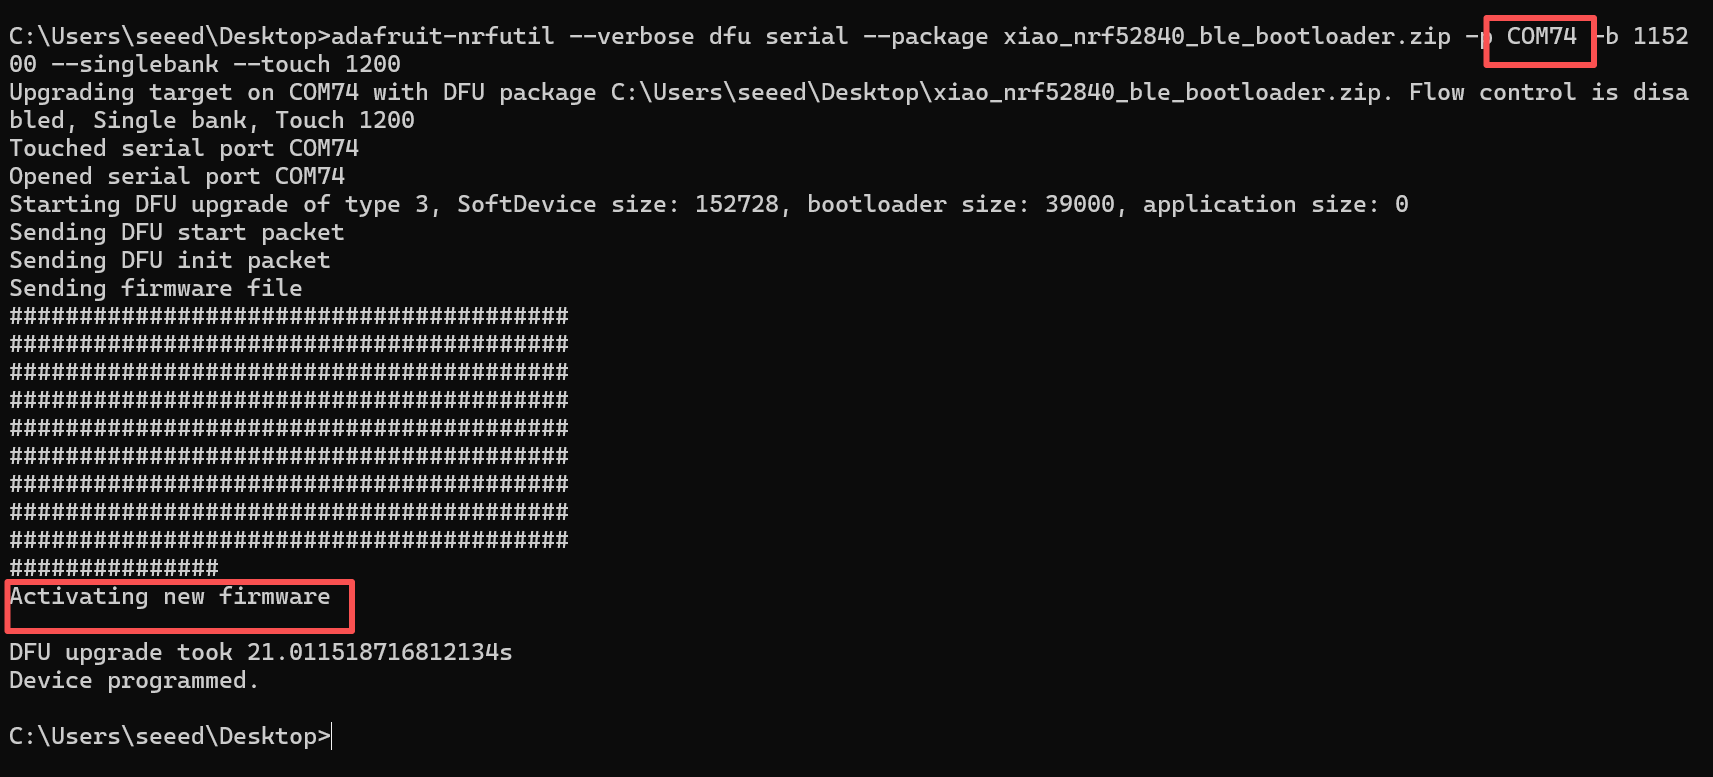
When you have completed the above steps, then you can flash the application firmware.
Signal Quality
-
SNR reflects the quality of the communication link. Normal device usually operates above -7 dB. Device with a SNR lower than -10 dB indicates poor performance.
-
RSSI is determined jointly by the device and its surrounding environment. Normal device usually operates above -110 dBm. Device with an RSSI lower than -115 dBm is considered to have poor performance.
To achieve the best signal effect, please use the device in an open, unobstructed area with minimal interference for use.
Charging Current

The Xiao nRF-52840 Plus maximum charging current is 200 mA. The charging management chip CN3165 is 0.99A. So the maximum charging current is 1A.
Why does my Solar Node blink white instead of blue when sending data?
This is a MeshCore firmware version difference, not a hardware fault:
- v1.12.0 ~ v1.14.0: blue LED TX
- v1.14.1 ~ v1.15.x: white LED TX
- v1.16.0 and later: blue LED TX
A white flash on v1.14.1 ~ v1.15.x does not indicate a hardware fault.
Why can't I power off the device by holding the Power button?
Long-pressing the Power button to power on/off is supported since MeshCore v1.14.1. On v1.14.0 and earlier, long-pressing the Power button has no response, and this is the normal firmware version behavior.
Why hasn't my Solar Node blinked for a long time?
- The TX LED only blinks when the Solar Node itself performs a LoRa TX.
- RX does not necessarily trigger the TX LED.
- The Repeater does not forward every packet it receives.
- The automatic advert interval can be very long.
- Since v1.16.0, the default Flood advert interval is 47 hours.
- If you need to verify immediately, use Send Advert.
Resource
Tech Support & Product Discussion