Get Started with Meshtastic
When the device is in the states below, please don't manually reboot or turn off it. Or else the device can be dead.
- Not finishing the message transmission process
- Being configured
Flash Firmware
Visit Meshtastic Web Flasher.
Select the target device to Seeed Wio Tracker L2 and choose the latest firmware, then click Flash.
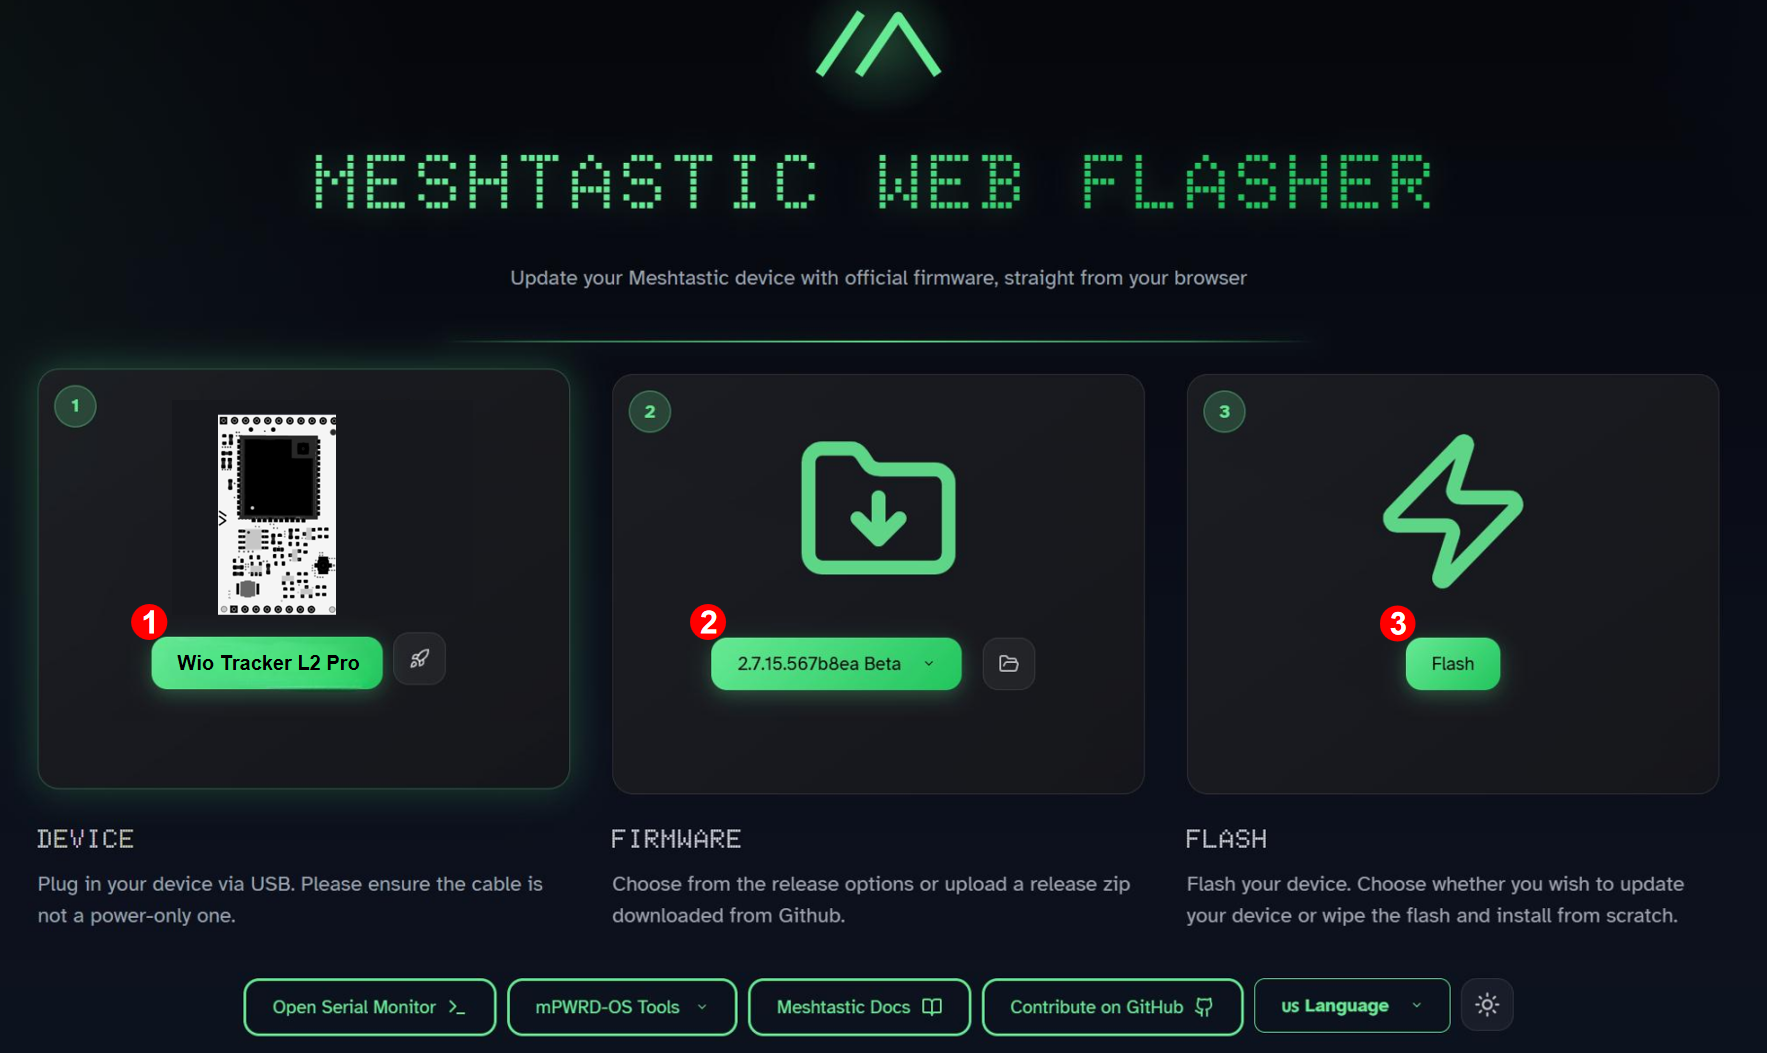
Switch on the device, click Enter DFU Mode, there will be a serial port named Tracker L2, click and connect it.
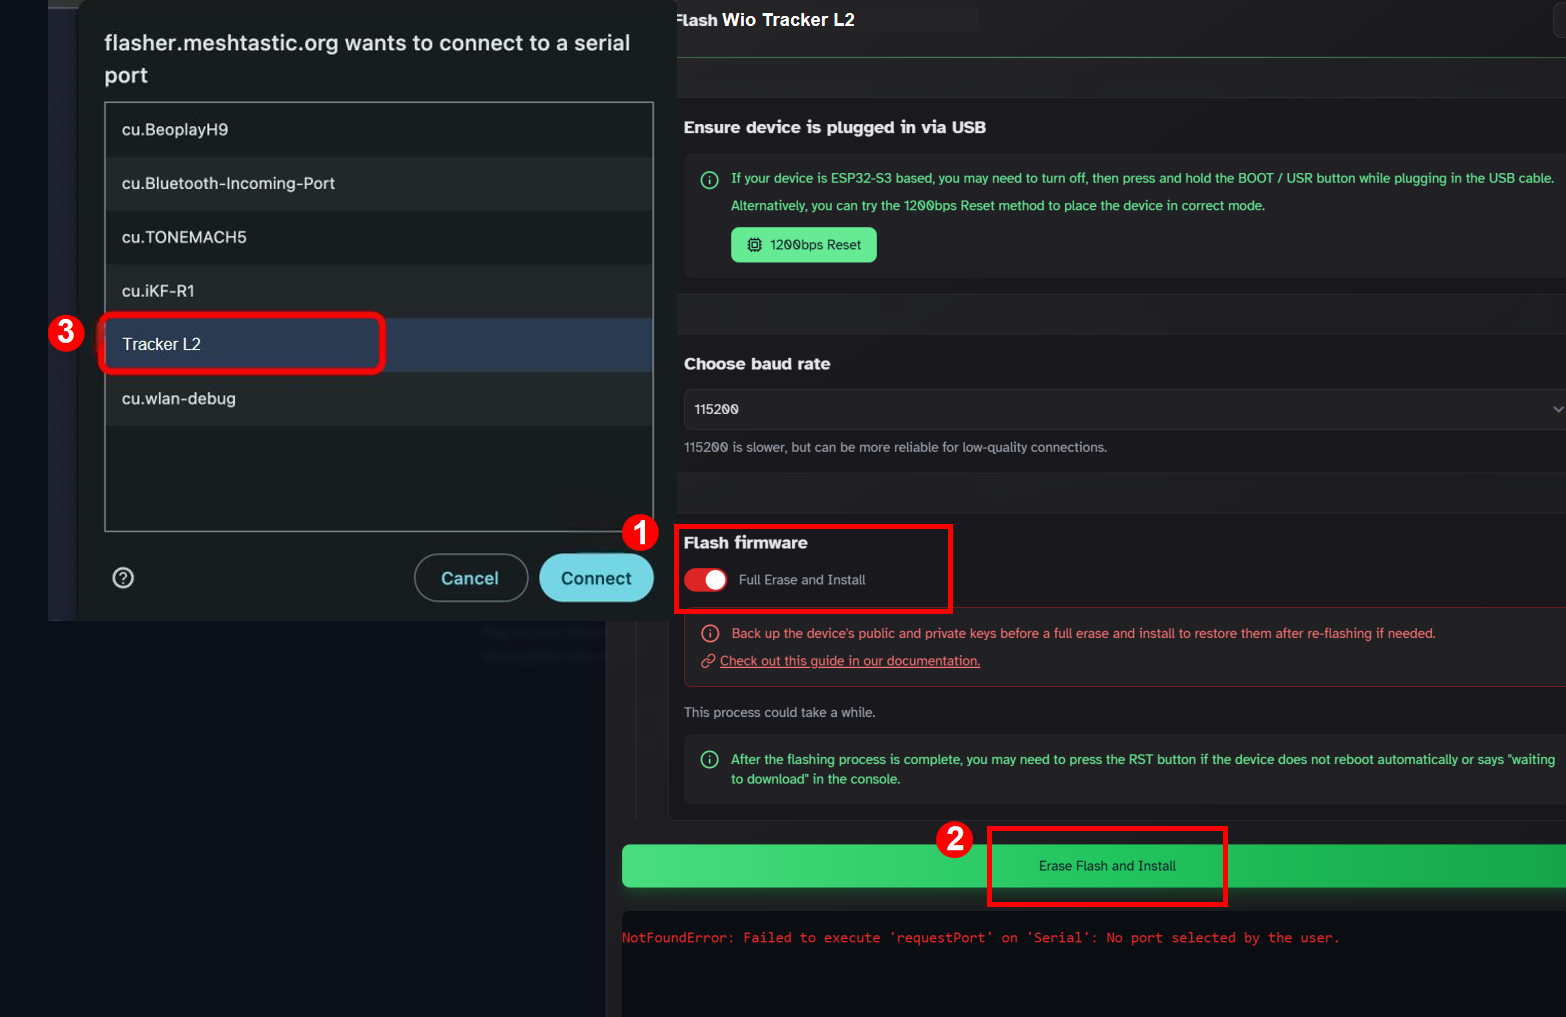
And then click "Flash". Don't forget to tick "Full Erase and Install" if you want to cover previous firmware.
Get Started
UI Switching
- MUI to BaseUI
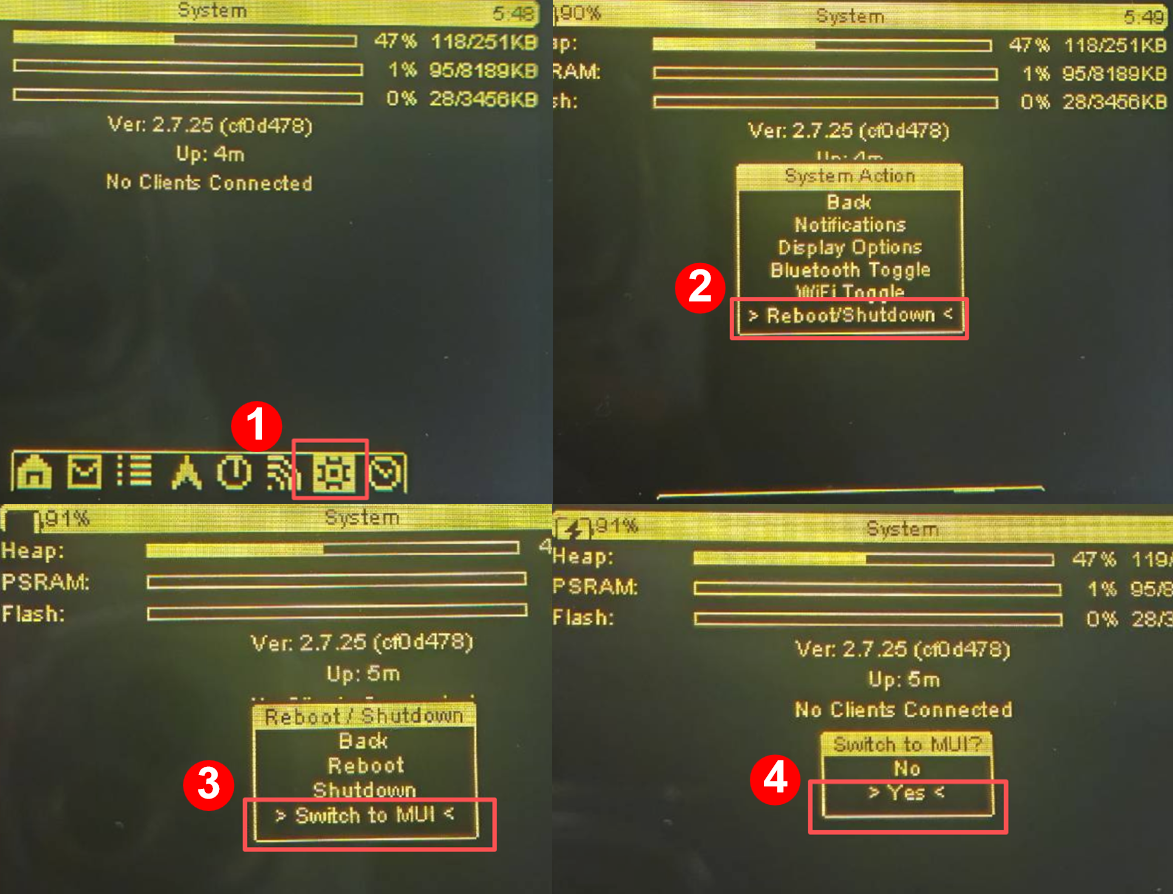
- BaseUI to MUI
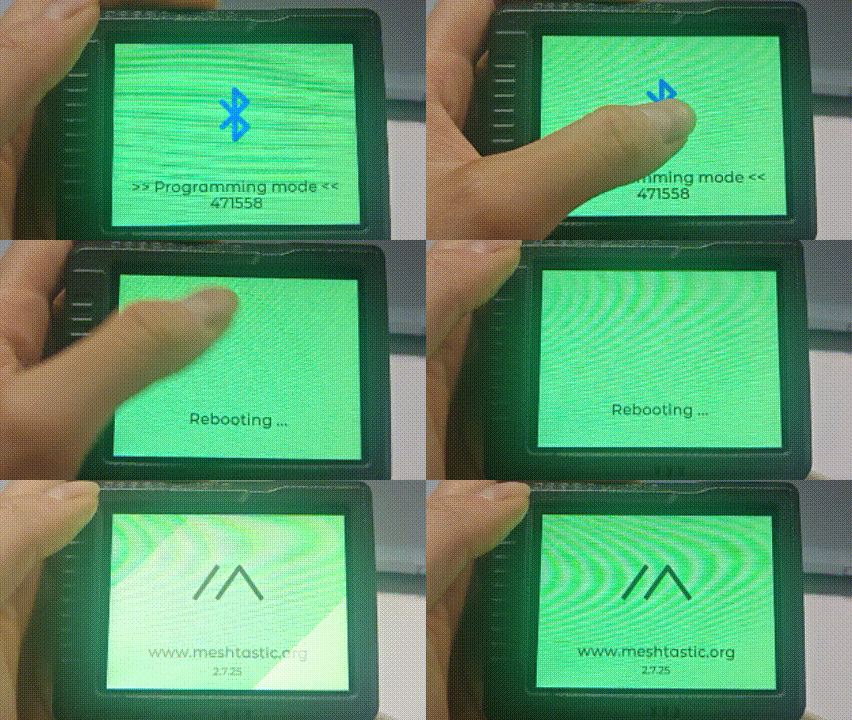
Go to Setting page -> Choose Reboot/Shutdown -> Long press the Bluetooth icon -> Click OK
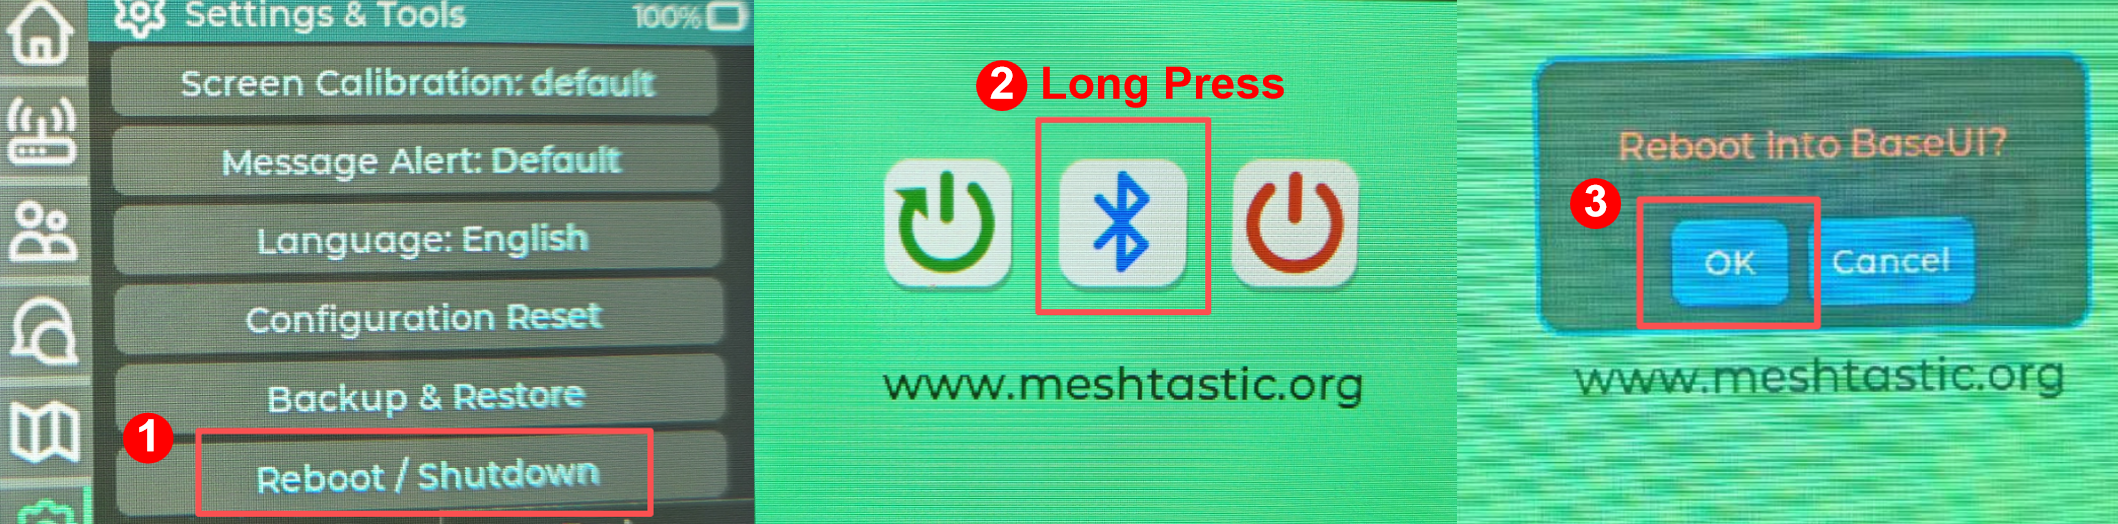
The BaseUI switch popup appears when you long-press the Bluetooth icon.
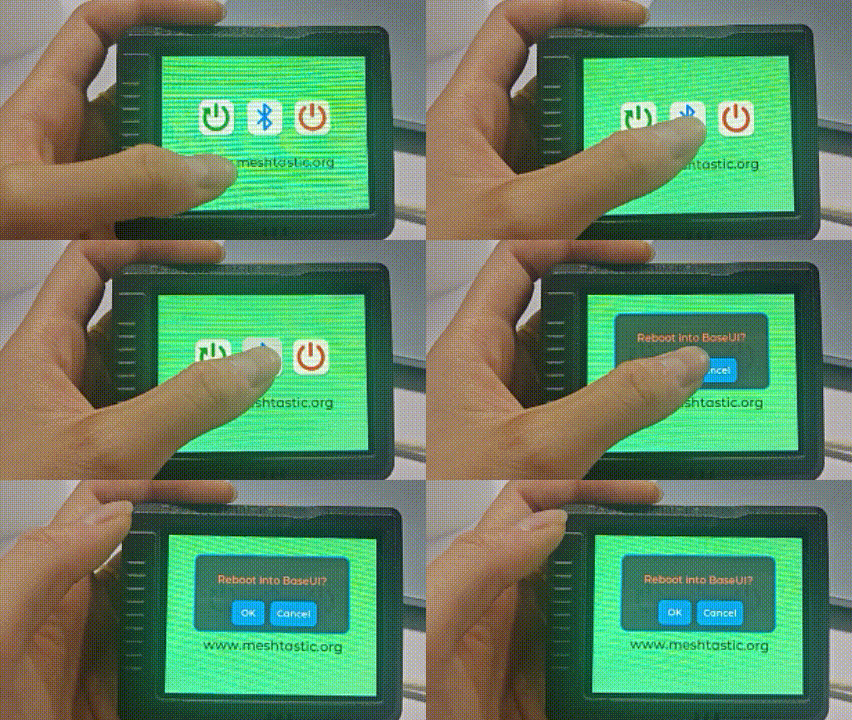
If you just click the Bluetooth icon, you will enter Bluetooth mode. If so, long press the Bluetooth icon shown on the screen, the device will automatically reboot to MUI.
Phone Connection
Step1. Get in Bluetooth Connection Mode
- MUI
- BaseUI
Go to Setting page, click Reboot/Shutdown, then click the Bluetooth icon.
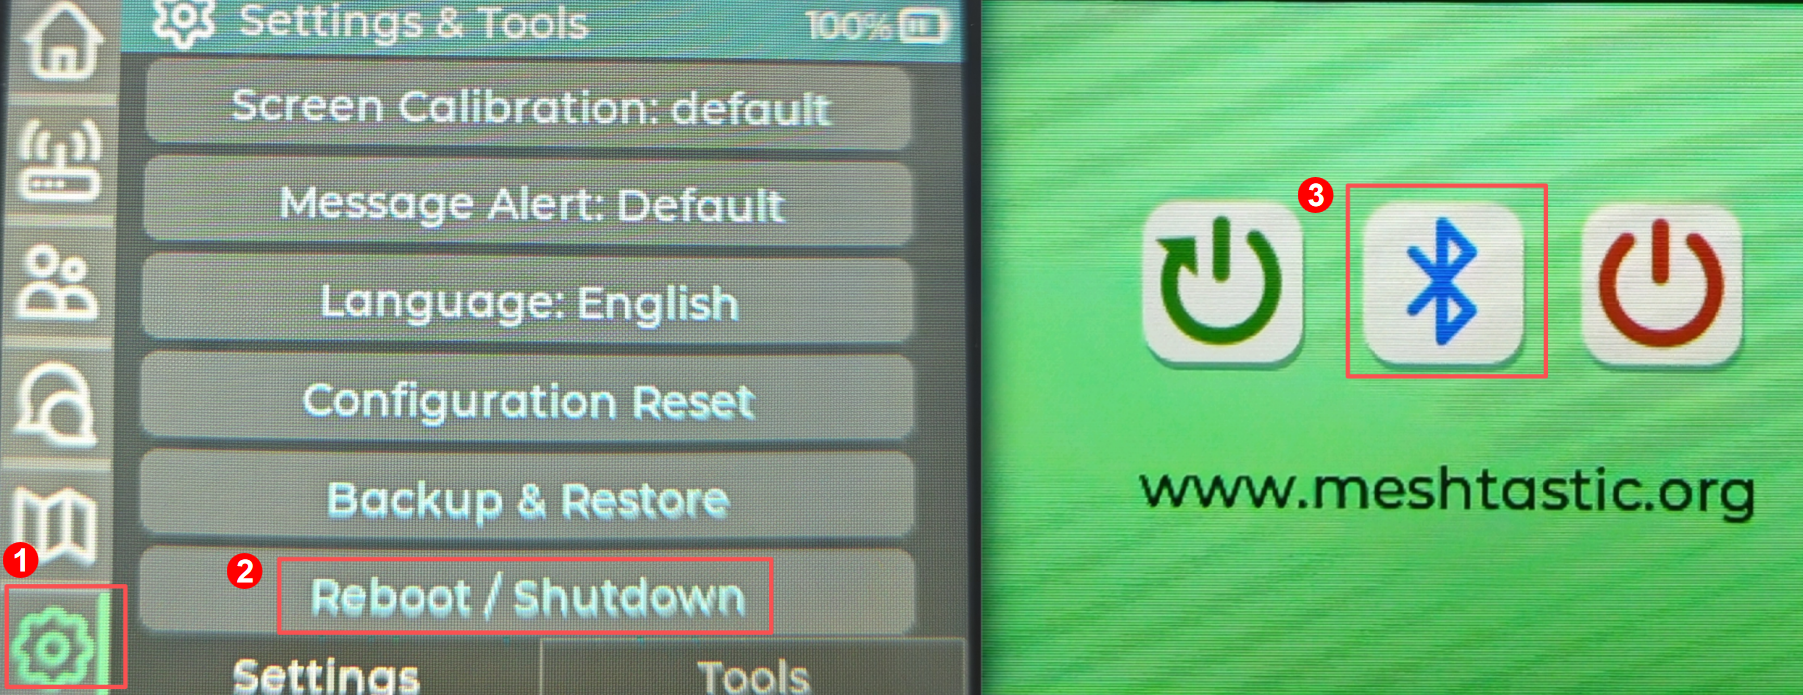
While using MUI, please first switch to Bluetooth Pairing mode before pairing with your ohone. Or else your phone can not recognize your device.
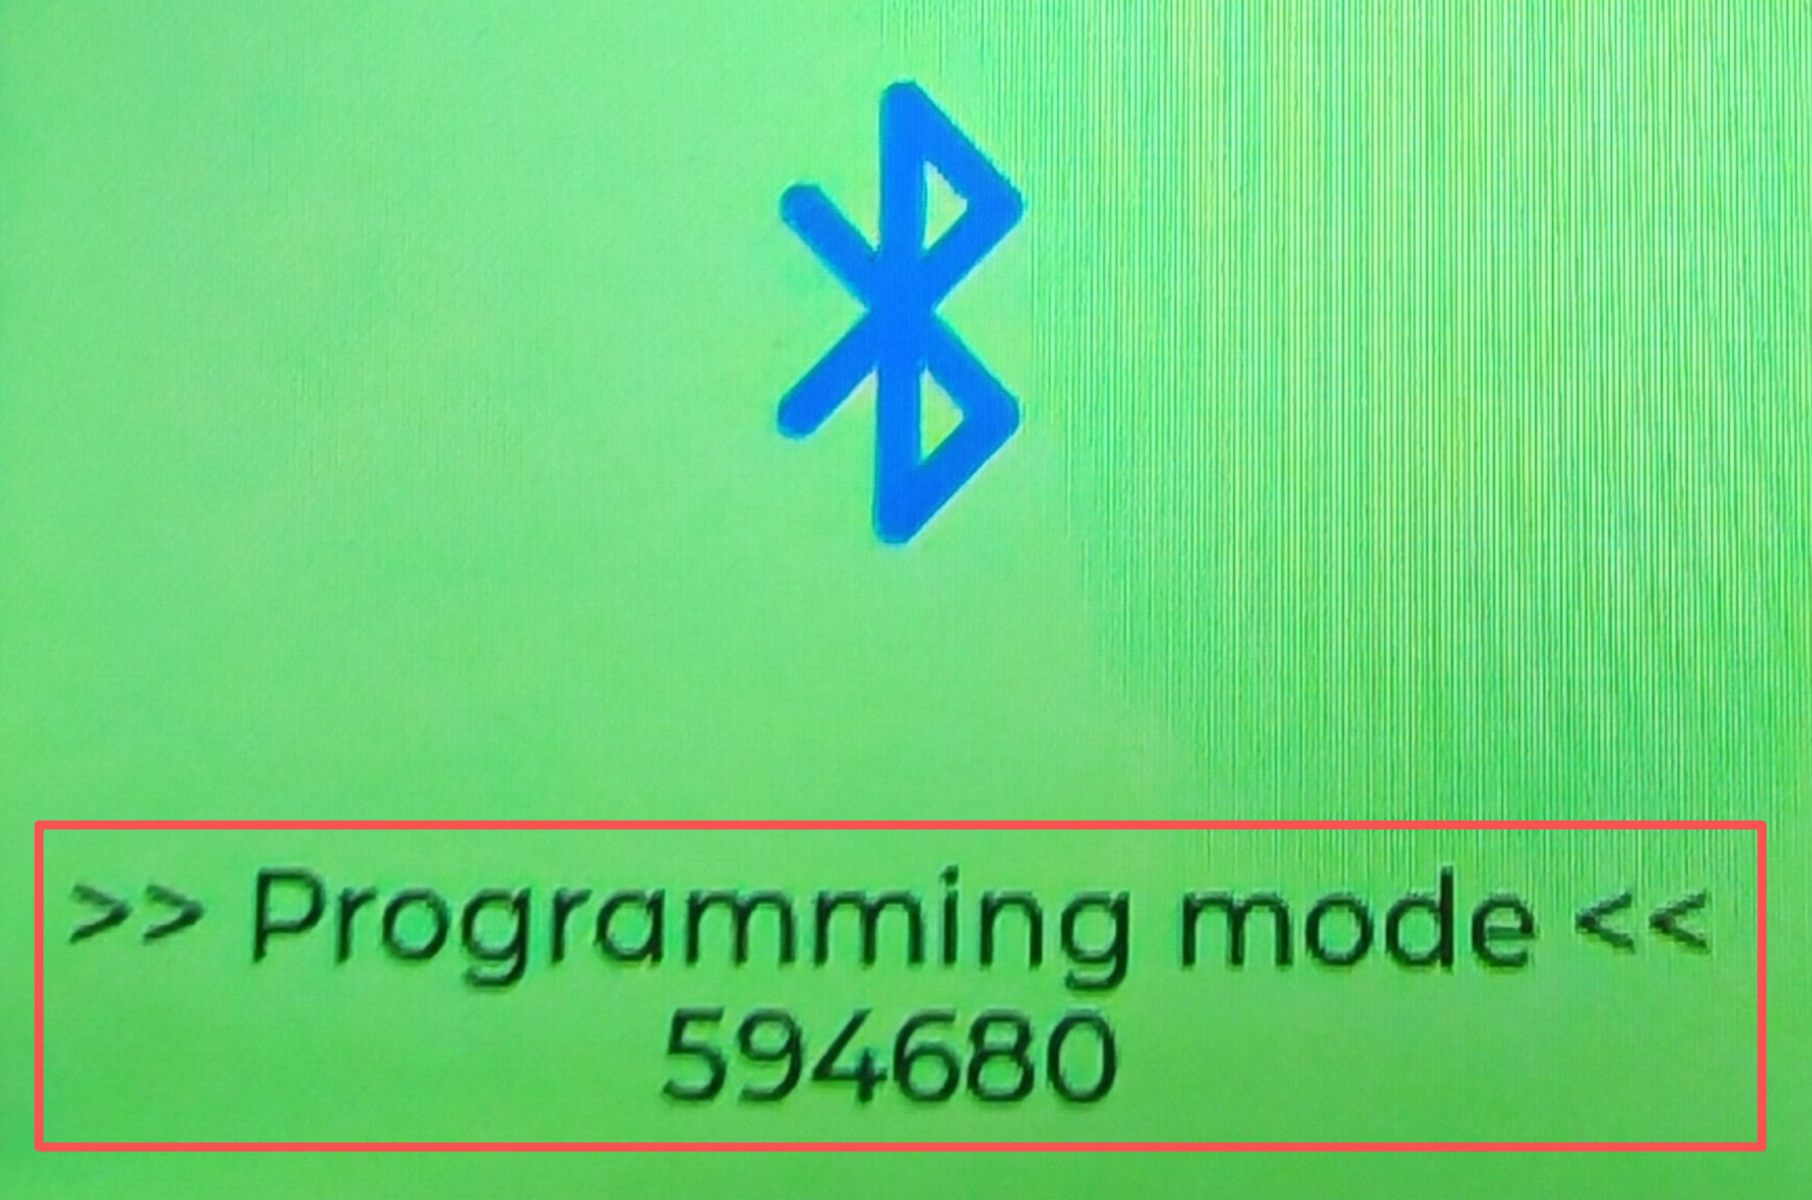
The device will then reboot in Bluetooth mode. The Bluetooth pairing code will be shown on the screen.
The device is always in Bluetooth pairing mode, requiring no special operation.
Step2. Download Meshtastic APP
Click here to download Meshtastic APP.
Step3. Pair with Device
- IOS
- Android
- Select the target device on the Bluetooth panel.
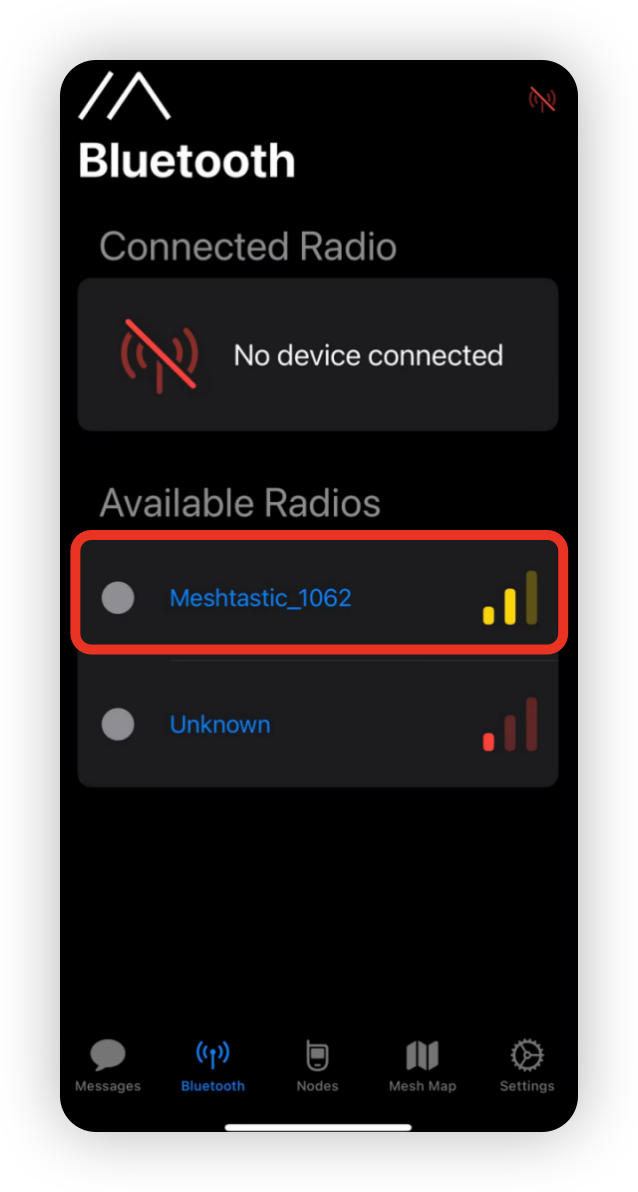
- Enter the code shown on the screen and then click
Pairto connect the device.

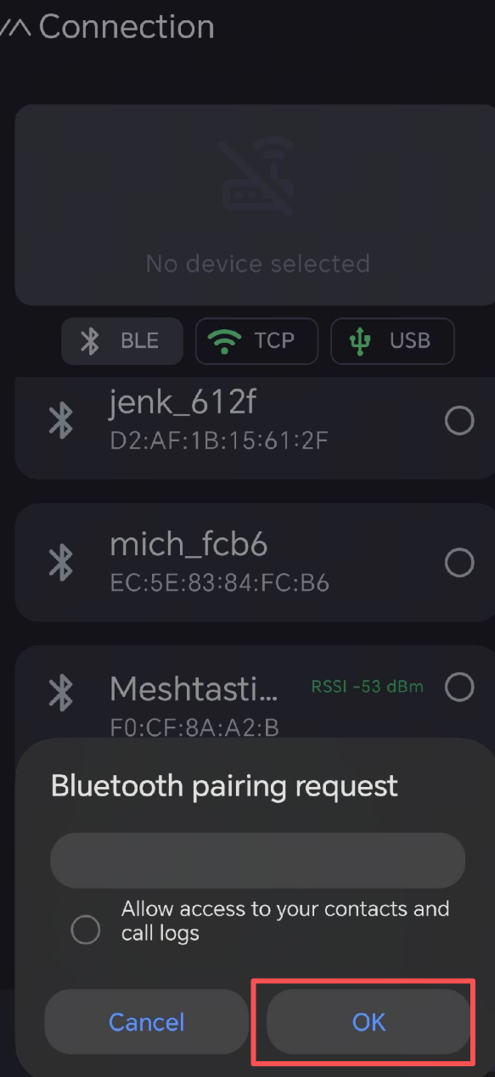
- Select the target device on the Bluetooth panel.
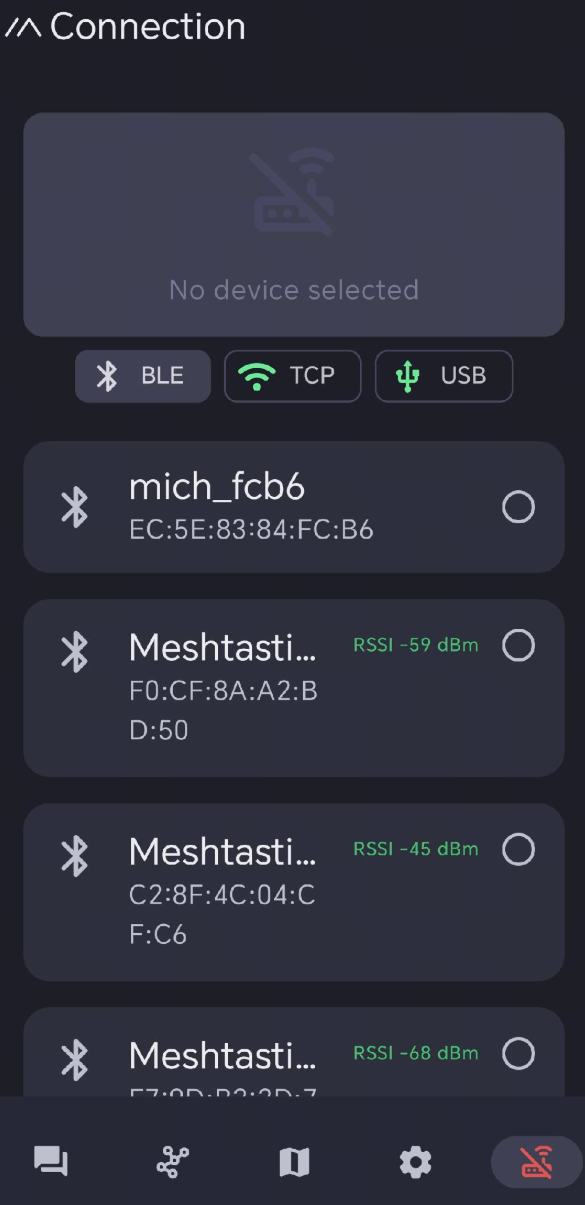
- Enter the code shown on the screen and then click
OKto connect the device.
Configure LoRa
In order to start communicating over the mesh, you must set your region. This setting controls which frequency range your device uses and should be set according to your regional location.
Region List
| Region Code | Description | Frequency Range (MHz) | Duty Cycle (%) | Power Limit (dBm) |
|---|---|---|---|---|
| UNSET | Unset | N/A | N/A | N/A |
| US | United States | 902.0 - 928.0 | 100 | 30 |
| EU_868 | European Union 868MHz | 869.4 - 869.65 | 10 | 27 |
Refer to LoRa Region by Country for a more comprehensive list.
EU_868 has to adhere to an hourly duty cycle limitation of 10%, calculated every minute on a rolling 1-hour basis. Your device will stop transmitting if you reach it, until it is allowed again.
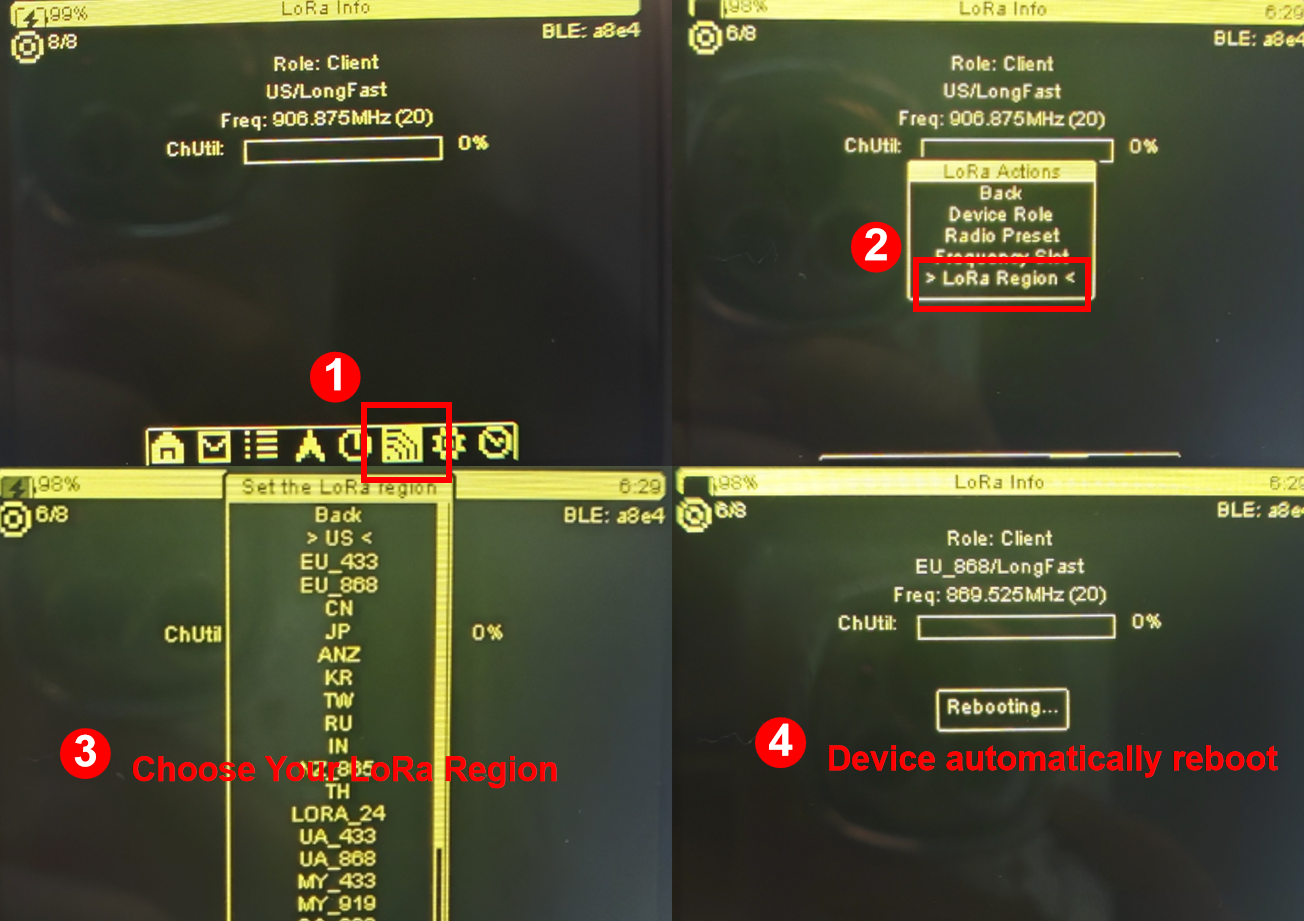
- Configure on MUI
- Configure on BaseUI
- Configure on Phone
Go to Setting page, click LeoR Region, the device will automatically reboot.
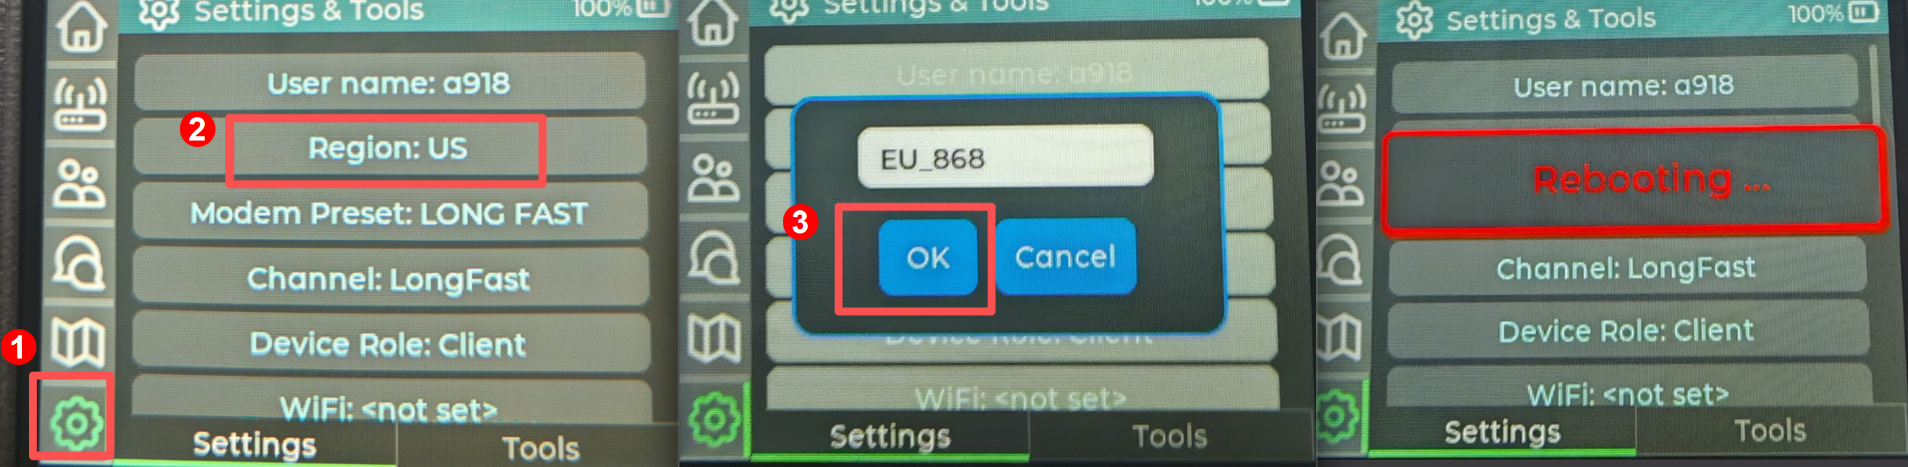
Go to LoRa Info page, click Region, choose region and then click the OK.
- IOS App
- Android App

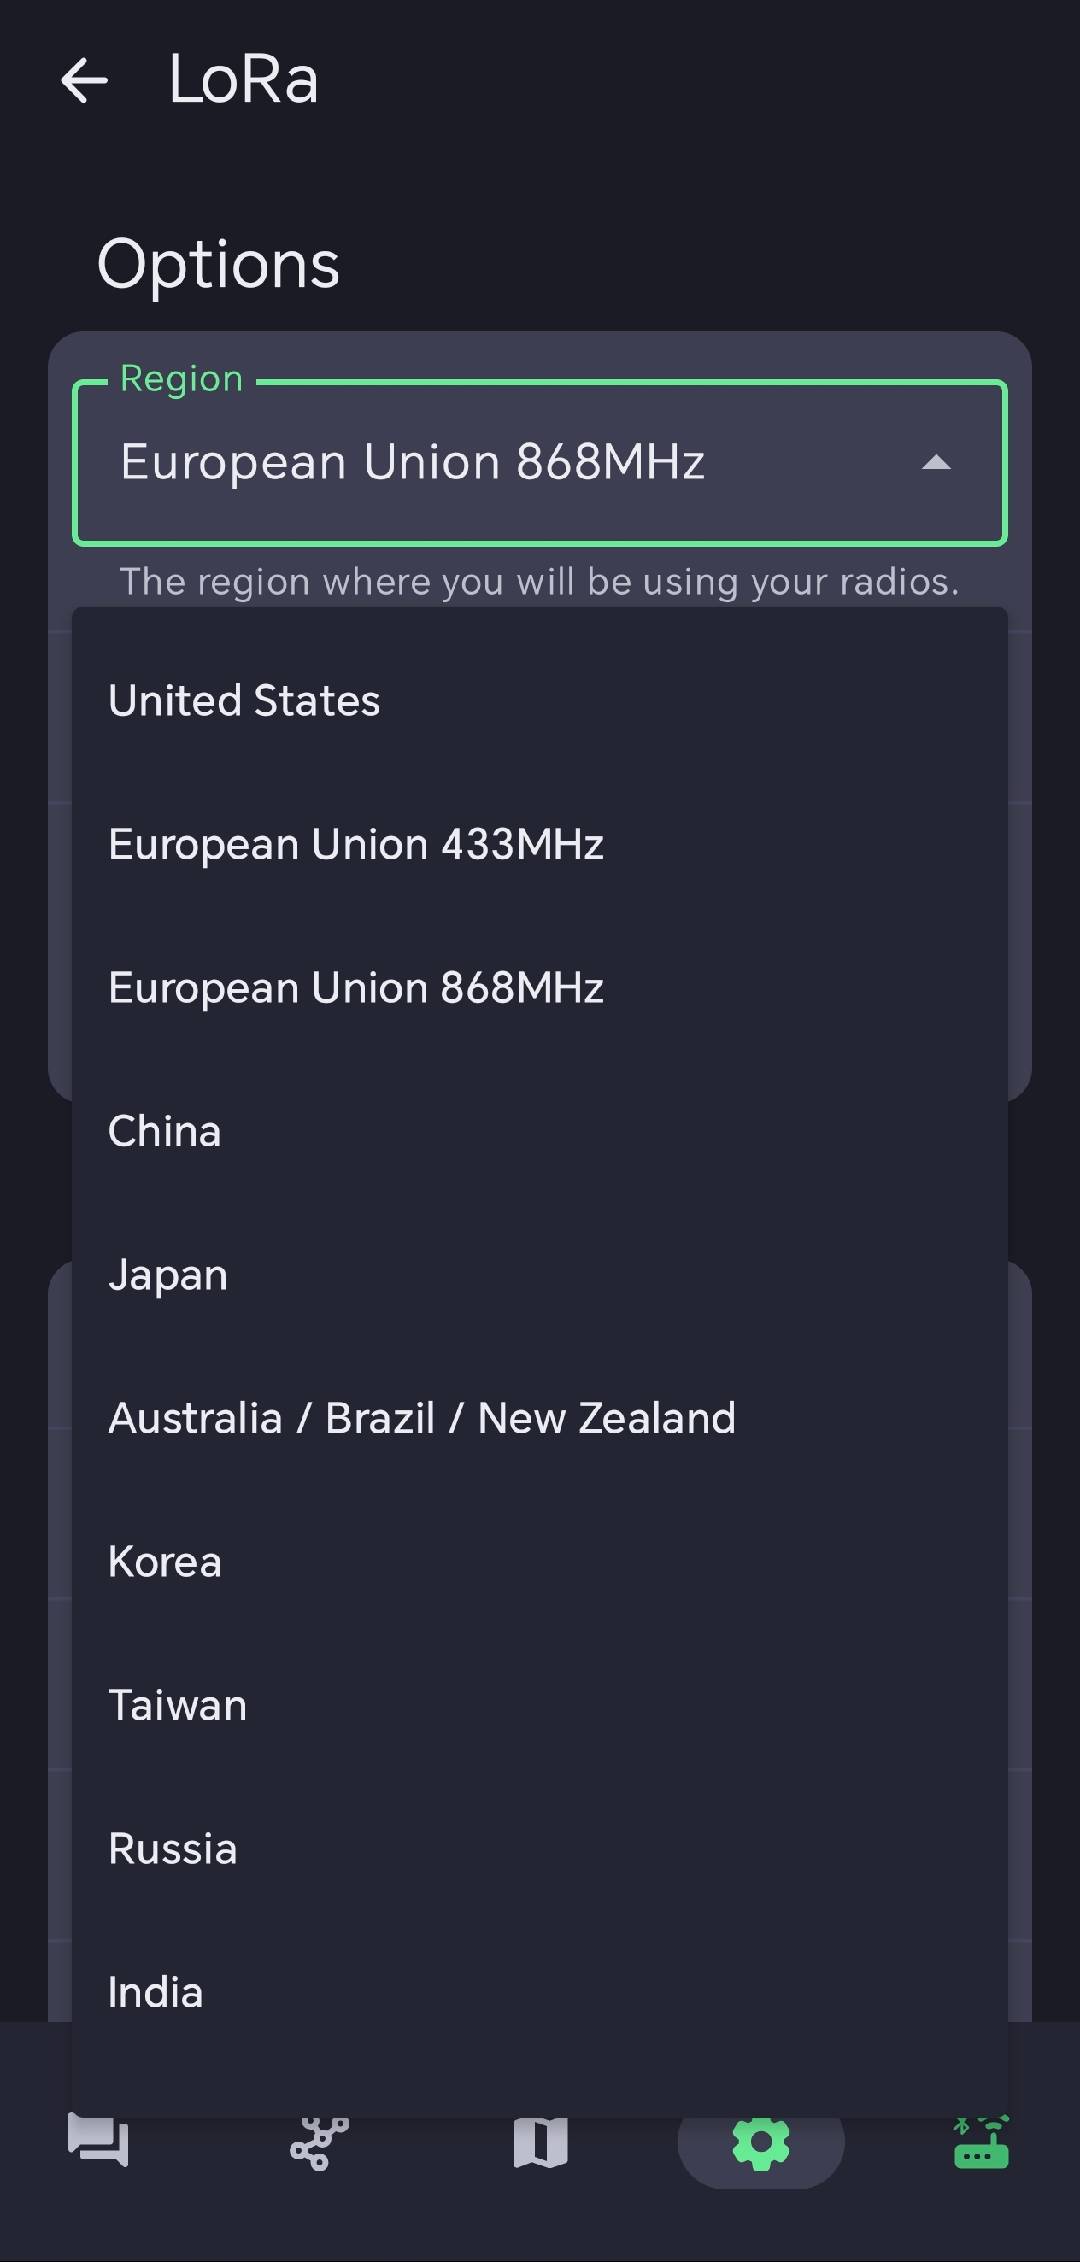
Now that you have set the LoRa region on your device, you can continue with configuring any LoRa Configs to suit your needs.
Map Usage
- Offline Map
- Online Map
Step1. Enable GPS
You need to enable GPS to get position. This can be configured directly on device by long pressing the position icon.
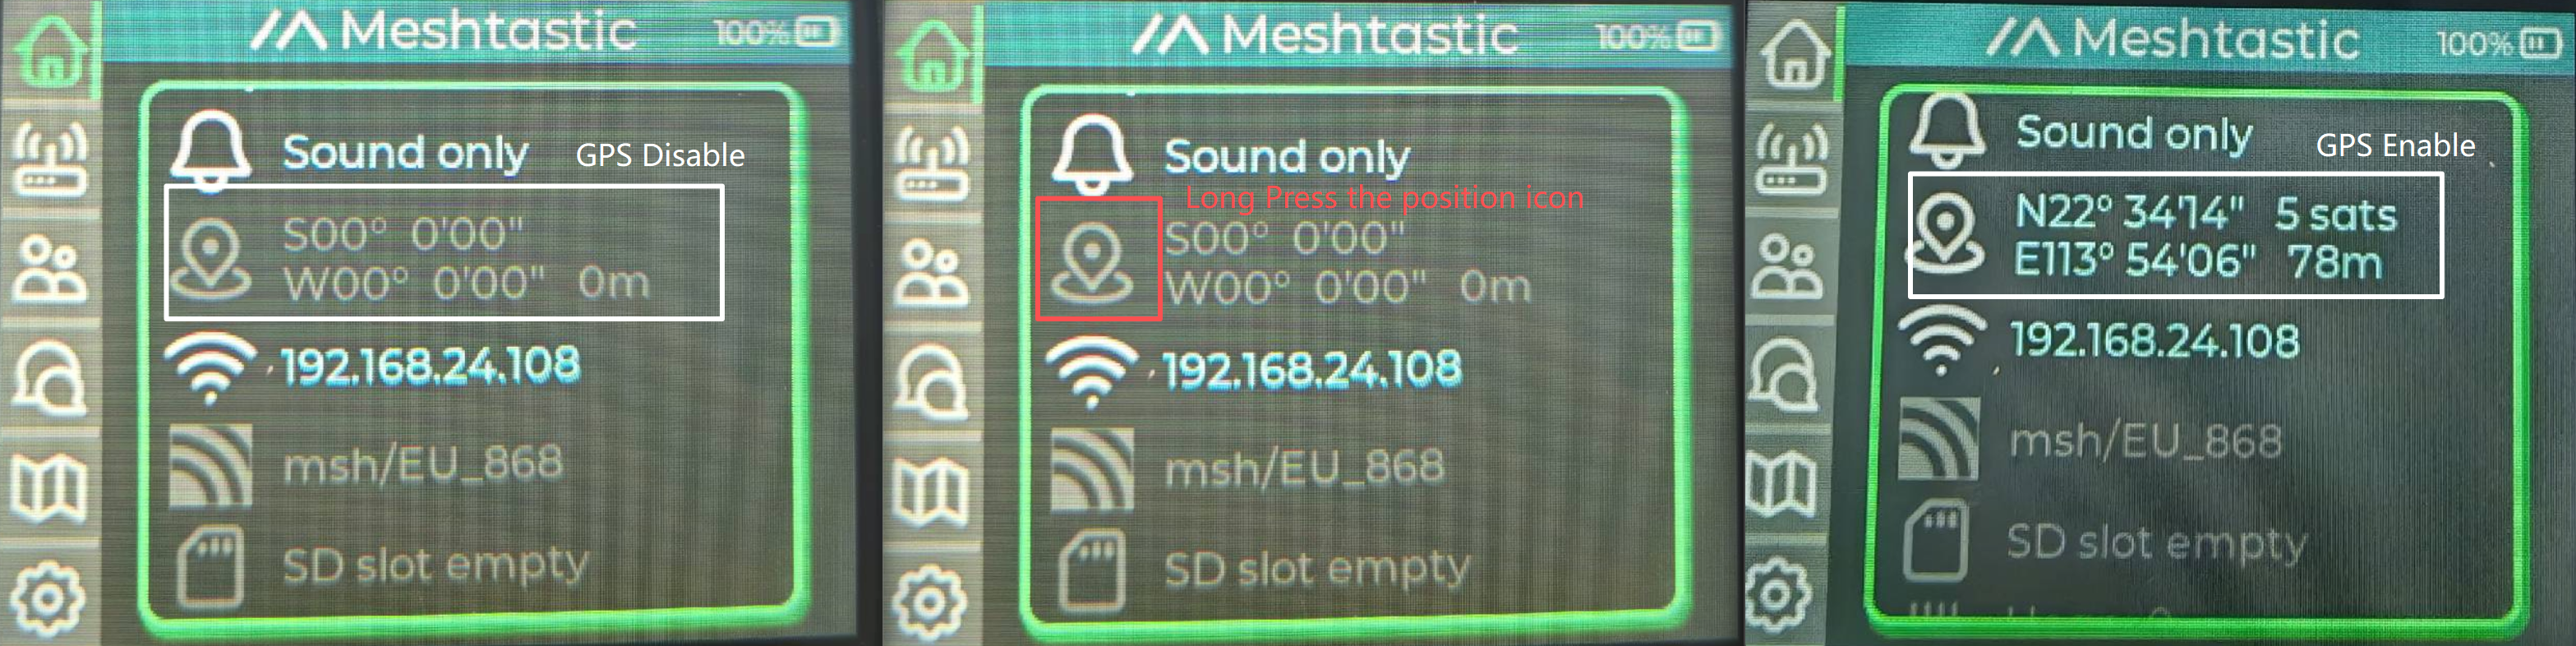
Also, you can configure it on your phone APP.
Step2. SD Card Preparation
You need to format and install map in your SD card. For detailedd SD card usage tutorial, please click here to view.
Step3. Install SD Card
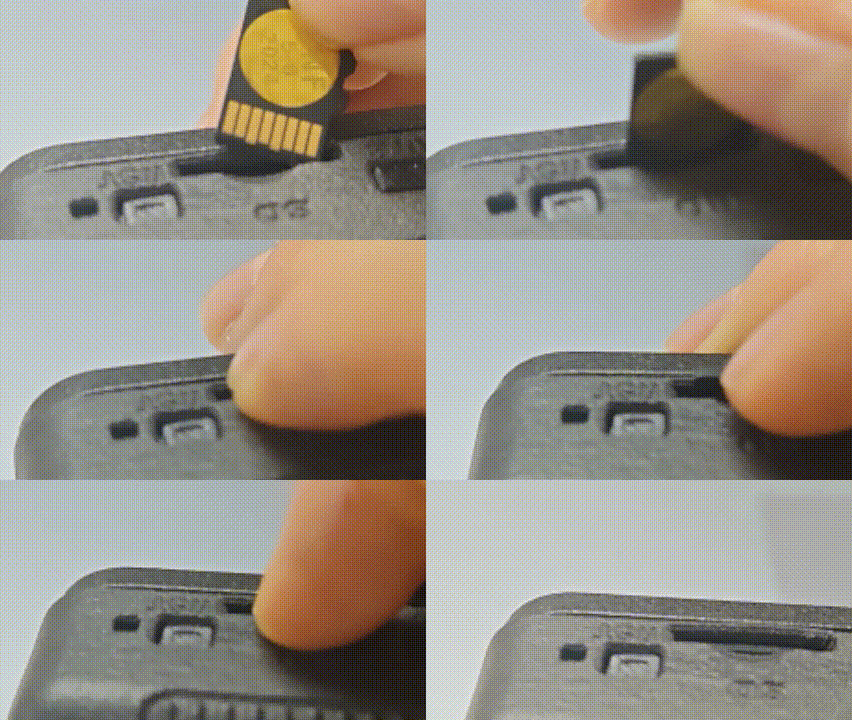
Step4. View Map
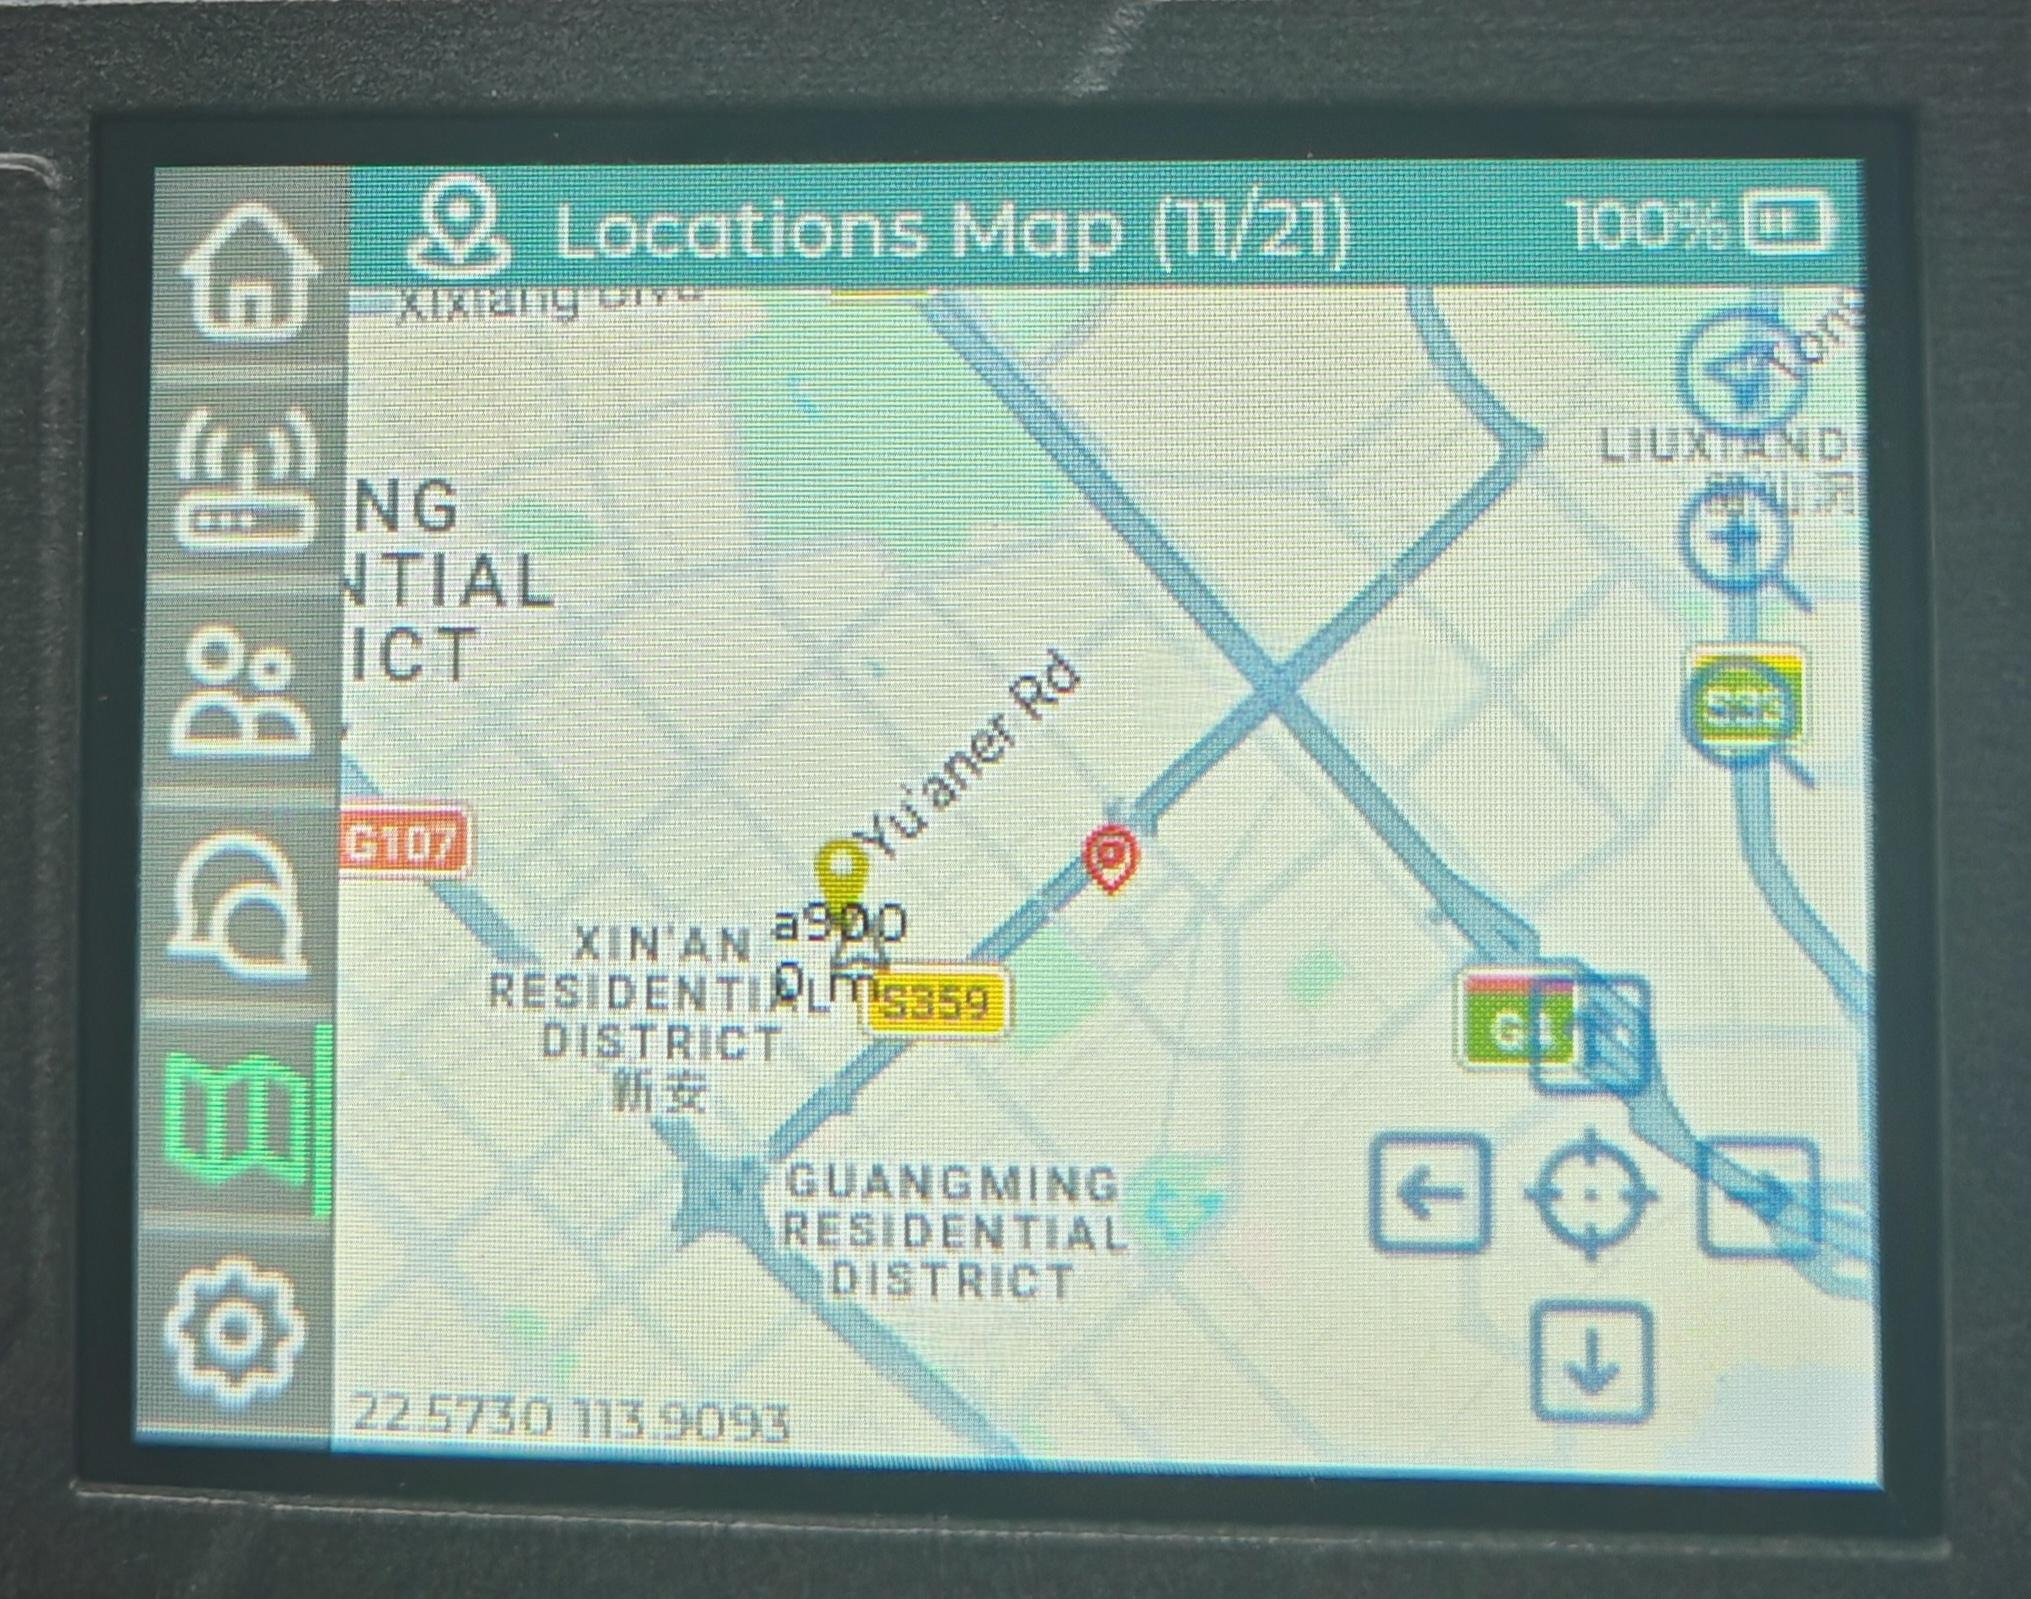
Waiting for the map to load. After successfully connecting to Wi-Fi and obtaining location, the device will display an offline map.
Step1. Enable GPS
You need to enable GPS to get position. This can be configured directly on device by long pressing the position icon.
Also, you can configure it on your phone APP.
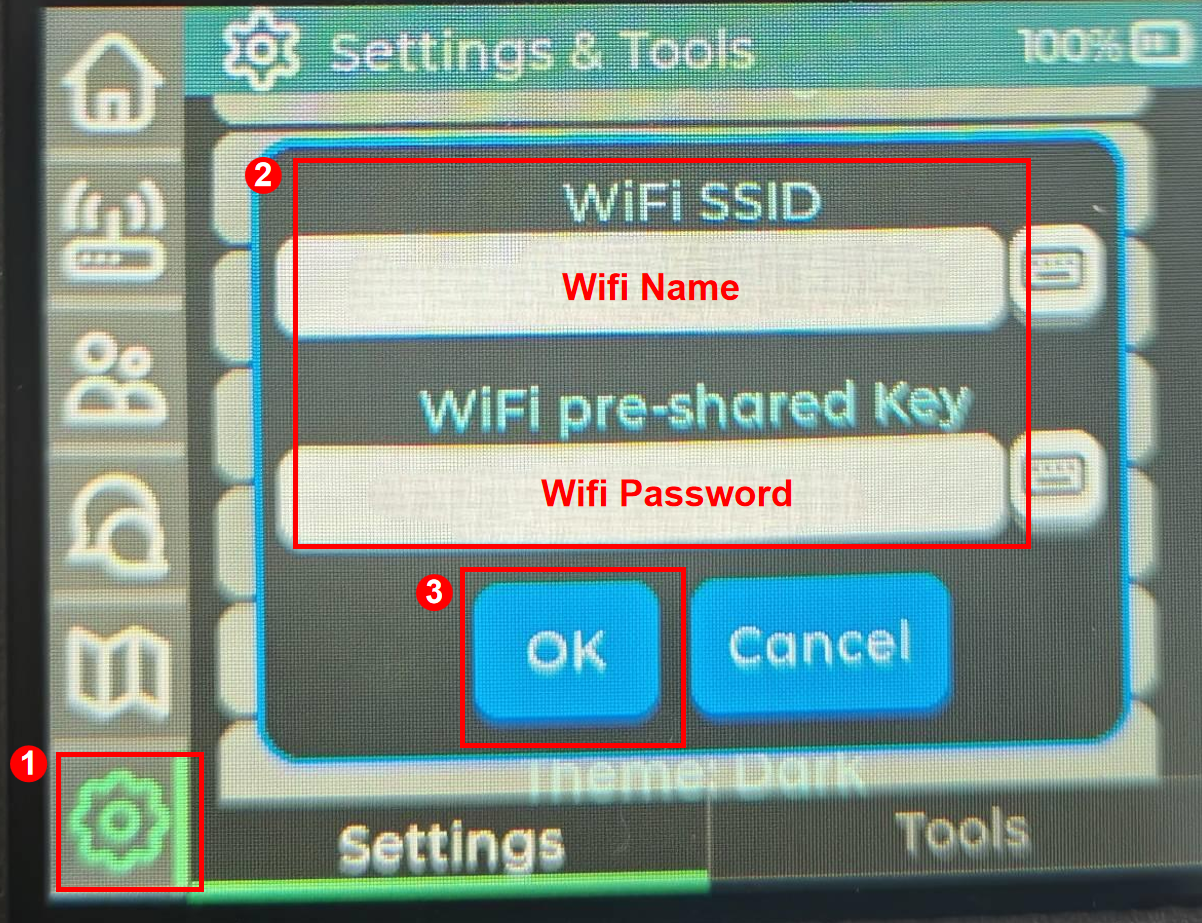
Step2. Set and enable Wifi
Set the Wifi name and password. This can be operated directly on device.
The connected Wifi should be 2.4G. 5G Wifi can not be used by the device.
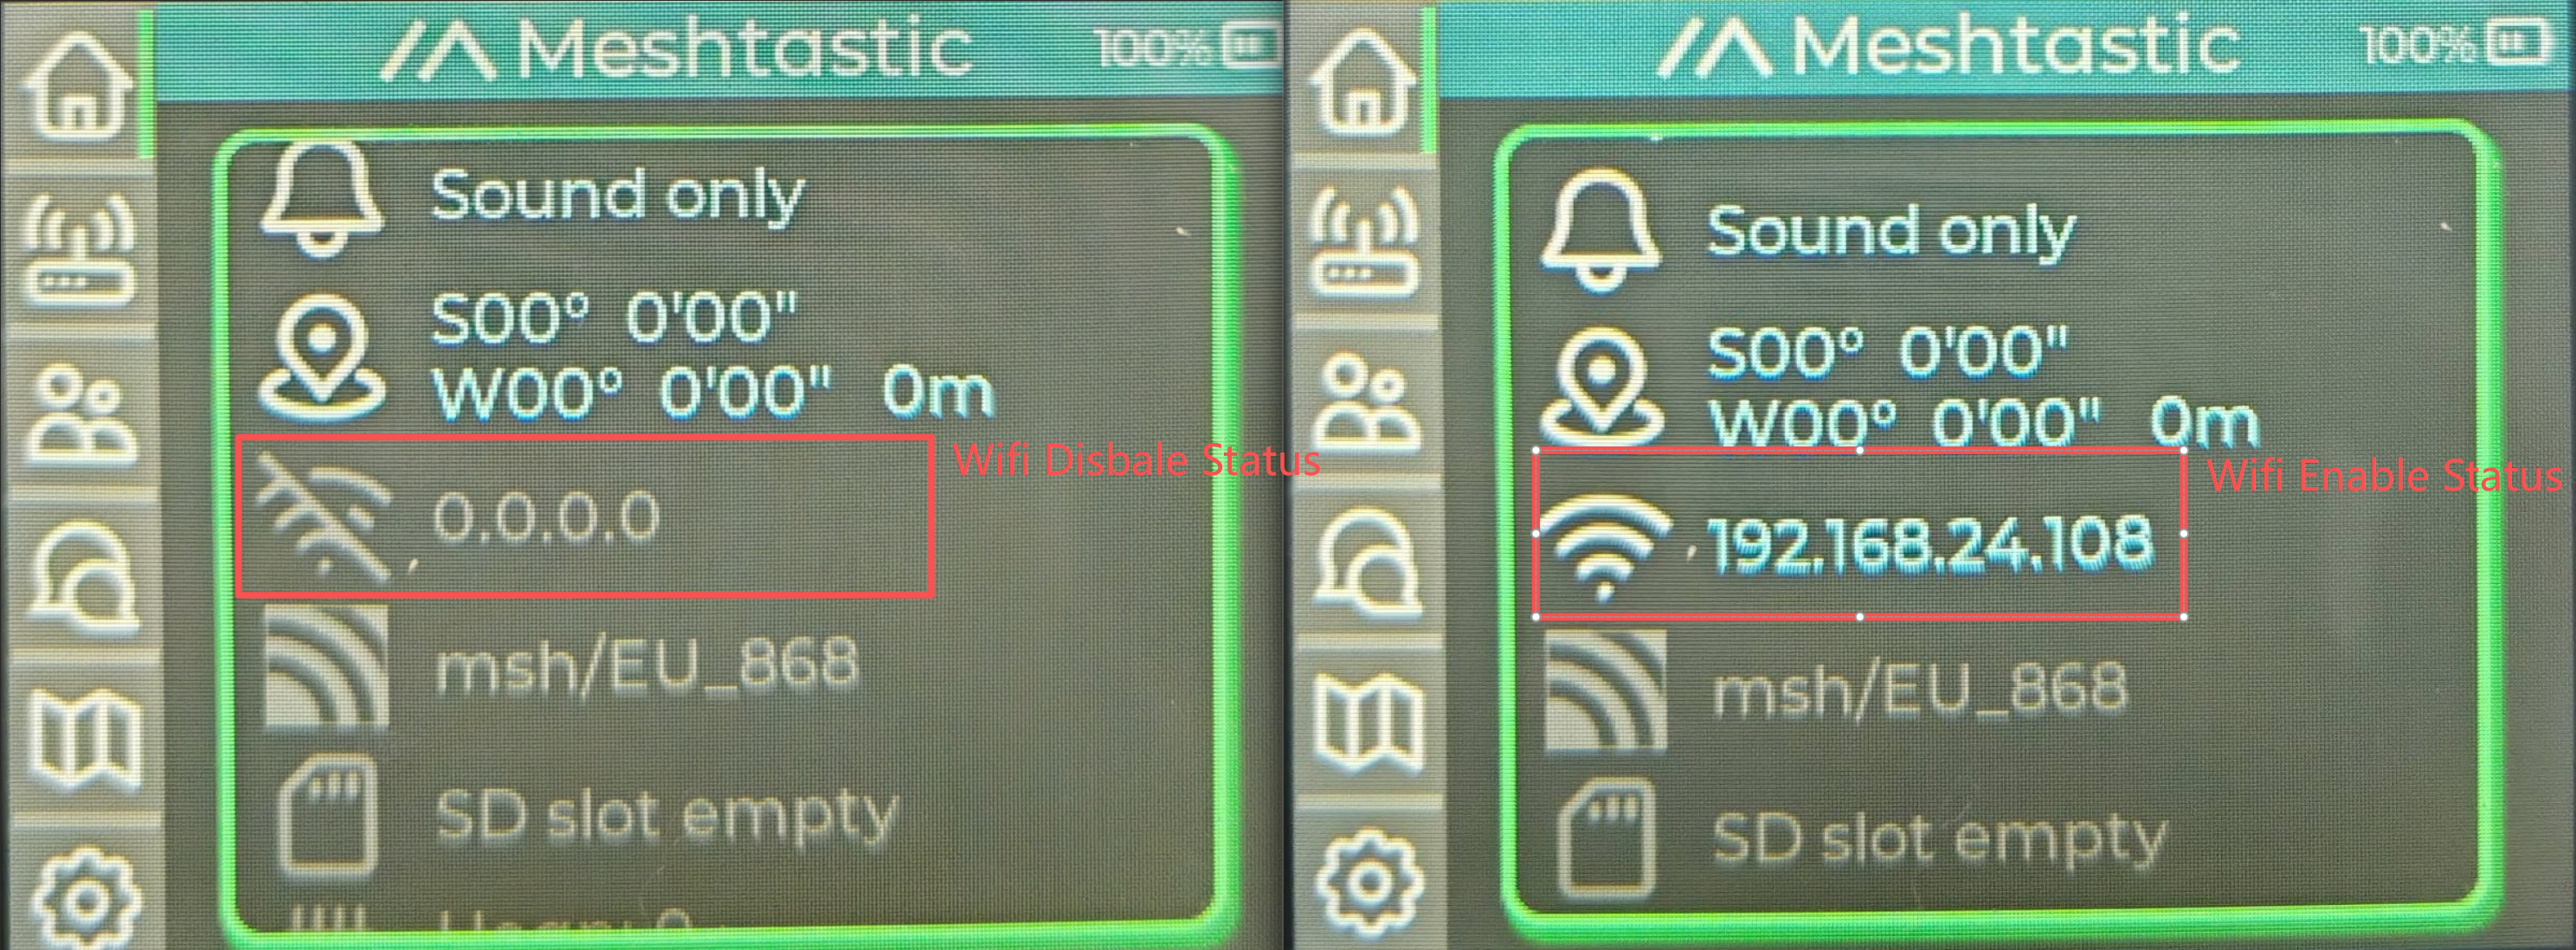
Wifi is disabled when the wifi ip is empty and the wifi icon is grey. Wifi is enabled when the wifi ip is displayed and the wifi icon is white.
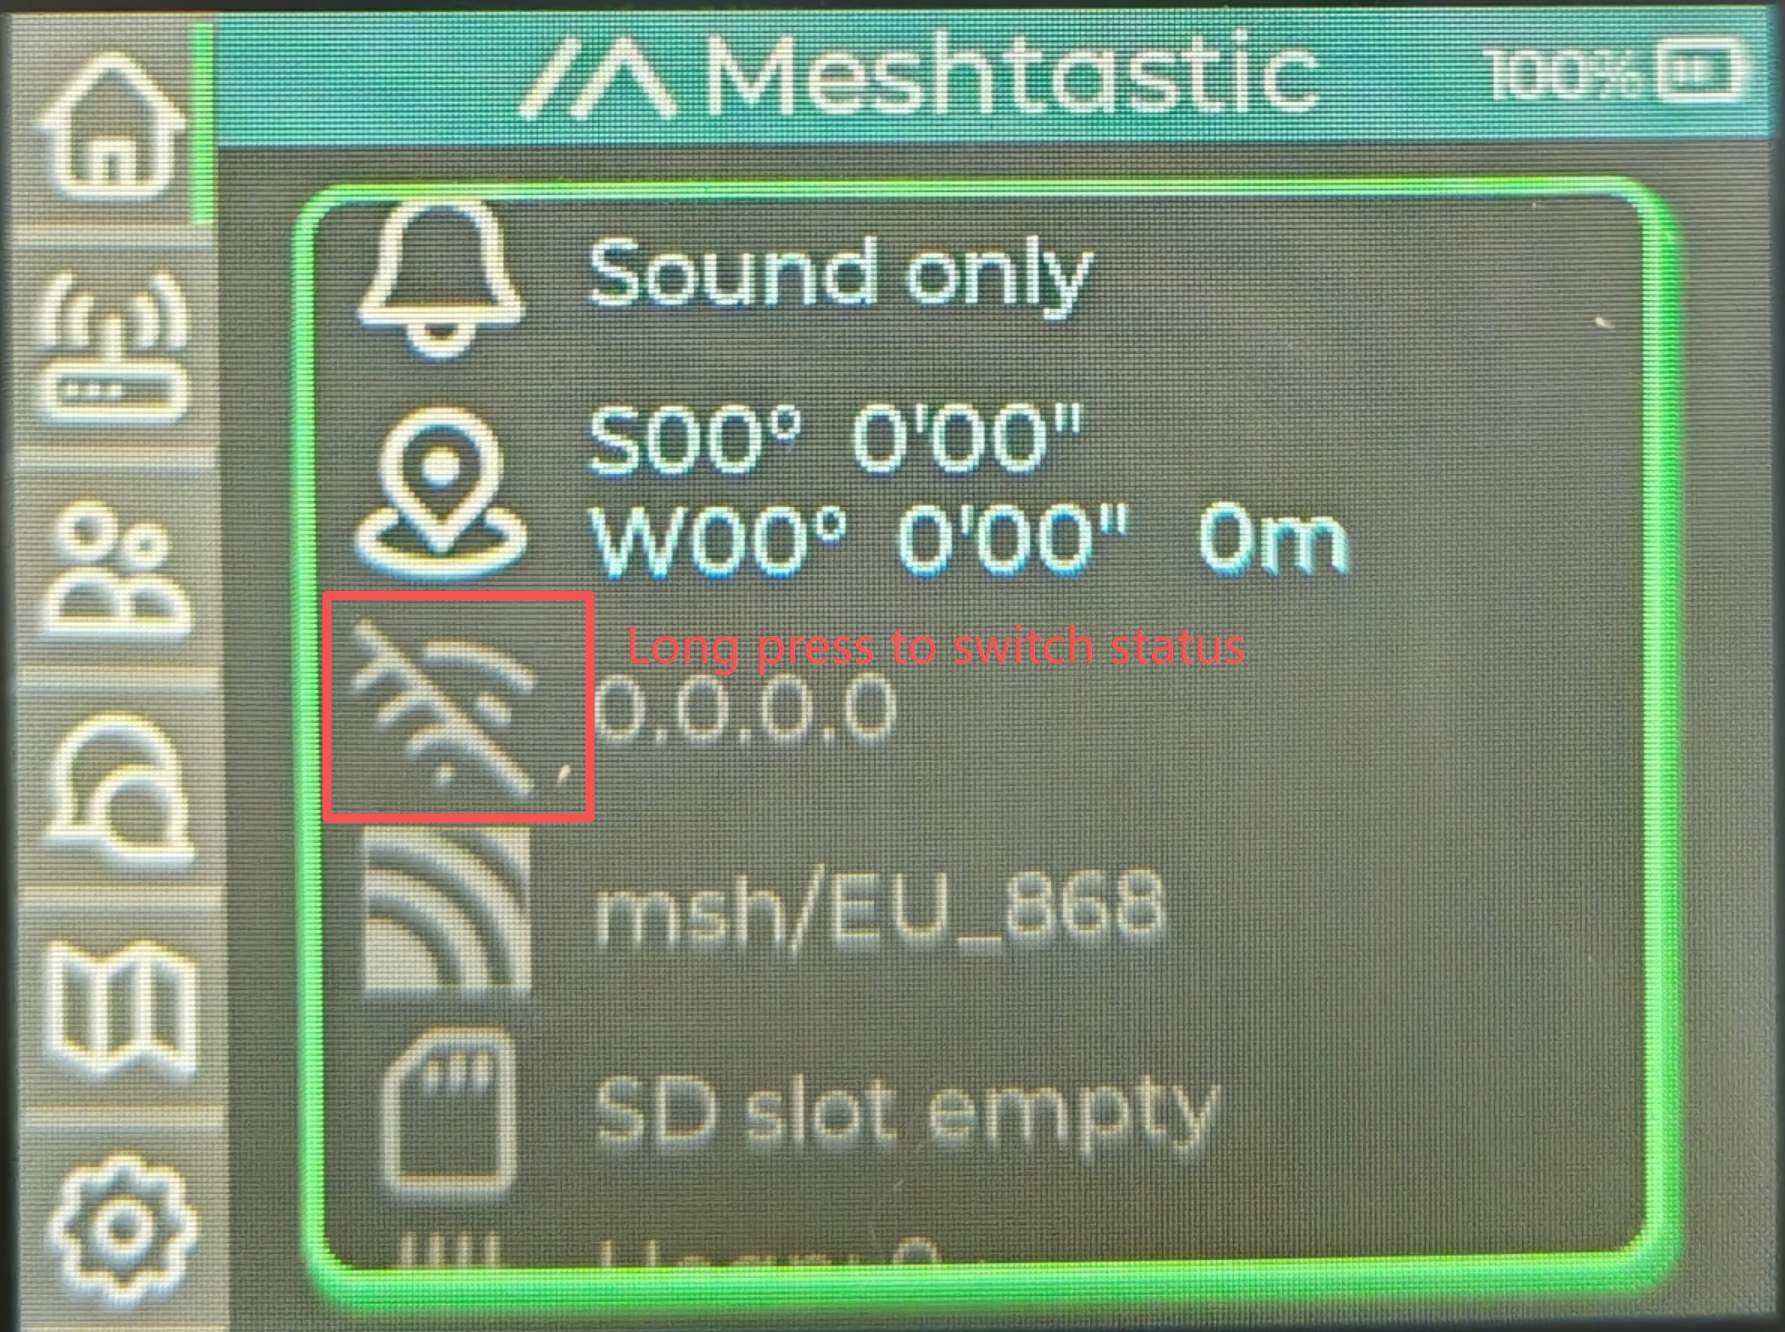
Long press the Wifi icon to switch status.
Step3. View map
Waiting for the map to load. After successfully connecting to Wi-Fi and obtaining location, the device will display an online map.
Advanced Usage
Connect via Website
If you want to text messages and communicate with other nodes in the website, you can connect the device to the Meshtastic Website now.
Step 1: Switch to BaseUI
Step 2: Open the Website
Click here to go to the webstite.

Step 3: Add the new device
Click "+ New Connection".

Choose serial method. Open the device manager to see which port the device is connected to. Choose that port in the pop-up window.

Your device will be shown in the list. Click to connect. If the connection succeed, you can see the device status directly on the website.

Configure GPS
You can adjust the update inerval and broadcast interval to obtain a more up-to-date location information.

For IOS, please turn on the Accurate Location. Otherwise, the positioning may deviate.

Sensor connection
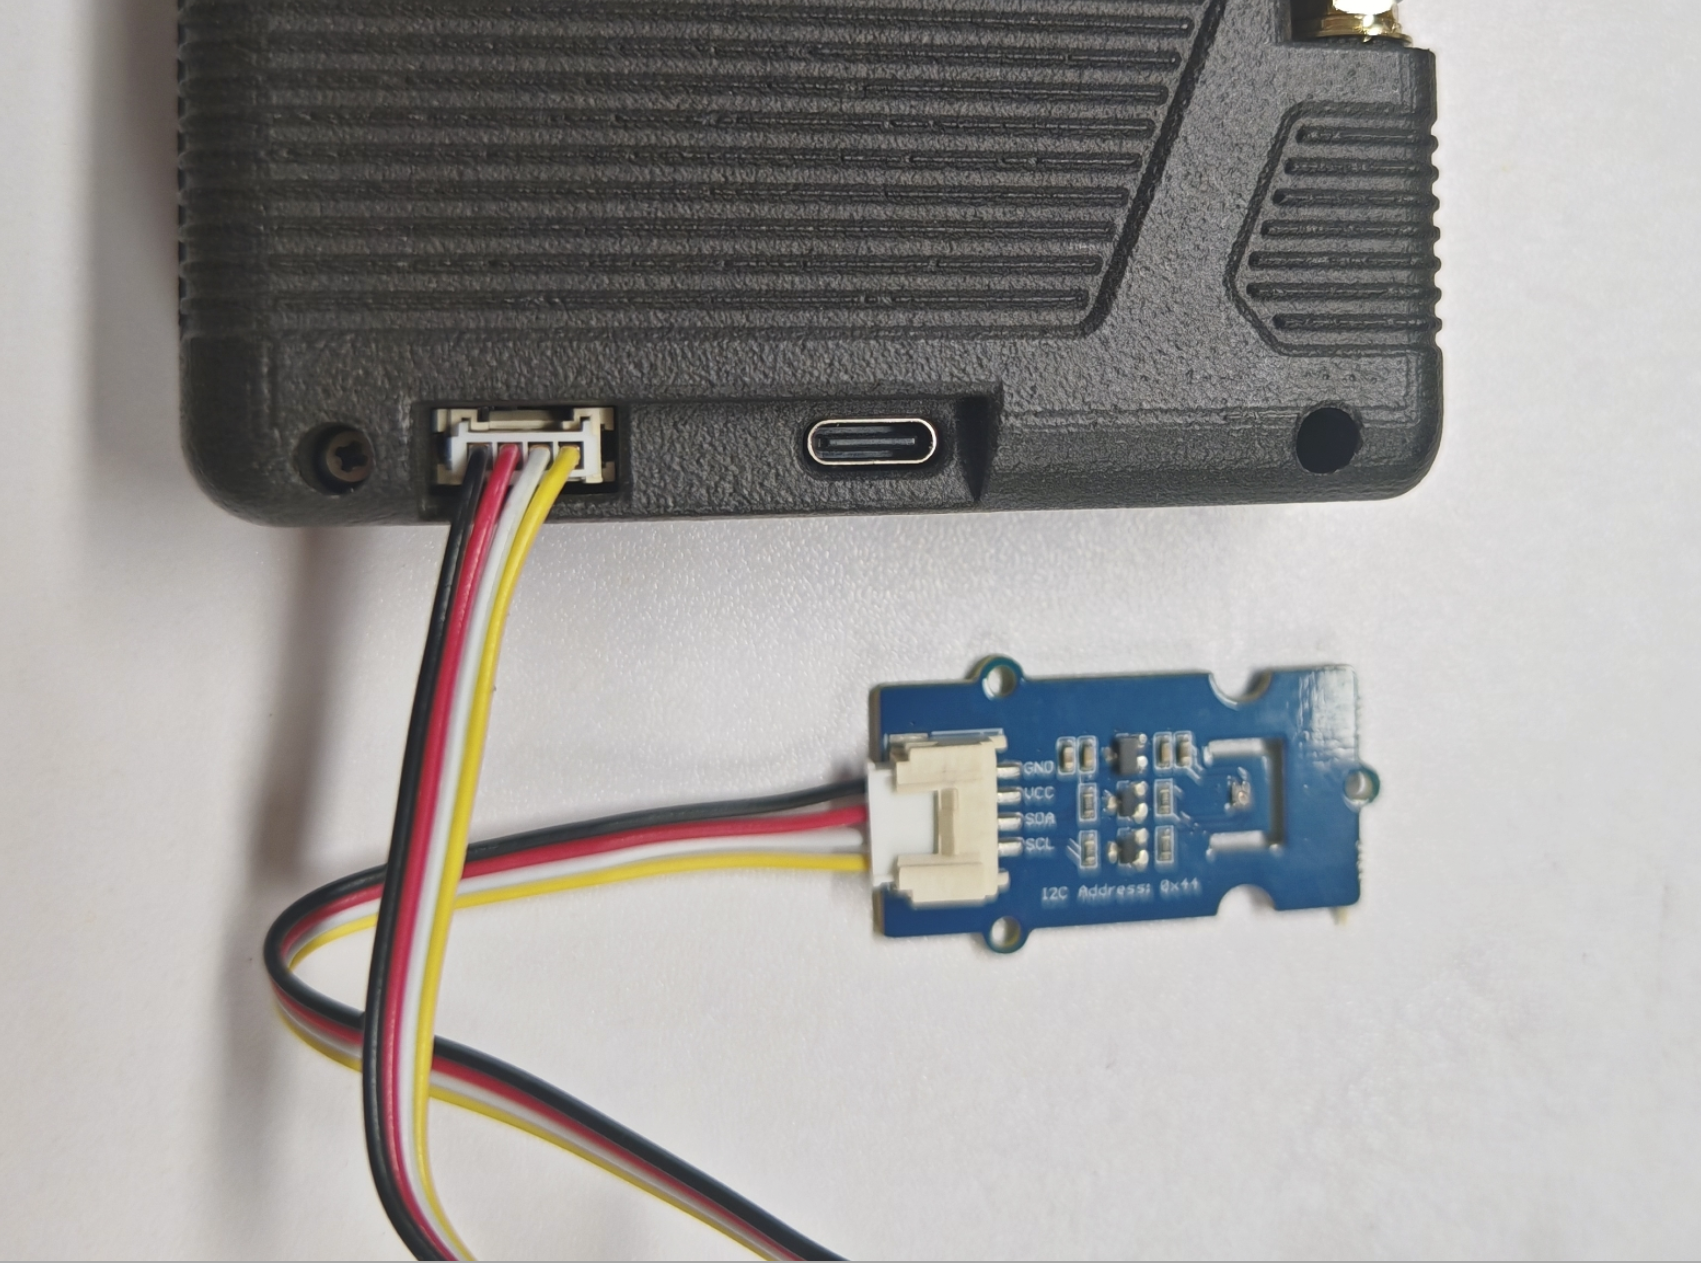
You can add sensor to the device via the grove interface. The following sensors have been verified to be compatible with the Grove interface on the device.
| Sensor type | Sensor Model | |
|---|---|---|
| Environmental Sensor | Pressure | BMP085 |
| Temperature | MCP9808 、PCT2075 | |
| Temperature & Humidity | SHT31/SHTC3/SHT4X、AHT10 | |
| Temperature & Humidity & Pressure | BME280 | |
| Other | Heart Rate & SpO₂ | MAX30102 |
| I2C Keyboard | CardKB | |
- IOS
- Android App
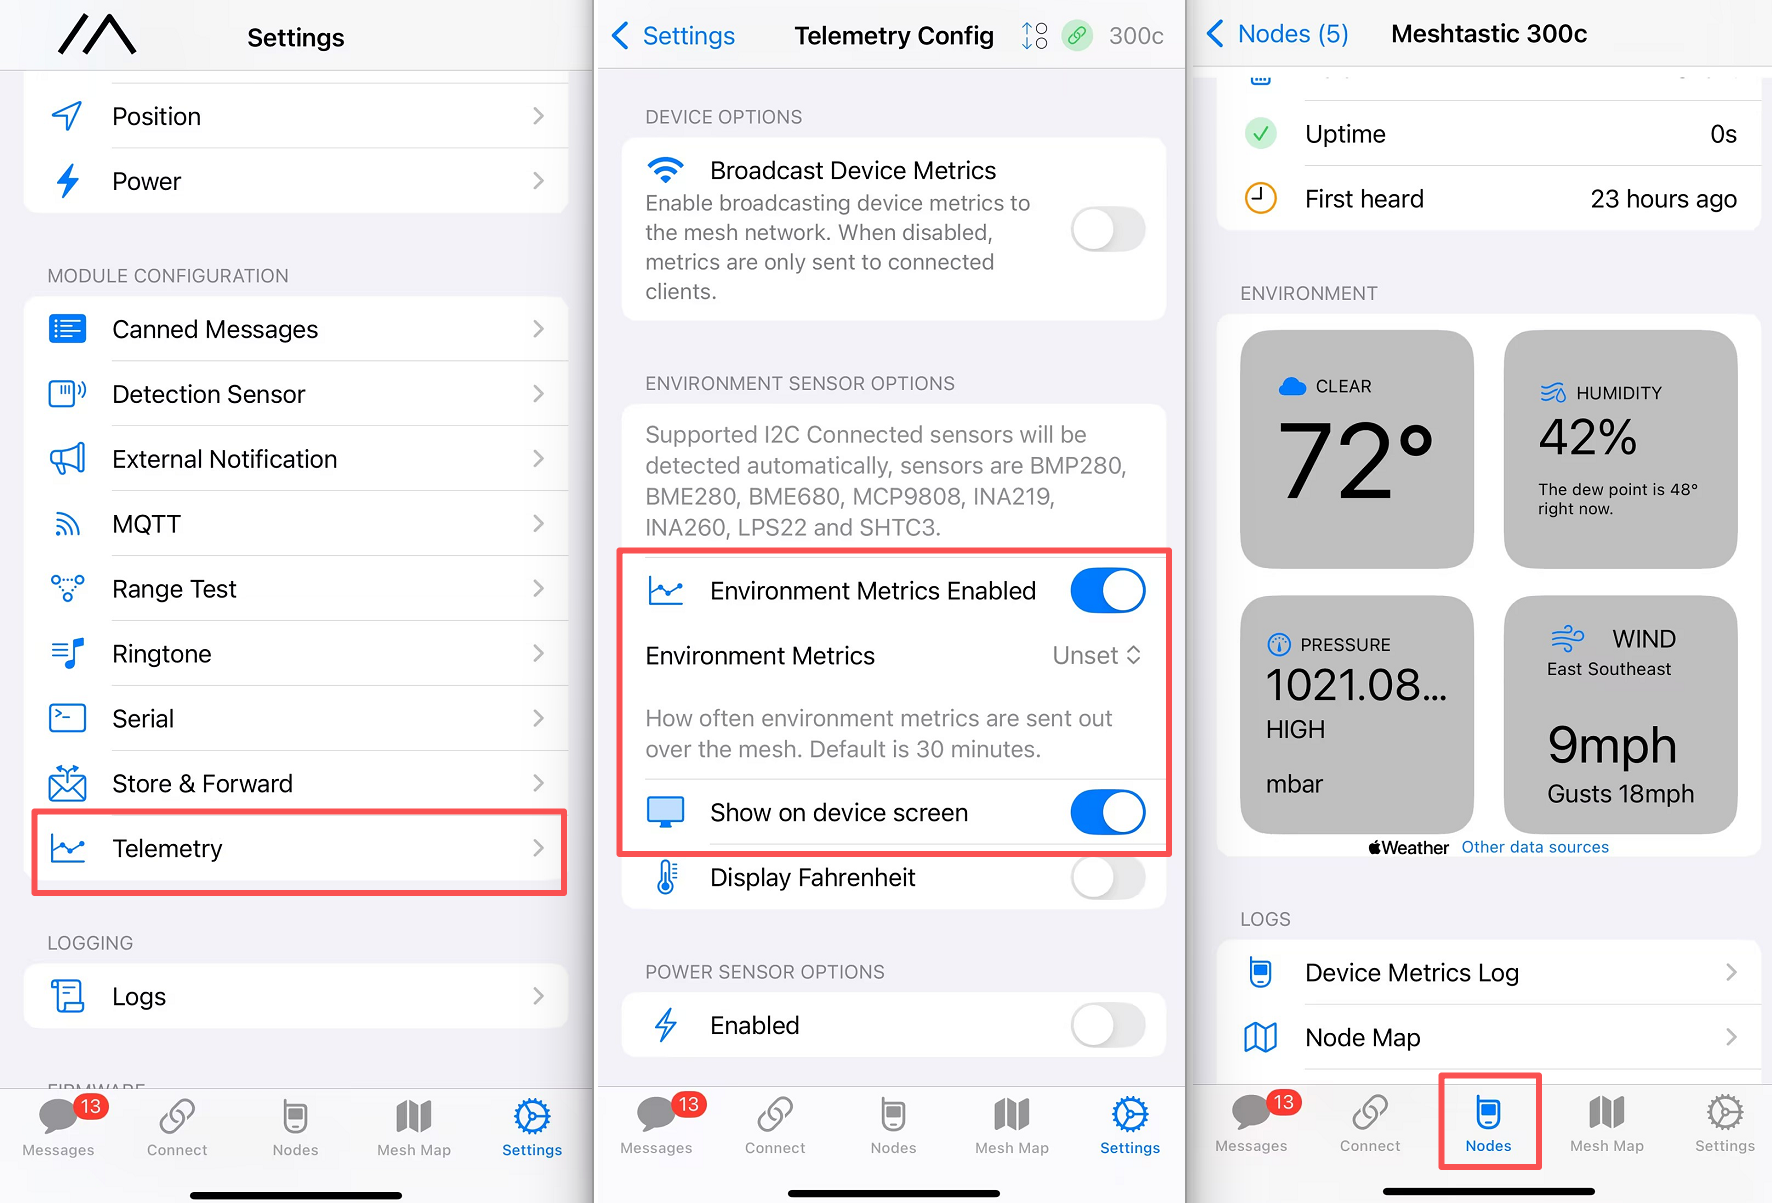
- Enable Telemetry to get sensor data. If you want to show sensor data on the OLED screen, enale
on screen
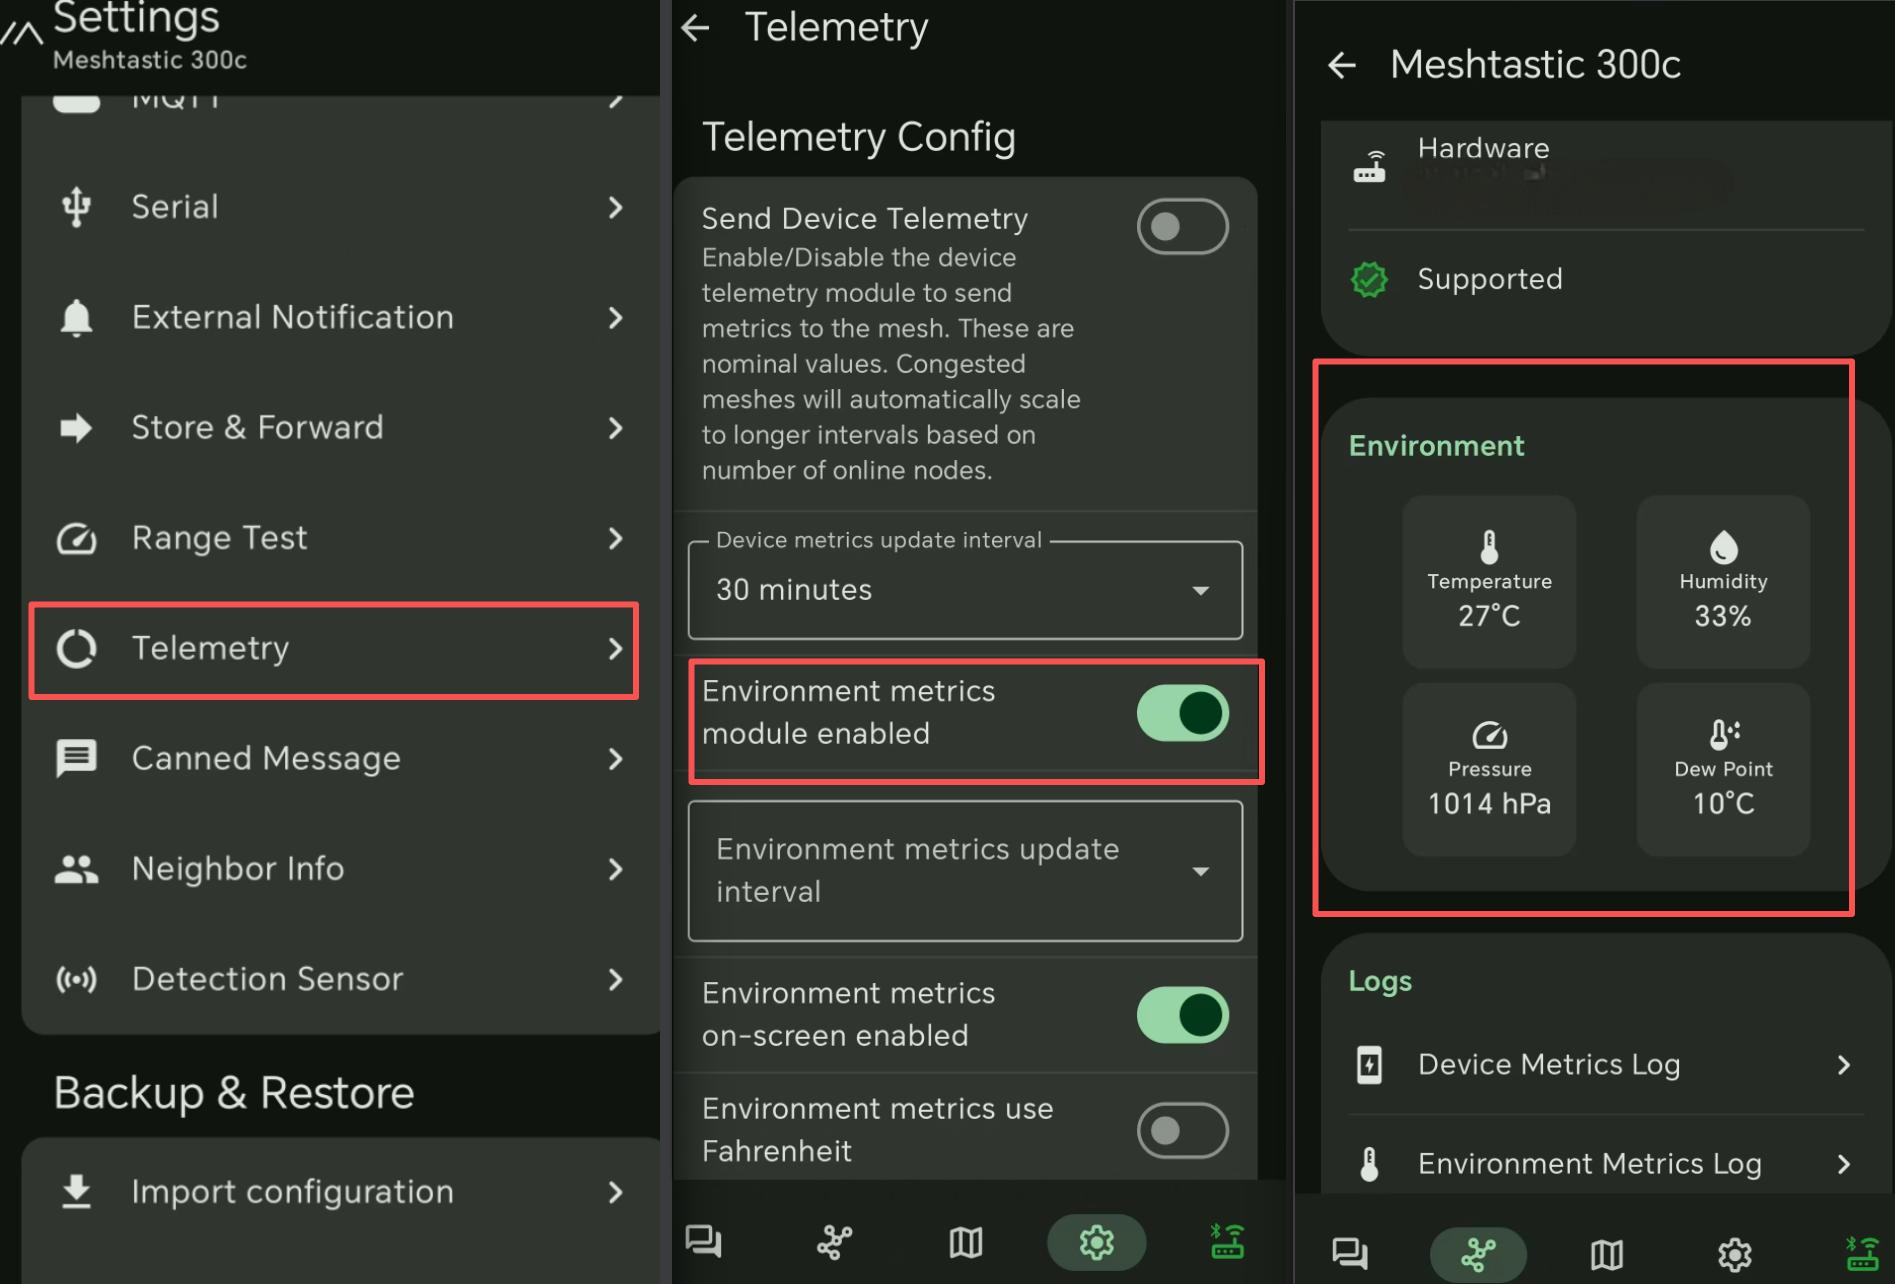
- Enable Telemetry to get sensor data. If you want to show sensor data on the OLED screen, enale
on screen
Other Function
- MUI
- BaseUI
- Menu Bar
- Home Page
- Node Page
- Channel Page
- Message Page
- Setting Page
- Tool
| Interaction Method | Effect |
|---|---|
| Long press home icon | Resynced |
| Long press node list icon | Enters node filter page |
| Long press settings icon | Screen turns off |
| Interaction Method | Effect |
|---|---|
| Click Message icon | Navigates to the message page |
| Click Node icon | Navigates to the node page |
| Click Clock icon | Real Time/Uptime Switch |
| Long press LoRa icon | LoRa TX off/on |
| Long press Notification icon | Notification enabled/Disabled |
| Click Notification icon | Sound/Banner/Sound & Banner Switch |
| Llong press GPS icon | GPS ON/Off |
| Long press WiFi icon | WiFi ON/Off |
| Long press MQTT icon | MQTT ON/Off |
| Click QR code icon | Displays the device QR code |
| Interaction Method | Effect |
|---|---|
| Click a node | Displays detail Information |
| Long press a node | Enters the private chat |
| View a node Position | Displays the node location in map |
Long press a channel to disable/enable Notification. Choose and click a channel to enter chat window.
Long press a chat to delete it. Choose and click a chat to enter chat window.
| Interaction Method | Effect |
|---|---|
| User Short Name | Change device short name |
| User Long Name | Change device long name |
| Screen Pin | Set password for device startup |
| Configuration Pin | Set password for configuration changes |
| Region | Configure LoRa region |
| Modem Preset | Configure LoRa preset |
| Channel | Edit channel |
| Device Role | Configure role |
| WiFi | Set Wifi SSID and password |
| Screen Timeout | Set screen timeout |
| Screen Brightness | Set screen brightness |
| Theme | Switches teame between dark and light backgrounds |
| Screen Calibration | Calibrate screen |
| Language | Switch displayed language |
| Factory Reset | Configuration restored to defaults |
| NodeDB Reset | Node data cleared |
| Clear Chat History | Chat history cleared |
| Reboot (green icon) | Device reboots |
| Turn Off (red icon) | Device powers off |
| Interaction Method | Effect |
|---|---|
| Mesh Detector | Displays detected active nodes |
| Signal Scanner | Displays RSSI and SNR of the selected node |
| Trace Route | Displays the routing path of the selected node |
| Statistic | Displays packet decoding information |
| Packet Log | Show device log |
- Home
- Node
- Position
- LoRa
- System
| Interaction Method | Effect |
|---|---|
| Select "Sleep Screen" | Turns off the display temporarily; wakes with user button press |
| Select "Send Position" | Manually announces device position to nodes on the mesh (speeds up discovery) |
Nevigate to "Node Action"
| Interaction Method | Effect |
|---|---|
| Select "Favorite" | Marks the selected node as a favorite |
| Select "Trace Route" | Performs a trace route to the selected node |
| Interaction Method | Effect |
|---|---|
| Select "GPS Toggle" | GPS on/off |
| Select "GPS Format" | Switches PS format |
| Select "Compass Headings" | Toggles between Dynamic, Fixed, and Freeze Heading for "N" |
| Select "Compass Calibrate" | Starts a 30-second compass calibration routine |
| Interaction Method | Effect |
|---|---|
| Select "LoRa Region" | Select LoRa region |
| Select "Device Role" | Switches between device Role |
| Select "Radio Preset" | Chooses from available presets |
| Interaction Method | Effect |
|---|---|
| Select "Notifications" | Enables / disables beeps |
| Select "Bluetooth Toggle" | Enables / disables Bluetooth |
| Select "Reboot/Shutdown" | Manually reboots or powers off the device |
FAQ
Device can not pair with Phone via BLE
- While using MUI, please first switch to Bluetooth Pairing mode before pairing with your ohone. Or else your phone can not recognize your device. Go to
Settingpage, clickReboot/Shutdown, then click theBluetooth icon.
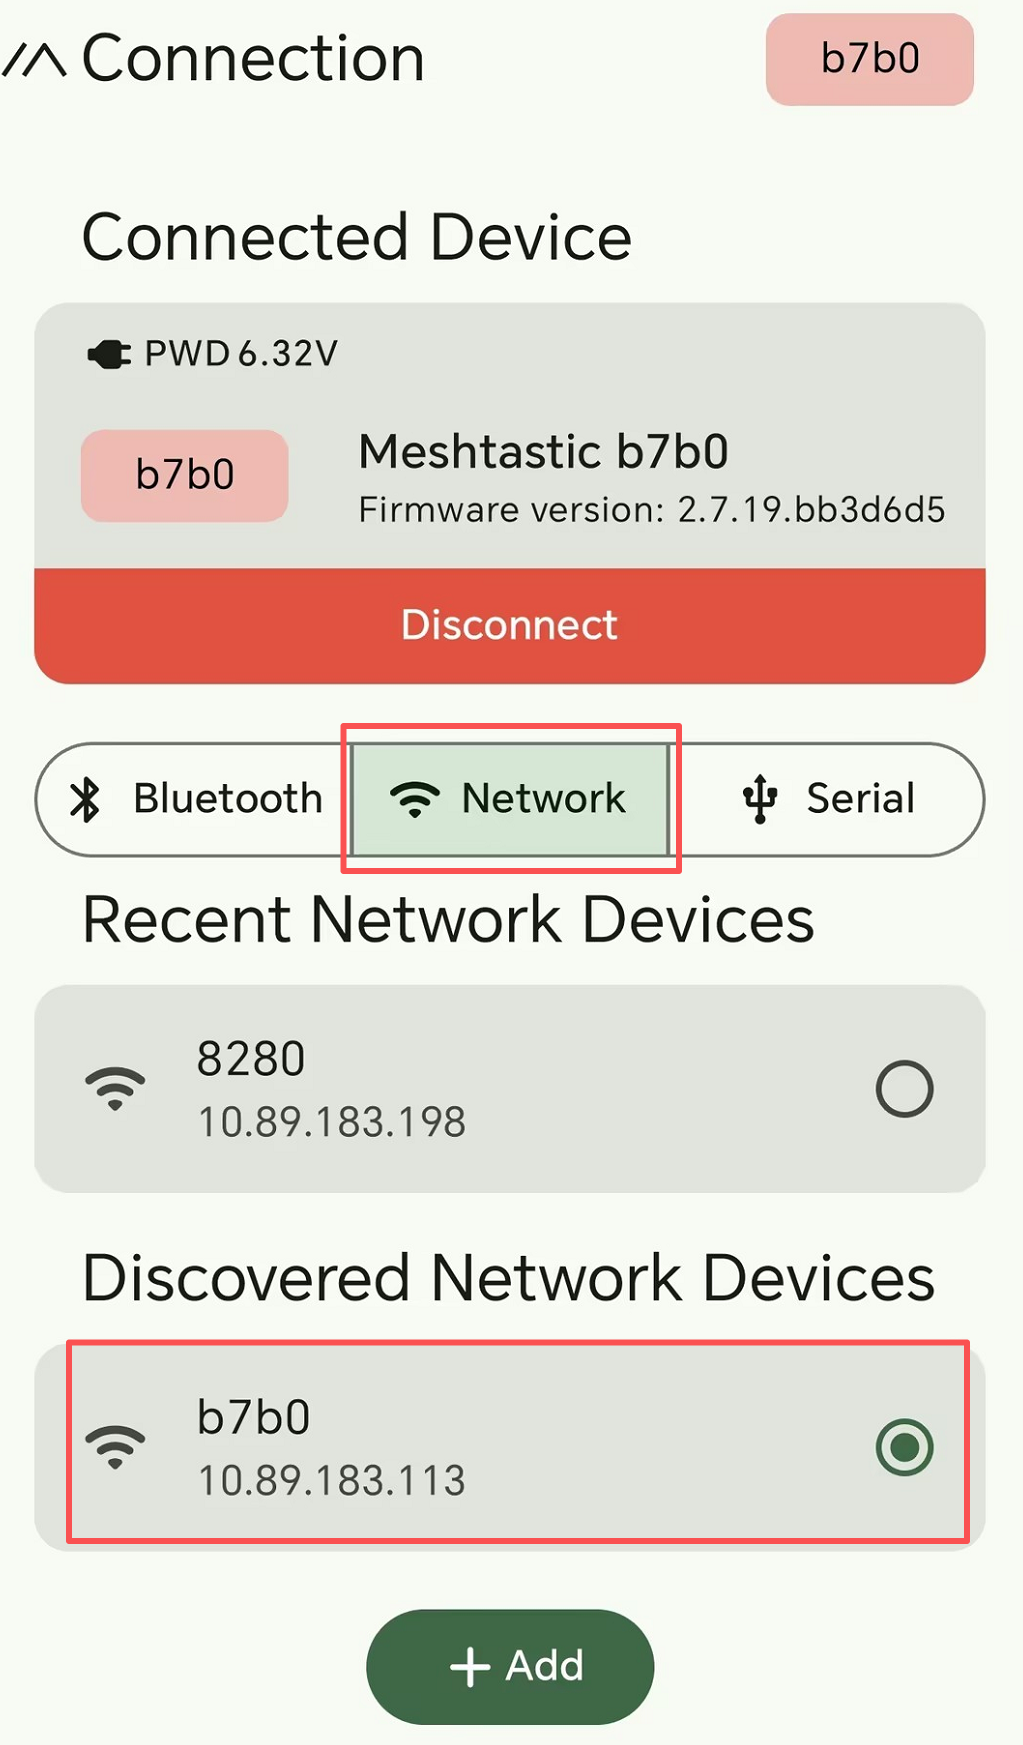
- While using BaseUI, after setting and enabling Wifi, you can only connect your device with your phone APP via Network.
Device can not connect with my Wifi
-
Please make sure you are connecting a
2.4g Wifi. The devcie can not pair with 5G Wifi. Usually phone hot spot can be adjusted to be 2.4g in phone setting. So you can test your phone hot spot first. -
Please enable Wifi after setting Wifi name and Wifi password.
Wifi is disabled when the wifi ip is empty and the wifi icon is grey. Wifi is enabled when the wifi ip is displayed and the wifi icon is white.
Device automatically turn off
Description
- After the device turning on, it will turn off or reboot automatically after a while.
- The serial port log ran for a while and then stopped.
This is possibly caused by manually and forcely rebooting or turning off the device when the device is in the following states:not finishing the messages transmission process, being configured......
Troubleshoot
You need to perform a flash erase, and the re-flash the latest firmware.
Factory Reset
If you want to restore to the default settings, you can do the factory reset. There are two methods for you to do the factory reset.
- Configure on MUI
- Configure on Phone
Go to Setting page, click Configure Reset, choose Factory Reset and then click the OK.

The device will reboot with default configuration.
Click the Factory Reset Button on the App. The device will reboot with the factory configuration automatically.

Direct Message Fail
NodeDB Reset
NodeDB is the local database that stores information about nodes discovered in the current Mesh network. If you encounter a situation where you can't communicate with a certain node, it might be because your nodedB has stored outdated information for that node. You will need to update it.
- Configure on MUI
- Configure on Phone
Go to Setting page, click Configure Reset, choose NodedB Reset and then click the OK.
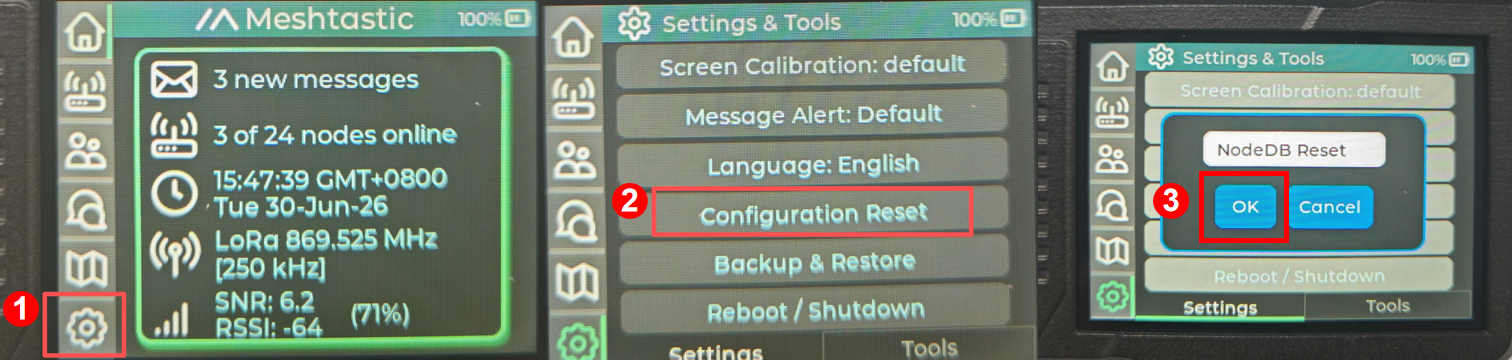
The device will reboot.
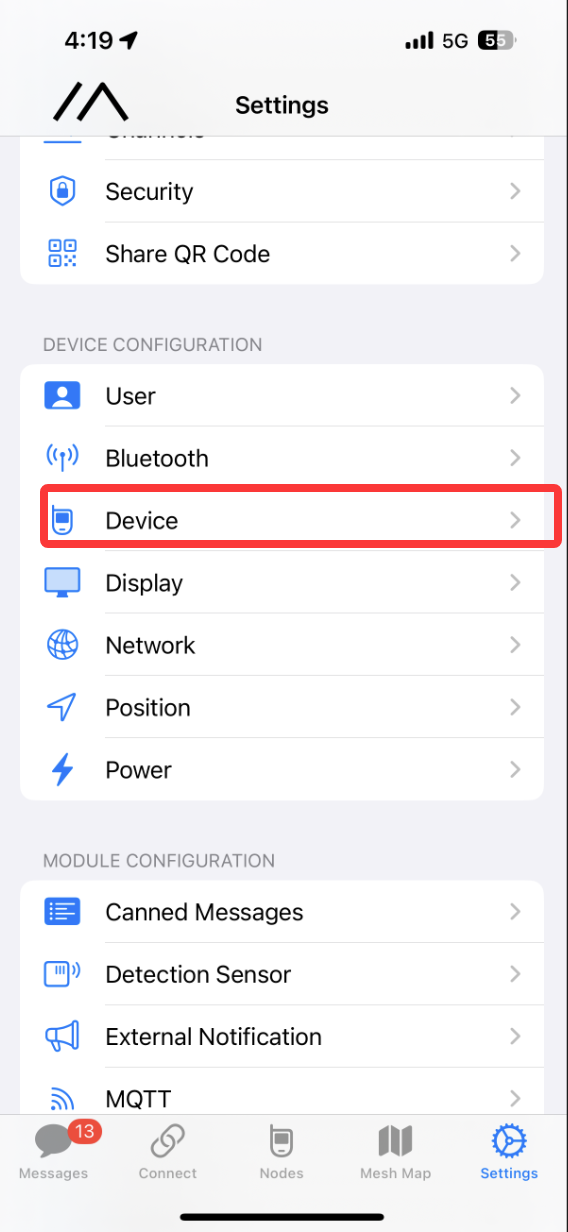
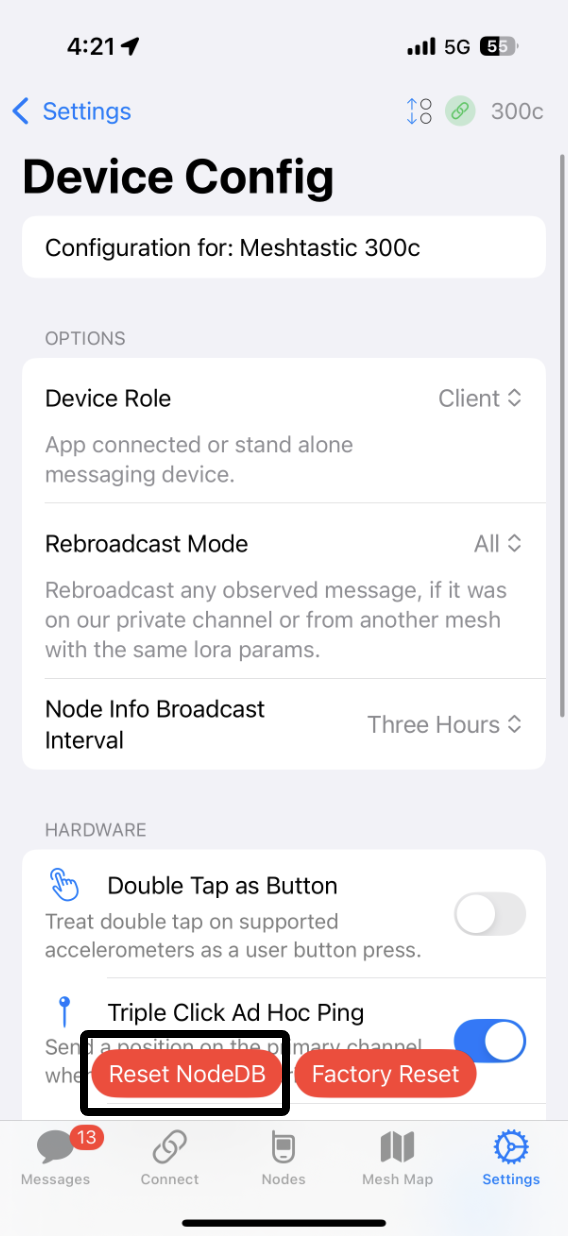
Open the app and connect to the target device. Go to Settings->Device->Device Config->Reset NodeDB.
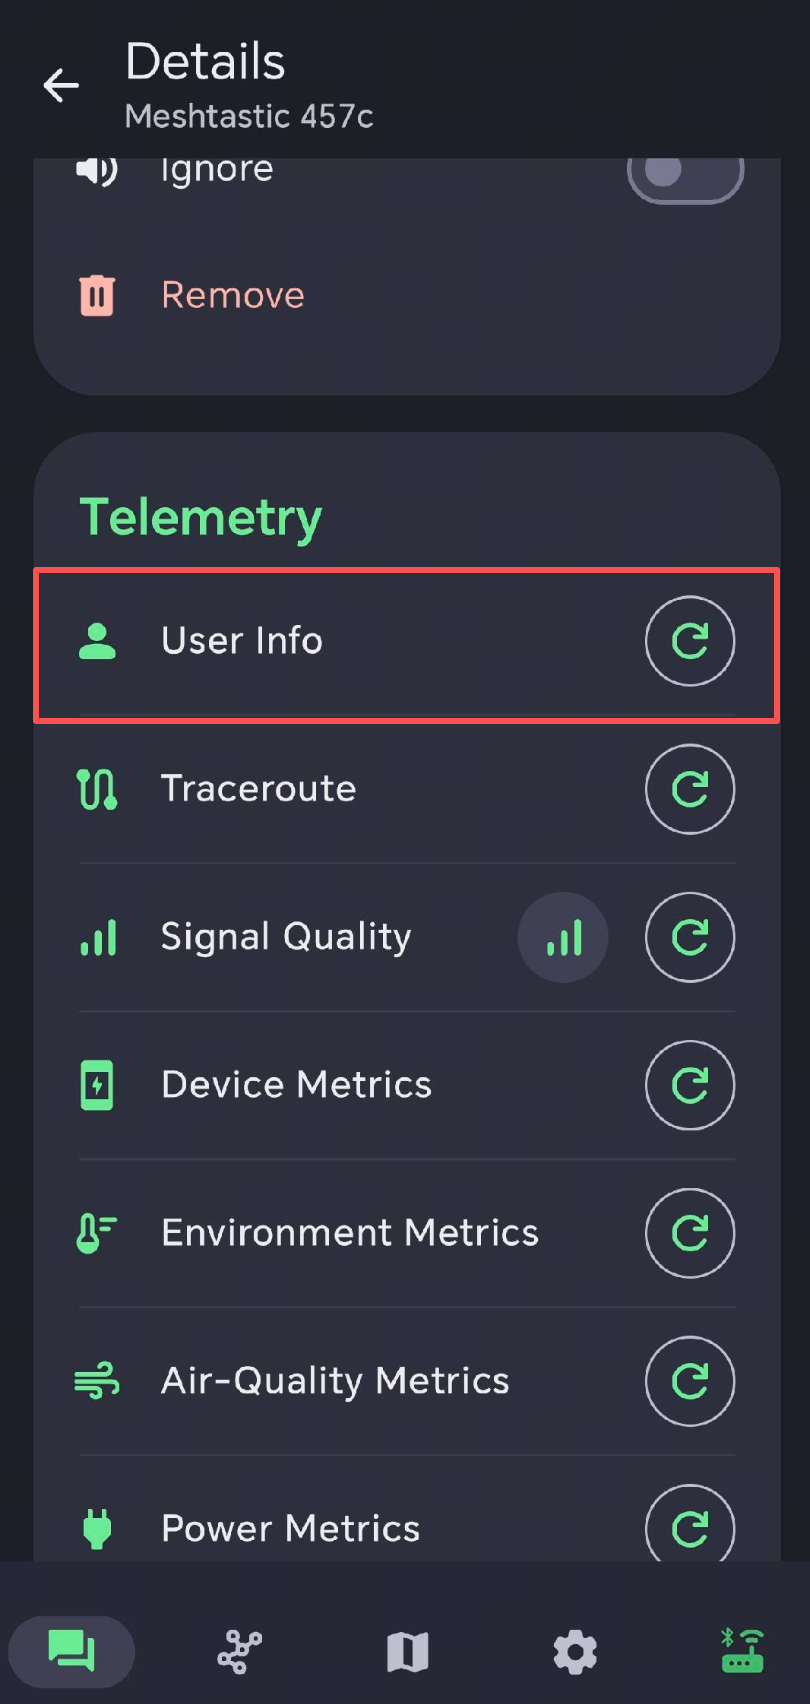
Exchange User Info
Each node will periodically send its own node information, enabling other nodes in the mesh to "see" and "recognize" it. Two nodes need to exchange their node information with each other in order to be able to communicate with each other. If you are unable to send or receive private messages with another node on the list, you can manually prompt them to exchange information in the app.
Regenerate Private Key
Each node owns a public/private key pair. To exchange an encrypted private message, the sender encrypts it with the recipient's public key, and only that recipient's private key can decrypt it. Two nodes can therefore communicate privately once they know each other's public key. If one node keeps failing in private-message transmission, try regenerating its private key. After regeneration, delete that node from the other devices' node lists so they can reconnect and obtain its new public key.
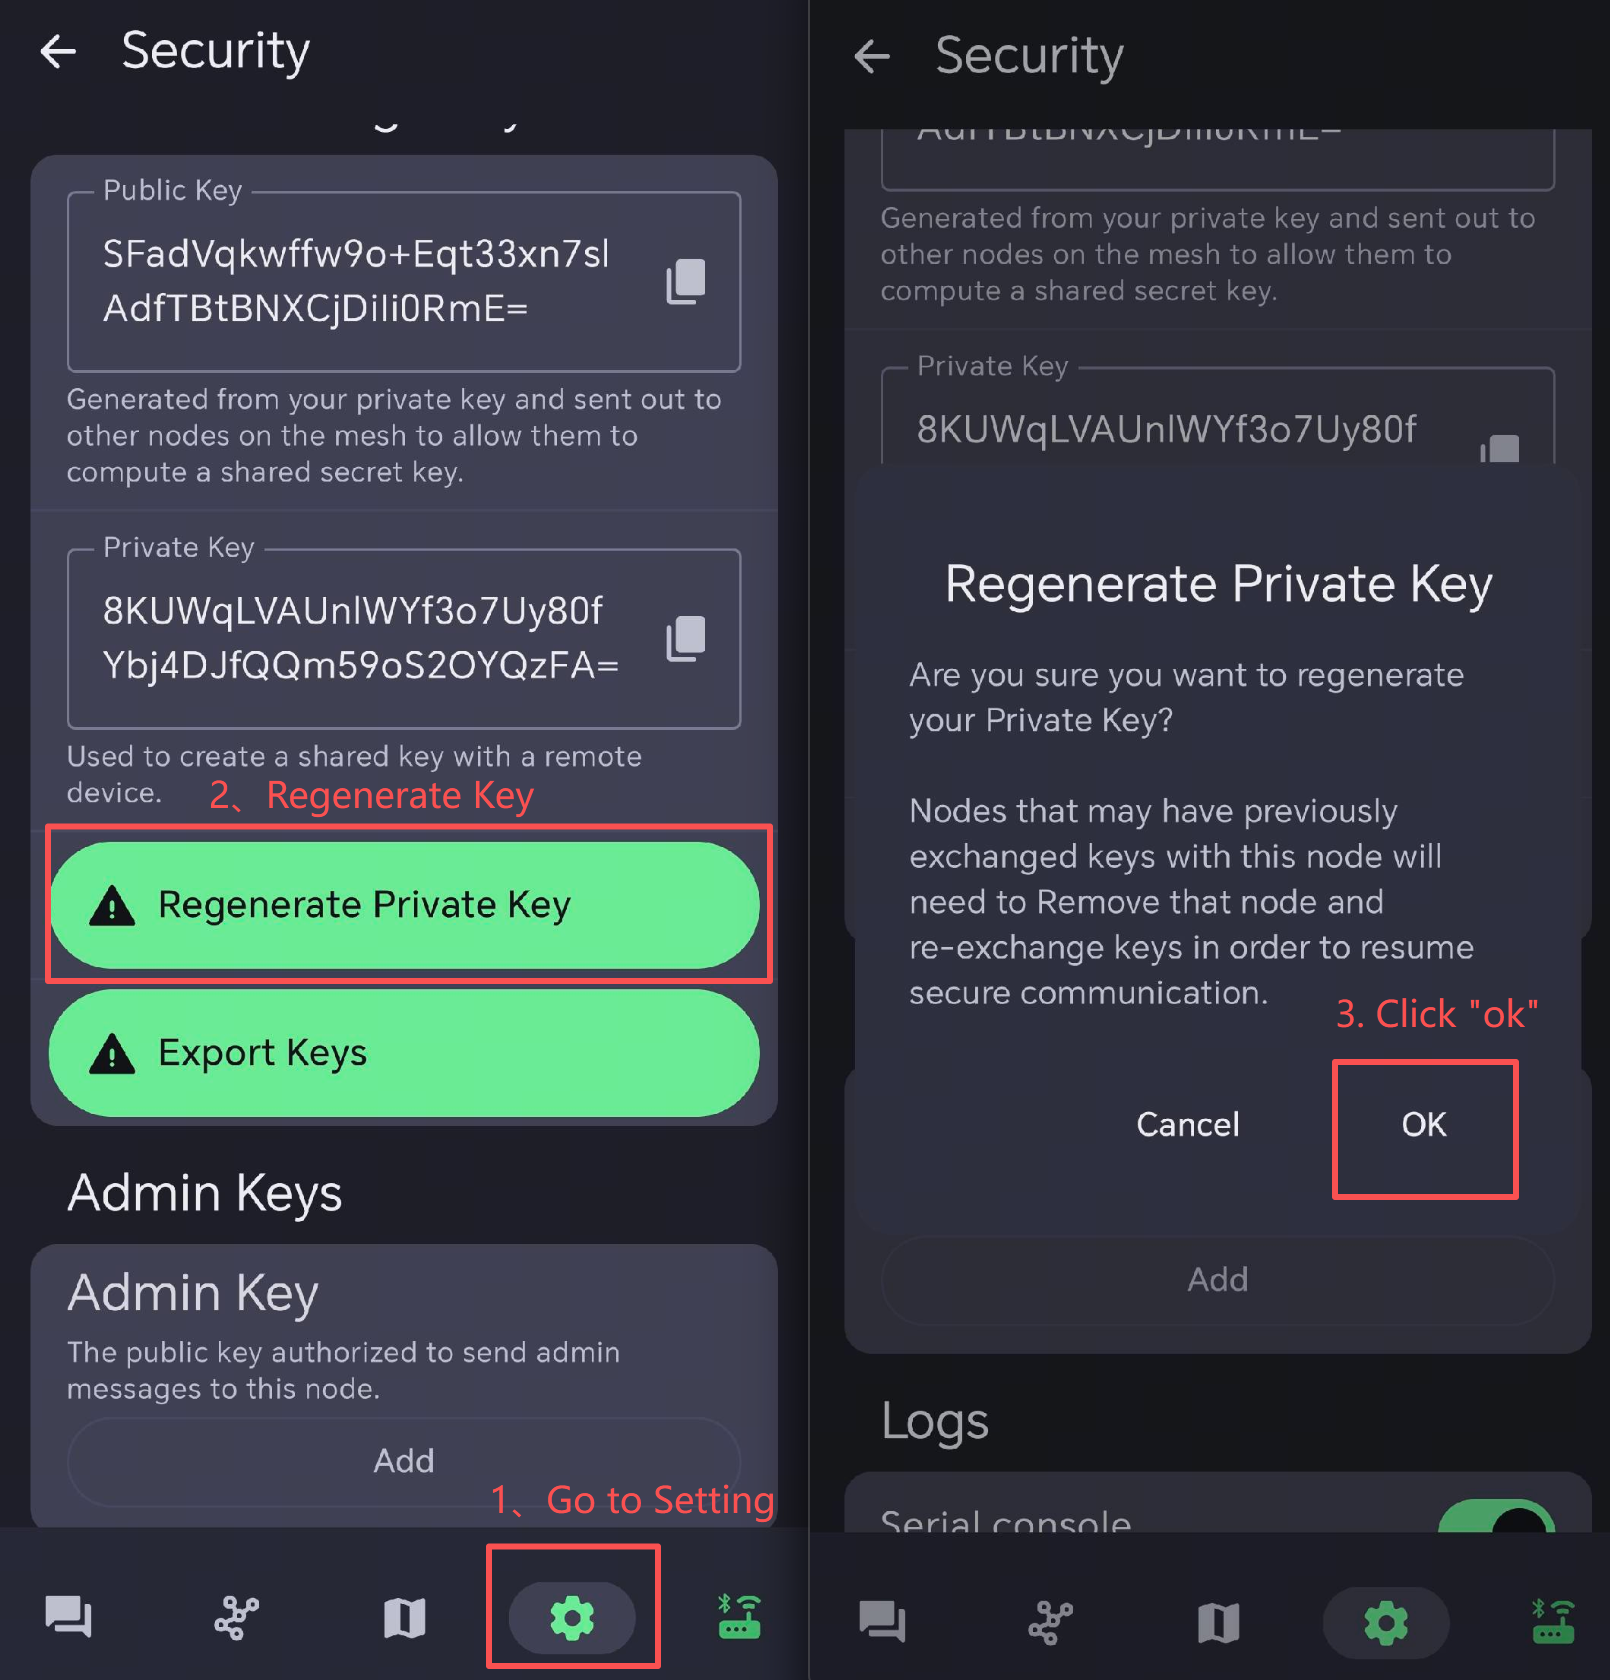
Reboot the faulty device to make the configuration function.
After the key regeneration, other device needs to reconnect with the node. So it is better to delete the node in other device's node list.
Signal Quality
-
SNR reflects the quality of the communication link. Normal device usually operates above -7 dB. Device with a SNR lower than -10 dB indicates poor performance.
-
RSSI is determined jointly by the device and its surrounding environment. Normal device usually operates above -110 dBm. Device with an RSSI lower than -115 dBm is considered to have poor performance.
To achieve the best signal effect, please use the device in an open, unobstructed area with minimal interference for use.