Getting Started with XIAO ePaper Display Board - EE02
| XIAO ePaper Display Board EE02 | 13.3" spectra™ 6 E-Ink Display |
|---|---|
 |  |
Introduction
The XIAO ePaper Display Board EE02 is a high-performance ePaper screen driver board specifically designed for 13.3-inch Spectra™ 6 six-color electronic paper displays. Powered by the XIAO ESP32-S3 Plus, it supports Wi-Fi and Bluetooth connectivity, and comes pre-flashed with SenseCraft Seeedash firmware — enabling AI-powered, drag-and-drop UI design with zero coding required. It is an ideal solution for wireless display applications such as real-time dashboards, digital signage, and smart home control panels.
Similar to its sibling, the EE04 (designed for smaller screens), the EE02 offers a seamless experience for developers looking to integrate large-format ePaper displays into their IoT projects. It simplifies the driving process and supports the SenseCraft Seeedash platform for easy content management.
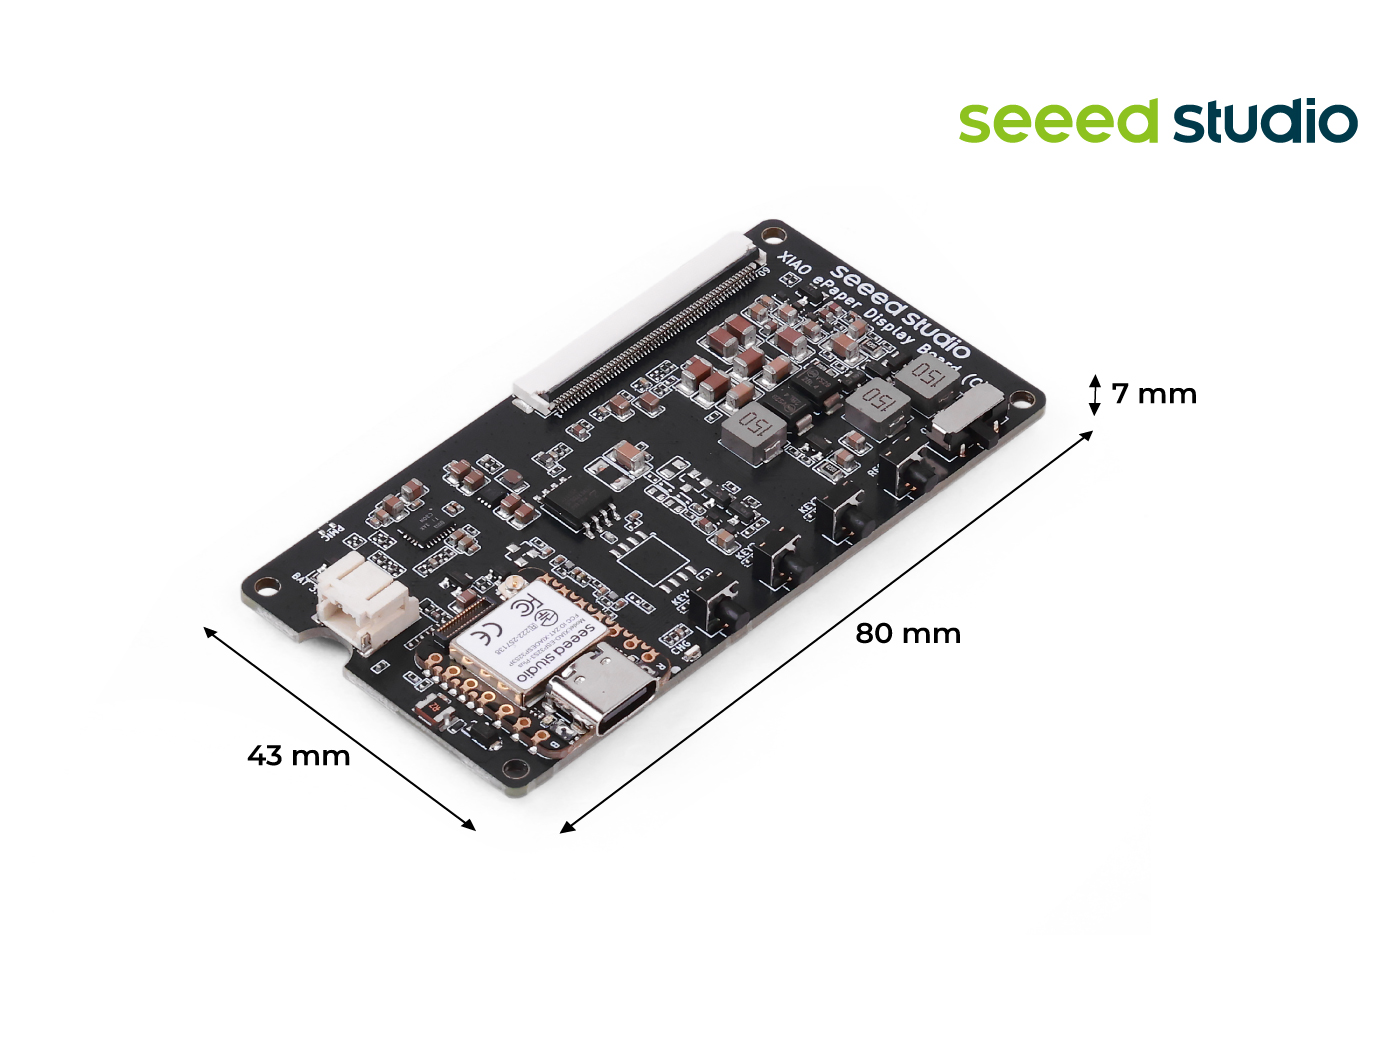
Features
- Built in XIAO ESP32-S3 Plus: Works immediately when connected to a compatible ePaper display.
- Dedicated 13.3" Spectra™ 6 E-Ink Support: Specifically designed for 13.3" Spectra™ 6 displays, ensuring quick setup and stable operation.
- BAT Connector with Switch: Provides simple battery connection and integrates a switch, enabling efficient power management and energy savings.
- User-Friendly Buttons: Features 1 reset button and 3 user-programmable buttons, providing flexibility for project acceleration and customizable functions.
- SenseCraft Seeedash Firmware Pre-Flashed: Simply plug in and start right away with SenseCraft Seeedash, our AI-powered no-code UI design platform. Choose from rich templates or drag-and-drop UI building (with optional AI assistance), and deploy to the ePaper display in just a few clicks.
Specification
| Parameter | Description |
|---|---|
| Controller | XIAO ESP32-S3 Plus |
| ePaper Connector | FPC 60 Pin, 0.5mm pitch |
| Supported Screen Size | 13.3-inch E-ink Display |
| Connectivity | Wi-Fi 802.11 b/g/n, Bluetooth 5.0 (LE) |
| Power Supply | 5V via USB Type-C / 3.7V Li-Battery (JST 2.0mm) |
| Battery Connector | JST 2.0mm 2-pin |
| Operating Voltage | 3.3V |
| Interface | USB Type-C, FPC connector for ePaper |
| Dimensions | 80mm x 43mm x 7mm |
| Operating Temperature | -20°C to 70°C |
| Switch | Battery Power ON/OFF |
| Button | 1x Reset button 3x User button |
Application
- Real-Time Dashboard: Live information displays for weather, stock, traffic, or home automation data.
- Security Alerts: Low-power notification displays for security system status and alert messages.
- Digital Photo Frame: ePaper photo frames with gentle refresh and ultra-low power consumption.
- Public Transit Arrival Board: Bus/train arrival information displays at stations and stops.
- Digital Signage: Restaurant menus, conference room signs, and retail price tags.
- Smart Home: Information dashboards for weather, calendar, and home automation status.
- Industrial HMI: Low-power status displays for machinery and warehouse management.
- Education: E-book readers or classroom information boards.
- Office: Desk nameplates or notice boards.
Hardware Overview
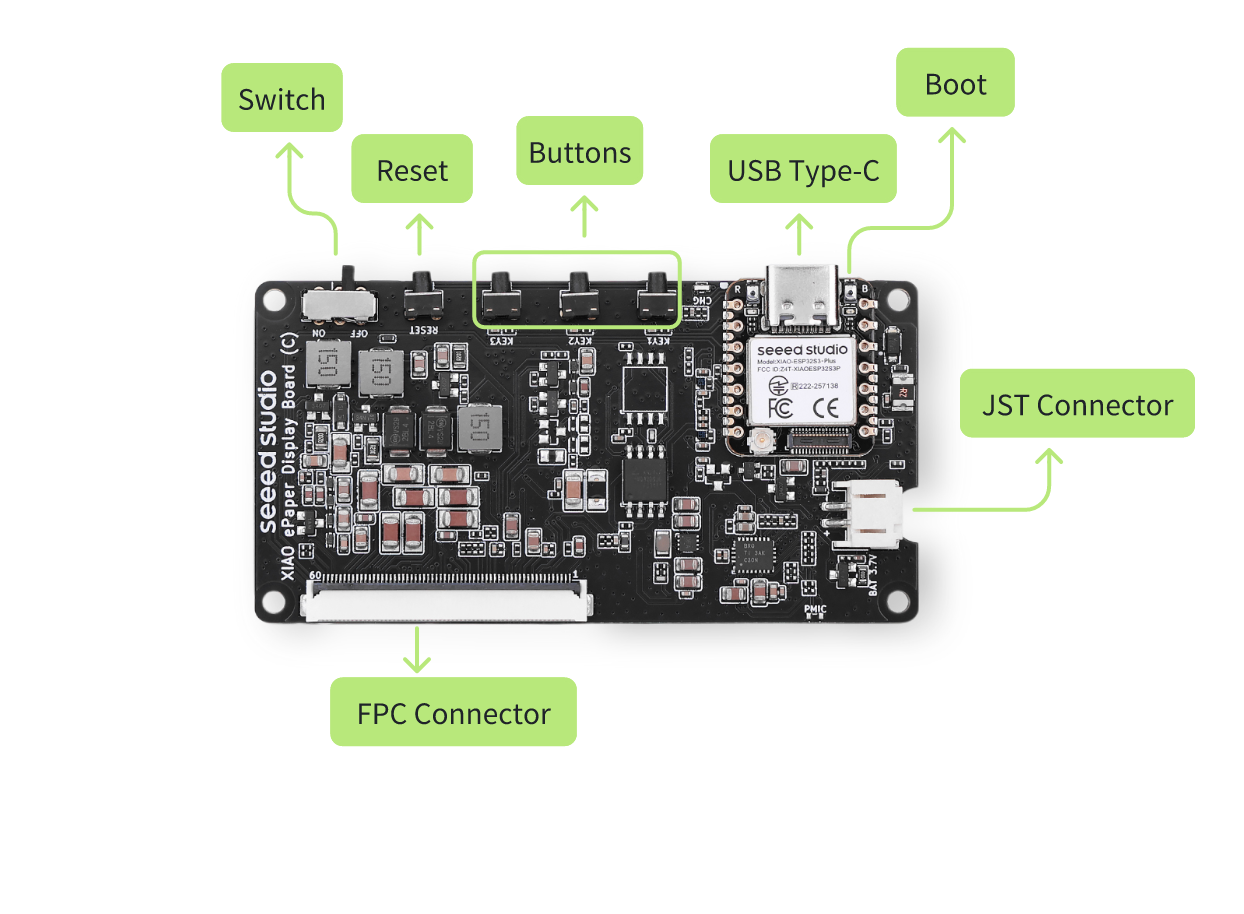
- USB Type-C: For power supply and firmware flashing.
- FPC Connector: To connect the 13.3-inch E-ink display.
- Reset Button: To reset the board.
- Buttons: They are "refresh the page","switch previous page" and "switch next page"
- Switch: Control the power of battery on/off.
- Boot Button: Used for entering bootloader mode.
- LED Indicators: Blinking means no battery connection. Green light on means battery is charging.
- JST Connector: 2 pins JST 2.0mm connector to connect battery.
Getting Started with SenseCraft Seeedash
This section will guide you through connecting your EE02 to the SenseCraft Seeedash platform, allowing you to easily update the screen content wirelessly.
Prerequisites
Before you begin, make sure you have the following:
- A Seeed Studio account for the SenseCraft Seeedash platform (sign up here if you don't have one)
- A 2.4GHz Wi-Fi network (5GHz is not supported)
Equipment Installation
Step 1. Connect the Screen and Board Carefully connect the FPC cable of the 13.3-inch E-ink screen to the connector on the EE02 driver board. Ensure the locking mechanism is secure.
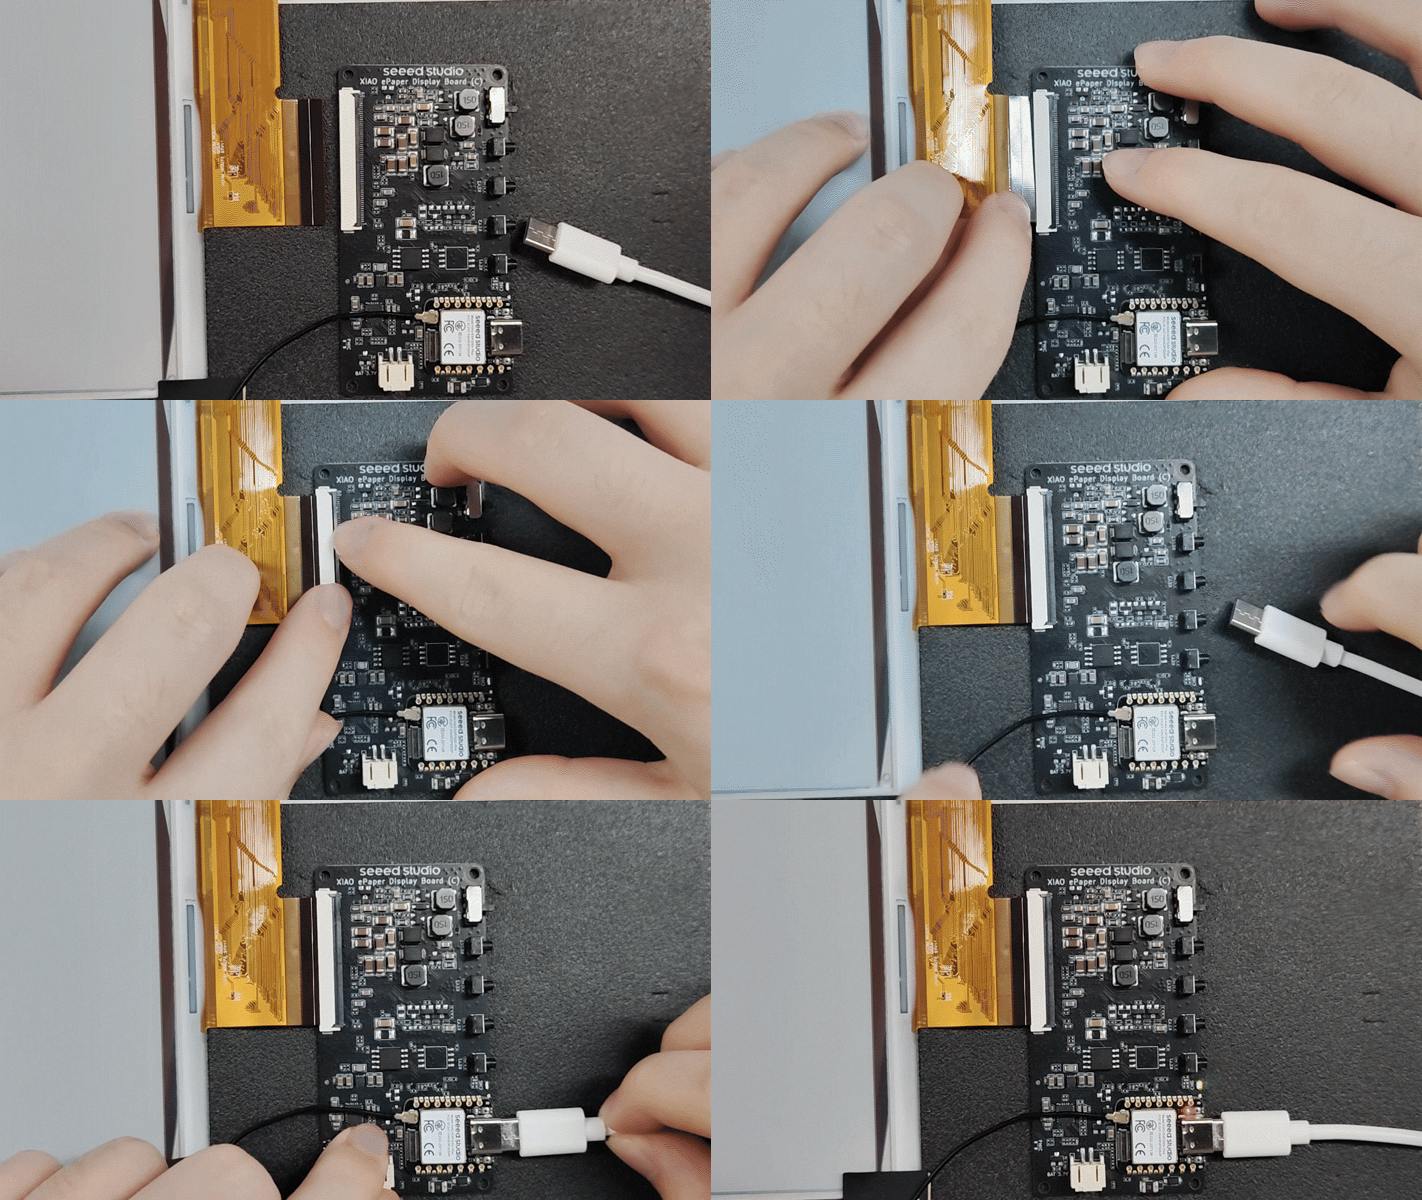
Step 2. Power On Connect the EE02 board to a power source (computer or USB adapter) using a USB Type-C cable. Upon powering up, the screen will refresh and display a welcome image.
Step 3. Enter Network Configuration Mode After the welcome image, the screen will automatically refresh to show the Network Configuration interface. This indicates the device is ready to connect to Wi-Fi.
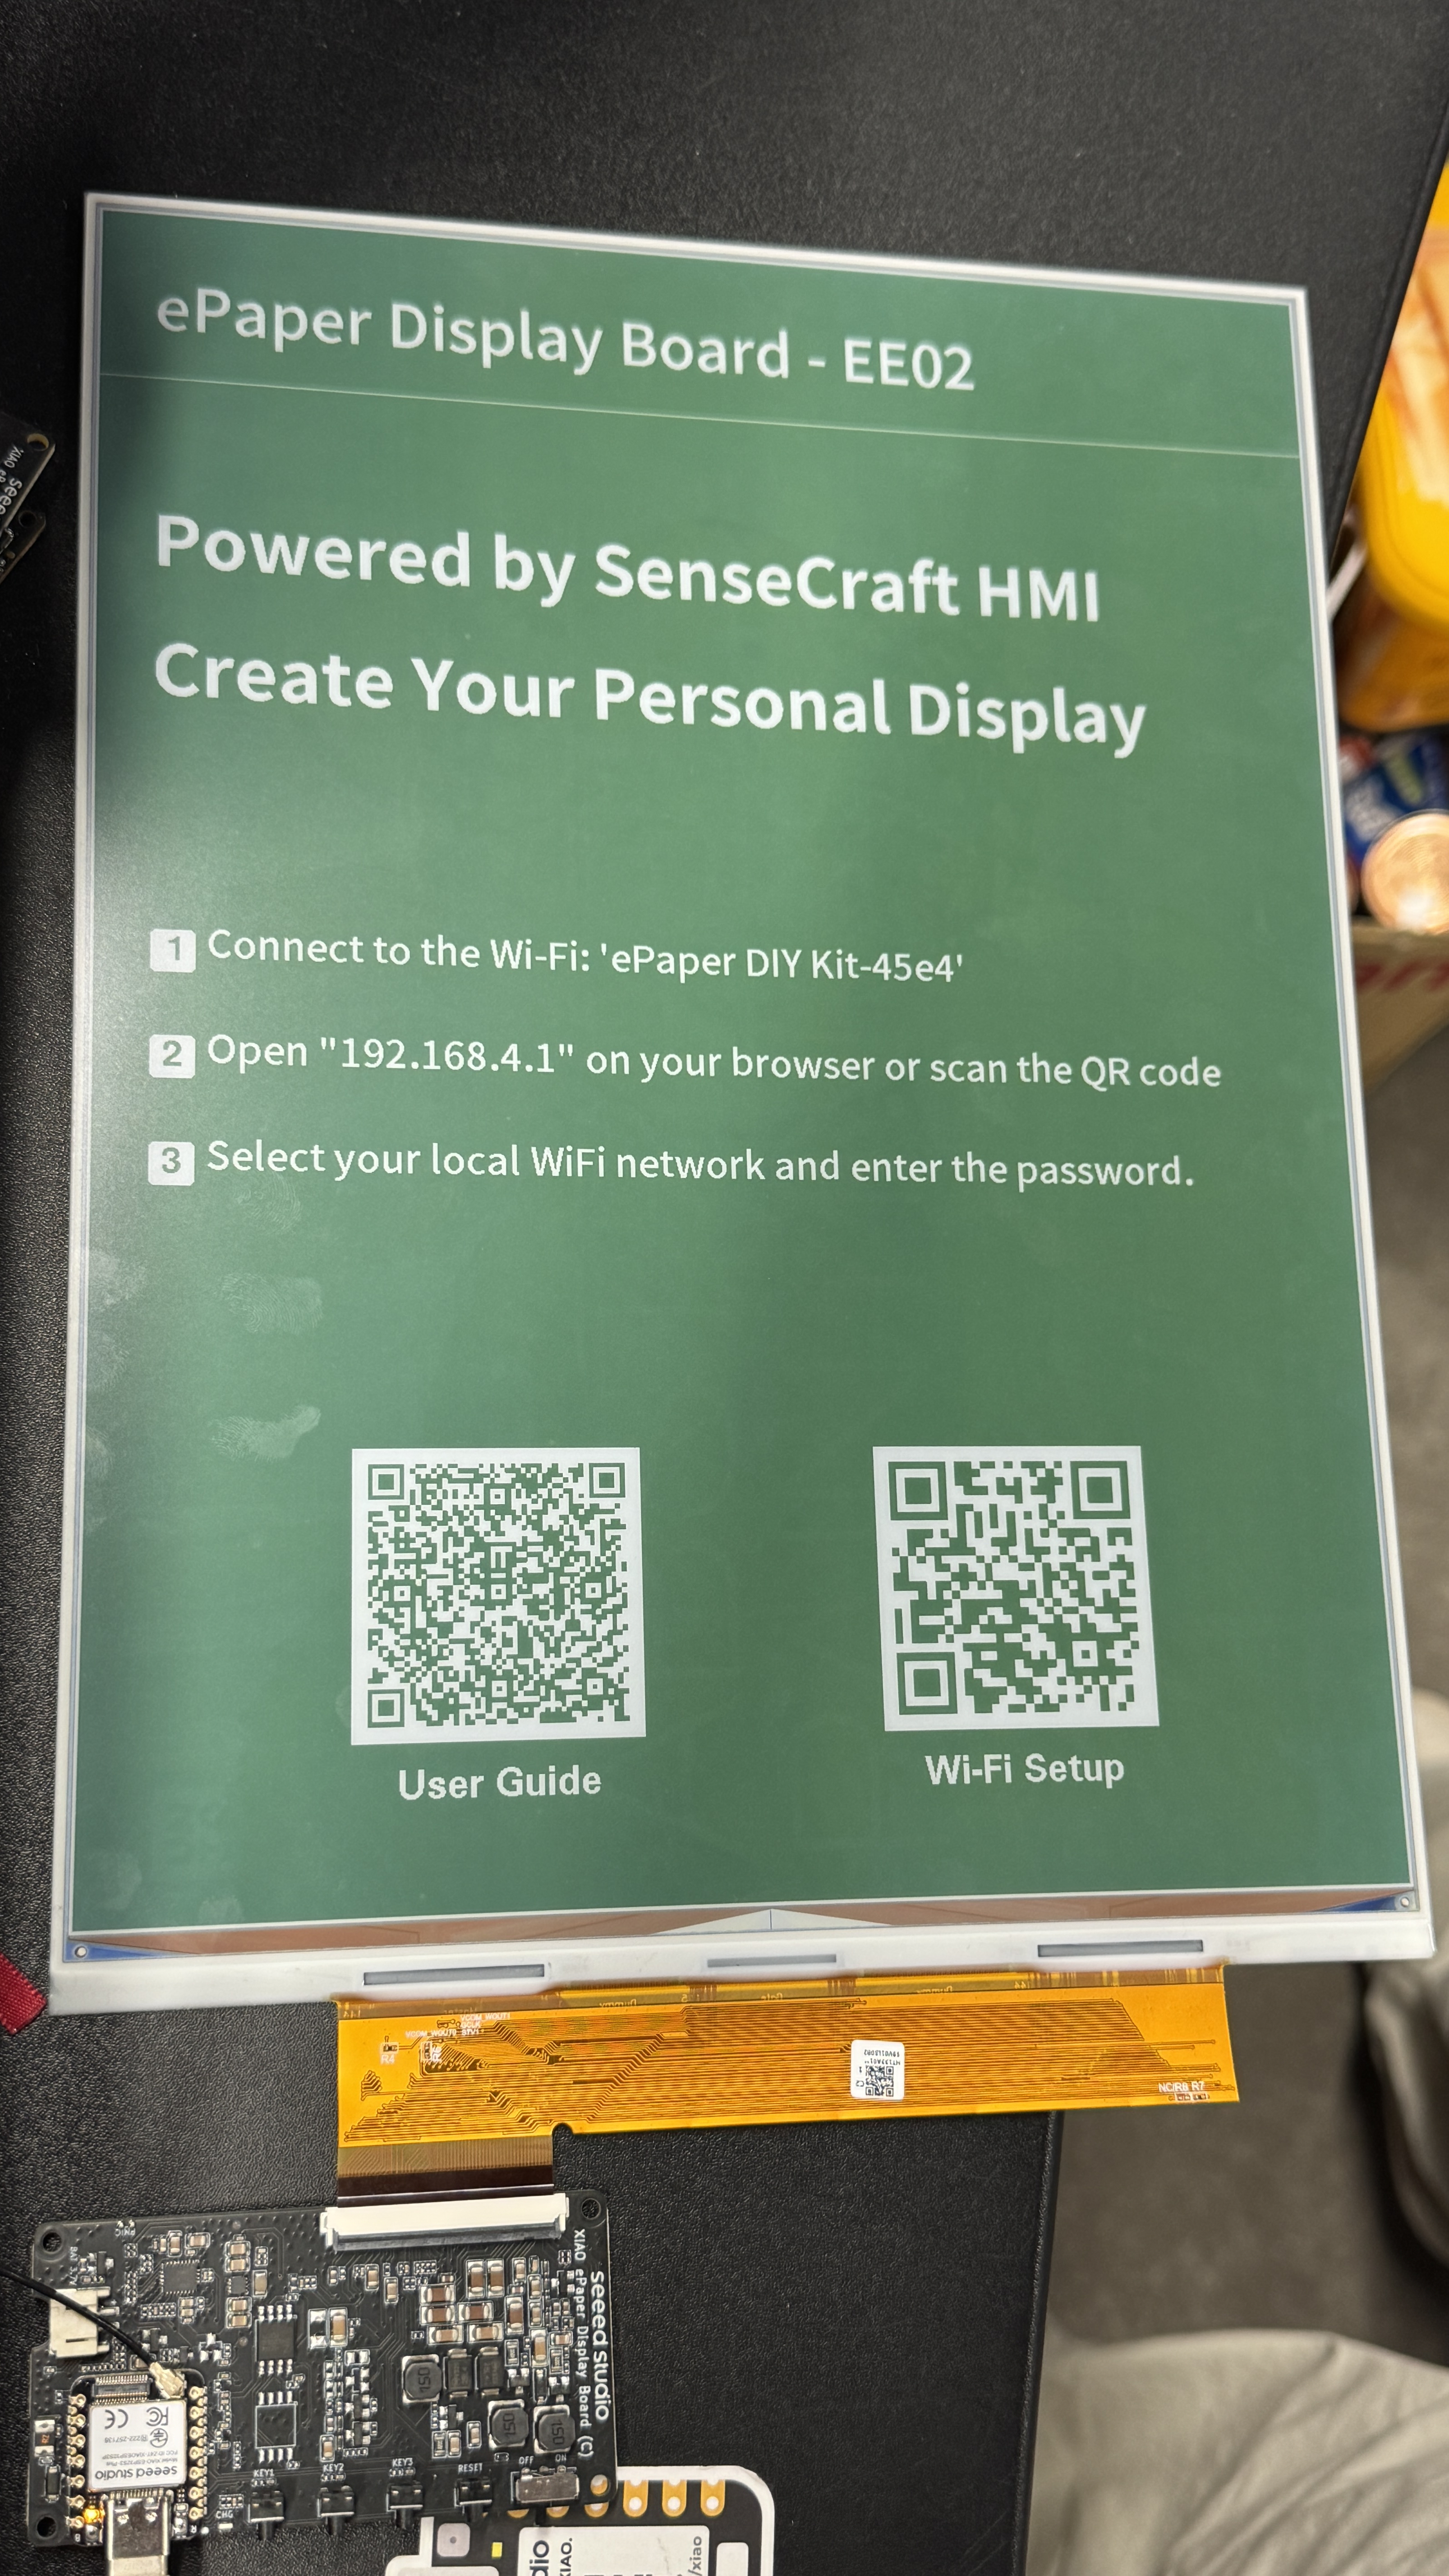
Network Configuration
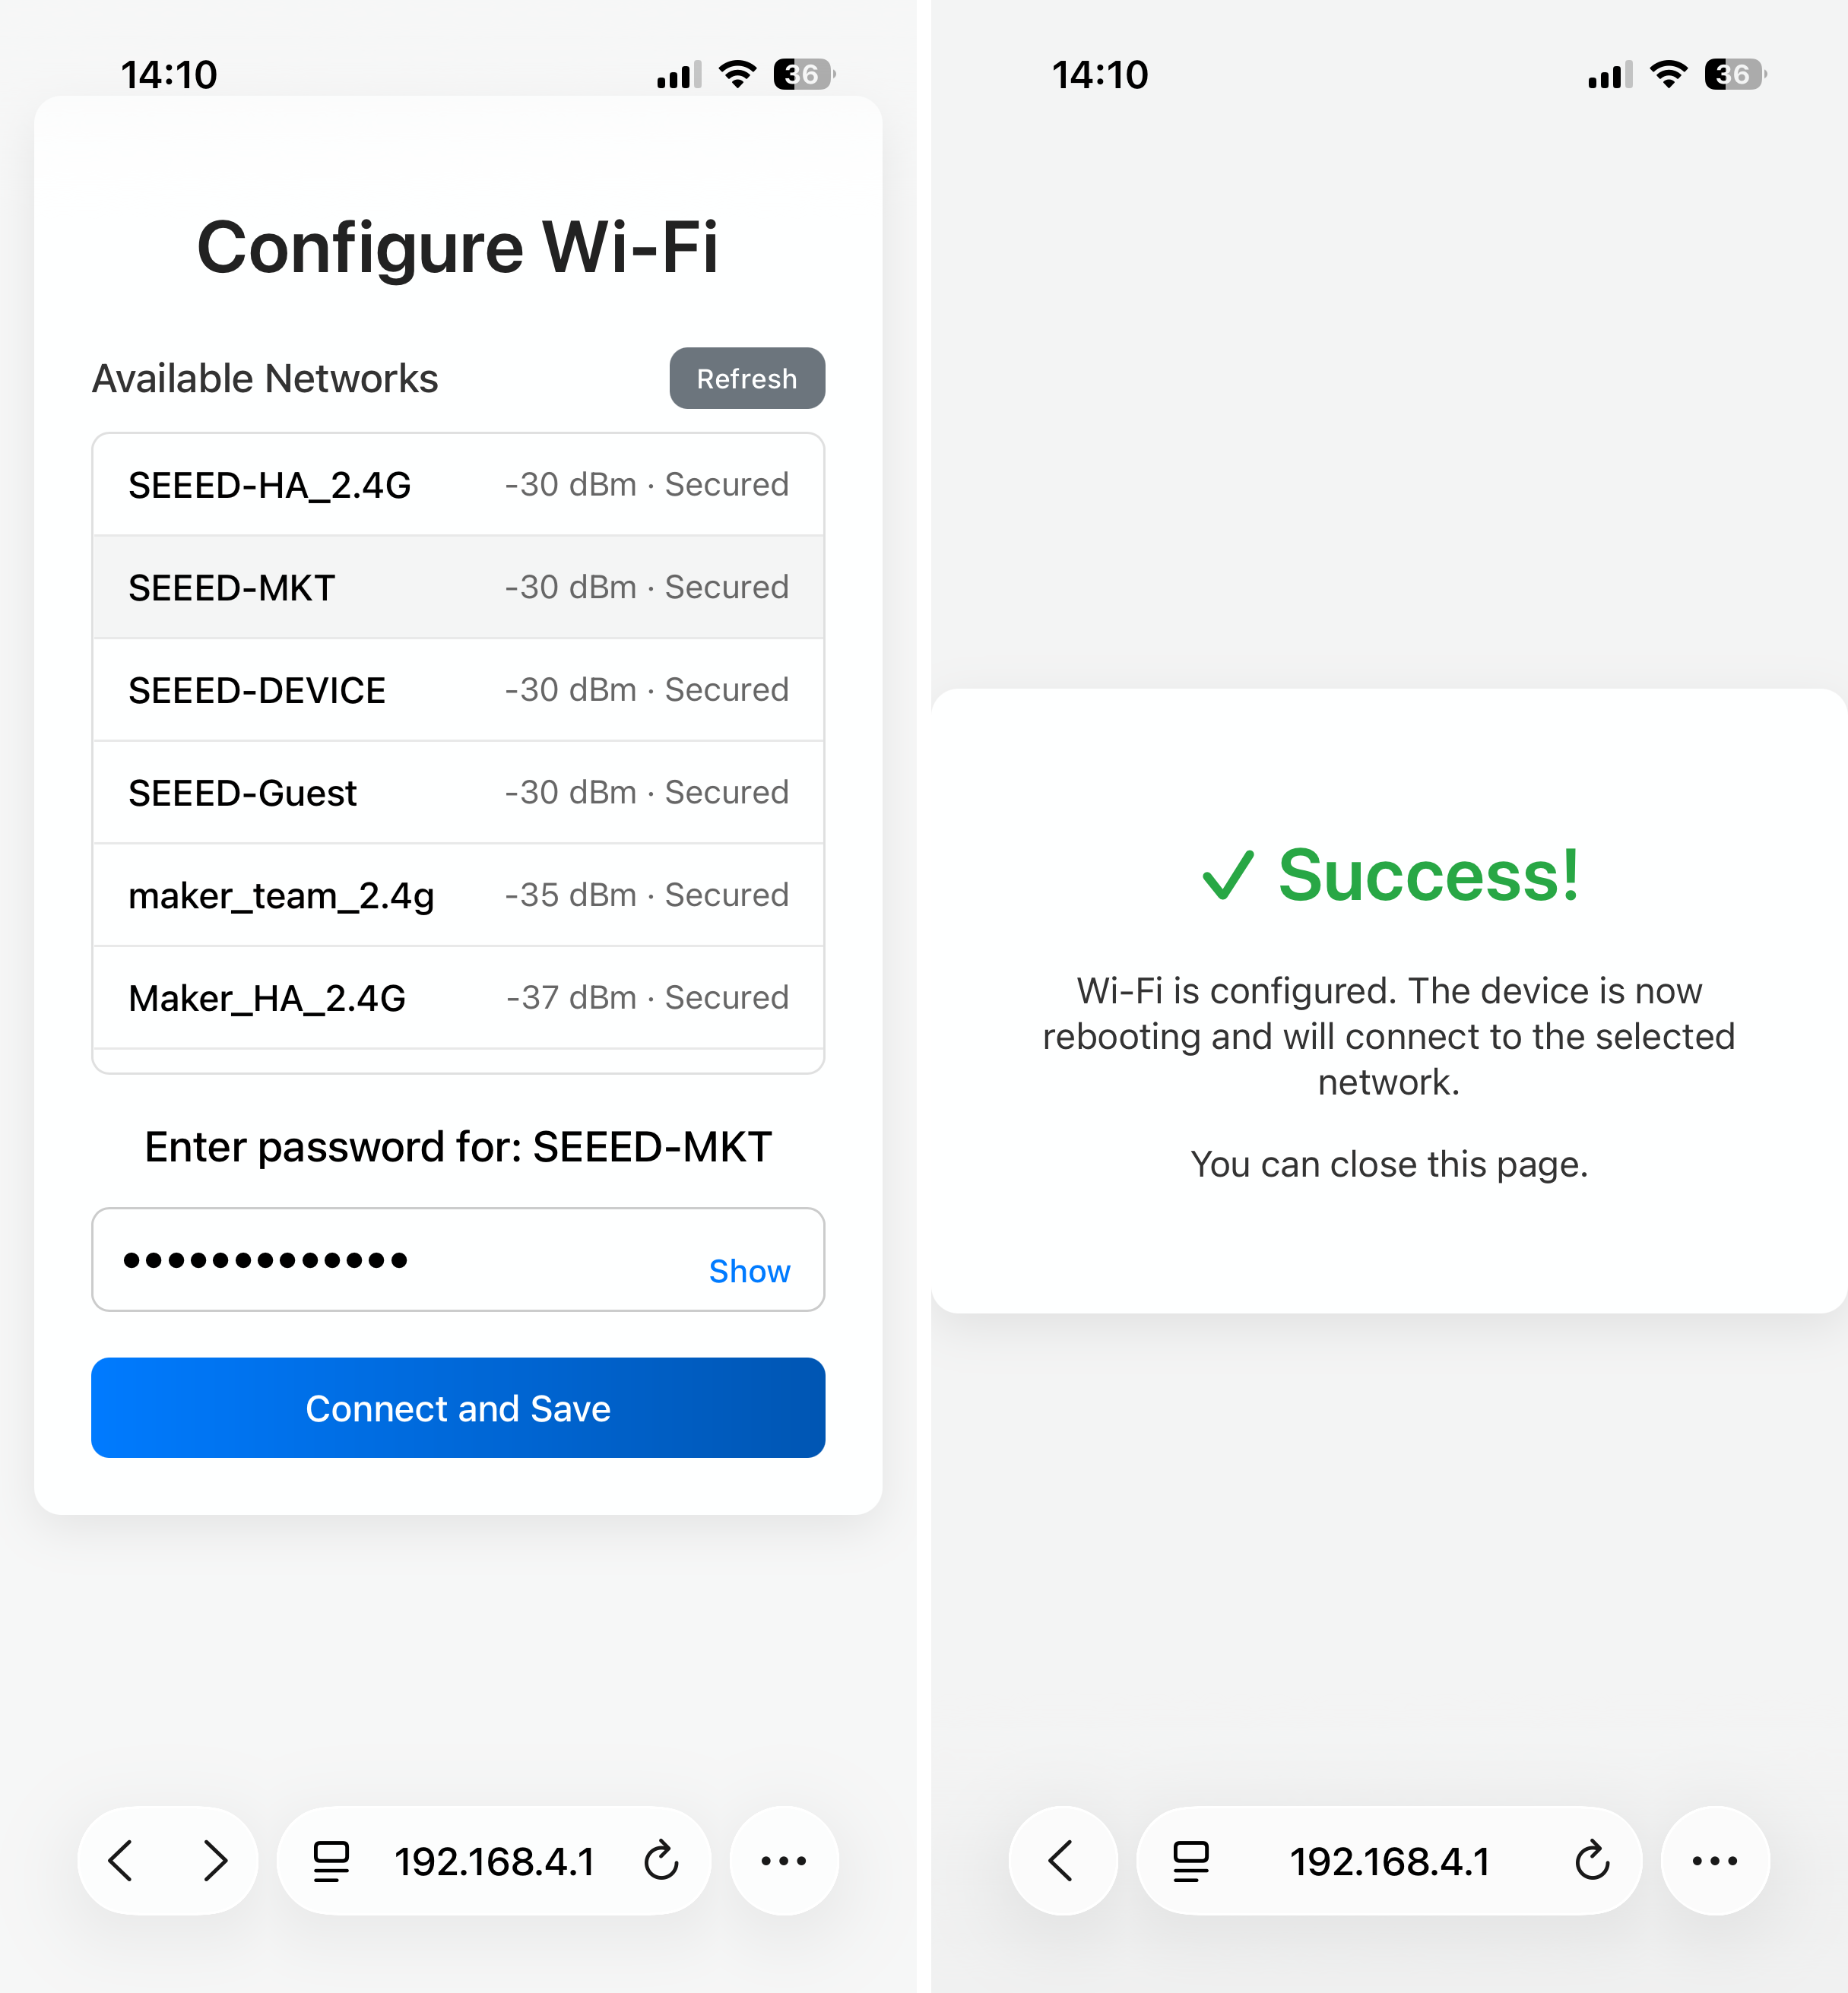
Step 4. Configure Wi-Fi via Mobile Phone Use your mobile phone to scan the QR code displayed on the screen (or connect to the hotspot indicated). Follow the prompts on your phone to enter your local Wi-Fi SSID and password to connect the EE02 to the internet.
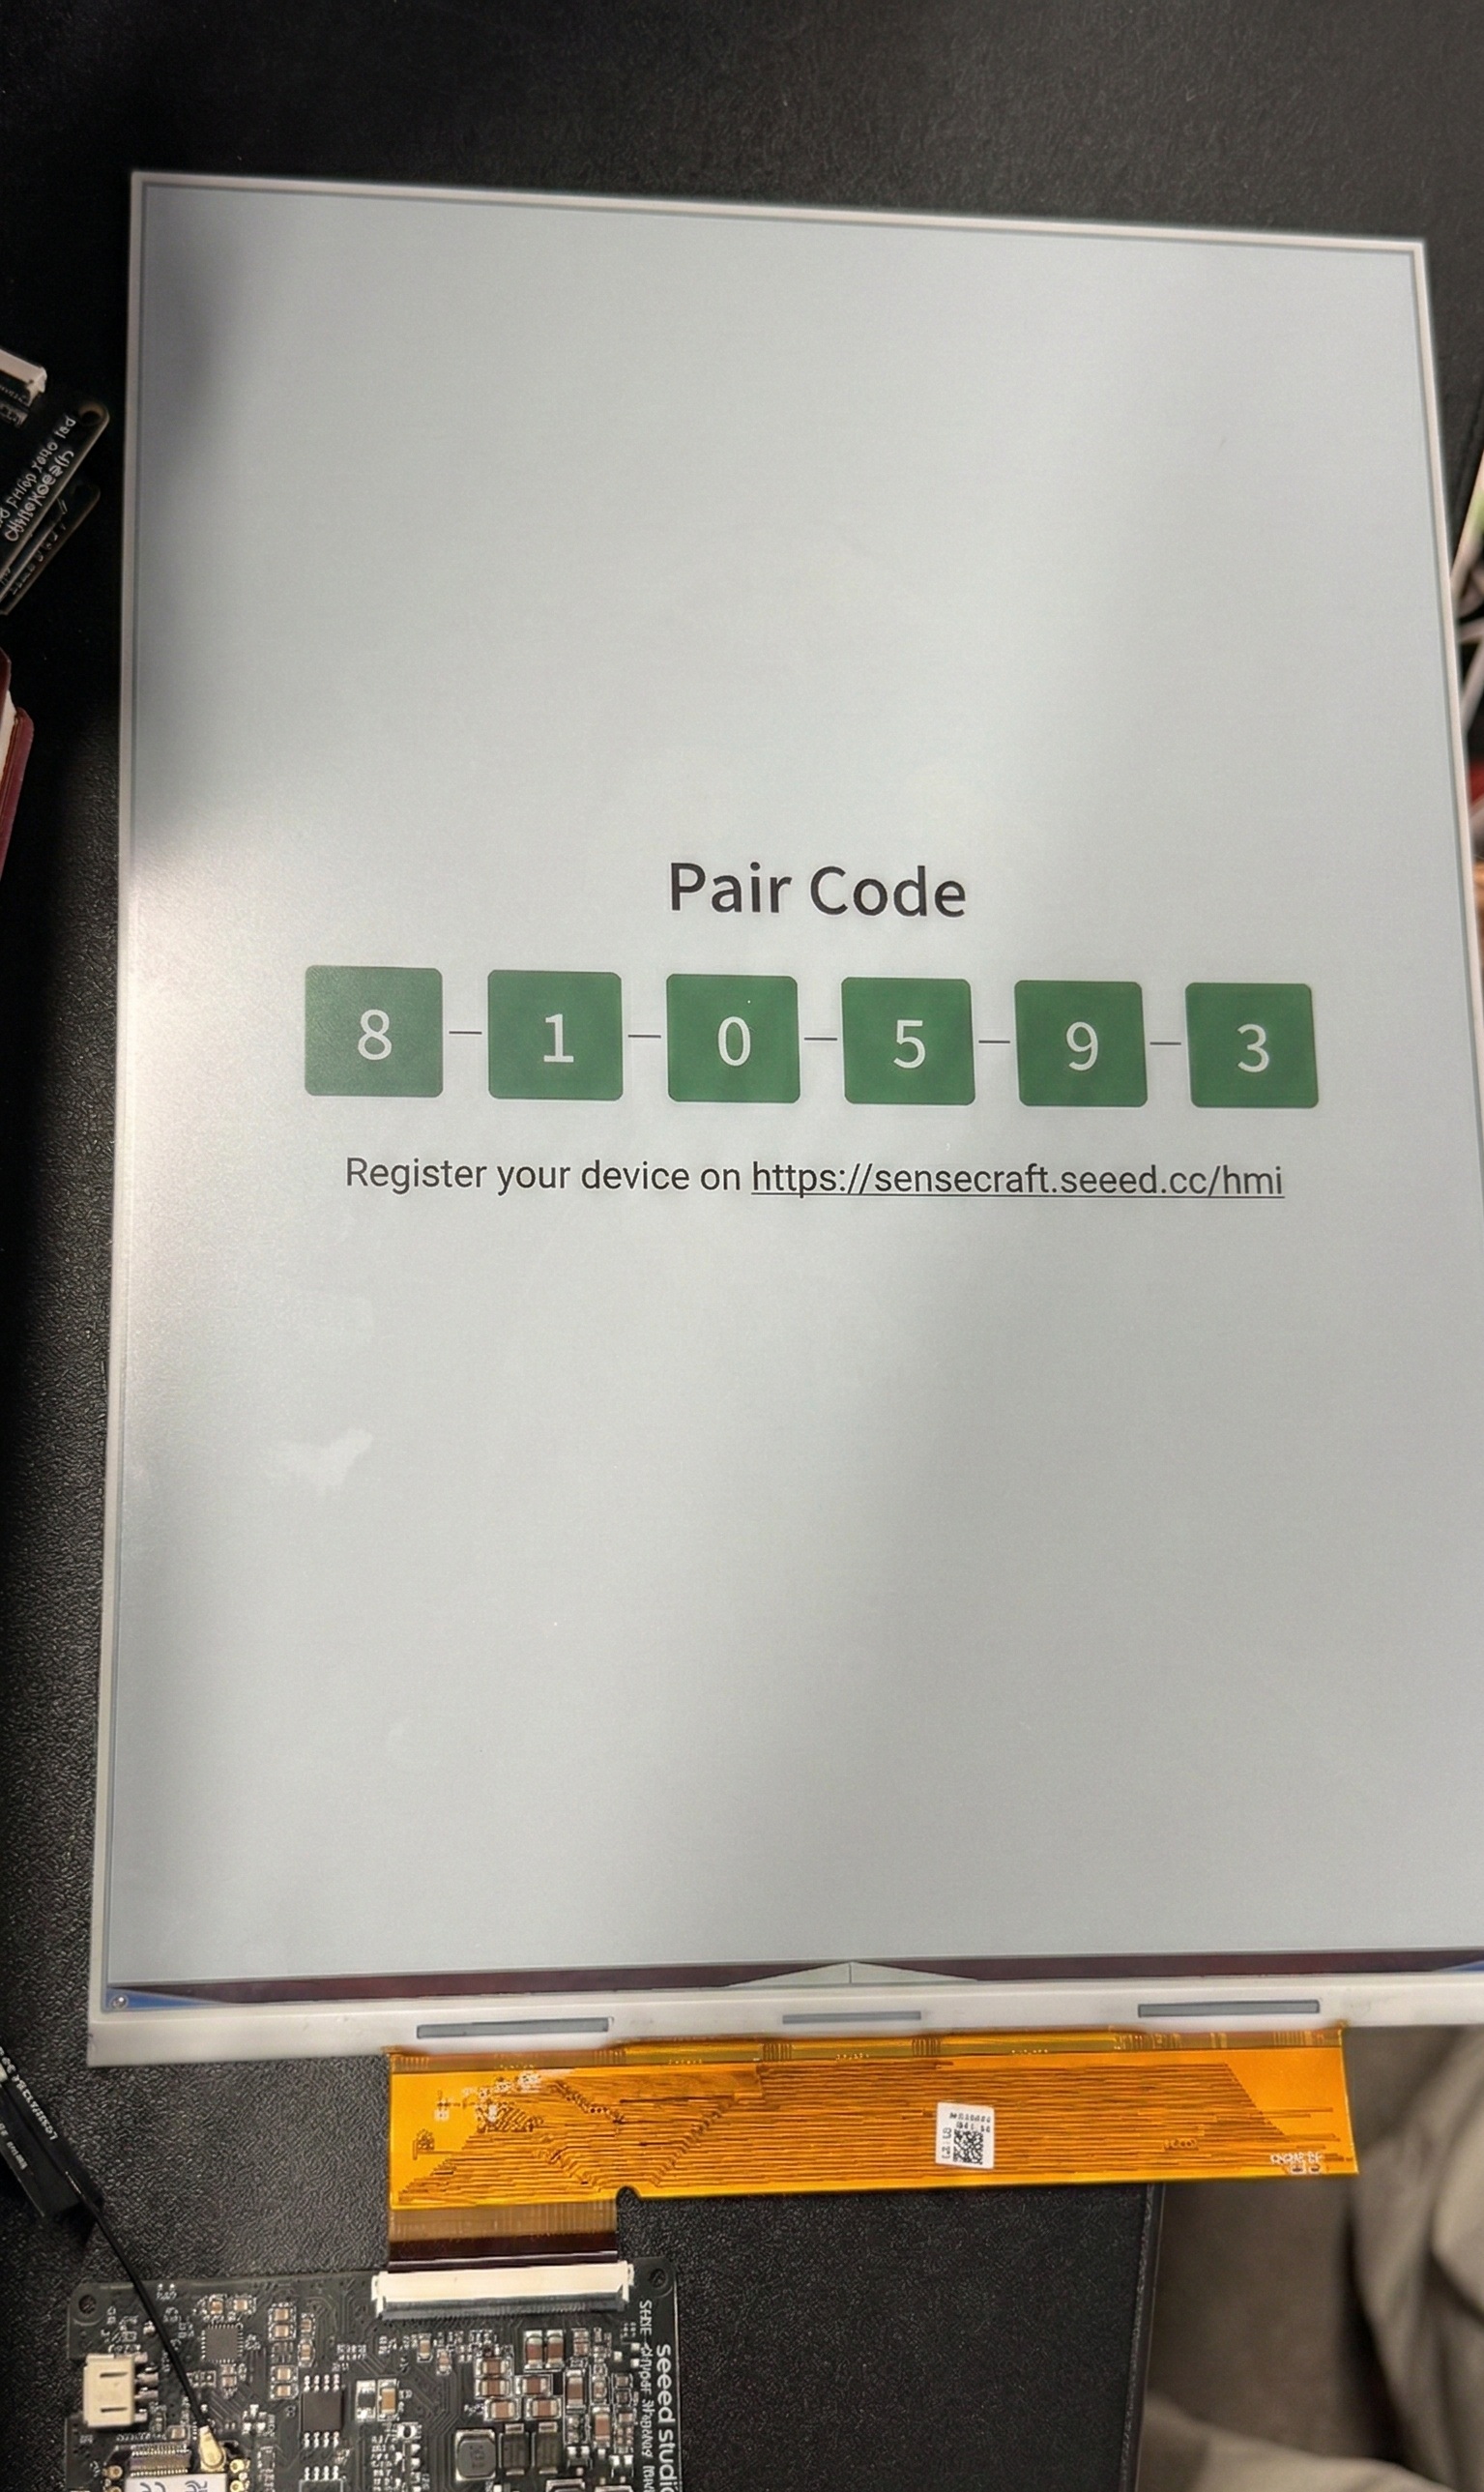
Step 5. Obtain Pairing Code Once the network configuration is successful, the screen will refresh again and display a unique Pairing Code (or Device ID). You will need this code for the next step.
Platform Binding & Update
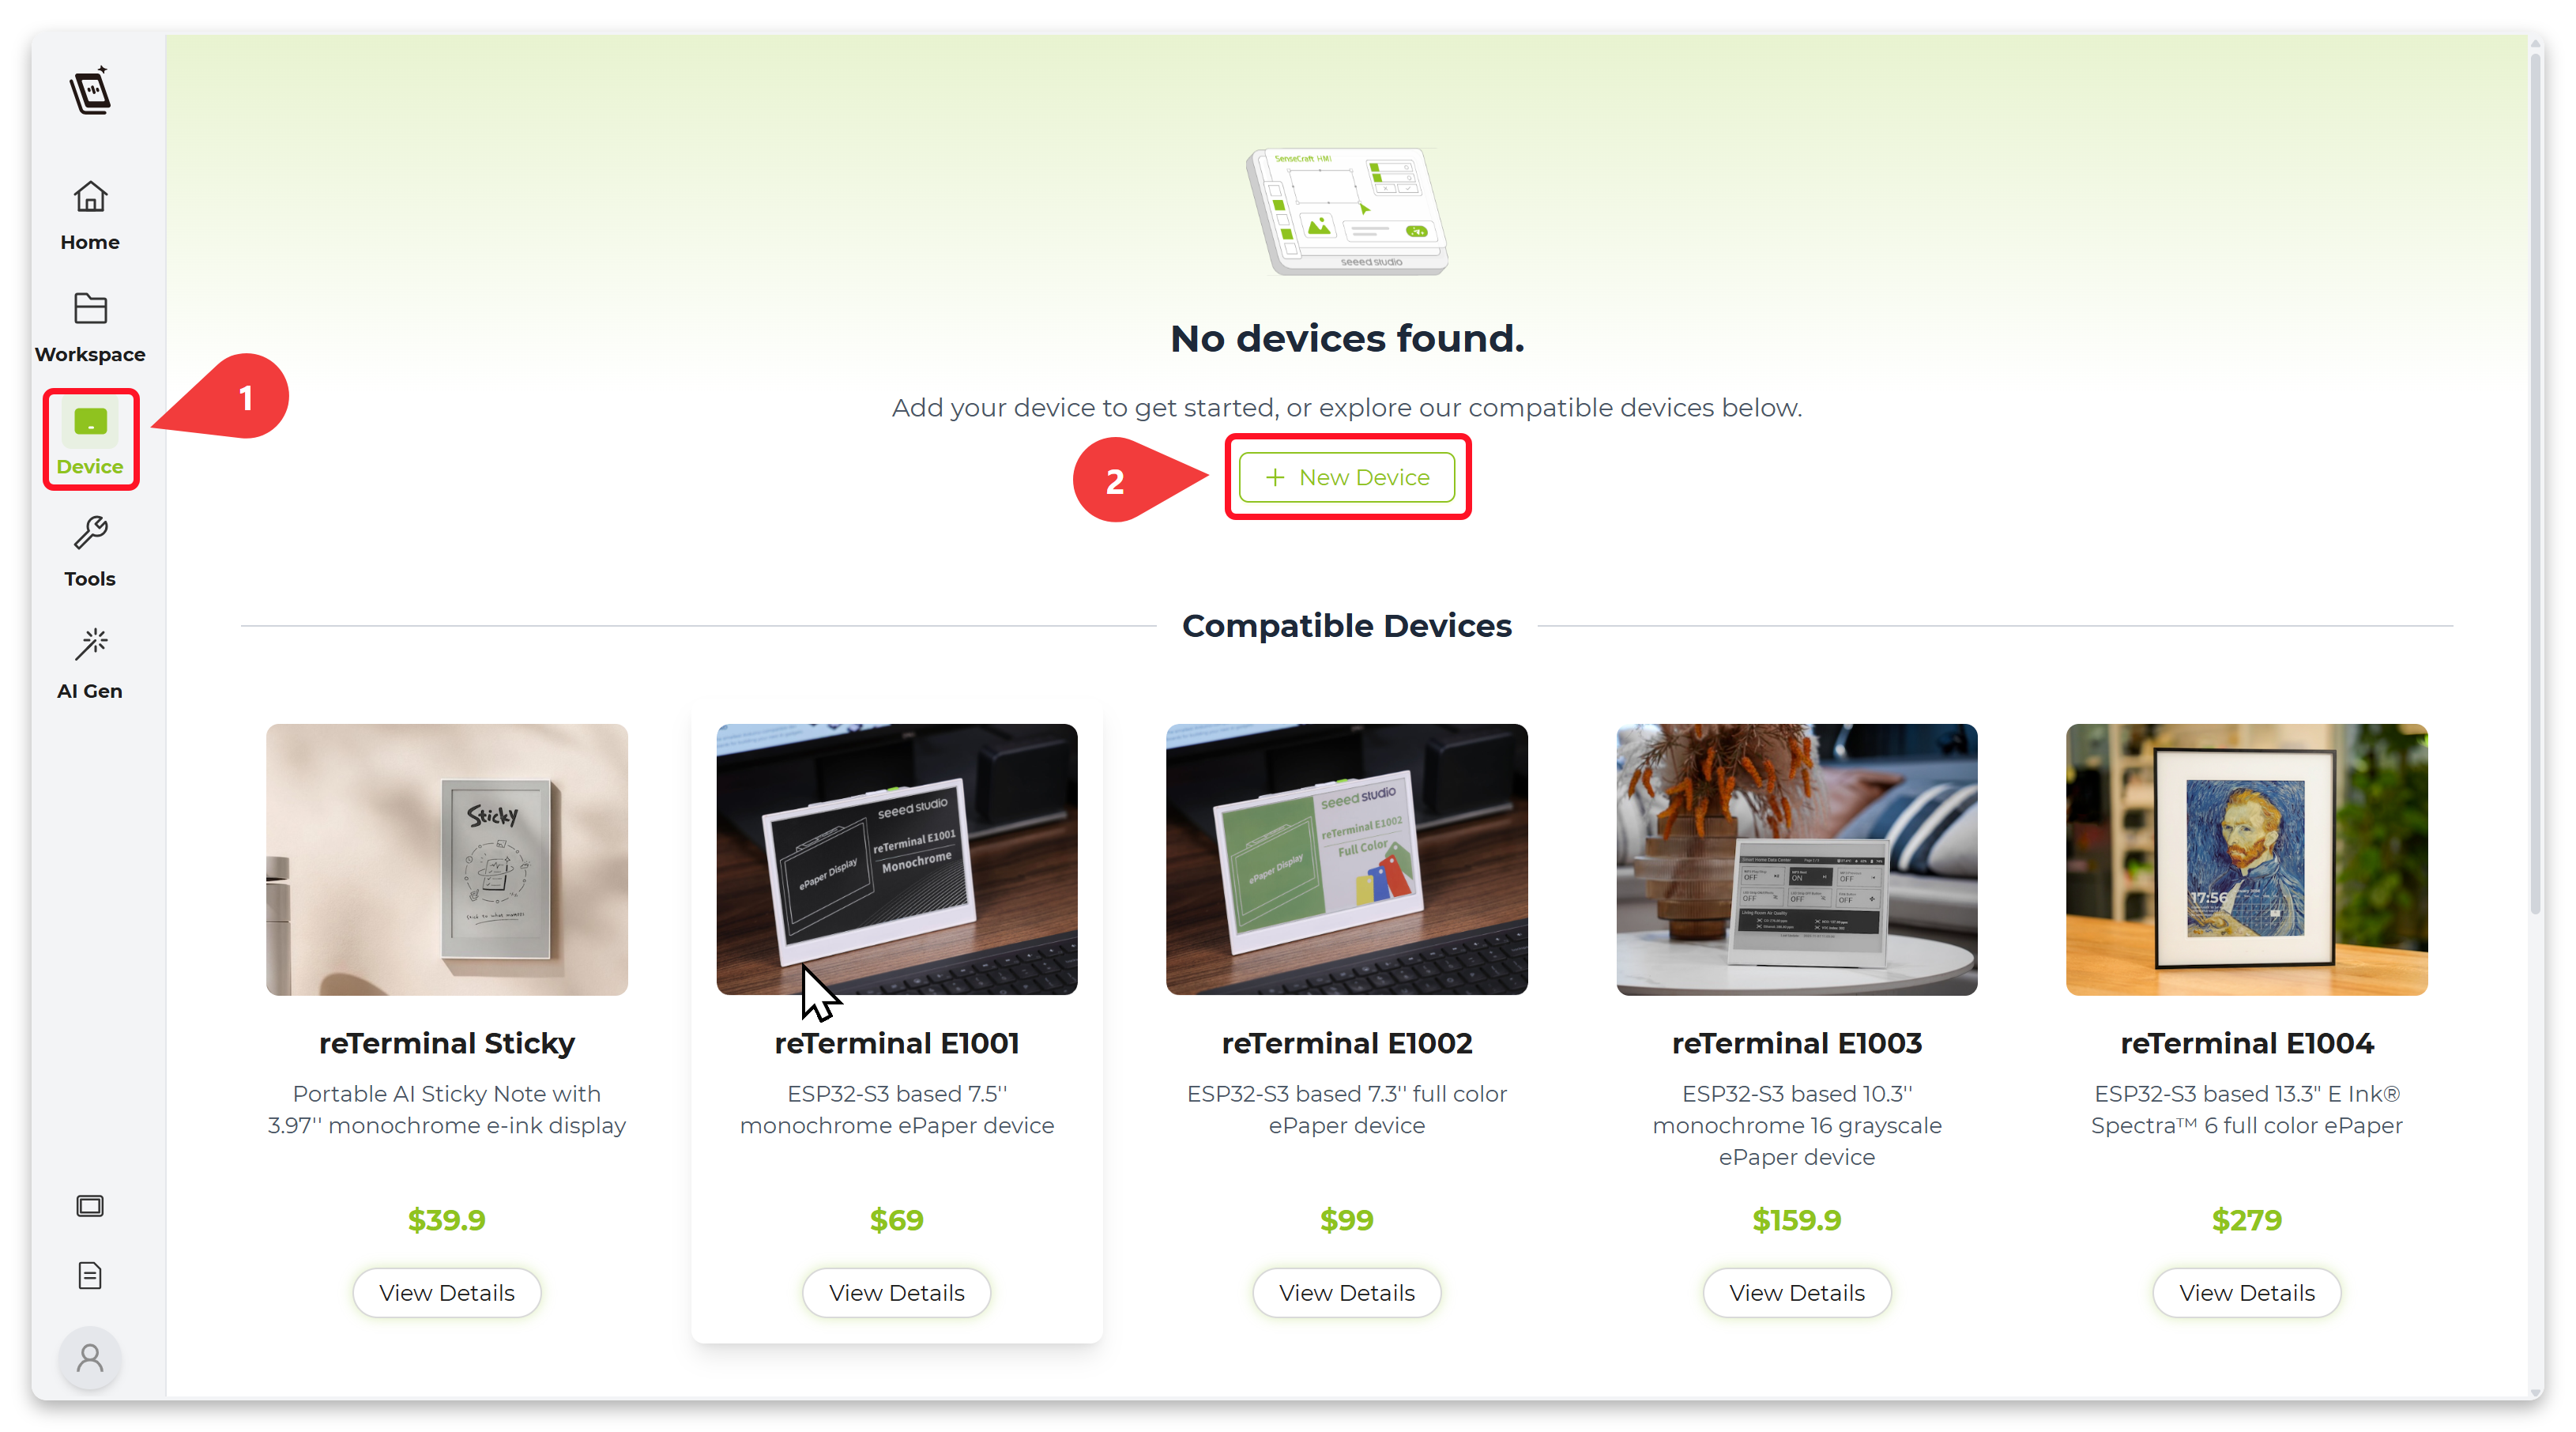
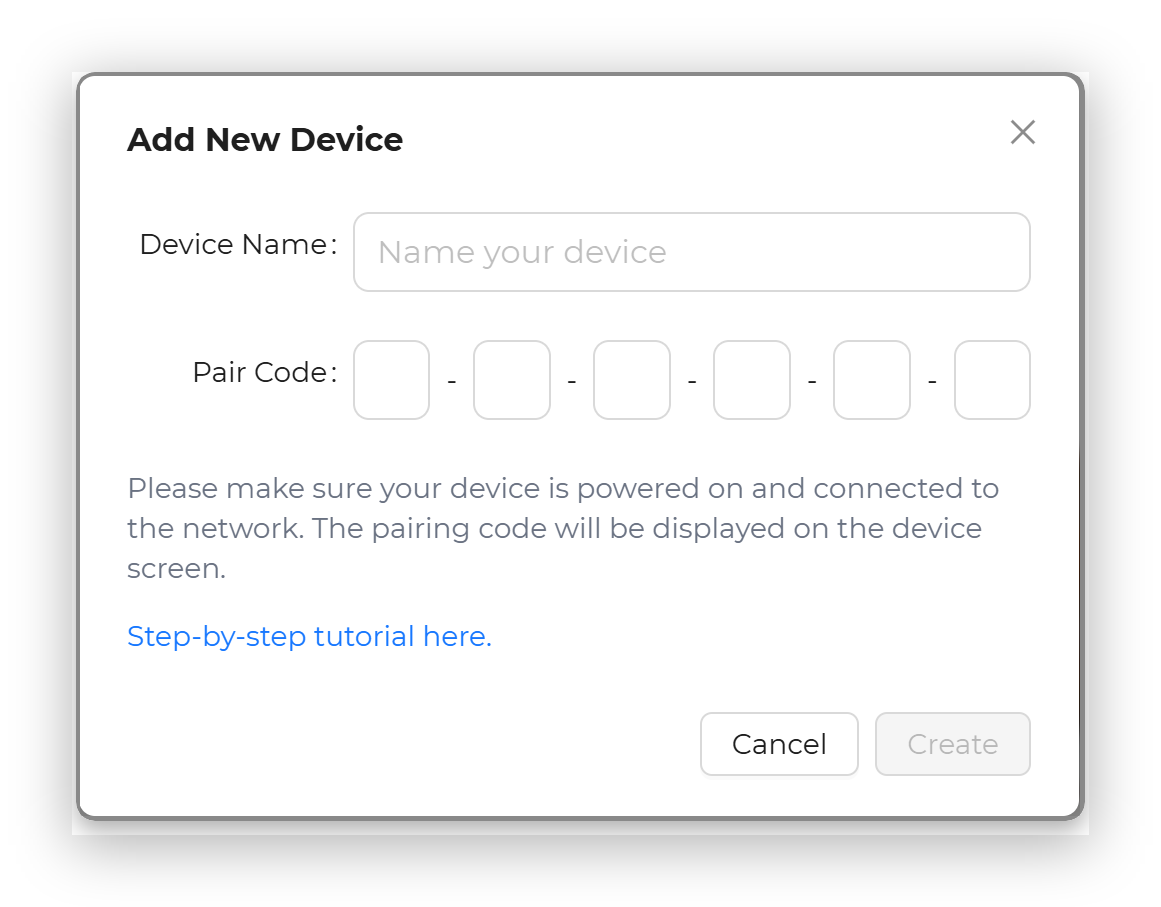
Step 6. Bind Device on SenseCraft Seeedash Go to the SenseCraft Seeedash Platform. Log in to your account. Navigate to the device management section and select "New Device". Enter the Pairing Code displayed on your E-ink screen to bind the device to your account.
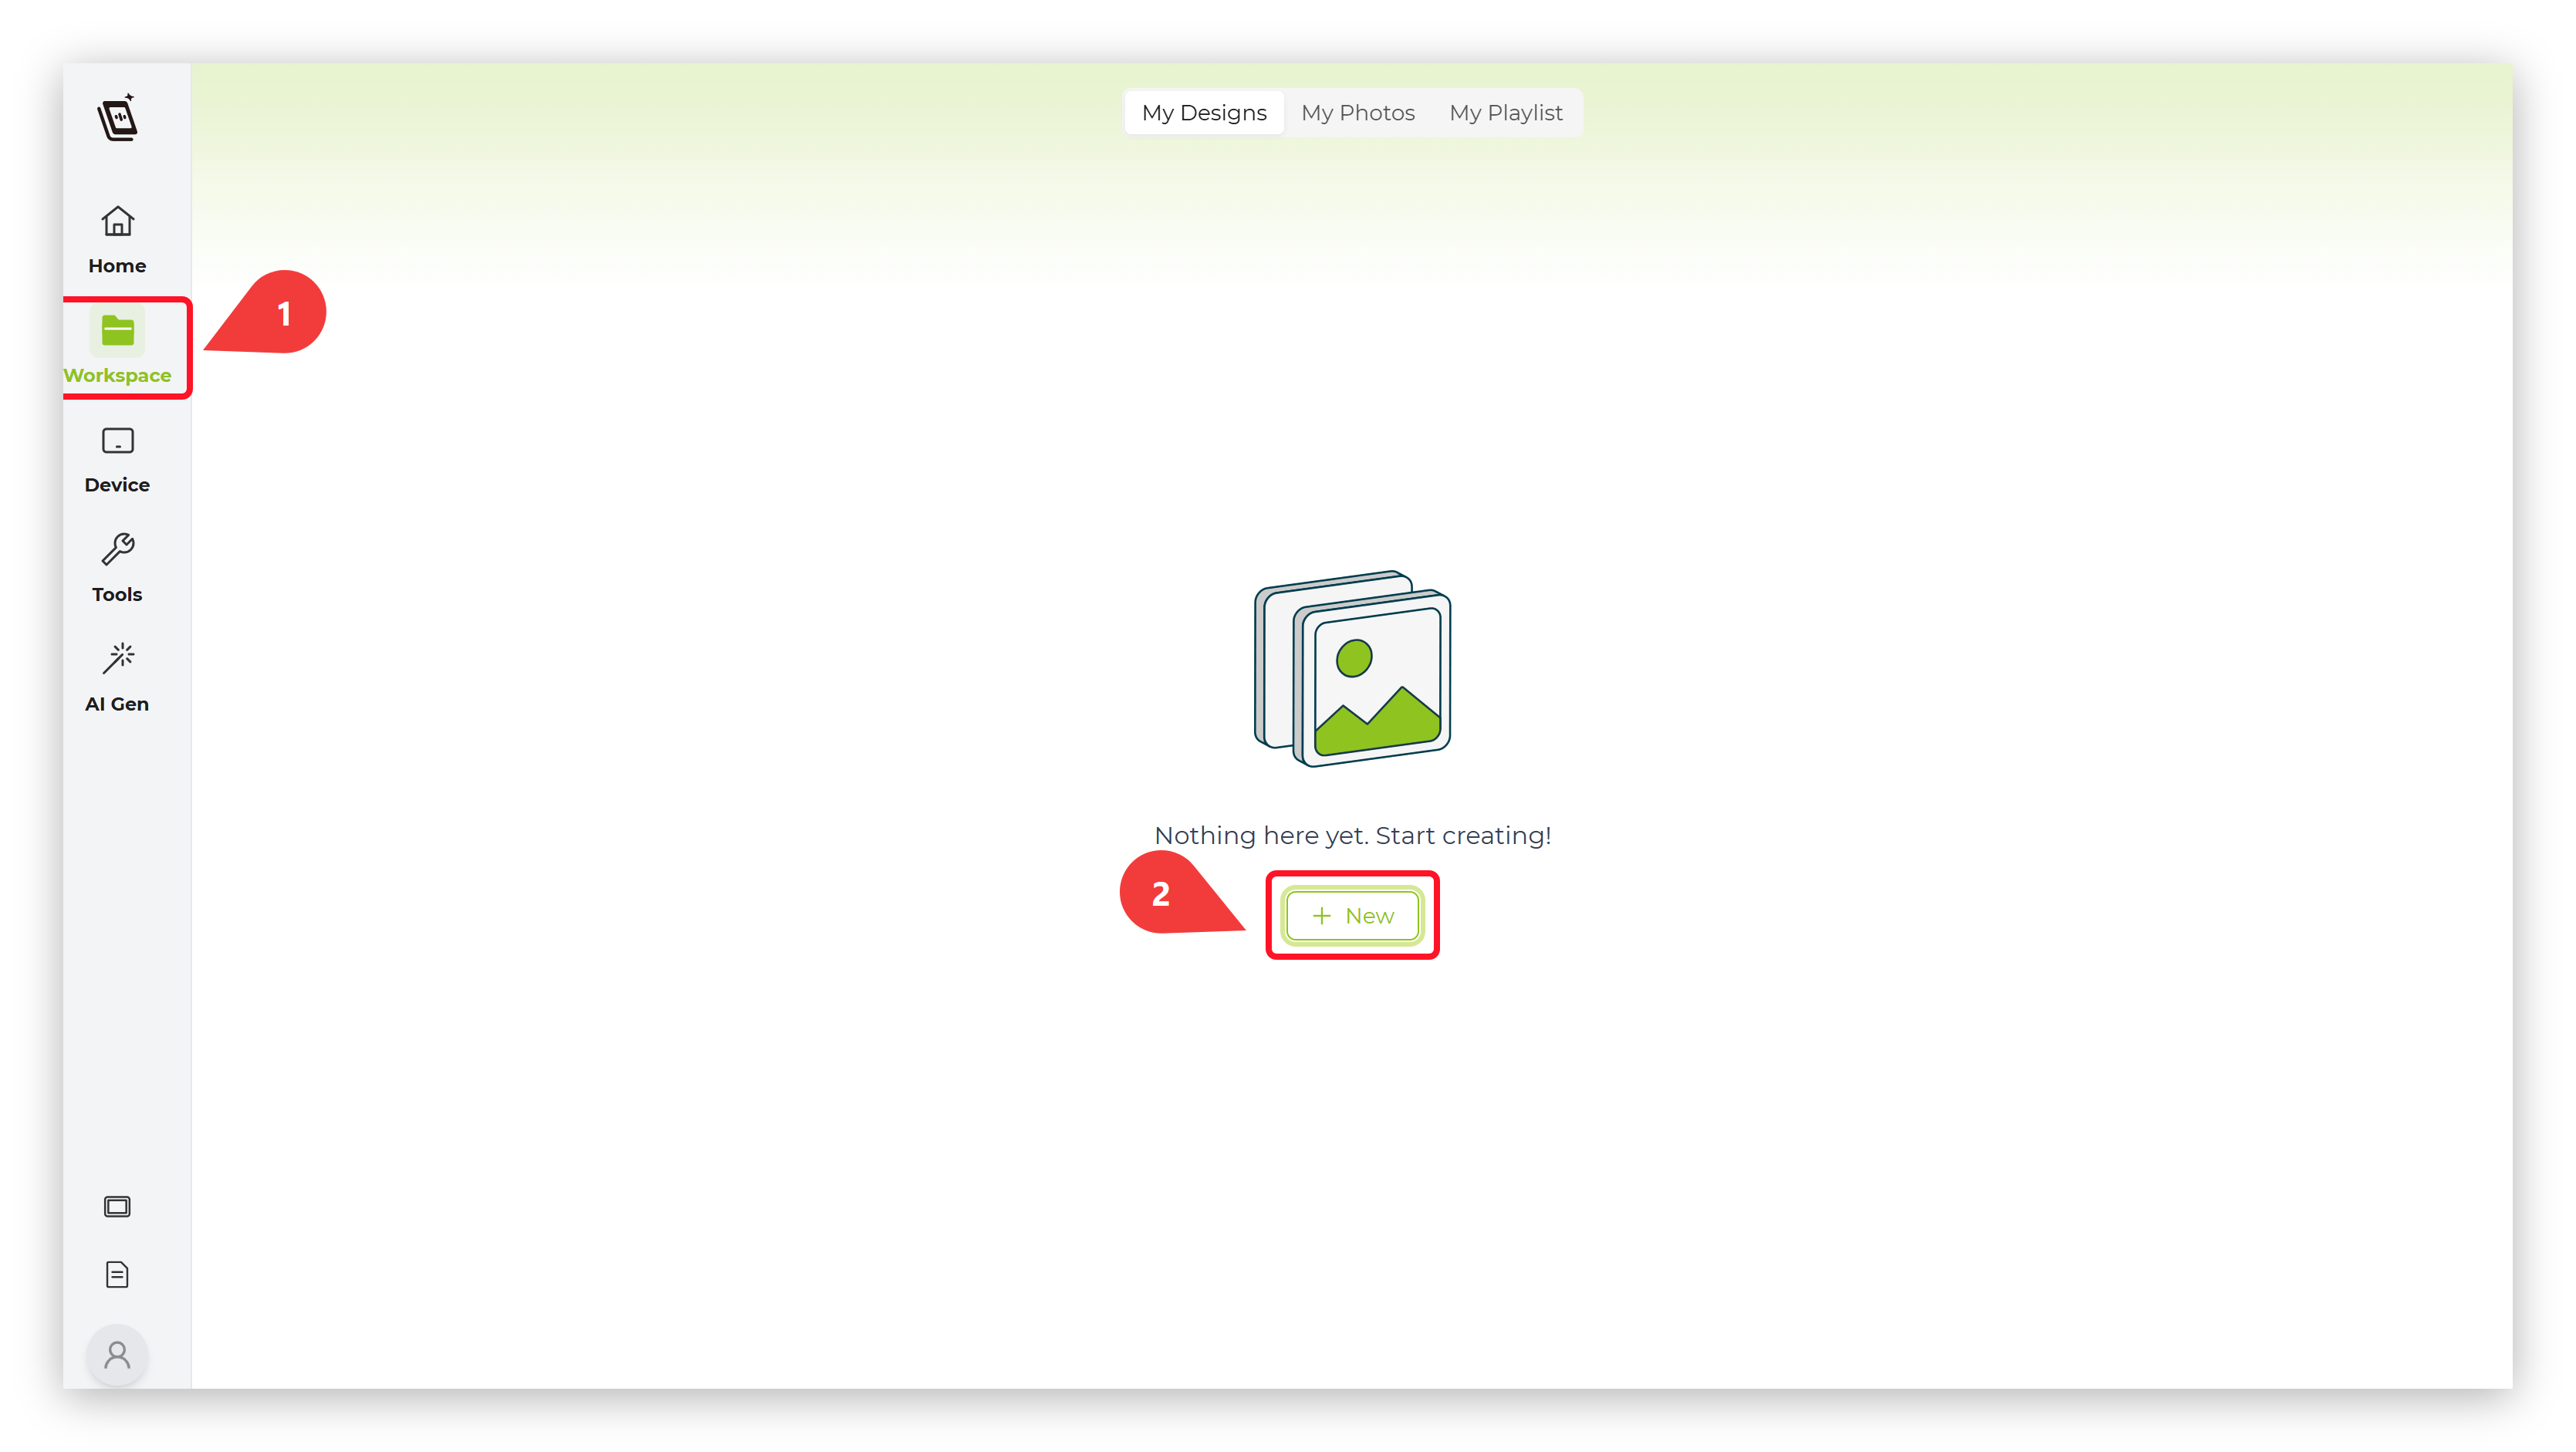
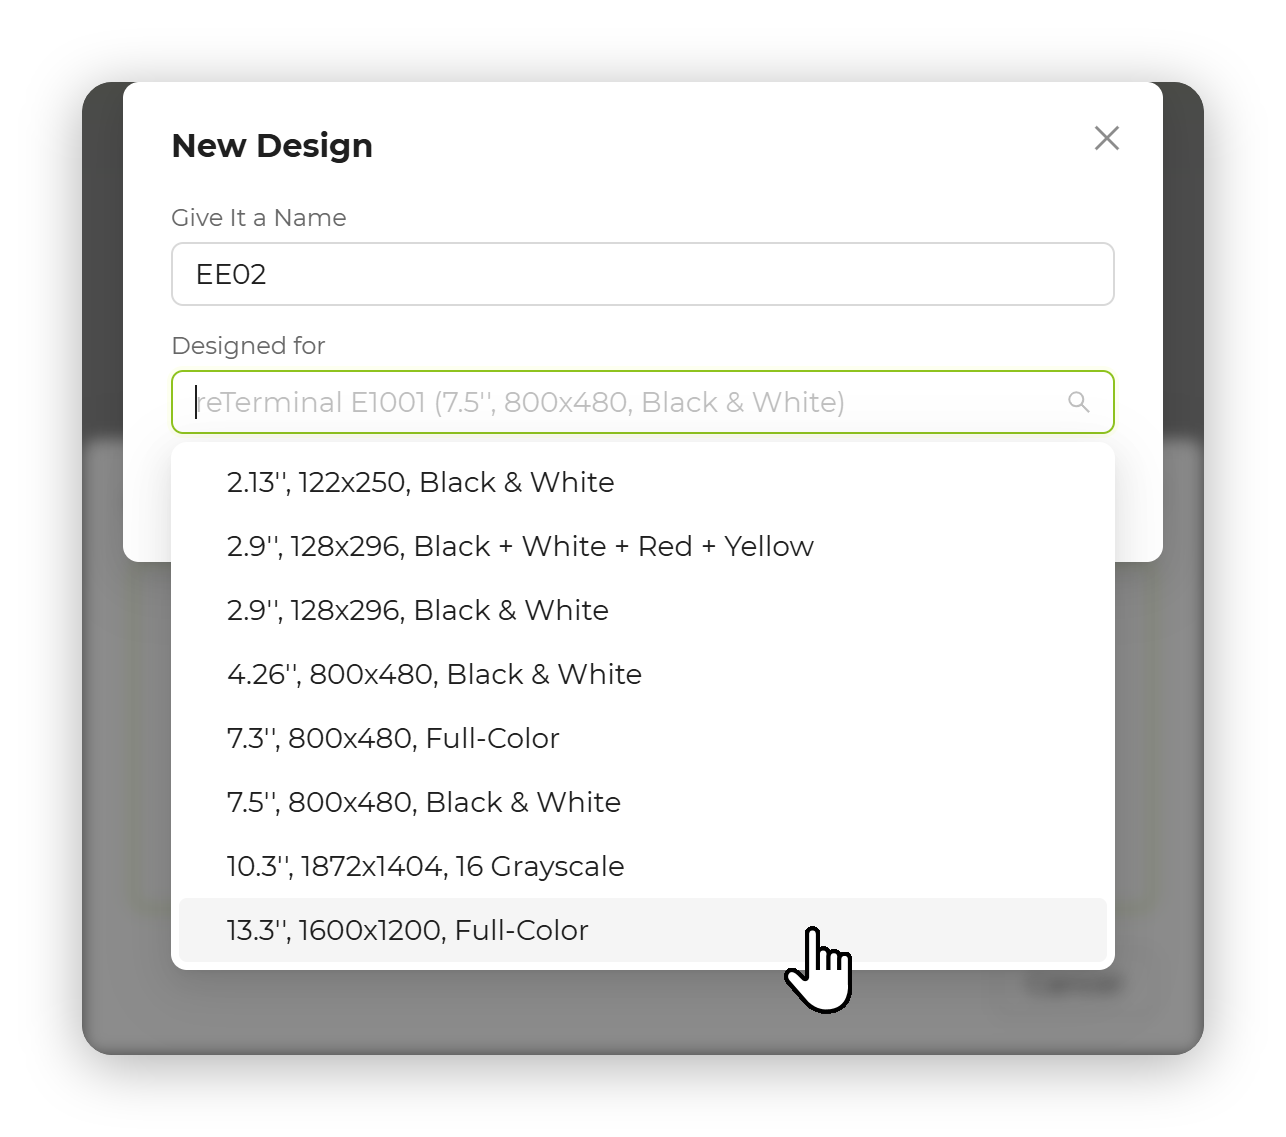
Step 7. Create and Push New Interface On the SenseCraft Seeedash platform, use the editor to create a new interface (e.g., upload an image or design a dashboard).
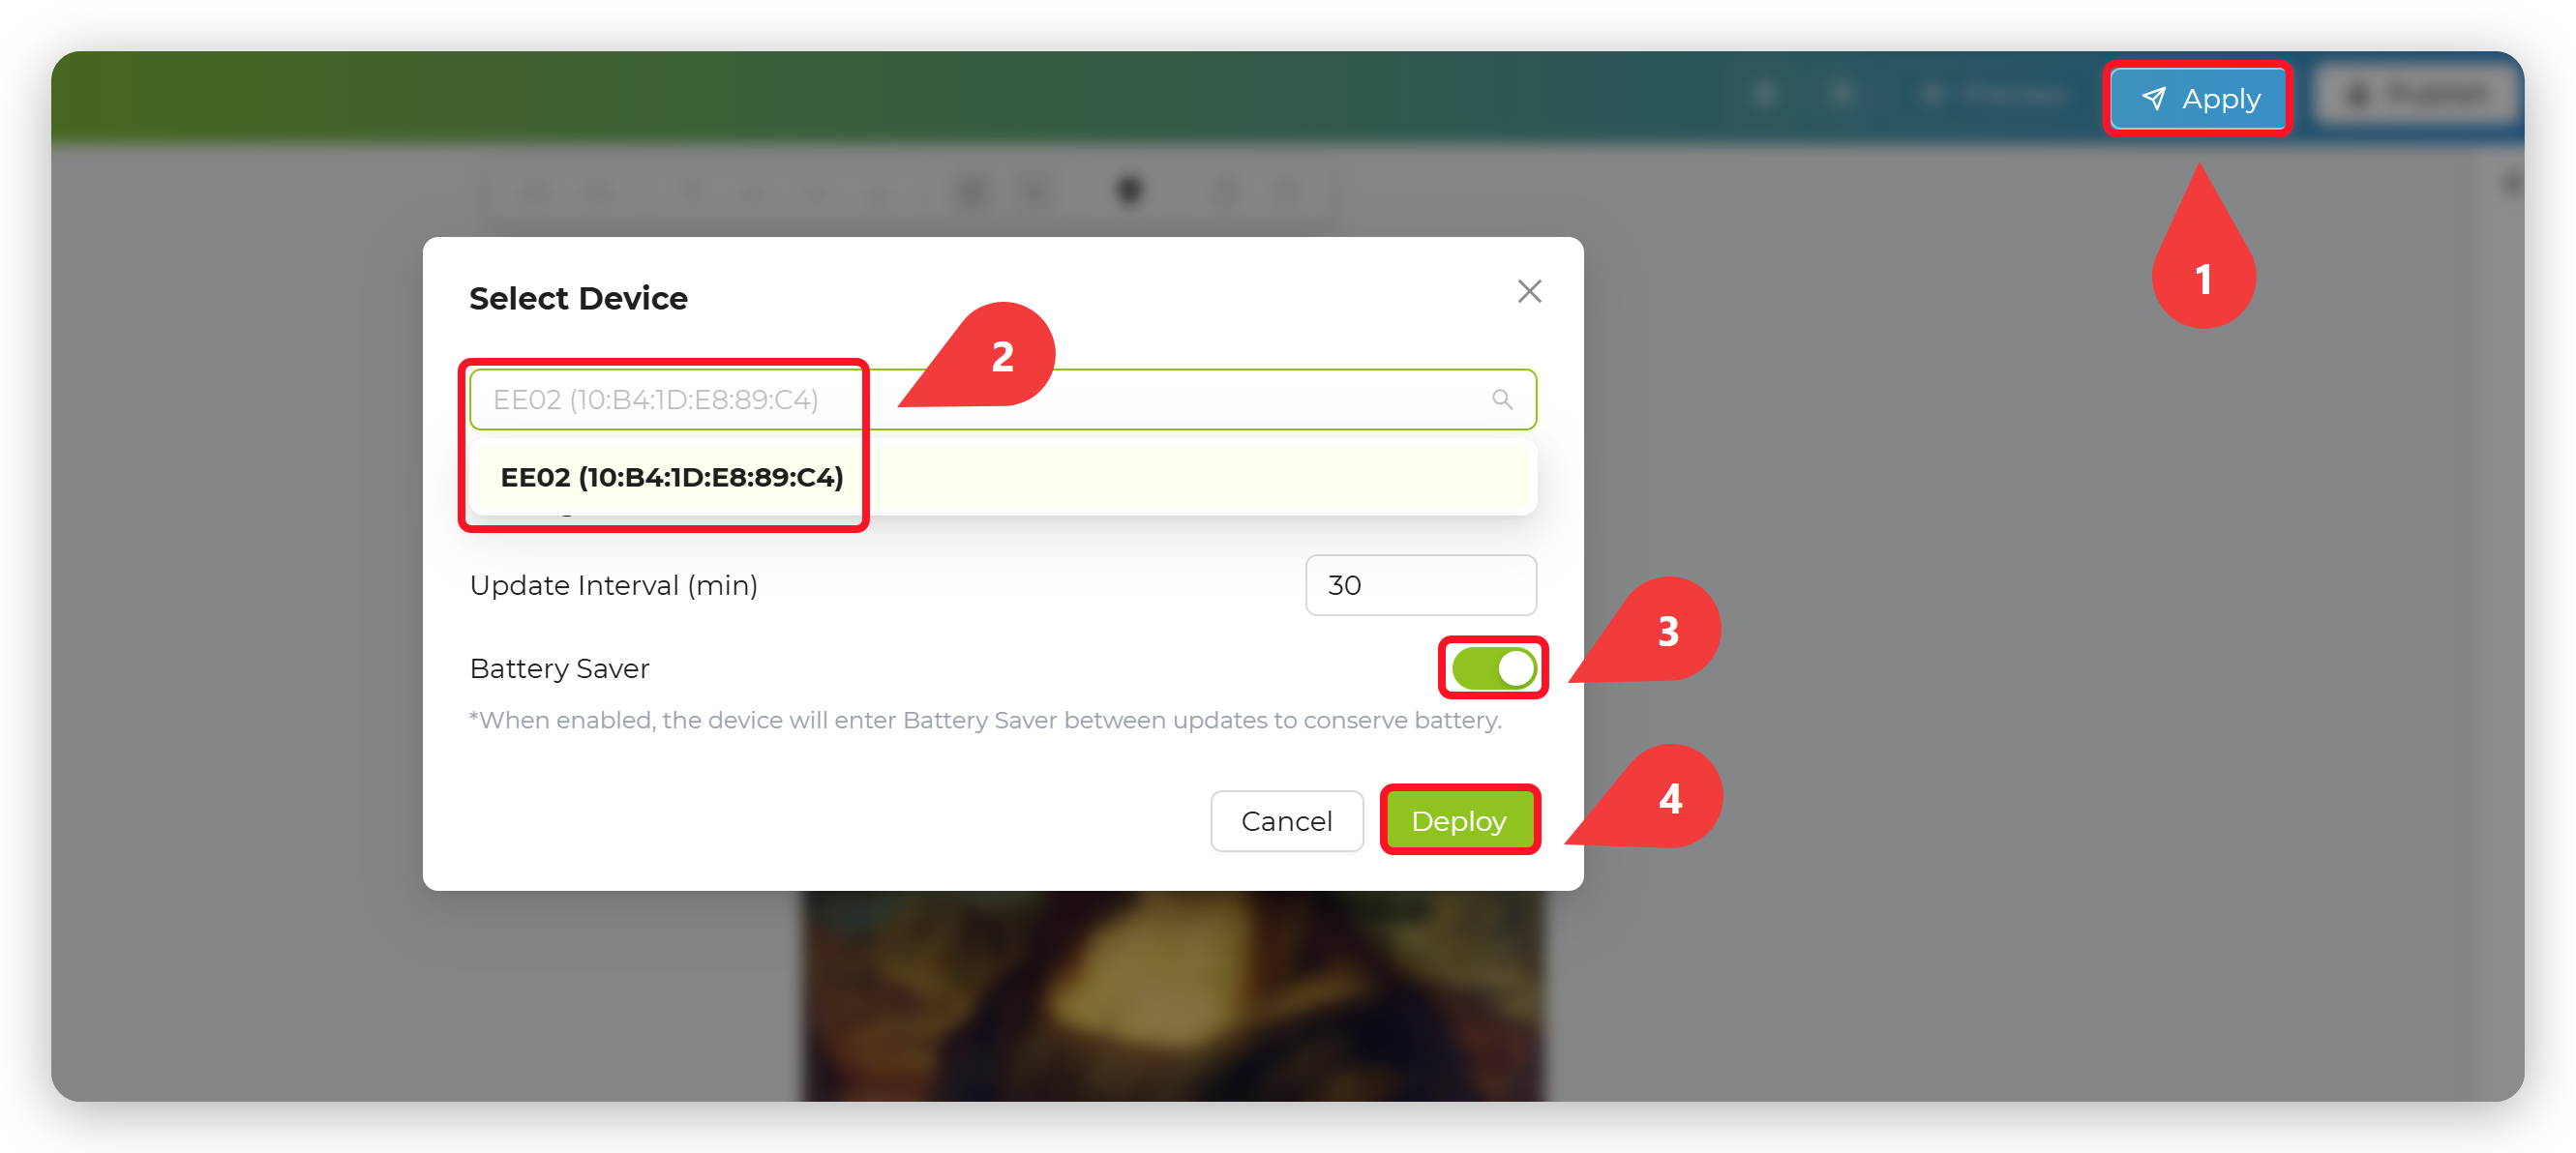
Step 8. Apply your images Once finished, click "Apply" button at the top right corner, and then select the device you want to receive the image. The EE02 will receive the data and refresh the 13.3-inch screen with your new content.
Step 9. Display on the screen
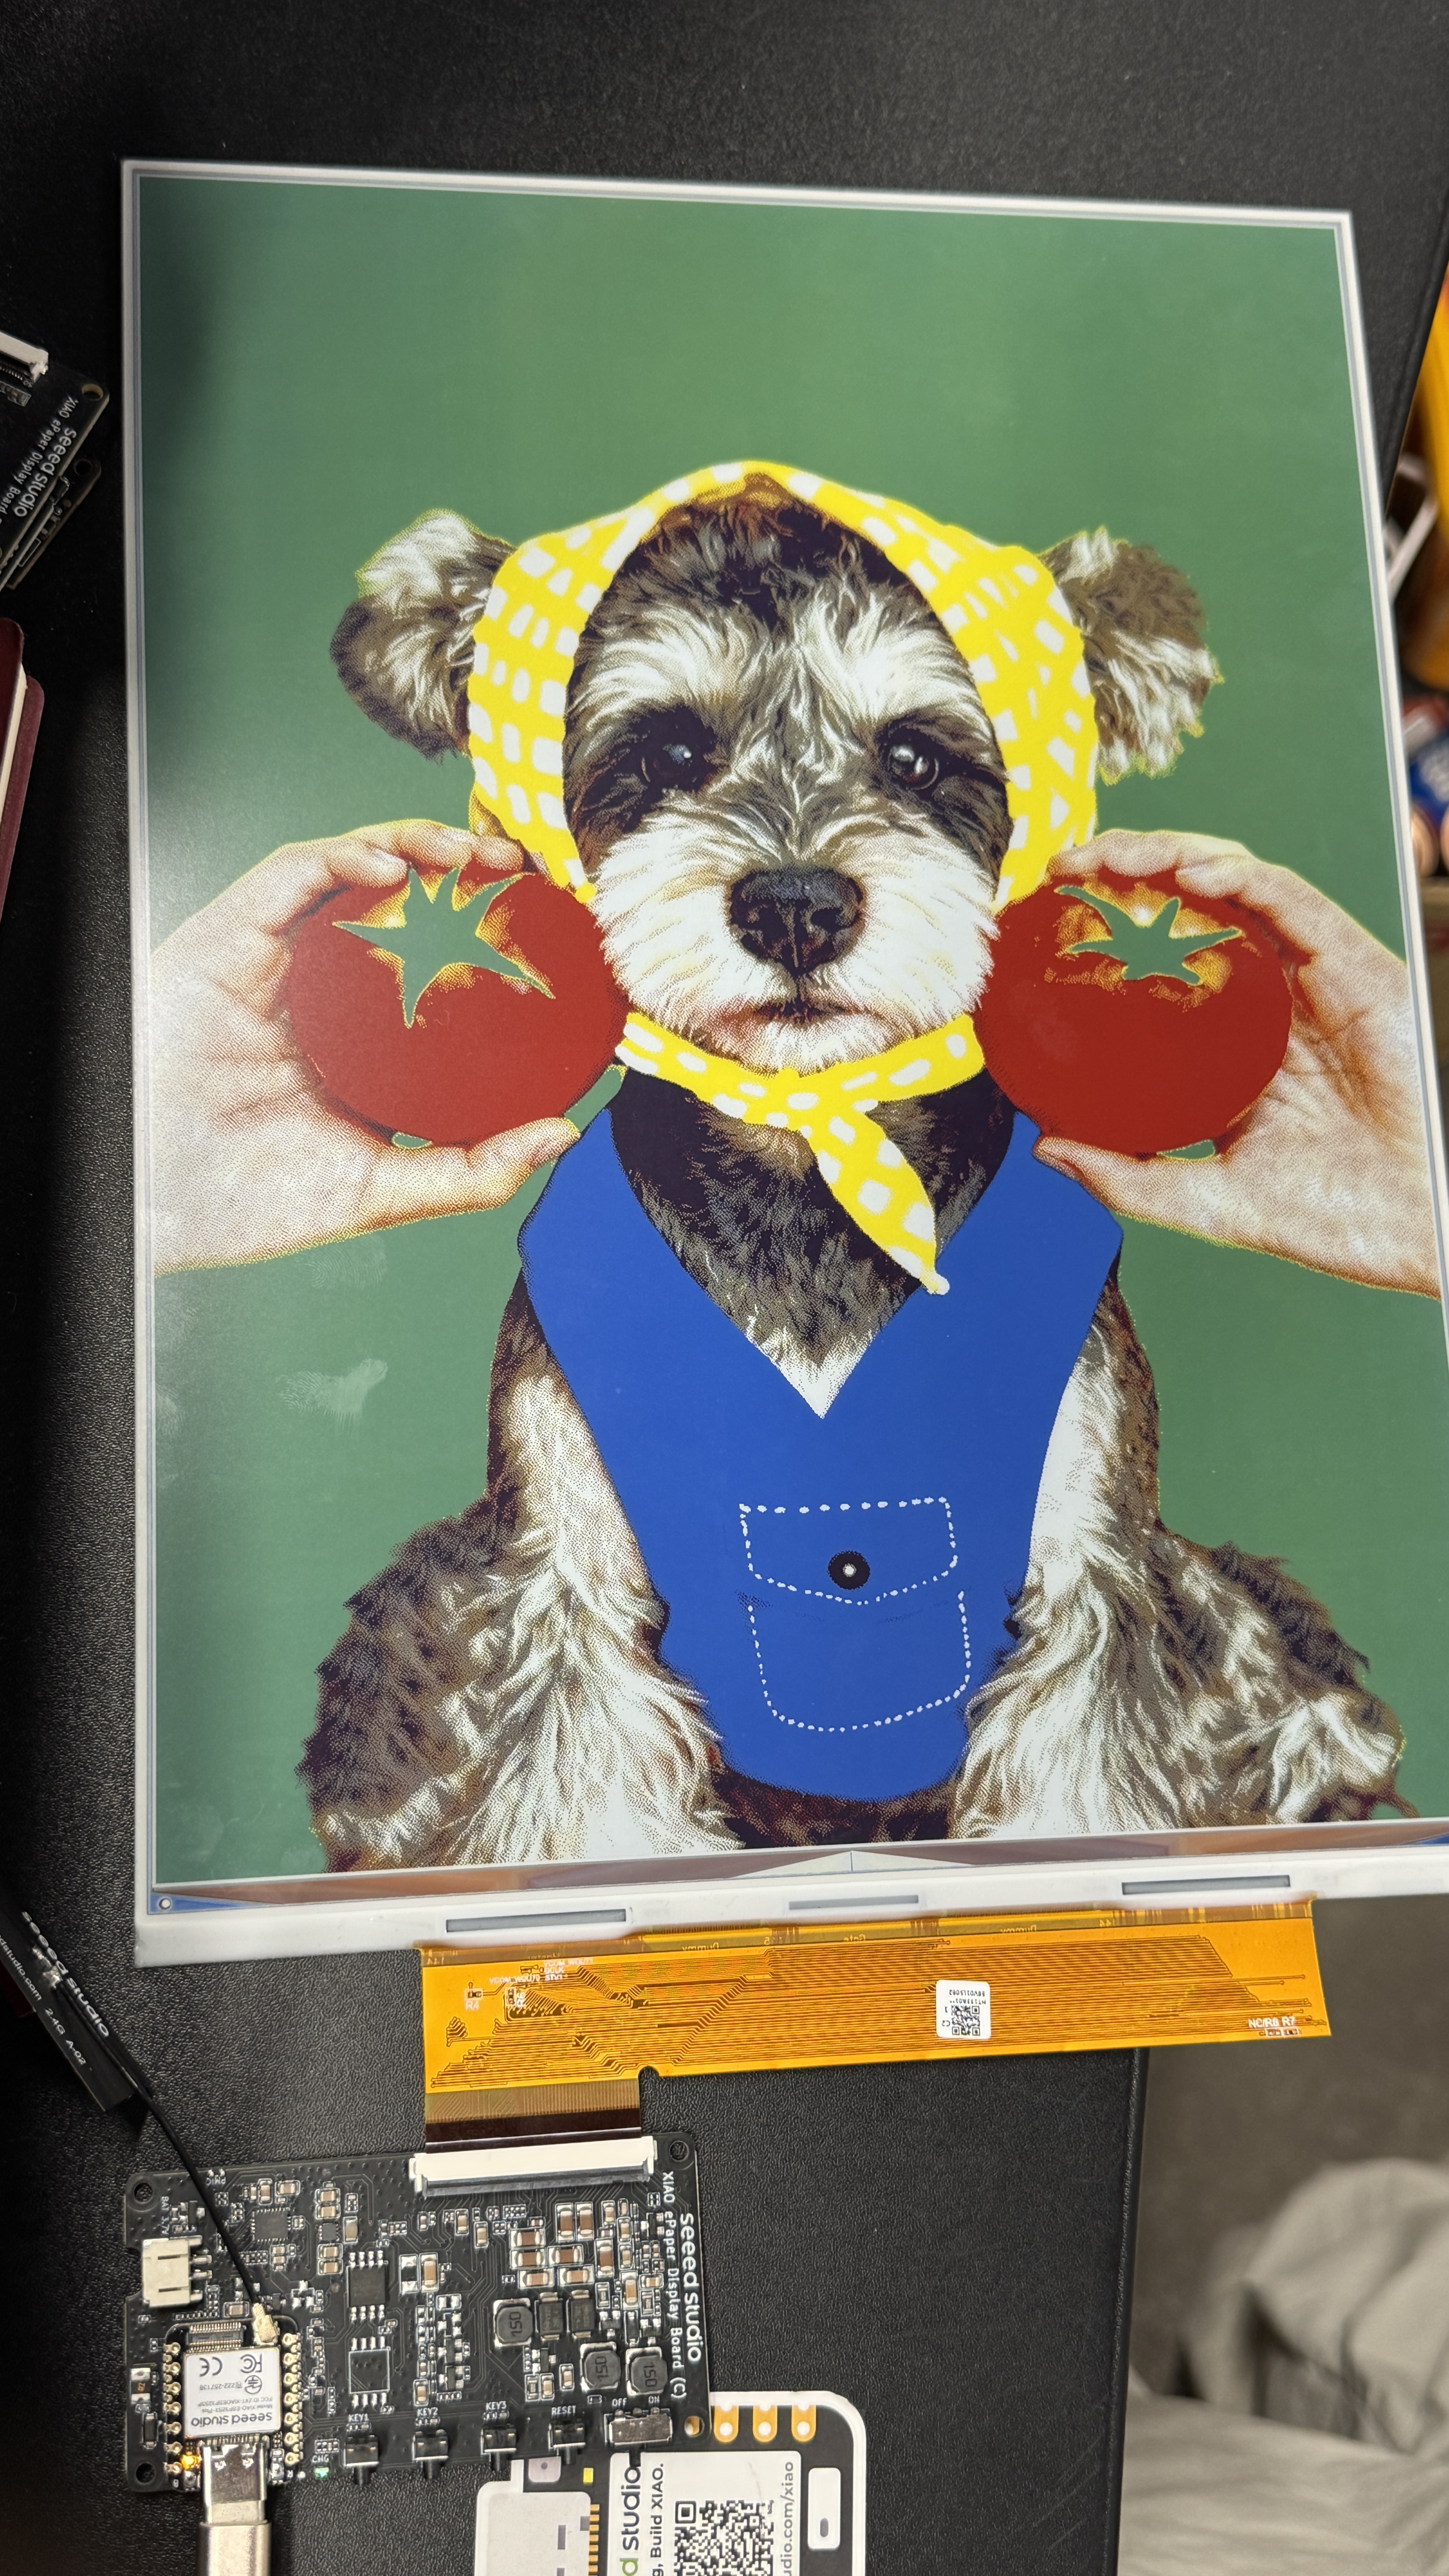
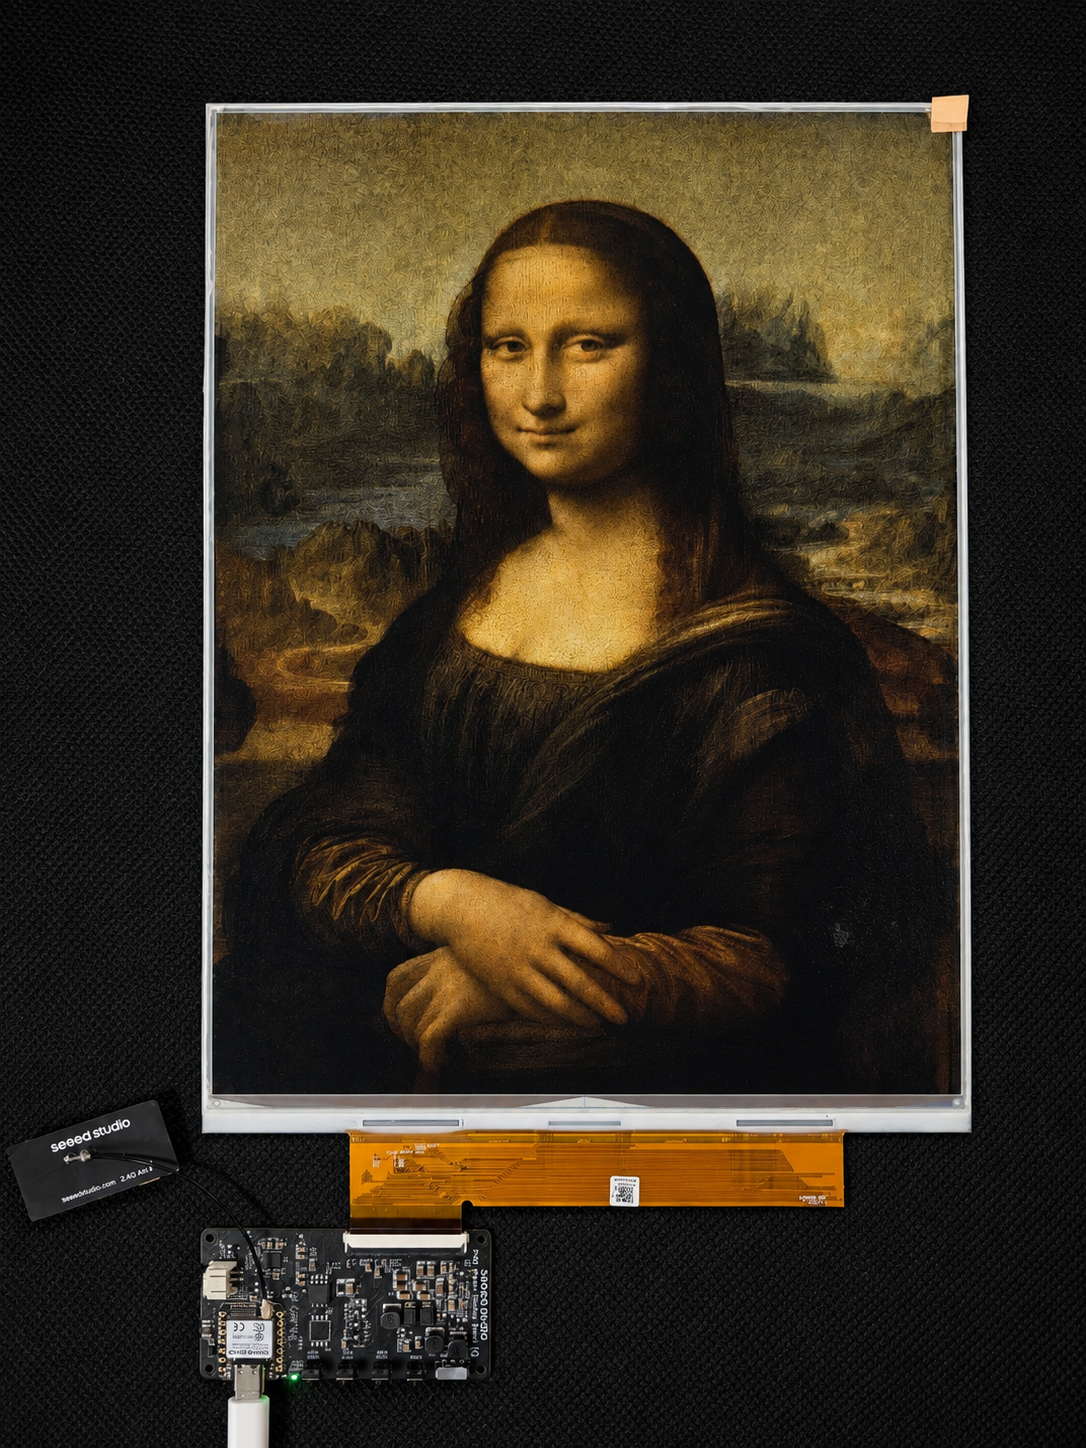
Finally the EE02 will receive the data and refresh the 13.3-inch screen with your new content.
Getting Started with Arduino
Install Seeed GFX2 Library
This library has the same function as the TFT library and is not compatible with it. If you have installed the TFT library or other similar display libraries, please uninstall them first.
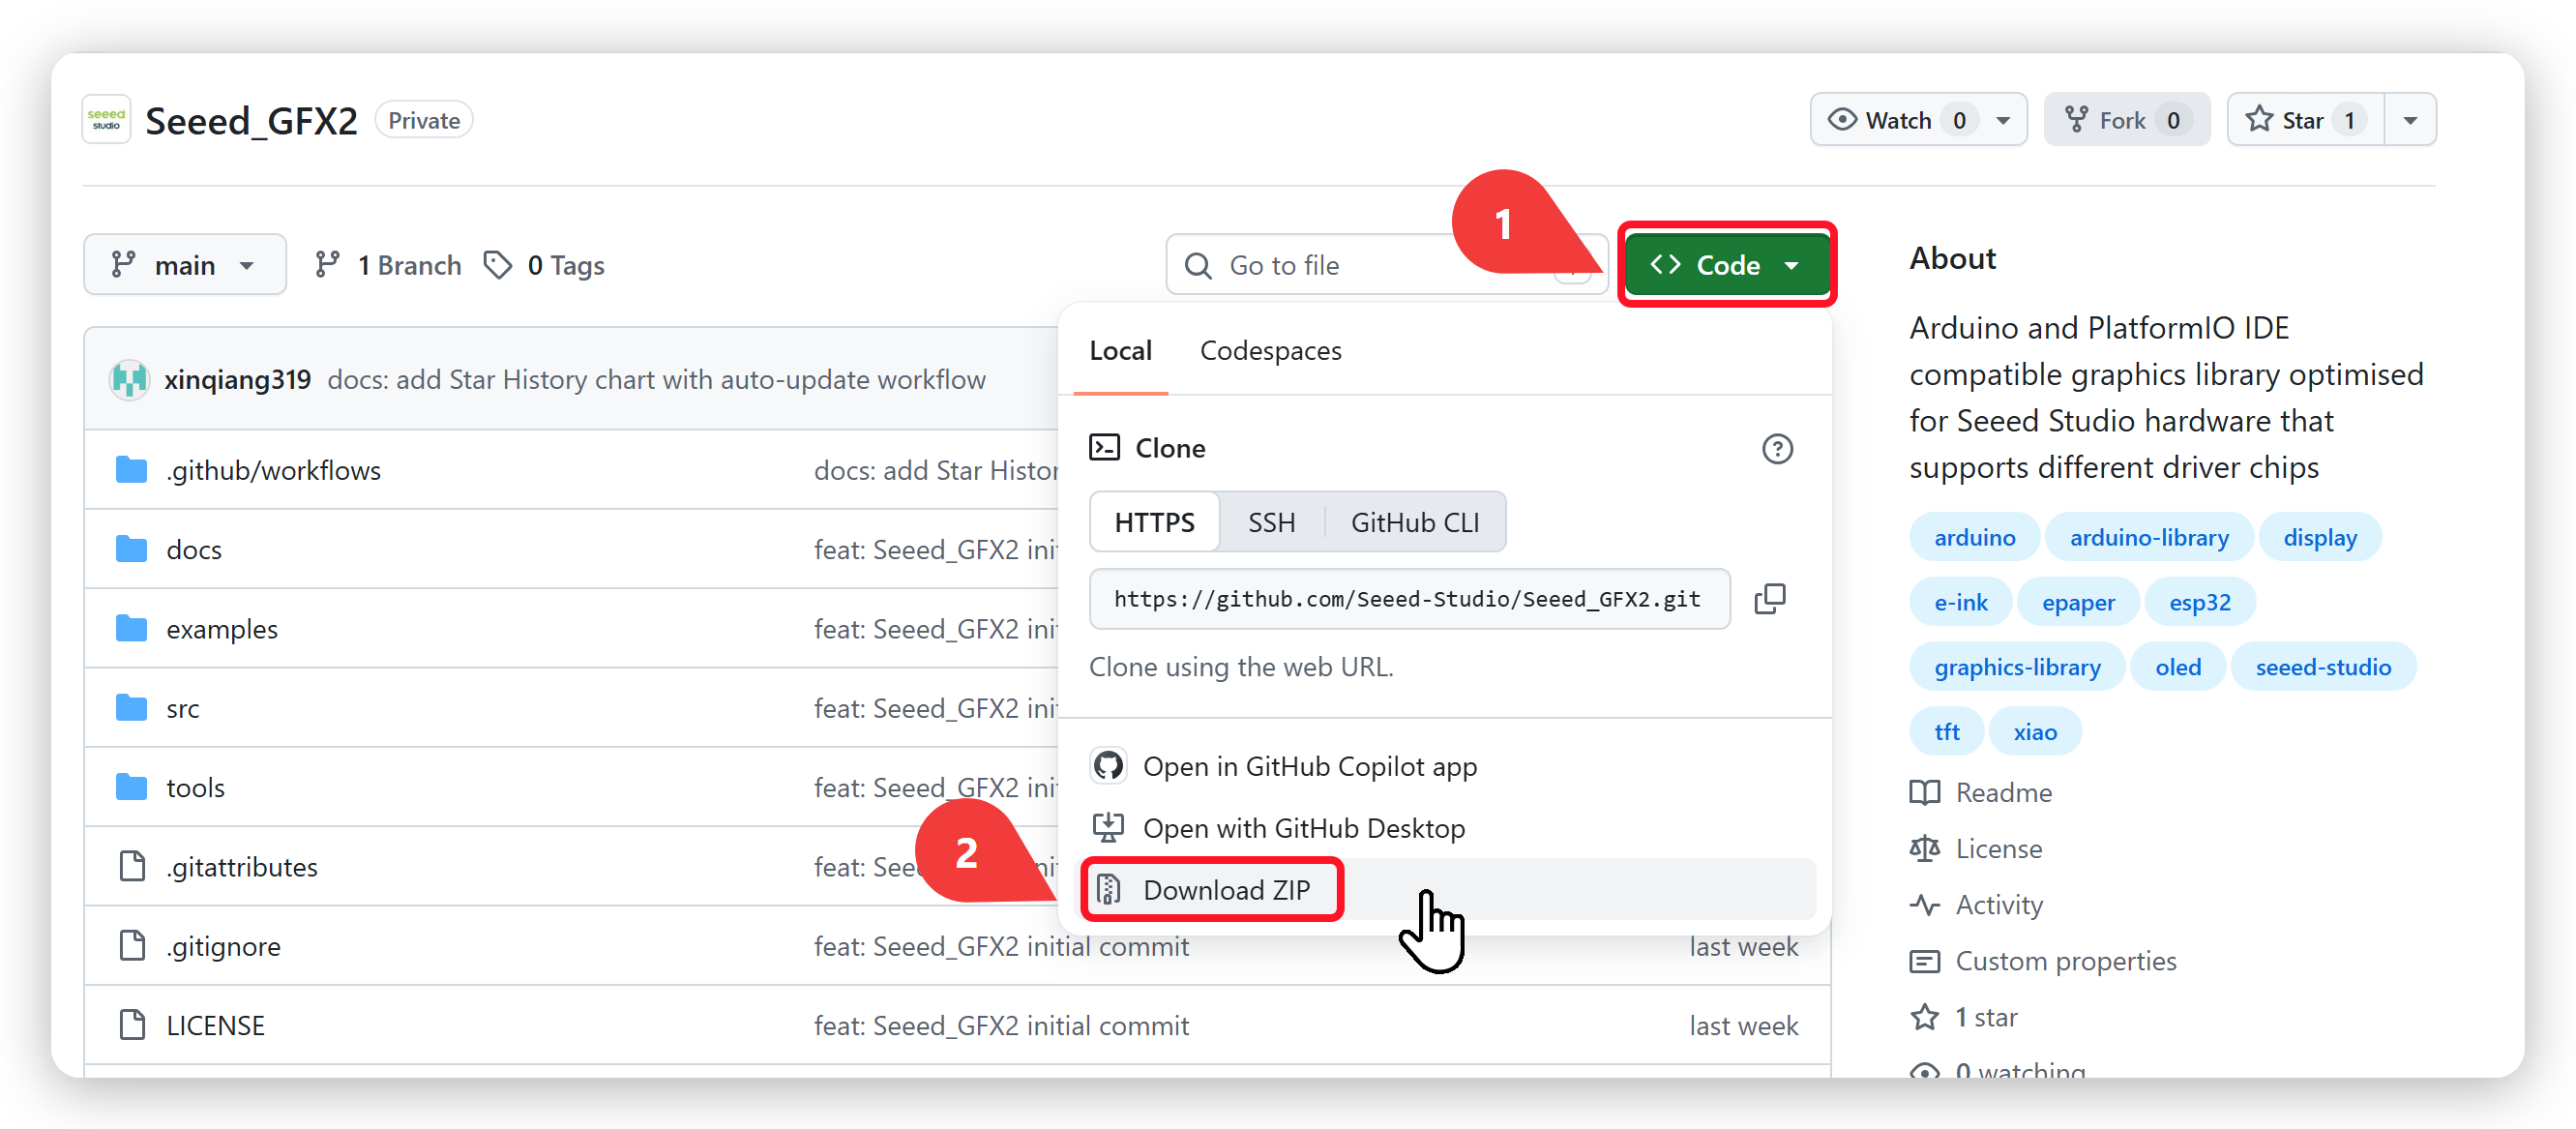
Download and install the Seeed GFX2 library from GitHub.
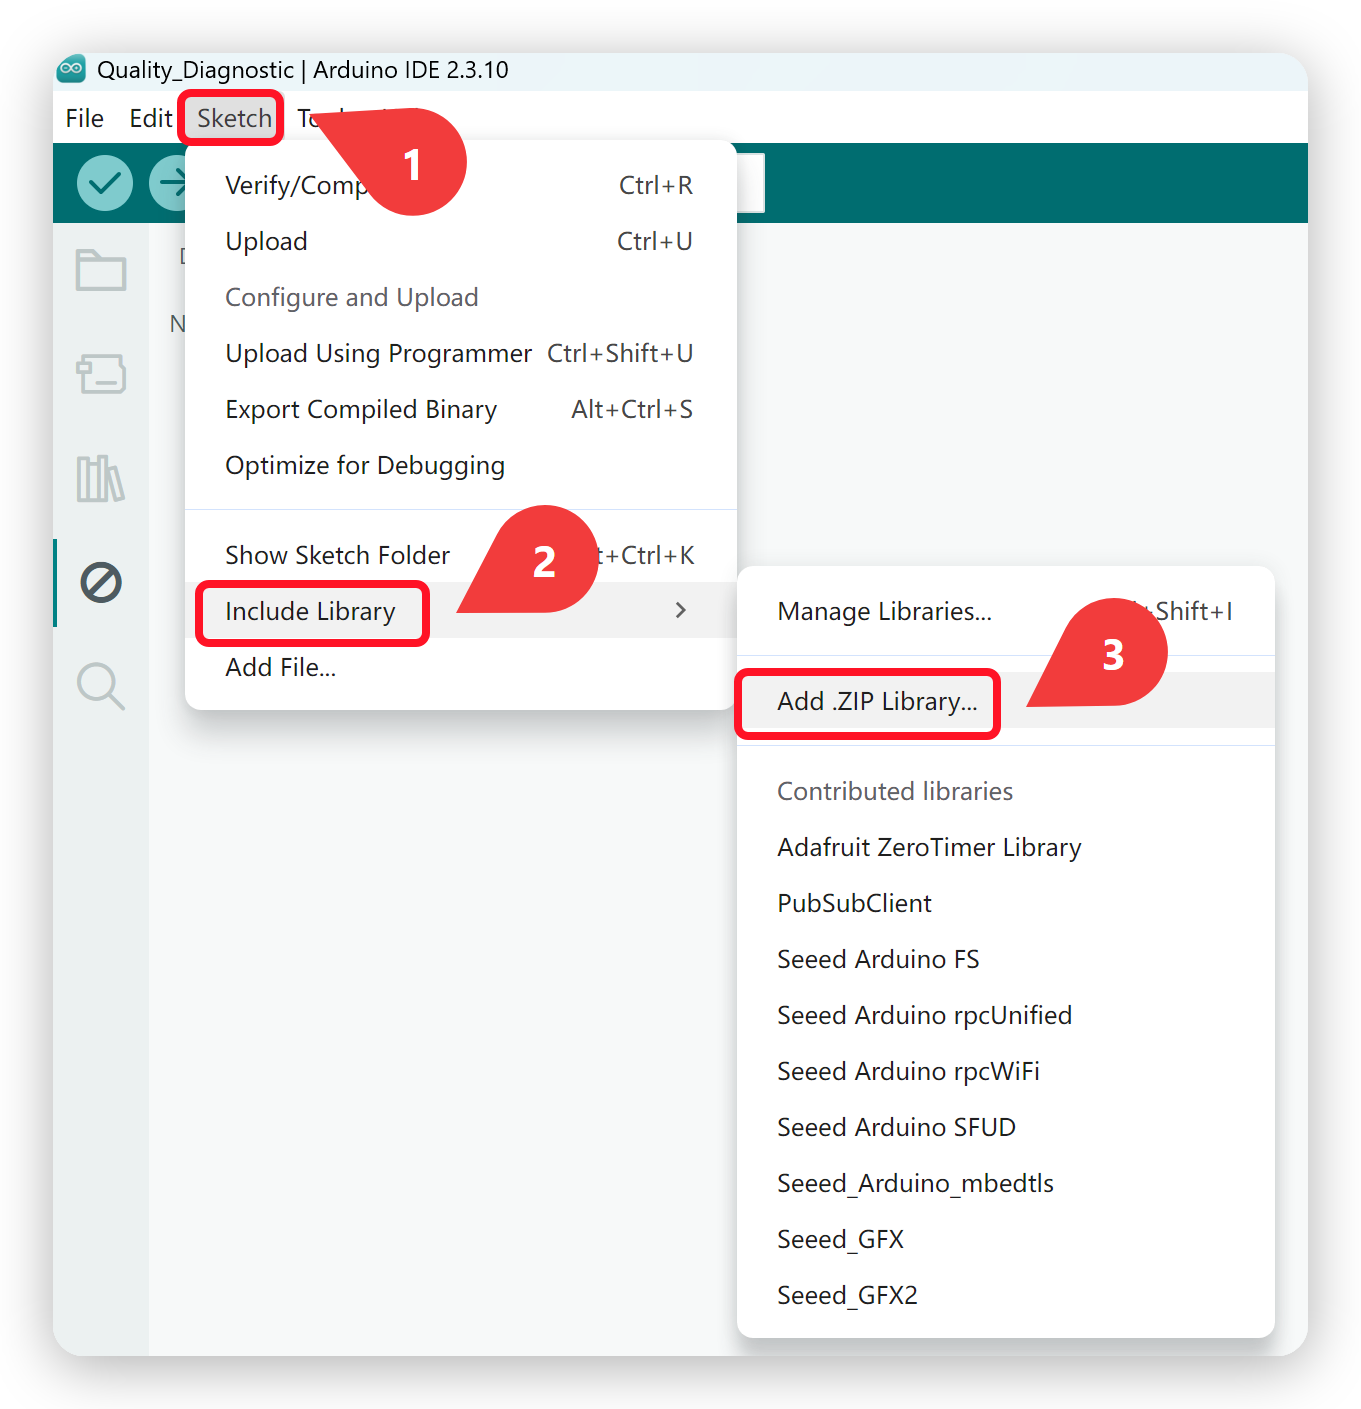
After downloading the library, go to Sketch -> Include Library -> Add .ZIP Library and select the downloaded library.
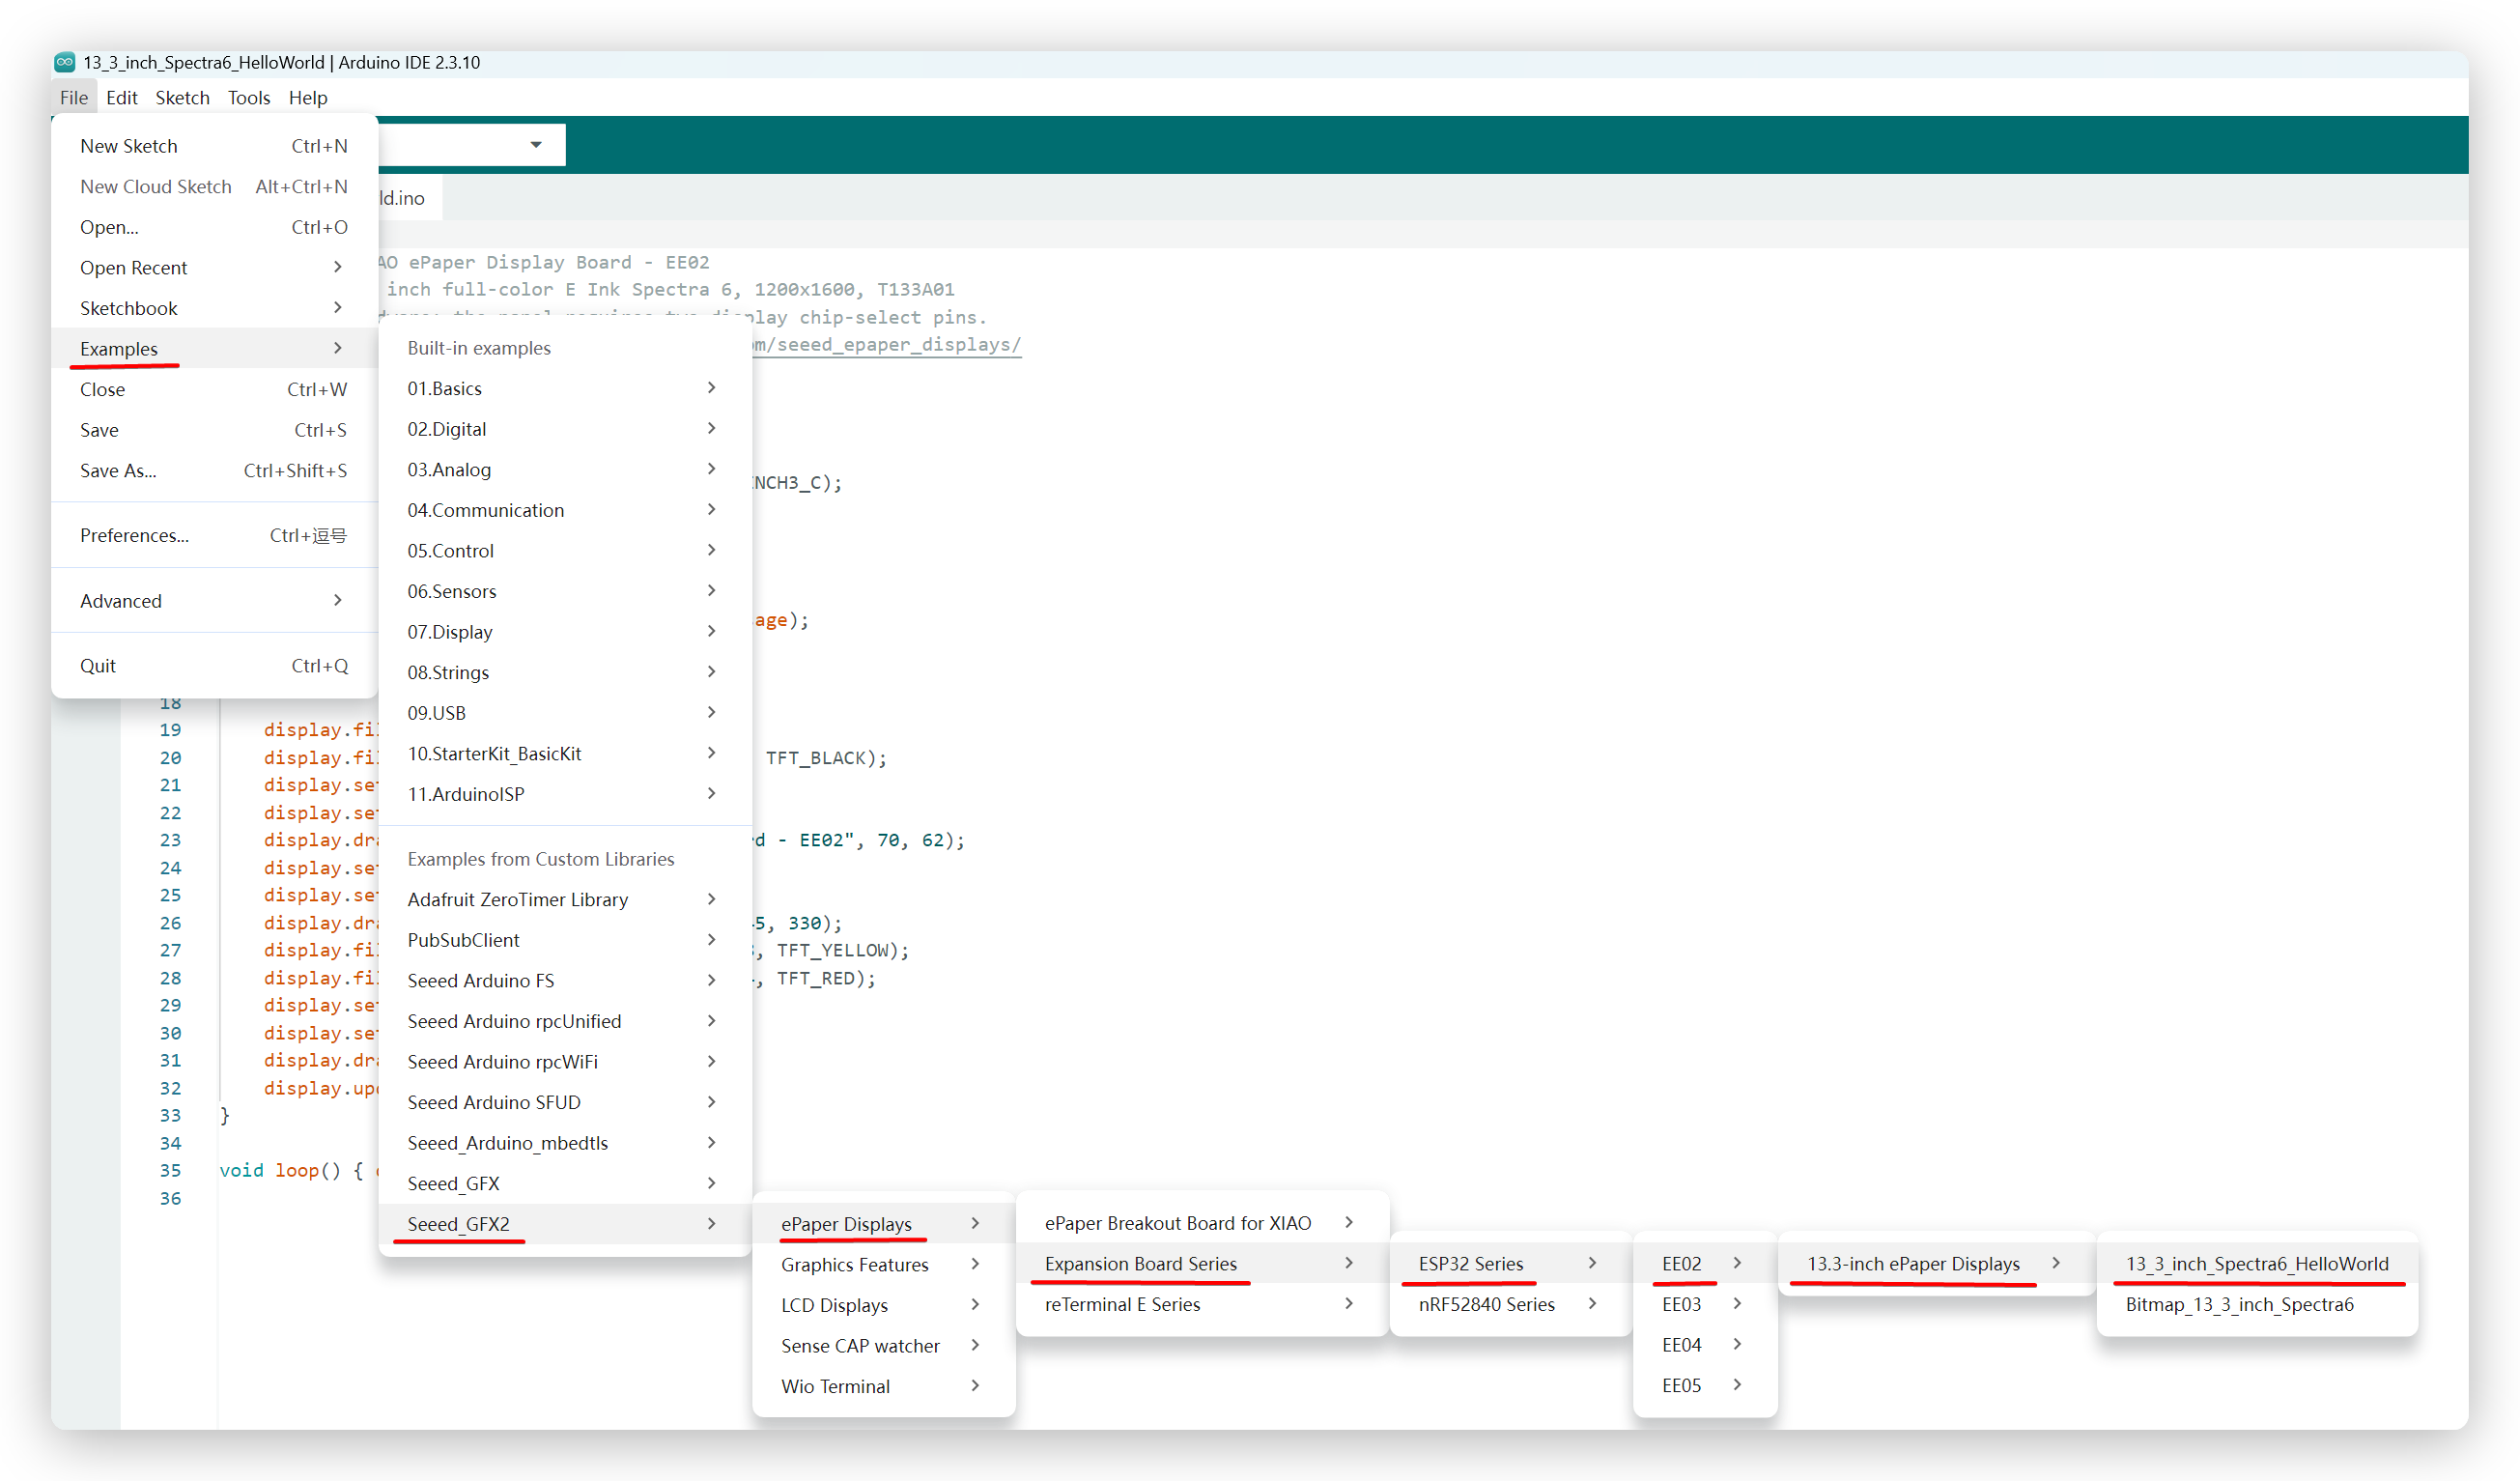
Configure and burn the program
As shown in the image, navigate to the example through this menu: File → Examples → Seeed_GFX2 → ePaper Displays → Expansion Board Series → ESP32 Series → EE02 → 13.3-inch ePaper Displays → 13_3_inch_Spectra6_HelloWorld
After that, go to Tools -> Board -> XIAO ESP32S3 Plus and Tools -> Port -> Select the port your board is connected to.
Note that PSRAM must be enabled.
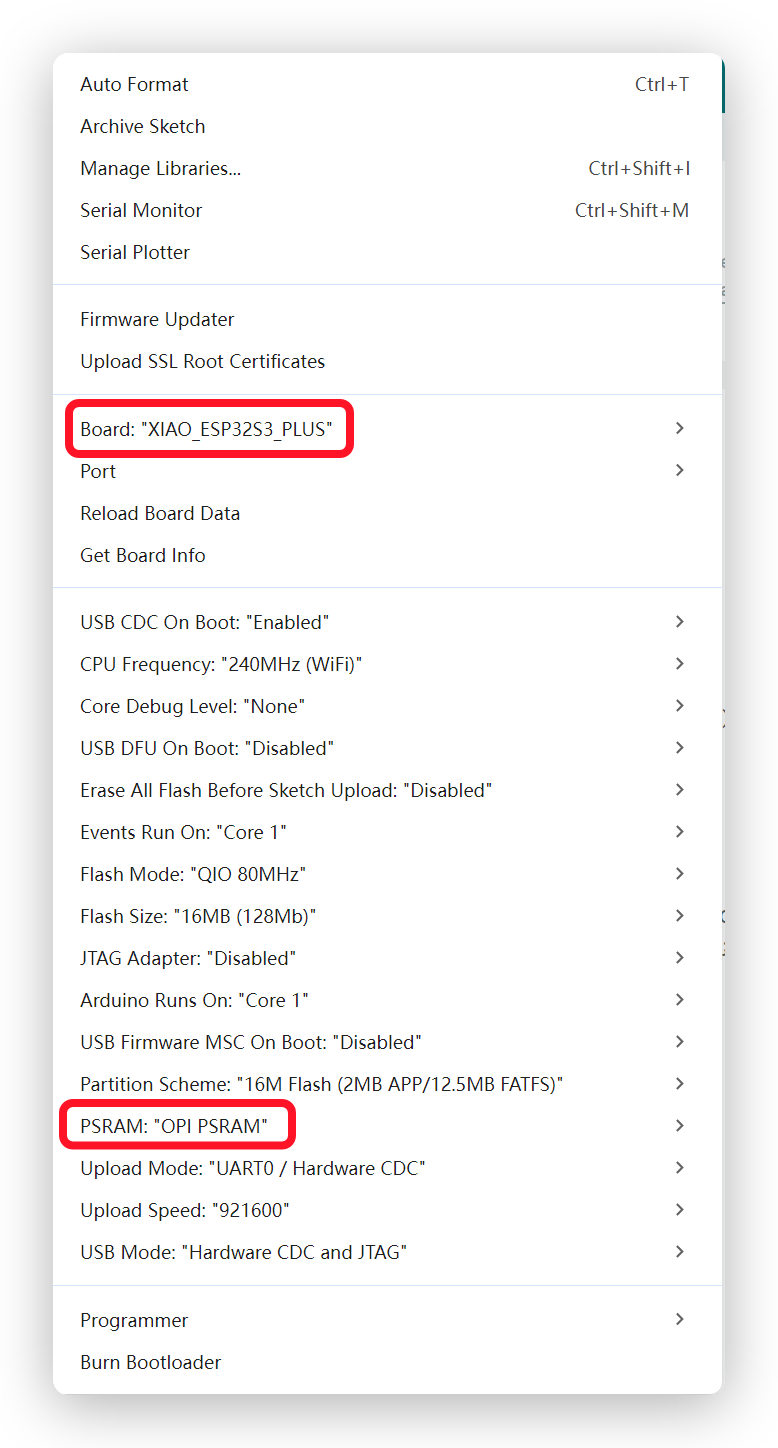
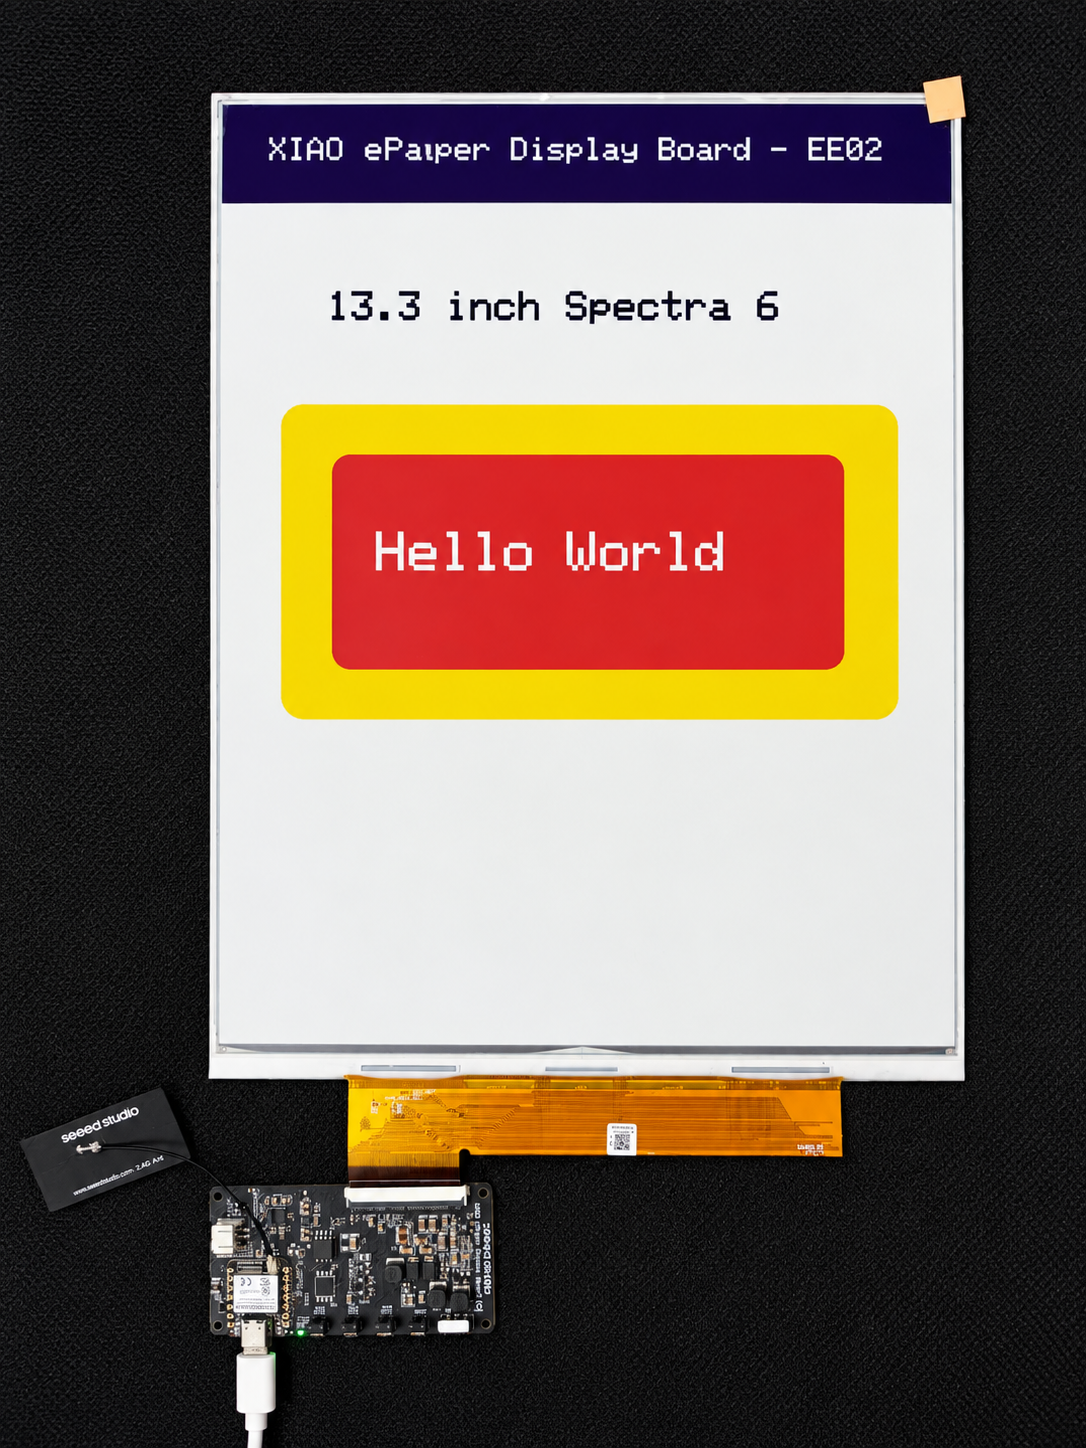
Then click Upload to upload the code. Now you will see the feedback in your epaper screen! Following is the result of the HelloWorld example.
Troubleshooting
Q1: The screen does not refresh after powering on.
- Check if the FPC cable is correctly inserted and locked.
- Ensure the USB Type-C cable provides sufficient power.
- Press the Reset button to restart the board.
- Make sure PSRAM is enabled in the Arduino IDE Tools menu.
Q2: Wi-Fi configuration fails.
- Ensure your Wi-Fi network is 2.4GHz (5GHz is not supported).
- Check if the Wi-Fi password was entered correctly.
- Move closer to the router to ensure a strong signal.
Q3: The screen display is blurry or has ghosting.
- This can happen if the screen hasn't been refreshed for a long time or if the power supply is unstable. Try refreshing the screen again via the Seeedash platform.
Q4: I hear a high-frequency sound during operation.
- This is normal! The ePaper power circuit may produce occasional high-frequency sound during refresh. It does not affect performance or the lifespan of the product.
Q5: I cannot bind the device on SenseCraft Seeedash / pairing fails.
- Double-check that you entered the pairing code correctly (it is case-sensitive).
- Ensure the EE02 is powered on and connected to Wi-Fi (check the screen status).
- Make sure your phone and the EE02 are on the same 2.4GHz Wi-Fi network during setup.
- If the device shows as offline, press the Reset button and try pairing again.
Resources
- [PDF] 13.3 E6 eInk Display module Datasheet
- [PDF] Seeed Studio XIAO ePaper Display EE02 Schematic
- [ZIP] Seeed Studio XIAO ePaper Display EE02 PCBA&SCH
Tech Support & Product Discussion
Thank you for choosing our products! We are here to provide you with different support to ensure that your experience with our products is as smooth as possible. We offer several communication channels to cater to different preferences and needs.