Getting Started with Matter Quickly with XIAO ESP32 Series
This article is the second tutorial in the Seeed Studio XIAO ESP32 Development Matter series. If you haven't configured your ESP-IDF environment yet, please read the first tutorial first:
This tutorial applies to the XIAO ESP32C3, XIAO ESP32S3. The Matter example provided by Espressif is temporarily unavailable for the XIAO ESP32C6 because the GPIO8 pin is not pinned out.
In the world of smart home technology, Matter has emerged as a game-changer, promising to revolutionize the way devices communicate and interact with each other. Matter is an open-source, standardized protocol that enables seamless interoperability between smart home devices from various manufacturers. By providing a common language and framework, Matter aims to simplify the development and deployment of IoT devices, creating a more connected and user-friendly smart home experience.
As a developer or enthusiast, you may be eager to explore the potential of Matter and start building your own Matter-compatible devices. That's where the XIAO ESP32 series and ESPLaunchPad come into play. The XIAO ESP32 series, particularly the XIAO ESP32C3, XIAO ESP32S3 and XIAO ESP32C6, are compact and powerful development boards that offer an ideal platform for creating Matter devices. With their robust features and extensive peripheral interfaces, these boards provide the necessary hardware foundation for your Matter projects.
To streamline the development process and make it more accessible, Espressif Systems has introduced ESPLaunchPad, a comprehensive platform that simplifies the firmware flashing and provisioning of ESP32 devices. ESPLaunchPad leverages the power of the ESP RainMaker ecosystem, allowing you to easily configure and control your devices using a smartphone app. By combining the XIAO ESP32 series with ESPLaunchPad, you can quickly get started with Matter development and experience the benefits of this transformative protocol.
In this tutorial, we will guide you through the process of using ESPLaunchPad to swiftly flash firmware onto your XIAO ESP32 board and pair it with your iPhone using a QR code. By following these steps, you'll be able to establish a connection between your phone and the XIAO ESP32 device, enabling you to control and interact with it seamlessly. This hands-on experience will provide you with a foundational understanding of Matter and its potential in the smart home ecosystem.
Throughout this tutorial, you'll learn how to:
- Set up your XIAO ESP32 board and prepare it for firmware flashing.
- Use ESPLaunchPad to effortlessly flash the Matter firmware onto your XIAO ESP32 device.
- Pair your XIAO ESP32 board with your iPhone using a QR code.
- Control and interact with your Matter device using the iPhone app.
- Explore the basic functionalities and capabilities of Matter in a practical setting.
By the end of this tutorial, you'll have gained a solid understanding of Matter and its implementation using the XIAO ESP32 series and ESPLaunchPad. You'll be equipped with the knowledge and skills to take your Matter development further, creating innovative smart home solutions that leverage the power of this groundbreaking protocol.
So, let's dive in and embark on an exciting journey into the world of Matter with the XIAO ESP32 series and ESPLaunchPad!
Prepare the Software
The following lists the systems and versions supported for use in this tutorial.
- Host: Ubuntu 22.04 LTS (Jammy Jellyfish) or macOS 10.15 or later.
Prepare the Hardware
At the end of this tutorial, we will show you how to add the XIAO ESP32 series as a Matter Endpoint to Apple Home to control the LED strips through Apple's ecosystem. So far, this tutorial supports the following XIAOs, and you can choose them directly for the content of this course.
| XIAO ESP32C3 | XIAO ESP32S3 |
|---|---|
 |  |
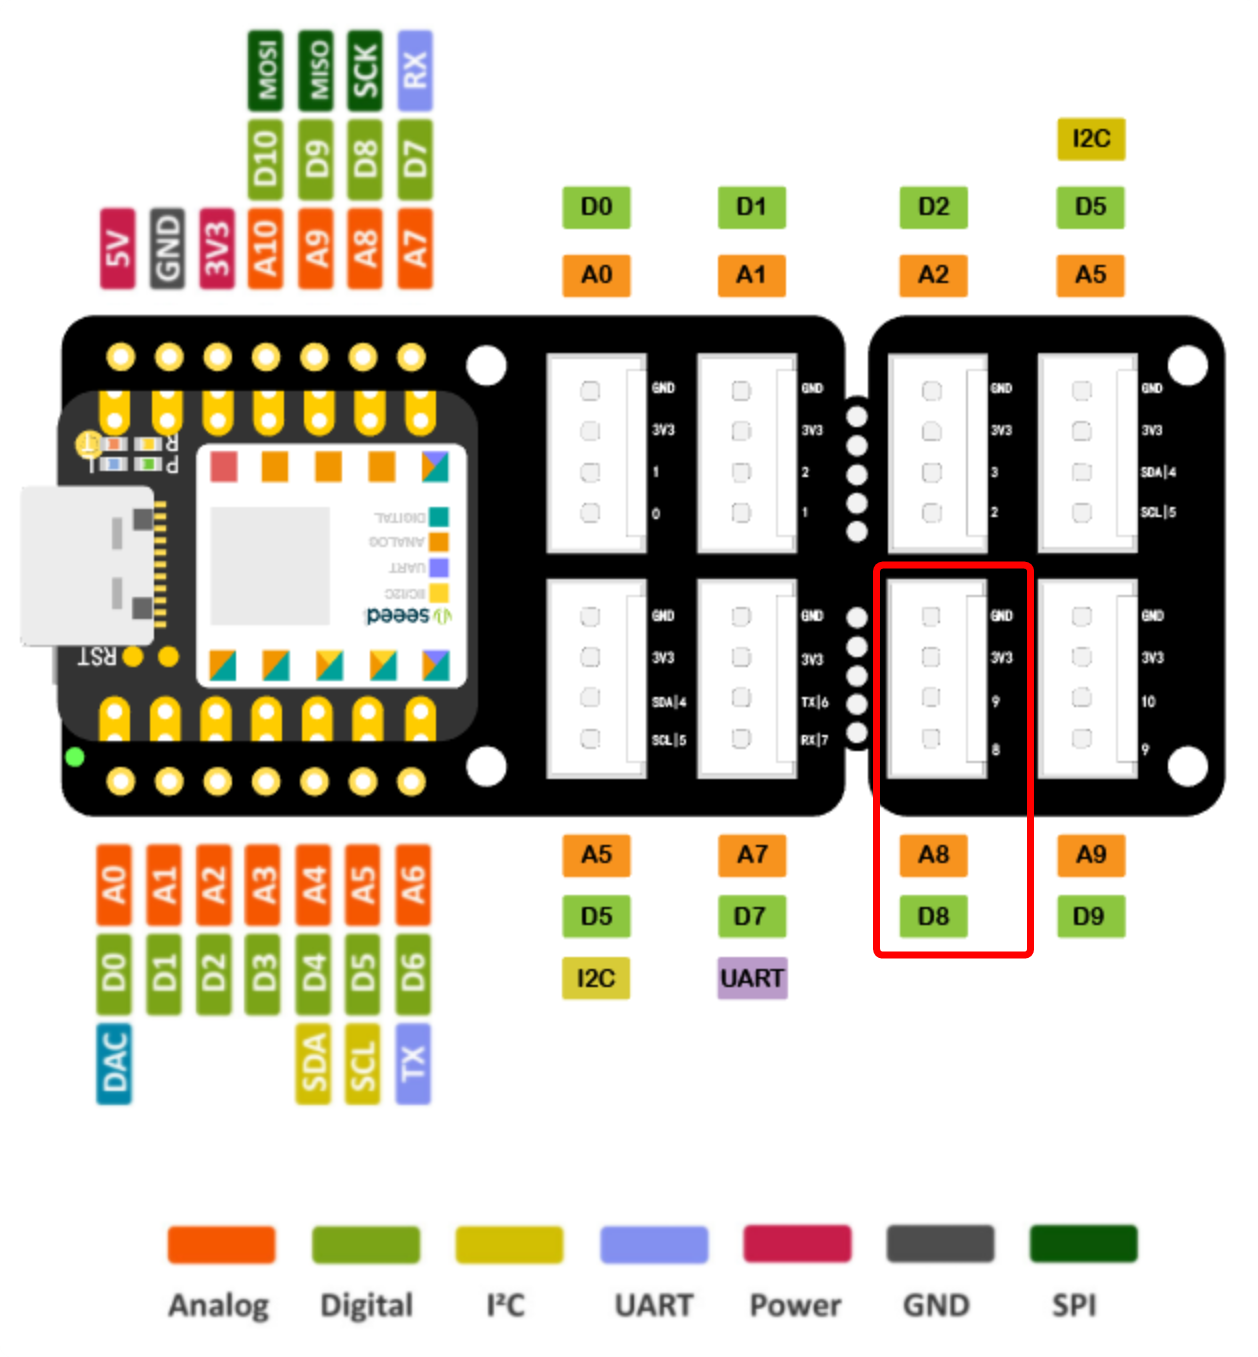
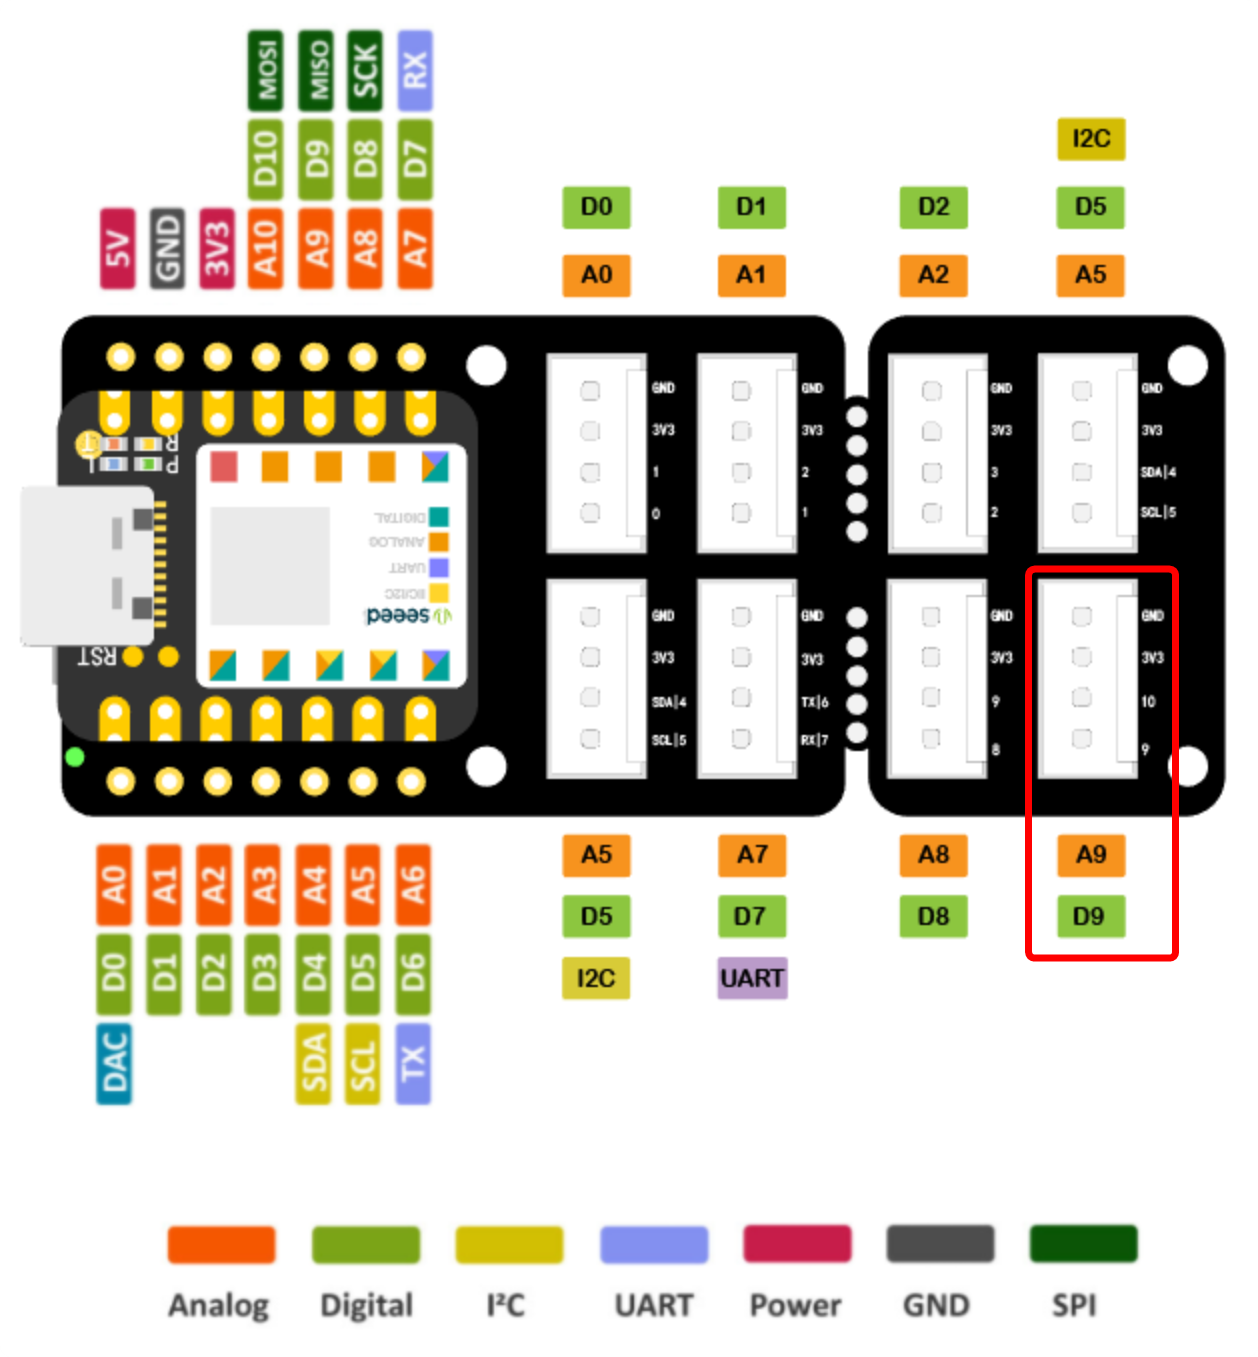
In addition to the XIAO, we also need the WS281x model light bar or light bead. Currently the light example provided by Espressif only supports a single bead, so whether you use a strip or a bead, it will only light up one light. We would also recommend that you pick up Grove Base for XIAO for ease of wiring.
| Grove Base for XIAO | Grove - RGB LED Ring (20 - WS2813 Mini) |
|---|---|
 |  |
If you are using the XIAO ESP32C3, connect the LED strip to pin D8.
If you are using the XIAO ESP32S3, connect the LED strip to pin D9.
This tutorial will use the XIAO ESP32C3 as an example to give you an overview of how to flash the firmware, add devices and the rest.
Video Tutorials
Step 1. Flash Matter Firmware for XIAO ESP32
Connect the XIAO ESP32C3 board to your computer using a USB cable. Ensure that the board is properly recognized by your computer.
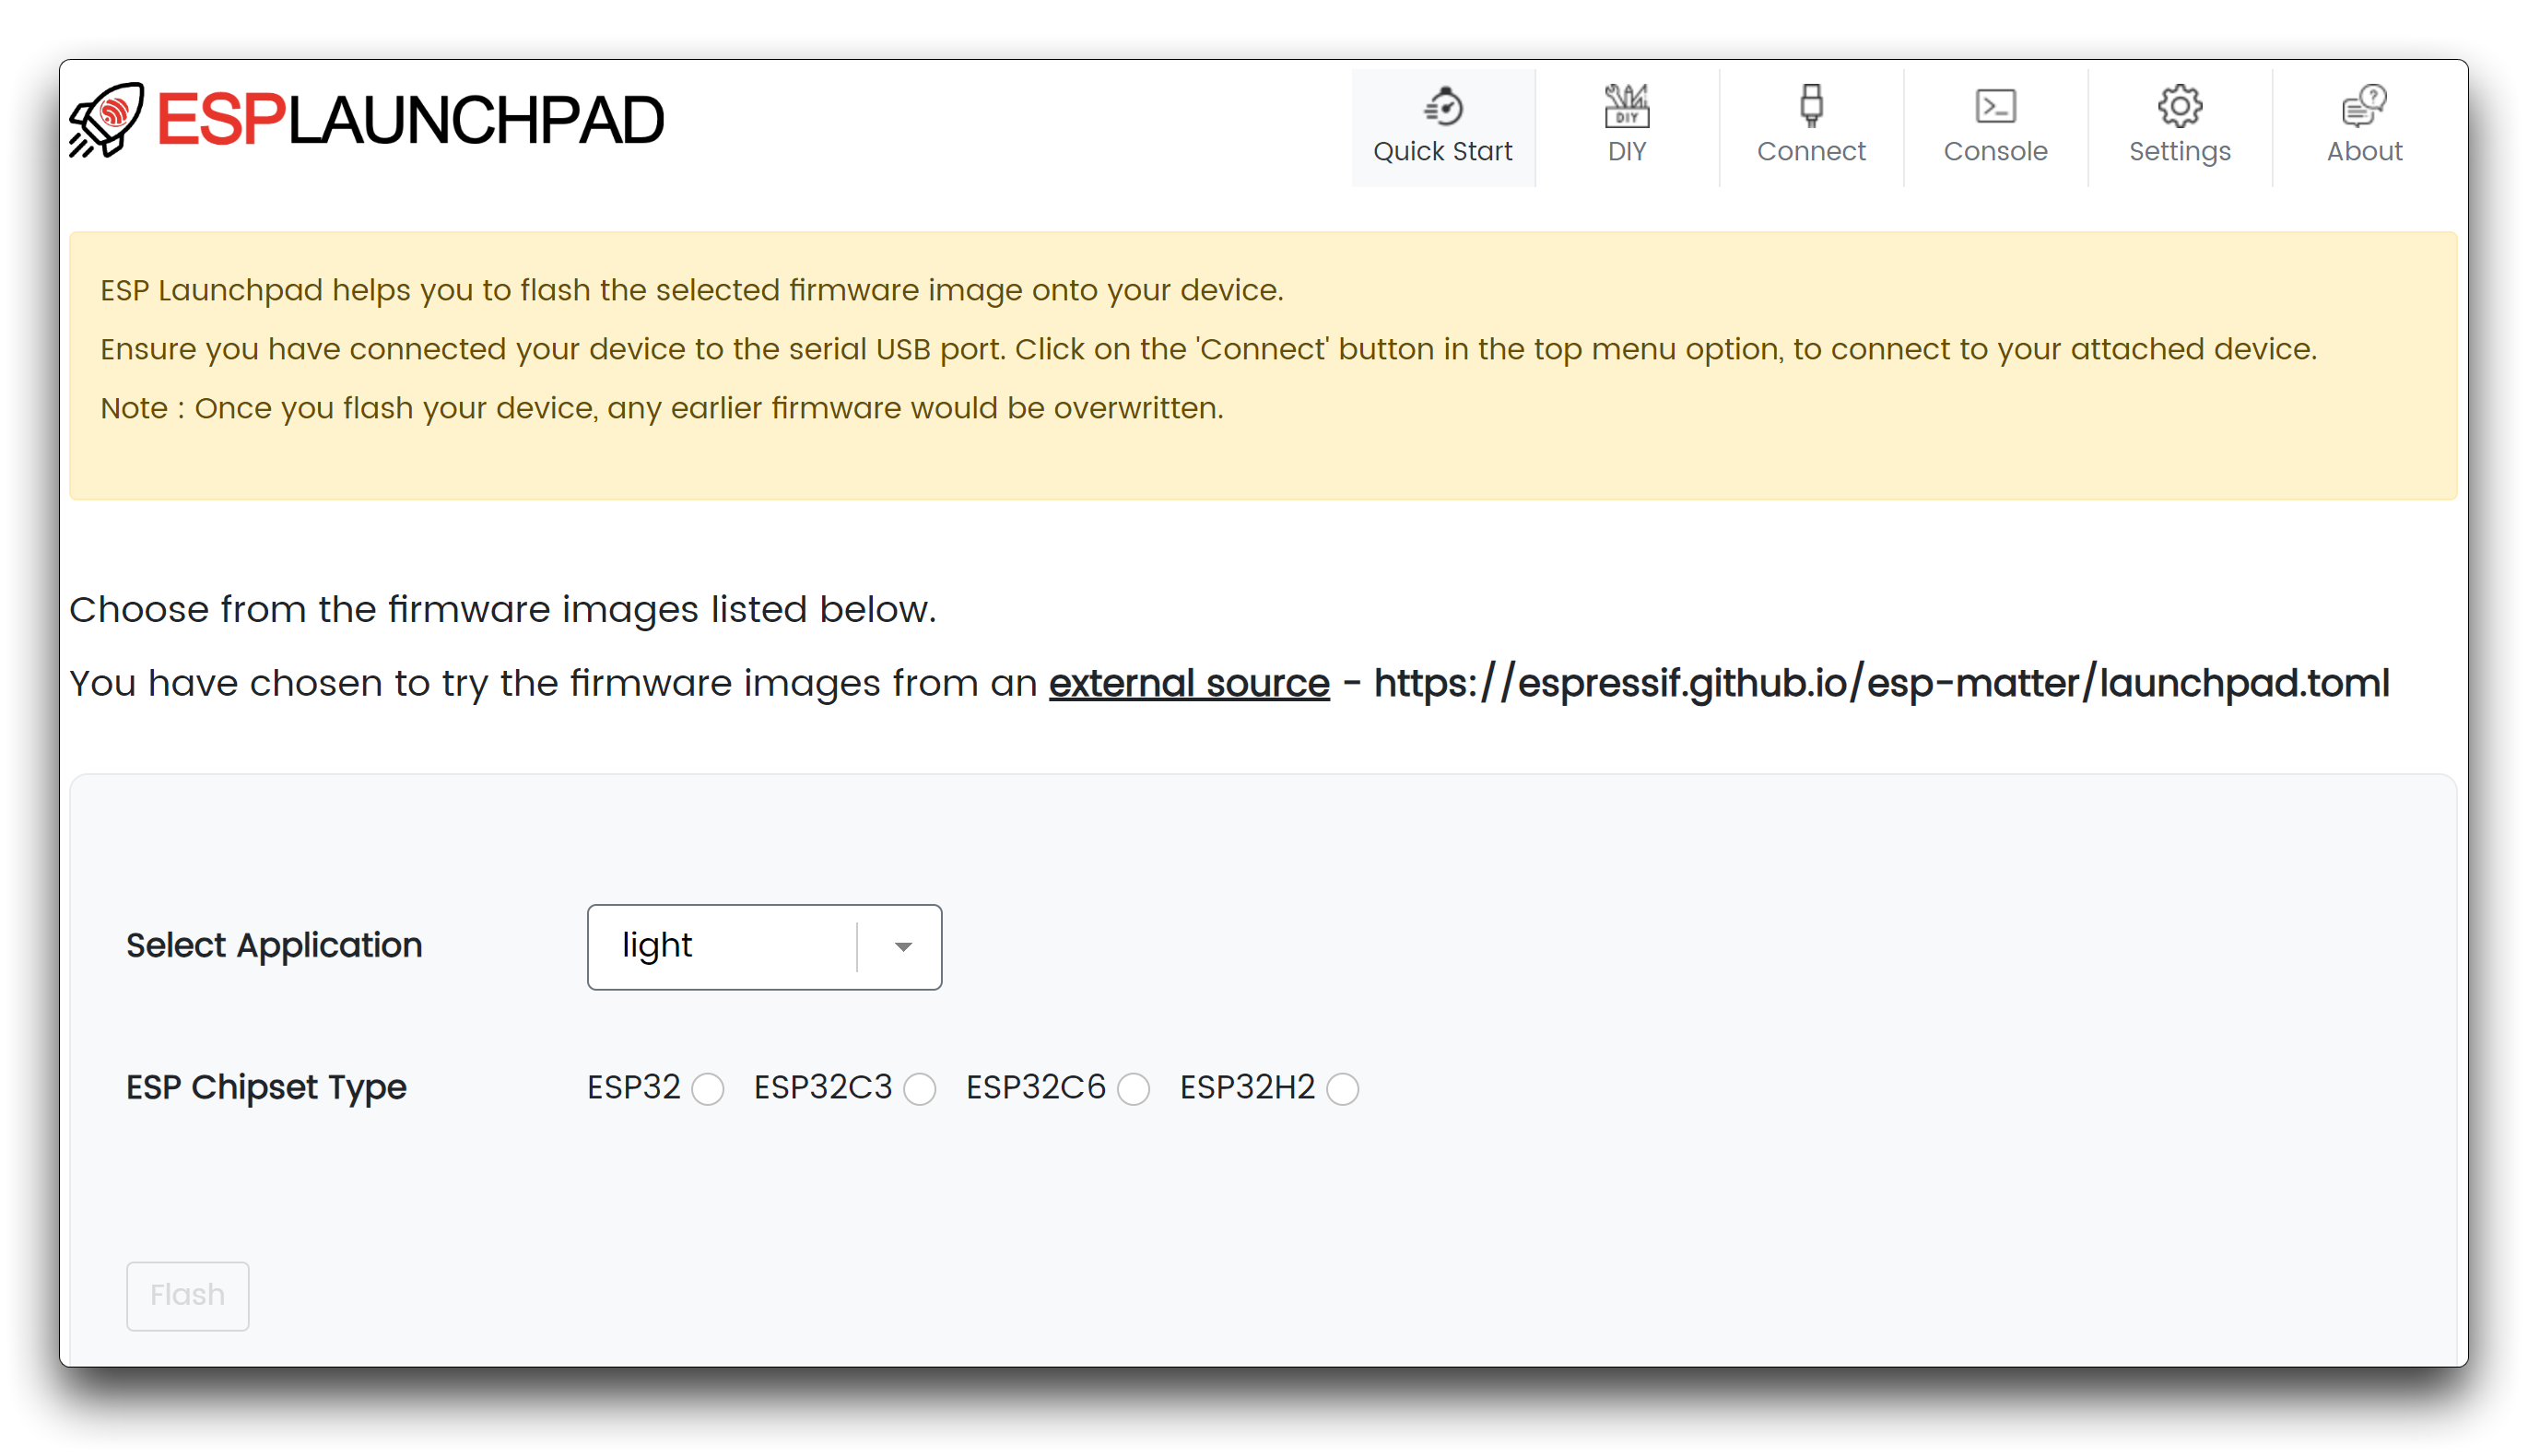
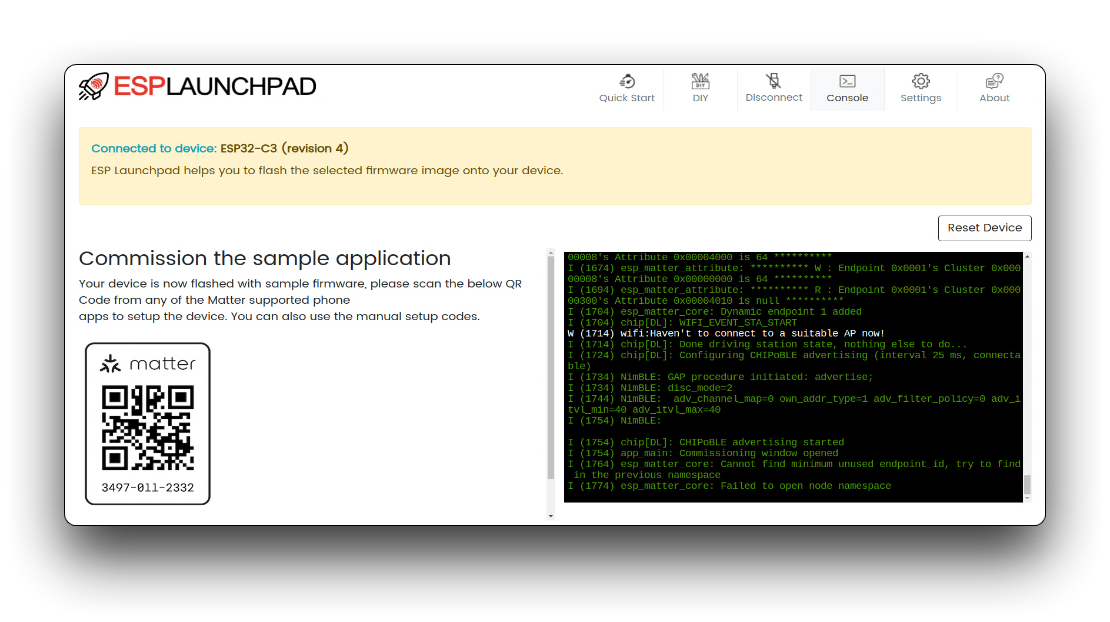
Open the ESPLaunchPad Website on your computer.
Select light in Select Application and select ESP32C3 in ESP Chipset Type.
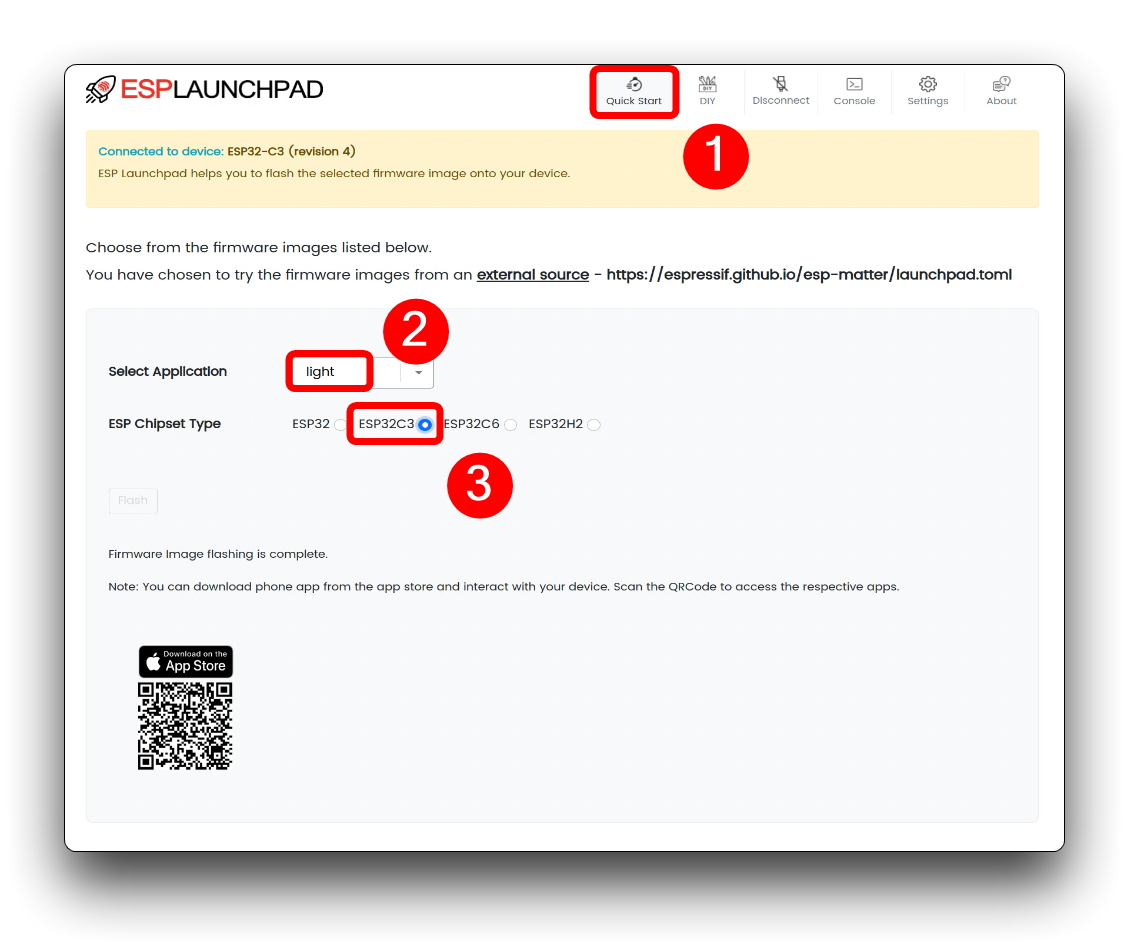
Then click on the Connect button in the upper right corner and select the XIAO device you have connected to your computer.
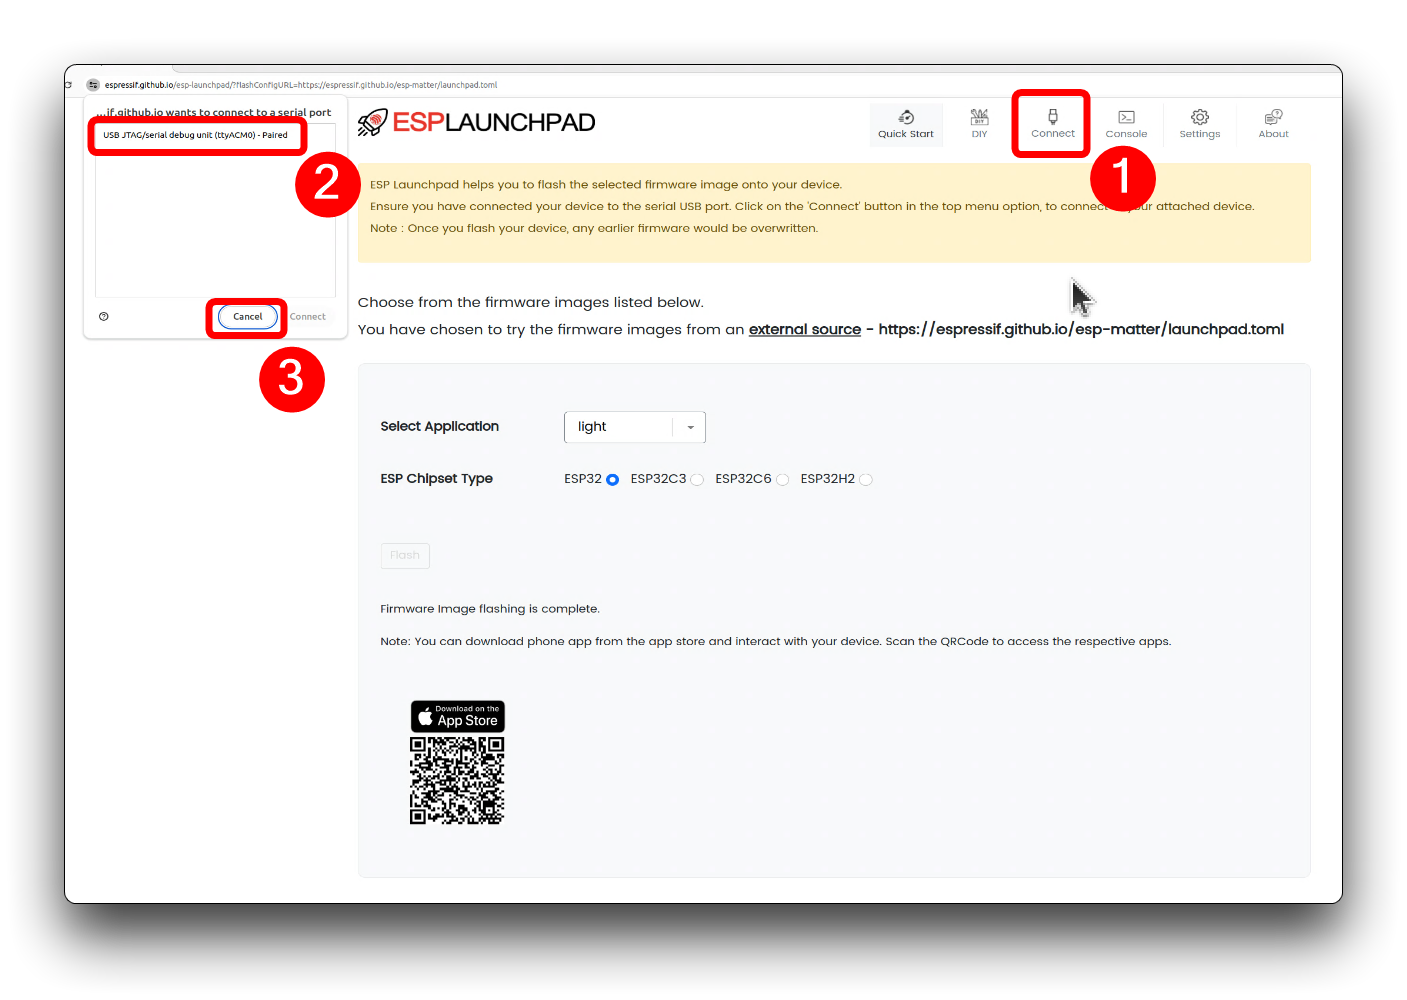
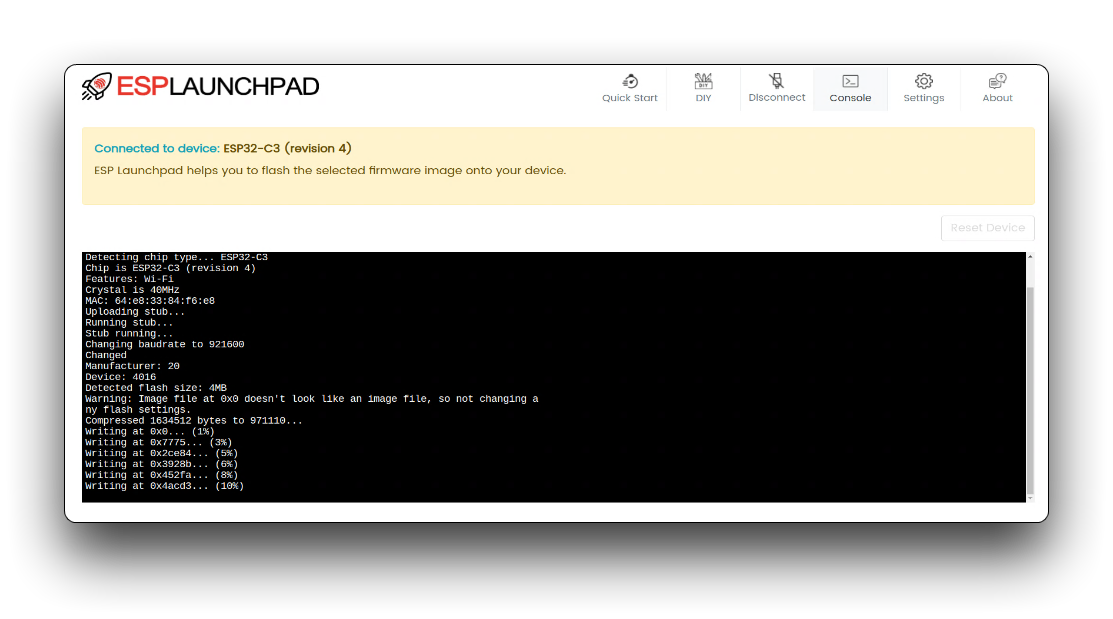
Then click the flash button below and wait for the firmware to upload.
Once the firmware upload is complete, you'll see some action alert boxes as well as a QR code, and we'll just click Done.
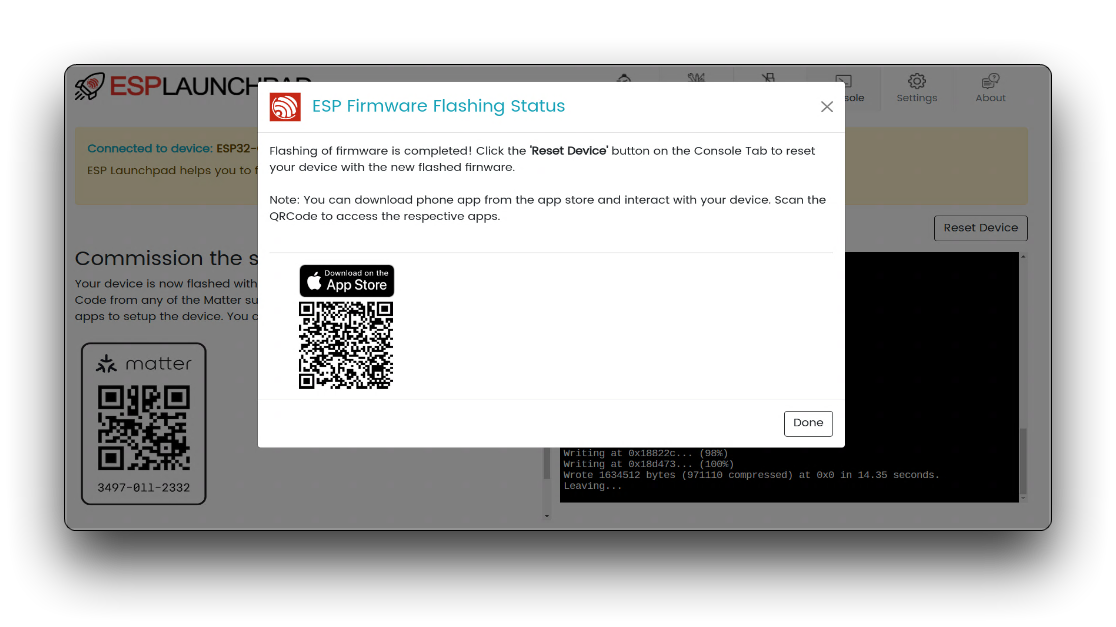
Then click the Reset Device button on the right side of the screen.
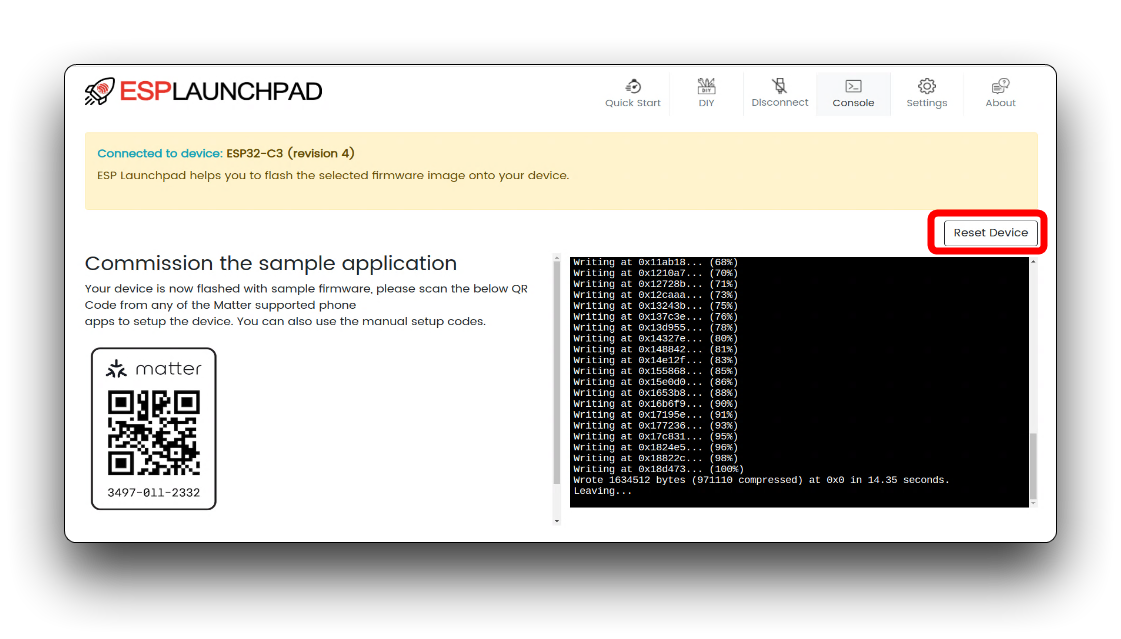
When you see the debug message, it means that everything is going very well. We can now proceed with the device binding.
Step 2. Add a device by scanning the code using the iPhone Home APP
In the section on adding devices, we'll take Apple's device as an example (since that's all I have on hand). If you have Google's device or Amazon's device on hand, maybe you can use them as well.
If, as in this article, you want to add devices using the Home APP for iPhone, you need to have an Apple device as a home hub. The devices currently supported by Home Hub are HomePod and Apple TV, read the Apple website for more details. For the purpose of this tutorial, it is assumed that you have already added the Home Hub in the Home APP.
Home APP is installed by default on iOS devices. If you have ever deleted it, you can search for it again in the App Store and download it.
Open the Home App on your iPhone. Tap the + button in the top right corner of the screen. Select Add or Scan Accessory from the menu. Use your iPhone camera to scan the QR code provided with the XIAO ESP32C3 . The Home App will recognize the Matter Accessory and display it as a new accessory. Tap Add to Home to add the XIAO ESP32C3 to your Home App. Please refer to the detailed operation pictures below.
| Page 1 | Page 2 | Page 3 |
|---|---|---|
 |  |  |
| Page 4 | Page 5 | Page 6 |
 |  |  |
| Page 7 | Page 8 | Page 9 |
 |  |
Step 3. Using the XIAO in the Home APP
In the Home App, locate the newly added XIAO ESP32C3 accessory. Tap on the accessory to access its controls. Use the brightness slider to adjust the brightness of the connected lights. Tap on the color icon to change the color of the lights. You can choose from a variety of predefined colors or use the color picker to create custom colors. The lights connected to the XIAO ESP32C3 will respond in real-time to the adjustments made in the Home App.
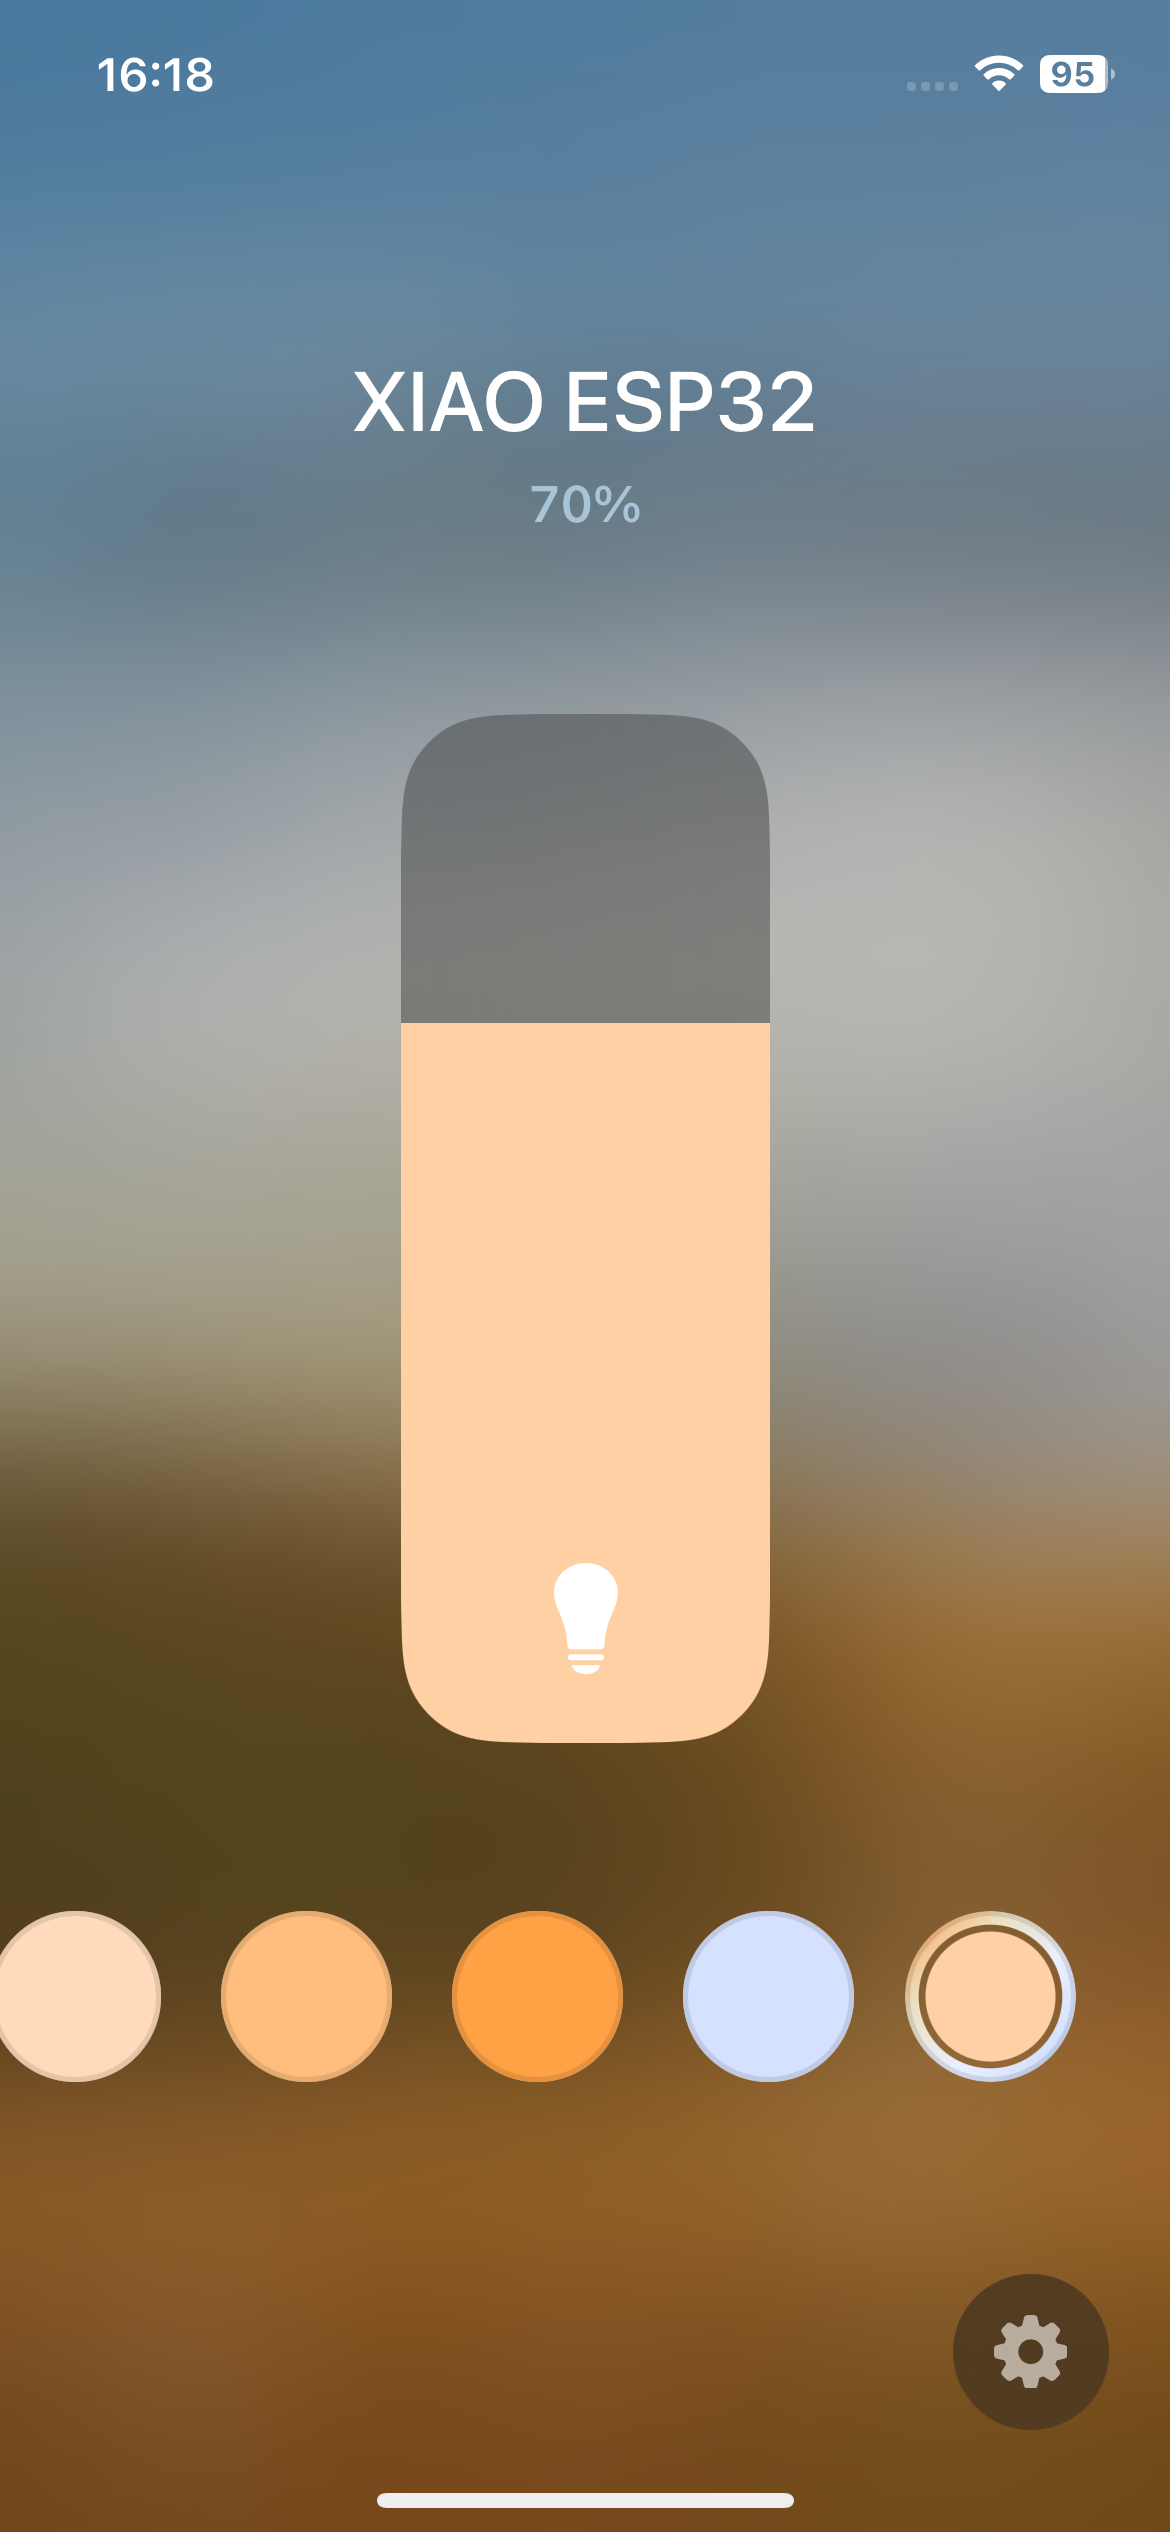
Congratulations! You have successfully flashed the light firmware onto the XIAO ESP32C3 board using ESPLaunchPad and paired it with your iPhone's Home App. You can now control the brightness and color of the connected lights directly from your iPhone, creating a personalized and convenient lighting experience.
Feel free to explore more advanced features and customization options available in the Home App and experiment with different light accessories compatible with the XIAO ESP32C3 board. With this foundation, you can further expand your smart home setup and create a truly connected and automated living space.
Troubleshooting
Q1: Failed to connect to the device for a long time in Home APP
If you fail to connect to the device for an extended period of time, make sure you see the log message after uploading the firmware. If you have not paired the device for a long time at this point, the XIAO may go into standby mode, at which point you will need to press the Reset button on the XIAO or use Reset Device on the ESPLaunchPad to reboot the device. After that try adding it again.
Apart from that, there could be network issues. Please make sure that XIAO and your iPhone are under the same LAN. And they both need to be connected to a 2.4GHz network, no 5GHz network. After the configuration is done, the phone can use other networks. But XIAO only supports 2.4GHz network.
Tech Support & Product Discussion
Thank you for choosing our products! We are here to provide you with different support to ensure that your experience with our products is as smooth as possible. We offer several communication channels to cater to different preferences and needs.