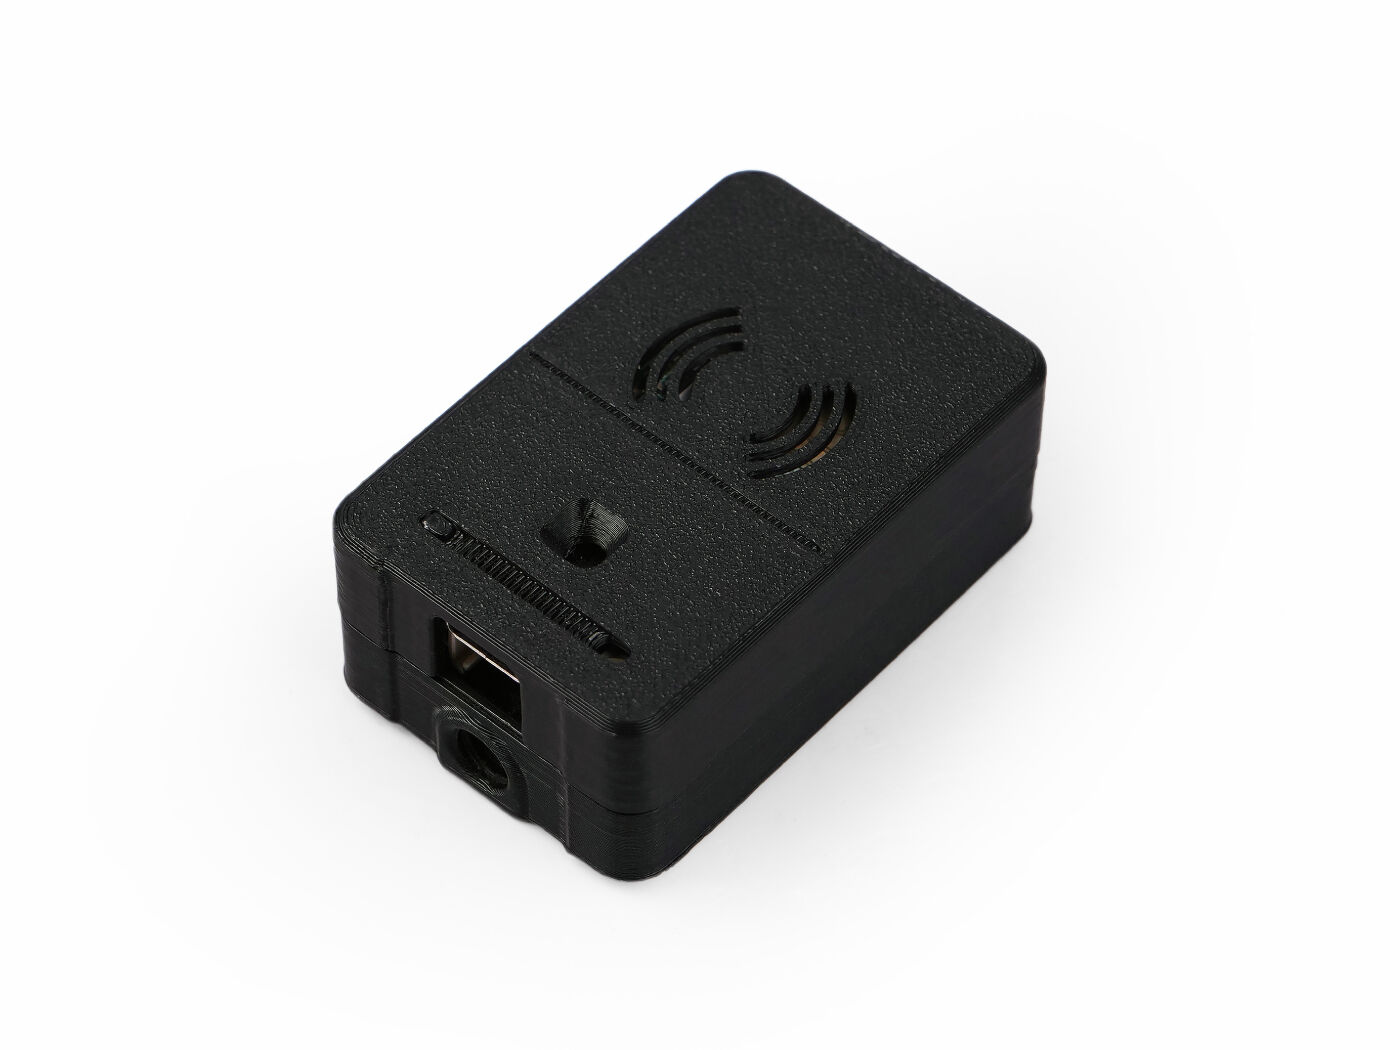
Getting started with 60GHz mmWave Breathing and Heartbeat Detection Sensor Kit with XIAO ESP32C6 (MR60BHA2)
Introducing our advanced mmWave Sensor Modules for XIAO, designed to provide cutting-edge monitoring solutions for both fall detection and heartbeat monitoring. Powered by the robust XIAO ESP32 microcontroller with built-in Wi-Fi and Bluetooth connectivity, these modules offer precise and reliable detection capabilities. Whether you need to monitor falls in real-time or track heartbeats with sensitive accuracy, our modules are equipped with state-of-the-art technology, including customizable RGB LEDs and ambient light sensing. With easy expansion options through Grove GPIO ports, these versatile modules are perfect for a wide range of applications, from smart home integration to healthcare monitoring.
Features
- Wi-Fi & Bluetooth Enabled: Both modules are powered by XIAO ESP32 with pre-flashed ESPHome firmware, ensuring quick setup and customization.
- Heartbeat Detection Module:
- Sensitive Heartbeat Monitoring: Detects heartbeats from up to 1.5 meters.
- Static Presence Detection: Monitors stationary individuals up to 6 meters away.
- Environmental Sensing:
- BH1750 Light Sensor: Measures ambient light from 1 to 65,535 lux.
- WS2812 RGB LED: Customizable LED for visual feedback and DIY projects.
- Expandable Connectivity: Includes Grove GPIO ports for adding additional sensors and modules.
Specification
| General Parameters | |
|---|---|
| mmWave Firmware | Breathing and Heartbeat Detection |
| Detection Range | Human Static Presence Detection: up to 6 Meters Breathing and Heartbeat Detection: 1.5 Meters |
| MCU | Seeed Studio XIAO ESP32C6 |
| LED | WS2812 RGB LED |
| Button | Rest |
| Light Sensor | BH1750 Range: 1 to 65,535 lux with adjustable measurements up to 100,000 lux |
| Connectivity | 1 GPIO Port (D0, D10) |
| Pin Header Spacing | 2.54mm |
| Power Supply | 5V/1A Input |
| Power consumption | 0.5w: Standby Mode 0.8w: Activation Mode 1.4w: work with Grove Relay status |
Application
- Security Systems
- Haelthcare Monitoring
- Smart Home Automation
- Elderly Care
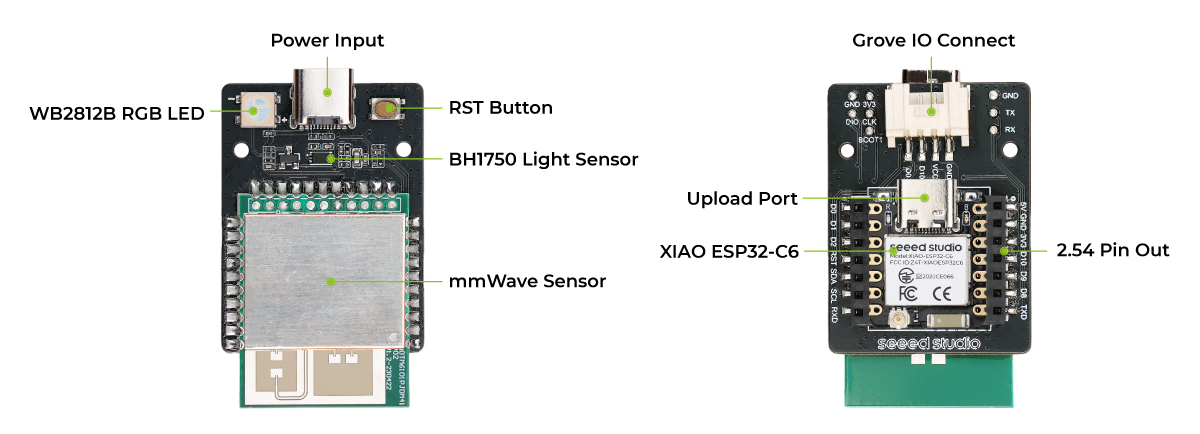
Hardware Overview
Getting Started
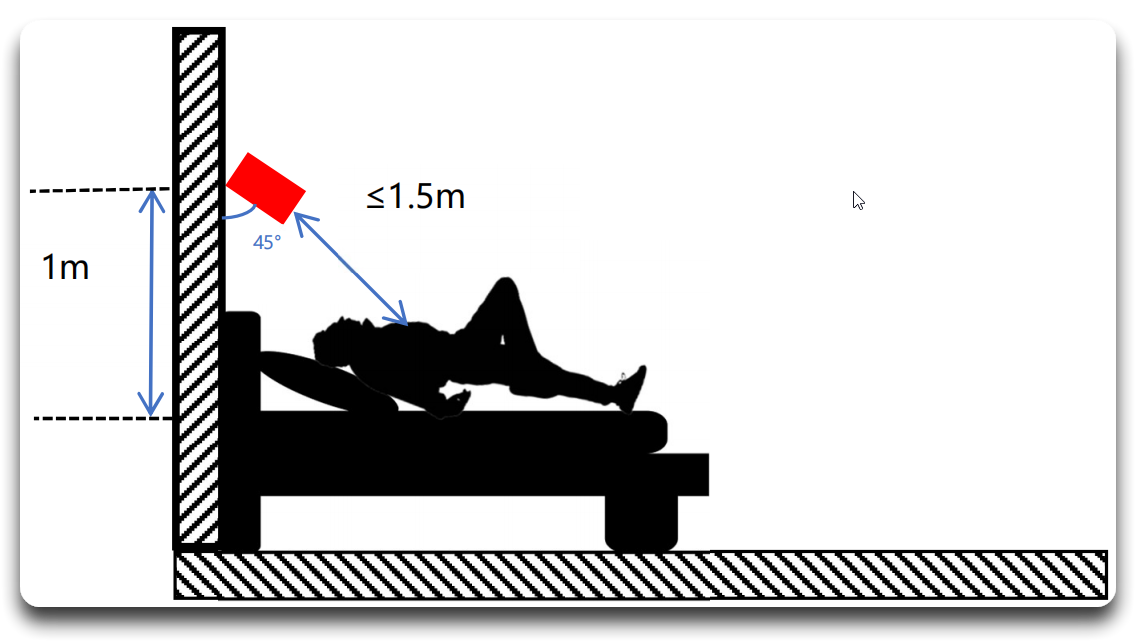
Installation method and sensing range
The latest respiratory and heart rate radar is recommended for use solely during sleep scenarios. Please refrain from utilising the radar's respiratory and heart rate functions whilst seated at a desk or during exercise, as this may result in significant inaccuracies.
Inclined installation. For sleep breathing and heart rate detection needs, an inclined installation method can be adopted. The radar is required to be installed at a height of 1m directly above the head of the bed, tilted downward at 45 ° towards the middle of the bed, and the distance between the radar and the chest cavity is controlled to be within 1.5m. The radar normal direction is aligned with the main detection position to ensure that the radar can detect respiratory and heartbeat data.
Please use this module in an open space, and stay out of the following scenarios within the detecting range to prevent interference with the module:
- Multiple radars installed too close together
- Wind moves curtains and sways plants
- Water flow and water film
- Large areas of metal and mirror reflections
- Detection through glass and thin wooden boards
- Installation location prone to vibrations
- Use of low-quality power supplies
Software Preparation (Arduino)
By default, the MR60BHA2 comes pre-assembled with the XIAO ESP32C6, but it's compatible with various other microcontrollers for communication and integration.
If this is your first time using Arduino with the XIAO series, follow the appropriate setup guide for your board:
- XIAO ESP32S3: Refer to the XIAO ESP32S3 Getting Started Guide.
- XIAO ESP32C3: Follow the Getting Started with Seeed Studio XIAO ESP32C3 guide.
- XIAO ESP32C6: Follow the Getting Started with Seeed Studio XIAO ESP32C6 guide.
Once your board is set up, proceed with the following steps:
-
Download the Seeed mmWave Library:
- Download the Seeed mmWave library from GitHub.
- Install the Library in Arduino IDE:
- Open the Arduino IDE.
- Navigate to Sketch > Include Library > Add .ZIP Library....
- Select the downloaded
.zipfile to install the library.
- Connect Your XIAO Board:
- Plug your XIAO board into your computer via USB.
- In the Arduino IDE, go to Tools > Board and select your XIAO board model.
- Choose the correct port under Tools > Port.
- Load an Example Sketch:
- Go to File > Examples > Seeed Arduino mmWave.
- Select the relevant example for Heartbeat Detection.
- Review the code and make any necessary adjustments.
- Upload the Sketch:
- Click Upload to flash the code to your XIAO board.
- Open the Serial Monitor in the Arduino IDE to view real-time sensor data.
Usage
This section provides example code snippets to help you quickly start using the Seeed Arduino mmWave Library with various functionalities, including breath monitoring, RGB LED control, and light sensing.
Breath Module
This example demonstrates how to use the MR60BHA2 sensor for monitoring breathing and heartbeat.
#include <Arduino.h>
#include "Seeed_Arduino_mmWave.h"
// Set up serial communication depending on the board type
#ifdef ESP32
# include <HardwareSerial.h>
HardwareSerial mmWaveSerial(0);
#else
# define mmWaveSerial Serial1
#endif
SEEED_MR60BHA2 mmWave;
void setup() {
Serial.begin(115200);
mmWave.begin(&mmWaveSerial);
}
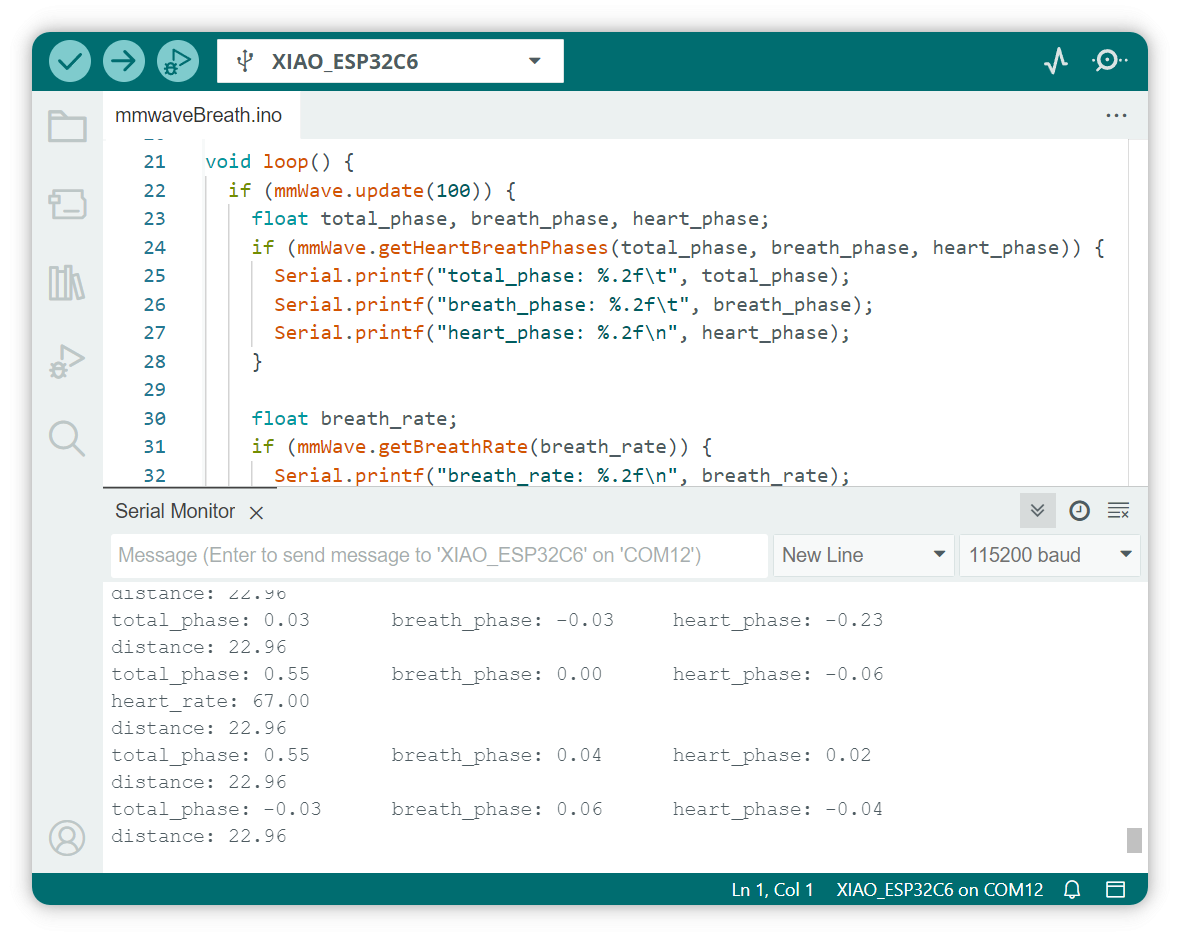
void loop() {
if (mmWave.update(100)) {
float total_phase, breath_phase, heart_phase;
if (mmWave.getHeartBreathPhases(total_phase, breath_phase, heart_phase)) {
Serial.printf("total_phase: %.2f\t", total_phase);
Serial.printf("breath_phase: %.2f\t", breath_phase);
Serial.printf("heart_phase: %.2f\n", heart_phase);
}
float breath_rate;
if (mmWave.getBreathRate(breath_rate)) {
Serial.printf("breath_rate: %.2f\n", breath_rate);
}
float heart_rate;
if (mmWave.getHeartRate(heart_rate)) {
Serial.printf("heart_rate: %.2f\n", heart_rate);
}
float distance;
if (mmWave.getDistance(distance)) {
Serial.printf("distance: %.2f\n", distance);
}
}
}
The output will be as follows on Arduino Serial Monitor:
If the returned data is not 0, indicate the existence of a living thing inside the detection's range.
Human Detection
This example demonstrates how to use the MR60BHA2 sensor for human detection.
Please make sure you have upgrade the firmware of MR60BHA2 module to the latest version.
The latest firmware adds human presence detection and human object related functions.
#include <Arduino.h>
#include "Seeed_Arduino_mmWave.h"

// If the board is an ESP32, include the HardwareSerial library and create a
// HardwareSerial object for the mmWave serial communication
#ifdef ESP32
#  include <HardwareSerial.h>
HardwareSerial mmWaveSerial(0);
#else
// Otherwise, define mmWaveSerial as Serial1
#  define mmWaveSerial Serial1
#endif

SEEED_MR60BHA2 mmWave;

void setup() {
  Serial.begin(115200);
  mmWave.begin(&mmWaveSerial);
}

void loop() {
  if (mmWave.update(100)) {
    if (mmWave.isHumanDetected()) {
        Serial.printf("-----Human Detected-----\n");
    }

    PeopleCounting target_info;
    if (mmWave.getPeopleCountingTargetInfo(target_info)) {
        Serial.printf("-----Got Target Info-----\n");
        Serial.printf("Number of targets: %zu\n", target_info.targets.size());

        for (size_t i = 0; i < target_info.targets.size(); i++) {
            const auto& target = target_info.targets[i];
            Serial.printf("Target %zu:\n", i + 1);
            Serial.printf("  x_point: %.2f\n", target.x_point);
            Serial.printf("  y_point: %.2f\n", target.y_point);
            Serial.printf("  dop_index: %d\n", target.dop_index);
            Serial.printf("  cluster_index: %d\n", target.cluster_index);
            Serial.printf("  move_speed: %.2f cm/s\n", target.dop_index * RANGE_STEP);
        }
    }
    // delay(500);
  }
}
The output will be as follows on Arduino Serial Monitor:
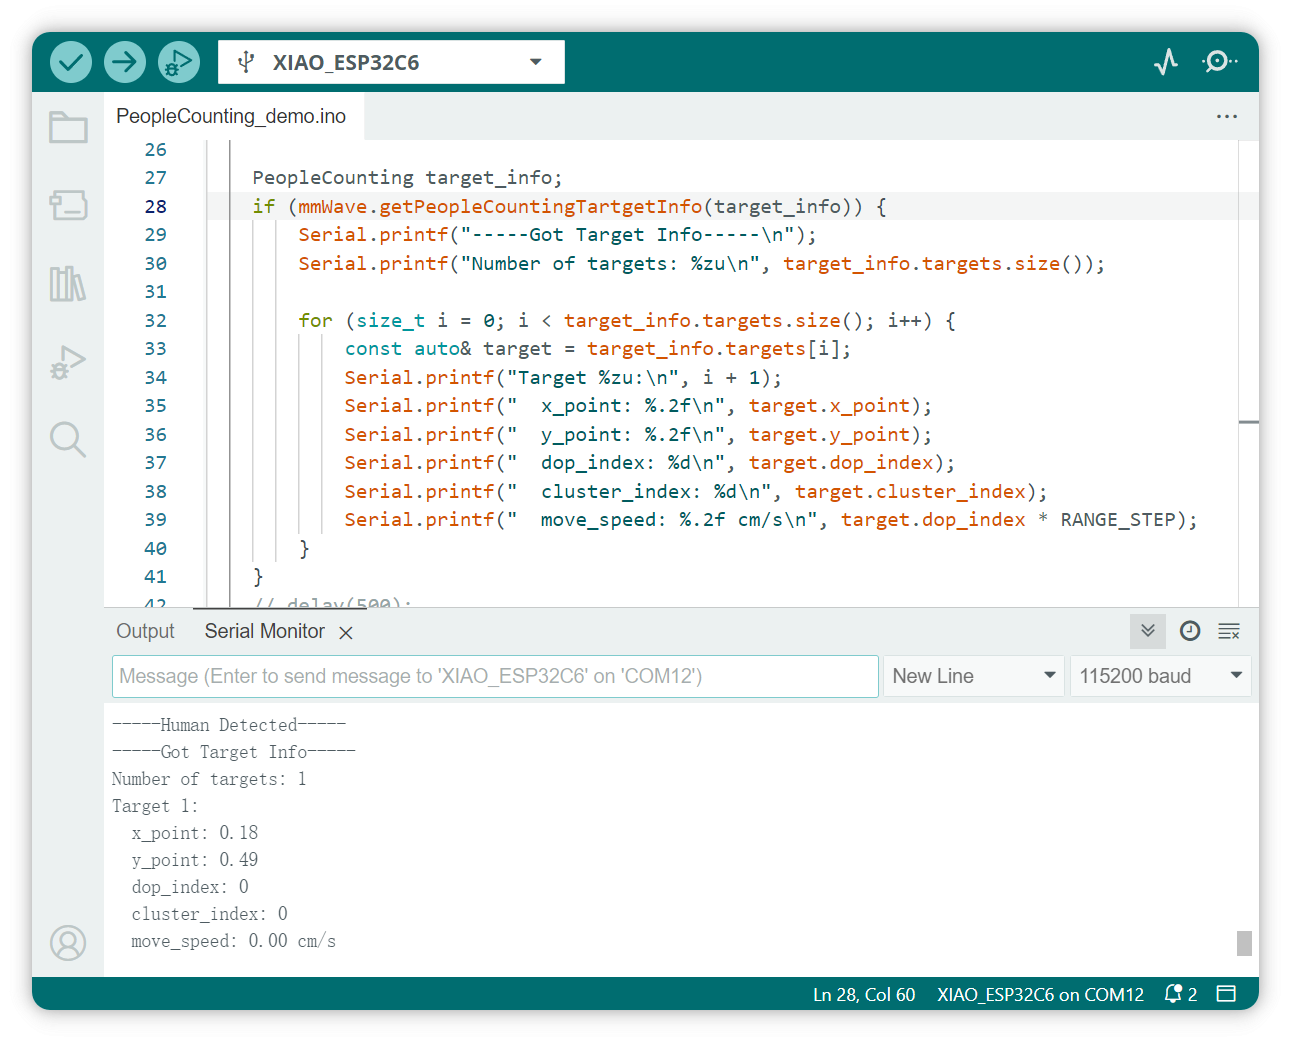
Breathing and heart rate can be detected within 1.5 meters, and presence can be detected within a range of 1.5 to 6 meters.
When there are people within the 1.5M range, the module will enter the heartbeat and breathing detection mode.
In this mode, the sensitivity of the human detection function may decrease.
Blink RGB LED
This example demonstrates how to control an RGB LED using the NeoPixel library.
- Step 1. Download the
Adafruit_NeoPixellibrary
Navigate to Sketch > Include Liarbry > Manage Libraries..., and search Adafruit_NeoPixel, install the lastest version.
- Step 2. Copy following code to a new sketch:
#include <Adafruit_NeoPixel.h>
#include <Arduino.h>

const int pixelPin = D1;

Adafruit_NeoPixel pixels = Adafruit_NeoPixel(1, pixelPin, NEO_GRB + NEO_KHZ800);

void setup() {
Serial.begin(115200);
pixels.begin();
pixels.clear();
pixels.show();
}

void loop() {
for (int i = 0; i < 10; i++) {
 pixels.setPixelColor(0, pixels.Color(255, 0, 0));
 pixels.show();
 delay(100);
 pixels.setPixelColor(0, pixels.Color(0, 0, 0));
 pixels.show();
 delay(100);
}

for (int i = 255; i >= 0; i--) {
 pixels.setPixelColor(0, pixels.Color(i, 0, 0));
 pixels.show();
 delay(10);
}
}
- Step 3. Select the correct board and port number to upload the program.
Once the program is successfully uploaded, you will see RGB LED on the right side of the mmWave Sensor Modules is blinking.
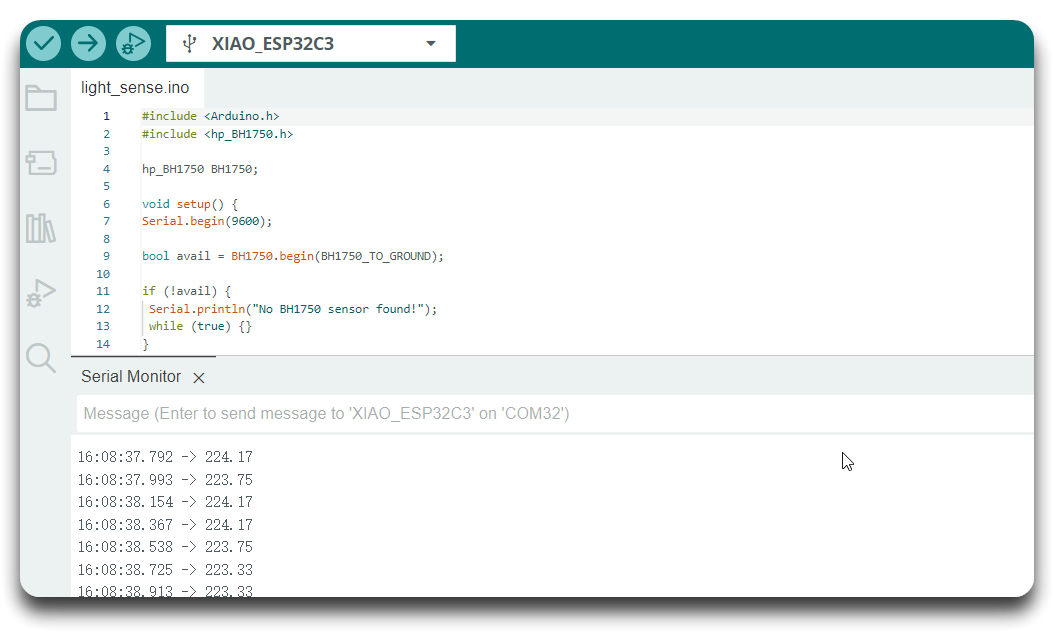
Light Sensor (BH1750)
This example shows how to read light intensity values using the BH1750 sensor.
- Step 1. Download the
hp_BH1750library
Navigate to Sketch > Include Liarbry > Manage Libraries..., and search hp_BH1750, install the lastest version.
- Step 2. Copy following code to a new sketch:
#include <Arduino.h>
#include <hp_BH1750.h>

hp_BH1750 BH1750;

void setup() {
Serial.begin(9600);

bool avail = BH1750.begin(BH1750_TO_GROUND);

if (!avail) {
 Serial.println("No BH1750 sensor found!");
 while (true) {}
}

Serial.printf("conversion time: %dms\n", BH1750.getMtregTime());
BH1750.start();
}

void loop() {
if (BH1750.hasValue()) {
 float lux = BH1750.getLux();
 Serial.println(lux);

 BH1750.start();
}
}
- Step 3. Select the correct board and port number to upload the program.
The output will be as follows on Arduino Serial Monitor:
Breath Module API
This example uses the SEEED_MR60BHA2 class to interface with the MR60BHA2 sensor for heart and breath monitoring. Here’s what each key function does:
-
mmWave.begin(&mmWaveSerial):- Initializes the sensor for communication using the specified serial interface. It sets up the connection between the XIAO board and the MR60BHA2 sensor.
-
mmWave.update(100):- Updates the sensor data. The parameter
100is a timeout value in milliseconds, specifying how long to wait for the sensor to provide new data. If new data is available within this timeframe, the function returnstrue.
- Updates the sensor data. The parameter
-
mmWave.getHeartBreathPhases(float &total_phase, float &breath_phase, float &heart_phase):- Retrieves the phase information related to heart and breath activities.
total_phaserepresents the overall phase shift, whilebreath_phaseandheart_phaseare specific to breathing and heartbeat activities, respectively.
-
mmWave.getBreathRate(float &rate):- Fetches the current breath rate detected by the sensor. The rate is returned in the reference variable
rate.
- Fetches the current breath rate detected by the sensor. The rate is returned in the reference variable
-
mmWave.getHeartRate(float &rate):- Retrieves the current heart rate detected by the sensor. The rate is returned in the reference variable
rate.
- Retrieves the current heart rate detected by the sensor. The rate is returned in the reference variable
-
mmWave.getDistance(float &distance):- Gets the distance from the sensor to the detected object (e.g., human body). This function is useful for understanding the range of the detected signal.
-
mmWave.getPeopleCountingPointCloud(PeopleCounting& point_cloud):- Retrieves information about point clouds. It just realizes the reception of message type, it is normal that there is no data.
- The
PeopleCountingstructure contains a vector of detected targets. Each target includes the following attributes:x_point: X coordinate of the target (in meter).y_point: Y coordinate of the target (in meter).dop_index: Doppler index, representing the speed of the target.- The actual movement speed (in cm/s) can be calculated as:
dop_index * RANGE_STEP, whereRANGE_STEPis the speed resolution.
- The actual movement speed (in cm/s) can be calculated as:
cluster_index: Cluster ID of the target, used to identify individual targets in the scene.
-
mmWave.getPeopleCountingTartgetInfo(PeopleCounting& target_info):- Retrieves information about detected targets.
- The
PeopleCountingstructure contains a vector of detected targets. Each target includes the following attributes:x_point: X coordinate of the target (in meter).y_point: Y coordinate of the target (in meter).dop_index: Doppler index, representing the speed of the target.- The actual movement speed (in cm/s) can be calculated as:
dop_index * RANGE_STEP, whereRANGE_STEPis the speed resolution.
- The actual movement speed (in cm/s) can be calculated as:
cluster_index: Cluster ID of the target, used to identify individual targets in the scene.
-
mmWave.isHumanDetected():- Returns whether a human is detected.
Module firmware upgrade
Modifying the radar firmware is a risky operation, so be sure to read this section carefully before following each step carefully. Please be aware that if a step is not performed correctly, the Radar may become bricked or unusable.
Special note, if you purchased the Fall Radar MR60FDA2, please do not flash the firmware illegally by the following way, it will surely brick your device!!!!
First, connect the XIAO ESP32C6 and MR60BHA2 modules together. Then use the following code to program XIAO.
#include <Arduino.h>
#include "Seeed_Arduino_mmWave.h"

// If the board is an ESP32, include the HardwareSerial library and create a
// HardwareSerial object for the mmWave serial communication
#ifdef ESP32
#  include <HardwareSerial.h>
HardwareSerial mmWaveSerial(0);
#else
// Otherwise, define mmWaveSerial as Serial1
#  define mmWaveSerial Serial1
#endif

void setup() {
  // Initialize the serial communication for debugging
  Serial.begin(115200);
  while (!Serial) {
    ; // Wait for Serial to initialize
  }

  // Initialize the mmWaveSerial communication
  mmWaveSerial.begin(115200);
}

void loop() {
  // Check if there is data available from mmWaveSerial
  while (mmWaveSerial.available() > 0) {
    char receivedChar = mmWaveSerial.read();
    Serial.write(receivedChar); // Forward data to Serial
  }

  // Check if there is data available from Serial
  while (Serial.available() > 0) {
    char receivedChar = Serial.read();
    mmWaveSerial.write(receivedChar); // Forward data to mmWaveSerial
  }
}
The function of the above code is to transparently transmit the serial port of the module to the USB serial port of XIAO, so as to upgrade the firmware of the module through XIAO.
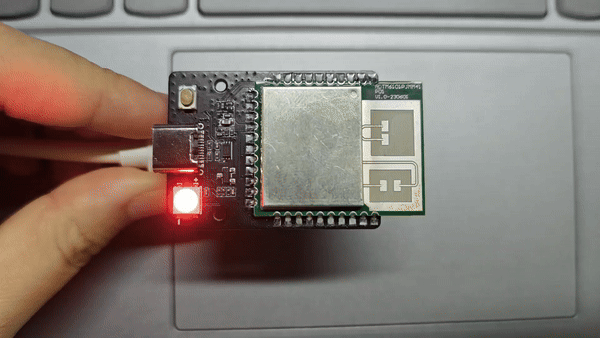
Please connect XIAO to your PC during the upgrade process.
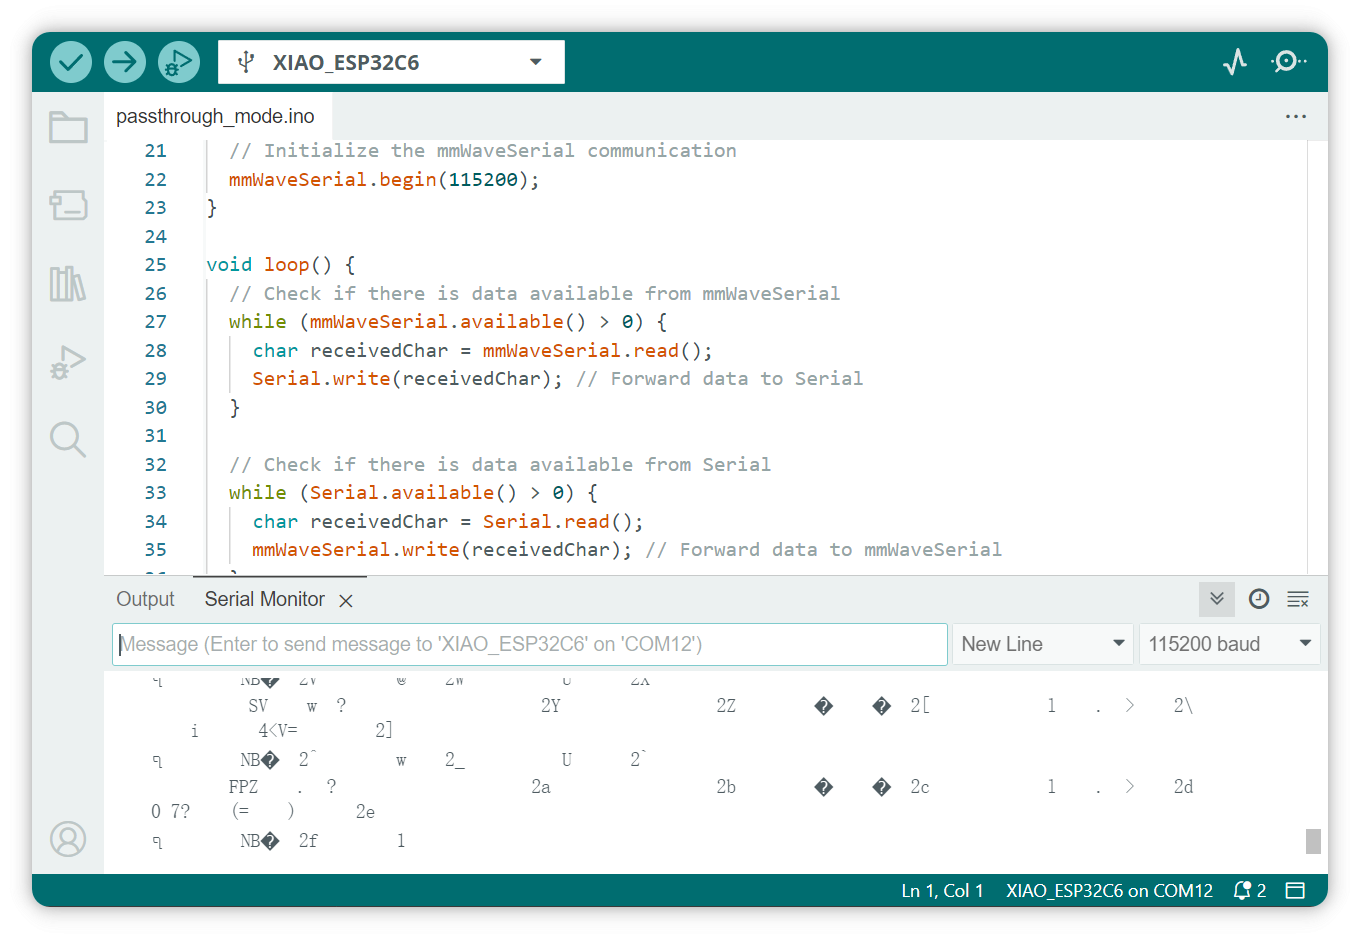
You will see the original data sent by the module.
Then you need to download and unzip the OTA tool and the firmware here.
The firmware 1.6.12 has the following update:
-
Fixed target loss when stationary within 1.5 meters.
-
Optimized tracking stability for targets moving between 0-3 meters, resolving previous inaccuracies in target coordinates. However, the reporting refresh rate has decreased.
-
Breathing and heart rate accuracy—No updates in this release. Continued optimization of related machine learning training is underway. A firmware update to improve breathing and heart rate accuracy will be released around month-end. The previous breathing and heart rate algorithm had fundamental issues, which have been addressed.
- MR60BHA2 Firmware upgrade tool: MR60BHA2_OTA.zip
- MR60BHA2 Firmware v1.6.12: MR60BHA2_eeprom_1.6.12.bin
Click here to preview the old version
- MR60BHA2 Firmware v1.6.4: MR60BHA2_eeprom_1.6.4.bin
The firmware 1.6.4 has the following update:
- Optimized the breathing and heart rate detection feature, fixing the bug where small body movements caused data loss.
- Enhanced the 3D presence detection function: breathing and heart rate can be detected within 1.5 meters, and presence can be detected within a range of 1.5 to 6 meters.
- Added a personnel detection feature, capable of detecting up to three individuals within a range of 6 meters.
- MR60BHA2 Firmware v1.6.5: MR60BHA2_eeprom_1.6.5.bin
The firmware 1.6.5 has the following update:
- Fixed the issue that breathing and heart rate were sometimes not detected when the human body was at rest.
- MR60BHA2 Firmware v1.6.10: MR60BHA2_eeprom_1.6.10.bin
The firmware 1.6.10 has the following update:
- Optimized breathing mechanics to resolve the issue where breath hold duration does not decrease.
- Added data collection functionality.
- Check and connect to the serial port (set the baud rate to 115200)
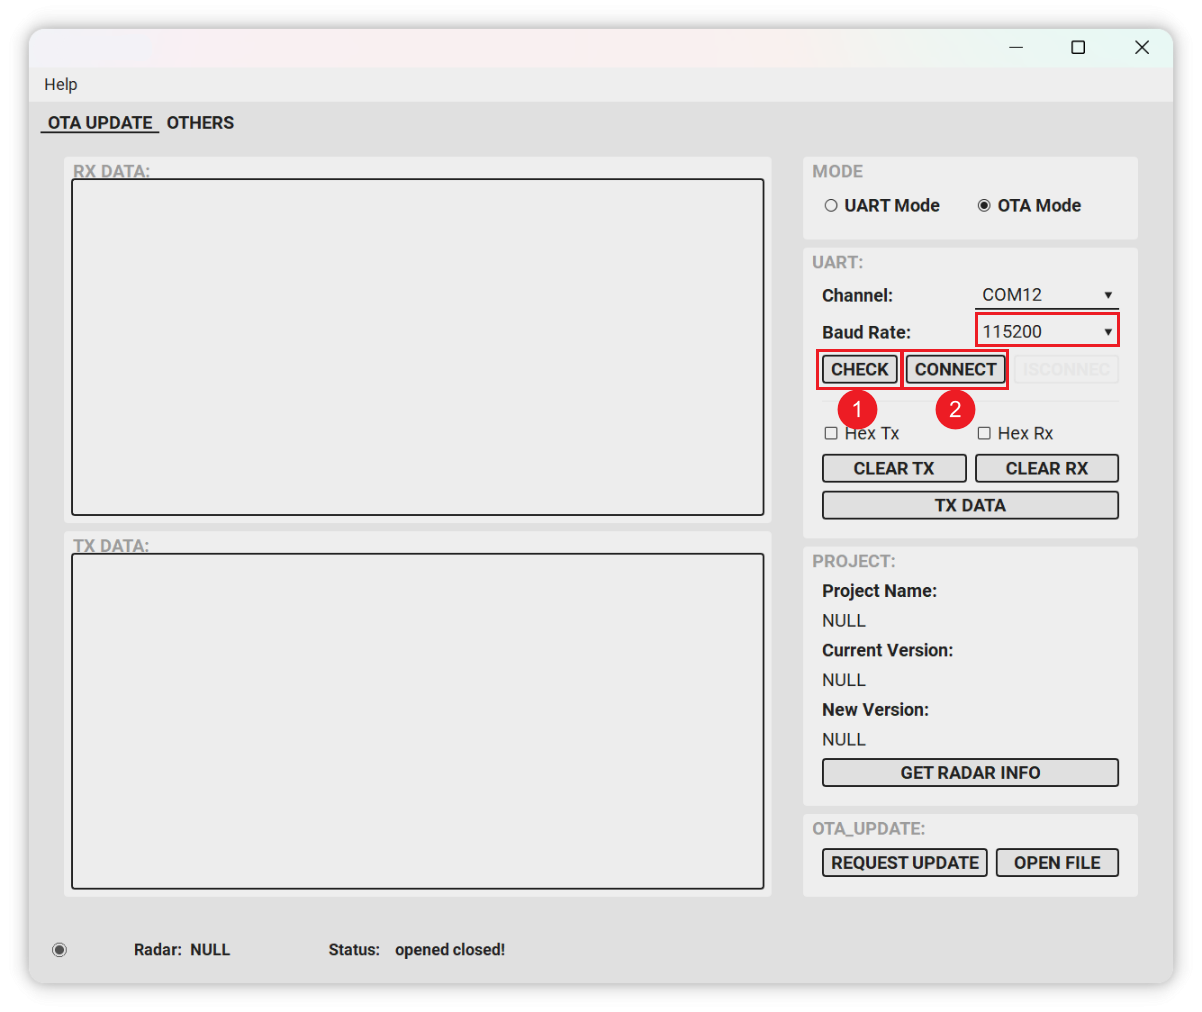
- Click "REQUEST UPDATE" to enter the upgrade mode:
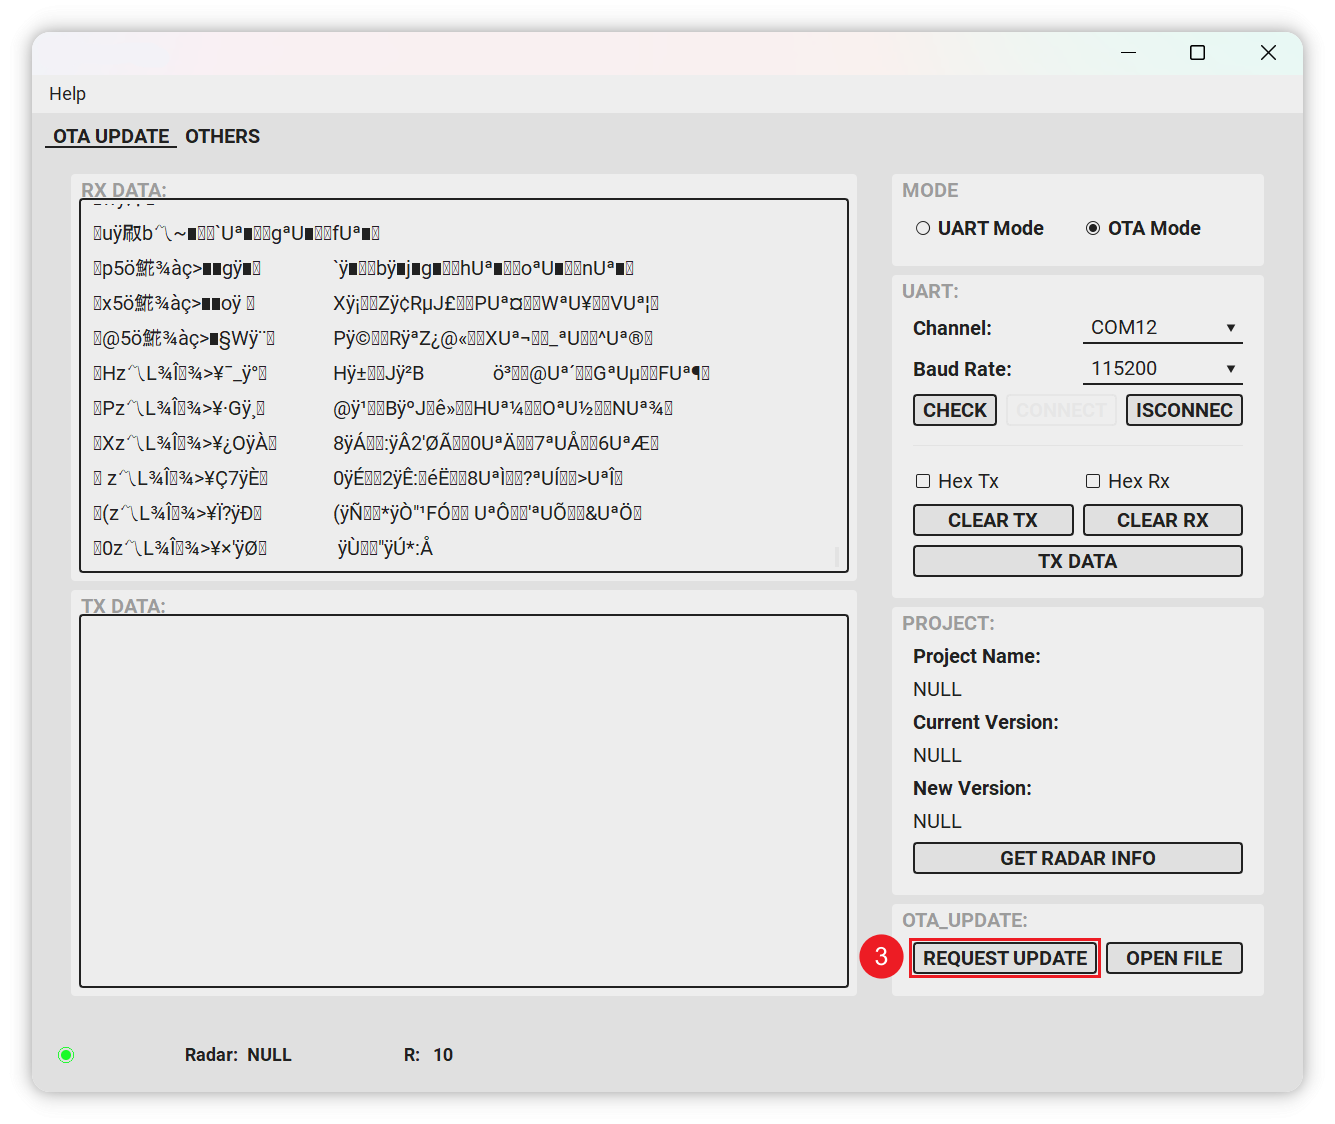
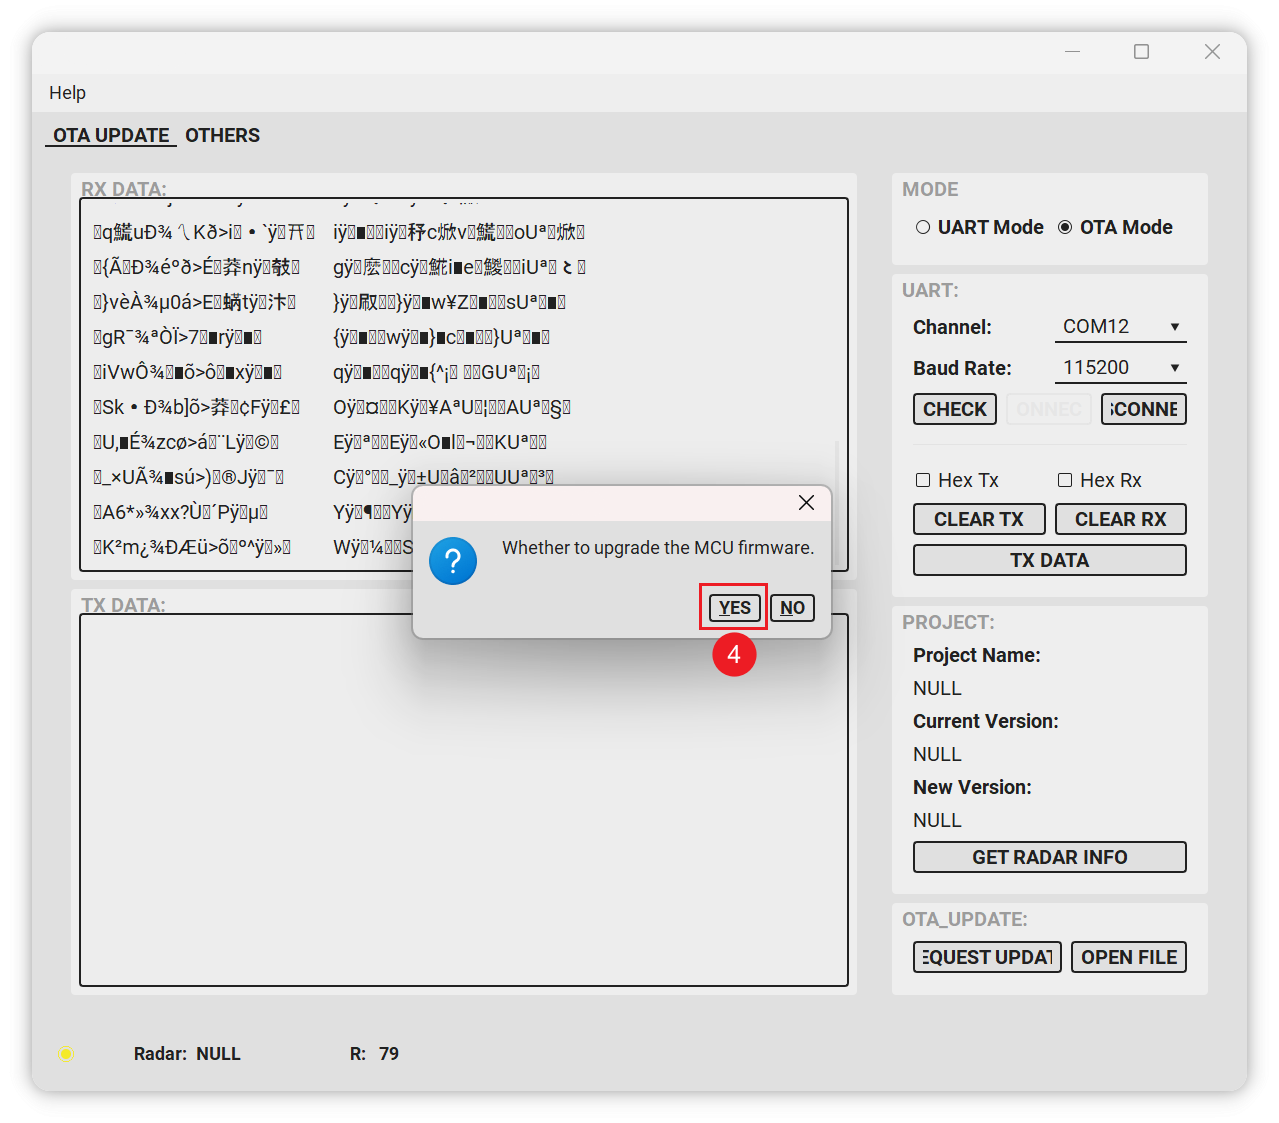
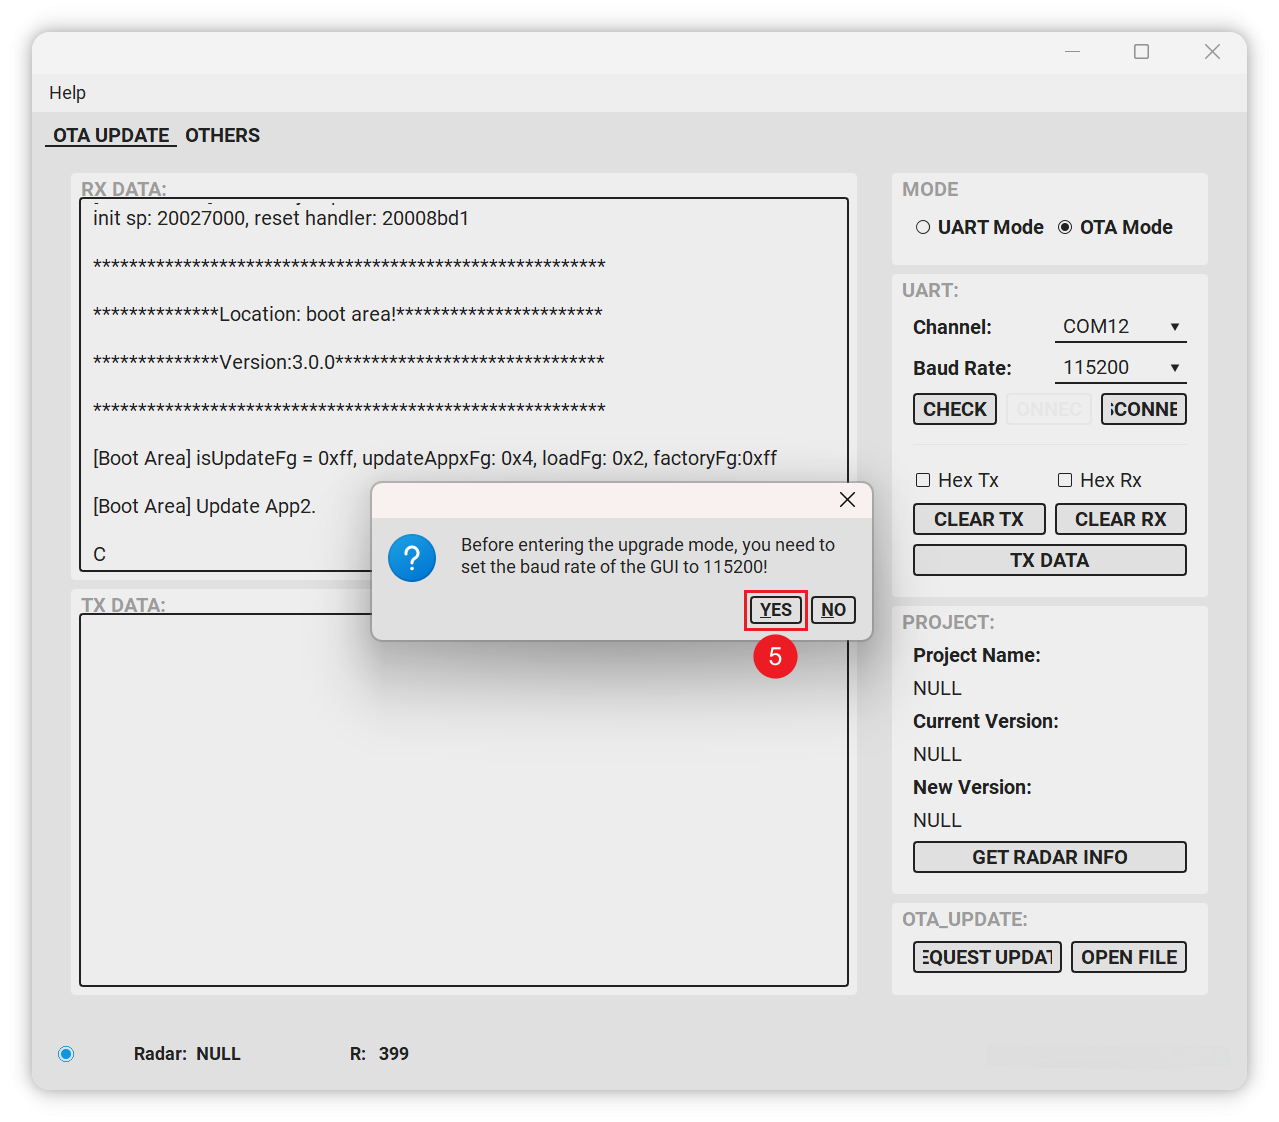
- If "C" or "43" is printed, it means that the module has entered upgrade mode.
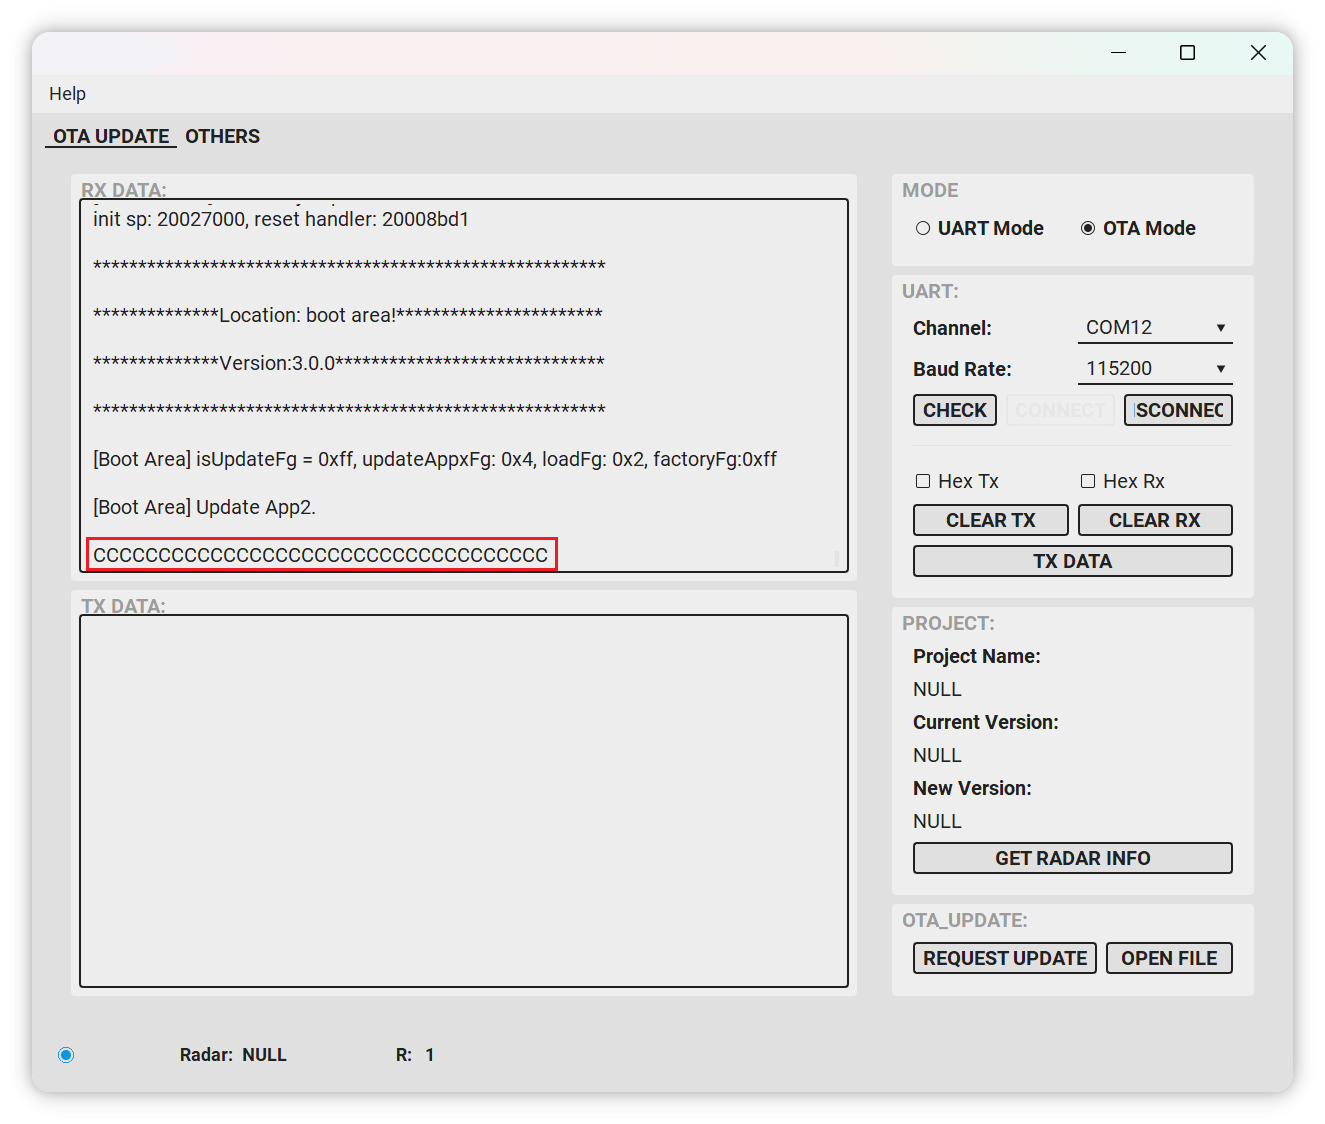
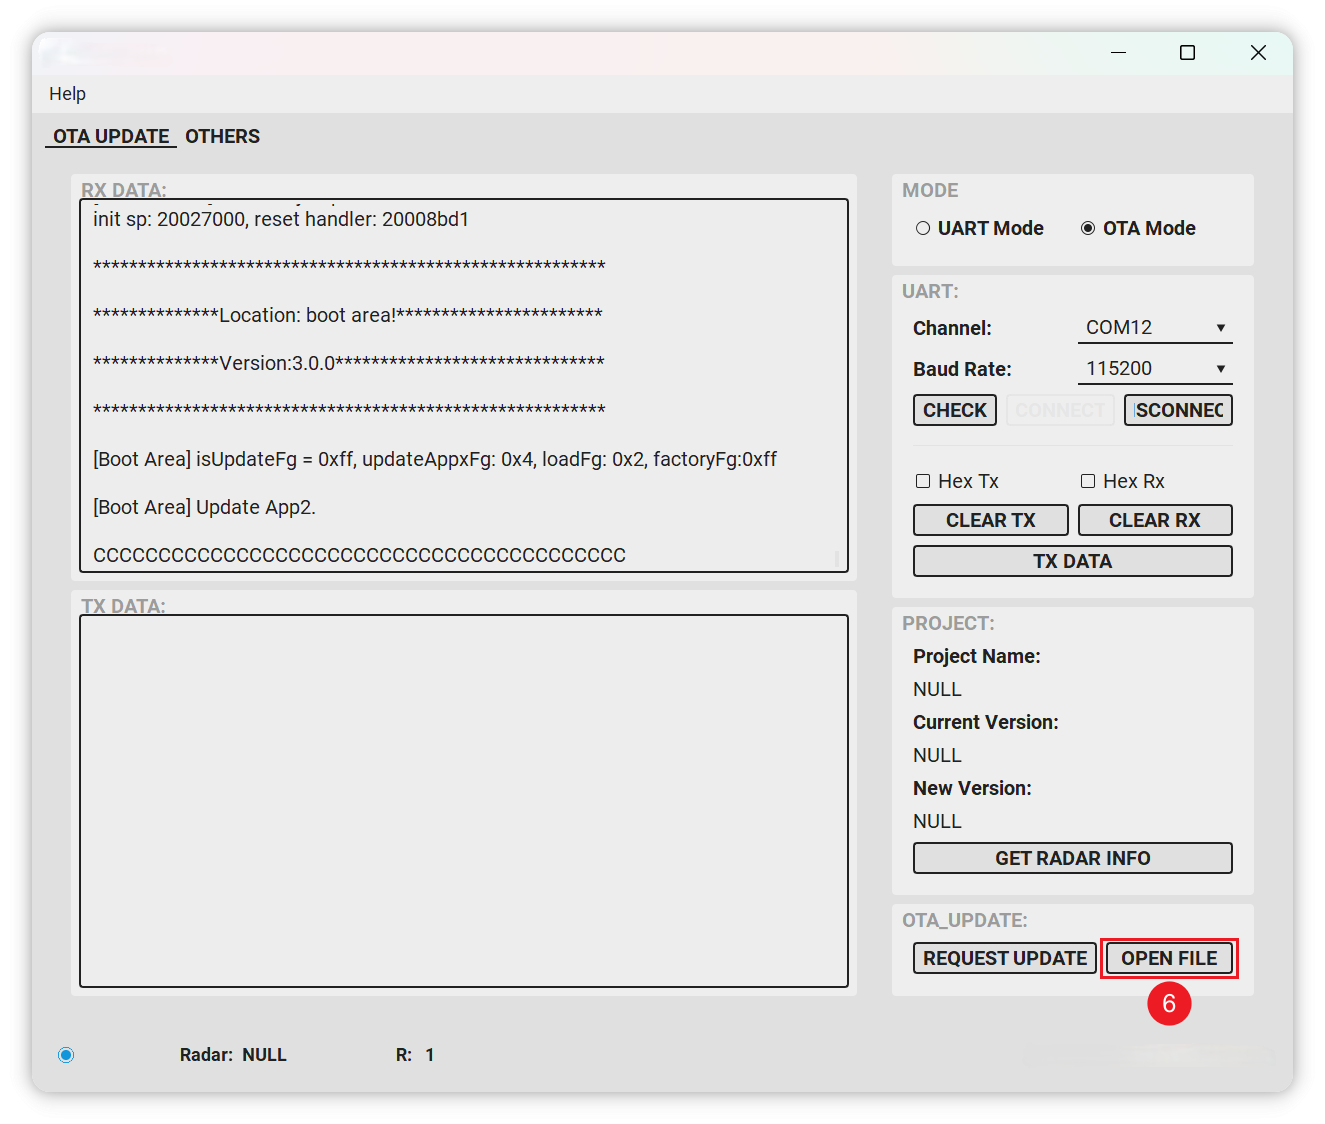
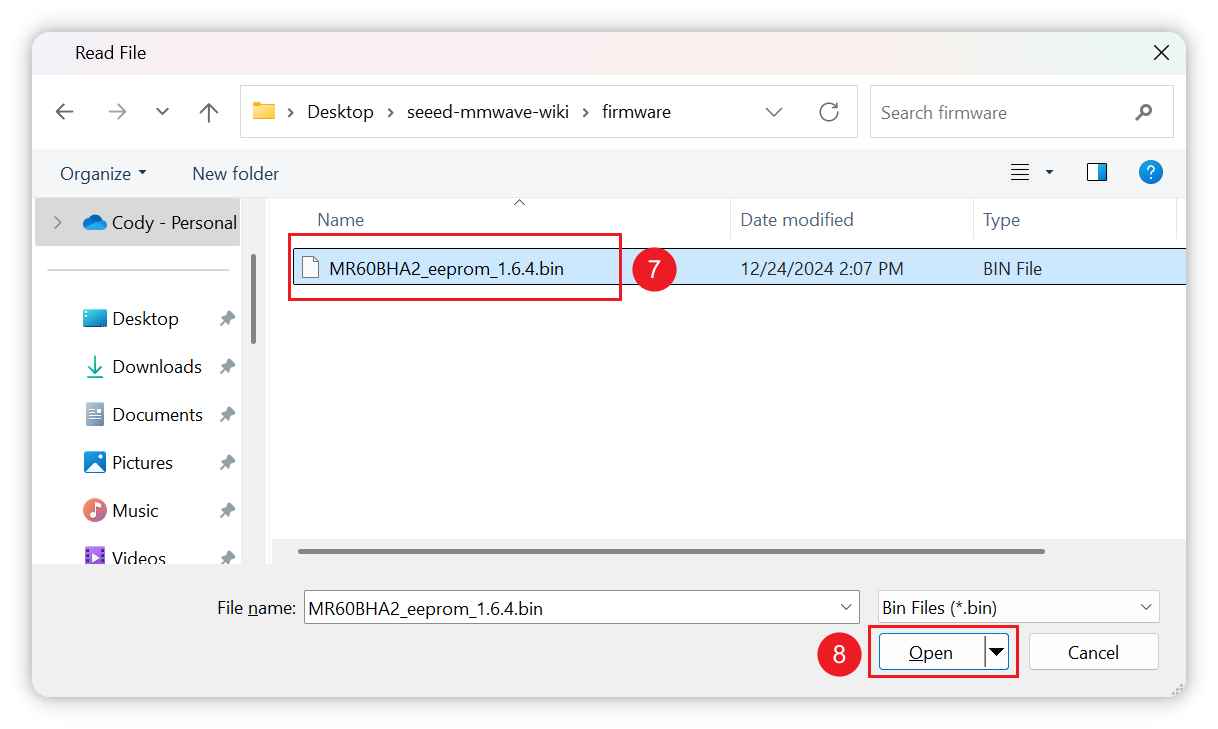
- Select the firmware to be upgraded. After selection, it will automatically enter the upgrade state.
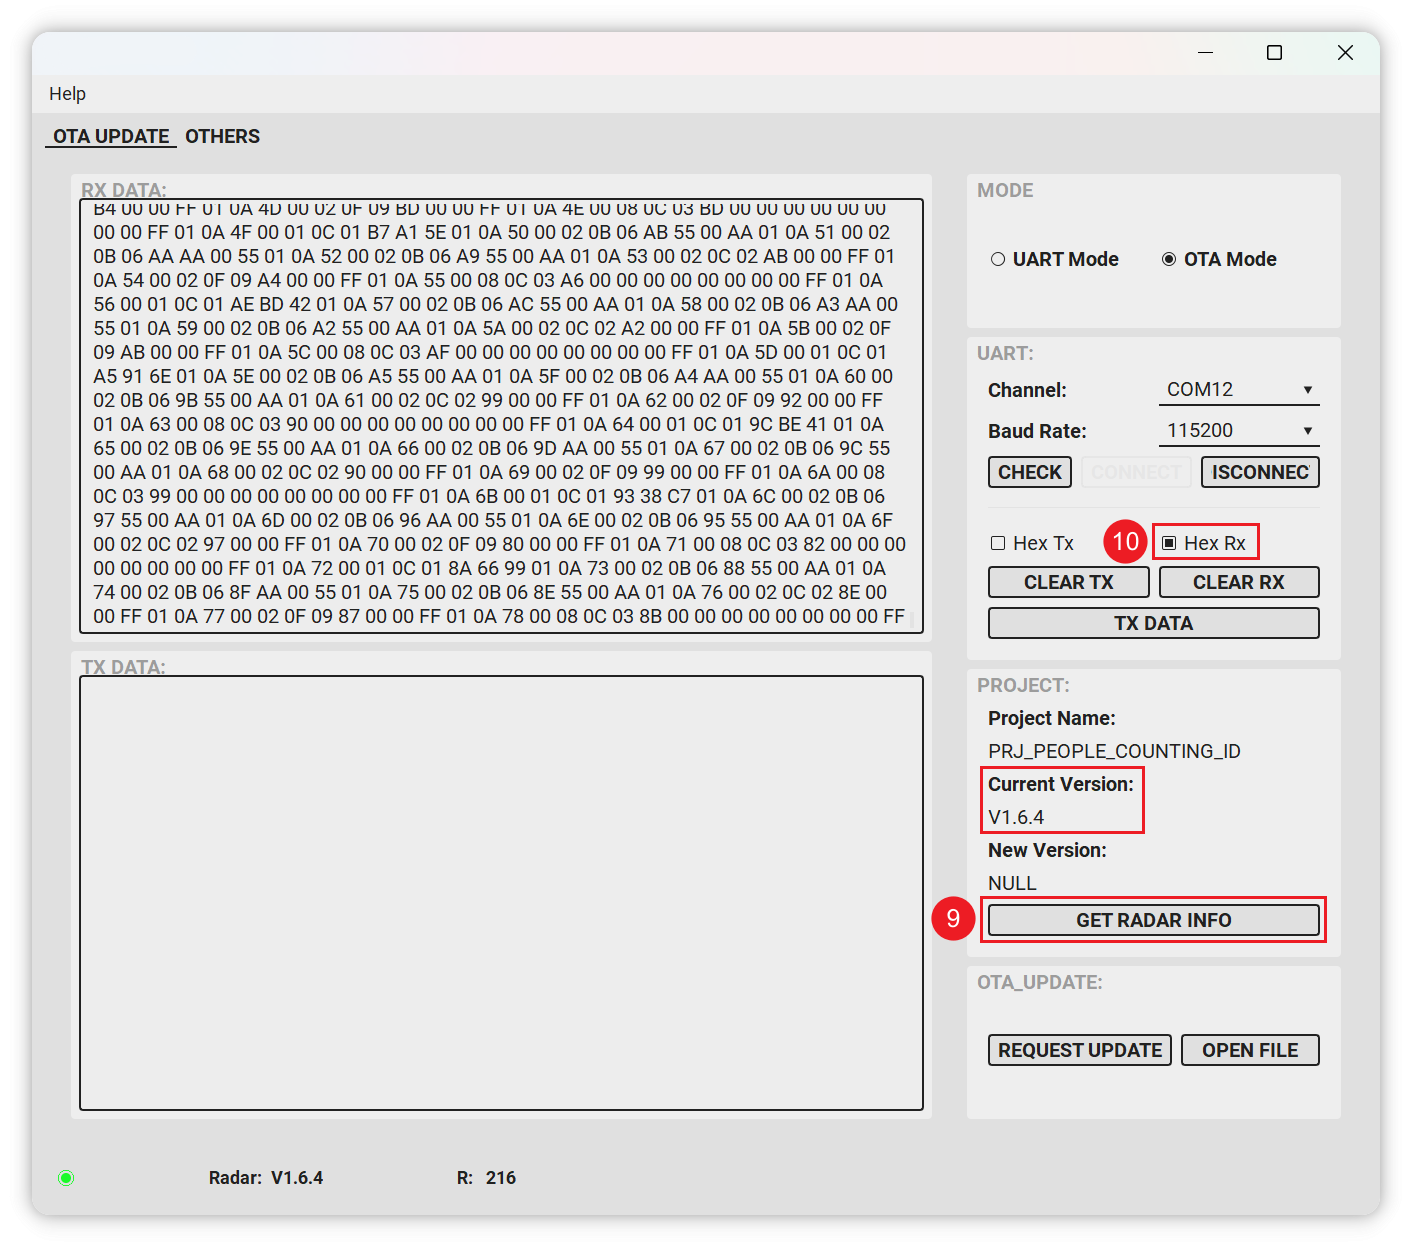
After the upgrade is completed, it will automatically jump to normal mode. If it does not jump, power off and restart, and then use OTA tool to view the serial port data.
- After the upgrade is complete, you can use OTA tool to read the version and raw data.
- You need to re-flash the firmware of XIAO ESP32C6 after the upgrade is completed.
If in the above steps you have operated incorrectly causing an anomaly to occur and have been unable to try to burn the firmware again and the radar is not working properly, then the radar may have suffered a brick due to corrupted firmware. The only way to try to recover the device is to refer to the files and documentation here. However, please understand that we do not provide technical support and assistance for the device bricked due to incorrect operation.
Open for Customization
Want to tailor-make the kit to fit your unique applications?
For more information about 3D point cloud data generation and interference zone configuration when customizing mmWave modules. Seeed provides one-stop R&D customization and manufacturing services for fast development from concept to production. Contact us at [email protected] to learn more.
The firmware and algorithms of the radar are not open source, and complex parameters of the radar such as 3D point cloud, detection distance, range, etc., require customised services, which may involve additional customisation fees and MOQs.
Resources
- STL: mmWave 3D Case
- GitHub Repository: Access the full codebase and documentation at the Seeed mmWave Library GitHub page.
- ESPHome Documentation: For further customization and integration, refer to the ESPHome documentation.
- MR60BHA2 Firmware upgrade tool: MR60BHA2_OTA.zip
- MR60BHA2 Firmware v1.6.12: MR60BHA2_eeprom_1.6.12.bin
- MR60BHA2 GUI Software: Seeed_Studio_mmWave_Sensor_MR60BHA2_GUI.zip
- mmWave Sensor SCH V1.0: mmWave_Sensor_SCH_V1.0.pdf
- MR60BHA2 Module Technical Specification: MR60BHA2_Breathing_and_Heartbeat_Module.pdf
- MR60BHA2 Tiny Frame Interface Manual: Seeed_Studio_Tiny_Frame_Interface_Breathing_and_Heartbeat.pdf
- Radar Firmware Recovery Method via Jlink: Radar_Firmware_Recovery_Method-Jlink.zip
Tech Support & Product Discussion
Thank you for choosing our products! We are here to provide you with different support to ensure that your experience with our products is as smooth as possible. We offer several communication channels to cater to different preferences and needs.