Getting Started with reTerminal D1001

Product Introduction
Overview
reTerminal D1001 is an intelligent large-screen interaction terminal powered by Espressif's latest high-performance ESP32-P4 chip. Designed for AIoT application scenarios requiring high-performance graphics display, video processing, and voice interaction, it leverages the ESP32-P4's powerful 400MHz dual-core RISC-V processor and rich multimedia peripheral interfaces to easily handle complex edge computing and multimedia tasks.
Core Features
- Powerful Processing for Rich Interfaces: Powered by ESP32-P4, a 32-bit RISC-V dual-core processor with 32 MB PSRAM, this device delivers the performance needed for graphics-rich interfaces, smooth real-time interaction, and more edge applications.
- Integrated Wireless Connectivity: Wireless communication is enabled by an onboard ESP32-C6 supporting Wi-Fi 6, Bluetooth 5 (LE), and 802.15.4 (Zigbee/Thread/Matter). The main processor communicates with the connectivity subsystem via an SDIO interface, enabling reliable wireless networking for connected devices and IoT applications.
- Field-Ready Cellular Expansion: Equipped with a built-in mPCIe slot supporting USB 2.0 signals, the device enables seamless 4G LTE connectivity for reliable networking in remote environments. It's ideal for field deployments, remote monitoring, and always-connected edge applications where stable wireless communication is essential.
- 8-Inch Touch Display with Rich HMI Support: The 8-inch 800 × 1280 capacitive LCD display, driven over MIPI-DSI and supporting both portrait and landscape modes, gives you the space to build polished dashboards, smart control panels, and other UI-focused embedded devices.
- Camera Interface for Vision Development: With a MIPI-CSI camera based on the SC2356 sensor and support for up to 1600 × 1200 at 30 fps, the platform is ready for image capture, live preview, and embedded vision development right out of the box.
- Voice and Audio Capabilities: Dual microphones and a built-in speaker enable voice input, sound capture, and playback. With echo cancellation supported by the ES7210 audio ADC, the system helps deliver clearer voice capture for AI assistants and voice-enabled applications.
Hardware Specifications
| Category | Parameter | Description |
|---|---|---|
| Basic | Processor | ESP32-P4NRW32 with 32MB PSRAM |
| Wireless SoC | ESP32-C6 | |
| Storage | 32MB QSPI Flash, support Micro SD card | |
| Display | Size | 8” |
| Resolution | 800×1280 | |
| Luminance (cd/㎡) | 250 | |
| Optimum Viewing Angle (O’Clock) | ALL | |
| Interface | MIPI-DSI | |
| Driver IC | 9365DA-H3 | |
| Touch Type | Capacitive touch | |
| Touch IC | GSL3670 | |
| Orientation | Portrait/Landscape rotation supported | |
| Camera | Sensor | SC2356 |
| Active Array Size | 1608×1208 | |
| Max Frame Rate | (1600*1200)30fps 10bit | |
| Interface | MIPI-CSI | |
| Audio | Microphone | Dual microphone |
| Speaker | 2W@8Ω NS4150B | |
| Audio IC | Codec: ES8311 Audio ADC: ES7210 | |
| Wireless Communication | Wi-Fi | Wi-Fi 6 (2.4GHz) |
| BLE | Bluetooth 5 (LE) | |
| Cellular | Mini-PCIe for 4G (optional) | |
| Antenna | On-board antenna and external Antenna | |
| Power | Battery | 2500mAh |
| Power Input | USB Type-C 5V | |
| Other | RTC | PCF8563T (supports timed interrupt wake-up) |
| Motion Sensor | LSM6DS3TR Six-Axis |
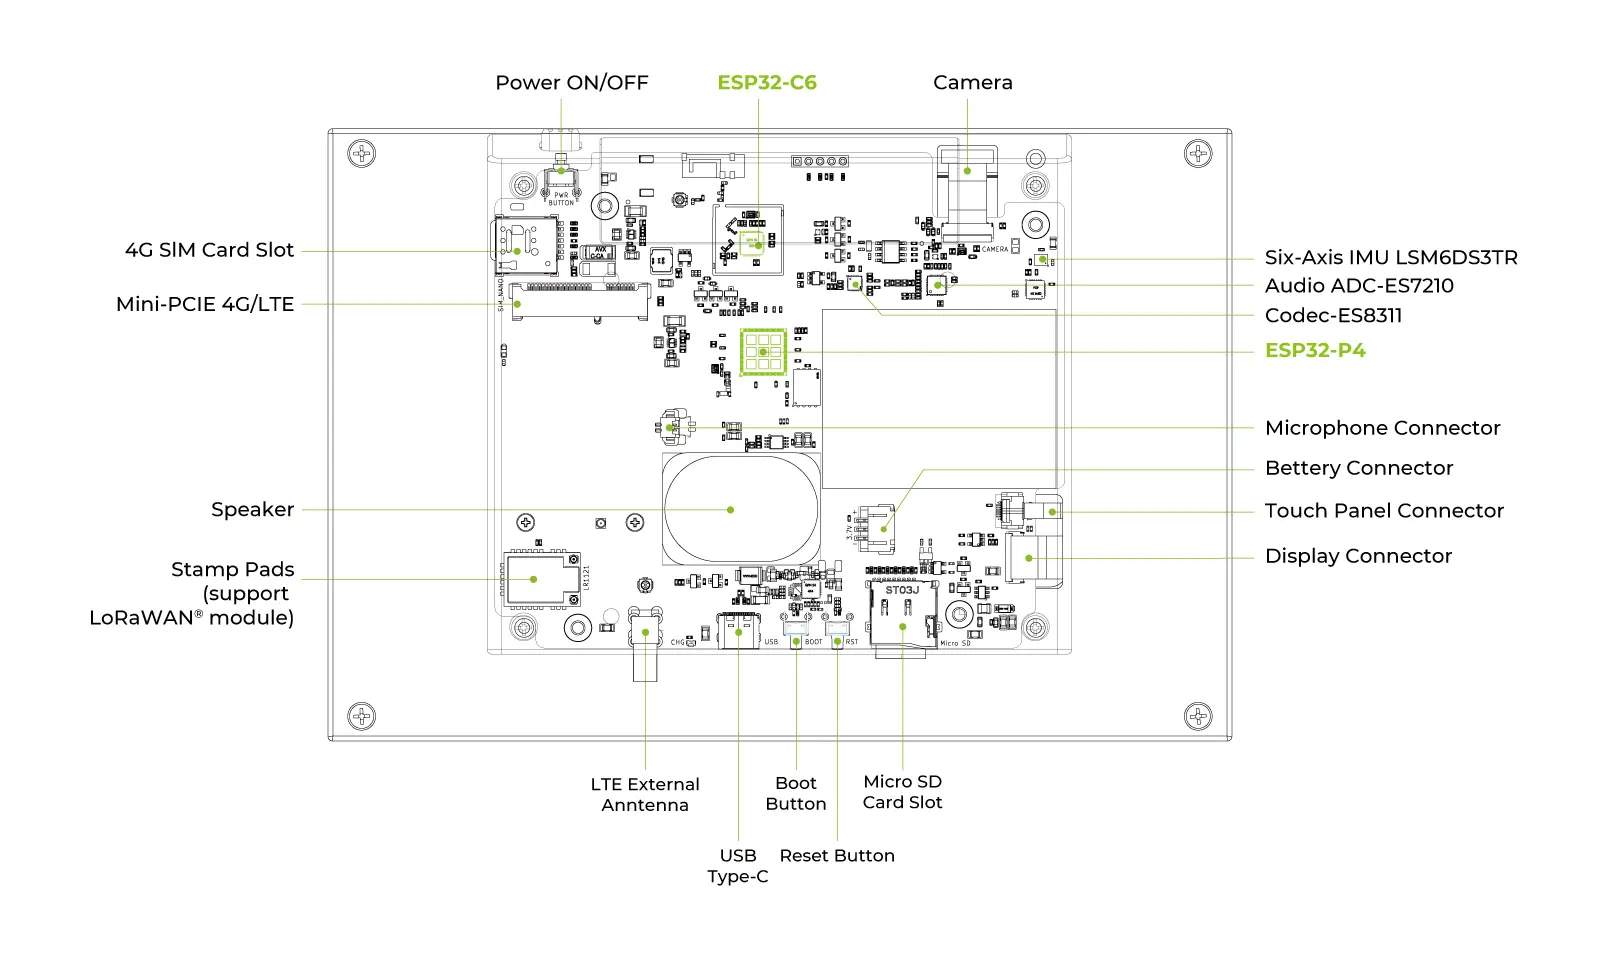
Hardware Overview
Application
- Smart Home Central Hub: An all-in-one HMI device for managing lighting, security, and home automation systems.
- Video Intercom Systems: Real-time visual communication for smart entry, doorbells, and security access.
- Interactive AI Assistants: Voice-enabled smart displays providing intuitive visual feedback and responsive control.
- Industrial Data Dashboards: Professional monitoring terminals for real-time equipment tracking and commercial data visualization.
- Edge Vision Terminals: Compact solutions for image capture, scanning, and interactive retail kiosks.
Getting Started with ESP-IDF
This section guides you through setting up the development environment and running the factory demo firmware to experience the powerful features of reTerminal D1001.
Configure the ESP-IDF development environment
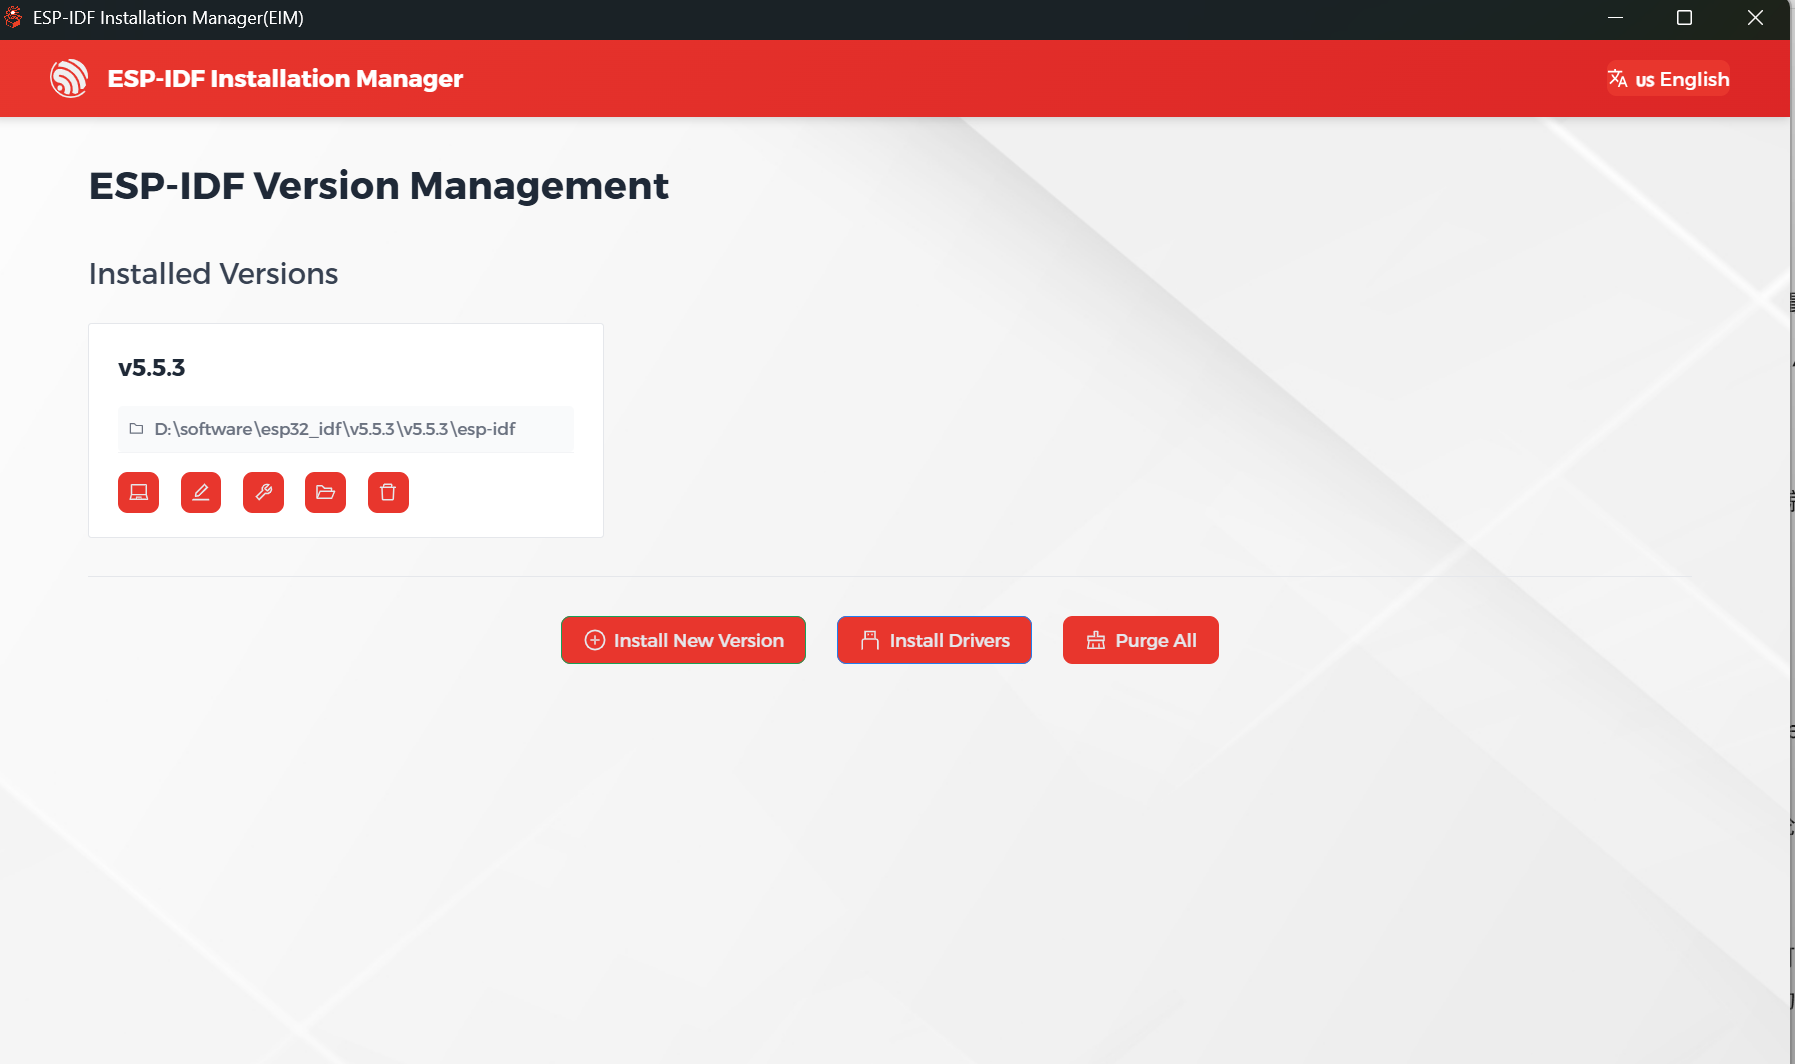
Step 1. Install ESP-IDF
Use Espressif's latest cross-platform installation tool, ESP-IDF Installation Manager.
-
Download ESP-IDF: Visit the ESP-IDF Installation Manager Download Page, select the Offline Installer tab, choose the Windows version (v5.4.2+ recommended), and click Download to get both the
.zstand.exefiles.

-
Install from Archive: Run the installer (
eim-gui-windows-x64.exe), select Install from archive (the offline package will be automatically detected), choose an installation path (default recommended; avoid Chinese characters or spaces), and click Start Installation.

-
Complete Installation: Once finished, click Install Driver to complete the setup.
Step 2. Install Visual Studio Code & ESP-IDF Extension
- Download and install Visual Studio Code.
- During installation, it is recommended to check "Add 'Open with Code' action to Windows Explorer file context menu" to quickly open project folders.
- Open VS Code, click the Extensions icon in the sidebar (or use
Ctrl + Shift + X) to open the Extensions view. - Type
ESP-IDFin the search box, find the ESP-IDF extension, and click Install.
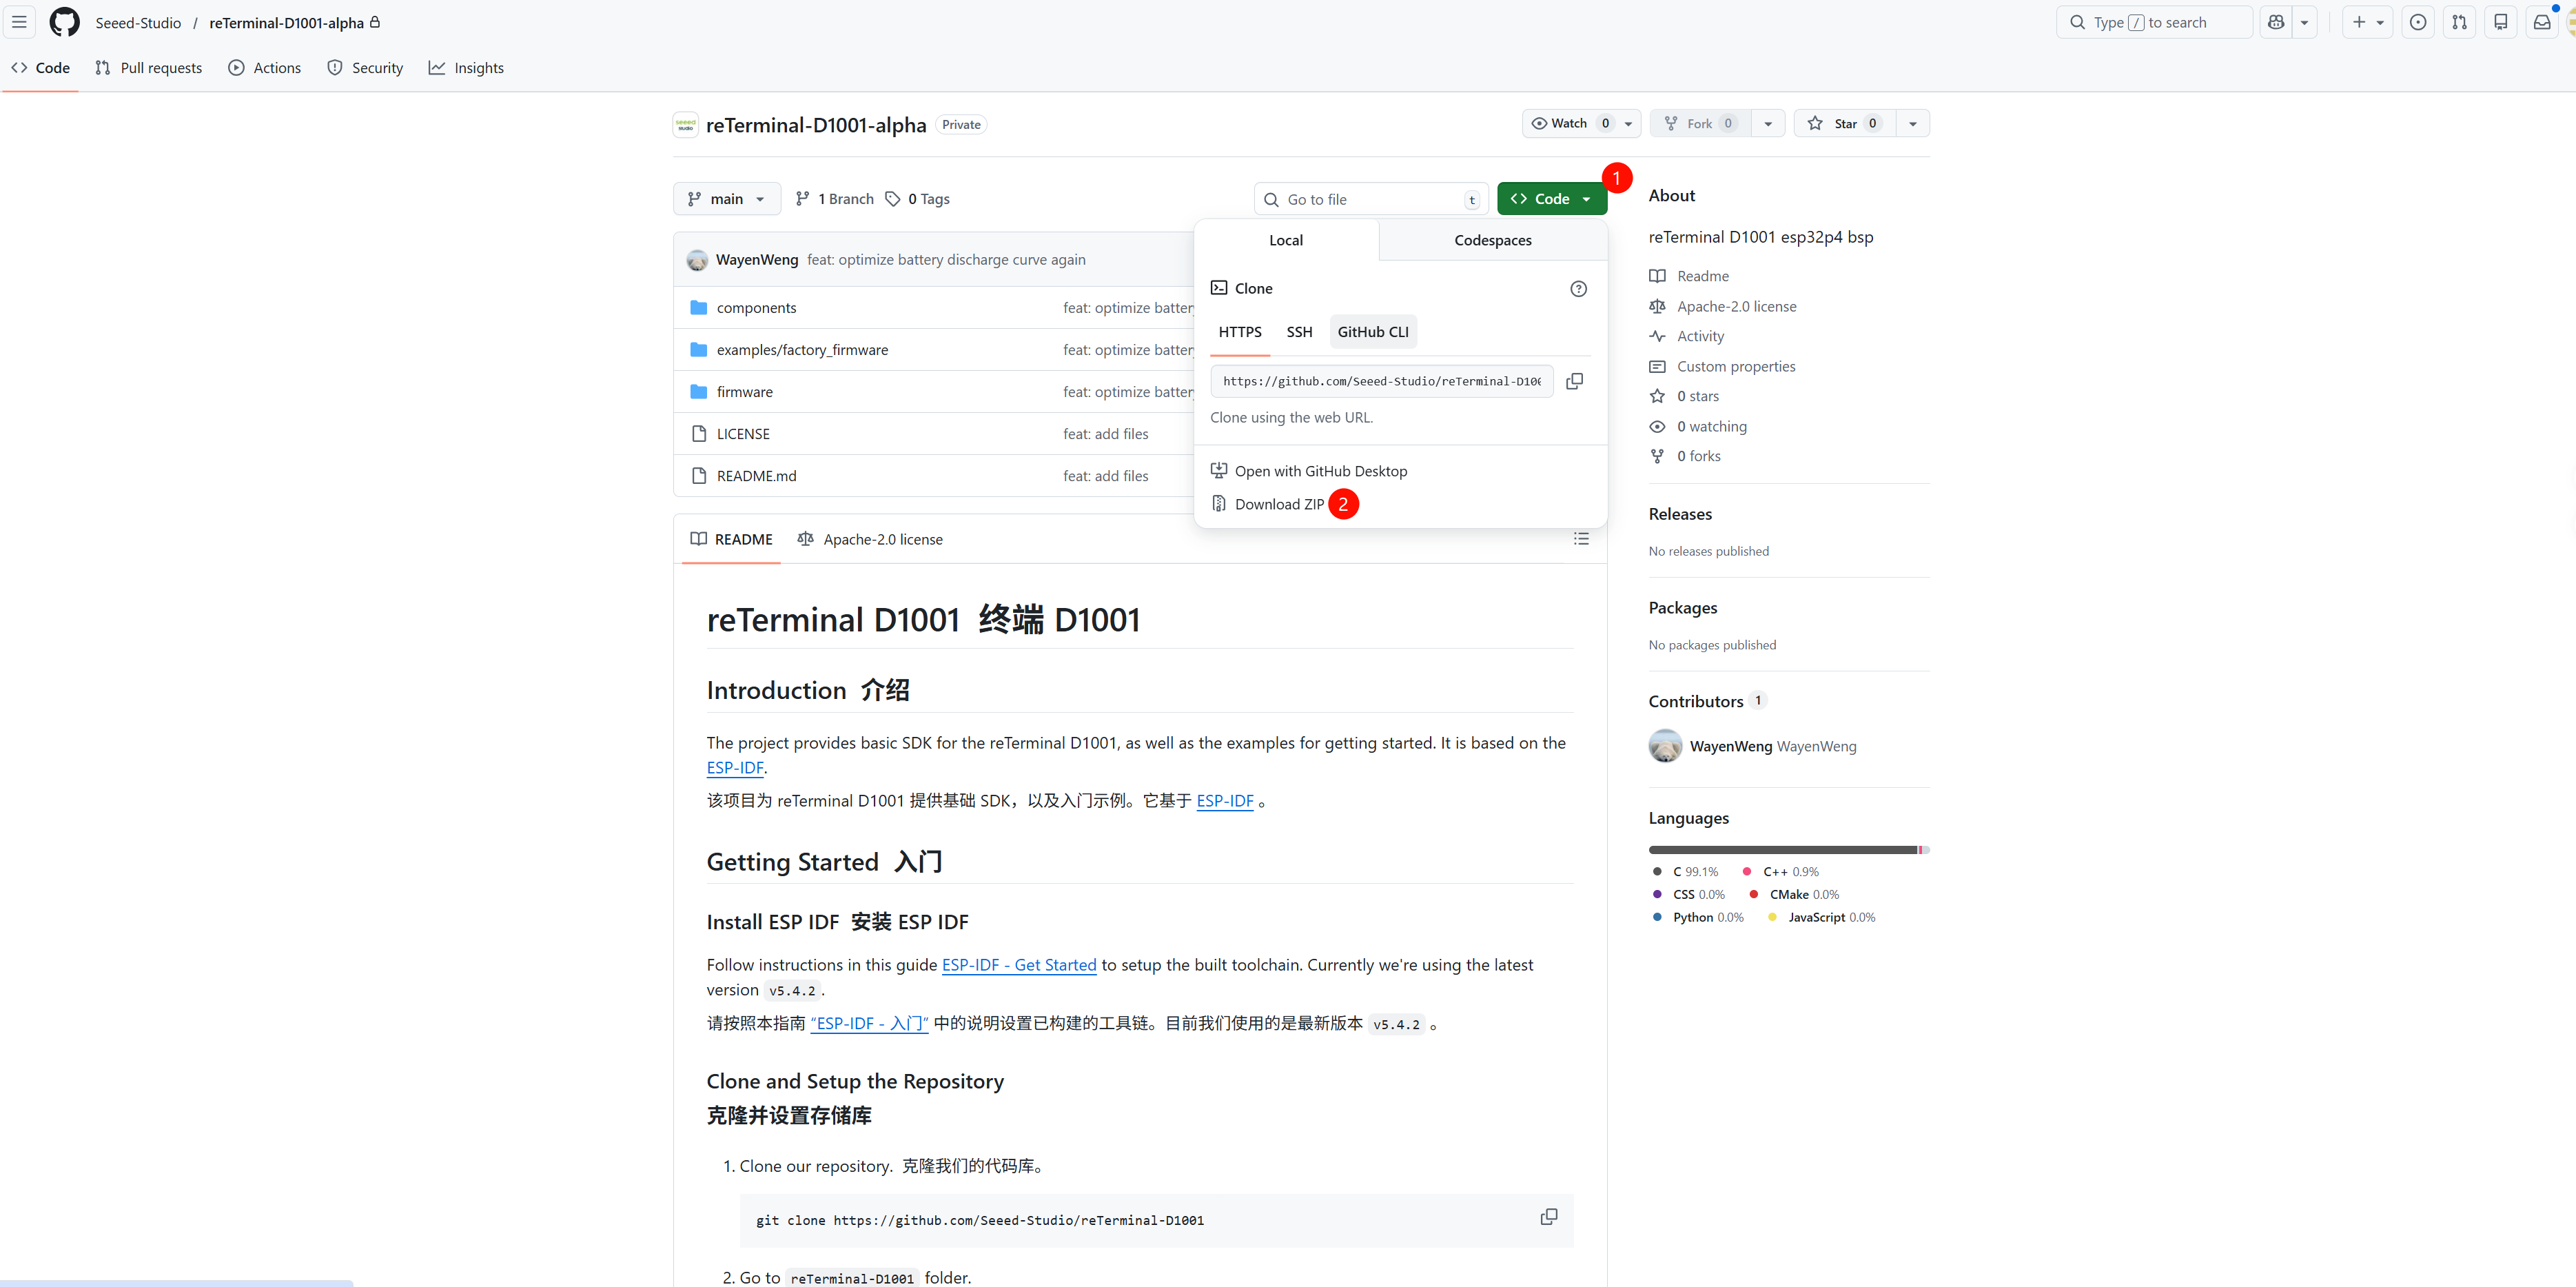
Get the Firmware Repository
Download the official reTerminal D1001 repository from GitHub.
Build and Flash Demo Firmware
-
Open Project: Use VS Code to open the cloned
reTerminal-D1001folder. tip
tipPlease make sure to open the
examples/factory_firmwaredirectory within the project. Opening the root directory may cause compilation failures.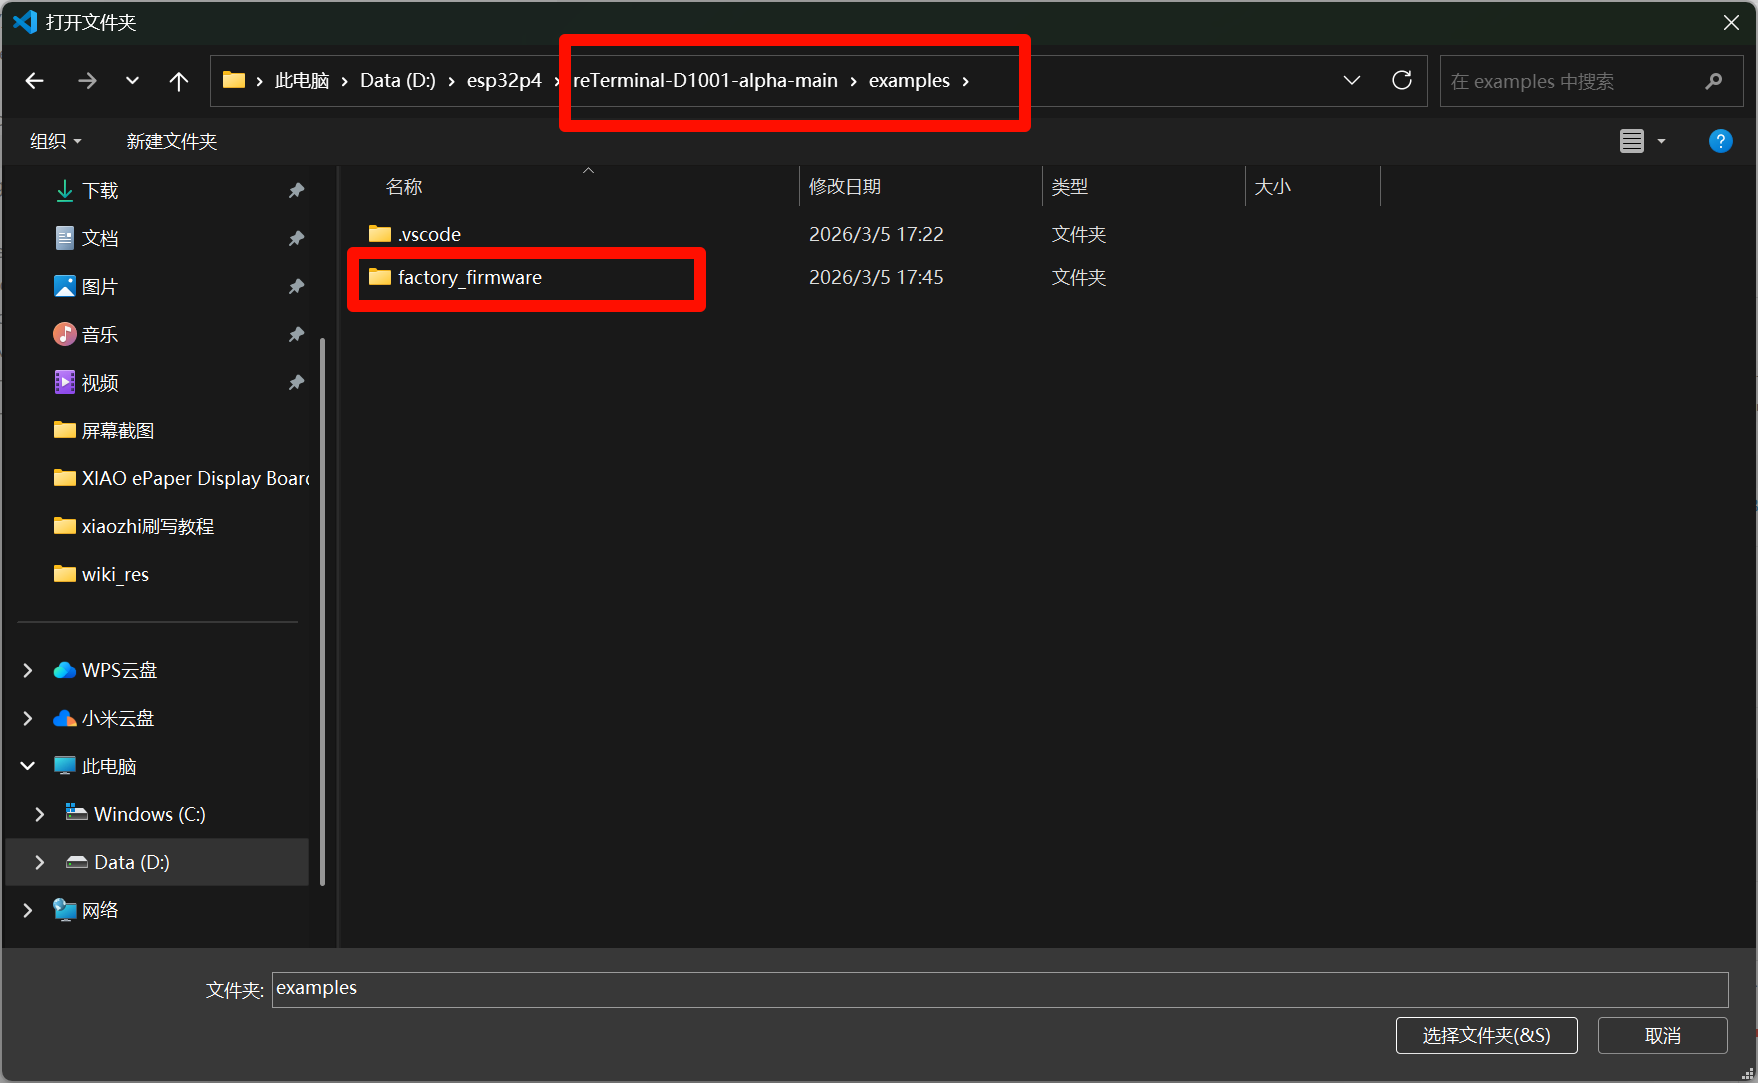
-
Set Target Chip:
- In the VS Code status bar at the bottom, select the target chip as
esp32p4. - Or run in the terminal:
idf.py set-target esp32p4.
- In the VS Code status bar at the bottom, select the target chip as
-
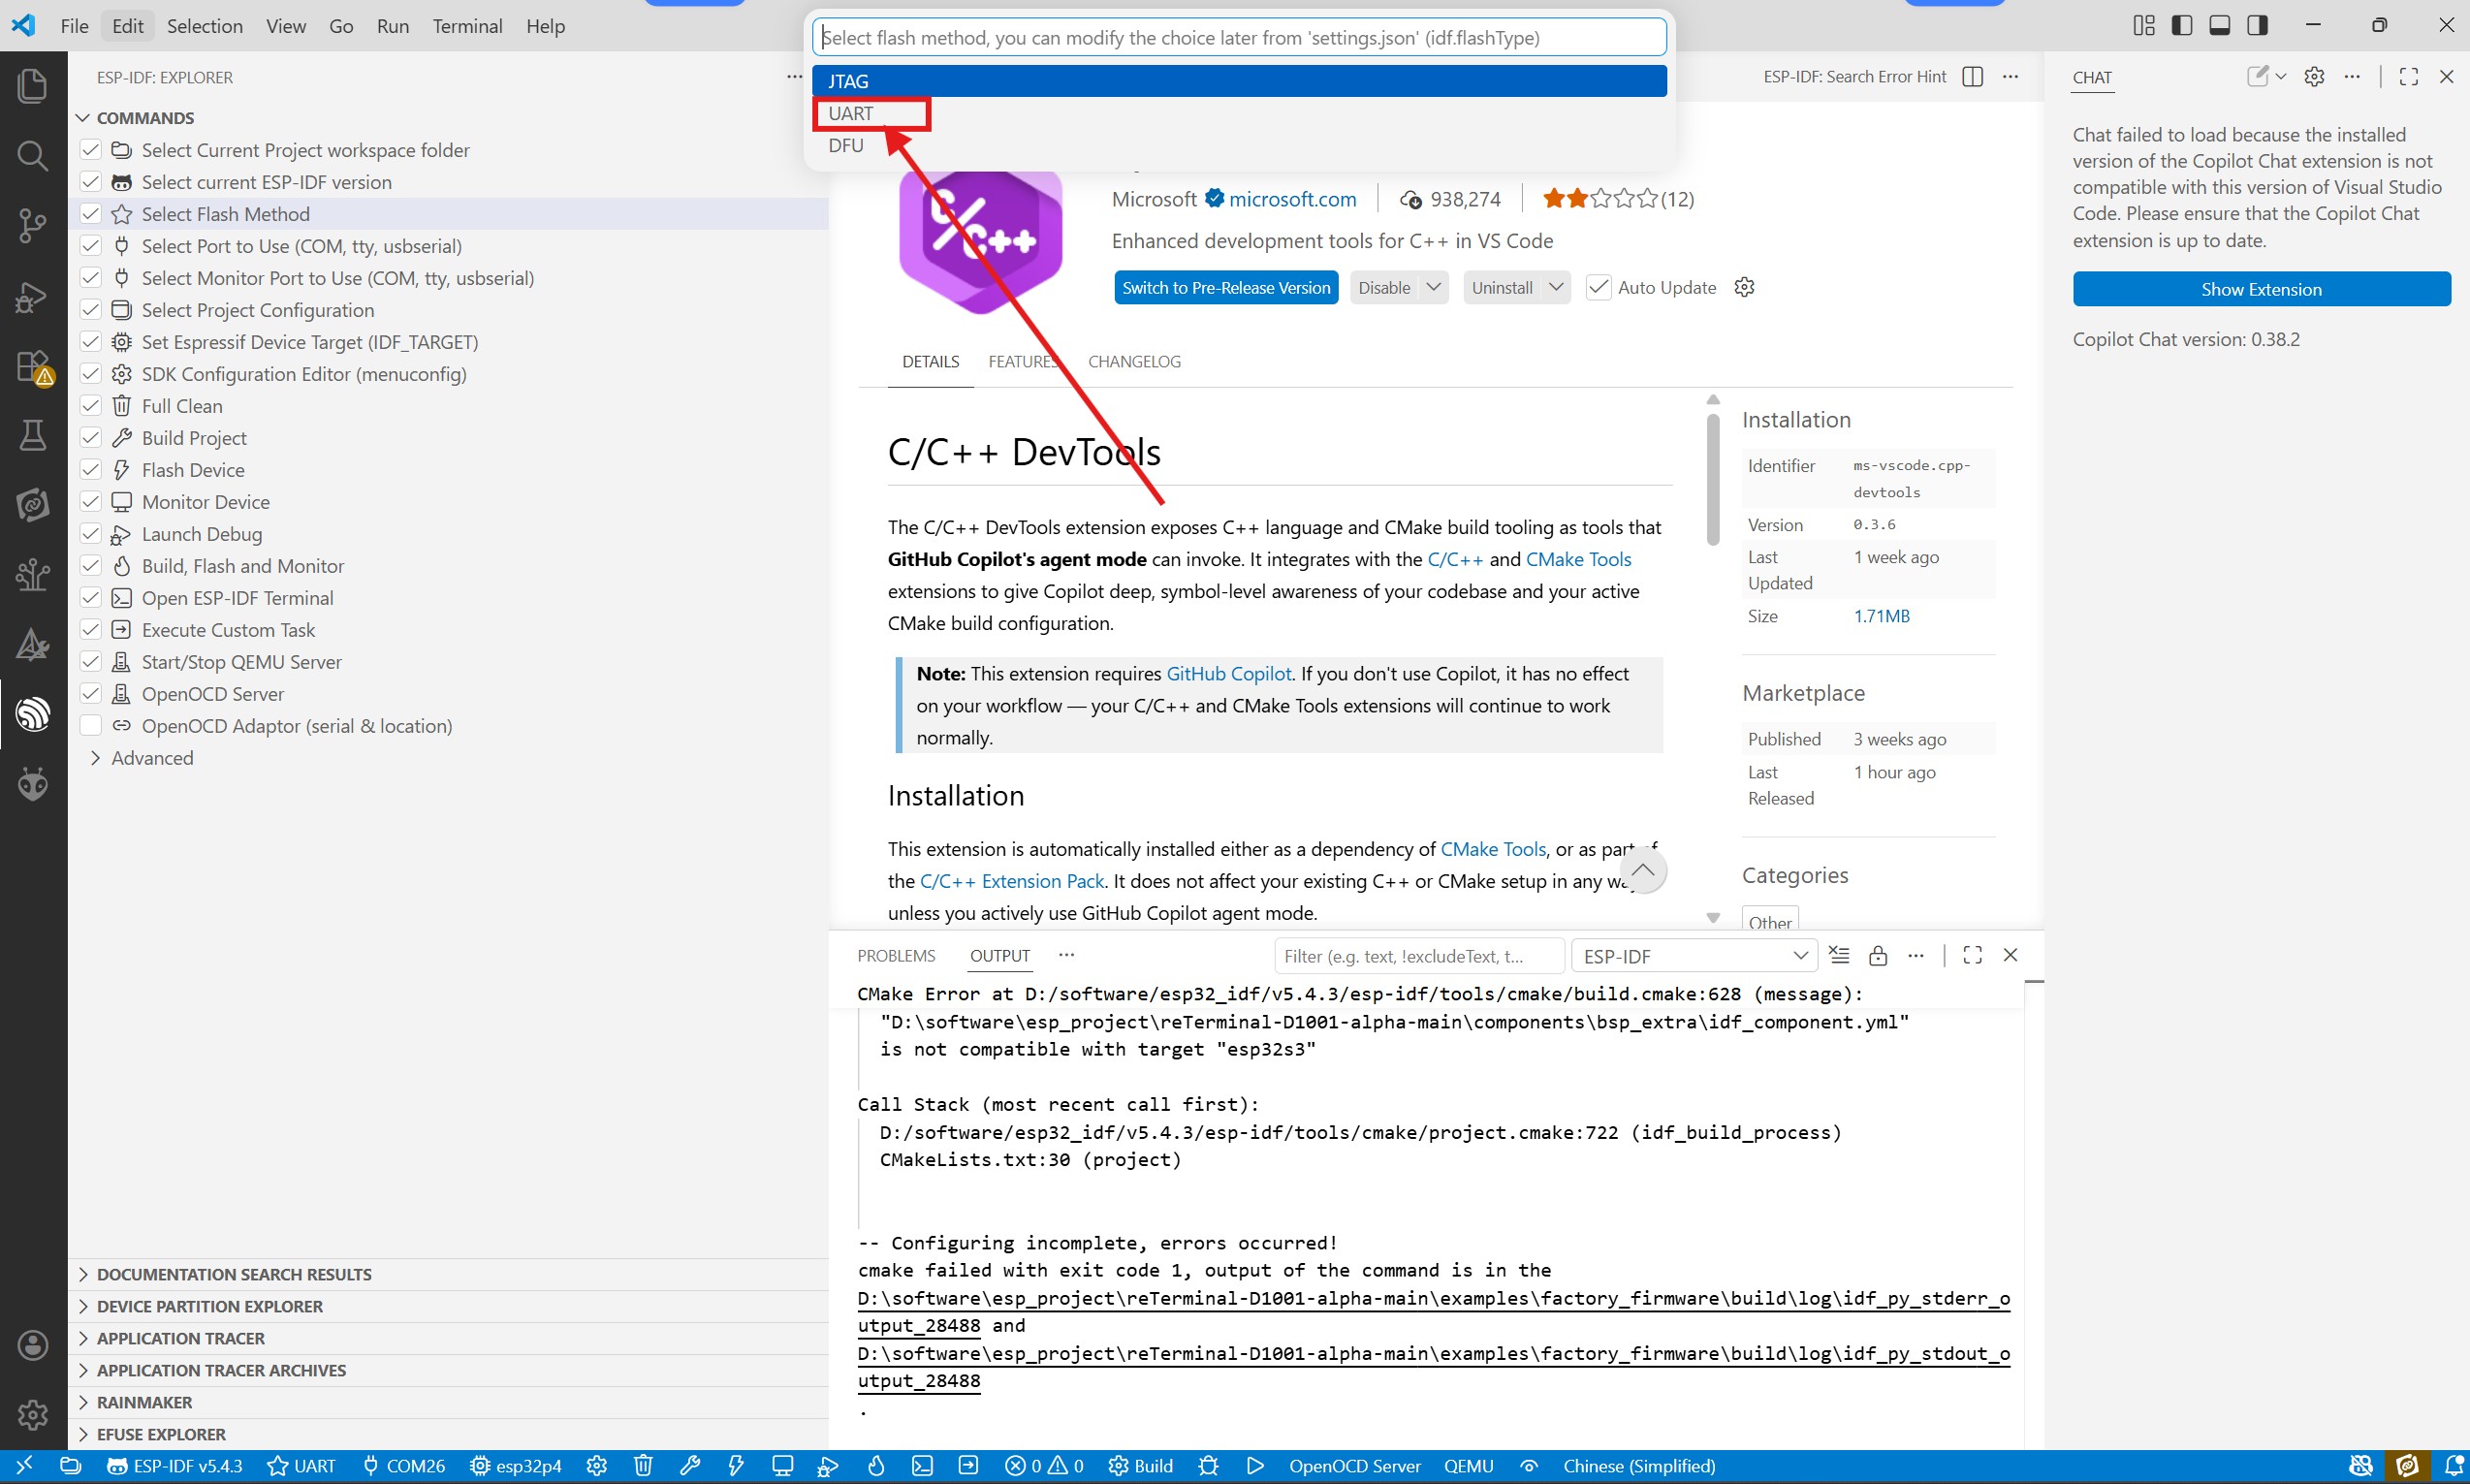
Select Flashing Mode:
- Select the correct flashing mode before flashing.
-
Build, Flash and Monitor:
- Connect the device to your computer via USB Type-C.
- Click the "Flash" (flame icon) button in the VS Code status bar to build, flash, and start the monitor in one step.

Experience Demo Features
After the firmware is successfully flashed, the device will automatically restart. You can interact with the device as follows:
- Power and Screen Control: Long press the green button for more than 3 seconds to power on. Short press the button to turn off the screen, and short press again to wake it up.
- Smooth UI Interaction: Experience smooth sliding transitions and application launch animations.

- Camera Preview: Open the Camera App to view real-time footage.

- Sensor Demo: Rotate the device to observe the screen auto-rotation effect or check other sensor data.

Resources
- Hardware Documents:
- Datasheets:
Tech Support & Product Discussion
Thank you for choosing our products! We are here to provide you with different support to ensure that your experience with our products is as smooth as possible. We offer several communication channels to cater to different preferences and needs.