SenseCAP Watcher Quick Start Guide

Quick Starter Guide Video
This is SenseCAP Watcher Quick Starter Guide which will help you unbox and get hands-on the device for the first time.
Introduction
SenseCAP Watcher is an AI watcher to help you monitor anomalies within a space and then take actions. Simply speak to Watcher to give commands, and it will execute your desired tasks when the event occurs.
As a new comer for smart building / smart home system, SenseCAP Watcher is far more intelligent compared to current sensors and actuators. It understands what is happening within the space and then takes actions accordingly.
Must-Do
Before using Watcher as a space assistant, we must ensure that the following three steps are performed successfully, which is the basis for all subsequent steps.
Step 1. Installation Packaging
The Watcher comes with a unique packaging that doubles as a stylish, calendar-like stand. By placing the Watcher inside this stand, you can create an attractive decoration for your home. Follow the step-by-step instructions below and refer to the accompanying video for a visual guide on how to install your Watcher in its stand.
Step 2. Power On
Please use a power plug that is compatible with the Watcher; the Watcher must be powered by a 5V power supply and may burn out if you use a non-compliant power adapter or a power supply with a voltage greater than 5V!

The chart above shows the recommended adapter specifications. If you don't know where you can purchase the right adapter, you can choose to buy it directly at the link below.
To power on your Watcher device, press and hold the wheel button located on the upper right corner for approximately 3 seconds until the Seeed Studio logo appears on the screen.

Once the logo is displayed, release the button and allow the device to complete its initialization process. After a few moments, the Watcher will display its main menu, indicating that it is ready for use.
If the device won't turn on with a long press, the device may be low on power and you may need to connect a cable to power it up before you can wake up the Watcher.
Step 3. Device Binding
SenseCraft Pro will automatically activate the trial service when your device is tethered to the SenseCraft APP.
After powering on your Watcher, if it has not been previously bound to a device, it will prompt you to connect to the SenseCraft app. Alternatively, you can find the "Connect to APP" option in the Settings menu. The Watcher will then display a QR code to download the SenseCraft app.
You can either scan the QR code or use the provided link to download the app.
To proceed with binding your Watcher to the SenseCraft app, follow these steps:
1. On your Watcher, rotate the wheel button clockwise to enter the QR code interface for binding the device.

2. Open the SenseCraft app on your mobile device and tap the plus sign (+) in the top right corner to add your Watcher by scanning the QR code.
Ensure that your mobile device's Bluetooth permissions are enabled, as the binding process requires a Bluetooth connection.

3. After successfully scanning the QR code, the app will navigate to the network configuration page. Select a 2.4GHz Wi-Fi network to connect your Watcher to the internet.

Tap the "Next" button to proceed.
4. Choose a name for your Watcher and select an appropriate group for it.

Tap the "Finish" button to complete the setup process.
5. The SenseCraft app will display a tutorial page, providing guidance on how to use your Watcher. Take a moment to familiarize yourself with the instructions.

Once the setup is complete, the app will open a chat window to communicate with your Watcher, while the Watcher will return to its main menu.
With the binding process finished, your Watcher is now connected to the SenseCraft app, and you can start exploring its features and capabilities. The app serves as a convenient way to interact with your Watcher, adjust settings, and receive notifications remotely.
Schedule a task for Watcher
Next, select the method you want to use to schedule an executable task for Watcher.
- Built-in task templates
- Through the APP
- By Voice
To run a task from the Task Templates on your Watcher, follow these steps:
1. From the main menu, use the wheel button to navigate to the Task Templates option.
2. Press the wheel button to enter the Task Templates submenu.
3. Scroll through the available task templates using the wheel button until you find the desired model task.
4. Press the wheel button to select and start running the chosen task.

Once the task begins, the Watcher will display an animated emoji face on the screen. This emoji indicates that the device is actively monitoring for the target object specified by the selected task template.
When the Watcher detects the target object, the display will switch from the emoji animation to a real-time view of the detected object. This allows you to see what the Watcher has identified.
If the target object moves out of the Watcher's view or is no longer detected, the display will automatically return to the animated emoji face, signifying that the device is still monitoring for the target.
Task Templates:
- Human Detection:
- This task template is designed to detect the presence of human beings.
- When the Watcher identifies a person, it will trigger an alarm notification.

- Pet Detection:
- The Pet Detection task template focuses on recognizing cats or dogs.
- If the Watcher detects a cat, it will trigger an alarm notification.

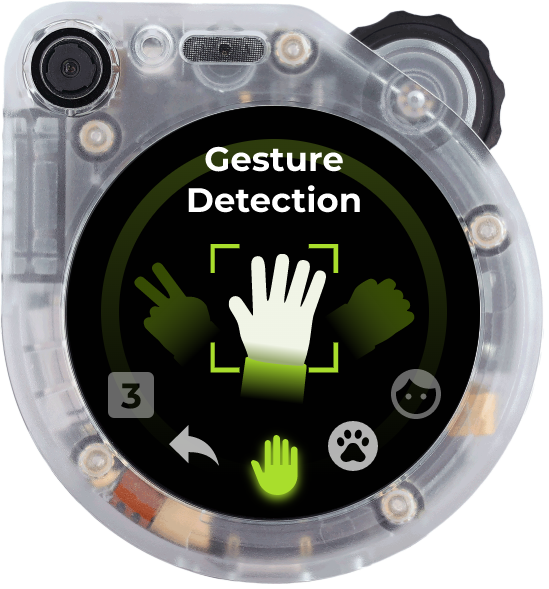
- Gesture Detection:
- This task template is configured to identify the "paper" hand gesture.
- When the Watcher recognizes the paper gesture, it will trigger an alarm notification.
Each of these task templates has specific alarm triggering conditions based on the detection of their respective targets: humans, cats, or the paper gesture. By using these templates, you can quickly set up the Watcher to monitor for the desired object without the need for extensive configuration.
Fees may apply for using some of SenseCraft AI's services, please refer to the documentation below for details:
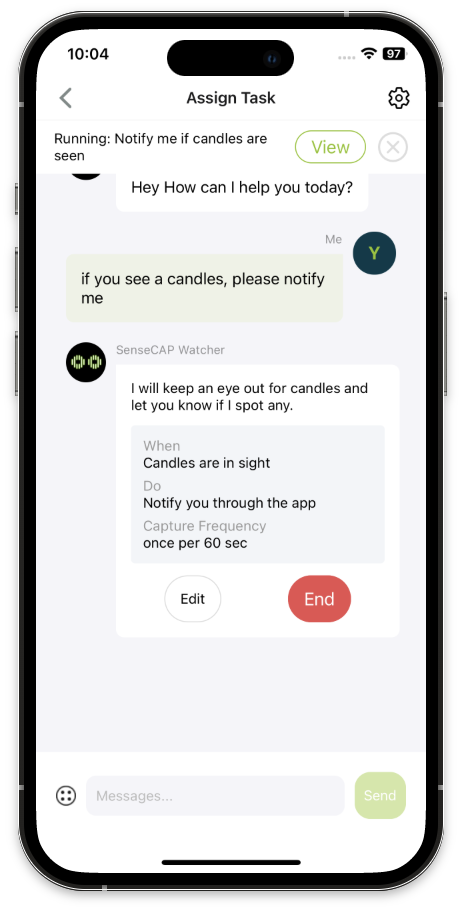
The SenseCraft APP allows you to send Tasks to your Watcher device. In this example, we will demonstrate the process of sending a task using one of the sample tasks provided by Watcher. Let's use the command If you see a candles, please notify me.
1. Open the SenseCraft APP and navigate to the chat window for your connected Watcher device.

2. In the chat window, either select the desired task from the available options or manually type in the command If you see a candles, please notify me. Send the command to your Watcher by tapping the send button or pressing enter.
3. Upon receiving the command, Watcher will interpret it and break it down into a task flow consisting of When, Do, and Capture Frequency components.

Review the parsed task flow to ensure that Watcher has correctly understood your command. The app will display the interpreted task details for your verification. If any part of the task flow does not align with your intended command, you can modify the task details by accessing the Detail Config section within the app.

4. Once you have confirmed or adjusted the task details, click the Run button to send the finalized task to your Watcher.
Watcher will download the task instructions, and once the download is complete, it will transform into a vigilant monitoring system, ready to detect any instances of candles.

5. If Watcher identifies a candles, it will send an alert based on the predefined settings, which may include flashing lights, audible alarms, and notifications through the SenseCraft APP.

Please note that due to the time constraints of the task flow, there will be a minimum interval between consecutive alerts to avoid excessive notifications.
By following these steps, you can effectively send commands to your Watcher using the SenseCraft APP, enabling it to perform specific monitoring tasks and notify you when the specified conditions are met.
Remember to regularly review and adjust your Watcher's settings and task flows to ensure optimal performance and alignment with your monitoring requirements. For a more detailed description and explanation of the APP's tasks and options, as well as a detailed description of the intervals, please read Watcher Task Assignment Guideline to learn more.
Fees may apply for using some of SenseCraft AI's services, please refer to the documentation below for details:
The Watcher offers a convenient and intuitive way to send tasks or engage in conversation using voice commands, thanks to its "Push to Talk" feature. This functionality is accessible from any screen or interface on the device, making it easy to interact with the Watcher without navigating through menus. Here's a step-by-step guide on how to use this feature:
-
Activate Push to Talk:
- Locate the Wheel Button on the top-right corner of the Watcher.
- Press and hold the Wheel Button to enter the voice input interface.

-
Speak Your Command or Message:
- While holding the Wheel Button, clearly speak your task or message to the Watcher.
- You can assign tasks, such as "Tell me if the baby is crying" or "If the dog is stealing food, say stop Copper". (Copper is the name of my dog.)
-
Release the Wheel Button:
- Once you have finished speaking, release the Wheel Button.
- The Watcher will process your voice input and determine whether it is a task assignment.
-
Task Assignment:
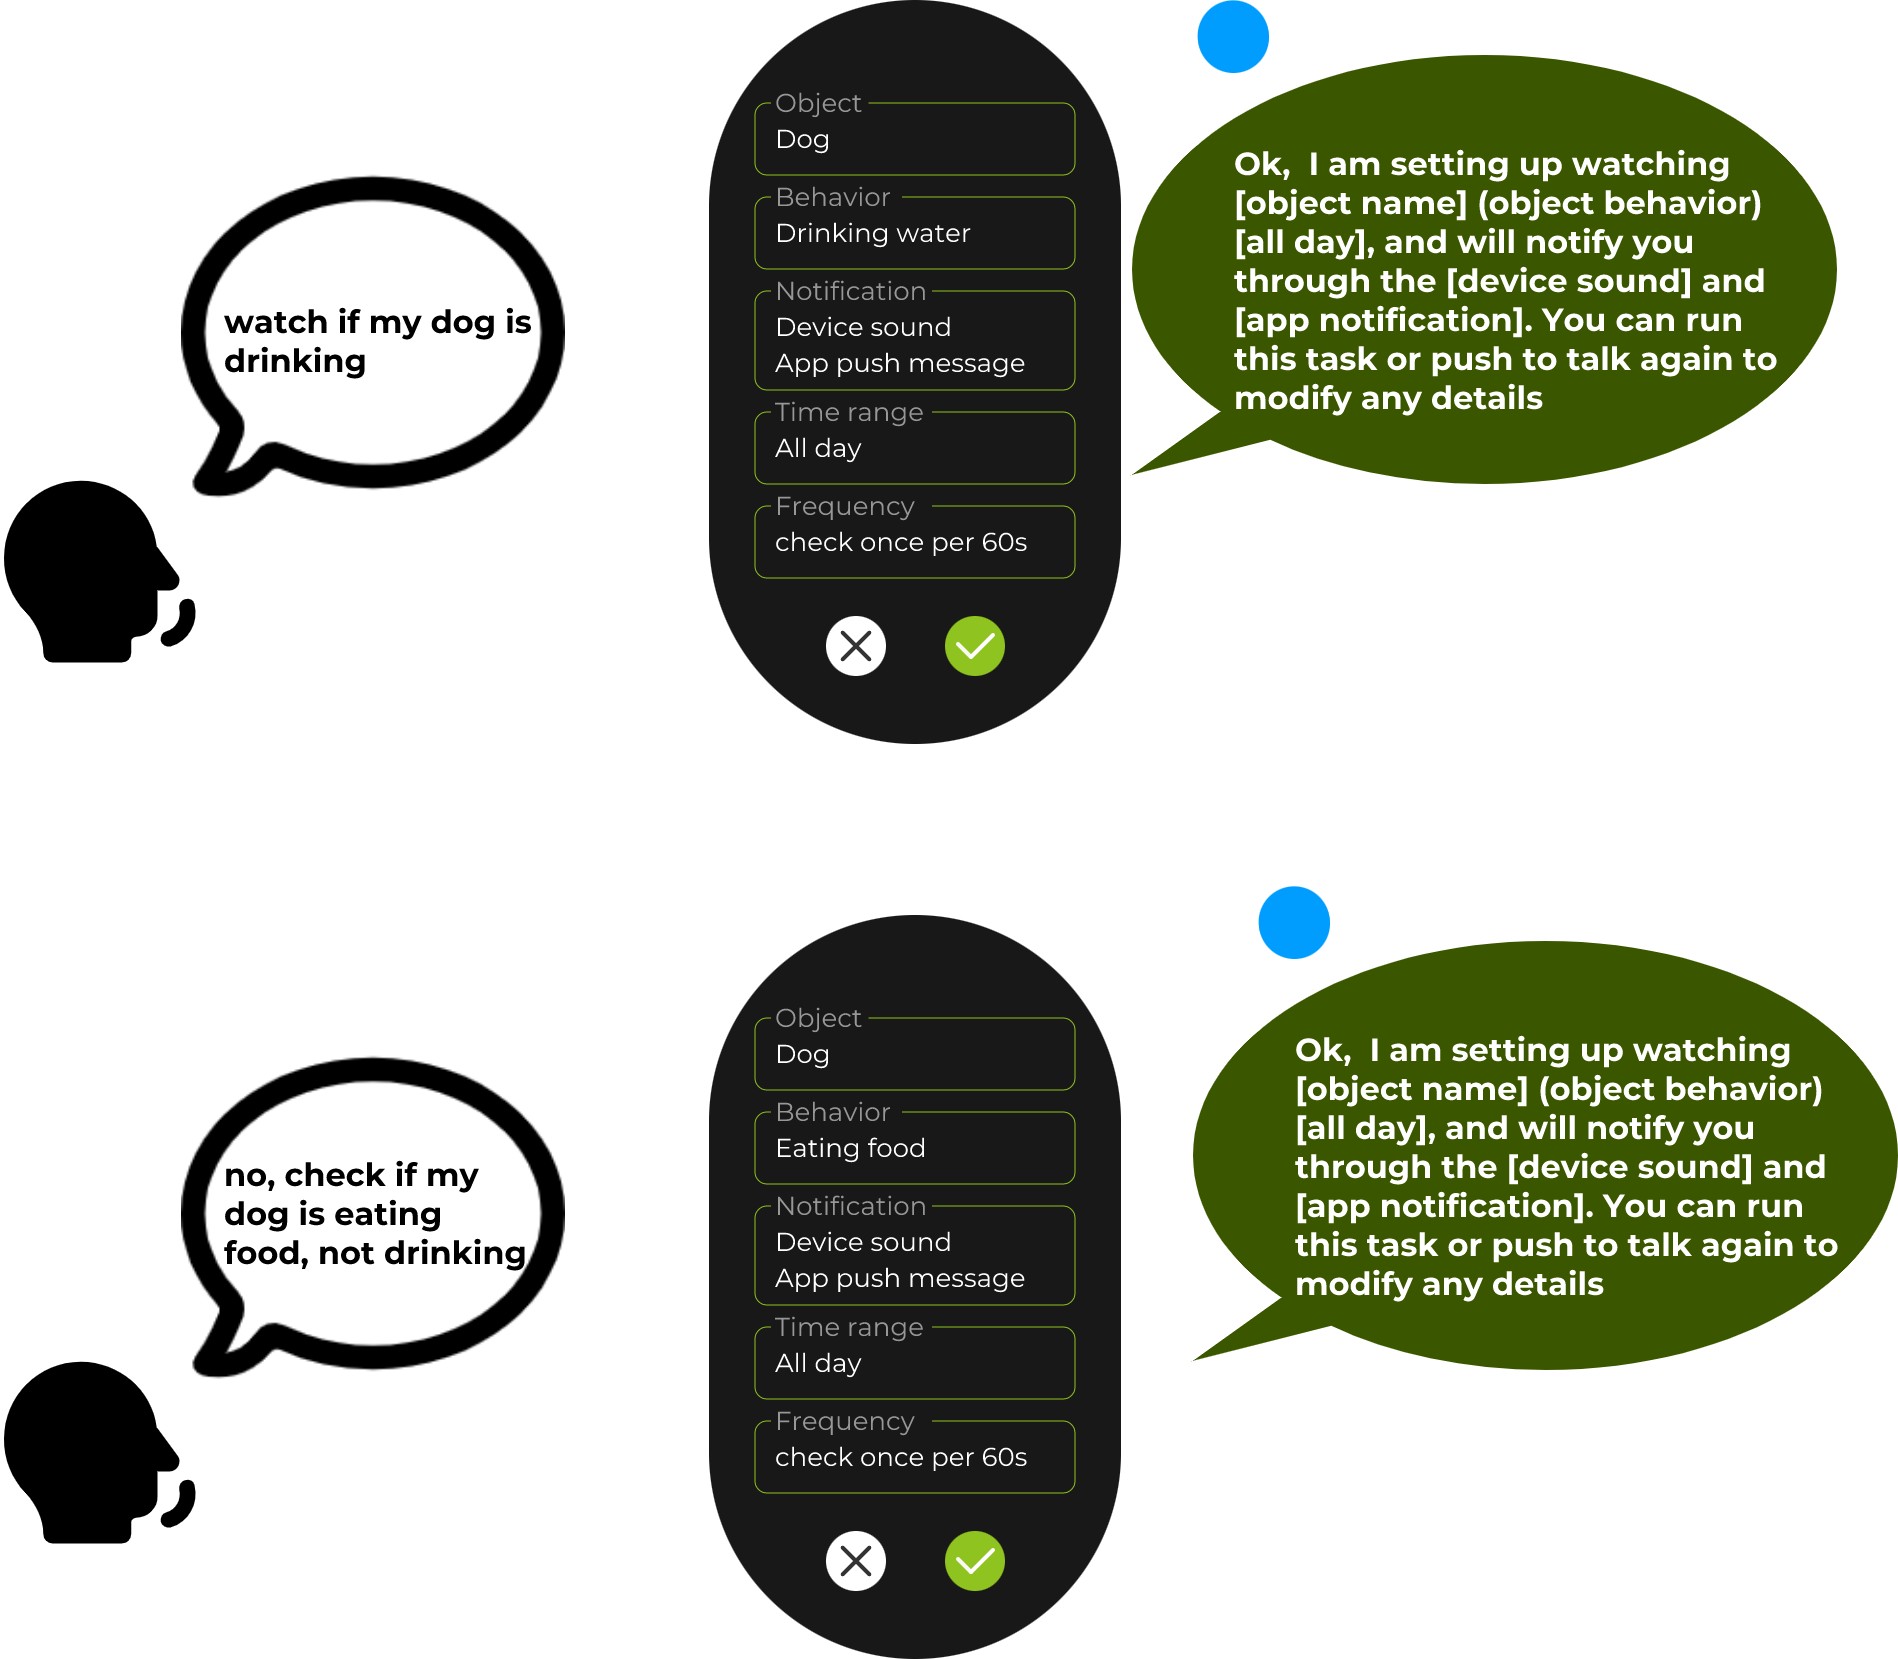
- If the Watcher recognizes your voice input as a task assignment, it will automatically break down your task into relevant components.
- The Watcher will display cards on its screen, showing the Object (what to monitor), Behavior (what action to look for), Notification (how to alert you), Time Range (when to monitor), and Frequency (how often to monitor).
- Review the displayed information to ensure it accurately represents your intended task.
- If the details are correct, confirm the task, and the Watcher will begin executing it according to the specified parameters.
- If Watcher misunderstands your task, long press the scroll wheel button and you can continue through the dialogue to try to correct Watcher's understanding of the task. If you still can't understand it correctly after several attempts, we recommend that you use the SenseCraft APP to place the task.
Tips for Optimal Usage:
- Speak clearly and at a moderate pace to ensure accurate voice recognition.
- When speaking, please get as close to Watcher as possible, about 3 ~ 10cm distance speaking recognition accuracy is best.
- Minimize background noise to improve the Watcher's ability to understand your voice commands.
- Be specific and concise when assigning tasks to help the Watcher accurately interpret your intentions.
By leveraging the Push to Talk feature, you can effortlessly send tasks and engage in conversations with the Watcher, making your interaction with the device more natural and efficient.
If you encounter an error of 0x7002, it means that the current Watcher's network status is not good and the audio service call failed, please change the network or location and retry again.
To end a running task
-
Tap the screen once or press the wheel button.
-
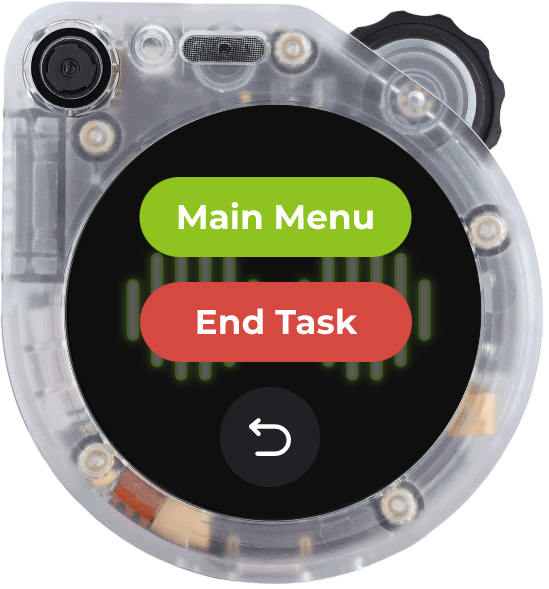
A confirmation popup will appear with two options: Main Menu and End Task. To terminate the task, either tap End Task on the screen or use the scroll wheel to navigate to "End Task" and press the scroll wheel button to confirm.
- Alternatively, you can end the task via the SenseCraft APP on your mobile device by pressing the End button on the task card.
Tech Support & Product Discussion
Thank you for choosing our products! We are here to provide you with different support to ensure that your experience with our products is as smooth as possible. We offer several communication channels to cater to different preferences and needs.