Grove Smart IR Gesture Sensor (PAJ7660)

Introduction
Grove Smart IR Gesture Sensor is an intelligent gesture recognition module equipped with an infrared camera sensor and applied AI algorithm. It can detect over 15 gestures with wide detection while supporting both IIC and SPI communication. This module also allows Grove, Type-C, and Seeed Studio XIAO direct connecting.
Feature
- Compact AI gesture sensor: Equip with an infrared camera sensor and apply AI algorithm to achieve gesture detection, in a compact size board of 4.3cm x 2.1cm
- Over 15 gestures with wide detection: Support various gestures such as N-finger push, pinch, tap, grab, rotation, thumb up/down, static, etc, with a detection range of 5-40cm
- High compatibility: Compatible with the XIAO series interface and the Grove connector through I2C communication while supporting images displayed on PC through SPI communication
- Flexible Voltage Selection: Grove Interface Compatible with 3.3V and 5V Systems
Hardware Overview

Getting Started
Operating Plane
The gesture operation distance is 15 to 30 cm, the farthest cannot exceed 35 cm. Based on Sensor FOV 78.3° (horizontal) and 62.9°(vertical), and the operating area is 48 x 36 cm² at 30 cm.

In addition to the distance to the sensor, you also need to pay attention to where the sensor is placed. On the front of the sensor, in the upper left corner, there is a small human shape. If you see the figure standing upright, then you have placed it in the correct position. If it is upside down, then it is likely that you will not get an accurate recognition result.

Background Interference
As background noise may impact the accuracy of gesture recognition, it is recommended to avoid the relative higher reflective background object behind the palm. In normal gesture recognition condition, recommend at least 35cm distance between palm and background.

Gesture Types
All supported gesture types are described in the following sections.
Gesture Definition
| Gesture | Description | Note |
|---|---|---|
| N Finger (N=0~5) | 0 ~ 5 fingers at top of fist  | Operation Distance 15 to 30 cm Static |
| N Finger Push (N=1~5) | N fingers move forward toward sensor  | Operation Distance 15 to 30 cm Programmable threshold |
| Pinch | 2-finger close to pinch, open to release  | Operation Distance 15 to 30 cm Can use palm center coordinate as cursor and Report Pinch result |
| Rotation CW/CCW | Move wrist in a circular pattern  | Operation Distance 15 to 30 cm Gesture detected angle can be set, can report angle value |
| Hand Swipe Right or Left | Swipe and move both hands away from each other for some distance  | Operation Distance 15 to 30 cm Programmable threshold |
| Tap | 1-finger click (fingers disappear)  | Operation Distance 15 to 30 cm Can use palm center coordinate as cursor |
| Grab | 5-finger to 0-finger  | Operation Distance 15 to 30 cm Can use palm center coordinate as cursor Report Grab result |
| Thumb Up | Thumb at top of fist  | Operation Distance 15 to 25cm |
| Thumb Down | Thumb at bottom of fist  | Operation Distance 15 to 25cm |
Gesture Operation Mode
There are 3 gesture modes: thumb, cursor, and gesture modes. Each of them defines specific gesture types for certain user scenarios or applications. The default combined mode includes all gestures except thumbs.
| Mode | Default Connection | Gesture Types |
|---|---|---|
| 2 | Thumb Mode | Thumb Up/Down |
| 4 | Cursor Mode | Static Finger Push Rotate Tap Pinch Grab |
| 5 | Gesture Mode (Default) | Static Finger Push Swipe Rotate Tap (IS_SELECT flag = 1) Pinch (IS_SELECT flag = 1) Grab (IS_SELECT flag = 1) |
Hardware Types
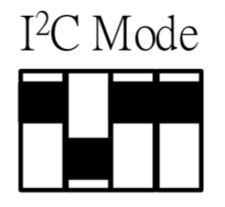
The Grove Smart IR Gesture Sensor supports a wide range of communication protocols with a choice of IIC, SPI and USB. The different modes are selected directly via a 4 position DIP switch on the back.

The diagram and table below will show you how to select the mode you wish to use with the 4 position DIP switch.

| 1 | 2 | 3 | 4 | |
|---|---|---|---|---|
| I2C Mode | ON | OFF | ON | ON |
| SPI Mode | ON | ON | ON | ON |
| USB Mode | OFF | OFF | OFF | OFF |
The wiring and code may also be slightly different when using different patterns. We will tell you more about this in the following examples.
Use of the upper computer software
If you want to connect the Grove Gesture Sensor to your computer via a USB cable and see the recognition in real time and the results, then using the upper computer software is best for you.
Step 1. Download and open the software
You can download the software as a zip file first by clicking here. Then, please unzip the downloaded zip file, open the unpacked GestureDemo_220620_Customer folder and double-click to run the GestureDemo_220620_Customer.exe file.
At this point an error window may pop up telling us that the Geture Sensor was not found, we can simply close the error message.
Step 2. Connect the Grove Gesture Sensor to PC
Next, make sure that the Grove Gesture Sensor is in USB mode by turning the 4-position DIP switch all the way to OFF.

Then using a high quality data cable, connect the Grove Gesture Sensor's USB-C port to your computer's USB port.
Step 3. View results in the software

Once connected to the computer, we click on the Run button in the top left corner of the software and then select Gesture mode to see the results in real time.

The types of gestures and their introduction can be found in the previous sections.
Arduino Library Overview
If this is your first time using Arduino, we highly recommend you to refer to Getting Started with Arduino.
Function
Before we get started developing a sketch, let's look at the available functions of the library.
-
bool init()—— This function initialises the Grove Gesture Sensor and returns True if the initialisation is successful and False if it fails. -
bool getResult(paj7620_gesture_t& res)—— The function serves to obtain the result of the sensor's recognition of the gesture.
Installation
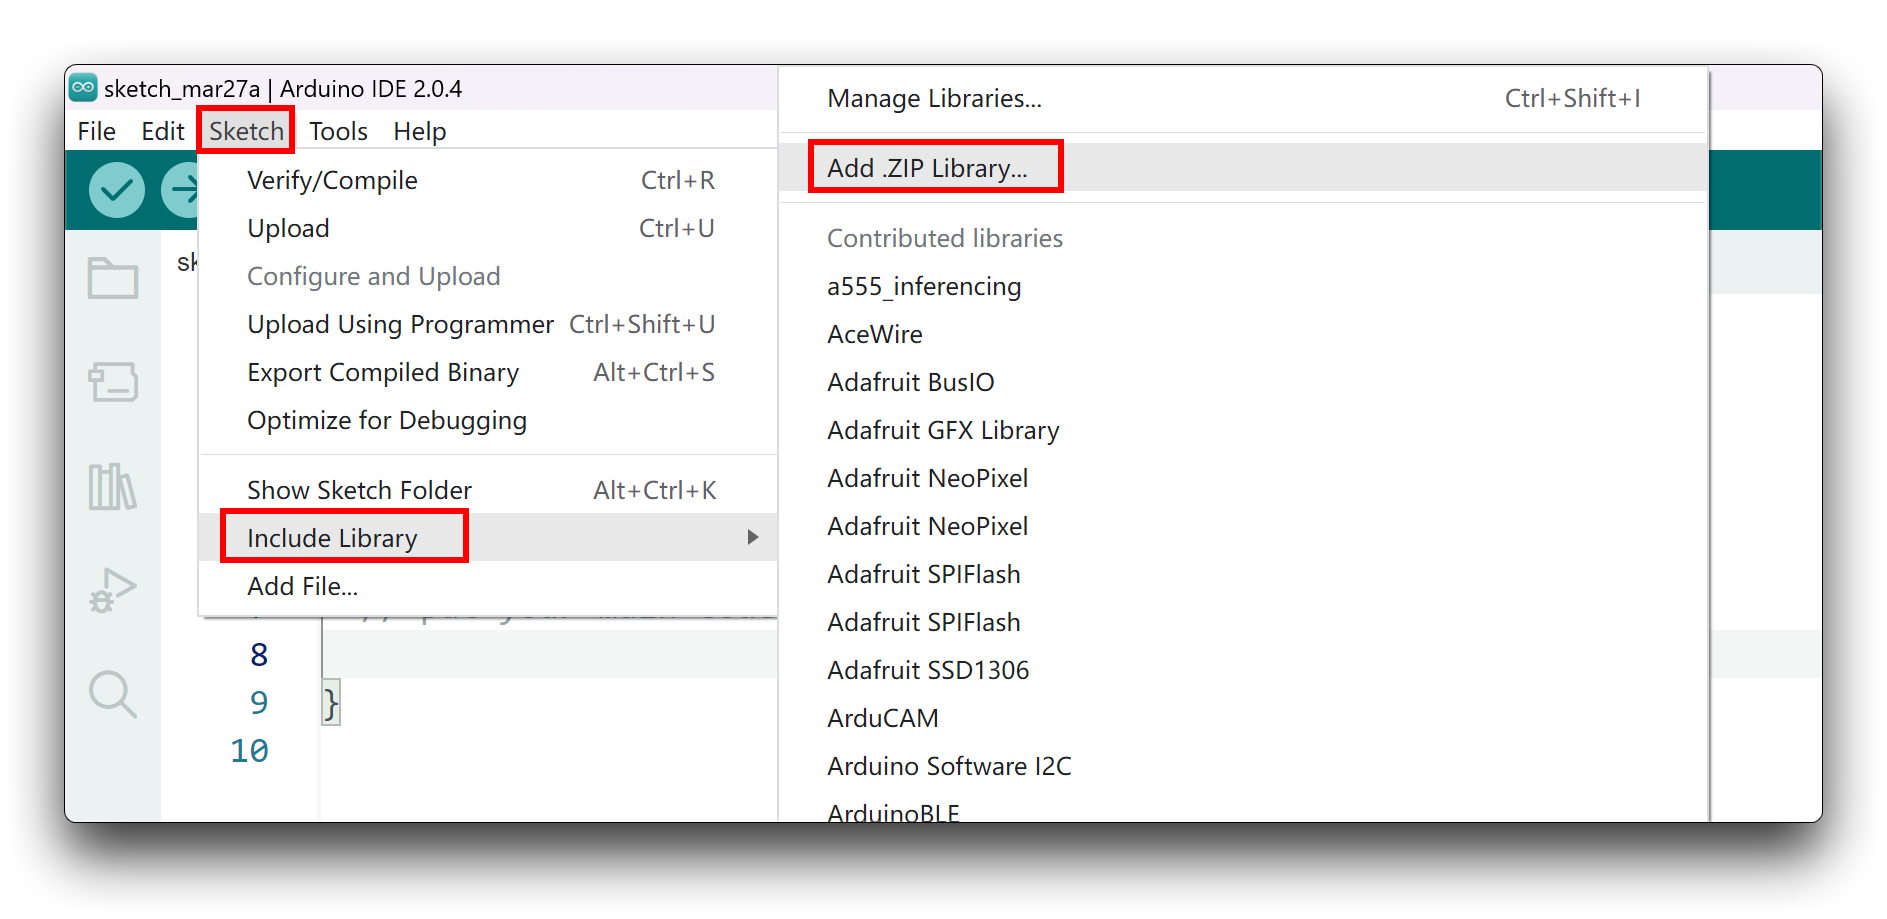
Since you have downloaded the zip Library, open your Arduino IDE, click on Sketch > Include Library > Add .ZIP Library. Choose the zip file you just downloaded,and if the library install correct, you will see Library added to your libraries in the notice window. Which means the library is installed successfully.

Demo 1: Connect sensors to MCU by IIC
Step 1. Turn the 4-position DIP switch to the IIC position

The second gear from left to right needs to be set to OFF, all others are ON.
Step 2. Connect the MCU to the Grove Gesture Sensor via the Grove cable
The IIC interface is compatible with the XIAO series and the Arduino/Seeeduino series. If you are using an Arduino/Seeeduino then you may need to use a Grove cable to connect to their IIC interface.

If you are using XIAO, then everything is easy, you just need to plug it straight in to the Grove Gesture Sensor's female connector and use it. Please note that the USB-C port is always facing outwards.

Step 3. Upload procedure
Copy the following program into the Arduino IDE, select the XIAO development board you are using, compile and upload the program.
Code 1: Gesture Mode (Default)
#include "Gesture.h"

pag7660 Gesture; // Combined mode is used by default

void setup() {
    Serial.begin(9600);
    while(!Serial) {
        delay(100);
    }
    Serial.println("\nPAG7660 TEST DEMO: Gesture combined mode.");

    if(Gesture.init()) {
        Serial.println("PAG7660 initialization success");
    } else {
        Serial.println("PAG7660 initialization failed");
    }
    Serial.println("Please input your gestures:\n");
}

void loop() {
    pag7660_gesture_t result;
    if (Gesture.getResult(result)) {
        printResultCombinedMode(result);
    }
    delay(100);
}

void printResultCombinedMode(const pag7660_gesture_t& result) {
    const char *cursor_str[] = {
        NULL,
        "Tap",
        "Grab",
        "Pinch",
    };
    switch (result.type) {
    case 0:
        switch (result.cursor.type) {
        case 1:
        case 2:
        case 3:
            if (result.cursor.select)
                Serial.println(cursor_str[result.cursor.type]);
            break;
        default:
            break;
        }
        break;
    case 1:
    case 2:
    case 3:
    case 4:
    case 5:
        Serial.print(result.type);
        Serial.println("-finger");
        break;
    case 6:
        Serial.print("Rotate Right ");
        Serial.println(result.rotate);
        break;
    case 7:
        Serial.print("Rotate Left ");
        Serial.println(result.rotate);
        break;
    case 8:
        Serial.println("Swipe Left");
        break;
    case 9:
        Serial.println("Swipe Right");
        break;
    case 19:
    case 20:
    case 21:
    case 22:
    case 23:
        Serial.print(result.type - 19 + 1);
        Serial.println("-finger push");
        break;
    default:
        break;
    }
}
If all goes well, gesture directly at the Grove Gesture Sensor and it will output the result in the serial monitor.

Code 2: Thumb Mode
#include "Gesture.h"

pag7660 Gesture(GESTURE_THUMB_MODE); // Thumb mode is used

void setup() {
    Serial.begin(9600);
    while(!Serial) {
        delay(100);
    }
    Serial.println("\nPAG7660 TEST DEMO: Gesture thumb mode.");

    // initialize with a SPI chip select pin number to use SPI
    if(Gesture.init()) {
        Serial.println("PAG7660 initialization success");
    } else {
        Serial.println("PAG7660 initialization failed");
    }
    Serial.println("Please input your gestures:\n");
}

void loop() {
    pag7660_gesture_t result;
    if (Gesture.getResult(result)) {
        if (result.thumb.up)
            Serial.println("Thumb Up");
        else if (result.thumb.down)
            Serial.println("Thumb Down");
        }
    delay(100);
}
If all goes well, gesture directly at the Grove Gesture Sensor and it will output the result in the serial monitor.

There are three different modes of the Grove Gesture Sensor. We have completed the development of the program for the two self-contained modes and make them available here, please refer to Gesture Operation Mode for more information on the differences between the different modes.
Demo 2: Connect sensors to XIAO by SPI
If you wish to use the SPI approach rather than the IIC, then you can refer to the steps here to complete your project.
Step 1. Turn the 4-position DIP switch to the SPI position

All switches need to be toggled to the ON position.
Step 2. Connect the XIAO to the Grove Gesture Sensor
Plug XIAO straight in to the Grove Gesture Sensor's female connector and use it. Please note that the USB-C port is always facing outwards.

Step 3. Upload procedure
Copy the following program into the Arduino IDE, select the XIAO development board you are using, compile and upload the program.
Code 1: Gesture Mode (Default)
#include "Gesture.h"

#define PAG7660_CS D3
pag7660 Gesture; // Combined mode is used by default

void setup() {
    Serial.begin(9600);
    while(!Serial) {
        delay(100);
    }
    Serial.println("\nPAG7660 TEST DEMO: Gesture combined mode.");

    if(Gesture.init(PAG7660_CS)) {
        Serial.println("PAG7660 initialization success");
    } else {
        Serial.println("PAG7660 initialization failed");
    }
    Serial.println("Please input your gestures:\n");
}

void loop() {
    pag7660_gesture_t result;
    if (Gesture.getResult(result)) {
        printResultCombinedMode(result);
    }
    delay(100);
}

void printResultCombinedMode(const pag7660_gesture_t& result) {
    const char *cursor_str[] = {
        NULL,
        "Tap",
        "Grab",
        "Pinch",
    };
    switch (result.type) {
    case 0:
        switch (result.cursor.type) {
        case 1:
        case 2:
        case 3:
            if (result.cursor.select)
                Serial.println(cursor_str[result.cursor.type]);
            break;
        default:
            break;
        }
        break;
    case 1:
    case 2:
    case 3:
    case 4:
    case 5:
        Serial.print(result.type);
        Serial.println("-finger");
        break;
    case 6:
        Serial.print("Rotate Right ");
        Serial.println(result.rotate);
        break;
    case 7:
        Serial.print("Rotate Left ");
        Serial.println(result.rotate);
        break;
    case 8:
        Serial.println("Swipe Left");
        break;
    case 9:
        Serial.println("Swipe Right");
        break;
    case 19:
    case 20:
    case 21:
    case 22:
    case 23:
        Serial.print(result.type - 19 + 1);
        Serial.println("-finger push");
        break;
    default:
        break;
    }
}
If all goes well, gesture directly at the Grove Gesture Sensor and it will output the result in the serial monitor.

Code 2: Thumb Mode
#include "Gesture.h"

#define PAG7660_CS D3
pag7660 Gesture(GESTURE_THUMB_MODE); // Thumb mode is used

void setup() {
    Serial.begin(9600);
    while(!Serial) {
        delay(100);
    }
    Serial.println("\nPAG7660 TEST DEMO: Gesture thumb mode.");

    // initialize with a SPI chip select pin number to use SPI
    if(Gesture.init(PAG7660_CS)) {
        Serial.println("PAG7660 initialization success");
    } else {
        Serial.println("PAG7660 initialization failed");
    }
    Serial.println("Please input your gestures:\n");
}

void loop() {
    pag7660_gesture_t result;
    if (Gesture.getResult(result)) {
        if (result.thumb.up)
            Serial.println("Thumb Up");
        else if (result.thumb.down)
            Serial.println("Thumb Down");
        }
    delay(100);
}
If all goes well, gesture directly at the Grove Gesture Sensor and it will output the result in the serial monitor.

There are three different modes of the Grove Gesture Sensor. We have completed the development of the program for the two self-contained modes and make them available here, please refer to Gesture Operation Mode for more information on the differences between the different modes.
Resources
- [ZIP] Grove Gesture Sensor SCH&PCB
- [PDF] Grove Gesture Sensor SCH
- [Datasheet] PAG7661QN_FW-DS_V0.8_05072022_Confidential.pdf
Tech Support & Product Discussion
Thank you for choosing our products! We are here to provide you with different support to ensure that your experience with our products is as smooth as possible. We offer several communication channels to cater to different preferences and needs.