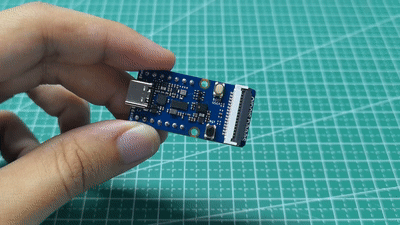
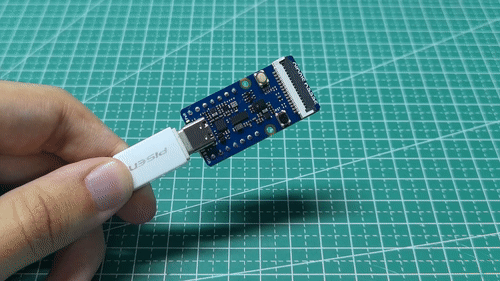
Grove Vision AI Module V2
Introduction
The Grove - Vision AI V2 is a thumb-sized AI vision module equipped with the WiseEye2 HX6538 processor, which adopts the Arm Cortex-M55 dual-core architecture. It features a standard CSI interface and is compatible with Raspberry Pi cameras. It has an onboard digital microphone and an SD card slot. It is highly suitable for various embedded AI vision projects. With the SenseCraft AI algorithm platform, trained ML models can be deployed to the sensor without the need for coding. It is compatible with the XIAO series and Arduino ecosystems, making it an ideal choice for various object detection applications.
Features
- The FIRST board based on the WiseEye2 HX6538 processor with a dual-core Arm Cortex-M55 architecture.
- Equipped with an integrated Arm Ethos-U55 micro neural network acceleration unit, ideal for AI image vision applications.
- Compatibility with a vast range of Raspberry Pi cameras.
- Onboard PDM microphone, SD card slot, Type-C, Grove interface, and abundant peripheral devices facilitate prototype development.
- Expandability with the Seeed Studio XIAO boards.
- Ready-to-use AI model from SenseCraft AI for nocode deployment.
- Support for a variety of efficient AI models, including MobilenetV1, MobilenetV2, Efficientnet-lite, Yolov5, and Yolov8.
Application
- Industrial Automation: Quality inspection, predictive maintenance, voice control, etc.
- Smart Cities: Device monitoring, energy management, etc.
- Transportation: Status monitoring, location tracking, etc.
- Smart Agriculture: Environmental monitoring, etc.
- Mobile IoT Devices: Wearable devices, handheld devices, etc.
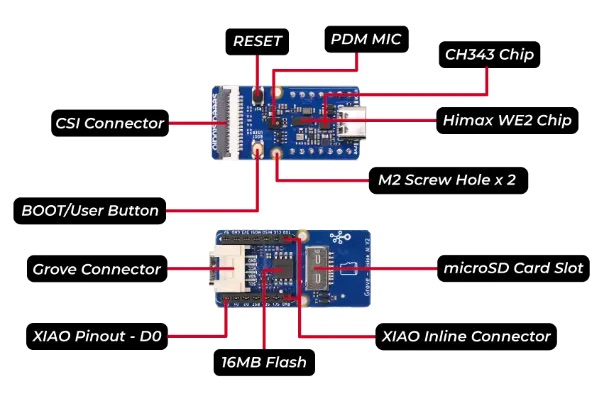
Hardware Overview
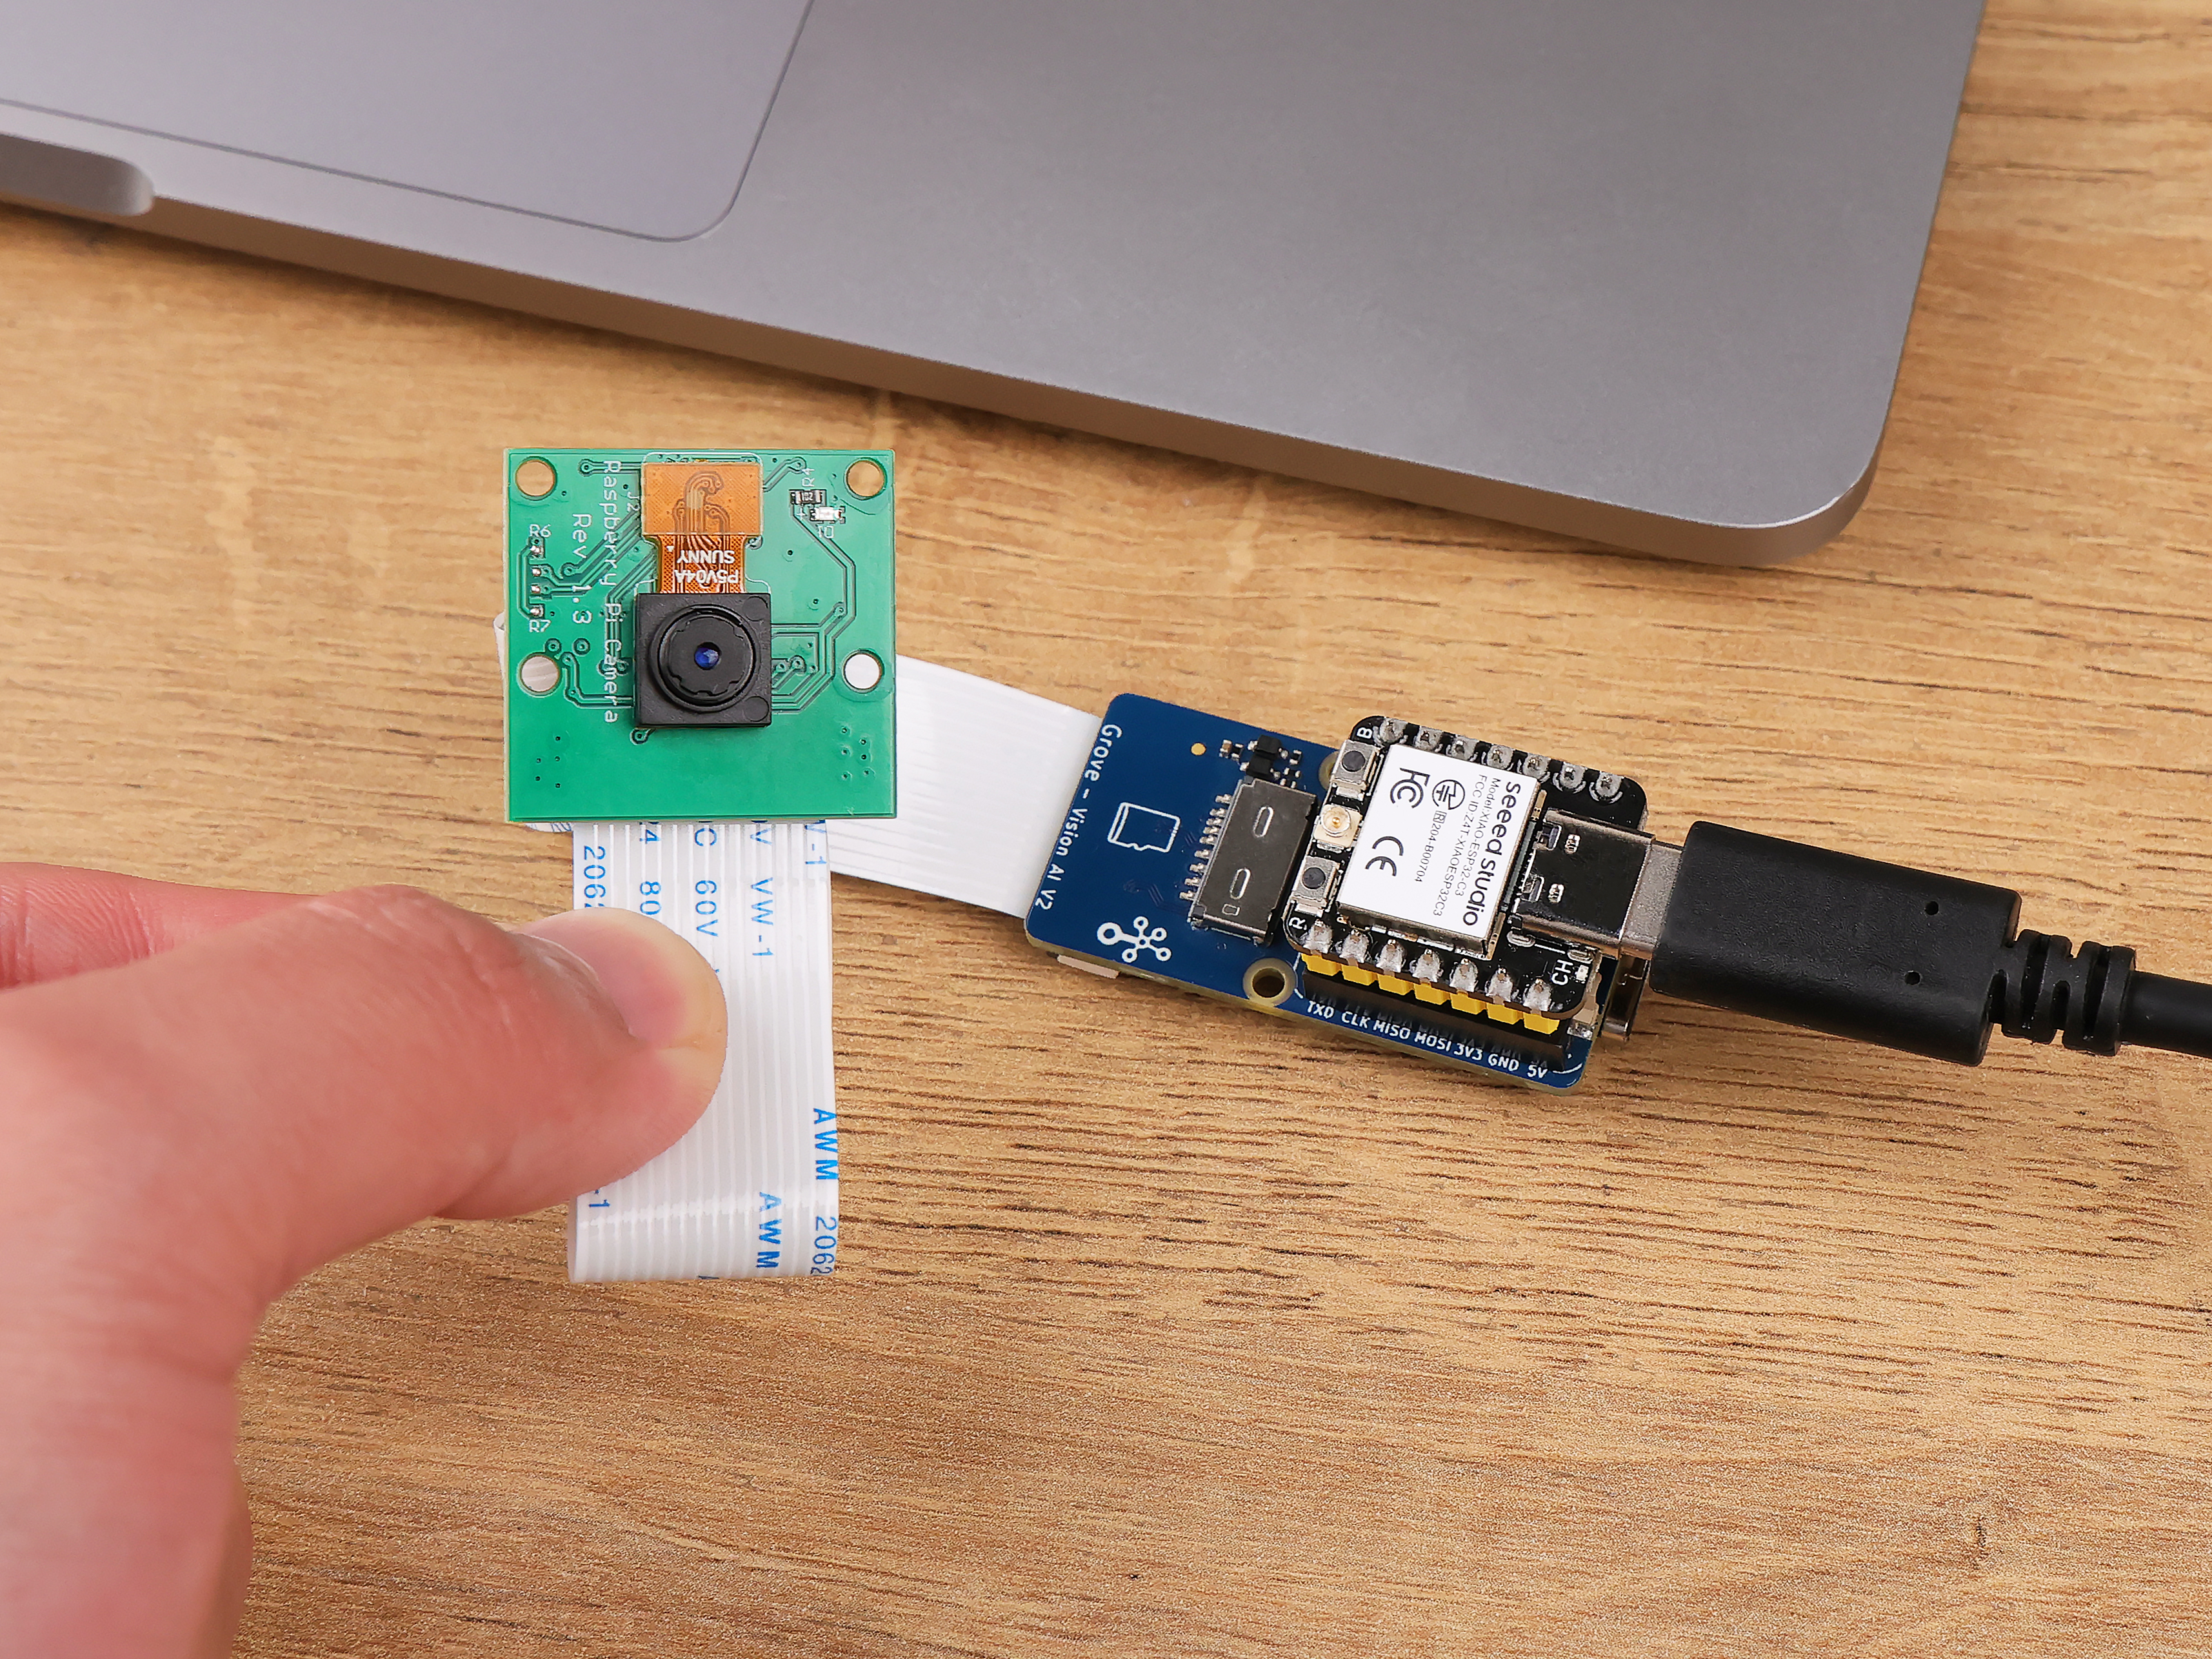
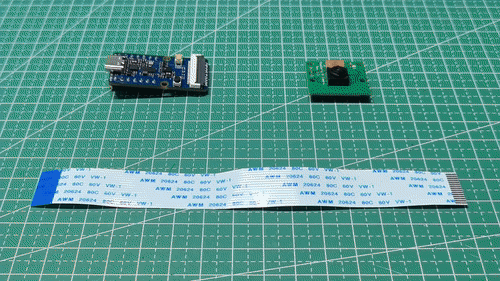
To use the full functionality of the Grove Vision AI V2 you may need to purchase a CSI camera separately, we recommend the OV5647-62 FOV Camera Module for Raspberry Pi.
Please note that the camera is not on the Part List for the Grove Vision AI V2.
Once you have the Grove Vision AI V2 and camera ready to go, then you can connect them via the CSI connection cable. When connecting, please pay attention to the direction of the row of pins and don't plug them in backwards.
Getting Started
Boot
If you have used some unusual method that has caused the Grove Vision AI to not work properly at all (at the software level), then you may need to put the device into BootLoader mode to revive the device. Here is how to enter BootLoader mode.
Method 1
Please disconnect the connection cable between the Grove Vision AI and your computer, then press and hold the Boot button on the device without releasing it. At this time, please connect Grove Vision AI to your computer with a Type-C type data cable, and then release it again. At this point the device will enter BootLoader mode.
Method 2
With the Grove Vision AI connected to your computer, you can enter BootLoader mode by pressing the Boot button and then quickly pressing the Reset button.
Reset
If you're experiencing problems with device data suddenly not uploading or images getting stuck, you can try restarting your device using the Reset button.
Driver
If you find that the Grove Vision AI V2 is not recognised after connecting it to your computer. Then you may need to install the CH343 driver on your computer. Here are some links to download and install the CH343 driver.
- Windows Vendor VCP Driver One-Click Installer: CH343SER.EXE
- Windows Vendor VCP Driver: CH343SER.ZIP
- Windows CDC driver one-click installer: CH343CDC.EXE
- Windows CDC driver: CH343CDC.ZIP
- macOS Vendor VCP Driver: CH34xSER_MAC.ZIP
Arduino Library Overview
If this is your first time using Arduino, we highly recommend you to refer to Getting Started with Arduino.
Grove Vision AI uses WiseEye2 HX6538 chip, image processing and model inference are processed locally in Grove Vision AI, and then the result is output to XIAO via IIC or UART, so the main purpose of this library is to process the data stream of Grove Vision AI, and it doesn't involve model inference or image processing. So the main purpose of this library is to process the data stream of Grove Vision AI, without involving model inference or image processing.
The Grove Vision AI communicates with the XIAO via the IIC, and the device's IIC address is 0x62. Image information transfer is via the USB serial port.
Function
Before we get started developing a sketch, let's look at the available functions of the library.
-
bool begin(TwoWire *wire = &Wire, uint16_t address = I2C_ADDRESS, uint32_t wait_delay = 2, uint32_t clock = 400000)—— Initialise Grove Vision AI V2.Input Parameters:
TwoWire *wire—— This pointer points to a TwoWire object, typically used to communicate with I2C devices.uint16_t address—— This is the address of the I2C device that identifies the particular device connected to the I2C bus.uint32_t wait_delay—— The delay (in milliseconds) to wait for a response before sending a command.uint32_t clock—— This is the clock rate of the I2C bus (in Hz).
Return:
TrueorFalse. Initialisation success is true, initialisation failure is false. -
int invoke(int times = 1, bool filter = 0, bool show = 0)—— Used to send INVOKE commands to the Grove Vision AI V2 to allow the Grove Vision AI to start calling models, inference and recognition.Input Parameters:
int times—— The number of Invoke.fileter—— Means the event reply will only be sent if the last result is different from the previous result (compared by geometry and score).bool show—— Means the event reply will only be sent if the last result is different from the previous result (compared by geometry and score).
For more information about Grove Vision AI's protocol definitions, you can read the protocol documentation.
Return: CMD_OK or CMD_ETIMEDOUT. Returns CMD_OK if the model was enabled successfully, otherwise returns CMD_ETIMEDOUT.
-
int available()—— Check how many bytes of data are available to read from the connected device via the IIC.Input Parameters: None.
Return: The number of data bytes that can be read from the device.
-
int read(char *data, int length)—— Reads data from the Grove Vision AI via the IIC interface. The purpose of the function is to populate the array pointed to by the provided data pointer with the read data.Input Parameters:
char *data—— An array for storing data.int length—— The length of the data to be read.
Return: The length of the data to be read.
-
int write(const char *data, int length)—— Writes data to the specified device via the I2C interface.Input Parameters:
const char *data—— The content of the data to be written.int length—— The length of the data to be written.
Return: The length of the data to be written.
-
std::vector<boxes_t> &boxes() { return _boxes; }—— Output the results in the form of a box.
typedef struct
{
    uint16_t x;      // Horizontal coordinates of the centre of the box
    uint16_t y;      // Vertical coordinates of the centre of the box
    uint16_t w;      // Width of the identification box
    uint16_t h;      // Height of the identification box
    uint8_t score;   // Confidence in identifying as target
    uint8_t target;  // Target
} boxes_t;
std::vector<classes_t> &classes() { return _classes; }—— Outputs the results as categories.
typedef struct
{
    uint8_t target;  // Target
    uint8_t score;   // Confidence in identifying as target
} classes_t;
std::vector<point_t> &points() { return _points; }—— Outputs the result as a dot.
typedef struct
{
    uint16_t x;      // Horizontal coordinates of the identification point
    uint16_t y;      // Vertical coordinates of identification point
    uint16_t z;      // Relative depth coordinates of the identification point
    uint8_t score;   // Confidence in identifying as target
    uint8_t target;  // Target
} point_t;
The depth coordinate here is relative, it does not mean that Grove Vision AI is depth camera enabled, but rather the algorithm calculates a relative depth coordinate which is valid in some models (e.g., face-3d models).
perf_t &perf() { return _perf; }—— Image processing and inference time.
typedef struct
{
    uint16_t prepocess;   // Pre-processing time
    uint16_t inference;   // inference time
    uint16_t postprocess; // Post-processing time
} perf_t;
The outputs do not always always output information that identifies boxes and points, depending on the model.
Installation
Since you have downloaded the zip Library, open your Arduino IDE, click on Sketch > Include Library > Add .ZIP Library. Choose the zip file you just downloaded,and if the library install correct, you will see Library added to your libraries in the notice window. Which means the library is installed successfully.

SenseCraft AI

SenseCraft is a series of software services developed by Seeed Studio to provide users with faster and simpler software services and applications. With three product lines, Data line, Edge line and AI line, SenseCraft is able to fulfill users' needs in data services, device management and AI applications. No matter what solution you need, SenseCraft can provide you with efficient and reliable solutions and customized services.
Combined with the empowerment of SenseCraft AI Model Assistant, you can easily upload a wide variety of co-created models and directly observe the results.

In this section, we'll walk you through using SenseCraft AI Model Assistant to quickly deploy and observe results.
Step 1. Connect the Grove Vision AI V2 to the SenseCraft AI Model Assistant
First, we need to open the main SenseCraft AI Model Assistant page.
Please use a Type-C type cable to connect Grove Vision AI V2 to your computer.
In the upper right corner of the SenseCraft AI Model Assistant page, you can select Grove Vision AI (WE2). Then click the Connect button on the far right.

In the new window that pops up, select the correct COM port for the device and click the Connect button.

Step 2. Upload a suitable model
Then, just select a model you want to use and click the Send button below. Here is an example of Gesture Detection.
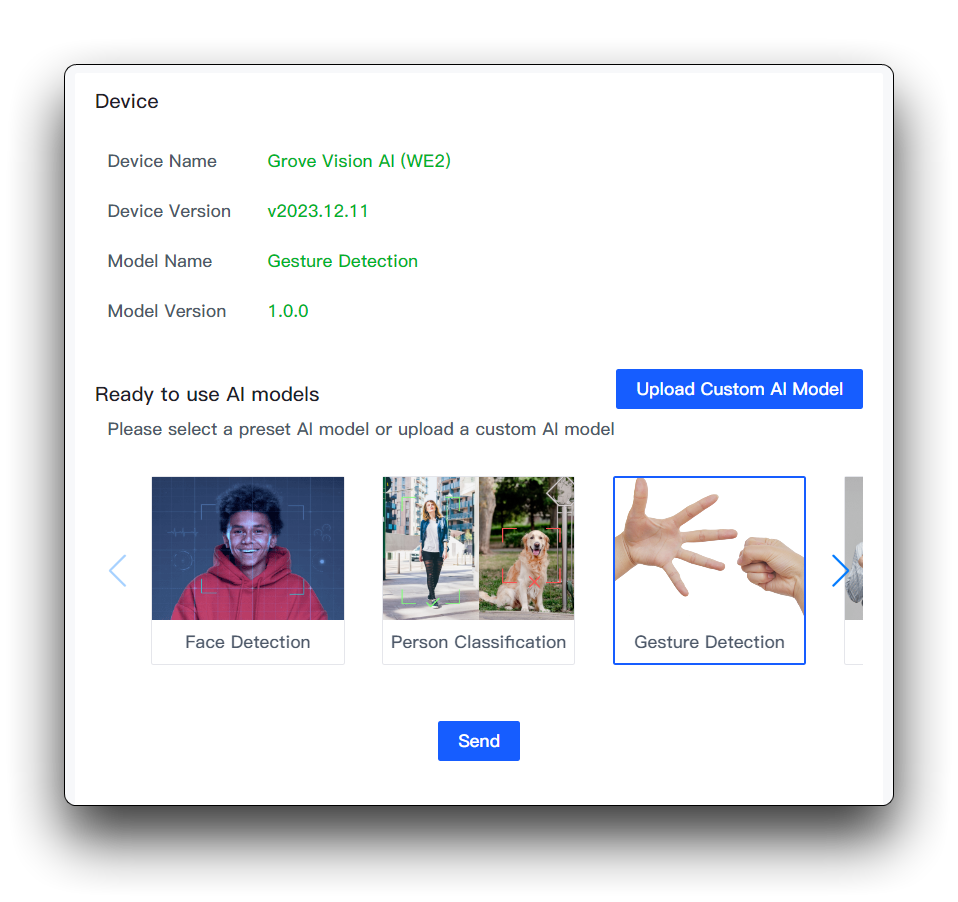
Wait for 1~2 minutes for the model to be uploaded.
Step 3. Observations
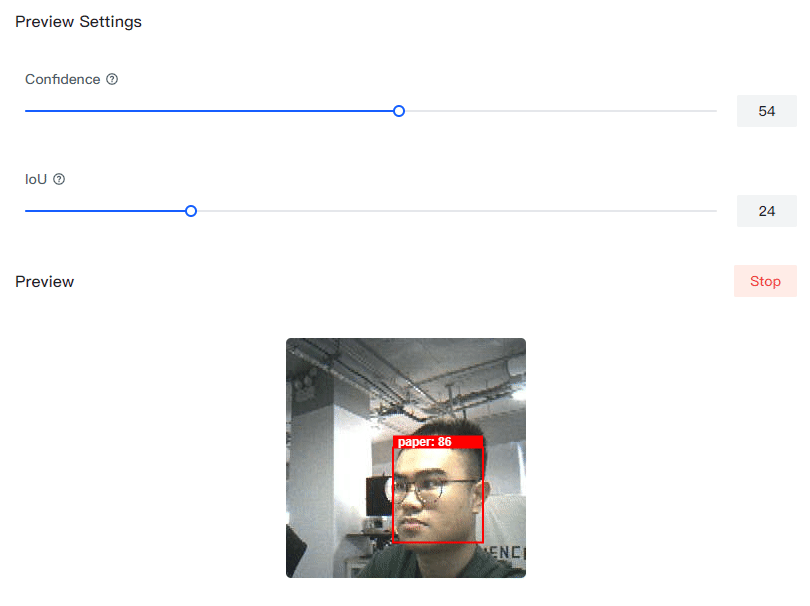
Once the model is uploaded successfully, you will be able to see the live feed from the Grove Vision AI V2 camera in the Preview on the right.
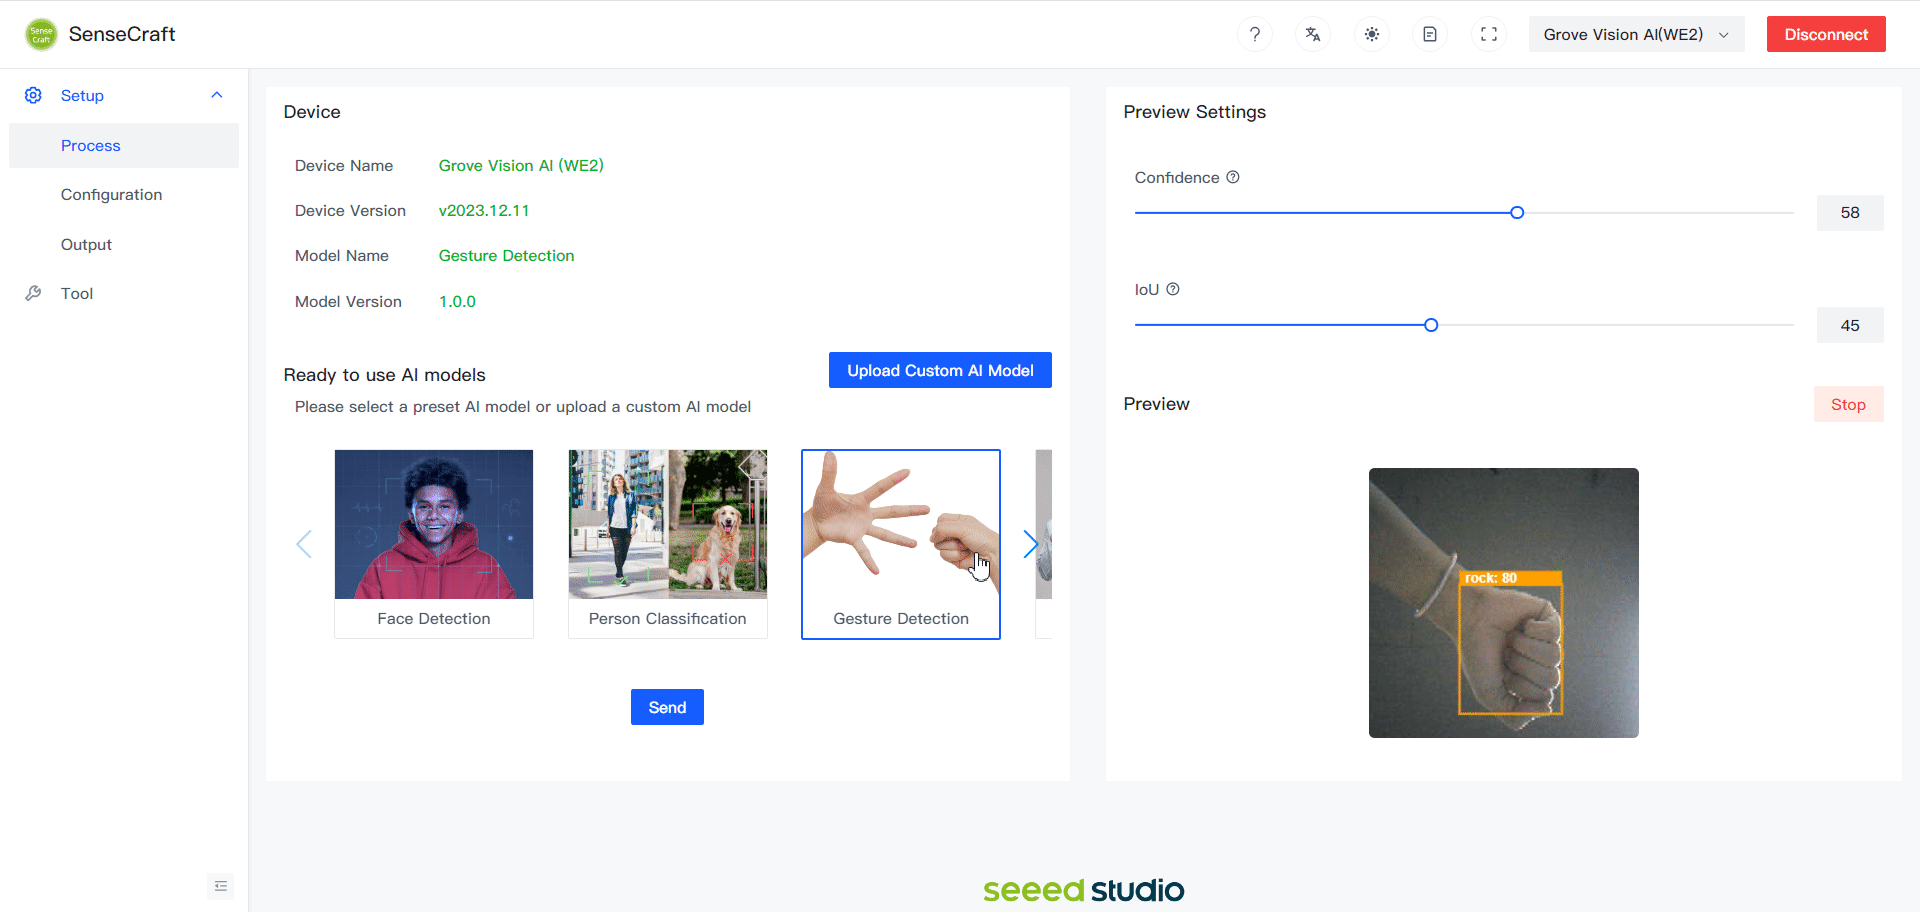
We can see that in the Preview Settings on the right hand side, there are two setting options that can be changed to optimise the recognition accuracy of the model.
- Confidence: Confidence refers to the level of certainty or probability assigned by a model to its predictions.
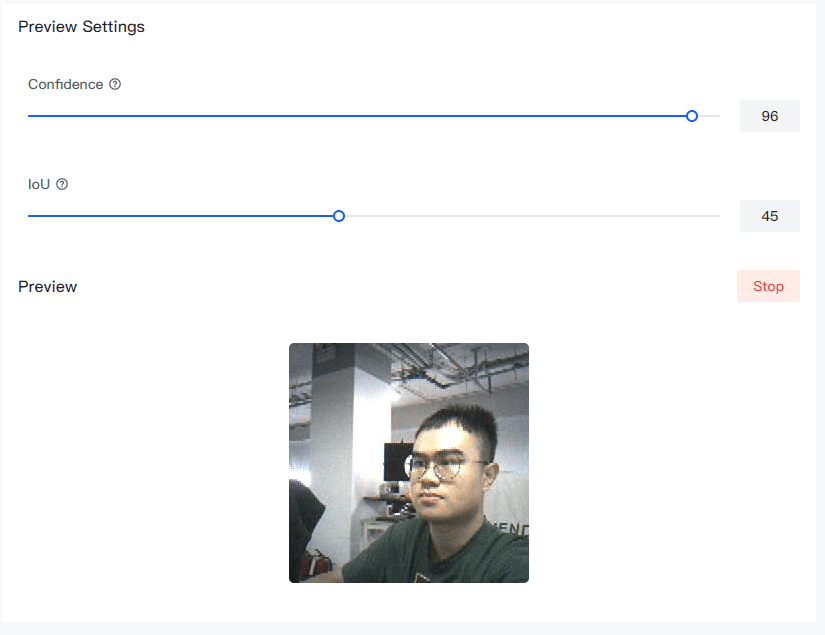
- IoU: IoU is used to assess the accuracy of predicted bounding boxes compared to truth bounding boxes.
At this point, you have finished uploading the model and observing the results.
XIAO Example
If you want to get a prototype of a sensor with machine vision capabilities, then you may want to consider adding an XIAO. Using XIAO and Grove Vision AI V2, you can use the model you want to use and quickly deploy it in your application area.
Before that, you still need to follow the SenseCraft AI steps and content to upload a model you want to use first.
Step 1. Materials Required
In this tutorial, we will use the XIAO ESP32S3 as an example to introduce the use of Arduino programmes. So, we recommend you to prepare the following hardware.
| Seeed Studio XIAO ESP32S3 | Grove Vision AI V2 | OV5647-62 FOV Camera Module for Raspberry Pi 3B+4B |
|---|---|---|
 |  |  |
You then need to connect the XIAO and Grove Vision AI V2 via the row of pins (or use the expansion board and Grove interface).
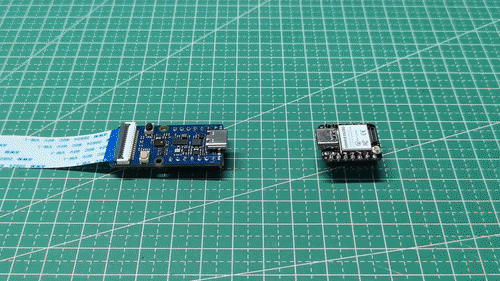
Please note the direction of the connection, Grove Vision AI's Type-C connector should be in the same direction as XIAO's Type-C connector.
Step 2. Launch the Arduino application.
Step 3. Select your development board model and add it to the Arduino IDE.
Below is a list of supported boards for the Grove Vision AI V2 example, you can choose the board you want to use to complete the next example. In this tutorial, XIAO ESP32S3 will be used as an example.
-
If you want to use Seeed Studio XIAO SAMD21 for the later routines, please refer to this tutorial to finish adding.
-
If you want to use Seeed Studio XIAO RP2040 for the later routines, please refer to this tutorial to finish adding.
-
If you want to use Seeed Studio XIAO nRF52840 for the later routines, please refer to this tutorial to finish adding.
-
If you want to use Seeed Studio XIAO ESP32C3 for the later routines, please refer to this tutorial to finish adding.
-
If you want to use Seeed Studio XIAO ESP32S3 for the later routines, please refer to this tutorial to finish adding.
-
If you want to use Seeeduino V4.3 for the later routines, please refer to this tutorial to finish adding.
Demo 1. Using XIAO to get recognition results reported by Grove Vision AI V2
The following procedure is a simple example to help you obtain and parse the recognition information reported by Grove Vision AI V2.
#include <Seeed_Arduino_SSCMA.h>

SSCMA AI;

void setup()
{
    AI.begin();
    Serial.begin(9600);
}

void loop()
{
    if (!AI.invoke())
    {
        Serial.println("invoke success");
        Serial.print("perf: prepocess=");
        Serial.print(AI.perf().prepocess);
        Serial.print(", inference=");
        Serial.print(AI.perf().inference);
        Serial.print(", postpocess=");
        Serial.println(AI.perf().postprocess);

        for (int i = 0; i < AI.boxes().size(); i++)
        {
            Serial.print("Box[");
            Serial.print(i);
            Serial.print("] target=");
            Serial.print(AI.boxes()[i].target);
            Serial.print(", score=");
            Serial.print(AI.boxes()[i].score);
            Serial.print(", x=");
            Serial.print(AI.boxes()[i].x);
            Serial.print(", y=");
            Serial.print(AI.boxes()[i].y);
            Serial.print(", w=");
            Serial.print(AI.boxes()[i].w);
            Serial.print(", h=");
            Serial.println(AI.boxes()[i].h);
        }
        for (int i = 0; i < AI.classes().size(); i++)
        {
            Serial.print("Class[");
            Serial.print(i);
            Serial.print("] target=");
            Serial.print(AI.classes()[i].target);
            Serial.print(", score=");
            Serial.println(AI.classes()[i].score);
        }
        for (int i = 0; i < AI.points().size(); i++)
        {
            Serial.print("Point[");
            Serial.print(i);
            Serial.print("] target=");
            Serial.print(AI.points()[i].target);
            Serial.print(", score=");
            Serial.print(AI.points()[i].score);
            Serial.print(", x=");
            Serial.print(AI.points()[i].x);
            Serial.print(", y=");
            Serial.println(AI.points()[i].y);
        }
    }
}
Explanation of procedure
This Arduino sketch utilizes the Seeed_Arduino_SSCMA library to interface with the Grove Vision AI Module V2. In the setup() function, the AI module is initialized, and serial communication is started.
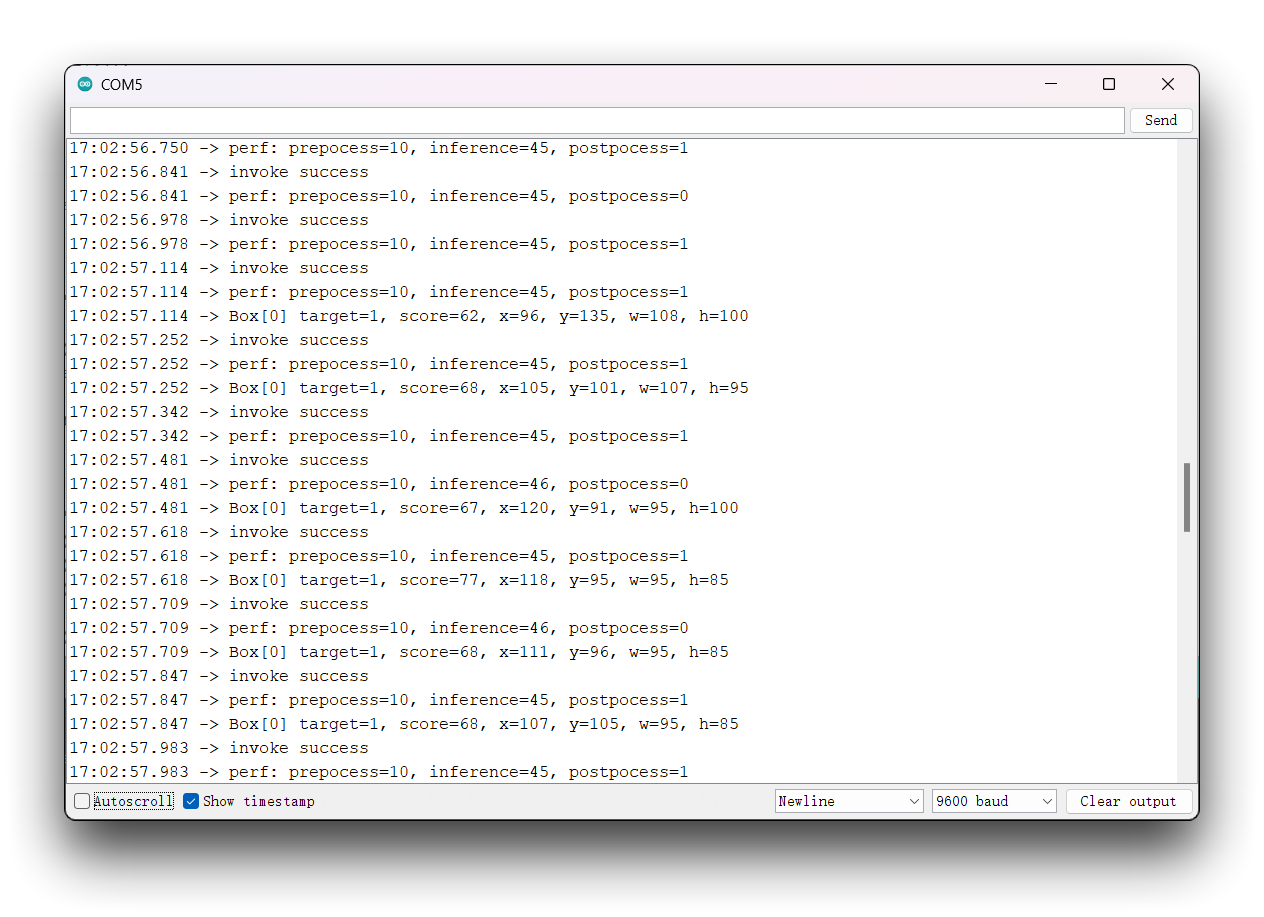
The loop() function repeatedly calls the invoke() method to perform inference using the built-in algorithms of the Grove Vision AI Module V2. Upon a successful inference, the sketch prints out performance metrics to the serial monitor, including preprocessing, inference, and postprocessing times.
The sketch processes and prints out detailed information about the results of the inference, including:
- Bounding boxes (
boxes()) that identify the locations and dimensions of detected objects in the form of x and y coordinates, width, and height. - Classifications (
classes()) that identify the categories of detected objects along with their confidence scores. - Points (
points()) that represent specific features or keypoints of detected objects, along with their x and y coordinates and confidence scores.
These results provide insights into the objects detected by the AI module, their positions, sizes, and the confidence level of each detection or classification. The output is printed to the serial monitor for further analysis or debugging.
Effect
We are still using the Gesture Detection model. After you have uploaded the application, please open the serial monitor and set the baud rate of the serial monitor to 9600. Please prepare your "rock-paper-scissors" and point it at the recognition area of the camera, and the serial monitor will output the recognition result.
Demo 2. Use the XIAO to communicate serially with the Grove Vision AI V2
The Grove Vision AI V2 supports communication via the UART protocol, and by using the built-in protocol, it is possible to operate the Himax WE2 chip of the Grove Vision AI V2. The following sample program shows how to use the XIAO to communicate with the Grove Vision AI V2 over the serial port.
#include <Arduino.h>
#include <Wire.h>

#include <Seeed_Arduino_SSCMA.h>

SSCMA AI;

void setup()
{
    // put your setup code here, to run once:
    Wire.begin();
    Serial.begin(115200);
    while (!Serial)
        delay(1000);

    Serial.println("Proxy start");
}

char buf[512];
void loop()
{
    int s_len = Serial.available();
    if (s_len)
    {
        int len = Serial.readBytes((char *)buf, s_len);
        AI.write(buf, len);
    }
    int t_len = AI.available();
    if (t_len)
    {
        if (t_len > 512)
        {
            t_len = 512;
        }

        AI.read(buf, t_len);
        Serial.write(buf, t_len);
    }
}
Explanation of procedure
This Arduino sketch establishes a communication interface between the serial console and the Grove Vision AI V2 module, utilizing the Seeed Studio Machine Learning Framework SSCMA. The sketch is designed to pass data to and from the Grove Vision AI V2 module via serial commands.
Here's the modified description of the sketch:
In the setup() function:
- The I2C communication protocol is initialized with
Wire.begin(), allowing for communication with the Grove Vision AI V2 module. - The serial communication is set up at a baud rate of 115200.
- The sketch waits for the serial connection to be active before it outputs "Proxy start" to the serial monitor, indicating that the proxy communication channel is ready.
In the loop() function:
- The sketch checks for incoming serial data using
Serial.available(). If there is data, it reads it into a buffer namedbuf. - The data collected in the buffer is then sent to the Grove Vision AI V2 module using the
AI.write()method. - Next, the sketch checks if the Grove Vision AI V2 module has any data to send back using
AI.available(). - If the Grove Vision AI V2 module has sent data, the sketch reads this data into the buffer
bufwithAI.read(), ensuring the data does not exceed the buffer size of 512 bytes. - Finally, the received data from the Grove Vision AI V2 module is transmitted back to the serial console using
Serial.write(), completing the two-way communication between the serial interface and the vision AI module.
This setup allows for interactive communication with the Grove Vision AI V2 module, enabling users to send instructions to and receive data from the module over a serial connection.
Troubleshooting
Q1: Is it possible for Grove Vision AI to see XIAO result information while outputting a live screen?
No can do. Considering the frame rate or the speed of image inference, we do not support simultaneous execution of both jobs at this stage. If XIAO is connected, then you can only receive the recognised information reported, but not the real-time frame.
Q2: Which cameras does Grove Vision AI V2 support? Does it only support the OV5647-62?
Currently we have written drivers for the OV5642 series of cameras, so Grove Vision AI V2 supports the full range of Raspberry Pi OV5647 cameras, e.g., the OV5647-62, OV5647-67, and OV5647-160.The other CSI cameras are theoretically supported, but due to the fact that some of the cameras don't have drivers written for them or the do not have a colour processing unit themselves, so there may be a problem that the colour is only green, and the loss of full colour will have a possible impact on the accuracy of the recognition.
Resources
- [PDF] Datasheet
- [GitHub] Seeed Grove Vision AI Module V2 SDK
Tech Support & Product Discussion
Thank you for choosing our products! We are here to provide you with different support to ensure that your experience with our products is as smooth as possible. We offer several communication channels to cater to different preferences and needs.