HEXFELLOW Y200 IMU Sensor Getting Start
The Y200 is a 9-axis gyroscope specifically developed for robots. The device supports a maximum power supply of 60V and uses a standard XT30 CAN interface for quick integration into a robot network. It features an internal potting process for excellent shock resistance, and its casing is designed with a reinforced structure for stable and reliable installation.

Specification
Here's the completed table with all parameters filled in for all motor models:
Angle Output Param
| Angle | Value | Note | |
|---|---|---|---|
| Roll | Accuracy: | 0.15° | 1σ RMS |
| Range: | ±180° | ||
| Pitch | Accuracy: | 0.15° | 1σ RMS |
| Range: | ±90° | ||
| Yaw (Unreferenced) | Accuracy: | 0.2° | 1σ RMS |
| Range: | ±180° | ||
| Resolution | 0.001° |
Gyro Param
| Parameter | Value | Note |
|---|---|---|
| Range | ±2000°/s | |
| Non-linearity | ±0.05%FS | |
| Noise density | 0.015°/s/√Hz | |
| Bias instability | 5°/h | Allan variance, 1σ |
| Bandwidth (-3dB) | 50Hz | |
| Zero offset | ±0.5°/s | 1σ RMS |
| Temperature drift | ±1°/s | 1σ RMS, -40~85°C |
Accelerometer Param
| Parameter | Value | Note |
|---|---|---|
| Range | ±12g | |
| Non-linearity | ±0.5%FS | |
| Noise density | 190μg/√Hz | |
| Bias instability | 0.05mg | Allan variance, 1σ |
| Bandwidth (-3dB) | 50Hz | |
| Zero offset | ±20mg | 1σ RMS |
| Temperature drift | ±20mg | 1σ RMS, -40~85°C |
Other Params
| Parameter | Value | Note |
|---|---|---|
| Voltage Tolerance | 12-60V | For XT30 2+2 connector. Non-USB-C, but USB-C power is compatible |
| Communication | CAN | |
| Max Output Frequency | 200Hz | |
| Dimensions | 60×60×15 mm | |
| Operating Temperature | -20~85°C |
Supported Platform
- reComputer Mini
- reComputer Robotics
Supported ROS Version
- ROS Noetic
- ROS Humble
Installation dimension diagram

Getting Start with IMU on reComputer Jetson
We provide linux driver using SocketCAN. It is the recommended way to work with IMU. Before you start, you need to connect the device to your PC! Here's the can bus wire and baudrate definition of the IMU

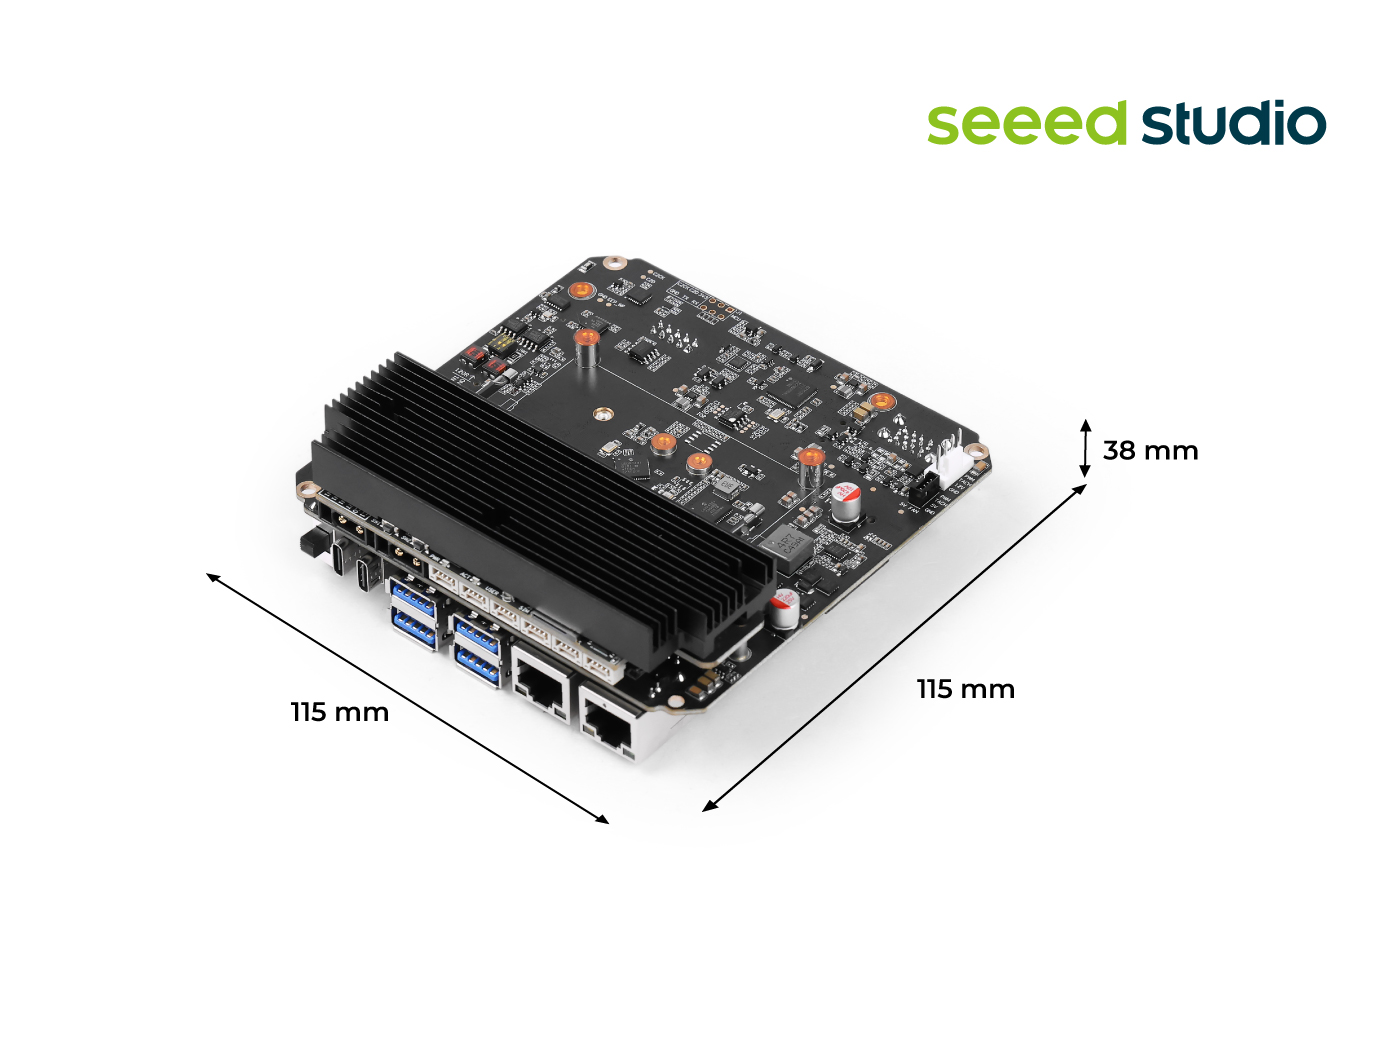
Both our reComputer Mini and reComputer Robotics J40 (shown above) feature an XT30 2+2 CAN communication interface, which supports simultaneous power supply and communication for IMUs.
The CAN_H and CAN_L pin assignments on our devices are reversed compared to most commercially available motors and sensors. Therefore, when wiring, you must swap the H and L connections to ensure proper communication. For CAN usage tutorials on more devices, please refer to the link.

Connecting XT30 2+2 Cables

The CAN_H and CAN_L pin assignments on our devices are reversed compared to most commercially available motors and sensors. Therefore, when wiring, you must swap the H and L connections to ensure proper communication. For CAN usage tutorials on more devices, please refer to the link.
Install ROS on Jetson
Please refer to the tutorial about Install ROS2 Humble or Install ROS1 on reComptuer Jetson
Enable CAN Function
For reComputer Robotics J401:
sudo ip link set can0 down
sudo ip link set can0 type can bitrate 500000
sudo ip link set can0 up
gpioset --mode=time --sec=60 2 3=0 & # For CAN1: gpioset --mode=time --sec=60 2 4=0 &
For reComputer Mini:
sudo ip link set can0 down
sudo ip link set can0 type can bitrate 500000
sudo ip link set can0 up
gpioset --mode=time --sec=30 0 43=0 # For CAN1: gpioset --mode=time --sec=30 0 106=0 &
Install the dependencies
Clone the repository:
cd ~/
pip3 install numpy==1.24
git clone https://github.com/hexfellow/hex_utils.git
Build the package:
cd hex_utils
sudo apt-get install python3-venv
python3 -m build
Install the package:
pip3 install dist/hex_utils-0.0.1-py3-none-any.whl
Create a workspace catkin_ws and get into the src
mkdir -p catkin_ws/src
cd catkin_ws/src
Clone this repo
git clone [email protected]:hexfellow/hex_imu.git
Go to catkin_ws directory and build the repo
- ROS1
cd ../
catkin_make
- ROS2
cd ../
colcon build
Source the setup.bash and run the test below
- ROS 1
source devel/setup.bash --extend
- ROS 2
source install/setup.bash --extend
Usage
- Launch the main node:
- ROS 1
roslaunch hex_imu canopen_imu.launch
- ROS 2
ros2 launch hex_imu canopen_imu.launch.py
- We also offer a dedicated launch file for visualizing IMU data. Follow the steps below to get started:
Before you begin, make sure you have the necessary plugin installed for RViz:
- ROS 1
sudo apt install ros-noetic-rviz-imu-plugin
- ROS 2
sudo apt install ros-humble-rviz-imu-plugin
Once the plugin is installed, you can start the visualization tool with the following command:
- ROS 1
roslaunch hex_imu canopen_imu_display.launch
- ROS 2
ros2 launch hex_imu canopen_imu_display.launch.py
- If you want to output Azimuth, you can run the following sample code (only supports ROS1)
roslaunch hex_imu canopen_imu.launch

rosrun hex_imu example.py
Public APIs
Publish
| Topic | Msg Type | Description |
|---|---|---|
/imu_data | sensor_msgs/Imu | IMU data including orientation, angular velocity and linear acceleration |
/magnetic_data | sensor_msgs/MagneticField | Magnetic field data |
Subscribe
| Topic | Msg Type | Description |
|---|---|---|
| None | None | No subscription required |
Parameters
| Name | Data Type | Description |
|---|---|---|
node_id | int | CANopen node ID of the IMU device |
channel | string | CAN channel name (e.g., 'can0') |
imu_topic | string | Topic name for publishing IMU data |
magnetic_topic | string | Topic name for publishing magnetic field data |
Tech Support & Product Discussion
Thank you for choosing our products! We are here to provide you with different support to ensure that your experience with our products is as smooth as possible. We offer several communication channels to cater to different preferences and needs.