HighTorque Motor Control Complete Guide
High-performance HighTorque motor control baseline with implementations in Python, C++, Rust, and Arduino
![]()
![]()
![]()
📋 Table of Contents
- Project Overview
- Hardware Preparation
- Software Environment Setup
- CAN Bus Configuration
- Python Complete Usage Guide
- C++ Complete Usage Guide
- Rust Complete Usage Guide
- Protocol Detailed Explanation
- Troubleshooting
- Performance Comparison
- Advanced Applications
🎯 Project Overview
What are HighTorque Motors?
Hightorque motors are brushless DC motor systems designed specifically for robotics applications, supporting CAN bus communication, suitable for:
- 🤖 Humanoid Robots - Joint control
- 🦾 Robotic Arms - Precision positioning
- 🚗 Mobile Robots - Wheel drive
- ⚙️ Automation Equipment - Servo control
Supported Motor Models
| Model | Torque | Max Speed | Reduction Ratio | Application |
|---|---|---|---|---|
| 5046_20 | 17 Nm | 50 rad/s | 20:1 | General joints |
| 4538_19 | 17 Nm | 44 rad/s | 19:1 | Lightweight joints |
| 5047_36 | 60 Nm | 50 rad/s | 36:1 | Heavy-duty applications |
| 5047_09 | 17 Nm | 33 rad/s | 9:1 | High-speed applications |
Core Features
- ✅ CAN Bus Communication - Support for multi-parallel motors
- ✅ High-Precision Control - Position/Velocity/Torque triple-loop control
- ✅ Real-time Feedback - Status monitoring and data collection
- ✅ Safety Protection - Over-current/over-voltage/over-temperature protection
- ✅ Multi-language SDK - Python/C++/Rust/Arduino support
🔧 Hardware Preparation
Required Hardware List
- HighTorque Motor - At least 1
- CAN Adapter - USB-to-CAN or PCIe CAN card
- CAN Cable - Twisted pair shielded cable
- 120Ω Termination Resistor - One at each end of the bus
- Power Supply - 24V or 48V DC power supply
- Development Host - Linux system (Ubuntu 20.04+ recommended)
Hardware Connection Diagram
[Linux Host] ←USB→ [CAN Adapter] ←CAN_H/CAN_L→ [Motor1]
                                            ↓
                                    [120Ω Resistor]
                                            ↓
                                          [Motor2]
Connection Steps
- Connect CAN Adapter to host USB port
- Connect CAN Bus:
- CAN_H ←→ CAN_H (all devices)
- CAN_L ←→ CAN_L (all devices)
- GND ←→ GND (common ground connection)
- Install Termination Resistors:
- Install one 120Ω resistor at each end of the bus
- If only 2 devices, install one in each device
- Connect Motor Power:
- Red wire: +24V/+48V
- Black wire: GND
- Yellow wire: CAN_H
- Green wire: CAN_L
💻 Software Environment Setup
System Requirements
- Operating System: Ubuntu 18.04+ / CentOS 7+ / Debian 10+
- Kernel Version: Linux 4.15+ (SocketCAN support)
- Architecture: x86_64 / ARM64
Universal Dependencies Installation
# Update system packages
sudo apt update && sudo apt upgrade -y

# Install basic tools
sudo apt install -y build-essential git cmake make

# Install CAN tools
sudo apt install -y can-utils

# Install Python development environment
sudo apt install -y python3 python3-pip python3-dev

# Install Rust (if needed)
curl --proto '=https' --tlsv1.2 -sSf https://sh.rustup.rs | sh
source ~/.cargo/env
Clone Project
# Clone official SDK
git clone https://github.com/Seeed-Projects/HighTorque_Control ~/HighTorque_Control
pushd ~/HighTorque_Control

# Check project structure
ls -la
# Should see: python/ cpp/ rust/ arduino/ directories
🌐 CAN Bus Configuration
1. Load CAN Kernel Modules
# Check if modules are loaded
lsmod | grep can

# If not loaded, load manually
sudo modprobe can
sudo modprobe can_raw
sudo modprobe can_dev
2. Configure CAN Interface
# Shut down interface (if already open)
sudo ip link set can0 down

# Configure CAN interface parameters
sudo ip link set can0 type can bitrate 1000000 restart-ms 100

# Start interface
sudo ip link set can0 up

# Check interface status
ip -details link show can0
3. Verify CAN Communication
# Terminal 1: Monitor CAN messages
candump can0

# Terminal 2: Send test message
cansend can0 123#DEADBEEF

# If you see messages, configuration is successful
4. Set Auto-start on Boot
# Create configuration file
sudo tee /etc/network/interfaces.d/can0 << EOF
auto can0
iface can0 inet manual
    pre-up ip link set can0 type can bitrate 1000000 restart-ms 100
    up ip link set can0 up
    down ip link set can0 down
EOF

# Make configuration effective
sudo systemctl restart networking
Troubleshooting
# Check interface permissions
sudo usermod -a -G dialout $USER
# Log out and log back in for effect

# Check device permissions
ls -la /dev/can*
# If no devices, check if driver is loaded correctly

# Check baud rate setting
ip -details link show can0 | grep bitrate
🐍 Python Complete Usage Guide
1. Environment Preparation
cd python

# Install Python dependencies
pip install -r requirements.txt

# Manual dependency installation (if requirements.txt doesn't exist)
pip install python-can==4.3.1 numpy matplotlib
2. Motor Scanning - Discover Connected Motors
# Basic scan (scan IDs 1-14)
python3 can_motor_scanner.py

# Specify scan range
python3 can_motor_scanner.py --start 1 --end 10

# Specify CAN channel
python3 can_motor_scanner.py --channel can0

# Detailed information mode
python3 can_motor_scanner.py --detailed

# Continuous monitoring mode (monitor for 30 seconds)
python3 can_motor_scanner.py --monitor 30

# Test single motor communication
python3 can_motor_scanner.py --test 1

# Save scan report
python3 can_motor_scanner.py --save scan_report.txt
Expected Output:
Initializing can0 @ 1000000bps...
✅ CAN interface connected successfully
==================================================
Starting motor ID scan (range: 1-14)...
Timeout: 0.05s per motor
Press Ctrl+C to stop at any time
==================================================
Scanning ID  1... ✅ [Response] Found motor ID: 1 (CAN ID: 0x8001)
Scanning ID  2... No response
Scanning ID  3... ✅ [Response] Found motor ID: 3 (CAN ID: 0x8003)
...
==================================================
✅ Scan completed, online motor list: [1, 3]
Total: 2 motors
3. Speed Control - Control Motor Rotation Speed
# Basic speed control (control motor ID=1)
python3 velocity_acceleration_control.py --motor_id 1

# Specify CAN channel
python3 velocity_acceleration_control.py --motor_id 1 --channel can0

# Specify baud rate
python3 velocity_acceleration_control.py --motor_id 1 --bitrate 1000000
Interactive Control Example:
Motor 1 started! Use control commands:
- Speed: +number (e.g.: +5.0, -2.5)
- Acceleration: anumber (e.g.: a10.0)
- Stop: stop
- Query status: status
- Exit: quit

> +5.0        # Set forward 5.0 rad/s
> a8.0        # Set acceleration 8.0 rad/s²
> stop        # Smart stop
> status      # Query current status
> quit        # Exit program
4. Position Control - Control Motor Angle
# Interactive position control
python3 angle_stream_control.py --motor_id 1 --mode interactive

# Sine wave test
python3 angle_stream_control.py --motor_id 1 --mode sine --amplitude 1.57 --frequency 0.5

# Step test
python3 angle_stream_control.py --motor_id 1 --mode step --target 1.57

# Multi-position test
python3 angle_stream_control.py --motor_id 1 --mode multi
Interactive Control Example:
Motor 1 connected and enabled!
Use control commands:
- Position: pvalue (radians, e.g.: p1.57, p-0.5)
- Torque: tvalue (Nm, e.g.: t2.0, t-1.5)
- Stop: stop
- Exit: quit

> p1.57       # Rotate to 90 degree position
> t2.0        # Set 2Nm torque
> stop        # Stop motor
> quit        # Exit program
5. Python Code Examples
Motor Scanning Code
#!/usr/bin/env python3
from can_motor_scanner import LivelyMotorScanner

def main():
    # Create scanner
    scanner = LivelyMotorScanner(channel='can0', bitrate=1000000)

    # Connect CAN bus
    if not scanner.connect():
        print("CAN connection failed!")
        return

    try:
        # Scan motors
        found_motors = scanner.scan_range(start_id=1, end_id=14)

        if found_motors:
            print(f"Found motors: {found_motors}")

            # Get detailed information
            for motor_id in found_motors:
                info = scanner.get_motor_info(motor_id)
                if info:
                    print(f"Motor{motor_id}: Mode={info.get('mode_name', 'Unknown')}")
        else:
            print("No motors found")

    finally:
        scanner.disconnect()

if __name__ == "__main__":
    main()
Speed Control Code
#!/usr/bin/env python3
from velocity_acceleration_control import MotorVelAccController

def main():
    # Create controller
    controller = MotorVelAccController(channel='can0', motor_id=1)

    # Connect and enable motor
    if not controller.connect():
        print("Connection failed!")
        return

    controller.enable_motor()
    controller.start_control()

    try:
        # Set speed and acceleration
        controller.set_velocity(5.0)  # 5 rad/s
        controller.set_acceleration(10.0)  # 10 rad/s²

        # Run for 10 seconds
        import time
        time.sleep(10)

        # Smart stop
        controller.emergency_stop()

    finally:
        controller.disable_motor()
        controller.disconnect()

if __name__ == "__main__":
    main()
⚡ C++ Complete Usage Guide
1. Environment Preparation
cd cpp

# Compile all programs
make clean
make

# Or compile single program
make can_motor_scanner
make velocity_acceleration_control
make angle_stream_control
2. Motor Scanning
# Scan motor IDs 1-5
./can_motor_scanner 1 5

# Scan all possible IDs
./can_motor_scanner 1 14
Expected Output:
Initializing CAN0 @ 1000000bps...
✅ CAN interface connected successfully
Starting motor ID scan (1-5)...
Scanning ID 1... ✅ Found motor ID: 1 (CAN ID: 0x8001)
Scanning ID 2... No response
Scanning ID 3... ✅ Found motor ID: 3 (CAN ID: 0x8003)
Scanning ID 4... No response
Scanning ID 5... No response
Scan completed! Online motors: [1, 3]
3. Speed Control
# Control motor ID=1
./velocity_acceleration_control 1

# Control specified ID motor
./velocity_acceleration_control 3
Control Commands:
+number- Set forward speed-number- Set backward speedanumber- Set accelerationstop- Smart stopquit- Exit program
4. Position Control
# Interactive mode
./angle_stream_control 1 interactive

# Sine wave mode
./angle_stream_control 1 sine

# Step mode
./angle_stream_control 1 step

# Multi-position mode
./angle_stream_control 1 multi
5. C++ Code Examples
Motor Scanning Code
#include "can_motor_scanner.h"

int main() {
    // Create scanner
    LivelyMotorScanner scanner("can0", 1000000);

    // Connect CAN bus
    if (!scanner.connect()) {
        std::cerr << "CAN connection failed!" << std::endl;
        return 1;
    }

    // Scan motors
    std::vector<int> found_motors = scanner.scan_range(1, 14);

    if (!found_motors.empty()) {
        std::cout << "Found motors: ";
        for (int id : found_motors) {
            std::cout << id << " ";
        }
        std::cout << std::endl;
    } else {
        std::cout << "No motors found" << std::endl;
    }

    scanner.disconnect();
    return 0;
}
Compile and run:
g++ -o scan_example scan_example.cpp -lcan
./scan_example
🦀 Rust Complete Usage Guide
1. Environment Preparation
cd rust

# Check if Rust is installed
rustc --version

# Compile release version
cargo build --release

# Or use Makefile
make
2. Motor Scanning
# Scan specified range
./target/release/can_motor_scanner --start-id 1 --end-id 5

# Complete scan
./target/release/can_motor_scanner --start-id 1 --end-id 14

# Specify CAN channel
./target/release/can_motor_scanner --channel can0 --start-id 1 --end-id 5
3. Speed Control
# Basic speed control
./target/release/velocity_acceleration_control --motor-id 1

# Specify channel
./target/release/velocity_acceleration_control --motor-id 1 --channel can0
4. Position Control
# Interactive mode
./target/release/angle_stream_control --motor-id 1 interactive

# Sine wave mode
./target/release/angle_stream_control --motor-id 1 sine --amplitude 1.57

# Step mode
./target/release/angle_stream_control --motor-id 1 step --target 1.57
5. Rust Code Examples
Motor Scanning Code
use livelybot_motor_sdk::{LivelyMotorController, CanFrame};

fn main() -> Result<(), Box<dyn std::error::Error>> {
    // Create controller
    let mut controller = LivelyMotorController::new("can0")?;

    // Connect CAN bus
    controller.connect()?;

    // Scan motors
    let mut found_motors = Vec::new();

    for motor_id in 1..=14 {
        if controller.ping_motor(motor_id)? {
            println!("✅ Found motor ID: {}", motor_id);
            found_motors.push(motor_id);
        } else {
            println!("❌ Motor ID: {} No response", motor_id);
        }
    }

    println!("Scan completed, found {} motors", found_motors.len());

    Ok(())
}
Compile and run:
# Save as scan_example.rs
rustc --extern livelybot_motor_sdk=target/release/liblivelybot_motor_sdk.rlib scan_example.rs
./scan_example
📡 Protocol Detailed Explanation
CAN Frame Format
- Frame Type: Extended frame (29-bit ID)
- Baud Rate: 1Mbps
- Data Length: 8 bytes
- Endianness: Big endian
Core Protocol Commands
1. Motor Scanning (Ping) Command
CAN ID: 0x8000 | motor_id
Data: [0x11, 0x00, 0x50, 0x50, 0x50, 0x50, 0x50, 0x50]
0x8000: High bit indicates need for replymotor_id: Motor ID (1-127)0x11: Read command0x00: Address (read motor mode)
2. Speed Control Command (0xAD)
CAN ID: 0x00AD
Data: [PosL, PosH, VelL, VelH, AccL, AccH, 0x50, 0x50]
PosL/PosH: Position target (16-bit, FACTOR_POS=10000.0)VelL/VelH: Velocity target (16-bit, FACTOR_VEL=4000.0)AccL/AccH: Acceleration target (16-bit, FACTOR_ACC=1000.0)0x50: Padding bytes
3. Position Control Command (0x90)
CAN ID: 0x0090
Data: [PosL, PosH, VelL, VelH, TqeL, TqeH, 0x50, 0x50]
PosL/PosH: Position target (16-bit, FACTOR_POS=10000.0)VelL/VelH: Velocity limit (16-bit, FACTOR_VEL=4000.0)TqeL/TqeH: Torque limit (16-bit, FACTOR_TQE=200.0)
Protocol Coefficients
| Parameter | Value | Description | Example |
|---|---|---|---|
| FACTOR_POS | 10000.0 | Position conversion factor | 1.57 rad → 15700 |
| FACTOR_VEL | 4000.0 | Velocity conversion factor | 5.0 rad/s → 20000 |
| FACTOR_ACC | 1000.0 | Acceleration conversion factor | 10.0 rad/s² → 10000 |
| FACTOR_TQE | 200.0 | Torque conversion factor | 2.0 Nm → 400 |
| MAGIC_POS | -32768 | Velocity mode flag | Special position value |
Data Conversion Examples
Position Conversion
# Radians → Protocol value
position_rad = 1.57  # 90 degrees
protocol_value = int(position_rad * FACTOR_POS)  # 15700

# Protocol value → Radians
protocol_value = 15700
position_rad = protocol_value / FACTOR_POS  # 1.57
Velocity Conversion
# rad/s → Protocol value
velocity_rps = 5.0
protocol_value = int(velocity_rps * FACTOR_VEL)  # 20000

# Protocol value → rad/s
protocol_value = 20000
velocity_rps = protocol_value / FACTOR_VEL  # 5.0
🔧 Troubleshooting
Common Issues and Solutions
1. CAN Interface Cannot Start
# Error message
Error: Cannot find device can0

# Solution
sudo modprobe can
sudo modprobe can_raw
sudo ip link set can0 type can bitrate 1000000
sudo ip link set can0 up
2. Insufficient Permissions
# Error message
Operation not permitted

# Solution 1: Add user to dialout group
sudo usermod -a -G dialout $USER
# Re-login for effect

# Solution 2: Run with sudo
sudo python3 can_motor_scanner.py
3. Cannot Scan Motors
# Check hardware connection
1. Confirm 120Ω termination resistor is installed
2. Check if CAN_H/CAN_L wiring is correct
3. Confirm motor power supply is normal
4. Check if baud rate setting matches

# Verify connection with candump
candump can0
# Manually rotate motor, should see feedback messages
4. Unstable Communication
# Check signal quality
candump can0 -tA
# View error frame count

# Adjust sampling point
sudo ip link set can0 down
sudo ip link set can0 type can bitrate 1000000 sample-point 0.875
sudo ip link set can0 up
5. Compilation Errors
# Python dependency issues
pip install --upgrade pip
pip install -r requirements.txt

# C++ compilation errors
sudo apt install build-essential
sudo apt install libcan-dev

# Rust compilation errors
rustup update
cargo clean && cargo build --release
Debugging Tips
1. Use Wireshark for CAN Communication Analysis
# Install wireshark
sudo apt install wireshark

# Start packet capture
sudo wireshark -i can0
2. Real-time Motor Status Monitoring
# Python continuous monitoring
python3 can_motor_scanner.py --monitor 60

# C++ real-time viewing
./can_motor_scanner 1 14 | grep "Found motor"
3. Protocol Analysis
# Send raw CAN commands
import can
bus = can.interface.Bus(channel='can0', interface='socketcan')
msg = can.Message(arbitration_id=0x8001, data=[0x11, 0x00, 0x50, 0x50, 0x50, 0x50, 0x50, 0x50])
bus.send(msg)
Controlling Motors with reComputer Mini Jetson Orin
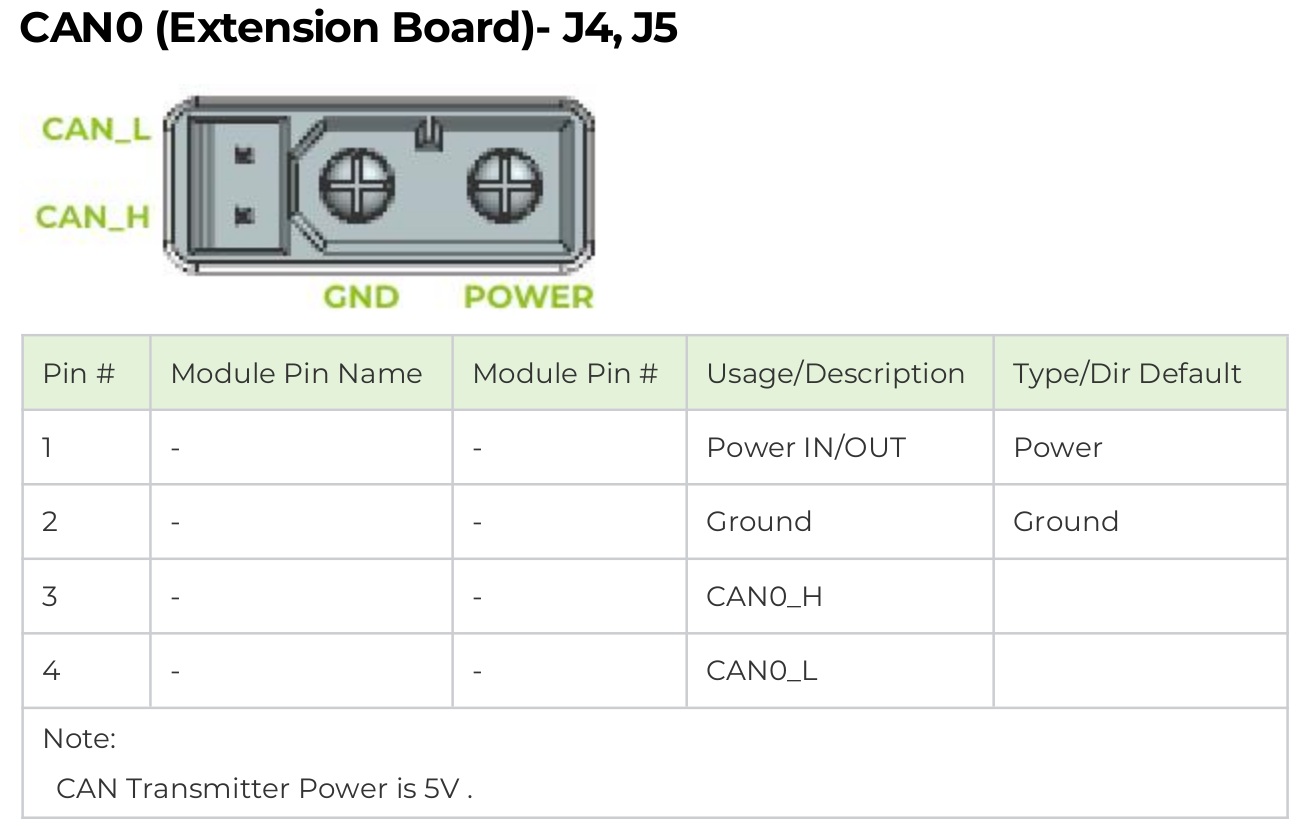
Currently, the most commonly used CAN communication interfaces for motors in the market are XT30(2+2) and JST connectors. Our reComputer Mini Jetson Orin and reComputer Robotics devices are equipped with dual XT30(2+2) ports and JST-based CAN interfaces, providing seamless compatibility.
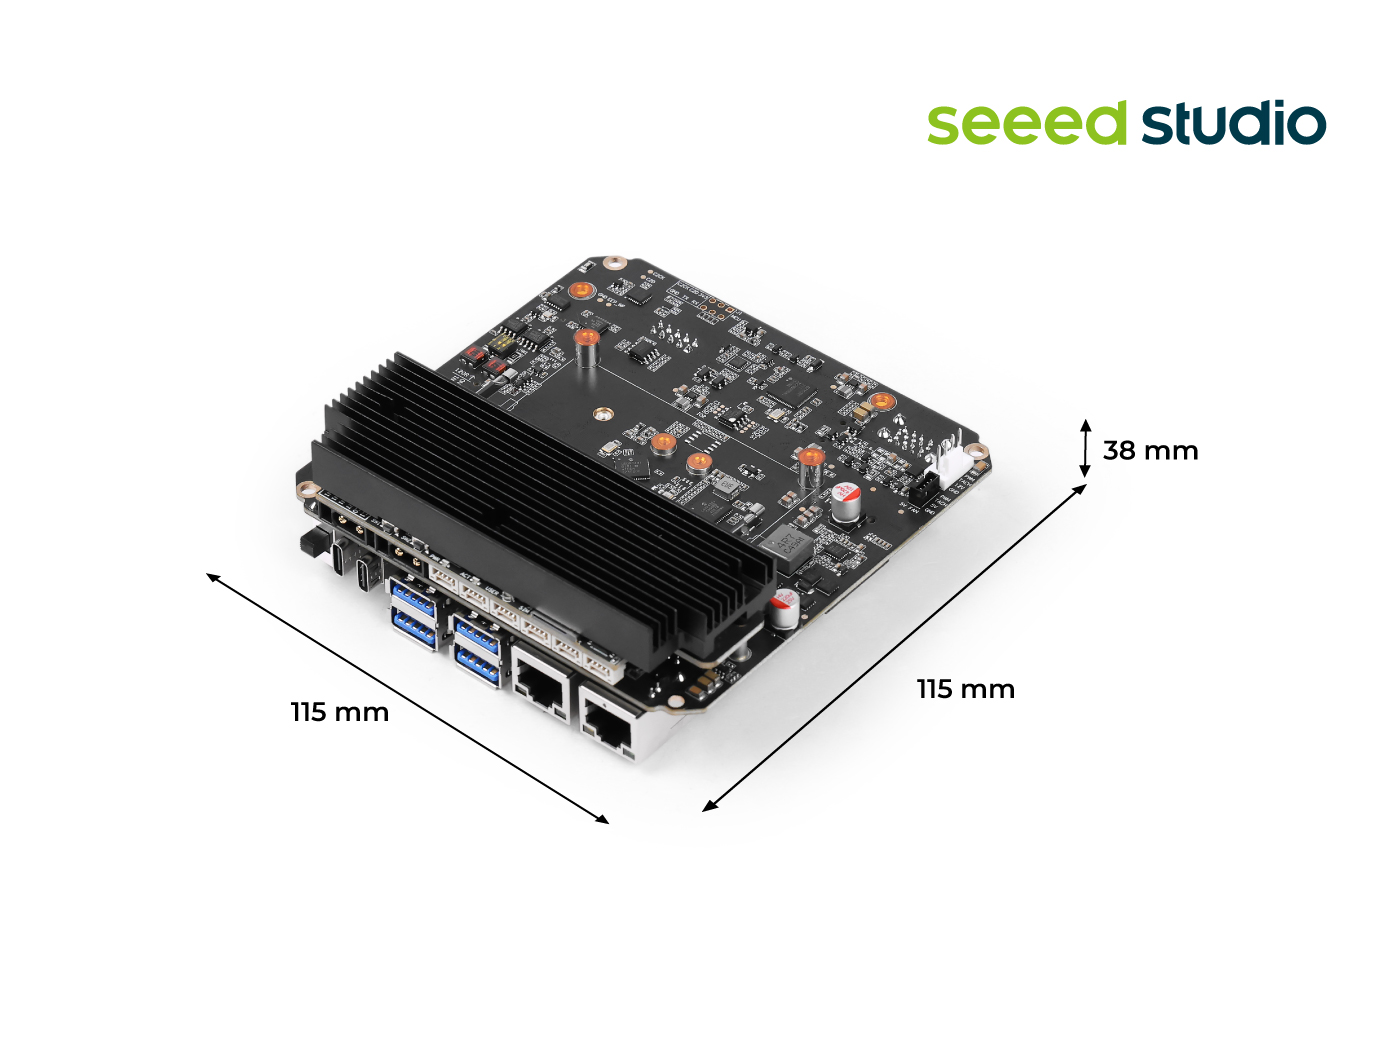
reComputer Mini:

reComputer Robotics
For more details on CAN usage, please refer to this wiki.
Enabling CAN Interface
Step 1: Before using CAN0 and CAN1, remove the bottom cover and set both 120Ω termination resistors to the ON position.
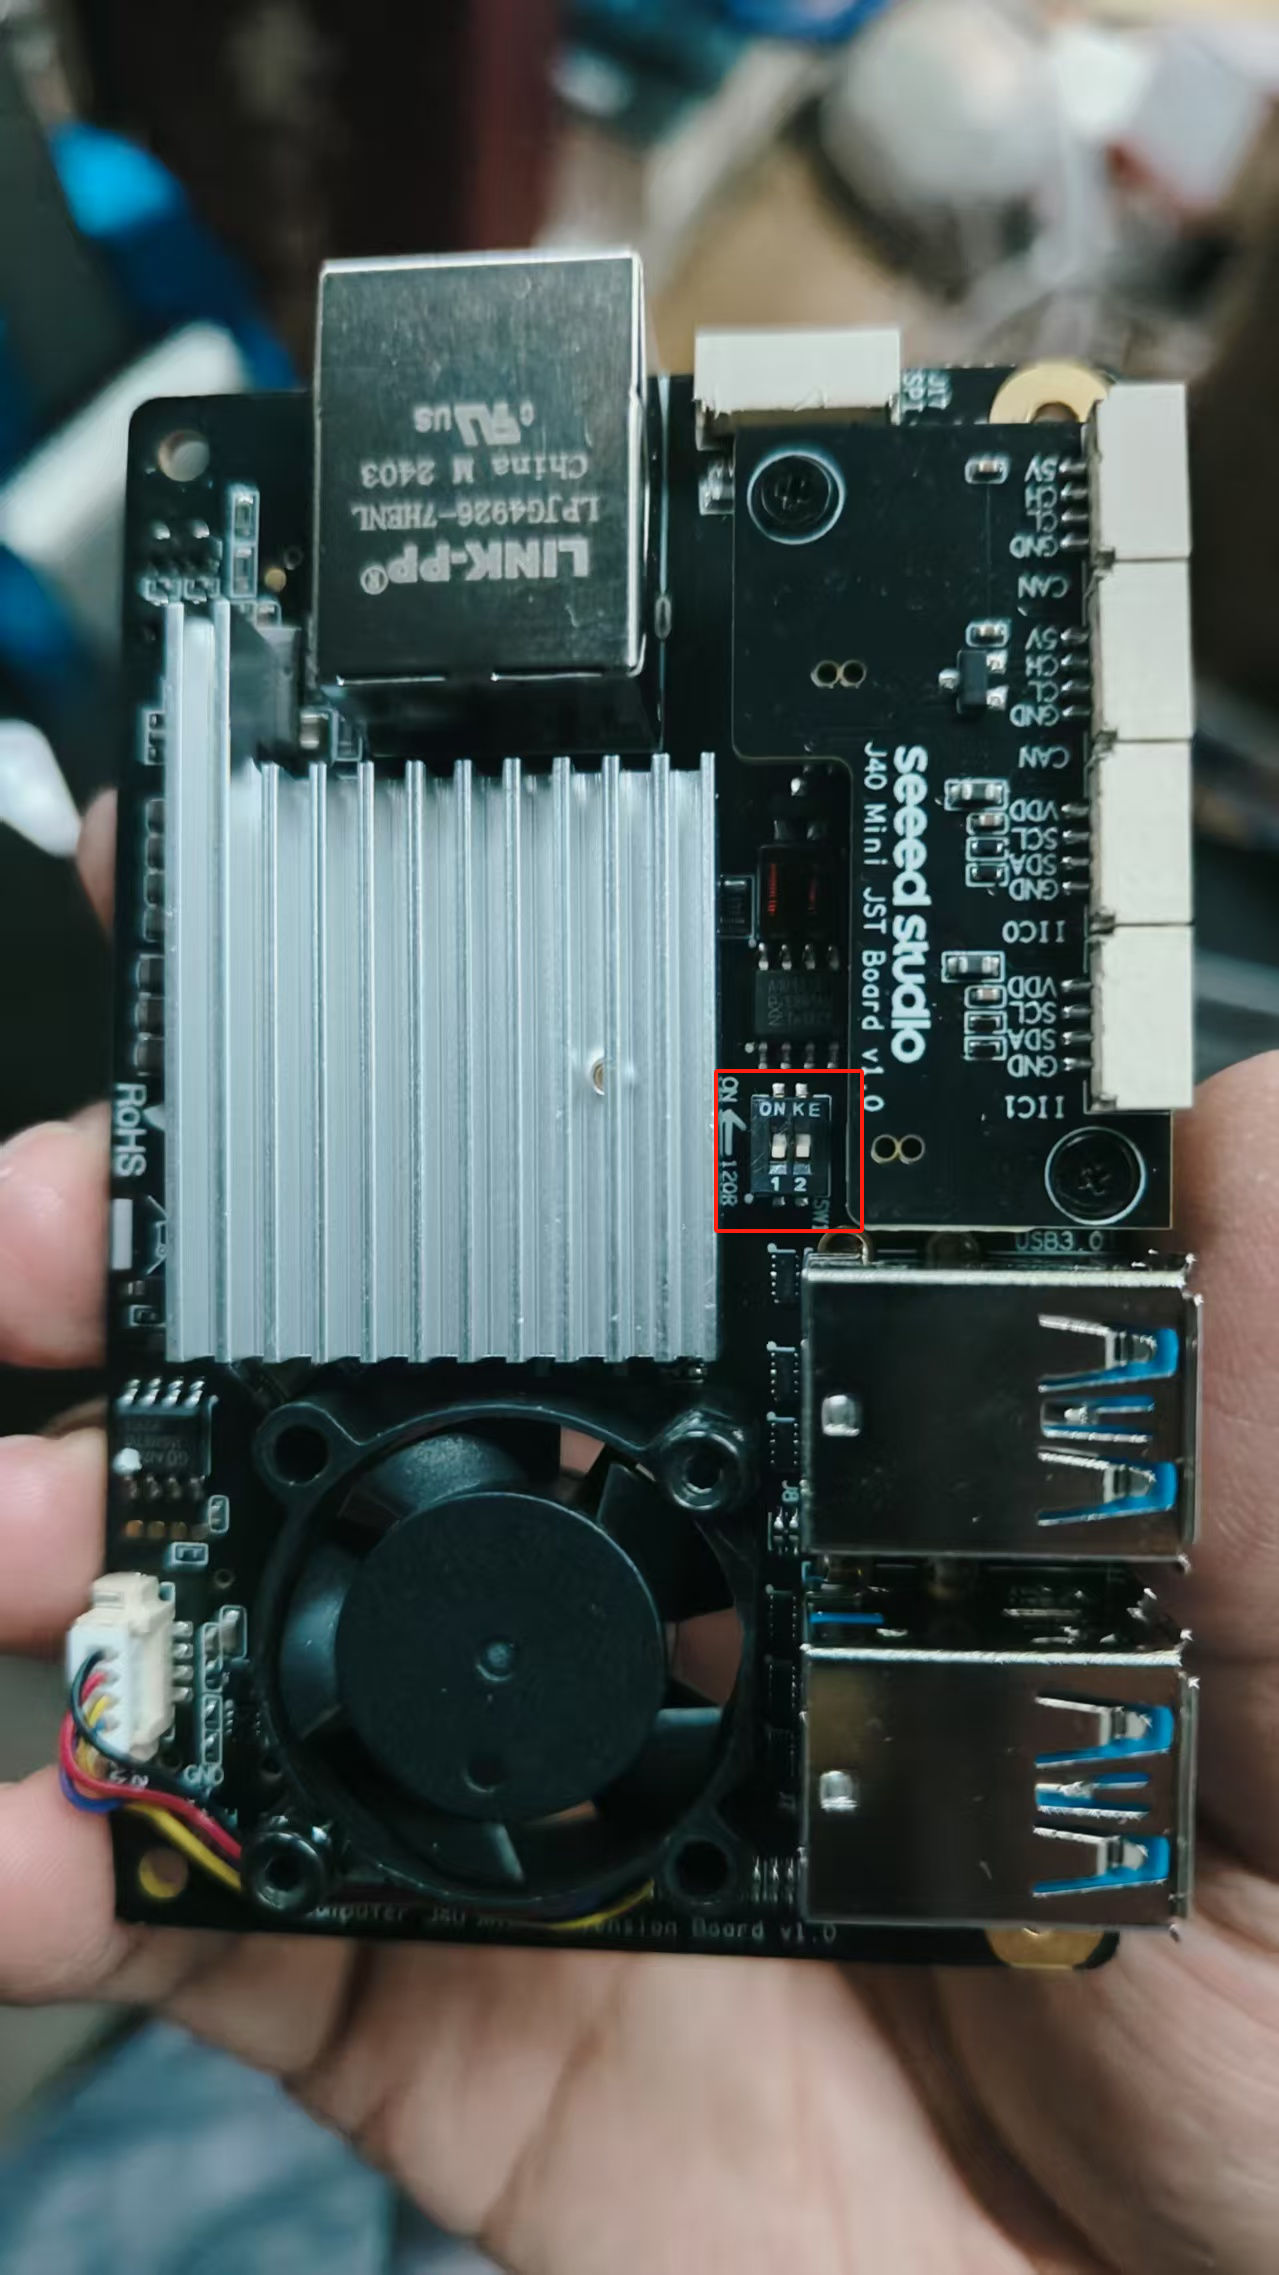
Step 2: Connect the motor directly to CAN0 of the reComputer Mini via the XT30(2+2) interface.
The H/L pins of the reComputer Mini's CAN interface are opposite to those of the motor, so the H/L connections in the XT30 2+2 harness need to be reversed.

This power solution is only suitable for single-motor learning and testing. For multi-motor applications, please design an independent power board to isolate the Jetson power supply from the motor power supply to avoid large currents passing directly through the Jetson.
Enabling Jetson CAN Communication
Open a terminal and enter the following command to pull the GPIO pin high to activate CAN0:
gpioset --mode=wait 0 43=0
If using the JST interface's CAN1, pull pin 106 high:
gpioset --mode=wait 0 106=0
Keep this terminal open and create a new terminal to configure CAN0:
sudo modprobe mttcan
sudo ip link set can0 type can bitrate 1000000
sudo ip link set can0 up
Python Control
- Install Python Environment
pip install python-can numpy
- Create Script Directory
mkdir -p ~/hightorque/scripts
- Create hightorque_motor.py File
cd ~/hightorque/scripts
touch hightorque_motor.py
Copy the following code into hightorque_motor.py.
hightorque_motor.py
import can
import numpy as np
from time import sleep
from enum import IntEnum

class MotorType(IntEnum):
    """Motor Type Enum"""
    HT5046 = 0  # 5046 Motor
    HT4538 = 1  # 4538 Motor
    HT5047_36 = 2  # 5047/6056 Dual-pole 36 Reduction Ratio
    HT5047_9 = 3  # 5047 Single-pole 9 Reduction Ratio

class ControlMode(IntEnum):
    """Control Mode Enum"""
    NORMAL = 0  # Normal Mode
    TORQUE = 1  # Torque Mode
    COOPERATIVE = 2  # Cooperative Control Mode

class Motor:
    def __init__(self, motor_type: MotorType, slave_id: int, master_id: int):
        """
        Initialize Motor Object
        :param motor_type: Motor Type
        :param slave_id: Slave ID
        :param master_id: Master ID
        """
        self.motor_type = motor_type
        self.slave_id = slave_id
        self.master_id = master_id
        self.position = 0
        self.velocity = 0
        self.torque = 0
        self.temperature = 0

        # Set Torque Conversion Parameters Based on Motor Type
        if motor_type == MotorType.HT5046:
            self.torque_k = 0.005397
            self.torque_d = -0.455107
        elif motor_type == MotorType.HT4538:
            self.torque_k = 0.004587
            self.torque_d = -0.290788
        elif motor_type == MotorType.HT5047_36:
            self.torque_k = 0.004563
            self.torque_d = -0.493257
        elif motor_type == MotorType.HT5047_9:
            self.torque_k = 0.005332
            self.torque_d = -0.072956

    def update_status(self, position: float, velocity: float, torque: float, temperature: float):
        """Update Motor Status"""
        self.position = position
        self.velocity = velocity
        self.torque = torque
        self.temperature = temperature

class MotorControl:
    def __init__(self, channel: str, bitrate: int = 1000000):
        """
        Initialize Motor Controller
        :param channel: CAN Channel
        :param bitrate: CAN Baud Rate
        """
        self.bus = can.interface.Bus(channel=channel, bustype='socketcan', bitrate=bitrate)
        self.motors = {}

    def add_motor(self, motor: Motor):
        """Add Motor to Controller"""
        self.motors[motor.slave_id] = motor

    def __send_data(self, motor_id: int, data: bytes):
        """
        Send CAN Data
        :param motor_id: Motor ID
        :param data: Data to Send
        """
        msg = can.Message(
            arbitration_id=0x8000 | motor_id,
            data=data,
            is_extended_id=True
        )
        self.bus.send(msg)

    def enable(self, motor: Motor):
        """Enable Motor"""
        data = bytes([0x01, 0x00, 0x01])
        self.__send_data(motor.slave_id, data)
        sleep(0.1)

    def disable(self, motor: Motor):
        """Disable Motor"""
        data = bytes([0x01, 0x00, 0x00])
        self.__send_data(motor.slave_id, data)
        sleep(0.1)

    def set_zero_position(self, motor: Motor):
        """Set Motor Zero Position"""
        data = bytes([0x40, 0x01, 0x04, 0x64, 0x20, 0x63, 0x0a])
        self.__send_data(motor.slave_id, data)
        sleep(1.0)  # Wait 1 second
        self.save_settings(motor)

    def save_settings(self, motor: Motor):
        """Save Motor Settings to Flash"""
        data = bytes([0x05, 0xb3, 0x02, 0x00, 0x00])
        self.__send_data(motor.slave_id, data)

    def control_position(self, motor: Motor, position: float, torque: float):
        """
        Position Control
        :param motor: Motor Object
        :param position: Target Position (Unit: 0.0001 turns)
        :param torque: Torque Limit
        """
        pos_bytes = int(position).to_bytes(2, 'little')
        tqe_bytes = int(torque).to_bytes(2, 'little')
        data = bytes([0x07, 0x07]) + pos_bytes + bytes([0x80, 0x00]) + tqe_bytes
        self.__send_data(motor.slave_id, data)

    def control_velocity(self, motor: Motor, velocity: float, torque: float):
        """
        Velocity Control
        :param motor: Motor Object
        :param velocity: Target Velocity (Unit: 0.00025 turns/second)
        :param torque: Torque Limit
        """
        vel_bytes = int(velocity).to_bytes(2, 'little')
        tqe_bytes = int(torque).to_bytes(2, 'little')
        data = bytes([0x07, 0x07, 0x00, 0x80]) + vel_bytes + tqe_bytes
        self.__send_data(motor.slave_id, data)

    def control_torque(self, motor: Motor, torque: float):
        """
        Torque Control
        :param motor: Motor Object
        :param torque: Target Torque
        """
        tqe_bytes = int(torque).to_bytes(2, 'little')
        data = bytes([0x05, 0x13]) + tqe_bytes
        self.__send_data(motor.slave_id, data)

    def control_cooperative(self, motor: Motor, position: float, velocity: float, torque: float):
        """
        Cooperative Control (Position, Velocity, Torque Simultaneous Control)
        :param motor: Motor Object
        :param position: Target Position (Unit: 0.0001 turns)
        :param velocity: Target Velocity (Unit: 0.00025 turns/second)
        :param torque: Torque Limit
        """
        vel_bytes = int(velocity).to_bytes(2, 'little')
        tqe_bytes = int(torque).to_bytes(2, 'little')
        pos_bytes = int(position).to_bytes(2, 'little')
        data = bytes([0x07, 0x35]) + vel_bytes + tqe_bytes + pos_bytes
        self.__send_data(motor.slave_id, data)

    def read_motor_status(self, motor: Motor):
        """Read Motor Status"""
        data = bytes([0x17, 0x01])
        self.__send_data(motor.slave_id, data)
        sleep(0.01)  # Wait for Data Reception

        # Receive and Parse Data
        msg = self.bus.recv(timeout=0.1)
        if msg and msg.arbitration_id == (0x8000 | motor.slave_id):
            data = msg.data
            if len(data) >= 8 and data[0] == 0x27:
                position = int.from_bytes(data[2:4], 'little')
                velocity = int.from_bytes(data[4:6], 'little')
                torque = int.from_bytes(data[6:8], 'little')
                motor.update_status(position, velocity, torque, 0)

    def periodic_read_status(self, motor: Motor, period_ms: int):
        """
        Set Periodic Motor Status Reading
        :param motor: Motor Object
        :param period_ms: Period (milliseconds)
        """
        period_bytes = int(period_ms).to_bytes(2, 'little')
        data = bytes([0x05, 0xb4, 0x02, 0x00]) + period_bytes
        self.__send_data(motor.slave_id, data)

    def close(self):
        """Close CAN Bus"""
        self.bus.shutdown()
- Create hightorque_test.py File
Copy the following code into hightorque_test.py.
hightorque_test.py
#!/usr/bin/env python3
# -*- coding: utf-8 -*-

import time
import math
import numpy as np
from hightorque_motor import Motor, MotorControl, MotorType

# Configuration Parameters
NUM_MOTORS = 2  # Number of Motors to Control
CAN_INTERFACE = "can0"  # CAN Interface Name
CAN_BITRATE = 1000000  # CAN Baud Rate
MOTOR_TYPE = MotorType.HT5047_36  # Motor Type

# Sine Wave Parameters
FREQUENCY = 0.1  # Frequency (Hz)
AMPLITUDE = 2500  # Amplitude (0.0001 turns)
OFFSET = 2500    # Offset to Ensure Positive Position
DURATION = 60.0  # Run Duration (s)

def main():
    # Create Motor Control Object
    controller = MotorControl(channel=CAN_INTERFACE, bitrate=CAN_BITRATE)

    try:
        # Create and Add Motors
        motors = []
        for i in range(NUM_MOTORS):
            motor = Motor(MOTOR_TYPE, slave_id=i+1, master_id=0)
            controller.add_motor(motor)
            motors.append(motor)

            # Enable Motor
            print(f"Enabling Motor {i+1}...")
            controller.enable(motor)
            time.sleep(1)  # Wait for Motor Enable

            # Set Zero Position
            print(f"Setting Motor {i+1} Zero Position...")
            controller.set_zero_position(motor)
            time.sleep(1)

            # Save Settings to Flash
            print(f"Saving Motor {i+1} Settings...")
            controller.save_settings(motor)
            time.sleep(1)

            # Read Initial Status
            controller.read_motor_status(motor)
            print(f"Motor {i+1} Initial Status:")
            print(f"Position: {motor.position * 0.0001:.4f} turns")
            print(f"Velocity: {motor.velocity * 0.00025:.4f} turns/second")
            print(f"Torque: {motor.torque * motor.torque_k + motor.torque_d:.4f} Nm")

        # Start Sine Wave Position Control
        print("\nStarting Sine Wave Position Control...")
        start_time = time.time()
        while time.time() - start_time < DURATION:
            current_time = time.time() - start_time

            # Calculate Sine Wave Position with Offset to Ensure Positive
            position = AMPLITUDE * math.sin(2 * math.pi * FREQUENCY * current_time) + OFFSET

            # Control All Motors
            for motor in motors:
                # Use Position Control Mode with Max Torque of 1000
                controller.control_position(motor, position=int(position), torque=1000)

            # Control Frequency
            time.sleep(0.001)  # 1kHz Control Frequency

    except KeyboardInterrupt:
        print("\nProgram Interrupted by User")
    finally:
        # Disable All Motors
        for motor in motors:
            print(f"Disabling Motor {motor.slave_id}...")
            controller.disable(motor)

        # Close CAN Bus
        controller.close()
        print("CAN Bus Closed")

if __name__ == "__main__":
    main()
- Run hightorque_test.py
python hightorque_test.py
Recommended Usage Scenarios
- Python: Rapid prototyping, algorithm verification, teaching experiments
- C++: Production environment, high-performance requirements, real-time control systems
- Rust: Production environment, memory safety requirements, long-term maintenance projects
Choose the Right Language
- Beginners: Python - Simple and easy to use, quick to get started
- Product Development: C++ - High performance, real-time control
- Long-term Projects: Rust - Memory safe, modern language features
Resources
- 📧 Motor Official Website: https://hightorquerobotics.com/
- 🐛 Project Issue Feedback: https://github.com/Seeed-Projects/HighTorque_Control/issue
- 🐛 Motor Official Interface: https://github.com/HighTorque-Robotics/livelybot_hardware_sdk/
Tech Support & Product Discussion
Thank you for choosing our products! We are here to provide you with different support to ensure that your experience with our products is as smooth as possible. We offer several communication channels to cater to different preferences and needs.