How to Build and Flash BSP Source for Jetson Thor

This wiki explains how to use the BSP source package to build and flash the NVIDIA Jetson AGX Thor Developer Kit from an Ubuntu host.
The workflow in this article uses the JetPack 7.1 BSP package provided below and covers:
- Downloading and extracting the BSP package
- Entering USB recovery mode on Thor
- Running
thor_build_flash.sh - Cleaning the workspace with
thor_cleanup.sh - Optional post-flash package installation
Prerequisites
- NVIDIA Jetson AGX Thor Developer Kit
- Ubuntu host PC
- USB Type-C data cable
- Stable power supply for Thor
- BSP package for Thor
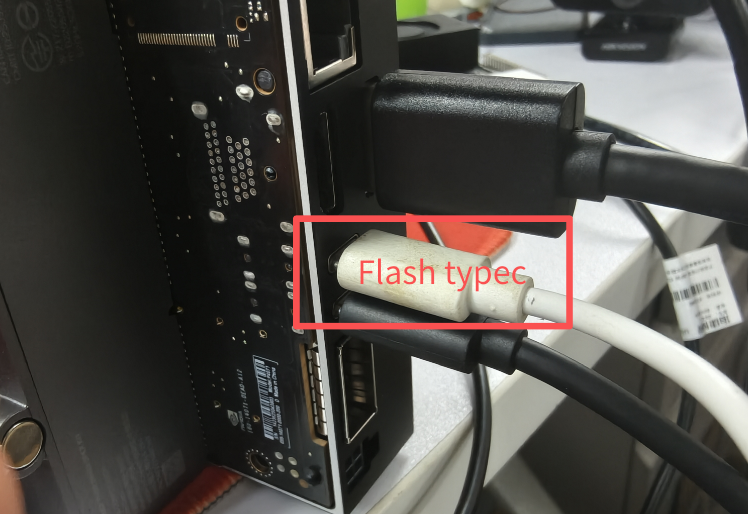
Use the USB Type-C flashing port closest to the HDMI connector when connecting Thor to the host PC.
1. Download and Extract the BSP Package
Download the BSP package first:
| JetPack Version | Download Link |
|---|---|
| 7.1 | Download |
After downloading the package, extract it and enter the working directory:
cd /other_data
sudo tar xpf <downloaded_package>.tar.gz
cd thor-dev/linux_for_tegra
Use sudo tar xpf when extracting the package so file ownership and permissions are preserved correctly.
2. Enter USB Recovery Mode on Thor
First connect the host PC to the USB Type-C flashing port near the HDMI connector:
The side buttons are shown below:
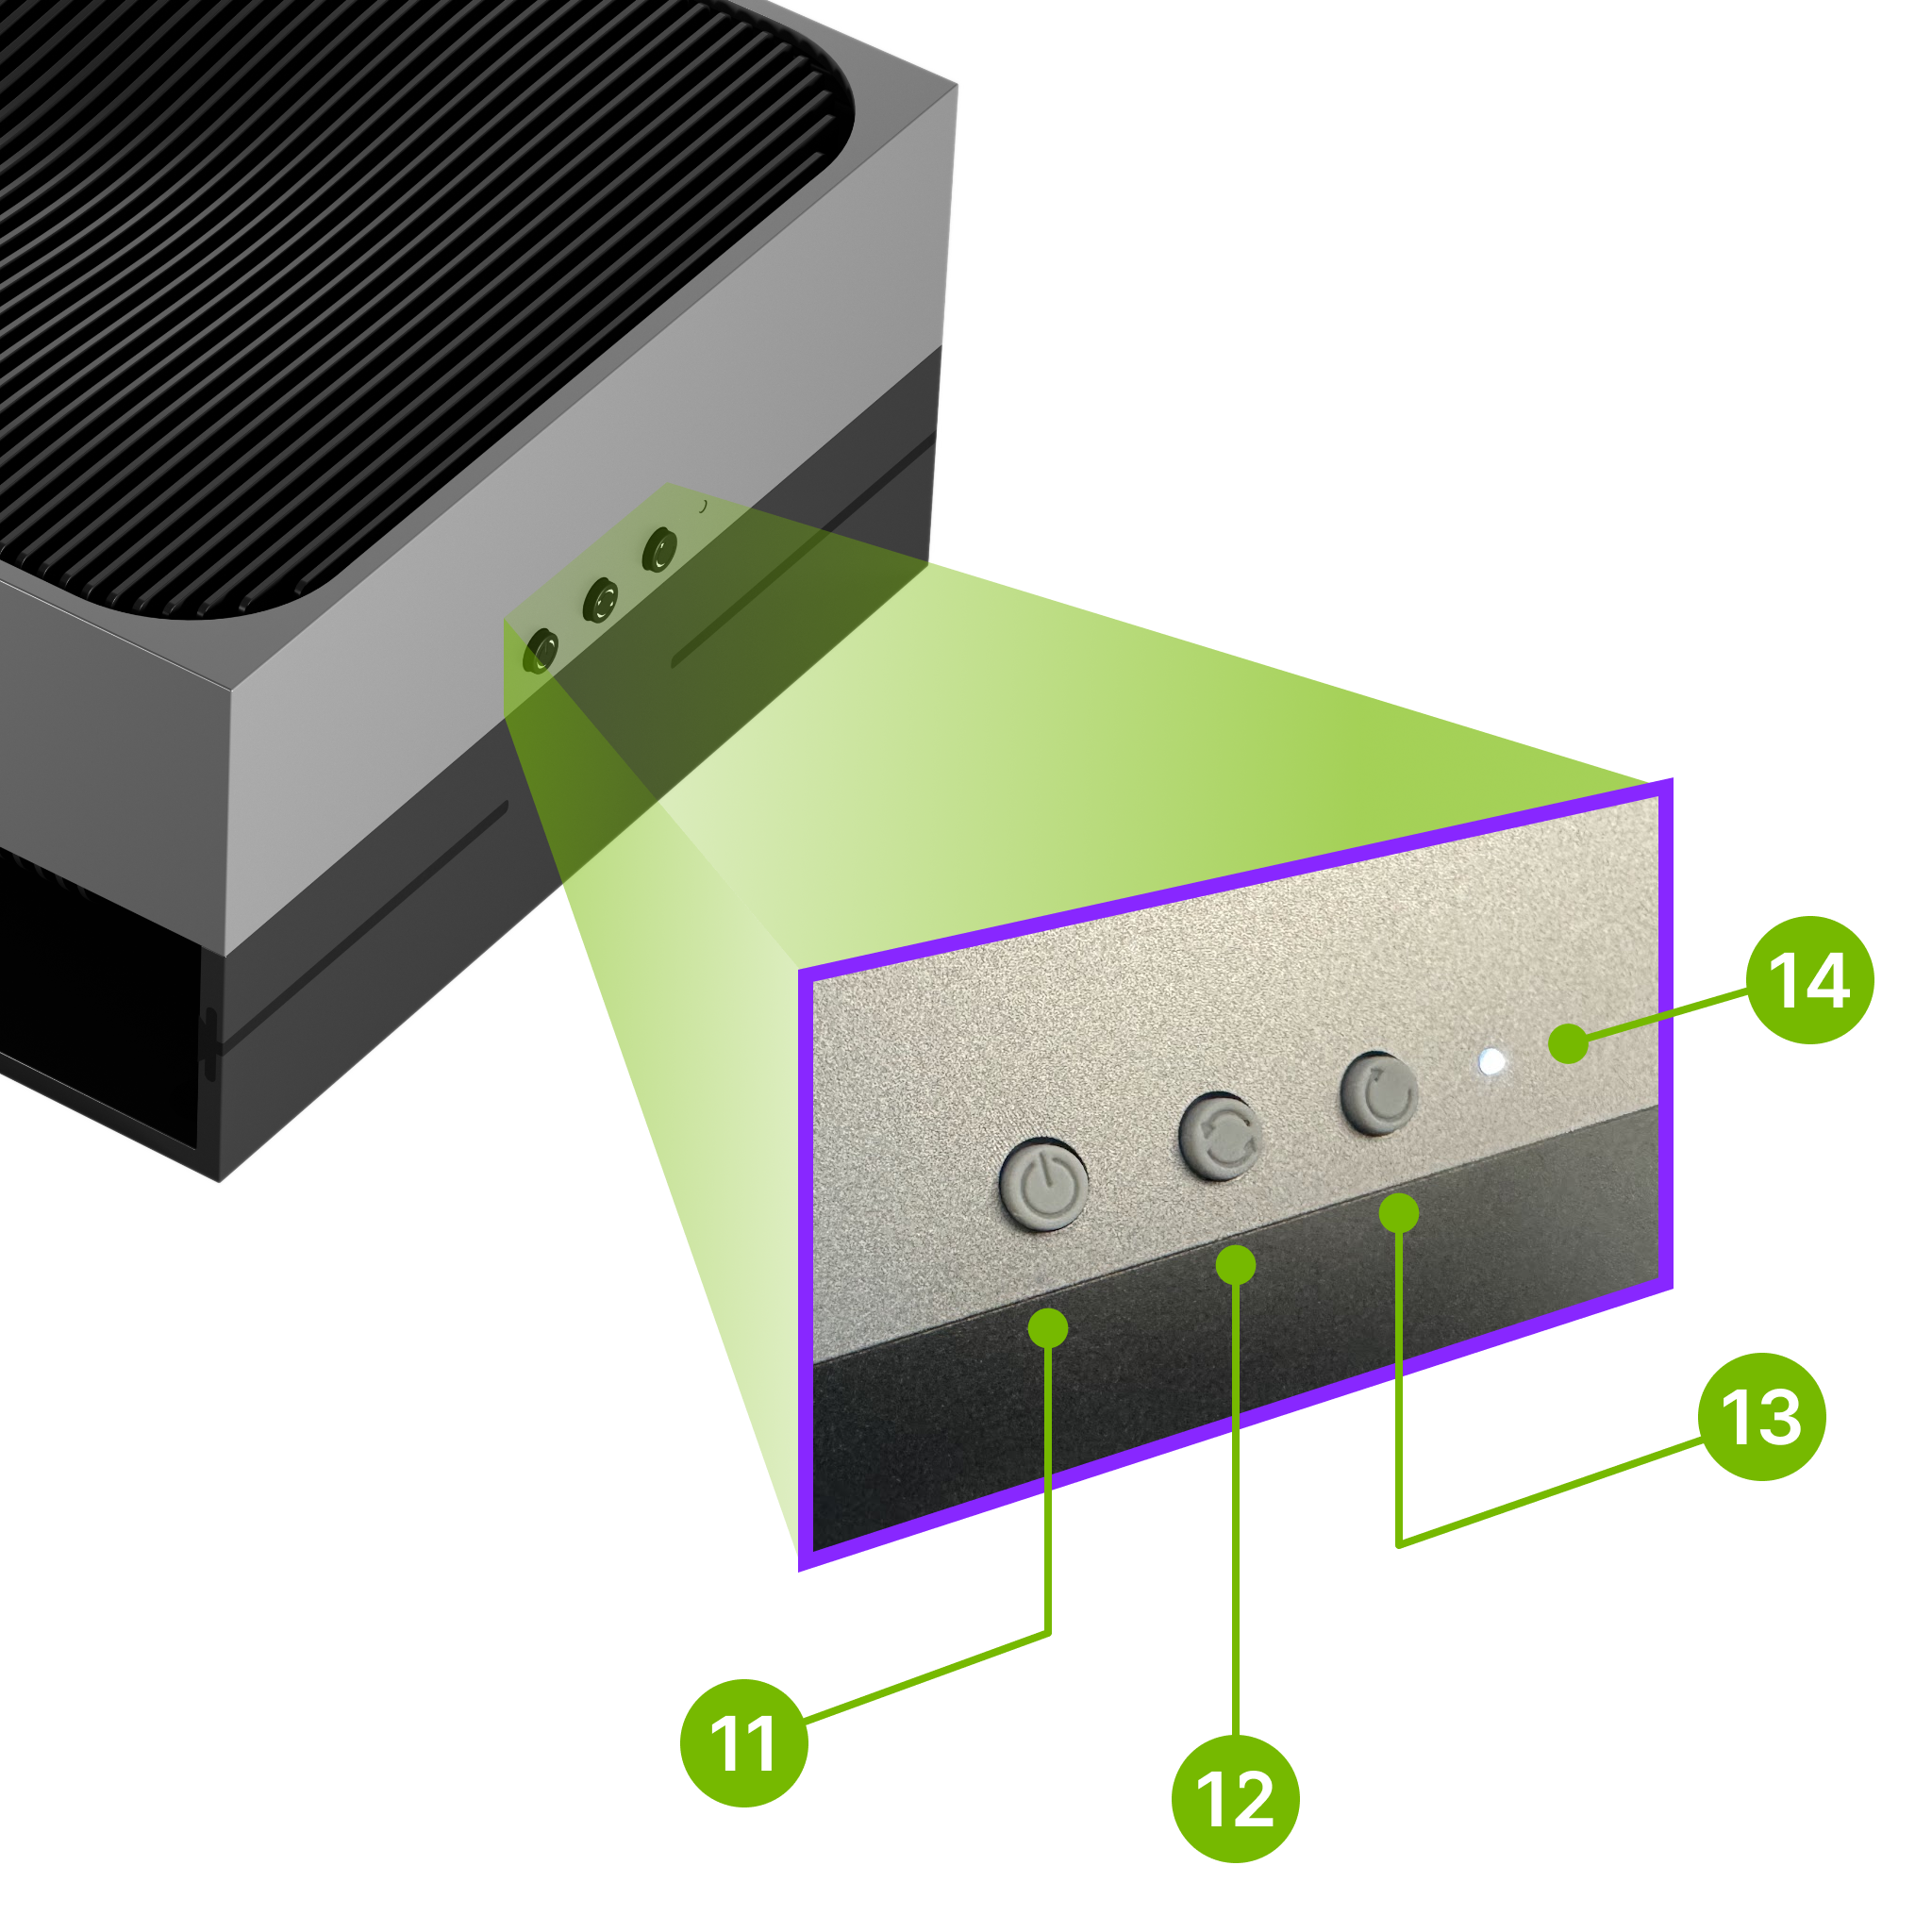
Button definitions in the image:
11: Power button12: Force Recovery button13: Reset button14: White LED
To enter recovery mode:
- Power off Thor.
- Connect the USB Type-C cable between the host PC and the Thor flashing port.
- Press and hold the Force Recovery button (
12). - While holding the Force Recovery button (
12), press the Power button (11) to power on the board. - Release the button after the board enters recovery mode.
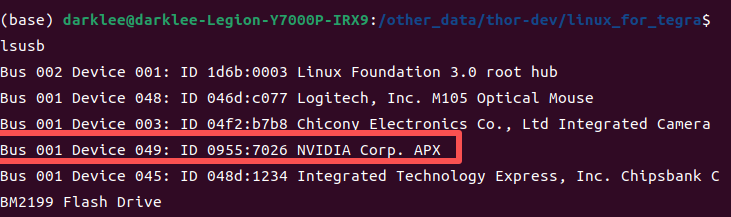
On the host PC, verify recovery mode with:
lsusb
Thor in USB recovery mode is typically enumerated as:
0955:7045
Reference image:
3. Build and Flash
Run the help command first:
cd /other_data/thor-dev/linux_for_tegra
./thor_build_flash.sh help
Default board settings are already configured for Thor J601:
CONFIG=jetson-agx-thor-devkitBOARDID=3834BOARDSKU=0008FAB=400BOARDREV=G.5CHIP_SKU=00:00:00:A0
Typical Flow
cd /other_data/thor-dev/linux_for_tegra

./thor_build_flash.sh prepare
./thor_build_flash.sh build
sudo -E ./thor_build_flash.sh flash
You can also run the full process in one shot:
./thor_build_flash.sh all
For the first flash, the split prepare -> build -> flash flow is recommended because it makes failures easier to identify.
Stage Meaning
-
prepare- Download the rootfs tarball
- Extract
rootfs/ - Run
apply_binaries.sh - Download and extract the cross toolchain
-
build- Compile the kernel and out-of-tree modules
- Copy the kernel image into
rootfs/boot/ - Run
rootfs_magic.sh - Update initrd
- Create the default user
-
flash- Call
l4t_initrd_flash.sh - Require the target board to be in USB recovery mode
- Call
Important Notes
- Run
buildas a normal user, not asroot. - Run
flashwithsudo -E. - Thor USB recovery mode is typically visible on the host as
0955:7045. - The script auto-fixes a missing
nvethernetrmsymlink before build.
Common Overrides
Use environment variables when you need to override defaults:
CONFIG=jetson-agx-thor-devkit \
DOWNLOAD_BASE_URL=http://192.168.1.77/jetson \
DEFAULT_USER=seeed \
DEFAULT_PASSWORD=seeed \
DEFAULT_HOSTNAME=jetson-test \
./thor_build_flash.sh build
Useful variables:
DOWNLOAD_BASE_URLROOTFS_NAMETOOLCHAIN_NAMEDEFAULT_USERDEFAULT_PASSWORDDEFAULT_HOSTNAMEFLASH_TARGETRUN_ROOTFS_MAGIC
4. Cleanup
Show help:
./thor_cleanup.sh help
Recommended Daily Cleanup
./thor_cleanup.sh incremental
This keeps source/kernel_out so the next compile remains fast, while removing:
output/bootloader/system.img*bootloader/esp.img*bootloader/recovery.img*bootloader/boot*.img- Flash temporary artifacts and logs
Cleanup Modes
-
incremental- Keep
source/kernel_out - Best choice for normal development
- Keep
-
rebuild- Also remove
source/kernel_out - The next build becomes a full rebuild
- Also remove
-
distclean- Also remove
rootfs/andl4t-gcc/ - Use only when archiving or fully resetting the environment
- Also remove
Dry Run
./thor_cleanup.sh incremental --dry-run
5. Optional Post-Flash Packages
After Thor boots successfully, you can optionally update package metadata and install the nvidia-jetpack meta-package:
sudo apt update
sudo apt install nvidia-jetpack
Troubleshooting
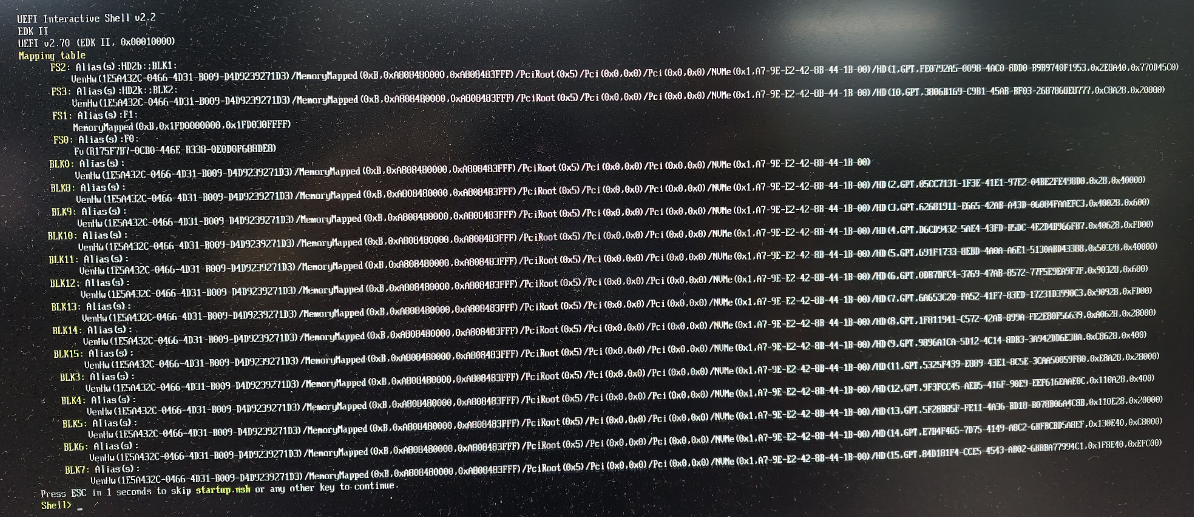
Boot shows an mmap error
If Thor does not boot normally and the screen shows an mmap error like the image below, re-enter USB recovery mode and reflash the board:
Run the following command from the flashing workspace:
cd /other_data/thor-dev/linux_for_tegra
sudo BOARDID=$BOARDID FAB=$FAB BOARDSKU=$BOARDSKU BOARDREV=$BOARDREV CHIP_SKU=$CHIP_SKU \
./l4t_initrd_flash.sh --erase-all jetson-agx-thor-devkit internal
If the mmap error persists after running the erase-and-reflash command above, collect the full boot log and contact support.
Resources
Tech Support & Product Discussion
Thank you for choosing our products! We are here to provide you with different support to ensure that your experience with our products is as smooth as possible. We offer several communication channels to cater to different preferences and needs.