How to Encrypt the Disk for Jetson
This wiki takes L4T 36.4.3 and reComputer J401 as examples, providing reference steps for Jetson disk encryption. The disk encryption process must be performed during flashing. If your disk needs to be encrypted, you will have to reconfigure and re-flash the system.
Before flashing, ensure that you have a properly built image source, as detailed in the following steps.
1. Prepare workspace
This section takes L4T 36.4.3 as an example to demonstrate how to build the source code project and compile it. The same process applies to other versions—simply replace the version number in the subsequent example commands with your desired build version.
Before getting start, you need to prepare an Ubuntu 20.04/22.04 PC host.
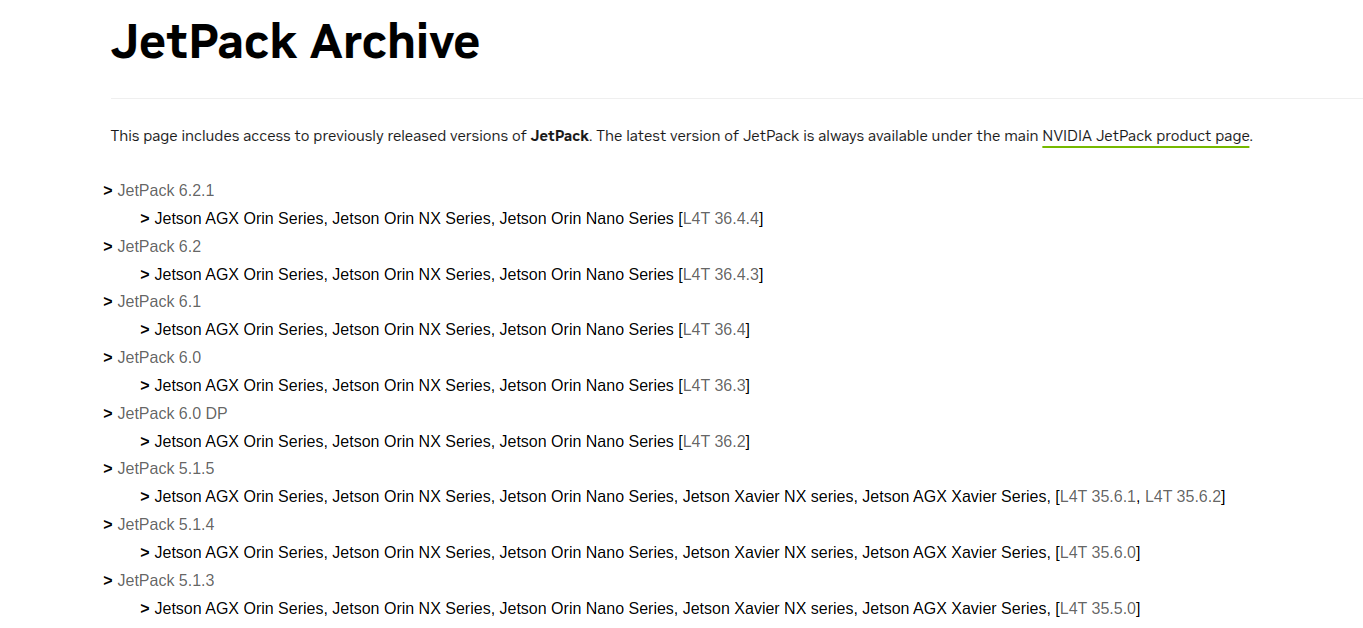
If you're unsure about the relationship between L4T versions and JetPack versions, you can refer to this link: https://developer.nvidia.com/embedded/jetpack-archive.
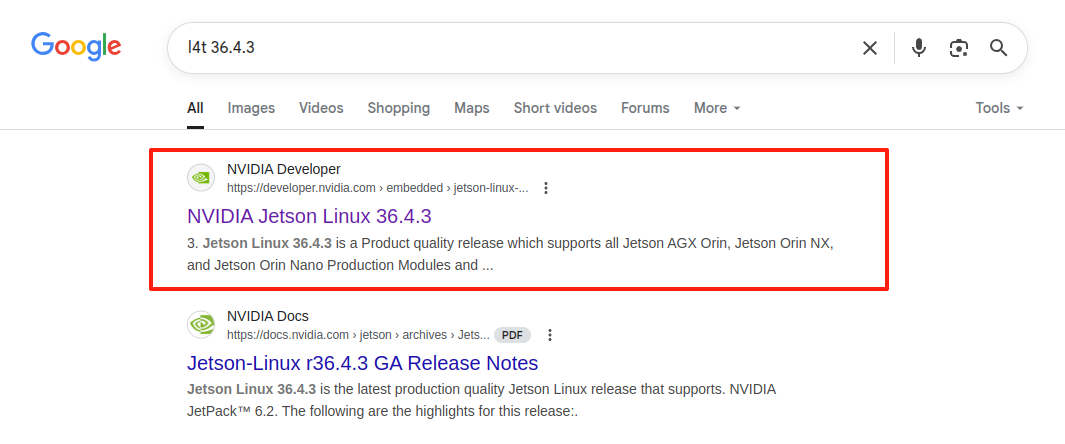
Search for the specific L4T (Linux for Tegra) release you want to compile, e.g.:
Extract the official BSP from NVIDIA, and you will get a directory named Linux_for_Tegra. Then, extract the root file system archive into the official Linux_for_Tegra directory:
tar xf Jetson_Linux_r36.4.3_aarch64.tbz2
sudo tar xpf Tegra_Linux_Sample-Root-Filesystem_r36.4.3_aarch64.tbz2 -C Linux_for_Tegra/rootfs/
Sync the source code for compiling. Replace the argument after -t with the L4T version you want:
cd Linux_for_Tegra/source/
./source_sync.sh -t jetson_36.4.3
Exit to the root directory of your workspace. Git clone the source code of your desired branch to your local machine using the following command
(replace -b <branch name> with the target branch):
sudo apt update
sudo apt install git-lfs
cd ../..
mkdir -p github/Linux_for_Tegra
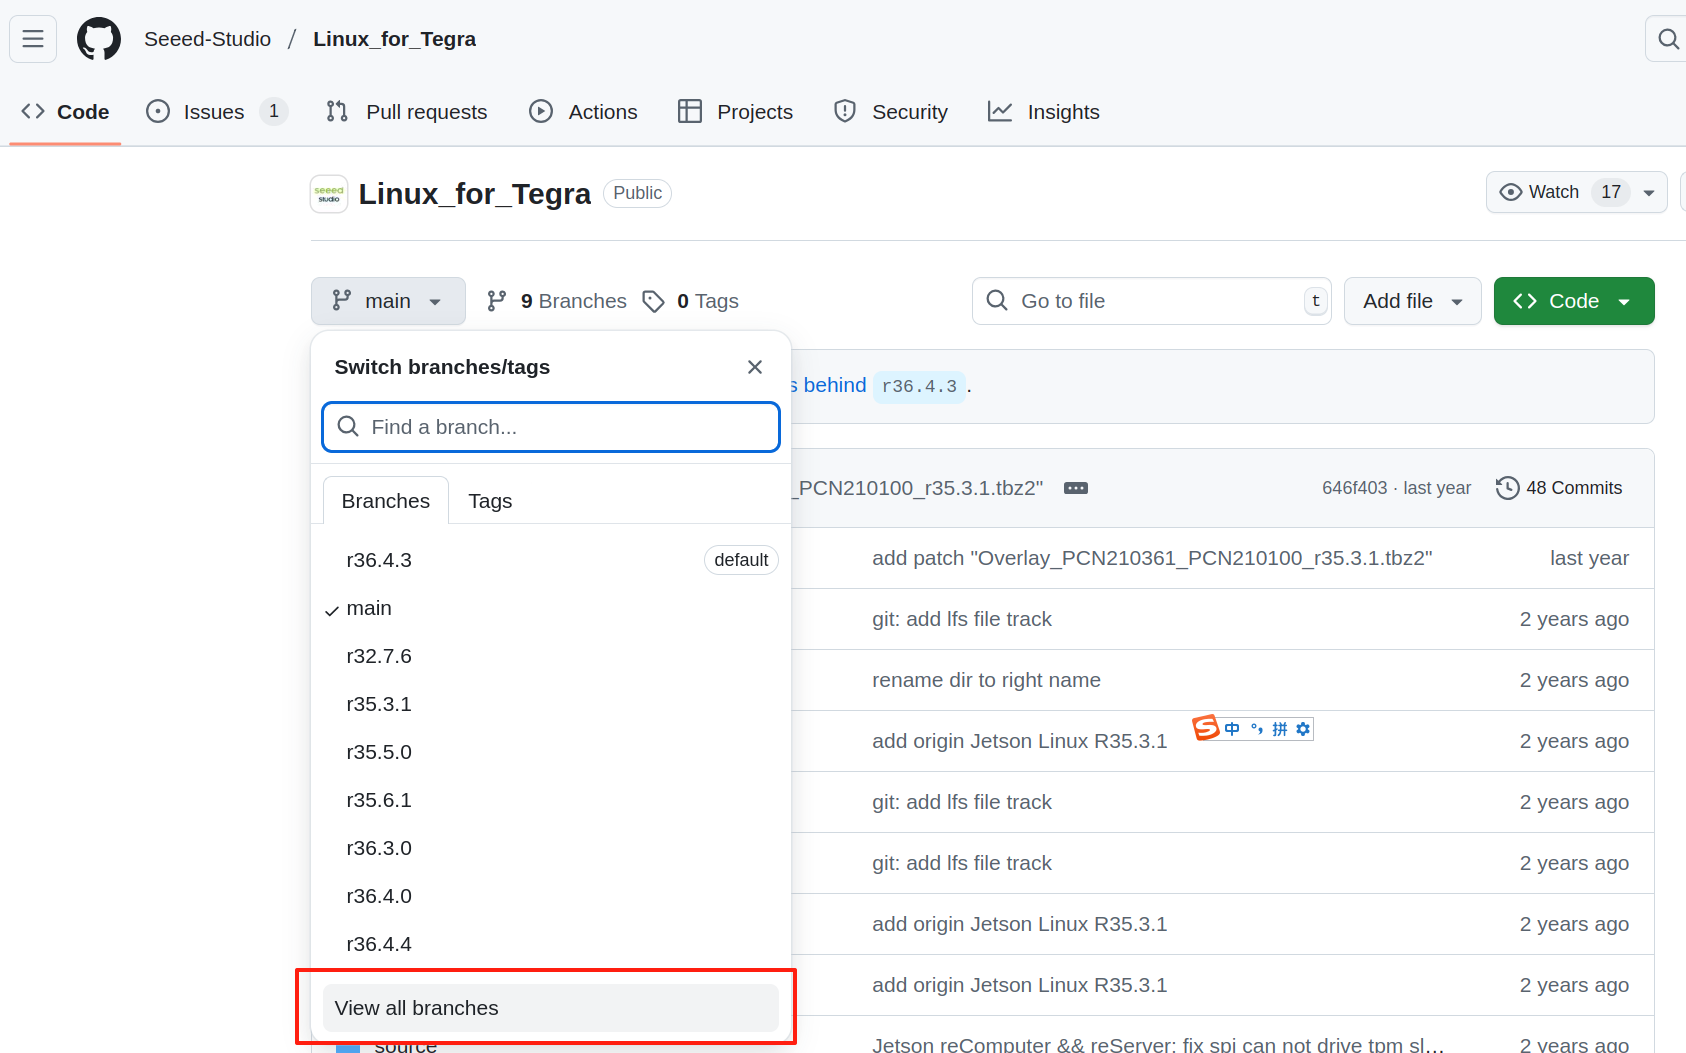
git clone https://github.com/Seeed-Studio/Linux_for_Tegra.git -b r36.4.3 --depth=1 github/Linux_for_Tegra
The BSP source code for Seeed's Jetson is available in this GitHub repository. You can check the different branches to find your desired L4T version, as each branch corresponds to a different L4T release.
Then overwrite the original source code:
cp -r github/Linux_for_Tegra/* Linux_for_Tegra/
Apply necessary changes to rootfs:
cd Linux_for_Tegra
sudo ./apply_binaries.sh
Install dependencies on your PC:
sudo apt-get update
sudo apt-get install build-essential flex bison libssl-dev
sudo apt-get install sshpass
sudo apt-get install abootimg
sudo apt-get install nfs-kernel-server
sudo apt-get install libxml2-utils
sudo apt-get install qemu-user-static
prepare work for kernel build:
mkdir -p l4t-gcc
tar xf aarch64--glibc--stable-2022.08-1.tar.bz2 -C ./l4t-gcc
export ARCH=arm64
export CROSS_COMPILE=/your_path/l4t-gcc/aarch64--glibc--stable-2022.08-1/bin/aarch64-buildroot-linux-gnu-
Compile and build kernel:
cd source
./nvbuild.sh
Install new kernel dtbs and drivers:
./do_copy.sh
export INSTALL_MOD_PATH=/your_path/Linux_for_Tegra/rootfs/
./nvbuild.sh -i
2. Encrypted File Generation and Flashing Guide
Enter the previously prepared and compiled source directory:
cd Linux_for_Tegra
Install dependencies:
sudo apt-get install python3-cryptography python3-cffi-backend libxml2-utils
sudo apt-get install python3-pycryptodome python3-crypto
sudo apt-get install cryptsetup


pip install cryptography
pip install pycrypto
pip install --user --upgrade pycryptodome
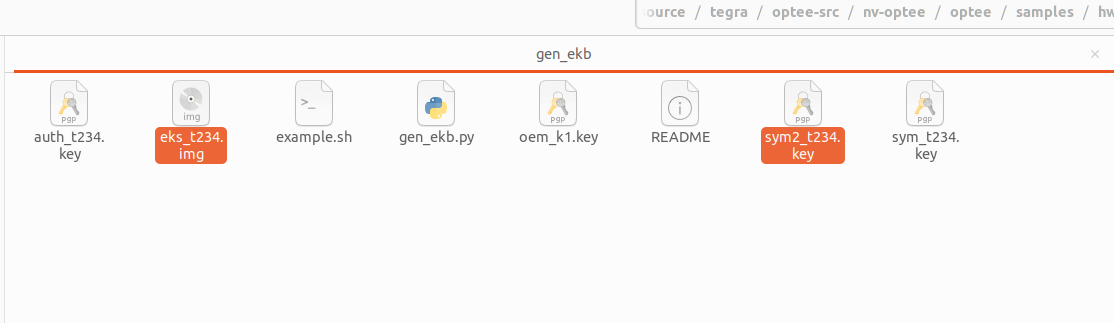
Generate encrypted files based on OPTEE. Execute the following commands to generate the encrypted files eks_t234.img and sym2_t234.key:
cd source/tegra/optee-src/nv-optee/optee/samples/hwkey-agent/host/tool/gen_ekb

openssl rand -hex 32 > sym_t234.key
openssl rand -hex 16 > sym2_t234.key
openssl rand -hex 16 > auth_t234.key
openssl rand -hex 32 > oem_k1.key

./example.sh
Copy the eks_t234.img and sym2_t234.key to the specified directories in your source folder:
cp eks_t234.img /your_path/cd Linux_for_Tegra/bootloader/
sudo cp sym2_t234.key /your_path/Linux_for_Tegra
The following example demonstrates how to generate the image using the reComputer J401 as an example:
sudo ./tools/kernel_flash/l4t_initrd_flash.sh \
  --network usb0 \
  --no-flash \
  --showlogs \
  -p "-c bootloader/generic/cfg/flash_t234_qspi.xml" \
  recomputer-orin-j401 \
  internal
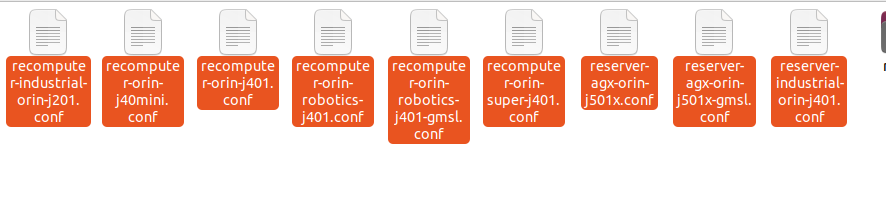
Replace recomputer-orin-j401 with the name of the device you are using. You need to provide a valid device name as a parameter, which you can find by checking the .conf filenames in the root directory of Linux_for_Tegra. The prefix of these filenames corresponds to the valid device name parameters.
For JetPack 5, since the file paths are different, you need to modify the -p parameter to:
-p "-c bootloader/t186ref/cfg/flash_t234_qspi.xml"
Therefore, the available device name parameters for L4T 36.4.3 are as follows. The j40 and j30 series use the same configuration file:
- recomputer-industrial-orin-j201 (recomputer-industrial-orin-j40/j30 also uses this
device nameas the parameter.) - recomputer-orin-j401
- reserver-agx-orin-j501x
- reserver-agx-orin-j501x-gmsl
- reserver-industrial-orin-j401
- recomputer-orin-j40mini
- recomputer-orin-robotics-j401
- recomputer-orin-super-j401
Copy eks_t234_sigheader.img.encrypt to the target directory:
sudo cp bootloader/eks_t234_sigheader.img.encrypt ./tools/kernel_flash/images/internal/
In the Linux_for_Tegra directory, run the following command to flash the encrypted root filesystem.
Again, replace recomputer-orin-j401 with the corresponding device name for your board.
sudo ROOTFS_ENC=1 \
./tools/kernel_flash/l4t_initrd_flash.sh \
  --external-device nvme0n1p1 \
  -i ./sym2_t234.key \
  -c tools/kernel_flash/flash_l4t_t234_nvme_rootfs_enc.xml \
  -S 80GiB \
  -p "-c bootloader/generic/cfg/flash_t234_qspi.xml" \
  --showlogs \
  --network usb0 \
  recomputer-orin-j401 internal
During this flashing process, the storage on your Jetson device will be encrypted.
Please make sure to keep the encryption files generated by OPTEE securely, as they will be required later for decryption.
3. Retrieve the Decryption Password
In the previously built source directory Linux_for_Tegra, copy the sym2_t234.key file to the following location:
cp source/tegra/optee-src/nv-optee/optee/samples/hwkey-agent/host/tool/gen_ekb/sym2_t234.key source/tegra/optee-src/nv-optee/optee/samples/luks-srv/host/tool/gen_luks_passphrase
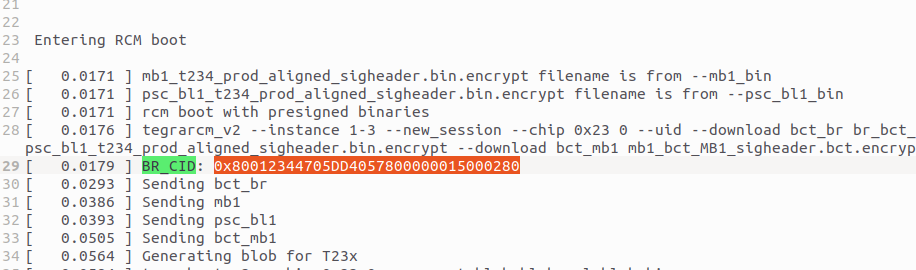
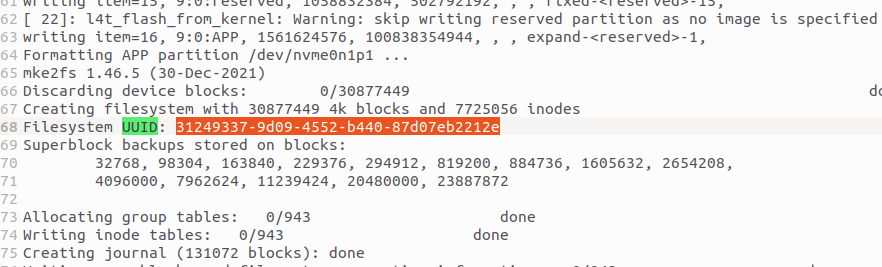
Then, generate the decryption password based on the UUID and BR_CID obtained during the flashing process:
cd source/tegra/optee-src/nv-optee/optee/samples/luks-srv/host/tool/gen_luks_passphrase


python3 gen_luks_passphrase.py -k sym2_t234.key -c "UUID of the disk" -u -e "BR_CID"
# For example
python gen_luks_passphrase.py -k sym2_t234.key -c "551df6eb-fa80-431c-bb54-121481e53bae" -u -e '0x80012344705E01D15C00000015020180'
The values of UUID and BR_CID can be found in the log files under Linux_for_Tegra/initrdlog.
Locate the corresponding log file based on the timestamp of your flashing operation to retrieve these values.
| BR CID | UUID |
|---|---|
 |  |
gen_luks_passphrase.pywill briefly display the decryption password in the terminal — please make sure to record it immediately before it disappears.

Resources
Tech Support & Product Discussion
Thank you for choosing our products! We are here to provide you with different support to ensure that your experience with our products is as smooth as possible. We offer several communication channels to cater to different preferences and needs.