How to establish communication between Jetson and EtherCAT devices
EtherCAT (Ethernet for Control Automation Technology) is an open-source, high-performance real-time Industrial Ethernet fieldbus protocol based on IEEE 802.3 Ethernet standards. It operates on a master-slave architecture and is renowned for its exceptional speed, precision, and flexibility in industrial automation environments
This document uses the recomputer robotics J401 as the EtherCAT master and the MyActuator X4 as the slave to demonstrate how to establish communication between a Jetson and EtherCAT devices.


1. Hardware connection
As the EtherCAT master, the Jetson typically uses its Ethernet interface to connect to EtherCAT slave devices.

Since many slave devices do not provide a standard Ethernet port, an adapter is often required to convert the Ethernet connection into a 4-pin interface (Tx+, Tx–, Rx+, Rx–).
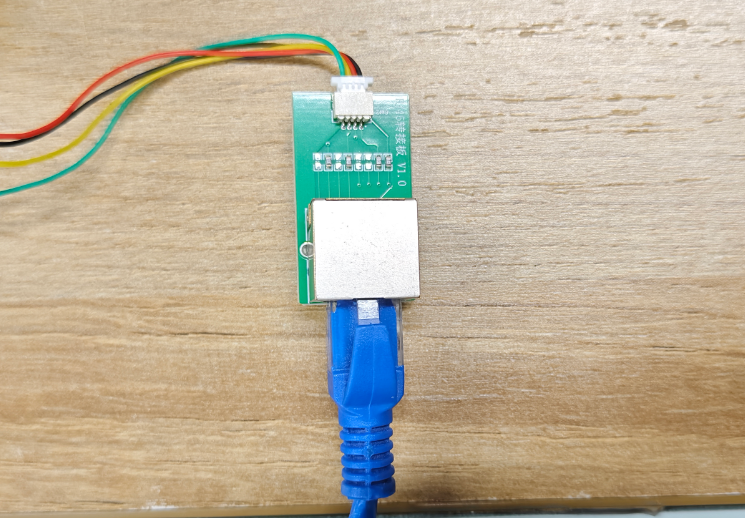
After establishing the physical EtherCAT connection, most slave devices still require additional external power.
2. Install driver of EtherCAT
This section uses L4T 36.4.3, which corresponds to JetPack 6.2 BSP, as an example to show how to install the driver of EtherCAT in Jetson.
Install the required dependencies for building the EtherCAT driver:
sudo apt update
sudo apt install build-essential cmake libtool autoconf automake
Pull the EtherCAT driver source code, then compile and install it:
git clone https://gitlab.com/etherlab.org/ethercat.git
cd ethercat

./bootstrap # to create the configure script, if downloaded from the repo

./configure --sysconfdir=/etc
make all modules
sudo make modules_install install
sudo depmod -a
To verify that the driver has been installed successfully, run the following command.
You should see the two kernel modules ec_master and ec_generic:
sudo lsmod | grep "ec_"

3. Configuration of EtherCAT
After installing the EtherCAT driver, several configurations are required to activate communication between the master and the slave devices.
First, edit the configuration file at /etc/ethercat.conf:
sudo vim /etc/ethercat.conf
Modify the two parameters at /etc/ethercat.conf according to the name of the Ethernet interface connected to the Jetson:
MASTER0_DEVICE="eno1"  # Replace eno1 with the Ethernet interface used for EtherCAT
DEVICE_MODULES="generic"
Replace eno1 with the Ethernet interface used for EtherCAT. You can use the ifconfig command to check the name of your interface.
After restarting the EtherCAT service, you should see the EtherCAT master device appear in the /dev directory:
sudo systemctl restart ethercat
ls /de/EtherCAT*

(optional) If /dev/EtherCAT is not found, try loading the kernel modules manually:
sudo modprobe ec_master devices="eno1"  # Replace eno1 with the Ethernet interface used for EtherCAT
sudo modprobe ec_generic
sudo systemctl restart ethercat
Replace eno1 with the Ethernet interface used for EtherCAT.
(optional) Sometimes the Ethernet interface used for EtherCAT may be occupied by NetworkManager. You can release it using the following commands:
sudo nmcli dev set eno1 managed no  # Replace eno1 with the Ethernet interface used for EtherCAT
sudo nmcli dev set eno1 managed on  # Replace eno1 with the Ethernet interface used for EtherCAT
Replace eno1 with the Ethernet interface used for EtherCAT.
4. Test communication between Jetson and EtherCAT slave
After confirming that the EtherCAT master node is correctly initialized on the Jetson and the hardware connections are properly established, you can test the communication between the Jetson and the EtherCAT devices in the terminal.
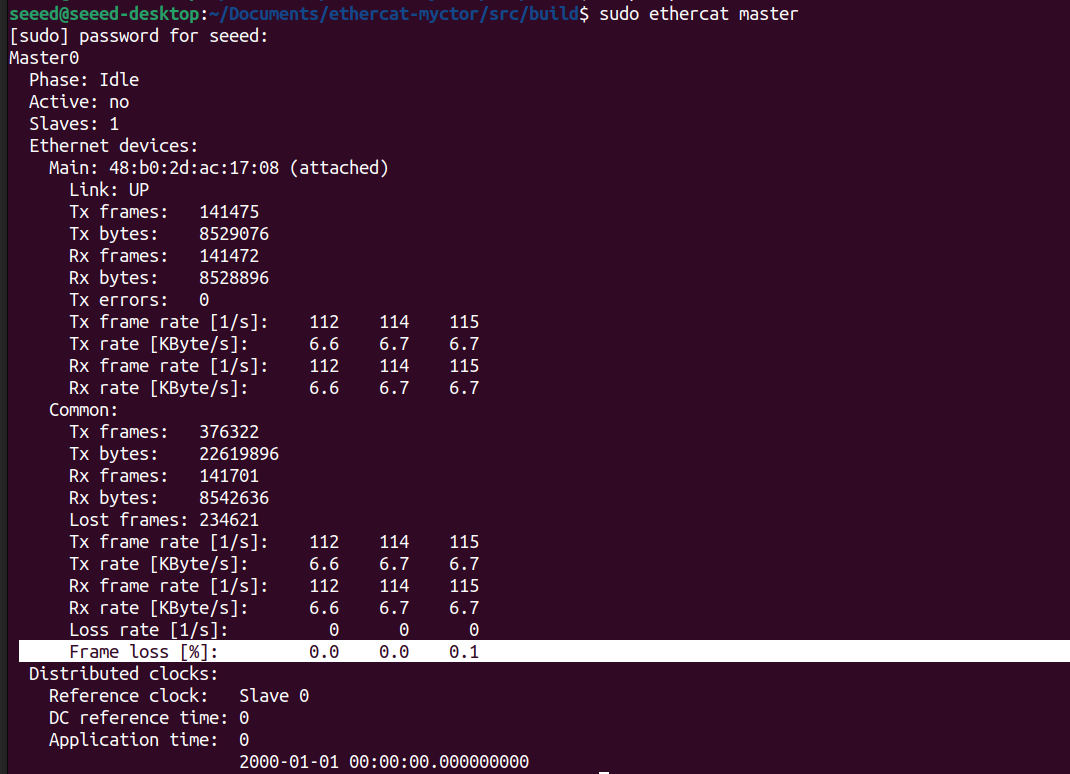
Scan for EtherCAT devices and test data transmission to check whether the packet loss rate is within a normal range:
sudo ethercat rescan
sudo ethercat master
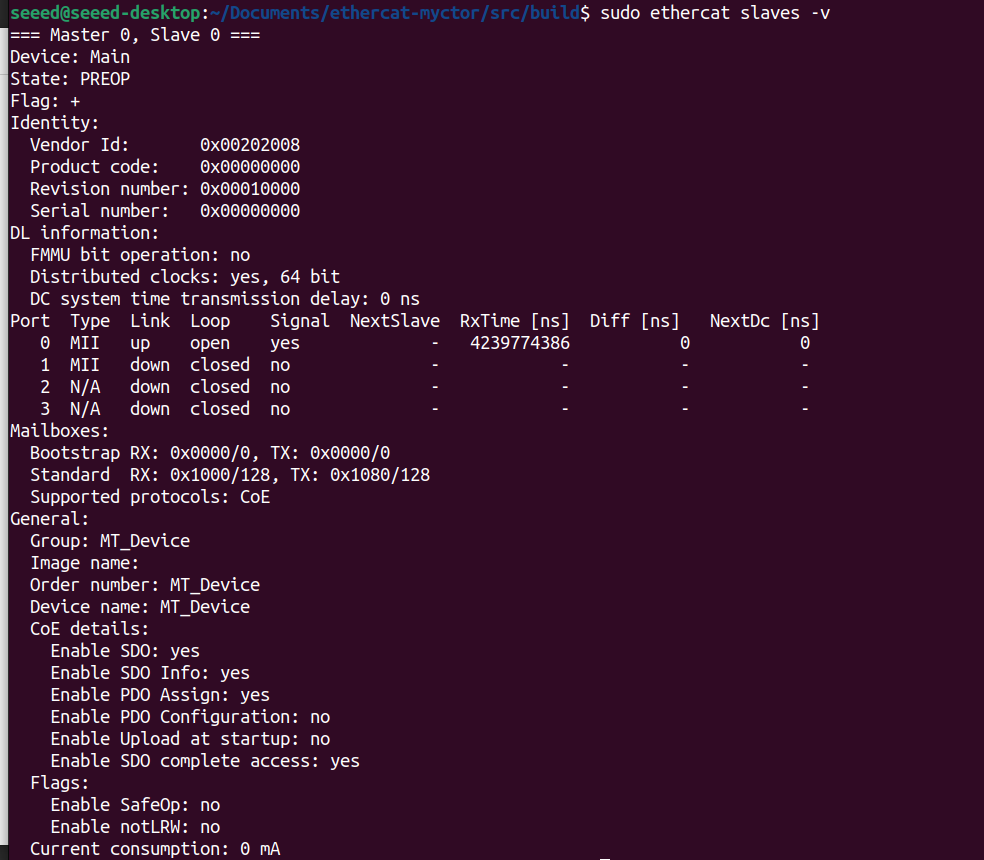
List all EtherCAT devices on the bus:
sudo ethercat rescan
sudo ethercat slaves -v
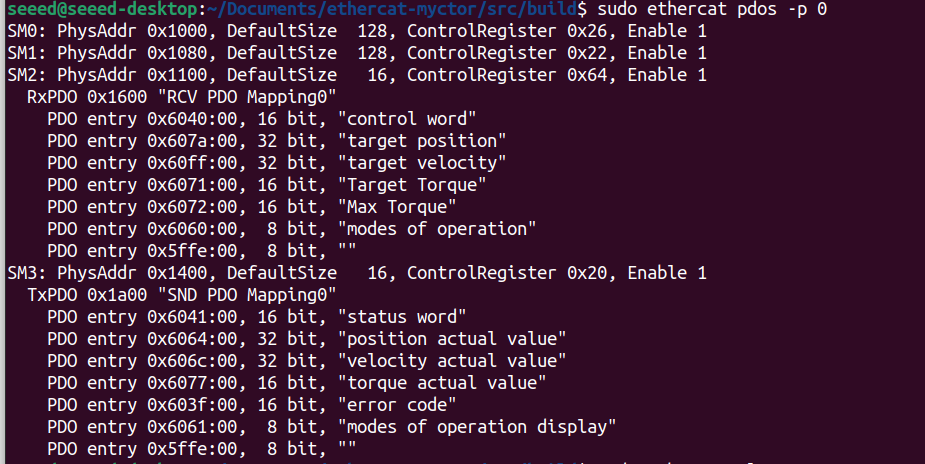
View the issue of EtherCAT device with index 0:
sudo ethercat rescan
sudo ethercat pdos -p 0 #0 to n
The parameter after -p can be any value from 0 to n.
5. Example – Controlling an EtherCAT Motor on Jetson (MyActuator X4)
Based on the configuration and verification steps in the previous sections, you should now be able to control an EtherCAT motor using a Jetson device.
In this section, we use the MyActuator X4 as an example to demonstrate how to control an EtherCAT motor from the Jetson.
This section is for reference only. Each EtherCAT motor uses a different communication protocol, so you will need to adapt the example according to the protocol used by your specific device.
This example provides sample code for controlling a MyActuator X4 EtherCAT motor. Download and compile it from GitHub:
git clone https://github.com/jjjadand/ethercat-myctor.git
cd src/build
cmake ..
make
The example is implemented based on the EtherCAT-Master, The flowchart of the program is shown below:
Program Flowchart
                     ┌──────────────────────────────────────┐
                     │        1. Master Initialization        │
                     ├──────────────────────────────────────┤
                     │ ecrt_request_master()                 │
                     │ ecrt_master_create_domain()           │
                     │ ecrt_master_slave_config()            │
                     │ Configure Distributed Clock (DC)      │
                     │ Register PDO entries (RxPDO/TxPDO)    │
                     │ ecrt_master_activate()                │
                     │ Get domain memory pointer             │
                     └──────────────────────────────────────┘
                                      │
                                      ▼
                     ┌──────────────────────────────────────┐
                     │      2. PREOP  →  SAFEOP Transition   │
                     ├──────────────────────────────────────┤
                     │ Slave boots in PREOP                 │
                     │ Master exchanges SDO if needed       │
                     │ (optional: set 0x6060 = CSP)         │
                     │ DC start time prepared               │
                     └──────────────────────────────────────┘
                                      │
                                      ▼
                     ┌──────────────────────────────────────┐
                     │      3. SAFEOP → OP Transition       │
                     ├──────────────────────────────────────┤
                     │ Domain becomes active (WKC > 0)      │
                     │ Application loop starts running      │
                     │ Master supplies application time     │
                     │ Master synchronizes DC clocks        │
                     │ Slave goes OP (operational)          │
                     └──────────────────────────────────────┘
                                      │
                                      ▼
                     ┌──────────────────────────────────────┐
                     │        4. CiA-402 State Machine       │
                     ├──────────────────────────────────────┤
                     │ Write ControlWord = 0x0006 (Shutdown)│
                     │ Wait READY_TO_SWITCH_ON              │
                     │ Write ControlWord = 0x0007 (SwitchOn)│
                     │ Wait SWITCHED_ON                     │
                     │ Write ControlWord = 0x000F (EnableOp)│
                     │ Wait OPERATION_ENABLED               │
                     └──────────────────────────────────────┘
                                      │
                                      ▼
                     ┌──────────────────────────────────────┐
                     │     5. Enter CSP Motion Operation     │
                     ├──────────────────────────────────────┤
                     │ Write Mode of Operation (0x6060=8)   │
                     │ Read Actual Position (0x6064)        │
                     │ Initialize Target Position (607A)    │
                     └──────────────────────────────────────┘
                                      │
                                      ▼
                     ┌──────────────────────────────────────┐
                     │     6. Real-Time Cyclic Operation     │
                     ├──────────────────────────────────────┤
                     │ loop at 1 kHz (or higher):           │
                     │   - Sleep until next cycle           │
                     │   - ecrt_master_application_time()   │
                     │   - ecrt_master_sync_reference_clock │
                     │   - ecrt_master_sync_slave_clocks    │
                     │   - Receive / process domain         │
                     │   - Generate new target position     │
                     │   - Write ControlWord = 0x000F       │
                     │   - Write OperationMode = 8 (CSP)     │
                     │   - Write new TargetPosition         │
                     │   - Queue & send domain              │
                     └──────────────────────────────────────┘
                                      │
                                      ▼
                     ┌──────────────────────────────────────┐
                     │     7. Monitoring & Fault Handling    │
                     ├──────────────────────────────────────┤
                     │ Read status word (0x6041) each cycle │
                     │ Detect faults (bit3)                 │
                     │ Detect target reached (0x0400)       │
                     │ Optionally read torque/velocity      │
                     │ Execute FAULT RESET if needed        │
                     └──────────────────────────────────────┘
                                      │
                                      ▼
                     ┌──────────────────────────────────────┐
                     │             8. Shutdown               │
                     ├──────────────────────────────────────┤
                     │ Stop real-time thread               │
                     │ Write ControlWord=0 (disable)       │
                     │ Release EtherCAT master             │
                     └──────────────────────────────────────┘
When controlling an EtherCAT motor on Jetson without a real-time kernel, it is recommended to lock the CPU frequency to ensure stable synchronization with the EtherCAT device.
After compiling the example, run the following commands in the terminal:
sudo jetson_clocks # lock CPU frequency for stability
sudo ./ethercat_master
After executing the program, wait for about two seconds — the motor will begin to move in a loop.
Resources
Tech Support & Product Discussion
Thank you for choosing our products! We are here to provide you with different support to ensure that your experience with our products is as smooth as possible. We offer several communication channels to cater to different preferences and needs.