Install Pytorch for reComputer Jetson
This wiki demonstrates how to install NVIDIA-optimized PyTorch on your reComputer, matching your JetPack version. It also covers how to use virtual environments (conda) to manage multiple PyTorch versions for development and deployment.
Prerequisites
- reComputer with JetPack installed
- Internet connection
Install PyTorch for reComputer
Here, we will introduce how to install PyTorch with CUDA support in the two commonly used versions of Jetpack 5 and Jetpack 6.
- JP5.1.3
- JP6.2
- Other Version
In reComputer, the commonly used version of Jetpack 5 is 5.1.3. Here, we will use it to introduce how to install PyTorch.
Step 1. Update system and install dependencies:
sudo apt-get -y update
sudo apt-get install -y python3-pip libopenblas-dev
Step 2. Download the official PyTorch wheel (example: torch-2.1.0 for JetPack 5.1.3, Python 3.8):
wget https://developer.download.nvidia.com/compute/redist/jp/v512/pytorch/torch-2.1.0a0+41361538.nv23.06-cp38-cp38-linux_aarch64.whl
pip install torch-2.1.0a0+41361538.nv23.06-cp38-cp38-linux_aarch64.whl
If you need a more recent version of torch that supports Jetpack 5.1.3, please download the compiled wheel file from here (torch-2.2 for python3.8).
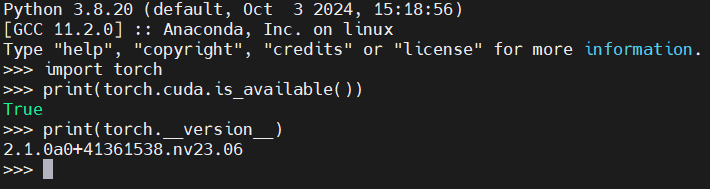
Step 3. Verify installation:
import torch
print(torch.cuda.is_available())
print(torch.__version__)
In reComputer, the commonly used version of Jetpack 6 is 6.2. Here, we will use it to introduce how to install PyTorch.
Step 1. Update system and install dependencies:
sudo apt-get -y update
sudo apt-get install -y python3-pip libopenblas-dev
Step 2. Install cuSPARSELt from here (required for PyTorch 24.06+):
cuSPARSELt is a high-performance CUDA library developed by NVIDIA specifically for sparse matrix multiplication. It is mainly used to accelerate matrix multiplication operations under sparse weights, which are commonly seen in large model inference and sparse neural networks. In the new version of PyTorch(PyTorch 24.06+), it will automatically call cusparselt to improve the inference speed of sparse models, especially on embedded GPUs like Jetson, which can significantly enhance efficiency.
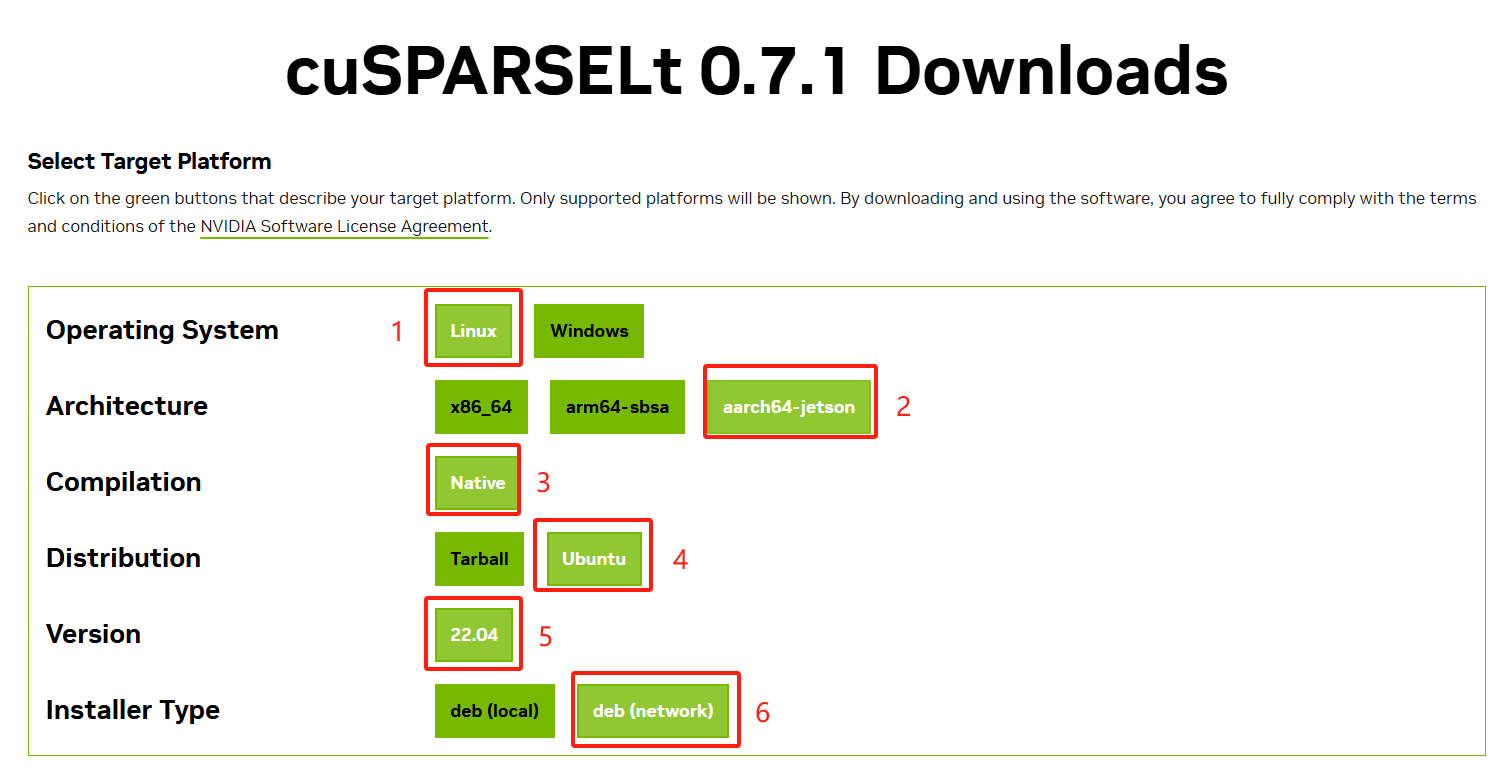
Step 3. According to the version selected as shown in the above figure, you will obtain the following installation command:
wget https://developer.download.nvidia.com/compute/cusparselt/0.7.1/local_installers/cusparselt-local-tegra-repo-ubuntu2204-0.7.1_1.0-1_arm64.deb
sudo dpkg -i cusparselt-local-tegra-repo-ubuntu2204-0.7.1_1.0-1_arm64.deb
sudo cp /var/cusparselt-local-tegra-repo-ubuntu2204-0.7.1/cusparselt-*-keyring.gpg /usr/share/keyrings/
sudo apt-get update
sudo apt-get -y install libcusparselt0 libcusparselt-dev
Step 4. Download and install PyTorch (example: torch-2.5.0 for JetPack 6.2, Python 3.10):
wget https://developer.download.nvidia.cn/compute/redist/jp/v61/pytorch/torch-2.5.0a0+872d972e41.nv24.08.17622132-cp310-cp310-linux_aarch64.whl
pip install torch-2.5.0a0+872d972e41.nv24.08.17622132-cp310-cp310-linux_aarch64.whl
If you need a more recent version of torch that supports Jetpack 6.2, please download the compiled wheel file from here (torch-2.7 for python3.10).
Step 5. Verify installation:
import torch
print(torch.cuda.is_available())

Step 1. Update system and install dependencies:
sudo apt-get -y update
sudo apt-get install -y python3-pip libopenblas-dev
Here is the officially provided compiled wheel file of PyTorch with CUDA support by NVIDIA.
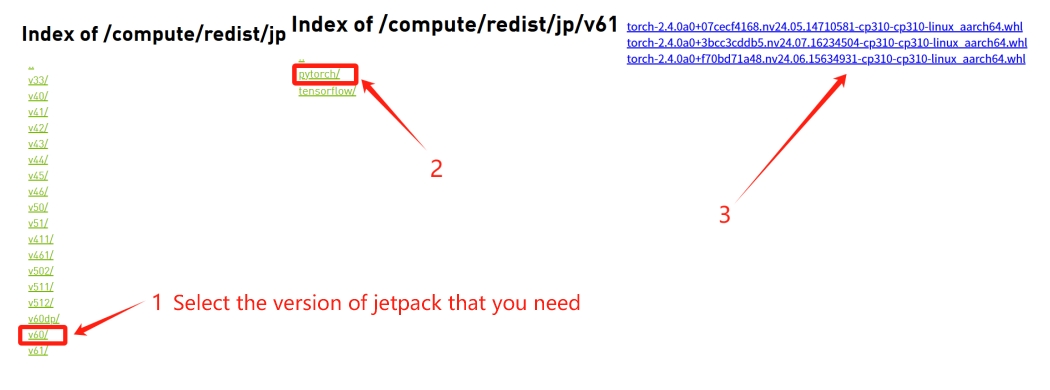
Step 2. Download the appropriate wheel file based on your JetPack version and Python version.
# Download the wheel file
wget https://developer.download.nvidia.cn/compute/redist/jp/v60/pytorch/torch-2.4.0a0+f70bd71a48.nv24.06.15634931-cp310-cp310-linux_aarch64.whl
# Install the wheel file
pip install torch-2.4.0a0+f70bd71a48.nv24.06.15634931-cp310-cp310-linux_aarch64.whl
Step 3. Verify installation:
import torch
print(torch.cuda.is_available())
Multiple PyTorch Versions with Conda
Miniconda is a lightweight installer for the Conda package manager, providing a minimal environment to quickly create and manage Python environments and packages.
Step 1. Install Miniconda:
wget https://repo.anaconda.com/miniconda/Miniconda3-latest-Linux-aarch64.sh
bash Miniconda3-latest-Linux-aarch64.sh
- Follow the instructions and enter "yes" to agree to the terms.
- The installation path is recommended to use the default setting, such as ~/miniconda3.
- Finally, it prompts whether to automatically add to .bashrc. It is recommended to enter "yes".
Step 2. Initialize and configure conda:
source ~/.bashrc
# Verify if conda is functioning properly
conda --version
# Disable automatic entry into the conda base environment
conda config --set auto_activate_base false
# Close and reopen the terminal. By default, it will not enter the base environment.
Step 3. Create a new environment and install a specific PyTorch wheel:
conda create -n torch_2.0 python=3.8
conda activate torch_2.0
Step 4. Download and install the PyTorch wheel file as shown in the previous sections.
For more details, see the NVIDIA PyTorch installation guide
Resources
Tech Support & Product Discussion
Thank you for choosing our products! We are here to provide you with different support to ensure that your experience with our products is as smooth as possible. We offer several communication channels to cater to different preferences and needs.