Integrate Watcher to Home Assistant
This tutorial does not apply to the Xiaozhi firmware version.
For Xiaozhi firmware, please visit the Xiaozhi Watcher Guide for detailed instructions.
The integration of artificial intelligence (AI) has revolutionized the world of smart home technology, and Watcher, a cutting-edge AI-powered device, has emerged as a game-changer. By seamlessly integrating Watcher with Home Assistant, a popular open-source home automation platform, users can unlock a new level of convenience, security, and efficiency in their smart homes.
In this comprehensive wiki, we will guide you through the process of integrating Watcher with Home Assistant, enabling you to harness the full potential of AI in your smart home setup. Whether you're a seasoned Home Assistant user or a newcomer to home automation, this integration opens up a realm of exciting possibilities, allowing your home to become smarter, more responsive, and tailored to your unique needs.
Below is the main content framework of this article.
- Installing the HACS plugin: Install the Home Assistant Community Store (HACS) to enable the installation of Seeed Studio's SenseCraft plugin within Home Assistant.
- Installing the SenseCraft plugin: Install the SenseCraft plugin by Seeed Studio, which allows for the swift deployment of Seeed Studio's products into Home Assistant.
- Integrate SenseCAP Watcher into Home Assistant: Integrate SenseCAP Watcher into Home Assistant and set up a visual dashboard for configuration.
Getting Started
Before the tutorial content of this article begins, you may need to have the following hardware ready.
Materials Required
| SenseCAP Watcher | Home Assistant Green |
|---|---|
 |  |
Home Assistant Green is the easiest and most privacy-focused way to automate your home. It offers an effortless setup and allows you to control all the smart devices with just one system, where all the data is stored locally by default. This board benefits from the thriving Home Assistant ecosystem and it will be improved every month by open source.
We recommend using Home Assistant Green as the Home Assistant host for this tutorial, or you can use any Home Assistant host with a Supervisor.
Installing the HACS plugin
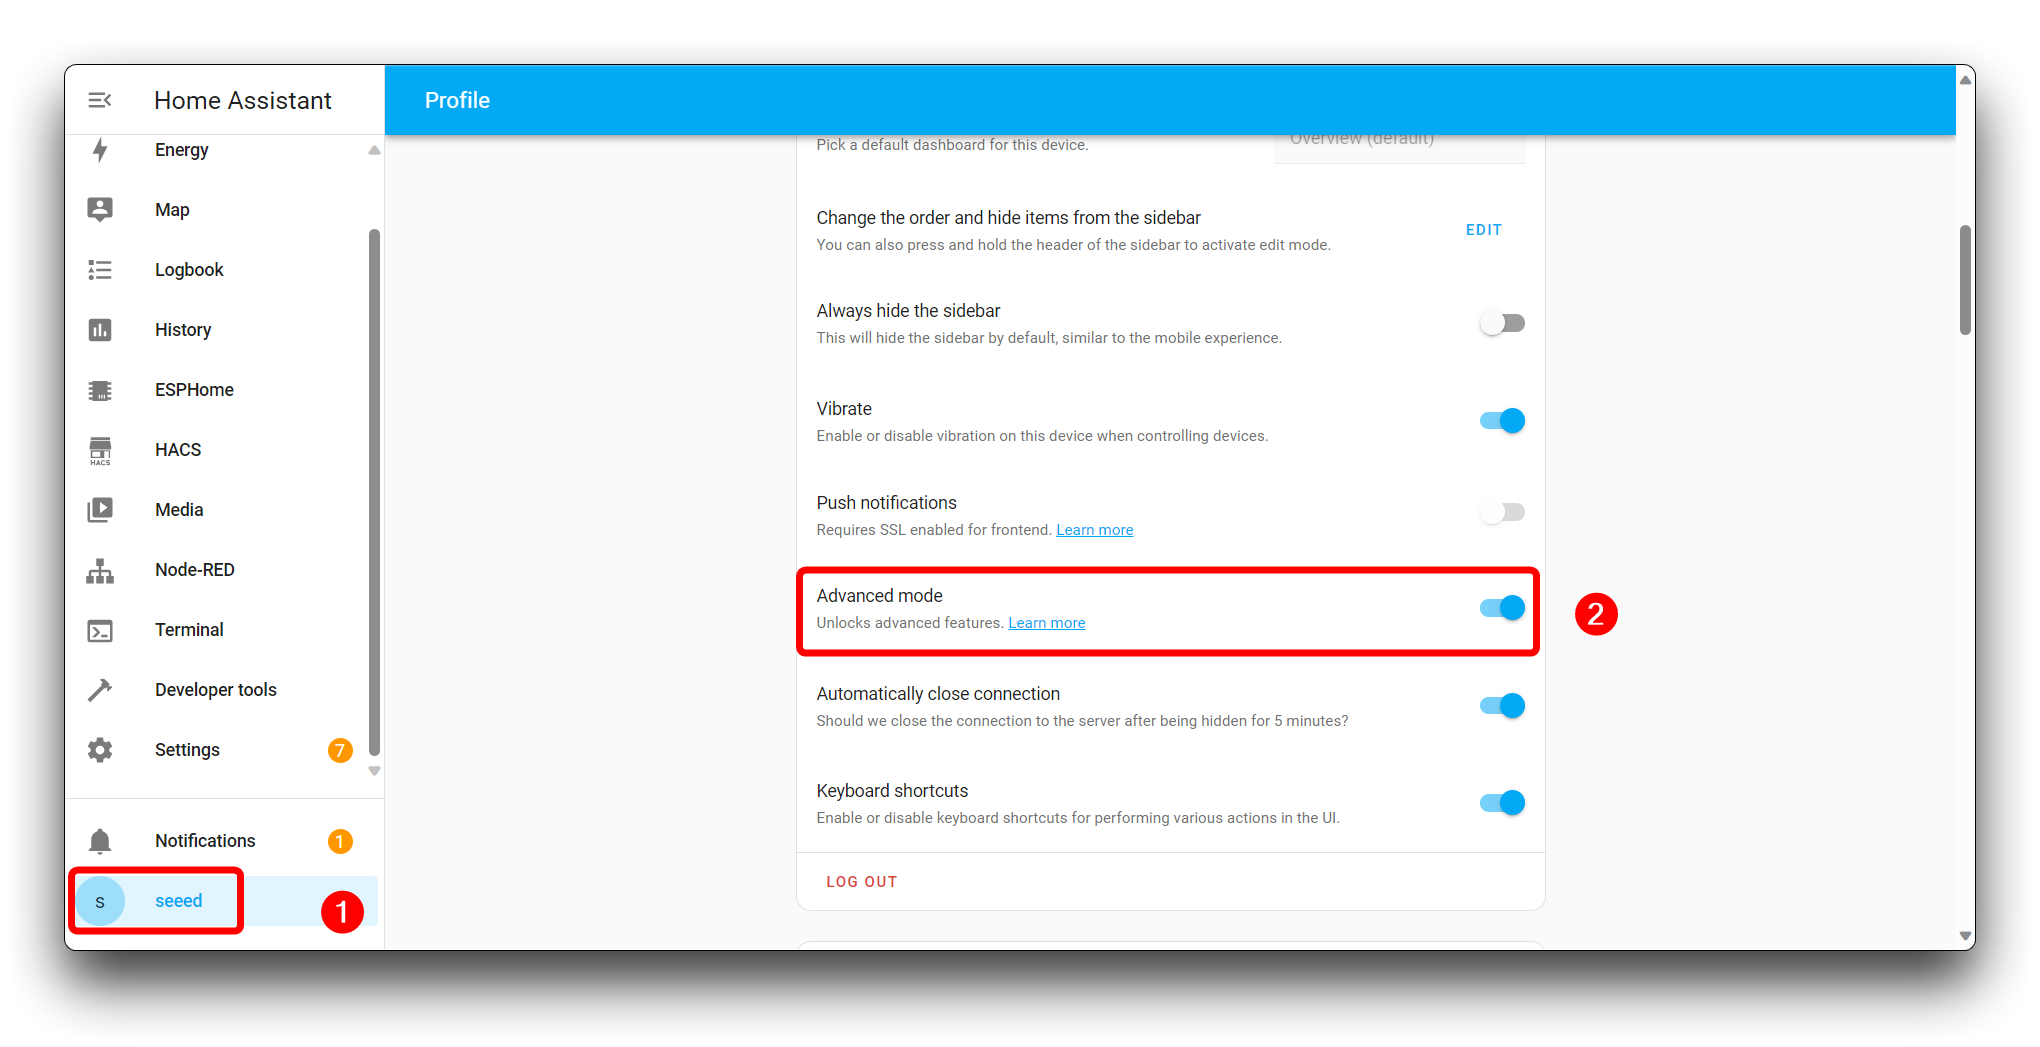
Step 1. Open Advanced Mode in Home Assistant
To unlock the full potential of Home Assistant and gain access to advanced features, you can enable "Advanced Mode" in the user interface.
Navigate to your Home Assistant web interface. Click on your profile icon at the bottom left corner of the Home Assistant sidebar. On your profile page, scroll down to find the Advanced Mode toggle. Switch the toggle to the on position.
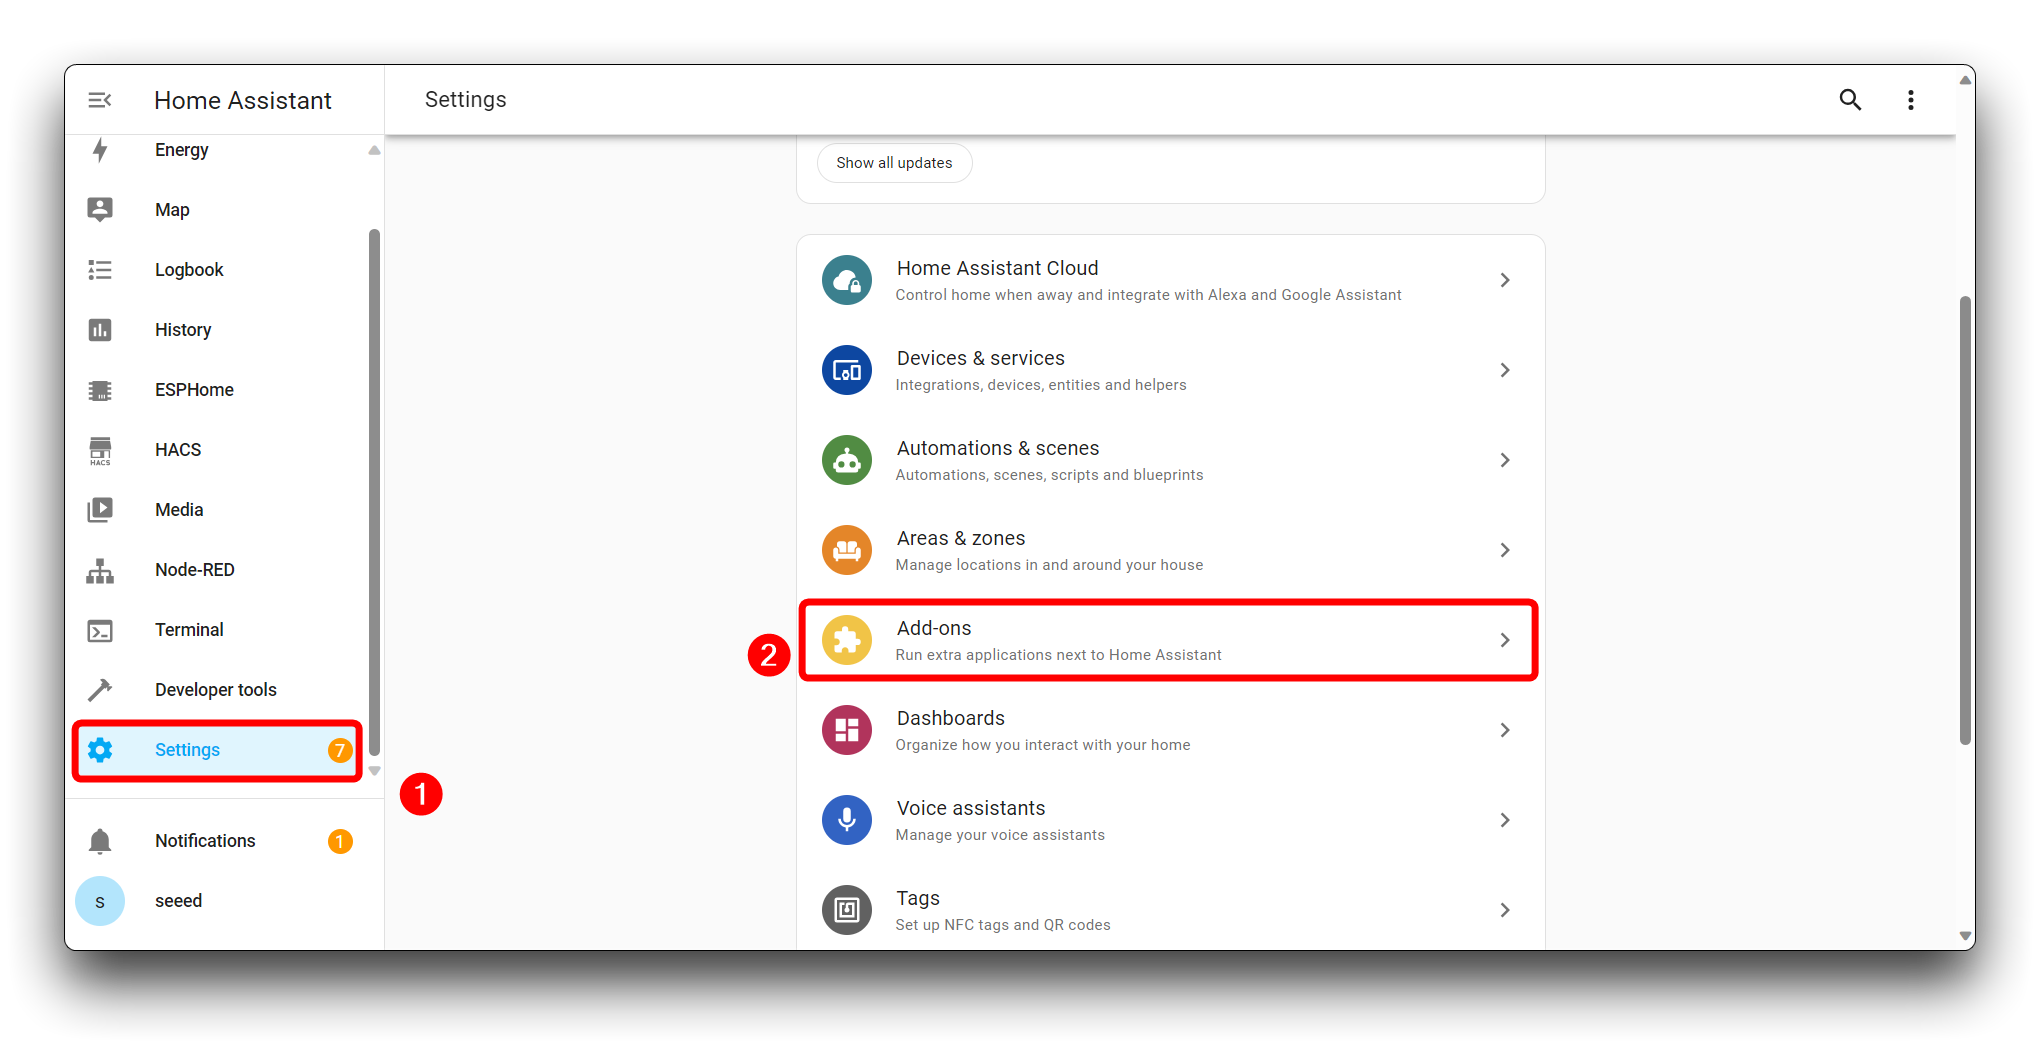
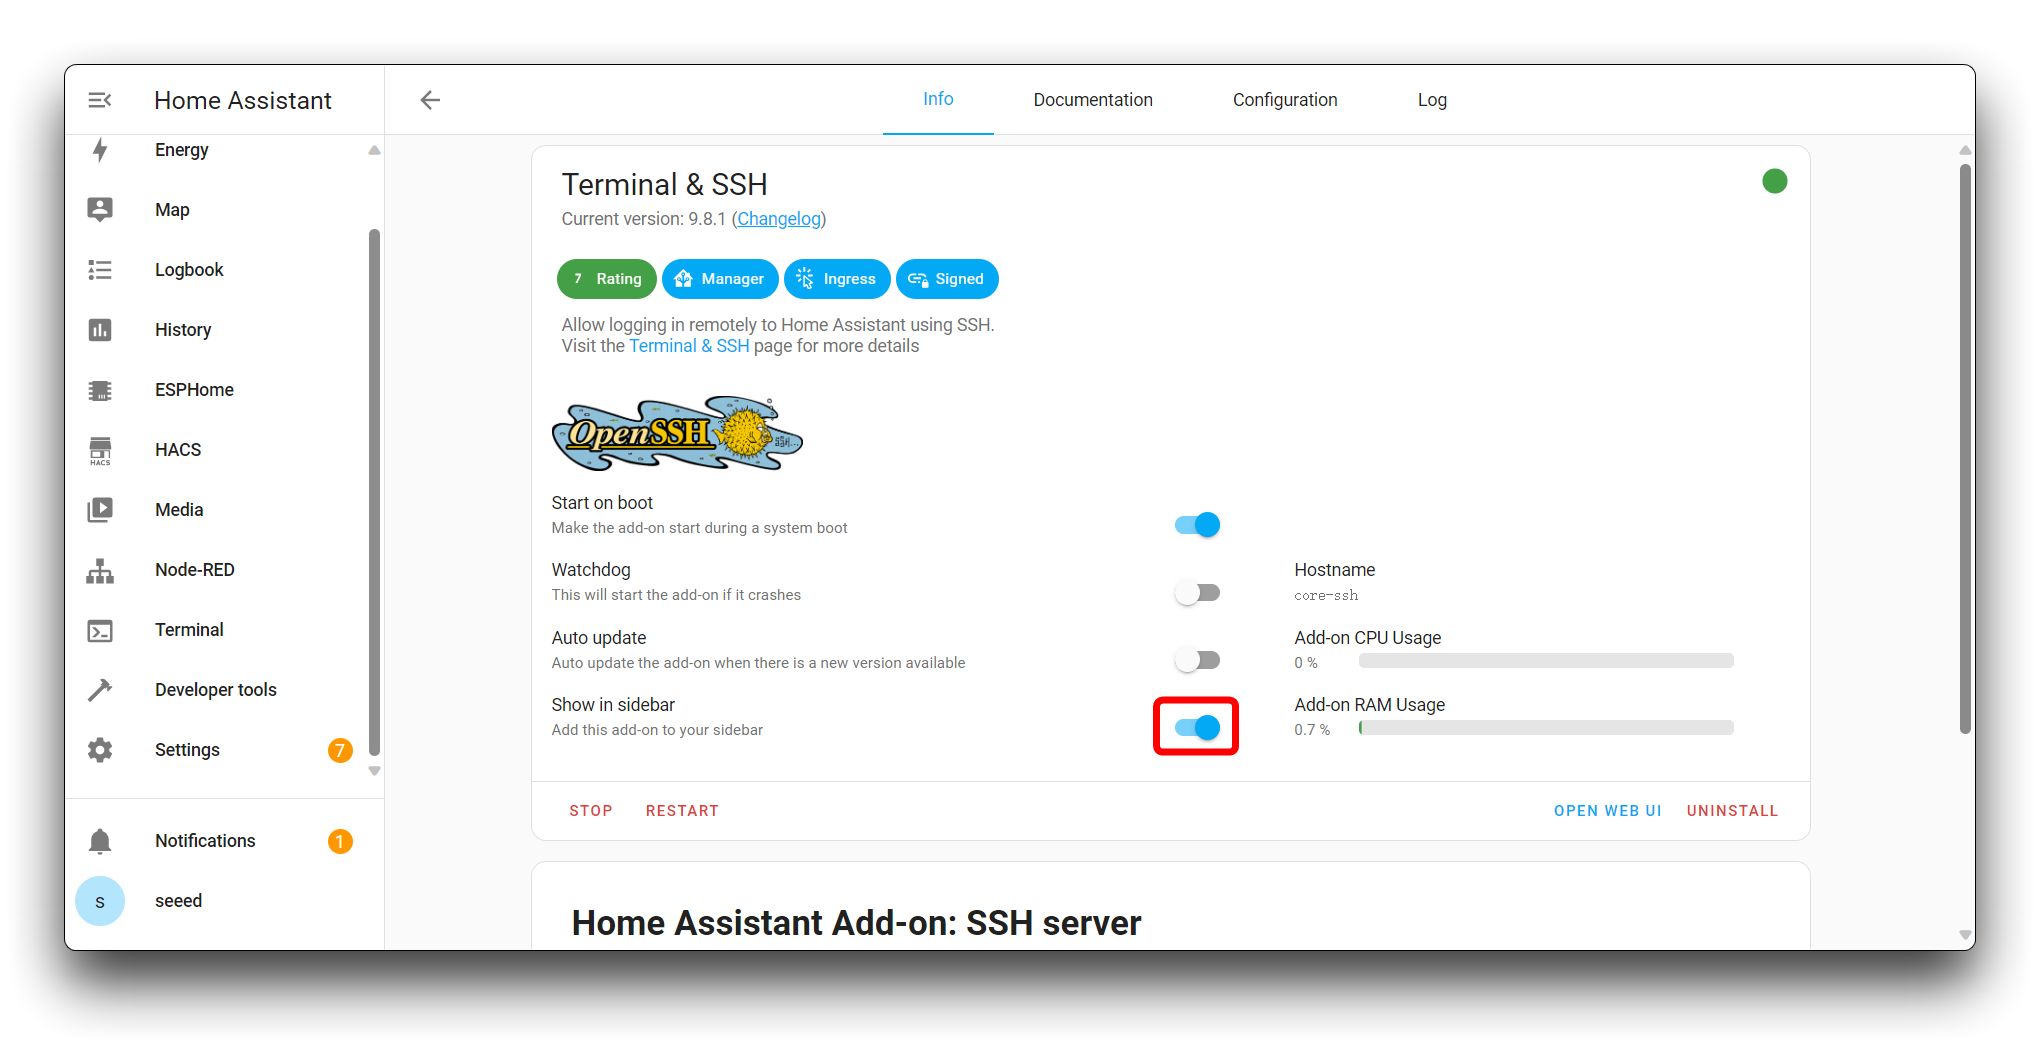
Step 2. Install Terminal & SSH
Click on Settings in the sidebar to access the settings menu. Click on Add-ons to access the add-on store.
Use the search bar or browse through the available add-ons to find Terminal & SSH.
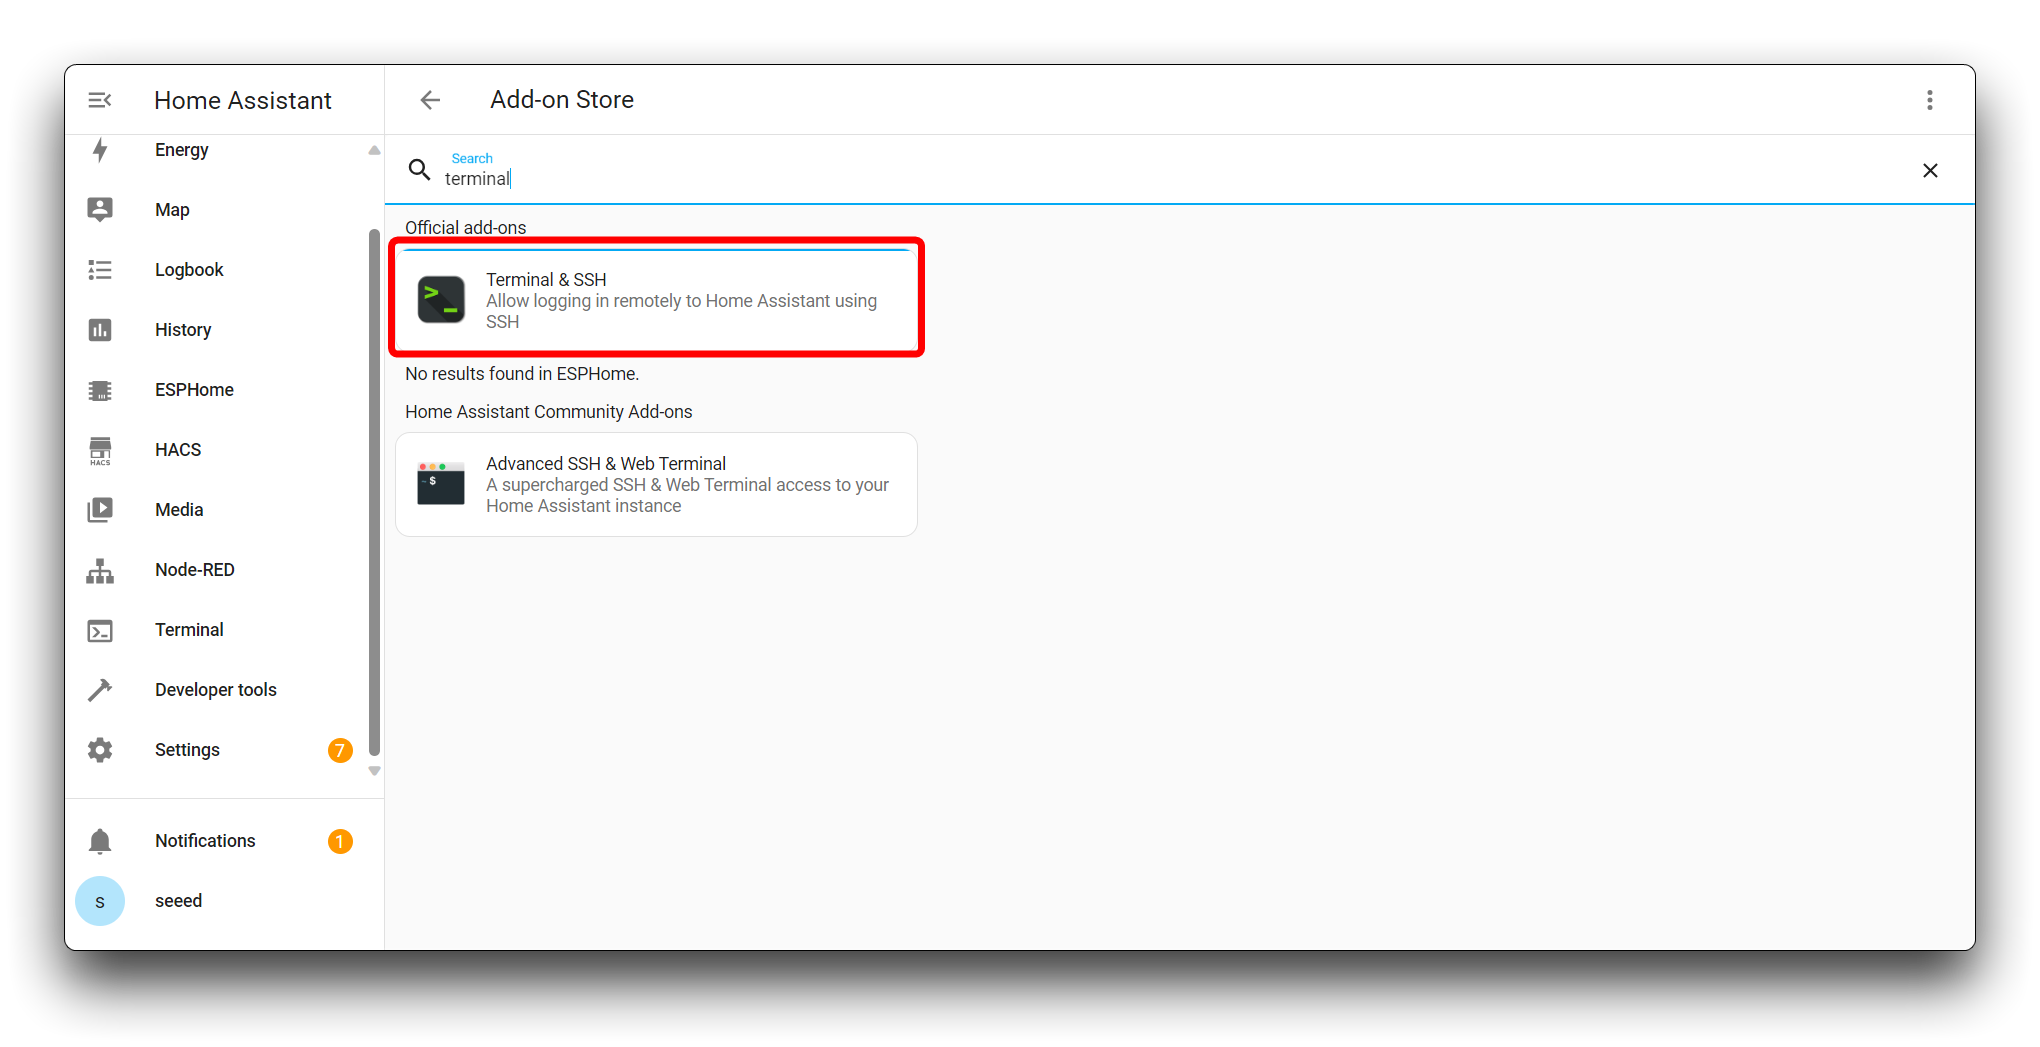
Once you've located Terminal & SSH, click on it to view the details. On the add-on's page, you'll see an overview, documentation, and configuration options. To install the add-on, click the Install button.
Step 3. Install HACS
Find the recently downloaded Terminal & SSH in the sidebar. In the terminal, navigate to the config directory, which is the root of your Home Assistant configuration:
cd /config
Execute the following command to download and run the HACS installation script:
wget -q -O - https://install.hacs.xyz | bash -
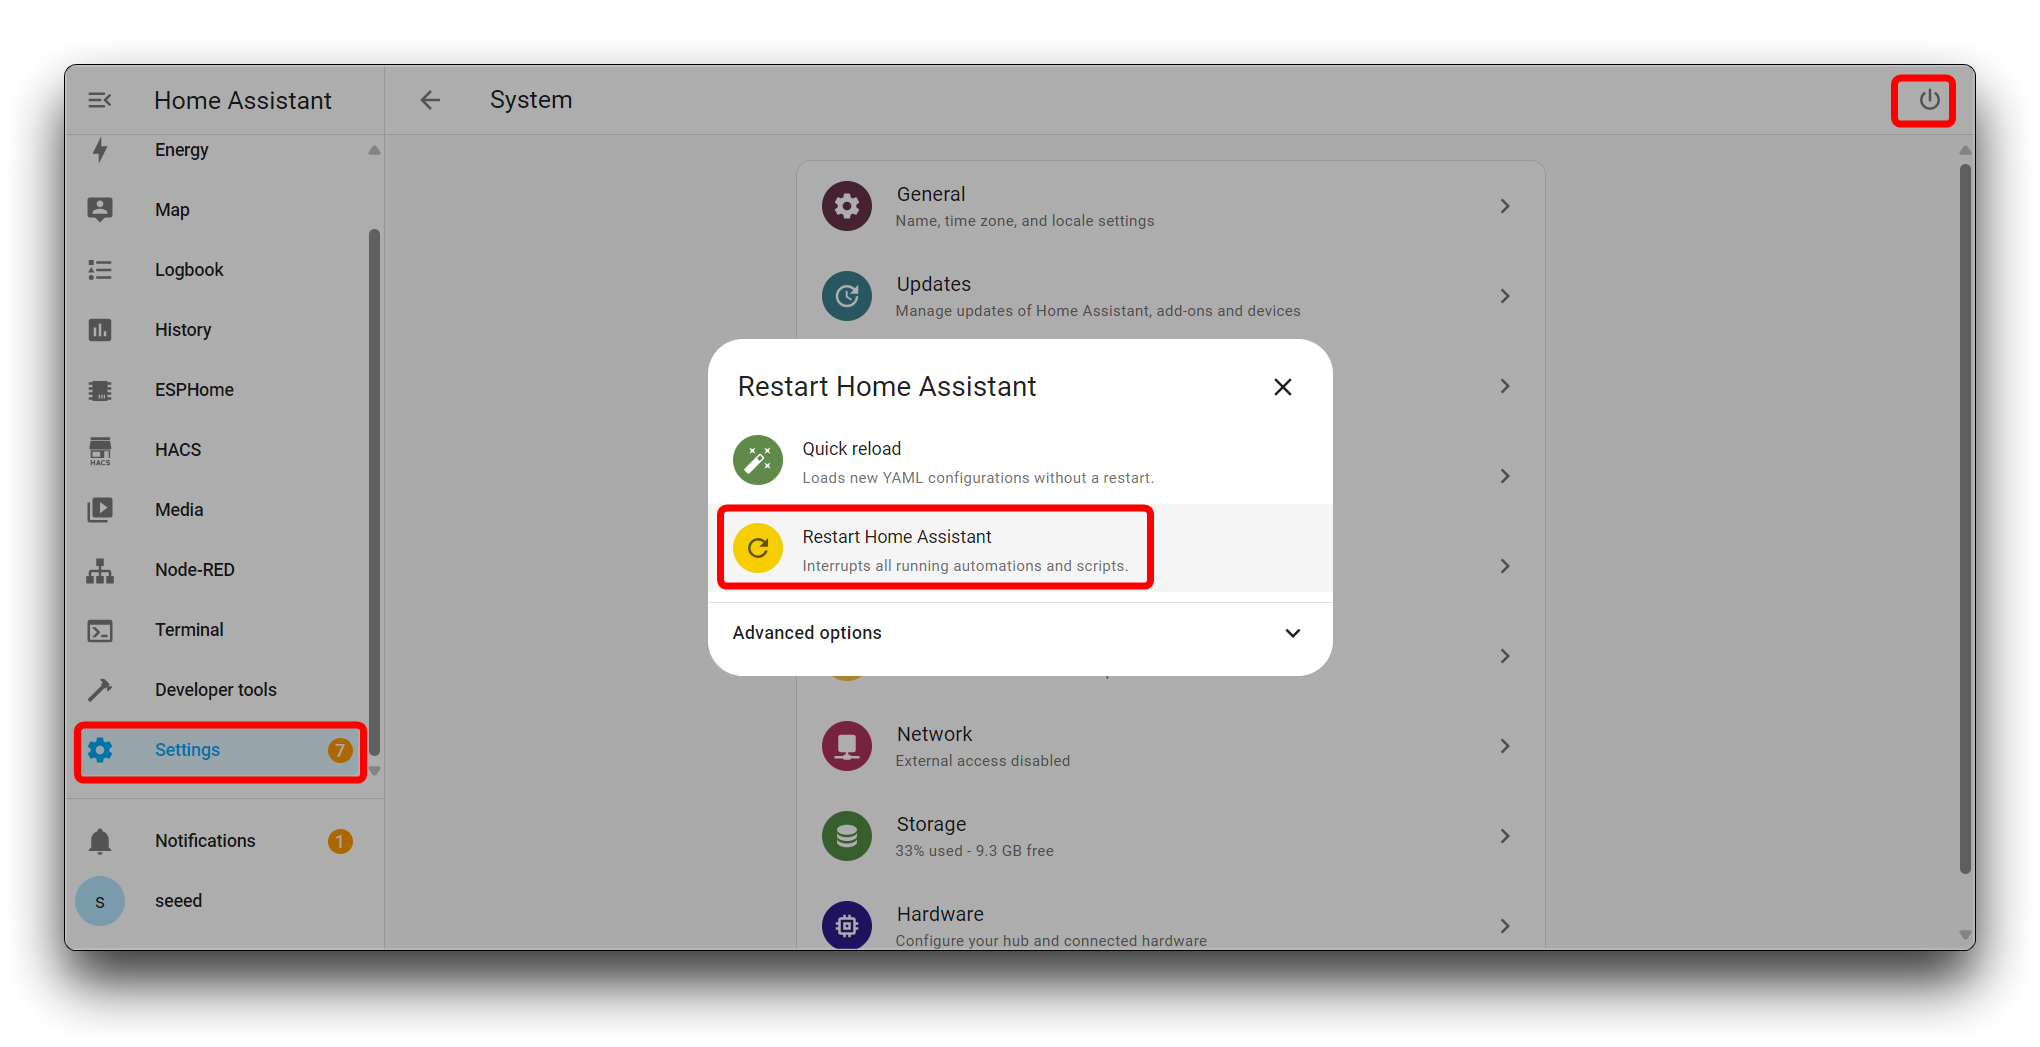
After the installation script has finished, you need to restart Home Assistant to apply the changes. You can restart Home Assistant through the UI by going to Settings > System > Restart.
After the reboot, click on Settings in the sidebar to open the settings menu. Within the settings menu, navigate to Devices & Services.
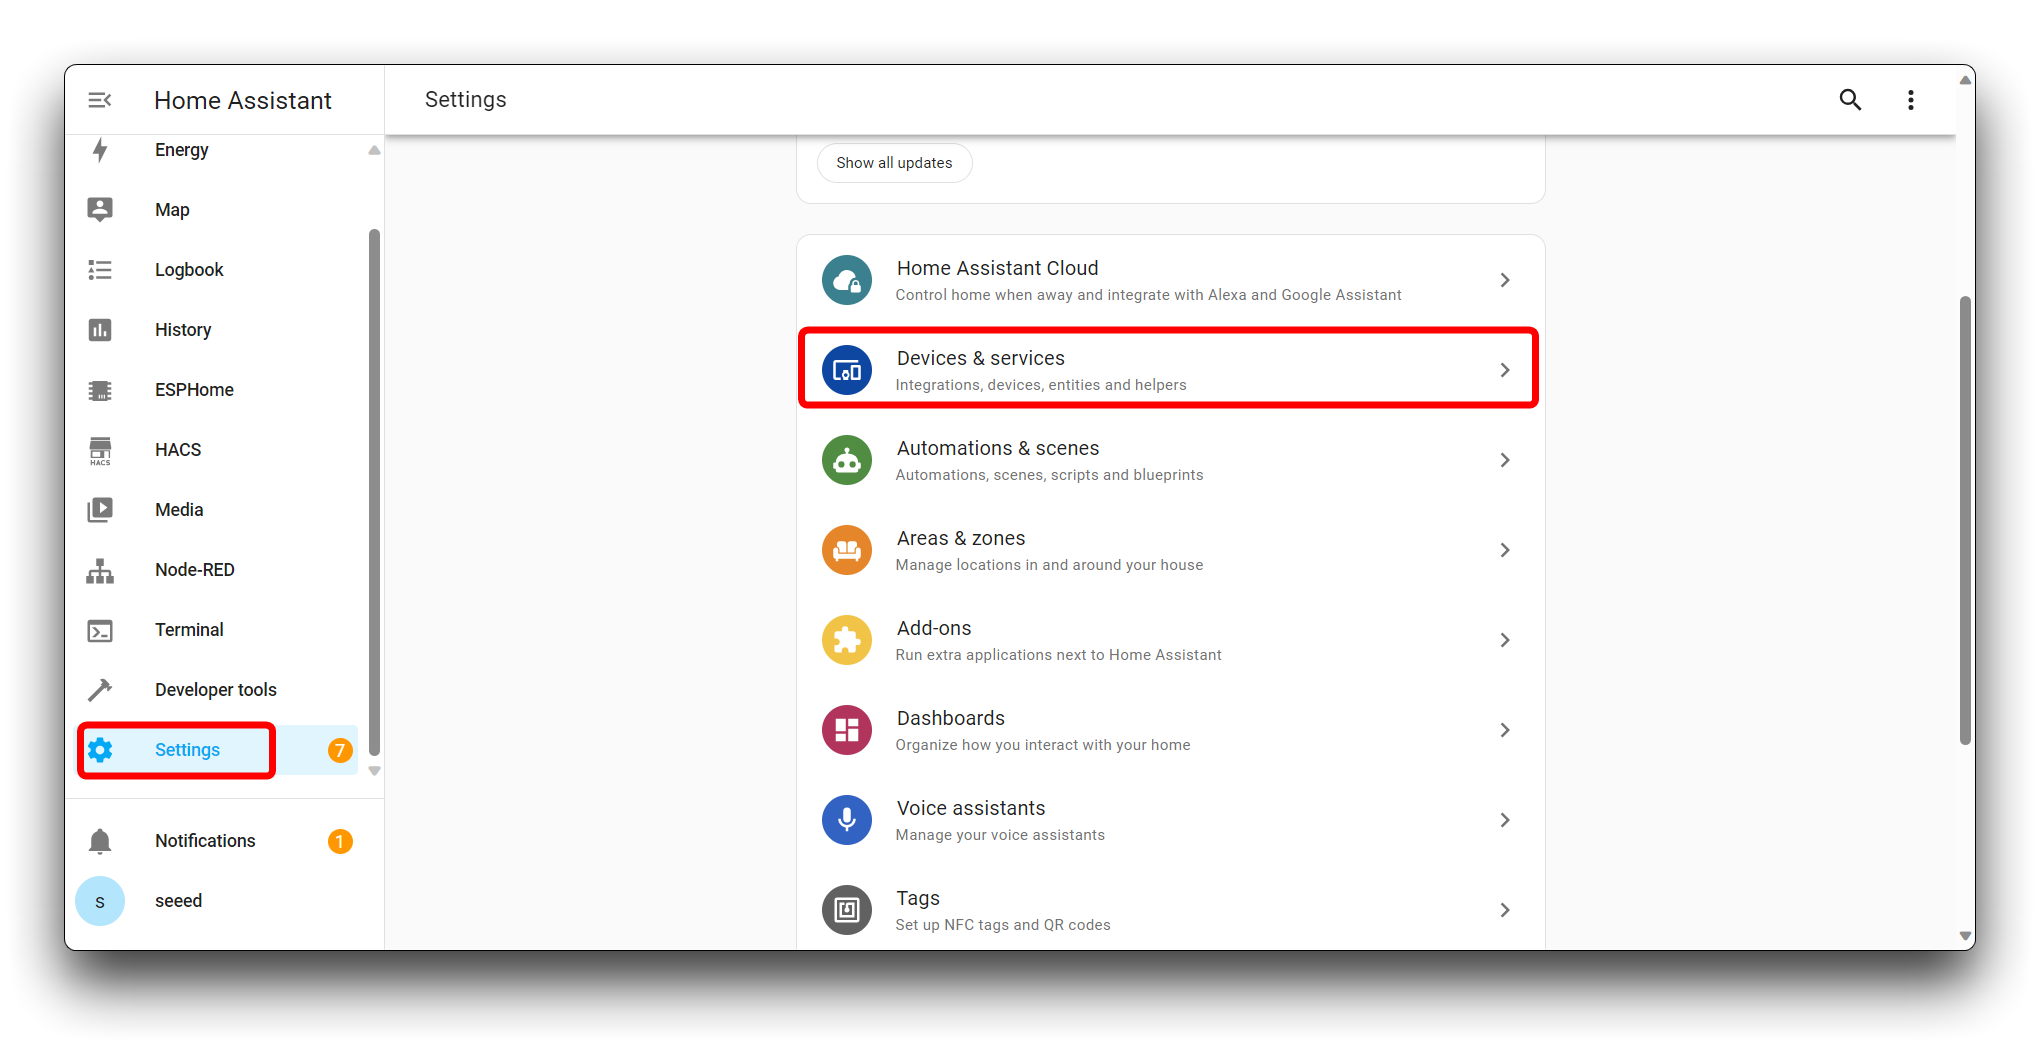
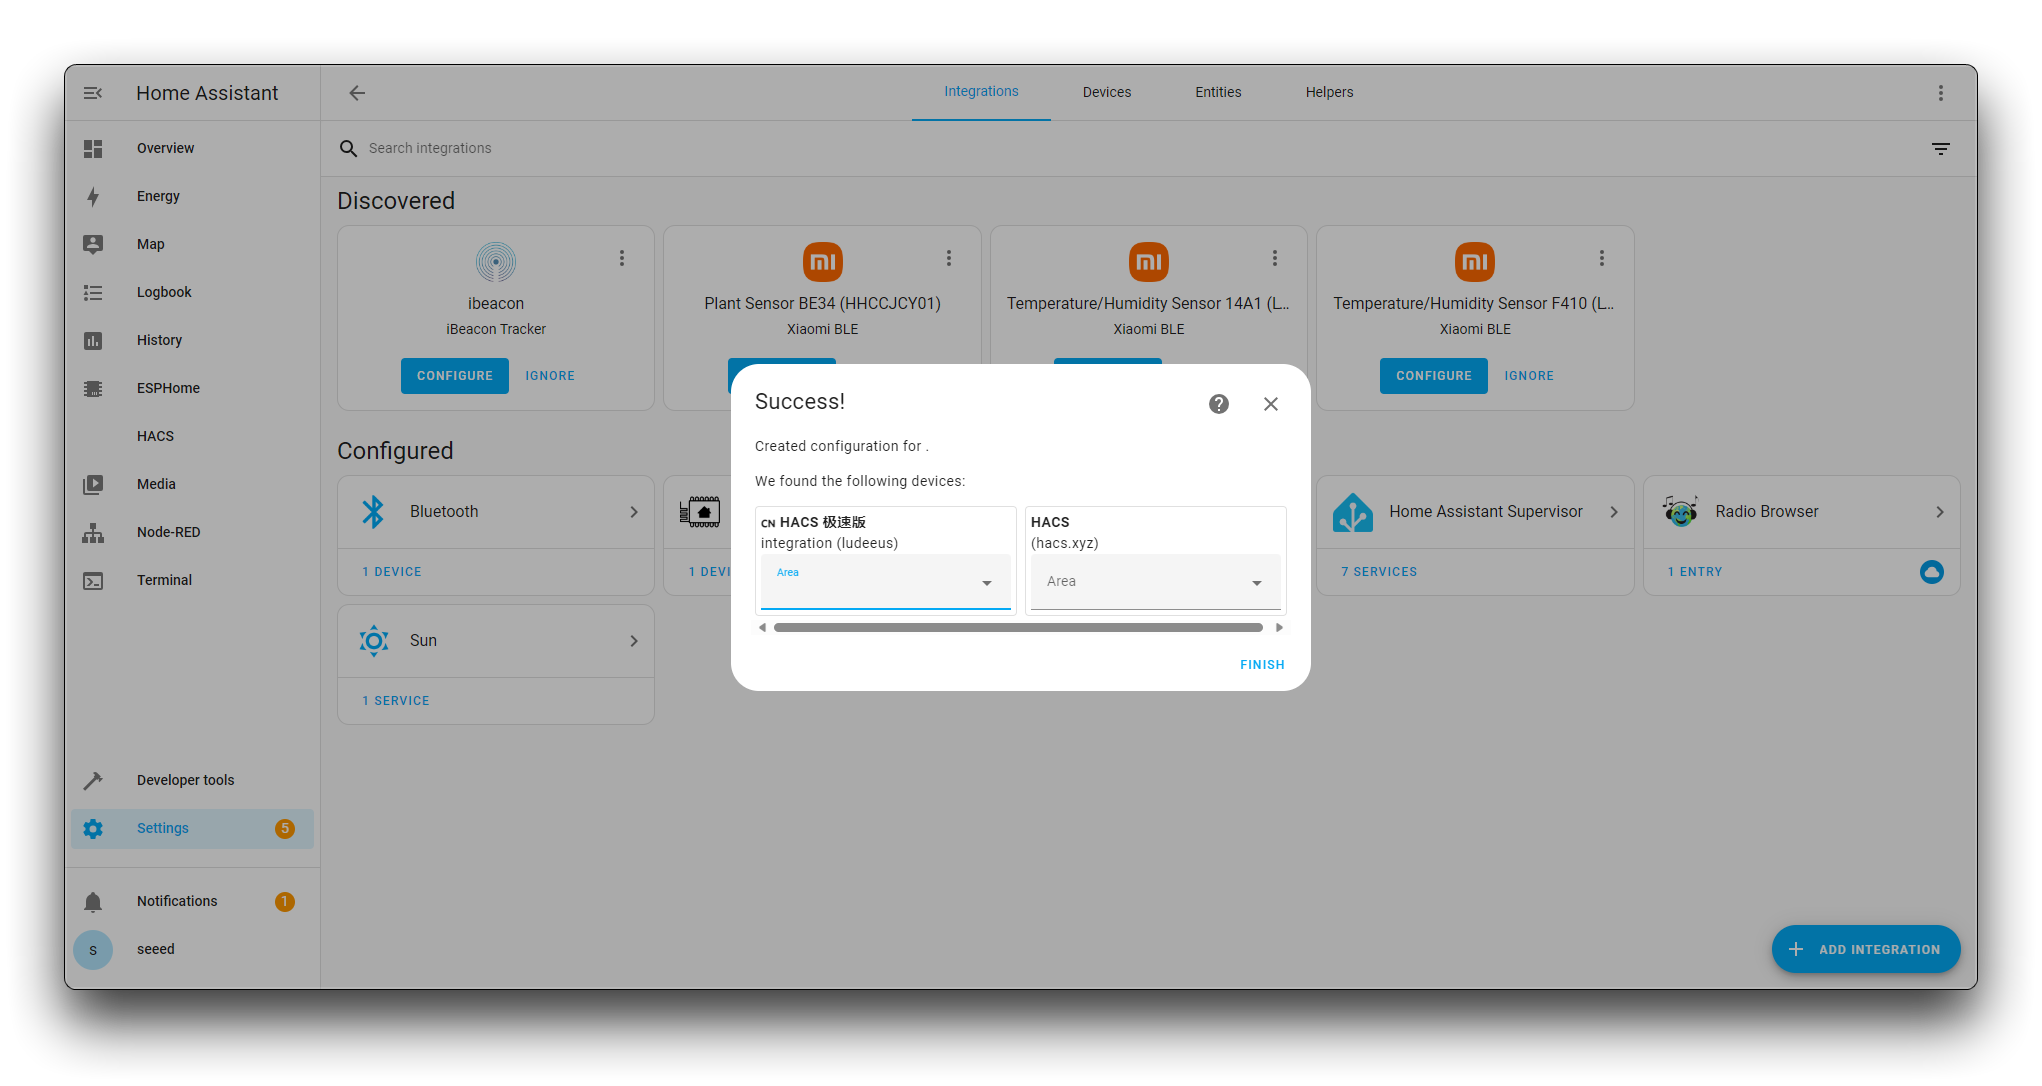
Click on ADD INTEGRATION to add a new integration to your Home Assistant setup.
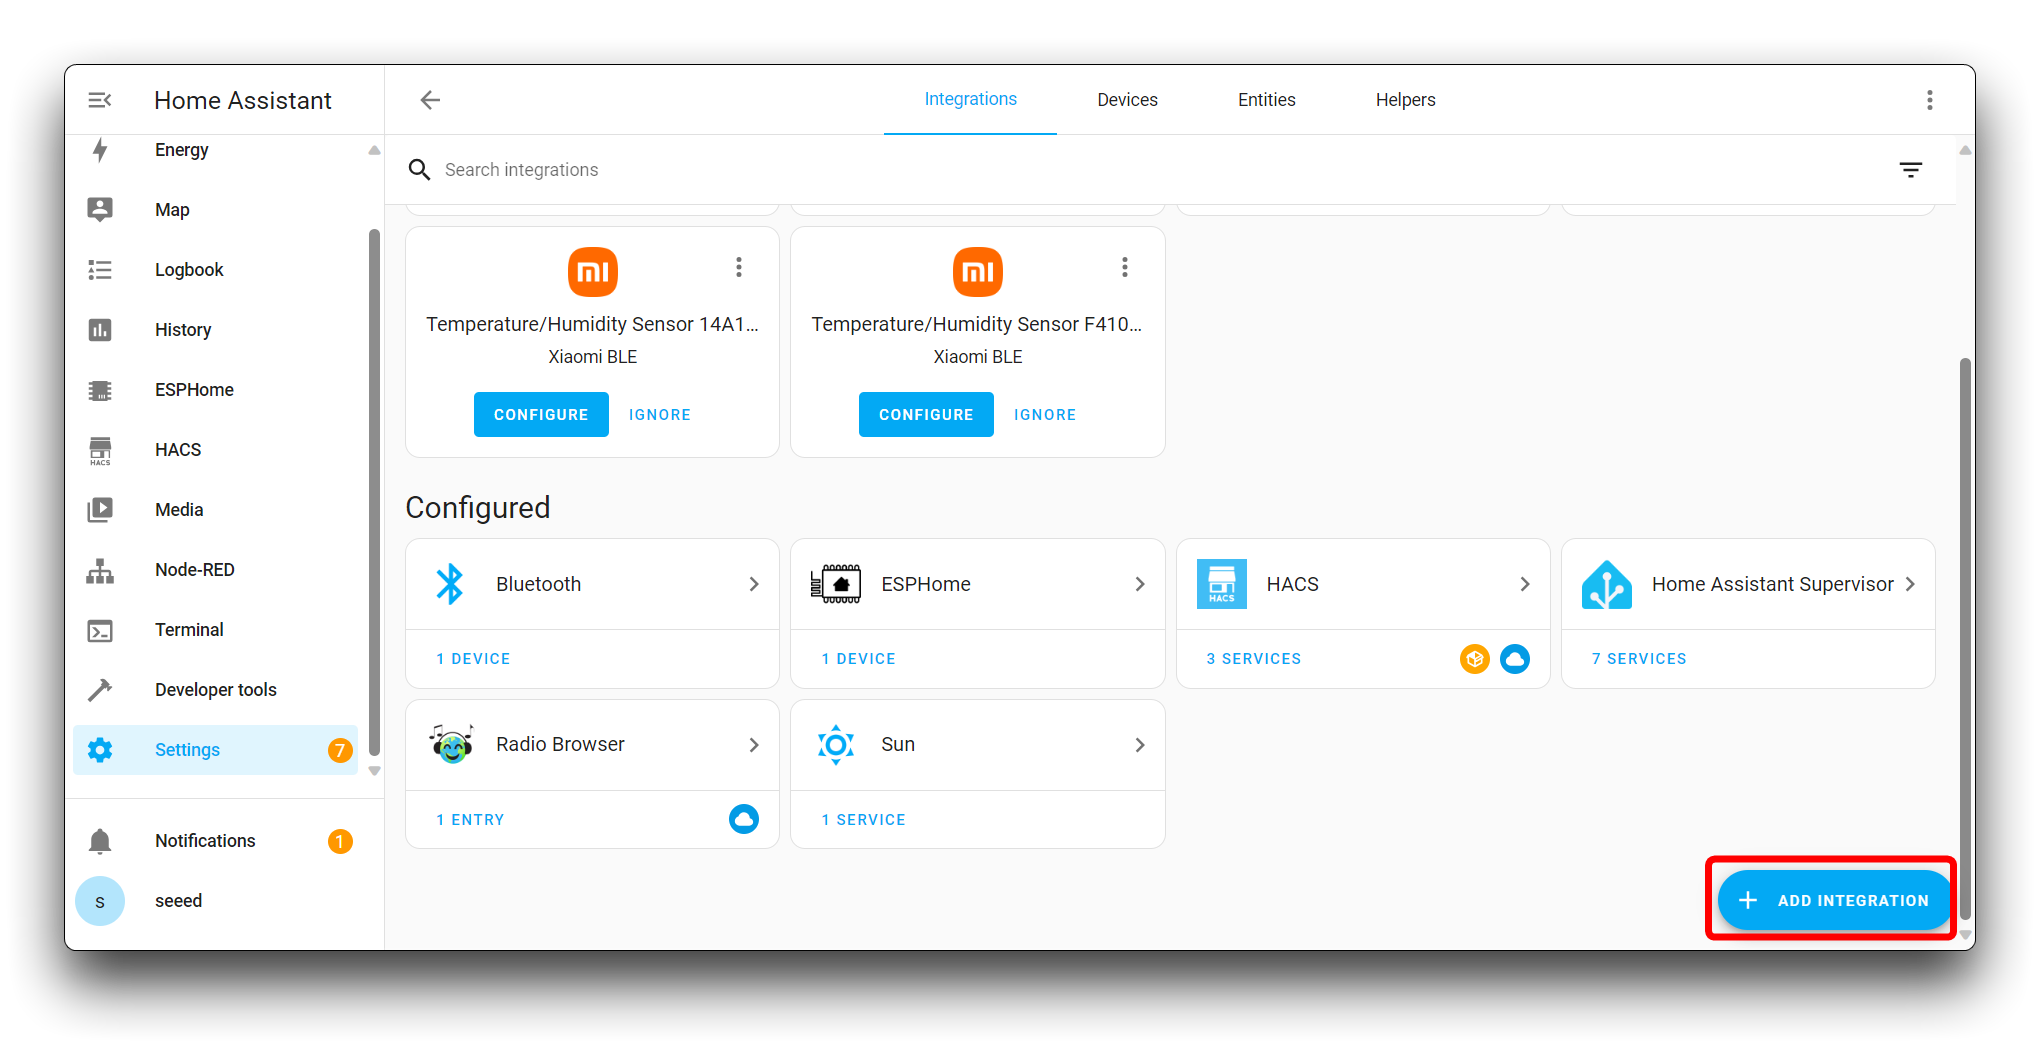
In the search bar, type HACS to look for the Home Assistant Community Store integration.
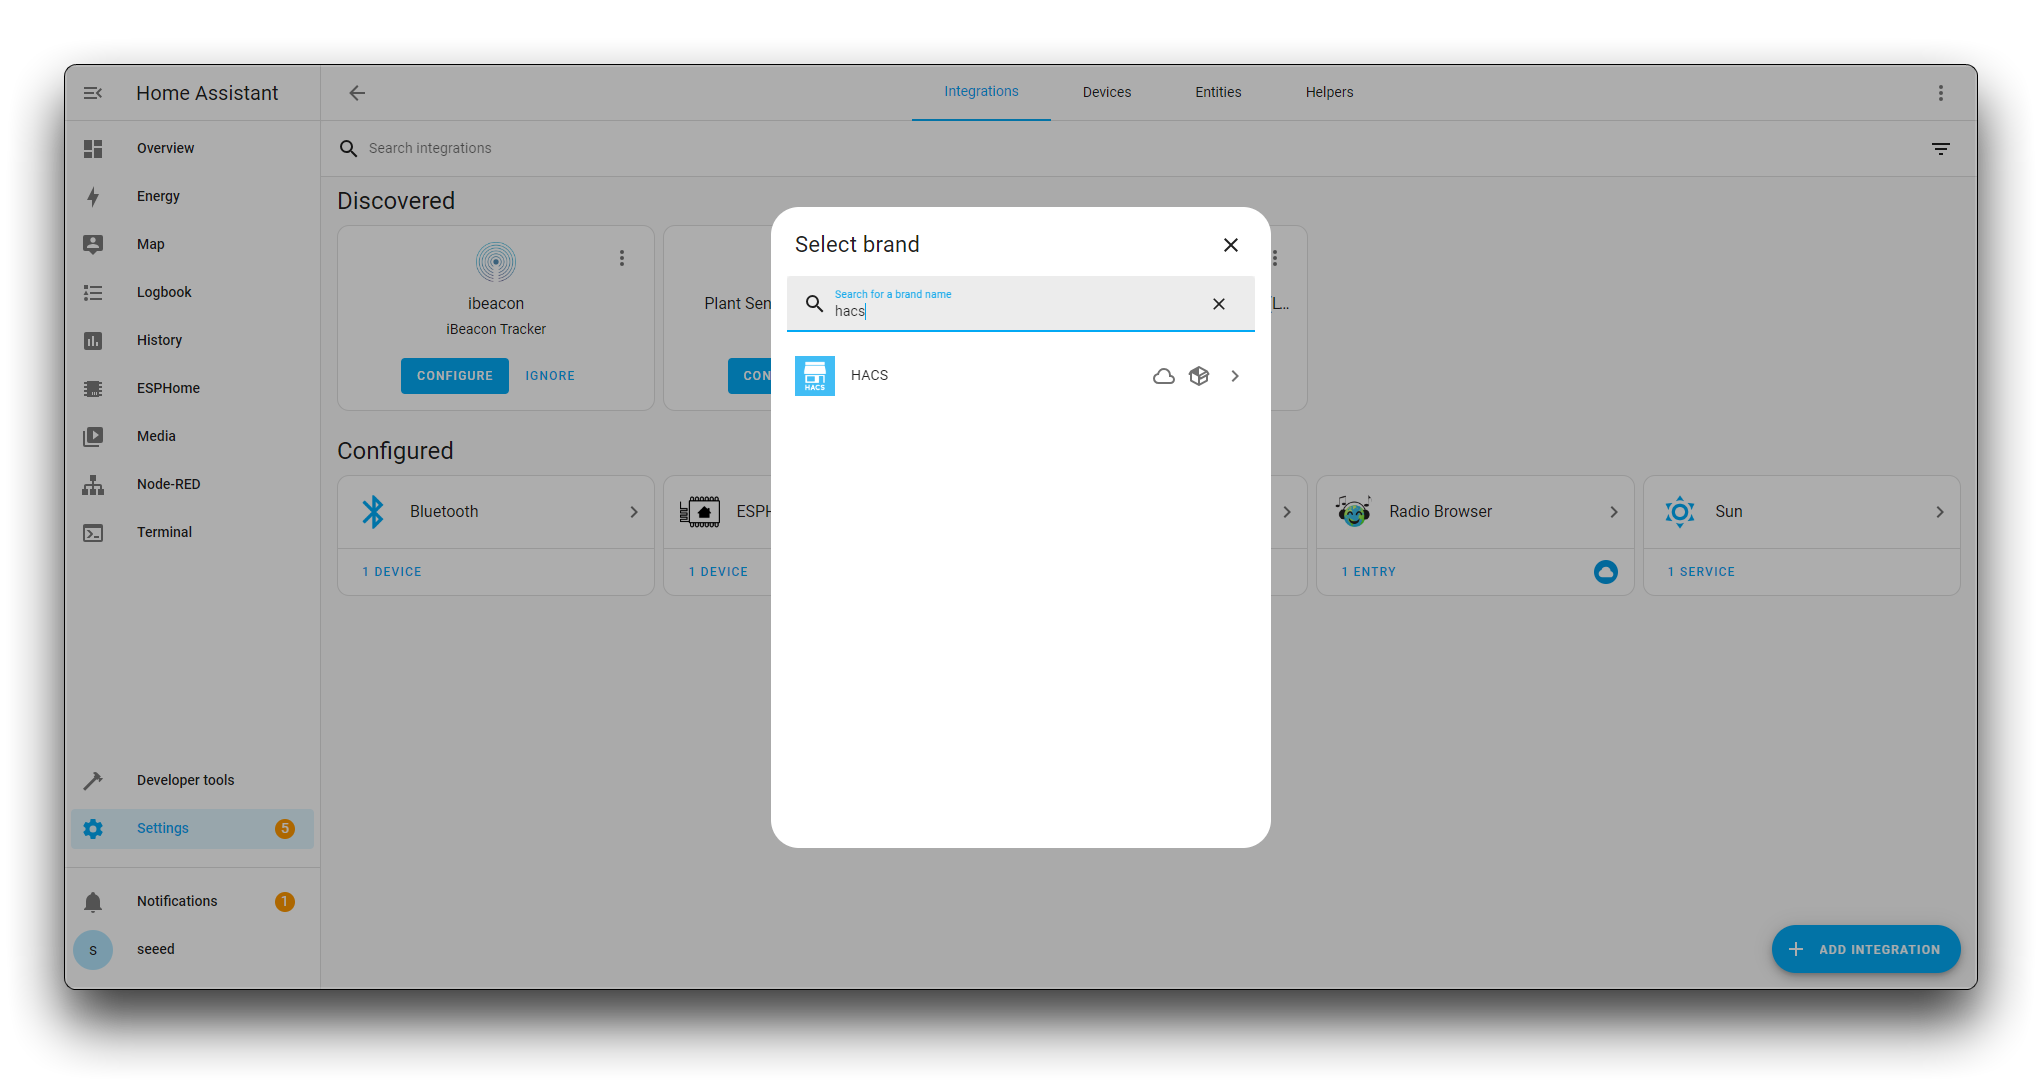
If HACS is found, it should appear in the list of available integrations. Click on it to start the installation process.
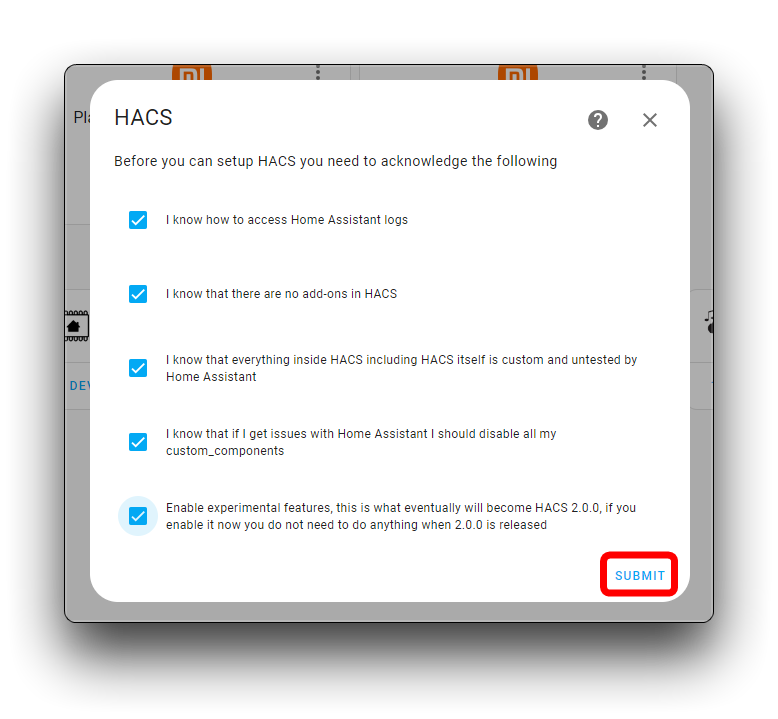
A license agreement or terms of service may pop up. Read through the agreement carefully, and if you agree to the terms, check all the boxes to indicate your agreement. Click SUBMIT to proceed with the installation.
Next, you will be prompted to log in with your GitHub account. This is necessary because HACS integrates with GitHub to manage the installation of community-created integrations and plugins.
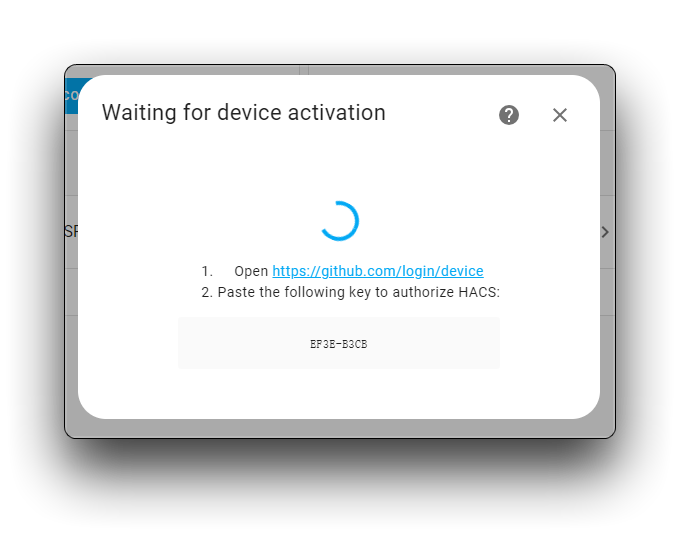
Follow the instructions to authorize Home Assistant to access your GitHub account. This will typically involve entering a verification code provided by GitHub to confirm your identity.
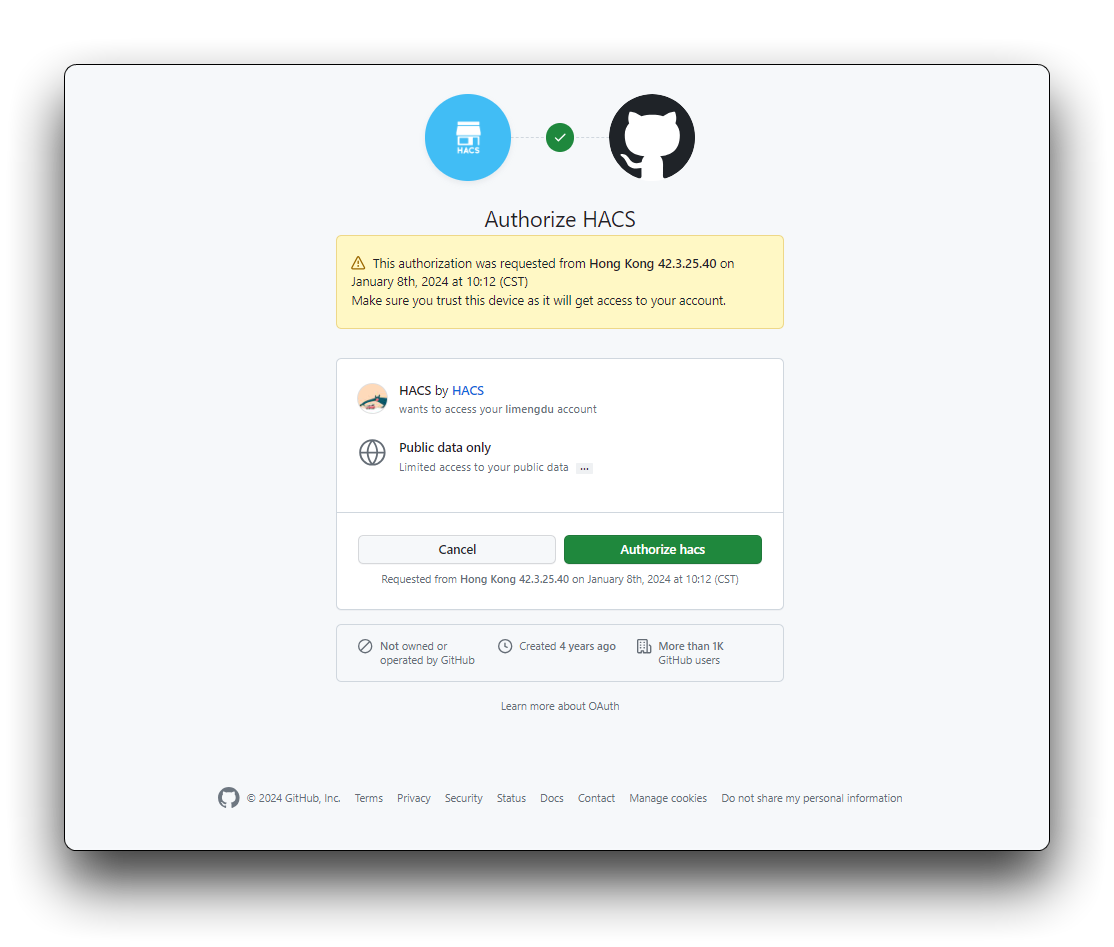
Once you have authorized Home Assistant to use your GitHub account, HACS will finish installing.
You may need to restart Home Assistant for HACS to fully integrate into your system.
Installing the SenseCraft plugin
Step 4. Installation of the SenseCraft plugin via HACS
Look for HACS in the sidebar and click on it to open the HACS interface. In the bottom right corner, you'll find a menu button (three dots or a plus sign, depending on your HACS version). Click on Custom repositories.
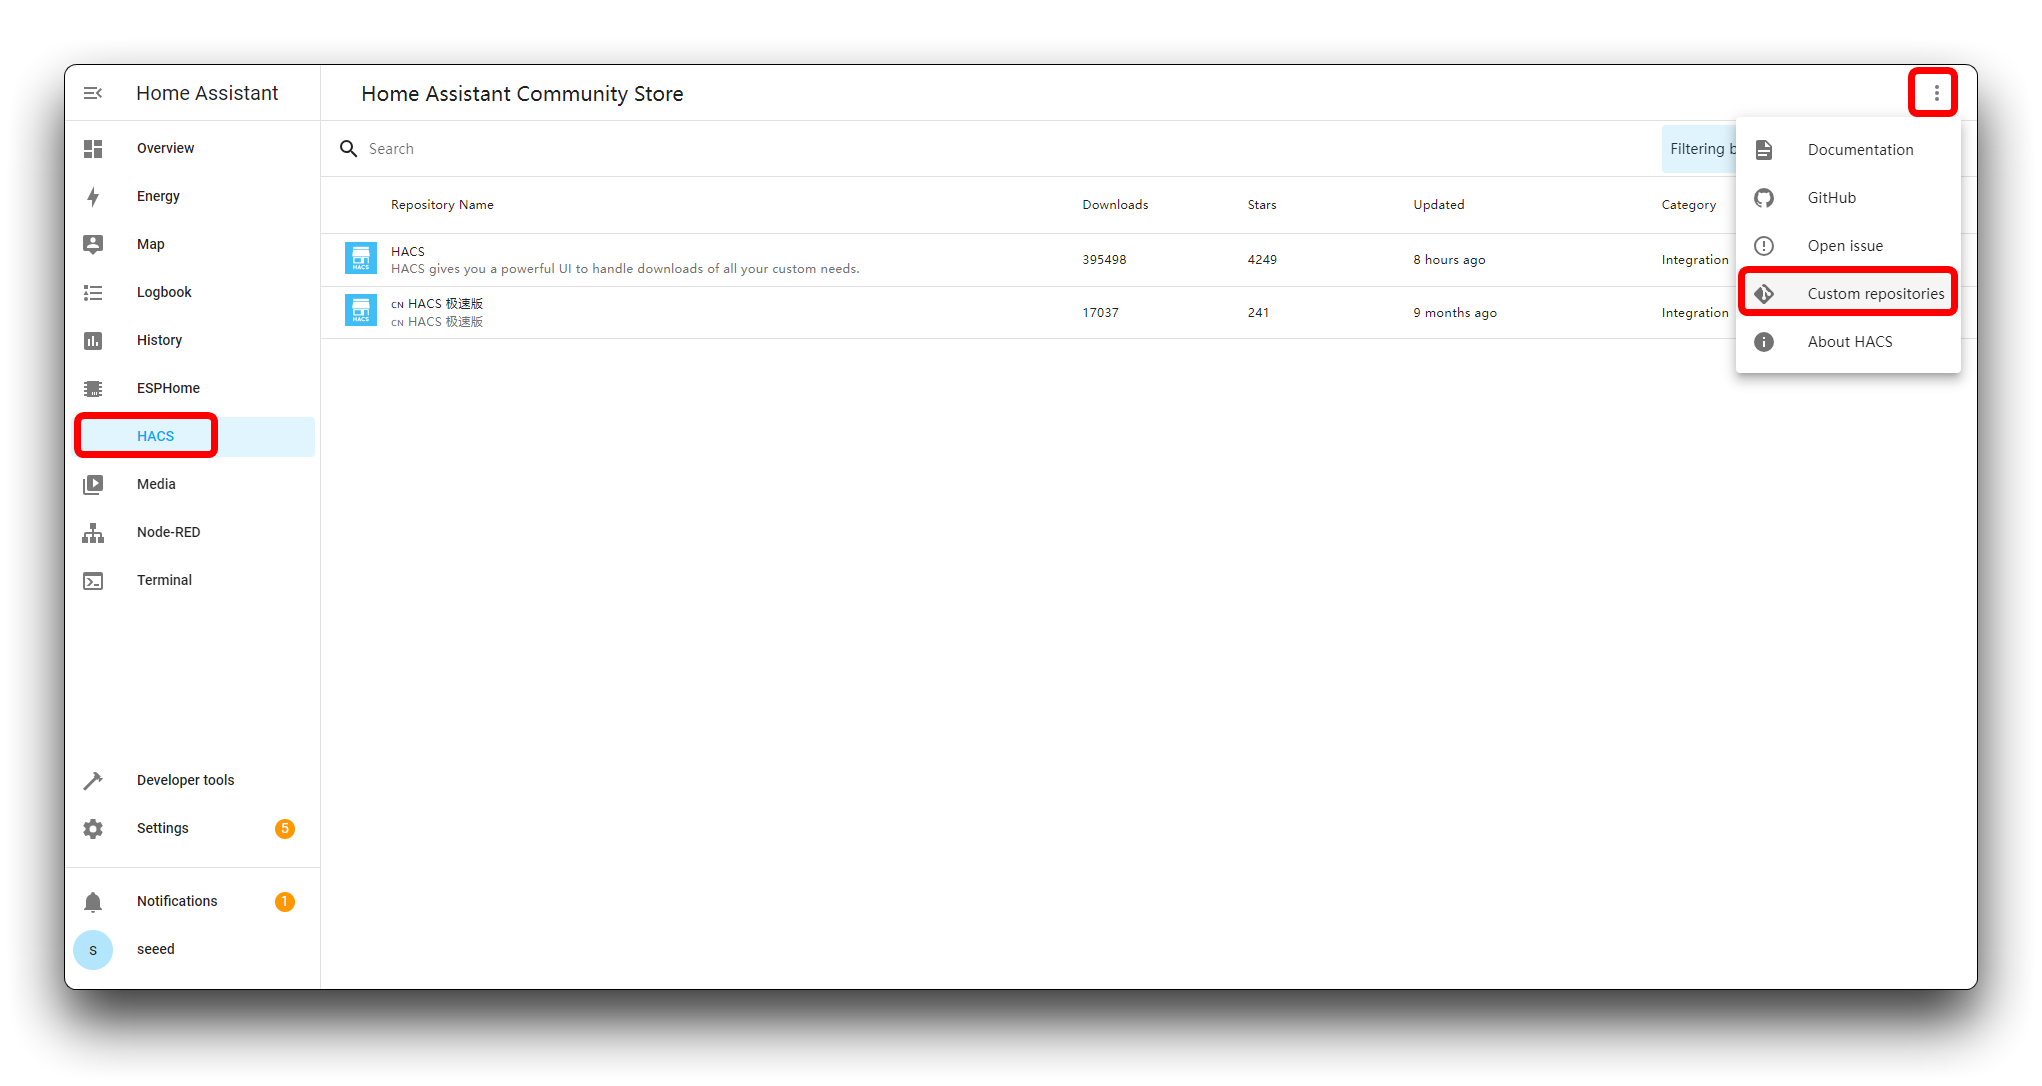
A dialog box will appear asking you to input the repository URL. Here, you will enter the custom repository URL for the SenseCraft integration. After entering the URL, select the category (for the SenseCraft integration, you would select Integration).
https://github.com/Seeed-Solution/SenseCraft-HomeAssistant.git
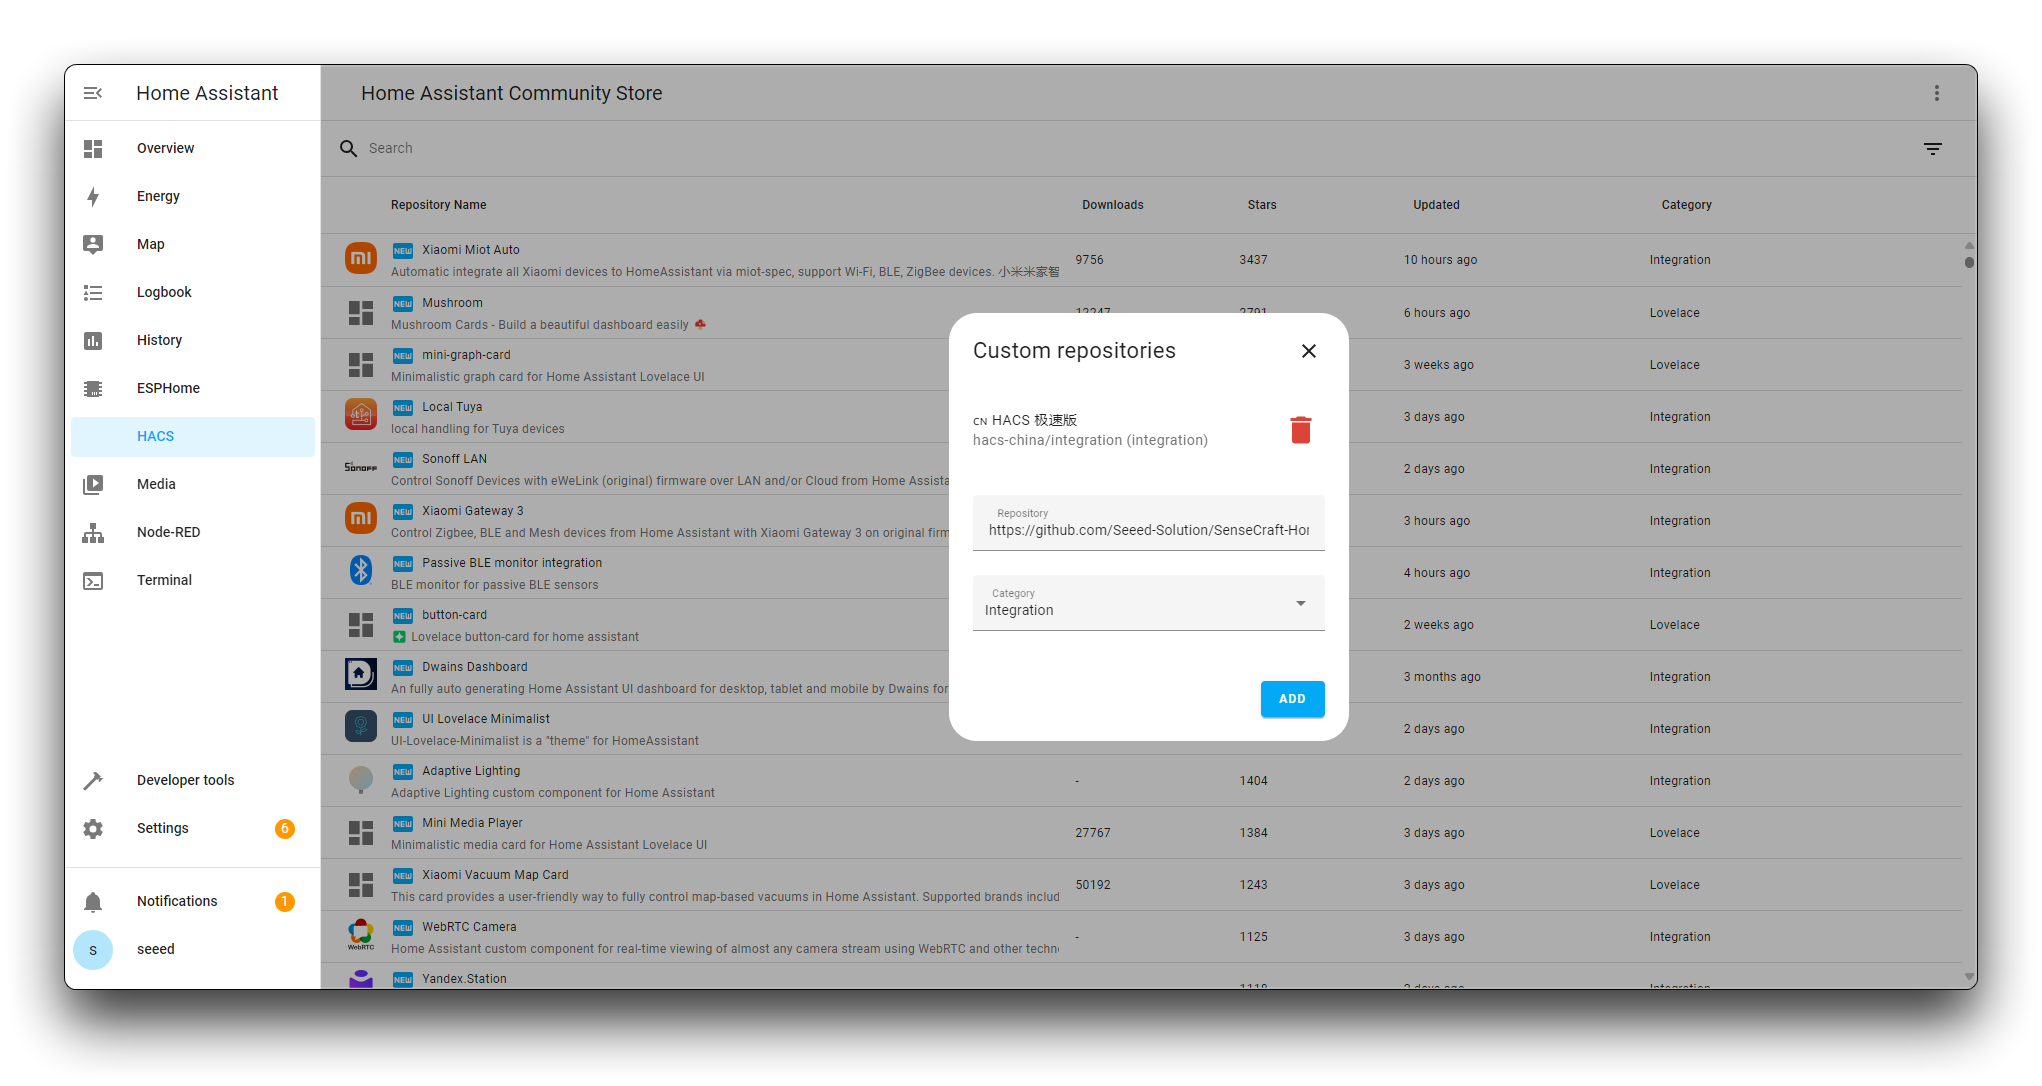
Click on Add. The repository is now added to your HACS, and you should be able to find the SenseCraft integration in the list under Integrations.
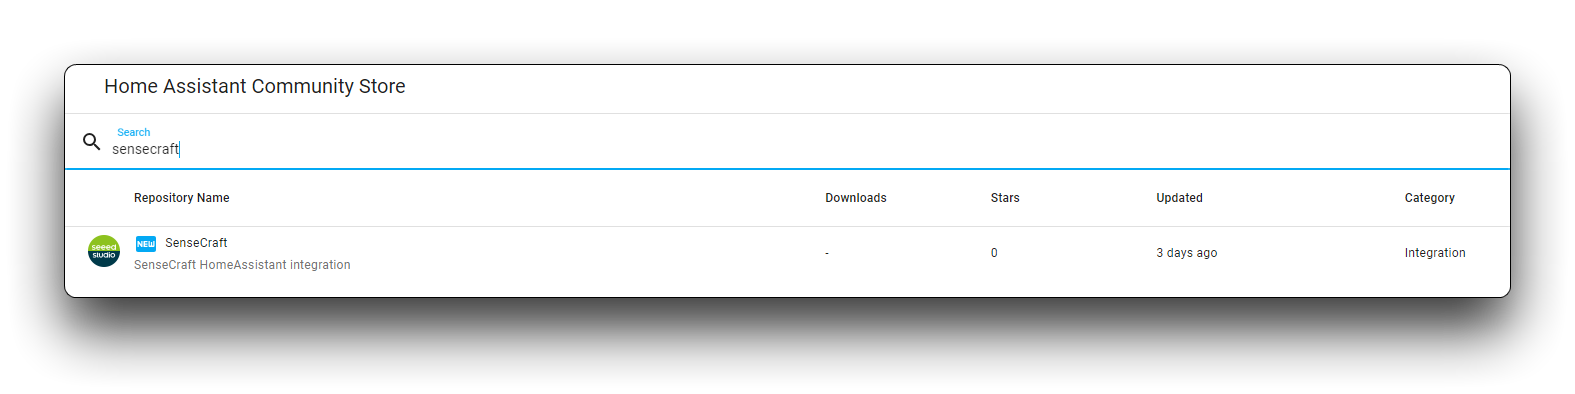
Locate the SenseCraft integration and click "DOWNLOAD".
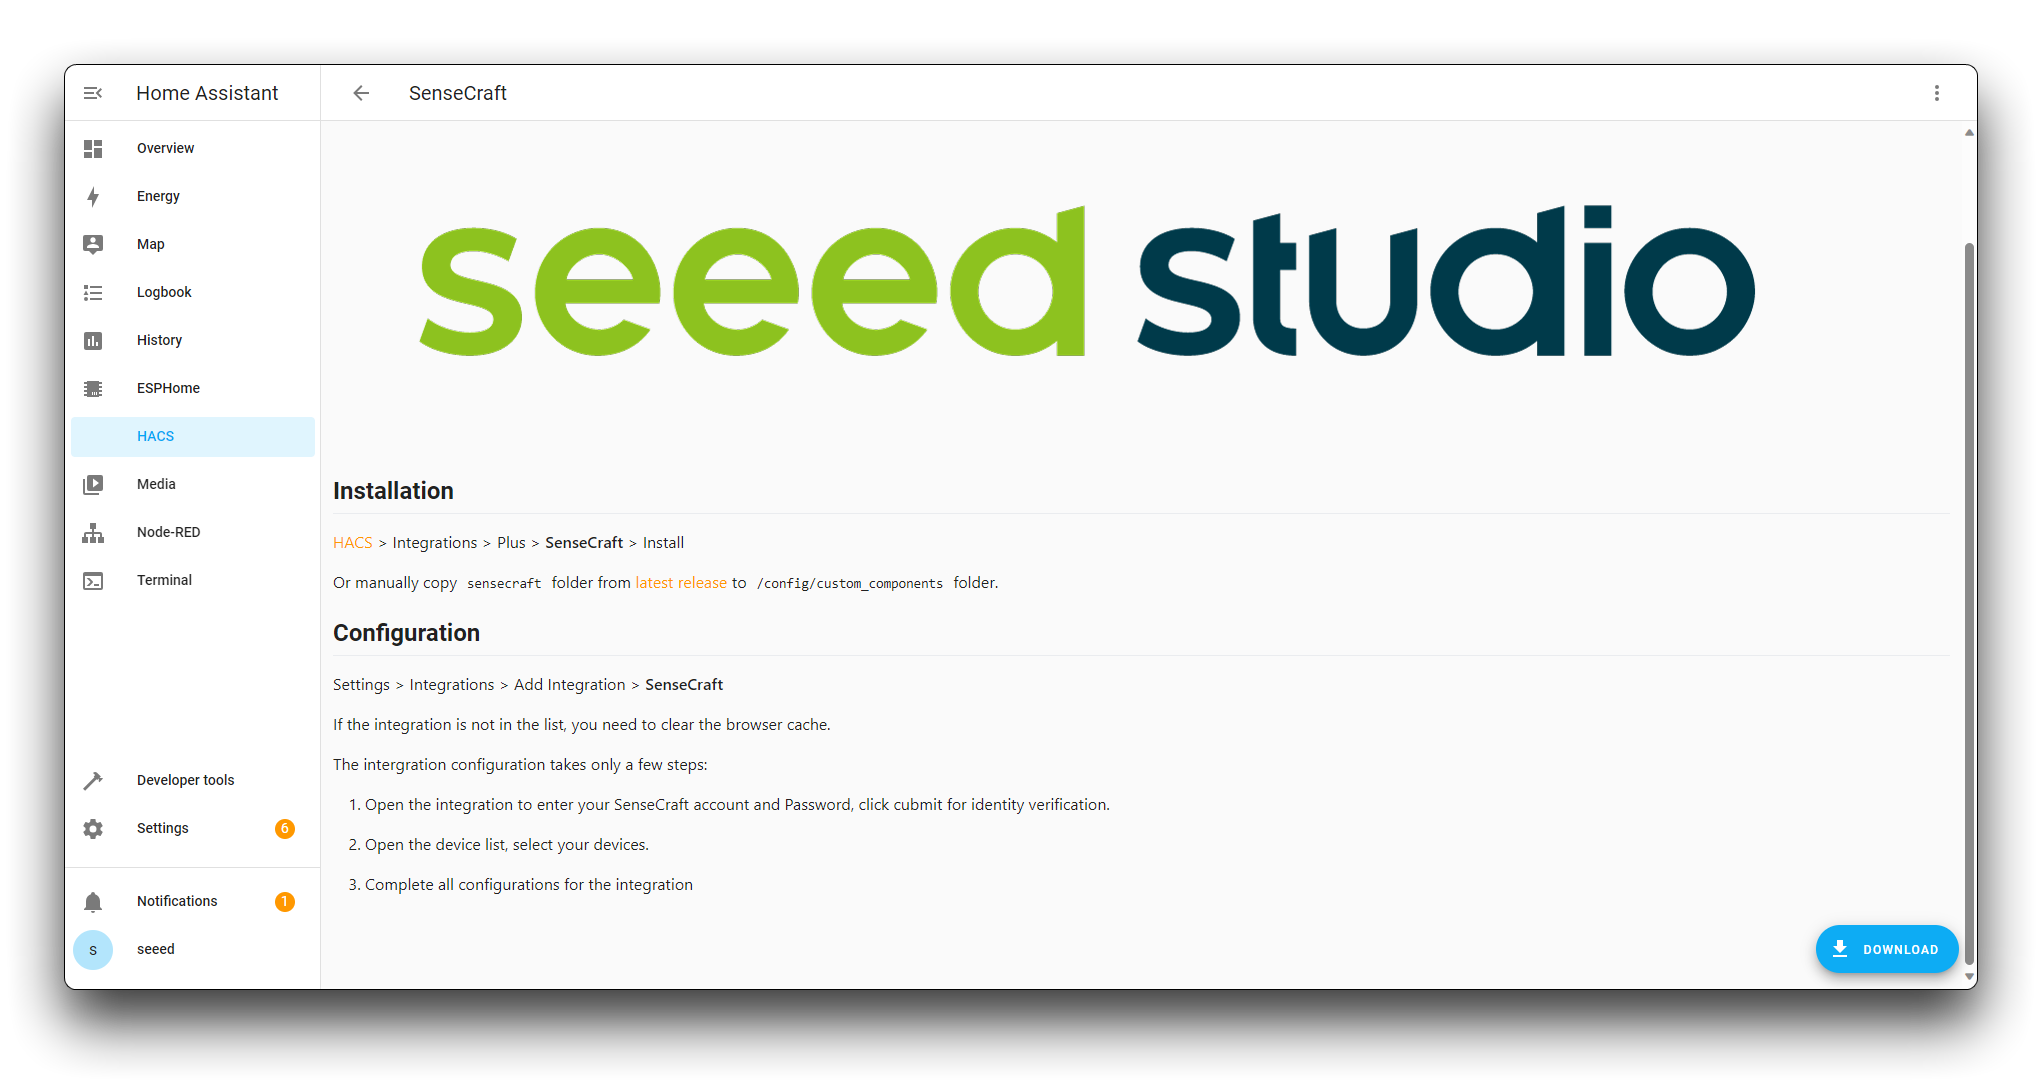
By this point, we have successfully completed the installation of the SenseCraft plugin.
Integrate SenseCAP Watcher into Home Assistant
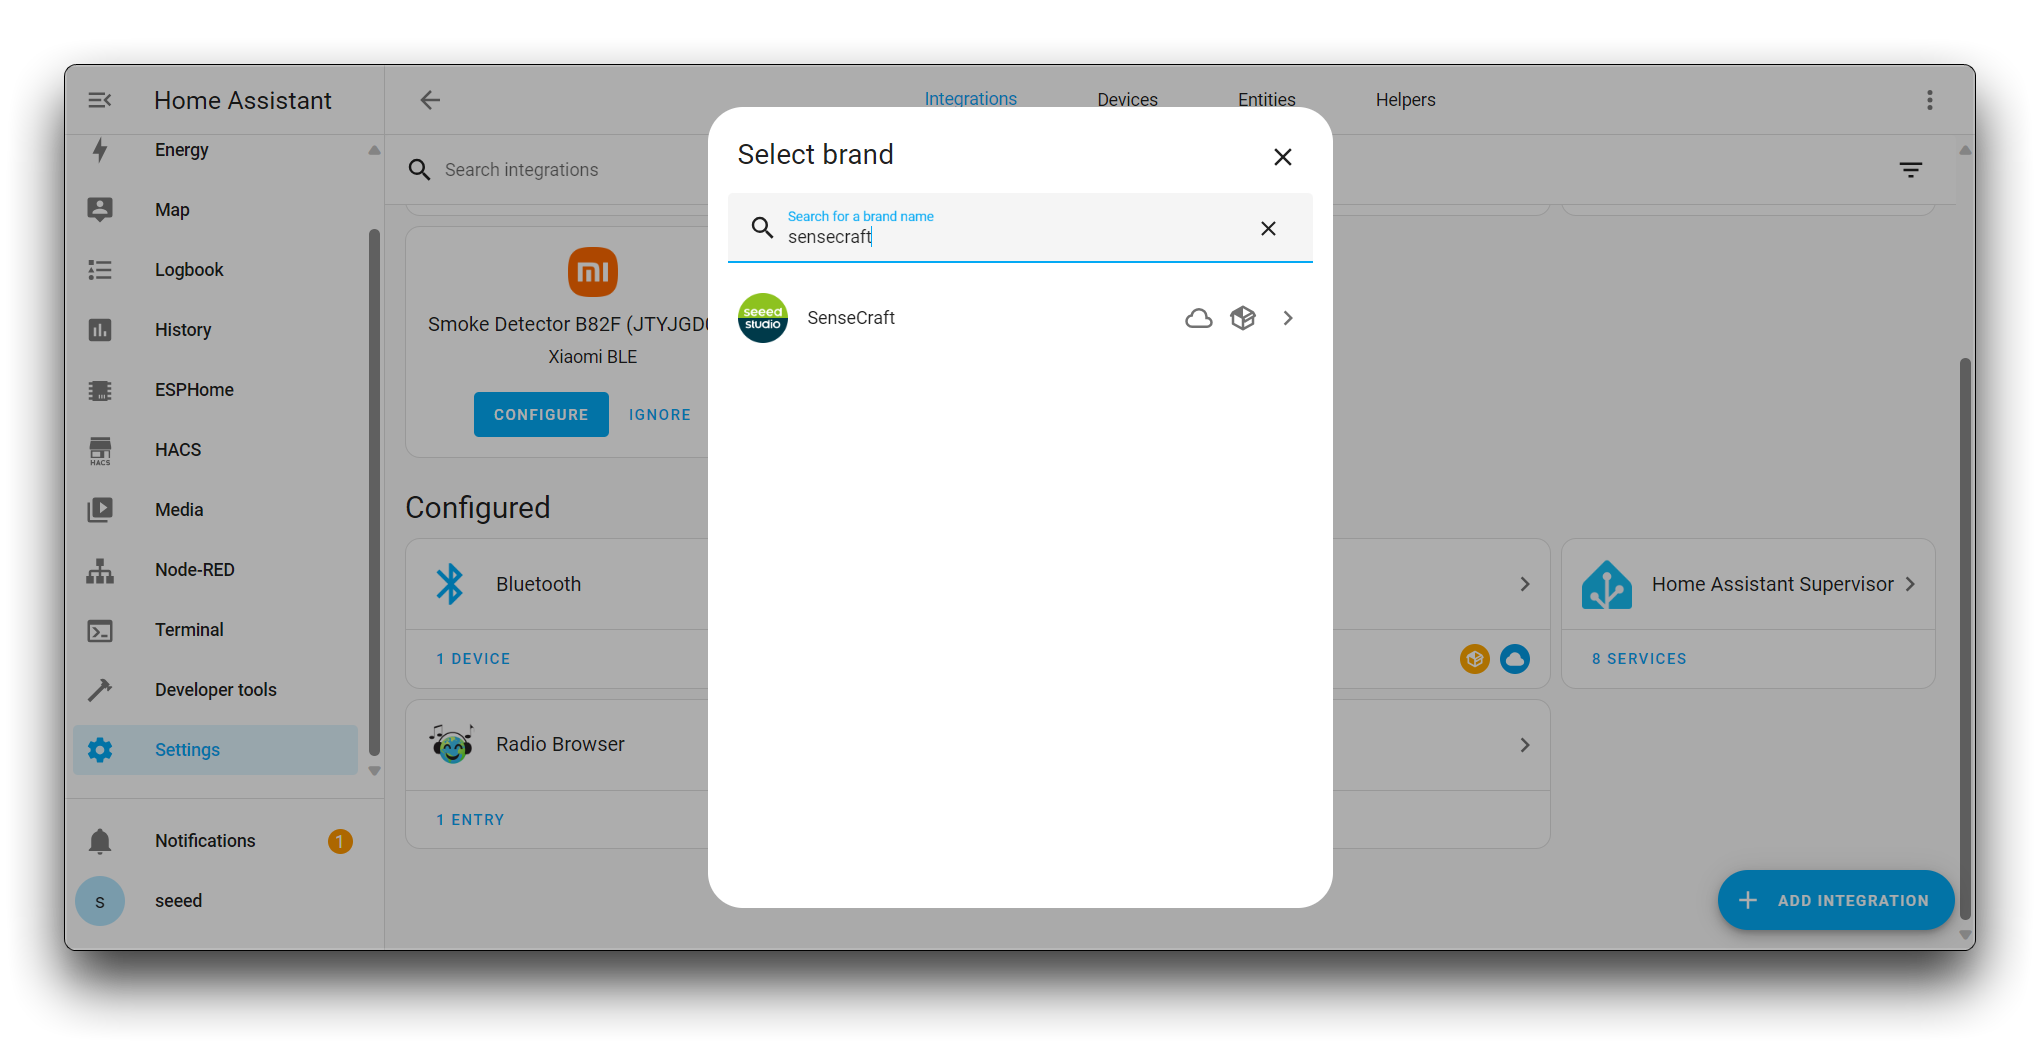
Step 5. Adding Watcher from SenseCraft
In the Settings page, choose Devices & Services.
Then click the ADD INTEGRATION button in the bottom right corner and search for SenseCraft.
Click on SenseCraft and select Action as Add device using host/id (局域网集成).
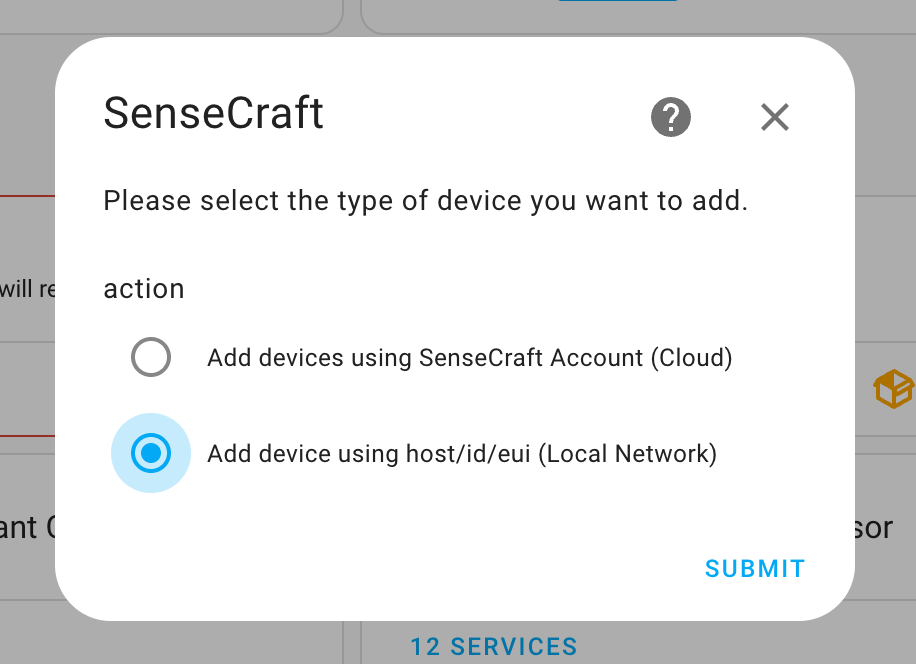
Currently, Add devices using SenseCraft Account(账号集成) is not available.
Then select Watcher in the device options.
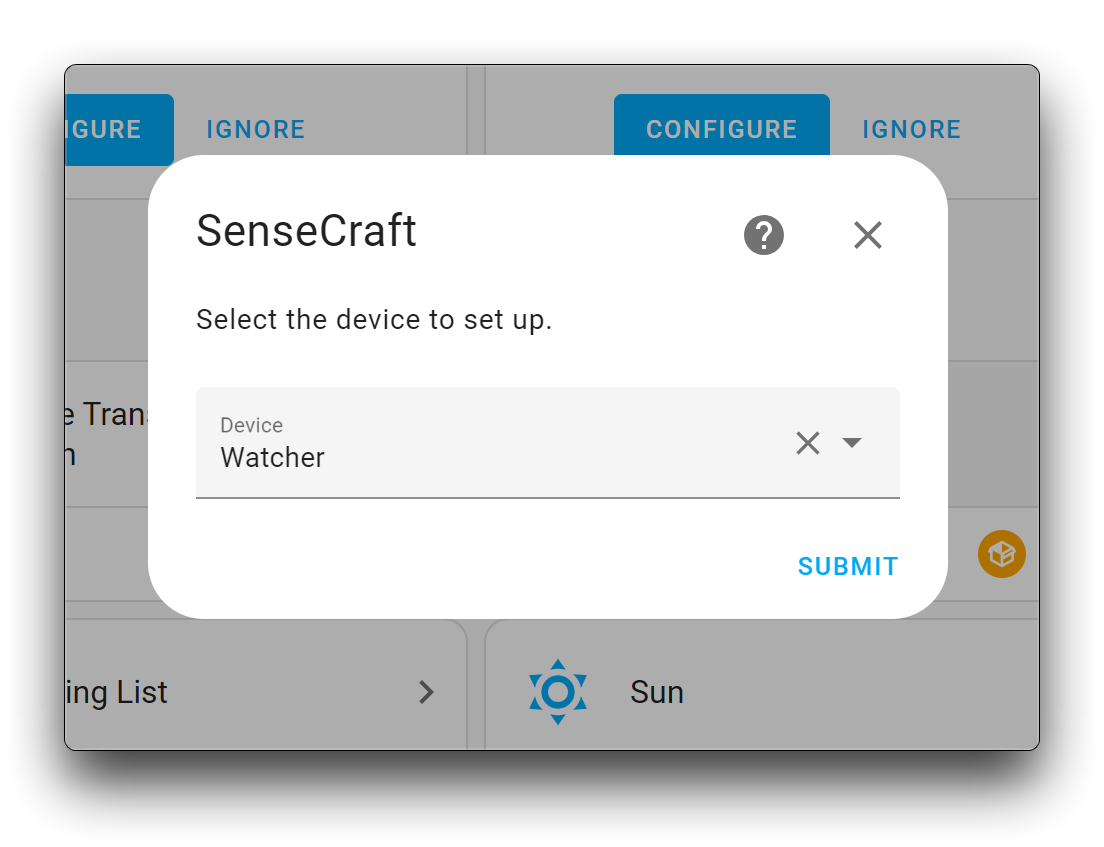
Inside the next page, please enter the Watcher's device EUI, you can find Watche's EUI inside the SenseCraft APP's Watcher's Setting.
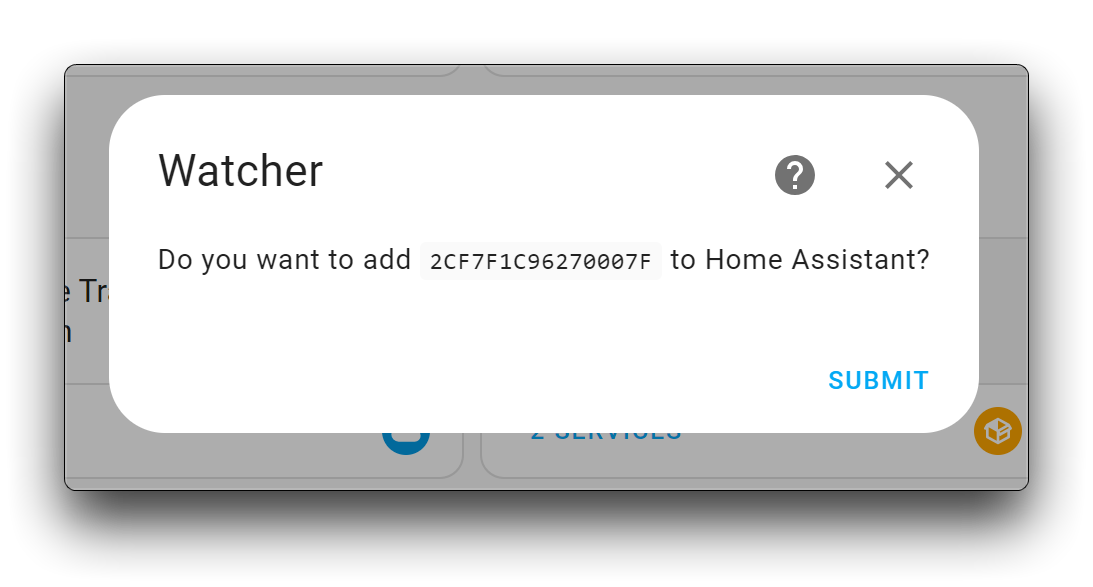
Please make sure the EUI is all capitalized!
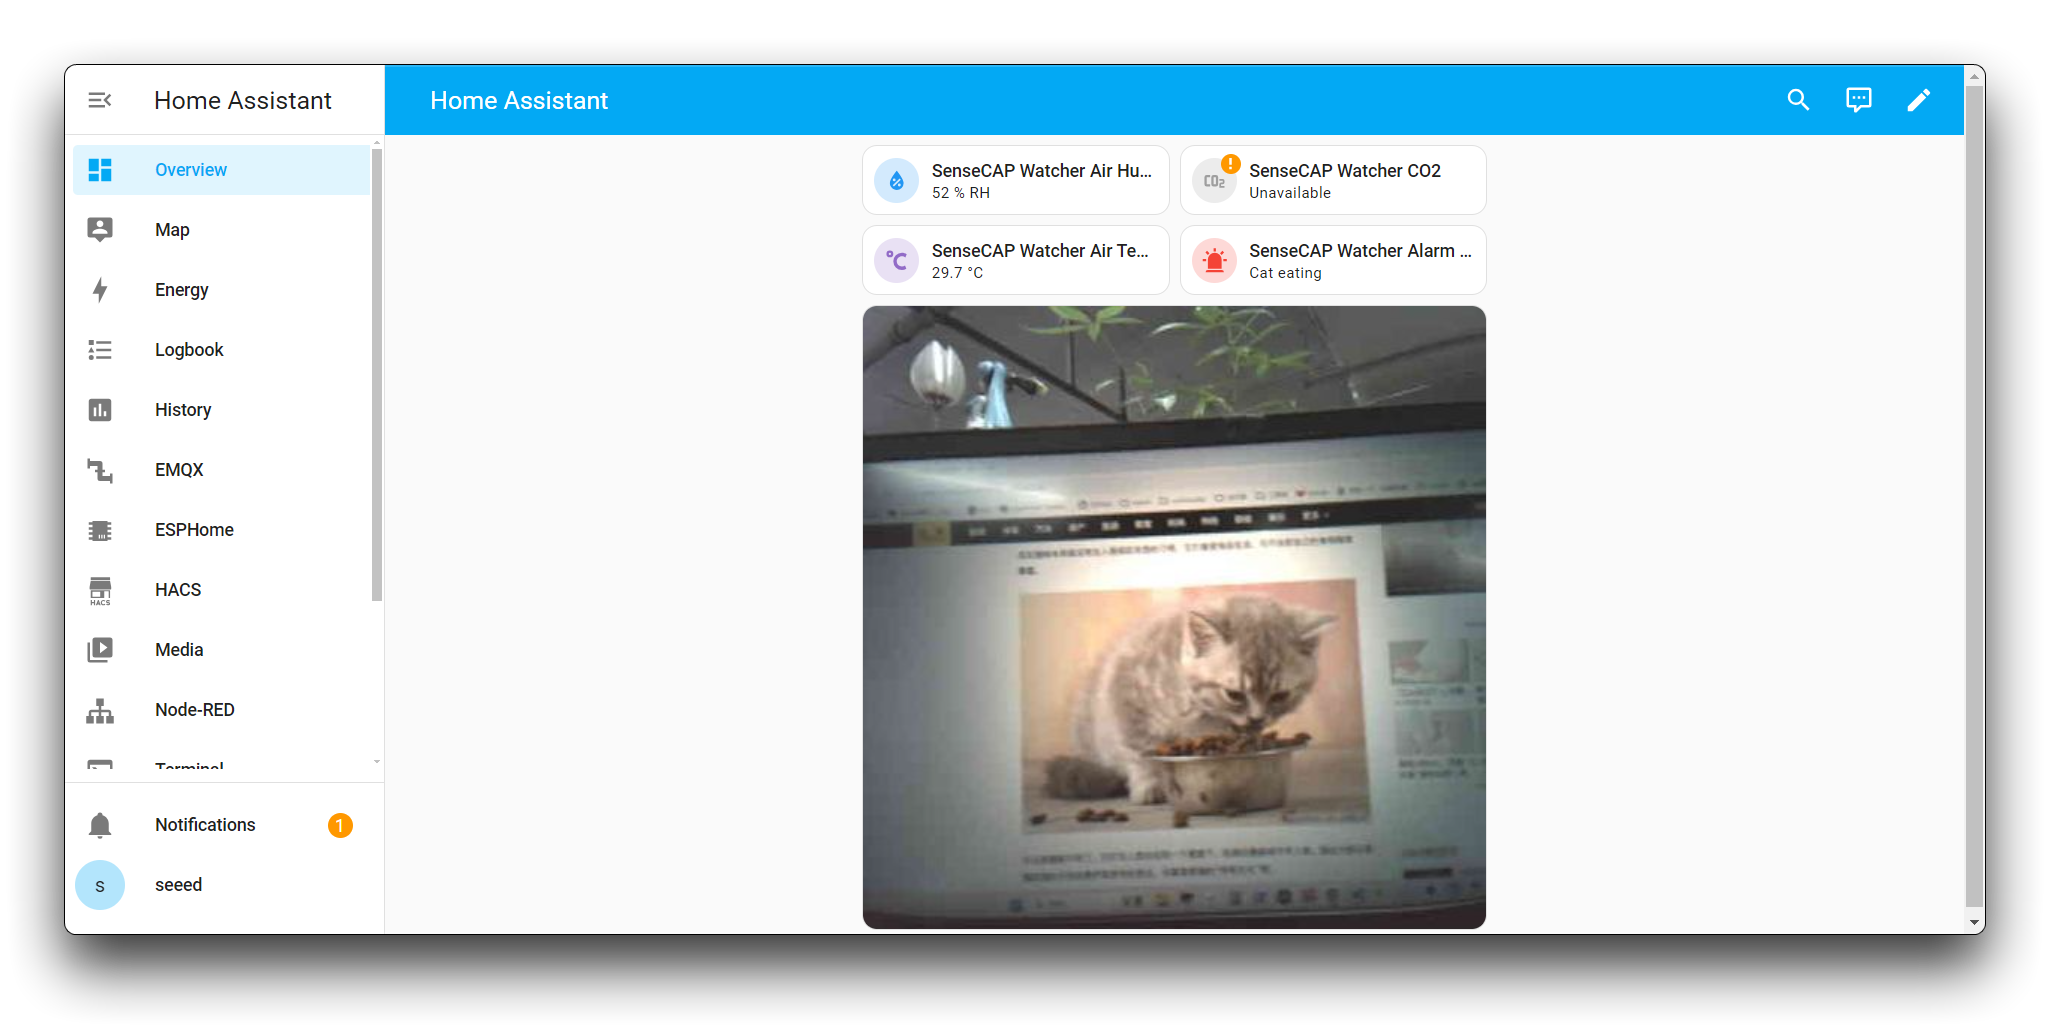
After SUBMIT, Watcher's Home Assistant component will be automatically added to display inside the Dashboard, which should be in a state of no data right now.
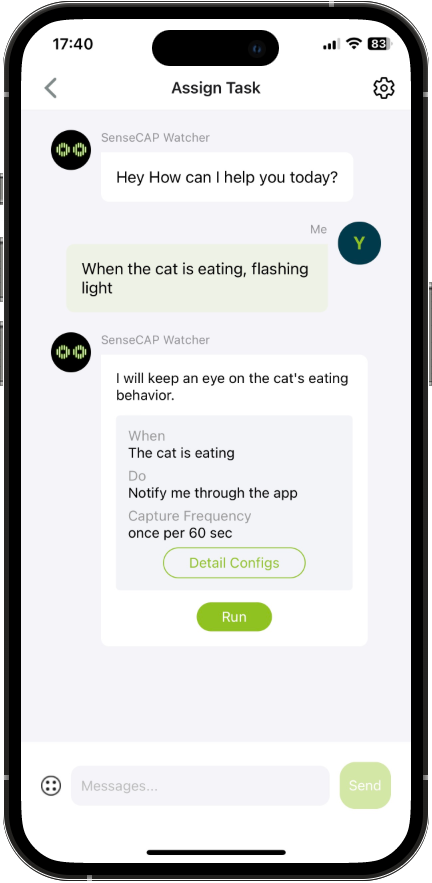
Step 6. Place the task and configure the HTTP Message Block
For Watcher's data to reach Home Assistant, then you need to have Watcher in a state where the task is running and configure the HTTP Message Block to send a stream of alarms to Home Assistant.
For example, I'm now placing a task on Watcher to detect if a cat is eating.
Inside Detail Config, find ‘If yes, then do the following’ and tick the HTTP Push Notification box below.
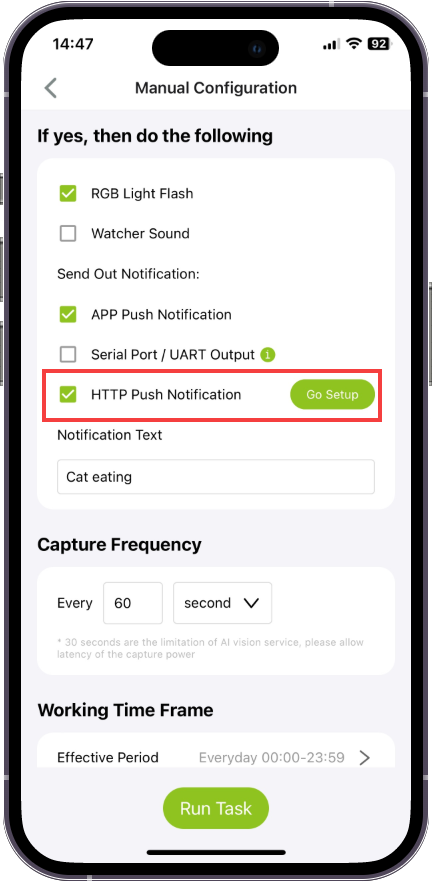
Then click on the Go Setup button and configure the Home Assistant information in there to make sure the data can reach the Home Assistant.
-
HTTP URL: Fill in Home Assistant's IP address in full, port number 8887. e.g.
http://192.168.1.151:8887. -
HTTP Token: leave blank spaces in writing.
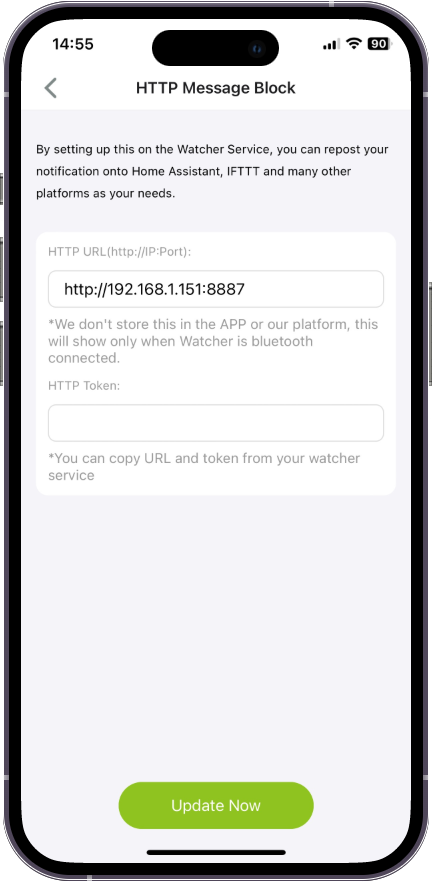
After confirming that it is filled out correctly, click Update Now at the bottom. then the task is sent down to Watcher.
Next, when Watcher detects your cat eating, it triggers an alarm and reports the data from the sensor to Home Assistant. based on this, you are free to set up the automation of your smart home next.
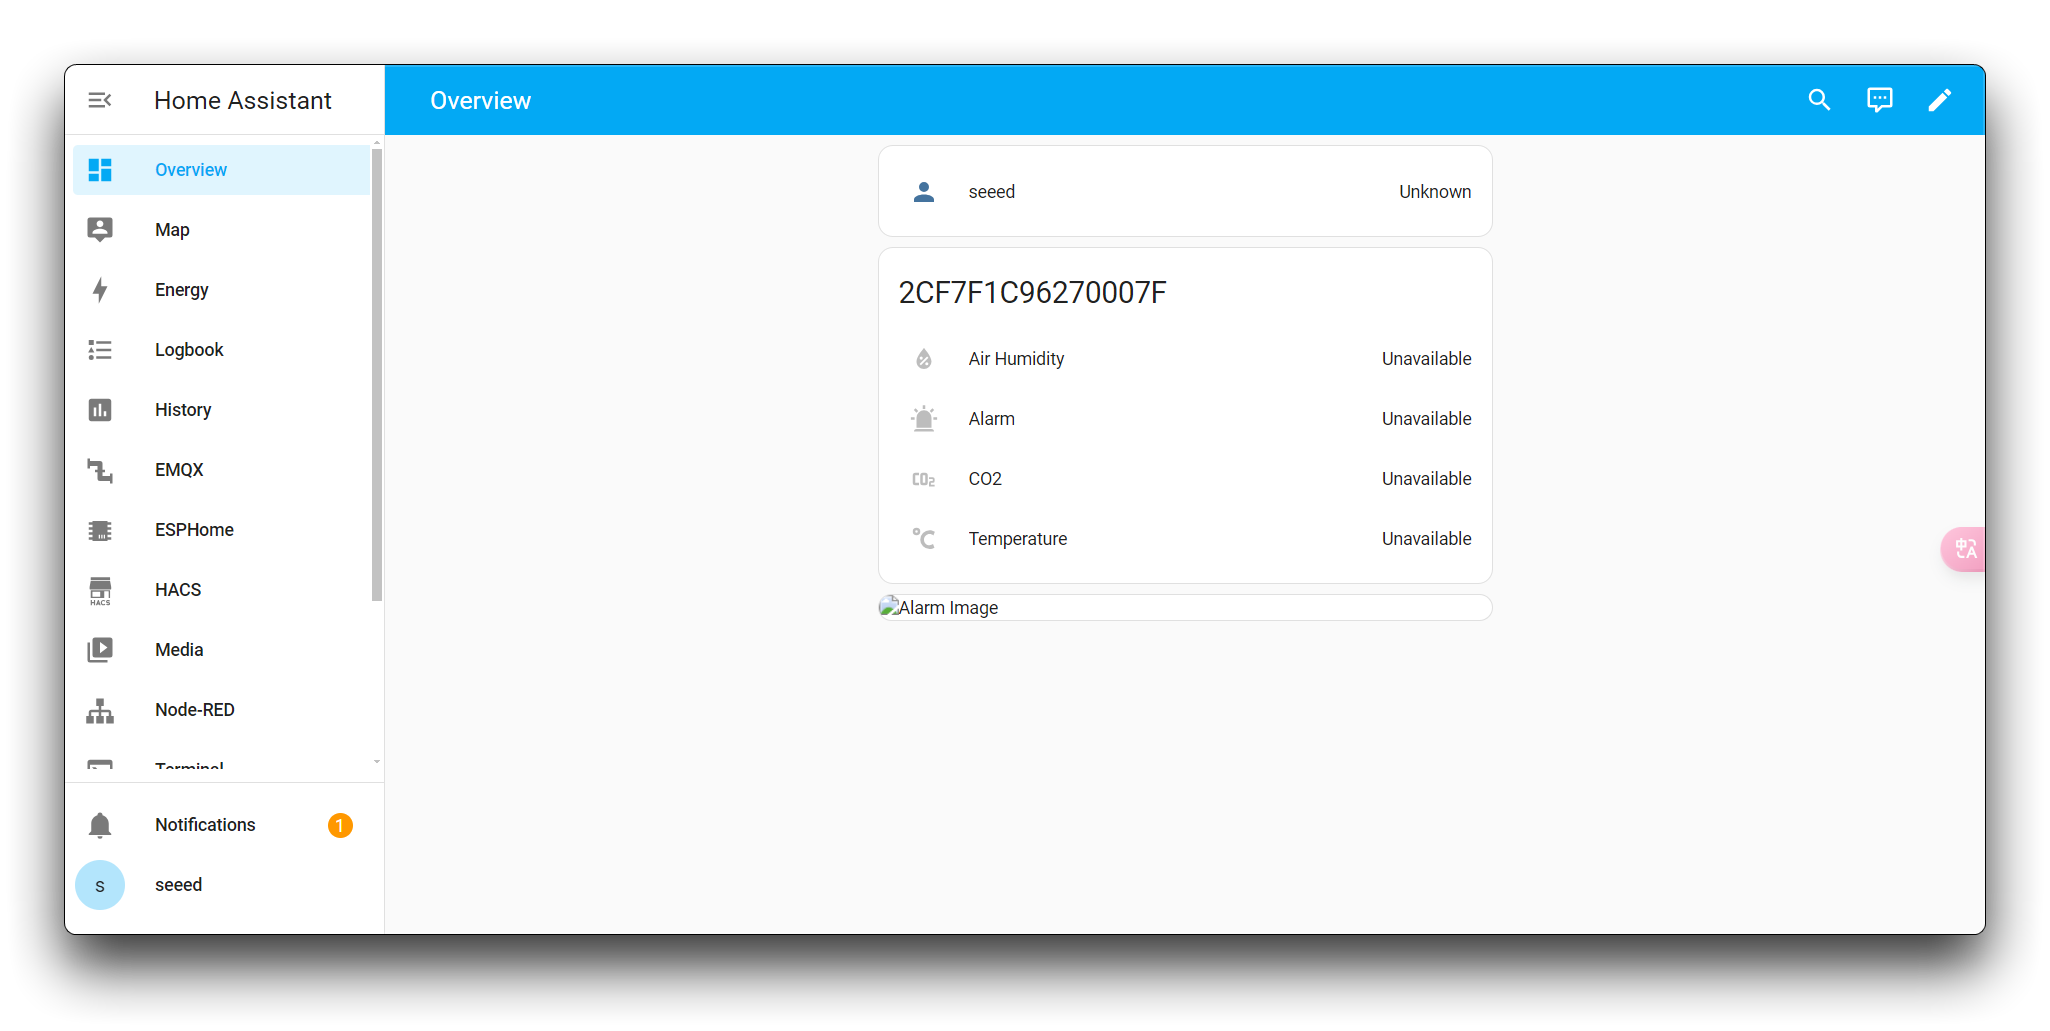
Click to view the sample Dashboard code
views:
  - type: sections
    title: Home Assistant
    path: home
    icon: mdi:home-assistant
    sections:
      - cards:
          - type: tile
            entity: sensor.air_humidity
            name: SenseCAP Watcher Air Humidity
            color: blue
            show_entity_picture: true
          - type: tile
            entity: sensor.co2
            name: SenseCAP Watcher CO2
            color: deep-orange
          - type: tile
            entity: sensor.temperature
            name: SenseCAP Watcher Air Temperature
            color: purple
            show_entity_picture: true
          - type: tile
            entity: sensor.alarm
            name: SenseCAP Watcher Alarm Message
            color: red
            show_entity_picture: true
          - type: picture
            image_entity: image.alarm_image
Tech Support & Product Discussion
Thank you for choosing our products! We are here to provide you with different support to ensure that your experience with our products is as smooth as possible. We offer several communication channels to cater to different preferences and needs.