Integration of real-time heat map with Grafana data dashboard
Introduction
This project conducts target detection using the YOLO11n model built into reCamera. It performs fuzzy processing on personnel targets and displays a heat map effect. All of this is handled locally within reCamera! And reCamera will send the detected data to the locally running Influxdb database. Then, Grafana reads the data from the Influxdb database to display real-time data dashboards.
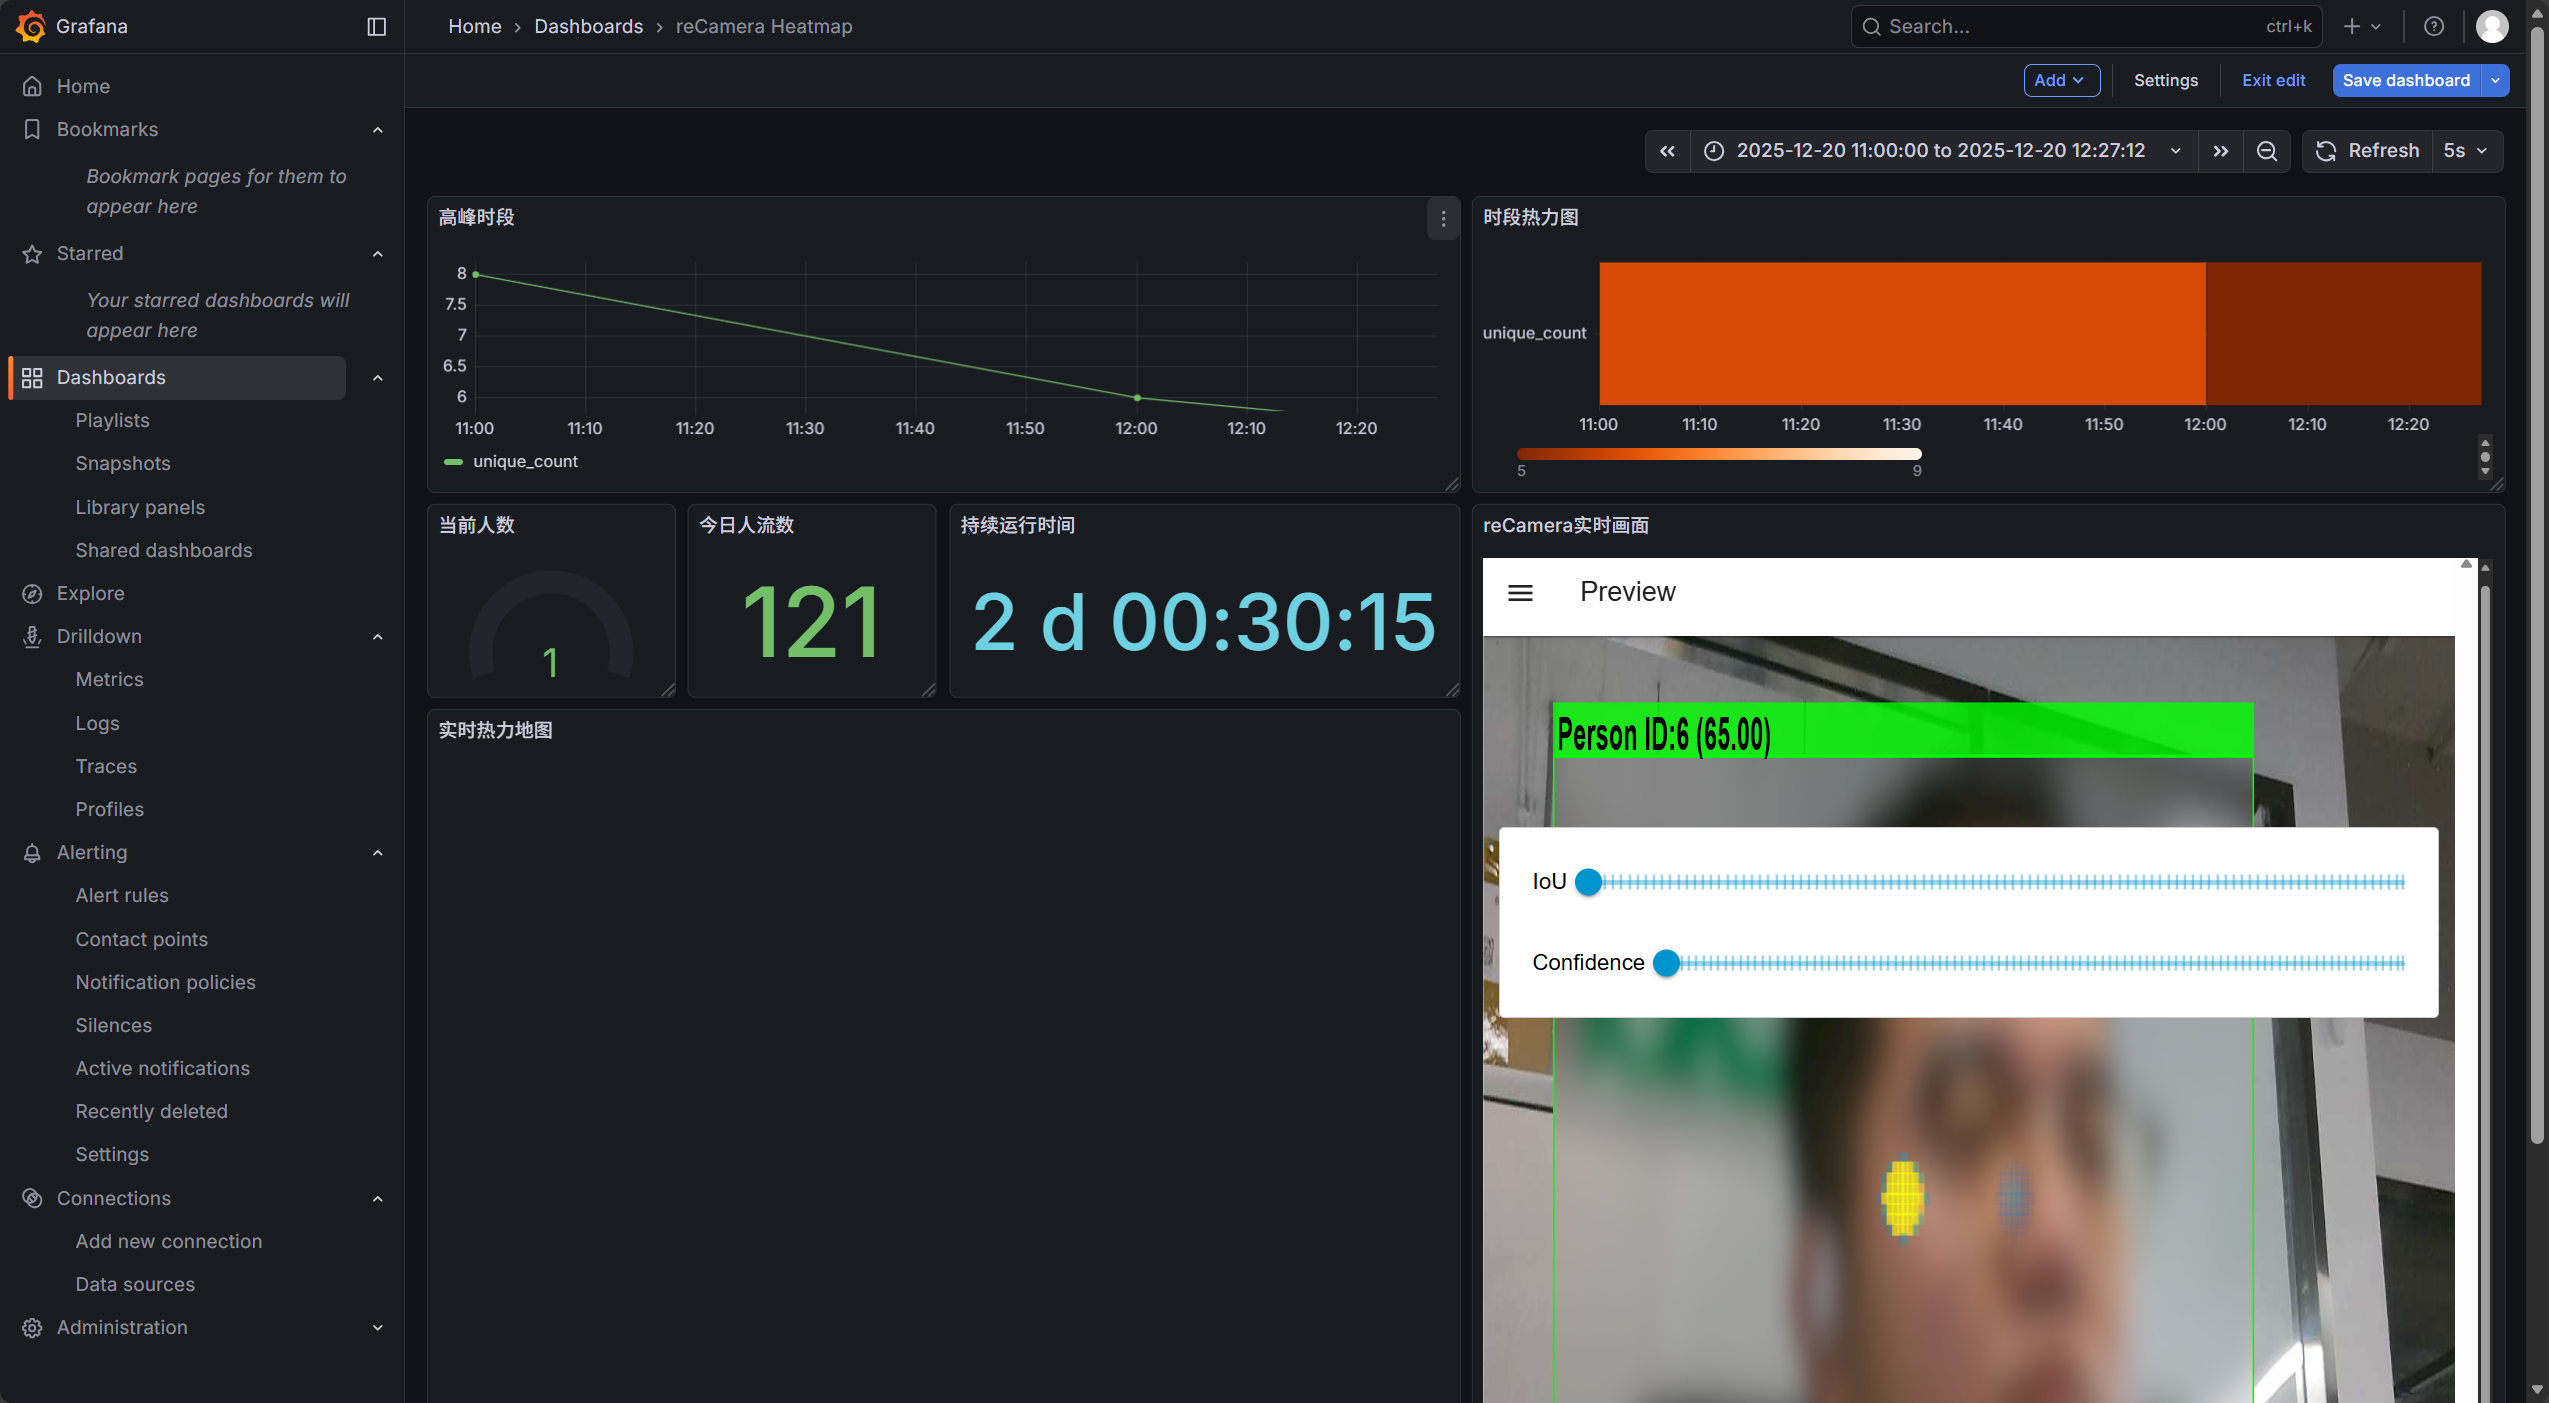
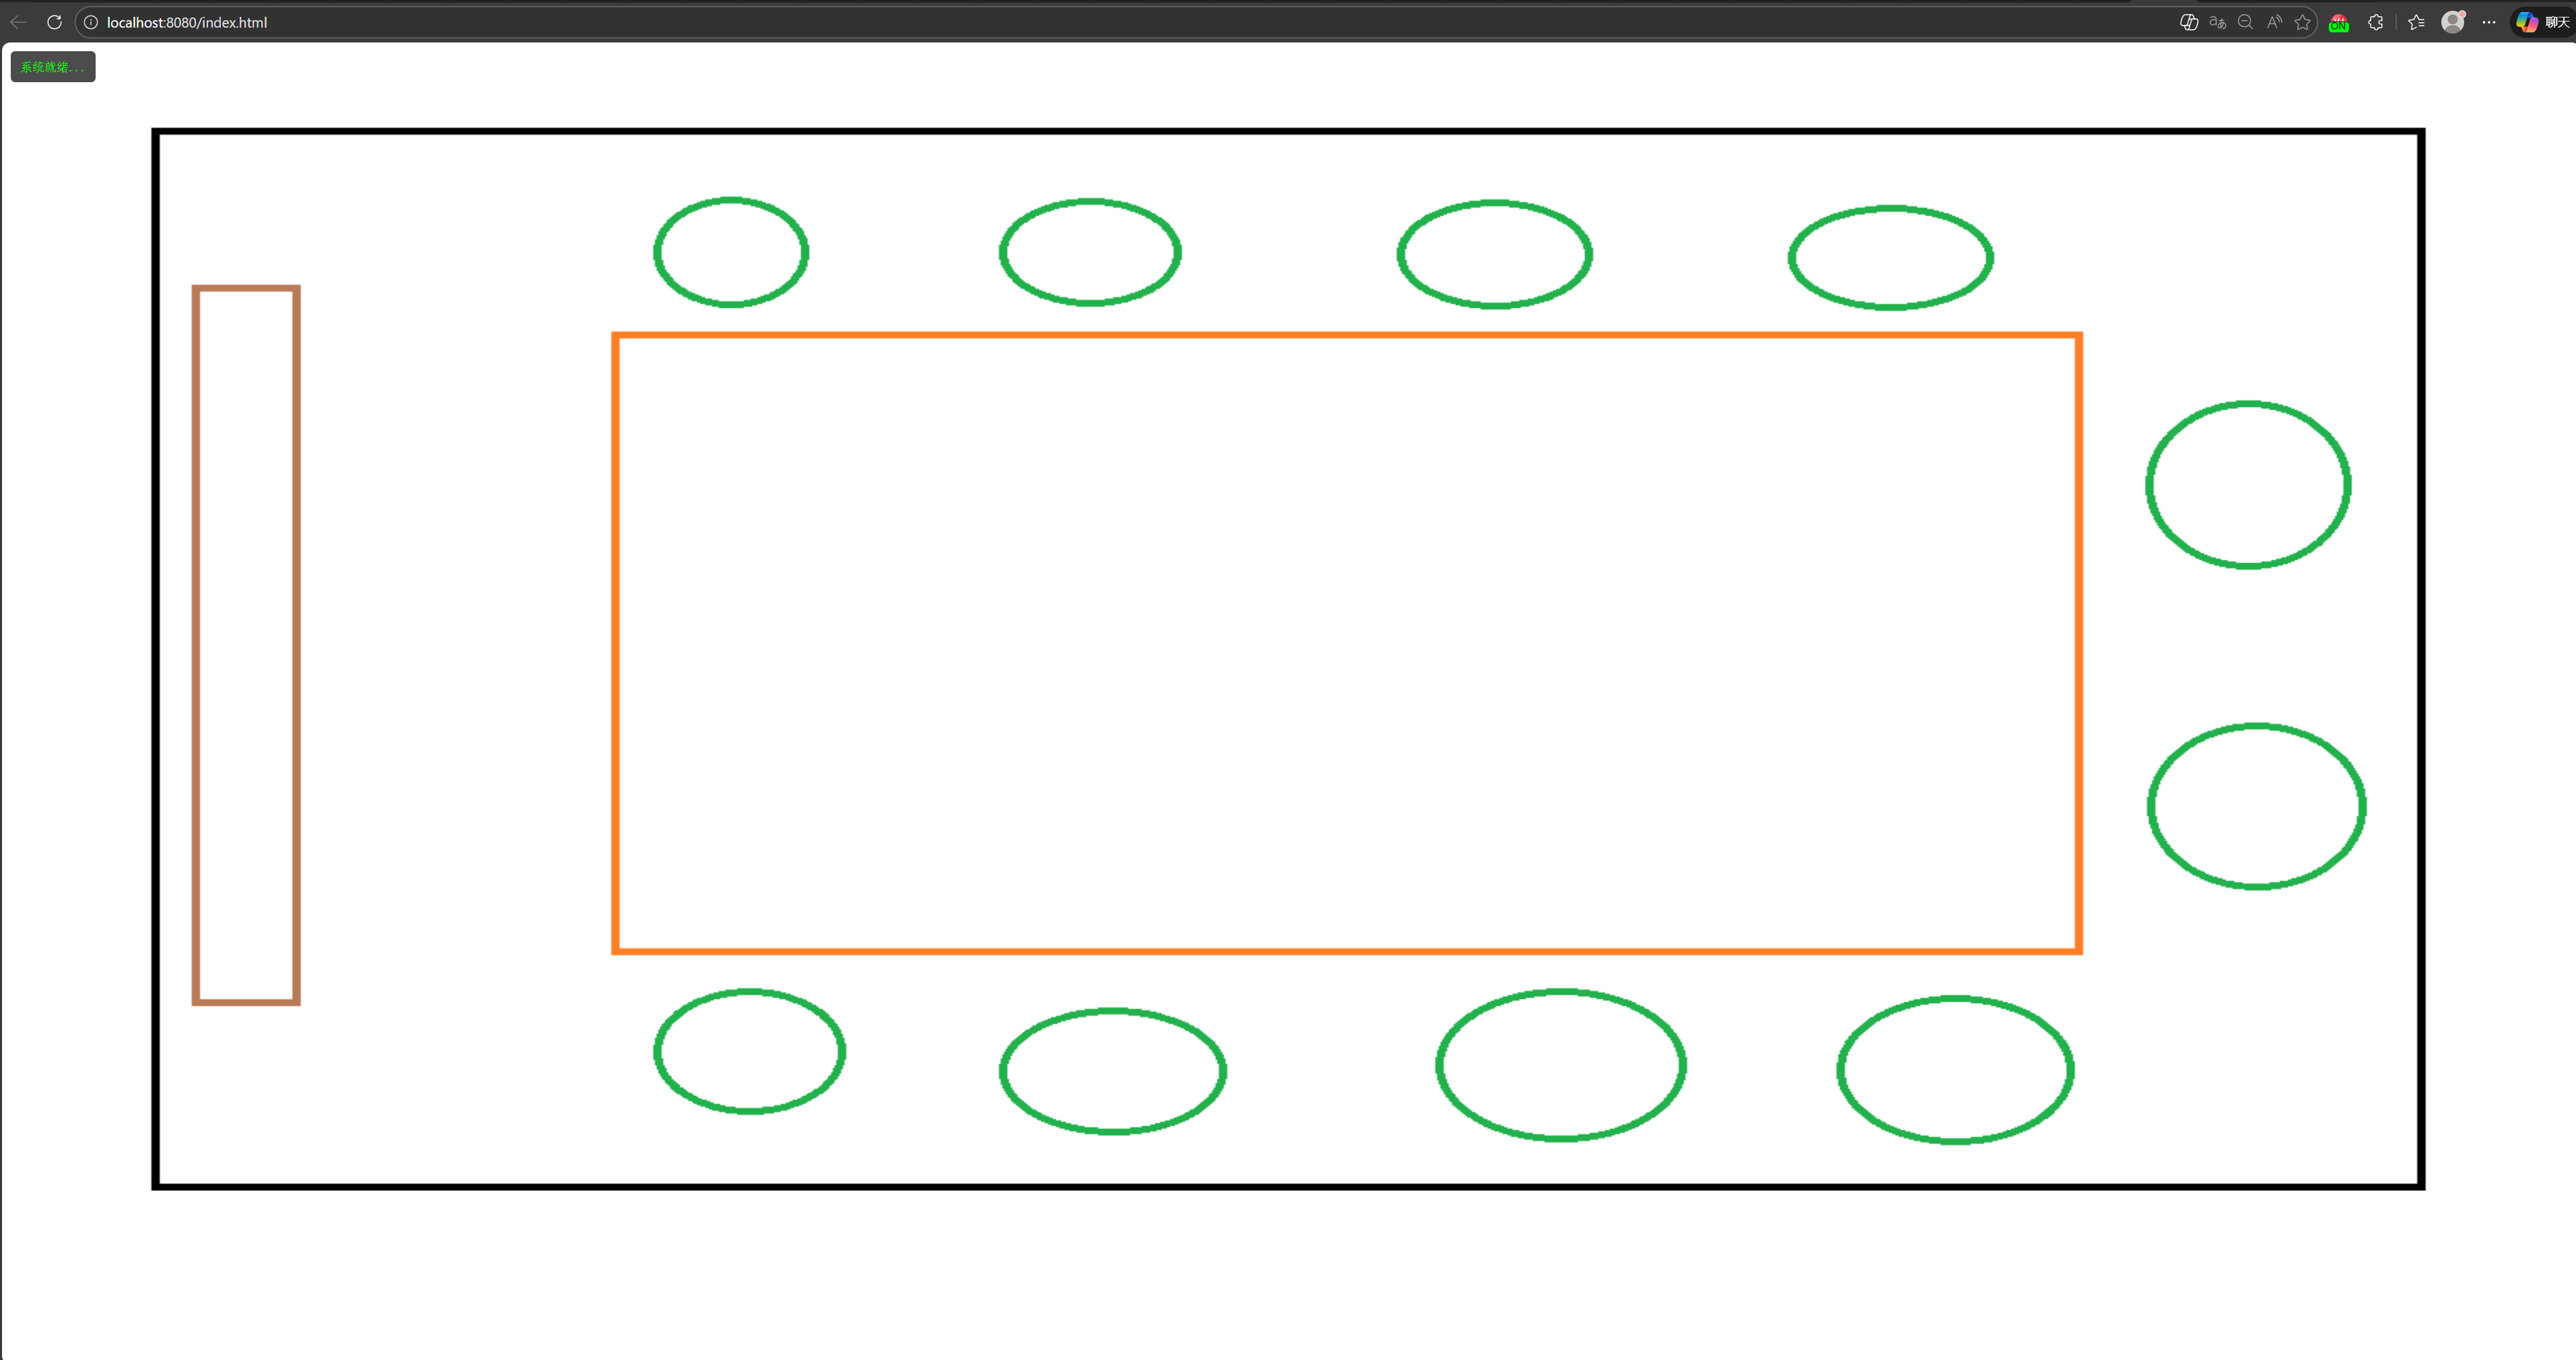
Here is the usage effect after completing this demo.

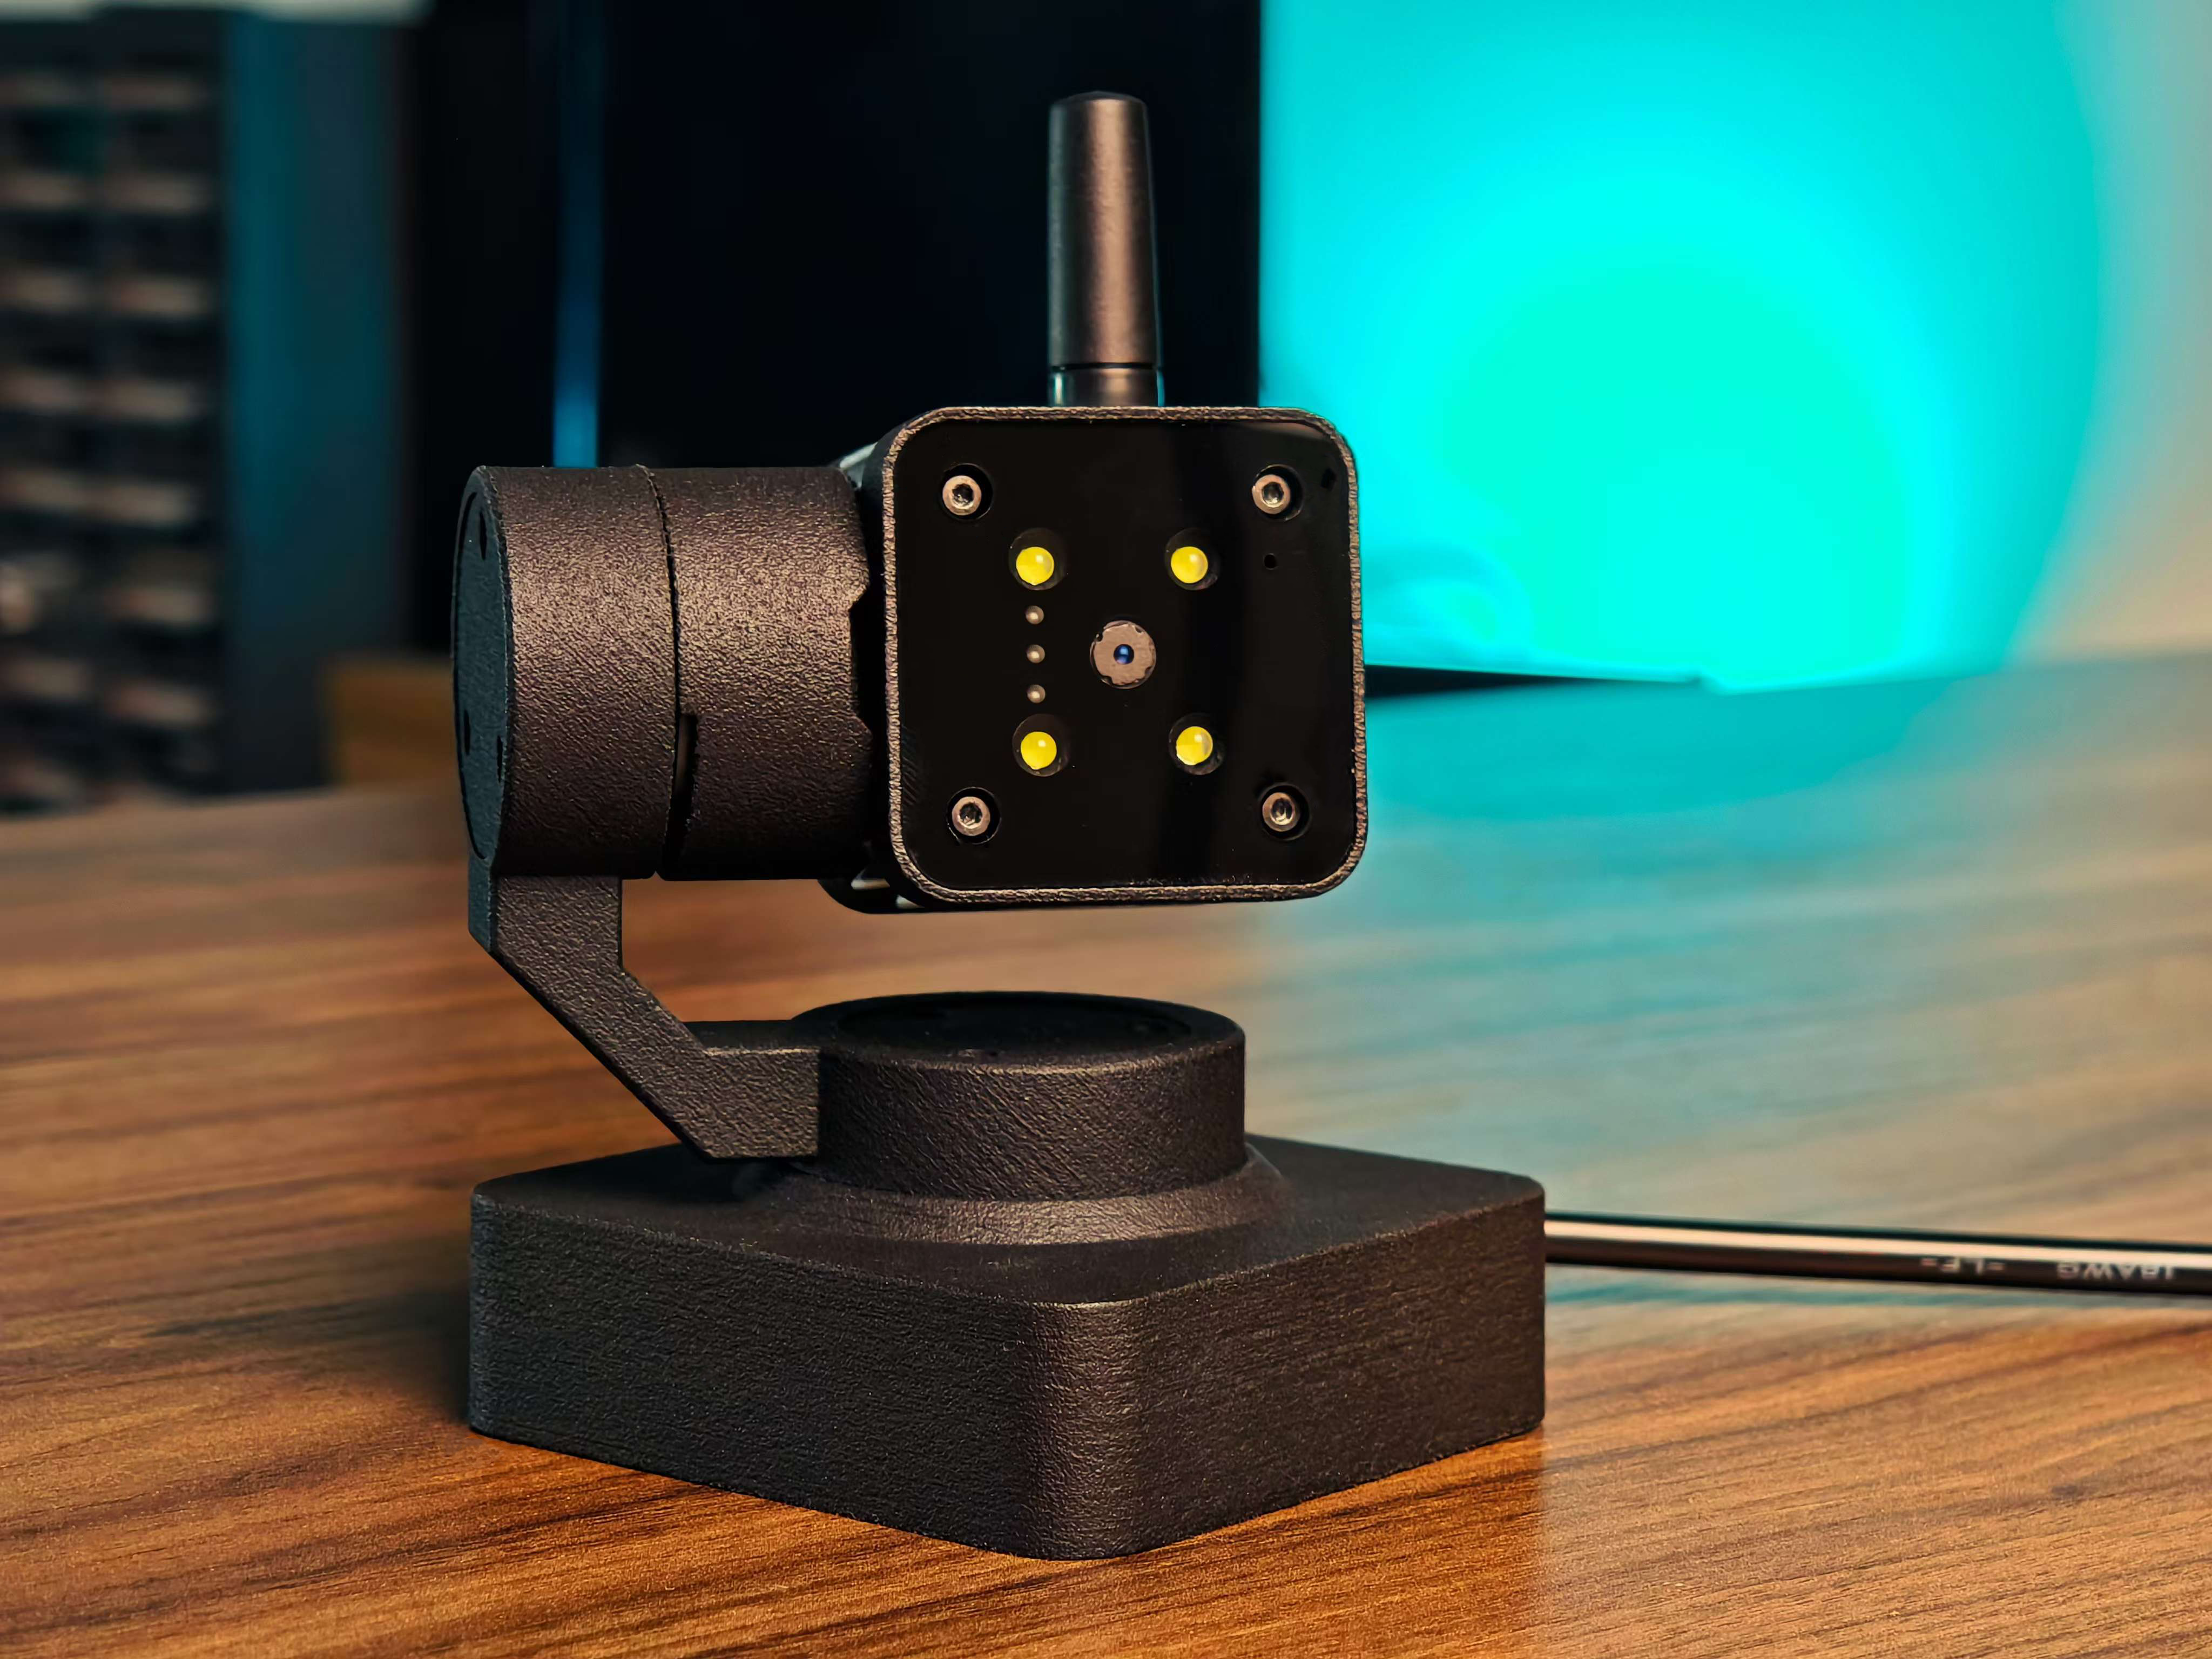
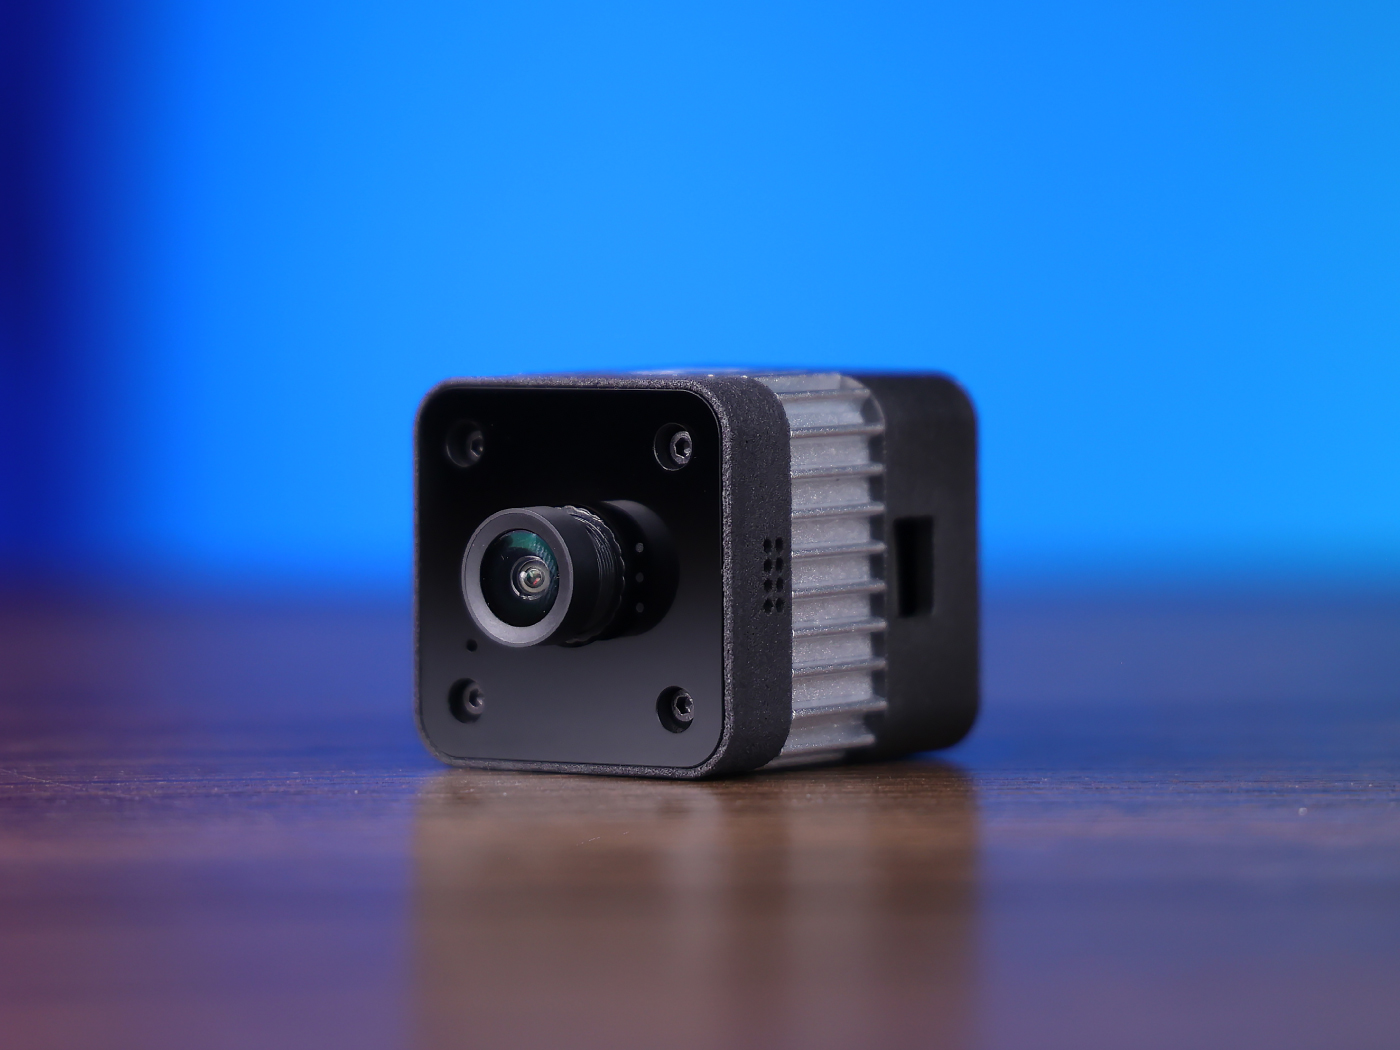
Hardware Preparation
One reCamera one computer
| reCamera 2002 Series | reCamera Gimbal | reCamera HQ POE |
|---|---|---|
 |  |  |
1.InfluxDB configuration
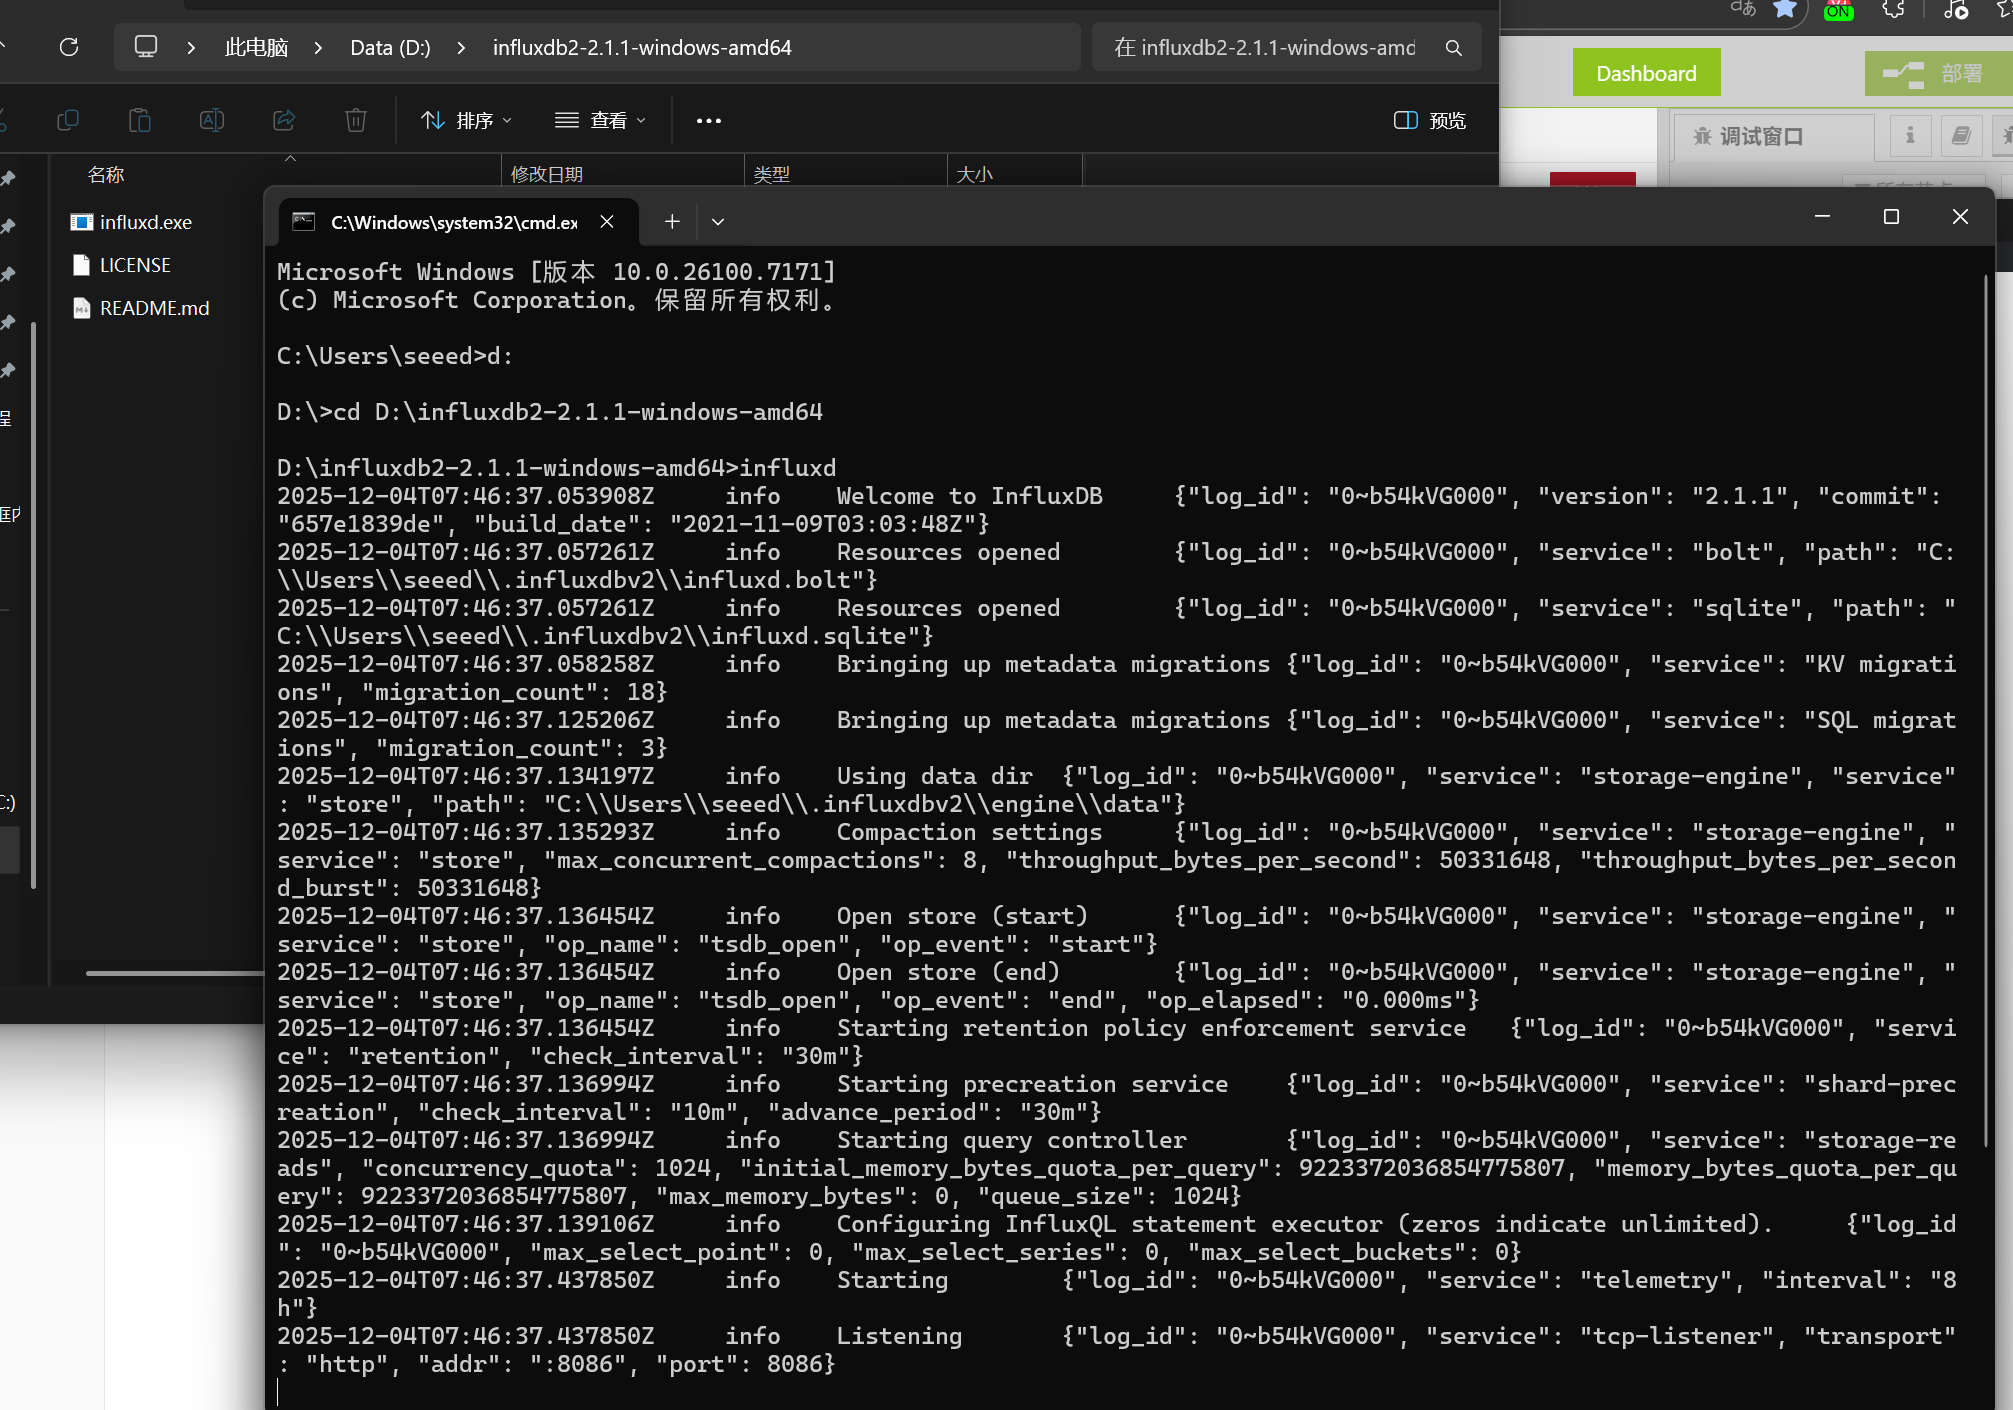
1.1 Download the InfluxDB2-2.1.1 and launch
Go to the download link, download it and extract it. Press Win + R to open Command Prompt, then enter the directory where the file was extracted, and finally type:
influxd
As shown in the following figure, the startup is successful
If your device is an ARM architecture device running a Linux system such as a Raspberry Pi, the download link is here.
If your device is an AMD architecture device running a Linux system, please click here to download.
Linux device startup For InfluxDB, the same procedure applies. Enter the directory after the decompression and run it:
./influxd

1.2 Enter the InfluxDB's local webpage for configuration
Then open a cmd terminal and enter the following command to query your computer IP
ipconfig
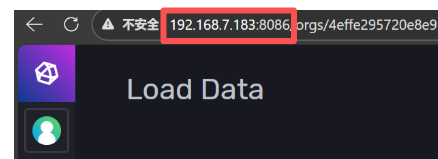
Then enter the queried IP into the browser, then add 8086 ports to enter the main interface of the InfluxDB.
For example, my IP is 192.168.7.183, then enter 192.168.7.183:8086 in the browser

Then click "Get Started" and fill in your own information. Note that in this step, be sure to remember the user name and password you set!!

Then click "Confgure Later"

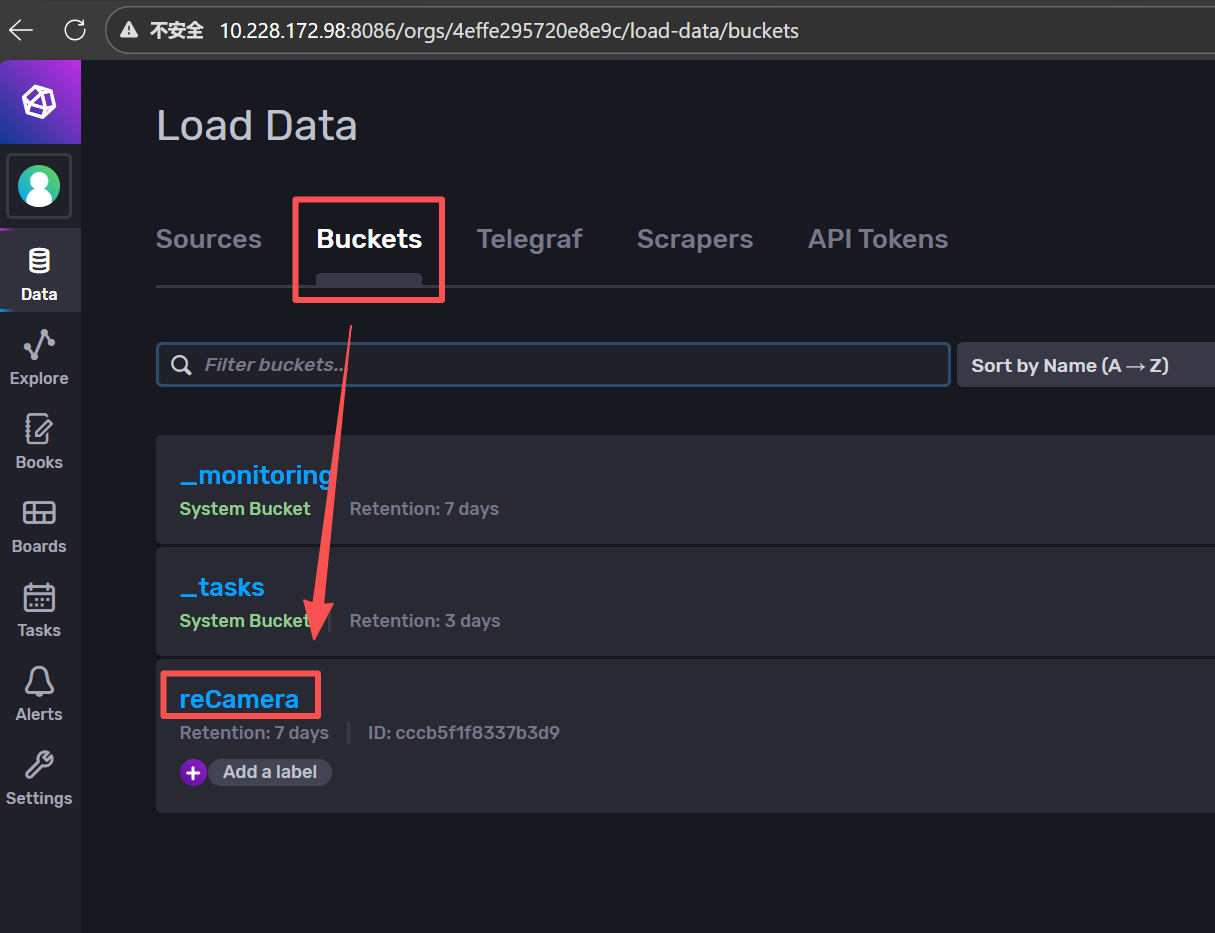
Then click Data to see the "Initial Bucket Name" that we just set in the step of filling in our own information. I filled in reCamera

Then click Setting to set the data retention time

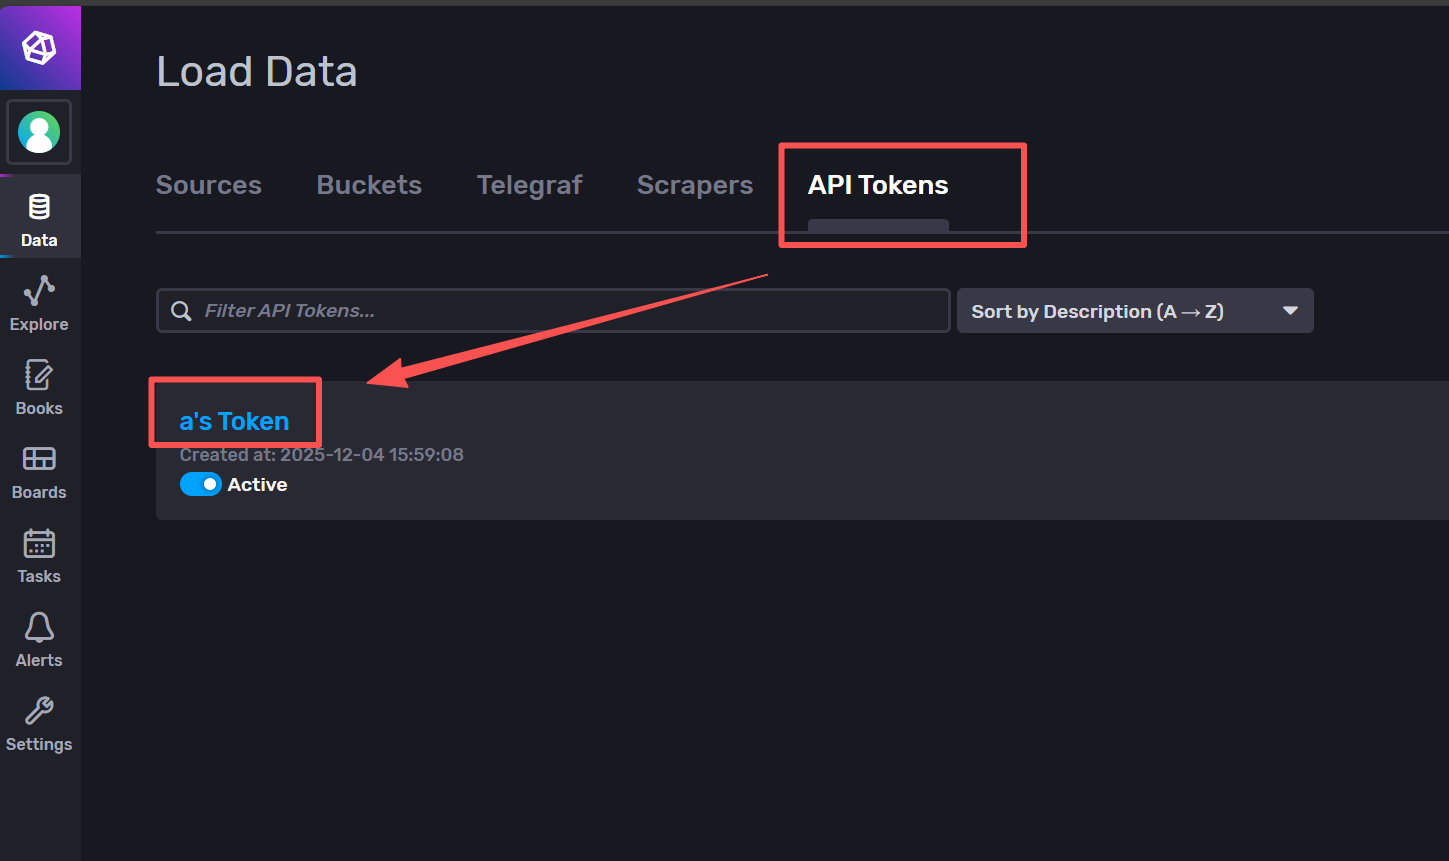
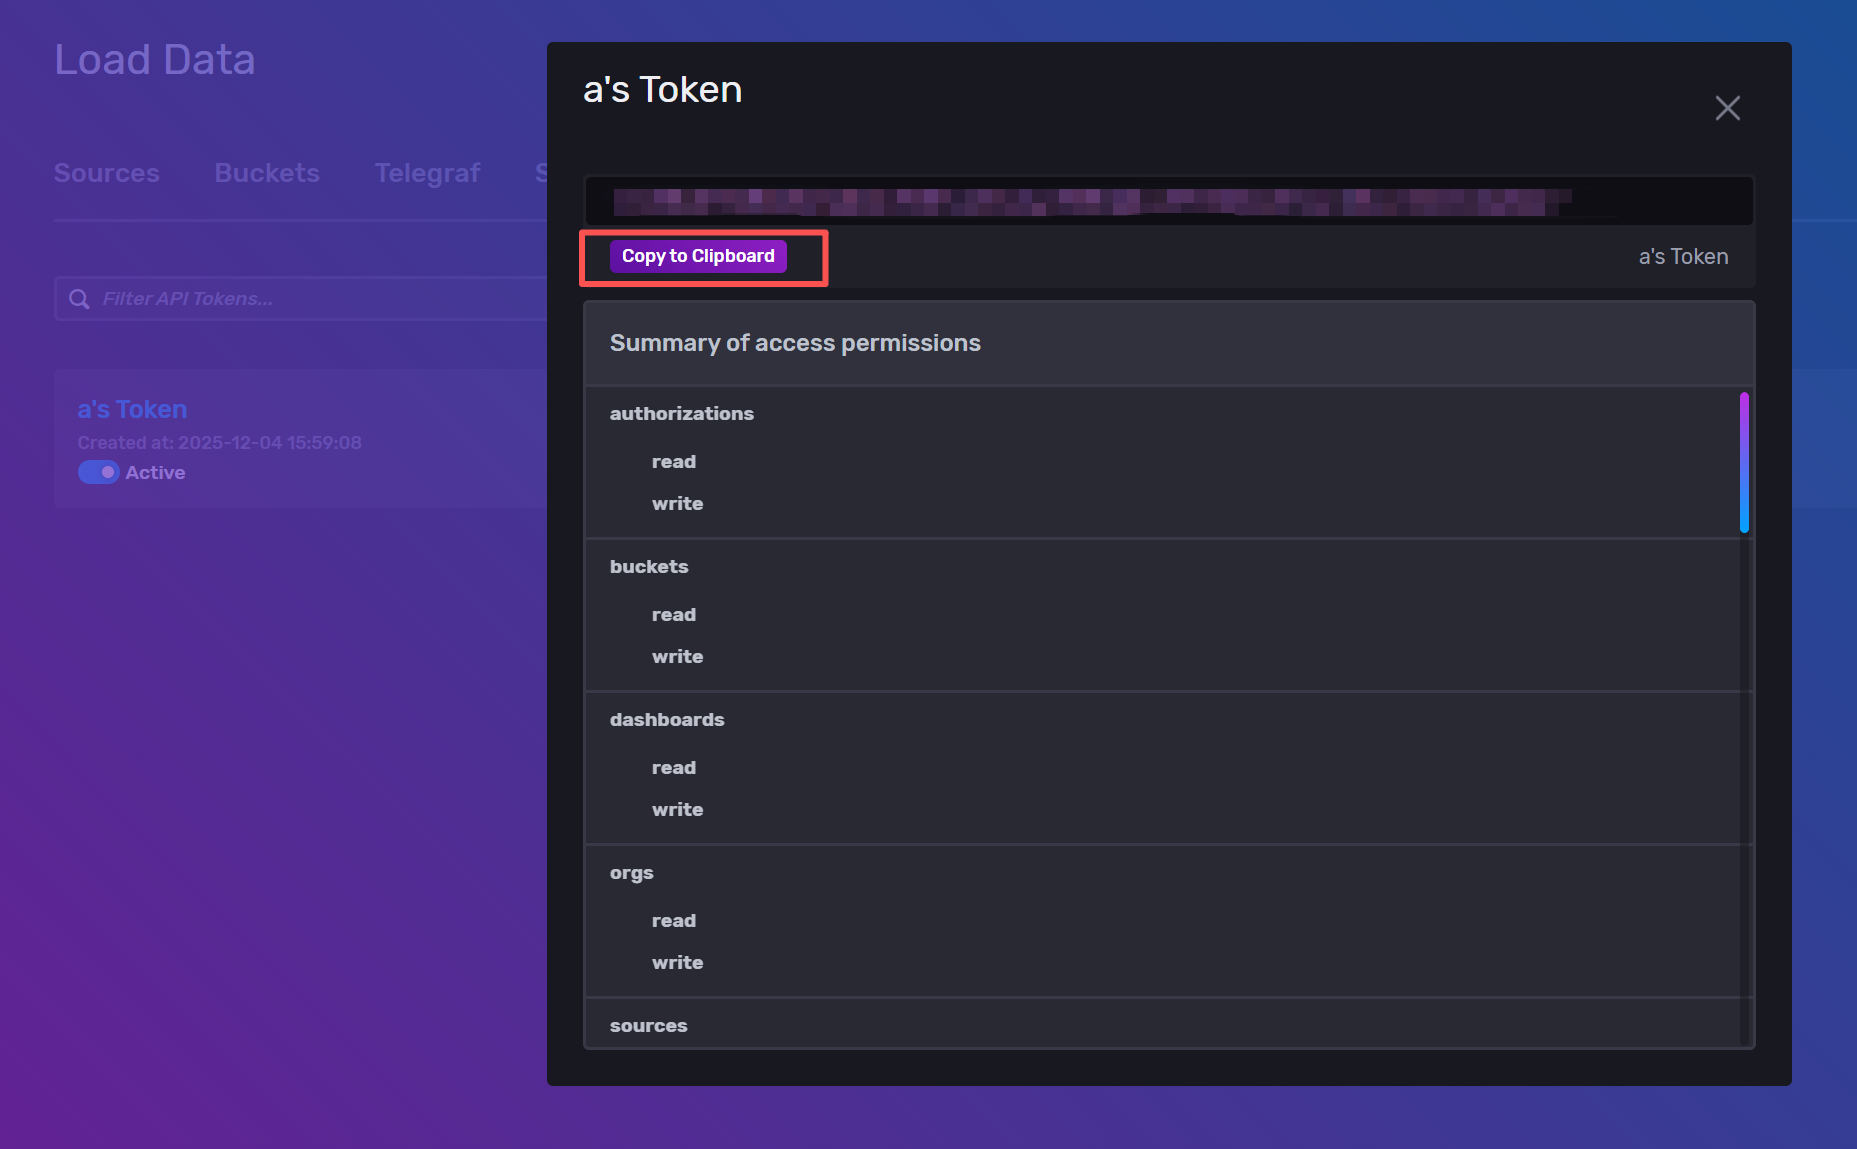
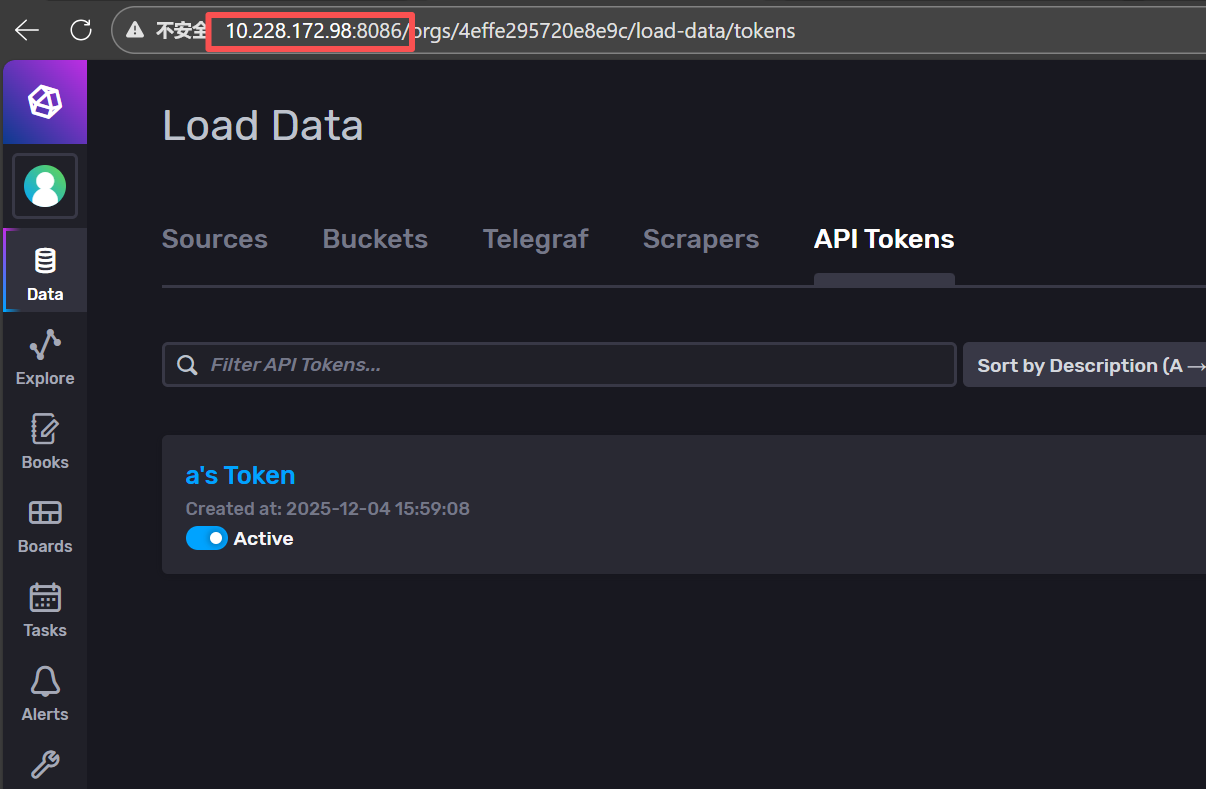
Click API Token to view the Token of your database, which will be used in the configuration of subsequent reCamera and the configuration of the heat map web page.

2.reCamera configuration
2.1 Connect reCamera to a Linux device (If you are not using a Linux device, please proceed to the next step and start from step 2.2)
If you plan to connect reCamera to a Linux device, I suggest that you first use a Windows or Mac computer to connect to reCamera and make some settings changes. Otherwise, reCamera will not be able to directly connect to the Linux device.
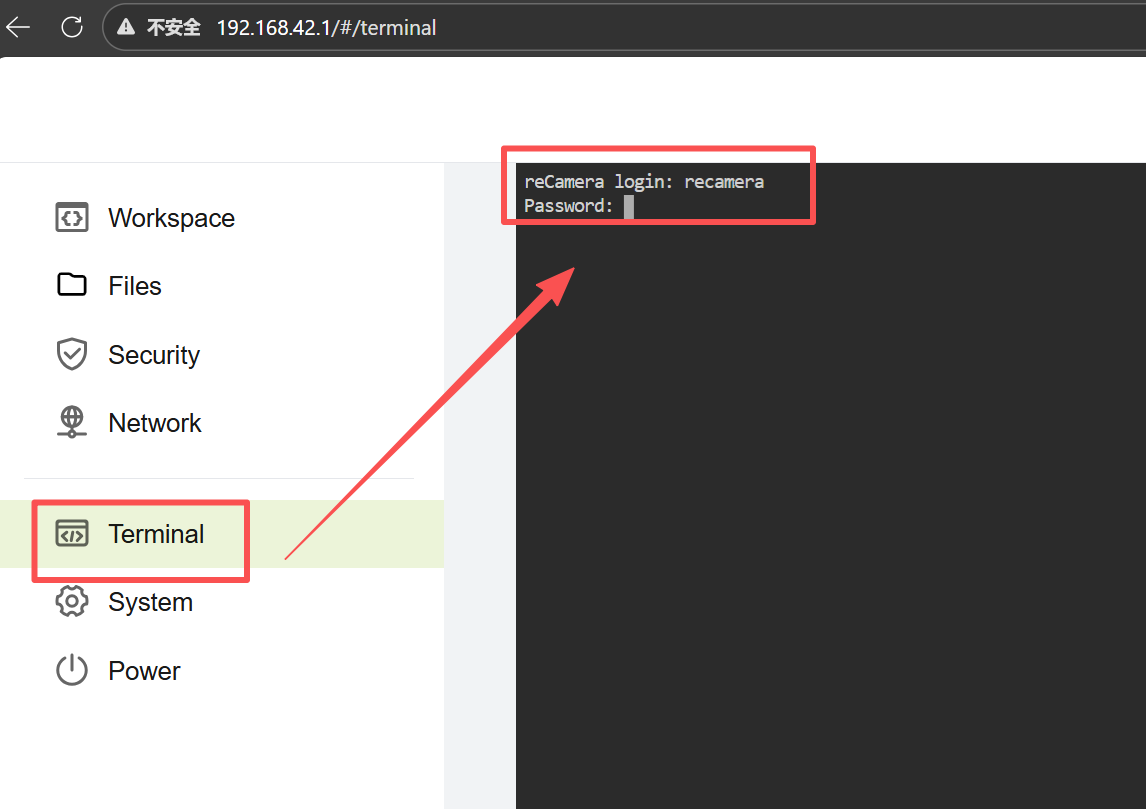
Take Windows as an example. Enter 192.168.42.1 in the browser, and then click "setting"

Then click on "Terminal", and enter the account name "recamera" and your password.
Then run it on the recamera terminal (this step will require you to enter the password again):
sudo rootfs_rw on

Then execute:
sudo vi /mnt/system/usb-ncm.sh
Then comment out this line (first press the "I" key on the keyboard to enter the write mode, then use the direction keys to reach this line, and add a "#" at the beginning). /etc/run_usb.sh probe acm >> /tmp/ncm.log 2>&1

Then just save and exit (press the ESC key on the keyboard to exit the write mode, and then enter ":wq" to save and exit).
It may become ineffective after multiple restarts and needs to be reset.
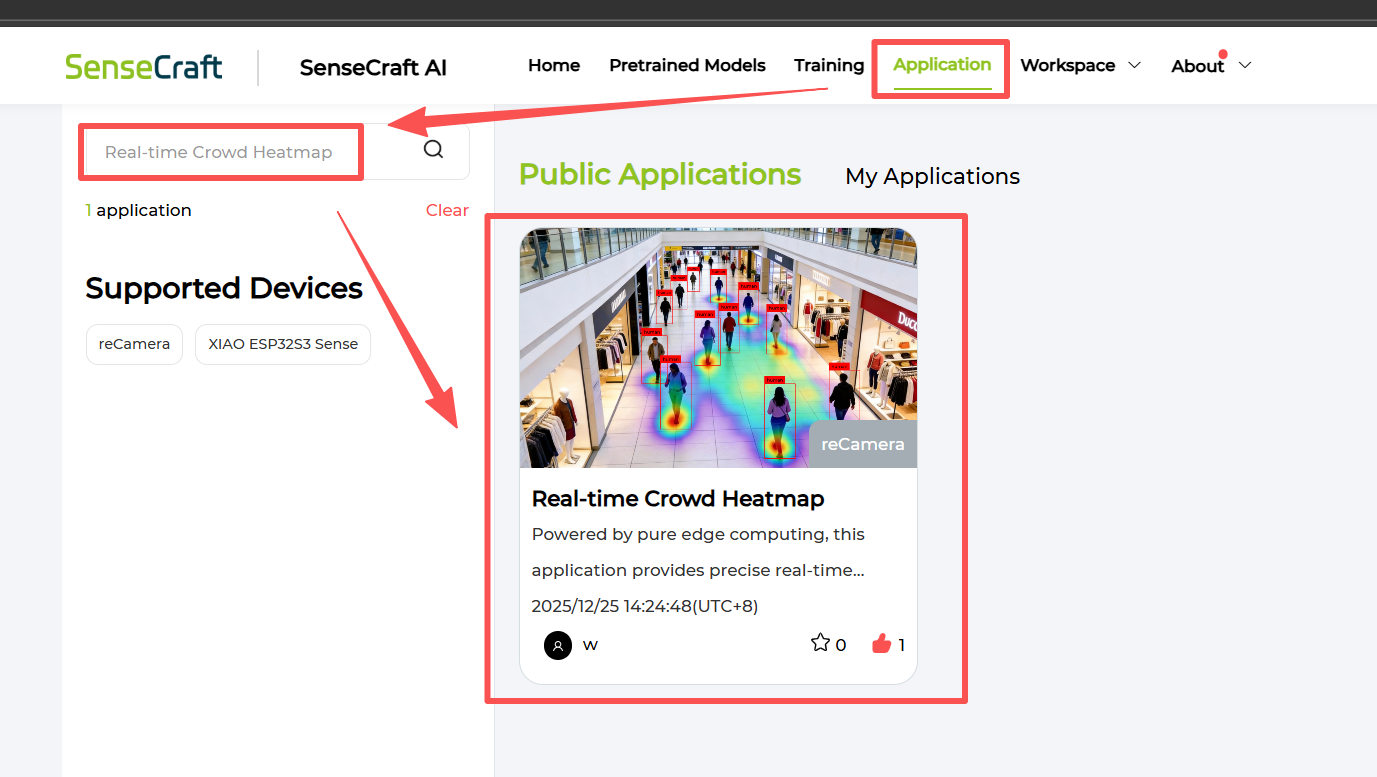
2.2 Install programs from SenseCraft platforms in reCamera
Go to the SenseCraft platform - Application - search box and enter "Real-time Crowd Heatmap" to search, find the application called "Real-time Crowd Heatmap" and deploy it to your reCamera.

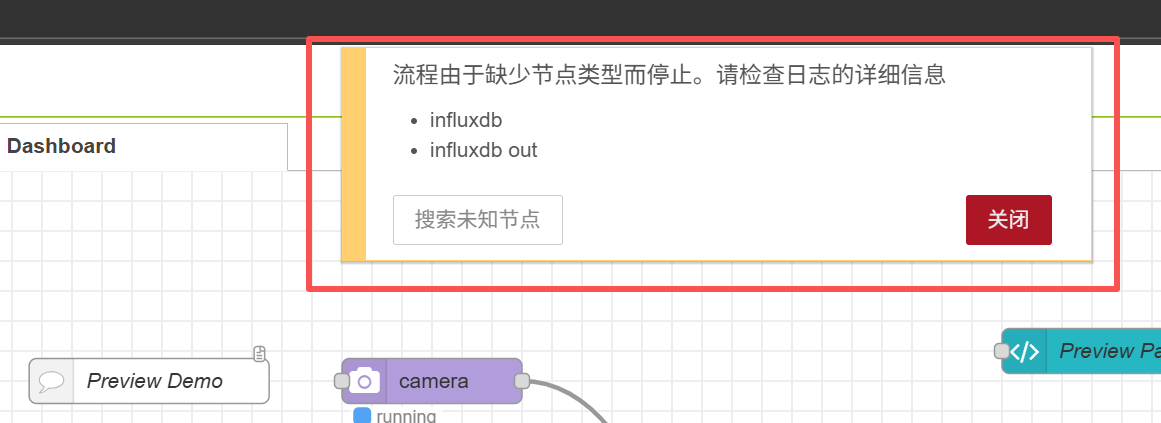
2.3 connect the network and install the missing node
After entering the workspace, this warning will pop up. This is normal. Click Close first. Later we need to install a node for the reCamera.
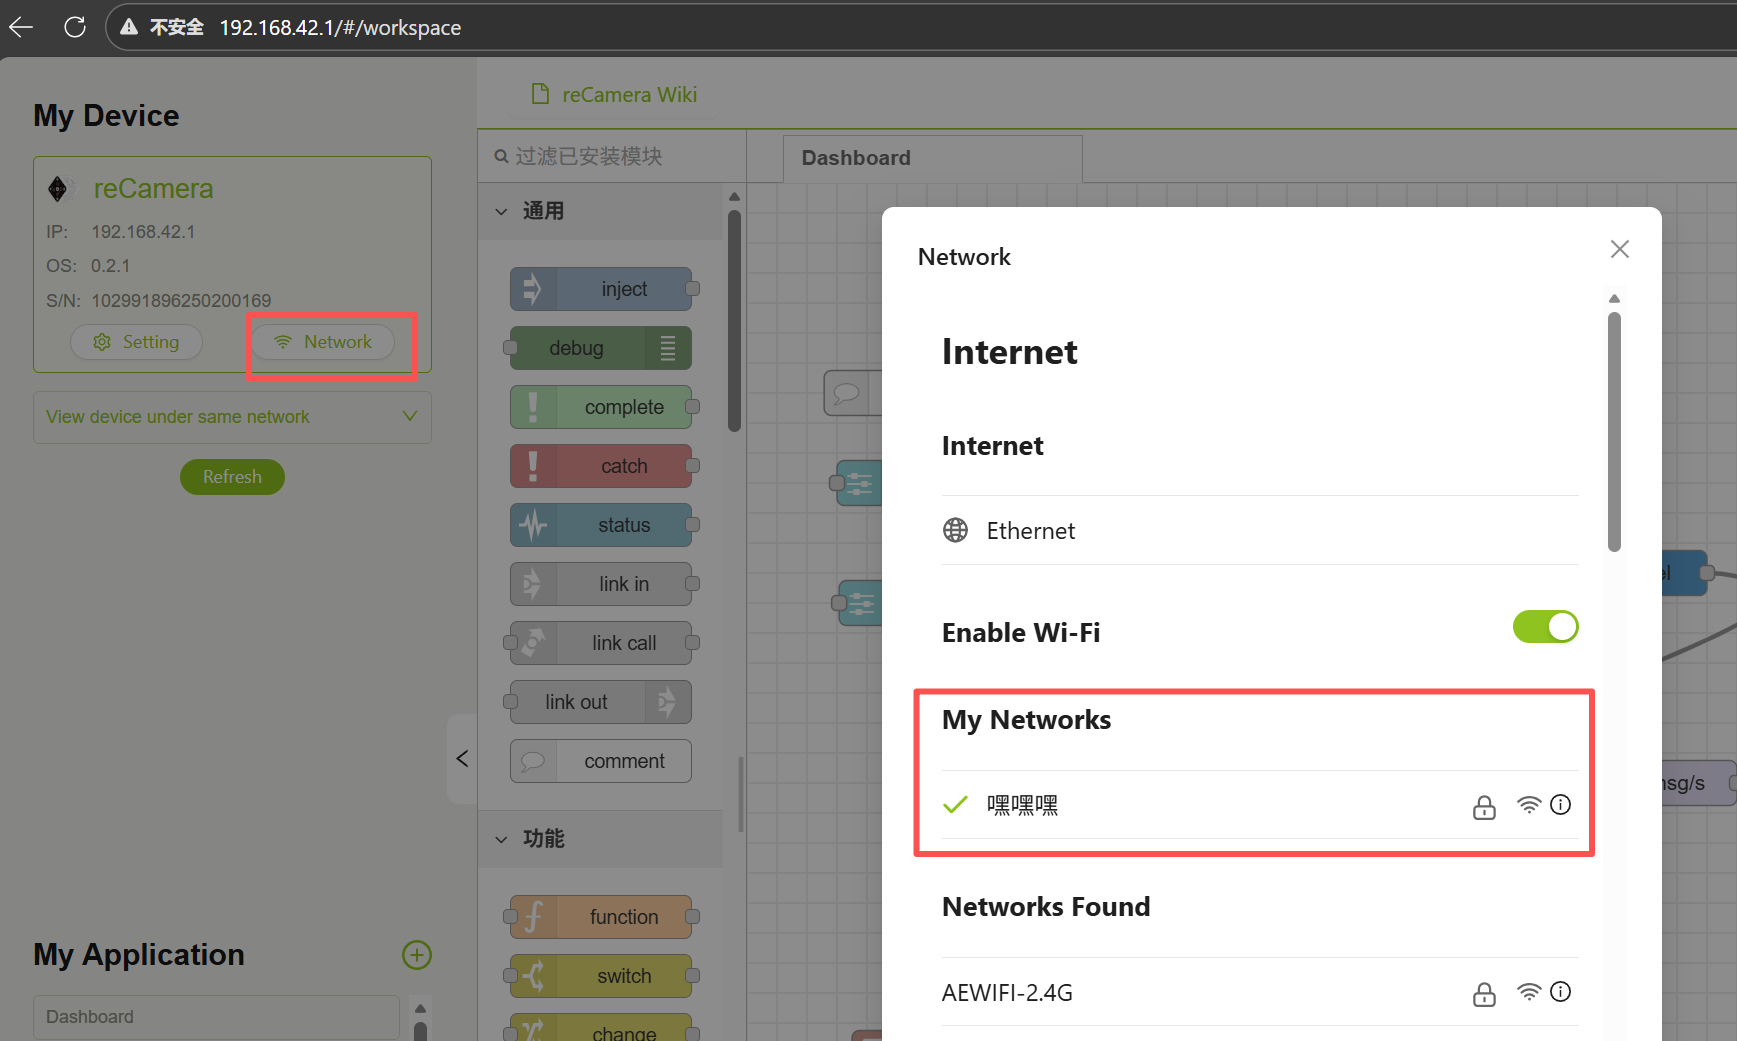
Connect the reCamera to the network (make sure that it is connected to the same network as your computer!! This is very important later)
Then install the node-red-contrib-influxdb node to the reCamera.
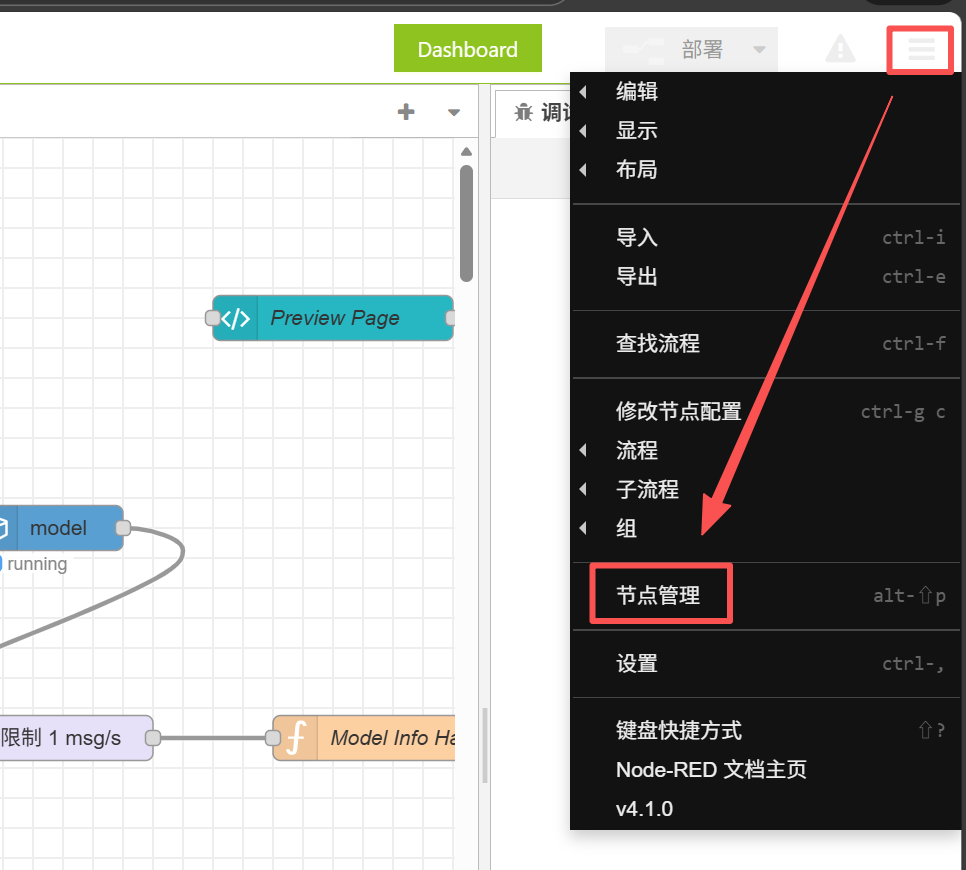
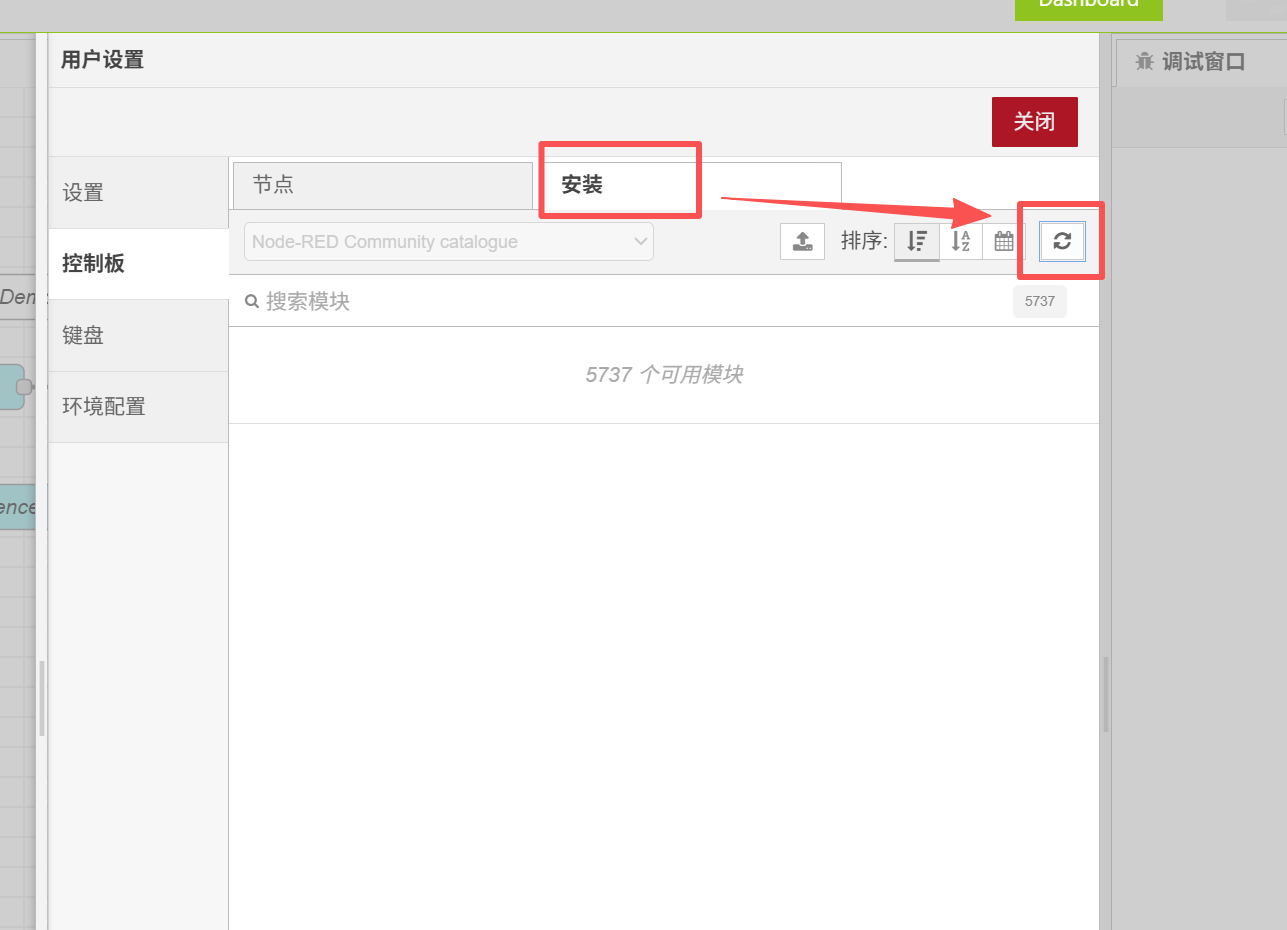
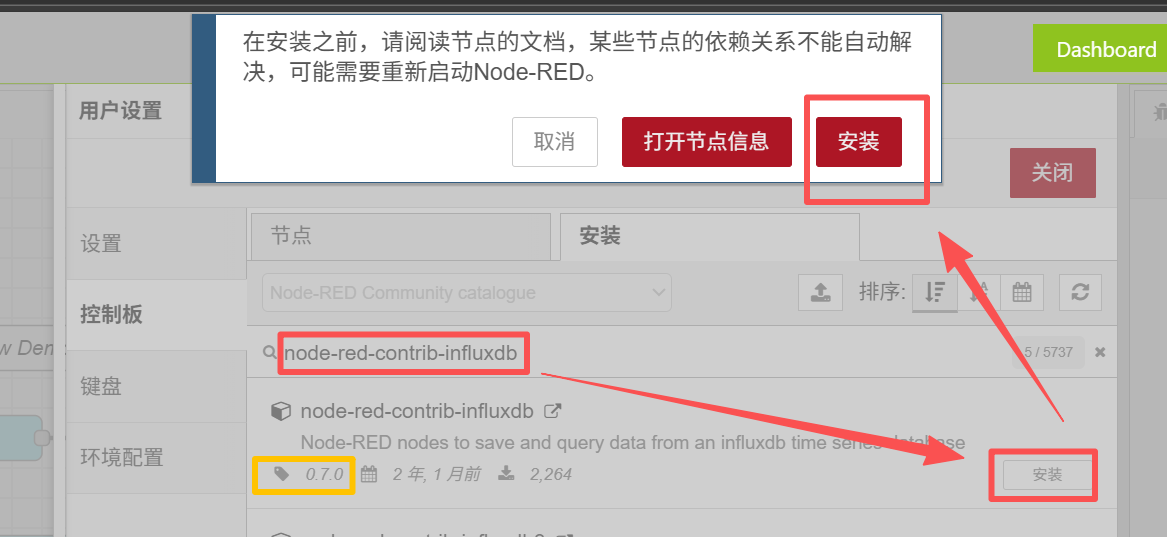
Then fill in the node-red-contrib-influxdb in the search box, and the first version 0.7.0 is the node we need. Click Install
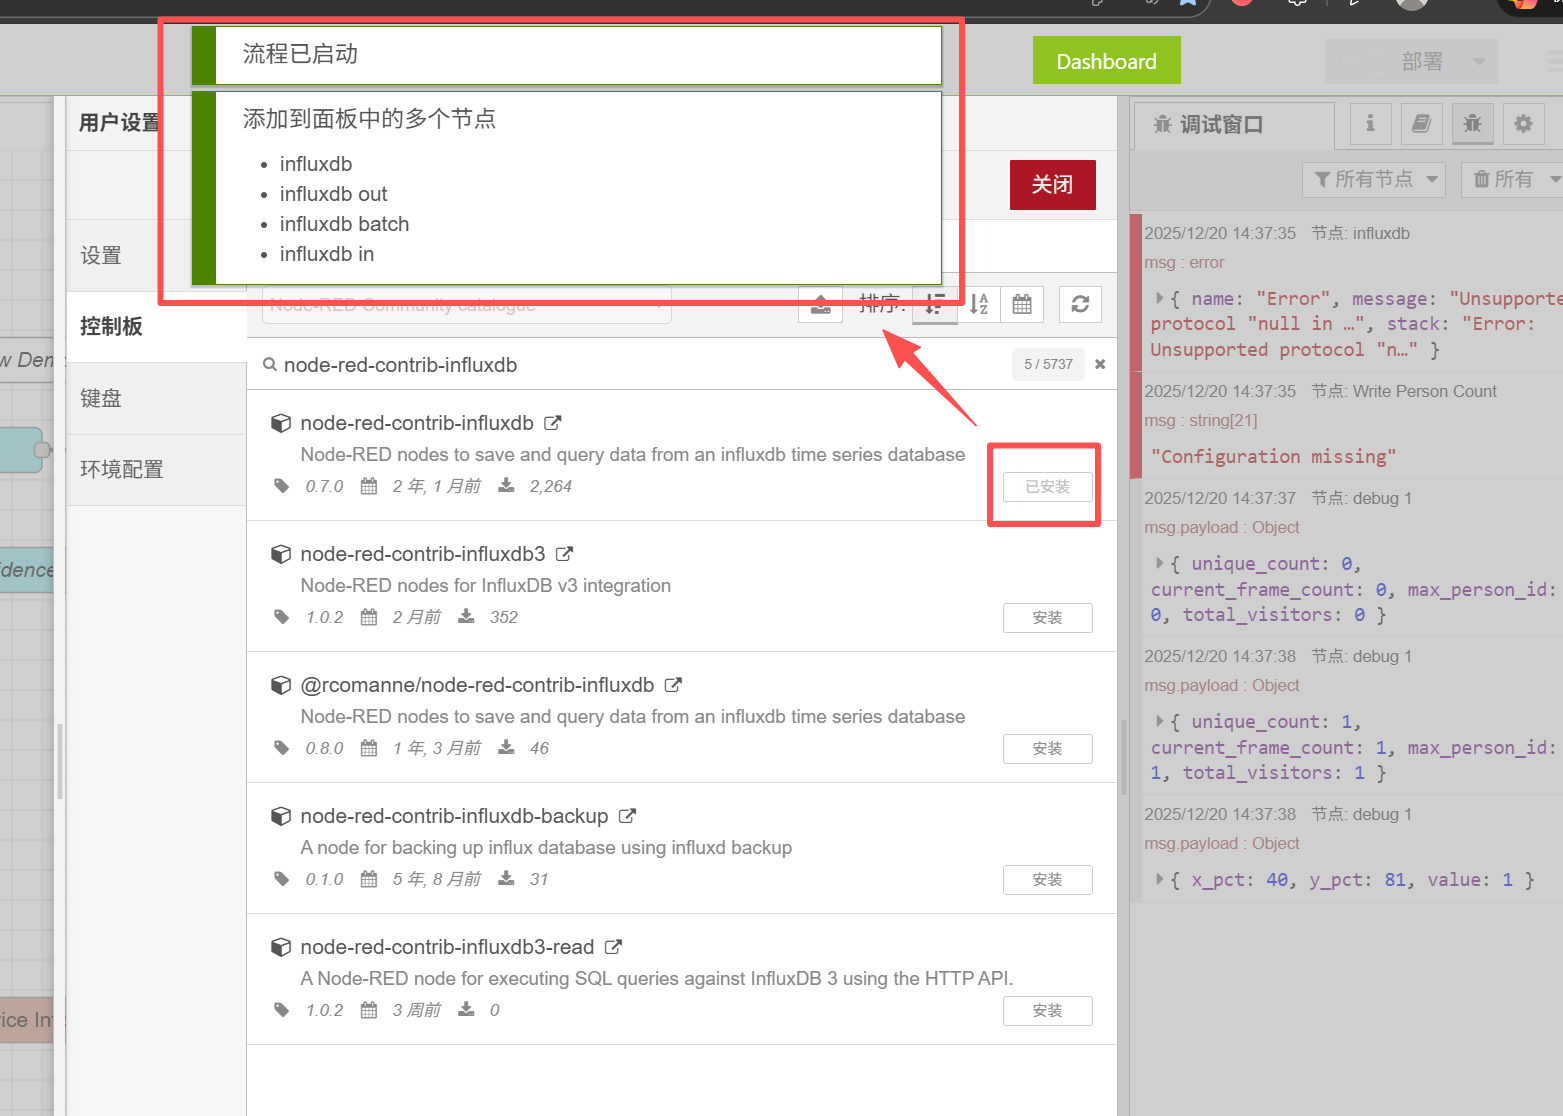
The installation takes a long time, please wait patiently, after the installation is successful, it will be displayed as follows
2.4 Configure InfluxDB Node
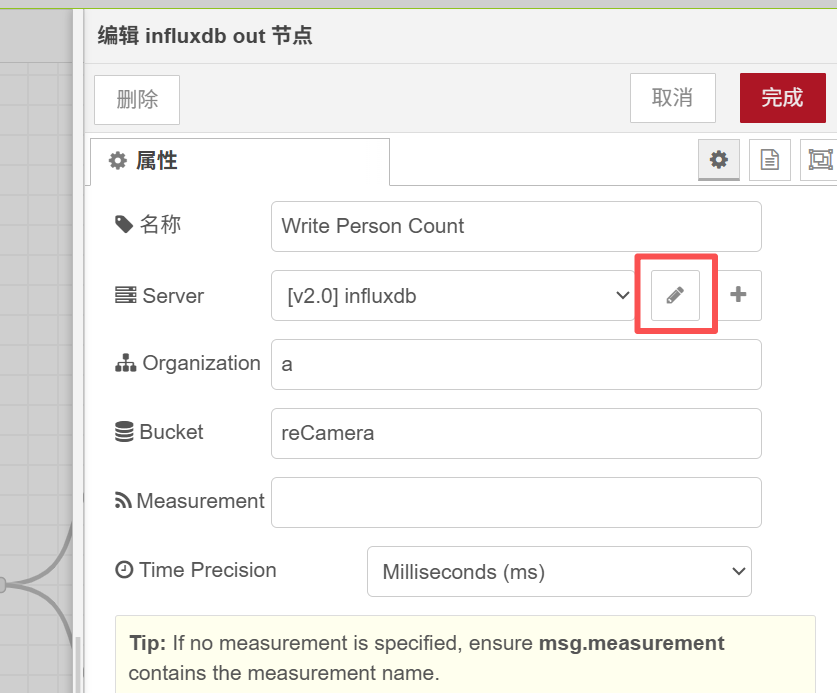
At this time, we also need to add some configuration information to the node named Write Person Count to find this node.
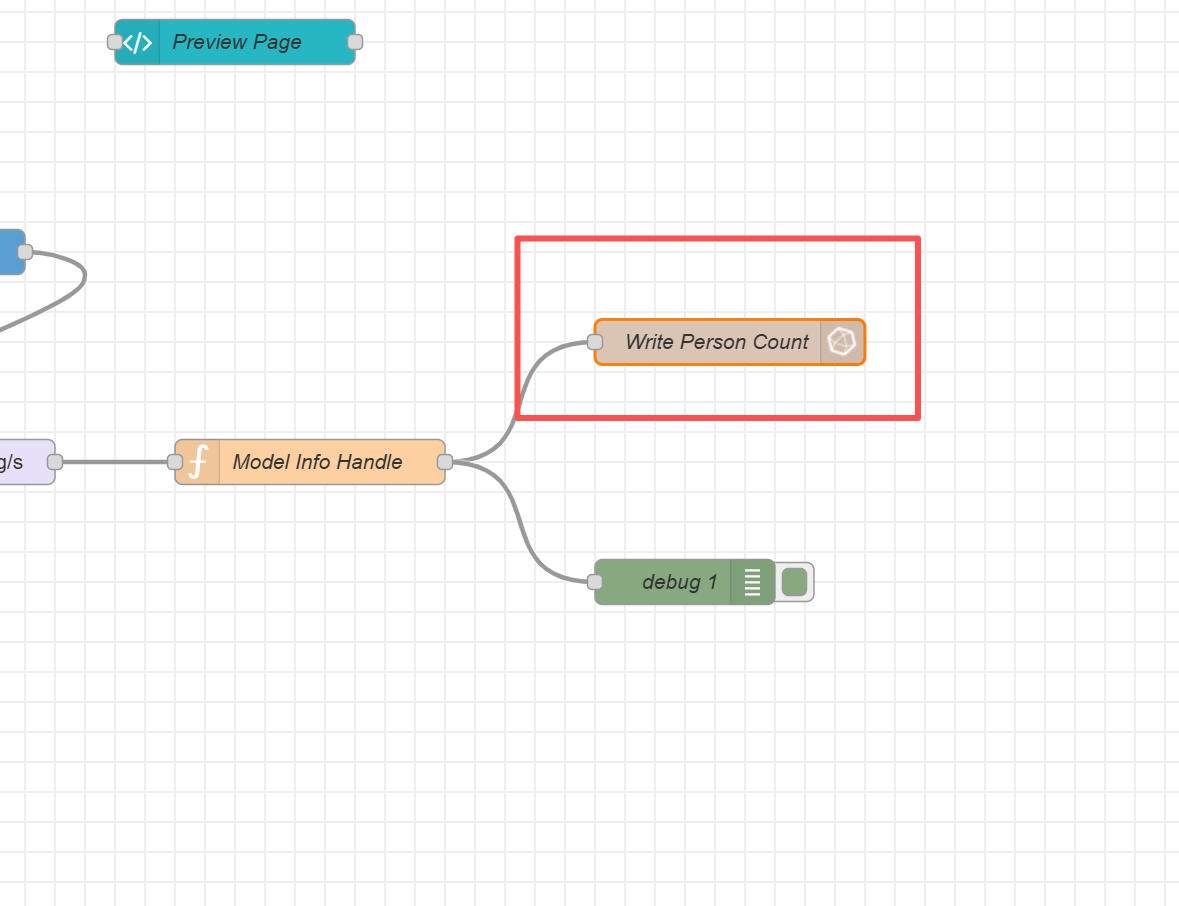
Double click to open the configuration panel, then click on the small pencil icon behind the server
Before this, remember that the content in the "Organization" and "Bucket" options below the small pencil is the same as what you configured in InfluxDB!!! "Organization" is your username in InfluxDB, and "Bucket" is the name of the database you created.
After clicking on the small pencil, we need to fill in the URL and Token
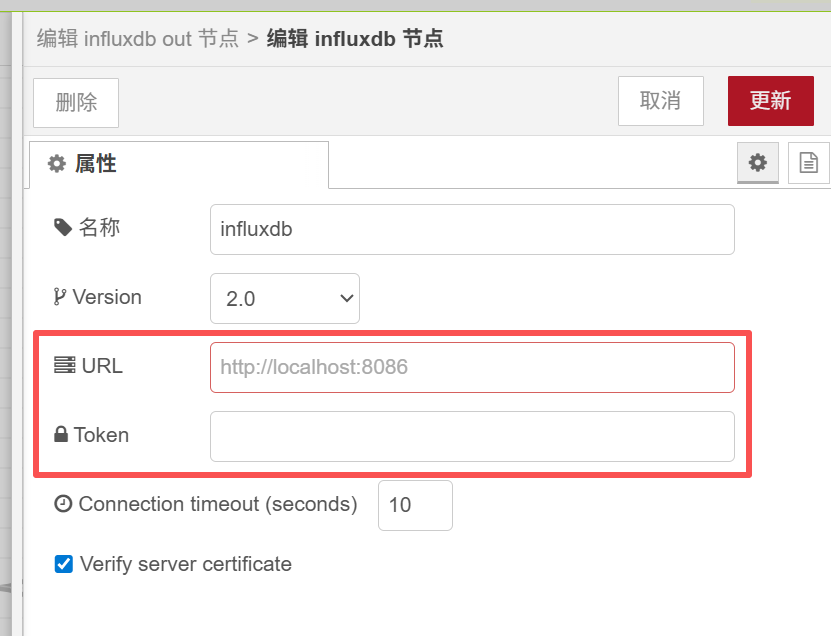
The URL here is to fill in the link of InfluxDB web page we entered in the first step. For example, your web page is 192.168.7.183:8086, then you can fill in http://192.168.7.183:8086 for the URL.
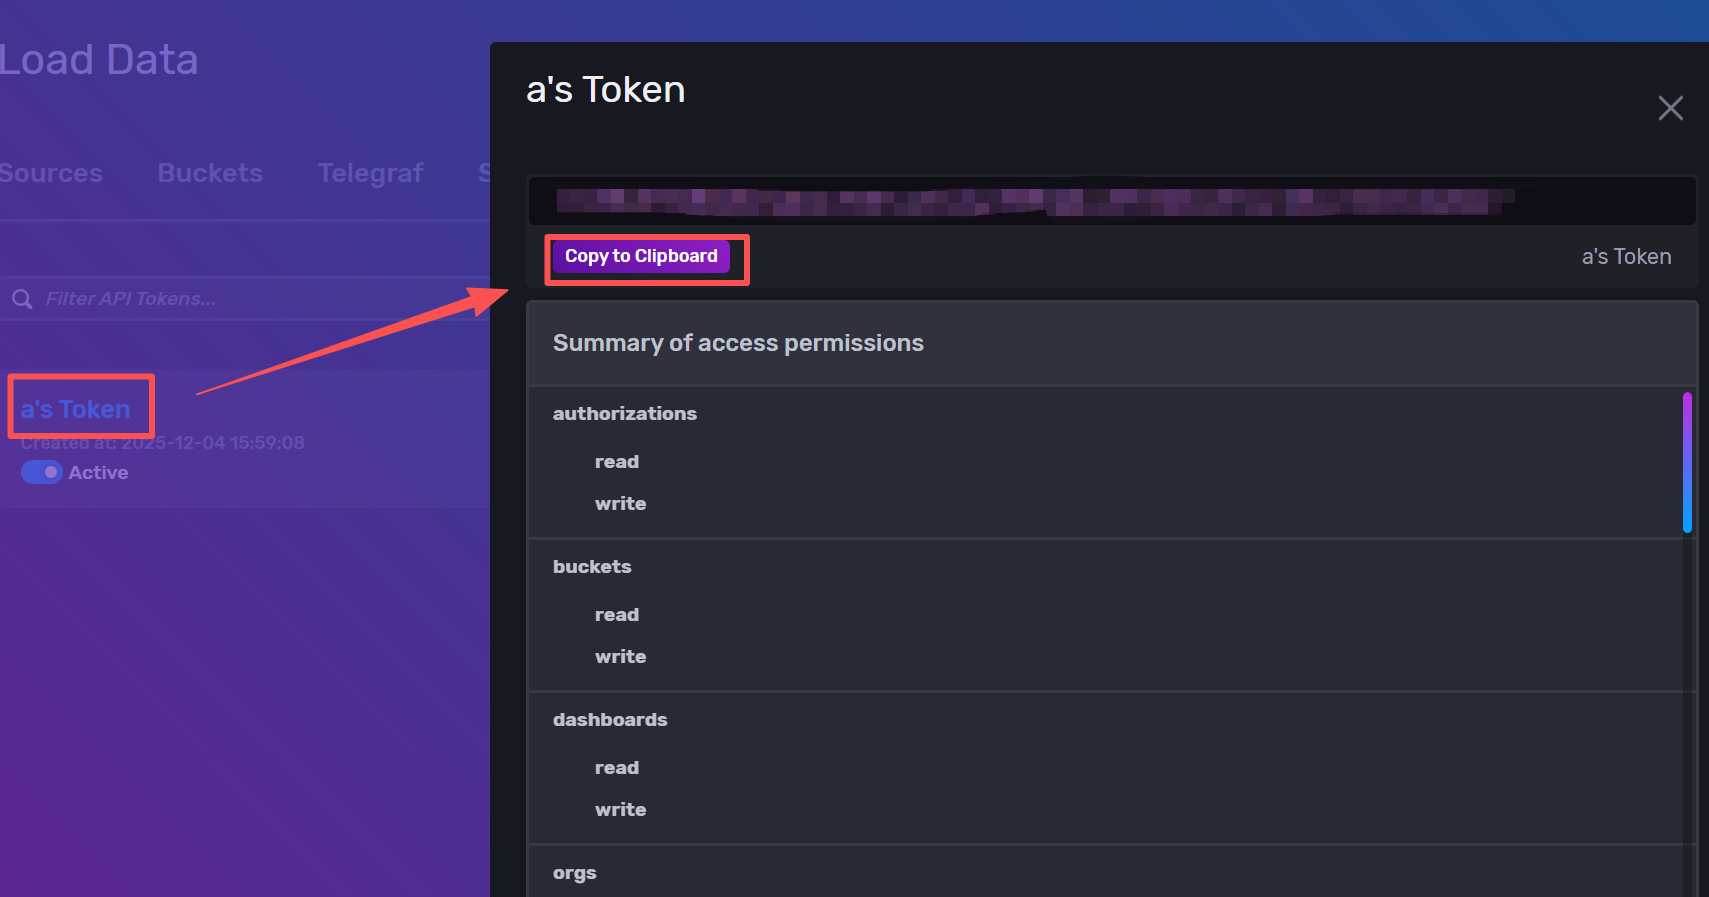
Then fill in the Token, which is the API Tokens in the InfluxDB web page we talked about at the beginning.
We click the Copy to Cilpboard and fill the copied Token into the configuration.
After filling in, click Update in the upper right corner. Do not change other settings.

Then we click on the deployment in the upper right corner to make the change just now take effect. There is a warning pop-up window and we can close it.

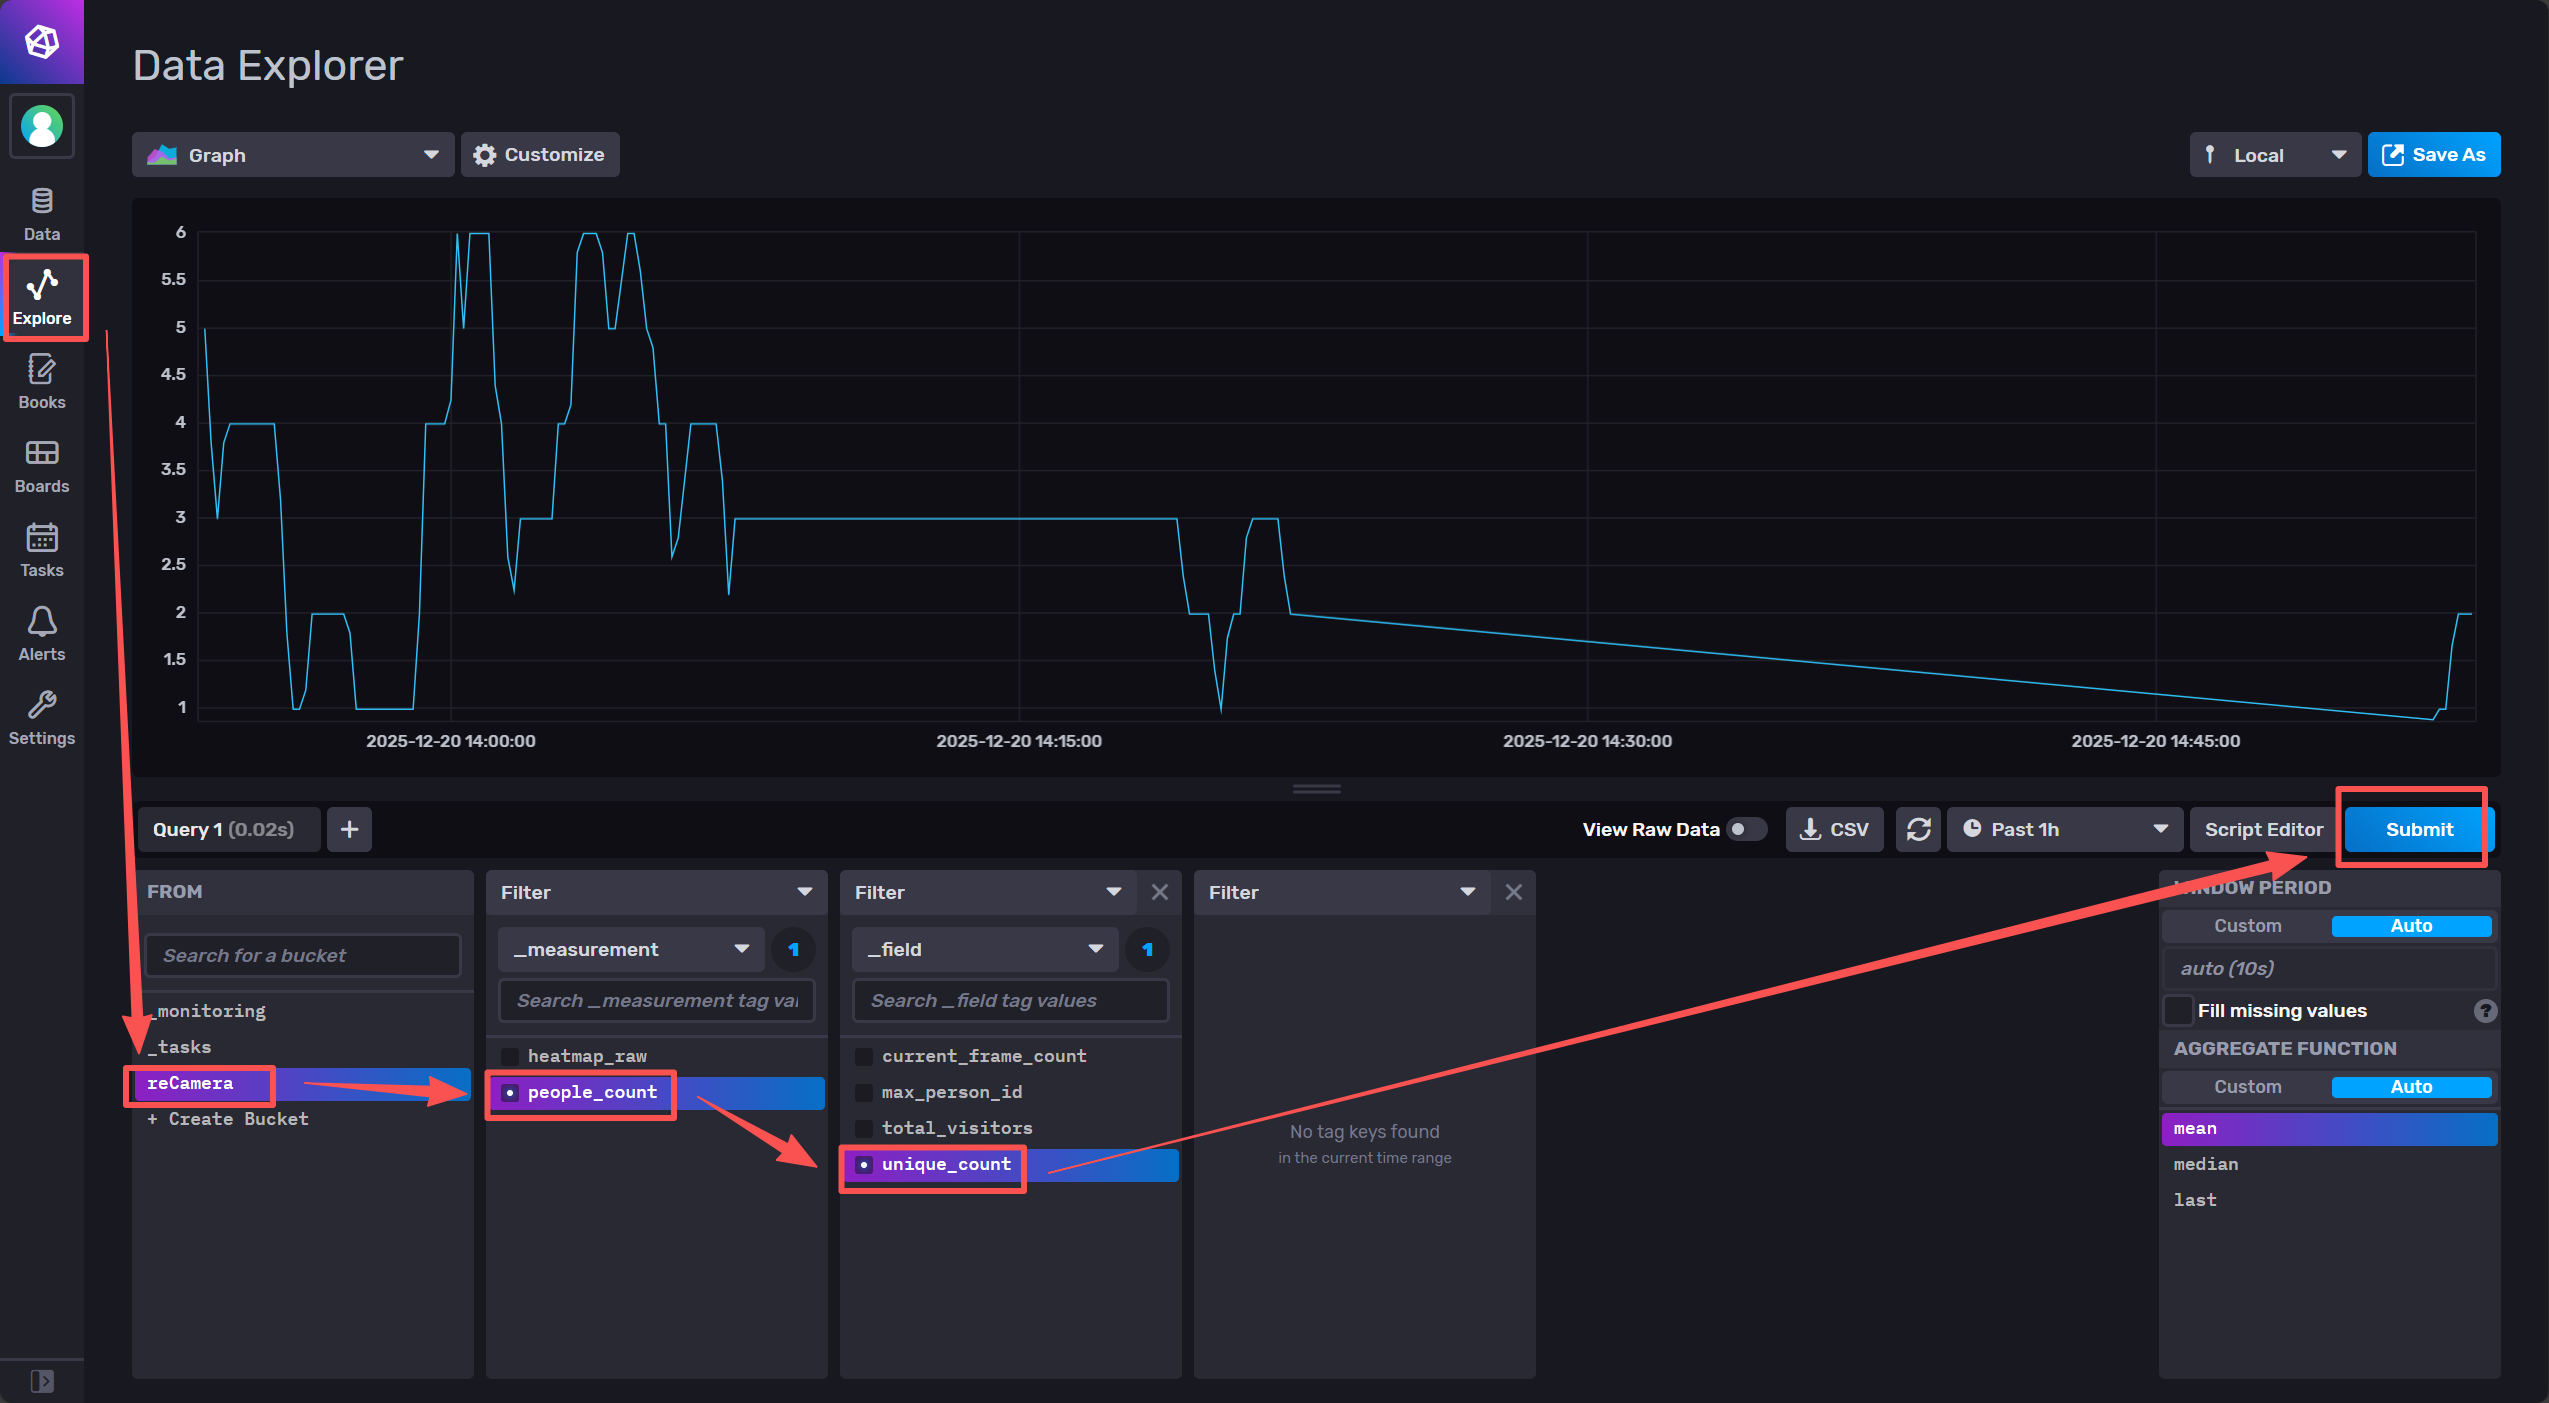
2.5 View InfluxDB data
At this point we can enter the InfluxDB interface to see if the data appears, if successful, click Submit, you will see the data line chart, here we query the number of data
3.Grafana configuration
3.1 Installation Grafana
3.1.1 Windows system
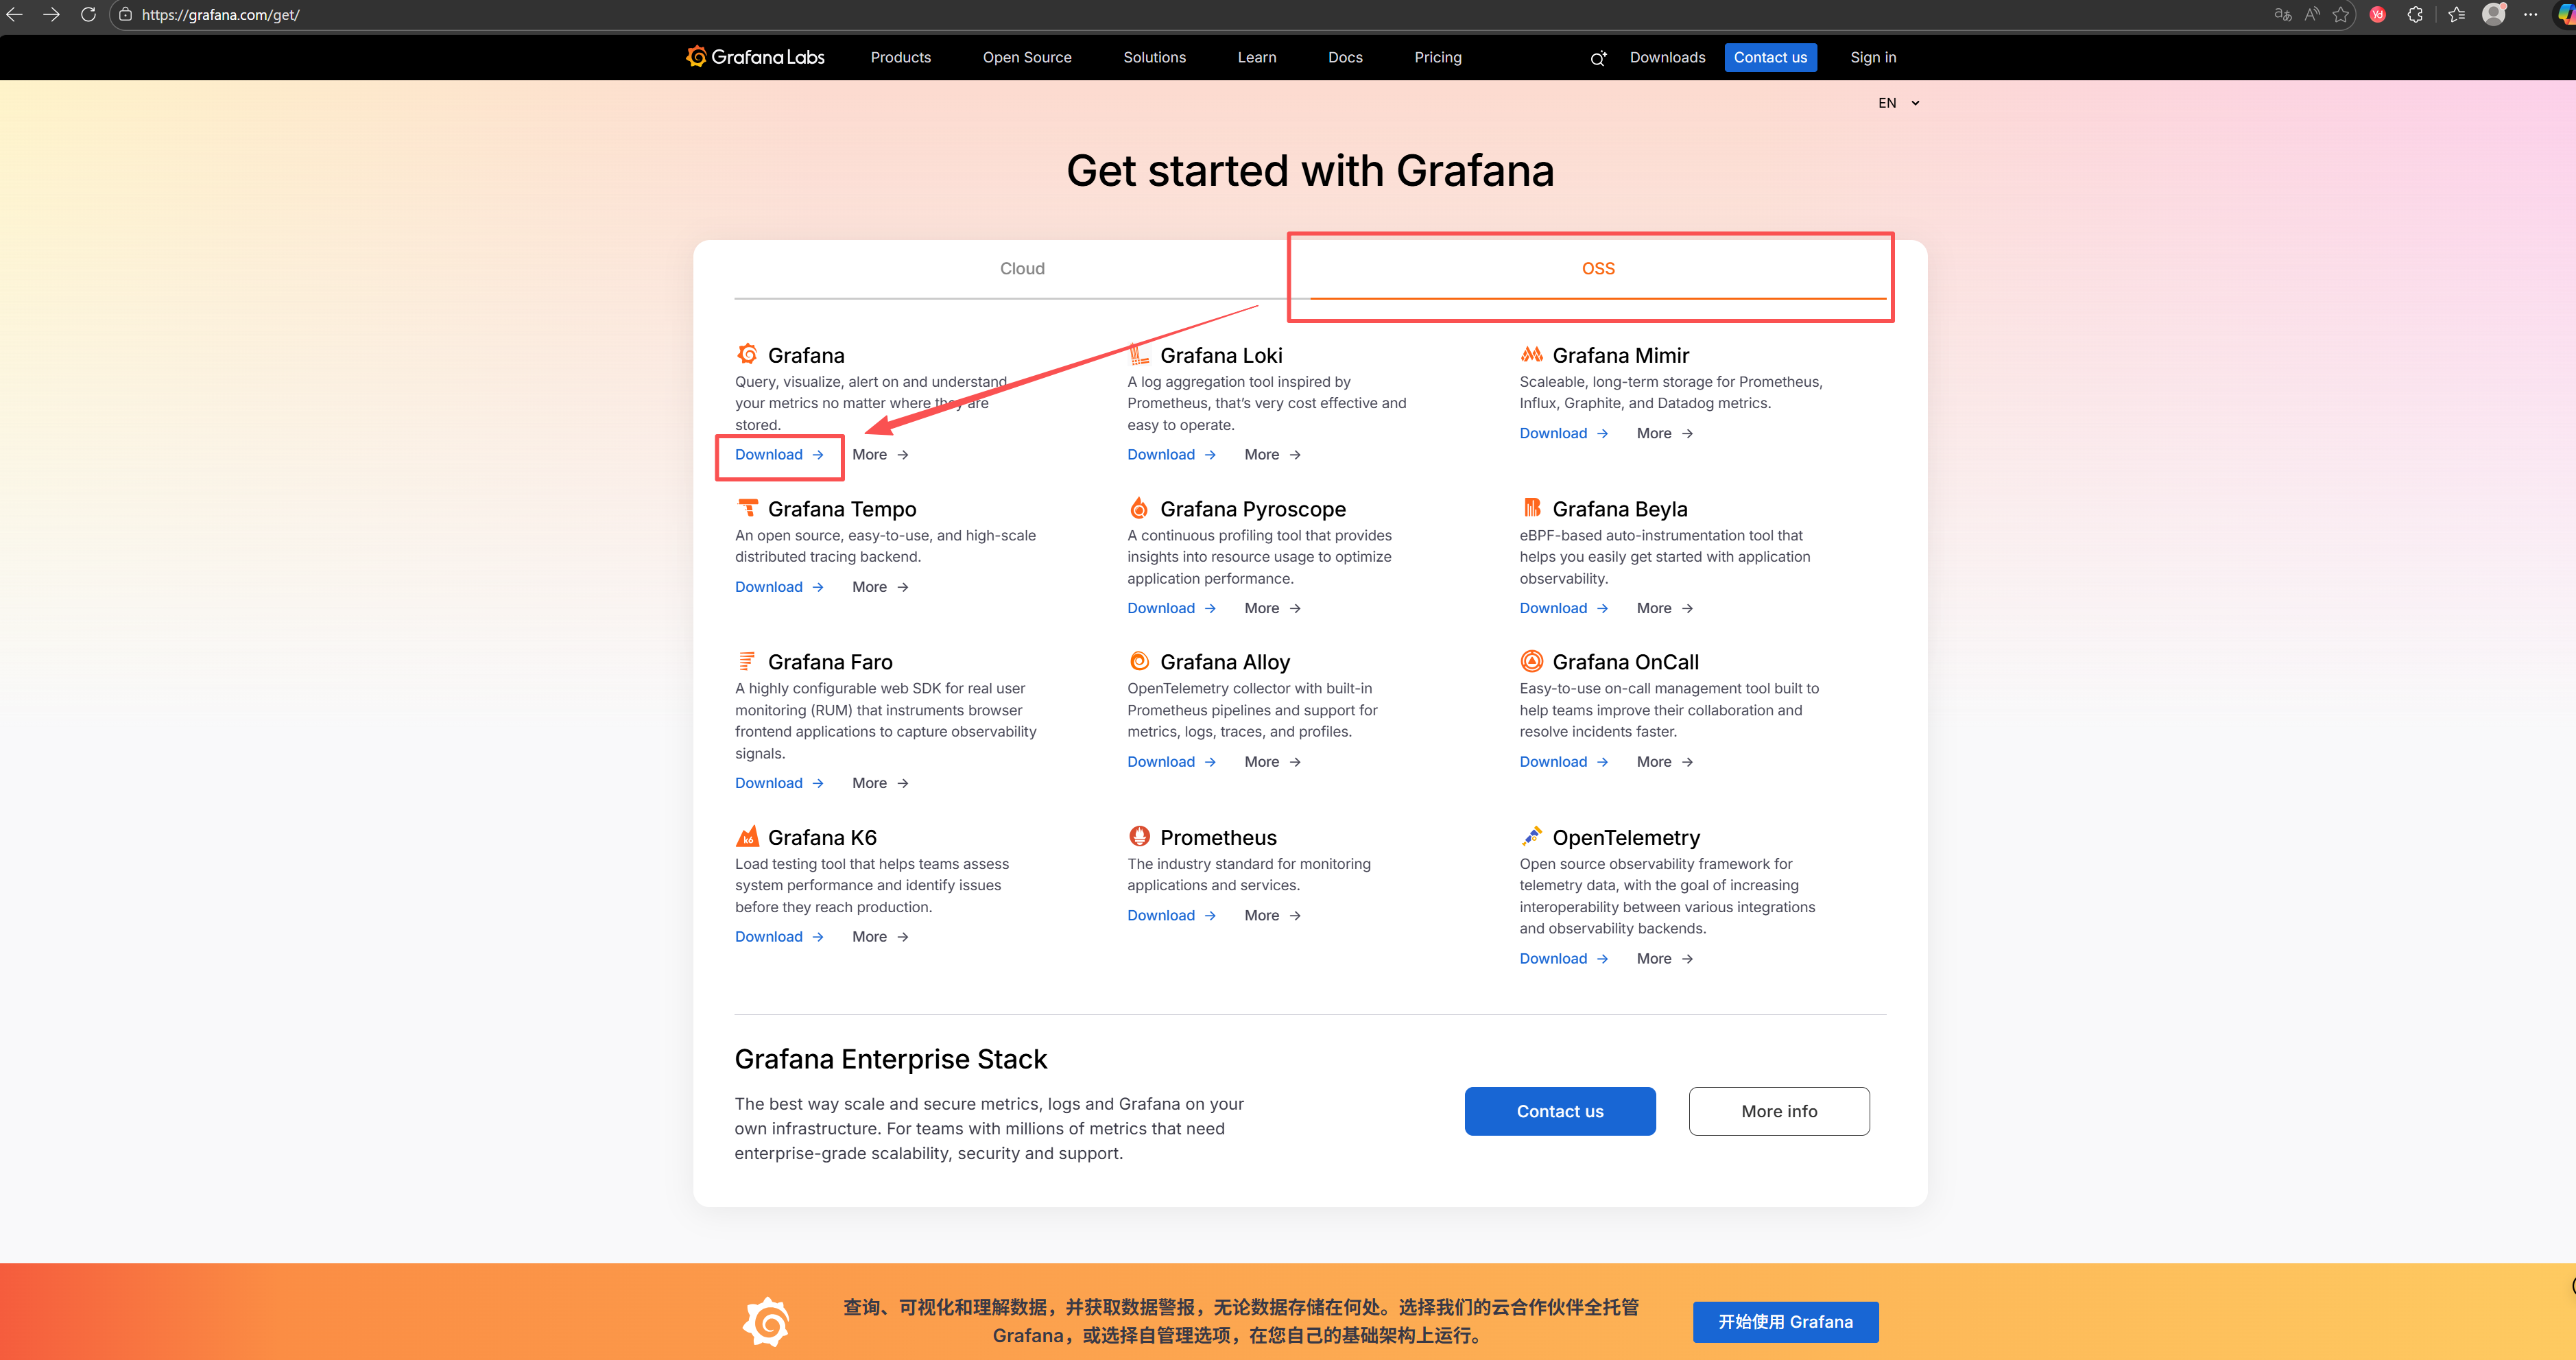
Enter the Grafana's official website Grafana get started | Cloud, Self-managed, Enterprise to download the installation package locally. The version I downloaded here is 12.3.0
Remember, Grafana must be installed on the C drive here!!! Otherwise, you cannot modify its configuration file later.
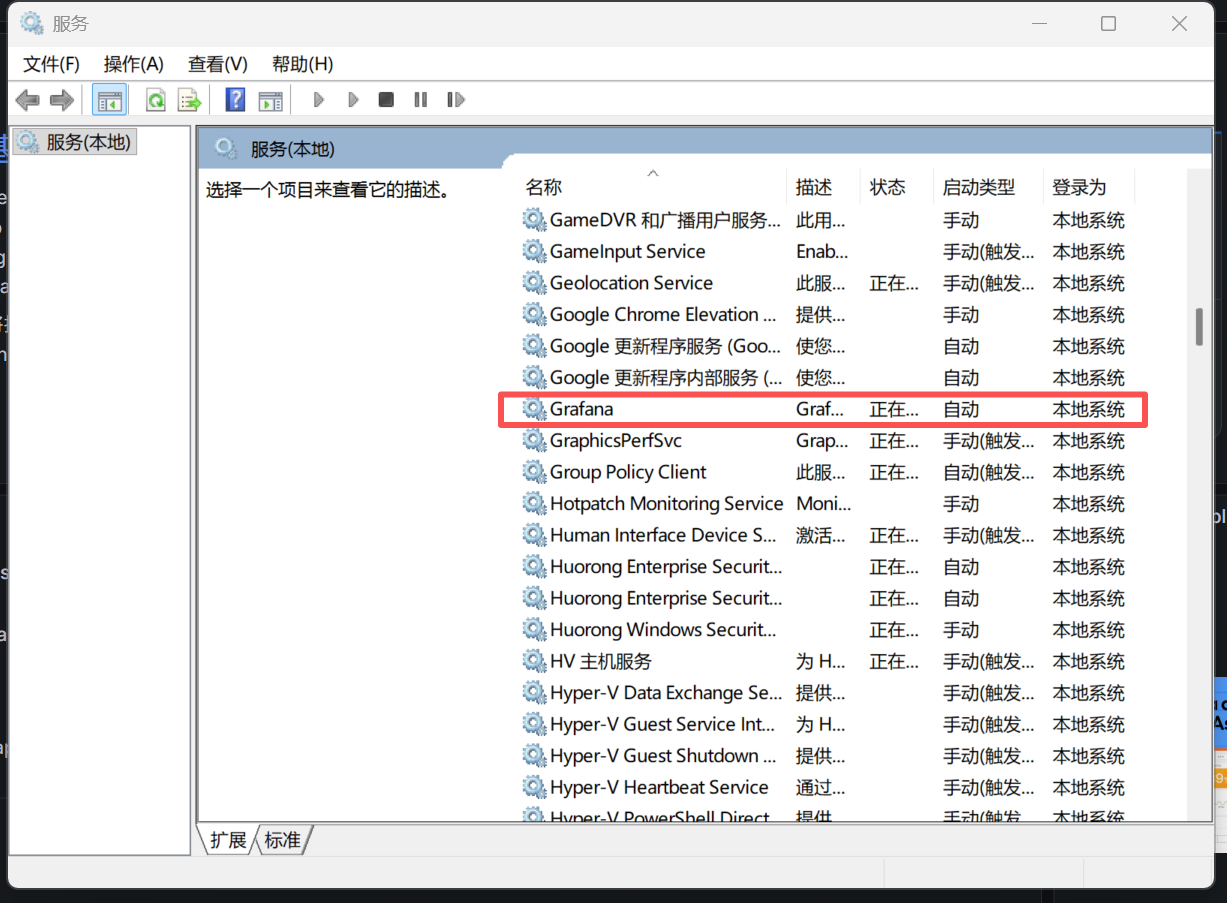
After downloading and installing, the Grafana should automatically run in the background, you can open the computer's "service" to see if it is running
3.1.2 Linux system
If your device is an ARM-based device running Linux such as a Raspberry Pi, then the download link is here
If your device is an AMD-based device running the Linux system, please download the link here
Then, decompress the tar.gz file that you have downloaded.
3.2 Modify defaults.ini to enable Grafana to embed HTML
3.2.1 Windows System
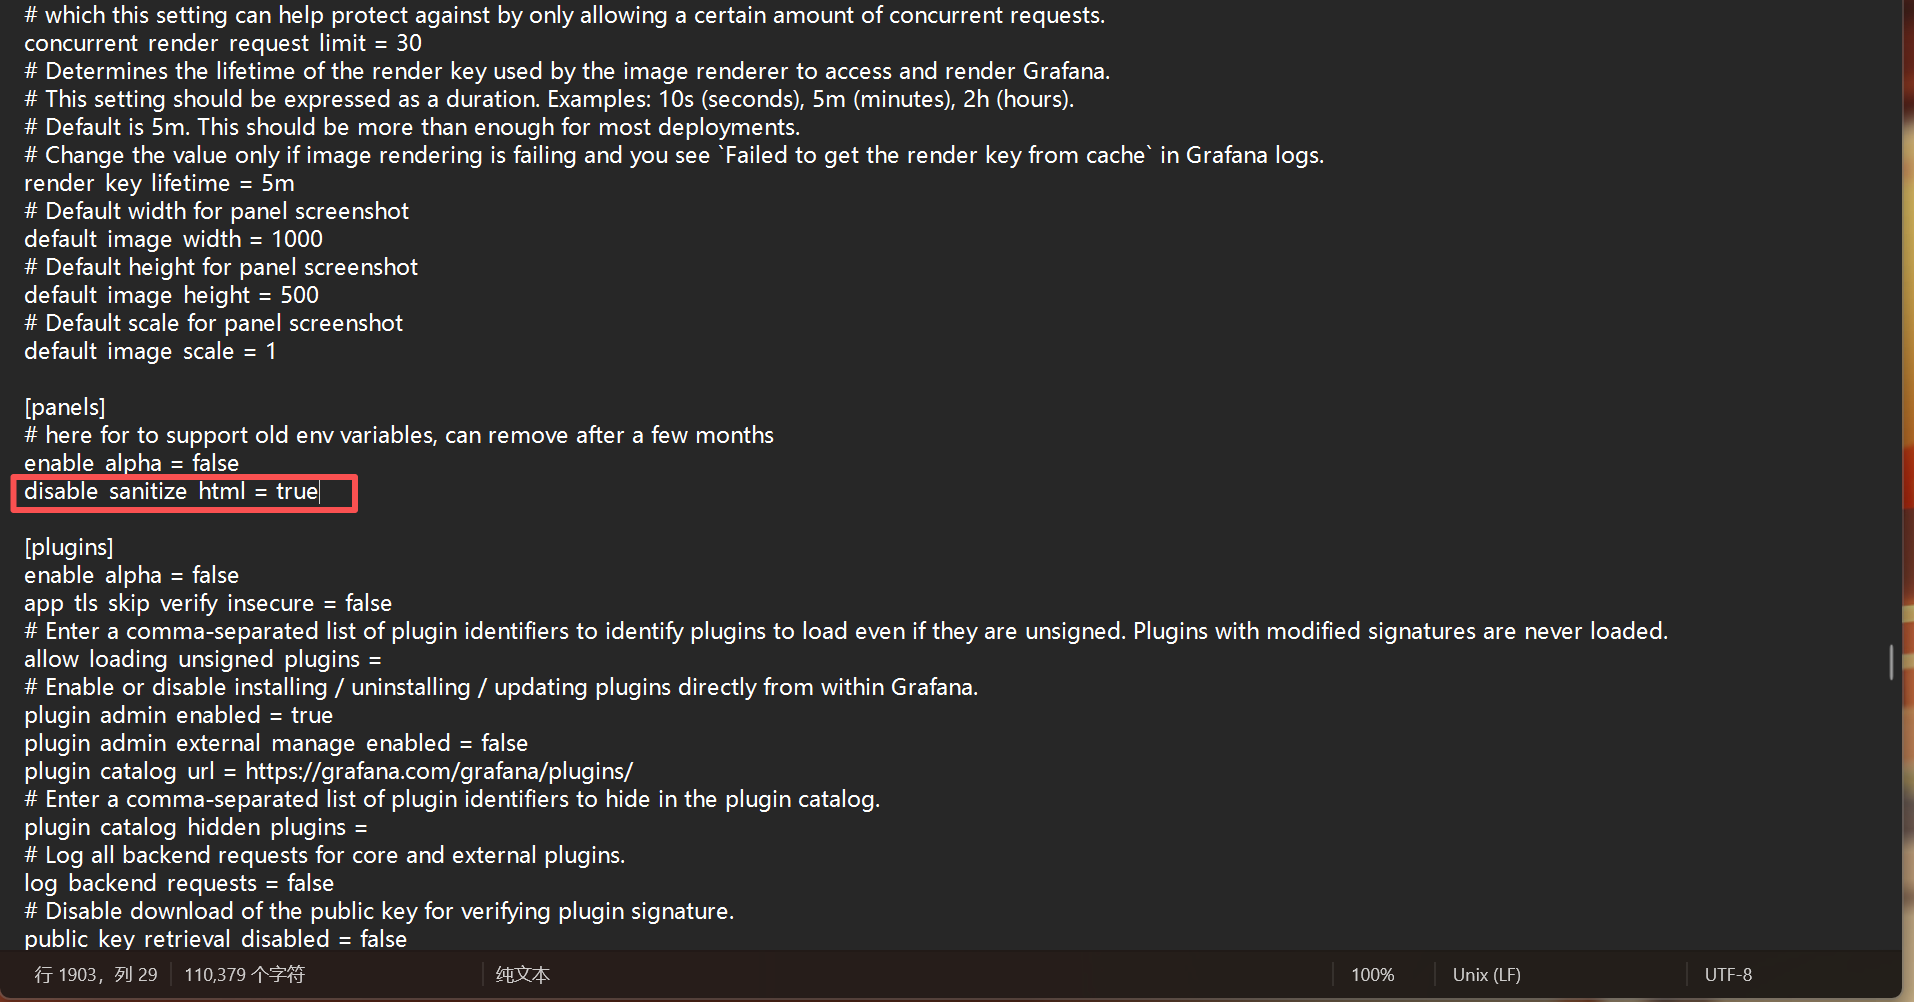
Navigate to the "grafana/conf" directory, locate the "defaults.ini" file, and right-click to open it with Notepad.

Press Ctrl + F, search for "disable_sanitize_html", change the original "disable_sanitize_html = false" to "disable_sanitize_html = true" to enable Grafana to embed html. After making the modification, save and exit.
3.2.2 Linux System
For the Linux system, defaults.ini is also located in the conf directory.

Right-click and select to open with an application similar to Notepad. Then, find this sentence in the picture and change the original "false" to "true".

3.3 Start Grafana
For the Windows system, if you have installed Grafana, you only need to check in the "Services" section whether Grafana is running as described in Step 3.1.1. Generally, Grafana will automatically start after installation.
For the Linux system, Grafana needs to be started manually. After entering the directory of the decompressed grafana file, run the following command:
./bin/grafana-server

3.4 Set data source
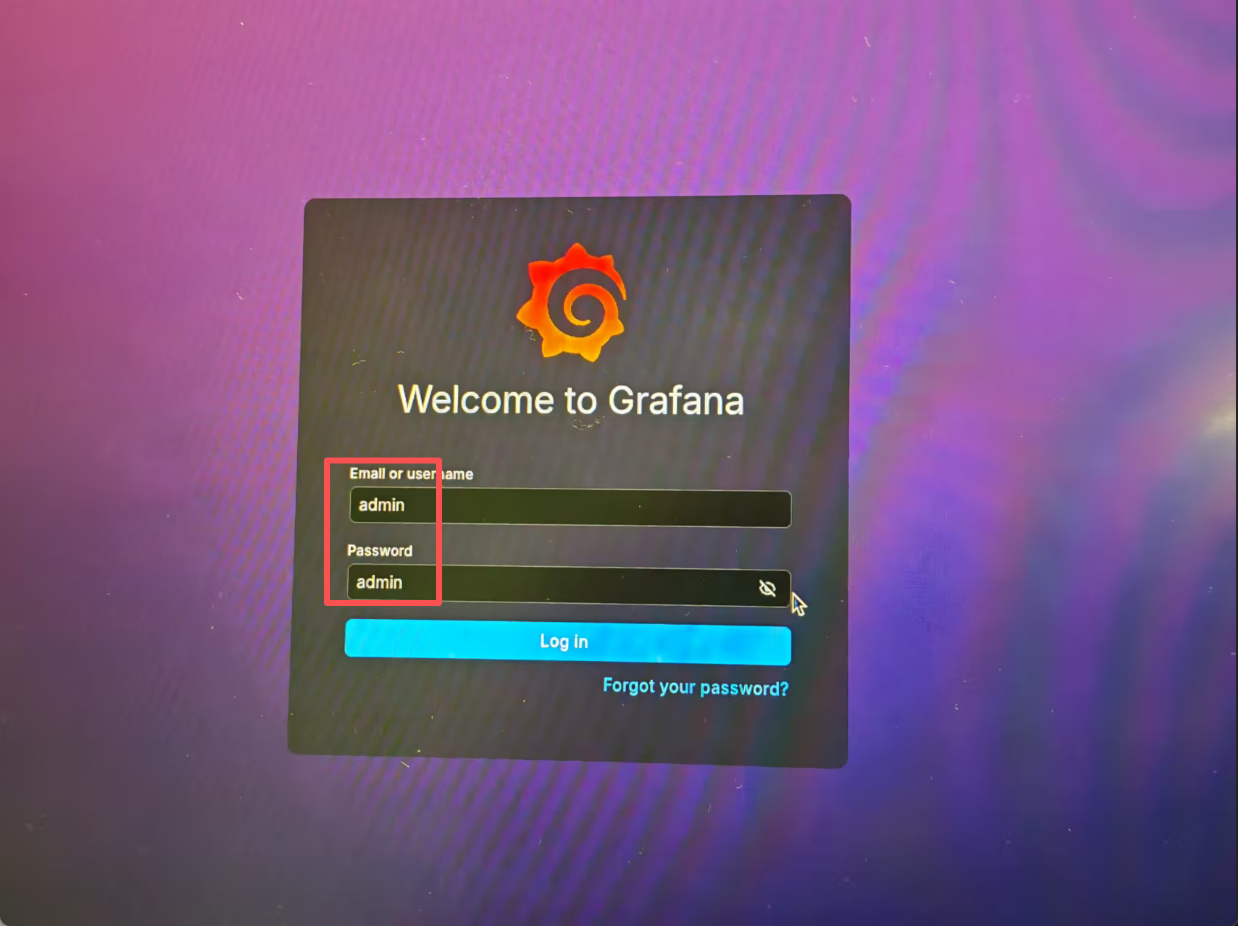
After confirming that Grafana is running, at this point, you can access the local Grafana interface by visiting http://localhost:3000 in the browser for configuration. First, you need to log in. The initial username and password are both admin. After logging in, the system will prompt you to change your new password. Please remember your password. The account will still be admin and will not change.
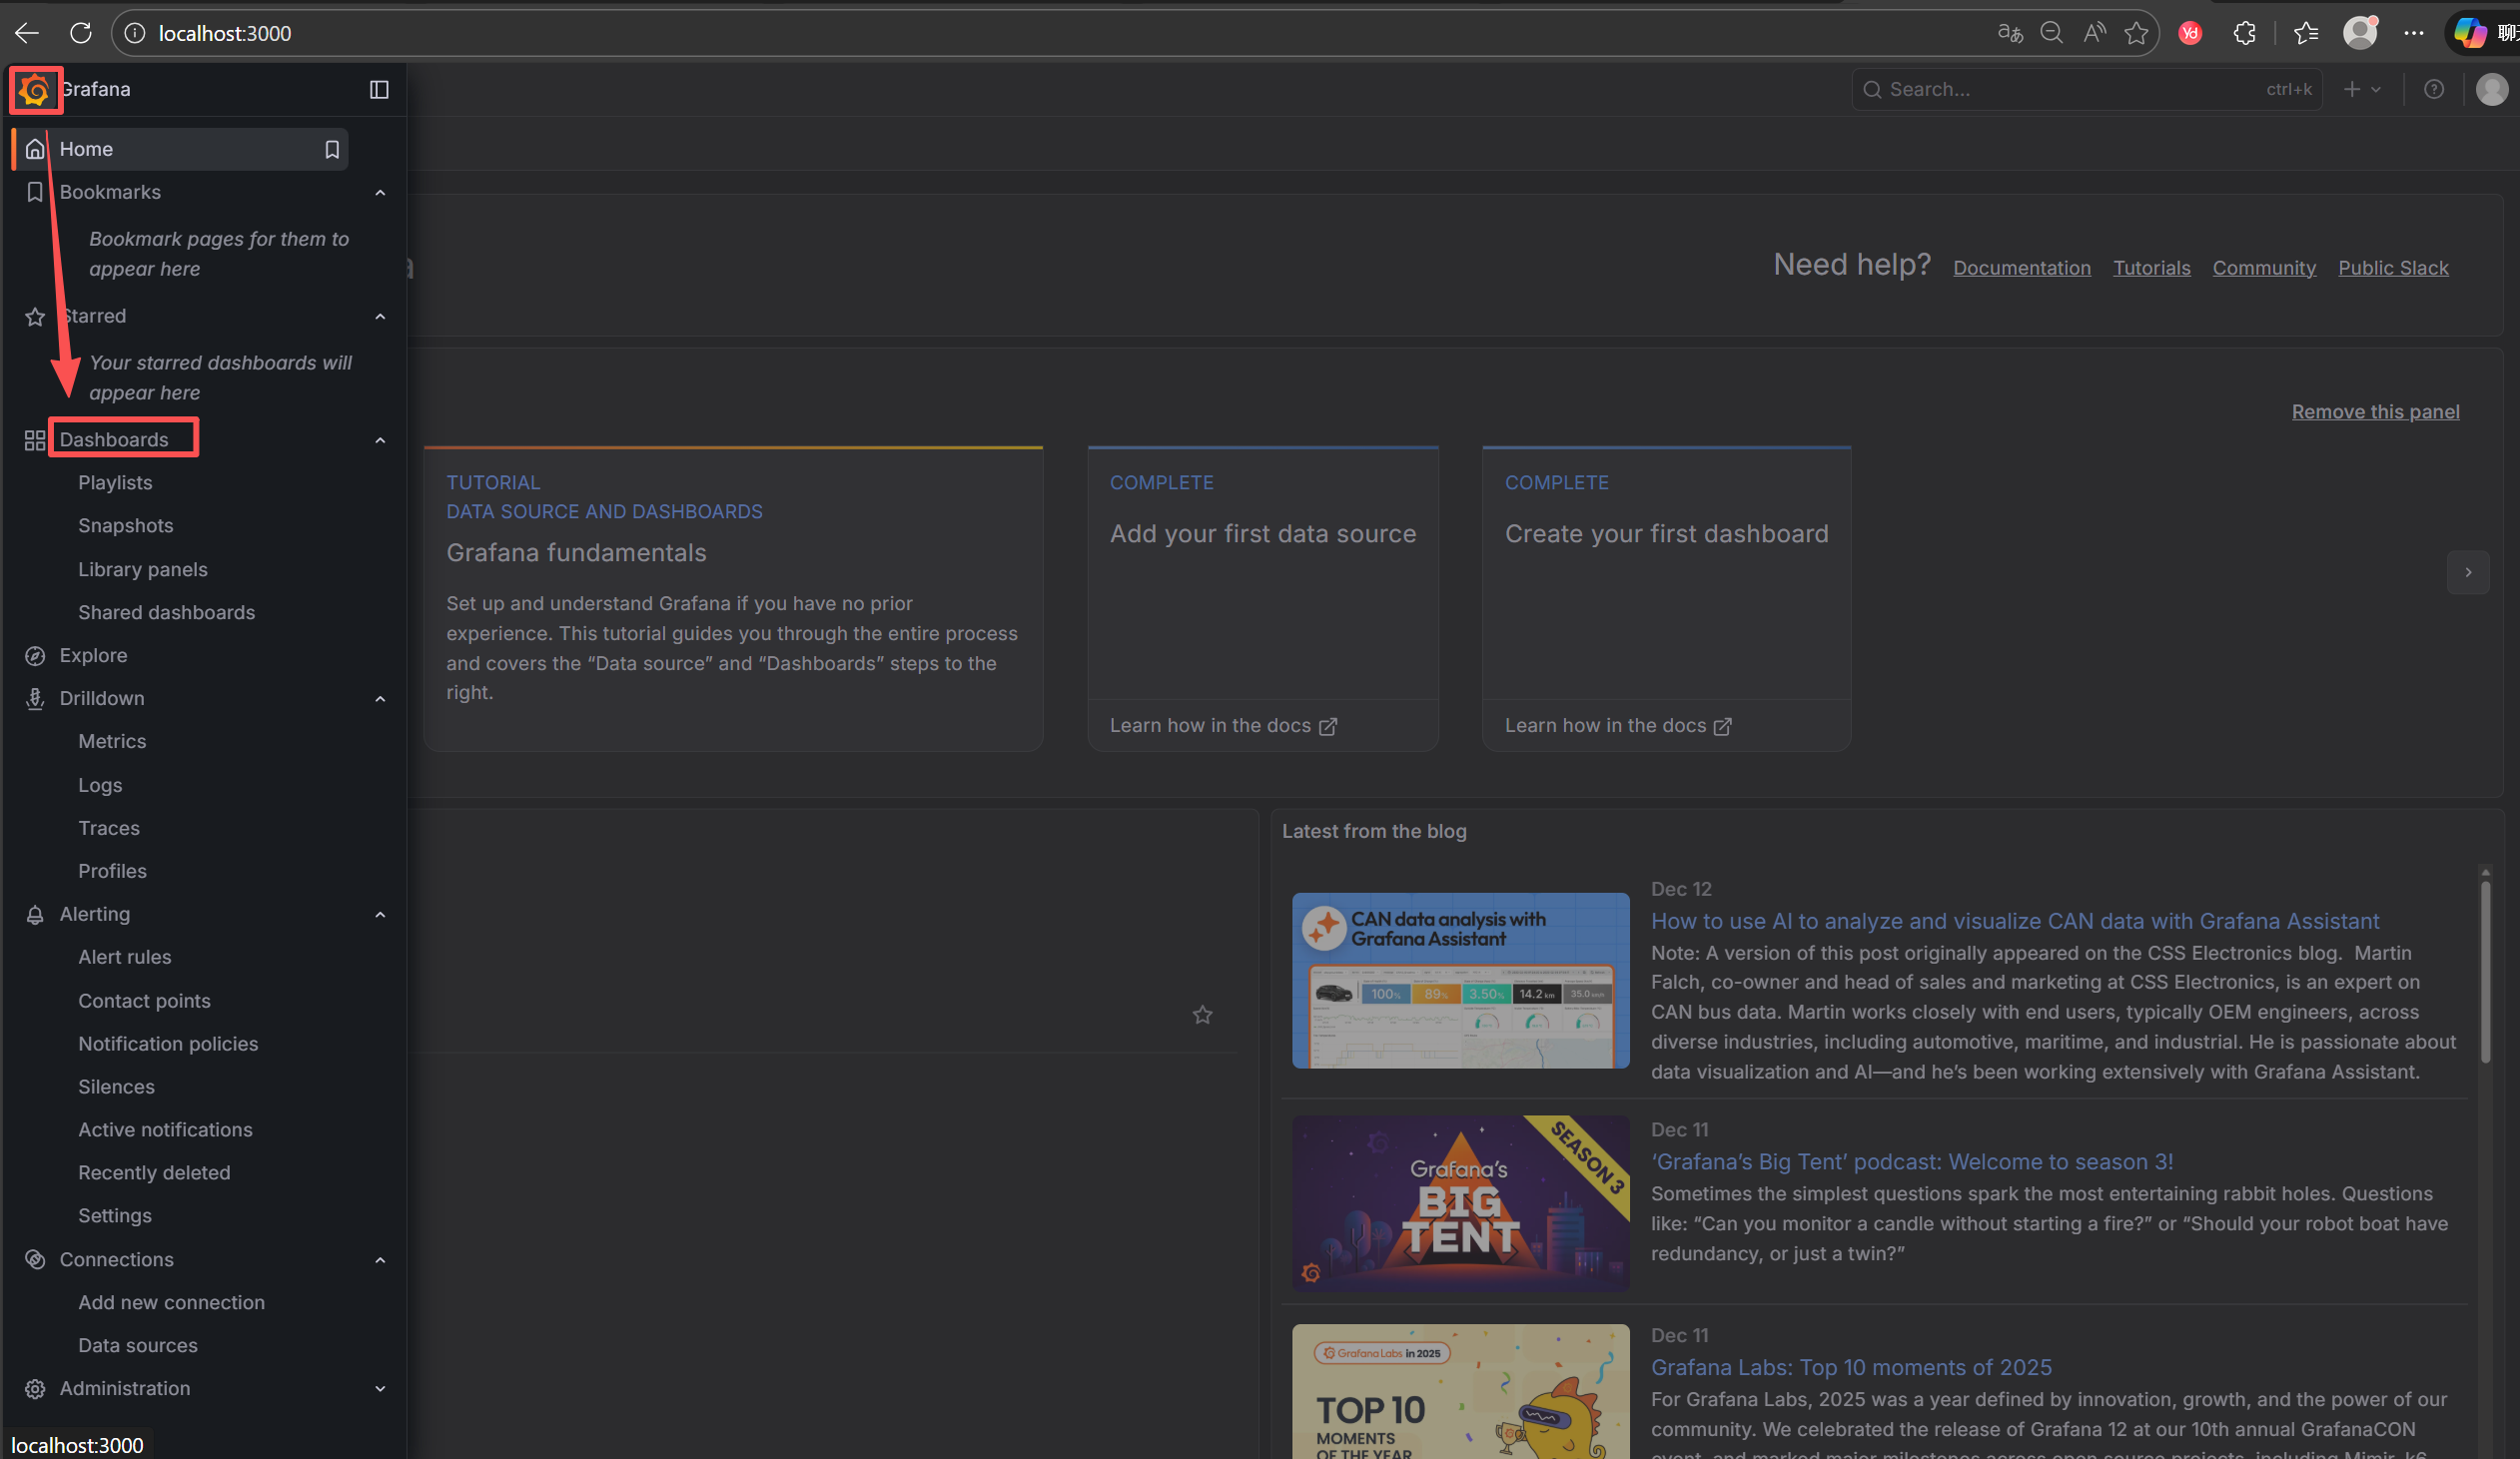
After logging in, we click on "Data sources" on the left side, and then select "Add new data source"

Then select "InfluxDB"

Next, you need to make the following six revisions:
(1) "Query language" selected as "Flux"
(2) Enter the URL of your database webpage, which is the link to the InfluxDB webpage you accessed in the first step. For example, if your webpage address is 192.168.7.183:8086, then the URL you should fill in is http://192.168.7.183:8086.
(3) Disable the "Basic auth" option
(4) "Organization" should be filled with the username you used when registering the database.
(5) Token should be filled with the API Tokens mentioned in the InfluxDB webpage as we discussed in step 2.3.
(6) "Default Bucket" should be filled with the name of the database you have created.

Once everything is ready, click "Save & Test". If the test is successful, it will display "datasource is working". At this point, you can proceed directly to the next step. These settings will be automatically saved.

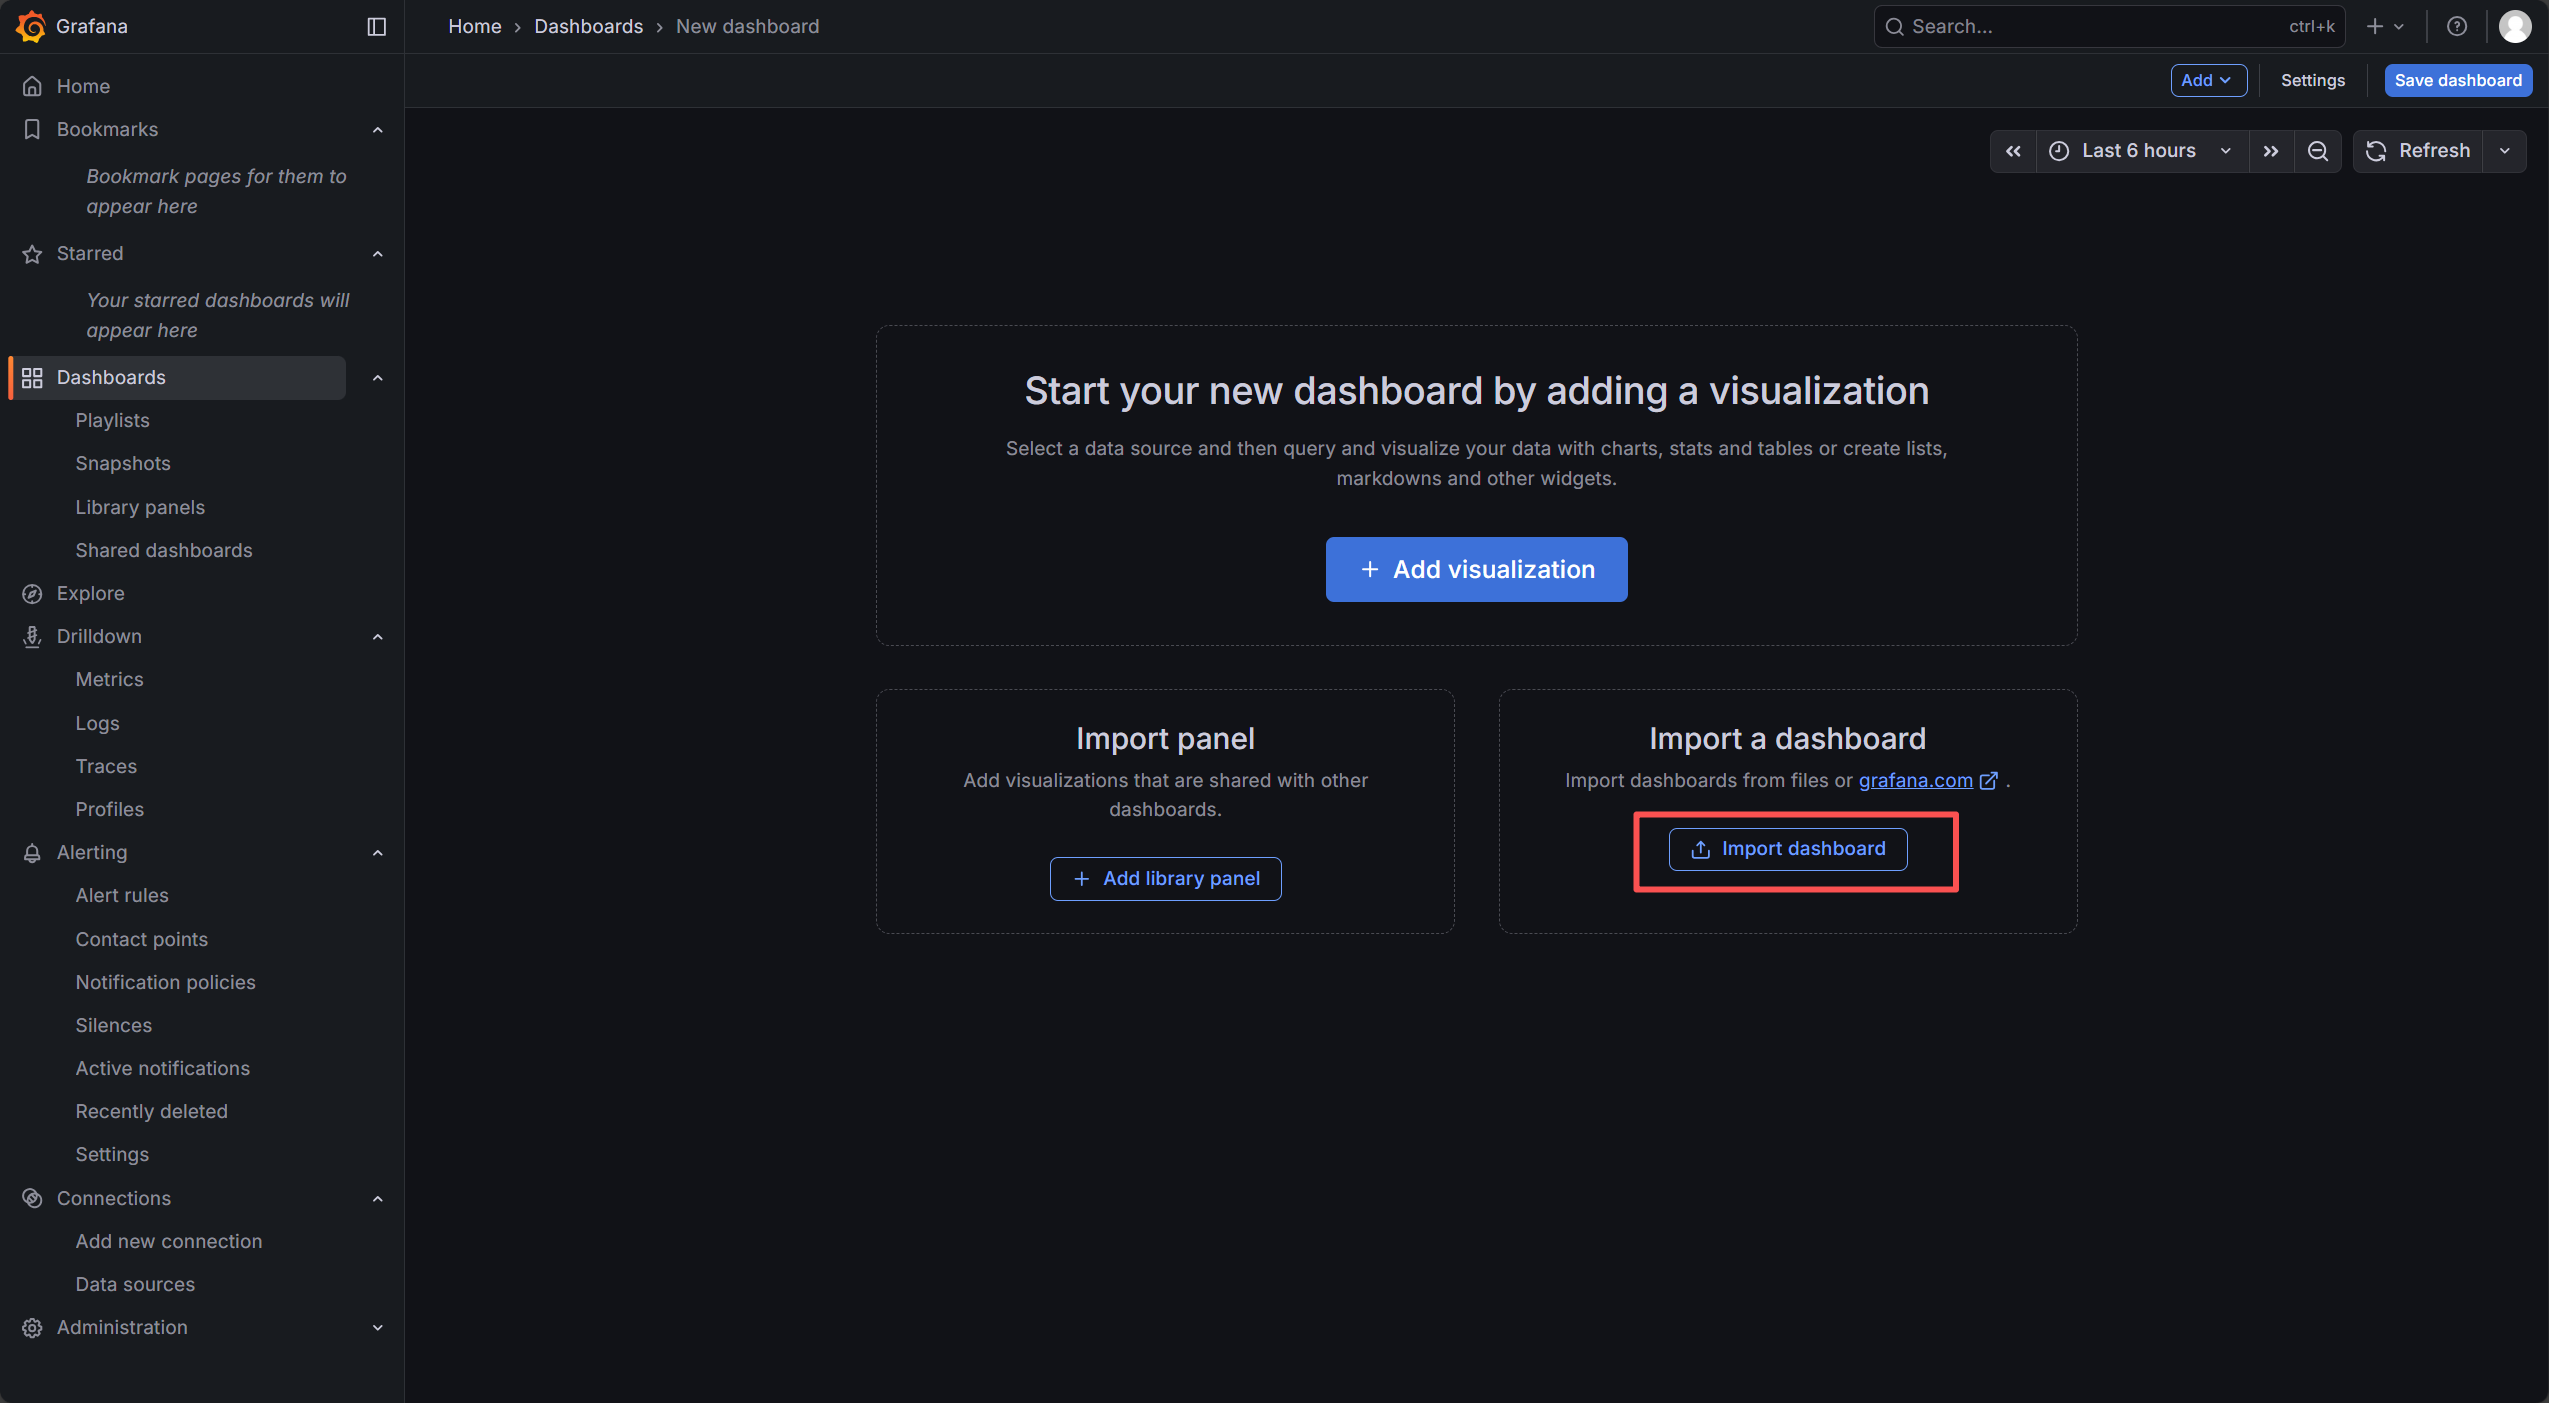
3.5 Import Dashboard
Click Dashboards
Then click on the New dashboard

Select Import dashboard
Please download the project I uploaded to GitHub. After downloading and extracting it, locate the "Grafana Json File" containing "reCamera Heatmap-1766213863140.json" in it. This file is the one we need to import into Grafana.

After importing, you should be able to see the following effect (if you do not see the following screen, please move to the FAQ section at the end of the article, there will be a solution)
4. Use of python calibration software
Remember to first download my project on GitHub. After extracting and opening it, locate the folder named "Heatmap area calibration", which contains three files: calibration_tool.py is the calibration program, R1.jpg is the original image captured by reCamera, and R2.png is the floor plan of the room that I drew.
4.1 Get a current native resolution image from the reCamera
Getting the original resolution image is important!! Although the steps will be more troublesome, but it directly affects the positioning accuracy of the heat map! Please be patient with the operation!
4.1.1 Use reCamera to take pictures
Return to the reCamera workspace interface and stop the program first

Then find the capture node on the left, drag it behind the camera node, and connect them with lines

Then double-click to open the capture node, modify the following two options (the function of this node is to take a photo every 2s and store it locally in the reCamera), then click Finish and redeploy, and click Run. After running for three or four seconds, click Stop Running (it does not need to run all the time, otherwise it will take pictures all the time). Next, we will move the pictures it takes to the local computer.

4.1.2 Transplant the pictures taken by reCamera to our computer
Let's see if the photo we just took was successful.
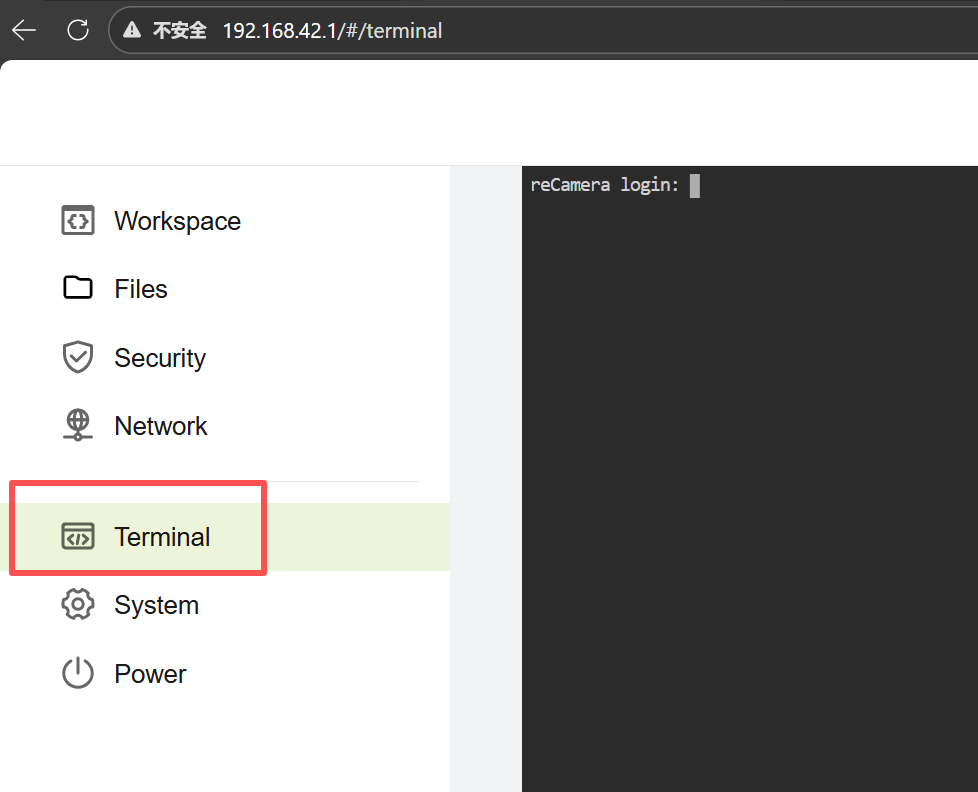
Click Setting

Click Terminal and enter the reCamera account password to log in.
Then enter the following two commands in turn:
Enter the Images folder
cd / && cd userdata/Images/
List Files
ls
Then you should see that the system lists some picture file names, which are the pictures just taken by the capture node.

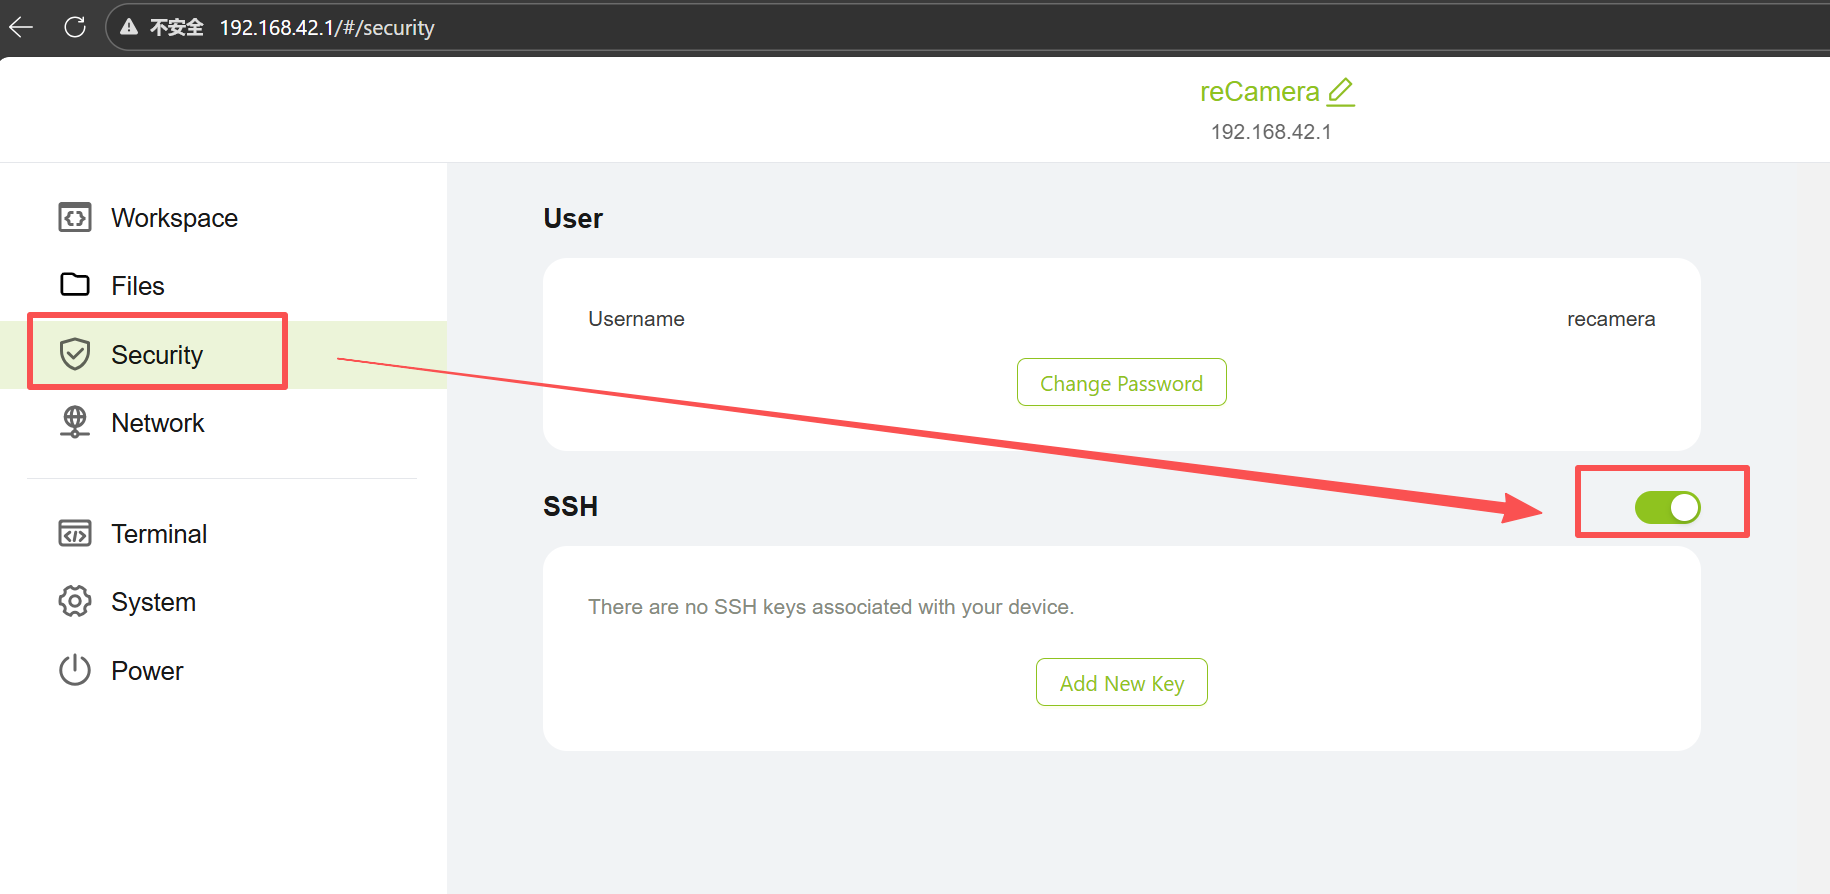
Return to the setting interface just now and open the ssh connection.
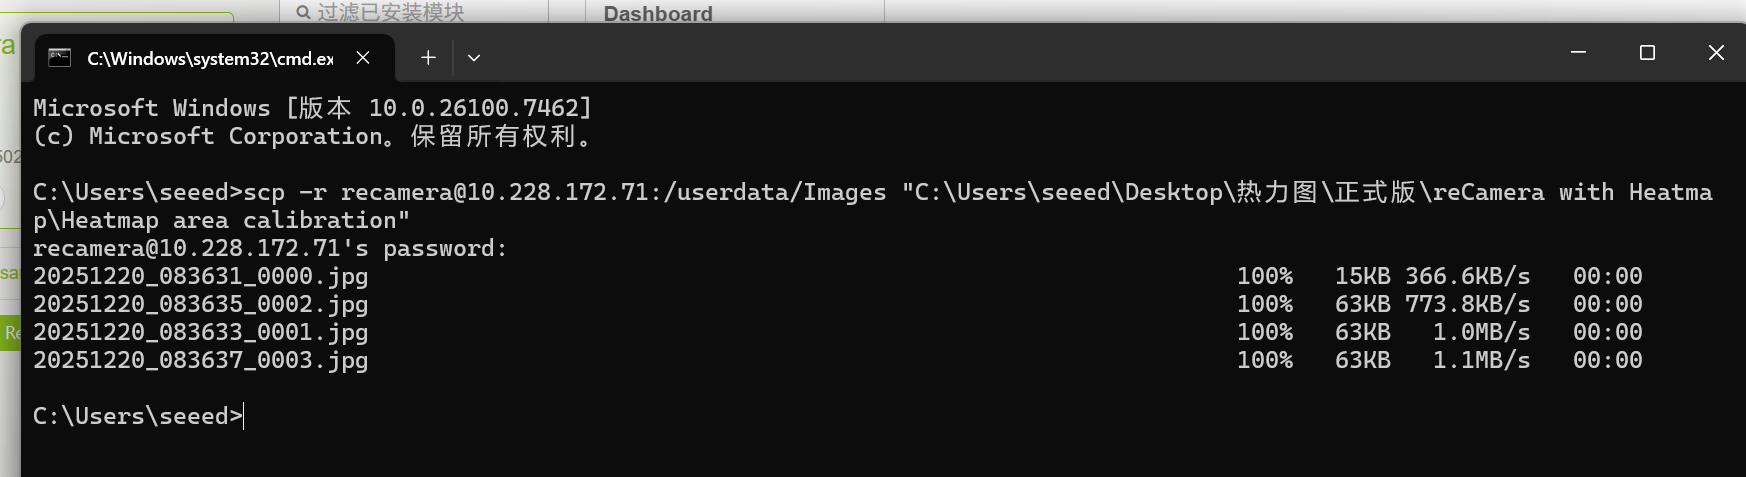
Then press Win R on the keyboard, enter cmd, and then enter at the terminal
scp -r recamera@<reCamera IP>:/userdata/Images "The folder path of the 'Heatmap area calibration' file that you downloaded from GitHub after decompression"
reCamera of these IPs can be found in the network settings


The folder path of the 'Heatmap area calibration' file that you downloaded from GitHub after decompression, we first enter the Heatmap area calibration, click the path box above the folder, and copy the path.

For example:
scp -r [email protected]:/userdata/Images "C:\Users\seeed\Desktop\热力图\正式版\reCamera with Heatmap\Heatmap area calibration"
Then enter the reCamera password to download to the path of your choice
Go back to the folder you just downloaded, and you'll see the Images folder you just downloaded.

Now delete the original R1.jpg from my project.

We choose the latest picture, usually the last picture, and we rename it R1

Then place this picture in the upper directory.

4.2 prepare room plan
You can use Windows's own drawing tools to draw and save as pictures and store them under the Heatmap area calibration path, or directly store your existing room plan under the Heatmap area calibration path. in this step, you should also remember to delete R2.png from my previous project and rename your picture R2 and store them under this path.

4.3 Use of Calibration Procedure
The calibration program is to Heatmap the calibration_tool.py program under the area calibration path.
I use Pycharm here by default. Before using it, I need to install Python's OpenCV library.
pip install opencv-python
There are two points to note: first, the two pictures need to be under the same path, that is, under the Heatmap area calibration path; Secondly, check whether the picture file name is correct

After the program runs, a window will pop up to display your camera screenshot. At this time, you need to click on the effective area with the mouse. The clicking sequence is very important: please click on the four corners of the area you want to select in the clockwise sequence of "upper left-> upper right-> lower right-> lower left". For example, if you only want to display the surface of the table, click on the four corners of the table. After 4 points, press any key on the keyboard (such as space) to enter the next step.

Next, a second window will pop up to display your overlook map R2.png. The click sequence must correspond to the first step: click on the corresponding positions of the four points on the map just now. For example, the upper left corner of the table was first clicked just now, and now the upper left corner of the table is clicked on the map. After 4 points, press any key to end.

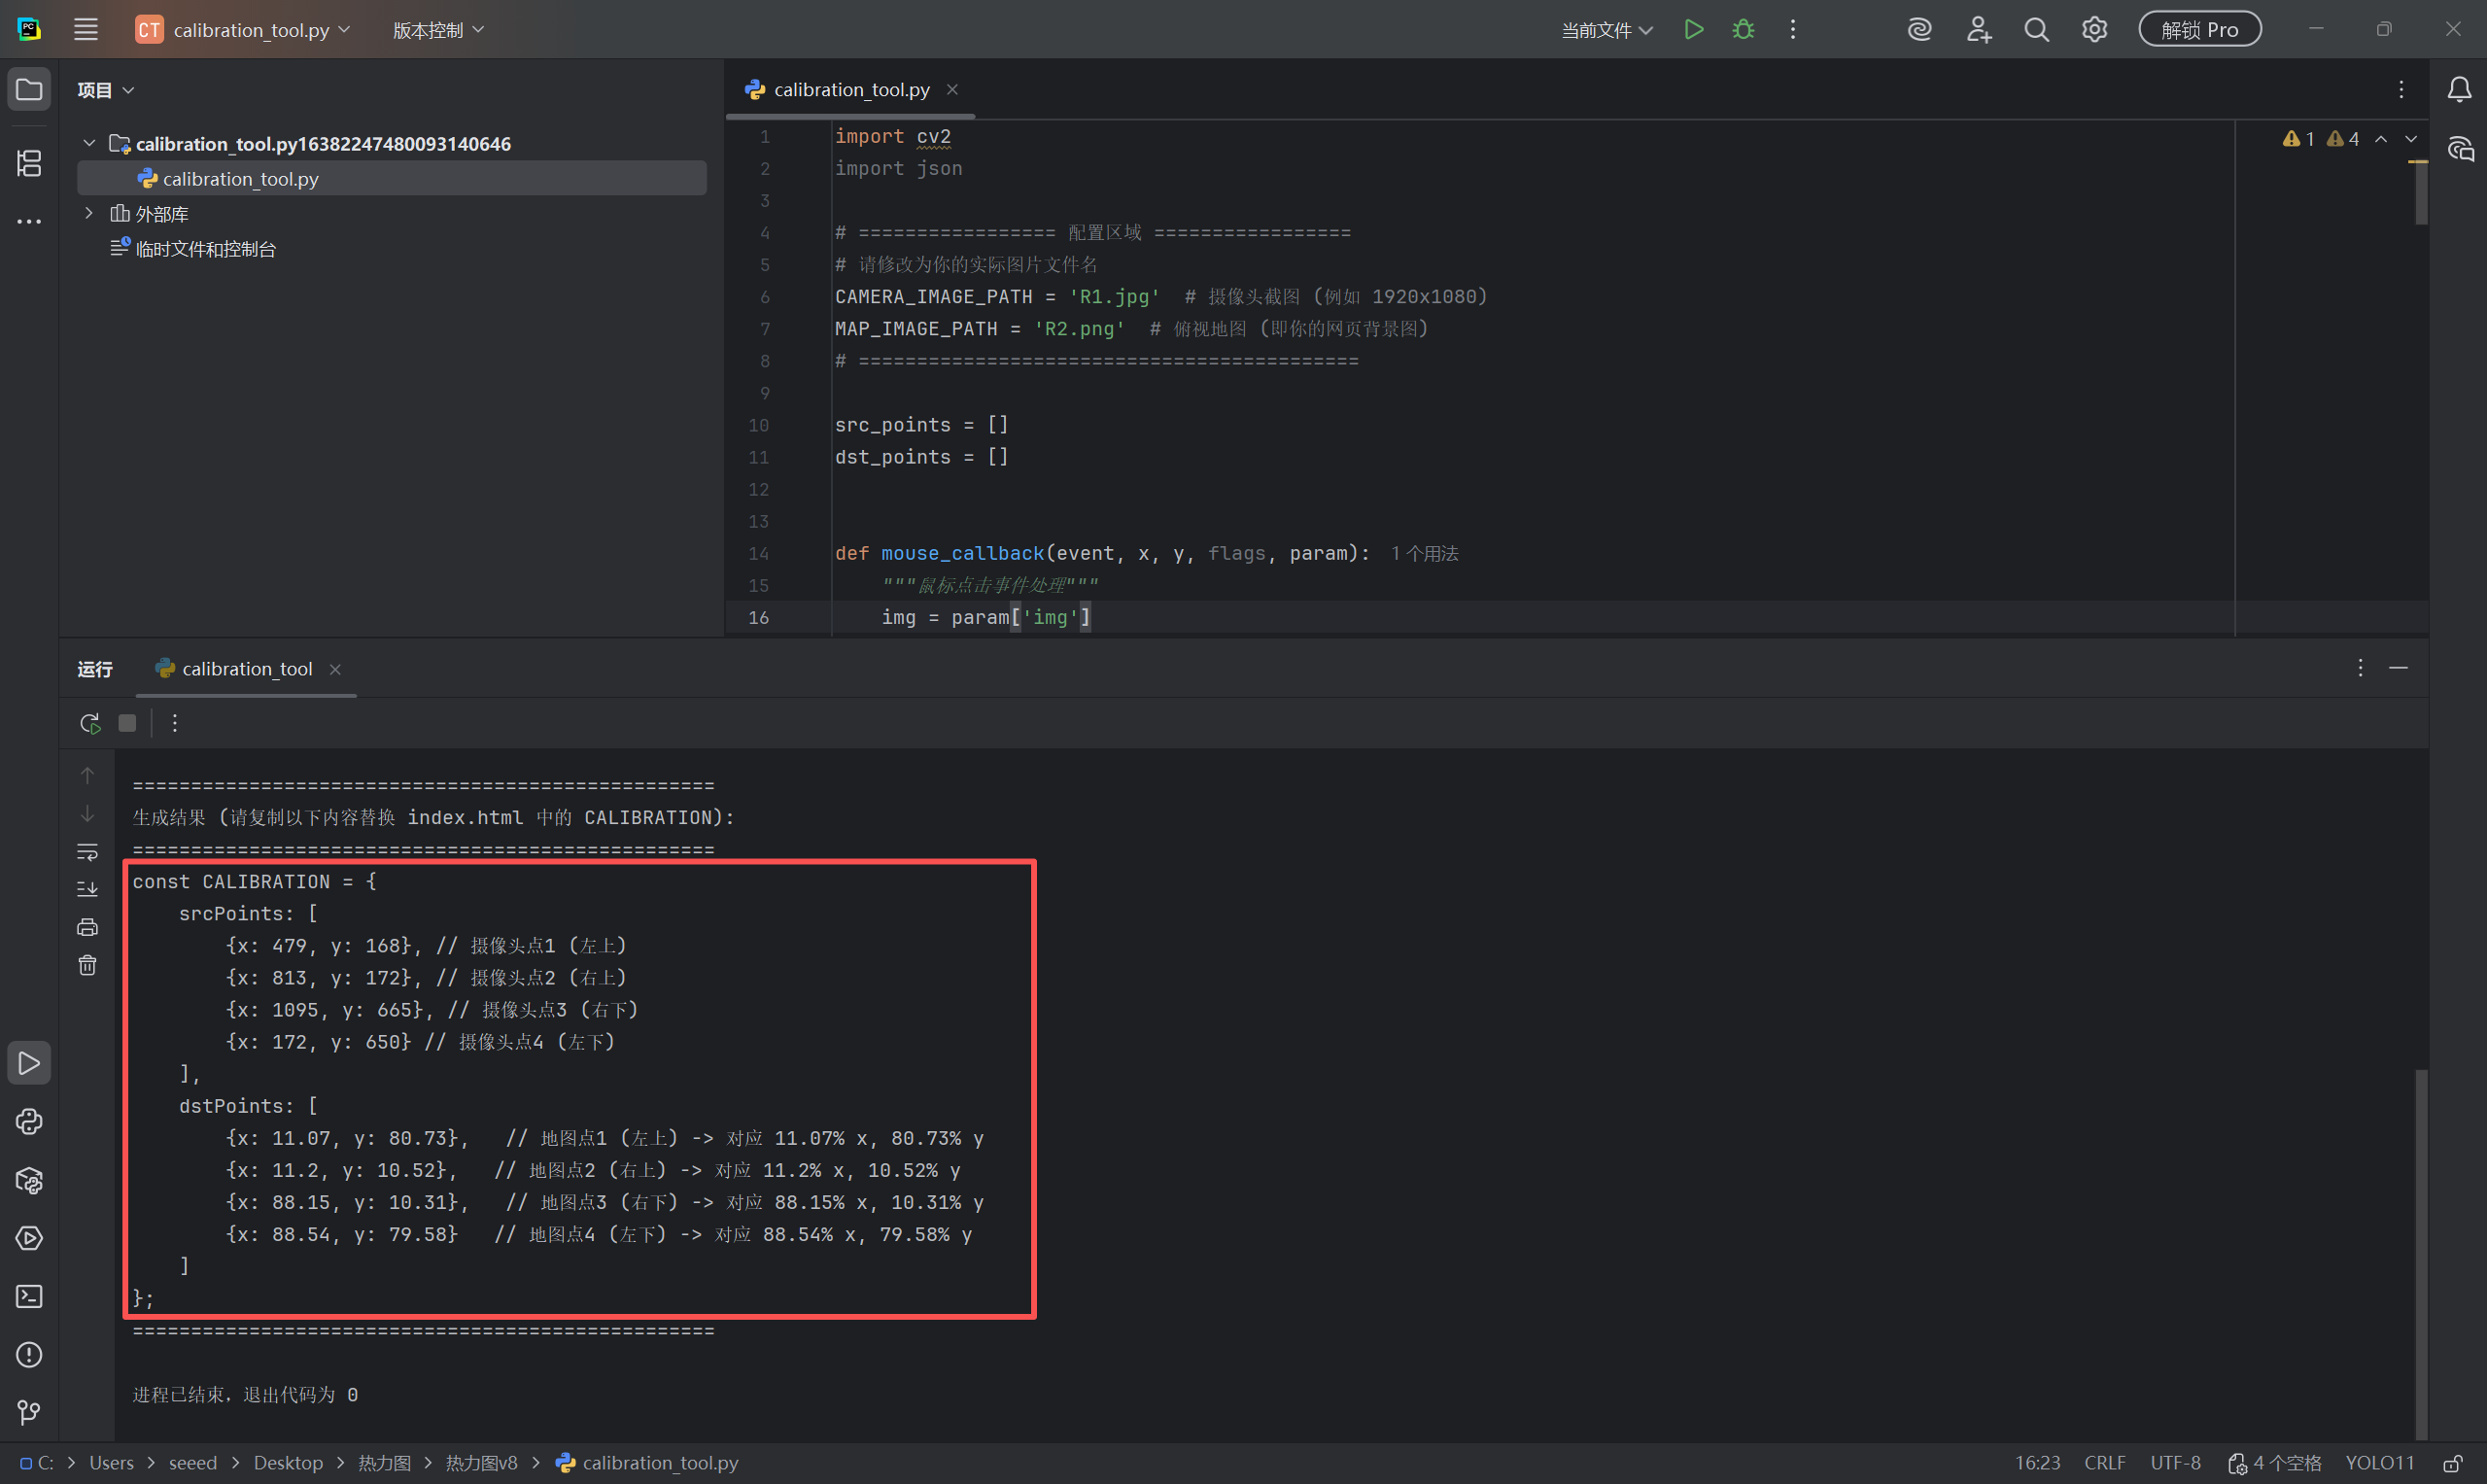
Then go back to the command line window (CMD), you will see that the script automatically generates a piece of JS code, directly copy that code, replace your index.html const CALIBRATION = { ... }; That's it. (It will not be used until the next step of "5.5 the calibrated coordinate data", regardless of it)
5. Configuration of the heat map page
The web configuration for the heatmap is also available in my GitHub project, specifically in the heatmap-demo folder, in the index.html file. We also need to modify several sections in this file; otherwise, it will not be able to run properly and receive the heat map coordinate data.
5.1 Webpage parameter configuration for heat map
5.1.1 Heat Map Picture

Please replace the file name of your actual picture
5.1.2 the configuration of the database part

Parameter explanation
The URL is the web address of the InfluxDB you open.
ORG is the user name when you configure the InfluxDB.

BUCKET is the name of the database you created InfluxDB.
TOKEN is your InfluxDB API Tokens, please replace the original 12345678 in HTML with your actual Token
5.1.3 Refresh Interval of Thermal Data & Query Period

Parameter explanation
REFRESH_INTERVAL refers to the number of milliseconds to refresh, DATA_RANGE refers to the query time in the past data. The default "3000" and "-3s" in the code, where "3000" means 3000 milliseconds, I .e. refreshed every 3 seconds, while "-3s" means to query the thermal coordinate data in the past 3s.
Mode selection
There are two modes that can be configured:
(1) "real-time mode": the thermal coordinates will refresh and clear the previous coordinates in real time without cumulative superposition. to realize the real-time mode, you need to set the DATA_RANGE to a short time. for example, my default "-3s" and "-3s" mean to query the thermal coordinate data in the past 3s, for example, the program has been running for 10s now, then when you configure the DATA_RANGE to -3s, the coordinate data displayed by the thermal diagram is the data of the 8th-10th second, and the coordinate data of the previous 1-7s will not be displayed;
(2) "Cumulative Mode": The thermal coordinates will be refreshed in real time but the previous coordinates will be superimposed. To realize the cumulative mode, you need to set the DATA_RANGE to a longer time, for example, you can set the DATA_RANGE to "-1h", then the thermal diagram will cumulatively display the data in the past 1h. After the program runs for 2 hours, the data in the second hour is now displayed, the first hour of data is not displayed.
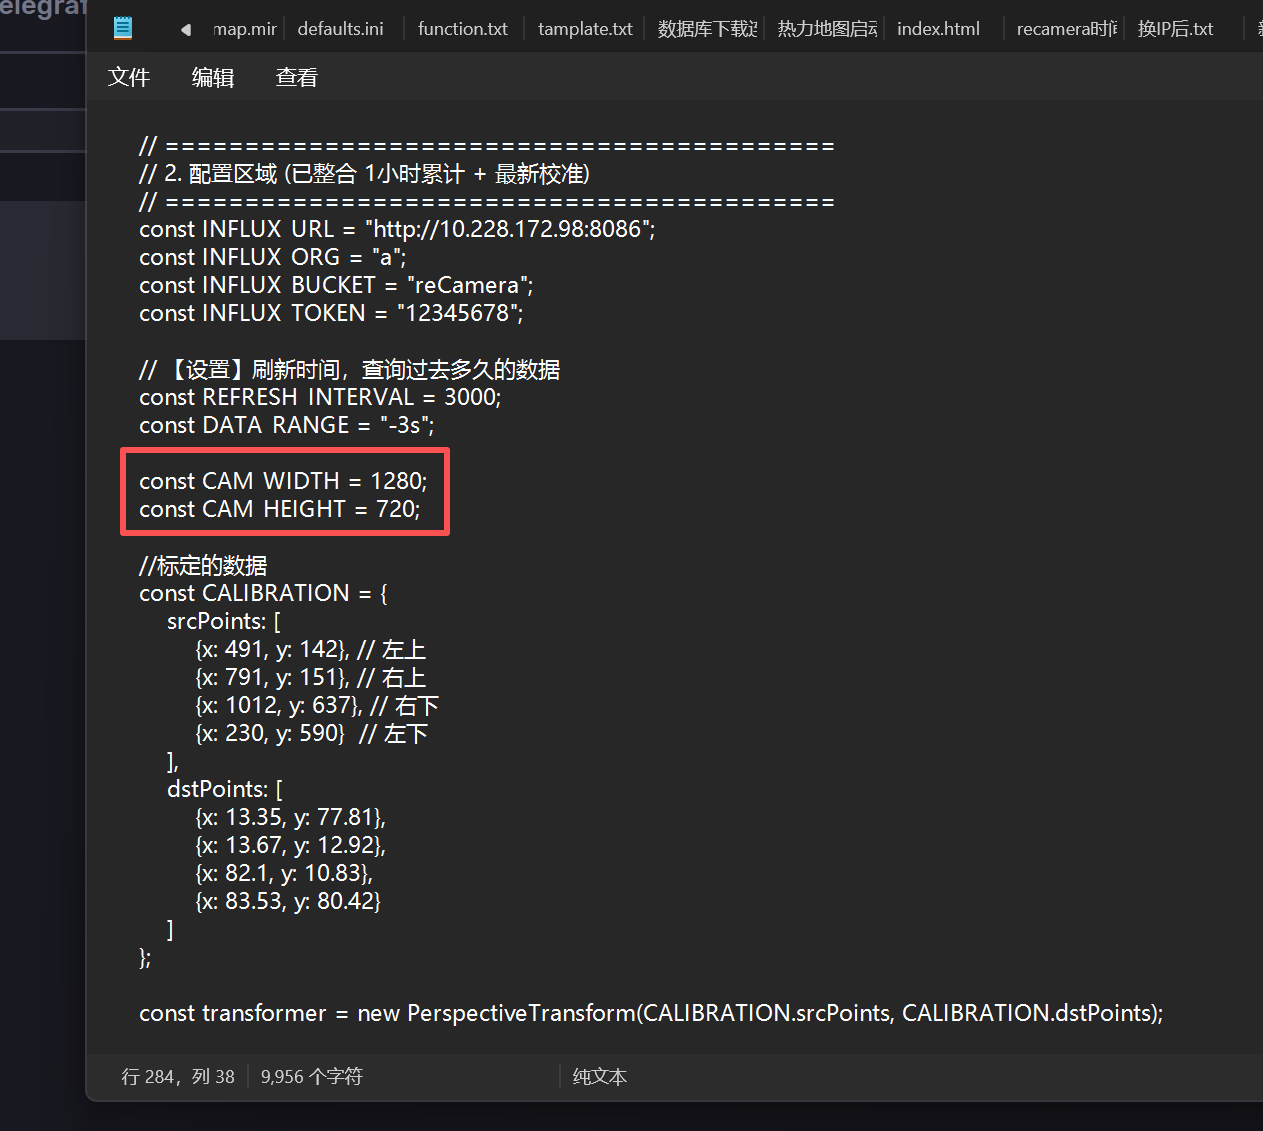
5.1.4 camera resolution
Parameter explanation
CAM_WIDTH / CAM_HEIGHT: The resolution of the camera's actual streaming (e. g. 1920x 1080 or 1280x 720) must be filled in here, otherwise the perspective transformation will be wrong.
This parameter is also presented in the step of "4.1.1 using reCamera to take photos". when we connect the camera node with the capture node, you can view the Resolution parameter of the camera node. this is the resolution parameter you need to modify. if 1920 × 1080 is selected here, then in the code, you should modify CAM WIDTH to 1920 and CAM HEIGHT to 1080

5.1.5 Coordinate data of calibration
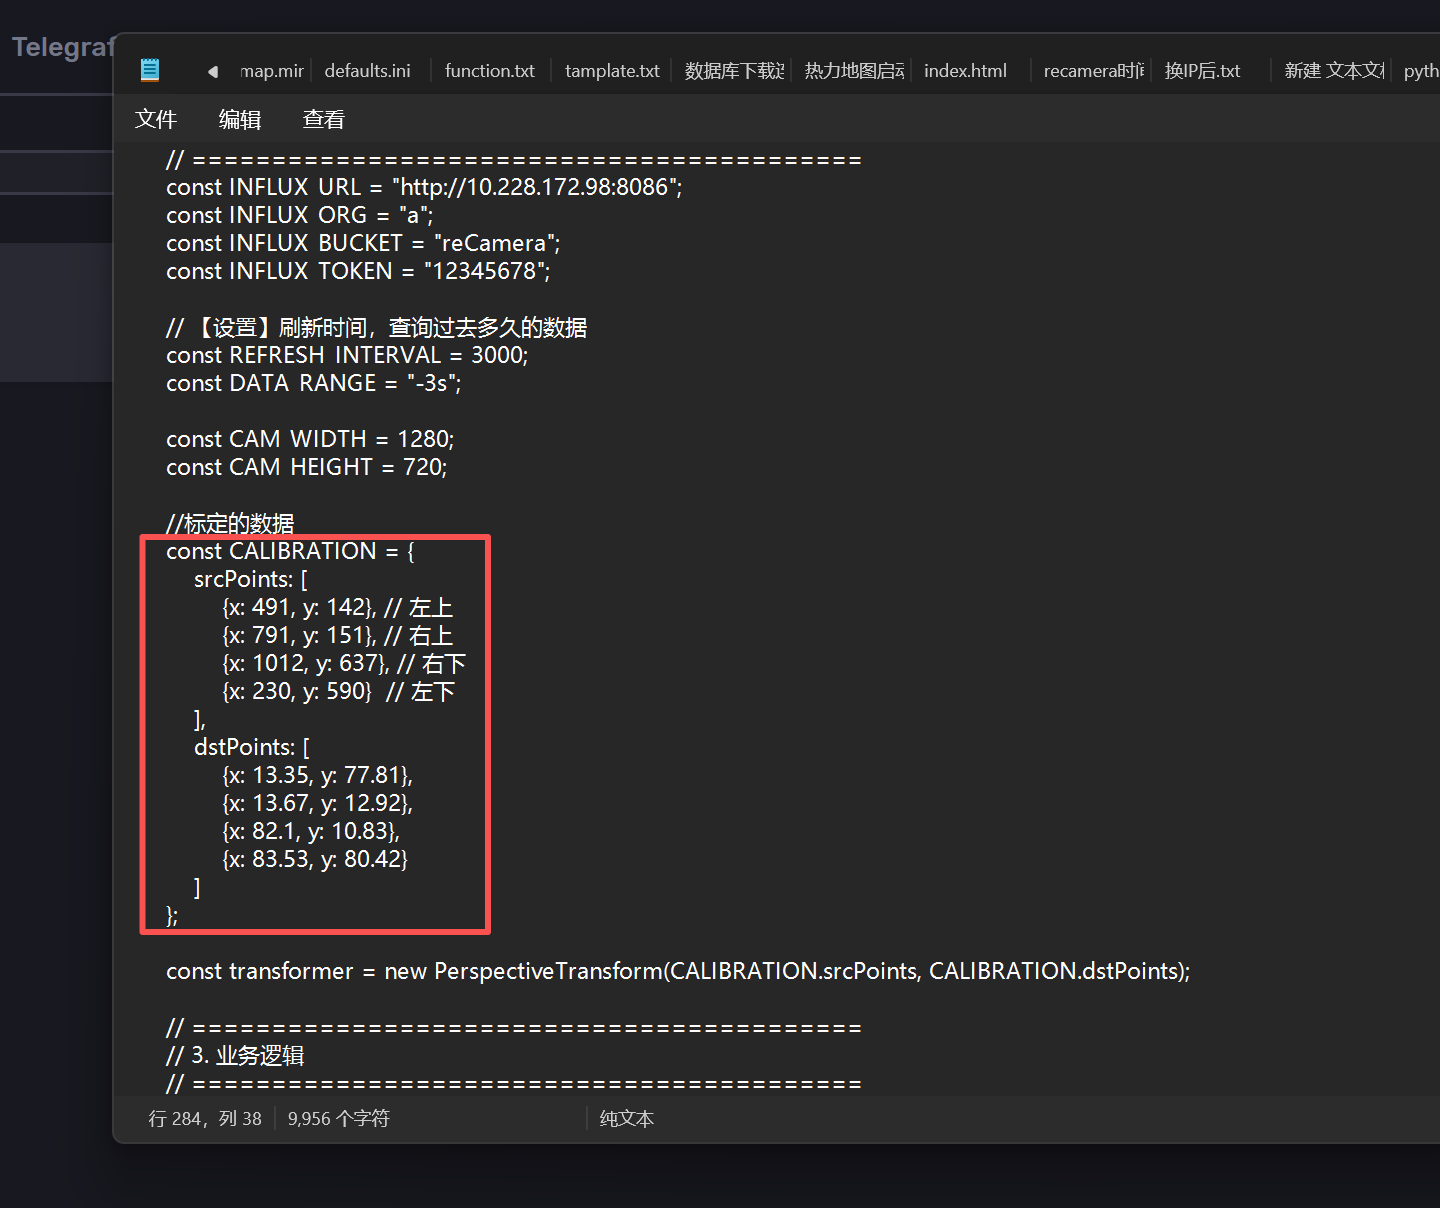
This is the code generated in the console after the python program is executed in the previous step "use of the 4.3 calibration program". replace this code
5.1.6 Thermal Threshold
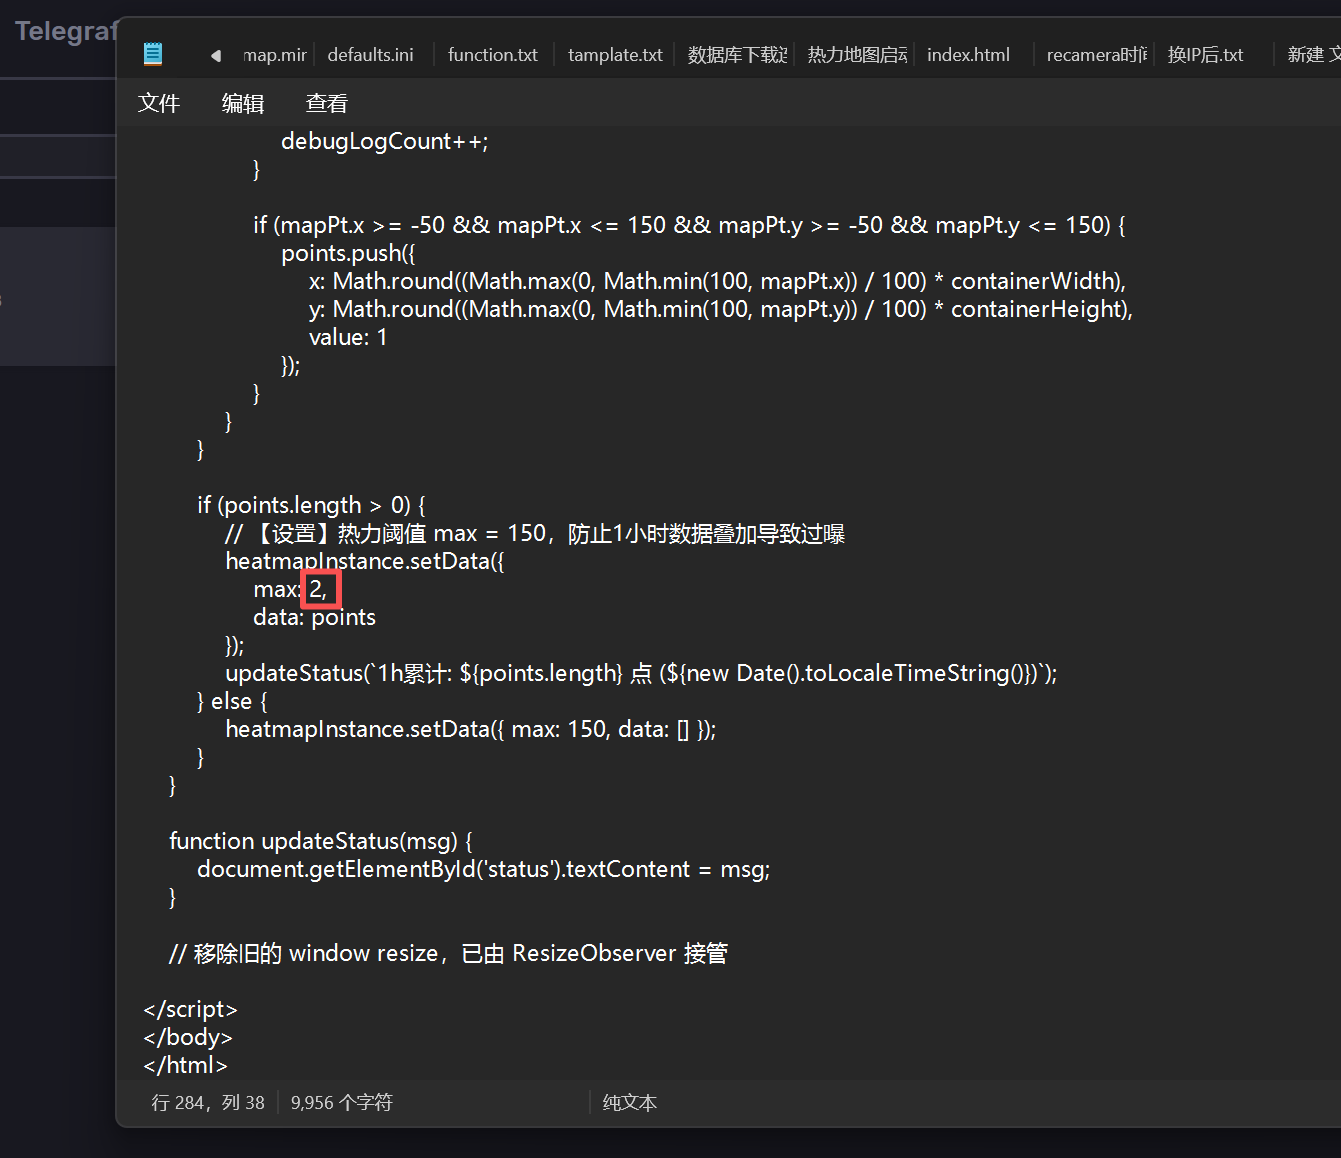
Parameter explanation
Sensitivity (max value): If it is in real-time mode (only a few points),max is set to about 2, otherwise the color is too light to see;
If it is a 1-hour accumulation (thousands of points),max should be set to 150 or higher, otherwise the map will be instantly red (overexposed).
5.2 Activate the heat map
Press Win + R, type "cmd", enter the path "heatmap-demo", and then input
python -m http.server 8080

Then, by opening the webpage "InfluxDB Heatmap (Grafana Fix + 1h Accumulation)" in the browser, you can see that the map has been loaded.
This step is also applicable to Linux.
6. Return to the Grafana panel and view the final result
At this point, you should be able to see the following display on the Grafana panel. If you encounter any issues, please refer to the "Frequently Asked Questions" section at the end of the article.

Frequently Asked Questions
Grafana webpage failed to open
After entering "Services", find "Grafana", then right-click and select "Restart". After that, simply open http://localhost:3000 again.

Grafana panel is loaded incorrectly
If it is found in the Grafana that the real-time thermal map or reCamera real-time screen cannot be loaded or displayed incorrectly, then you need to click the panel with problems to refresh, taking the thermal map panel as an example:

Then click Refresh

There is a problem loading the thermal map
If you encounter the problem of loading the thermal map, please first check whether all the configuration items in this step are correct. if all the configuration items are correct and there is still a problem with loading the thermal map, please press F12 key in the [InfluxDB Heatmap (Grafana Fix 1h Accumulation)](http:// localhost:8080/index.html) interface to view the output of the web console for troubleshooting.

Caton appears in the real-time picture of the reCamera
If you find that the real-time picture of the reCamera is stuck and "WebSocket:Disconnected" appears after running for a while, this is a normal phenomenon, reCamera the resources are limited and the memory will be too full. Wait for it to resume displaying.
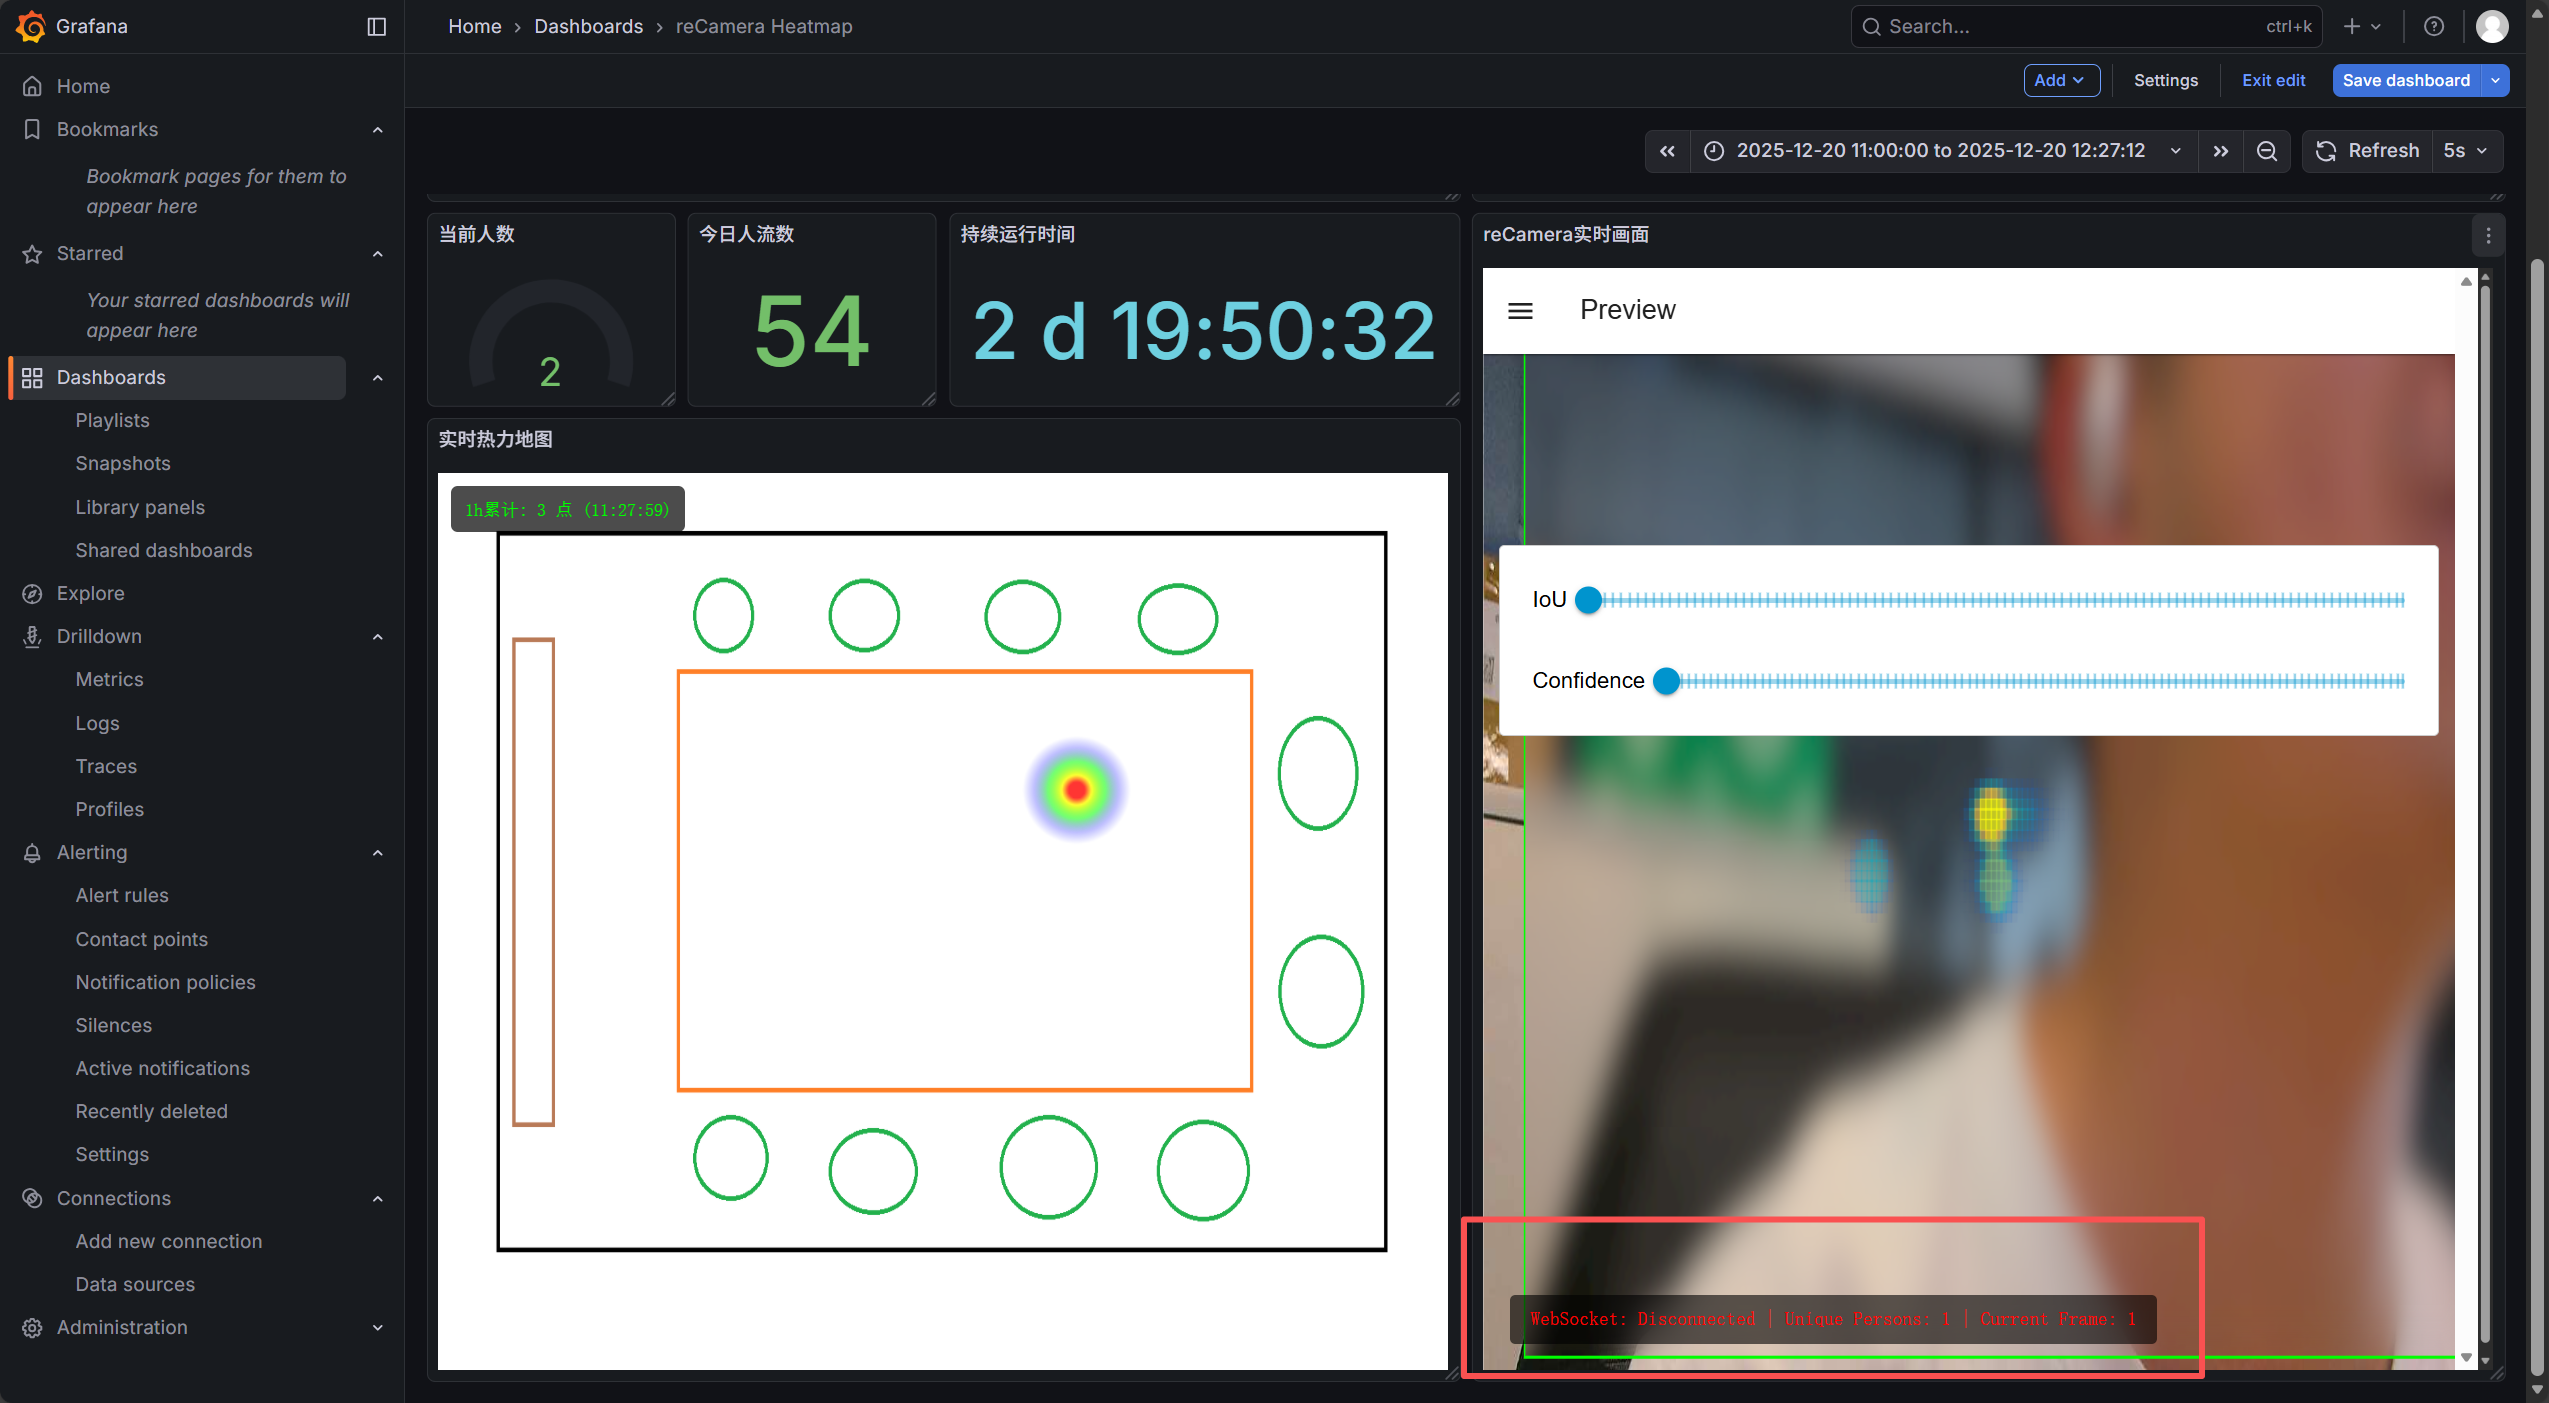
The "Current Number" and "Number of People Today" in the Grafana panel are displayed incorrectly
This is a normal phenomenon, because there will be noise interference, and the value will return to normal after a period of time.

What does "continuous running time" mean in the Grafana panel
The "continuous running time" here refers to how long the database has been running from the first day to now, because I set the data retention time of reCamera database in the InfluxDB to be 7 days, so it will automatically clear and re-time after seven days, here you can freely set the data storage time of each database in the InfluxDB.


Whether data can be exported
Yes, you need to select the data you need in the InfluxDB Explore interface, then click Submit, and then click Download CSV

If the IP address changes, for instance if you switch to a different network, then you will need to modify these sections accordingly.
(1) The IP address and verification token of the "InfluxDB Out" node in Node-RED
(2) The login IP of the InfluxDB database, for example:: http://10.241.1.98:8086/
(3) The IP of the data source in Grafana
(4) The IP in the HTML code of the heat map
Tech Support & Product Discussion
Thank you for choosing our products! We are here to provide you with different support to ensure that your experience with our products is as smooth as possible. We offer several communication channels to cater to different preferences and needs.