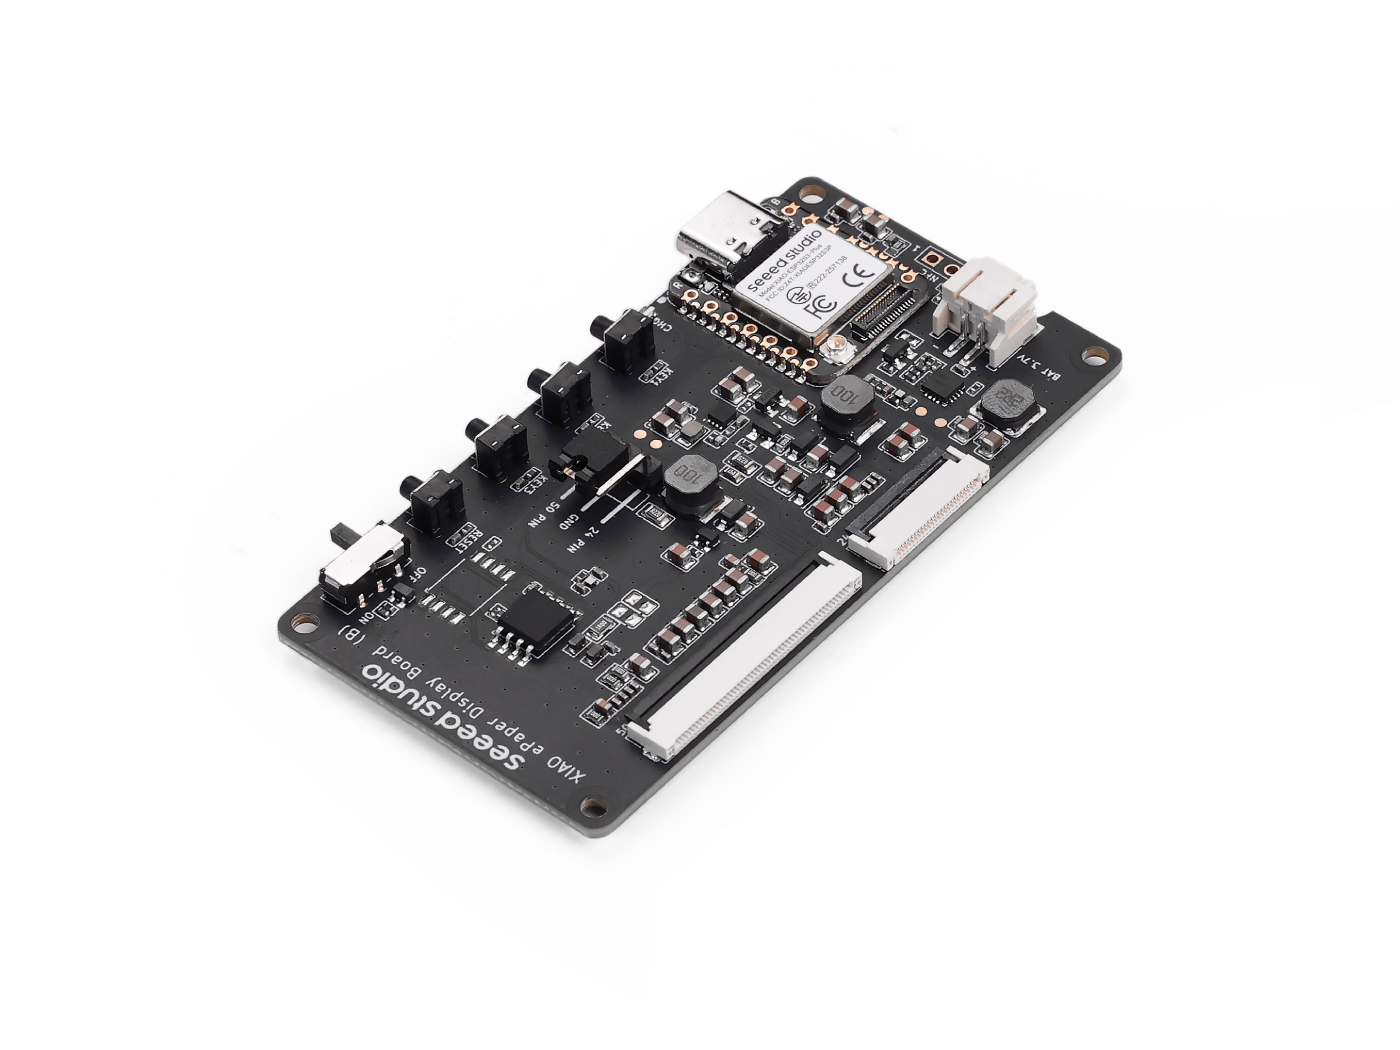
ESPHome クックブック: XIAO ePaper ドライバボード (EE0x)
このページは EE0x ドライバボード向け ESPHome クックブック です。対象は EE02 / EE03 / EE04 / EE05 となります。4 つのボードはいずれも同じ XIAO ESP32-S3 をベースにし、同じ SPI 接続の ePaper インターフェースを共有しているため、ワークフローは同一です。ボード間で変わるのは YAML の display: ブロック内で選択するスクリーンのモデルだけです。
動作例: 7.5 インチ 800×480 モノクロスクリーンを接続した EE04。 display.model 行のボード + スクリーンの組み合わせを自分のものに置き換えれば、残りの設定はそのまま適用できます。
共通のボイラープレート — 書き込み方法の選択、汎用 YAML スケルトン、Home Assistant への接続 — は Work with ESPHome にまとめてあります。Seeed の ePaper で ESPHome を使うのが初めての場合は、まずそちらに目を通してください。
ESPHome とは?
ESPHome は、一般的な WiFi 対応マイコン向けのカスタムファームウェアを簡単に作成できる、オープンソースのファームウェアフレームワークです。ESPHome を使うと、次のことができます。
- シンプルな YAML 設定ファイルを使って、カスタムスマートホームデバイスを作成する
- Home Assistant とシームレスに統合し、統一されたスマートホーム体験を実現する
- 複数のインターフェース(Web、API、MQTT)を通じてデバイスを制御・監視する
- 強力なオンデバイスオートメーションで自宅を自動化する
- 物理的にアクセスすることなく、「Over The Air」(OTA)でワイヤレスにデバイスを更新する
はじめに
ハードウェア概要

Home Assistant Green は、最も簡単かつプライバシー重視で自宅を自動化できる方法です。セットアップは手軽で、すべてのスマートデバイスを 1 つのシステムから制御でき、データはデフォルトですべてローカルに保存されます。このボードは活発な Home Assistant エコシステムの恩恵を受けており、オープンソースによって毎月改善されていきます。
また、いくつかの Seeed Studio 製品向けに Home Assistant のインストール方法もまとめていますので、そちらも参照してください。
Seeed Studio 製品を使用していない場合でも、公式の Home Assistant ウェブサイトで、他の製品向けの Home Assistant のインストール方法を確認して学ぶことができます。
ステップ 1. ESPHome をインストールする
Settings -> Add-ons -> ADD-ON STORE に移動します。

検索欄に ESPHome と入力します。
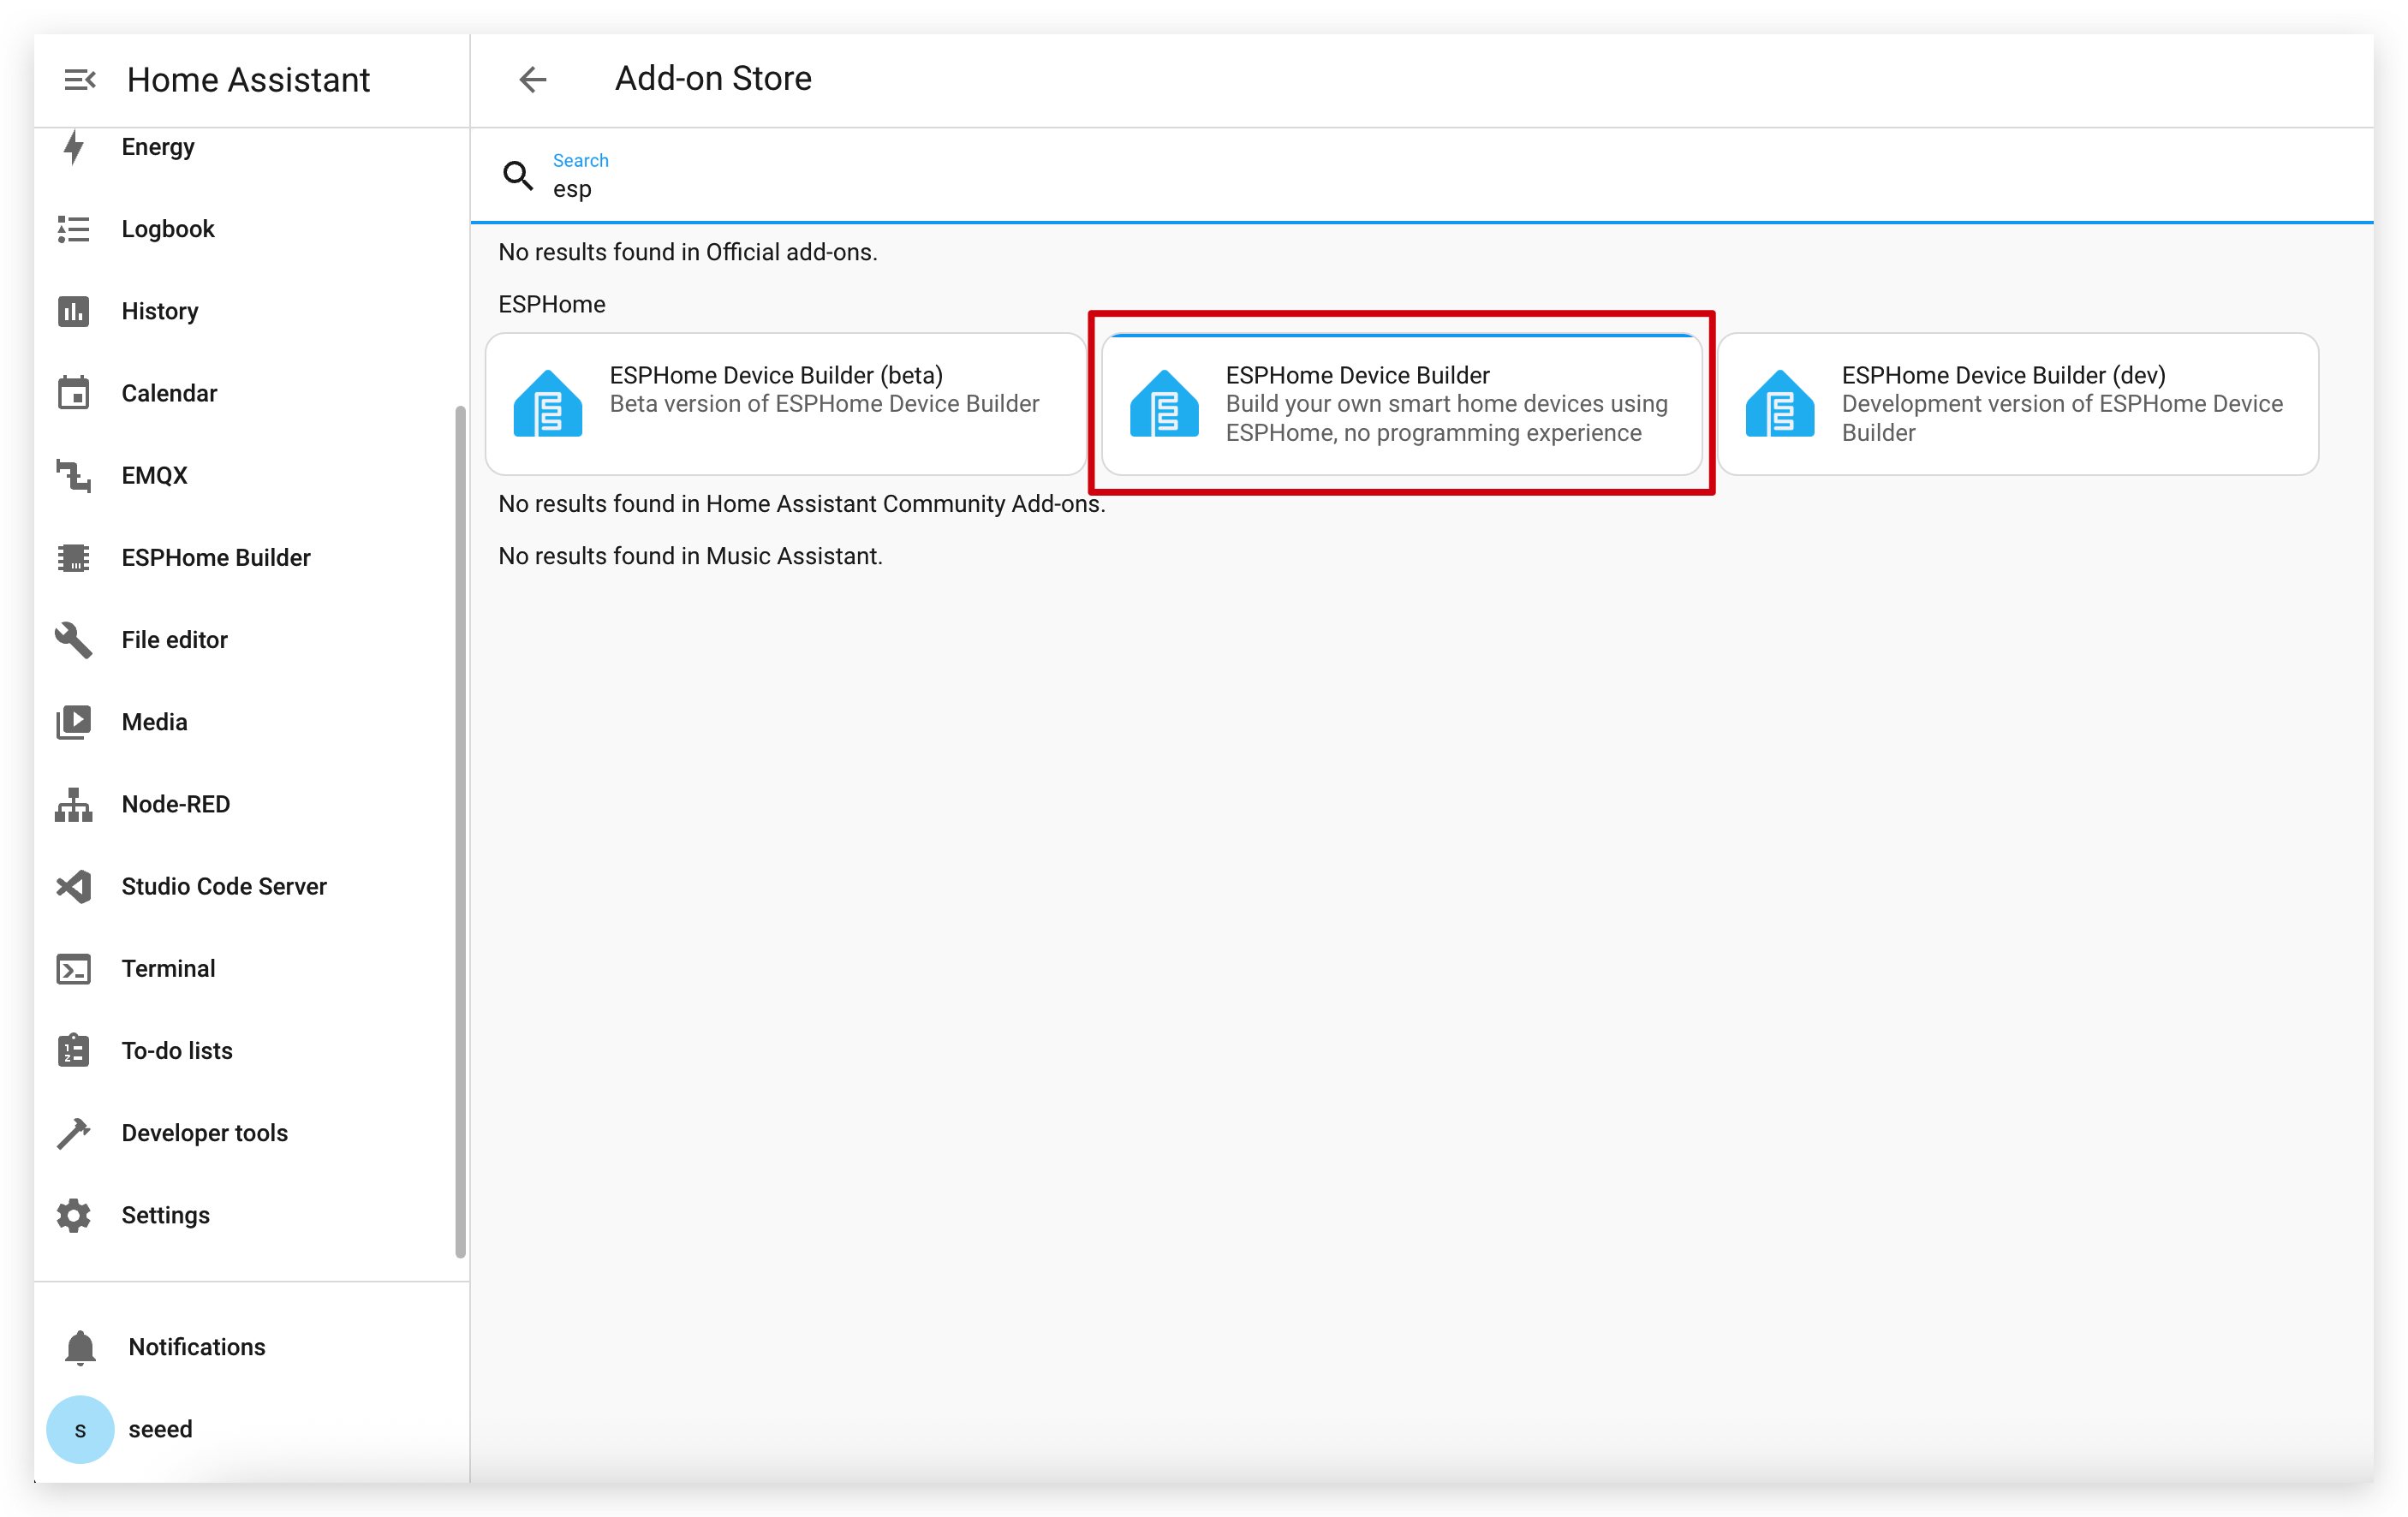
INSTALL と START をクリックします。
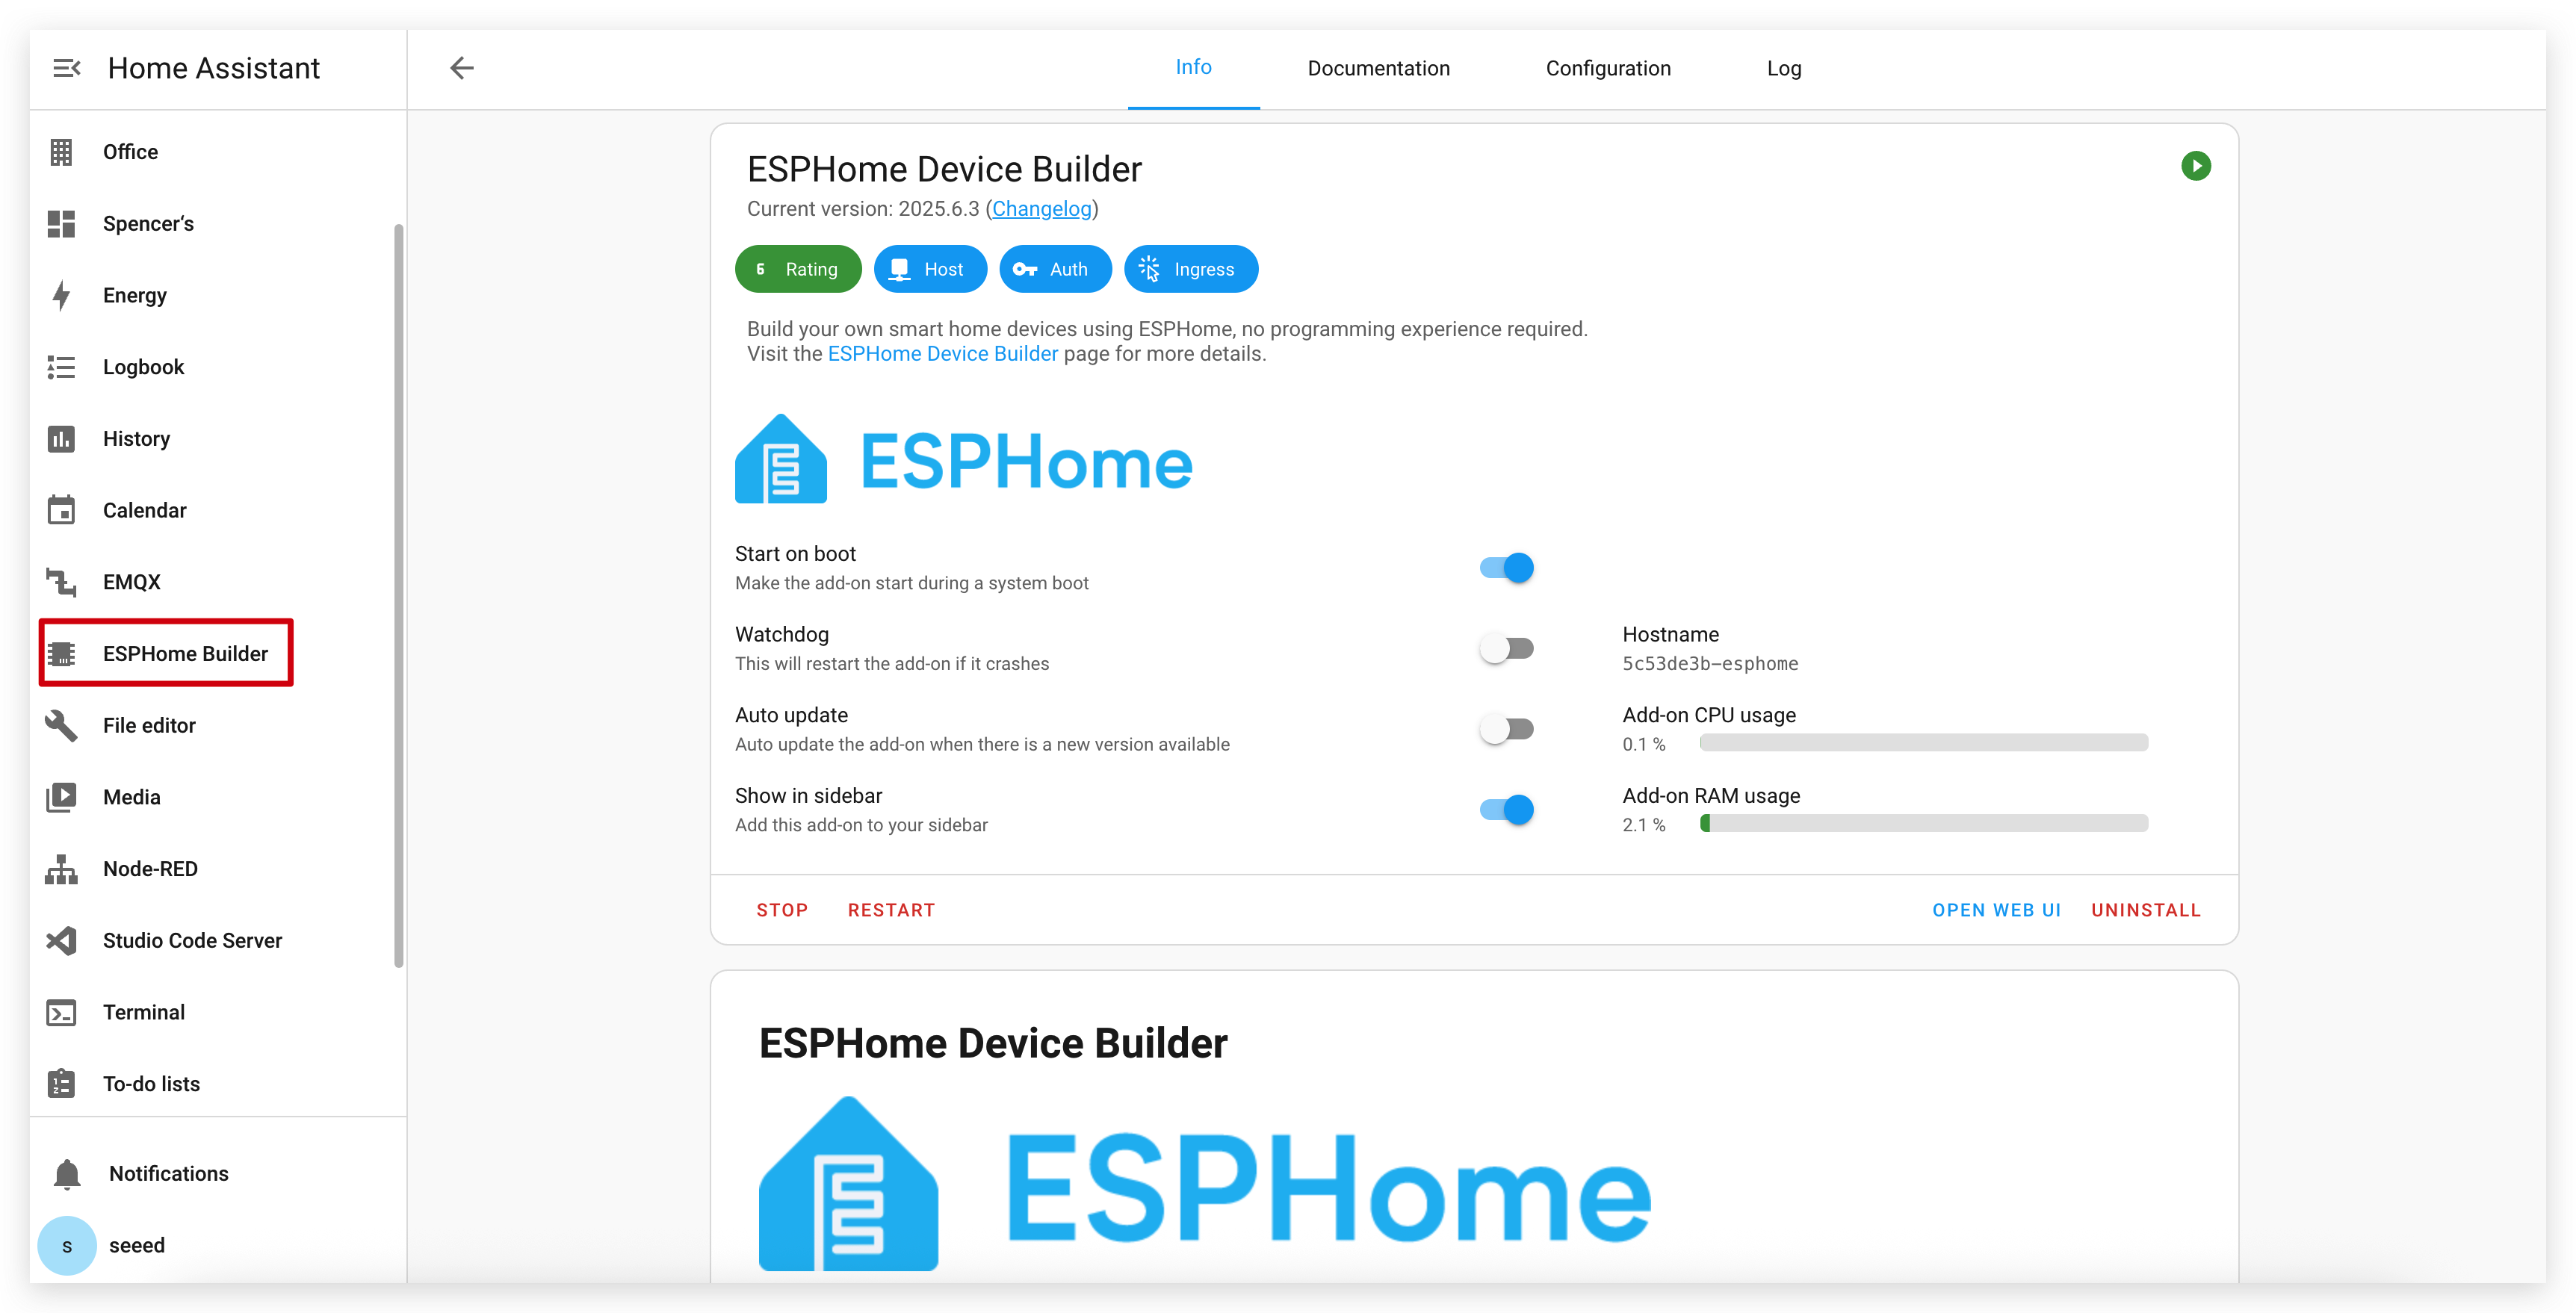
アドオンストアで ESPHome が見つからない場合は、使用している Home Assistant のインストール形態がアドオンをサポートしているか(Home Assistant OS や supervised インストールなど)を確認してください。その他のインストール形態(Home Assistant Container など)の場合は、Docker を使って ESPHome Device Builder を独立して実行する必要があるかもしれません。詳しくは 公式 ESPHome ドキュメント を参照してください。
ステップ 2. 新しいデバイスを追加する
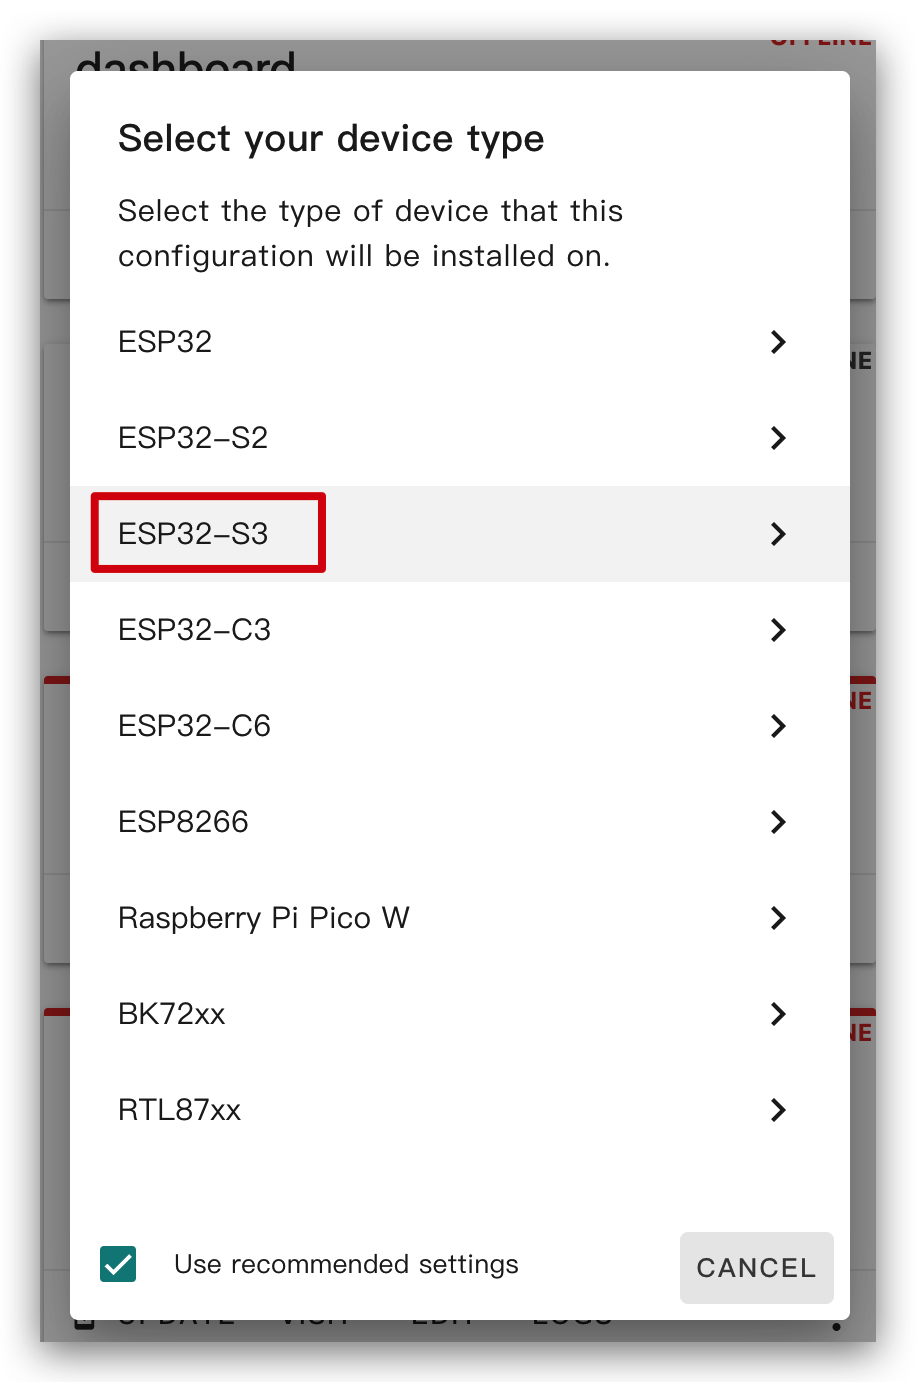
ESPHome を開き、NEW DEVICE をクリックします。
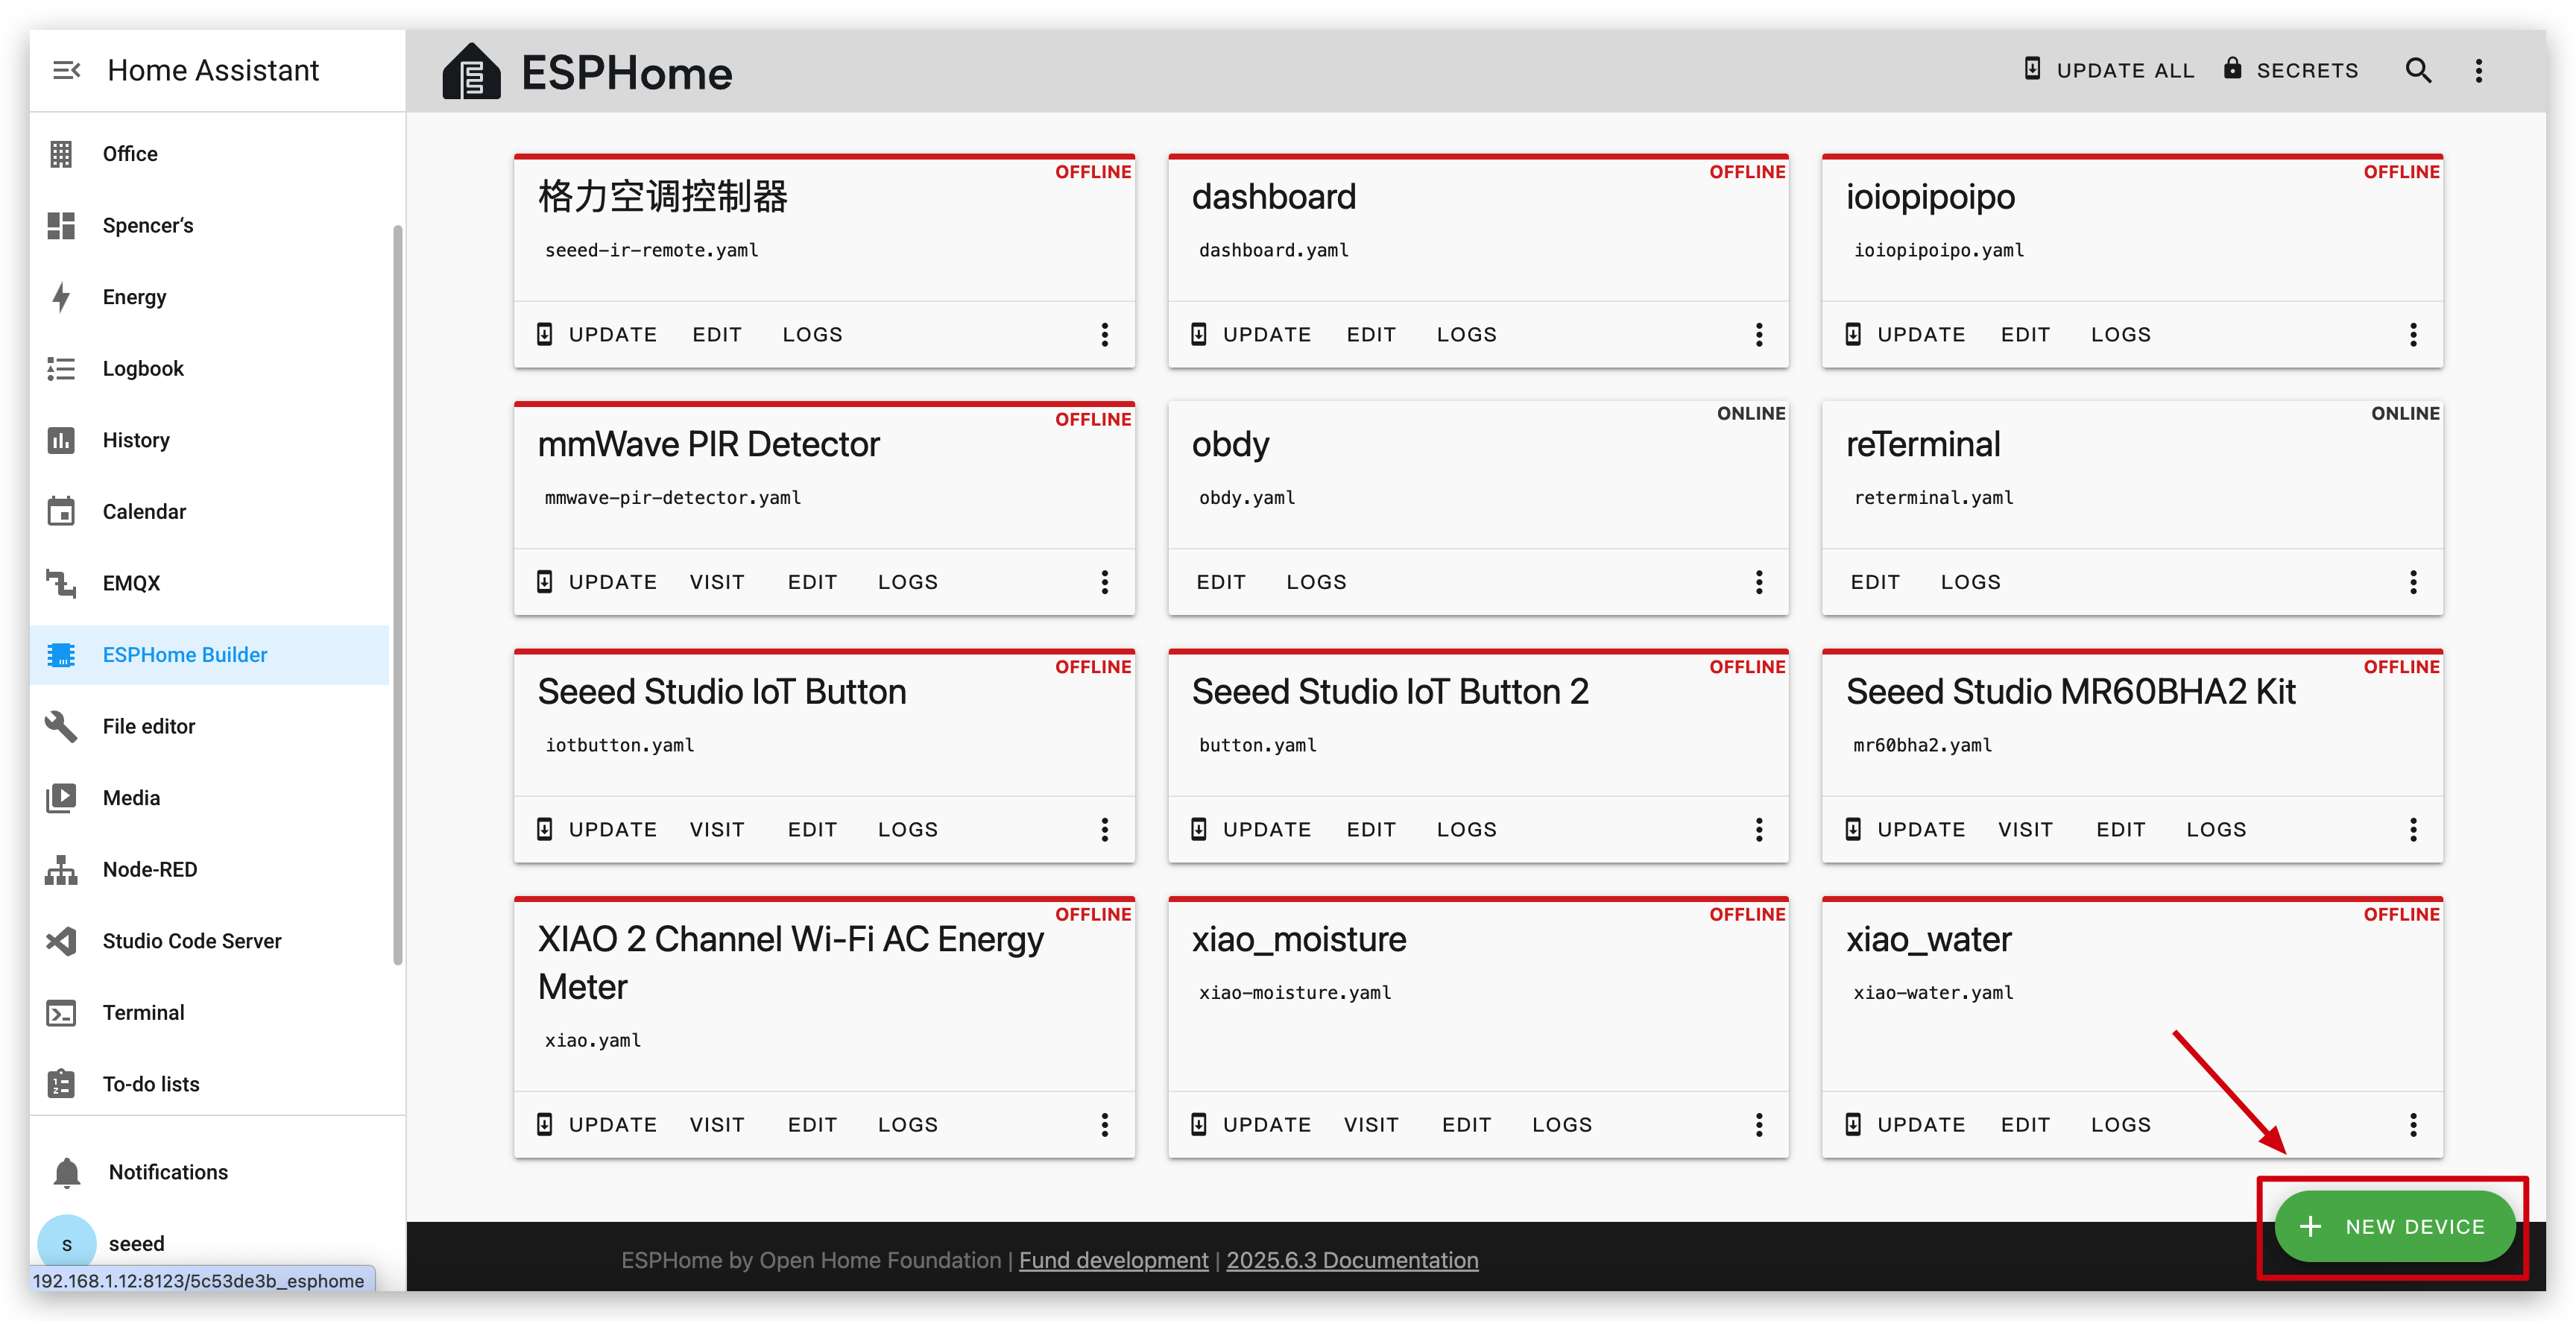
XIAO ePaper Display Board(ESP32-S3) - EE04 に好きな名前を付け、チップタイプとして ESP32-S3 を選択し、SKIP をクリックします。
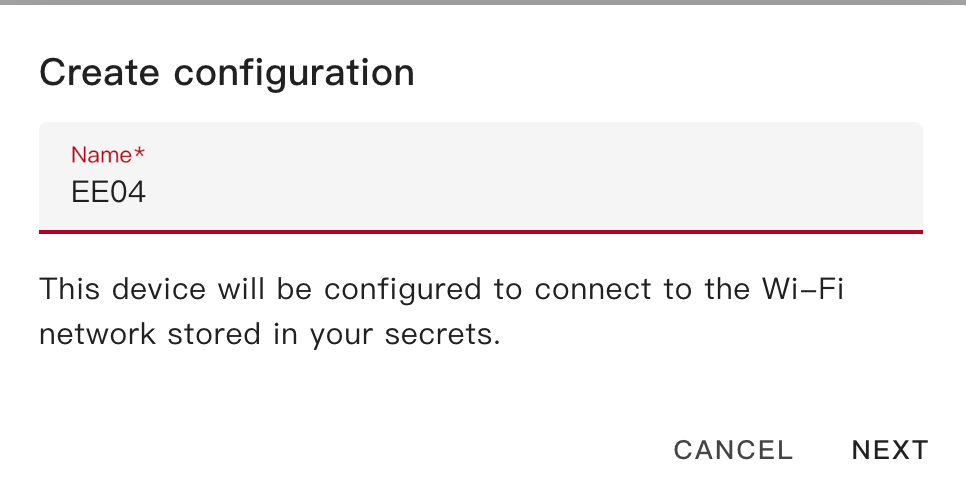
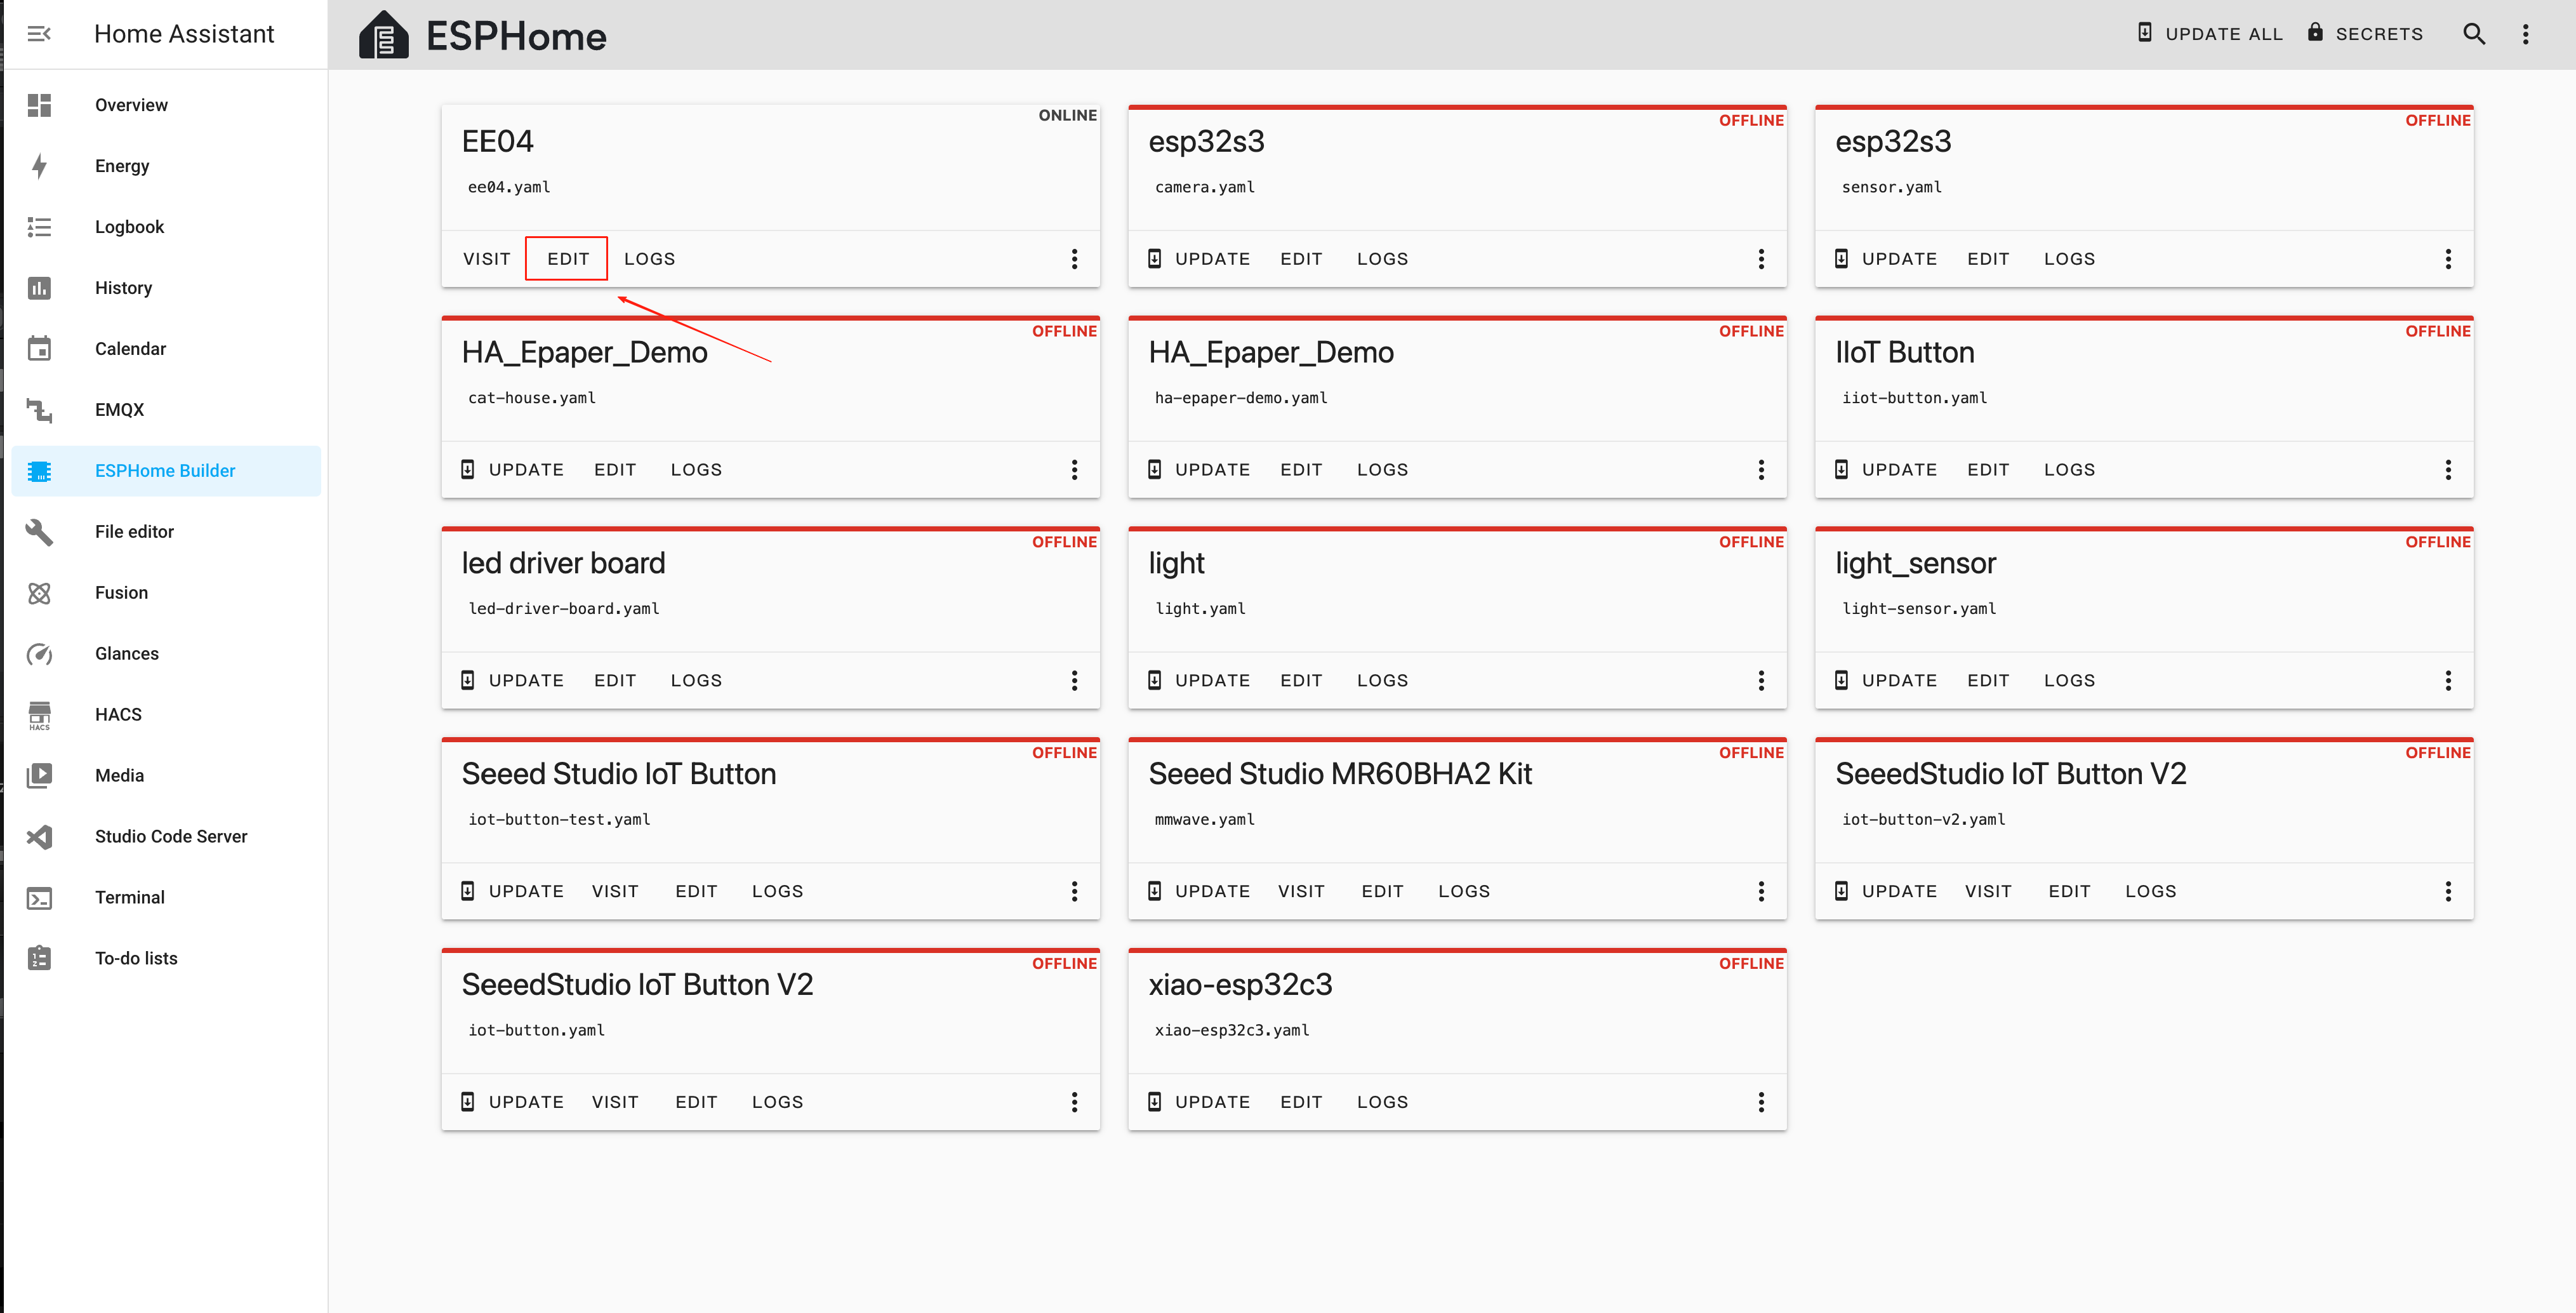
新しいデバイスを作成したら、EDIT をクリックします。
ステップ 3. ファームウェアをインストールする
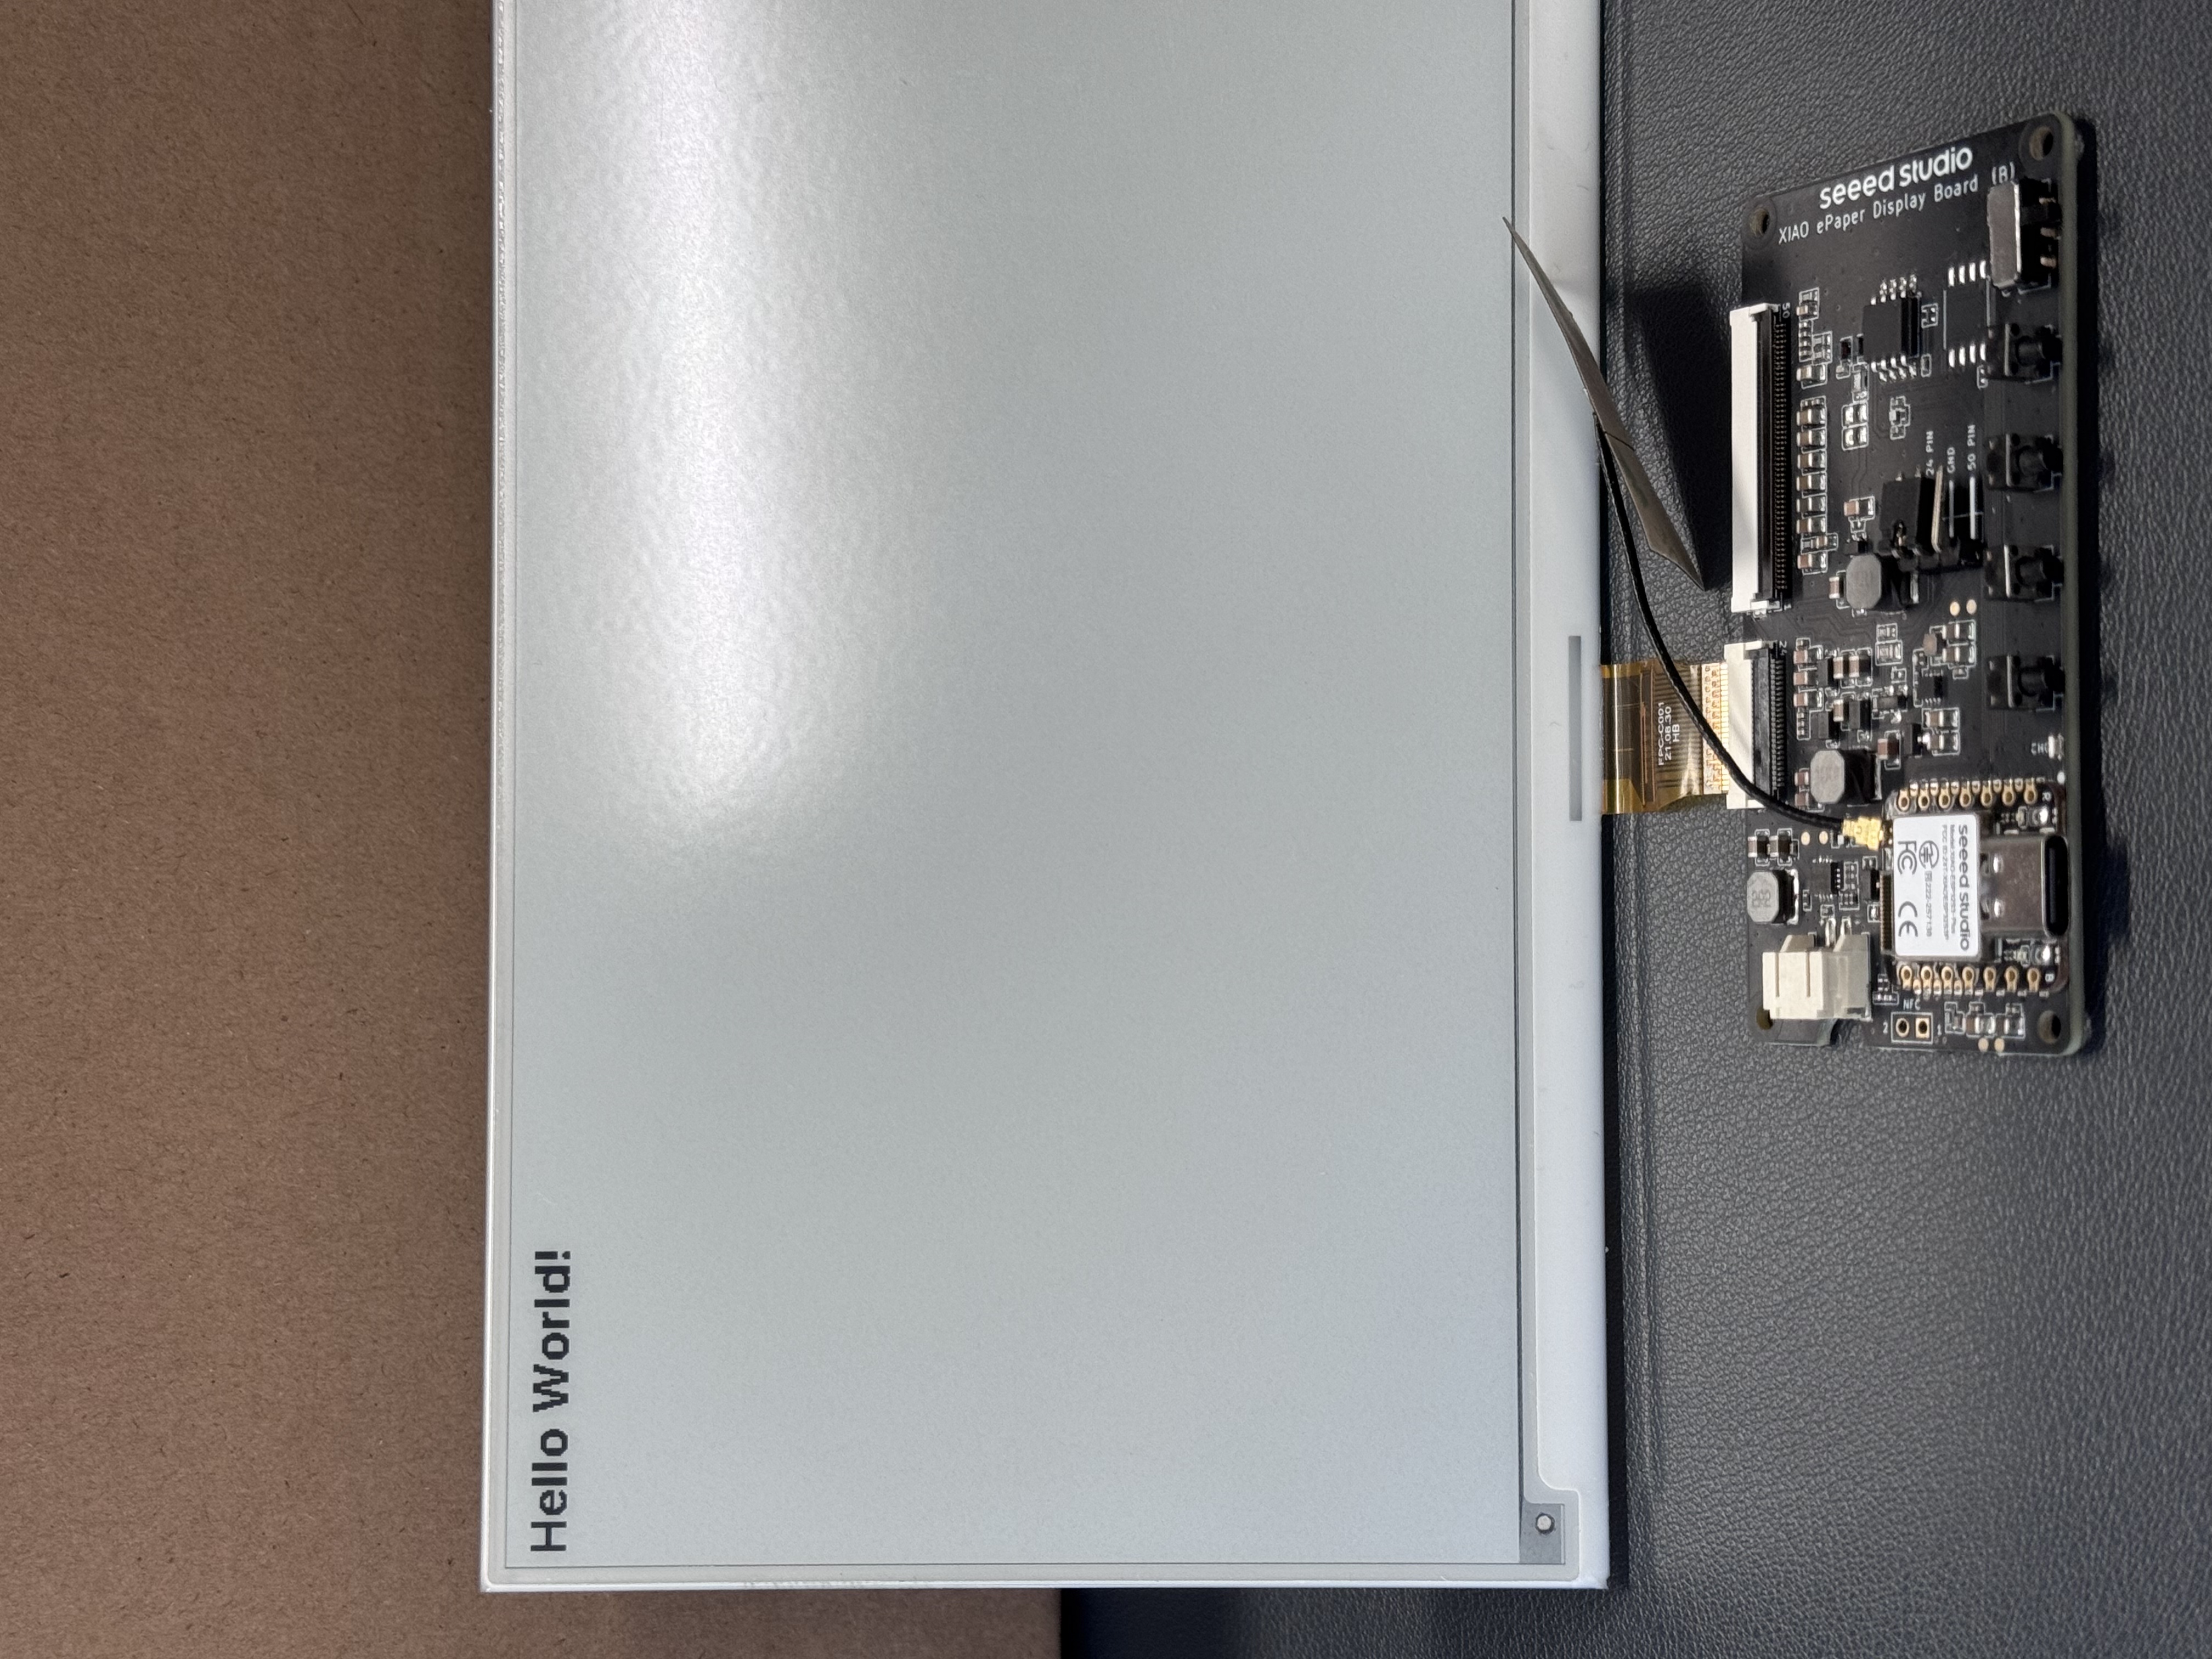
これは基本的なサンプルで、ディスプレイに "Hello World!" を表示します。
主な目的は、デバイスにファームウェアをインストールするさまざまな方法を紹介することです。
以下のコードをコピーして、YAML ファイル内の captive_portal のコード行の後に貼り付けることで、このサンプルを利用できます。
- 次のルーチンでは、ファームウェアをダウンロードする前にフォントが必要になるため、この リンク をクリックして設定を完了してください。
ssid:,password:には、使用するネットワーク名とパスワードを追加する必要があります。- Quadruple Color 2.13 と Quadruple Color 2.9 は外部ライブラリを使用するため、ESPHome で使用する
board名が異なります。
以下は 24 ピンコネクタのスクリーンタイプです:
- 1.54 インチ モノクロカラー
- 2.13 インチ モノクロカラー
- 2.13 インチ Quadruple Color
- 2.9 Inch モノクロカラー
- 2.9 Inch 4色カラー
- 4.2 Inch モノクロカラー
- 5.83 Inc モノクロカラー
- 7.5 Inch モノクロカラー
esphome:
  name: ee04
  friendly_name: EE04

esp32:
  board: esp32-s3-devkitc-1
  framework:
    type: esp-idf

# Enable logging
logger:

# Enable Home Assistant API
api:
  encryption:
    key: "b0AIbJ+kbeMayi1PgSGXtiD1yQCapUBF4A/7v7btys0="

ota:
  - platform: esphome
    password: "5d7cca6f4b3f38aba559ab0d6aaf5926"

wifi:
  ssid:
  password:

  # Enable fallback hotspot (captive portal) in case wifi connection fails
  ap:
    ssid: "Ee04 Fallback Hotspot"
    password: "zxPMBtCEWonm"

# define font to display words
font:
  - file: "gfonts://Inter@700"
    id: myFont
    size: 24

captive_portal:

# define SPI interface
spi:
  clk_pin: GPIO7
  mosi_pin: GPIO9

display:
  - platform: waveshare_epaper
    id: epaper_display
    model: 1.54inv2
    cs_pin: GPIO44
    dc_pin: GPIO10
    busy_pin: GPIO4
    reset_pin:  GPIO38
    rotation: 0
    update_interval: 300s
    lambda: |-
      it.print(0, 0, id(myFont), "Hello World!");
esphome:
  name: ee04
  friendly_name: EE04

esp32:
  board: esp32-s3-devkitc-1
  framework:
    type: esp-idf

# Enable logging
logger:

# Enable Home Assistant API
api:
  encryption:
    key: "b0AIbJ+kbeMayi1PgSGXtiD1yQCapUBF4A/7v7btys0="

ota:
  - platform: esphome
    password: "5d7cca6f4b3f38aba559ab0d6aaf5926"

wifi:
  ssid:
  password:

  # Enable fallback hotspot (captive portal) in case wifi connection fails
  ap:
    ssid: "Ee04 Fallback Hotspot"
    password: "zxPMBtCEWonm"

# define font to display words
font:
  - file: "gfonts://Inter@700"
    id: myFont
    size: 24

captive_portal:

# define SPI interface
spi:
  clk_pin: GPIO7
  mosi_pin: GPIO9

display:
  - platform: waveshare_epaper
    id: epaper_display
    model: 2.13inv2 #More models you can refer to here: https://esphome.io/components/display/waveshare_epaper/
    cs_pin: GPIO44
    dc_pin: GPIO10
    busy_pin: GPIO4
    reset_pin:  GPIO38
    rotation: 0
    update_interval: 300s
    lambda: |-
      it.print(0, 0, id(myFont), "Hello World!");
esphome:
  name: ee04
  friendly_name: EE04
  libraries:
    - SPI


esp32:
  board: esp32-s3-devkitc-1
  framework:
    type: arduino


# Enable logging
logger:

# Enable Home Assistant API
api:
  encryption:
    key: "eg2Jyse0gE146lJ2mVaqAnwteb4U2GJ7d1sZc2BOOsc="

ota:
  - platform: esphome
    password: "e2f184b95aac832509885f676abf5b73"

wifi:
  ssid:
  password:

  # Enable fallback hotspot (captive portal) in case wifi connection fails
  ap:
    ssid: "ESPHome_Epaper"
    password: "123456789"

external_components:
  - source: github://xcjk-tofuture/esphome@dev
    components: [ waveshare_epaper ]

font:
  - file: "gfonts://Inter@700"
    id: font1
    size: 24

captive_portal:

spi:
  clk_pin: GPIO7
  mosi_pin: GPIO9

display:
  - platform: waveshare_epaper
    id: my_display
    model: gdey0213f51
    cs_pin: GPIO44
    dc_pin: GPIO10
    busy_pin: GPIO4
    reset_pin:  GPIO38
    rotation: 90
    update_interval: 30s
    full_update_every: 1
    lambda: |-
      const auto BLACK   = Color(0,   0,   0,   0);
      const auto RED     = Color(255, 0,   0,   0);
      const auto YELLOW  = Color(255, 255, 0,   0);
      const auto WHITE   = Color(255, 255, 255, 0);

      it.fill(YELLOW);
      it.print(0, 0, id(font1), BLACK, "Hello World in BLACK!");
      it.print(0, 30, id(font1), RED, "Hello World in RED!");
      it.print(0, 60, id(font1), YELLOW, "Hello World in YELLOW!");
esphome:
  name: ee04
  friendly_name: EE04

esp32:
  board: esp32-s3-devkitc-1
  framework:
    type: esp-idf

# Enable logging
logger:

# Enable Home Assistant API
api:
  encryption:
    key: "b0AIbJ+kbeMayi1PgSGXtiD1yQCapUBF4A/7v7btys0="

ota:
  - platform: esphome
    password: "5d7cca6f4b3f38aba559ab0d6aaf5926"

wifi:
  ssid:
  password:

  # Enable fallback hotspot (captive portal) in case wifi connection fails
  ap:
    ssid: "Ee04 Fallback Hotspot"
    password: "zxPMBtCEWonm"

# define font to display words
font:
  - file: "gfonts://Inter@700"
    id: myFont
    size: 24

captive_portal:

# define SPI interface
spi:
  clk_pin: GPIO7
  mosi_pin: GPIO9

display:
  - platform: waveshare_epaper
    id: epaper_display
    model: 2.90inv2
    cs_pin: GPIO44
    dc_pin: GPIO10
    busy_pin: GPIO4
    reset_pin:  GPIO38
    rotation: 0
    update_interval: 300s
    lambda: |-
      it.print(0, 0, id(myFont), "Hello World!");
esphome:
  name: ee04
  friendly_name: EE04
  libraries:
    - SPI


esp32:
  board: esp32-s3-devkitc-1
  framework:
    type: arduino


# Enable logging
logger:

# Enable Home Assistant API
api:
  encryption:
    key: "eg2Jyse0gE146lJ2mVaqAnwteb4U2GJ7d1sZc2BOOsc="

ota:
  - platform: esphome
    password: "e2f184b95aac832509885f676abf5b73"

wifi:
  ssid:
  password:

  # Enable fallback hotspot (captive portal) in case wifi connection fails
  ap:
    ssid: "ESPHome_Epaper"
    password: "123456789"

external_components:
  - source: github://xcjk-tofuture/esphome@dev
    components: [ waveshare_epaper ]


# external_components:
#   - source:
#       type: local
#       path: components_epaper
#     components : [waveshare_epaper]

font:
  - file: "gfonts://Inter@700"
    id: font1
    size: 24

captive_portal:

spi:
  clk_pin: GPIO7
  mosi_pin: GPIO9
display:
  - platform: waveshare_epaper
    id: my_display
    model: gdey029f51h
    cs_pin: GPIO44
    dc_pin: GPIO10
    busy_pin: GPIO4
    reset_pin:  GPIO38
    rotation: 90
    update_interval: 30s
    full_update_every: 1
    lambda: |-
      const auto BLACK   = Color(0,   0,   0,   0);
      const auto RED     = Color(255, 0,   0,   0);
      const auto YELLOW  = Color(255, 255, 0,   0);
      const auto WHITE   = Color(255, 255, 255, 0);

      it.print(0, 0, id(font1), BLACK, "Hello World in BLACK!");
      it.print(0, 30, id(font1), RED, "Hello World in RED!");
      it.print(0, 60, id(font1), YELLOW, "Hello World in YELLOW!");
      ESP_LOGD("epaper", "reflash......");
esphome:
  name: ee04
  friendly_name: EE04

esp32:
  board: esp32-s3-devkitc-1
  framework:
    type: esp-idf

# Enable logging
logger:

# Enable Home Assistant API
api:
  encryption:
    key: "b0AIbJ+kbeMayi1PgSGXtiD1yQCapUBF4A/7v7btys0="

ota:
  - platform: esphome
    password: "5d7cca6f4b3f38aba559ab0d6aaf5926"

wifi:
  ssid:
  password:

  # Enable fallback hotspot (captive portal) in case wifi connection fails
  ap:
    ssid: "Ee04 Fallback Hotspot"
    password: "zxPMBtCEWonm"


# define font to display words
font:
  - file: "gfonts://Inter@700"
    id: myFont
    size: 24

captive_portal:

# define SPI interface
spi:
  clk_pin: GPIO7
  mosi_pin: GPIO9

display:
  - platform: waveshare_epaper
    id: epaper_display
    model: gdey042t81
    cs_pin: GPIO44
    dc_pin: GPIO10
    busy_pin: GPIO4
    reset_pin:  GPIO38
    rotation: 0
    update_interval: 300s
    lambda: |-
      it.print(0, 0, id(myFont), "Hello World!");
esphome:
  name: ee04
  friendly_name: EE04

esp32:
  board: esp32-s3-devkitc-1
  framework:
    type: esp-idf

# Enable logging
logger:

# Enable Home Assistant API
api:
  encryption:
    key: "b0AIbJ+kbeMayi1PgSGXtiD1yQCapUBF4A/7v7btys0="

ota:
  - platform: esphome
    password: "5d7cca6f4b3f38aba559ab0d6aaf5926"

wifi:
  ssid:
  password:

  # Enable fallback hotspot (captive portal) in case wifi connection fails
  ap:
    ssid: "Ee04 Fallback Hotspot"
    password: "zxPMBtCEWonm"

# define font to display words
font:
  - file: "gfonts://Inter@700"
    id: myFont
    size: 24

captive_portal:

# define SPI interface
spi:
  clk_pin: GPIO7
  mosi_pin: GPIO9

display:
  - platform: waveshare_epaper
    id: epaper_display
    model: gdey0583t81
    cs_pin: GPIO44
    dc_pin: GPIO10
    busy_pin: GPIO4
    reset_pin:  GPIO38
    rotation: 0
    update_interval: 300s
    lambda: |-
      it.print(0, 0, id(myFont), "Hello World!");
esphome:
  name: ee04
  friendly_name: EE04

esp32:
  board: esp32-s3-devkitc-1
  framework:
    type: esp-idf

# Enable logging
logger:

# Enable Home Assistant API
api:
  encryption:
    key: "b0AIbJ+kbeMayi1PgSGXtiD1yQCapUBF4A/7v7btys0="

ota:
  - platform: esphome
    password: "5d7cca6f4b3f38aba559ab0d6aaf5926"

wifi:
  ssid:
  password:

  # Enable fallback hotspot (captive portal) in case wifi connection fails
  ap:
    ssid: "Ee04 Fallback Hotspot"
    password: "zxPMBtCEWonm"

# define font to display words
font:
  - file: "gfonts://Inter@700"
    id: myFont
    size: 24

captive_portal:

# define SPI interface
spi:
  clk_pin: GPIO7
  mosi_pin: GPIO9

display:
  - platform: waveshare_epaper
    id: epaper_display
    model: 7.50inv2
    cs_pin: GPIO44
    dc_pin: GPIO10
    busy_pin: GPIO4
    reset_pin:  GPIO38
    rotation: 0
    update_interval: 300s
    lambda: |-
      it.print(0, 0, id(myFont), "Hello World!");
以下は 50 ピンコネクタのスクリーンタイプです:
- 7.3 Inch spectra™ 6
esphome:
  name: ee04
  friendly_name: EE04

esp32:
  board: esp32-s3-devkitc-1
  framework:
    type: esp-idf

# Enable logging
logger:

# Enable Home Assistant API
api:
  encryption:
    key: "b0AIbJ+kbeMayi1PgSGXtiD1yQCapUBF4A/7v7btys0="

ota:
  - platform: esphome
    password: "5d7cca6f4b3f38aba559ab0d6aaf5926"

wifi:
  ssid:
  password:

  # Enable fallback hotspot (captive portal) in case wifi connection fails
  ap:
    ssid: "Ee04 Fallback Hotspot"
    password: "zxPMBtCEWonm"

font:
  - file: "gfonts://Inter@700"
    id: font1
    size: 24

captive_portal:

external_components:
  - source:
      type: git
      url: https://github.com/esphome/esphome/
      ref: 2025.10.5
    components: [ epaper_spi, display ]

spi:
  clk_pin: GPIO7
  mosi_pin: GPIO9

display:
  - platform: epaper_spi
    id: my_display
    model: 7.3in-Spectra-E6
    cs_pin: GPIO44
    dc_pin:
      number: GPIO10
      inverted: false
    busy_pin:
      number: GPIO4
      inverted: true
    reset_pin:  GPIO38
    rotation: 0
    update_interval: 30s
    lambda: |-
      const auto BLACK   = Color(0,   0,   0,   0);
      const auto RED     = Color(255, 0,   0,   0);
      const auto BLUE     = Color(0, 0,   255,   0);
      const auto GREEN     = Color(0, 255,   0,   0);
      const auto YELLOW  = Color(255, 255, 0,   0);
      const auto WHITE   = Color(255, 255, 255, 0);

      it.fill(WHITE);
      it.print(0, 0, id(font1), BLACK, "Hello World in BLACK!");
      it.print(0, 30, id(font1), RED, "Hello World in RED!");
      it.print(0, 60, id(font1), YELLOW, "Hello World in YELLOW!");
      it.print(0, 90, id(font1), GREEN, "Hello World in GREEN!");
      it.print(0, 120, id(font1), BLUE, "Hello World in BLUE!");
INSTALL をクリックしてコードをデバイスにインストールすると、次の画像が表示されます。

- Install through browser
- Install through host
- Install through Wi-Fi
Home Assistant ホスト(Raspberry PI/Green/Yellow など)が手元から離れた場所にある場合は、この方法を推奨します。手元のコンピュータを使ってインストールできます。
まず、コンパイル済みファームウェアをダウンロードするために Manual download をクリックする必要があります。

この Web サイトを開き、ここから ePaper パネルにファームウェアを書き込みます。

ESPHome に戻り、ファームウェアをダウンロードします。

Factory format を選択します。

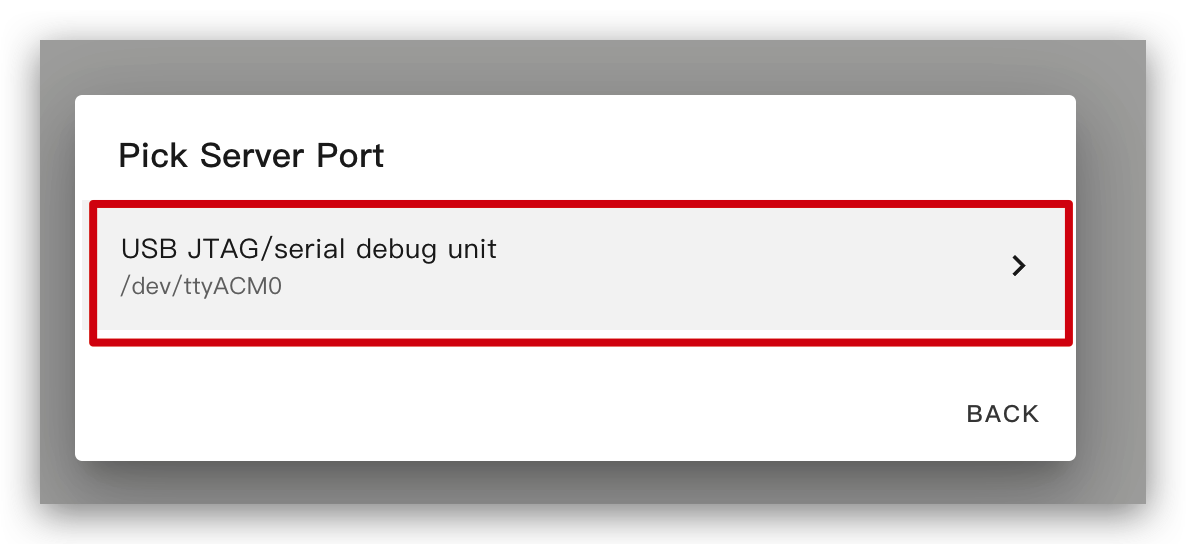
USB ケーブルを使用してePaper パネルをコンピュータに接続し、CONNECT をクリックします。

usbmodemxxx(Windows では COMxxx)を選択し、connect をクリックします。

INSTALL をクリックし、先ほどダウンロードしたファームウェアを選択します。

しばらく待つと、ディスプレイに「Hello world!」と表示されます。
Home Assistant ホスト(Raspberry Pi / Green / Yellow など)が近くにある場合は、この方法の方が簡単なので推奨します。
デバイスにコードをインストールする前に、Home Assistant を実行している Raspberry Pi や HA Green(Yellow)などに USB ケーブルでこのデバイスを接続する必要があります。
画像に従ってオプションをクリックし、コードをデバイスにインストールします。

しばらく待つと、次の画像のようなフィードバックが表示されます。これはコードが正常に動作していることを意味します。
これは最も簡単な方法ですが、最初にプログラムをインストールする際には、左側の方法を使って ePaper パネルにプログラムをアップロードしておく必要があります。その後は Wi-Fi 経由でアップロードできます。また、この方法が機能するためには、YAML 設定に有効な暗号化キーを含む適切に設定された ota と api セクションが含まれていることを確認してください。
この方法では、ePaper パネルを何かに接続する必要はなく、オンラインになっていることだけを確認してください。
オプションをクリックすると、ファームウェアが自動的に ePaper パネルにインストールされます。

ESPHome での描画の基本
シンプルなグラフィックの描画
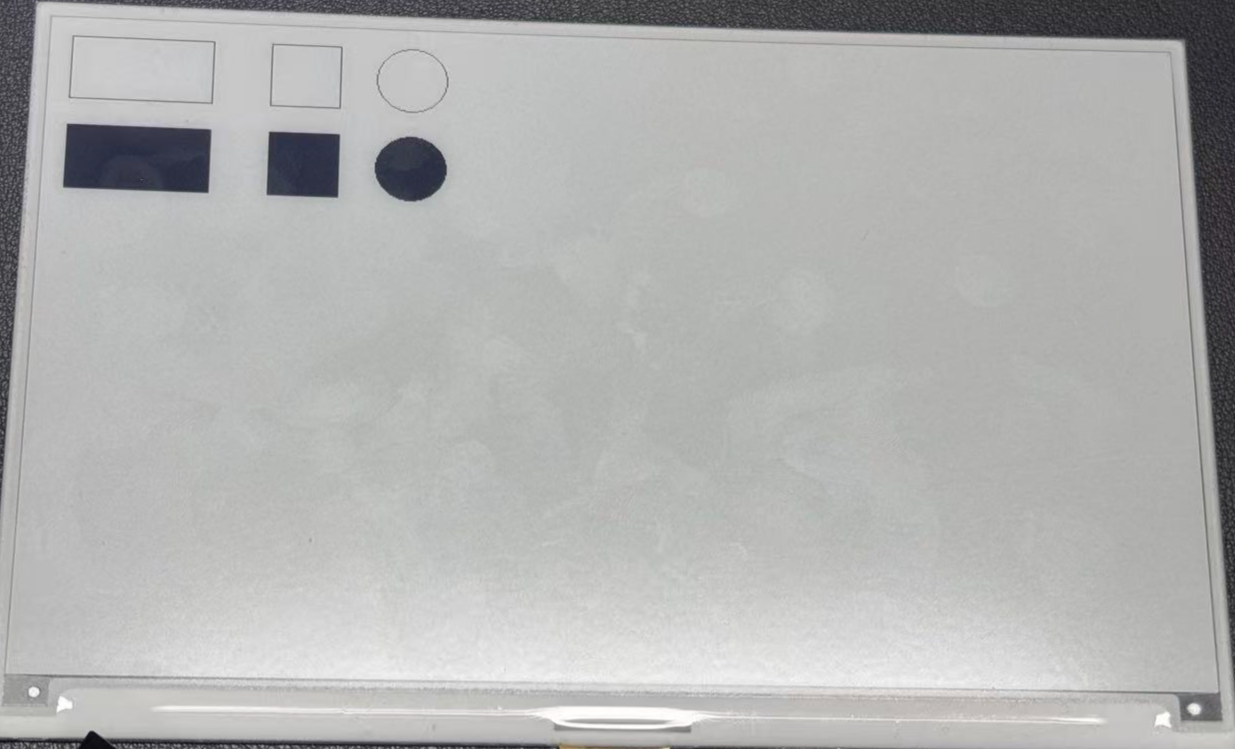
このサンプル YAML コードは、ESPHome プロジェクト用に SPI インターフェースと XIAO ePaper Display Board(ESP32-S3)- EE04 を設定します。lambda セクションには、画面上にシンプルな図形を描画するコマンドが含まれています:
- 2 つの長方形(位置 (10, 10)、サイズ 100x50 のものと、(150, 10)、サイズ 50x50 のもの)
- 半径 25 の円 1 つ(位置 (250, 35))
- 2 つの塗りつぶし長方形((10, 80) と (150, 80))
- 半径 25 の塗りつぶし円 1 つ(位置 (250, 105))
このサンプルは、以下のコードをコピーして YAML ファイル内の captive_portal コード行の後に貼り付けることで使用できます。
- 1.54 インチ モノクロ カラー
- 2.13 インチ 4 色カラー
- 2.13 インチ モノクロ カラー
- 2.9 インチ 4 色カラー
- 2.9 インチ モノクロ カラー
- 4.2 インチ モノクロカラー
- 5.83 インチ モノクロカラー
- 7.5 インチ モノクロカラー
esphome:
  name: ee04
  friendly_name: EE04

esp32:
  board: esp32-s3-devkitc-1
  framework:
    type: esp-idf

# Enable logging
logger:

# Enable Home Assistant API
api:
  encryption:
    key: "b0AIbJ+kbeMayi1PgSGXtiD1yQCapUBF4A/7v7btys0="

ota:
  - platform: esphome
    password: "5d7cca6f4b3f38aba559ab0d6aaf5926"

wifi:
  ssid:
  password:

  # Enable fallback hotspot (captive portal) in case wifi connection fails
  ap:
    ssid: "Ee04 Fallback Hotspot"
    password: "zxPMBtCEWonm"

captive_portal:

spi:
  clk_pin: GPIO7
  mosi_pin: GPIO9

display:
  - platform: waveshare_epaper
    id: epaper_display
    model: 1.54inv2
    cs_pin: GPIO44
    dc_pin: GPIO10
    busy_pin: GPIO4
    reset_pin:  GPIO38
    rotation: 0
    update_interval: 300s
    lambda: |-
      it.rectangle(10, 10, 100, 50);
      it.rectangle(150, 10, 50, 50);
      it.circle(250, 35, 25);
      it.filled_rectangle(10, 80, 100, 50);
      it.filled_rectangle(150, 80, 50, 50);
      it.filled_circle(250, 105, 25);
esphome:
  name: ee04
  friendly_name: EE04
  libraries:
    - SPI


esp32:
  board: esp32-s3-devkitc-1
  framework:
    type: arduino


# Enable logging
logger:

# Enable Home Assistant API
api:
  encryption:
    key: "eg2Jyse0gE146lJ2mVaqAnwteb4U2GJ7d1sZc2BOOsc="

ota:
  - platform: esphome
    password: "e2f184b95aac832509885f676abf5b73"

wifi:
  ssid:
  password:

  # Enable fallback hotspot (captive portal) in case wifi connection fails
  ap:
    ssid: "ESPHome_Epaper"
    password: "123456789"

external_components:
  - source: github://xcjk-tofuture/esphome@dev
    components: [ waveshare_epaper ]

font:
  - file: "gfonts://Inter@700"
    id: font1
    size: 24

captive_portal:

spi:
  clk_pin: GPIO7
  mosi_pin: GPIO9

display:
  - platform: waveshare_epaper
    id: my_display
    model: gdey0213f51
    cs_pin: GPIO44
    dc_pin: GPIO10
    busy_pin: GPIO4
    reset_pin:  GPIO38
    rotation: 90
    update_interval: 30s
    full_update_every: 1
    lambda: |-
      const auto BLACK   = Color(0,   0,   0,   0);
      const auto RED     = Color(255, 0,   0,   0);
      const auto YELLOW  = Color(255, 255, 0,   0);
      const auto WHITE   = Color(255, 255, 255, 0);

      it.rectangle(10, 10, 100, 50,YELLOW);
      it.rectangle(150, 10, 50, 50,YELLOW);
      it.circle(250, 35, 25,YELLOW);
      it.filled_rectangle(10, 80, 100, 50,YELLOW);
      it.filled_rectangle(150, 80, 50, 50,YELLOW);
      it.filled_circle(250, 105, 25,YELLOW);
esphome:
  name: ee04
  friendly_name: EE04

esp32:
  board: esp32-s3-devkitc-1
  framework:
    type: esp-idf

# Enable logging
logger:

# Enable Home Assistant API
api:
  encryption:
    key: "b0AIbJ+kbeMayi1PgSGXtiD1yQCapUBF4A/7v7btys0="

ota:
  - platform: esphome
    password: "5d7cca6f4b3f38aba559ab0d6aaf5926"

wifi:
  ssid:
  password:

  # Enable fallback hotspot (captive portal) in case wifi connection fails
  ap:
    ssid: "Ee04 Fallback Hotspot"
    password: "zxPMBtCEWonm"

captive_portal:

spi:
  clk_pin: GPIO7
  mosi_pin: GPIO9

display:
  - platform: waveshare_epaper
    id: epaper_display
    model: 2.13inv2 #More models you can refer to here: https://esphome.io/components/display/waveshare_epaper/
    cs_pin: GPIO44
    dc_pin: GPIO10
    busy_pin: GPIO4
    reset_pin:  GPIO38
    rotation: 0
    update_interval: 300s
    lambda: |-
      it.rectangle(10, 10, 100, 50);
      it.rectangle(150, 10, 50, 50);
      it.circle(250, 35, 25);
      it.filled_rectangle(10, 80, 100, 50);
      it.filled_rectangle(150, 80, 50, 50);
      it.filled_circle(250, 105, 25);
esphome:
  name: ee04
  friendly_name: EE04
  libraries:
    - SPI


esp32:
  board: esp32-s3-devkitc-1
  framework:
    type: arduino


# Enable logging
logger:

# Enable Home Assistant API
api:
  encryption:
    key: "eg2Jyse0gE146lJ2mVaqAnwteb4U2GJ7d1sZc2BOOsc="

ota:
  - platform: esphome
    password: "e2f184b95aac832509885f676abf5b73"

wifi:
  ssid:
  password:

  # Enable fallback hotspot (captive portal) in case wifi connection fails
  ap:
    ssid: "ESPHome_Epaper"
    password: "123456789"

external_components:
  - source: github://xcjk-tofuture/esphome@dev
    components: [ waveshare_epaper ]

captive_portal:

spi:
  clk_pin: GPIO7
  mosi_pin: GPIO9

display:
  - platform: waveshare_epaper
    id: my_display
    model: gdey029f51h
    cs_pin: GPIO44
    dc_pin: GPIO10
    busy_pin: GPIO4
    reset_pin:  GPIO38
    rotation: 90
    update_interval: 30s
    full_update_every: 1
    lambda: |-
      const auto BLACK   = Color(0,   0,   0,   0);
      const auto RED     = Color(255, 0,   0,   0);
      const auto YELLOW  = Color(255, 255, 0,   0);
      const auto WHITE   = Color(255, 255, 255, 0);

      it.rectangle(10, 10, 100, 50,YELLOW);
      it.rectangle(150, 10, 50, 50,YELLOW);
      it.circle(250, 35, 25,YELLOW);
      it.filled_rectangle(10, 80, 100, 50,YELLOW);
      it.filled_rectangle(150, 80, 50, 50,YELLOW);
      it.filled_circle(250, 105, 25,YELLOW);
esphome:
  name: ee04
  friendly_name: EE04

esp32:
  board: esp32-s3-devkitc-1
  framework:
    type: esp-idf

# Enable logging
logger:

# Enable Home Assistant API
api:
  encryption:
    key: "b0AIbJ+kbeMayi1PgSGXtiD1yQCapUBF4A/7v7btys0="

ota:
  - platform: esphome
    password: "5d7cca6f4b3f38aba559ab0d6aaf5926"

wifi:
  ssid:
  password:

  # Enable fallback hotspot (captive portal) in case wifi connection fails
  ap:
    ssid: "Ee04 Fallback Hotspot"
    password: "zxPMBtCEWonm"

captive_portal:

spi:
  clk_pin: GPIO7
  mosi_pin: GPIO9

display:
  - platform: waveshare_epaper
    id: epaper_display
    model: 2.90inv2
    cs_pin: GPIO44
    dc_pin: GPIO10
    busy_pin: GPIO4
    reset_pin:  GPIO38
    rotation: 0
    update_interval: 300s
    lambda: |-
      it.rectangle(10, 10, 100, 50);
      it.rectangle(150, 10, 50, 50);
      it.circle(250, 35, 25);
      it.filled_rectangle(10, 80, 100, 50);
      it.filled_rectangle(150, 80, 50, 50);
      it.filled_circle(250, 105, 25);
esphome:
  name: ee04
  friendly_name: EE04

esp32:
  board: esp32-s3-devkitc-1
  framework:
    type: esp-idf

# Enable logging
logger:

# Enable Home Assistant API
api:
  encryption:
    key: "b0AIbJ+kbeMayi1PgSGXtiD1yQCapUBF4A/7v7btys0="

ota:
  - platform: esphome
    password: "5d7cca6f4b3f38aba559ab0d6aaf5926"

wifi:
  ssid:
  password:

  # Enable fallback hotspot (captive portal) in case wifi connection fails
  ap:
    ssid: "Ee04 Fallback Hotspot"
    password: "zxPMBtCEWonm"

captive_portal:

spi:
  clk_pin: GPIO7
  mosi_pin: GPIO9

display:
  - platform: waveshare_epaper
    id: epaper_display
    model: gdey042t81
    cs_pin: GPIO44
    dc_pin: GPIO10
    busy_pin: GPIO4
    reset_pin:  GPIO38
    rotation: 0
    update_interval: 300s
    lambda: |-
      it.rectangle(10, 10, 100, 50);
      it.rectangle(150, 10, 50, 50);
      it.circle(250, 35, 25);
      it.filled_rectangle(10, 80, 100, 50);
      it.filled_rectangle(150, 80, 50, 50);
      it.filled_circle(250, 105, 25);
esphome:
  name: ee04
  friendly_name: EE04

esp32:
  board: esp32-s3-devkitc-1
  framework:
    type: esp-idf

# Enable logging
logger:

# Enable Home Assistant API
api:
  encryption:
    key: "b0AIbJ+kbeMayi1PgSGXtiD1yQCapUBF4A/7v7btys0="

ota:
  - platform: esphome
    password: "5d7cca6f4b3f38aba559ab0d6aaf5926"

wifi:
  ssid:
  password:

  # Enable fallback hotspot (captive portal) in case wifi connection fails
  ap:
    ssid: "Ee04 Fallback Hotspot"
    password: "zxPMBtCEWonm"

captive_portal:

spi:
  clk_pin: GPIO7
  mosi_pin: GPIO9

display:
  - platform: waveshare_epaper
    id: epaper_display
    model: gdey0583t81
    cs_pin: GPIO44
    dc_pin: GPIO10
    busy_pin: GPIO4
    reset_pin:  GPIO38
    rotation: 0
    update_interval: 300s
    lambda: |-
      it.rectangle(10, 10, 100, 50);
      it.rectangle(150, 10, 50, 50);
      it.circle(250, 35, 25);
      it.filled_rectangle(10, 80, 100, 50);
      it.filled_rectangle(150, 80, 50, 50);
      it.filled_circle(250, 105, 25);
esphome:
  name: ee04
  friendly_name: EE04

esp32:
  board: esp32-s3-devkitc-1
  framework:
    type: esp-idf

# Enable logging
logger:

# Enable Home Assistant API
api:
  encryption:
    key: "b0AIbJ+kbeMayi1PgSGXtiD1yQCapUBF4A/7v7btys0="

ota:
  - platform: esphome
    password: "5d7cca6f4b3f38aba559ab0d6aaf5926"

wifi:
  ssid:
  password:

  # Enable fallback hotspot (captive portal) in case wifi connection fails
  ap:
    ssid: "Ee04 Fallback Hotspot"
    password: "zxPMBtCEWonm"

captive_portal:

spi:
  clk_pin: GPIO7
  mosi_pin: GPIO9

display:
  - platform: waveshare_epaper
    id: epaper_display
    model: 7.50inv2
    cs_pin: GPIO44
    dc_pin: GPIO10
    busy_pin: GPIO4
    reset_pin:  GPIO38
    rotation: 0
    update_interval: 300s
    lambda: |-
      it.rectangle(10, 10, 100, 50);
      it.rectangle(150, 10, 50, 50);
      it.circle(250, 35, 25);
      it.filled_rectangle(10, 80, 100, 50);
      it.filled_rectangle(150, 80, 50, 50);
      it.filled_circle(250, 105, 25);
- 7.3 インチ spectra™ 6
esphome:
  name: ee04
  friendly_name: EE04

esp32:
  board: esp32-s3-devkitc-1
  framework:
    type: esp-idf

# Enable logging
logger:

# Enable Home Assistant API
api:
  encryption:
    key: "b0AIbJ+kbeMayi1PgSGXtiD1yQCapUBF4A/7v7btys0="

ota:
  - platform: esphome
    password: "5d7cca6f4b3f38aba559ab0d6aaf5926"

wifi:
  ssid:
  password:

  # Enable fallback hotspot (captive portal) in case wifi connection fails
  ap:
    ssid: "Ee04 Fallback Hotspot"
    password: "zxPMBtCEWonm"

captive_portal:

external_components:
  - source:
      type: git
      url: https://github.com/esphome/esphome/
      ref: 2025.10.5
    components: [ epaper_spi, display ]

spi:
  clk_pin: GPIO7
  mosi_pin: GPIO9

display:
  - platform: epaper_spi
    id: my_display
    model: 7.3in-Spectra-E6
    cs_pin: GPIO44
    dc_pin:
      number: GPIO10
      inverted: false
    busy_pin:
      number: GPIO4
      inverted: true
    reset_pin:  GPIO38
    rotation: 0
    update_interval: 30s
    lambda: |-
      const auto BLACK   = Color(0,   0,   0,   0);
      const auto RED     = Color(255, 0,   0,   0);
      const auto BLUE     = Color(0, 0,   255,   0);
      const auto GREEN     = Color(0, 255,   0,   0);
      const auto YELLOW  = Color(255, 255, 0,   0);
      const auto WHITE   = Color(255, 255, 255, 0);

      it.rectangle(10, 10, 100, 50,BLACK);
      it.rectangle(150, 10, 50, 50,RED);
      it.circle(250, 35, 25,BLUE);
      it.filled_rectangle(10, 80, 100, 50,GREEN);
      it.filled_rectangle(150, 80, 50, 50,YELLOW);
      it.filled_circle(250, 105, 25,WHITE);
次の画像のようなフィードバックが表示されたら、コードは正常に実行されています。
紙面の都合上、他のパターンの描画方法や原理については詳しく説明しません。必要に応じて、読者の方はESPHome のこの部分の詳細なサンプルを参照することをおすすめします。
TrueType フォントの描画
この例では、TrueType フォントを使用して XIAO ePaper Display Board(ESP32-S3) - EE04 にカスタムアイコンを表示する方法を説明します。Material Design Icons は、ePaper ディスプレイに最適な、拡大縮小可能な豊富なシンボルを提供します。
必要なツールのインストール
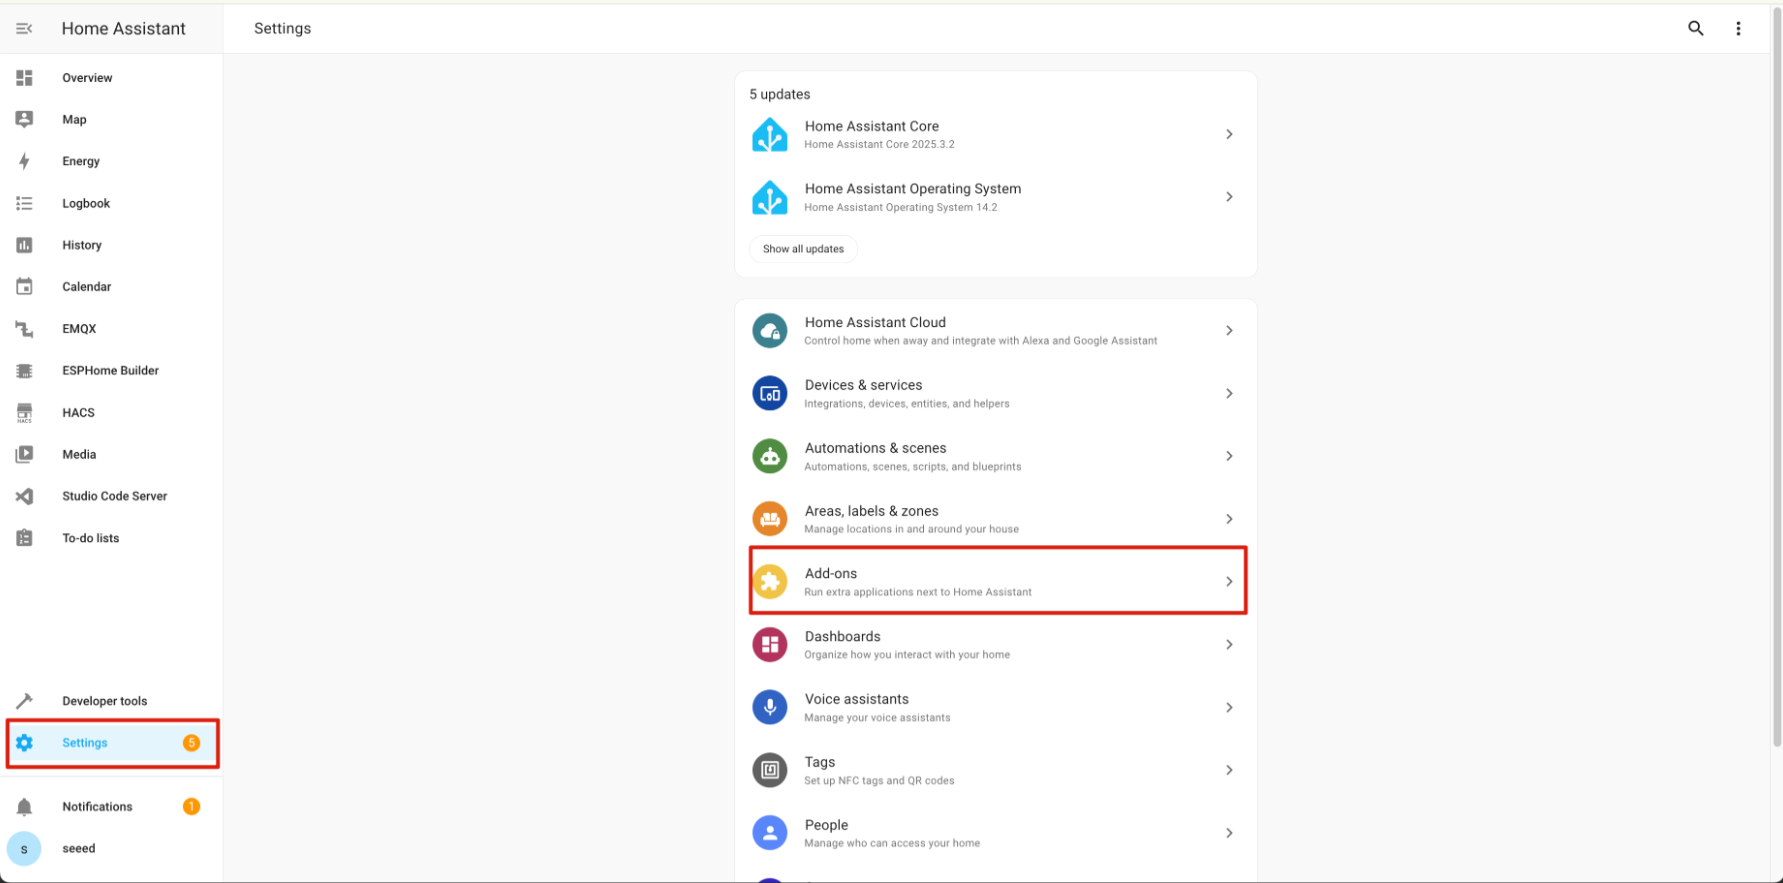
ステップ 1. まず、ファイルを管理するために Studio Code Server アドオンをインストールする必要があります。Home Assistant の Add-ons ストアに移動し、Studio Code Server を検索してクリックします。
ステップ 2. INSTALL をクリックしてインストールが完了するまで待ちます。インストールが完了したら、START をクリックしてエディタを起動します。

アイコンフォントの設定
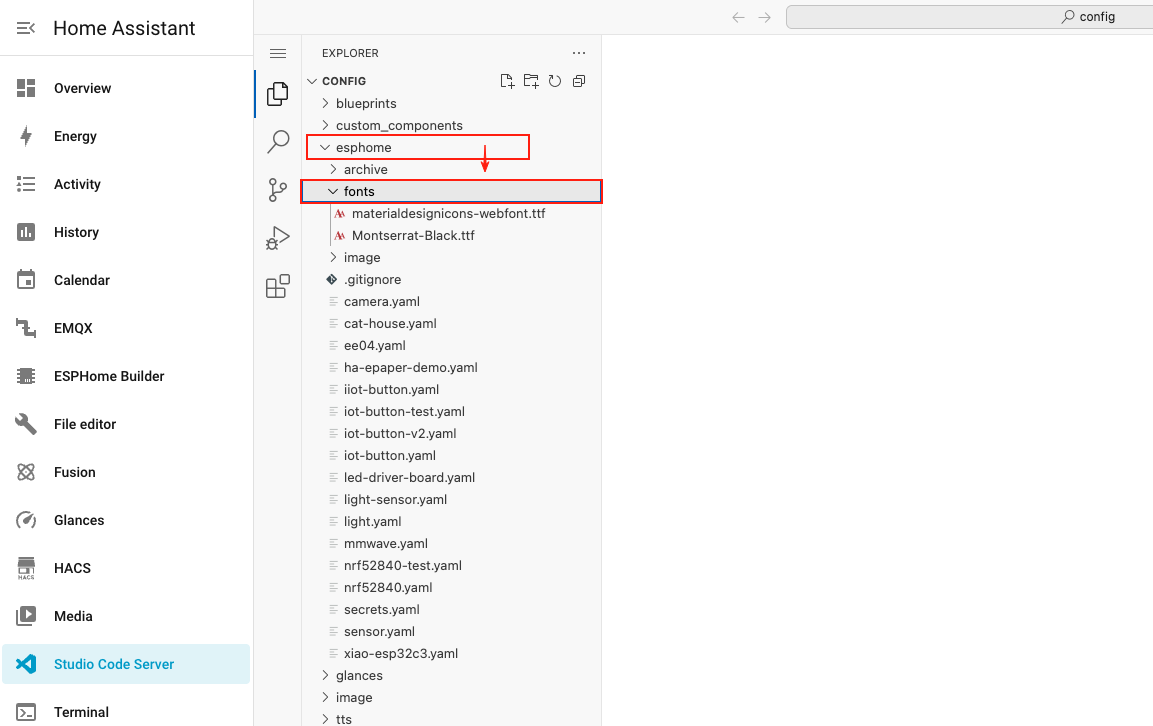
ステップ 3. ESPHome の設定ディレクトリ内に fonts という新しいフォルダを作成します。このフォルダには、アイコン表示に必要な TrueType フォントファイルを保存します。
ステップ 4. 下のボタンをクリックして Material Design Icons のフォントファイルをダウンロードし、内容を展開します。
ステップ 5. ダウンロードしたフォントファイル(materialdesignicons-webfont.ttf)を、先ほど作成した fonts フォルダにアップロードします。

アイコン用に ESPHome を設定する
ステップ 6. 次のコードを、ESPHome の設定ファイル内の captive_portal セクションの後に追加します。このコードでは、アイコン用の 2 つのフォントサイズを定義し、ディスプレイに天気アイコンを表示するように設定します。
- 1.54 インチ モノクロカラー
- 2.13 Inch 4色
- 2.13 Inch モノクロ
- 2.9 Inch 4色
- 2.9 Inch モノクロ
- 4.2 Inch モノクロ
- 5.83 Inch モノクロ
- 7.5 Inch モノクロカラー
esphome:
name: ee04
friendly_name: EE04
esp32:
board: esp32-s3-devkitc-1
framework:
type: esp-idf
# Enable logging
logger:
# Enable Home Assistant API
api:
encryption:
key: "b0AIbJ+kbeMayi1PgSGXtiD1yQCapUBF4A/7v7btys0="
ota:
- platform: esphome
password: "5d7cca6f4b3f38aba559ab0d6aaf5926"
wifi:
ssid:
password:
# Enable fallback hotspot (captive portal) in case wifi connection fails
ap:
ssid: "Ee04 Fallback Hotspot"
password: "zxPMBtCEWonm"
captive_portal:
# define font to display words
font:
- file: 'fonts/materialdesignicons-webfont.ttf' # Path to the font file
id: font_mdi_large
size: 200 # Large icon size
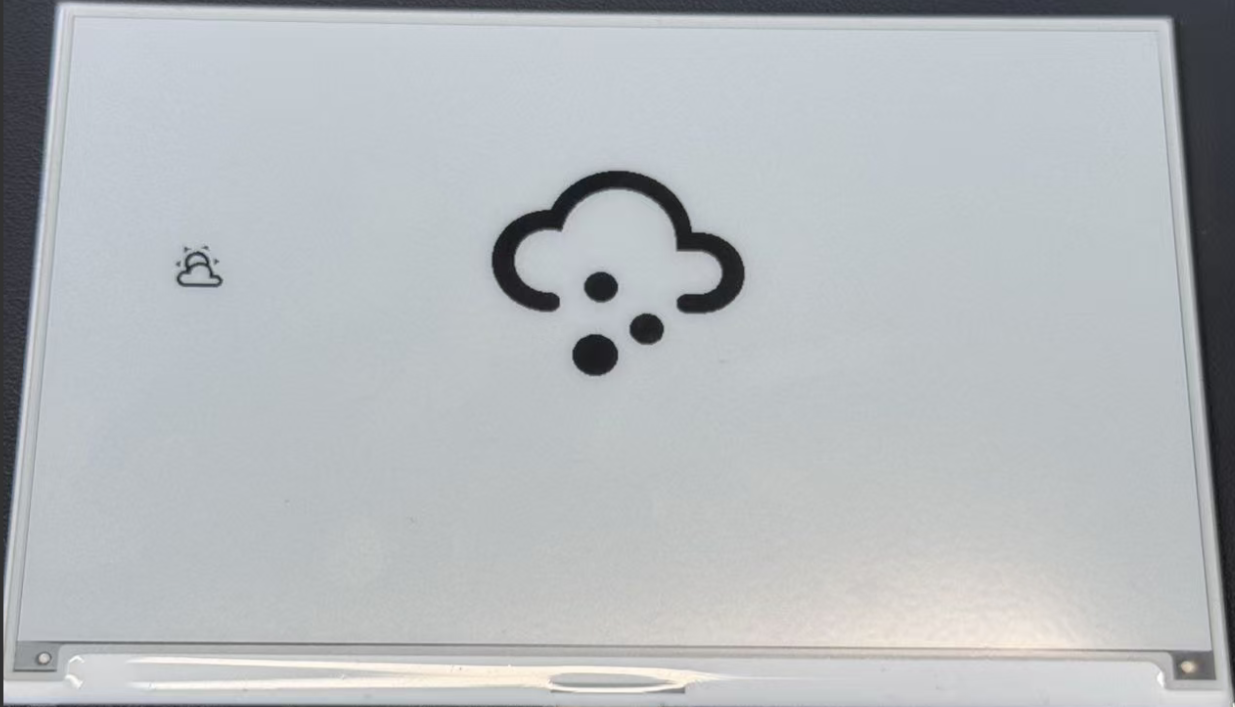
glyphs: &mdi-weather-glyphs
- "\U000F0595" # weather-cloudy icon
- "\U000F0592" # weather-hail icon
- file: 'fonts/materialdesignicons-webfont.ttf'
id: font_mdi_medium # Medium icon size
size: 40
glyphs: *mdi-weather-glyphs
# define SPI interface
spi:
clk_pin: GPIO7
mosi_pin: GPIO9
display:
- platform: waveshare_epaper
id: epaper_display
model: 1.54inv2
cs_pin: GPIO44
dc_pin: GPIO10
reset_pin:
number: GPIO38
inverted: false
busy_pin:
number: GPIO4
inverted: true
update_interval: 300s
lambda: |-
it.printf(100, 200, id(font_mdi_medium), TextAlign::CENTER, "\U000F0595");
it.printf(400, 200, id(font_mdi_large), TextAlign::CENTER, "\U000F0592");
esphome:
  name: ee04
  friendly_name: EE04
  libraries:
    - SPI


esp32:
  board: esp32-s3-devkitc-1
  framework:
    type: arduino


# Enable logging
logger:

# Enable Home Assistant API
api:
  encryption:
    key: "eg2Jyse0gE146lJ2mVaqAnwteb4U2GJ7d1sZc2BOOsc="

ota:
  - platform: esphome
    password: "e2f184b95aac832509885f676abf5b73"

wifi:
  ssid:
  password:

  # Enable fallback hotspot (captive portal) in case wifi connection fails
  ap:
    ssid: "ESPHome_Epaper"
    password: "123456789"

external_components:
  - source: github://xcjk-tofuture/esphome@dev
    components: [ waveshare_epaper ]


# define font to display words
font:
  - file: 'fonts/materialdesignicons-webfont.ttf'  # Path to the font file
    id: font_mdi_large
    size: 200        # Large icon size
    glyphs: &mdi-weather-glyphs
      - "\U000F0595" # weather-cloudy icon
      - "\U000F0592" # weather-hail icon
  - file: 'fonts/materialdesignicons-webfont.ttf'
    id: font_mdi_medium   # Medium icon size
    size: 40
    glyphs: *mdi-weather-glyphs

captive_portal:

spi:
  clk_pin: GPIO7
  mosi_pin: GPIO9

display:
  - platform: waveshare_epaper
    id: my_display
    model: gdey0213f51
    cs_pin: GPIO44
    dc_pin: GPIO10
    busy_pin: GPIO4
    reset_pin:  GPIO38
    rotation: 90
    update_interval: 30s
    full_update_every: 1
    lambda: |-
      it.printf(100, 200, id(font_mdi_medium), TextAlign::CENTER, "\U000F0595");
      it.printf(400, 200, id(font_mdi_large), TextAlign::CENTER, "\U000F0592");
esphome:
  name: ee04
  friendly_name: EE04

esp32:
  board: esp32-s3-devkitc-1
  framework:
    type: esp-idf

# Enable logging
logger:

# Enable Home Assistant API
api:
  encryption:
    key: "b0AIbJ+kbeMayi1PgSGXtiD1yQCapUBF4A/7v7btys0="

ota:
  - platform: esphome
    password: "5d7cca6f4b3f38aba559ab0d6aaf5926"

wifi:
  ssid:
  password:

  # Enable fallback hotspot (captive portal) in case wifi connection fails
  ap:
    ssid: "Ee04 Fallback Hotspot"
    password: "zxPMBtCEWonm"

captive_portal:

# define font to display words
font:
  - file: 'fonts/materialdesignicons-webfont.ttf'  # Path to the font file
    id: font_mdi_large
    size: 200        # Large icon size
    glyphs: &mdi-weather-glyphs
      - "\U000F0595" # weather-cloudy icon
      - "\U000F0592" # weather-hail icon
  - file: 'fonts/materialdesignicons-webfont.ttf'
    id: font_mdi_medium   # Medium icon size
    size: 40
    glyphs: *mdi-weather-glyphs

# define SPI interface
spi:
  clk_pin: GPIO7
  mosi_pin: GPIO9

display:
  - platform: waveshare_epaper
    id: epaper_display
    model: 2.13inv2 #More models you can refer to here: https://esphome.io/components/display/waveshare_epaper/
    cs_pin: GPIO44
    dc_pin: GPIO10
    reset_pin:
      number: GPIO38
      inverted: false
    busy_pin:
      number: GPIO4
      inverted: true
    update_interval: 300s
    lambda: |-
      it.printf(100, 200, id(font_mdi_medium), TextAlign::CENTER, "\U000F0595");
      it.printf(400, 200, id(font_mdi_large), TextAlign::CENTER, "\U000F0592");
esphome:
  name: ee04
  friendly_name: EE04
  libraries:
    - SPI


esp32:
  board: esp32-s3-devkitc-1
  framework:
    type: arduino


# Enable logging
logger:

# Enable Home Assistant API
api:
  encryption:
    key: "eg2Jyse0gE146lJ2mVaqAnwteb4U2GJ7d1sZc2BOOsc="

ota:
  - platform: esphome
    password: "e2f184b95aac832509885f676abf5b73"

wifi:
  ssid:
  password:

  # Enable fallback hotspot (captive portal) in case wifi connection fails
  ap:
    ssid: "ESPHome_Epaper"
    password: "123456789"

external_components:
  - source: github://xcjk-tofuture/esphome@dev
    components: [ waveshare_epaper ]


# external_components:
#   - source:
#       type: local
#       path: components_epaper
#     components : [waveshare_epaper]


captive_portal:

# define font to display words
font:
  - file: 'fonts/materialdesignicons-webfont.ttf'  # Path to the font file
    id: font_mdi_large
    size: 200        # Large icon size
    glyphs: &mdi-weather-glyphs
      - "\U000F0595" # weather-cloudy icon
      - "\U000F0592" # weather-hail icon
  - file: 'fonts/materialdesignicons-webfont.ttf'
    id: font_mdi_medium   # Medium icon size
    size: 40
    glyphs: *mdi-weather-glyphs

spi:
  clk_pin: GPIO7
  mosi_pin: GPIO9
display:
  - platform: waveshare_epaper
    id: my_display
    model: gdey029f51h
    cs_pin: GPIO44
    dc_pin: GPIO10
    busy_pin: GPIO4
    reset_pin:  GPIO38
    rotation: 90
    update_interval: 30s
    full_update_every: 1
    lambda: |-
      it.printf(100, 200, id(font_mdi_medium), TextAlign::CENTER, "\U000F0595");
      it.printf(400, 200, id(font_mdi_large), TextAlign::CENTER, "\U000F0592");
esphome:
  name: ee04
  friendly_name: EE04

esp32:
  board: esp32-s3-devkitc-1
  framework:
    type: esp-idf

# Enable logging
logger:

# Enable Home Assistant API
api:
  encryption:
    key: "b0AIbJ+kbeMayi1PgSGXtiD1yQCapUBF4A/7v7btys0="

ota:
  - platform: esphome
    password: "5d7cca6f4b3f38aba559ab0d6aaf5926"

wifi:
  ssid:
  password:

  # Enable fallback hotspot (captive portal) in case wifi connection fails
  ap:
    ssid: "Ee04 Fallback Hotspot"
    password: "zxPMBtCEWonm"

captive_portal:

# define font to display words
font:
  - file: 'fonts/materialdesignicons-webfont.ttf'  # Path to the font file
    id: font_mdi_large
    size: 200        # Large icon size
    glyphs: &mdi-weather-glyphs
      - "\U000F0595" # weather-cloudy icon
      - "\U000F0592" # weather-hail icon
  - file: 'fonts/materialdesignicons-webfont.ttf'
    id: font_mdi_medium   # Medium icon size
    size: 40
    glyphs: *mdi-weather-glyphs

# define SPI interface
spi:
  clk_pin: GPIO7
  mosi_pin: GPIO9

display:
  - platform: waveshare_epaper
    id: epaper_display
    model: 2.90inv2
    cs_pin: GPIO44
    dc_pin: GPIO10
    reset_pin:
      number: GPIO38
      inverted: false
    busy_pin:
      number: GPIO4
      inverted: true
    update_interval: 300s
    lambda: |-
      it.printf(100, 200, id(font_mdi_medium), TextAlign::CENTER, "\U000F0595");
      it.printf(400, 200, id(font_mdi_large), TextAlign::CENTER, "\U000F0592");
esphome:
  name: ee04
  friendly_name: EE04

esp32:
  board: esp32-s3-devkitc-1
  framework:
    type: esp-idf

# Enable logging
logger:

# Enable Home Assistant API
api:
  encryption:
    key: "b0AIbJ+kbeMayi1PgSGXtiD1yQCapUBF4A/7v7btys0="

ota:
  - platform: esphome
    password: "5d7cca6f4b3f38aba559ab0d6aaf5926"

wifi:
  ssid:
  password:

  # Enable fallback hotspot (captive portal) in case wifi connection fails
  ap:
    ssid: "Ee04 Fallback Hotspot"
    password: "zxPMBtCEWonm"

captive_portal:

# define font to display words
font:
  - file: 'fonts/materialdesignicons-webfont.ttf'  # Path to the font file
    id: font_mdi_large
    size: 200        # Large icon size
    glyphs: &mdi-weather-glyphs
      - "\U000F0595" # weather-cloudy icon
      - "\U000F0592" # weather-hail icon
  - file: 'fonts/materialdesignicons-webfont.ttf'
    id: font_mdi_medium   # Medium icon size
    size: 40
    glyphs: *mdi-weather-glyphs

# define SPI interface
spi:
  clk_pin: GPIO7
  mosi_pin: GPIO9

display:
  - platform: waveshare_epaper
    id: epaper_display
    model: gdey042t81
    cs_pin: GPIO44
    dc_pin: GPIO10
    reset_pin:
      number: GPIO38
      inverted: false
    busy_pin:
      number: GPIO4
      inverted: true
    update_interval: 300s
    lambda: |-
      it.printf(100, 200, id(font_mdi_medium), TextAlign::CENTER, "\U000F0595");
      it.printf(400, 200, id(font_mdi_large), TextAlign::CENTER, "\U000F0592");
esphome:
  name: ee04
  friendly_name: EE04

esp32:
  board: esp32-s3-devkitc-1
  framework:
    type: esp-idf

# Enable logging
logger:

# Enable Home Assistant API
api:
  encryption:
    key: "b0AIbJ+kbeMayi1PgSGXtiD1yQCapUBF4A/7v7btys0="

ota:
  - platform: esphome
    password: "5d7cca6f4b3f38aba559ab0d6aaf5926"

wifi:
  ssid:
  password:

  # Enable fallback hotspot (captive portal) in case wifi connection fails
  ap:
    ssid: "Ee04 Fallback Hotspot"
    password: "zxPMBtCEWonm"

captive_portal:

# define font to display words
font:
  - file: 'fonts/materialdesignicons-webfont.ttf'  # Path to the font file
    id: font_mdi_large
    size: 200        # Large icon size
    glyphs: &mdi-weather-glyphs
      - "\U000F0595" # weather-cloudy icon
      - "\U000F0592" # weather-hail icon
  - file: 'fonts/materialdesignicons-webfont.ttf'
    id: font_mdi_medium   # Medium icon size
    size: 40
    glyphs: *mdi-weather-glyphs

# define SPI interface
spi:
  clk_pin: GPIO7
  mosi_pin: GPIO9

display:
  - platform: waveshare_epaper
    id: epaper_display
    model: gdey0583t81
    cs_pin: GPIO44
    dc_pin: GPIO10
    reset_pin:
      number: GPIO38
      inverted: false
    busy_pin:
      number: GPIO4
      inverted: true
    update_interval: 300s
    lambda: |-
      it.printf(100, 200, id(font_mdi_medium), TextAlign::CENTER, "\U000F0595");
      it.printf(400, 200, id(font_mdi_large), TextAlign::CENTER, "\U000F0592");
esphome:
  name: ee04
  friendly_name: EE04

esp32:
  board: esp32-s3-devkitc-1
  framework:
    type: esp-idf

# Enable logging
logger:

# Enable Home Assistant API
api:
  encryption:
    key: "b0AIbJ+kbeMayi1PgSGXtiD1yQCapUBF4A/7v7btys0="

ota:
  - platform: esphome
    password: "5d7cca6f4b3f38aba559ab0d6aaf5926"

wifi:
  ssid:
  password:

  # Enable fallback hotspot (captive portal) in case wifi connection fails
  ap:
    ssid: "Ee04 Fallback Hotspot"
    password: "zxPMBtCEWonm"

captive_portal:

# define font to display words
font:
  - file: 'fonts/materialdesignicons-webfont.ttf'  # Path to the font file
    id: font_mdi_large
    size: 200        # Large icon size
    glyphs: &mdi-weather-glyphs
      - "\U000F0595" # weather-cloudy icon
      - "\U000F0592" # weather-hail icon
  - file: 'fonts/materialdesignicons-webfont.ttf'
    id: font_mdi_medium   # Medium icon size
    size: 40
    glyphs: *mdi-weather-glyphs

# define SPI interface
spi:
  clk_pin: GPIO7
  mosi_pin: GPIO9

display:
  - platform: waveshare_epaper
    id: epaper_display
    model: 7.50inv2
    cs_pin: GPIO44
    dc_pin: GPIO10
    reset_pin:
      number: GPIO38
      inverted: false
    busy_pin:
      number: GPIO4
      inverted: true
    update_interval: 300s
    lambda: |-
      it.printf(100, 200, id(font_mdi_medium), TextAlign::CENTER, "\U000F0595");
      it.printf(400, 200, id(font_mdi_large), TextAlign::CENTER, "\U000F0592");
- 7.3 Inch spectra™ 6
esphome:
  name: ee04
  friendly_name: EE04

esp32:
  board: esp32-s3-devkitc-1
  framework:
    type: esp-idf

# Enable logging
logger:

# Enable Home Assistant API
api:
  encryption:
    key: "b0AIbJ+kbeMayi1PgSGXtiD1yQCapUBF4A/7v7btys0="

ota:
  - platform: esphome
    password: "5d7cca6f4b3f38aba559ab0d6aaf5926"

wifi:
  ssid:
  password:

  # Enable fallback hotspot (captive portal) in case wifi connection fails
  ap:
    ssid: "Ee04 Fallback Hotspot"
    password: "zxPMBtCEWonm"

captive_portal:

external_components:
  - source:
      type: git
      url: https://github.com/esphome/esphome/
      ref: 2025.10.5
    components: [ epaper_spi, display ]

# define font to display words
font:
  - file: 'fonts/materialdesignicons-webfont.ttf'  # Path to the font file
    id: font_mdi_large
    size: 200        # Large icon size
    glyphs: &mdi-weather-glyphs
      - "\U000F0595" # weather-cloudy icon
      - "\U000F0592" # weather-hail icon
  - file: 'fonts/materialdesignicons-webfont.ttf'
    id: font_mdi_medium   # Medium icon size
    size: 40
    glyphs: *mdi-weather-glyphs

# define SPI interface
spi:
  clk_pin: GPIO7
  mosi_pin: GPIO9

display:
  - platform: epaper_spi
    id: my_display
    model: 7.3in-Spectra-E6
    cs_pin: GPIO44
    dc_pin:
      number: GPIO10
      inverted: false
    busy_pin:
      number: GPIO4
      inverted: true
    reset_pin:  GPIO38
    rotation: 0
    update_interval: 30s
    lambda: |-
      it.printf(100, 200, id(font_mdi_medium), TextAlign::CENTER, "\U000F0595");
      it.printf(400, 200, id(font_mdi_large), TextAlign::CENTER, "\U000F0592");
-
glyphsセクションは、フォントファイルからどのアイコンを読み込むかを定義します。必要なアイコンだけを読み込むことで、デバイスのメモリを節約できます。 -
書き込みが完了してから最終的な表示が出るまで、プログラムには 2~3 分かかる場合があります。
ステップ 7. 設定を保存し、XIAO ePaper Display Board(ESP32-S3) - EE04 にアップロードします。次の画像のようなフィードバックが表示されたら、コードが正常に実行されていることを意味します。
異なるアイコンでカスタマイズする
Material Design Icons ライブラリには、プロジェクトで使用できる何千ものアイコンが含まれています。ここでは、さまざまなアイコンを見つけて使用する方法を説明します。
ステップ 1. 下のボタンをクリックして Material Design Icons の Web サイトにアクセスします。
ステップ 2. プロジェクトで使用したいアイコンを検索します。カテゴリ別に閲覧するか、検索機能を使用できます。

ステップ 3. 気に入ったアイコンを見つけたら、それをクリックして詳細を表示します。F0595 のような形式の Unicode 値を探します。
ステップ 4. 次のようにして、その Unicode 値を ESPHome の設定に追加します:
- フォント設定の
glyphsリストに追加する - 新しいアイコンを使用するようにディスプレイコードを更新する
例えば、Unicode F0123 の新しいアイコンを使用するには:
glyphs:
  - "\U000F0595" # weather-cloudy icon
  - "\U000F0592" # weather-hail icon
  - "\U000F0123" # your new icon
そして display lambda 内で:
lambda: |-
  it.printf(100, 200, id(font_mdi_medium), TextAlign::CENTER, "\U000F0123");
ステップ 5. 更新した設定を保存し、デバイスにアップロードして新しいアイコンを確認します。
天気ダッシュボードには、F0590(晴れ)、F0591(晴れ時々曇り)、F0593(雨)、F059E(風)などのアイコンを使用することを検討してください。
先ほど設定した Home Assistant からの天気データとこれらのアイコンを組み合わせることで、現在の状況を適切なアイコンで表示する動的な天気ディスプレイを作成できます。
カスタム画像の表示
この例では、XIAO ePaper Display Board(ESP32-S3) - EE04 にカスタム画像を表示する方法を説明します。この機能を使用して、ロゴやアイコン、ダッシュボード体験を向上させる任意のグラフィックを表示できます。
準備
ステップ 1. Home Assistant に Studio Code Server アドオンがインストールされていることを確認します。まだインストールしていない場合は、前の例の手順に従ってください。
ステップ 2. ESPHome の設定ディレクトリに image という新しいフォルダを作成します。このフォルダには、表示したい画像ファイルを保存します。
config/
└── esphome/
    ├── your_device.yaml
    └── image/         <- Create this folder
画像の追加
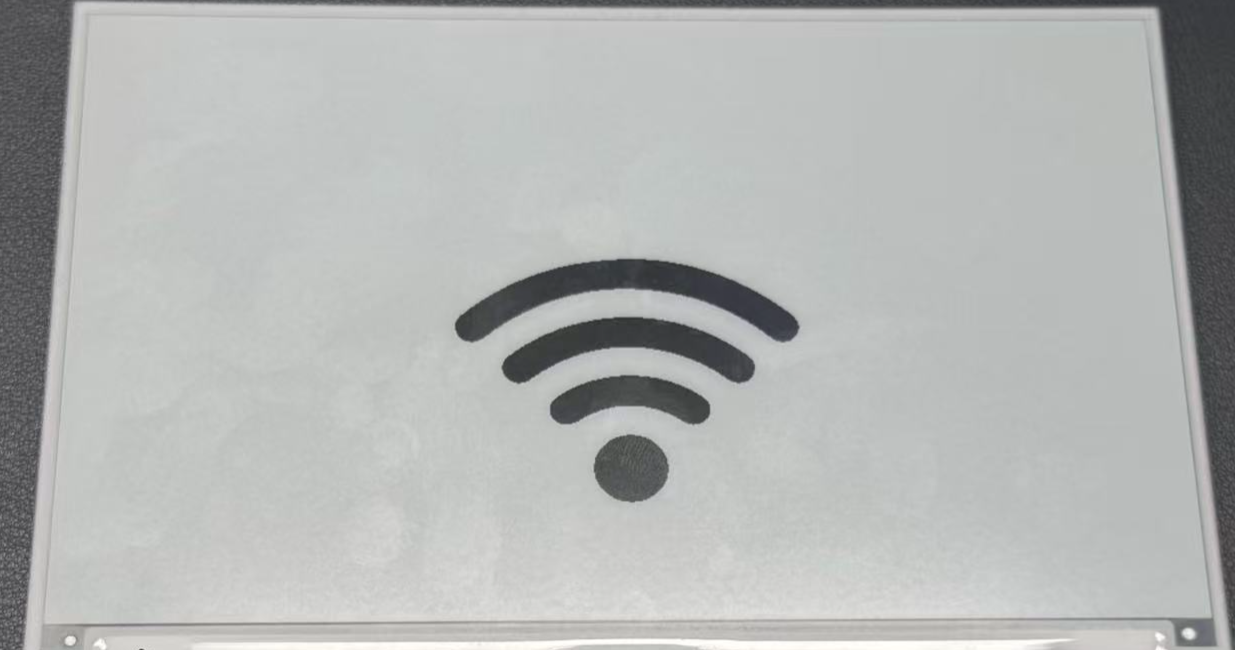
ステップ 3. 機能をテストするためにサンプル画像をダウンロードします。以下で提供されている WiFi アイコンを使用するか、自分の画像を使用することもできます。
ステップ 4. Studio Code Server のファイルマネージャーを使用して、ダウンロードした画像を先ほど作成した image フォルダにアップロードします。

ePaper ディスプレイで最良の結果を得るには、白黒の領域がはっきりした高コントラストの画像を使用してください。JPG と PNG の両方の形式がサポートされています。
画像表示用に ESPHome を設定する
ステップ 5. 次のコードを captive_portal セクションの後に ESPHome の設定ファイルへ追加します。このコードは画像リソースを定義し、それを表示するようにディスプレイを設定します。
- 1.54 Inch モノクロカラー
- 2.13 Inch モノクロカラー
- 2.13 Inch 4色
- 2.9 Inch 4色
- 2.9 Inch モノクロ
- 4.2 Inch モノクロ
- 5.83 Inch モノクロ
- 7.5 Inch モノクロ
esphome:
  name: ee04
  friendly_name: EE04

esp32:
  board: esp32-s3-devkitc-1
  framework:
    type: esp-idf

# Enable logging
logger:

# Enable Home Assistant API
api:
  encryption:
    key: "b0AIbJ+kbeMayi1PgSGXtiD1yQCapUBF4A/7v7btys0="

ota:
  - platform: esphome
    password: "5d7cca6f4b3f38aba559ab0d6aaf5926"

wifi:
  ssid:
  password:

  # Enable fallback hotspot (captive portal) in case wifi connection fails
  ap:
    ssid: "Ee04 Fallback Hotspot"
    password: "zxPMBtCEWonm"

captive_portal:

image:
  - file: /config/esphome/image/wifi.jpg    # Path to your image file (JPG or PNG)
    id: myImage
    type: BINARY                            # Binary mode works best for e-paper
    resize: 800x480                         # Resize to match display resolution
    invert_alpha: true                      # Invert colors if needed

spi:
  clk_pin: GPIO7
  mosi_pin: GPIO9

display:
  - platform: waveshare_epaper
    id: epaper_display
    model: 1.54inv2
    cs_pin: GPIO44
    dc_pin: GPIO10
    reset_pin:
      number: GPIO38
      inverted: false
    busy_pin:
      number: GPIO4
      inverted: true
    update_interval: 300s
    lambda: |-
      it.image(0, 0, id(myImage));          # Display image at position (0,0)
esphome:
  name: ee04
  friendly_name: EE04

esp32:
  board: esp32-s3-devkitc-1
  framework:
    type: esp-idf

# Enable logging
logger:

# Enable Home Assistant API
api:
  encryption:
    key: "b0AIbJ+kbeMayi1PgSGXtiD1yQCapUBF4A/7v7btys0="

ota:
  - platform: esphome
    password: "5d7cca6f4b3f38aba559ab0d6aaf5926"

wifi:
  ssid:
  password:

  # Enable fallback hotspot (captive portal) in case wifi connection fails
  ap:
    ssid: "Ee04 Fallback Hotspot"
    password: "zxPMBtCEWonm"

captive_portal:

image:
  - file: /config/esphome/image/wifi.jpg    # Path to your image file (JPG or PNG)
    id: myImage
    type: BINARY                            # Binary mode works best for e-paper
    resize: 800x480                         # Resize to match display resolution
    invert_alpha: true                      # Invert colors if needed

spi:
  clk_pin: GPIO7
  mosi_pin: GPIO9

display:
  - platform: waveshare_epaper
    id: epaper_display
    model: 2.13inv2 #More models you can refer to here: https://esphome.io/components/display/waveshare_epaper/
    cs_pin: GPIO44
    dc_pin: GPIO10
    reset_pin:
      number: GPIO38
      inverted: false
    busy_pin:
      number: GPIO4
      inverted: true
    update_interval: 300s
    lambda: |-
      it.image(0, 0, id(myImage));          # Display image at position (0,0)
esphome:
  name: ee04
  friendly_name: EE04
  libraries:
    - SPI


esp32:
  board: esp32-s3-devkitc-1
  framework:
    type: arduino


# Enable logging
logger:

# Enable Home Assistant API
api:
  encryption:
    key: "eg2Jyse0gE146lJ2mVaqAnwteb4U2GJ7d1sZc2BOOsc="

ota:
  - platform: esphome
    password: "e2f184b95aac832509885f676abf5b73"

wifi:
  ssid:
  password:

  # Enable fallback hotspot (captive portal) in case wifi connection fails
  ap:
    ssid: "ESPHome_Epaper"
    password: "123456789"

external_components:
  - source: github://xcjk-tofuture/esphome@dev
    components: [ waveshare_epaper ]


image:
  - file: /config/esphome/image/wifi.jpg    # Path to your image file (JPG or PNG)
    id: myImage
    type: BINARY                            # Binary mode works best for e-paper
    resize: 800x480                         # Resize to match display resolution
    invert_alpha: true                      # Invert colors if needed

captive_portal:

spi:
  clk_pin: GPIO7
  mosi_pin: GPIO9

display:
  - platform: waveshare_epaper
    id: my_display
    model: gdey0213f51
    cs_pin: GPIO44
    dc_pin: GPIO10
    busy_pin: GPIO4
    reset_pin:  GPIO38
    rotation: 90
    update_interval: 30s
    full_update_every: 1
    lambda: |-
      it.image(0, 0, id(myImage));          # Display image at position (0,0)
esphome:
  name: ee04
  friendly_name: EE04
  libraries:
    - SPI


esp32:
  board: esp32-s3-devkitc-1
  framework:
    type: arduino


# Enable logging
logger:

# Enable Home Assistant API
api:
  encryption:
    key: "eg2Jyse0gE146lJ2mVaqAnwteb4U2GJ7d1sZc2BOOsc="

ota:
  - platform: esphome
    password: "e2f184b95aac832509885f676abf5b73"

wifi:
  ssid:
  password:

  # Enable fallback hotspot (captive portal) in case wifi connection fails
  ap:
    ssid: "ESPHome_Epaper"
    password: "123456789"

external_components:
  - source: github://xcjk-tofuture/esphome@dev
    components: [ waveshare_epaper ]

captive_portal:

image:
  - file: /config/esphome/image/wifi.jpg    # Path to your image file (JPG or PNG)
    id: myImage
    type: BINARY                            # Binary mode works best for e-paper
    resize: 800x480                         # Resize to match display resolution
    invert_alpha: true                      # Invert colors if needed

spi:
  clk_pin: GPIO7
  mosi_pin: GPIO9
display:
  - platform: waveshare_epaper
    id: my_display
    model: gdey029f51h
    cs_pin: GPIO44
    dc_pin: GPIO10
    busy_pin: GPIO4
    reset_pin:  GPIO38
    rotation: 90
    update_interval: 30s
    full_update_every: 1
    lambda: |-
      it.image(0, 0, id(myImage));          # Display image at position (0,0)
esphome:
  name: ee04
  friendly_name: EE04

esp32:
  board: esp32-s3-devkitc-1
  framework:
    type: esp-idf

# Enable logging
logger:

# Enable Home Assistant API
api:
  encryption:
    key: "b0AIbJ+kbeMayi1PgSGXtiD1yQCapUBF4A/7v7btys0="

ota:
  - platform: esphome
    password: "5d7cca6f4b3f38aba559ab0d6aaf5926"

wifi:
  ssid:
  password:

  # Enable fallback hotspot (captive portal) in case wifi connection fails
  ap:
    ssid: "Ee04 Fallback Hotspot"
    password: "zxPMBtCEWonm"

captive_portal:

image:
  - file: /config/esphome/image/wifi.jpg    # Path to your image file (JPG or PNG)
    id: myImage
    type: BINARY                            # Binary mode works best for e-paper
    resize: 800x480                         # Resize to match display resolution
    invert_alpha: true                      # Invert colors if needed

spi:
  clk_pin: GPIO7
  mosi_pin: GPIO9

display:
  - platform: waveshare_epaper
    id: epaper_display
    model: 2.90inv2
    cs_pin: GPIO44
    dc_pin: GPIO10
    reset_pin:
      number: GPIO38
      inverted: false
    busy_pin:
      number: GPIO4
      inverted: true
    update_interval: 300s
    lambda: |-
      it.image(0, 0, id(myImage));          # Display image at position (0,0)
esphome:
  name: ee04
  friendly_name: EE04

esp32:
  board: esp32-s3-devkitc-1
  framework:
    type: esp-idf

# Enable logging
logger:

# Enable Home Assistant API
api:
  encryption:
    key: "b0AIbJ+kbeMayi1PgSGXtiD1yQCapUBF4A/7v7btys0="

ota:
  - platform: esphome
    password: "5d7cca6f4b3f38aba559ab0d6aaf5926"

wifi:
  ssid:
  password:

  # Enable fallback hotspot (captive portal) in case wifi connection fails
  ap:
    ssid: "Ee04 Fallback Hotspot"
    password: "zxPMBtCEWonm"

captive_portal:

image:
  - file: /config/esphome/image/wifi.jpg    # Path to your image file (JPG or PNG)
    id: myImage
    type: BINARY                            # Binary mode works best for e-paper
    resize: 800x480                         # Resize to match display resolution
    invert_alpha: true                      # Invert colors if needed

spi:
  clk_pin: GPIO7
  mosi_pin: GPIO9

display:
  - platform: waveshare_epaper
    id: epaper_display
    model: gdey042t81
    cs_pin: GPIO44
    dc_pin: GPIO10
    reset_pin:
      number: GPIO38
      inverted: false
    busy_pin:
      number: GPIO4
      inverted: true
    update_interval: 300s
    lambda: |-
      it.image(0, 0, id(myImage));          # Display image at position (0,0)
esphome:
  name: ee04
  friendly_name: EE04

esp32:
  board: esp32-s3-devkitc-1
  framework:
    type: esp-idf

# Enable logging
logger:

# Enable Home Assistant API
api:
  encryption:
    key: "b0AIbJ+kbeMayi1PgSGXtiD1yQCapUBF4A/7v7btys0="

ota:
  - platform: esphome
    password: "5d7cca6f4b3f38aba559ab0d6aaf5926"

wifi:
  ssid:
  password:

  # Enable fallback hotspot (captive portal) in case wifi connection fails
  ap:
    ssid: "Ee04 Fallback Hotspot"
    password: "zxPMBtCEWonm"

captive_portal:

image:
  - file: /config/esphome/image/wifi.jpg    # Path to your image file (JPG or PNG)
    id: myImage
    type: BINARY                            # Binary mode works best for e-paper
    resize: 800x480                         # Resize to match display resolution
    invert_alpha: true                      # Invert colors if needed

spi:
  clk_pin: GPIO7
  mosi_pin: GPIO9

display:
  - platform: waveshare_epaper
    id: epaper_display
    model: gdey0583t81
    cs_pin: GPIO44
    dc_pin: GPIO10
    reset_pin:
      number: GPIO38
      inverted: false
    busy_pin:
      number: GPIO4
      inverted: true
    update_interval: 300s
    lambda: |-
      it.image(0, 0, id(myImage));          # Display image at position (0,0)
esphome:
  name: ee04
  friendly_name: EE04

esp32:
  board: esp32-s3-devkitc-1
  framework:
    type: esp-idf

# Enable logging
logger:

# Enable Home Assistant API
api:
  encryption:
    key: "b0AIbJ+kbeMayi1PgSGXtiD1yQCapUBF4A/7v7btys0="

ota:
  - platform: esphome
    password: "5d7cca6f4b3f38aba559ab0d6aaf5926"

wifi:
  ssid:
  password:

  # Enable fallback hotspot (captive portal) in case wifi connection fails
  ap:
    ssid: "Ee04 Fallback Hotspot"
    password: "zxPMBtCEWonm"

captive_portal:

image:
  - file: /config/esphome/image/wifi.jpg    # Path to your image file (JPG or PNG)
    id: myImage
    type: BINARY                            # Binary mode works best for e-paper
    resize: 800x480                         # Resize to match display resolution
    invert_alpha: true                      # Invert colors if needed

spi:
  clk_pin: GPIO7
  mosi_pin: GPIO9

display:
  - platform: waveshare_epaper
    id: epaper_display
    model: 7.50inv2
    cs_pin: GPIO44
    dc_pin: GPIO10
    reset_pin:
      number: GPIO38
      inverted: false
    busy_pin:
      number: GPIO4
      inverted: true
    update_interval: 300s
    lambda: |-
      it.image(0, 0, id(myImage));          # Display image at position (0,0)
- 7.3 Inch spectra™ 6
esphome:
  name: ee04
  friendly_name: EE04

esp32:
  board: esp32-s3-devkitc-1
  framework:
    type: esp-idf

# Enable logging
logger:

# Enable Home Assistant API
api:
  encryption:
    key: "b0AIbJ+kbeMayi1PgSGXtiD1yQCapUBF4A/7v7btys0="

ota:
  - platform: esphome
    password: "5d7cca6f4b3f38aba559ab0d6aaf5926"

wifi:
  ssid:
  password:

  # Enable fallback hotspot (captive portal) in case wifi connection fails
  ap:
    ssid: "Ee04 Fallback Hotspot"
    password: "zxPMBtCEWonm"

captive_portal:

external_components:
  - source:
      type: git
      url: https://github.com/esphome/esphome/
      ref: 2025.10.5
    components: [ epaper_spi, display ]

image:
  - file: /config/esphome/image/wifi.jpg    # Path to your image file (JPG or PNG)
    id: myImage
    type: BINARY                            # Binary mode works best for e-paper
    resize: 800x480                         # Resize to match display resolution
    invert_alpha: true                      # Invert colors if needed

spi:
  clk_pin: GPIO7
  mosi_pin: GPIO9

display:
  - platform: epaper_spi
    id: my_display
    model: 7.3in-Spectra-E6
    cs_pin: GPIO44
    dc_pin:
      number: GPIO10
      inverted: false
    busy_pin:
      number: GPIO4
      inverted: true
    reset_pin:  GPIO38
    rotation: 0
    update_interval: 30s
    lambda: |-
      it.image(0, 0, id(myImage));          # Display image at position (0,0)
ステップ 6. 設定を保存し、XIAO ePaper Display Board(ESP32-S3) - EE04 にアップロードします。更新が完了すると、ePaper ディスプレイに画像が表示されます。
高度な画像テクニック
次のような追加テクニックを使って、画像表示を強化できます:
画像の位置指定
画面上の特定の座標に画像を配置するには:
lambda: |-
  // Display image at position (100,50)
  it.image(100, 50, id(myImage));
画像とテキストの組み合わせ
同じ画面上に画像とテキストの両方を表示できます:
lambda: |-
  // Display image
  it.image(0, 0, id(myImage));

  // Add text below or beside the image
  it.printf(400, 400, id(myFont), TextAlign::CENTER, "WiFi Connected");
複数画像の使用
同じ画面に複数の画像を表示するには、設定内でそれぞれの画像を定義します:
image:
  - file: /config/esphome/image/wifi.jpg
    id: wifiImage
    type: BINARY
    resize: 200x200

  - file: /config/esphome/image/temperature.png
    id: tempImage
    type: BINARY
    resize: 200x200

# In the display lambda:
lambda: |-
  it.image(50, 50, id(wifiImage));
  it.image(300, 50, id(tempImage));
ePaper ディスプレイにはリフレッシュレートに制限があることを忘れないでください。update_interval: 300s の設定は、ディスプレイが 5 分ごとに 1 回だけリフレッシュされることを意味します。必要に応じてこの値を調整できますが、リフレッシュが頻繁すぎると ePaper ディスプレイの寿命が短くなる可能性がある点に注意してください。
画像とテキスト、そして前の例で扱ったその他の表示要素を組み合わせることで、XIAO ePaper Display Board(ESP32-S3) - EE04 上にリッチで情報量の多いダッシュボードを作成できます。
参考 & リソース
技術サポート & 製品ディスカッション
弊社製品をお選びいただきありがとうございます。私たちは、製品をできるだけスムーズにご利用いただけるよう、さまざまなサポートを提供しています。お好みやニーズに合わせて選べる、複数のコミュニケーションチャネルをご用意しています。