Raspberry Pi 向け reSpeaker 6-Mic Circular Array Kit

Seeed の ReSpeaker 6-Mic Circular Array Kit は Raspberry Pi 用に設計された拡張ボード、いわゆる HAT です。これは 6 個のマイクを備えた円形マイクアレイキットで、AI や音声アプリケーション向けに設計されています。つまり、Amazon Alexa Voice Service や Google Assistant などを統合できる Raspberry Pi を使って、より強力で柔軟な音声プロダクトを構築できます。
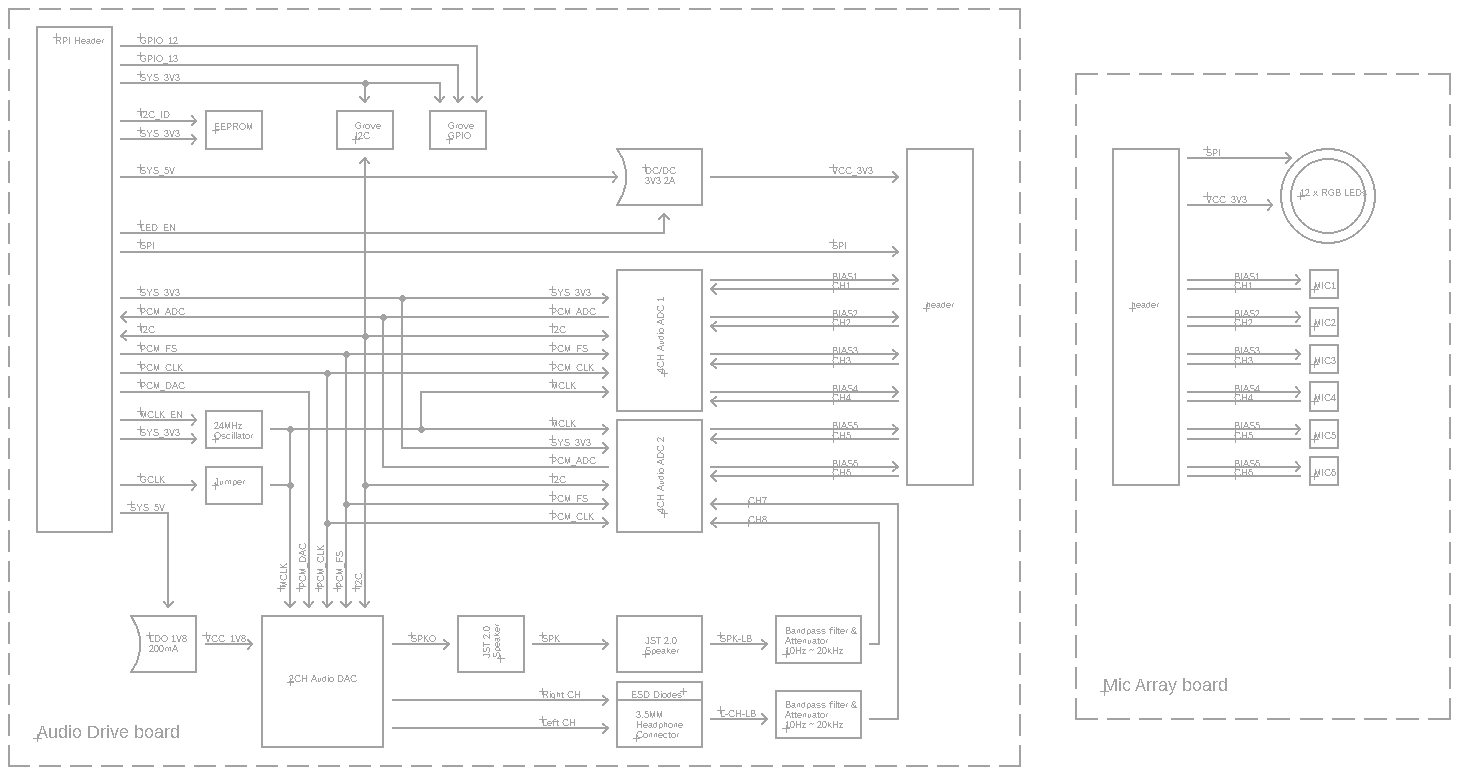
Raspberry Pi 向け ReSpeaker 6-Mic Circular Array Kit は 2 枚のボードで構成されており、1 枚は Voice Accessory HAT、もう 1 枚は 6 マイクの円形アレイです。
Raspberry Pi 向け ReSpeaker 6-Mic Circular Array Kit は Raspbian システムで 8 チャンネル入力と 8 チャンネル出力をサポートします。最初の 6 つの入力チャンネルはマイク録音用で、残り 2 つの入力チャンネルは再生のエコーチャンネルです。最初の 2 つの出力チャンネルは再生用で、残り 6 つの出力チャンネルはダミーです。

特徴
- 2 つの ADC チップと 1 つの DAC チップ
- 8 チャンネル入力および 8 チャンネル出力
- 6 マイクアレイ
- Grove 対応
- Raspberry Pi 互換(Raspberry Pi Zero および Zero W、Raspberry Pi B+、Raspberry Pi 2 B、Raspberry Pi 3 B、Raspberry Pi 3 B+、Raspberry Pi 3 A+、Raspberry Pi 4 をサポート)
- ヘッドセットおよびスピーカー音声出力
仕様
- 2 x X-Power AC108 ADC
- 6 x 高性能マイク
- 1 x X-Power AC101 DAC
- 音声出力:
- 3.5mm ヘッドセットオーディオジャック
- スピーカージャック
- Raspberry Pi 40 ピンヘッダと互換
- マイク: MSM321A3729H9CP
- 感度: -22 dBFS(無指向性)
- SNR: 59 dB
- 最大サンプリングレート: 48Khz
応用例
- スマートスピーカー
- インテリジェント音声アシスタントシステム
- ボイスレコーダー
- 音声会議システム
- 会議用通信機器
- 音声対話ロボット
- 車載音声アシスタント
- その他、音声コマンドが必要なシナリオ
ハードウェア概要
システム図
インターフェース

接続後、必ずマルチメータを使用して、回路の導通が上図のとおりになっているか確認してください。
組立図


はじめに
ハードウェア
前提条件
ReSpeaker 6-Mic Circular Array x1
PC x1
イヤホンまたはスピーカー x1
実際には ReSpeaker 6-Mic Circular Array は Raspberry Pi Zero、Raspberry Pi 1 B+、Raspberry Pi 2 B、Raspberry Pi 3 B、Raspberry Pi 3 model B+、Raspberry Pi 3 A+、Raspberry Pi 4 をサポートしており、この Wiki では Raspberry Pi 3 を使用しています。
接続
ステップ 1. ReSpeaker Voice Accessory HAT と ReSpeaker 6-Mic circular Array をリボンケーブルで接続します
ステップ 2. ReSpeaker Voice Accessory HAT を 40 ピン GPIO を介して Raspberry Pi に挿し込みます
ステップ 3. earphone を 3.5mm headset audio jack に挿し込むか、speaker を JST 2.0 speaker jack に接続します
ステップ 4. micro-USB ケーブルで Raspberry Pi と PC を接続します

ソフトウェア
前提条件
Plan A
Putty もしくは他の ssh ツールを使用して Raspberry Pi に接続する必要があります。開始する前に、次の点を確認してください:
1- ssh 機能を有効にして、putty から接続できるようにします。ssh の有効化方法がわからない場合は、how to setup ssh raspberry pi を Google で検索してください
2- Raspberry Pi と PC が同じ WiFi ネットワーク上で動作していることを確認します。WiFi の設定方法がわからない場合は、how to setup wifi raspberry pi を Google で検索してください
3- Raspberry Pi の IP アドレスを取得します。IP アドレスの取得方法がわからない場合は、raspberry offical documentation を参照してください
4- その IP アドレスを使用して、putty ssh サーバ経由で Raspberry Pi と PC を接続します。

その後、ホスト名とパスワードを入力してください。デフォルトの ID は pi、パスワードは raspberry です。
login as: pi
[email protected]'s password:raspberry
これでログインできたので、putty でコマンドを入力して Raspberry Pi を操作できます。
このキットを alexa または dueros と連携させるには、認証を取得するために Web サイトを開く必要があります。そのため、VNC Viewer を使用して Amazon または Baidu アカウントにログインする必要があります。したがって、Raspberry Pi の VNC サービスを有効にしていることを確認してください。
あるいは、単に Plan B を検討してもかまいません。
Plan B
上記の手順が面倒な場合は、HDMI モニタを使用し、USB キーボードと USB マウスを Raspberry Pi に接続するだけでも動作します。シンプルで簡単です。
ステップ 1. seeed-voicecard をインストール
seeed voice card のソースコードを取得し、Linux カーネルドライバをすべてインストールします。
sudo apt-get update
sudo apt-get upgrade
git clone https://github.com/respeaker/seeed-voicecard.git
cd seeed-voicecard
sudo ./install.sh
sudo reboot
ステップ 2. サウンドカードを確認
以下のコマンドを入力して録音デバイスを確認します。
pi@raspberrypi:~ $ arecord -L
次のように表示されるはずです:
pi@raspberrypi:~ $ arecord -L
null
    Discard all samples (playback) or generate zero samples (capture)
default
ac108
dmixer
ac101
sysdefault:CARD=seeed8micvoicec
    seeed-8mic-voicecard,
    Default Audio Device
dmix:CARD=seeed8micvoicec,DEV=0
    seeed-8mic-voicecard,
    Direct sample mixing device
dsnoop:CARD=seeed8micvoicec,DEV=0
    seeed-8mic-voicecard,
    Direct sample snooping device
hw:CARD=seeed8micvoicec,DEV=0
    seeed-8mic-voicecard,
    Direct hardware device without any conversions
plughw:CARD=seeed8micvoicec,DEV=0
    seeed-8mic-voicecard,
    Hardware device with all software conversions
次のコマンドを使用して再生デバイスを確認します。
pi@raspberrypi:~ $ aplay -L
次のように表示されるはずです:
pi@raspberrypi:~ $ aplay -L
null
    Discard all samples (playback) or generate zero samples (capture)
default
ac108
dmixer
ac101
sysdefault:CARD=ALSA
    bcm2835 ALSA, bcm2835 ALSA
    Default Audio Device
dmix:CARD=ALSA,DEV=0
    bcm2835 ALSA, bcm2835 ALSA
    Direct sample mixing device
dmix:CARD=ALSA,DEV=1
    bcm2835 ALSA, bcm2835 IEC958/HDMI
    Direct sample mixing device
dsnoop:CARD=ALSA,DEV=0
    bcm2835 ALSA, bcm2835 ALSA
    Direct sample snooping device
dsnoop:CARD=ALSA,DEV=1
    bcm2835 ALSA, bcm2835 IEC958/HDMI
    Direct sample snooping device
hw:CARD=ALSA,DEV=0
    bcm2835 ALSA, bcm2835 ALSA
    Direct hardware device without any conversions
hw:CARD=ALSA,DEV=1
    bcm2835 ALSA, bcm2835 IEC958/HDMI
    Direct hardware device without any conversions
plughw:CARD=ALSA,DEV=0
    bcm2835 ALSA, bcm2835 ALSA
    Hardware device with all software conversions
plughw:CARD=ALSA,DEV=1
    bcm2835 ALSA, bcm2835 IEC958/HDMI
    Hardware device with all software conversions
sysdefault:CARD=seeed8micvoicec
    seeed-8mic-voicecard,
    Default Audio Device
dmix:CARD=seeed8micvoicec,DEV=0
    seeed-8mic-voicecard,
    Direct sample mixing device
dsnoop:CARD=seeed8micvoicec,DEV=0
    seeed-8mic-voicecard,
    Direct sample snooping device
hw:CARD=seeed8micvoicec,DEV=0
    seeed-8mic-voicecard,
    Direct hardware device without any conversions
plughw:CARD=seeed8micvoicec,DEV=0
    seeed-8mic-voicecard,
    Hardware device with all software conversions
ステップ 3. 録音と再生
録音してから再生することも、録音と再生を同時に行うこともできます。
#It will capture sound on AC108 and save as a.wav
arecord -Dac108 -f S32_LE -r 16000 -c 8 a.wav
#Take care of that the captured mic audio is on the first 6 channels

#It will play sound file a.wav on AC101
aplay -D ac101 a.wav
#Do not use -D plughw:1,0 directly except your wave file is single channel only.

#Doing capture && playback the same time
arecord -D hw:1,0 -f S32_LE -r 16000 -c 8 to_be_record.wav &
#mono_to_play.wav is a mono channel wave file to play
aplay -D plughw:1,0 -r 16000 mono_to_play.wav
6-Mic Circular Array Kit(または 4-Mics Linear Array Kit)を使用して同時にキャプチャと再生を行う開発者向けの制限事項:
-1. キャプチャを必ず先に開始してください。そうしないと、キャプチャチャンネルが乱れる可能性があります。
-2. 再生出力チャンネルには、8 つすべて同じチャンネルデータ、または 4 つすべて同じステレオチャンネルデータを入力する必要があります。そうしないと、スピーカーやヘッドホンから音が出ない可能性があります。
-3. 同時に再生と録音を行いたい場合、aplay する音楽ファイルはモノラルでなければなりません。そうでないと、このコマンドを使って再生することはできません。
Audacity を使って再生および録音することもできます。
Audacity は VNC 経由で開くか、モニタを接続して開いてください
sudo apt update
sudo apt install audacity
audacity                      // run audacity

LED で遊ぶ
6-mic circular array には 12 個の GRB LED があり、自分で LED を設定できます。ここでは、それらをどのように点灯させるかを見ていきます。
git clone --depth 1 https://github.com/respeaker/pixel_ring.git
cd pixel_ring
pip install -U -e .
python examples/respeaker_4mic_array.py
LED が点灯して走る様子が見えるはずです。また、python examples/respeaker_4mic_array.py ファイルを参照して、自分だけのエフェクトを作成できます。
リアルタイム音源定位とトラッキング
ODAS は Open embeddeD Audition System の略です。これは、音源の定位、トラッキング、分離、およびポストフィルタリングを行うためのライブラリです。これを使って遊んでみましょう。
- ステップ 1. ODAS を取得してビルドします。
sudo apt-get install libfftw3-dev libconfig-dev libasound2-dev libgconf-2-4
sudo apt-get install cmake
git clone https://github.com/introlab/odas.git
mkdir odas/build
cd odas/build
cmake ..
make
-
ステップ 2. ODAS Studio を入手して開きます。
-
ステップ 3. odascore は odas/bin/odaslive にあり、config file はこちらにあります。

音声の抽出
PyAudio python library を使用して音声を抽出します。
- ステップ 1. 6 Mic pi hat のデバイスインデックス番号を取得するために、次のスクリプトを実行する必要があります。
sudo pip install pyaudio
cd ~
nano get_index.py
- ステップ 2. 以下のコードをコピーして get_index.py に貼り付けます。
import pyaudio

p = pyaudio.PyAudio()
info = p.get_host_api_info_by_index(0)
numdevices = info.get('deviceCount')

for i in range(0, numdevices):
        if (p.get_device_info_by_host_api_device_index(0, i).get('maxInputChannels')) > 0:
            print "Input Device id ", i, " - ", p.get_device_info_by_host_api_device_index(0, i).get('name')
-
ステップ 3. Ctrl + X を押して終了し、Y を押して保存します。
-
ステップ 4. 'sudo python get_index.py' を実行すると、以下のようにデバイス ID が表示されます。
Input Device id 2 - seeed-8mic-voicecard: - (hw:1,0)
- ステップ 5.
RESPEAKER_INDEX = 2をインデックス番号に変更します。python スクリプト record.py を実行して音声を録音します。
import pyaudio
import wave

RESPEAKER_RATE = 16000
RESPEAKER_CHANNELS = 8
RESPEAKER_WIDTH = 2
# run getDeviceInfo.py to get index
RESPEAKER_INDEX = 2  # refer to input device id
CHUNK = 1024
RECORD_SECONDS = 5
WAVE_OUTPUT_FILENAME = "output.wav"

p = pyaudio.PyAudio()

stream = p.open(
            rate=RESPEAKER_RATE,
            format=p.get_format_from_width(RESPEAKER_WIDTH),
            channels=RESPEAKER_CHANNELS,
            input=True,
            input_device_index=RESPEAKER_INDEX,)

print("* recording")

frames = []

for i in range(0, int(RESPEAKER_RATE / CHUNK * RECORD_SECONDS)):
    data = stream.read(CHUNK)
    frames.append(data)

print("* done recording")

stream.stop_stream()
stream.close()
p.terminate()

wf = wave.open(WAVE_OUTPUT_FILENAME, 'wb')
wf.setnchannels(RESPEAKER_CHANNELS)
wf.setsampwidth(p.get_sample_size(p.get_format_from_width(RESPEAKER_WIDTH)))
wf.setframerate(RESPEAKER_RATE)
wf.writeframes(b''.join(frames))
wf.close()
- ステップ 6. 8 チャンネルからチャンネル 0 のデータを抽出したい場合は、以下のコードに従ってください。ほかのチャンネル X の場合は、[0::8] を [X::8] に変更してください。
import pyaudio
import wave
import numpy as np

RESPEAKER_RATE = 16000
RESPEAKER_CHANNELS = 8
RESPEAKER_WIDTH = 2
# run getDeviceInfo.py to get index
RESPEAKER_INDEX = 2  # refer to input device id
CHUNK = 1024
RECORD_SECONDS = 3
WAVE_OUTPUT_FILENAME = "output.wav"

p = pyaudio.PyAudio()

stream = p.open(
            rate=RESPEAKER_RATE,
            format=p.get_format_from_width(RESPEAKER_WIDTH),
            channels=RESPEAKER_CHANNELS,
            input=True,
            input_device_index=RESPEAKER_INDEX,)

print("* recording")

frames = []

for i in range(0, int(RESPEAKER_RATE / CHUNK * RECORD_SECONDS)):
    data = stream.read(CHUNK)
    # extract channel 0 data from 8 channels, if you want to extract channel 1, please change to [1::8]
    a = np.fromstring(data,dtype=np.int16)[0::8]
    frames.append(a.tostring())

print("* done recording")

stream.stop_stream()
stream.close()
p.terminate()

wf = wave.open(WAVE_OUTPUT_FILENAME, 'wb')
wf.setnchannels(1)
wf.setsampwidth(p.get_sample_size(p.get_format_from_width(RESPEAKER_WIDTH)))
wf.setframerate(RESPEAKER_RATE)
wf.writeframes(b''.join(frames))
wf.close()
DOA
キーワード付き DOA
必要条件
- pyaudio
- numpy
- snowboy
インストール
pyaudio、numpy、snowboy をインストールします。virtualenv を使って仮想の python 環境を作成します。
sudo apt install python-pyaudio python-numpy python-virtualenv
sudo apt-get install swig python-dev libatlas-base-dev build-essential make
git clone --depth 1 https://github.com/Kitt-AI/snowboy.git
cd snowboy
virtualenv --system-site-packages env
source env/bin/activate
python setup.py build
python setup.py bdist_wheel
pip install dist/snowboy*.whl
git clone https://github.com/voice-engine/voice-engine.git
cd voice-engine
python setup.py bdist_wheel
pip install dist/*.whl
snowboy と言ってみましょう
- ステップ 1. kws_doa.py を実行します
cd ~/voice-engine/examples/respeaker_6mic_array_for_pi/
python kws_doa.py
ここに kws_doa.py のコードがあります
"""
Search the keyword "snowboy".
After finding the keyword, Direction Of Arrival (DOA) is estimated.

Hardware: ReSpeaker 6 Mic Array for Raspberry Pi
"""

import sys
import time
from voice_engine.source import Source
from voice_engine.channel_picker import ChannelPicker
from voice_engine.kws import KWS
from voice_engine.doa_respeaker_6mic_array import DOA


def main():
    src = Source(rate=16000, channels=8)
    ch0 = ChannelPicker(channels=src.channels, pick=0)
    kws = KWS(model='snowboy', sensitivity=0.6, verbose=True)
    doa = DOA(rate=16000)

    src.link(ch0)
    ch0.link(kws)
    src.link(doa)

    def on_detected(keyword):
        print('detected {} at direction {}'.format(keyword, doa.get_direction()))

    kws.set_callback(on_detected)

    src.recursive_start()
    while True:
        try:
            time.sleep(1)
        except KeyboardInterrupt:
            break

    src.recursive_stop()

    # wait a second to allow other threads to exit
    time.sleep(1)


if __name__ == '__main__':
    main()
- ステップ 2. snowboy と言ってみると、DOA の出力は次のようになります。
(env) pi@raspberrypi:~/voice-engine/examples/respeaker_6mic_array_for_pi $ python kws_doa.py
['arecord', '-t', 'raw', '-f', 'S16_LE', '-c', '8', '-r', '16000', '-D', 'default', '-q']
0000000000000000000000000000000000000000000000000000000000000000000000000000000002222222222222222222222222222222222222222222222/usr/local/lib/python2.7/dist-packages/voice_engine-0.1.3-py2.7.egg/voice_engine/gcc_phat.py:22: RuntimeWarning: invalid value encountered in divide
  cc = np.fft.irfft(R / np.abs(R), n=(interp * n))
detected 1 at direction 283.32811392
3000000000000000000000000000000000000000000000000000000000000000000000000000000000000000000000000000000000000000000000000000000000000000000000000000000000000000000000000000000000000000000000000000000000000000002222222222222222222222222222222222222222222222detected 1 at direction 210.0
30000000000000000000000000000000000000000000000000000000000000000000000000000000000000000000000000000000000000000000000000000000000000000000000000000000000000000000000000000000000000000000000000000000000000000000000000000000000000000002222222222222222222222222222222222222222222222detected 1 at direction 62.5448292531
30000000000000000000000000000000000000000000000000000000000000000000000000000000000000000000000000000000000000000000000000000000000000000000000000000000000000000000000000000000000000000000000000000000000000000002222222222222222222222222222222222222222222222222detected 1 at direction 62.5448292531
300000000000000000000000000000000000000000000000000000000000000000000000000000000000000000000000000000000000000000000000000000000000000000000000000000000000000000000000000000000000000000000000000000000000000000000000000000000000000000000000000000000000000002222222222222222222222222222222222222222222detected 1 at direction 223.32811392
300000000000000000000000000000000000000000000000000000000000000000000000000000000000000000000000000000000000000000000000000000000000000000000000000000000000000000000000000000000000000000000022222222222222222222222222222222222222222222222222detected 1 at direction 223.32811392
30000000000000000000000000000000000000000000000000000000000000000000000000000000000000000000000000000000000000000000000000000000000000000000000000000000000000000000000000000000000000000000000000000000000000000000000000000000000000222222222222222222222222222222222222222detected 1 at direction 283.32811392
300000000000000000000000000000000000000000000000000000000000000000000000000000000000000000000000000000000000000000000000000000000000000000000000000000000000000000000000000000000000000000000000000000000000000000000002222222222222222222222222222222222222222222detected 1 at direction 237.455170747
ボタン
reSpeaker_6-Mic が Raspberry 上に正しくインストールされているか確認したい場合、ボタンは良いアイデアです。以下のコードを使って確認できます。
import RPi.GPIO as GPIO
import time

BUTTON = 26

GPIO.setmode(GPIO.BCM)
GPIO.setup(BUTTON, GPIO.IN)

while True:
    state = GPIO.input(BUTTON)
    if state:
        print("off")
    else:
        print("on")
    time.sleep(1)
FAQ
Q1: Mic Array には 6 個のマイクしかないのに、どうして 8 チャンネルなのですか?
A1: このアレイには 2 つの AC108 があり、各 AC108 チップは 4 チャンネル出力を持っています。そのため合計 8 チャンネルとなり、そのうち 6 チャンネルがマイク用で、残り 2 チャンネルが再生用チャンネルです。
Q2: Raspberry が ReSpeaker 2-mics hat を検出できるのに、ReSpeaker 6-mics Circular array を検出できない場合は?
A2: raspberry -> Preferences -> Raspberry Pi Configuration をクリックし、Interfaces タブを選択して、1-Wire が Disabled になっていることを確認してください。
リソース
- [PDF] AC101 データシート
- [PDF] AC108 データシート
- [Dxf] ReSpeaker Circular Array for Voice Accessory HAT with 6 Microphones ケースファイル
- [Dxf] ReSpeaker Circular Array for Voice Accessory HAT with 6 Microphone 2D ファイル
- [Driver] Seeed-Voice ドライバ
- [Algorithms] DOA、VAD、NS を含むアルゴリズム
- [Voice Engine] 音声対応オブジェクトを作成するための構成要素を提供する Voice Engine プロジェクト
- [Algorithms] AEC
技術サポート & 製品ディスカッション
弊社製品をお選びいただきありがとうございます。私たちは、製品をできるだけスムーズにご利用いただけるよう、さまざまなサポートを提供しています。お好みやニーズに応じて選べる、複数のコミュニケーションチャネルをご用意しています。