シングルチャネルLoRaWANゲートウェイ - SenseCAP Indicator
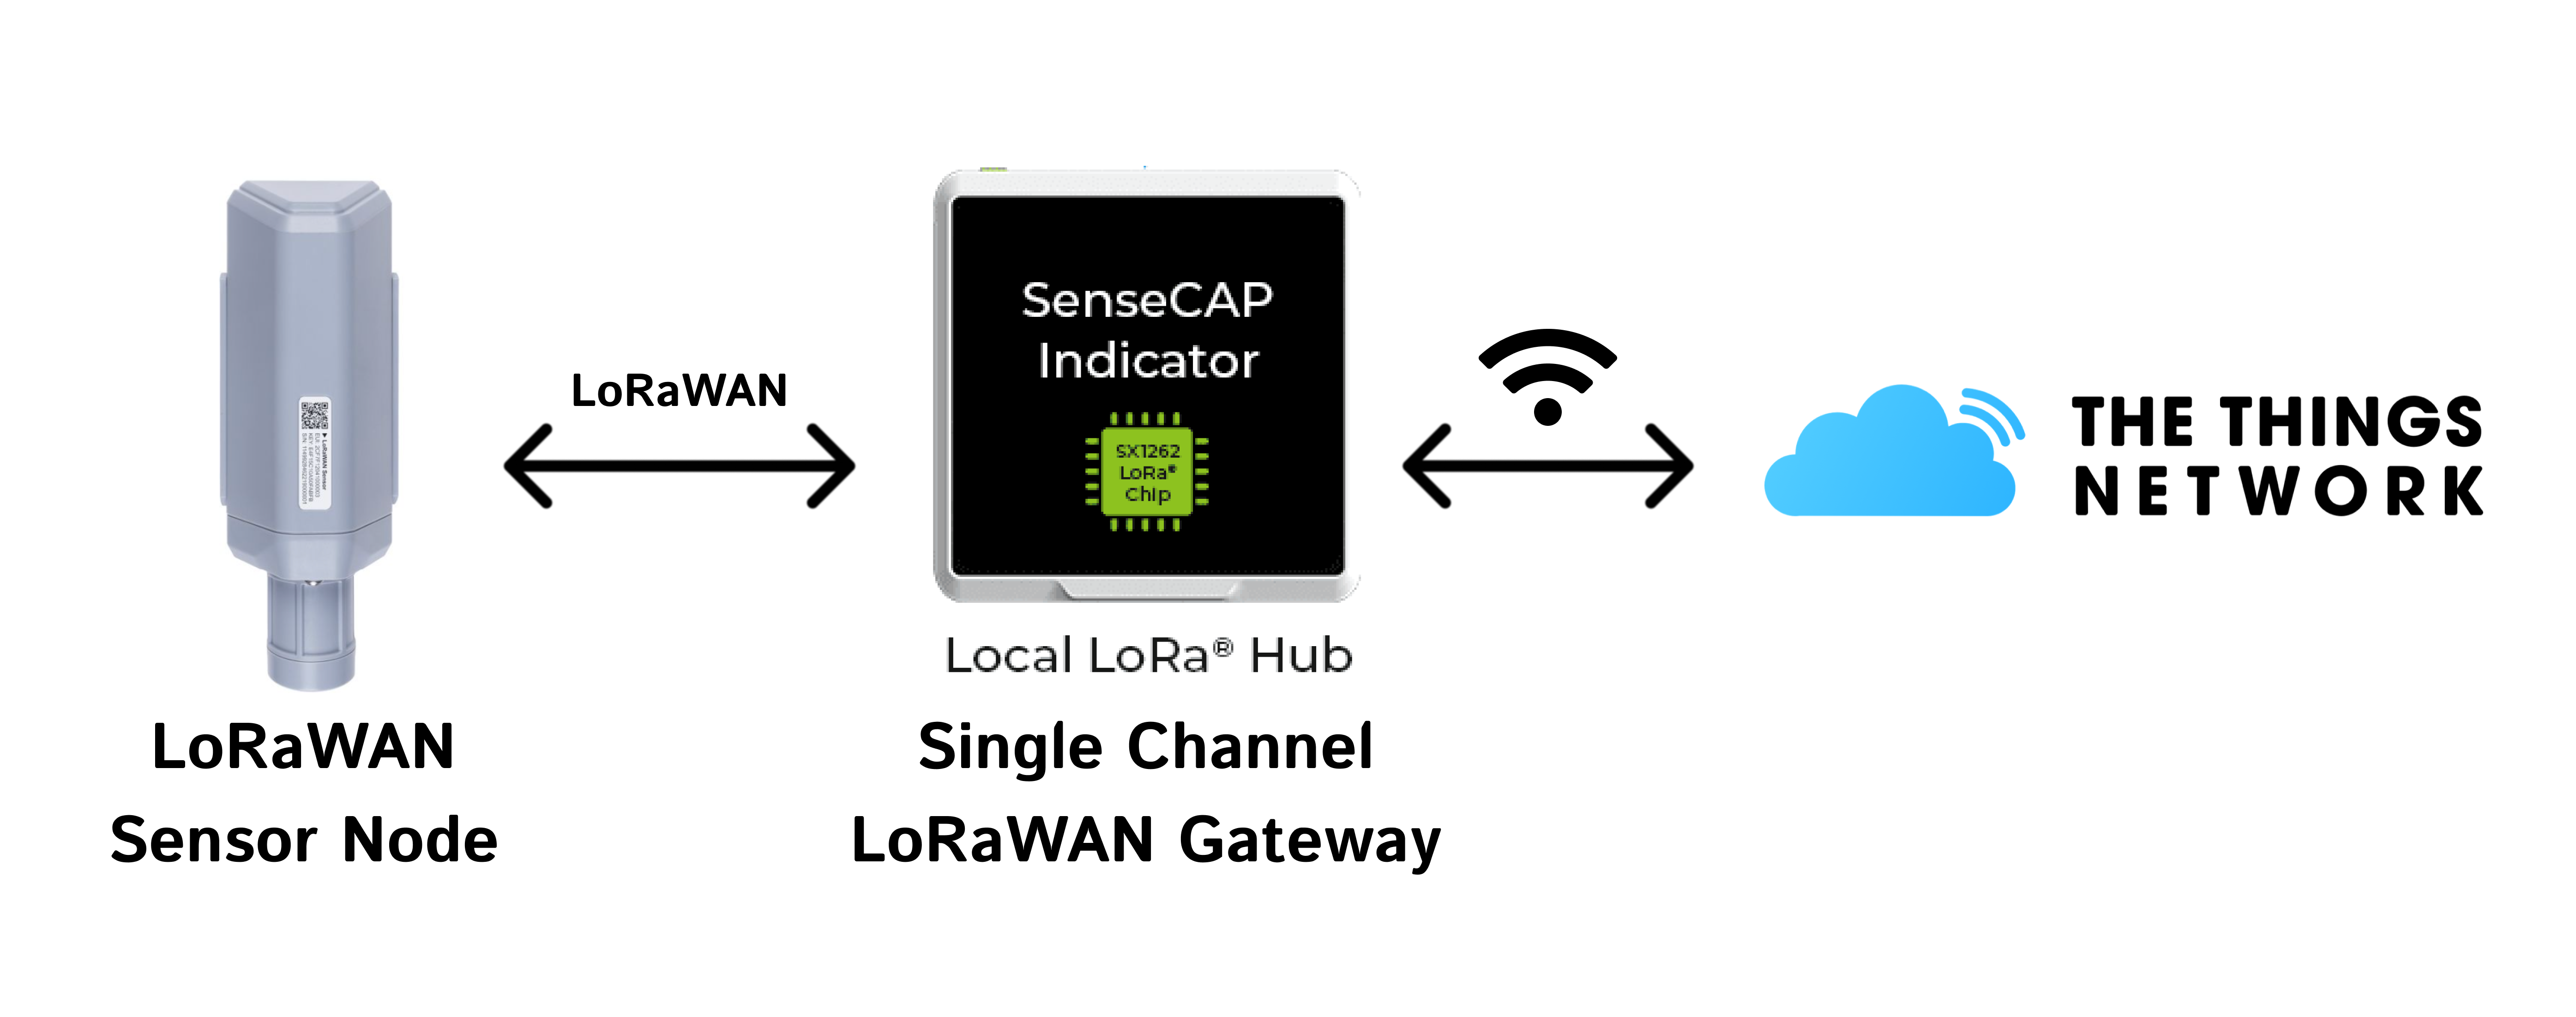
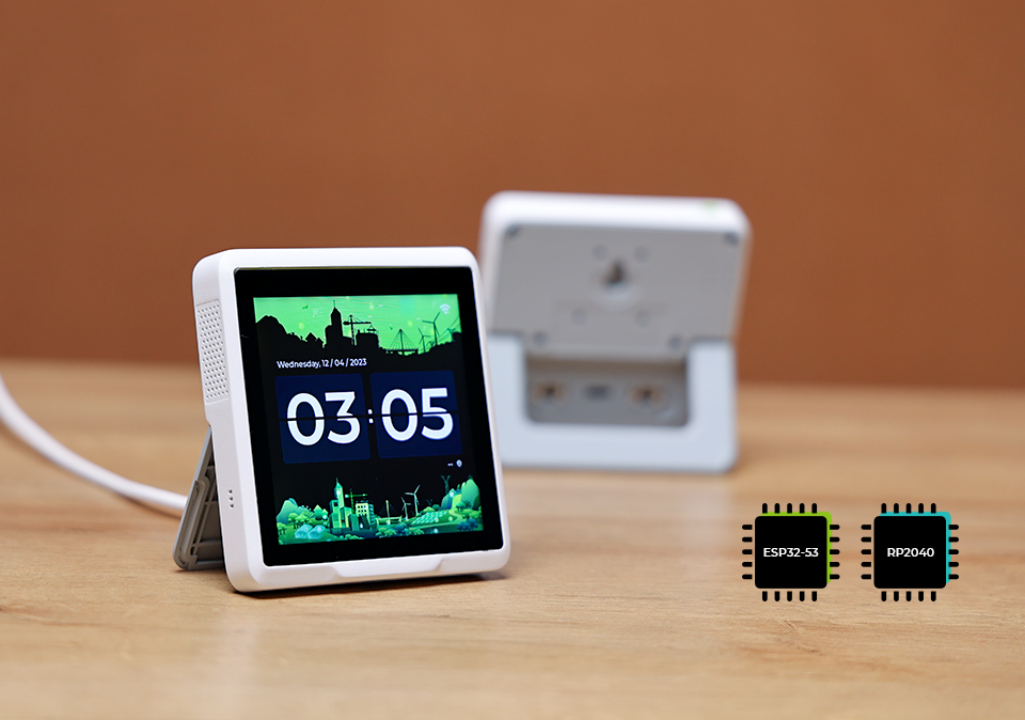
このプロジェクトは、SenseCAP Indicatorを使用してシングルチャネルLoRaWANゲートウェイ(LoRaHub)を実装する方法を実演します。SenseCAP IndicatorはESP32S3をホストMCUとして使用し、SX1262 LoRaラジオを搭載しており、The Things Network(TTN)上でLoRaWANアプリケーションを構築します。ファームウェアのアップグレードは、LoRa技術を深く探求し、LNS(LoRaネットワークサーバー)への接続を確立することに興味がある方にとって実用的なソリューションを提供します。
シングルチャネルゲートウェイ(One-Channel Hubと呼ばれる)は、ユーザーがLoRa領域の探索を始めることを可能にする低コストツールです。これらのゲートウェイは、特定の拡散係数とチャネルでLoRaパケットを受信し、これらのパケットとネットワーク間の交換を促進できます。手頃な価格のため、多くのユーザーがLoRaを実験するために独自のシングルチャネルゲートウェイの構築に着手しています。
これがGitHubプロジェクトです:SenseCAP Indicator LoRaHub Demonstration。
ファームウェアのフラッシュ
ファームウェアはインストール用に準備されています。bin libraryから最新バージョンをダウンロードするだけです。
GitHubでマージ版のファームウェアも提供しています。以下の手順は初心者にとって理解しやすいように分離版に基づいています。マージ版を直接書き込みたい場合は、フラッシュアドレスを0x0に設定してください。
完全なESP-IDF環境を使用しない場合でも、esptoolユーティリティを使用して提供されたバイナリファイルをフラッシュすることが可能です。
ファームウェアをダウンロードするにはクリックしてください:
ファームウェアのカスタマイズとビルド
設定をリセットしたい場合、以下の手順がESP-IDF環境下で自分でファームウェアをビルドするのに役立ちます。
環境のセットアップ
このプロジェクトはEspressif ESP-IDF開発に基づいています。環境をセットアップするには、このガイドを確認してください。
ESP-IDFの取得
mkdir -p ~/esp
cd ~/esp
git clone -b v5.2.1 --recursive https://github.com/espressif/esp-idf.git
ツールのセットアップ
cd esp-idf/
./install.sh
ワンチャンネルハブのインストール
ステップ1: ハブをローカルリポジトリにクローンします。そしてプロジェクトパスに移動します。
git clone https://github.com/Seeed-Solution/SenseCAP_Indicator_ESP32.git

cd ~/this_project_directory/
ステップ 2: 必要なドライバーをインストールする
- 無線ドライバーを取得する:
cd ~/this_project_directory/components/radio_drivers
- SX126xドライバー(sx1261, sx1262, sx1268):
git clone -b v2.3.2 https://github.com/Lora-net/sx126x_driver.git sx126x_driver
- llcc68 ドライバー:
git clone -b v2.3.2 https://github.com/Lora-net/llcc68_driver.git llcc68_driver
- lr11xxドライバー(lr1121):
git clone -b v2.4.1 https://github.com/Lora-net/SWDR001.git lr11xx_driver
ファームウェアのビルド
ステップ1: lorahubディレクトリに入ります。
cd ~/this_project_directory/lorahub
Linux/MACターミナルをコマンドラインからESP-IDFでビルドするために準備してください。この手順は、インストールされた'ESP-IDF x.x CMD'ツールが自動的に環境を準備するため、Windowsではスキップできます。
. ~/esp/esp-idf/export.sh
ビルド対象のESP32ターゲットを設定します。
idf.py set-target esp32s3
必要に応じてビルドをカスタマイズします:
idf.py menuconfig
プロジェクトをビルドします:
idf.py all
esp-idfでフラッシュ
フラッシュするOne-Channel Hubに関連付けられたシリアルデバイスを特定します。 LinuxとMacの場合、以下でシリアルポートを確認できます
ls /dev/cu*
その後、idf.pyを使用してフラッシュします。portを置き換えてください
idf.py -p port flash
権限エラーが返される場合は、現在のユーザーがdialoutグループに属しているかを確認してください。属していない場合は、以下を実行し、Linuxマシンを再起動してから再試行してください:
sudo usermod -a -G dialout $USERNAME
Windows セットアップでは、デバイスが COM14 としてマウントされていると仮定すると、上記のコマンドは次のようになります:
idf.py -p COM14 flash
モニターコンソールを起動してログを確認します(オプション)。
idf.py -p port monitor
esptoolを使用したフラッシュ
完全なESP-IDF環境を使用しない場合、esptoolユーティリティを使用して提供されたバイナリファイルをフラッシュすることも可能です。
https://docs.espressif.com/projects/esptool/en/latest/esp32/
// Merged version
esptool.py --chip esp32s3 -p port -b 460800 --before=default_reset --after=hard_reset write_flash --flash_mode dio --flash_freq 80m --flash_size 8MB 0x0 Indicator_Lorahub_v1.0.0.bin
// Seperated version
esptool.py --chip esp32s3 -p port -b 460800 --before=default_reset --after=hard_reset write_flash --flash_mode dio --flash_freq 80m --flash_size 8MB 0x0 bootloader.bin 0x10000 indicator_lorahub.bin 0x8000 partition-table.bin
Windows環境でのフラッシュ用esptoolコマンドは以下の通りです:
// Merged version
py -m esptool --chip esp32s3 -p COM -b 460800 --before=default_reset --after=hard_reset write_flash --flash_mode dio --flash_freq 80m --flash_size 8MB 0x0 Indicator_Lorahub_v1.0.0.bin
// Seperated version
py -m esptool --chip esp32s3 -p COM -b 460800 --before=default_reset --after=hard_reset write_flash --flash_mode dio --flash_freq 80m --flash_size 8MB 0x0 bootloader.bin 0x10000 indicator_lorahub.bin 0x8000 partition-table.bin
port と COM を使用するシリアルポートの名前に置き換えてください。接続に失敗した場合は、トラブルシューティングを参照してください。
esptool-JS でフラッシュする
フラッシュには Online esptool を推奨します。
ステップ 1: ボーレートを 115200 に設定し、正しいポートに接続します。
ステップ 2: bin ファイルを選択し、対応するフラッシュアドレスを入力します。
- マージ版:
| Flash Address | File |
|---|---|
| 0x0 | Indicator_Lorahub_v1.0.0.bin |
- 分離版:
| フラッシュアドレス | ファイル |
|---|---|
| 0x0 | bootloader.bin |
| 0x10000 | indicator_lorahub.bin |
| 0x8000 | partition-table.bin |
Indicator設定
ステップ1. Wi-Fiページに入ってネットワークを設定し、適切なSSIDを選択してパスワードを入力します。
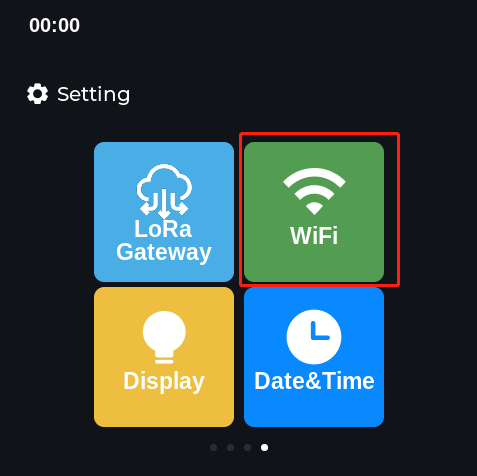
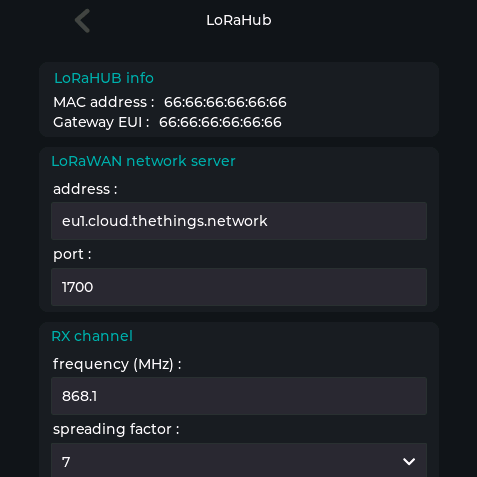
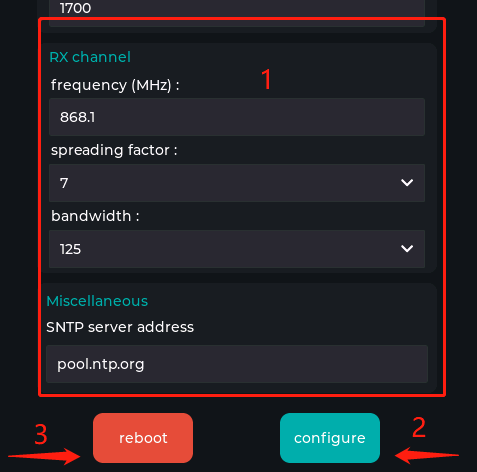
ステップ2. LoRa Gatewayページでパラメータを設定し、LNSとポートを「1700」に設定し、「configure」をクリックしてから「reboot」をクリックします。
The Things Network(TTN)への接続
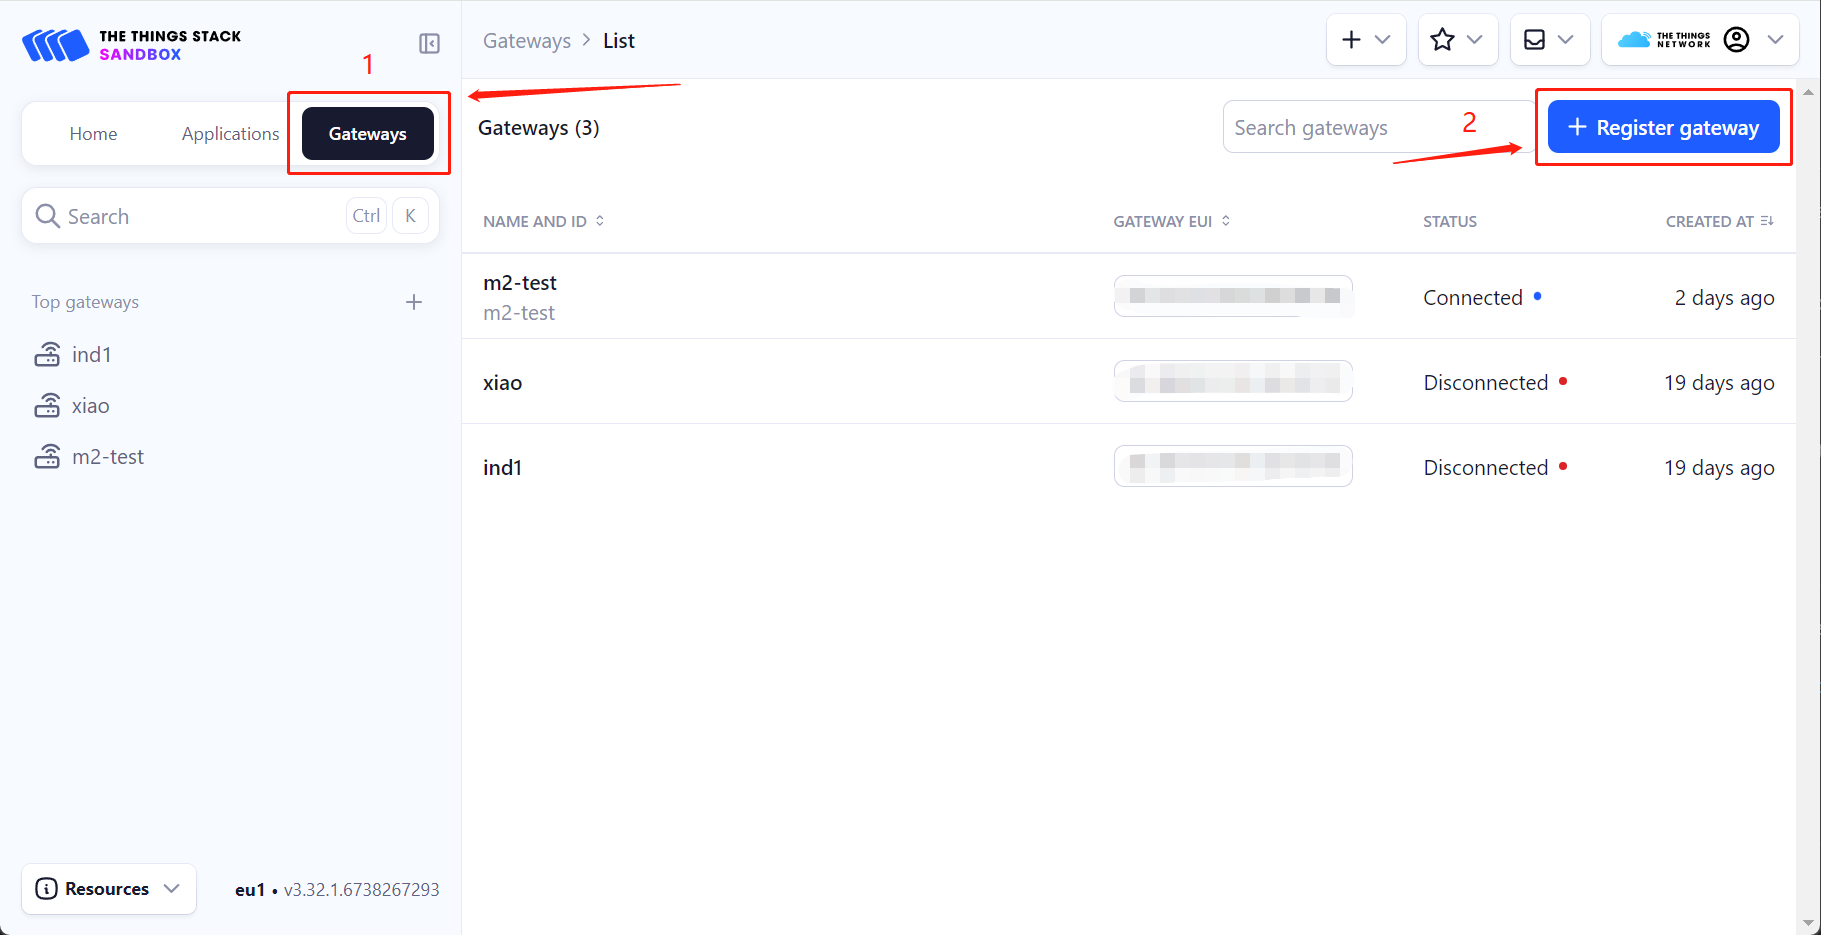
ステップ1: TTNプラットフォームにログインしてconsoleに移動し、Gateways->Register gatewayをクリックします。
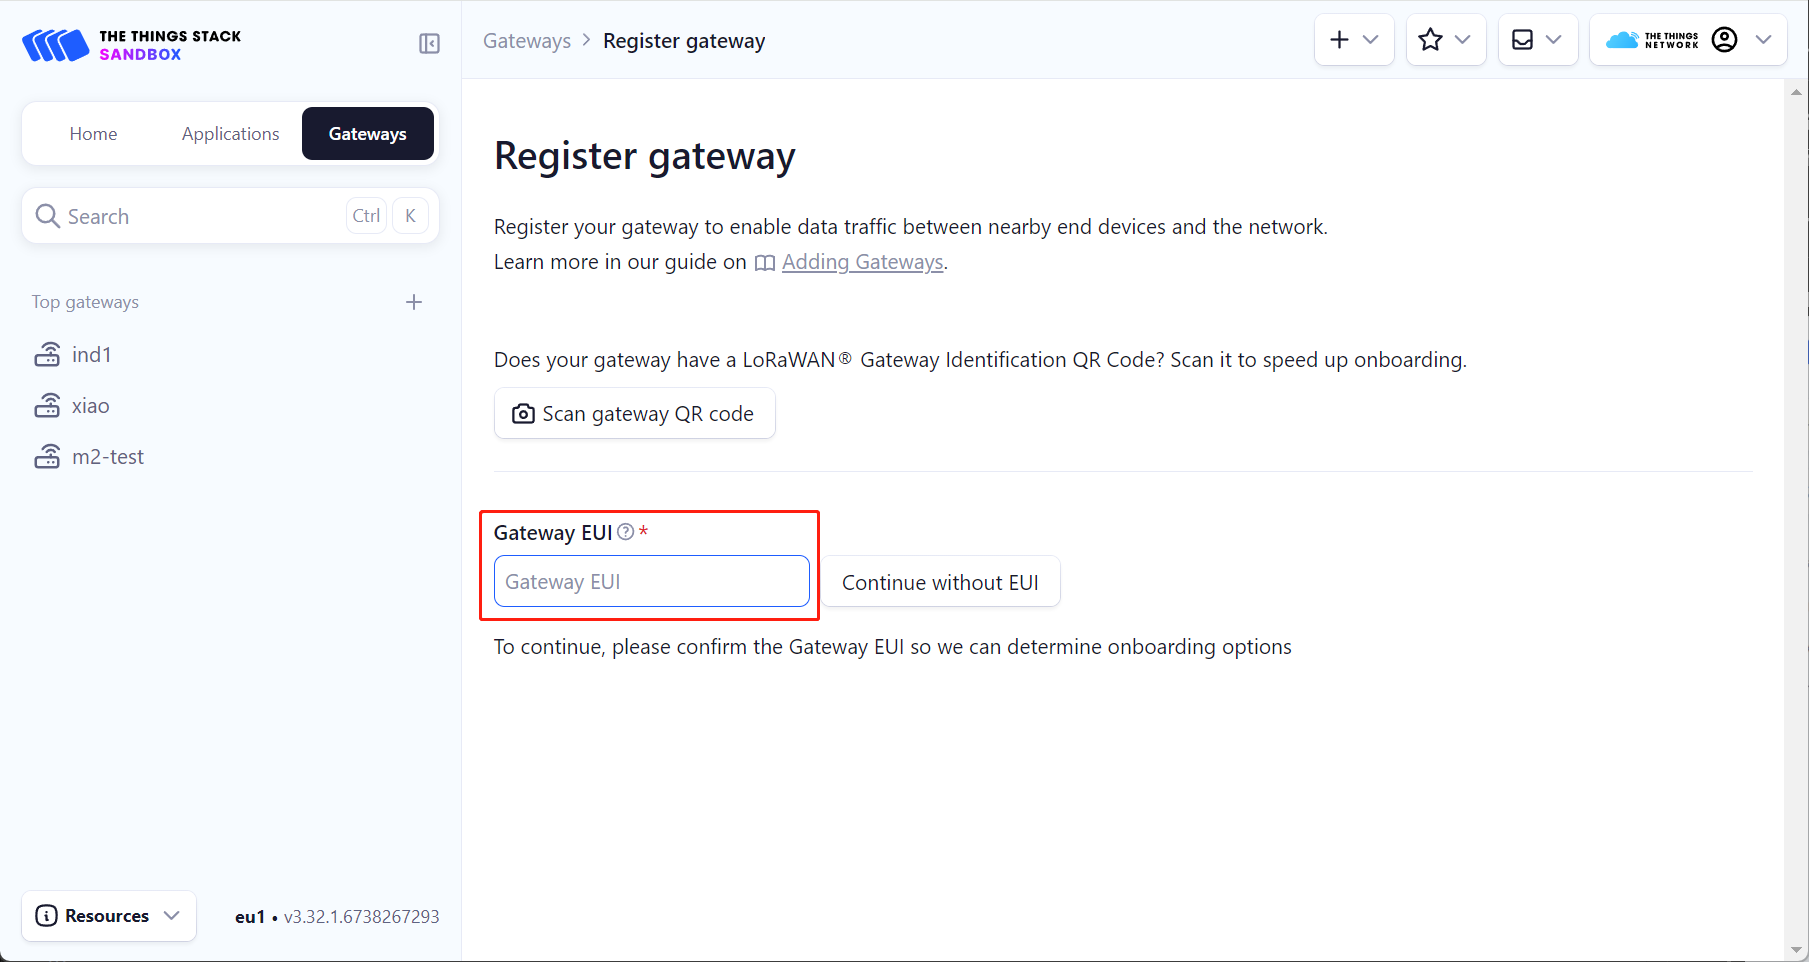
ステップ2: IndicatorのGateway IDをGateway EUIに入力します。
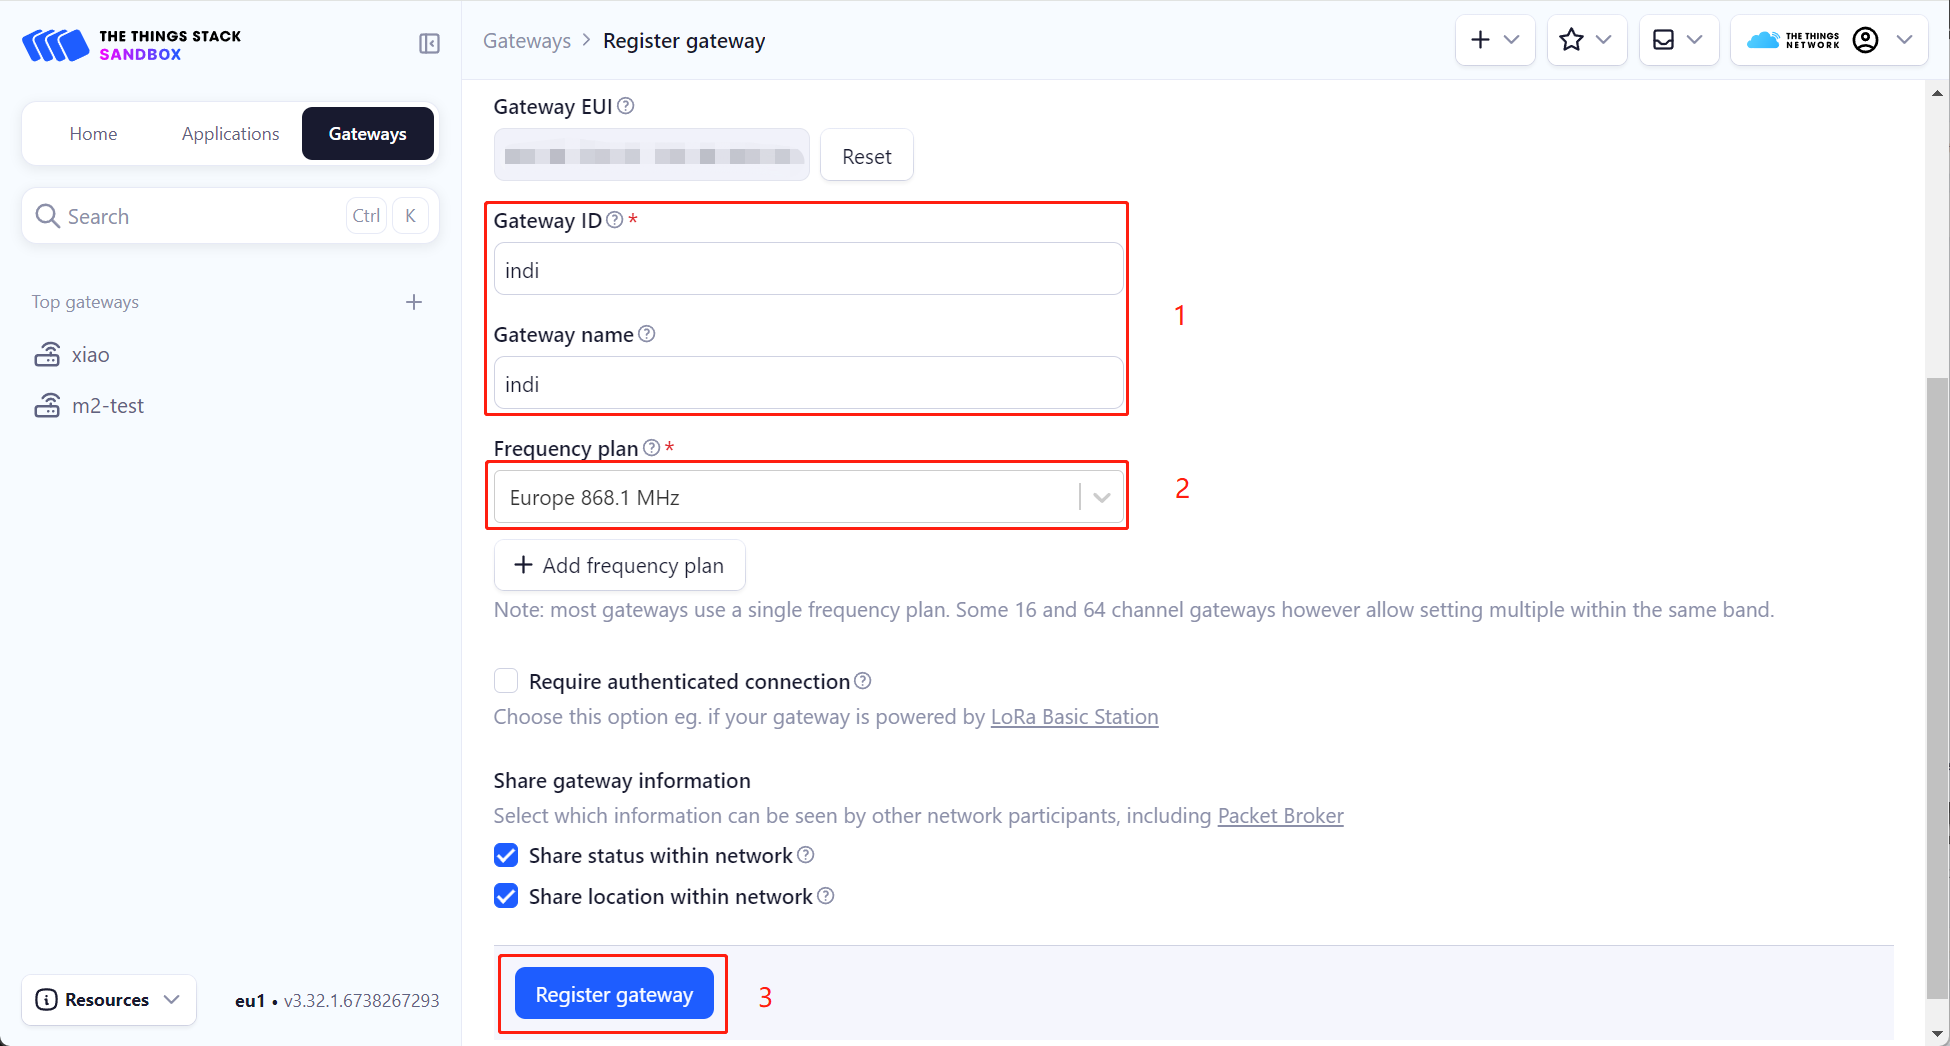
ステップ3: カスタムゲートウェイ名を入力した後、対応するFrequency plan(Indicatorの設定と一致する必要があります)を選択し、Register gatewayをクリックします。この時点で、IndicatorのシングルチャネルゲートウェイがTTNに追加されました。
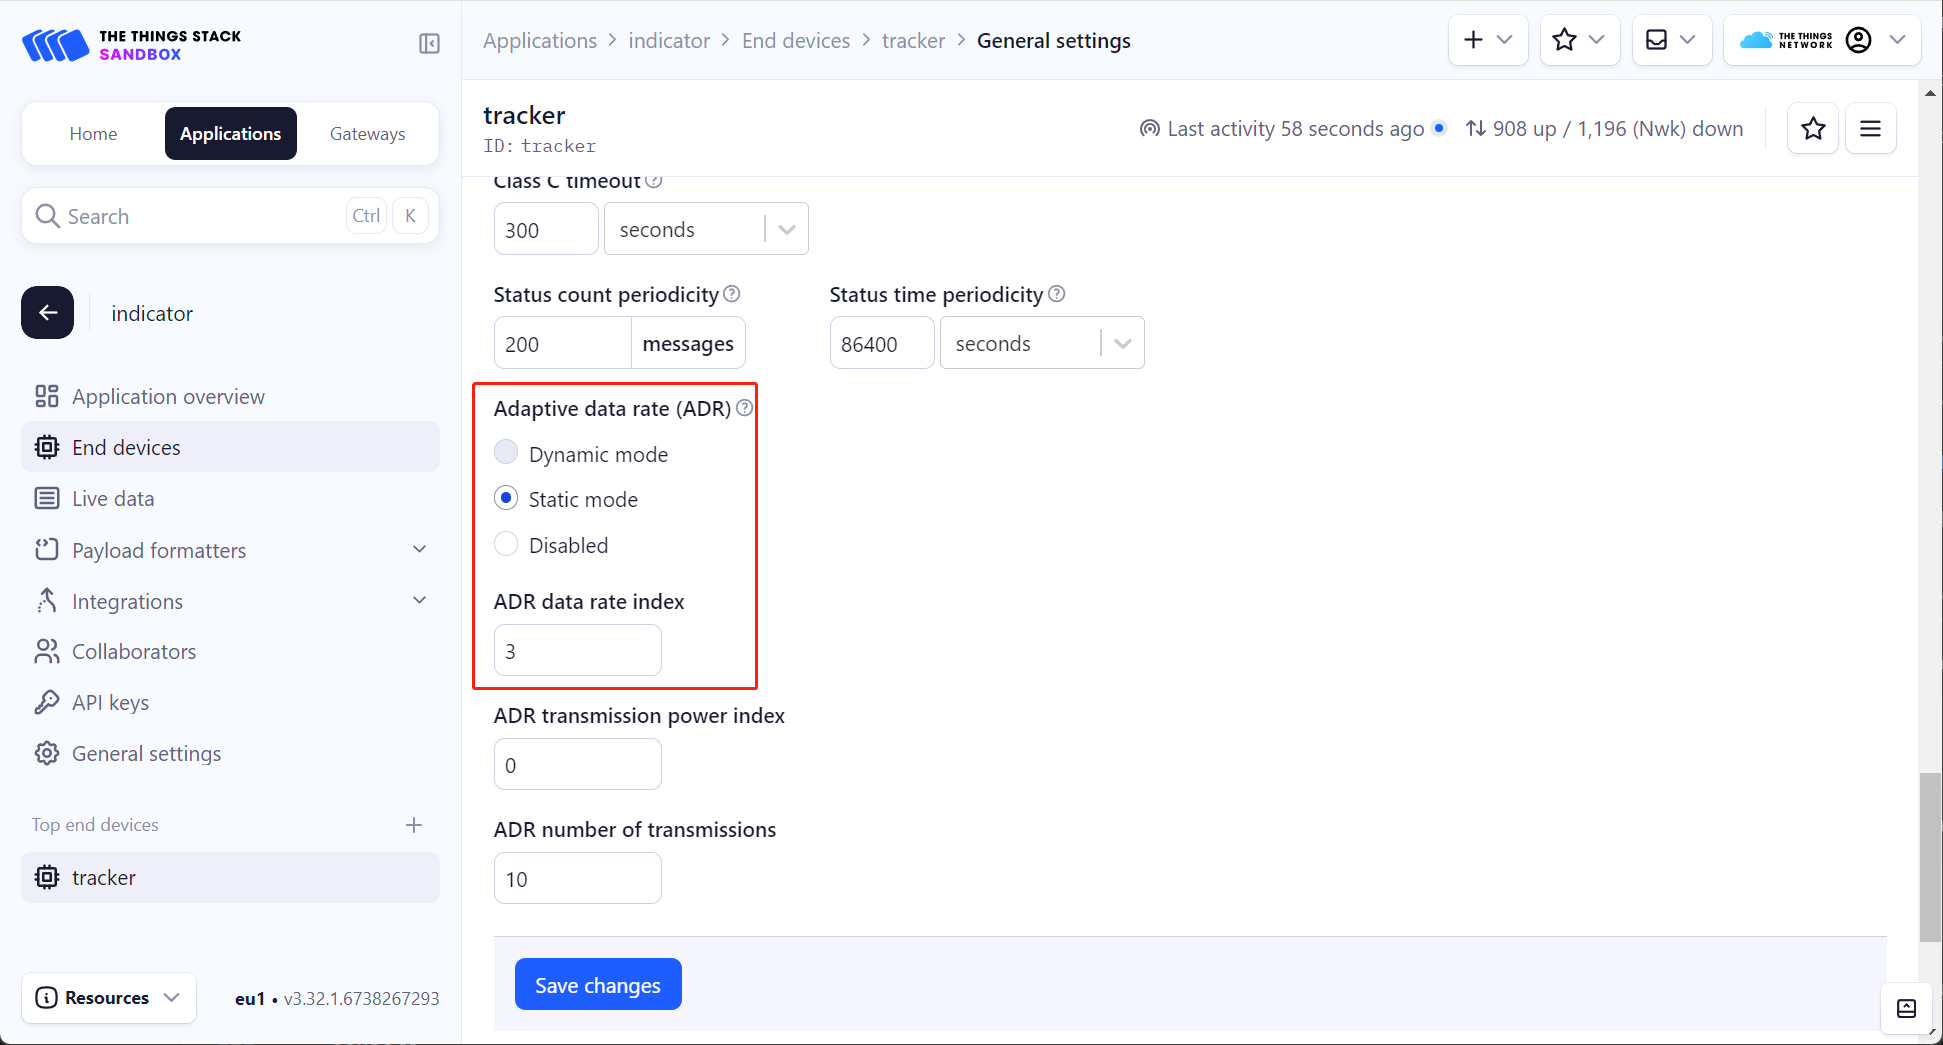
ステップ4: Indicatorシングルチャネルゲートウェイを追加した後、Applicationsをクリックしてデバイスを追加します。この例では、SenseCAP T1000 Trackerをノードデバイスとして使用します。詳細な接続手順については、Wiki: https://wiki.seeedstudio.com/SenseCAP_T1000_tracker_TTN/ を参照してください。End devices->General settings->Network layer->Advanced MAC settingsで、Adaptive data rate (ADR)をStatic modeに設定し、ADR data rate indexはIndicatorで設定されたspreading factorに応じて設定する必要があります。例えば、spreading factorが9に設定されている場合、ADR data rate indexは3に設定する必要があり、他の値についても同様です。
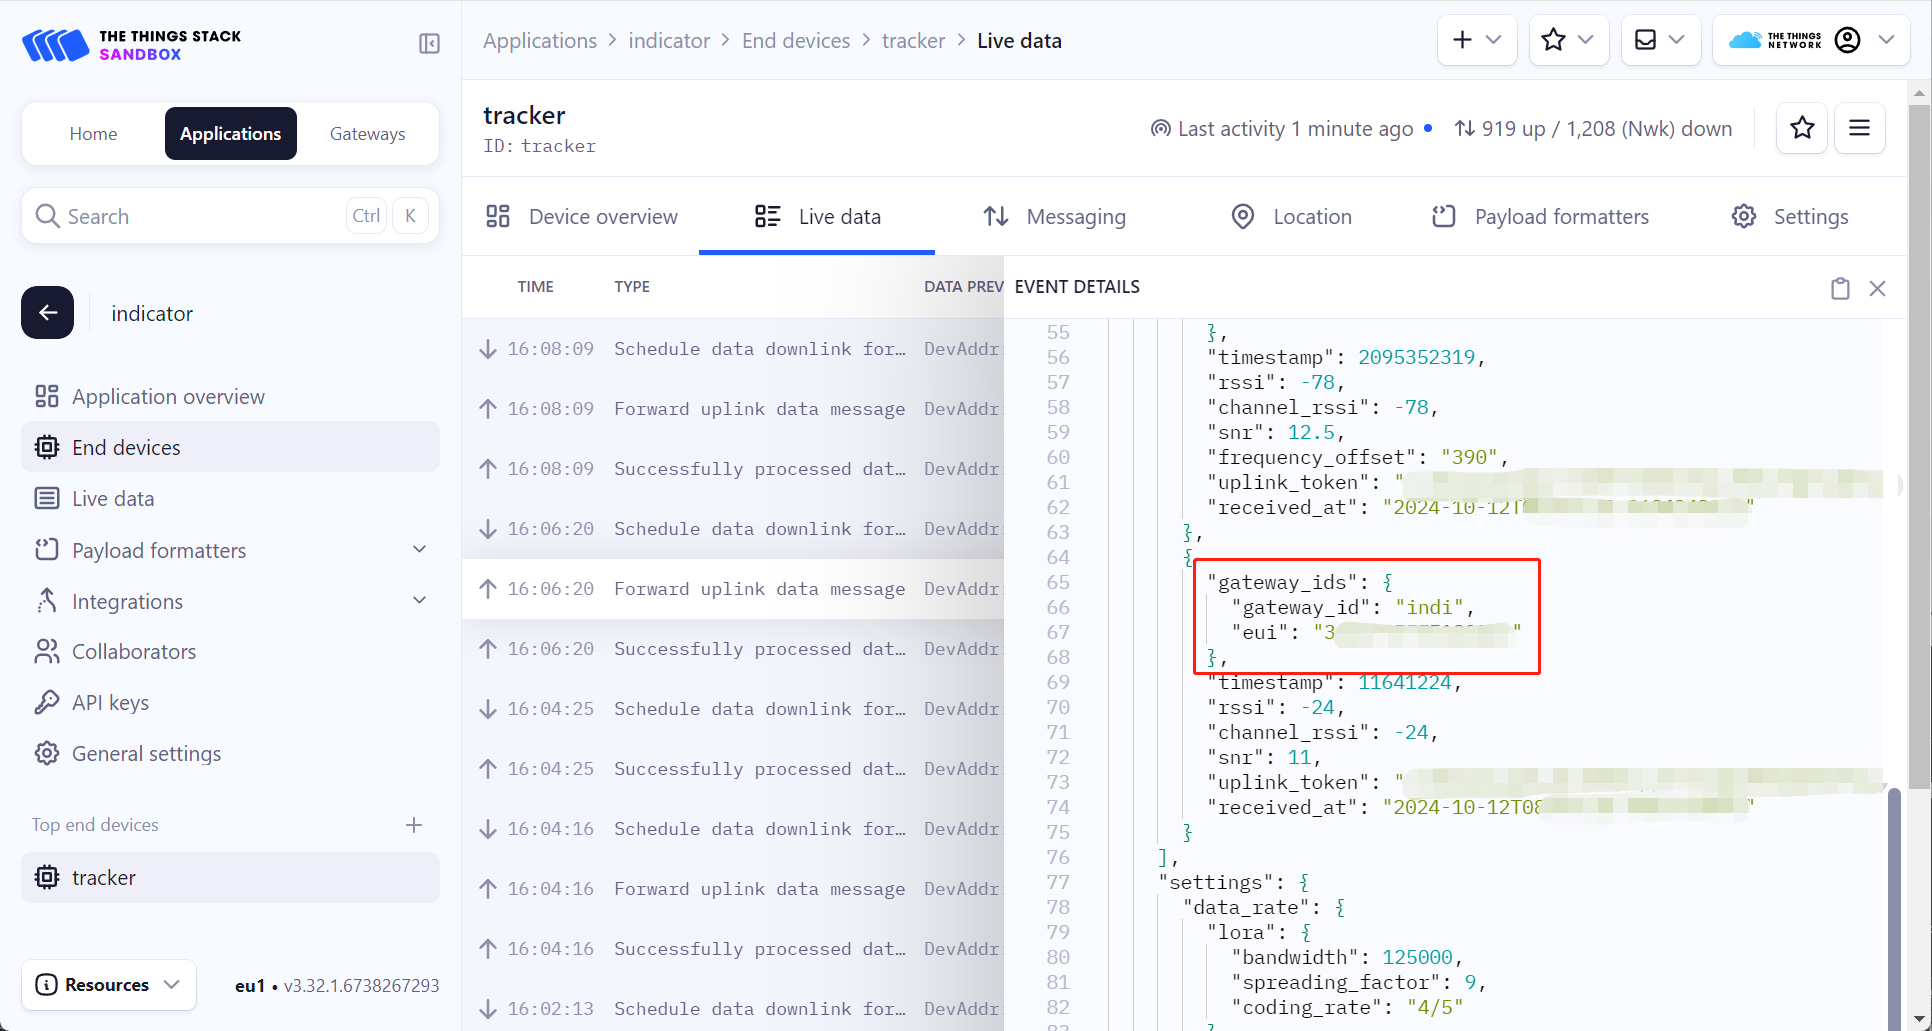
ステップ5: 以下に示すように、追加されたノードデバイスのLive dataでEVENT DETAILSを確認して関連ログを表示できます。ノードデバイスが新しく追加されたIndicatorシングルチャネルゲートウェイを通じてデータを報告していることがわかります。
ChirpStackへの接続
ステップ1: Setup ChirpStack on Ubuntu/Debianを参照してChirpStackをインストールします。
ステップ2: ChirpStackをインストールした後、/etc/chirpstackディレクトリにシングルチャネル地域定義を追加する必要があります。
このWikiでは、868.1Mhzチャネルを使用してEU868バンドの下にシングルチャネル定義を作成します。
region_eu868_1ch.toml
# This file contains an example EU868 configuration.
[[regions]]

  # ID is an user-defined identifier for this region.
  id="eu868_1ch"

  # Description is a short description for this region.
  description="EU868_1CH"

  # Common-name refers to the common-name of this region as defined by
  # the LoRa Alliance.
  common_name="EU868"


  # Gateway configuration.
  [regions.gateway]

    # Force gateways as private.
    #
    # If enabled, gateways can only be used by devices under the same tenant.
    force_gws_private=false


    # Gateway backend configuration.
    [regions.gateway.backend]

      # The enabled backend type.
      enabled="mqtt"

      # MQTT configuration.
      [regions.gateway.backend.mqtt]

        # Topic prefix.
        #
        # The topic prefix can be used to define the region of the gateway.
        # Note, there is no need to add a trailing '/' to the prefix. The trailing
        # '/' is automatically added to the prefix if it is configured.
        topic_prefix="eu868"

        # MQTT server (e.g. scheme://host:port where scheme is tcp, ssl or ws)
        server="tcp://$MQTT_BROKER_HOST:1883"

        # Connect with the given username (optional)
        username=""

        # Connect with the given password (optional)
        password=""

        # Quality of service level
        #
        # 0: at most once
        # 1: at least once
        # 2: exactly once
        #
        # Note: an increase of this value will decrease the performance.
        # For more information: https://www.hivemq.com/blog/mqtt-essentials-part-6-mqtt-quality-of-service-levels
        qos=0

        # Clean session
        #
        # Set the "clean session" flag in the connect message when this client
        # connects to an MQTT broker. By setting this flag you are indicating
        # that no messages saved by the broker for this client should be delivered.
        clean_session=false

        # Client ID
        #
        # Set the client id to be used by this client when connecting to the MQTT
        # broker. A client id must be no longer than 23 characters. If left blank,
        # a random id will be generated by ChirpStack.
        client_id=""

        # Keep alive interval.
        #
        # This defines the maximum time that that should pass without communication
        # between the client and server.
        keep_alive_interval="30s"

        # CA certificate file (optional)
        #
        # Use this when setting up a secure connection (when server uses ssl://...)
        # but the certificate used by the server is not trusted by any CA certificate
        # on the server (e.g. when self generated).
        ca_cert=""

        # TLS certificate file (optional)
        tls_cert=""

        # TLS key file (optional)
        tls_key=""

  # Region specific network configuration.
  [regions.network]

    # Installation margin (dB) used by the ADR engine.
    #
    # A higher number means that the network-server will keep more margin,
    # resulting in a lower data-rate but decreasing the chance that the
    # device gets disconnected because it is unable to reach one of the
    # surrounded gateways.
    installation_margin=10

    # RX window (Class-A).
    #
    # Set this to:
    # 0: RX1 / RX2
    # 1: RX1 only
    # 2: RX2 only
    rx_window=0

    # RX1 delay (1 - 15 seconds).
    rx1_delay=1

    # RX1 data-rate offset
    rx1_dr_offset=0

    # RX2 data-rate
    rx2_dr=0

    # RX2 frequency (Hz)
    rx2_frequency=869525000

    # Prefer RX2 on RX1 data-rate less than.
    #
    # Prefer RX2 over RX1 based on the RX1 data-rate. When the RX1 data-rate
    # is smaller than the configured value, then the Network Server will
    # first try to schedule the downlink for RX2, failing that (e.g. the gateway
    # has already a payload scheduled at the RX2 timing) it will try RX1.
    rx2_prefer_on_rx1_dr_lt=0

    # Prefer RX2 on link budget.
    #
    # When the link-budget is better for RX2 than for RX1, the Network Server will first
    # try to schedule the downlink in RX2, failing that it will try RX1.
    rx2_prefer_on_link_budget=false

    # Downlink TX Power (dBm)
    #
    # When set to -1, the downlink TX Power from the configured band will
    # be used.
    #
    # Please consult the LoRaWAN Regional Parameters and local regulations
    # for valid and legal options. Note that the configured TX Power must be
    # supported by your gateway(s).
    downlink_tx_power=-1

    # ADR is disabled.
    adr_disabled=true

    # Minimum data-rate.
    min_dr=5

    # Maximum data-rate.
    max_dr=5

    # Add the following after min_dr/max_dr configuration
    enabled_uplink_channels=[0]
単一チャネル地域をカスタマイズすることもできます。詳細は LoRaWAN theory for the One-Channle Hub を参照してください。
ステップ 3: /etc/chirpstack/chirpstack.toml を修正して、新しく定義した地域を有効にします。
enabled_regions={
  ...,
  "eu868_1ch",
  ...,
}
ステップ 4: ChirpStackのコンソールにログインし、シングルチャンネルゲートウェイを追加します。
ゲートウェイを追加する前に、シングルチャンネル地域が正常に有効化されていることを確認してください。

シングルチャンネル地域が正常に有効化されている場合、シングルチャンネルゲートウェイをChirpStackに追加します。

ステップ 5: LoRa Gatewayページでパラメータを設定し、アドレスをChirpStackサーバーのアドレスに設定し、configureをクリックしてからrebootをクリックします。
再起動後、ChirpStackのコンソールでステータスがオンラインに変わることが確認できます。

ステップ 6: シングルチャンネルゲートウェイと同じデータレートを使用することで、エンドデバイスの接続時間を最適化できます。
シングルチャンネルゲートウェイの設定SF7 BW125を参考に、T1000-AのデータレートをDR5に調整します。

T1000-Aのデータレートを設定した後、そのためのデバイスプロファイルを作成する必要があります。
地域にはEU868を選択し、地域設定にはEU868_1CHを選択します。

下図に示すように、T1000-Aがシングルチャンネルゲートウェイを通じてChirpStackにデータを正常にアップロードしていることが確認できます。

リソース
技術サポート & 製品ディスカッション
弊社製品をお選びいただき、ありがとうございます!弊社製品での体験が可能な限りスムーズになるよう、さまざまなサポートを提供しています。さまざまな好みやニーズに対応するため、複数のコミュニケーションチャンネルを提供しています。