Wio TerminalでWeb Bluetooth APIsを使用する
これは、Wio TerminalのBluetooth機能をWeb Bluetooth APIsと連携させるためのWikiです。Web Bluetooth APIsは、ウェブブラウザ上でBluetoothデバイスとやり取りする機能を提供します。
Web Bluetooth APIとは
これまで、Bluetoothデバイスとのやり取りはネイティブアプリでのみ可能でした。Web Bluetooth APIはこれを変え、ウェブブラウザでも可能にすることを目指しています。Physical Webのような取り組みとともに、人々はウェブから直接デバイスに近づき、やり取りすることができます。ウェブアプリから制御されるドローンの動画をチェックして、その仕組みを理解してください。
Web Bluetoothの簡単な例
以下の例では、Wio Terminalをセットアップし、簡単なHTMLサイトを使用してWeb Bluetooth APIをWio TerminalのBluetoothと連携させる方法を示します。
Arduinoのセットアップ
-
Wio Terminal Bluetooth Overviewに従って、BluetoothファームウェアをWio Terminalにフラッシュし、必要なライブラリをダウンロードしてください。
-
以下のコードをコピーしてWio Terminalにアップロードしてください:
#include <rpcBLEDevice.h>
#include <BLEServer.h>
#include <BLE2902.h>

bool _BLEClientConnected = false;
uint8_t level = 10;

#define BatteryService BLEUUID((uint16_t)0x180F)
BLECharacteristic BatteryLevelCharacteristic(BLEUUID((uint16_t)0x2A19), BLECharacteristic::PROPERTY_READ  | BLECharacteristic::PROPERTY_WRITE  | BLECharacteristic::PROPERTY_NOTIFY);

class MyServerCallbacks : public BLEServerCallbacks {
    void onConnect(BLEServer* pServer) {
      _BLEClientConnected = true;
    };

    void onDisconnect(BLEServer* pServer) {
      _BLEClientConnected = false;
    }
};

/* ###############################################################  スマートフォンからデータを受信するコールバック */
#define CHARACTERISTIC_UUID_RX "6E400002-B5A3-F393-E0A9-E50E24DCCA9E"

class MyCallbacks: public BLECharacteristicCallbacks {

    void onWrite(BLECharacteristic *pCharacteristic) {
      std::string rxValue = pCharacteristic->getValue();
      Serial.println(rxValue[0]);

      if (rxValue.length() > 0) {
        Serial.println("*********");
        Serial.print("受信した値: ");

        for (int i = 0; i < rxValue.length(); i++) {
          Serial.print(rxValue[i]);
        }
        Serial.println();
        Serial.println("*********");
      }

    }
};

/* ############################################################### */
void initBLE() {
  BLEDevice::init("BLE Battery");
  // BLEサーバーを作成
  BLEServer *pServer = BLEDevice::createServer();
  pServer->setCallbacks(new MyServerCallbacks());

  // BLEサービスを作成
  BLEService *pBattery = pServer->createService(BatteryService);

  pBattery->addCharacteristic(&BatteryLevelCharacteristic);
  BatteryLevelCharacteristic.addDescriptor(new BLE2902());


  /* ###############################################################  コールバックを定義 */
  BLECharacteristic *pWriteCharacteristic = pBattery->createCharacteristic(
                                         CHARACTERISTIC_UUID_RX,
                                         BLECharacteristic::PROPERTY_WRITE
                                       );
  pWriteCharacteristic->setAccessPermissions(GATT_PERM_READ | GATT_PERM_WRITE);

  pWriteCharacteristic->setCallbacks(new MyCallbacks());
  /* ############################################################### */

  pServer->getAdvertising()->addServiceUUID(BatteryService);

  pBattery->start();
  // 広告を開始
  pServer->getAdvertising()->start();
}

void setup() {
  Serial.begin(115200);
//   while(!Serial);
  Serial.println("--- Wio Terminal BLEバッテリーレベルインジケーター ---");
  initBLE();
}

void loop() {

  BatteryLevelCharacteristic.setValue(&level, 1);
  BatteryLevelCharacteristic.notify();
  delay(3000);

  level++;
  Serial.print("バッテリーレベル: ");
  Serial.println(int(level));

  if (int(level)==100)
    level=0;
}
上記のコードは、Wio TerminalをBluetoothの発見可能な名前**BLE Battery**として設定し、Bluetoothサーバーとして動作させ、バッテリーBLEサービスを確立します。これは重要であり、後でWeb Bluetooth APIs HTMLサイトと一致させる必要があります。
Web Bluetooth API HTMLウェブサイト
Wio Terminalのセットアップが完了したら、Web Bluetooth APIsを使用してやり取りするためのHTMLサイトを作成する必要があります。以下を参考にしてください:
-
webbluetooth.htmlをここからダウンロードしてください。 -
最新のGoogle ChromeまたはMicrosoft Edge(Web Bluetooth APIsをサポートしている)で
webbluetooth.htmlを開きます。 -
サイト上で右クリックし、検証(macOSではCMD+OPT+I、WindowsではCtrl+Shift+I)を選択し、コンソールを選択します:
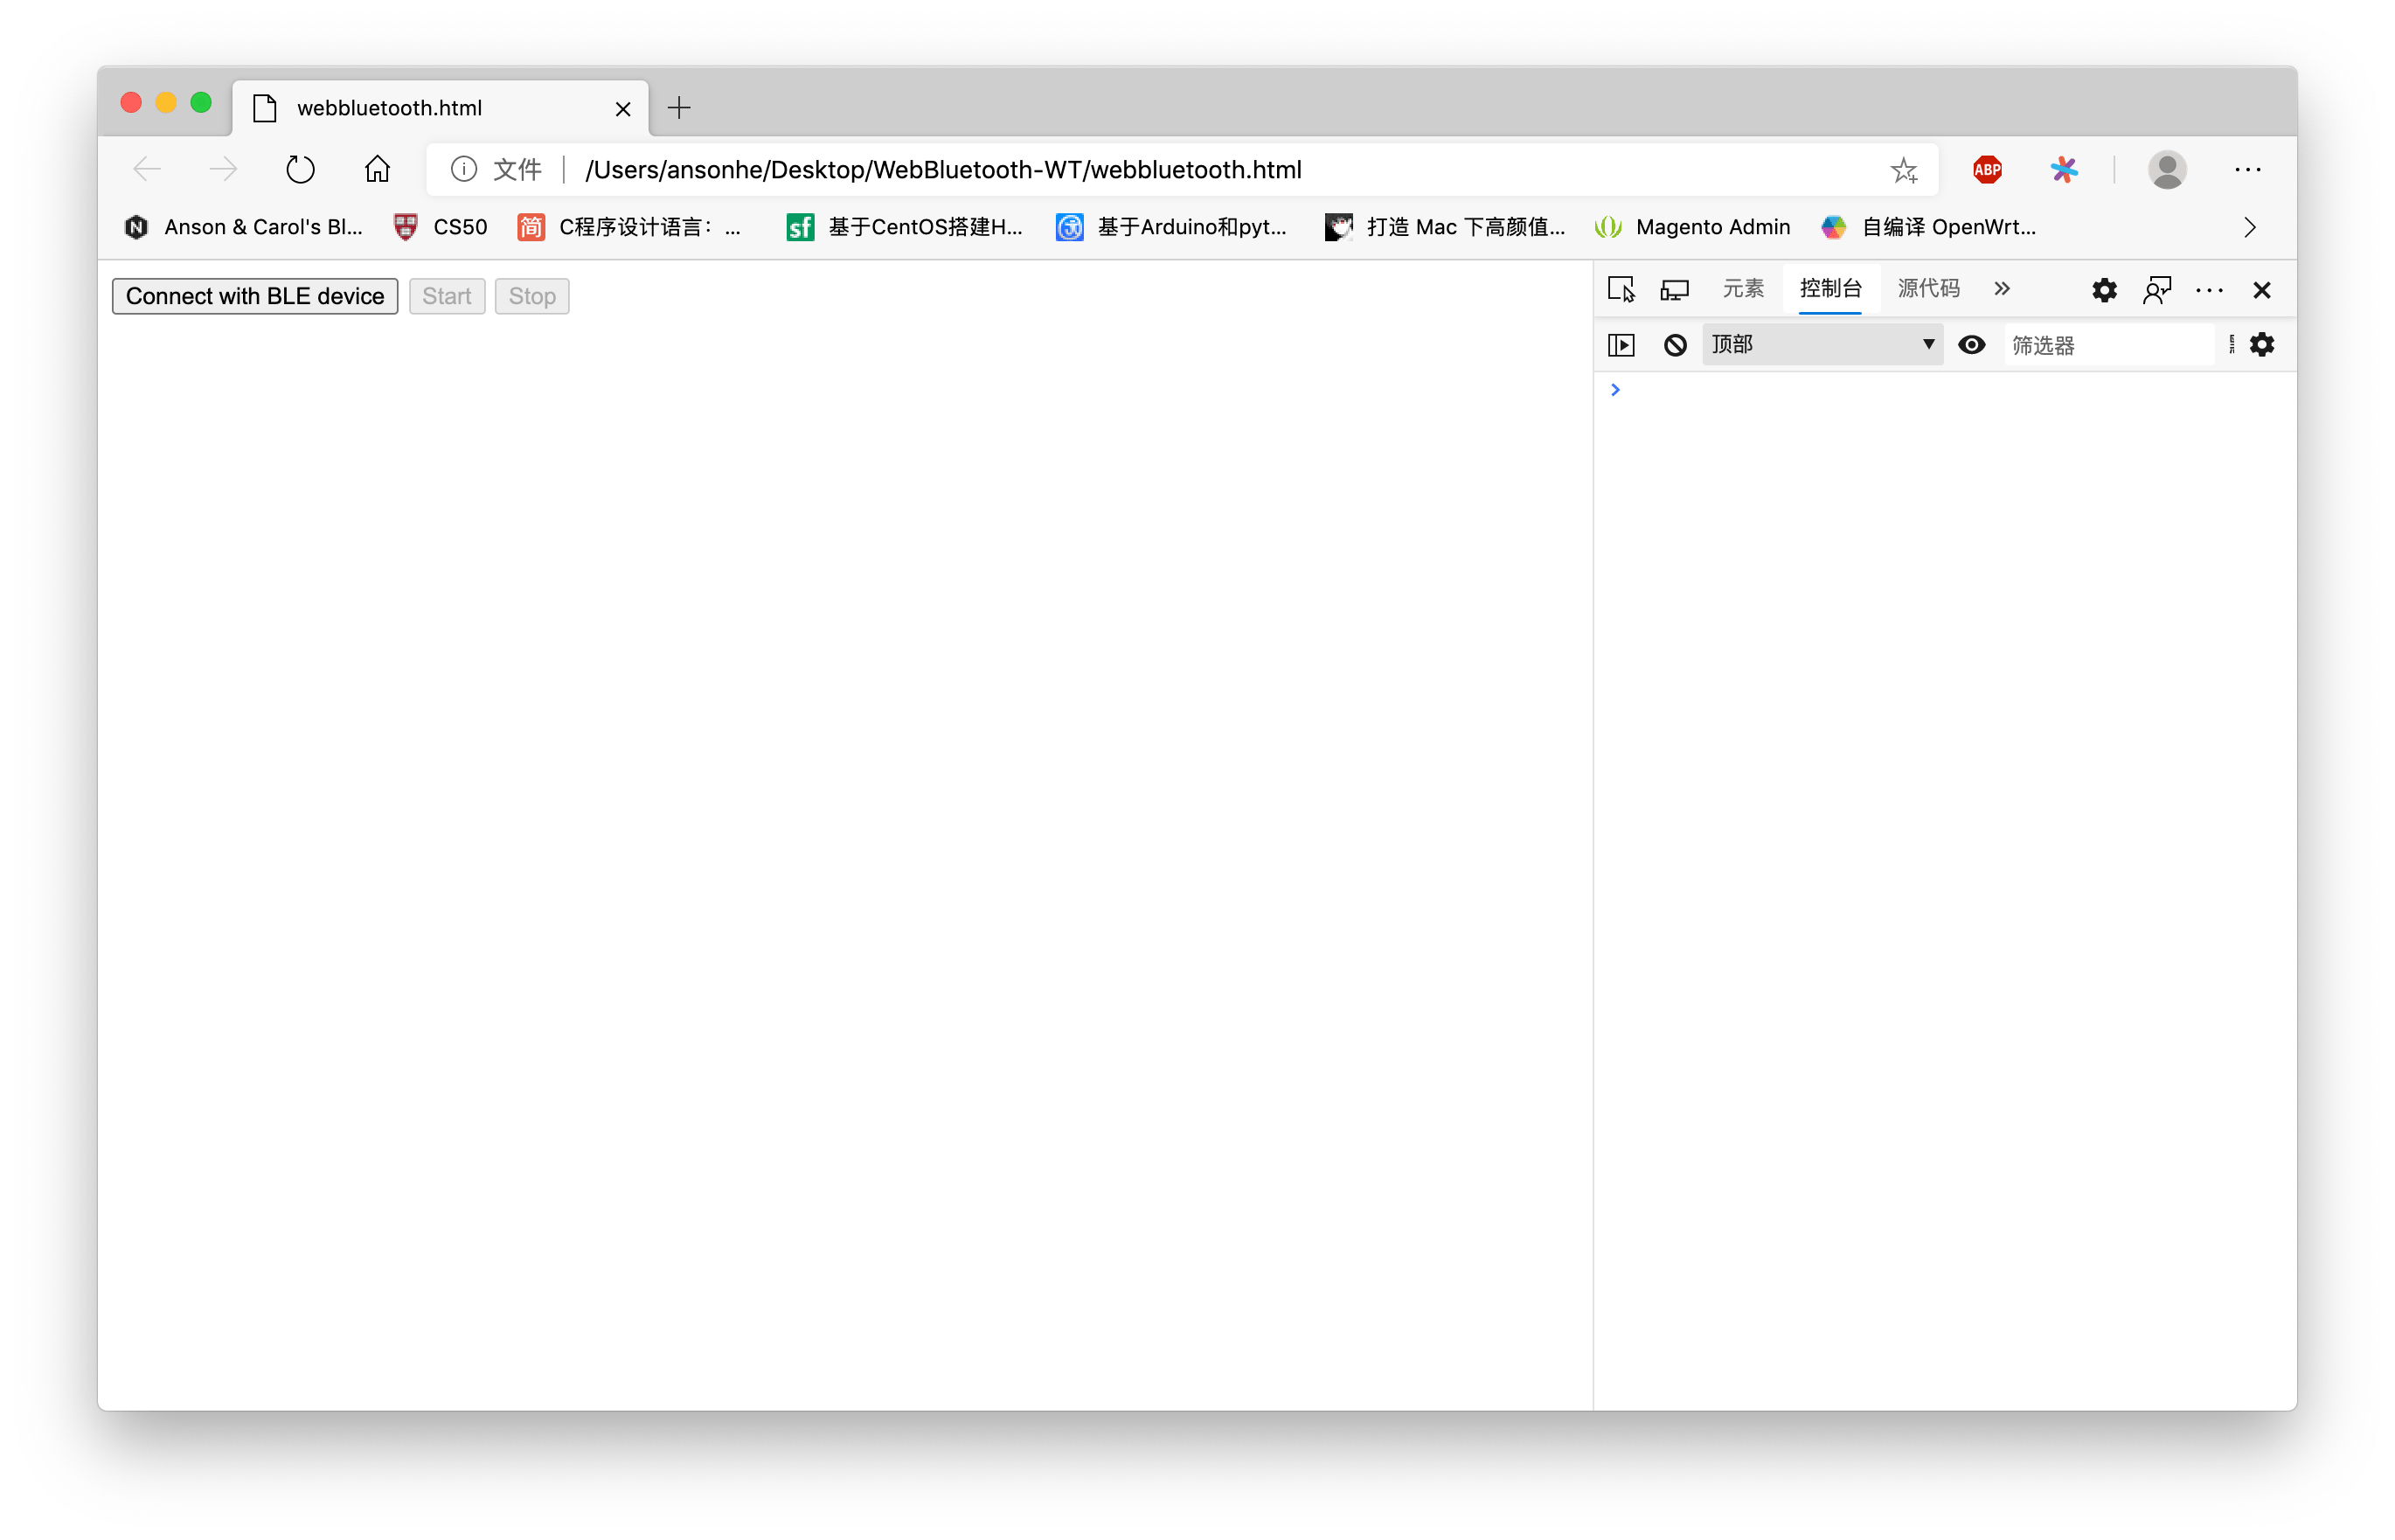
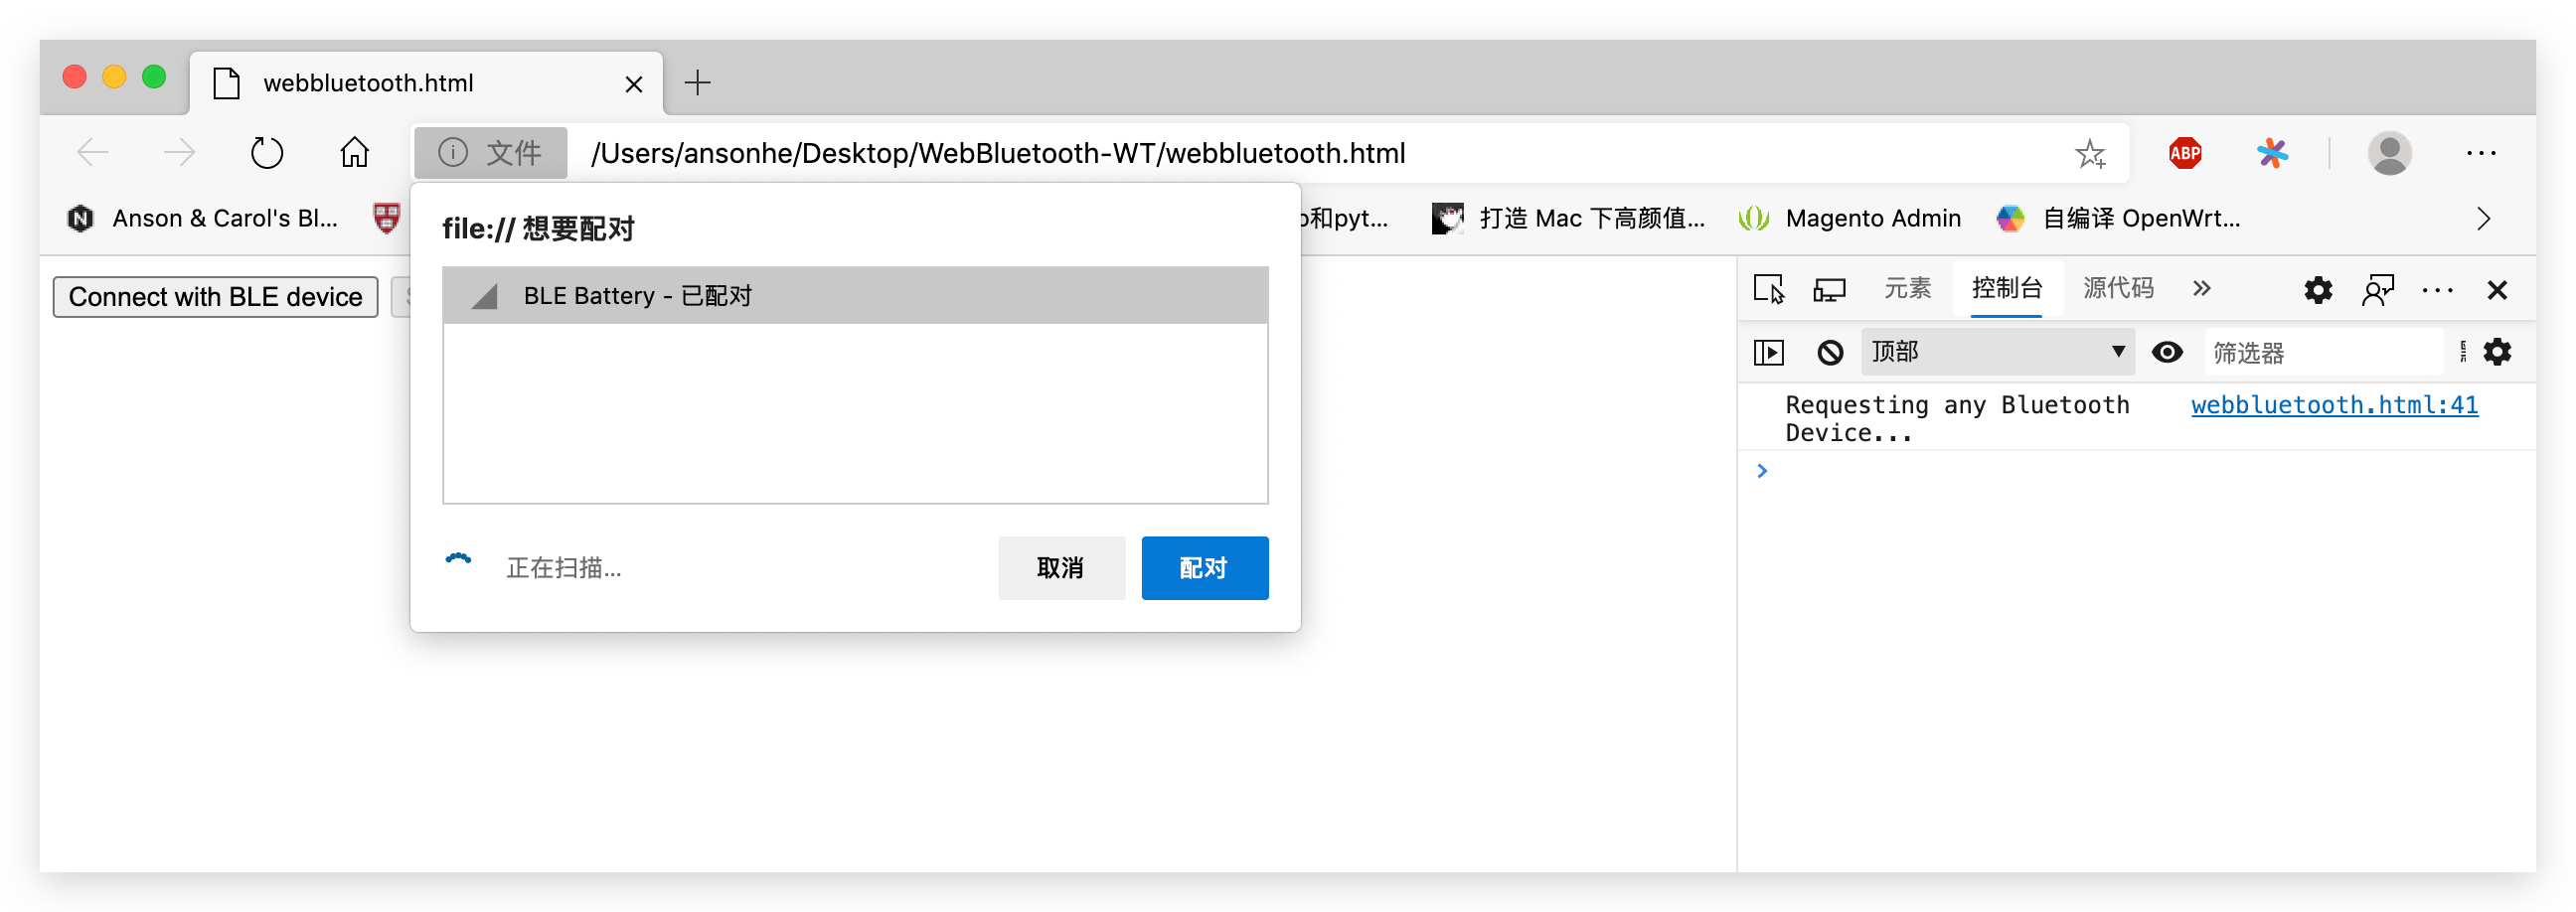
- サイト上のConnect with BLE deviceボタンをクリックします。接続ウィンドウに
BLE Battery(Wio Terminal)が表示されるはずです。Connectをクリックしてください。
注意: Web Bluetooth APIsは実際には近くのすべてのBLEデバイスを検出しますが、ここでは
BLE Batteryという名前のBLEデバイスに限定するフィルターを使用しています。
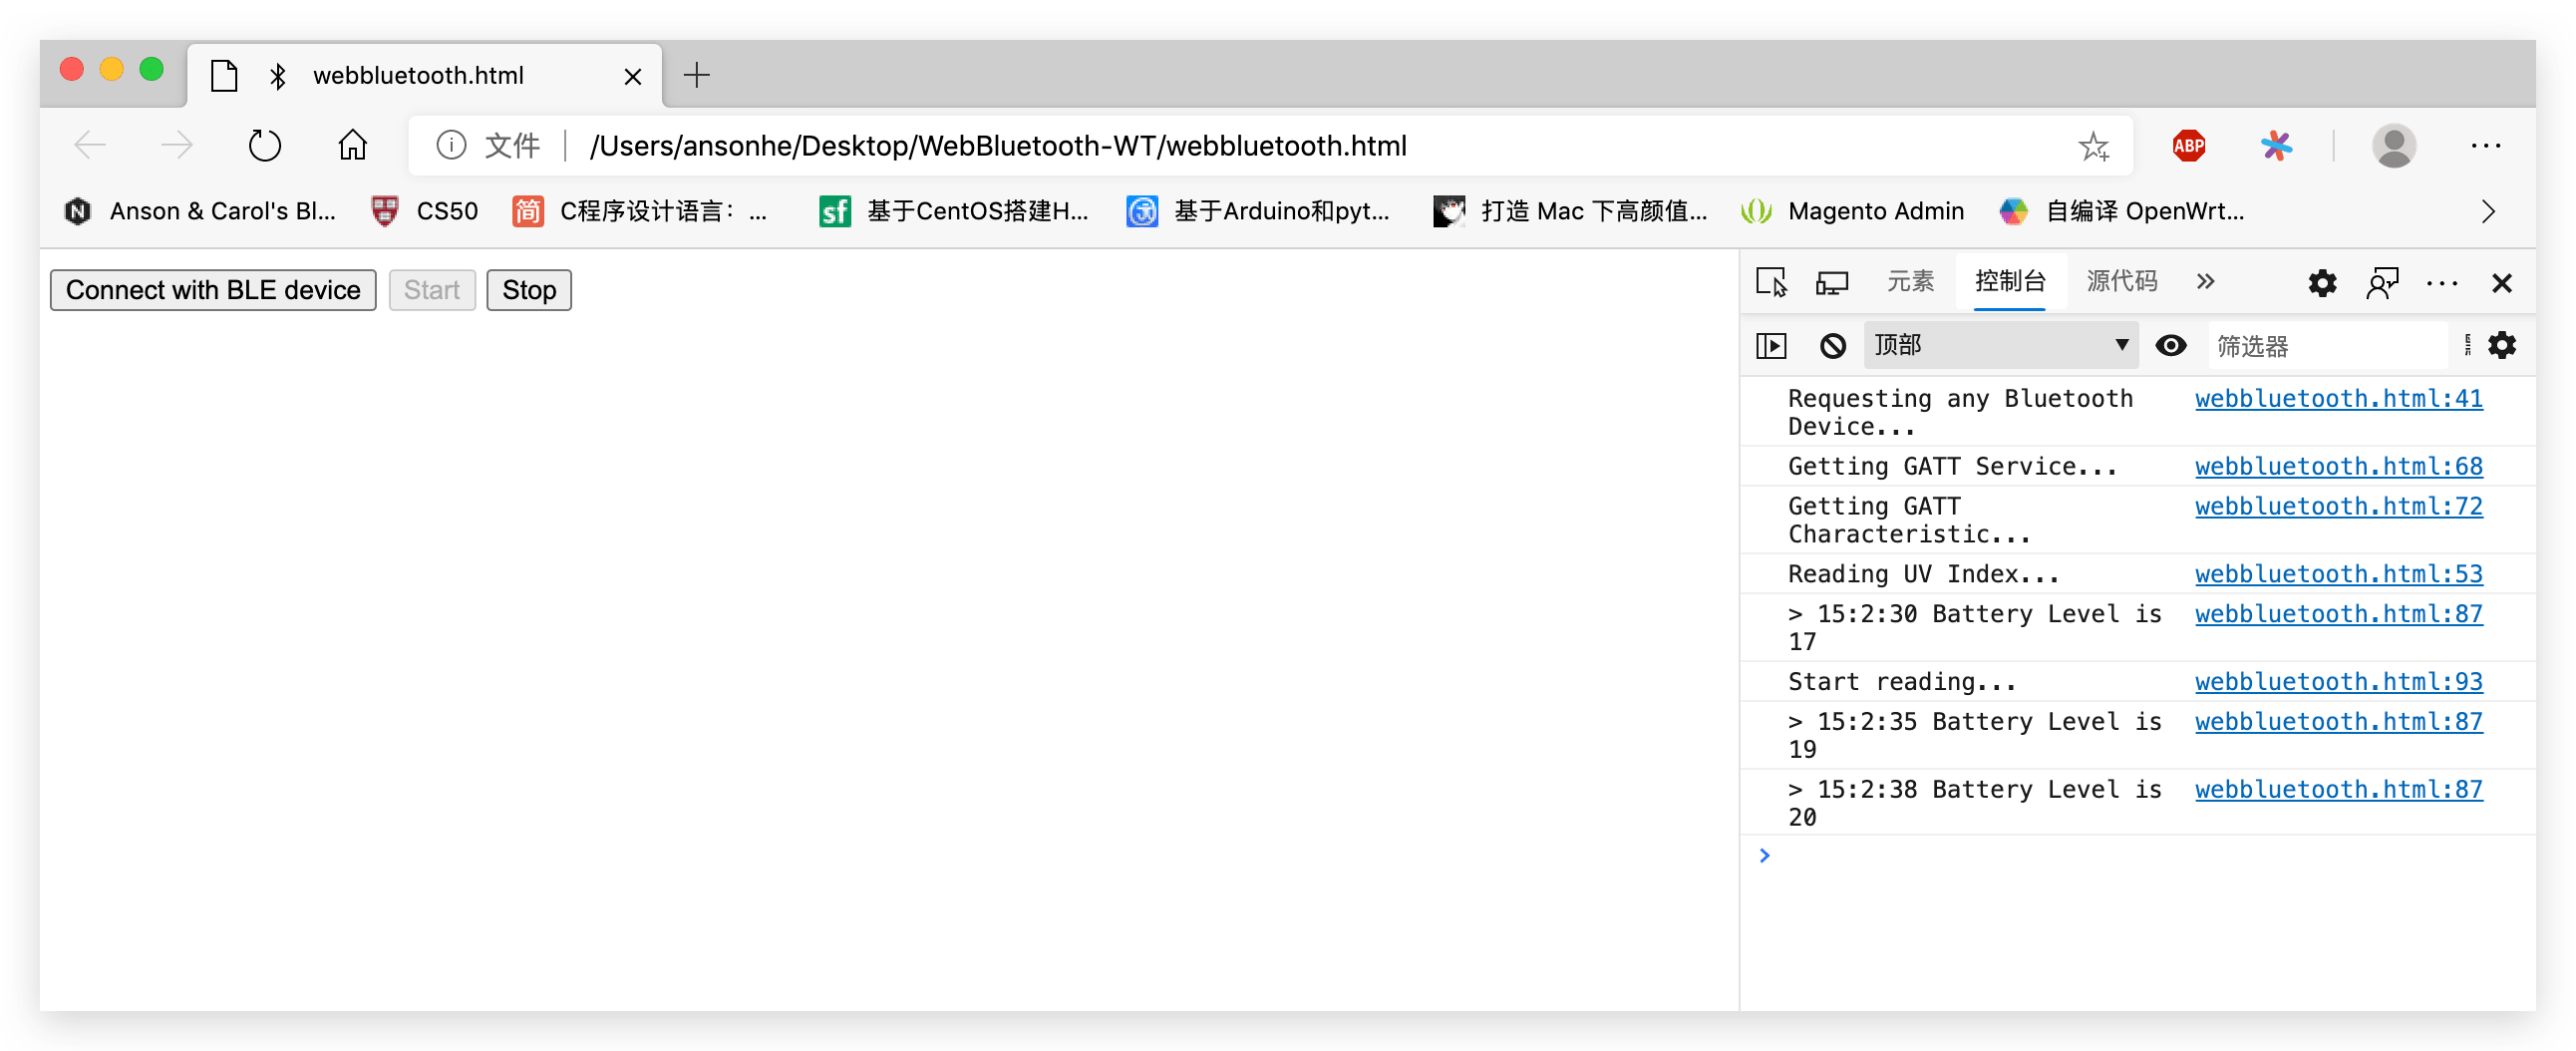
- サイト上でStartボタンをクリックすると、Wio Terminalから送信されるバッテリー情報データの受信が開始されます!
Web Bluetooth API サイトコンソール:
Arduino シリアルモニター制御コンソール:
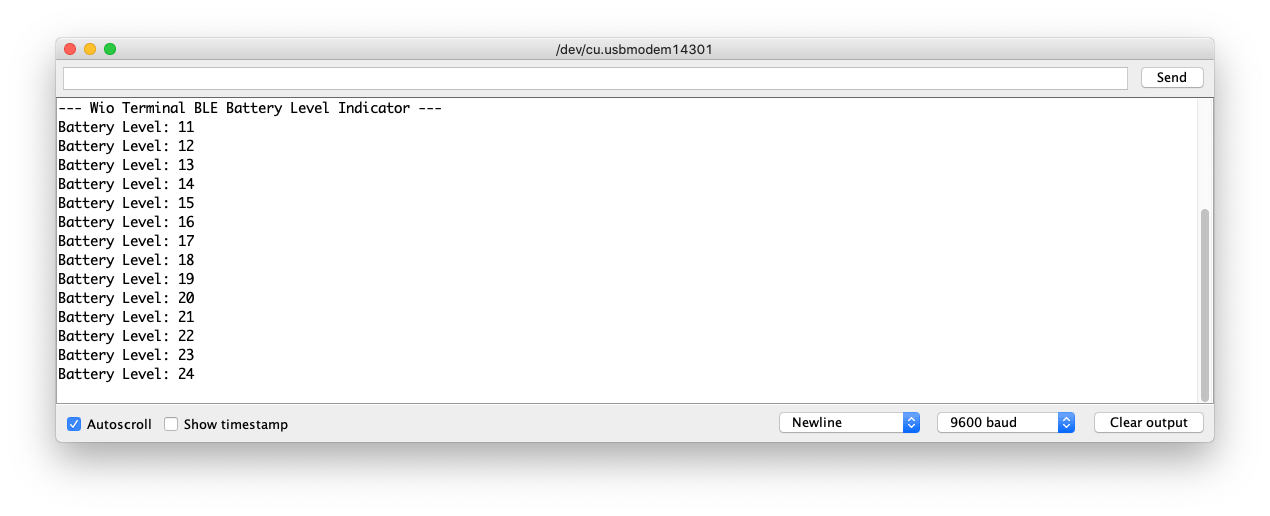
- これでWio TerminalがWeb Bluetooth APIを使用してサイトと連携しています!これにより、BLE機能がさらに興味深いものとなり、Webブラウザを通じて情報を送信できるようになります!
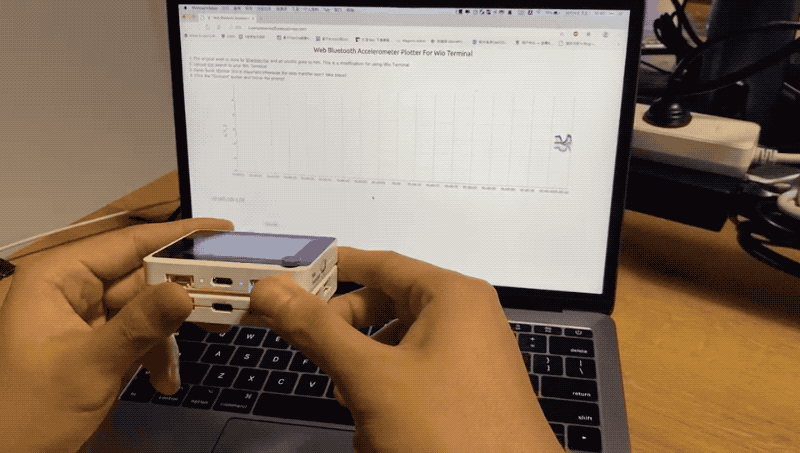
Web Bluetooth APIを使用してウェブサイトで加速度データを可視化する
以下は、Web Bluetooth APIを使用したウェブサイトの良い例です。この例では、Wio TerminalをWeb Bluetoothで接続し、オンボードの加速度データを可視化します。
Arduino セットアップ
-
以下の手順を実行する前に、Wio Terminalの加速度センサー概要を確認してください。
-
WebBluetooth-Accelerator.inoの例をダウンロードするか、以下のコードをArduino IDEにコピーしてください。
#include <rpcBLEDevice.h>
#include <BLEServer.h>
#include <LIS3DHTR.h>

#define accelerometerService "19b10000-e8f2-537e-4f6c-d104768a1214"
#define firstCharacteristic  "19b10010-e8f2-537e-4f6c-d104768a1214"
#define DESCRIPTOR_UUID      "19b10010"

LIS3DHTR<TwoWire> lis;

bool deviceConnected = false;
bool oldDeviceConnected = false;

BLEServer *pServer = NULL;
BLECharacteristic * pCharacteristic;

class MyServerCallbacks: public BLEServerCallbacks {
    void onConnect(BLEServer* pServer) {
      Serial.println("MyServerCallbacks onConnect ");
      deviceConnected = true;
    };

    void onDisconnect(BLEServer* pServer) {
      deviceConnected = false;
    }
};

class MyCallbacks: public BLECharacteristicCallbacks {
    void onWrite(BLECharacteristic *pCharacteristic) {
      std::string rxValue = pCharacteristic->getValue();

      if (rxValue.length() > 0) {
        Serial.println("*********");
        Serial.print("Received Value: ");
        for (int i = 0; i < rxValue.length(); i++)
          Serial.print(rxValue[i]);

        Serial.println();
        Serial.println("*********");
      }
    }
};

void setup() {
  Serial.begin(115200);
//  while(!Serial){};

  lis.begin(Wire1);
  if (!lis) {
    Serial.println("Accelerater Error!");
    while(1);
  }
  lis.setOutputDataRate(LIS3DHTR_DATARATE_25HZ); //データ出力レート
  lis.setFullScaleRange(LIS3DHTR_RANGE_2G); //スケール範囲を2gに設定
  Serial.println("Accelerater Initialised!");

  Serial.println("Starting BLE work!");

  BLEDevice::init("Accelerometer");
  pServer = BLEDevice::createServer();
  pServer->setCallbacks(new MyServerCallbacks());

  BLEService *pService = pServer->createService(accelerometerService);
  pCharacteristic = pService->createCharacteristic(
                                         firstCharacteristic,
                                         BLECharacteristic::PROPERTY_READ |
                                         BLECharacteristic::PROPERTY_WRITE
                                       );
  pCharacteristic->setAccessPermissions(GATT_PERM_READ | GATT_PERM_WRITE);
  BLEDescriptor *pDescriptor = pCharacteristic->createDescriptor(
                                         DESCRIPTOR_UUID,
                                          ATTRIB_FLAG_VOID | ATTRIB_FLAG_ASCII_Z,
                                         GATT_PERM_READ | GATT_PERM_WRITE,
                                         2
                                         );
  pCharacteristic->setCallbacks(new MyCallbacks());
  pService->start();

  BLEAdvertising *pAdvertising = BLEDevice::getAdvertising();
  pAdvertising->addServiceUUID(accelerometerService);
  pAdvertising->setScanResponse(true);
  pAdvertising->setMinPreferred(0x06);  // iPhone接続問題を解決する機能
  pAdvertising->setMinPreferred(0x12);
  BLEDevice::startAdvertising();
  Serial.println("Characteristic defined! Now you can read it in your phone!");
}

void loop() {
  if (deviceConnected) {
    updateAcceleration();
  }
      // 切断処理
    if (!deviceConnected && oldDeviceConnected) {
        delay(500); // Bluetoothスタックが準備する時間を与える
        pServer->startAdvertising(); // 広告を再開
        Serial.println("start advertising");
        oldDeviceConnected = deviceConnected;
    }
    // 接続処理
    if (deviceConnected && !oldDeviceConnected) {
    // 接続時に実行する処理
        oldDeviceConnected = deviceConnected;
    }
}

void updateAcceleration() {
  float x_values, y_values, z_values;
  x_values = lis.getAccelerationX();
  y_values = lis.getAccelerationY();
  z_values = lis.getAccelerationZ();

  String accelerometerData = String(x_values)+"|"+String(y_values)+"|"+String(z_values);
  Serial.println(accelerometerData);
  pCharacteristic->setValue(accelerometerData.c_str());
  pCharacteristic->notify();
  delay(20);
}
- この例をWio Terminalにアップロードしてください。
Web Bluetooth API HTMLウェブサイト
- **Web Bluetooth Accelerometer Plotter For Wio Terminal**ウェブサイトを開いてください。
HTMLソースコードも参照可能です。
Accelerator(Wio Terminal)という名前のデバイスを接続すると、ウェブサイト上で加速度データを確認できるはずです!
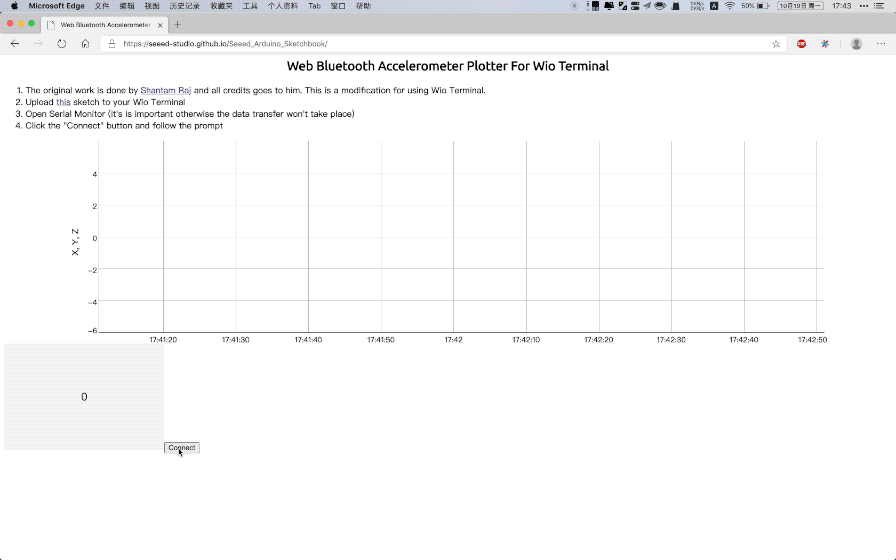
これにより、Wio Terminalと連携するWeb Bluetoothインタラクションウェブサイトを作成できることを意味します!
リソース
技術サポートと製品に関する議論
弊社製品をお選びいただきありがとうございます!製品をご利用いただく際にスムーズな体験を提供するため、さまざまなサポートを提供しております。異なる好みやニーズに対応するため、複数のコミュニケーションチャネルをご用意しています。