Bluetooth使用方法(Seeed nrf52 mbed対応ボードライブラリ)
Seeed Studio XIAO nRF52840 と Seeed Studio XIAO nRF52840 Sense はどちらもBluetooth接続をサポートしています。このwikiでは、基本的なBluetooth機能を紹介し、「Seeed nrf52 mbed対応ボードライブラリ」を使用した24GHz呼吸睡眠検出モジュールのデモを提供します。
はじめに
必要なハードウェア
- 1 x Seeed Studio XIAO nRF52840 または Seeed Studio XIAO nRF52840 Sense
- 1 x Bluetooth接続機能付きスマートフォン/PC
- 1 x USB Type-Cケーブル
必要なソフトウェア
Arduinoライブラリ概要
Arduinoを初めて使用する場合は、Getting Started with Arduinoを参照することを強くお勧めします。
Seeed Studio XIAO nRF52840のBluetooth機能を使用するには、公式のArduino BLEライブラリを使用する必要があります。
24GHz睡眠呼吸レーダーのデモを適用したい場合は、サポートされているライブラリもダウンロードする必要があります。
機能
コードライブラリArduinoBLEの機能と使用方法の紹介については、Arduinoウェブサイトを参照してください。
コードライブラリSeeed 24GHz Sleep Breathing Radar BLEの機能と使用方法の紹介については、Wikiを参照してください。
インストール
- 方法1(この方法は上記のコードライブラリの両方で利用可能です。)
zipライブラリをダウンロードしたので、Arduino IDEを開き、Sketch > Include Library > Add .ZIP Libraryをクリックします。ダウンロードしたzipファイルを選択し、ライブラリが正しくインストールされると、通知ウィンドウにLibrary added to your librariesと表示されます。これはライブラリが正常にインストールされたことを意味します。

- 方法2(ArduinoBLEライブラリのみインストール可能です。)
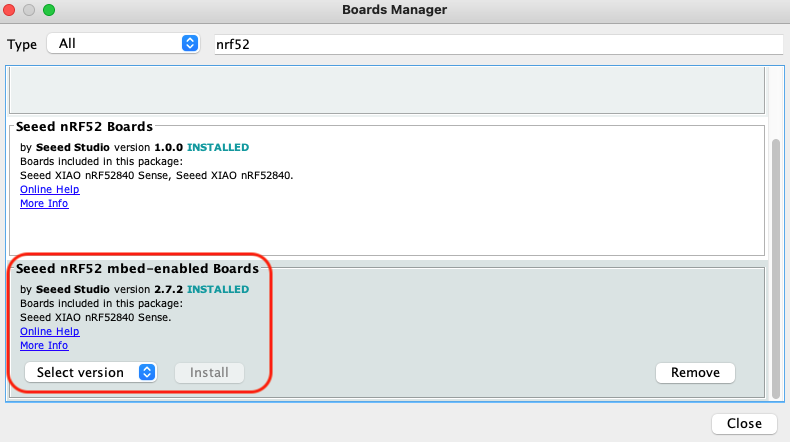
ライブラリマネージャーは、Arduino IDEバージョン1.5以降(1.6.x)から追加されました。「Sketch」メニューの「Include Library」、「Manage Libraries...」にあります。
ライブラリマネージャーを開くと、ワンクリックでインストールできるライブラリの大きなリストが表示されます。製品のライブラリを見つけるには、製品名または「k type」や「digitizer」などのキーワードで検索すると、必要なライブラリが表示されます。目的のライブラリをクリックすると、「Install」ボタンが表示されます。そのボタンをクリックすると、ライブラリが自動的にインストールされます。インストールが完了したら、ライブラリマネージャーを閉じます。
アプリケーション例
ライブラリがインストールされ、基本機能を理解したところで、Seeed Studio XIAO nRF52840 でいくつかの例を実行して、その動作を確認してみましょう。
ステップ 1. Arduino アプリケーションを起動します。
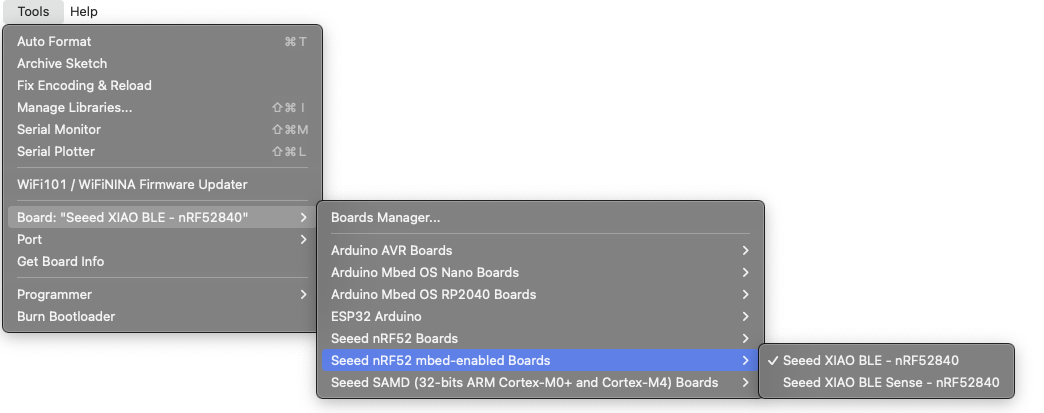
ステップ 2. 開発ボードモデルを選択し、Arduino IDE に追加します。ここでは「Seeed nrf52 mbed-enabled Boards Library」を使用しています。
ボードライブラリのインストールについては、このチュートリアルを参照してインストールを完了してください。
デモ 1 スマートフォンを使用して内蔵LEDを制御
この例では、Seeed Studio XIAO nF52840 (Sense) とスマートフォンをBluetoothで接続し、スマートフォンからメッセージを送信してSeeed Studio XIAO nRF52840 (Sense) の内蔵赤色LEDをON/OFFします。
以下のコードをArduino IDEに貼り付けて、Seeed Studio XIAO nRF52840 にアップロードしてください。
#include <ArduinoBLE.h>

BLEService ledService("19B10000-E8F2-537E-4F6C-D104768A1214"); // Bluetooth® Low Energy LED Service

// Bluetooth® Low Energy LED Switch Characteristic - custom 128-bit UUID, read and writable by central
BLEByteCharacteristic switchCharacteristic("19B10001-E8F2-537E-4F6C-D104768A1214", BLERead | BLEWrite);

const int ledPin = LED_BUILTIN; // pin to use for the LED

void setup() {
  Serial.begin(9600);
  while (!Serial);

  // set LED pin to output mode
  pinMode(ledPin, OUTPUT);

  // begin initialization
  if (!BLE.begin()) {
    Serial.println("starting Bluetooth® Low Energy module failed!");

    while (1);
  }

  // set advertised local name and service UUID:
  BLE.setLocalName("LED");
  BLE.setAdvertisedService(ledService);

  // add the characteristic to the service
  ledService.addCharacteristic(switchCharacteristic);

  // add service
  BLE.addService(ledService);

  // set the initial value for the characeristic:
  switchCharacteristic.writeValue(0);

  // start advertising
  BLE.advertise();

  Serial.println("BLE LED Peripheral");
}

void loop() {
  // listen for Bluetooth® Low Energy peripherals to connect:
  BLEDevice central = BLE.central();

  // if a central is connected to peripheral:
  if (central) {
    Serial.print("Connected to central: ");
    // print the central's MAC address:
    Serial.println(central.address());

    // while the central is still connected to peripheral:
  while (central.connected()) {
        if (switchCharacteristic.written()) {
          if (switchCharacteristic.value()) {
            Serial.println("LED on");
            digitalWrite(ledPin, LOW); // changed from HIGH to LOW
          } else {
            Serial.println(F("LED off"));
            digitalWrite(ledPin, HIGH); // changed from LOW to HIGH
          }
        }
      }

    // when the central disconnects, print it out:
    Serial.print(F("Disconnected from central: "));
    Serial.println(central.address());
  }
}
この例の実装の鍵となるのは以下の段落です。
  while (central.connected()) {
        if (switchCharacteristic.written()) {
          if (switchCharacteristic.value()) {
            Serial.println("LED on");
            digitalWrite(ledPin, LOW); // changed from HIGH to LOW
          } else {
            Serial.println(F("LED off"));
            digitalWrite(ledPin, HIGH); // changed from LOW to HIGH
          }
        }
      }
このコードの目的は、Seeed Studio XIAO nRF52840 がBluetoothデバイス central.connected() によって接続され、Bluetoothデバイス switchCharacteristic.written() からコンテンツを受信した際に判定を行うことです。判定値がゼロ以外 switchCharacteristic.value() の場合はライトが点灯し、判定値が0の場合はライトが消灯します。
シリアルモニターをボーレート9600で開くと、LEDが点灯または消灯するはずです。出力は以下の画像のようになるはずです。
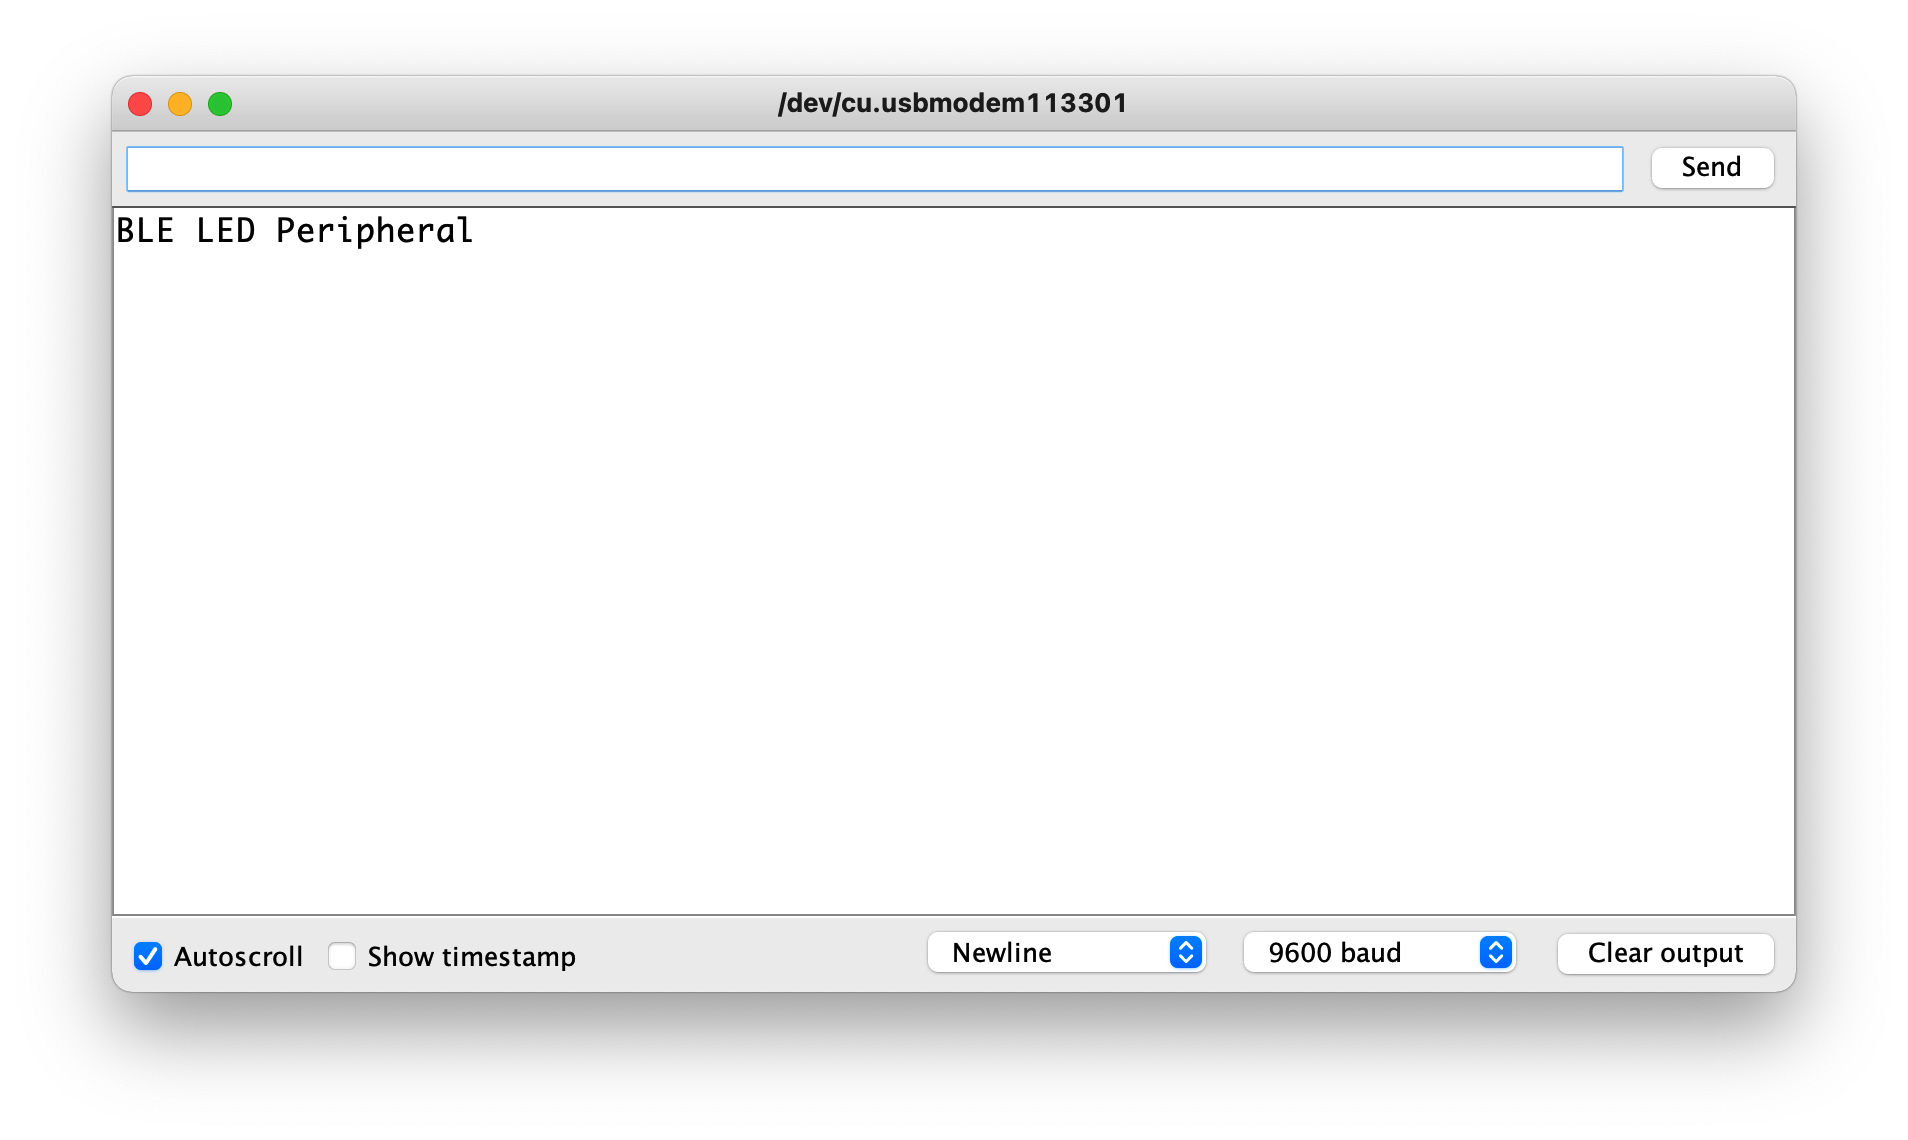
この時点で、以下に説明するように、モバイルアプリを使用してBluetoothでSeeed Studio XIAO nRF52840 のライトを制御することができます。
| iPhone | Android | 説明 |
|---|---|---|
 |  | ソフトウェアを開き、LEDという名前のBluetoothデバイスを検索してConnectをクリックします。一部のデバイスはArduinoとして表示される場合があります。 |
 |  | Seeed Studio XIAO nRF52840 Bluetoothインターフェースに移動し、デバイスをクリックしてデバイスの詳細を表示します。 |
 |  | Seeed Studio XIAO nRF52840 に送信するデータを入力します。1を送信するとライトが点灯し、0を送信するとライトが消灯します。 |
 |  | Bluetooth制御インターフェースに戻ると、値が変更され、Seeed Studio XIAO nRF52840 の赤いライトが点灯(または消灯)していることが確認できます。 |
 | ||
デモ 2 XIAO BLE を使用して BLE 経由で 24GHz 睡眠検出モジュールのデータを取得する
この例では、センサーの値を取得し、Seeed Studio XIAO nRF52840 を使用して Bluetooth 経由でセンサーが検出したデータに関する情報をモバイルデバイスに送信する方法について説明します。
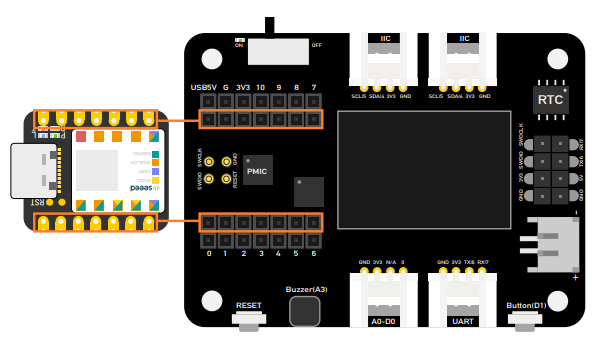
以下の画像に従って、Seeed Studio XIAO nRF52840 ボードと 24GHz 呼吸睡眠検出モジュールを接続してください。詳細については、こちらをクリックしてください。

ライブラリ内のサンプルコードを開き、Seeed Studio XIAO nRF52840 にアップロードしてください。
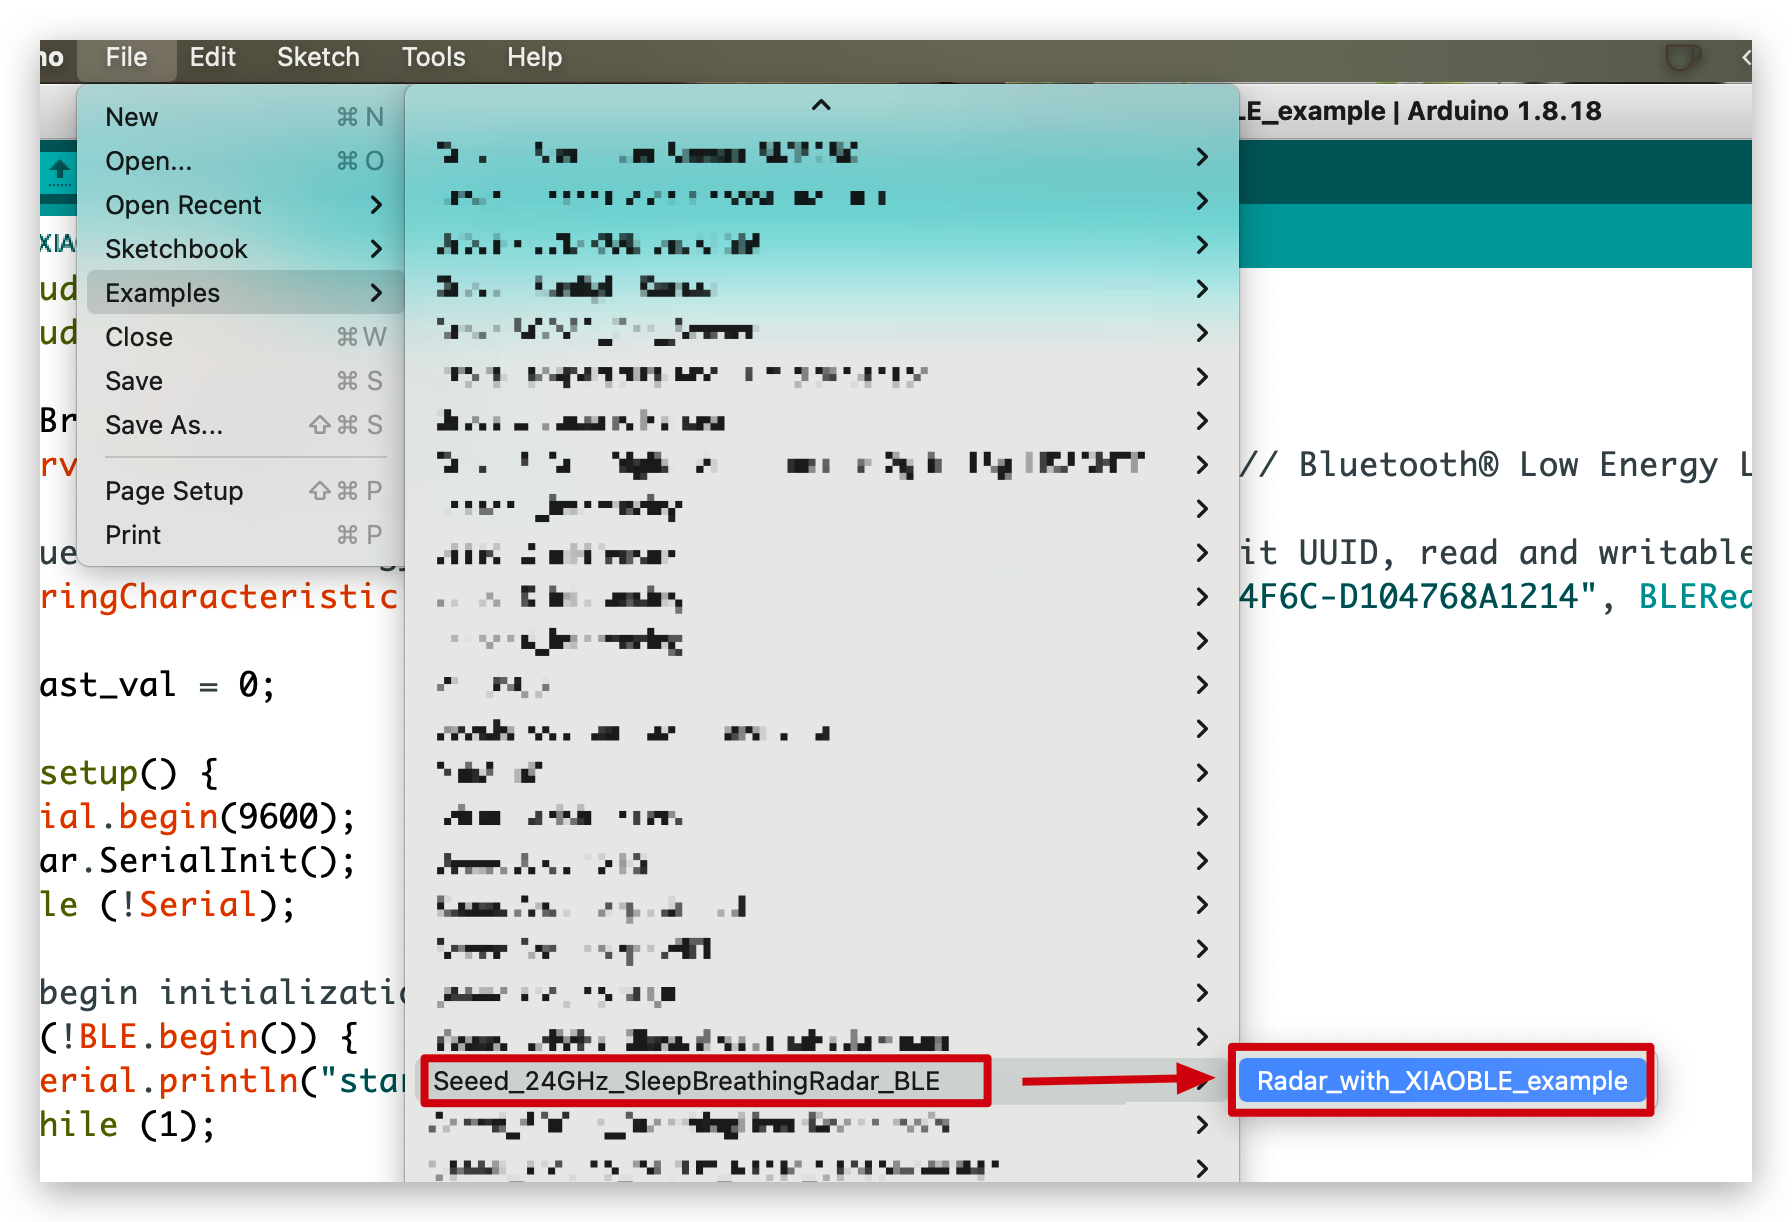
//Radar_with_XIAOBLE_example

#include <ArduinoBLE.h>
#include <sleepbreathingradarBLE.h>

SleepBreathingRadarBLE radar;
BLEService radarService("19B10000-E8F2-537E-4F6C-D104768A1214"); // Bluetooth® Low Energy LED Service

// Bluetooth® Low Energy LED Switch Characteristic - custom 128-bit UUID, read and writable by central
BLEStringCharacteristic switchCharacteristic("19B10001-E8F2-537E-4F6C-D104768A1214", BLERead | BLENotify, 20);

int last_val = 0;

void setup() {
  Serial.begin(9600);
  radar.SerialInit();
  while (!Serial);

  // begin initialization
  if (!BLE.begin()) {
    Serial.println("starting Seeed Studio XIAO nRF52840 with 60GHz radar sensor demo failed!");
    while (1);
  }

  // set advertised local name and service UUID:
  BLE.setLocalName("Seeed Studio XIAO nRF52840");
  BLE.setAdvertisedService(radarService);

  // add the characteristic to the service
  radarService.addCharacteristic(switchCharacteristic);

  // add service
  BLE.addService(radarService);

  // start advertising
  BLE.advertise();

  Serial.println("Seeed Studio XIAO nRF52840 active, waiting for connections...");
}

void loop() {
  // listen for Bluetooth® Low Energy peripherals to connect:
  BLEDevice central = BLE.central();

  // if a central is connected to peripheral:
  if (central) {
    Serial.print("Connected to central: ");
    // print the central's MAC address:
    Serial.println(central.address());

    // while the central is still connected to peripheral:
    while (central.connected()){
       radar.recvRadarBytes();                       //Receive radar data and start processing
       if (radar.newData == true) {                  //The data is received and transferred to the new list dataMsg[]
          byte dataMsg[radar.dataLen+3] = {0x00};
          dataMsg[0] = 0x53;                         //Add the header frame as the first element of the array
          for (byte n = 0; n < radar.dataLen; n++)dataMsg[n+1] = radar.Msg[n];  //Frame-by-frame transfer
          dataMsg[radar.dataLen+1] = 0x54;
          dataMsg[radar.dataLen+2] = 0x43;
          radar.newData = false;                     //A complete set of data frames is saved
          int new_val = radar.Sleep_inf(dataMsg);    //Use radar built-in algorithm to output human motion status
          if(new_val != last_val){
            radar.OutputAssignment(new_val);
            switchCharacteristic.setValue(radar.str);
            last_val = new_val;
          }
        }
    }

    // when the central disconnects, print it out:
      Serial.print(F("Disconnected from central: "));
      Serial.println(central.address());
    }
}
この例では、モバイルデバイスにデータを送信する関数は setValue() です。データのリアルタイム表示を取得したい場合は、以下のコードに BLENotify を追加する必要があります。最後のパラメータ 20 は、送信できるデータの最大長を示しています。
BLEStringCharacteristic switchCharacteristic("19B10001-E8F2-537E-4F6C-D104768A1214", BLERead | BLENotify, 20);
シリアルモニターをボーレート9600で開くと、センサーとそれが向けられているオブジェクトとの間の距離がミリメートルとフィートの両方で表示されるはずです。出力は以下の画像のようになるはずです。
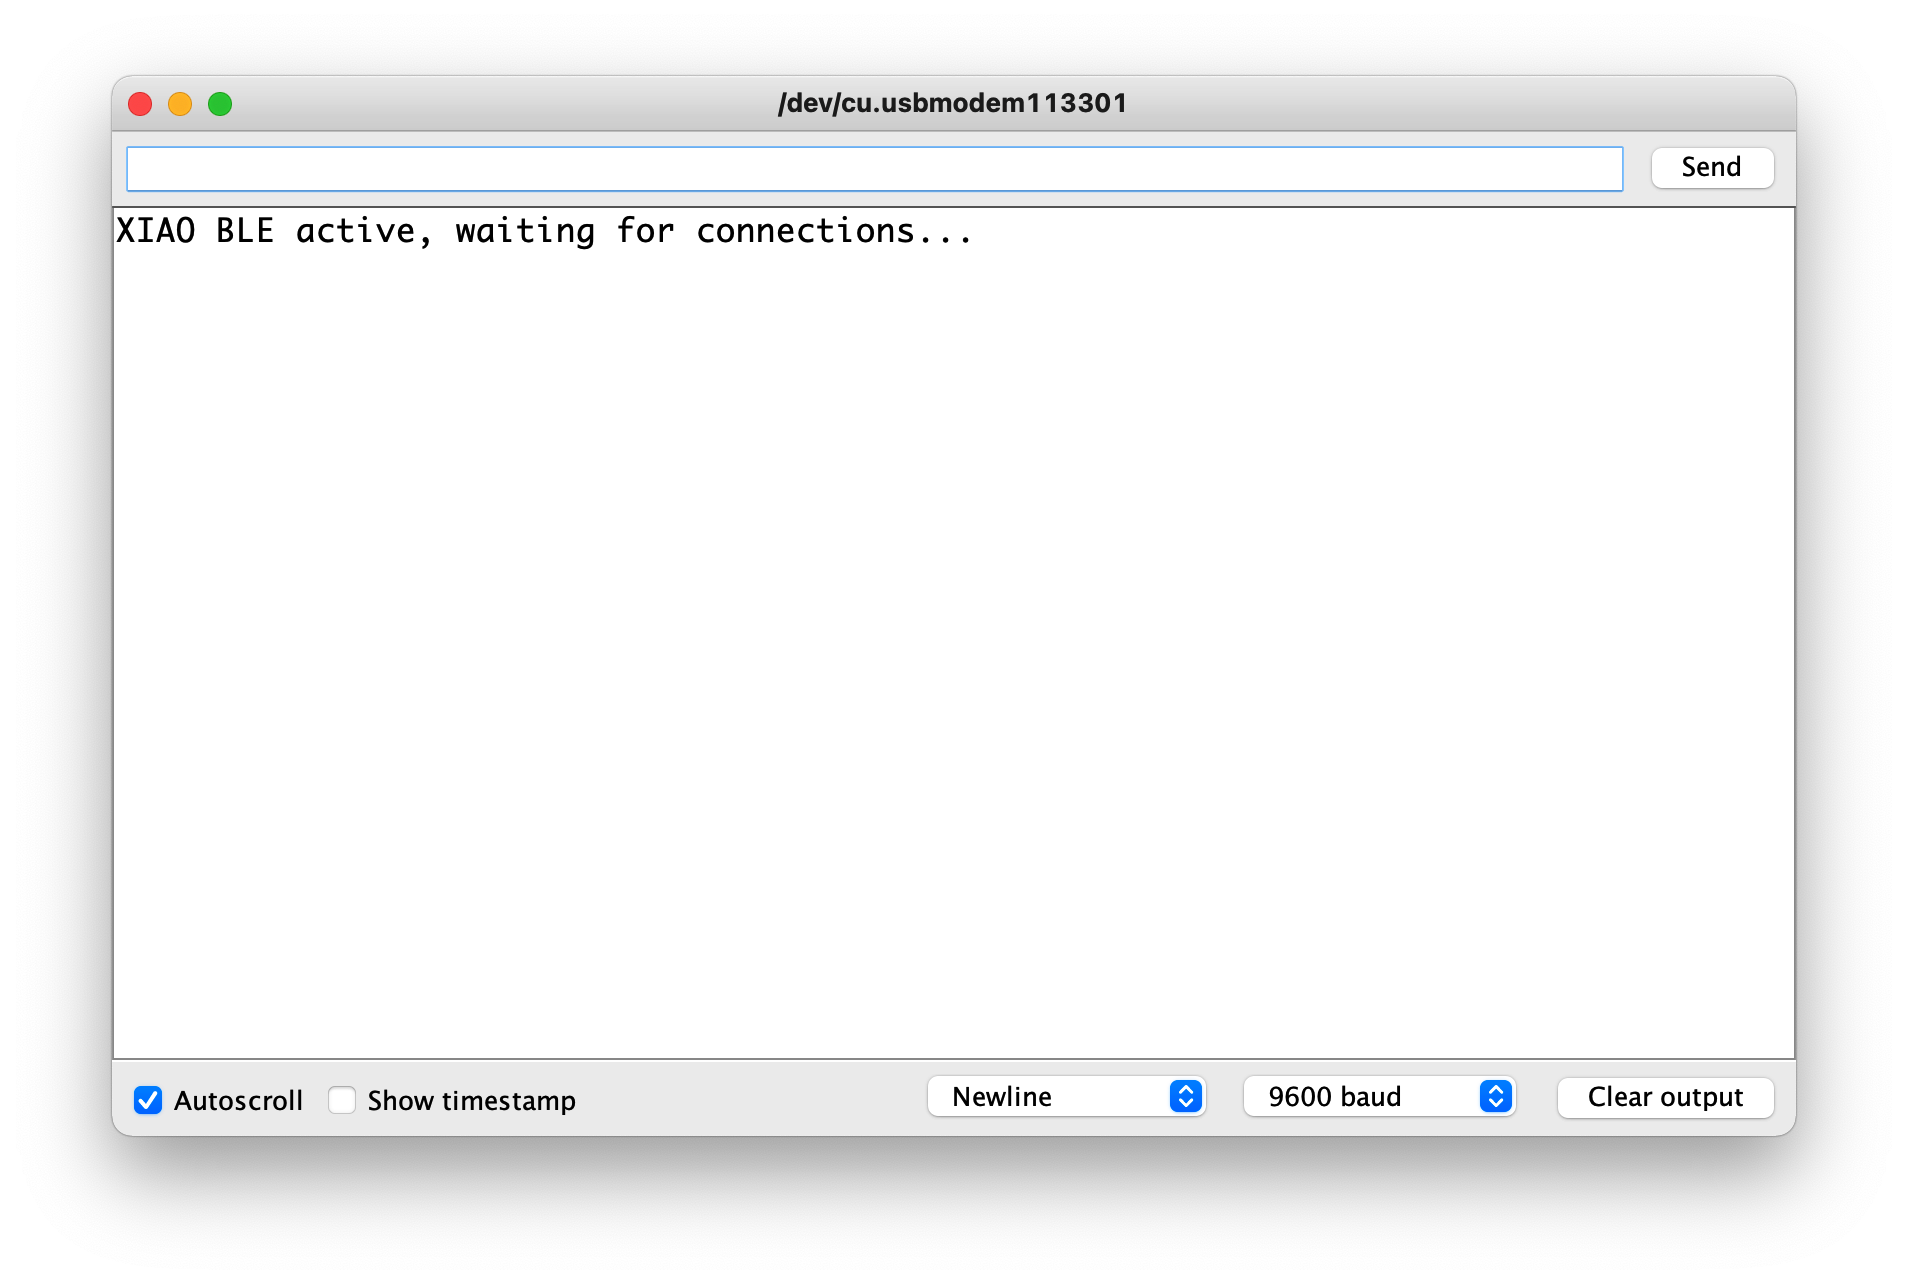
次に、以下の手順に従ってBluetoothで送信されるライブデータを取得できます。
| iPhone | Android | 説明 |
|---|---|---|
|  | ソフトウェアを開き、Seeed Studio XIAO nRF52840という名前のBluetoothデバイスを検索して接続をクリックします。一部のデバイスはArduinoとして表示される場合があります。 |
| = | | Seeed Studio XIAO nRF52840 Bluetoothインターフェースに移動し、デバイスをクリックしてデバイスの詳細を表示します。 |
 |  | ソフトウェアのライブ更新データを開きます。 |
 |  | 次に、レーダーが睡眠メッセージを検出するたびに、Seeed Studio XIAO nRF52840のBluetoothを介して電話に送信されます。 |
 | ||
デモ 3 Bluetooth通信による2つのXIAO nRF52840でのLED制御
この例では、2つのXIAO nRF52840を使用し、それらのBluetooth機能を使って通信を行います。一方のXIAOはホストとして動作し、XIAO拡張ボードに接続され、拡張ボードのボタンを介して制御コマンドを送信します。もう一方のXIAOはスレーブとして動作します。
開始する前に、以下の準備をしてください。
 |  |
| Seeed Studio XIAO拡張ボード | 2 x Seeed XIAO BLE nRF52840 Sense |
XIAO nRF52840のうち1つを選択してください。これにはデバイスを接続する必要がなく、以下のプログラムを直接アップロードします。
#include <ArduinoBLE.h>

BLEService ledService("19B10000-E8F2-537E-4F6C-D104768A1214"); // Bluetooth® Low Energy LED Service

// Bluetooth® Low Energy LED Switch Characteristic - custom 128-bit UUID, read and writable by central
BLEByteCharacteristic switchCharacteristic("19B10001-E8F2-537E-4F6C-D104768A1214", BLERead | BLEWrite);

const int ledPin = LED_BUILTIN; // pin to use for the LED

void setup() {
  Serial.begin(9600);
  while (!Serial);

  // set LED pin to output mode
  pinMode(ledPin, OUTPUT);

  // begin initialization
  if (!BLE.begin()) {
    Serial.println("starting Bluetooth® Low Energy module failed!");

    while (1);
  }

  // set advertised local name and service UUID:
  BLE.setLocalName("XIAO");
  BLE.setAdvertisedService(ledService);

  // add the characteristic to the service
  ledService.addCharacteristic(switchCharacteristic);

  // add service
  BLE.addService(ledService);

  // set the initial value for the characeristic:
  switchCharacteristic.writeValue(0);

  // start advertising
  BLE.advertise();

  // print address
  Serial.print("Address: ");
  Serial.println(BLE.address());

  Serial.println("XIAO nRF52840 Peripheral");
}

void loop() {
  // listen for Bluetooth® Low Energy peripherals to connect:
  BLEDevice central = BLE.central();

  // if a central is connected to peripheral:
  if (central) {
    Serial.print("Connected to central: ");
    // print the central's MAC address:
    Serial.println(central.address());

    // while the central is still connected to peripheral:
    while (central.connected()) {
      // if the remote device wrote to the characteristic,
      // use the value to control the LED:
      if (switchCharacteristic.written()) {
        if (switchCharacteristic.value()) {   // any value other than 0
          Serial.println("LED on");
          digitalWrite(ledPin, HIGH);         // will turn the LED on
        } else {                              // a 0 value
          Serial.println(F("LED off"));
          digitalWrite(ledPin, LOW);          // will turn the LED off
        }
      }
    }

    // when the central disconnects, print it out:
    Serial.print(F("Disconnected from central: "));
    Serial.println(central.address());
  }
}
このプログラムの主な目的は、XIAOを「XIAO」という名前のBluetoothデバイスにして、他のBluetoothデバイスから検索・接続できるようにすることです。接続後、0または1を送信してXIAO上のLEDをそれぞれオフまたはオンに制御できます。
Seeed Studio XIAO nRF52840を拡張ボードに取り付けます。
この目的のため、拡張ボードに接続されたXIAOに以下の手順をアップロードします。
#include <ArduinoBLE.h>
#include <U8x8lib.h>
#include <Wire.h>

// variables for button
const int buttonPin = D1;
int oldButtonState = LOW;

void setup() {
  Serial.begin(9600);
  while (!Serial);

  // configure the button pin as input
  pinMode(buttonPin, INPUT_PULLUP);

  // initialize the Bluetooth® Low Energy hardware
  BLE.begin();

  Serial.println("Bluetooth® Low Energy Central - LED control");

  // start scanning for peripherals
  BLE.scanForName("XIAO");
}

void loop() {
  // check if a peripheral has been discovered
  BLEDevice peripheral = BLE.available();
  if (peripheral) {
    // discovered a peripheral, print out address, local name, and advertised service
    Serial.print("Found ");
    Serial.print(peripheral.address());
    Serial.print(" '");
    Serial.print(peripheral.localName());
    Serial.print("' ");
    Serial.print(peripheral.advertisedServiceUuid());
    Serial.println();

    if (peripheral.localName() != "XIAO") {
      return;
    }

    // stop scanning
    BLE.stopScan();

    system_control(peripheral);

    // peripheral disconnected, start scanning again
    BLE.scanForName("XIAO");
  }
  delay(100);
}

void system_control(BLEDevice peripheral) {
  // connect to the peripheral
  Serial.println("Connecting ...");

  if (peripheral.connect()) {
    Serial.println("Connected");
  } else {
    Serial.println("Failed to connect!");
    return;
  }

  // discover peripheral attributes
  Serial.println("Discovering attributes ...");
  if (peripheral.discoverAttributes()) {
    Serial.println("Attributes discovered");
  } else {
    Serial.println("Attribute discovery failed!");
    peripheral.disconnect();
    return;
  }

  // retrieve the LED characteristic
  BLECharacteristic ledCharacteristic = peripheral.characteristic("19b10001-e8f2-537e-4f6c-d104768a1214");

  if (!ledCharacteristic) {
    Serial.println("Peripheral does not have LED characteristic!");
    peripheral.disconnect();
    return;
  } else if (!ledCharacteristic.canWrite()) {
    Serial.println("Peripheral does not have a writable LED characteristic!");
    peripheral.disconnect();
    return;
  }

  while (peripheral.connected()) {
    // while the peripheral is connected
    // read the button pin
    int buttonState = digitalRead(buttonPin);

    if (oldButtonState != buttonState) {
      // button changed
      oldButtonState = buttonState;

      if (buttonState) {
        Serial.println("button pressed");

        // button is pressed, write 0x01 to turn the LED on
        ledCharacteristic.writeValue((byte)0x01);
      } else {
        Serial.println("button released");

        // button is released, write 0x00 to turn the LED off
        ledCharacteristic.writeValue((byte)0x00);
      }
    }
  }

  Serial.println("Peripheral disconnected");
}
プログラムをアップロードしたら、シリアルモニターをオンにしてください。プログラムはローカル名「XIAO」を持つ近くのBluetoothデバイスを検索し、それに接続を開始します(1〜3分待つ必要があります)。
接続成功メッセージがシリアルモニターに表示されたら、拡張ボードのキーD1を使用して、もう一方のXIAO nRF52840 LEDの切り替えを制御できます。
もちろん、拡張ボードをお持ちでない場合は、独自のボタンやその他のデバイスを使用することもできます。
さらに詳しく
より多くの例を試したい場合は、File > Examples > INCOMPATIBLE > ArduinoBLEに移動し、ArduinoBLEの下にあるすべての例を確認してください。
技術サポートと製品ディスカッション
弊社製品をお選びいただき、ありがとうございます!弊社製品でのご体験が可能な限りスムーズになるよう、さまざまなサポートを提供いたします。異なる好みやニーズに対応するため、複数のコミュニケーションチャンネルを提供しています。