Seeed Studio XIAO SAMD21でのSPI通信
SPI通信インターフェース
ハードウェア
必要な材料
-
Type-Cケーブル x1
ハードウェア接続
-
ステップ1. Grove-高精度圧力センサーのCSKをSeeed Studio XIAOのSCKに接続します。
-
ステップ2. センサーのCSをSeeed Studio XIAOのD3に接続します。
-
ステップ3. センサーのSDOをSeeed Studio XIAOのMISOに接続します。
-
ステップ4. センサーのSDIをSeeed Studio XIAOのMOSIに接続します。
-
ステップ5. センサーのGNDをSeeed Studio XIAOのGNDに接続します。
-
ステップ6. センサーの3V3をSeeed Studio XIAOの3.3Vに接続します。
-
ステップ7. Type-CケーブルでSeeed Studio XIAOをPCに接続します。
ソフトウェア
注記
Arduinoを初めて使用する場合は、開始前にArduino入門を参照することを強くお勧めします。
-
ステップ1. GithubからDPS310-Pressure-Sensorライブラリをダウンロードします。
-
ステップ2. ライブラリのインストール方法を参照してArduino用ライブラリをインストールします。
-
ステップ3. コードをArduino IDEにコピーしてアップロードします。
#include <Dps310.h>

// Dps310 Opject
Dps310 Dps310PressureSensor = Dps310();

void setup()
{
  //pin number of your slave select line
  //XMC2GO
  int16_t pin_cs = 3;
  //for XMC 1100 Bootkit  & XMC4700 Relax Kit uncomment the following line
  //int16_t pin_cs = 10;

  Serial.begin(9600);
  while (!Serial);


  //Call begin to initialize Dps310
  //The parameter pin_nr is the number of the CS pin on your Microcontroller
  Dps310PressureSensor.begin(SPI, pin_cs);

  //temperature measure rate (value from 0 to 7)
  //2^temp_mr temperature measurement results per second
  int16_t temp_mr = 2;
  //temperature oversampling rate (value from 0 to 7)
  //2^temp_osr internal temperature measurements per result
  //A higher value increases precision
  int16_t temp_osr = 2;
  //pressure measure rate (value from 0 to 7)
  //2^prs_mr pressure measurement results per second
  int16_t prs_mr = 2;
  //pressure oversampling rate (value from 0 to 7)
  //2^prs_osr internal pressure measurements per result
  //A higher value increases precision
  int16_t prs_osr = 2;
  //startMeasureBothCont enables background mode
  //temperature and pressure ar measured automatically
  //High precision and hgh measure rates at the same time are not available.
  //Consult Datasheet (or trial and error) for more information
  int16_t ret = Dps310PressureSensor.startMeasureBothCont(temp_mr, temp_osr, prs_mr, prs_osr);
  //Use one of the commented lines below instead to measure only temperature or pressure
  //int16_t ret = Dps310PressureSensor.startMeasureTempCont(temp_mr, temp_osr);
  //int16_t ret = Dps310PressureSensor.startMeasurePressureCont(prs_mr, prs_osr);


  if (ret != 0)
  {
    Serial.print("Init FAILED! ret = ");
    Serial.println(ret);
  }
  else
  {
    Serial.println("Init complete!");
  }
}


void loop()
{
  uint8_t pressureCount = 20;
  float pressure[pressureCount];
  uint8_t temperatureCount = 20;
  float temperature[temperatureCount];

  //This function writes the results of continuous measurements to the arrays given as parameters
  //The parameters temperatureCount and pressureCount should hold the sizes of the arrays temperature and pressure when the function is called
  //After the end of the function, temperatureCount and pressureCount hold the numbers of values written to the arrays
  //Note: The Dps310 cannot save more than 32 results. When its result buffer is full, it won't save any new measurement results
  int16_t ret = Dps310PressureSensor.getContResults(temperature, temperatureCount, pressure, pressureCount);

  if (ret != 0)
  {
    Serial.println();
    Serial.println();
    Serial.print("FAIL! ret = ");
    Serial.println(ret);
  }
  else
  {
    Serial.println();
    Serial.println();
    Serial.print(temperatureCount);
    Serial.println(" temperature values found: ");
    for (int16_t i = 0; i < temperatureCount; i++)
    {
      Serial.print(temperature[i]);
      Serial.println(" degrees of Celsius");
    }

    Serial.println();
    Serial.print(pressureCount);
    Serial.println(" pressure values found: ");
    for (int16_t i = 0; i < pressureCount; i++)
    {
      Serial.print(pressure[i]);
      Serial.println(" Pascal");
    }
  }

  //Wait some time, so that the Dps310 can refill its buffer
  delay(10000);
}
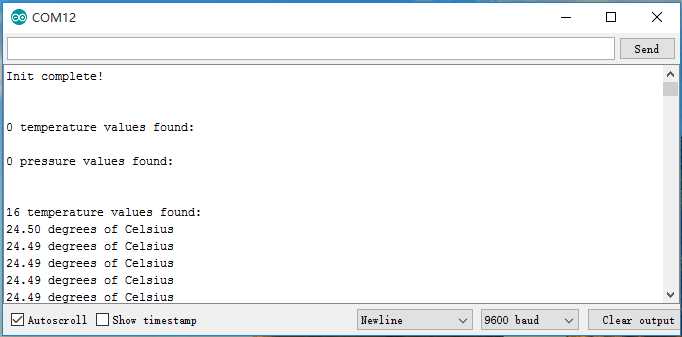
- ステップ4. ツール > シリアルモニタをクリックするか、Ctrl+Shift+Mを同時に押して、アップロードが成功した後にシリアルモニタを開くと、以下のような出力が表示されます: