MicroPythonを使用したXIAO ESP32C3 Wi-Fiトラッカー
このwikiは更新されました: https://wiki.seeedstudio.com/xiao_esp32c3_with_micropython/
このチュートリアルでは、XIAO ESP32C3をMicropythonで活用する方法について簡潔な概要を提供します。さらに、高速で高品質な家庭用ネットワークを構築する際に非常に有用なWi-Fi信号強度トラッカーの実用的な応用について探求します。 その結果、Wi-Fiトラッカーのガイダンスに従うことで、Wi-Fi信号増強器の配置を効果的に最適化し、最適な信号カバレッジを確保できます。
ハードウェアの準備
ここではSeeed Studio XIAO ESP32C3とXIAO用拡張ボードベースをハードウェアとして使用しています。


ソフトウェアの準備
| Thonny IDE | Esptool |
|---|---|
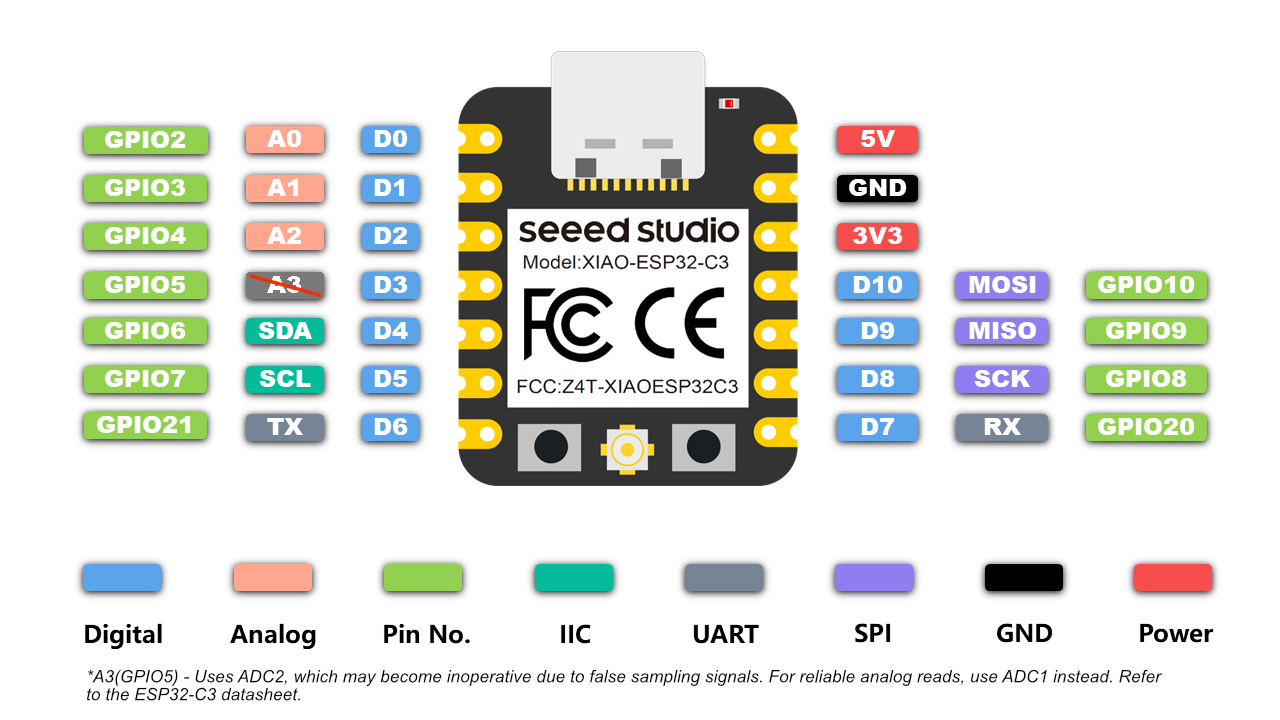
使用前に、ここで使用しているソフトウェア/ファームウェアはESP32C3チップ用に設計されていることを明記する必要があります。そのため、ピンを使用する際は、ボード上のピンではなく汎用入出力(General Purpose Input/Output)を確認してください。
例えば、左側の最初の行のピンを使用しようとする場合、A0やD0ではなくGPIO2であることを確認してください。
はじめに
XIAO ESP32C3をMicroPythonでプログラムできるようにするには、2つのステップ(「PC上でのMicropython設定」と「XIAO ESP32C3上でのMicropythonセットアップ」)が必要です。
セットアップ後、各デモからコードを段階的にコピーして完成を達成できます。
PC上でのMicropython設定
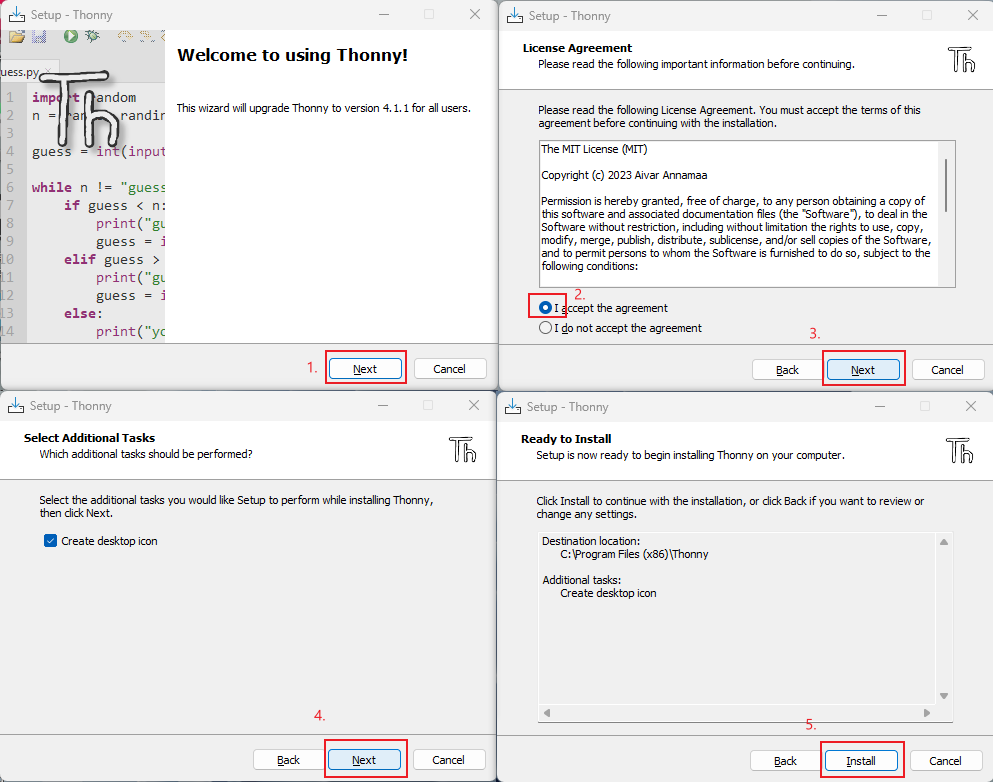
Thonny IDEのインストール(Windows)
画像の手順に従ってください
esptoolを使用したファームウェアの更新
- 自分のファイルの場所を開く
git clone https://github.com/espressif/esptool.git
- Download the latest firmware (This Tutorial is v1.20.0 (2023-04-26) .bin)
https://micropython.org/download/esp32c3/
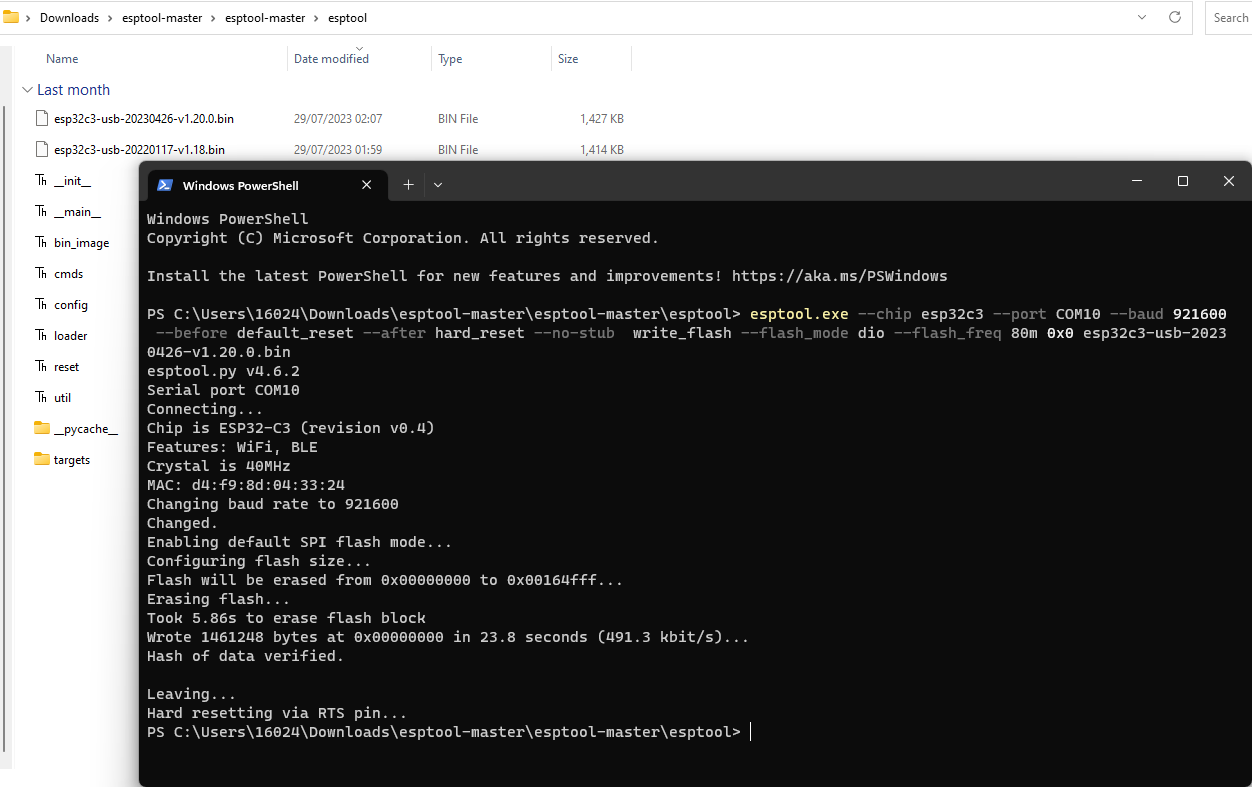
- 最新のファームをこのファイル場所に置き、CMDでファイルを開く
your own file location\esptool-master\esptool
- CMD にこのコマンドを入力してファームウェアをフラッシュします (フラッシュする前にブートローダーモードに入ってください)
esptool.exe --chip esp32c3 --port COM10 --baud 921600 --before default_reset --after hard_reset --no-stub write_flash --flash_mode dio --flash_freq 80m 0x0 esp32c3-usb-20230426-v1.20.0.bin
Linuxを使用している場合は、"esptool.exe"を"esptool.py"に変更してください。"COM10"を自分のシリアルポートに変更してください。"esp32c3-usb-20230426-v1.20.0.bin"をダウンロードした最新のファームウェア名に変更してください。
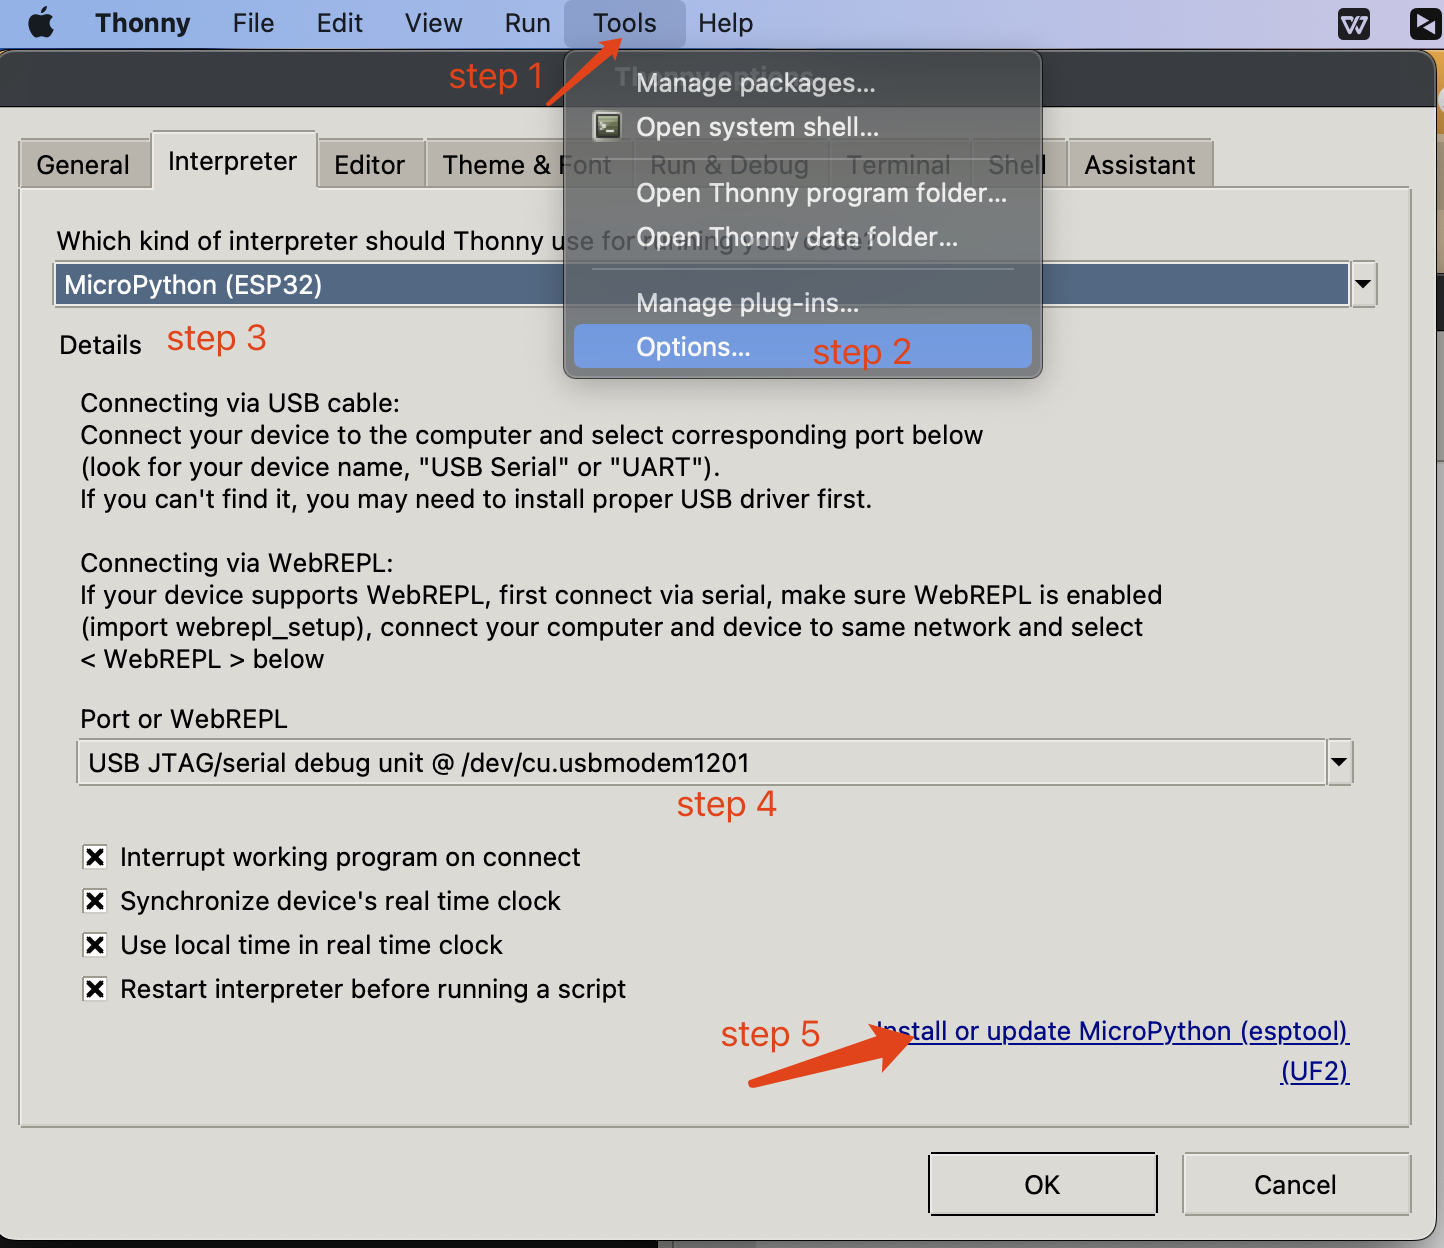
XIAO ESP32C3でのMicropythonセットアップ
-
XIAO ESP32C3を接続し、Thonnyを開いて右下をクリックしてインタープリターを設定します
-
インタープリター- Micropython (ESP32)とポートを選択 >>> OKをクリック
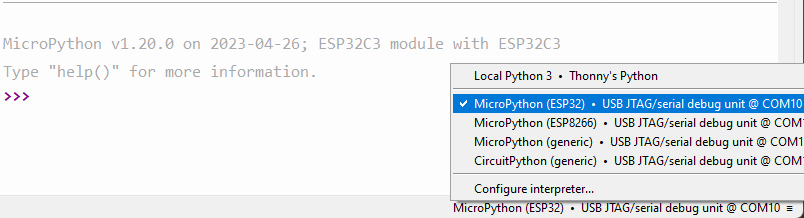
注意:すべてがうまくいけば、シェルに出力が表示されます
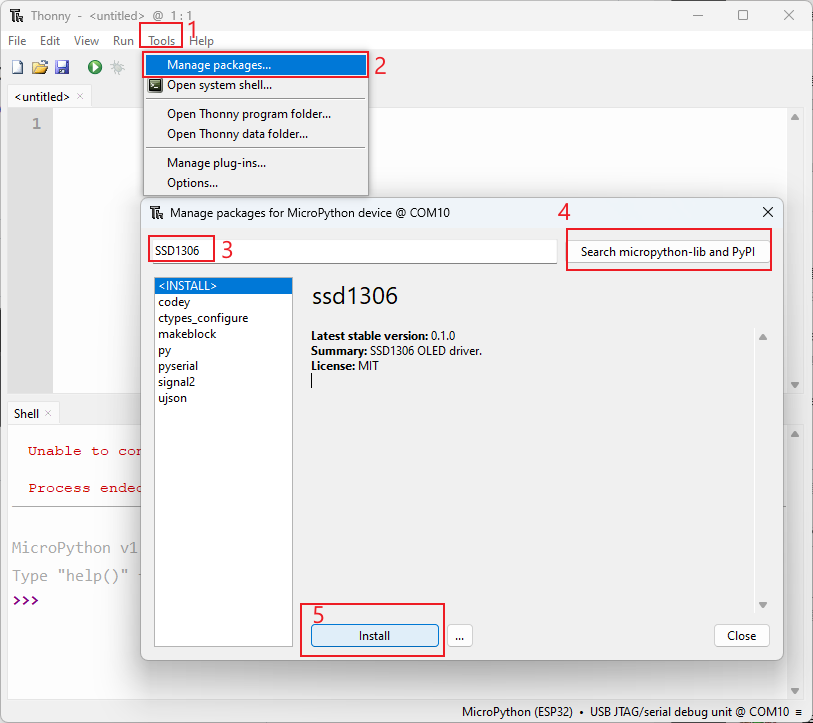
必要なライブラリのインストール
「Tools」をクリック >>> 「Management Packages」をクリック >>> ライブラリ名を入力 >>> 「Search micropython-lib and PyPl」をクリック
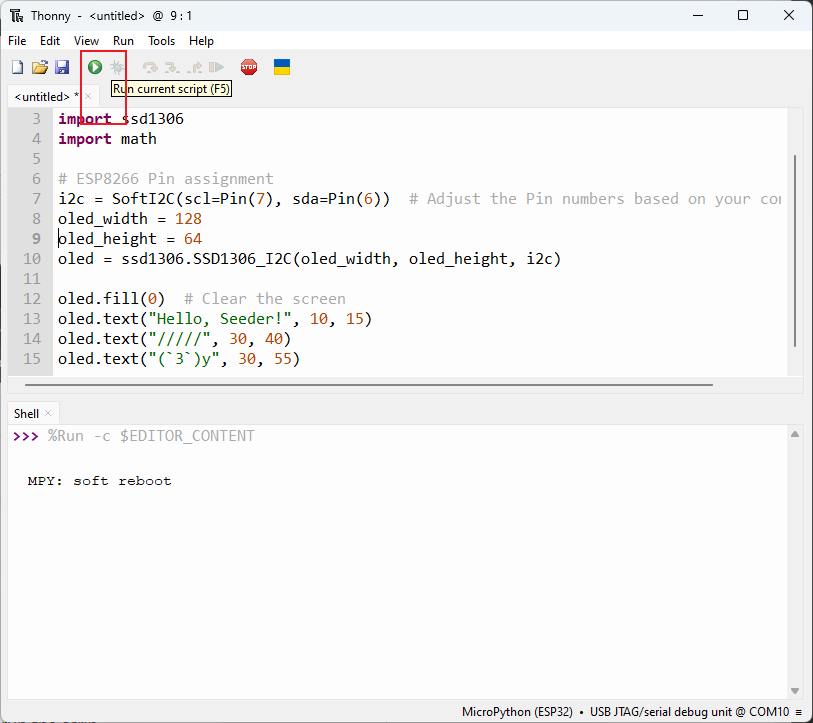
スクリプトの実行とボードへの書き込み
- コーディングが完了したら、緑のボタンをクリックしてスクリプトを実行します
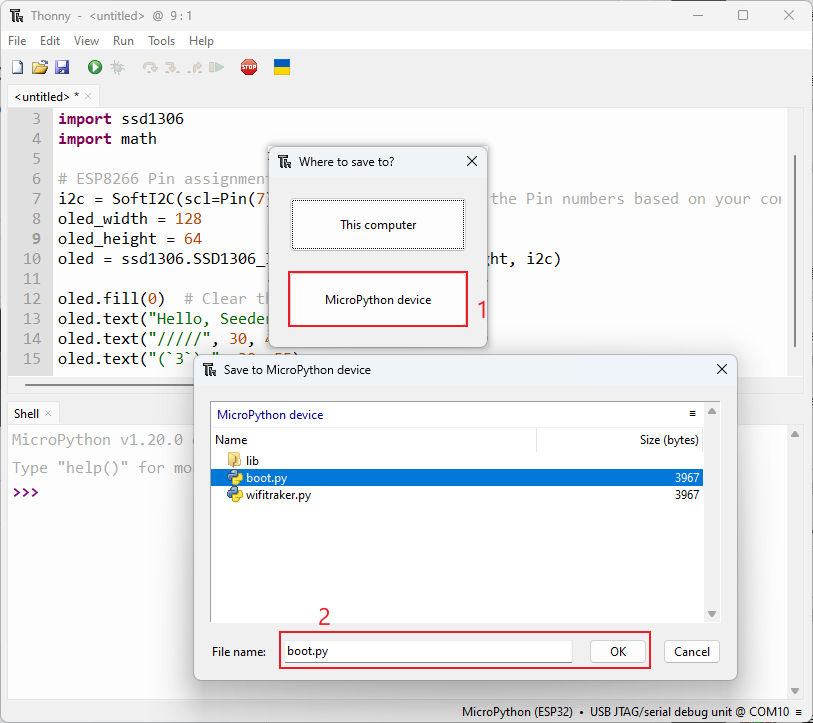
- ファイルを「boot.py」としてボードに保存することで、コードをボードに書き込みます
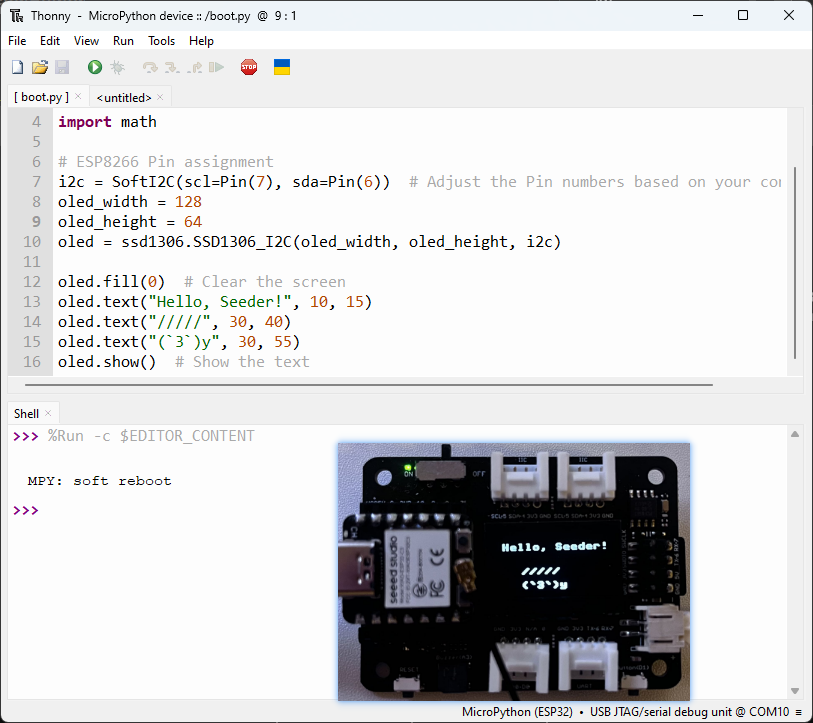
デモ1:OLEDスクリーンを点灯させる
1. Hello Seeder
import time
from machine import Pin, SoftI2C
import ssd1306
import math

# ESP8266 Pin assignment
i2c = SoftI2C(scl=Pin(7), sda=Pin(6))  # Adjust the Pin numbers based on your connections
oled_width = 128
oled_height = 64
oled = ssd1306.SSD1306_I2C(oled_width, oled_height, i2c)

oled.fill(0)  # Clear the screen
oled.text("Hello, Seeder!", 10, 15)
oled.text("/////", 30, 40)
oled.text("(`3`)y", 30, 55)
oled.show()  # Show the text
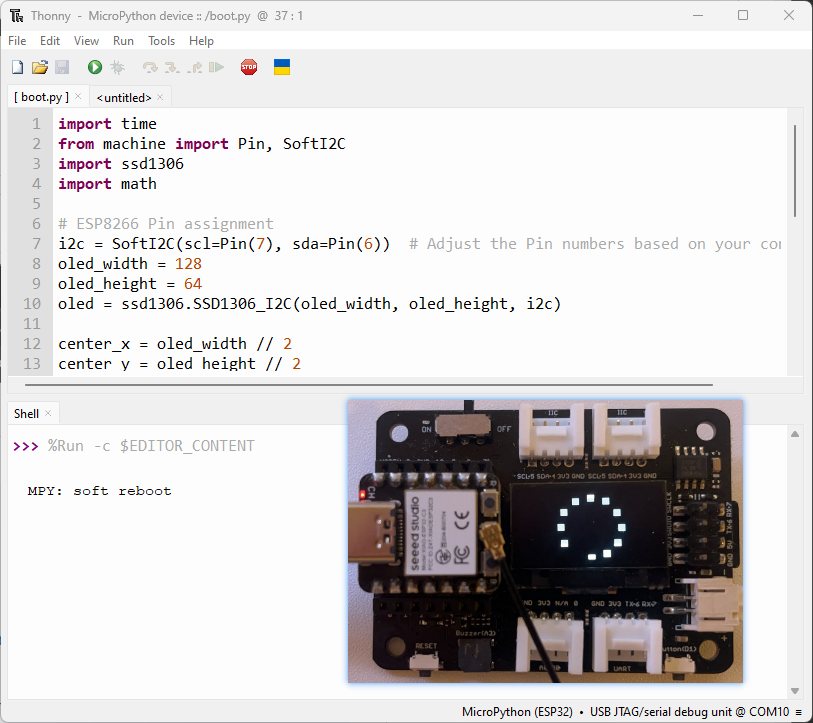
2. 動的ローディング効果
import time
from machine import Pin, SoftI2C
import ssd1306
import math

# ESP8266 Pin assignment
i2c = SoftI2C(scl=Pin(7), sda=Pin(6))  # Adjust the Pin numbers based on your connections
oled_width = 128
oled_height = 64
oled = ssd1306.SSD1306_I2C(oled_width, oled_height, i2c)

center_x = oled_width // 2
center_y = oled_height // 2
square_size = 6  # Size of each square
num_squares = 12  # Number of squares
angle_increment = 2 * math.pi / num_squares

while True:
    oled.fill(0)  # Clear the screen

    for i in range(num_squares):
        angle = i * angle_increment
        x = int(center_x + (center_x - square_size-30) * math.cos(angle))
        y = int(center_y + (center_x - square_size-30) * math.sin(angle))

        # Draw all squares
        for j in range(num_squares):
            angle_j = j * angle_increment
            x_j = int(center_x + (center_x - square_size-30) * math.cos(angle_j))
            y_j = int(center_y + (center_x - square_size-30) * math.sin(angle_j))

            oled.fill_rect(x_j, y_j, square_size, square_size, 1)  # Draw the square

        oled.fill_rect(x, y, square_size, square_size, 0)  # Erase the current square
        oled.show()
        time.sleep_ms(100)  # Pause before next iteration
デモ 2: ブザーを鳴らす
1. 音
import time
from time import sleep
import machine
from machine import Pin, SoftI2C


# Buzzer settings

buzzer_pin = machine.Pin(5, machine.Pin.OUT)
buzzer = machine.PWM(buzzer_pin)
buzzer.freq(1047)

# Buzzer working

while True:

    buzzer.duty(10)
    time.sleep(1)
    buzzer.duty(0)
    time.sleep(1)
2. Play the Song "He's a pirate"
import machine
import time

# Buzzer settings
buzzer_pin = machine.Pin(5, machine.Pin.OUT)
buzzer = machine.PWM(buzzer_pin)
buzzer.freq(1047)

# Defining frequency of each music note
NOTE_C4 = 262
NOTE_D4 = 294
NOTE_E4 = 330
NOTE_F4 = 349
NOTE_G4 = 392
NOTE_A4 = 440
NOTE_B4 = 494
NOTE_C5 = 523
NOTE_D5 = 587
NOTE_E5 = 659
NOTE_F5 = 698
NOTE_G5 = 784
NOTE_A5 = 880
NOTE_B5 = 988

# Music notes of the song, 0 is a rest/pulse
notes = [
    NOTE_E4, NOTE_G4, NOTE_A4, NOTE_A4, 0,
    NOTE_A4, NOTE_B4, NOTE_C5, NOTE_C5, 0,
    NOTE_C5, NOTE_D5, NOTE_B4, NOTE_B4, 0,
    NOTE_A4, NOTE_G4, NOTE_A4, 0,

    NOTE_E4, NOTE_G4, NOTE_A4, NOTE_A4, 0,
    NOTE_A4, NOTE_B4, NOTE_C5, NOTE_C5, 0,
    NOTE_C5, NOTE_D5, NOTE_B4, NOTE_B4, 0,
    NOTE_A4, NOTE_G4, NOTE_A4, 0,

    NOTE_E4, NOTE_G4, NOTE_A4, NOTE_A4, 0,
    NOTE_A4, NOTE_C5, NOTE_D5, NOTE_D5, 0,
    NOTE_D5, NOTE_E5, NOTE_F5, NOTE_F5, 0,
    NOTE_E5, NOTE_D5, NOTE_E5, NOTE_A4, 0,

    NOTE_A4, NOTE_B4, NOTE_C5, NOTE_C5, 0,
    NOTE_D5, NOTE_E5, NOTE_A4, 0,
    NOTE_A4, NOTE_C5, NOTE_B4, NOTE_B4, 0,
    NOTE_C5, NOTE_A4, NOTE_B4, 0,

    NOTE_A4, NOTE_A4,
    #Repeat of first part
    NOTE_A4, NOTE_B4, NOTE_C5, NOTE_C5, 0,
    NOTE_C5, NOTE_D5, NOTE_B4, NOTE_B4, 0,
    NOTE_A4, NOTE_G4, NOTE_A4, 0,

    NOTE_E4, NOTE_G4, NOTE_A4, NOTE_A4, 0,
    NOTE_A4, NOTE_B4, NOTE_C5, NOTE_C5, 0,
    NOTE_C5, NOTE_D5, NOTE_B4, NOTE_B4, 0,
    NOTE_A4, NOTE_G4, NOTE_A4, 0,

    NOTE_E4, NOTE_G4, NOTE_A4, NOTE_A4, 0,
    NOTE_A4, NOTE_C5, NOTE_D5, NOTE_D5, 0,
    NOTE_D5, NOTE_E5, NOTE_F5, NOTE_F5, 0,
    NOTE_E5, NOTE_D5, NOTE_E5, NOTE_A4, 0,

    NOTE_A4, NOTE_B4, NOTE_C5, NOTE_C5, 0,
    NOTE_D5, NOTE_E5, NOTE_A4, 0,
    NOTE_A4, NOTE_C5, NOTE_B4, NOTE_B4, 0,
    NOTE_C5, NOTE_A4, NOTE_B4, 0,
    #End of Repeat

    NOTE_E5, 0, 0, NOTE_F5, 0, 0,
    NOTE_E5, NOTE_E5, 0, NOTE_G5, 0, NOTE_E5, NOTE_D5, 0, 0,
    NOTE_D5, 0, 0, NOTE_C5, 0, 0,
    NOTE_B4, NOTE_C5, 0, NOTE_B4, 0, NOTE_A4,

    NOTE_E5, 0, 0, NOTE_F5, 0, 0,
    NOTE_E5, NOTE_E5, 0, NOTE_G5, 0, NOTE_E5, NOTE_D5, 0, 0,
    NOTE_D5, 0, 0, NOTE_C5, 0, 0,
    NOTE_B4, NOTE_C5, 0, NOTE_B4, 0, NOTE_A4
]

# Durations (in ms) of each music note of the song
# Quarter Note is 250 ms when songSpeed = 1.0
durations = [
    125, 125, 250, 125, 125,
    125, 125, 250, 125, 125,
    125, 125, 250, 125, 125,
    125, 125, 375, 125,

    125, 125, 250, 125, 125,
    125, 125, 250, 125, 125,
    125, 125, 250, 125, 125,
    125, 125, 375, 125,

    125, 125, 250, 125, 125,
    125, 125, 250, 125, 125,
    125, 125, 250, 125, 125,
    125, 125, 125, 250, 125,

    125, 125, 250, 125, 125,
    250, 125, 250, 125,
    125, 125, 250, 125, 125,
    125, 125, 375, 375,

    250, 125,
    #Rpeat of First Part
    125, 125, 250, 125, 125,
    125, 125, 250, 125, 125,
    125, 125, 375, 125,

    125, 125, 250, 125, 125,
    125, 125, 250, 125, 125,
    125, 125, 250, 125, 125,
    125, 125, 375, 125,

    125, 125, 250, 125, 125,
    125, 125, 250, 125, 125,
    125, 125, 250, 125, 125,
    125, 125, 125, 250, 125,

    125, 125, 250, 125, 125,
    250, 125, 250, 125,
    125, 125, 250, 125, 125,
    125, 125, 375, 375,
    #End of Repeat

    250, 125, 375, 250, 125, 375,
    125, 125, 125, 125, 125, 125, 125, 125, 375,
    250, 125, 375, 250, 125, 375,
    125, 125, 125, 125, 125, 500,

    250, 125, 375, 250, 125, 375,
    125, 125, 125, 125, 125, 125, 125, 125, 375,
    250, 125, 375, 250, 125, 375,
    125, 125, 125, 125, 125, 500
]

def play_song():
    total_notes = len(notes)
    for i in range(total_notes):
        current_note = notes[i]
        wait = durations[i]
        if current_note != 0:
            buzzer.duty(512)  # Set duty cycle for sound
            buzzer.freq(current_note)  # Set frequency of the note
        else:
            buzzer.duty(0)  # Turn off the sound
        time.sleep_ms(wait)
        buzzer.duty(0)  # Turn off the sound
while True:
    # Play the song
    play_song()
デモ 3: Wi-fiに接続
1. Wi-fiに接続

import network
import urequests
import utime as time

# Network settings
wifi_ssid = "Your Own SSID"
wifi_password = "Your Own Password"

def scan_and_connect():
    station = network.WLAN(network.STA_IF)
    station.active(True)

    print("Scanning for WiFi networks, please wait...")
    for ssid, bssid, channel, RSSI, authmode, hidden in station.scan():
        print("* {:s}".format(ssid))
        print("   - Channel: {}".format(channel))
        print("   - RSSI: {}".format(RSSI))
        print("   - BSSID: {:02x}:{:02x}:{:02x}:{:02x}:{:02x}:{:02x}".format(*bssid))
        print()

    while not station.isconnected():
        print("Connecting...")
        station.connect(wifi_ssid, wifi_password)
        time.sleep(10)

    print("Connected!")
    print("My IP Address:", station.ifconfig()[0])


# Execute the functions
scan_and_connect()
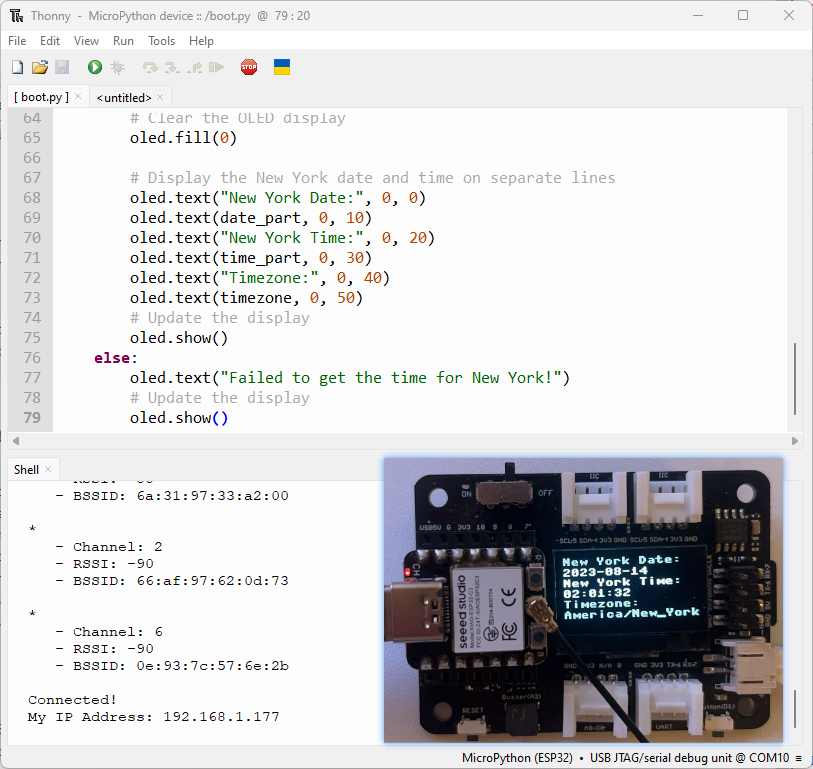
2. ニューヨーク時間をオンラインでリクエスト
from machine import Pin, SoftI2C
import ssd1306
from time import sleep
import time
import network
import urequests
import ujson

# ESP32 Pin assignment
# i2c = SoftI2C(scl=Pin(22), sda=Pin(21))

# ESP8266 Pin assignment
i2c = SoftI2C(scl=Pin(7), sda=Pin(6))  # Adjust the Pin numbers based on your connections

oled_width = 128
oled_height = 64
oled = ssd1306.SSD1306_I2C(oled_width, oled_height, i2c)

station = network.WLAN(network.STA_IF)
station.active(True)

# Network settings
wifi_ssid = "Your wifi ssid"
wifi_password = "Your wifi password"
url = "http://worldtimeapi.org/api/timezone/America/New_York"

print("Scanning for WiFi networks, please wait...")
authmodes = ['Open', 'WEP', 'WPA-PSK' 'WPA2-PSK4', 'WPA/WPA2-PSK']
for (ssid, bssid, channel, RSSI, authmode, hidden) in station.scan():
    print("* {:s}".format(ssid))
    print("   - Channel: {}".format(channel))
    print("   - RSSI: {}".format(RSSI))
    print("   - BSSID: {:02x}:{:02x}:{:02x}:{:02x}:{:02x}:{:02x}".format(*bssid))
    print()

# Continually try to connect to WiFi access point
while not station.isconnected():
    # Try to connect to WiFi access point
    print("Connecting...")
    station.connect(wifi_ssid, wifi_password)
    time.sleep(10)

# Display connection details
print("Connected!")
print("My IP Address:", station.ifconfig()[0])


while True:
    # Perform HTTP GET request on a non-SSL web
    response = urequests.get(url)
    # Check if the request was successful
    if response.status_code == 200:
        # Parse the JSON response
        data = ujson.loads(response.text)
        # Extract the "datetime" field for New York
        ny_datetime = data["datetime"]
        # Split the date and time components
        date_part, time_part = ny_datetime.split("T")
        # Get only the first two decimal places of the time
        time_part = time_part[:8]
        # Get the timezone
        timezone = data["timezone"]

        # Clear the OLED display
        oled.fill(0)

        # Display the New York date and time on separate lines
        oled.text("New York Date:", 0, 0)
        oled.text(date_part, 0, 10)
        oled.text("New York Time:", 0, 20)
        oled.text(time_part, 0, 30)
        oled.text("Timezone:", 0, 40)
        oled.text(timezone, 0, 50)
        # Update the display
        oled.show()
    else:
        oled.text("Failed to get the time for New York!")
        # Update the display
        oled.show()
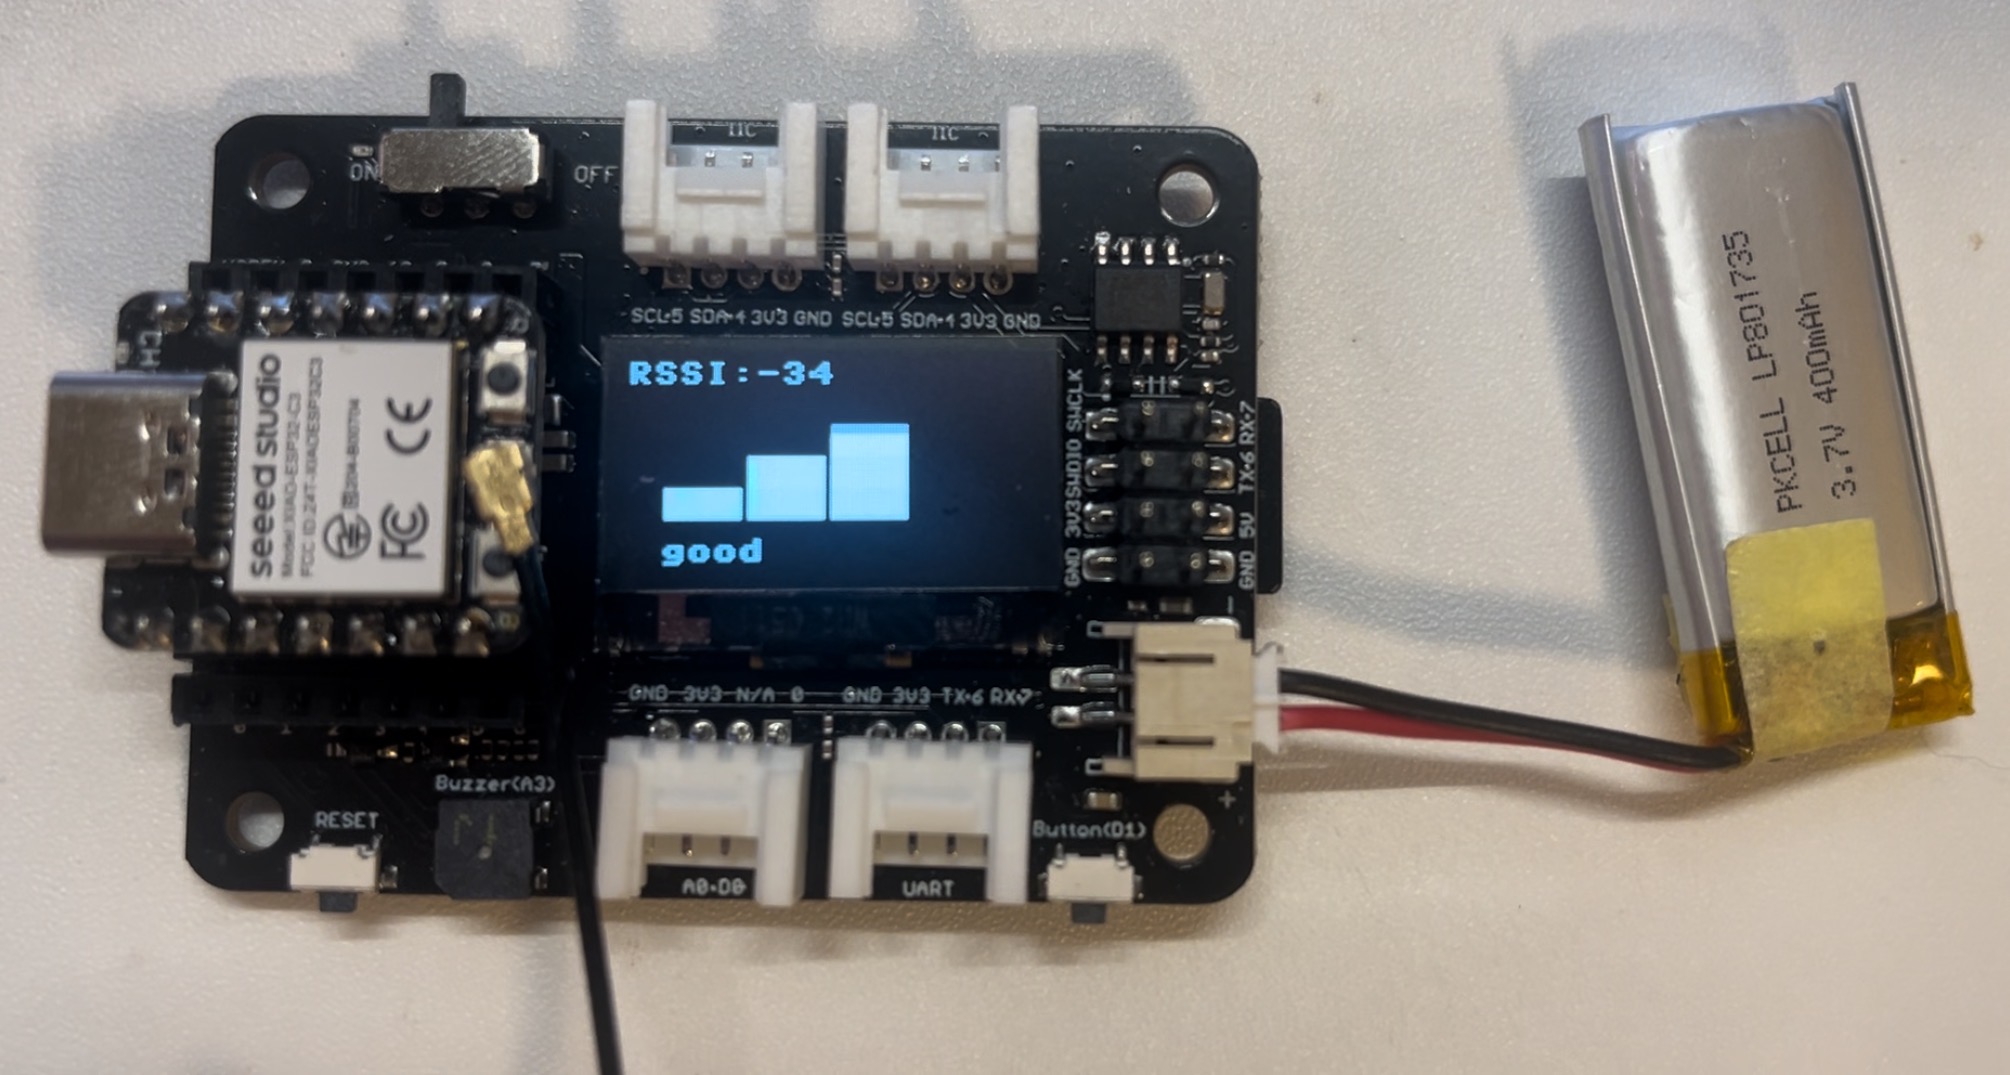
Final: Wi-fi信号強度トラッカー
これはこのプロジェクトのメインタスクです。このコードを通じて、このような簡単なデバイスで自宅のwifi信号を追跡することができます。
import network
import time
from time import sleep
import machine
from machine import Pin, SoftI2C
import ssd1306
import math

# ESP32C3 Pin assignment
i2c = SoftI2C(scl=Pin(7), sda=Pin(6))  # Adjust the Pin numbers based on your connections
oled_width = 128
oled_height = 64
oled = ssd1306.SSD1306_I2C(oled_width, oled_height, i2c)

# Network settings
wifi_ssid = "Your Own SSID"
wifi_password = "Your Own Password"
machine.freq(160000000)  # Set CPU frequency to 160 MHz (ESP8266 specific)
oled.text("Starting up...", 0, 0)
oled.show()

station = network.WLAN(network.STA_IF)
station.active(True)
station.connect(wifi_ssid, wifi_password)
time.sleep(1)

while not station.isconnected():
    time.sleep(1)

oled.fill(0)
oled.text("Connecting to", 0, 0)
oled.text(wifi_ssid, 0, 20)
oled.show()
time.sleep(2)

oled.fill(0)
ip_address = station.ifconfig()[0]  # Get the IP address
oled.text("Connected! ", 0, 0)
oled.text("IP Address:", 0, 20)
oled.text(ip_address, 0, 40)
oled.show()
time.sleep(2)

# Buzzer settings
buzzer_pin = machine.Pin(5, machine.Pin.OUT)
buzzer = machine.PWM(buzzer_pin)
buzzer.freq(1047)
buzzer.duty(0)

center_x = oled_width // 2
center_y = oled_height // 2
square_size = 6  # Size of each square
num_squares = 12  # Number of squares
angle_increment = 2 * math.pi / num_squares

x_pos = [12, 38, 64, 90]
statuses = ["poor", "normal", "good", "excellent"]

def calculate_block_count(rssi):
    # Determine the number of blocks based on RSSI values
    if -80 <= rssi < -60:
        return 1
    elif -60 <= rssi < -40:
        return 2
    elif -40 <= rssi < -20:
        return 3
    elif -20 <= rssi <= 10:
        return 4

def draw_blocks(count):
    for i in range(count):
        y_pos = 50 - calculate_block_height(i)
        oled.fill_rect(x_pos[i], y_pos, 24, calculate_block_height(i), 1)
    for i in range(count, 4):  # Clear unused area
        y_pos = 50 - calculate_block_height(i)
        oled.fill_rect(x_pos[i], y_pos, 24, calculate_block_height(i), 0)

def calculate_block_height(index):
    return 10 * (index + 1)

loop_count = 0  # Initialize loop count

while loop_count < 2:  # Execute the loop 24 times
    oled.fill(0)  # Clear the screen

    for i in range(num_squares):
        angle = i * angle_increment
        x = int(center_x + (center_x - square_size-30) * math.cos(angle))
        y = int(center_y + (center_x - square_size-30) * math.sin(angle))

        # Draw all squares
        for j in range(num_squares):
            angle_j = j * angle_increment
            x_j = int(center_x + (center_x - square_size-30) * math.cos(angle_j))
            y_j = int(center_y + (center_x - square_size-30) * math.sin(angle_j))

            oled.fill_rect(x_j, y_j, square_size, square_size, 1)  # Draw the square

        oled.fill_rect(x, y, square_size, square_size, 0)  # Erase the current square
        oled.show()
        time.sleep_ms(100)  # Pause before next iteration

    loop_count += 1  # Increase loop count

oled.fill(0)  # Clear the screen after finishing the loops
oled.show()

while True:
    oled.fill(0)
    station = network.WLAN(network.STA_IF)
    time.sleep(0.1)
    rssi = station.status('rssi')
    rssi_duty = 160 + 2 * int(rssi)
    rssi_duty_2 = int(rssi_duty / 2)
    rssi_abs = abs(int(rssi)) / 100

    block_count = calculate_block_count(rssi)
    status = statuses[block_count - 1]  # Get the status text based on block count

    draw_blocks(block_count)

    oled.text(status, 11, 56)

    oled.text("RSSI:", 0, 0)
    oled.text(str(rssi), 40, 0)
    # Update the display
    oled.show()

    buzzer.duty(rssi_duty)
    time.sleep(rssi_abs)
    buzzer.duty(0)
    time.sleep(rssi_abs)
    buzzer.duty(rssi_duty_2)
    time.sleep(rssi_abs)
    buzzer.duty(0)
    time.sleep(rssi_abs)
さらに詳しく
- Thonnyに統合されたesptoolを使用してXIAO ESP32C3にファームウェアをフラッシュすることもでき、これはMAC OSでサポートされています。
✨ コントリビュータープロジェクト
- このプロジェクトはSeeed Studioのコントリビュータープロジェクトによってサポートされています。
- Zacharyの努力に感謝し、あなたの作品は展示されます。
技術サポート & 製品ディスカッション
私たちの製品をお選びいただき、ありがとうございます!私たちは、お客様の製品体験が可能な限りスムーズになるよう、さまざまなサポートを提供しています。異なる好みやニーズに対応するため、複数のコミュニケーションチャンネルを提供しています。