Vision AI V2データのRS485伝送
Vision AI V2と組み合わせてRS485拡張ボードを使用する場合は、RS485拡張ボードの裏面に新しいヘッダーピンを再はんだ付けする必要があります。
ハードウェア準備
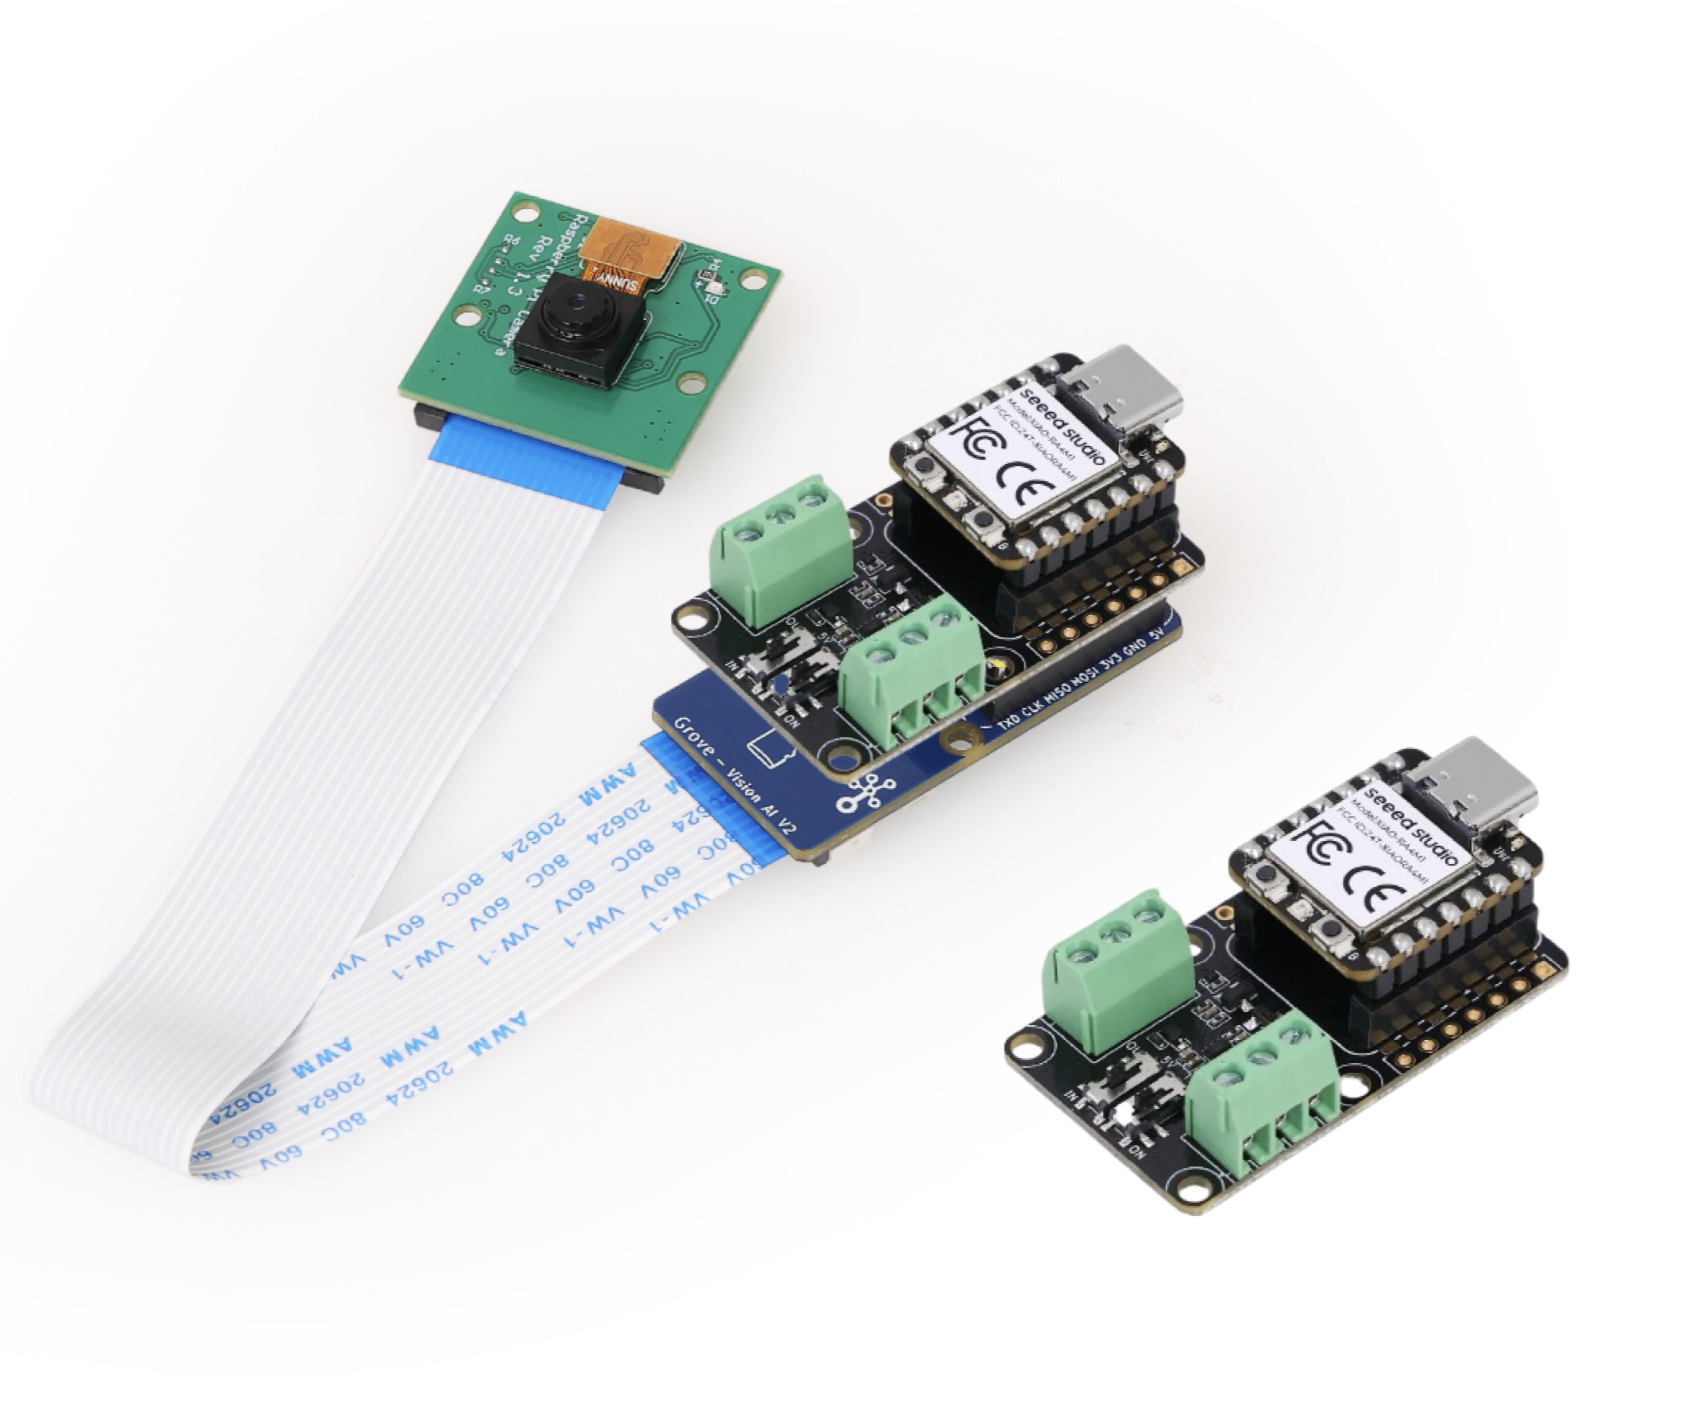
| Seeed Studio XIAO ESP32S3 | Grove Vision AI V2 | OV5647-62 FOV Camera Module for Raspberry Pi 3B+4B | Seeed Studio XIAO RS485-Expansion-Board |
|---|---|---|---|
 |  |  |  |
接続方法
まず、2つの拡張ボード、2つのXIAOシリーズ開発ボード、1つのVision AI V2を準備し、図に従って対応するピンを接続します。このルーチンではXIAO ESP32C3をデモとして使用します。
ステップ1. 2つのRS485拡張ボードと2つのXIAOシリーズ開発ボードを準備し、以下の図に従ってピンを接続します
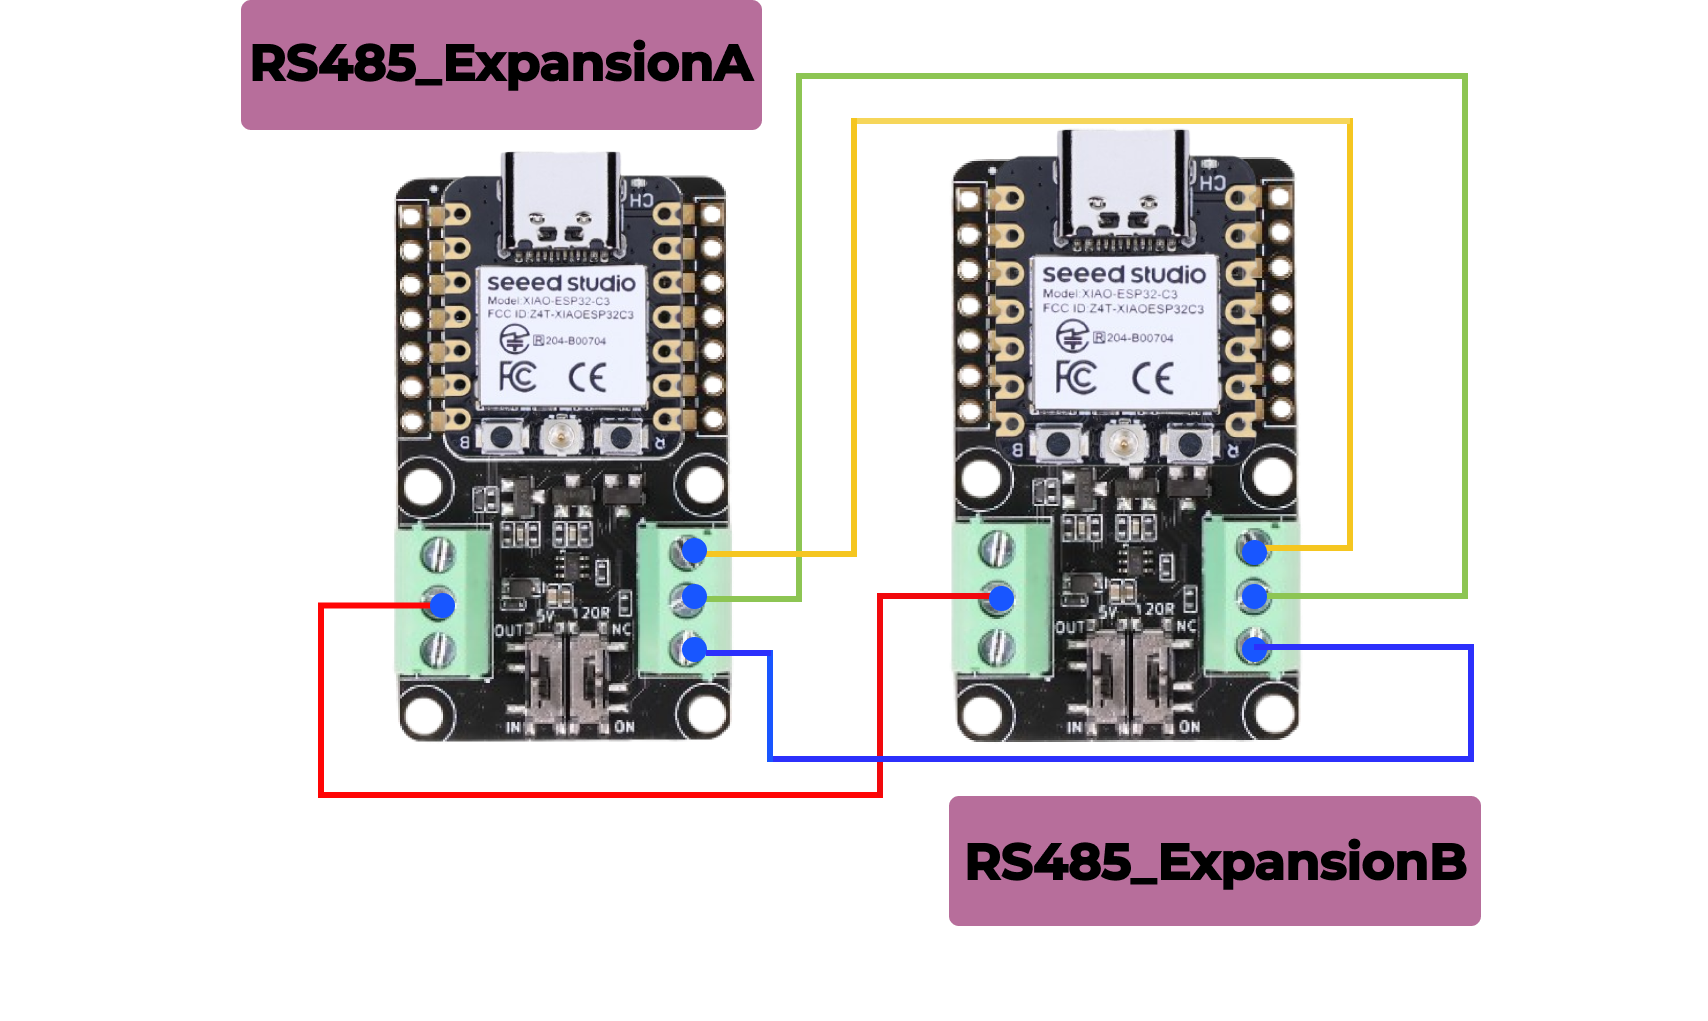
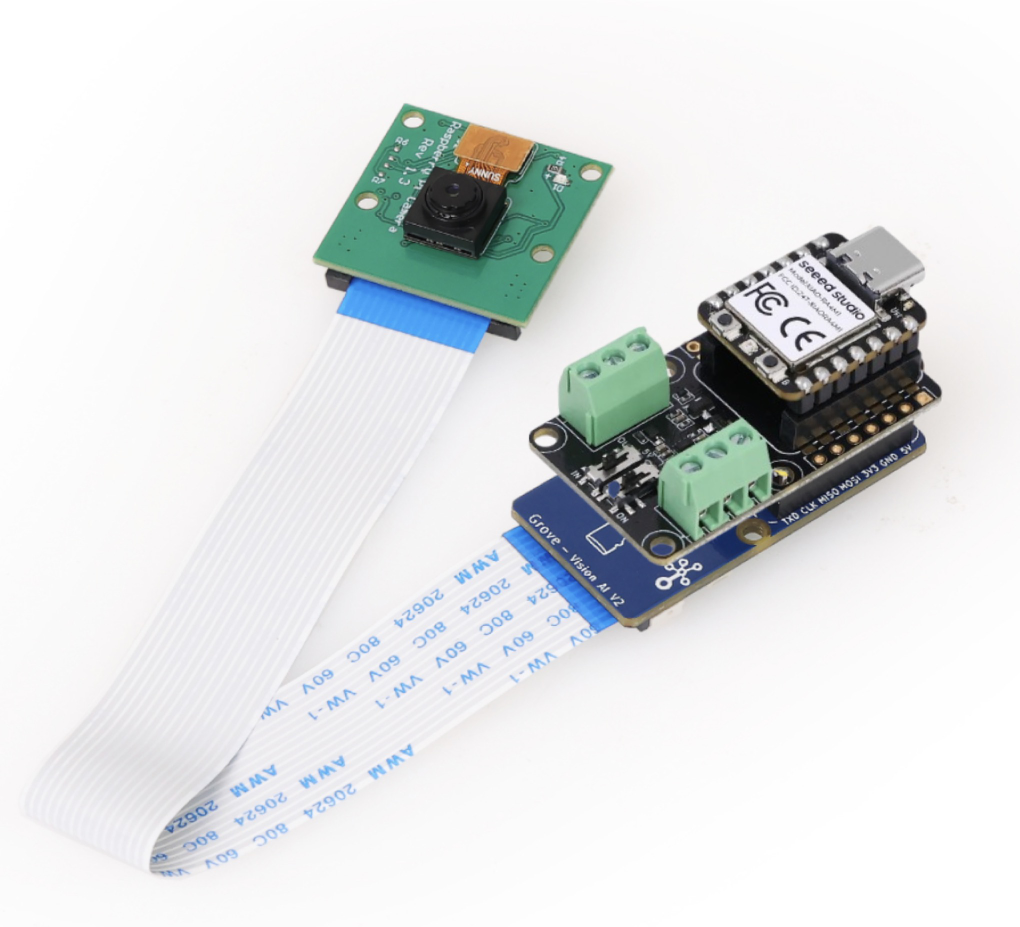
ステップ2. Vision AI V2を準備し、2つのRS485拡張ボードのうち1つの裏面に送信機として取り付けます
RS485拡張ボードを初めて使用する場合で、配線方法がわからない場合は、このリンクをクリックしてください(https://wiki.seeedstudio.com/ja/XIAO-RS485-Expansion-Board/)
モデルの書き込み方法やモデル出力コードの追加方法がわからない場合は、このリンクをクリックしてください(https://wiki.seeedstudio.com/ja/grove_vision_ai_v2_software_support/)。各ステップが詳細に説明されています
より良い後続の使用のために、これら2つのステップをスキップしないでください!
ソフトウェア準備
送信機コード
#include <Seeed_Arduino_SSCMA.h>

#ifdef ESP32
#include <HardwareSerial.h>

HardwareSerial Serial3(1);

// Define two Serial devices mapped to the two internal UARTs
HardwareSerial atSerial(0);

#else
#define atSerial Serial1
#endif

#define enable_pin D2 // Define the enable pin as D2

SSCMA AI;

void setup()
{
    Serial3.begin(115200, SERIAL_8N1, 7, 6); // Initialize Serial3 with 115200 baud rate, 8 data bits, no parity, 1 stop bit
    Serial.begin(9600); // Initialize Serial for debugging output
    AI.begin(&atSerial); // Initialize the AI module with the AT serial

    pinMode(enable_pin, OUTPUT); // Set the enable pin as an output
    digitalWrite(enable_pin, HIGH); // Set the enable pin to high to enable the AI module
}

void loop()
{
    if (!AI.invoke(1, false, true)) { // Invoke the AI to start processing

        Serial.println("invoke success"); // Print success message

        // Print performance metrics
        Serial.print("perf: prepocess=");
        Serial.print(AI.perf().prepocess);
        Serial.print(", inference=");
        Serial.print(AI.perf().inference);
        Serial.print(", postpocess=");
        Serial.println(AI.perf().postprocess);

        // Loop through detected boxes
        for (int i = 0; i < AI.boxes().size(); i++) {
            Serial.print("Box[");
            Serial.print(i);
            Serial.print("] target=");
            Serial.print(AI.boxes()[i].target);
            Serial.print(", score=");
            Serial.print(AI.boxes()[i].score);
            Serial.print(", x=");
            Serial.print(AI.boxes()[i].x);
            Serial.print(", y=");
            Serial.print(AI.boxes()[i].y);
            Serial.print(", w=");
            Serial.print(AI.boxes()[i].w);
            Serial.print(", h=");
            Serial.println(AI.boxes()[i].h);
        }

        // Loop through detected classes
        for (int i = 0; i < AI.classes().size(); i++) {
            Serial.print("Class[");
            Serial.print(i);
            Serial.print("] target=");
            Serial.println(AI.classes()[i].target);

            // Check the target class and send corresponding status
            if (AI.classes()[i].target == 0) {
                String status_a = "no people detected"; // Define status for no people detected
                Serial3.println(status_a); // Send status to Serial3
                Serial.println(status_a); // Print status to Serial monitor
            } else if (AI.classes()[i].target == 1) {
                String status_b = "people detected"; // Define status for people detected
                Serial3.println(status_b); // Send status to Serial3
                Serial.println(status_b); // Print status to Serial monitor
            }
        }
        delay(1000); // Wait for 1 second before the next loop iteration
    }
}
コード詳細機能
-
ライブラリインクルード
- ハードウェアシリアル機能を使用するために
HardwareSerialライブラリをインクルードします。 - AIモジュール制御のために
Seeed_Arduino_SSCMAライブラリをインクルードします。
- ハードウェアシリアル機能を使用するために
-
シリアルオブジェクト作成
HardwareSerial Serial3(1);
HardwareSerial atSerial(0);
シリアル通信用にSerial3とatSerialオブジェクトを作成します。
-
AIオブジェクト作成
SSCMA AI;AI処理用にSSCMAクラスのインスタンスを作成します。
-
パフォーマンスメトリクス
Serial.print("perf: prepocess=");
Serial.print(AI.perf().prepocess);
Serial.print(", inference=");
Serial.print(AI.perf().inference);
Serial.print(", postpocess=");
Serial.println(AI.perf().postprocess);
AI処理段階のパフォーマンスメトリクスを出力します:前処理、推論、後処理。
-
検出ボックスループ
for (int i = 0; i < AI.boxes().size(); i++) {
    Serial.print("Box[");
    Serial.print(i);
    Serial.print("] target=");
    Serial.print(AI.boxes()[i].target);
    Serial.print(", score=");
    Serial.print(AI.boxes()[i].score);
    Serial.print(", x=");
    Serial.print(AI.boxes()[i].x);
    Serial.print(", y=");
    Serial.print(AI.boxes()[i].y);
    Serial.print(", w=");
    Serial.print(AI.boxes()[i].w);
    Serial.print(", h=");
    Serial.println(AI.boxes()[i].h);
}
検出されたボックスをループし、ターゲット、スコア、バウンディングボックス座標を含む詳細を出力します。
-
検出クラスループ
for (int i = 0; i < AI.classes().size(); i++) {
   Serial.print("Class[");
   Serial.print(i);
   Serial.print("] target=");
   Serial.println(AI.classes()[i].target);
検出されたクラスをループし、そのターゲットを出力します。
-
マクロ定義
pinMode(enable_pin, OUTPUT); // Set the enable pin as an output
digitalWrite(enable_pin, LOW);
イネーブルピンをD2として定義します。
-
メッセージ送信
// Check the target class and send corresponding status
if (AI.classes()[i].target == 0) {
    String status_a = "no people detected"; // Define status for no people detected
    Serial3.println(status_a); // Send status to Serial3
    Serial.println(status_a); // Print status to Serial monitor
} else if (AI.classes()[i].target == 1) {
    String status_b = "people detected"; // Define status for people detected
    Serial3.println(status_b); // Send status to Serial3
    Serial.println(status_b); // Print status to Serial monitor
}
人が検出されたかどうかを判定し、人が検出された場合は受信機にPEOPLE DETECTEDを送信し、人が検出されなかった場合は受信機にNO PEOPLE DETECTEDを送信します。
受信機コード
#include <HardwareSerial.h>

HardwareSerial Serial3(1); // Use UART2
#define enable_pin D2 // Define the enable pin as D2


void setup() {
  Serial.begin(115200); // Initialize the hardware serial with a baud rate of 115200
  Serial3.begin(115200, SERIAL_8N1, 7, 6); // Initialize Serial3 with 115200 baud rate, 8 data bits, no parity, 1 stop bit (RX=D4(GPIO4), TX=D5(GPIO5))

  // Wait for the hardware serial to be ready
  while(!Serial3);
  while(!Serial); // This line is generally unnecessary as Serial.begin() is ready immediately

  pinMode(enable_pin, OUTPUT); // Set the enable pin as an output
  digitalWrite(enable_pin, LOW); // Set the enable pin to low to enable the device
}

void loop() {
    delay(100); // Delay for 100 milliseconds
    // Check if there is data available from the hardware serial
    if (Serial3.available()) {
        String receivedData = Serial3.readStringUntil('\n'); // Read string until newline character
        Serial.print("Received data: "); // Print label for received data
        Serial.println(receivedData); // Directly print the received data
    }
}
コード詳細機能
-
ライブラリのインクルード
- ハードウェアシリアル機能を使用するために
HardwareSerialライブラリをインクルードします。
- ハードウェアシリアル機能を使用するために
-
シリアルオブジェクトの作成
- UART2を使用して
Serial3オブジェクトを作成します。
- UART2を使用して
-
マクロ定義
pinMode(enable_pin, OUTPUT); // Set the enable pin as an output
digitalWrite(enable_pin, LOW);
イネーブルピンをD2として定義します。
-
セットアップ関数
Serial3.begin(115200, SERIAL_8N1, 7, 6);メインシリアルとSerial3を初期化し、ボーレート、データビットなどを設定します。これはvision ai v2と通信してデータを転送するシリアルポートです。
while(!Serial3);
while(!Serial);
すべてのシリアルポートが準備完了するまで待機し、イネーブルピンを出力として設定し、ローに引いてデバイスを有効にします。
-
ループ関数
if (Serial3.available());: 100ミリ秒ごとにSerial3でデータが利用可能かどうかをチェックします。String receivedData = Serial3.readStringUntil('\n');: データが利用可能な場合、改行文字まで読み取り、受信したデータをメインシリアルに出力します。
-
結果の出力
Serial.print("Received data: ");
Serial.println(receivedData);
送信者のメッセージを出力します
結果チャート
ただし、カメラは人を認識すると**「people detected」を送信し、人を認識しないと「no people detected」**を送信し、受信者は送信者の認識結果をシリアルポートに表示します。

技術サポート & 製品ディスカッション
弊社製品をお選びいただきありがとうございます!弊社製品での体験が可能な限りスムーズになるよう、さまざまなサポートを提供いたします。さまざまな好みやニーズに対応するため、複数のコミュニケーションチャネルを提供しています。