Jetson AGX Orin 上でのマルチ GMSL カメラによるリアルタイム物体検出と 3D 再構成
この Wiki では、reServer Industrial J501 キャリアボードと GMSL 拡張ボードを使用して、マルチカメラシステムにおけるリアルタイム物体検出と 3D 再構成のデプロイ方法を紹介します。
| NVIDIA Jetson AGX Orin モジュール | reServer Industrial J501 キャリアボード | reServer Industrial J501-GMSL 拡張ボード |
|---|---|---|
 |  |  |
前提条件
- NVIDIA Jetson AGX Orin モジュール 32GB/64GB
- 最新の JetPack 6.2 SDK をフラッシュ済み(GMSL 拡張ボード対応)
- reServer Industrial J501 キャリアボード
- reServer Industrial J501-GMSL 拡張ボード
- GMSL カメラ
GMSL カメラの構成
ハードウェア接続

GMSL カメラから入力を得るためには、まずシリアライザおよびデシリアライザのフォーマットを設定する必要があります。これらをシステム起動スクリプトに追加し、システム起動時に自動で設定されるようにします。
ステップ 1. 構成スクリプトを作成:
touch media-setup.sh
ステップ 2. 次の内容を media-setup.sh に貼り付けます:
#!/bin/bash
# Set Serializer & Deserializer Formats
media-ctl -d /dev/media0 --set-v4l2 '"ser_0_ch_0":1[fmt:YUYV8_1X16/1920x1536]'
media-ctl -d /dev/media0 --set-v4l2 '"ser_1_ch_1":1[fmt:YUYV8_1X16/1920x1536]'
media-ctl -d /dev/media0 --set-v4l2 '"ser_2_ch_2":1[fmt:YUYV8_1X16/1920x1536]'
media-ctl -d /dev/media0 --set-v4l2 '"ser_3_ch_3":1[fmt:YUYV8_1X16/1920x1536]'
media-ctl -d /dev/media0 --set-v4l2 '"ser_4_ch_0":1[fmt:YUYV8_1X16/1920x1536]'
media-ctl -d /dev/media0 --set-v4l2 '"ser_5_ch_1":1[fmt:YUYV8_1X16/1920x1536]'
media-ctl -d /dev/media0 --set-v4l2 '"ser_6_ch_2":1[fmt:YUYV8_1X16/1920x1536]'
media-ctl -d /dev/media0 --set-v4l2 '"ser_7_ch_3":1[fmt:YUYV8_1X16/1920x1536]'

media-ctl -d /dev/media0 --set-v4l2 '"des_0_ch_0":0[fmt:YUYV8_1X16/1920x1536]'
media-ctl -d /dev/media0 --set-v4l2 '"des_0_ch_1":0[fmt:YUYV8_1X16/1920x1536]'
media-ctl -d /dev/media0 --set-v4l2 '"des_0_ch_2":0[fmt:YUYV8_1X16/1920x1536]'
media-ctl -d /dev/media0 --set-v4l2 '"des_0_ch_3":0[fmt:YUYV8_1X16/1920x1536]'
media-ctl -d /dev/media0 --set-v4l2 '"des_1_ch_0":0[fmt:YUYV8_1X16/1920x1536]'
media-ctl -d /dev/media0 --set-v4l2 '"des_1_ch_1":0[fmt:YUYV8_1X16/1920x1536]'
media-ctl -d /dev/media0 --set-v4l2 '"des_1_ch_2":0[fmt:YUYV8_1X16/1920x1536]'
media-ctl -d /dev/media0 --set-v4l2 '"des_1_ch_3":0[fmt:YUYV8_1X16/1920x1536]'
ステップ 3. media-setup.sh に実行権限を付与:
chmod +x media-setup.sh
ステップ 4. systemd サービスを作成:
sudo vim /etc/systemd/system/mediactl-init.service

# 次の内容を追加します:
[Unit]
Description=Set media-ctl formats at boot
After=multi-user.target

[Service]
Type=oneshot
ExecStart=/usr/local/bin/media-setup.sh
RemainAfterExit=true

[Install]
WantedBy=multi-user.target
ステップ 5. 保存して終了後、サービスを有効化:
sudo systemctl daemon-reexec
sudo systemctl daemon-reload
sudo systemctl enable mediactl-init.service
sudo systemctl start mediactl-init.service
ステップ 5. デバイスを再起動し、サービスが実行中か確認:
sudo systemctl status mediactl-init.service

# 次のコマンドでカメラを素早く起動し、ウィンドウに映像ストリームを表示できます:
gst-launch-1.0 v4l2src device=/dev/video0  ! xvimagesink -ev
gst-launch-1.0 v4l2src device=/dev/video1  ! xvimagesink -ev
gst-launch-1.0 v4l2src device=/dev/video2  ! xvimagesink -ev
gst-launch-1.0 v4l2src device=/dev/video3  ! xvimagesink -ev
gst-launch-1.0 v4l2src device=/dev/video4  ! xvimagesink -ev
gst-launch-1.0 v4l2src device=/dev/video5  ! xvimagesink -ev
gst-launch-1.0 v4l2src device=/dev/video6  ! xvimagesink -ev
gst-launch-1.0 v4l2src device=/dev/video7  ! xvimagesink -ev

私たちの GMSL 拡張ボードは最大 8 台のカメラビデオ入力をサポートし、PTP タイムスタンプ精度は 1ms 未満で、8 つのビデオデータストリームの同期を保証します。
8 台のカメラで YOLO11 を迅速デプロイしリアルタイム物体検出
YOLOv11 は Ultralytics によって公開されたリアルタイム物体検出モデルで、速度・精度・効率の強力なバランスを提供します。改良されたアーキテクチャと学習戦略により、これまでのバージョンよりも性能と展開の柔軟性で優れています。エッジデバイス、自律システム、産業向け AI アプリケーションに特に適しており、検出・セグメンテーション・トラッキングなどのタスクを高い信頼性でサポートします。
YOLO11 をインストールしてマルチカメラ物体検出を実行
ステップ 1. 必要なパッケージをダウンロードしてインストール:
以下のパッケージは、CUDA 12.6 を搭載した JetPack 6.2 用にビルドされています。
onnxruntime_gpu-1.22.0-cp310-cp310-linux_aarch64.whl
torch-2.7.0-cp310-cp310-linux_aarch64.whl
torchvision-0.22.0-cp310-cp310-linux_aarch64.whl
# pip でパッケージをインストール:
sudo apt update
sudo apt install python3-pip -y
pip install -U pip
pip install onnxruntime_gpu-1.22.0-cp310-cp310-linux_aarch64.whl
pip install torch-2.7.0-cp310-cp310-linux_aarch64.whl
pip install torchvision-0.22.0-cp310-cp310-linux_aarch64.whl
pip install ultralytics
TensorRT モデルをエクスポート:
yolo export model=./models/yolo11n.pt format=engine device=0 half=True dynamic=True
yolo export model=./models/yolo11n-seg.pt format=engine device=0 half=True dynamic=True
yolo export model=./models/yolo11n-pose.pt format=engine device=0 half=True dynamic=True
以下の Python スクリプトを実行すると、8 台のカメラで素早く物体検出を行えます:
detect.py
import cv2
import time
import threading
import numpy as np
import torch
from ultralytics import YOLO

device = 'cuda' if torch.cuda.is_available() else 'cpu'
print(f"Using device: {device}")
model_detect = YOLO('./models/yolo11n.engine',task="detect")
model_seg = YOLO('./models/yolo11n-seg.engine',task="segment")
model_pose = YOLO('./models/yolo11n-pose.engine',task="pose")

camera_num = 8
frame_width, frame_height = 320, 240
frames = [np.zeros((frame_height, frame_width, 3), dtype=np.uint8) for _ in range(camera_num)]
locks = [threading.Lock() for _ in range(camera_num)]
running = True

def capture_thread(index):
    cap = cv2.VideoCapture(index)
    p_time = time.time()
    while running:
        detect_way = model_detect
        ret, frame = cap.read()
        frame_resized = cv2.resize(frame, (frame_width, frame_height))
        if index == 4 or index == 5:
            detect_way = model_seg
        if index ==6 or index == 7:
            detect_way = model_pose
        annotated = frame_resized.copy()
        results = detect_way.predict(
        source=frame_resized,
        device=device,
        verbose=False,
        stream=False,
        imgsz=640,
        conf=0.25
        )
        for r in results:
            annotated = r.plot()
        current_time = time.time()
        fps = 1 / (current_time - p_time)
        p_time = current_time
        cv2.putText(annotated, f"FPS: {fps:.2f}", (10, 25),
                        cv2.FONT_HERSHEY_SIMPLEX, 0.5, (0, 255, 255), 1, cv2.LINE_AA)

        with locks[index]:
            frames[index] = annotated

    cap.release()

def main():
    global running

    threads = []
    for i in range(camera_num):
        t = threading.Thread(target=capture_thread, args=(i,))
        t.start()
        threads.append(t)

    try:
        while True:
            frame_copy = []
            for i in range(camera_num):
                with locks[i]:
                    frame_copy.append(frames[i].copy())
            row1 = cv2.hconcat(frame_copy[:4])
            row2 = cv2.hconcat(frame_copy[4:8])
            result = cv2.vconcat([row1, row2])
            cv2.imshow("Multi-Camera", result)

            if cv2.waitKey(1) & 0xFF == ord('q'):
                break

    finally:
        running = False
        for t in threads:
            t.join()
        cv2.destroyAllWindows()

if __name__ == "__main__":
    main()
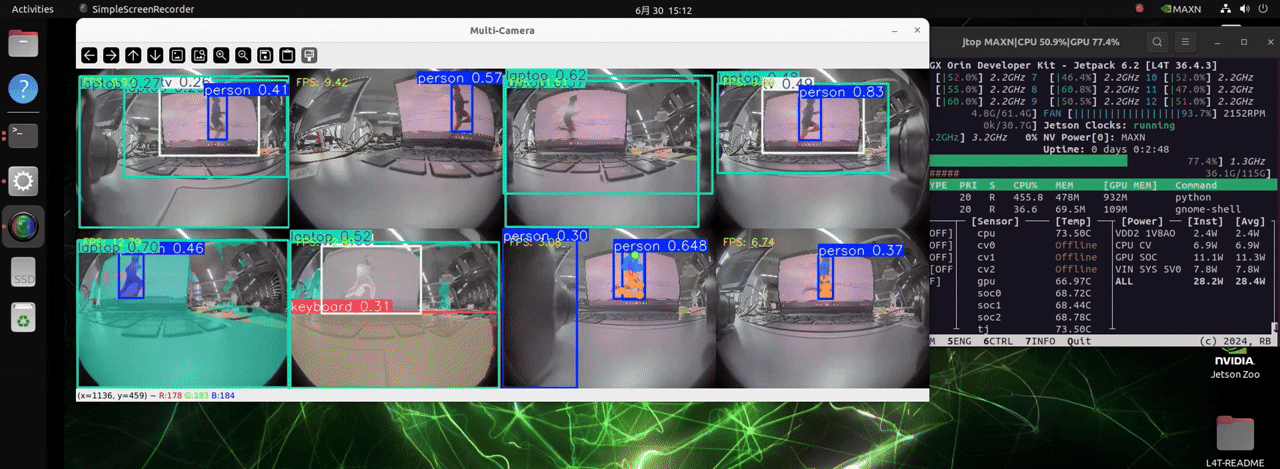
J501 は非常に高い計算能力を持つ NVIDIA AGX Orin モジュールを搭載しており、最大 8 台のカメラを扱い、3 種類の異なる検出タスクのモデルを同時に読み込むことで、リアルタイムな物体検出を可能にします。
VGGT を用いた 3D 再構成を迅速にデプロイ
VGGT は、複雑な環境における 3D 理解と推論のために設計されたビジョン・ランゲージモデルです。マルチビュー画像と言語入力を組み合わせて、詳細な 3D シーン表現を生成し、環境に関する空間的・意味的な質問に回答します。トランスフォーマベースのアーキテクチャを基盤としており、視覚的グラウンディング、3D 物体位置推定、言語ガイド付きナビゲーションなどのタスクで優れた性能を発揮し、ロボティクスやエンボディド AI アプリケーションに非常に適しています。
VGGT 環境をインストールしてマルチカメラで 3D 再構成を実行
git clone https://github.com/facebookresearch/vggt.git
cd vggt
pip install -r requirements.txt
pip install -r requirements_demo.txt
次のスクリプトを実行すると、8 台のカメラで素早く 3D 再構成を行えます:
demo.py
import os
import glob
import time
import threading
import argparse
from typing import List, Optional

import numpy as np
import torch
from tqdm.auto import tqdm
import viser
import viser.transforms as viser_tf
import cv2
from PIL import Image
from defisheye import Defisheye

try:
    import onnxruntime
except ImportError:
    print("onnxruntime not found. Sky segmentation may not work.")

from visual_util import segment_sky, download_file_from_url
from vggt.models.vggt import VGGT
from vggt.utils.load_fn import load_and_preprocess_images
from vggt.utils.geometry import closed_form_inverse_se3, unproject_depth_map_to_point_map
from vggt.utils.pose_enc import pose_encoding_to_extri_intri


def viser_wrapper(
    pred_dict: dict,
    port: int = 8080,
    init_conf_threshold: float = 50.0,  # represents percentage (e.g., 50 means filter lowest 50%)
    use_point_map: bool = False,
    background_mode: bool = False,
    mask_sky: bool = False,
    image_folder: str = None,
):
    """
    Visualize predicted 3D points and camera poses with viser.

    Args:
        pred_dict (dict):
            {
                "images": (S, 3, H, W)   - Input images,
                "world_points": (S, H, W, 3),
                "world_points_conf": (S, H, W),
                "depth": (S, H, W, 1),
                "depth_conf": (S, H, W),
                "extrinsic": (S, 3, 4),
                "intrinsic": (S, 3, 3),
            }
        port (int): Port number for the viser server.
        init_conf_threshold (float): Initial percentage of low-confidence points to filter out.
        use_point_map (bool): Whether to visualize world_points or use depth-based points.
        background_mode (bool): Whether to run the server in background thread.
        mask_sky (bool): Whether to apply sky segmentation to filter out sky points.
        image_folder (str): Path to the folder containing input images.
    """
    print(f"Starting viser server on port {port}")

    server = viser.ViserServer(host="0.0.0.0", port=port)
    server.gui.configure_theme(titlebar_content=None, control_layout="collapsible")

    # Unpack prediction dict
    images = pred_dict["images"]  # (S, 3, H, W)
    world_points_map = pred_dict["world_points"]  # (S, H, W, 3)
    conf_map = pred_dict["world_points_conf"]  # (S, H, W)

    depth_map = pred_dict["depth"]  # (S, H, W, 1)
    depth_conf = pred_dict["depth_conf"]  # (S, H, W)

    extrinsics_cam = pred_dict["extrinsic"]  # (S, 3, 4)
    intrinsics_cam = pred_dict["intrinsic"]  # (S, 3, 3)

    # Compute world points from depth if not using the precomputed point map
    if not use_point_map:
        world_points = unproject_depth_map_to_point_map(depth_map, extrinsics_cam, intrinsics_cam)
        conf = depth_conf
    else:
        world_points = world_points_map
        conf = conf_map

    # Apply sky segmentation if enabled
    if mask_sky and image_folder is not None:
        conf = apply_sky_segmentation(conf, image_folder)

    # Convert images from (S, 3, H, W) to (S, H, W, 3)
    # Then flatten everything for the point cloud
    colors = images.transpose(0, 2, 3, 1)  # now (S, H, W, 3)
    S, H, W, _ = world_points.shape

    # Flatten
    points = world_points.reshape(-1, 3)
    colors_flat = (colors.reshape(-1, 3) * 255).astype(np.uint8)
    conf_flat = conf.reshape(-1)

    cam_to_world_mat = closed_form_inverse_se3(extrinsics_cam)  # shape (S, 4, 4) typically
    # For convenience, we store only (3,4) portion
    cam_to_world = cam_to_world_mat[:, :3, :]

    # Compute scene center and recenter
    scene_center = np.mean(points, axis=0)
    points_centered = points - scene_center
    cam_to_world[..., -1] -= scene_center

    # Store frame indices so we can filter by frame
    frame_indices = np.repeat(np.arange(S), H * W)

    # Build the viser GUI
    gui_show_frames = server.gui.add_checkbox("Show Cameras", initial_value=True)

    # Now the slider represents percentage of points to filter out
    gui_points_conf = server.gui.add_slider(
        "Confidence Percent", min=0, max=100, step=0.1, initial_value=init_conf_threshold
    )

    gui_frame_selector = server.gui.add_dropdown(
        "Show Points from Frames", options=["All"] + [str(i) for i in range(S)], initial_value="All"
    )

    # Create the main point cloud handle
    # Compute the threshold value as the given percentile
    init_threshold_val = np.percentile(conf_flat, init_conf_threshold)
    init_conf_mask = (conf_flat >= init_threshold_val) & (conf_flat > 0.1)
    point_cloud = server.scene.add_point_cloud(
        name="viser_pcd",
        points=points_centered[init_conf_mask],
        colors=colors_flat[init_conf_mask],
        point_size=0.001,
        point_shape="circle",
    )

    # We will store references to frames & frustums so we can toggle visibility
    frames: List[viser.FrameHandle] = []
    frustums: List[viser.CameraFrustumHandle] = []

    def visualize_frames(extrinsics: np.ndarray, images_: np.ndarray) -> None:
        """
        Add camera frames and frustums to the scene.
        extrinsics: (S, 3, 4)
        images_:    (S, 3, H, W)
        """
        # Clear any existing frames or frustums
        for f in frames:
            f.remove()
        frames.clear()
        for fr in frustums:
            fr.remove()
        frustums.clear()

        # Optionally attach a callback that sets the viewpoint to the chosen camera
        def attach_callback(frustum: viser.CameraFrustumHandle, frame: viser.FrameHandle) -> None:
            @frustum.on_click
            def _(_) -> None:
                for client in server.get_clients().values():
                    client.camera.wxyz = frame.wxyz
                    client.camera.position = frame.position

        img_ids = range(S)
        for img_id in tqdm(img_ids):
            cam2world_3x4 = extrinsics[img_id]
            T_world_camera = viser_tf.SE3.from_matrix(cam2world_3x4)

            # Add a small frame axis
            frame_axis = server.scene.add_frame(
                f"frame_{img_id}",
                wxyz=T_world_camera.rotation().wxyz,
                position=T_world_camera.translation(),
                axes_length=0.05,
                axes_radius=0.002,
                origin_radius=0.002,
            )
            frames.append(frame_axis)

            # Convert the image for the frustum
            img = images_[img_id]  # shape (3, H, W)
            img = (img.transpose(1, 2, 0) * 255).astype(np.uint8)
            h, w = img.shape[:2]

            # If you want correct FOV from intrinsics, do something like:
            # fx = intrinsics_cam[img_id, 0, 0]
            # fov = 2 * np.arctan2(h/2, fx)
            # For demonstration, we pick a simple approximate FOV:
            fy = 1.1 * h
            fov = 2 * np.arctan2(h / 2, fy)

            # Add the frustum
            frustum_cam = server.scene.add_camera_frustum(
                f"frame_{img_id}/frustum", fov=fov, aspect=w / h, scale=0.05, image=img, line_width=1.0
            )
            frustums.append(frustum_cam)
            attach_callback(frustum_cam, frame_axis)

    def update_point_cloud() -> None:
        """Update the point cloud based on current GUI selections."""
        # Here we compute the threshold value based on the current percentage
        current_percentage = gui_points_conf.value
        threshold_val = np.percentile(conf_flat, current_percentage)

        print(f"Threshold absolute value: {threshold_val}, percentage: {current_percentage}%")

        conf_mask = (conf_flat >= threshold_val) & (conf_flat > 1e-5)

        if gui_frame_selector.value == "All":
            frame_mask = np.ones_like(conf_mask, dtype=bool)
        else:
            selected_idx = int(gui_frame_selector.value)
            frame_mask = frame_indices == selected_idx

        combined_mask = conf_mask & frame_mask
        point_cloud.points = points_centered[combined_mask]
        point_cloud.colors = colors_flat[combined_mask]

    @gui_points_conf.on_update
    def _(_) -> None:
        update_point_cloud()

    @gui_frame_selector.on_update
    def _(_) -> None:
        update_point_cloud()

    @gui_show_frames.on_update
    def _(_) -> None:
        """Toggle visibility of camera frames and frustums."""
        for f in frames:
            f.visible = gui_show_frames.value
        for fr in frustums:
            fr.visible = gui_show_frames.value

    # Add the camera frames to the scene
    visualize_frames(cam_to_world, images)

    print("Starting viser server...")
    # If background_mode is True, spawn a daemon thread so the main thread can continue.
    if background_mode:

        def server_loop():
            while True:
                time.sleep(0.001)

        thread = threading.Thread(target=server_loop, daemon=True)
        thread.start()
    else:
        while True:
            time.sleep(0.01)

    return server


# Helper functions for sky segmentation


def apply_sky_segmentation(conf: np.ndarray, image_folder: str) -> np.ndarray:
    """
    Apply sky segmentation to confidence scores.

    Args:
        conf (np.ndarray): Confidence scores with shape (S, H, W)
        image_folder (str): Path to the folder containing input images

    Returns:
        np.ndarray: Updated confidence scores with sky regions masked out
    """
    S, H, W = conf.shape
    sky_masks_dir = image_folder.rstrip("/") + "_sky_masks"
    os.makedirs(sky_masks_dir, exist_ok=True)

    # Download skyseg.onnx if it doesn't exist
    if not os.path.exists("skyseg.onnx"):
        print("Downloading skyseg.onnx...")
        download_file_from_url("https://huggingface.co/JianyuanWang/skyseg/resolve/main/skyseg.onnx", "skyseg.onnx")

    skyseg_session = onnxruntime.InferenceSession("skyseg.onnx")
    image_files = sorted(glob.glob(os.path.join(image_folder, "*")))
    sky_mask_list = []

    print("Generating sky masks...")
    for i, image_path in enumerate(tqdm(image_files[:S])):  # Limit to the number of images in the batch
        image_name = os.path.basename(image_path)
        mask_filepath = os.path.join(sky_masks_dir, image_name)

        if os.path.exists(mask_filepath):
            sky_mask = cv2.imread(mask_filepath, cv2.IMREAD_GRAYSCALE)
        else:
            sky_mask = segment_sky(image_path, skyseg_session, mask_filepath)

        # Resize mask to match H×W if needed
        if sky_mask.shape[0] != H or sky_mask.shape[1] != W:
            sky_mask = cv2.resize(sky_mask, (W, H))

        sky_mask_list.append(sky_mask)

    # Convert list to numpy array with shape S×H×W
    sky_mask_array = np.array(sky_mask_list)
    # Apply sky mask to confidence scores
    sky_mask_binary = (sky_mask_array > 0.1).astype(np.float32)
    conf = conf * sky_mask_binary

    print("Sky segmentation applied successfully")
    return conf


parser = argparse.ArgumentParser(description="VGGT demo with viser for 3D visualization")
parser.add_argument(
    "--image_folder", type=str, default="examples/kitchen/images/", help="Path to folder containing images"
)
parser.add_argument("--use_point_map", action="store_true", help="Use point map instead of depth-based points")
parser.add_argument("--background_mode", action="store_true", help="Run the viser server in background mode")
parser.add_argument("--port", type=int, default=8080, help="Port number for the viser server")
parser.add_argument(
    "--conf_threshold", type=float, default=25.0, help="Initial percentage of low-confidence points to filter out"
)
parser.add_argument("--mask_sky", action="store_true", help="Apply sky segmentation to filter out sky points")


def main():
    """
    Main function for the VGGT demo with viser for 3D visualization.

    This function:
    1. Loads the VGGT model
    2. Processes input images from the specified folder
    3. Runs inference to generate 3D points and camera poses
    4. Optionally applies sky segmentation to filter out sky points
    5. Visualizes the results using viser

    Command-line arguments:
    --image_folder: Path to folder containing input images
    --use_point_map: Use point map instead of depth-based points
    --background_mode: Run the viser server in background mode
    --port: Port number for the viser server
    --conf_threshold: Initial percentage of low-confidence points to filter out
    --mask_sky: Apply sky segmentation to filter out sky points
    """
    args = parser.parse_args()
    device = "cuda" if torch.cuda.is_available() else "cpu"
    print(f"Using device: {device}")

    print("Initializing and loading VGGT model...")
    # model = VGGT.from_pretrained("facebook/VGGT-1B")

    model = VGGT()
    _URL = "https://huggingface.co/facebook/VGGT-1B/resolve/main/model.pt"
    model.load_state_dict(torch.hub.load_state_dict_from_url(_URL))

    model.eval()
    model = model.to(device)
    width=640
    height=480
    images = []
    camera_num = 8
    caps = [cv2.VideoCapture(i) for i in range(camera_num)]
    for cap in caps:
        ret, img = cap.read()
        img = cv2.resize(img, (width, height))
        obj = Defisheye(img)
        img = obj.convert(outfile=None)
        img = cv2.cvtColor(img, cv2.COLOR_BGR2RGB)
        img = Image.fromarray(img)
        images.append(img)
    images_tensor = load_and_preprocess_images(images).to(device)

    images = load_and_preprocess_images(images).to(device)
    print(f"Preprocessed images shape: {images.shape}")

    print("Running inference...")
    dtype = torch.bfloat16 if torch.cuda.get_device_capability()[0] >= 8 else torch.float16

    with torch.no_grad():
        with torch.cuda.amp.autocast(dtype=dtype):
            predictions = model(images)

    print("Converting pose encoding to extrinsic and intrinsic matrices...")
    extrinsic, intrinsic = pose_encoding_to_extri_intri(predictions["pose_enc"], images.shape[-2:])
    predictions["extrinsic"] = extrinsic
    predictions["intrinsic"] = intrinsic

    print("Processing model outputs...")
    for key in predictions.keys():
        if isinstance(predictions[key], torch.Tensor):
            predictions[key] = predictions[key].cpu().numpy().squeeze(0)  # remove batch dimension and convert to numpy

    if args.use_point_map:
        print("Visualizing 3D points from point map")
    else:
        print("Visualizing 3D points by unprojecting depth map by cameras")

    if args.mask_sky:
        print("Sky segmentation enabled - will filter out sky points")

    print("Starting viser visualization...")

    viser_server = viser_wrapper(
        predictions,
        port=args.port,
        init_conf_threshold=args.conf_threshold,
        use_point_map=args.use_point_map,
        background_mode=args.background_mode,
        mask_sky=args.mask_sky,
        image_folder=args.image_folder,
    )
    print("Visualization complete")


if __name__ == "__main__":
    main()
この Python スクリプトを実行し、ブラウザを開いて viser サーバーにアクセスしてください。vggt モデルの読み込み時間はやや長くなる場合があります。忍耐強く待ってください。
リモートサーバーでこのスクリプトを実行している場合は、localhost をサーバーの IP アドレスに置き換えてください。
http://localhost:8080

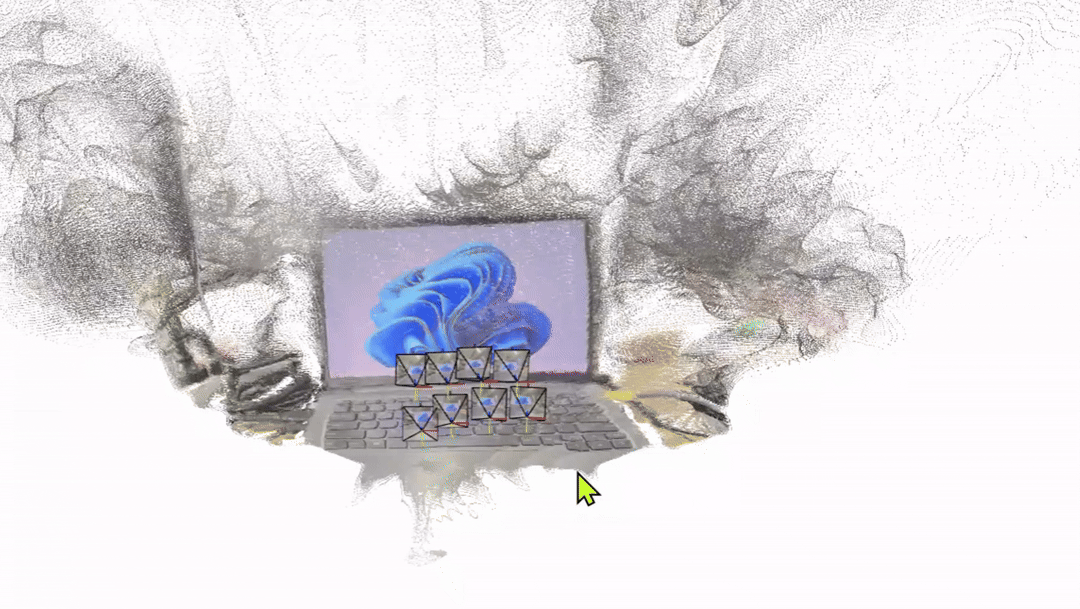
使用しているカメラは歪みの大きい魚眼カメラであるため、歪み補正後の画像品質は低下し、最終的な 3D モデリング結果に影響します。歪みが少なく、画質の高いカメラを使用すれば、結果は改善されます。
リソース
テクニカルサポート & 製品ディスカッション
当社製品をお選びいただきありがとうございます。製品をスムーズにご利用いただけるよう、さまざまなサポートをご用意しています。ご希望や用途に合わせ、以下の窓口をご利用ください。