TRMNL 7.5inch(OG) DIY Kit と ESPHome の連携
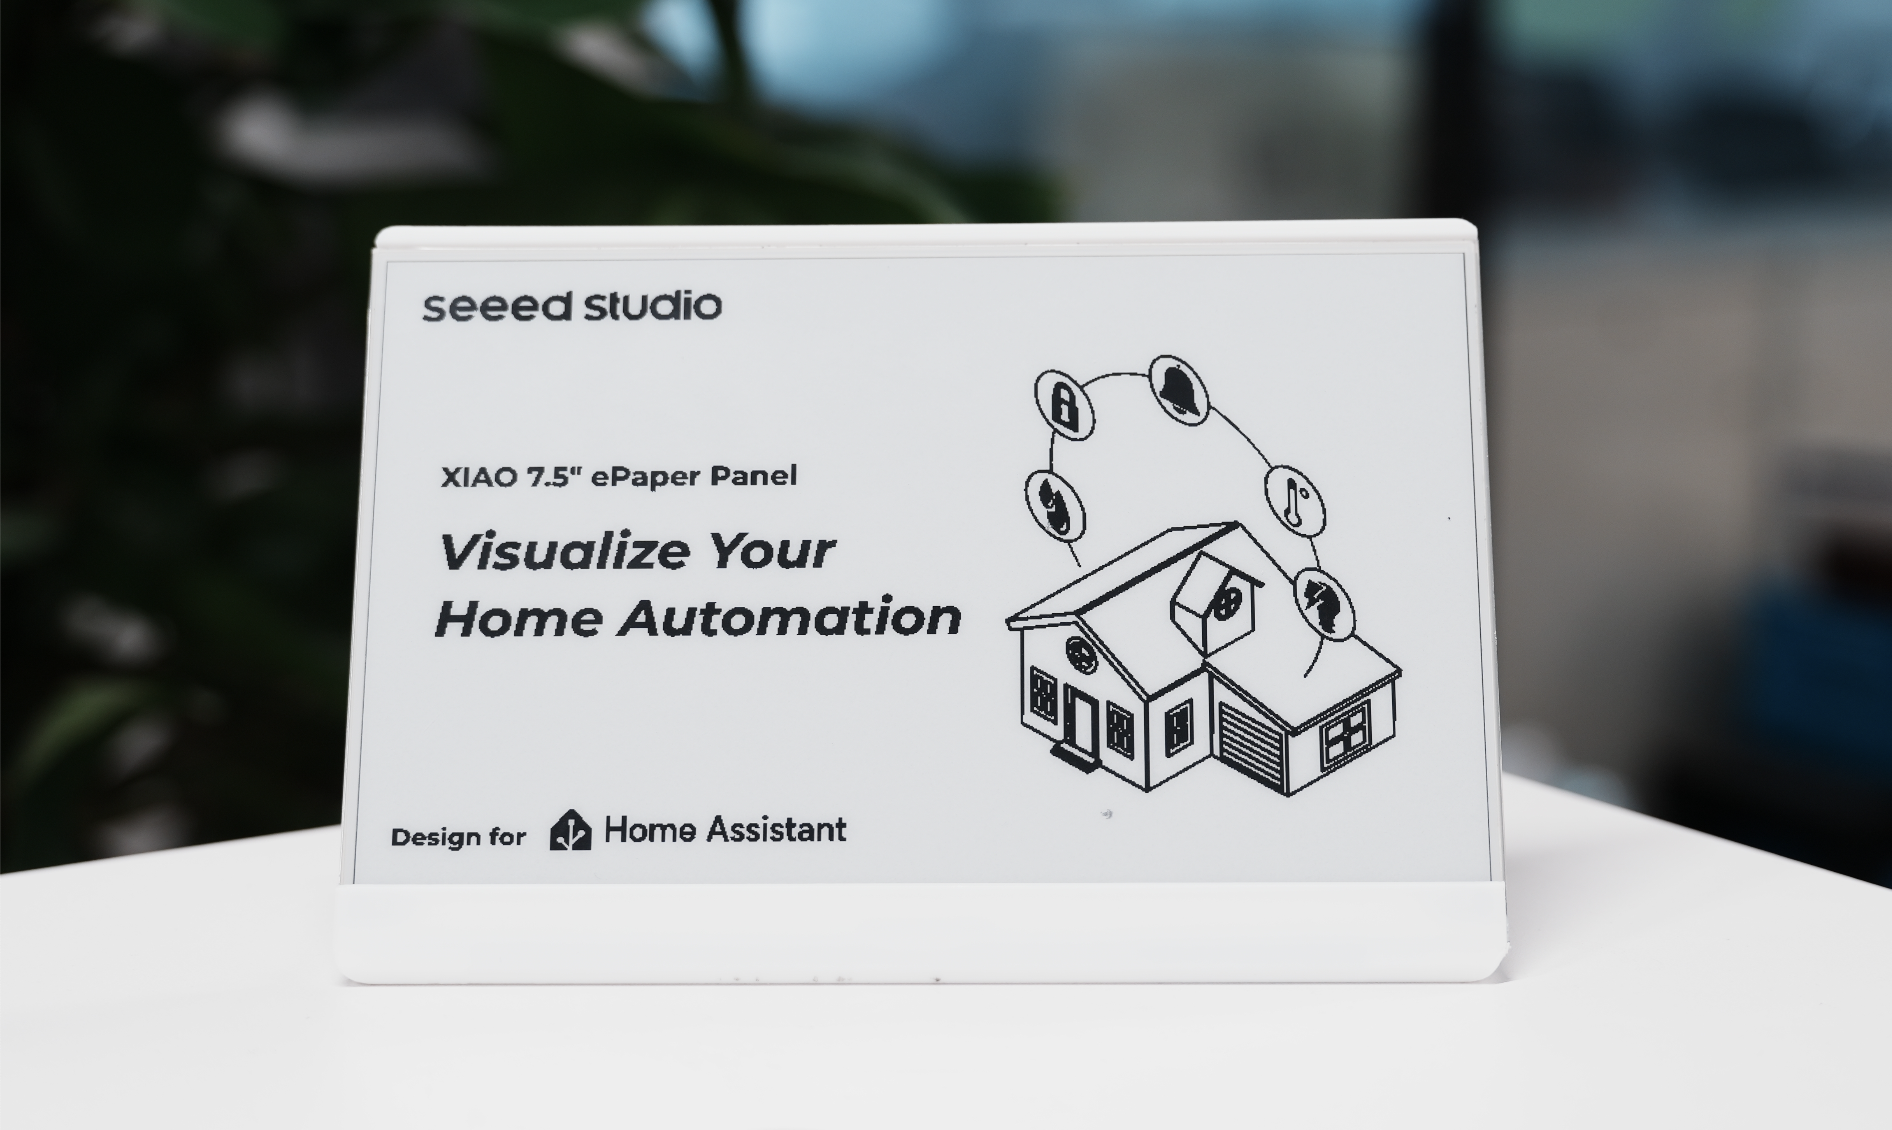
Home Assistant の紹介
Home Assistant は、スマートホームデバイスを単一の統合インターフェースから制御・監視できる強力なオープンソースホームオートメーションプラットフォームです。スマートホームの中央ハブとして機能し、ルーチンの自動化、センサーの監視、より知的な生活空間の構築を可能にします。

なぜ Home Assistant なのか?
-
ローカル制御: 多くのクラウドベースソリューションとは異なり、Home Assistant はネットワーク上でローカルに動作するため、データのプライバシーが保たれ、インターネット接続がなくても自動化が機能します。
-
幅広いデバイスサポート: Home Assistant は数千種類のスマートホームデバイスやサービスと統合でき、高い汎用性と将来性を提供します。
-
強力な自動化: 時間、デバイス状態、センサー読み取り値など、さまざまなトリガーに応答する高度な自動化ルールを作成できます。
-
カスタマイズ可能なダッシュボード: 最も重要な情報を表示する独自のユーザーインターフェースを設計できます。
なぜ TRMNL 7.5inch(OG) DIY Kit と Home Assistant なのか?
TRMNL 7.5inch(OG) DIY Kit は、いくつかの理由で Home Assistant の優れたコンパニオンです:
-
省エネルギー: e-paper ディスプレイはコンテンツを更新する時のみ電力を消費するため、天気予報、カレンダーイベント、システムステータスなどの持続的な情報表示に最適です。
-
優れた視認性: LCD スクリーンとは異なり、e-paper ディスプレイは直射日光を含むあらゆる照明条件で読みやすく、壁掛けホームコントロールパネルに理想的です。
-
長いバッテリー寿命: ディープスリープモードと組み合わせることで、一目で価値ある情報を提供しながら、単一のバッテリー充電で数ヶ月間動作できます。
-
柔軟な統合: ESPHome を通じて、ディスプレイは Home Assistant とシームレスに統合され、スマートホームシステムからのあらゆるデータをエレガントで常時表示可能な形式で表示できます。
これらの利点により、TRMNL 7.5inch(OG) DIY Kit は Home Assistant セットアップ用の省エネルギーで常時オンの情報ディスプレイを作成するのに理想的な選択肢となります。
ESPHome 統合
ESPHome は ESP8266/ESP32 デバイス専用に設計されたオープンソースファームウェア作成ツールです。シンプルな YAML 設定ファイルを使用してカスタムファームウェアを作成し、デバイスにフラッシュできます。TRMNL 7.5inch(OG) DIY Kit の場合、ESPHome はデバイスと Home Assistant 間の通信を可能にする重要なミドルウェアとして機能します。
このシステムは、YAML 設定を ESP デバイス上で動作する完全機能のファームウェアに変換することで動作します。このファームウェアは、ネットワークへの接続、Home Assistant との通信、ePaper ディスプレイの制御といった複雑なタスクをすべて処理します。Home Assistant と組み合わせることで、ESPHome は高度なホームオートメーションディスプレイとコントロールを作成するための堅牢なプラットフォームを提供します。
セットアップ方法とこの多用途ディスプレイを最大限に活用する方法を探ってみましょう。
入門ガイド
この記事のチュートリアル内容を始める前に、以下のハードウェアを準備する必要があります。
必要な材料
Home Assistant Green は、ホームオートメーションを実現する最も簡単でプライバシーに配慮した方法です。簡単なセットアップを提供し、すべてのスマートデバイスを単一のシステムで制御でき、すべてのデータはデフォルトでローカルに保存されます。このボードは活発な Home Assistant エコシステムの恩恵を受け、オープンソースにより毎月改善されています。
このチュートリアルでは Home Assistant Green を Home Assistant ホストとして使用することをお勧めしますが、Supervisor を備えた任意の Home Assistant ホストを使用することもできます。
Seeed Studio 製品の一部について Home Assistant のインストール方法も書いていますので、参考にしてください。
- ODYSSEY-X86 での Home Assistant 入門
- reTerminal での Home Assistant 入門
- LinkStar H68K/reRouter CM4 での Home Assistant 入門
Seeed Studio 製品を使用していない場合は、Home Assistant 公式ウェブサイトで他の製品への Home Assistant インストール方法を確認・学習することもできます。
機器の設置
ステップ 1. ディスプレイをドライバーボードに接続
FPC ケーブルを XIAO ePaper Display Board のコネクタに合わせ、ラッチを固定して確実な接続を確保します。
FPC ケーブルの金属面は上向きにする必要があります。そうでないと、コンテンツが表示されません。
以下のインストールチュートリアルに従ってください。多くの人が間違えます。

ステップ 2. バッテリーの取り付け
バッテリーケーブルをドライバーボードの JST コネクタに接続し、正しい極性(赤線を +、黒線を - に)を確認します。

ステップ 3. エンクロージャーの組み立て(オプション)
スクリーンのフレキシブルケーブルは非常に壊れやすいことに注意してください。操作時は注意してください。損傷すると、スクリーン全体が動作しなくなります。
リソース部分からオープンソースエンクロージャー部品を印刷し、内部にコンポーネントを組み立てます。

まず、ドライバーボードとバッテリーを組み立てます。
TRMNL キットが正常に動作するかテストします。
スクリーンをケースに差し込み、FPC を外に出せるようにします。
FPC 延長ケーブルを接続し、ケース全体を組み立てます。
L字型エンクロージャーも非常に似ています。
TRMNL キットがルーターから遠い場合は、アンテナをケースの外に移動できます。より良いパフォーマンスが得られます。
ステップ 1. ESPHome のインストール
すでに ESPHome をインストールしている場合は、このステップをスキップできます。
Settings -> Add-ons -> ADD-ON STORE に移動します


ESPHome を検索してクリックします。INSTALL と START をクリックします。
アドオンストアでESPHomeが見つからない場合は、アドオンをサポートするHome Assistantインストール(Home Assistant OSまたは監視付きインストールなど)を使用していることを確認してください。他のインストールタイプ(Home Assistant Containerなど)の場合、DockerでESPHome Device Builderを独立して実行する必要がある場合があります。詳細については、公式ESPHomeドキュメントを参照してください。

その後、ESPHome Builderがサイドバーに表示されます。

ステップ2. 新しいデバイスを追加
ESPHomeに移動し、NEW DEVICEをクリックします。

お好みのデバイス名を付け、チップタイプにESP32-S3を選択し、SKIPをクリックします。

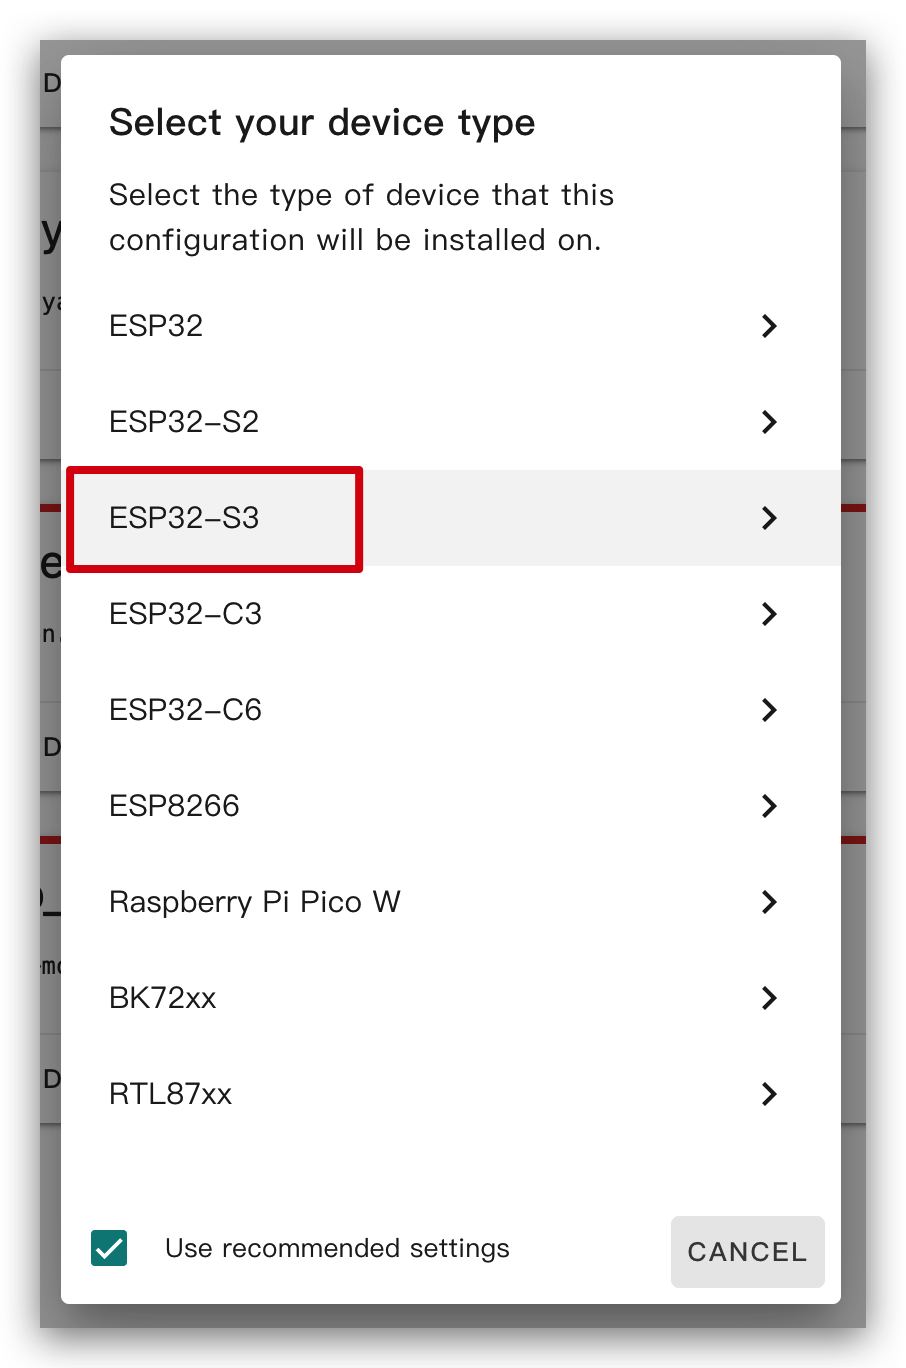

新しいデバイスを作成した後、EDITをクリックします。

デフォルトで生成されたコード内で、esp32のフレームワークがesp-idfになっている場合がありますが、これをarduinoに変更する必要があります。
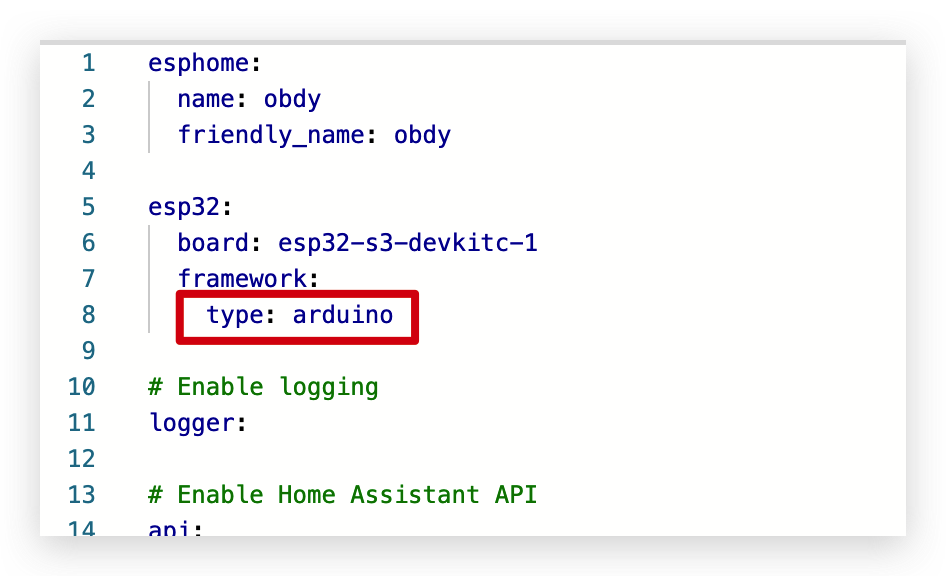
ステップ3. ファームウェアのインストール
これは非常に基本的な例で、ディスプレイに「Hello World!」を表示します。
主な目的は、デバイスにファームウェアをインストールするさまざまな方法を示すことです。
以下のコードをコピーして、下図のようにcaptive_portalの後に貼り付けることができます。
# define font to display words
font:
  - file: "gfonts://Inter@700"
    id: font1
    size: 24

# define SPI interface
spi:
  clk_pin: GPIO7
  mosi_pin: GPIO9

display:
  - platform: waveshare_epaper
    model: 7.50inv2
    cs_pin: GPIO44
    dc_pin: GPIO10
    reset_pin: GPIO38
    busy_pin:
      number: GPIO4
      inverted: true
    update_interval: 30s
    lambda: |-
      it.print(0, 0, id(font1), "Hello World!");
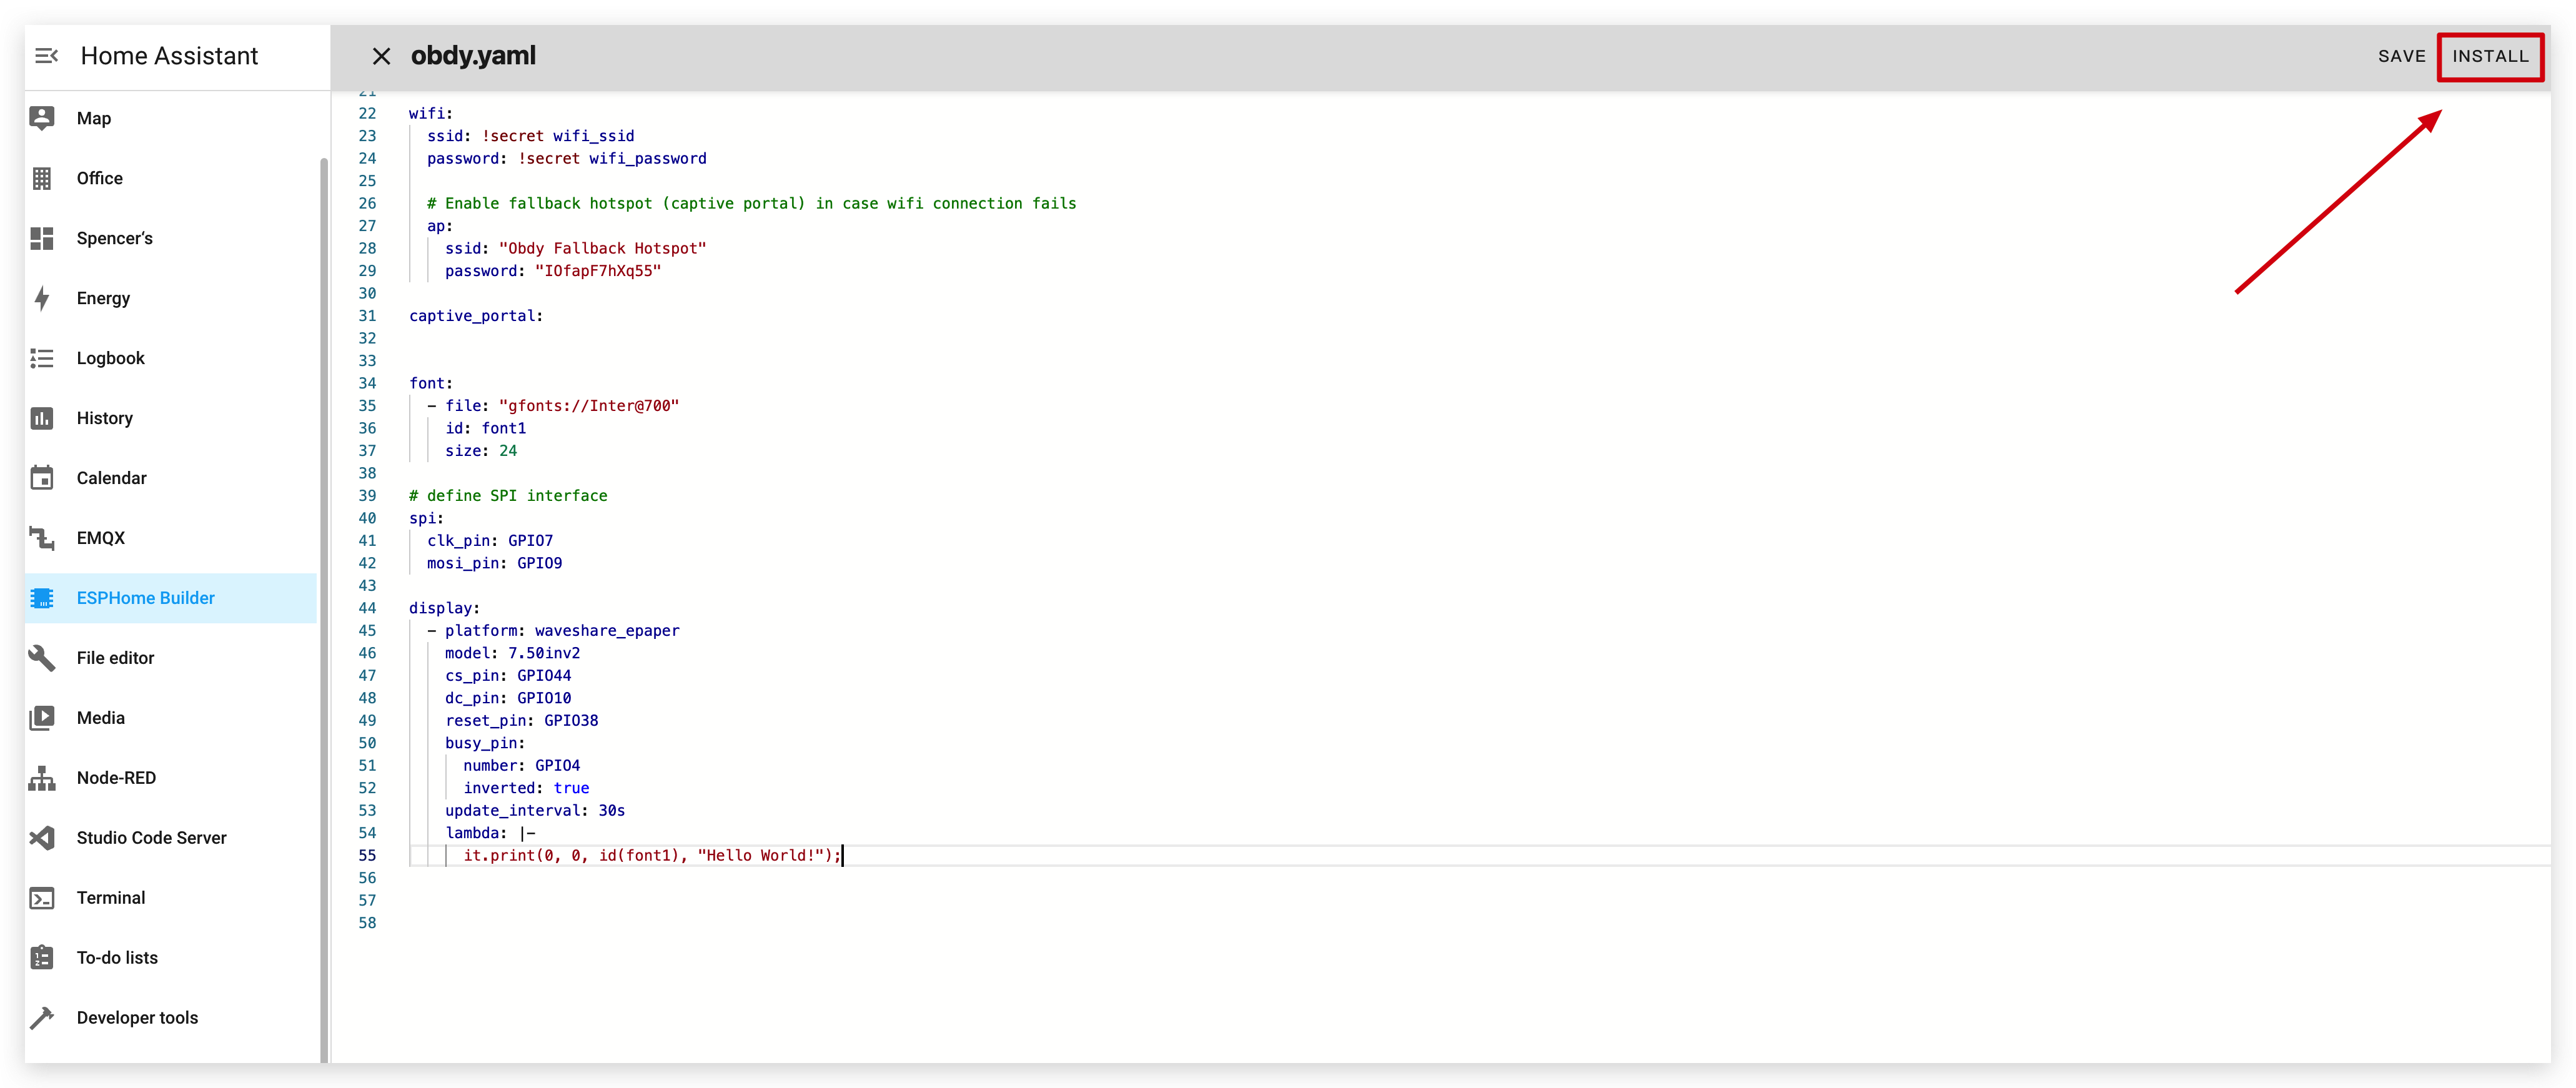
INSTALLをクリックしてコードをデバイスにインストールすると、以下の画像が表示されます。
- ブラウザ経由でインストール
- ホスト経由でインストール
- Wi-Fi経由でインストール
Home Assistantホスト(Raspberry PI/Green/Yellowなど)が遠くにある場合は、この方法をお勧めします。手元にあるコンピュータでインストールできます。
まず、Manual downloadをクリックしてコンパイル済みファームウェアをダウンロードする必要があります。

ファームウェアをePaperパネルにアップロードするこのウェブサイトを開きます。

ESPHomeに戻ってファームウェアをダウンロードします。

Factory formatを選択します。

USBケーブルを使用してePaperパネルをコンピュータに接続し、CONNECTをクリックします。

usbmodemxxx(WindowsではCOMxxx)を選択し、connectをクリックします。問題が発生しましたか?こちらをクリック。

INSTALLをクリックし、先ほどダウンロードしたファームウェアを選択します。

しばらく待つと、ディスプレイに「Hello world!」が表示されます~


Home Assistantホスト(Raspberry PI/Green/Yellowなど)が近くにある場合は、より簡単なのでこの方法をお勧めします。
コードをデバイスにインストールする前に、USBケーブルを使用してこのデバイスをHome Assistantを実行しているRaspberry PiまたはHA Green(Yellow)などに接続する必要があります。
画像に従ってオプションをクリックし、コードをデバイスにインストールします。デバイスがディープスリープモードの時にポートが見つからない?


しばらく待つと、以下の画像のようなフィードバックが表示されます。これはコードが正常に実行されていることを意味します。


これは最も簡単な方法ですが、初回プログラムインストール時には、まず左側の方法を使用してePaperパネルにプログラムをアップロードする必要があります。その後、wifi経由でアップロードできます。また、この方法が機能するためには、YAMLコンフィギュレーションに有効な暗号化キーを持つ適切に設定されたotaとapiセクションが含まれていることを確認してください。
この方法では、ePaperパネルを何にも接続する必要がなく、オンラインであることを確認するだけです。
オプションをクリックすると、ファームウェアが自動的にePaperパネルにインストールされます。

しばらく待つと、以下の画像のようなフィードバックが表示されます。失敗した場合は、信号が弱いことが原因の可能性があります。デバイスをルーターに近づけてください。問題が発生しましたか?こちらをクリック。


基本的な使用方法
1. 図形の表示
この例では、ディスプレイに図形を表示します。
以下のコードをコピーして、下図のようにcaptive_portal部分に貼り付けることができます。
spi:
  clk_pin: GPIO7
  mosi_pin: GPIO9

display:
  - platform: waveshare_epaper
    model: 7.50inv2
    cs_pin: GPIO44
    dc_pin: GPIO10
    reset_pin: GPIO38
    busy_pin:
      number: GPIO4
      inverted: true
    update_interval: 5min
    lambda: |-
      it.rectangle(10, 10, 100, 50);
      it.rectangle(150, 10, 50, 50);
      it.circle(250, 35, 25);

      it.filled_rectangle(10, 80, 100, 50);
      it.filled_rectangle(150, 80, 50, 50);
      it.filled_circle(250, 105, 25);
以下の画像のようなフィードバックが表示されると、コードが正常に実行されていることを意味します。
より多くの使用方法については、こちらをクリックしてください。

2. HAの情報を表示
この例では、HAの情報をディスプレイに表示します。
まず最初に、このデバイスをHAに追加する必要があります。そうしないと、HAから情報を取得できません。
HAがデバイスを表示しない場合は、まず上記のデモを実行する必要があります。上記のデモを実行した後、HAでデバイスを確認できます。


その後、SUBMITとFINISHをクリックします。


ESPHomeをインストールして新しいデバイスを追加した後、以下のコードをコピーして、下図のようにcaptive_portalの後に貼り付けることができます。
# Define font to show info
font:
  - file: "gfonts://Inter@700"
    id: myFont
    size: 24

# Get info from HA, as string format
text_sensor:
  - platform: homeassistant
    entity_id: weather.forecast_home
    id: myWeather
    internal: true
  - platform: homeassistant
    entity_id: weather.forecast_home
    id: myTemperature
    attribute: "temperature"
    internal: true

# Get info from HA, as float format
sensor:
  - platform: homeassistant
    entity_id: weather.forecast_home
    id: myPressure
    attribute: "pressure"
    internal: true

# Display info via SPI
spi:
  clk_pin: GPIO7
  mosi_pin: GPIO9

display:
  - platform: waveshare_epaper
    model: 7.50inv2
    cs_pin: GPIO44
    dc_pin: GPIO10
    reset_pin: GPIO38
    busy_pin:
      number: GPIO4
      inverted: true
    update_interval: 30s
    lambda: |-
      //print info in log
      ESP_LOGD("epaper", "weather: %s", id(myWeather).state.c_str());
      ESP_LOGD("epaper", "temperature: %s", id(myTemperature).state.c_str());
      ESP_LOGD("epaper", "pressure: %.1f", id(myPressure).state);
      //display info in epaper screen
      it.printf(100, 100, id(myFont), "%s", id(myWeather).state.c_str());
      it.printf(100, 150, id(myFont), "%s", id(myTemperature).state.c_str());
      it.printf(100, 200, id(myFont), "%.1f", id(myPressure).state);
これらのコードをデバイスにインストールします。

このコードの機能は、HAから天気、温度、気圧を取得してディスプレイに表示することです。

Home Assistantに天気関連のコンポーネントがない場合は、統合機能からOpen-Meteoという統合をダウンロードできます。
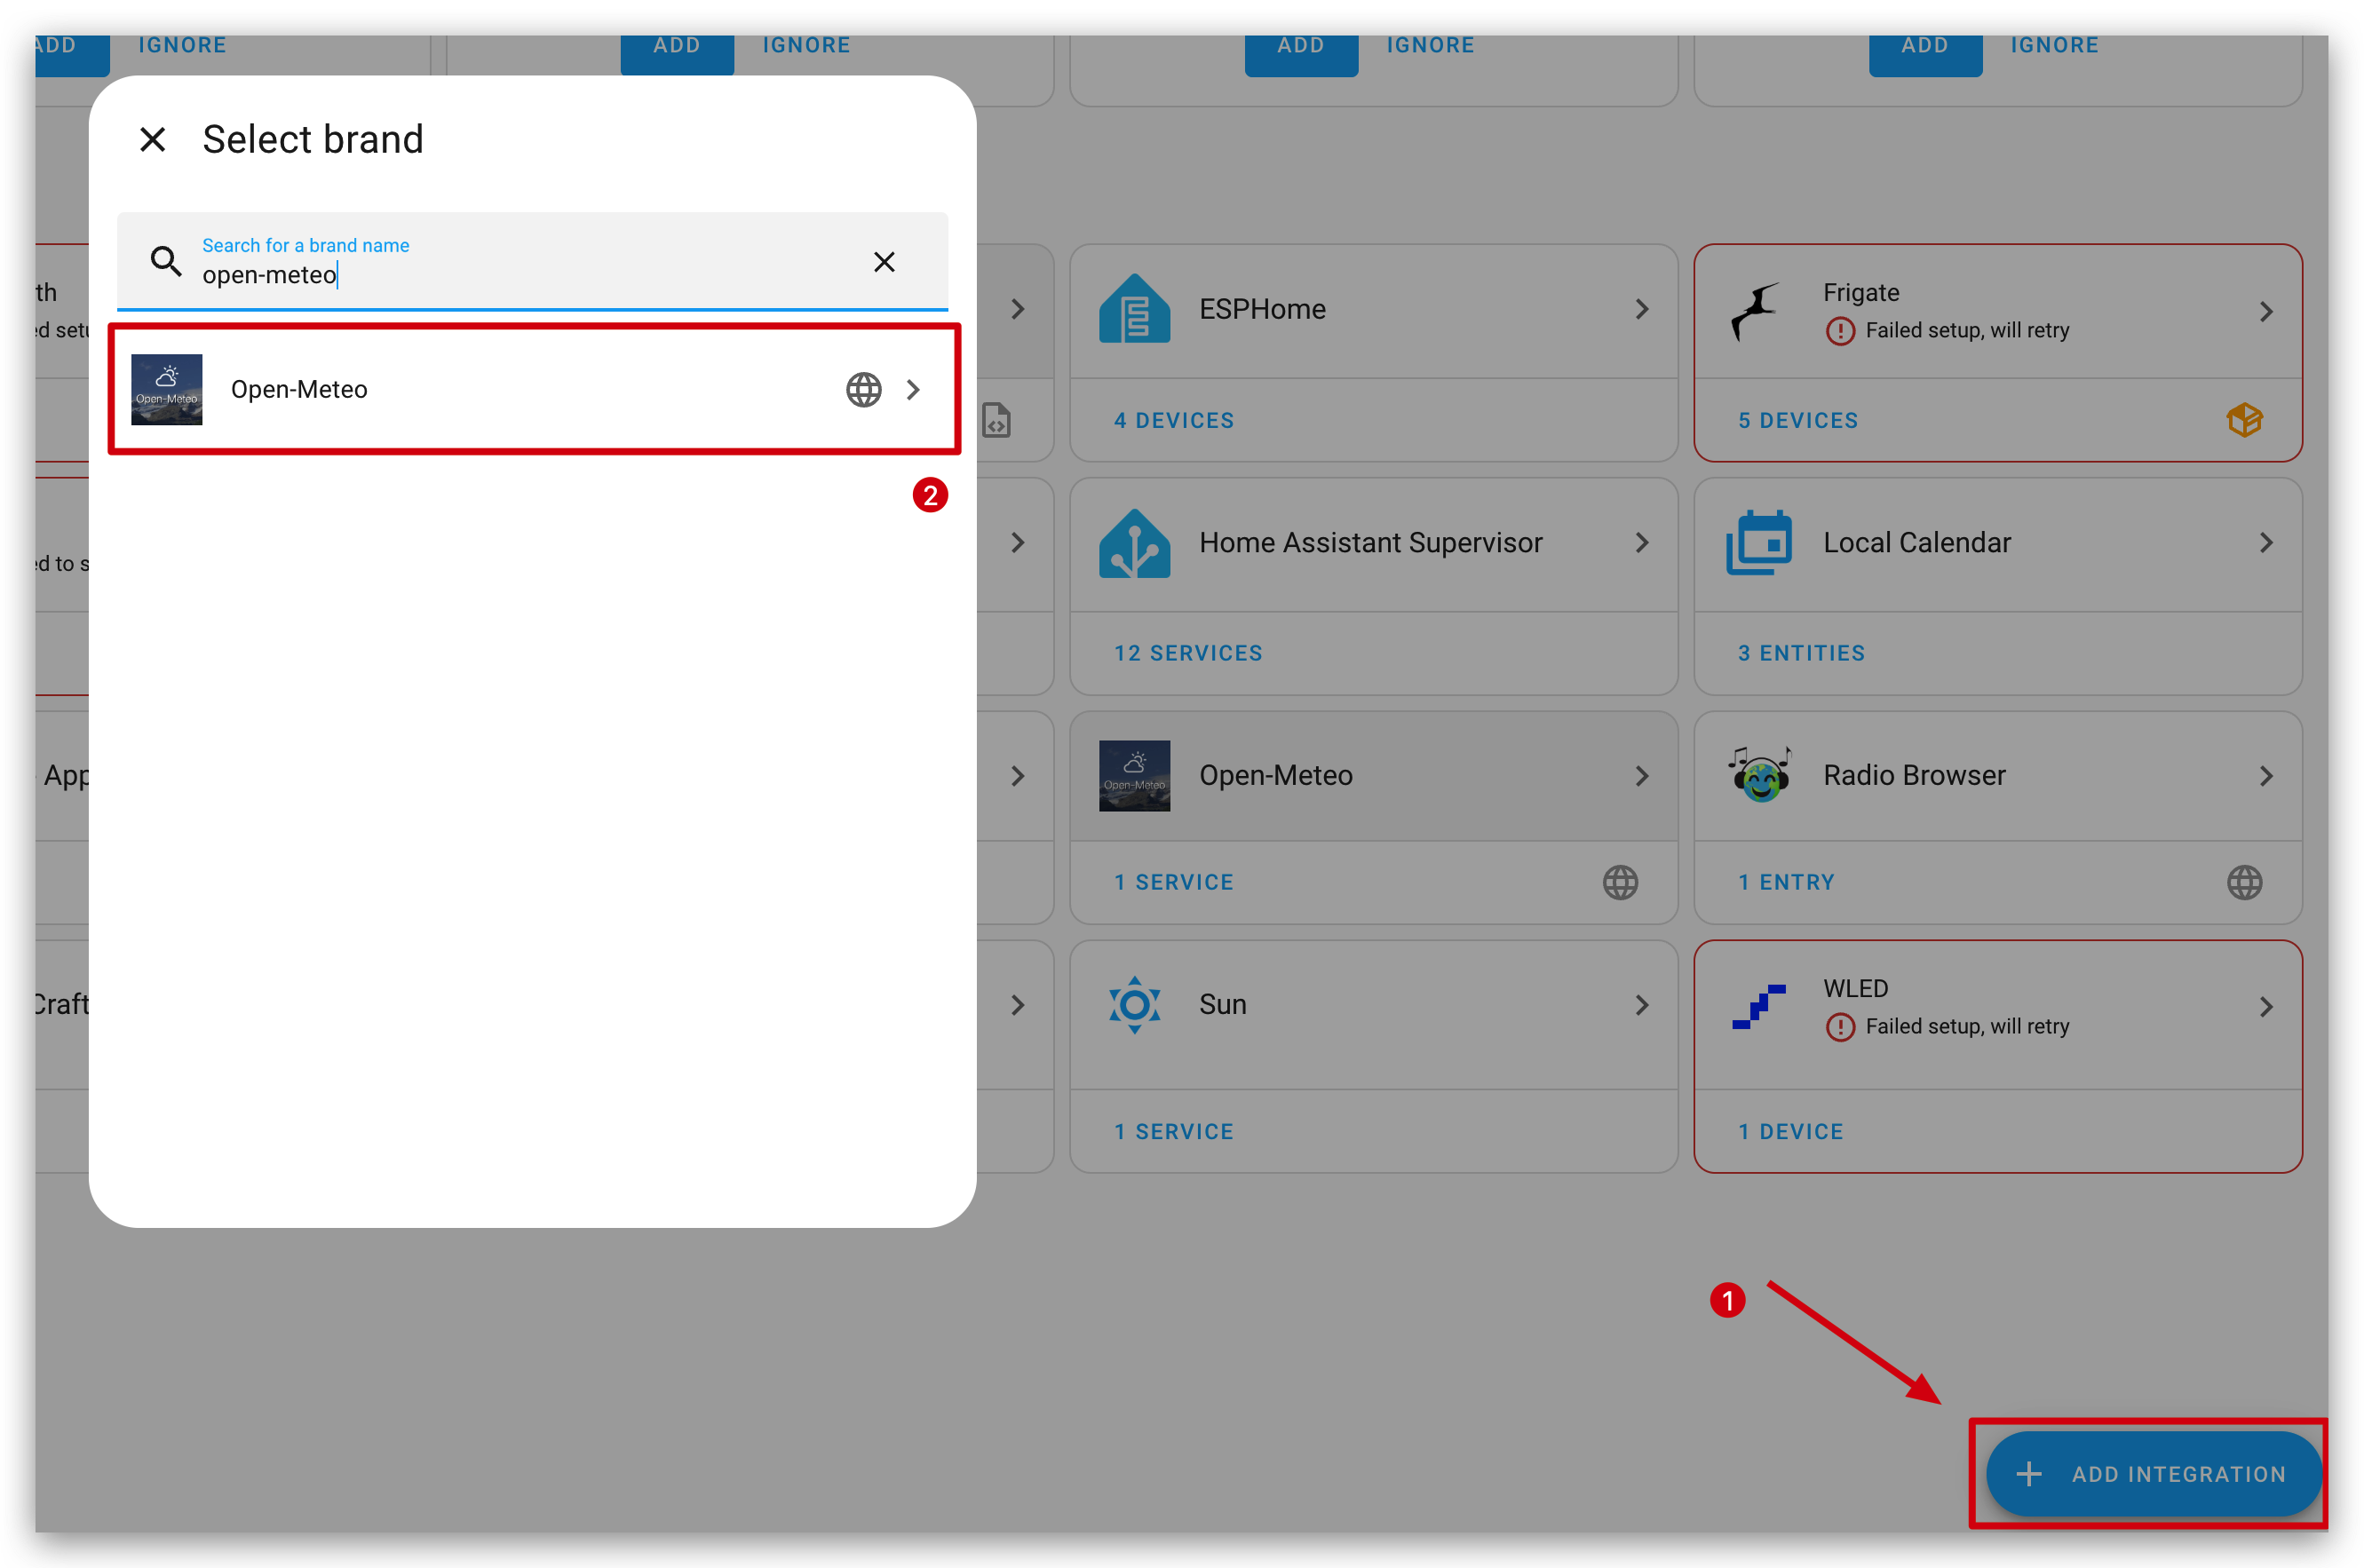
以下の画像のようなフィードバックが表示されれば、コードが正常に実行されていることを意味します。


3. アイコンを表示
この例では、ディスプレイにアイコンを表示します。
まず、ファイルエディターアドオンをインストールする必要があります。Studio Code Serverを検索してクリックします。INSTALLをクリックしてSTARTします。


そして、fontsという新しいフォルダを作成し、このファイルをダウンロードしてfontsフォルダに入れます。

以下のコードをコピーして、下図のようにcaptive_portalの後に貼り付けることができます。
font:
  - file: 'fonts/materialdesignicons-webfont.ttf'  #here is the directory to save ttf file
    id: font_mdi_large
    size: 200        # big size icon
    glyphs: &mdi-weather-glyphs
      - "\U000F0595" # weather cloudy
      - "\U000F0592" # weather hail
  - file: 'fonts/materialdesignicons-webfont.ttf'
    id: font_mdi_medium   # small size icon
    size: 40
    glyphs: *mdi-weather-glyphs

spi:
  clk_pin: GPIO7
  mosi_pin: GPIO9

display:
  - platform: waveshare_epaper
    model: 7.50inv2
    cs_pin: GPIO44
    dc_pin: GPIO10
    reset_pin: GPIO38
    busy_pin:
      number: GPIO4
      inverted: true
    update_interval: 30s
    lambda: |-
      it.printf(100, 200, id(font_mdi_medium), TextAlign::CENTER, "\U000F0595");
      it.printf(400, 200, id(font_mdi_large), TextAlign::CENTER, "\U000F0592");
以下の画像のようなフィードバックが表示されれば、コードが正常に実行されていることを意味します。

他のアイコンを使用したい場合は、下のボタンをクリックしてさらに探索できます。
使用したいアイコンを選択します。

コードをコピーして、以下の画像のようにcaptive_portal部分に貼り付けます。


4. 画像を表示
この例では、お好みの画像をディスプレイに表示します。
前の例と同様に、Studio Code Serverをインストールし、画像を保存するためにimageという新しいフォルダを作成する必要があります。
そして、imageフォルダに画像を入れます。下のボタンをクリックして画像をダウンロードして試すことができます。

以下のコードをコピーして、下図のようにcaptive_portalの後に貼り付けることができます。
image:
  - file: /config/esphome/image/wifi.jpg    # the path where you save the image, png or jpg format
    id: myImage
    type: BINARY
    resize: 800x480    # how big you want to show, the biggest size should be as same as ePaper Penal pixel(800x480)
    invert_alpha: true   # invert color

spi:
  clk_pin: GPIO7
  mosi_pin: GPIO9

display:
  - platform: waveshare_epaper
    model: 7.50inv2
    cs_pin: GPIO44
    dc_pin: GPIO10
    reset_pin: GPIO38
    busy_pin:
      number: GPIO4
      inverted: true
    update_interval: 30s
    lambda: |-
      it.image(0, 0, id(myImage));
以下の画像のようなフィードバックが表示されれば、コードが正常に実行されていることを意味します。

デモ 1. Home Assistantダッシュボードのスクリーンショットを撮る
この例では、HAのスクリーンショットをディスプレイに表示します。
まず、スクリーンショットアドオンPuppetをインストールする必要があります。こちらをクリックしてインストールしてください。

バージョンは1.11.4以上である必要があることに注意してください。インストール後、Configuration pageに移動します。このアドオン用のaccess_tokenを作成する必要があります。

次のステップでトークンを作成し、ここに貼り付けます。

Security pageの下部に移動してトークンを作成し、それをコピーしてPuppetアドオンに貼り付けます。

Puppetアドオンを再起動することを忘れないでください。

アドオンを開始すると、ポート10000で新しいサーバーが起動します。リクエストしたパスは、そのページのスクリーンショットを返します。必要なビューポートサイズを指定する必要があります。
例えば、デフォルトダッシュボードの1000px x 1000pxのスクリーンショットを取得するには、以下を取得します:
# http://192.168.1.191:10000/lovelace/0?viewport=1000x1000(My address)

http://homeassistant.local:10000/lovelace/0?viewport=1000x1000
E Ink®ディスプレイのカラーパレットを削減するには、einkパラメータを追加できます。値は使用する色数(黒を含む)を表します。例えば、2色のE Ink®ディスプレイの場合:
http://homeassistant.local:10000/lovelace/0?viewport=1000x1000&eink=2
eink=2を使用している場合、invertパラメータを追加して色を反転することもできます:
http://homeassistant.local:10000/lovelace/0?viewport=1000x1000&eink=2&invert
さらに、他のページのスクリーンショットも撮ることができます。例えば、HAのTo-do listsページ:
http://192.168.1.191:10000/todo?viewport=800x480&eink=2&invert
このリンクをブラウザに入力することで、スクリーンショットの効果を確認できます。

以下のコードをコピーして、esp32の後に貼り付けてください:
# Enable PSRAM support since online_image requires more than the available RAM capacity
psram:
  mode: octal
  speed: 80MHz
以下のコードをコピーして、下図のようにcaptive_portalの後に貼り付けることができます。
http_request:
  verify_ssl: false
  timeout: 10s
  watchdog_timeout: 15s

online_image:
  - id: dashboard_image
    format: PNG
    type: BINARY
    buffer_size: 30000
    url: http://192.168.1.191:10000/todo?viewport=800x480&eink=2&invert #change this link to your screenshot link
    update_interval: 30s
    on_download_finished:
      - delay: 0ms
      - component.update: main_display

spi:
  clk_pin: GPIO7
  mosi_pin: GPIO9

display:
  - platform: waveshare_epaper
    id: main_display
    model: 7.50inv2
    cs_pin: GPIO44
    dc_pin: GPIO10
    reset_pin: GPIO38
    busy_pin:
      number: GPIO4
      inverted: true
    update_interval: never
    lambda: |-
      it.image(0, 0, id(dashboard_image));
以下の画像のようなフィードバックが表示されたら、コードが正常に実行されていることを意味します。

デモ2. ディープスリープモード
ディープスリープモード中は、デバイスに直接コードをアップロードできません。ダウンロードモードに入る必要があります。Q3にジャンプするにはここをクリック
この例では、ディープスリープモードを使用して電力を節約する方法を示します。6時間ごとに情報を更新します。
以下のコードをコピーして、下図のようにcaptive_portalの後に貼り付けることができます。
globals:
  - id: sleep_counter
    type: int
    restore_value: yes  # key parameter, to use RTC storage
    initial_value: '0'

# Here is deep sleep part
deep_sleep:
  id: deep_sleep_1
  run_duration: 30s  # Device wake up and run 30s (enough to display)
  sleep_duration: 3min  # deep sleep for 3min

interval:
  - interval: 29s  # run this command before the end of run_duration
    then:
      - logger.log: "Entering deep sleep now..."

font:
  - file: "gfonts://Inter@700"
    id: font1
    size: 24

spi:
  clk_pin: GPIO7
  mosi_pin: GPIO9

display:
  - platform: waveshare_epaper
    model: 7.50inv2
    cs_pin: GPIO44
    dc_pin: GPIO10
    reset_pin: GPIO38
    busy_pin:
      number: GPIO4
      inverted: true
    update_interval: 3min
    lambda: |-
      id(sleep_counter) += 1;
      ESP_LOGD("main", "Wakeup count: %d", id(sleep_counter));
      it.printf(100, 100, id(font1), "Wakeup count: %d", id(sleep_counter));
カウンターが表示されます。起動するたびに1つずつ増加します。

デモ3. 包括的な例
より良く理解するために、まず上記の基本的な使用方法を実行することを強くお勧めします。
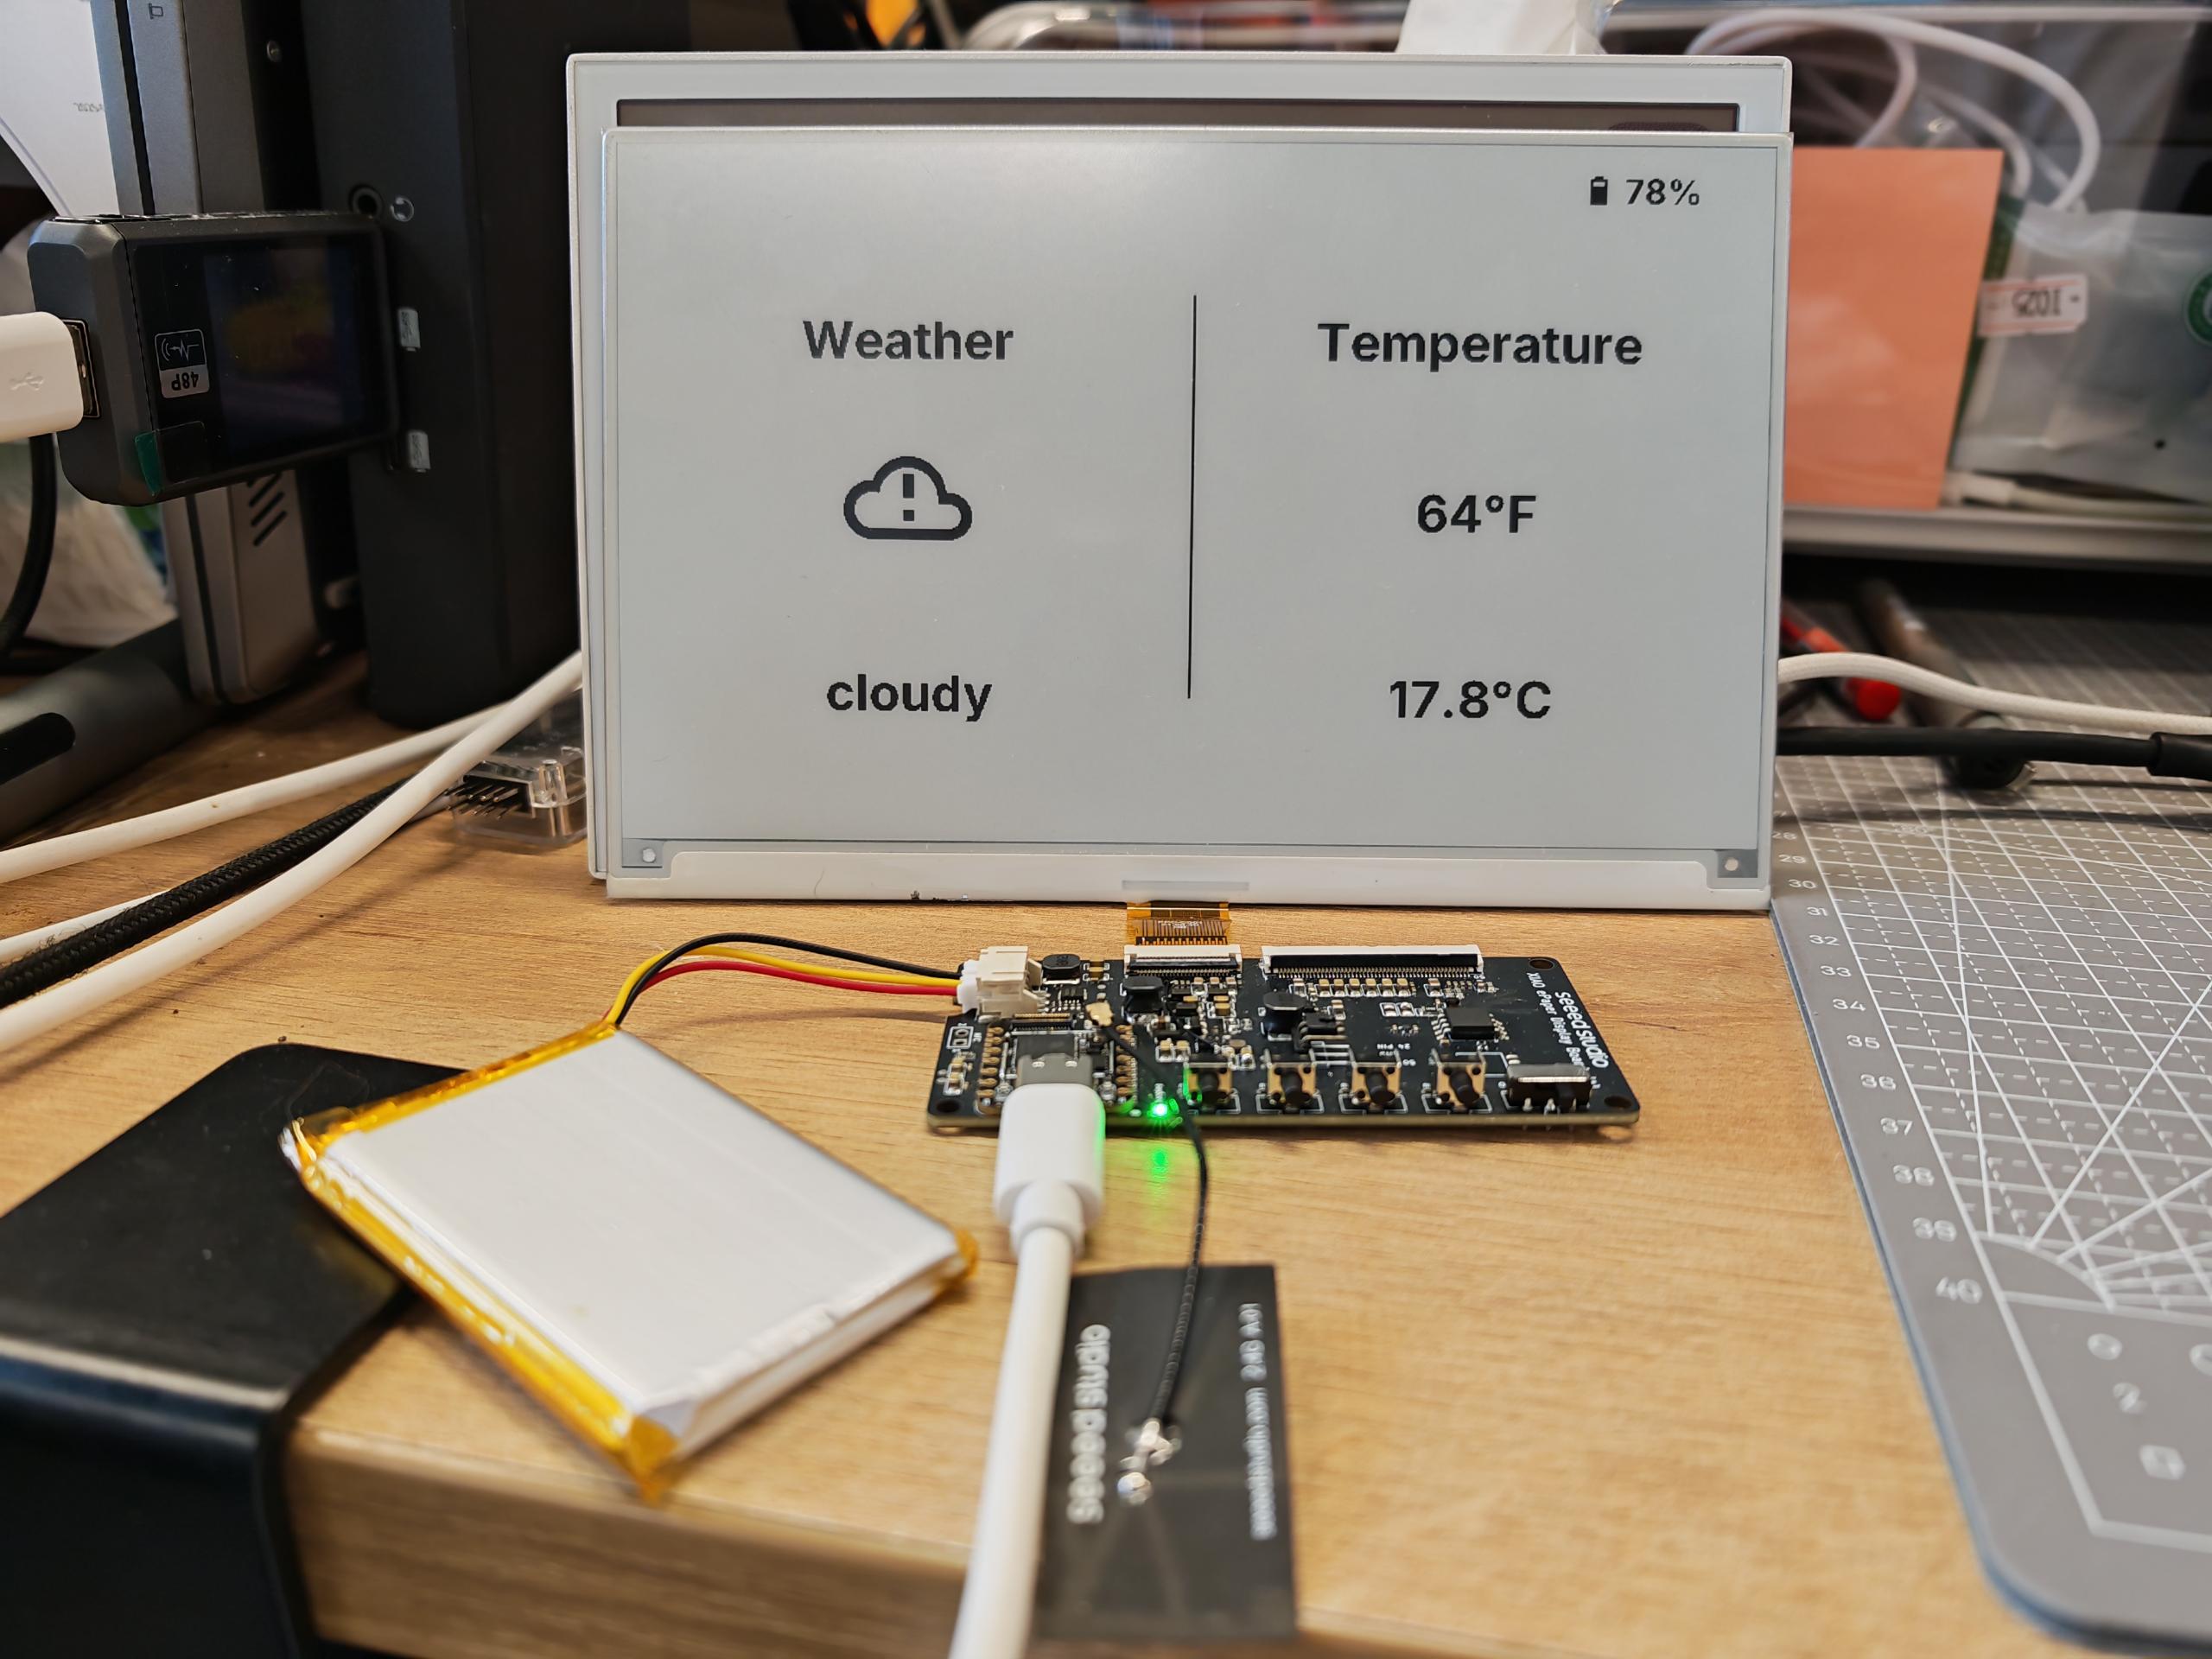
この例では、TRMNL 7.5インチe-paper DIYキット用の包括的なESPHome設定を示します。YAMLコードは複数の機能を統合して、Home Assistantとシームレスに連携するスマートでインタラクティブなディスプレイパネルを作成します。
目的と機能:
-
この設定により、デバイスはWi-FiとHome Assistantに接続し、簡単な管理のためにAPIとOTAアップデートの両方をサポートします。
-
物理ボタンで制御される2つの切り替え可能なページで、e-paperディスプレイにさまざまなタイプの情報を表示するように設定します。
-
デバイスはバッテリー電圧を読み取り、バッテリーの割合を計算し、対応するバッテリーアイコンと値を表示します。
-
天気状況と温度はHome Assistantから取得され、適切なアイコンと単位で表示されます。
-
現在の時刻と日付も表示され、Home Assistantと同期されます。
この例では、センサー読み取り値、Home Assistantデータ、ユーザー入力を組み合わせて、ESPHomeとTRMNL 7.5インチe-paperキットを使用して機能豊富な常時オンスマートディスプレイを構築する方法を紹介します。
完全なコードをプレビューするにはここをクリック
esphome:
  name: obdy
  friendly_name: obdy
  on_boot:
    priority: 600
    then:
      - output.turn_on: bsp_battery_enable
      - delay: 200ms
      - component.update: battery_voltage
      - component.update: battery_level

esp32:
  board: esp32-s3-devkitc-1
  framework:
    type: arduino

# Enable PSRAM support since online_image requires more than the available RAM capacity
psram:
  mode: octal
  speed: 80MHz

# Enable logging
logger:

# Enable Home Assistant API
api:
  encryption:
    key: "j0V30kuJ6Zdij9SU6Ee+7ruwid+7SQOxtinjld2PRc0="

ota:
  - platform: esphome
    password: "db786195ae6f9748f5b57ea9bd1d4161"

wifi:
  ssid: !secret wifi_ssid
  password: !secret wifi_password

  # Enable fallback hotspot (captive portal) in case wifi connection fails
  ap:
    ssid: "Obdy Fallback Hotspot"
    password: "IOfapF7hXq55"

captive_portal:

# Deep-sleep, wake by GPIO4
# deep_sleep:
#   id: deep_sleep_1
#   run_duration: 1min
#   sleep_duration: 60min
#   wakeup_pin: GPIO4
#   wakeup_pin_mode: INVERT_WAKEUP

spi:
  clk_pin: GPIO7
  mosi_pin: GPIO9

# Fonts
font:
  - file: "gfonts://Inter@700"
    id: small_font
    size: 24
  - file: "gfonts://Inter@700"
    id: mid_font
    size: 36
  - file: "gfonts://Inter@700"
    id: big_font
    size: 180
  - file: "gfonts://Inter@700"
    id: time_font
    size: 96      # for the big time display
  - file: 'fonts/materialdesignicons-webfont.ttf'
    id: font_bat_icon
    size: 24
    glyphs:
      - "\U000F007A"  # mdi-battery-10
      - "\U000F007B"  # mdi-battery-20
      - "\U000F007C"  # mdi-battery-30
      - "\U000F007D"  # mdi-battery-40
      - "\U000F007E"  # mdi-battery-50
      - "\U000F007F"  # mdi-battery-60
      - "\U000F0080"  # mdi-battery-70
      - "\U000F0081"  # mdi-battery-80
      - "\U000F0082"  # mdi-battery-90
      - "\U000F0079"  # mdi-battery
  - file: "fonts/materialdesignicons-webfont.ttf" # <-- 替换成你的字体文件路径
    id: weather_icon_font
    size: 100
    glyphs:
      - "\U000F0599" # weather-sunny
      - "\U000F0595" # weather-partly-cloudy
      - "\U000F0F2F" # weather-cloudy
      - "\U000F0597" # weather-rainy
      - "\U000F0598" # weather-snowy
      - "\U000F059B" # weather-windy
      - "\U000F0594" # weather-fog
      - "\U000F0596" # weather-lightning

globals:
  - id: page_index
    type: int
    restore_value: true
    initial_value: '0'
  - id: battery_glyph
    type: std::string
    restore_value: no
    initial_value: "\"\\U000F0079\""   # default full battery

sensor:
  - platform: adc
    pin: GPIO1
    name: "Battery Voltage"
    id: battery_voltage
    update_interval: 60s
    attenuation: 12db
    filters:
      - multiply: 2.0
  - platform: template
    name: "Battery Level"
    id: battery_level
    unit_of_measurement: "%"
    icon: "mdi:battery"
    device_class: battery
    state_class: measurement
    lambda: 'return id(battery_voltage).state;'
    update_interval: 60s
    on_value:
      then:
        - lambda: |-
            int pct = int(x);
            if (pct <= 10)      id(battery_glyph) = "\U000F007A";
            else if (pct <= 20) id(battery_glyph) = "\U000F007B";
            else if (pct <= 30) id(battery_glyph) = "\U000F007C";
            else if (pct <= 40) id(battery_glyph) = "\U000F007D";
            else if (pct <= 50) id(battery_glyph) = "\U000F007E";
            else if (pct <= 60) id(battery_glyph) = "\U000F007F";
            else if (pct <= 70) id(battery_glyph) = "\U000F0080";
            else if (pct <= 80) id(battery_glyph) = "\U000F0081";
            else if (pct <= 90) id(battery_glyph) = "\U000F0082";
            else                id(battery_glyph) = "\U000F0079";
    filters:
      - calibrate_linear:
          - 4.15 -> 100.0
          - 3.96 -> 90.0
          - 3.91 -> 80.0
          - 3.85 -> 70.0
          - 3.80 -> 60.0
          - 3.75 -> 50.0
          - 3.68 -> 40.0
          - 3.58 -> 30.0
          - 3.49 -> 20.0
          - 3.41 -> 10.0
          - 3.30 -> 5.0
          - 3.27 -> 0.0
      - clamp:
          min_value: 0
          max_value: 100

output:
  - platform: gpio
    pin: GPIO6
    id: bsp_battery_enable

binary_sensor:
  - platform: gpio    # Next page KEY1
    pin:
      number: GPIO2
      mode: INPUT_PULLUP
      inverted: true
    id: key1
    name: "Key1"
    on_press:
      then:
        - lambda: |-
            id(page_index) = (id(page_index) + 1) % 2;
            id(epaper_display).update();

  - platform: gpio     # Prev page KEY2
    pin:
      number: GPIO3
      mode: INPUT_PULLUP
      inverted: true
    id: key2
    name: "Key2"
    on_press:
      then:
        - lambda: |-
            id(page_index) = (id(page_index) - 1 + 2) % 2;
            id(epaper_display).update();

  # - platform: gpio
  #   pin:
  #     number: GPIO5       # KEY3
  #     mode: INPUT_PULLUP
  #     inverted: true
  #   id: key2
  #   name: "Key2"
  #   on_press:
  #     then:

# Home Assistant time
time:
  - platform: homeassistant
    id: ha_time

text_sensor:
  - platform: homeassistant
    entity_id: weather.home
    id: myWeather
  - platform: homeassistant
    entity_id: weather.home
    id: temp
    attribute: "temperature"

display:
  - platform: waveshare_epaper
    id: epaper_display
    model: 7.50inv2
    cs_pin: GPIO44
    dc_pin: GPIO10
    reset_pin: GPIO38
    busy_pin:
      number: GPIO4
      inverted: true
    update_interval: never
    lambda: |-
      // ----------  PAGE 0  ----------
      if (id(page_index) == 0) {
        // Screen dimension constants for easy adjustment
        const int scr_w = 800;
        const int scr_h = 480;
        const int center_x = scr_w / 2; // Center X-coordinate of the screen (400)

        // --- Top-right: Battery Info ---
        // Display the battery icon using an icon font
        it.printf(scr_w - 130, 13, id(font_bat_icon), "%s", id(battery_glyph).c_str());
        // Display the battery percentage text
        it.printf(scr_w - 100, 10, id(small_font), "%.0f%%", id(battery_level).state);

        // --- Draw the vertical separator line ---
        // Draw a vertical line in the middle to separate left and right areas
        it.filled_rectangle(center_x, 100, 2, 280);

        // ==================================================
        //                    LEFT AREA: WEATHER INFO
        // ==================================================
        // Calculate the center X-coordinate of the left area for alignment
        const int left_center_x = center_x / 2; // 200

        // 1. Display the title "Weather" at the top of the left area
        it.printf(left_center_x, 110, id(mid_font), TextAlign::TOP_CENTER, "Weather");

        // 2. Get the weather condition and select the corresponding icon
        std::string weather_condition = id(myWeather).state;
        std::string weather_icon = "\U000F0599"; // Default icon (sunny), as a fallback for unknown states

        if (weather_condition == "partlycloudy") {
          weather_icon = "\U000F0595"; // weather-partly-cloudy
        } else if (weather_condition == "cloudy") {
          weather_icon = "\U000F0F2F"; // weather-cloudy
        } else if (weather_condition == "rainy") {
          weather_icon = "\U000F0597"; // weather-rainy
        } else if (weather_condition == "snowy") {
          weather_icon = "\U000F0598"; // weather-snowy
        } else if (weather_condition == "windy") {
          weather_icon = "\U000F059B"; // weather-windy
        } else if (weather_condition == "fog") {
          weather_icon = "\U000F0594"; // weather-fog
        } else if (weather_condition == "lightning") {
          weather_icon = "\U000F0596"; // weather-lightning
        }
        // Display the weather icon in the center of the left area
        it.printf(left_center_x, 240, id(weather_icon_font), TextAlign::CENTER, "%s", weather_icon.c_str());

        // 3. Display the weather condition text below the icon
        it.printf(left_center_x, 400, id(mid_font), TextAlign::BOTTOM_CENTER, "%s", weather_condition.c_str());


        // ==================================================
        //                    RIGHT AREA: TEMPERATURE INFO
        // ==================================================
        // Calculate the center X-coordinate of the right area for alignment
        const int right_center_x = center_x + (center_x / 2); // 600

        // 1. Display the title "Temperature" at the top of the right area
        it.printf(right_center_x, 110, id(mid_font), TextAlign::TOP_CENTER, "Temperature");

        // 3. Display the temperature reading below the icon, with one decimal place
        float temp_c = stof(id(temp).state);
        double temp_f = temp_c * 9.0 / 5.0 + 32.0;
        it.printf(right_center_x, 250, id(mid_font), TextAlign::CENTER, "%.0f°F", temp_f);
        it.printf(right_center_x, 380, id(mid_font), TextAlign::CENTER, "%.1f°C", temp_c);
      }
      // ----------  PAGE 1  ----------
      else{
        // Battery top-right
        it.printf(670, 13, id(font_bat_icon), "%s", id(battery_glyph).c_str());
        it.printf(700, 10, id(small_font), "%.0f%%", id(battery_level).state);

        auto now = id(ha_time).now();
        struct tm timeinfo = now.to_c_tm();

        // centering time HH:MM
        char timeStr[6];
        strftime(timeStr, sizeof(timeStr), "%H:%M", &timeinfo);
        it.printf(400, 180, id(time_font), TextAlign::CENTER, timeStr);

        // Date: Day of week
        const char *weekday[] = {"Sun","Mon","Tue","Wed","Thu","Fri","Sat"};
        const char *wday = weekday[timeinfo.tm_wday];

        // Date: month - day
        char dateStr[12];
        strftime(dateStr, sizeof(dateStr), "%b %d", &timeinfo);  // e.g. Jun 15

        // Day of the week + date below the time
        it.printf(400, 280, id(mid_font), TextAlign::CENTER, "%s, %s", wday, dateStr);
      }
以下の画像のようなフィードバックが表示されたら、コードが正常に実行されていることを意味します。
FAQ
Q1: データが表示されないのはなぜですか?
この場合、Settings -> Devices & Services -> Integrations に移動してデバイスを再設定する必要があります。ePaper パネルが見つからない場合は、HA を再起動してみてください。

Q2: Home Assistant でこれらのデータを取得できないのはなぜですか?
この場合、Settings -> Devices & Services -> Integrations に移動してデバイスを HA に追加する必要があります。

Q3: デバイスがディープスリープモードの時に新しいプログラムをアップロードするにはどうすればよいですか?


デバイスがディープスリープモードの時は、直接新しいプログラムをアップロードすることはできません。
-
まず、デバイスの電源が入っていることを確認します。次に、XIAO ESP32-S3 Plus の USB-C ポートの隣にある Boot ボタンを長押しします。
-
Boot ボタンを押したまま、Reset ボタンを一度押してから、Boot ボタンを離します。
-
その後、バッテリースイッチをオフにして、電源ケーブルを抜きます。
-
最後に、ケーブルを再接続して新しいプログラムをアップロードします。
Q4: TRMNL 7.5inch(OG) DIY Kit がコンピューターに接続できませんか?

何度か抜き差しを試すか、プロンプトに従ってドライバーをインストールしてください。
Q5: Wi-Fi プログラムアップロードが失敗しましたか?

この場合、ePaper パネルがオフラインまたはディープスリープモードになっています。オンラインにするか、起動してください。
技術サポート & 製品ディスカッション
弊社製品をお選びいただき、ありがとうございます!弊社製品での体験が可能な限りスムーズになるよう、さまざまなサポートを提供いたします。さまざまな好みやニーズに対応するため、複数のコミュニケーションチャンネルを用意しています。

