7. MotorBridge モーター制御ライブラリ
Seeed Physical AI Beginner's Course 第7章 — ベンダー横断 CAN モーター制御ライブラリ MotorBridge と、Web および Python から DM / RS モーターを制御する方法について説明します。
7.1 MotorBridge とは?
7.1 MotorBridge とは?
MotorBridge は、ロボットアーム/ヒューマノイドロボット向けの一体型関節モーターを対象とした、Seeed Studio によるベンダー横断・統一 CAN モーター制御ソフトウェアスタックです。下位層には高性能な Rust コアを採用し、標準 C ABI インターフェースを提供、さらに Python / C++ / ROS2 の言語バインディングを備えています。1 セットの API で、市場にある主流の一体型関節モーターを駆動できます。
1 つのコードで、すべての主流関節モーターに対応し、各ベンダー独自の CAN プロトコル差異を吸収 — ロボットアーム開発における、複数モーターブランド対応の煩雑さという課題をピンポイントで解決します。
解決する業界のペインポイント:
市販の一体型関節(Damiao、RobStride、MyActuator など)は、それぞれ独自の CAN プロトコルやコマンド形式、制御モードを持ち、互換性がまったくありません。MotorBridge はその上に抽象化レイヤーを提供し、上位 API 呼び出しは完全に統一され、下位層でベンダーごとのプロトコルに自動適応します。モーターを切り替える際は、ベンダーのパラメータを変更するだけで、モーション制御ロジックを変更する必要はありません。
具体的には、次の問題を解決します:
- モーターブランドを変更するたびに、CAN 通信および 3 ループ制御コード一式を書き直す必要がある;
- 開発者は 5 つ以上の独自プロトコルを同時に学習し、複数のコードライブラリを保守しなければならない;
- 統一されたデバッグ/キャリブレーション/可視化ツールがなく、各モーター付属のツールは相互運用できない;
- Python ネイティブ制御はリアルタイム性が低く、GC ポーズがロボットのモーション制御に影響する。
| モーターベンダー | バスタイプ | 対応制御モード |
|---|---|---|
| Damiao | CAN2.0 / シリアルブリッジ | MIT インピーダンス、位置-速度、純粋速度、力-位置制御 |
| RobStride | CAN2.0 | MIT、位置、速度 |
| MyActuator RMD | CAN2.0 | 電流、位置、速度 |
| HighTorque | CAN2.0 | MIT、位置-速度、純粋速度、力-位置制御 |
| Hexfellow | CAN-FD | MIT、位置-速度 |
全体レイヤー構成(上位から下位へ)
アプリケーション層(ユーザー開発層):
Python、C++(開発中)、ROS2 ノードをサポートします。開発者は統一 API を直接呼び出すだけで、下位の CAN プロトコルを意識する必要はありません。
- Python:ctypes で Rust でコンパイルされた動的ライブラリをバインドし、軽量かつ性能ロスなし;
- 補助ツール:コマンドライン CLI、Web 可視化コンソール MotorBridge-Studio。
従来のベンダー専用 SDK と比べた利点
| 比較項目 | ベンダー純正 SDK | MotorBridge |
|---|---|---|
| 複数モーターブランド対応 | 単一ブランド専用で、モーター切り替え時はコードを書き直し | 統一 API で、モーター変更時はベンダーパラメータを変えるだけ |
| リアルタイム性能 | Python 実装で GC によるスタッタリングが発生し、タイミングが不安定 | Rust 下位層で GC なし、高いリアルタイム性能 |
| デバッグツール | それぞれ独立した上位ツールで、操作がバラバラ | 統一 CLI + Web 可視化コンソール |
| マルチ言語対応 | 多くは Python のみ提供 | Python / C++ / ROS2 で下位ライブラリを共有 |
| プロトコルのカプセル化 | 開発者が CAN メッセージを手動でパースする必要あり | 下位 CAN プロトコルの詳細を完全に隠蔽 |
| クロスプラットフォーム | 対応状況がバラバラ | Windows / macOS / Linux をフルサポート |
7.2 インストール環境
7.2 インストール環境
7.2.1 Miniforge のインストール
Ubuntu へのインストール
wget https://github.com/conda-forge/miniforge/releases/latest/download/Miniforge3-Linux-x86_64.sh
bash Miniforge3-Linux-x86_64.sh
次に、プロンプトに従って yes を入力するか Enter キーを押します。インストールが完了したら、次のコマンドを入力してターミナルスクリプトを更新します:
source ~/.bashrc
ユーザー名の前に (base) が表示されていれば、インストールは成功しています。
その他のプラットフォーム
Jetson / Raspberry Pi:
wget "https://github.com/conda-forge/miniforge/releases/latest/download/Miniforge3-$(uname)-$(uname -m).sh"
bash Miniforge3-$(uname)-$(uname -m).sh
macOS:
curl -L -O "https://github.com/conda-forge/miniforge/releases/latest/download/Miniforge3-MacOSX-$(uname -m).sh"
bash Miniforge3-MacOSX-$(uname -m).sh
Windows:
ブラウザで Miniforge Release ページ を開き、最新版の Miniforge3-Windows-x86_64.exe を探してクリックし、ダウンロードします。
7.2.2 環境の作成
Python 3.10 以上の仮想環境 — motorbridge には Python バージョン 3.10 以上が必要です:
conda create -y -n rebot_motorbridge python=3.12
続いて仮想環境を有効化します。ターミナルを開き、仮想環境内の関連機能を使いたいときは、毎回この有効化コマンドを再実行する必要があります:
conda activate rebot_motorbridge
motorbridge のインストール
rebot_motorbridge 仮想環境を有効化した後、次のコマンドを実行して motorbridge をインストールします:
pip install motorbridge
7.3 MotorBridge による DM モーター制御
7.3 MotorBridge による DM モーター制御
Web 制御
- ブラウザで次のアドレスを開きます:
https://motorbridge.github.io/motorbridge-studio/
- Help オプションをクリックし、使用しているオペレーティングシステムとドライバボードに応じて対応するコマンドをコピーし、IP アドレスとポート番号を確認してから、ターミナルで Enter を押して実行します。
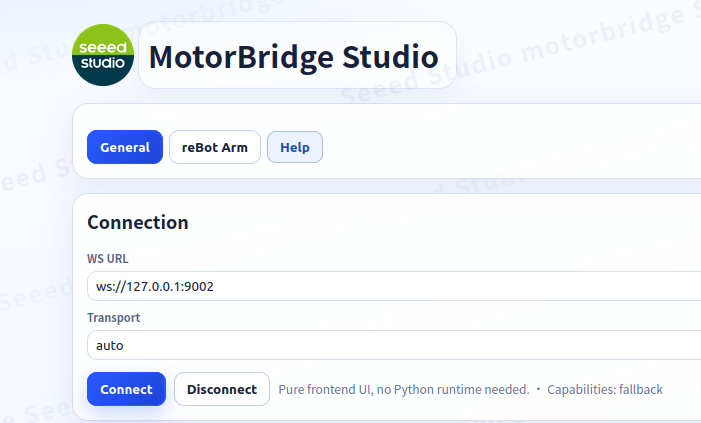
ここでは Damiao DM モーターを例に説明します:
- Linux プラットフォームでは、次のコマンドを入力します:
motorbridge-gateway -- \
  --bind 127.0.0.1:9002 --vendor damiao --transport dm-serial \
  --serial-port /dev/ttyACM0 --serial-baud 921600 \
  --dt-ms 20
- macOS プラットフォームでは、次のコマンドを入力します:
motorbridge-gateway -- \
  --bind 127.0.0.1:9002 --vendor damiao --transport dm-serial \
  --serial-port /dev/tty.usbmodem14101 --serial-baud 921600 \
  --dt-ms 20
- Windows では、次のコマンドを入力します:
motorbridge-gateway -- --bind 127.0.0.1:9002 --vendor damiao --transport dm-serial --serial-port COM3 --serial-baud 921600 --dt-ms 20
ポート番号は正しいポートを指定し、バインド前に権限が付与されている必要があります。
- 上記コマンドを入力したら、Web ページに戻って Connect をクリックします。接続に成功すると、右上に緑色の
Connectedという文字が表示されます。
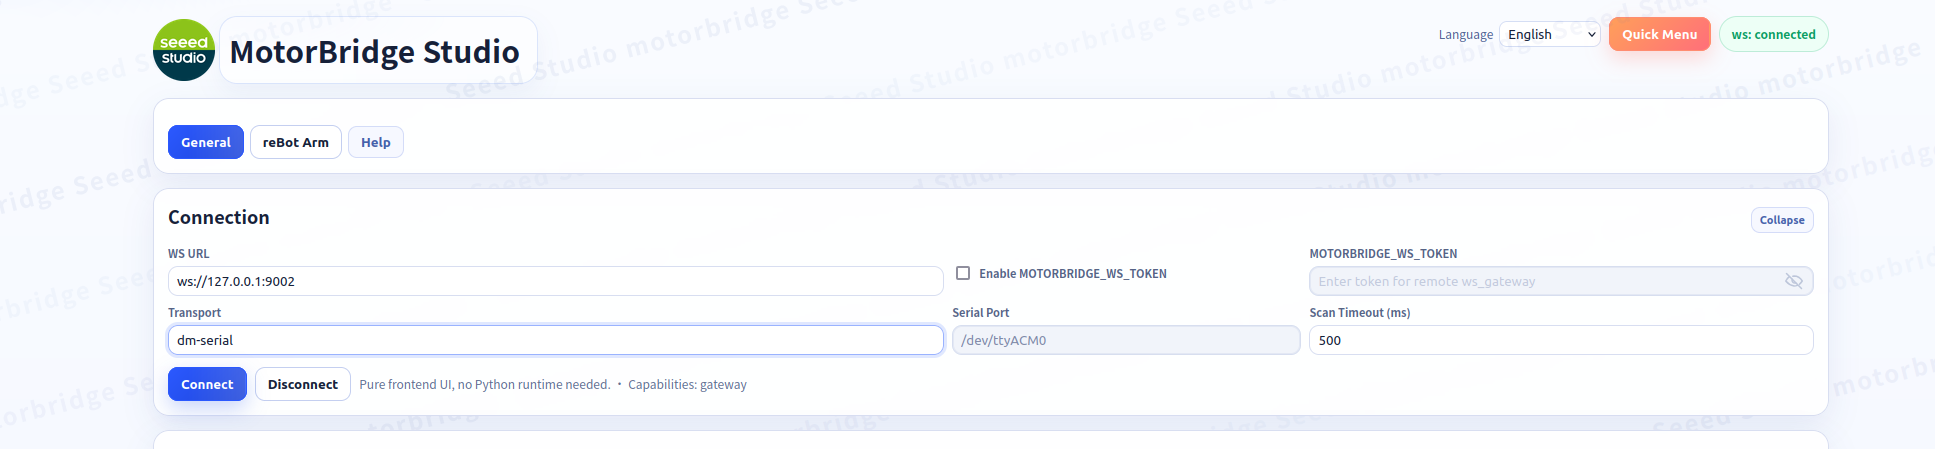
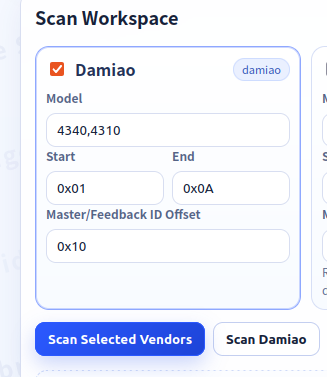
- DM モーターを選択した後、Scan Damiao をクリックします。
- スキャンが成功すると、次のようなカードが表示されます。
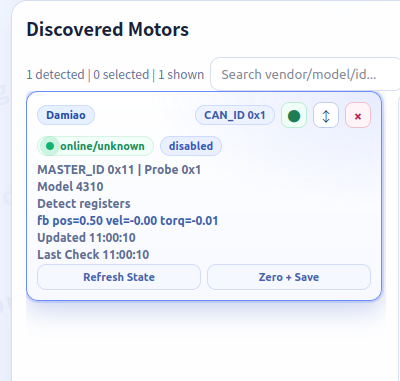
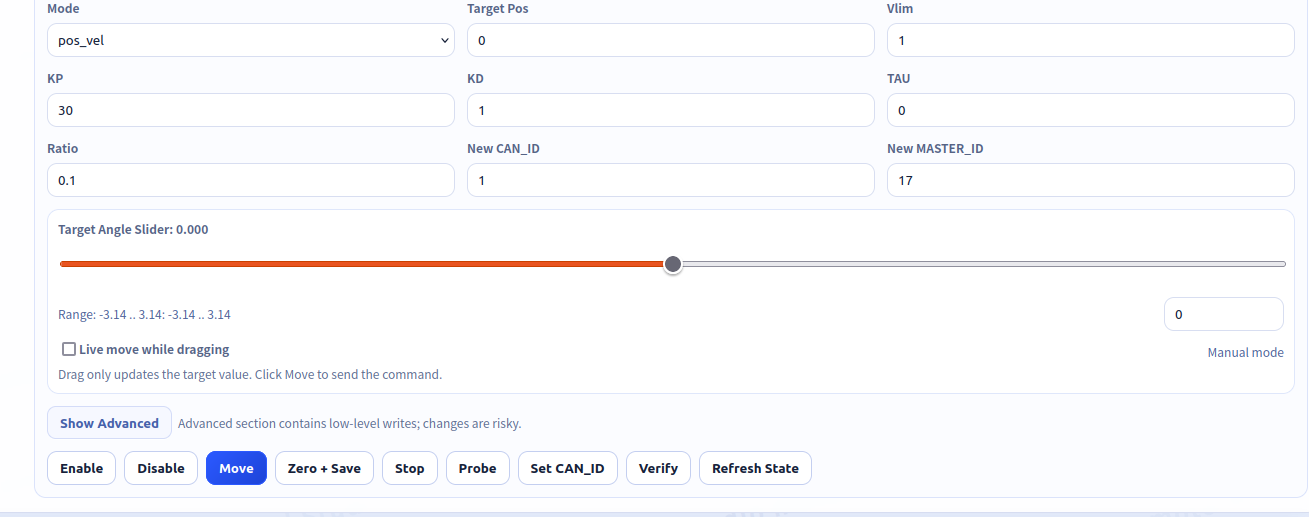
- 右側にはモーター関連のパラメータが表示されます。左下の有効化ボタンをクリックすると、モーターのランプが緑色に変わります。この状態でモーターを制御できます。
-
スライダーをドラッグするか、小さなボックスに対応する角度(単位は rad)を入力し、Move をクリックすると、モーターが目標角度まで回転します。
-
Enable ボタンをクリックした後、Zero+Save をクリックすると、現在位置をゼロ点として設定できます。
-
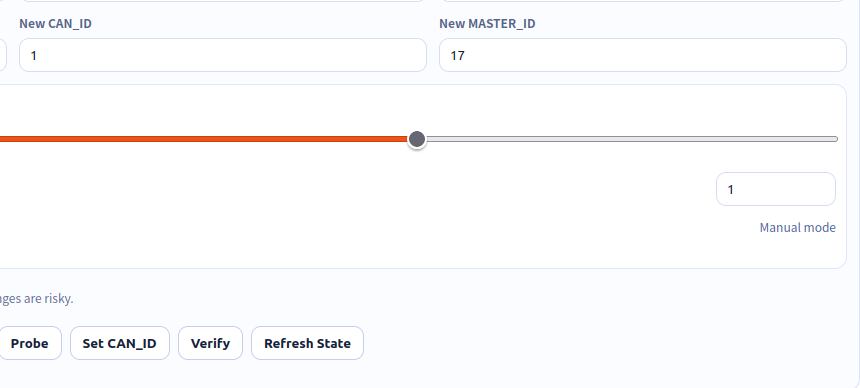
モーター ID を設定します。モーターを reBot 上で使用する場合、
can_idは対応する関節番号に設定し、master_idは0x10 + can_idに設定します。
例えば、can_id が 1 の場合、master_id は 0x11、つまり 16 + 1 = 17 にする必要があります。その後、Set CAN_ID をクリックします。
Python コード制御
環境がインストールされていない場合は、まず 7.2 節のインストール環境を参照してください。DM モーター関連のサンプルはすべて、Damiao のシリアルポートを通じて実装されています。
まず、サンプルコードを取得します:
git clone https://github.com/hopcan/motorbridge_ctrl.git
次に、対応する conda 環境を有効化し、サンプルコードのフォルダに入ります:
conda activate rebot_motorbridge

cd your_folder_path/motorbridge_ctrl/dm_motor_ctrl
DM モーターの有効化/無効化
1_enable_dm.py は、DM モーターの有効化/無効化の典型的なサンプルです。
python 1_enable_dm.py
現象:DM モーターを有効化すると、モーターのランプが緑色に点灯します。3 秒後、DM モーターは無効化されます。
# Enable specified motor, disable motor after 3 seconds
from motorbridge import Controller, Mode
import time

motor_configs = {
    1 : {
        "can_id": 0x01,
        "master_id": 0x11,  # 0x10 + 1
        "model": "4310",  # 4310 / 4340P / 6001
    },
}

ctrl = Controller.from_dm_serial("/dev/ttyACM0", 921600)

# Add motor to the bus
motor = {}
for num, cfg in motor_configs.items():
    motor[num] = ctrl.add_damiao_motor(cfg["can_id"], cfg["master_id"], cfg["model"])

# Enable all motors on the bus
ctrl.enable_all()

time.sleep(3)

# Disable all motors on the bus
ctrl.disable_all()
モーター ID のスキャン
2_scan_DMmotor.py は、DM モーターの CAN ID をスキャンするサンプルです。
python 2_scan_DMmotor.py
メイン実装関数 scan_damiao_motors の入力は、CAN ID の範囲とポートです。実行後、スキャンされた CAN ID と、その対応するマスター ID が表示されます。このスクリプトは、CAN ID と対応するマスター ID が正しいかどうかを確認するために使用できます。
from motorbridge import Controller

def scan_damiao_motors(start_can_id, end_can_id, channel="/dev/ttyACM0"):
    found_motors = []

    print(f"start scanning  {channel},canID : {start_can_id} - {end_can_id}")

    for motor_can_id in range(start_can_id, end_can_id + 1):
        ctrl = Controller.from_dm_serial(channel, 921600)
        temp_motor_master_id = 0x11 + motor_can_id

        try:
            motor = ctrl.add_damiao_motor(motor_can_id, temp_motor_master_id, "4340P")

            try:
                # Read register to get CAN ID
                esc_id = motor.get_register_u32(8, timeout_ms=100)
                master_id = motor.get_register_u32(7, timeout_ms=100)
                print(f"[find] motor_can_id=0x{esc_id:02X} motor_master_id=0x{master_id:02X}")
                found_motors.append(esc_id)

            except Exception:
                # Read error, no such CAN ID
                print(f"[no respond] motor_can_id=0x{motor_can_id:02X}")

            finally:
                motor.close()

        except Exception as e:
            print(f"[error] motor_can_id=0x{motor_can_id:02X}: {e}")
        finally:
            ctrl.close_bus()
            ctrl.close()

    print(f"\nfinish find {len(found_motors)} motor")
    return found_motors

# Run scanning
if __name__ == "__main__":
    motors = scan_damiao_motors(start_can_id=1, end_can_id=10, channel="/dev/ttyACM0")

    print("\nfind motor config:")
    for can_id in motors:
        print(f"  can_id=0x{can_id:02X}")
CAN ID と対応するマスター ID の設定
3_set_id.py は、DM モーターの CAN ID とマスター ID を設定するサンプルです。
python 3_set_id.py
メイン実装関数 set_DMmotor_ID の入力は、古い CAN ID、設定したい新しい CAN ID、設定したい新しいマスター ID、およびポートです。
from motorbridge import Controller
from motorbridge import Controller, RID_MST_ID, RID_ESC_ID
import time

# Set CAN ID and master ID
def set_DMmotor_ID(old_can_id, new_can_id, new_master_id, channel="/dev/ttyACM0"):

    ctrl = Controller.from_dm_serial(channel, 921600)
    temp_motor_master_id = 0x10 + old_can_id
    motor = ctrl.add_damiao_motor(old_can_id, temp_motor_master_id, "4340P")

    try:
        motor.write_register_u32(RID_MST_ID, new_master_id)
    except Exception:
        pass
    try:
        motor.write_register_u32(RID_ESC_ID, new_can_id)
    except Exception:
        pass
    new_motor = ctrl.add_damiao_motor(new_can_id, new_master_id, "4340P")
    new_motor.store_parameters()
    print("change ID and save")
    time.sleep(1)
    ctrl.close_bus()
    ctrl.close()

if __name__ == "__main__":
    old_can_id = 0x06
    new_can_id = 0x01
    new_master_id = 0x11
    set_DMmotor_ID(old_can_id, new_can_id, new_master_id, channel="/dev/ttyACM0")
各種モードの制御
4_mit_ctrl.py は MIT モードの制御サンプルです。kp はコントローラの剛性、kd はコントローラの減衰、tau はフィードフォワードトルクです。
python 4_mit_ctrl.py
現象:このサンプルでは tau のみを与えているため、モーターは回転し続けます。MIT モードに基づいて、さまざまな制御モードを導出できます。例えば、kp=0 で kd が 0 でない場合、vel を与えることで定速回転を実現できます;kp=0 かつ kd=0 の場合、tau を与えることで所定トルク出力を実現できます。
- tau のみを与える場合、あまり大きな tau を与えないでください。tau が大きすぎると、所望の tau を実現するためにモーターがどんどん速く回転してしまいます。
- 位置制御を行う場合、kd を 0 に設定しないでください。そうしないと、モーターの振動や制御不能を引き起こす可能性があります。
- pos と vlim の単位はそれぞれ rad および rad/s で、データ型は float です。
from motorbridge import Controller, Mode
import time


motor_can_id = 0x01
motor_master_id = 0x11
channel = "/dev/ttyACM0"

# Get motor control handle
ctrl = Controller.from_dm_serial(channel, 921600)
motor = ctrl.add_damiao_motor(motor_can_id, motor_master_id, "4340P")

# Enable all motors
ctrl.enable_all()

# Switch to MIT mode, timeout 1000ms
motor.ensure_mode(Mode.MIT, timeout_ms=1000)

# MIT control
motor.send_mit(
    pos=0.0,
    vel=0.0,
    kp=0.0,
    kd=0.0,
    tau=0.8  # 0.8 Nm
)

# Run for 5s
time.sleep(5)

# Disable all motors
ctrl.disable_all()
ctrl.close_bus()
ctrl.close()
5_pos_vel_ctrl.py は pos_vel モードの制御サンプルです。
python 5_pos_vel_ctrl.py
pos は制御対象の目標位置であり、vlim は動作中の最大絶対速度を制限するために使用されます。
pos と vlim の単位はそれぞれ rad および rad/s で、データ型は float です。
from motorbridge import Controller, Mode
import time


motor_can_id = 0x01
motor_master_id = 0x11
channel = "/dev/ttyACM0"

# Get motor control handle
ctrl = Controller.from_dm_serial(channel, 921600)
motor = ctrl.add_damiao_motor(motor_can_id, motor_master_id, "4340P")

# Enable all motors
ctrl.enable_all()

# Switch to position-velocity mode, timeout 1000ms
motor.ensure_mode(Mode.POS_VEL, timeout_ms=1000)

# Position-velocity mode control
motor.send_pos_vel(
    pos=2.0,    # target angle (rad)
    vlim=1.5    # max vel (rad/s)
)

# Run for 5s
time.sleep(5)

# Disable all motors
ctrl.disable_all()
ctrl.close_bus()
ctrl.close()
6_vel_ctrl.py は vel モードの制御サンプルです。
python 6_vel_ctrl.py
from motorbridge import Controller, Mode
import time


motor_can_id = 0x01
motor_master_id = 0x11
channel = "/dev/ttyACM0"

# Get motor control handle
ctrl = Controller.from_dm_serial(channel, 921600)
motor = ctrl.add_damiao_motor(motor_can_id, motor_master_id, "4340P")

# Enable all motors
ctrl.enable_all()

# Switch to velocity mode, timeout 1000ms
motor.ensure_mode(Mode.VEL, 1000)

# Velocity mode control
motor.send_vel(vel=1.0)  # 1 rad/s

# Run for 5s
time.sleep(5)

# Disable all motors
ctrl.disable_all()
ctrl.close_bus()
ctrl.close()
ここで vel は制御対象の目標速度です。
pos の単位は rad/s で、データ型は float です。
7_force_pos.py は force_pos モードの制御サンプルです。
python 7_force_pos.py
from motorbridge import Controller, Mode
import time


motor_can_id = 0x01
motor_master_id = 0x11
channel = "/dev/ttyACM0"

# Get motor control handle
ctrl = Controller.from_dm_serial(channel, 921600)
motor = ctrl.add_damiao_motor(motor_can_id, motor_master_id, "4340P")

# Enable all motors
ctrl.enable_all()

# Switch to force_pos mode, timeout 1000ms
motor.ensure_mode(Mode.FORCE_POS, 1000)

# force_pos control
motor.send_force_pos(
    pos=0.5,    # target angle (rad)
    vlim=1.0,   # max vel (rad/s)
    ratio=0.3   # torque ratio (0.0 - 1.0), 0 means no torque, 1 means full torque
)

# Run for 5s
time.sleep(5)

# Disable all motors
ctrl.disable_all()
ctrl.close_bus()
ctrl.close()
pos は制御対象の目標位置、vlim は速度制限、ratio は使用するトルク量を表します。ratio が 0 のときはトルクなし、1 のときはフルトルクを意味します。
モーター状態の取得
8_get_state.py はモーター状態を取得するサンプルです。
python 8_get_state.py
from motorbridge import Controller, Mode
import time


motor_can_id = 0x01
motor_master_id = 0x11
channel = "/dev/ttyACM0"

# Get motor control handle
ctrl = Controller.from_dm_serial(channel, 921600)
motor = ctrl.add_damiao_motor(motor_can_id, motor_master_id, "4340P")

# Enable all motors
ctrl.enable_all()

# Switch to pos_vel mode, timeout 1000ms
motor.ensure_mode(Mode.POS_VEL, 1000)

# Record start time
start = time.perf_counter()

# Control cycle
dt = 0.01  # 10ms

# Run for 5s
while time.perf_counter() - start < 5.0:
    now_time = time.perf_counter() - start
    motor.send_pos_vel(
        pos=2.0,    # target angle (rad)
        vlim=1.5    # max vel (rad/s)
    )
    time.sleep(dt)
    state = motor.get_state()

    if state:
        print(f"time:{now_time:.3f}")
        print(f"pos: {state.pos:.3f} rad")
        print(f"vel: {state.vel:.3f} rad/s")
        print(f"torque: {state.torq:.3f} Nm\n")
    else:
        print("no respond\n")

# Disable all motors
ctrl.disable_all()
ctrl.close_bus()
ctrl.close()
8_get_state.py で示されている例は、制御処理中に前フレームでモーターから返された応答フレームを取得するためのものです。この応答フレームは、モーターに制御フレームを送信したときに送信され、モーターが返信します。これは質疑応答モードに相当します。モーターを動かさずに状態取得のためだけに応答フレームを返させたい場合は、9_set_zero.py におけるモーター状態の読み取り方法を参照してください。
モーターのゼロ点を設定
9_set_zero.py は、モーターのゼロ点を設定する例です。
python 9_set_zero.py
from motorbridge import Controller, Mode
import time


motor_can_id = 0x01
motor_master_id = 0x11
channel = "/dev/ttyACM0"

# Get motor control handle
ctrl = Controller.from_dm_serial(channel, 921600)
motor = ctrl.add_damiao_motor(motor_can_id, motor_master_id, "4340P")

# Set zero point
try:
    motor.set_zero_position()
    print("set zero successfully")
except Exception:
    print("set zero failed")
time.sleep(1)

# Check position
start = time.perf_counter()
dt = 0.01  # 10ms
while time.perf_counter() - start < 1.0:
    now_time = time.perf_counter() - start
    motor.request_feedback()
    time.sleep(dt)
    state = motor.get_state()
    if state:
        print(f"time:{now_time:.3f}")
        print(f"pos: {state.pos:.3f} rad")
        print(f"vel: {state.vel:.3f} rad/s")
        print(f"torque: {state.torq:.3f} Nm\n")
    else:
        print("no respond\n")

time.sleep(1)

ctrl.close_bus()
ctrl.close()
現象:ゼロ点の設定に成功すると、モーターの現在の状態が読み取られ、ゼロ点設定が成功したかどうかを確認します。
7.4 MotorBridge による RS モーターの制御
お使いのシステムにまだ PCAN ドライバがインストールされていない場合は、こちらのページを参照してください:PCAN driver installed スライダーをドラッグするか、小さなボックスに対応する角度(単位は rad)を入力し、Move をクリックすると、モーターは目標角度まで回転します。 Enable ボタンをクリックした後、Zero+Save をクリックして現在位置をゼロ点として設定します。 モーター ID を設定します。モーターを reBot 上で使用する場合、 現象:RS モーターが有効化されると、モーターのランプが緑色になります。3 秒後、RS モーターは無効化され、モーターのランプは赤色になります。 メイン実装関数 メイン実装関数 現象:この例では tau のみを与えているため、モーターは回転し続けます。MIT モードに従って、さまざまな制御モードを導出できます。例えば、kp=0 かつ kd が 0 でない場合、vel を与えることで定速回転を実現できます。kp=0 かつ kd=0 の場合、tau を与えることで所定のトルク出力を実現できます。 ここでの pos の単位は rad/s であり、データ型は float です。 現象:ゼロ点の設定に成功すると、モーターの現在状態が読み取られ、ゼロ点設定が成功したかどうかを確認します。7.4 MotorBridge による RS モーターの制御
Web コントロール
peak_usb カーネルモジュールをロードし、ポートを確認し、ボーレートを設定してポートを起動します:# The kit comes with PCAN-USB, which usually should directly appear as can0 or can1
sudo modprobe peak_usb
ip -br link
# If can0 appears, then set the bitrate
sudo ip link set can0 down 2>/dev/null
sudo ip link set can0 type can bitrate 1000000
sudo ip link set can0 up
https://motorbridge.github.io/motorbridge-studio/
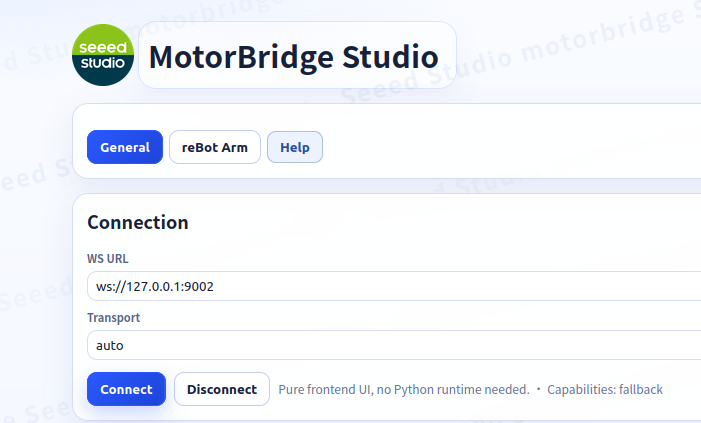
motorbridge-gateway -- --bind 127.0.0.1:9002 --transport socketcan --channel can0
motorbridge-gateway -- --bind 127.0.0.1:9002 --transport socketcan --channel can0
motorbridge-gateway -- --bind 127.0.0.1:9002 --transport socketcan --channel can0@1000000
Connected という文字が表示されます。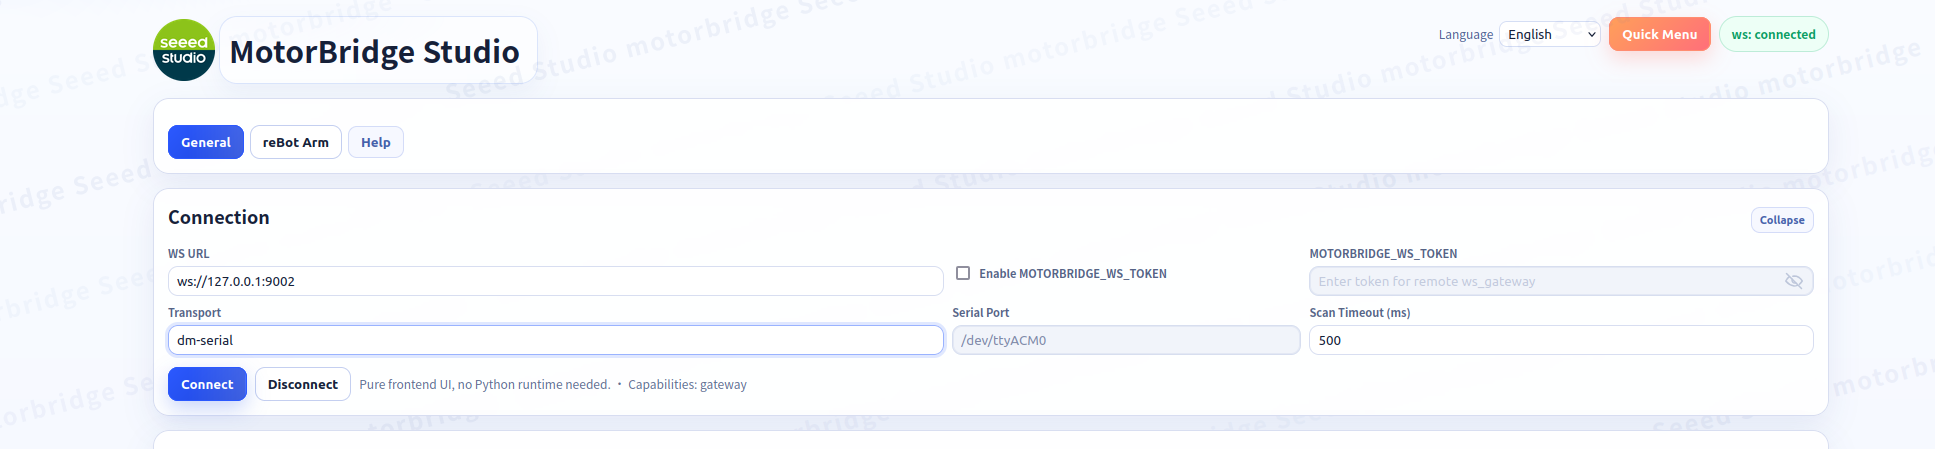
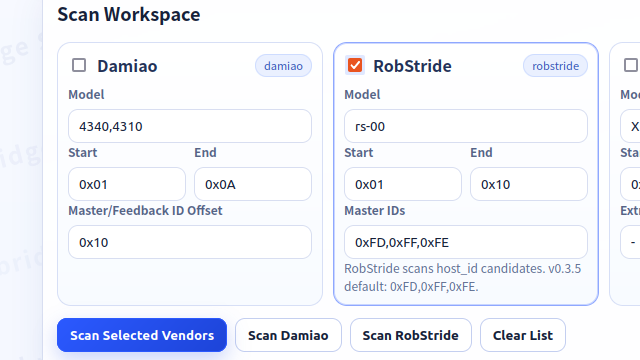
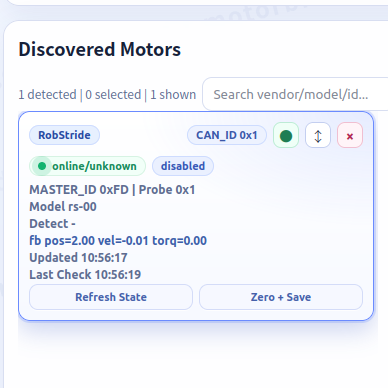
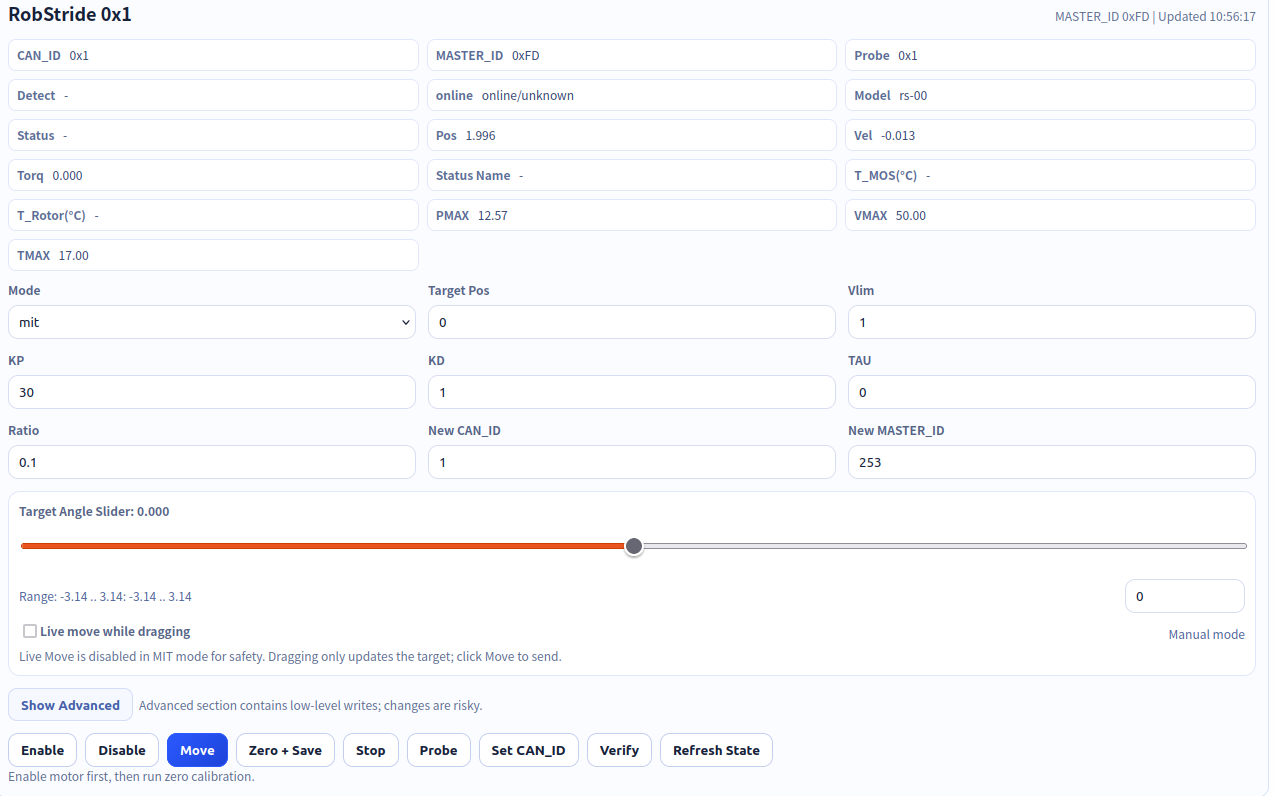
can_id は対応する関節番号に設定し、master_id は固定です。Python コードによる制御
RS モーターの有効化/無効化
1_enable_rs.py は、RS モーターの有効化/無効化の典型的な例です。python 1_enable_rs.py# Enable specified motor, disable motor after 3 seconds
from motorbridge import Controller, Mode
import time
motor_configs = {
1 : {
"can_id": 0x07,
"master_id": 0xfd, # fixed
"model": "rs-00", # rs-06 / rs-00
},
}
ctrl = Controller("can0")
# Add motor
motor = {}
for num, cfg in motor_configs.items():
motor[num] = ctrl.add_robstride_motor(cfg["can_id"], cfg["master_id"], cfg["model"])
# Enable all motors
ctrl.enable_all()
# Switch to MIT mode, timeout 1000ms
motor[1].ensure_mode(Mode.MIT, timeout_ms=1000)
# Control MIT
motor[1].send_mit(
pos=0.0,
vel=0.0,
kp=0.0,
kd=0.0,
tau=0.3 # 0.3 Nm
)
time.sleep(3)
# Disable all motors
ctrl.disable_all()モーター ID のスキャン
2_scan_RSmotor.py は、RS モーターの CAN ID をスキャンする例です。python 2_scan_RSmotor.pyfrom motorbridge import Controller, Mode
import time
def scan_robstride_motors(start_can_id, end_can_id, channel="can0"):
found_motors = []
for motor_can_id in range(start_can_id, end_can_id + 1):
ctrl = Controller(channel)
try:
motor = ctrl.add_robstride_motor(motor_can_id, 0xfd, "rs-00")
try:
can_id, respond_id = motor.robstride_ping()
found_motors.append(can_id)
print(f"can_id={can_id:02X} respond_id={respond_id:02X}") # response ID is not master ID
except Exception:
# Scan error
print(f"[no respond] no this motor_can_id=0x{motor_can_id:02X}")
finally:
motor.close()
except Exception as e:
print(f"[error] motor_can_id=0x{motor_can_id:02X}: {e}")
finally:
ctrl.close_bus()
ctrl.close()
print(f"\nfinish find {len(found_motors)} motor\n")
return found_motors
if __name__ == "__main__":
motors = scan_robstride_motors(1, 10, channel="can0")
print("\nfind motor config:")
for can_id in motors:
print(f" can_id=0x{can_id:02X}")scan_robstride_motors の入力は、CAN ID の範囲とポートです。実行後、スキャンされた CAN ID とその対応する master ID が表示されます。このスクリプトは、CAN ID と対応する master ID が正しいかどうかを確認するために使用できます。CAN ID と対応する Master ID の設定
3_set_id.py は、RS モーターの CAN ID と master ID を設定する例です。python 3_set_id.pyfrom motorbridge import Controller
from motorbridge import Controller, RID_MST_ID, RID_ESC_ID
import time
# Set CAN ID
def set_RSmotor_ID(old_can_id, new_can_id, channel="can0"):
ctrl = Controller(channel)
motor = ctrl.add_robstride_motor(old_can_id, 0xfd, "rs-00")
try:
motor.robstride_set_device_id(new_can_id)
print(f"change to new id :{new_can_id}")
except Exception:
print("set id failed")
time.sleep(1)
ctrl.close_bus()
ctrl.close()
if __name__ == "__main__":
old_can_id = 0x01
new_can_id = 0x01
set_RSmotor_ID(old_can_id, new_can_id, channel="can0")set_RSmotor_ID の入力は、古い CAN ID、設定したい新しい CAN ID、およびポートです。各種モードの制御
4_mit_ctrl.py は MIT モードの制御例です。kp はコントローラの剛性、kd はコントローラの減衰、tau はフィードフォワードトルクです。python 4_mit_ctrl.pyfrom motorbridge import Controller, Mode
import time
motor_can_id = 0x01
motor_master_id = 0xfd
channel = "can0"
# Get motor handle
ctrl = Controller(channel)
motor = ctrl.add_robstride_motor(motor_can_id, motor_master_id, "rs-00")
# Enable all motors
ctrl.enable_all()
# Switch to MIT mode, timeout 1000ms
motor.ensure_mode(Mode.MIT, timeout_ms=1000)
# Control MIT
motor.send_mit(
pos=0.0,
vel=0.0,
kp=0.0,
kd=0.0,
tau=0.3 # 0.3 Nm
)
# Run for 3s
time.sleep(3)
# Disable all motors
ctrl.disable_all()
ctrl.close_bus()
ctrl.close()
5_pos_vel_ctrl.py は pos_vel モード用の制御サンプルです。python 5_pos_vel_ctrl.pyfrom motorbridge import Controller, Mode
import time
motor_can_id = 0x01
motor_master_id = 0xfd
channel = "can0"
# Get motor handle
ctrl = Controller(channel)
motor = ctrl.add_robstride_motor(motor_can_id, motor_master_id, "rs-00")
# Enable all motors
ctrl.enable_all()
# Switch to position-velocity mode, timeout 1000ms
motor.ensure_mode(Mode.POS_VEL, timeout_ms=1000)
# Control position-velocity
motor.send_pos_vel(
pos=2.0, # target angle (rad)
vlim=1.5 # max vel (rad/s)
)
# Run for 5s
time.sleep(5)
# Disable all motors
ctrl.disable_all()
ctrl.close_bus()
ctrl.close()pos は制御対象の目標位置であり、vlim は動作中の最大絶対速度を制限するために使用されます。
6_vel_ctrl.py は vel モード用の制御サンプルです。python 6_vel_ctrl.pyfrom motorbridge import Controller, Mode
import time
motor_can_id = 0x01
motor_master_id = 0xfd
channel = "can0"
# Get motor handle
ctrl = Controller(channel)
motor = ctrl.add_robstride_motor(motor_can_id, motor_master_id, "rs-00")
# Enable all motors
ctrl.enable_all()
# Switch to position-velocity mode, timeout 1000ms
motor.ensure_mode(Mode.POS_VEL, timeout_ms=1000)
# Control position-velocity
motor.send_pos_vel(
pos=2.0, # target angle (rad)
vlim=1.5 # max vel (rad/s)
)
# Run for 5s
time.sleep(5)
# Disable all motors
ctrl.disable_all()
ctrl.close_bus()
ctrl.close()vel は制御対象の目標速度です。モーター状態の取得
7_get_state.py はモーター状態を取得するサンプルです。python 7_get_state.pyfrom motorbridge import Controller, Mode
import time
motor_can_id = 0x01
motor_master_id = 0xfd
channel = "can0"
# Get motor handle
ctrl = Controller(channel)
motor = ctrl.add_robstride_motor(motor_can_id, motor_master_id, "rs-00")
# Enable all motors
ctrl.enable_all()
# Switch to position-velocity mode, timeout 1000ms
motor.ensure_mode(Mode.POS_VEL, 1000)
# Record start time
start = time.perf_counter()
# Control cycle
dt = 0.01 # 10ms
# Run for 5s
while time.perf_counter() - start < 5.0:
now_time = time.perf_counter() - start
motor.send_pos_vel(
pos=2.0, # target angle (rad)
vlim=1.5 # max vel (rad/s)
)
time.sleep(dt)
state = motor.get_state()
if state:
print(f"time:{now_time:.3f}")
print(f"pos: {state.pos:.3f} rad")
print(f"vel: {state.vel:.3f} rad/s")
print(f"torque: {state.torq:.3f} Nm\n")
else:
print("no respond\n")
# Disable all motors
ctrl.disable_all()
ctrl.close_bus()
ctrl.close()7_get_state.py で示されているサンプルは、制御処理中にモーターが前フレームで返した応答フレームを取得するものです。この応答フレームは、制御フレームをモーターに送信したときに送られ、モーターが返信するもので、質疑応答モードに相当します。モーターを動かさずに状態取得のためだけに応答フレームを返させたい場合は、8_set_zero.py におけるモーター状態読み取りのサンプルを参照してください。モーターのゼロ点設定
8_set_zero.py はモーターのゼロ点を設定するサンプルです。python 8_set_zero.pyfrom motorbridge import Controller, Mode
import time
motor_can_id = 0x01
motor_master_id = 0xfd
channel = "can0"
# Get motor handle
ctrl = Controller(channel)
motor = ctrl.add_robstride_motor(motor_can_id, motor_master_id, "rs-00")
try:
motor.set_zero_position()
print("set zero successfully")
except Exception:
print("set zero failed")
time.sleep(1)
# Check position
start = time.perf_counter()
dt = 0.01 # 10ms
while time.perf_counter() - start < 1.0:
now_time = time.perf_counter() - start
motor.request_feedback()
time.sleep(dt)
state = motor.get_state()
if state:
print(f"time:{now_time:.3f}")
print(f"pos: {state.pos:.3f} rad")
print(f"vel: {state.vel:.3f} rad/s")
print(f"torque: {state.torq:.3f} Nm\n")
else:
print("no respond\n")
time.sleep(1)
ctrl.close_bus()
ctrl.close()