reSpeaker XVF3800 USB マイクアレイと XIAO ESP32S3 MQTT オーディオストリーミング
概要
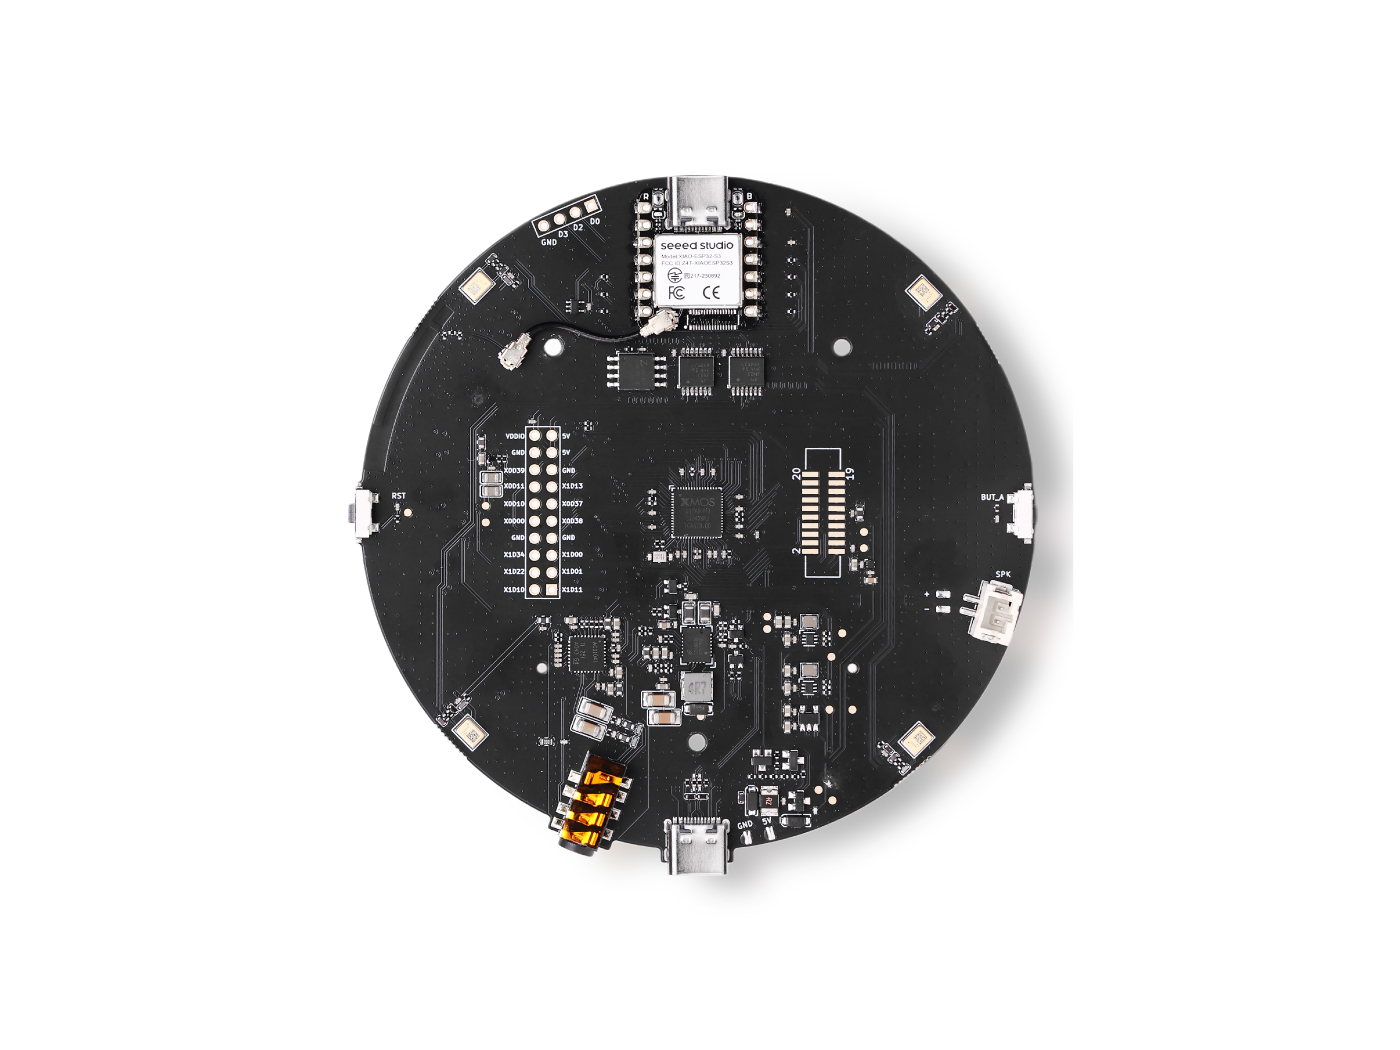
このプロジェクトでは、XIAO ESP32S3ボードに組み込まれたReSpeaker XVF3800マイクロフォンアレイからキャプチャしたオーディオをストリーミングし、.wavファイルとしてMQTTブローカーに送信する方法を実演します。オーディオはI2S経由でキャプチャされ、WAV形式でエンコードされ、MQTT経由で公開されます。
ライブラリ
機能概要
このスケッチは以下の処理を行います:
- 指定されたWiFiネットワークに接続します。
- MQTTブローカー(例:test.mosquitto.org)に接続します。
- ReSpeaker XVF3800 with XIAO ESP32S3からI2Sを使用してリアルタイムオーディオをキャプチャします
- オーディオをWAV形式にエンコードします。
- オーディオを単一のMQTTメッセージとして公開します。
- poll()を使用してMQTT接続を維持します。
Arduinoコード
アップロード前に以下のフィールドを更新してください:
const char* ssid = "your-SSID";
const char* password = "your-WIFI-password";
const char* broker = "test.mosquitto.org";
const char* topic = "xvf3800/audio.wav";
int port = 1883;
完全なコード(約3秒間のオーディオをストリーミング)
#include "WiFi.h"                // For WiFi connectivity
#include "ArduinoMqttClient.h"   // For MQTT communication
#include "AudioTools.h"          // For handling I2S audio and WAV encoding

// Define how much audio data to send
#define MQTT_PACKET_SIZE 1024    // Size of each MQTT data packet (in bytes)
#define NUM_PACKETS 375          // Number of packets to send (~3 seconds of audio at 16kHz)

// WiFi network credentials
const char* ssid = "your-SSID";              // Replace with your WiFi SSID
const char* password = "your-WIFI-password"; // Replace with your WiFi password

// MQTT broker configuration
const char* broker = "test.mosquitto.org";   // Public test MQTT broker
const char* topic = "xvf3800/audio.wav";     // Topic to publish audio to
int port = 1883;                             // Standard MQTT port

// Create MQTT and WiFi clients
WiFiClient wifiClient;
MqttClient mqttClient(wifiClient);

// Configure audio: 16kHz sample rate, stereo (2 channels), 32-bit per sample
AudioInfo info(16000, 2, 32);
I2SStream i2s_in;           // I2S audio input stream
I2SConfig i2s_config;       // I2S hardware configuration

// Stream that encodes audio in WAV format and sends it via MQTT
EncodedAudioStream out_stream(&mqttClient, new WAVEncoder());
StreamCopy copier(out_stream, i2s_in, MQTT_PACKET_SIZE); // Handles copying I2S data into the MQTT stream

// Connect to WiFi network
void connectWiFi() {
  Serial.printf("Connecting to WiFi: %s\n", ssid);
  WiFi.begin(ssid, password);                // Start WiFi connection
  while (WiFi.status() != WL_CONNECTED) {    // Wait until connected
    Serial.print(".");
    delay(1000);
  }
  Serial.println("\nConnected to WiFi!");
}

// Connect to MQTT broker
void connectMQTT() {
  mqttClient.setId("xvf3800_stream");        // Set MQTT client ID
  Serial.printf("Connecting to MQTT broker: %s\n", broker);

  if (!mqttClient.connect(broker, port)) {   // Try to connect to MQTT
    Serial.print("MQTT connection failed! Code: ");
    Serial.println(mqttClient.connectError());
    while (true); // Stop here if connection fails
  }

  Serial.println("Connected to MQTT broker!");
}

// Set up I2S audio input configuration
void setupI2SInput() {
  i2s_config = i2s_in.defaultConfig(RX_MODE);  // Set RX mode for audio input
  i2s_config.copyFrom(info);                   // Apply audio format to config

  // Assign correct GPIO pins for XVF3800
  i2s_config.pin_bck = 8;       // Bit clock
  i2s_config.pin_ws = 7;        // Word select (LR clock)
  i2s_config.pin_data = 44;     // Not used for RX, but required by lib
  i2s_config.pin_data_rx = 43;  // Data input pin from XVF3800
  i2s_config.is_master = true;  // XVF3800 provides clock, so this board acts as master

  i2s_in.begin(i2s_config);     // Initialize I2S input with given config
  Serial.println("I2S input started.");
}

void setup() {
  Serial.begin(115200);         // Start serial monitor
  AudioLogger::instance().begin(Serial, AudioLogger::Info); // Enable audio debug logs

  connectWiFi();                // Connect to WiFi
  connectMQTT();                // Connect to MQTT
  setupI2SInput();              // Configure and start I2S audio input

  out_stream.begin(info);       // Initialize WAV encoder with audio format

  // Start a new MQTT message and reserve enough space for the full audio stream
  mqttClient.beginMessage(topic, MQTT_PACKET_SIZE * NUM_PACKETS, true);

  // Copy audio from microphone (I2S) into MQTT stream
  copier.copyN(NUM_PACKETS);   // Copies a fixed number of packets (3 seconds of audio)

  mqttClient.endMessage();     // Finalize the MQTT message and send it
  Serial.println("Audio stream sent via MQTT!");
}

void loop() {
  mqttClient.poll();           // Keep MQTT connection alive (important if broker expects pings)
  delay(5000);                 // Optional delay, useful if recording repeatedly
}
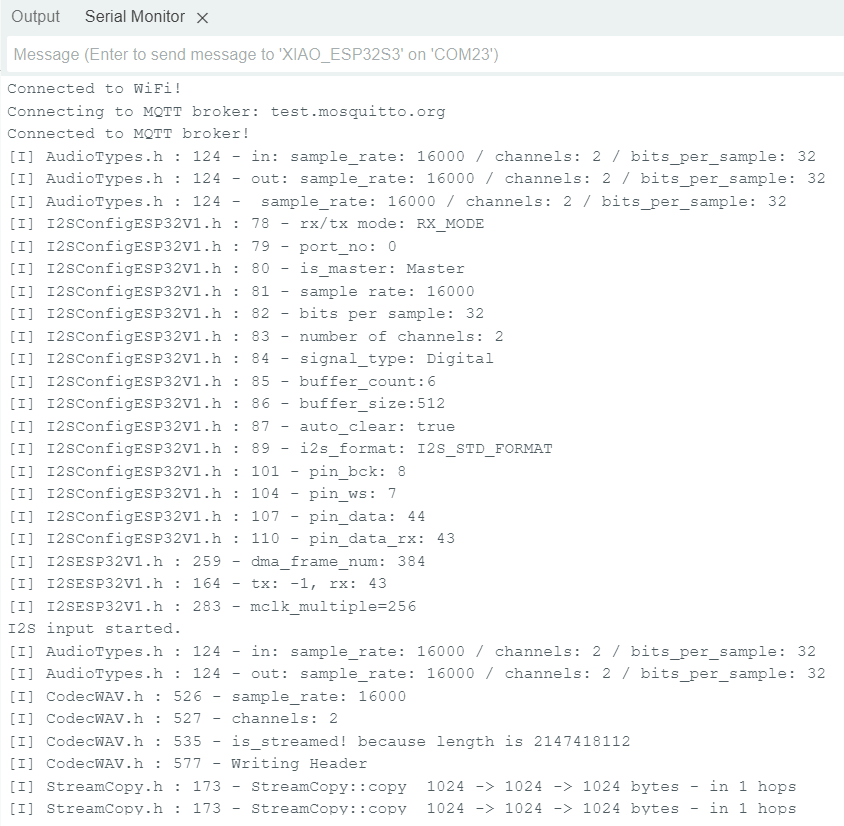
シリアルモニター(115200ボー)を使用して接続とストリーミング状態を確認してください。
Pythonスクリプト(音声の受信と保存用)
import paho.mqtt.client as mqtt

broker = "test.mosquitto.org"
port = 1883
topic = "xvf3800/audio.wav"
output_file = "output.wav"
audio_data = bytearray()

def on_message(client, userdata, msg):
    global audio_data
    print("🔊 Received audio message")
    audio_data.extend(msg.payload)

    with open(output_file, "wb") as f:
        f.write(audio_data)
    print(f"✅ WAV file saved as: {output_file}")

client = mqtt.Client()
client.on_message = on_message

print(f"Connecting to MQTT broker {broker}...")
client.connect(broker, port, 60)

client.subscribe(topic)
print(f"📡 Subscribed to: {topic}")
client.loop_forever()
オーディオの再生
ファイルが保存されたら(output.wav)、以下のような任意のオーディオプレーヤーを使用して開くだけです:
- VLC
- Windows Media Player
- Audacity(検査用)
技術サポート & 製品ディスカッション
弊社製品をお選びいただき、ありがとうございます!お客様の製品体験が可能な限りスムーズになるよう、さまざまなサポートを提供いたします。異なる好みやニーズに対応するため、複数のコミュニケーションチャンネルをご用意しています。