ESPHome クックブック: ボタン、ブザー、LED、バッテリー & 省電力(reTerminal E シリーズ)
このページでは、すでに reTerminal E シリーズ向け ESPHome ディスプレイクックブック(デバイスが Wi-Fi に接続済み、Home Assistant との連携がオンライン、最初のダッシュボードが表示済み)を一通り終えていることを前提とします。プラットフォームレベルの YAML スケルトンと Home Assistant 連携手順については、ESPHome を使う を参照してください。RTC、microSD カード検出、マイクの設定については、ESPHome クックブック: RTC、SD カード & マイク を参照してください。
開発環境をセットアップする前に、プロジェクトの結果をすばやくプレビューしたり、基本的なデモファームウェアを試したい場合は、reTerminal E-Series Firmware Hub を開いてください。対応する reTerminal E シリーズデバイスを選択し、ブラウザから直接デモファームウェアを書き込むことができます。
この記事では、ESPHome ディスプレイクックブック で扱った基礎的な概念を踏まえつつ、reTerminal E シリーズ ePaper Display デバイスのオンボード I/O と電源関連の ESPHome 設定について説明します。ESPHome や reTerminal E シリーズを初めて扱う場合は、ここで紹介するハードウェア例を使う前に、まずディスプレイガイドから始めることをおすすめします。
ハードウェア機能
reTerminal E シリーズ ePaper Display には、ESPHome を通じて Home Assistant で活用できる複数のハードウェアコンポーネントが搭載されています。
-
3 つのプログラマブルボタン(GPIO3、GPIO4、GPIO5)
-
ブザー(GPIO45)
-
バッテリーレベル監視(電圧用 GPIO1)
-
オンボード LED(GPIO6)
-
温度・湿度センサー(I²C インターフェース)
ここでは、これらの各コンポーネントを実用的なアプリケーションでどのように使うかを見ていきます。
reTerminal E シリーズ ePaper Display ハードウェアコンポーネントの制御
ここでは、reTerminal E シリーズ ePaper Display 上の各ハードウェアコンポーネントを Home Assistant でどのように利用するかを説明します。
ボタンと LED
この例では、reTerminal E シリーズ ePaper Display 上の 3 つのボタンを使って機能を制御し、オンボード LED による視覚的なフィードバックを行う方法を示します。
この例を使用するには、以下のコードをコピーして、Yaml ファイル内の captive_portal コード行の後に貼り付けてください。
# Button configuration
binary_sensor:
  - platform: gpio
    pin:
      number: GPIO3         # Green button
      mode: INPUT_PULLUP
      inverted: true
    id: button_1
    name: "Button 1"
    on_press:
      then:
        - light.turn_on: onboard_led
        - delay: 500ms
        - light.turn_off: onboard_led

  - platform: gpio
    pin:
      number: GPIO4          # Right white button
      mode: INPUT_PULLUP
      inverted: true
    id: button_2
    name: "Button 2"
    on_press:
      then:
        - light.turn_on: onboard_led
        - delay: 200ms
        - light.turn_off: onboard_led
        - delay: 200ms
        - light.turn_on: onboard_led
        - delay: 200ms
        - light.turn_off: onboard_led

  - platform: gpio
    pin:
      number: GPIO5           # Left white button
      mode: INPUT_PULLUP
      inverted: true
    id: button_3
    name: "Button 3"
    on_press:
      then:
        - light.toggle: onboard_led

# LED configuration
output:
  - platform: gpio
    pin: GPIO6
    id: led_output
    inverted: true

light:
  - platform: binary
    name: "Onboard LED"
    output: led_output
    id: onboard_led
この設定では、次のことを行います。
- 3 つすべてのボタンをプルアップ抵抗付き入力として設定
- ボタン 1 を押したときに LED を短く点滅させるように設定
- ボタン 2 を押したときに LED をダブルブリンクパターンで点滅させるように設定
- ボタン 3 を押したときに LED のオン/オフをトグルするように設定
- LED を Home Assistant から制御可能な light エンティティとして利用できるようにする
ブザー制御
reTerminal E シリーズ ePaper Display には、GPIO45 に接続されたブザーが搭載されており、音によるフィードバックに使用できます。ここでは、その設定方法を説明します。
この例を使用するには、以下のコードをコピーして、Yaml ファイル内の captive_portal コード行の後に貼り付けてください。
# This component creates a raw PWM (Pulse Width Modulation) output signal.
# For ESP32, the correct platform is 'ledc', which uses the dedicated LED Control hardware peripheral.
output:
  - platform: ledc   # CORRECTED: 'ledc' is the correct platform for ESP32 PWM.
    pin: GPIO45
    id: buzzer_pwm
    # The frequency determines the pitch of the buzzer's sound. 1000Hz is a mid-range tone.
    frequency: 1000Hz

# Create a light entity to provide a user-friendly way to control the buzzer.
# The 'brightness' of the light will control the PWM duty cycle, which effectively changes the buzzer's volume.
light:
  - platform: monochromatic
    output: buzzer_pwm
    name: "Buzzer"
    id: buzzer
    # Setting transition length to 0s makes the buzzer turn on and off instantly.
    default_transition_length: 0s

# This section defines the physical button that will trigger the buzzer.
binary_sensor:
  - platform: gpio
    pin:
      number: GPIO3            # The GPIO pin connected to the green button.
      mode: INPUT_PULLUP       # Use the internal pull-up resistor.
      inverted: true           # The signal is low when pressed.
    id: button_1
    # 'on_press' defines the sequence of actions to execute when the button is pressed.
    on_press:
      then:
        # First beep: turn on at 50% volume (brightness) for 200 milliseconds.
        - light.turn_on:
            id: buzzer
            brightness: 50%
        - delay: 200ms
        - light.turn_off: buzzer
        # Pause for 100 milliseconds between beeps.
        - delay: 100ms
        # Second beep: turn on at 70% volume for 200 milliseconds.
        - light.turn_on:
            id: buzzer
            brightness: 70%
        - delay: 200ms
        - light.turn_off: buzzer
この設定では、次のことを行います。
- ブザーを PWM 出力として設定
- ブザーを制御するための light エンティティを作成
- ボタン 1 を押したときに短いビープパターンを再生するように設定
frequency パラメータを調整することで、ブザーの音程を変更できます。値を大きくすると、より高い音程になります。
バッテリー監視
reTerminal E シリーズ ePaper Display は、GPIO1 のアナログ入力を通じてバッテリーレベルを監視できます。ここでは、その設定方法を説明します。
esphome:
  name: reterminal-e10xx
  friendly_name: reTerminal_E10xx
  on_boot:
    priority: 600
    then:
      - output.turn_on: bsp_battery_enable

esp32:
  board: esp32-s3-devkitc-1
  framework:
    type: arduino

# Enable logging
logger:

# Enable Home Assistant API
api:
  encryption:
    key: "REPLACE_WITH_YOUR_API_KEY"

ota:
  - platform: esphome
    password: "REPLACE_WITH_YOUR_OTA_PASSWORD"

wifi:
  ssid: !secret wifi_ssid
  password: !secret wifi_password

  # Enable fallback hotspot (captive portal) in case wifi connection fails
  ap:
    ssid: "Reterminal-E10Xx"
    password: "ChangeMe123"

captive_portal:

output:
  - platform: gpio
    pin: GPIO21
    id: bsp_battery_enable

sensor:
  - platform: adc
    pin: GPIO1
    name: "Battery Voltage"
    id: battery_voltage
    update_interval: 60s
    attenuation: 12db
    filters:
      - multiply: 2.0  # Voltage divider compensation

  - platform: template
    name: "Battery Level"
    id: battery_level
    unit_of_measurement: "%"
    icon: "mdi:battery"
    device_class: battery
    state_class: measurement
    lambda: 'return id(battery_voltage).state;'
    update_interval: 10s
    filters:
      - calibrate_linear:
          - 4.15 -> 100.0
          - 3.96 -> 90.0
          - 3.91 -> 80.0
          - 3.85 -> 70.0
          - 3.80 -> 60.0
          - 3.75 -> 50.0
          - 3.68 -> 40.0
          - 3.58 -> 30.0
          - 3.49 -> 20.0
          - 3.41 -> 10.0
          - 3.30 -> 5.0
          - 3.27 -> 0.0
      - clamp:
          min_value: 0
          max_value: 100
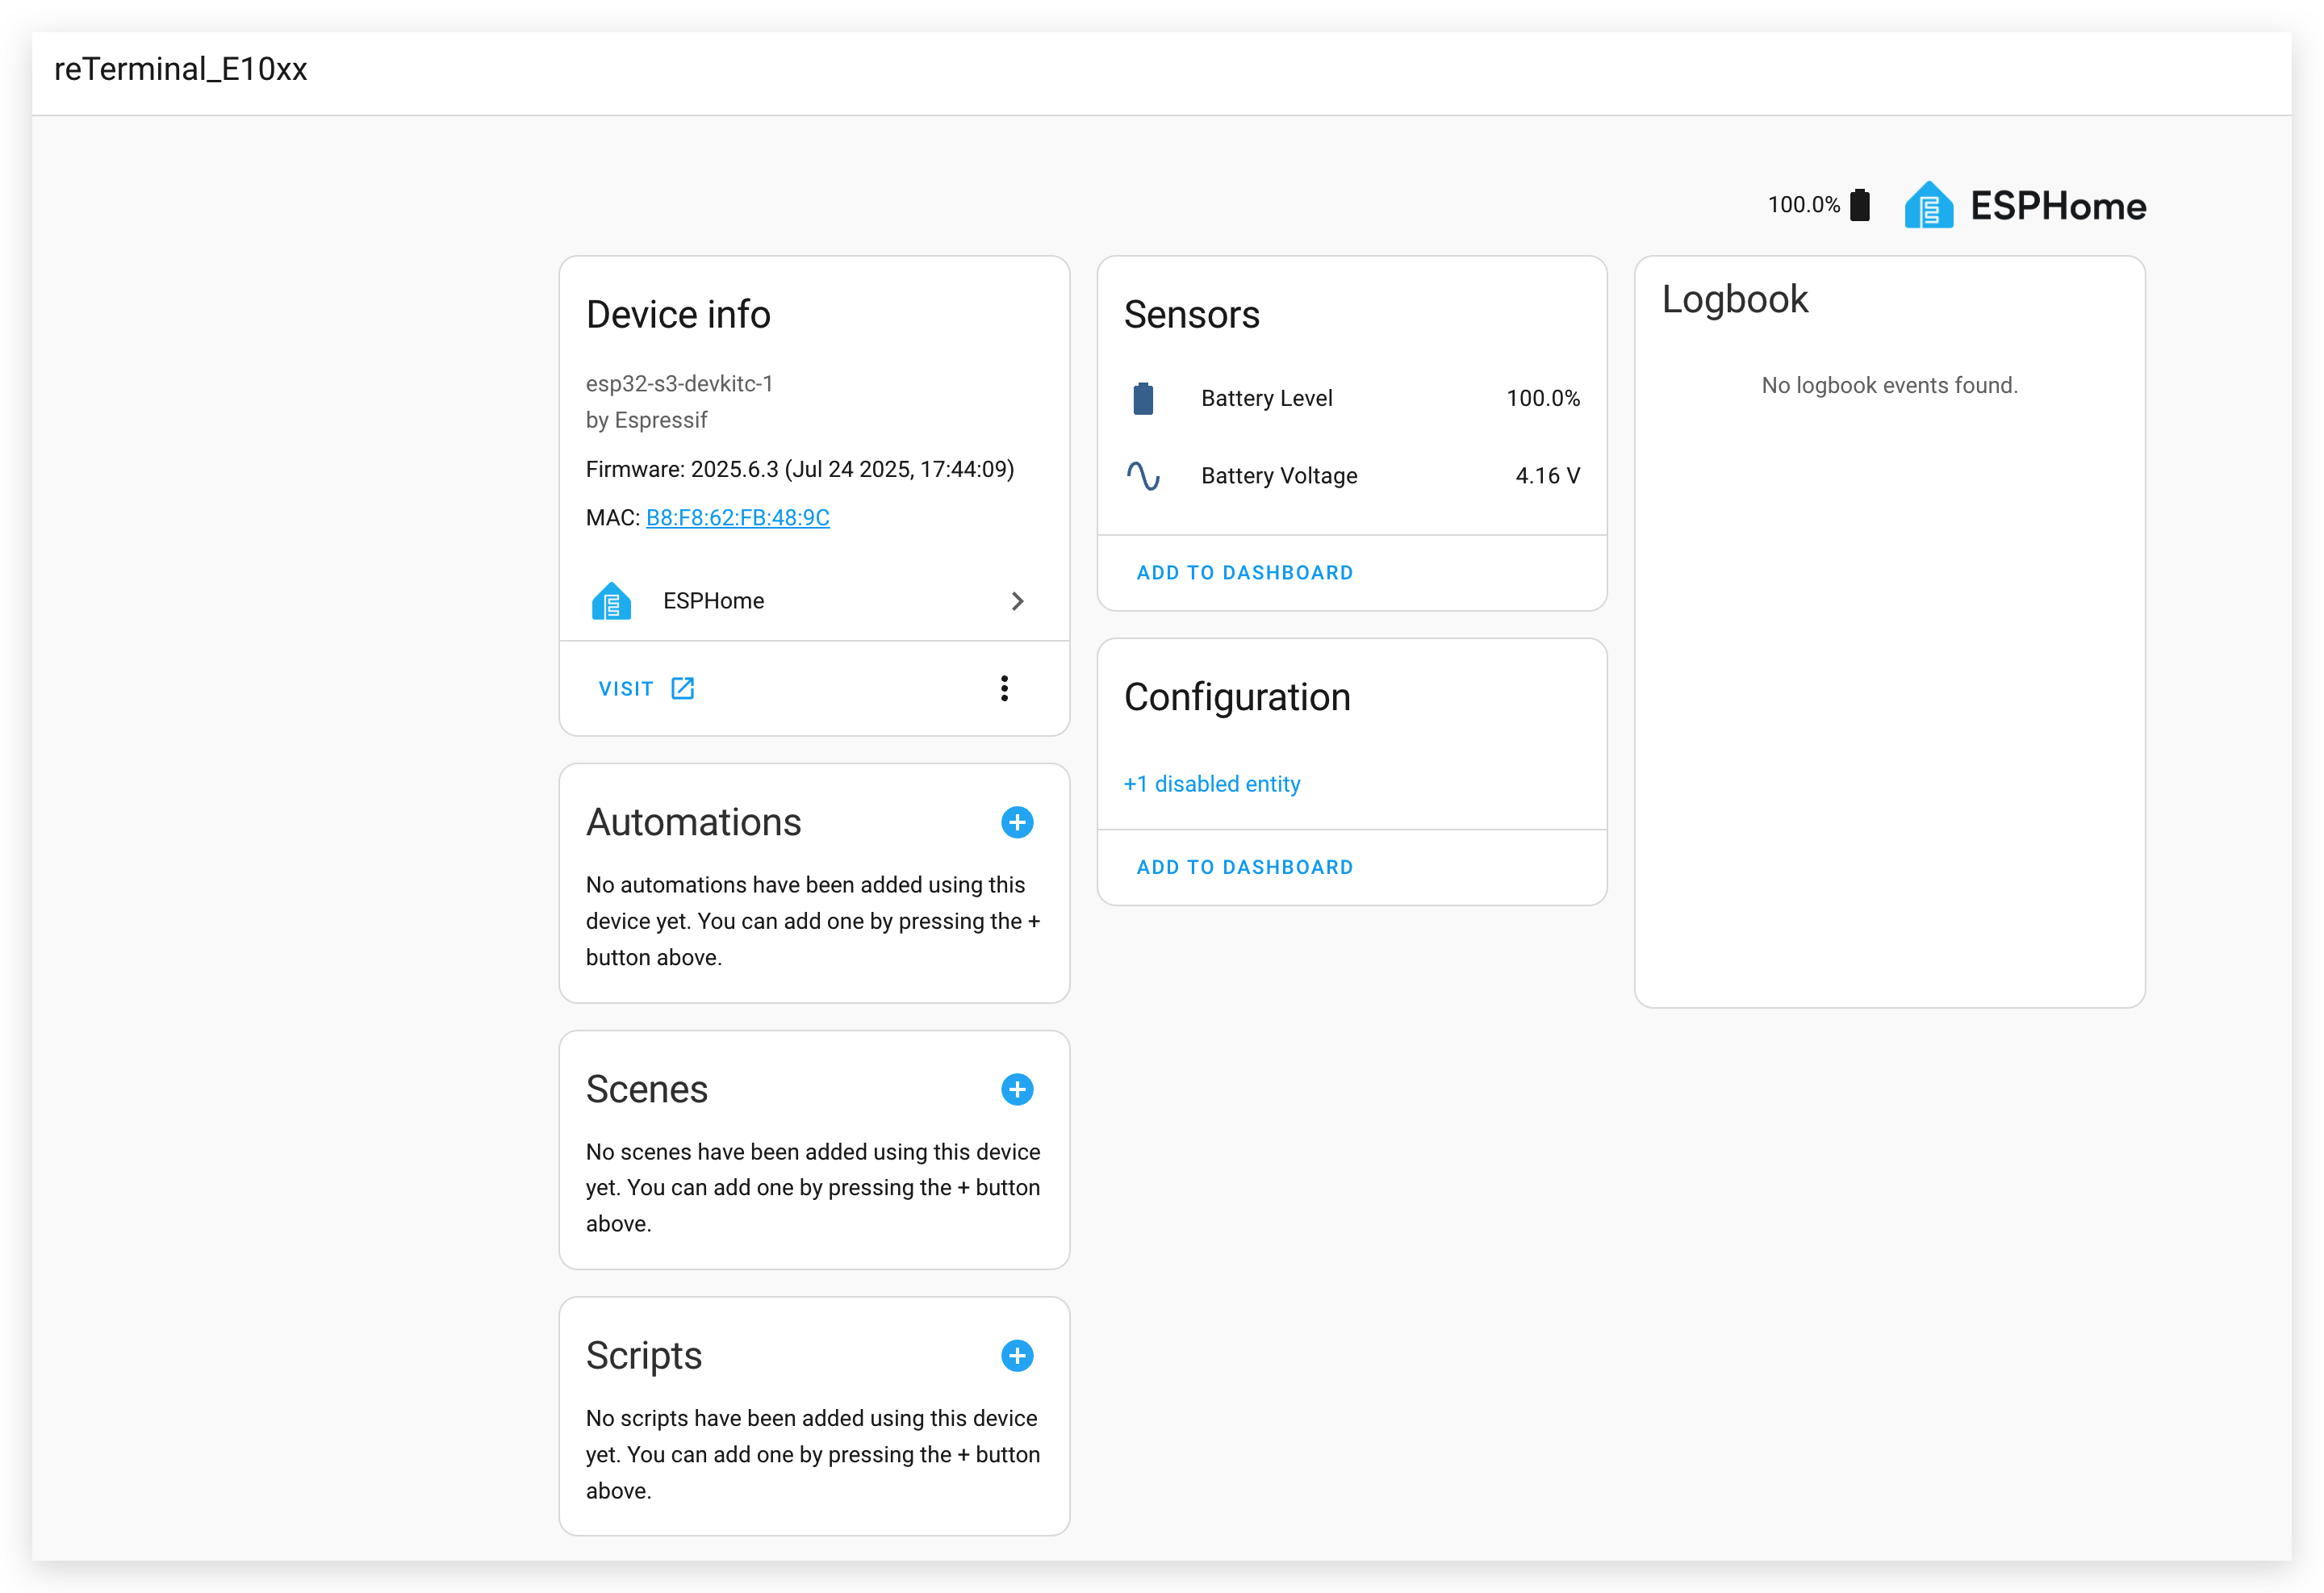
この設定では、次のことを行います。
- ADC を通じてバッテリー電圧を読み取る
- キャリブレーションカーブを用いて電圧をバッテリー残量(パーセンテージ)に変換する
- 生の電圧値とパーセンテージの両方を Home Assistant で利用できるようにする
バッテリーレベルを測定するには、GPIO21 ピンを有効にする必要があります。これを有効にしない場合、GPIO1 からバッテリー電圧値を読み取ることはできません。
デモ 2. Home Assistant ダッシュボードをスクリーンショットとして取得する
この例では、Home Assistant ダッシュボードのスクリーンショットを取得し、それを reTerminal E シリーズに表示する方法を示します。
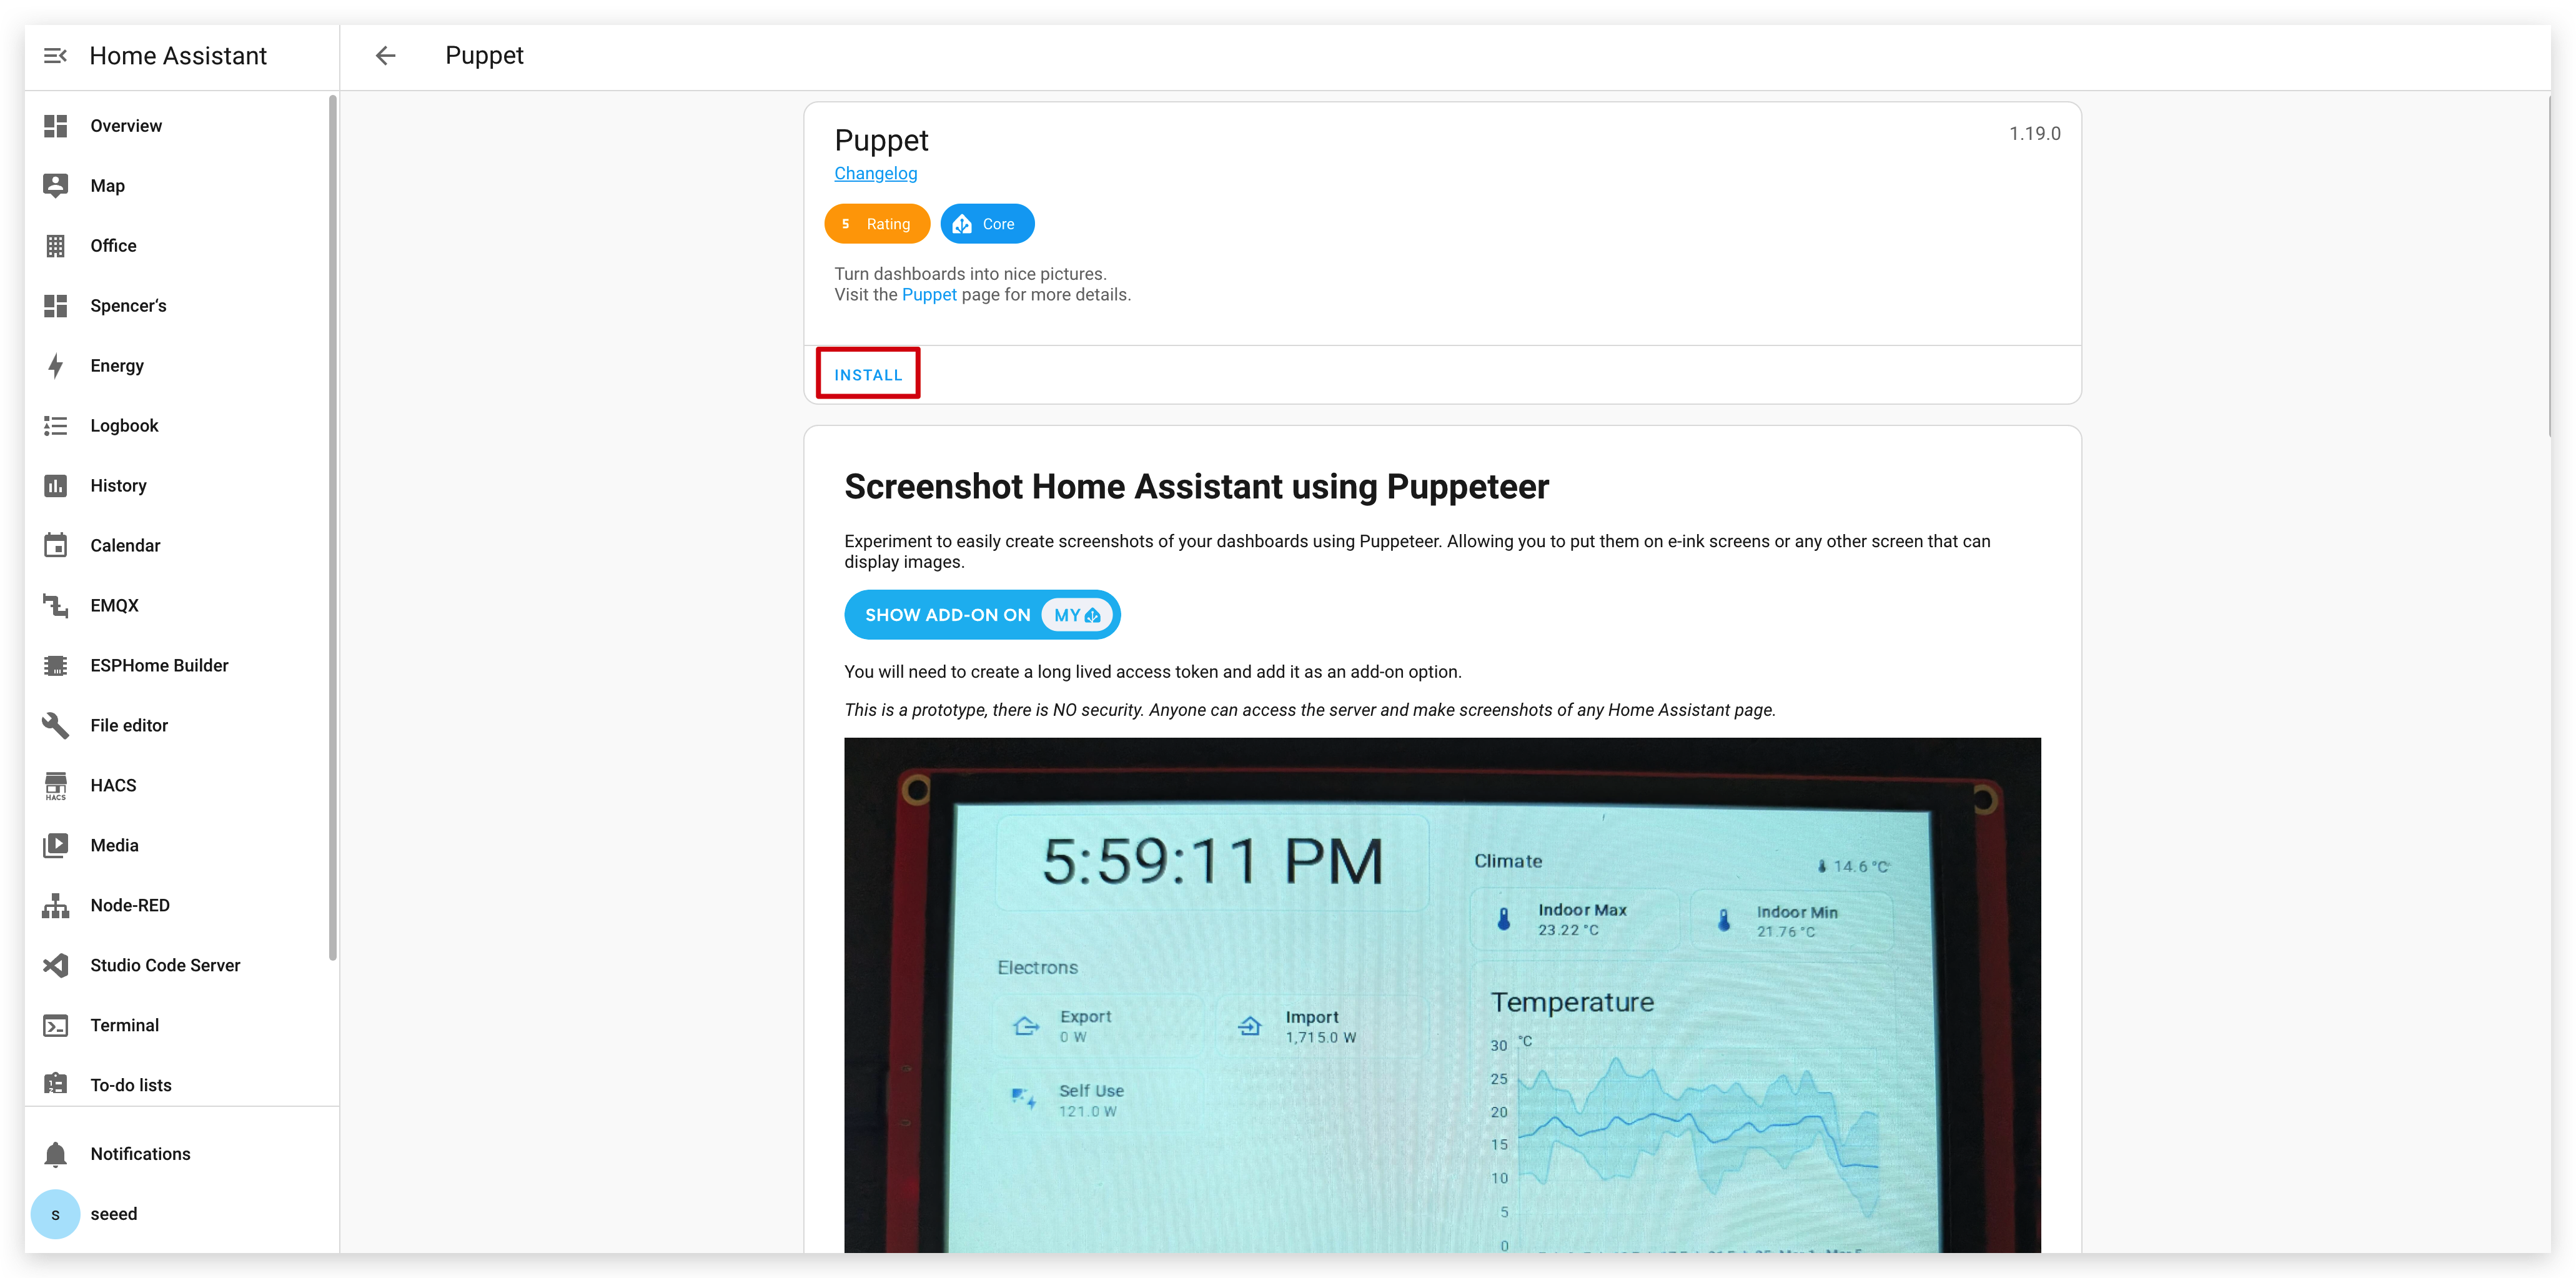
Puppet アドオンのインストール
ステップ 1. まず Puppet アドオンをインストールする必要があります。以下のボタンをクリックすると、お使いの Home Assistant インスタンス内のアドオンインストールページに直接移動します。
ステップ 2. アドオンページで「INSTALL」ボタンをクリックし、インストールが完了するまで待ちます。
アクセストークンの作成
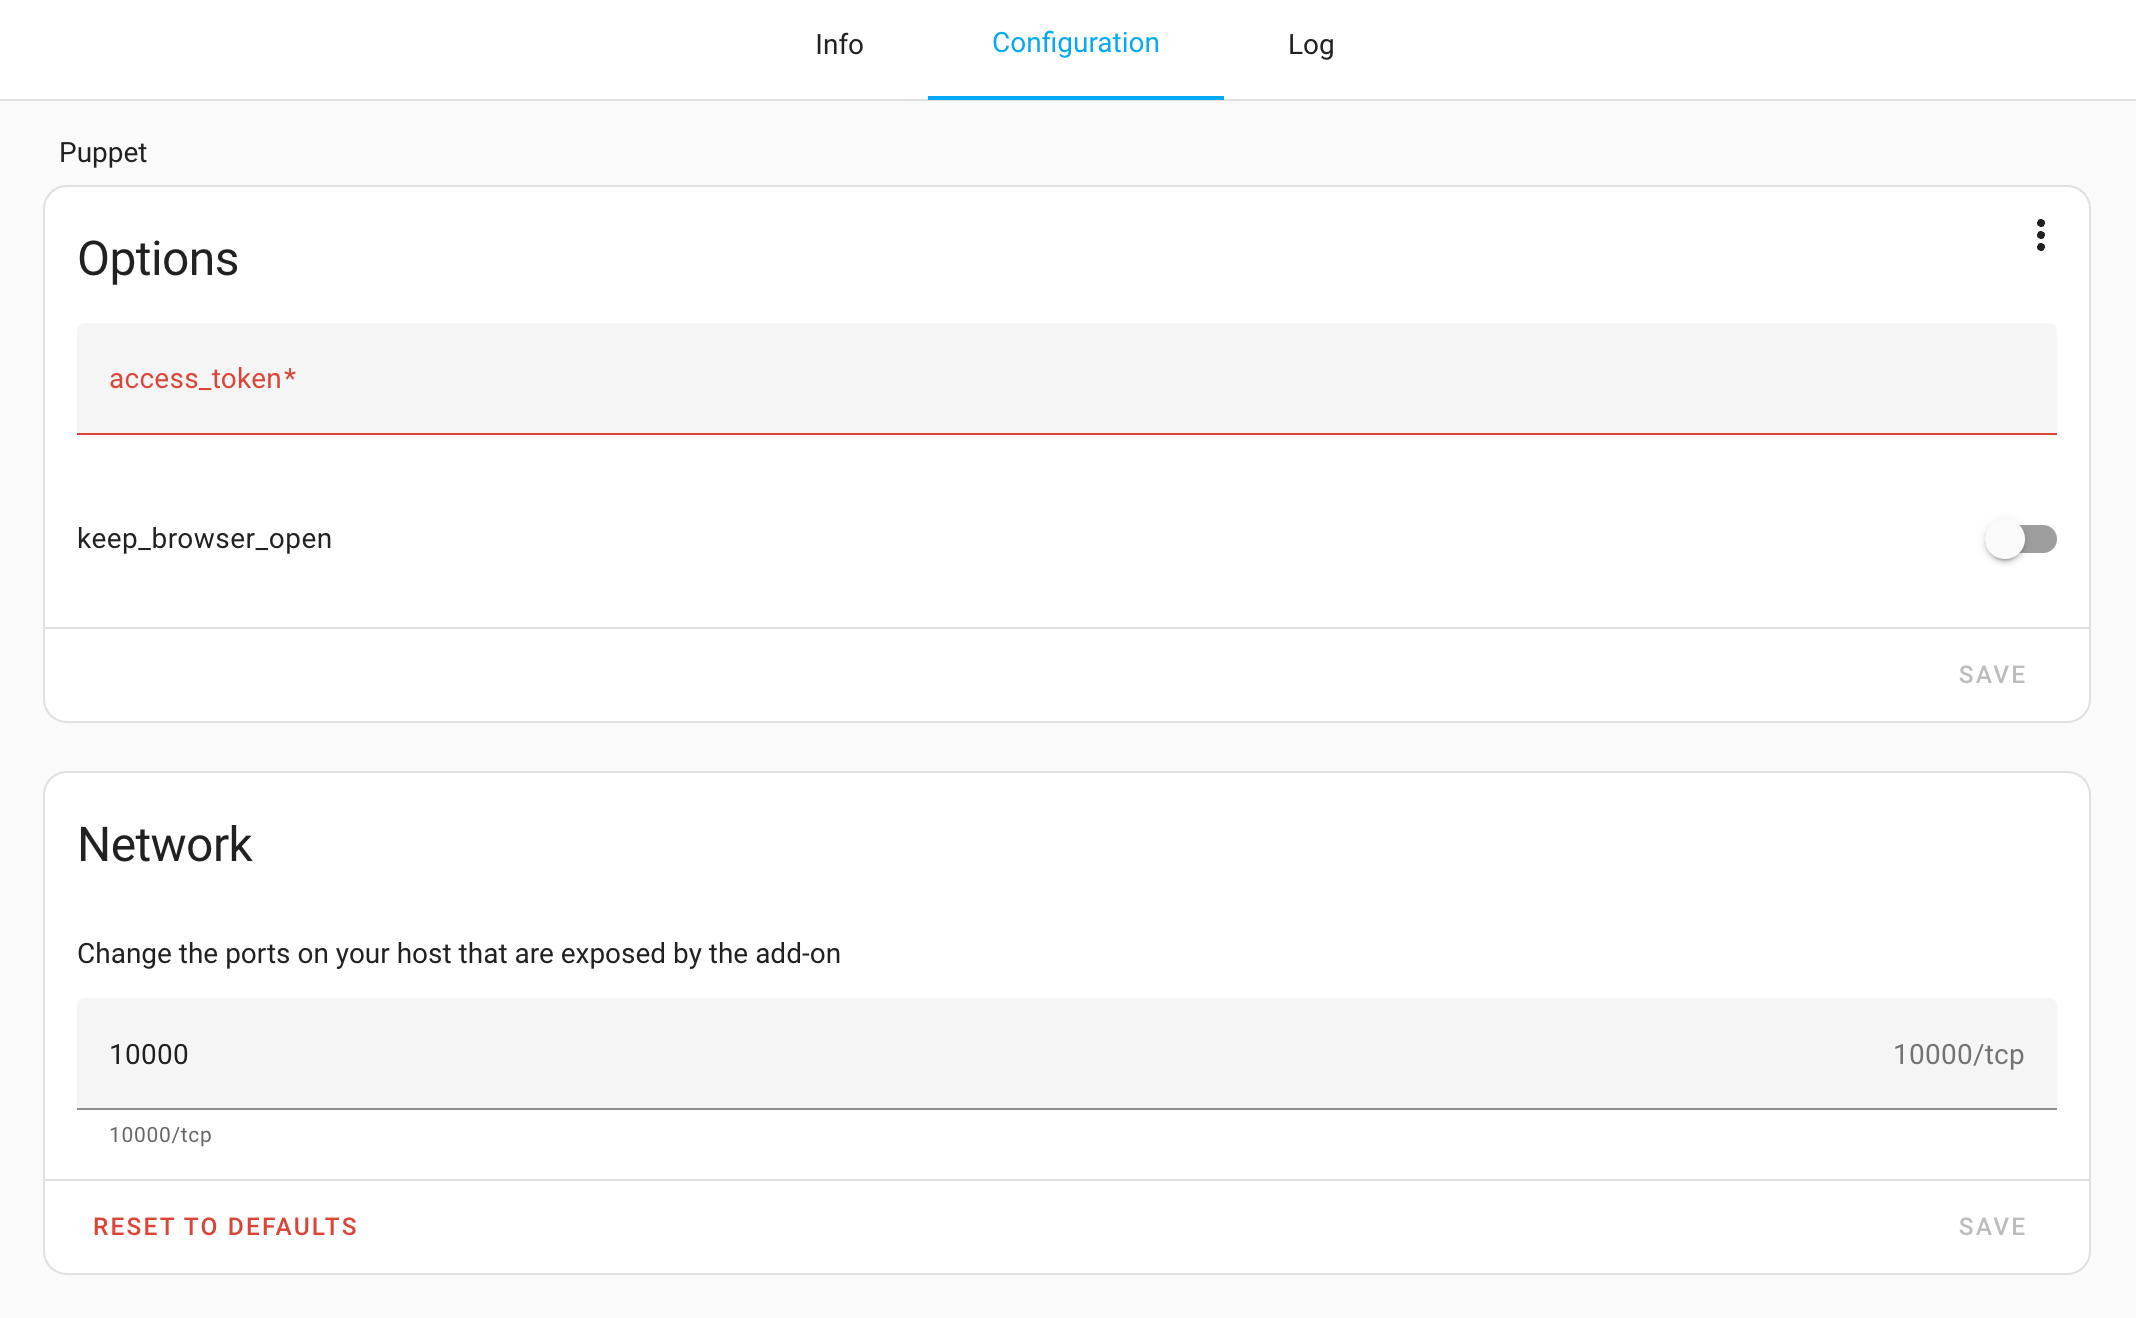
ステップ 3. インストール後、Puppet アドオンの Configuration ページに移動します。ここでトークンを入力する必要があることがわかります。このアドオン用のアクセストークンを作成する必要があります。
ステップ 4. 左下のユーザー名をクリックして Home Assistant のプロフィール画面に移動し、ページ下部の「Long-Lived Access Tokens」を選択します。
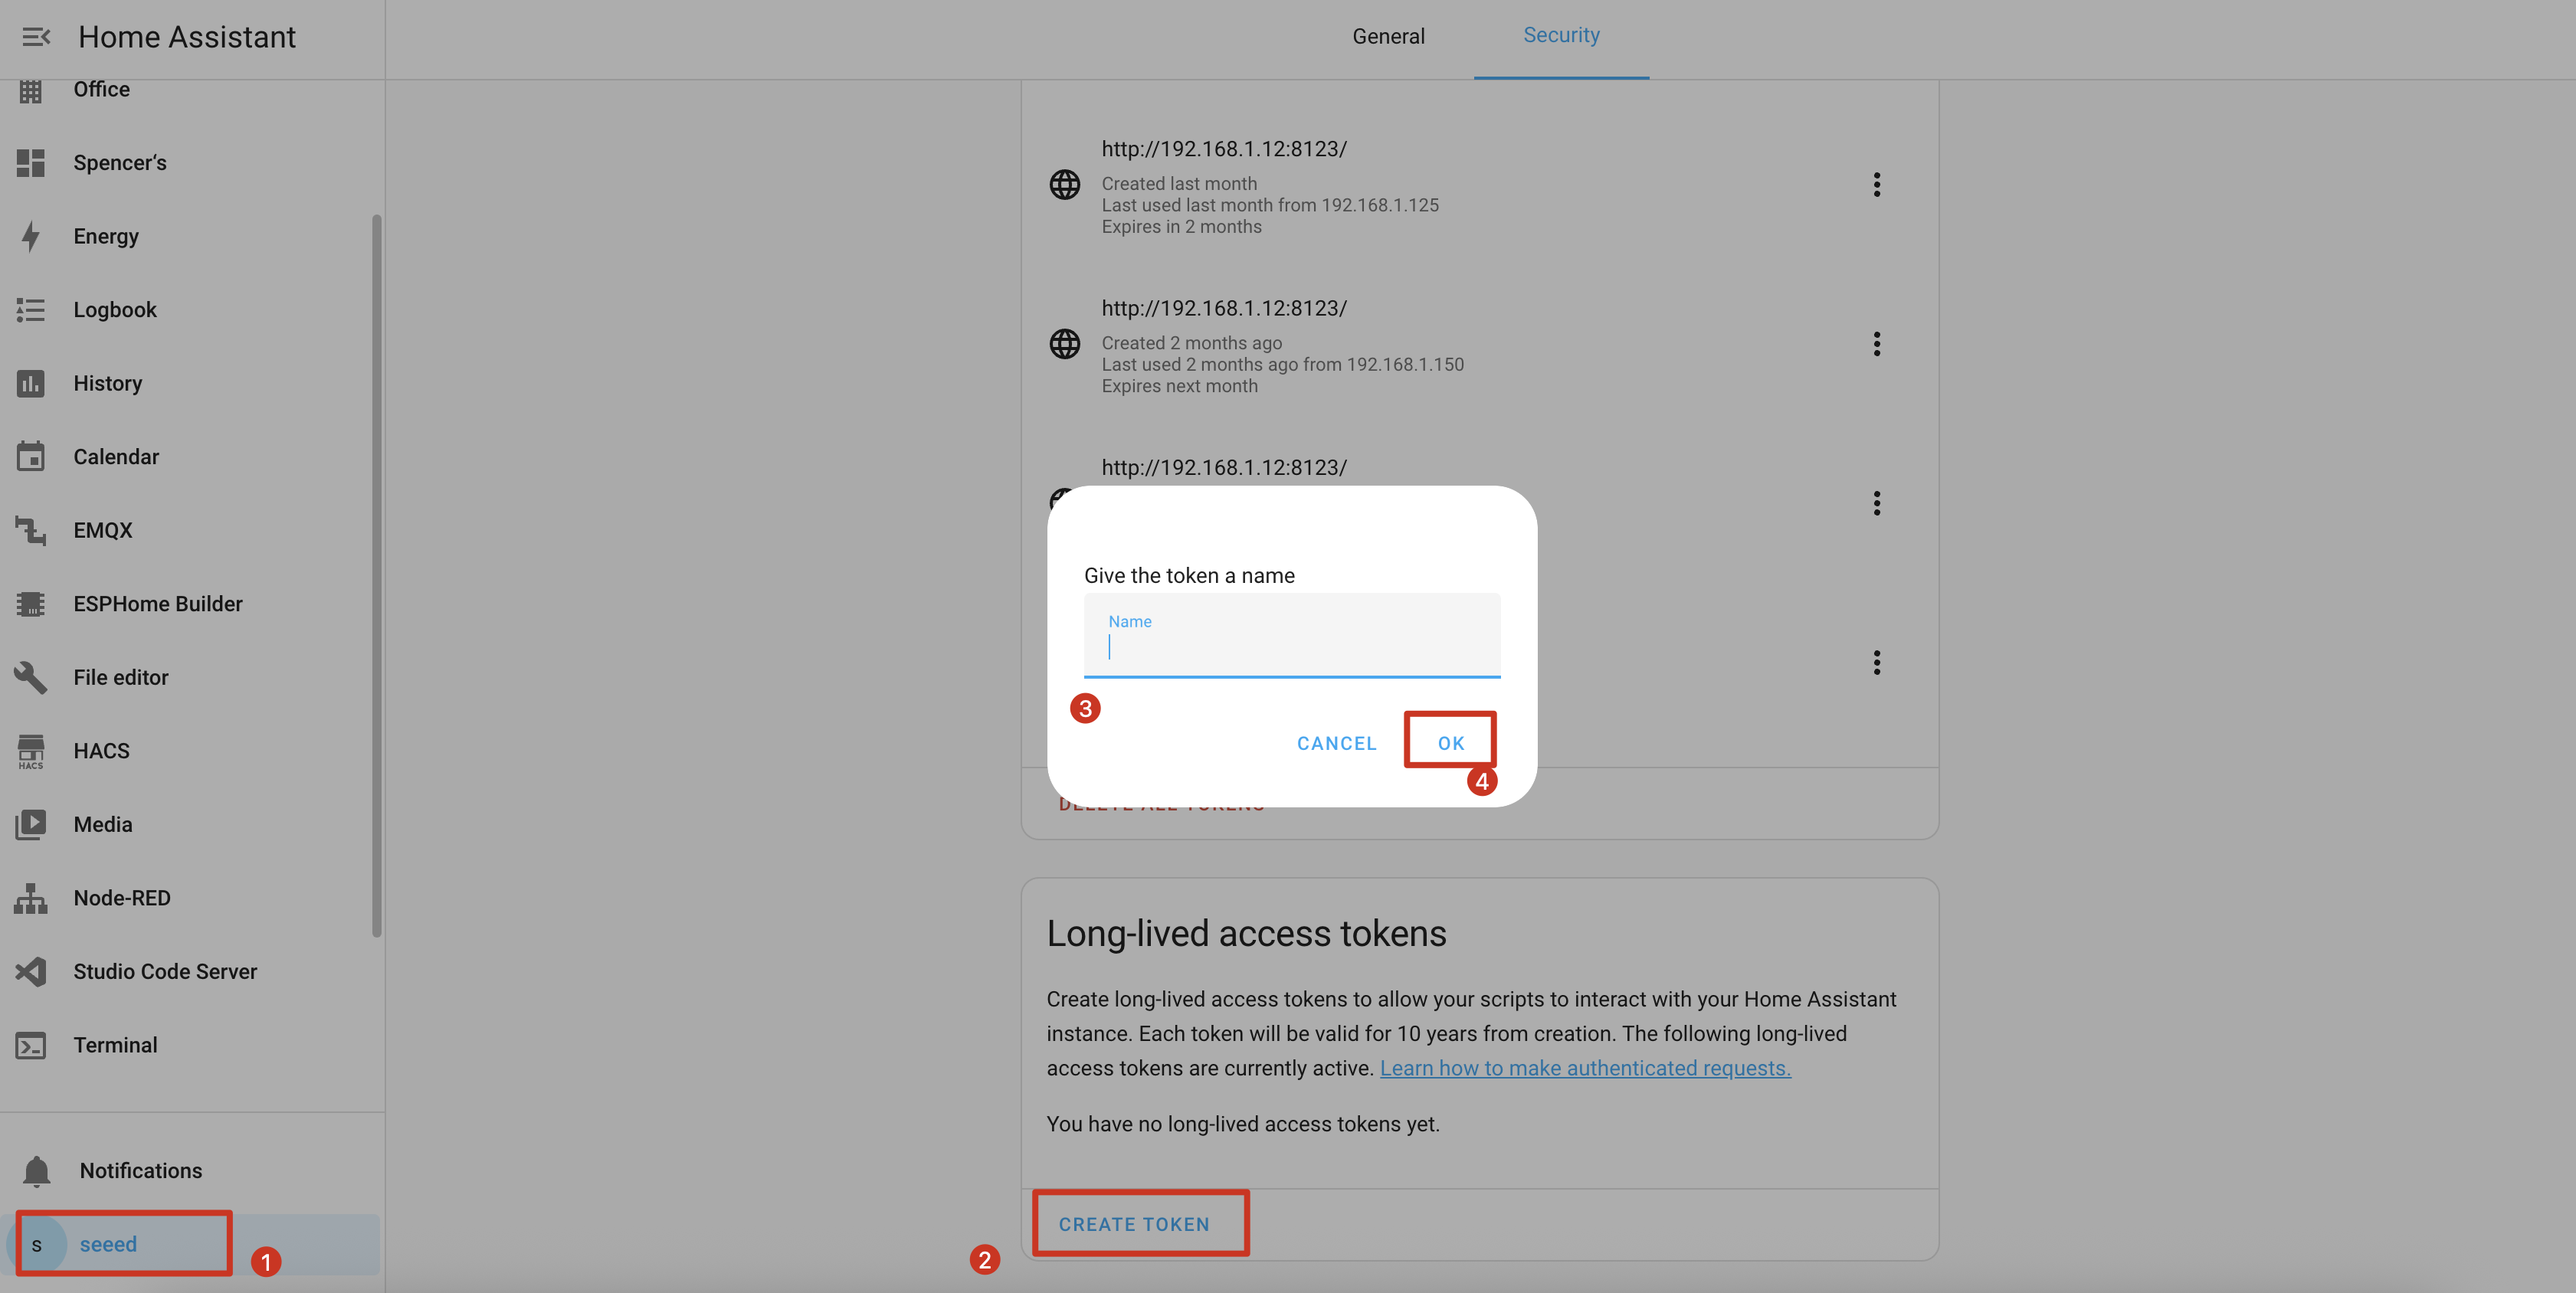
ステップ 5. 「Puppet Screenshot」のようなわかりやすい名前で新しいトークンを作成し、生成されたトークンをコピーします。
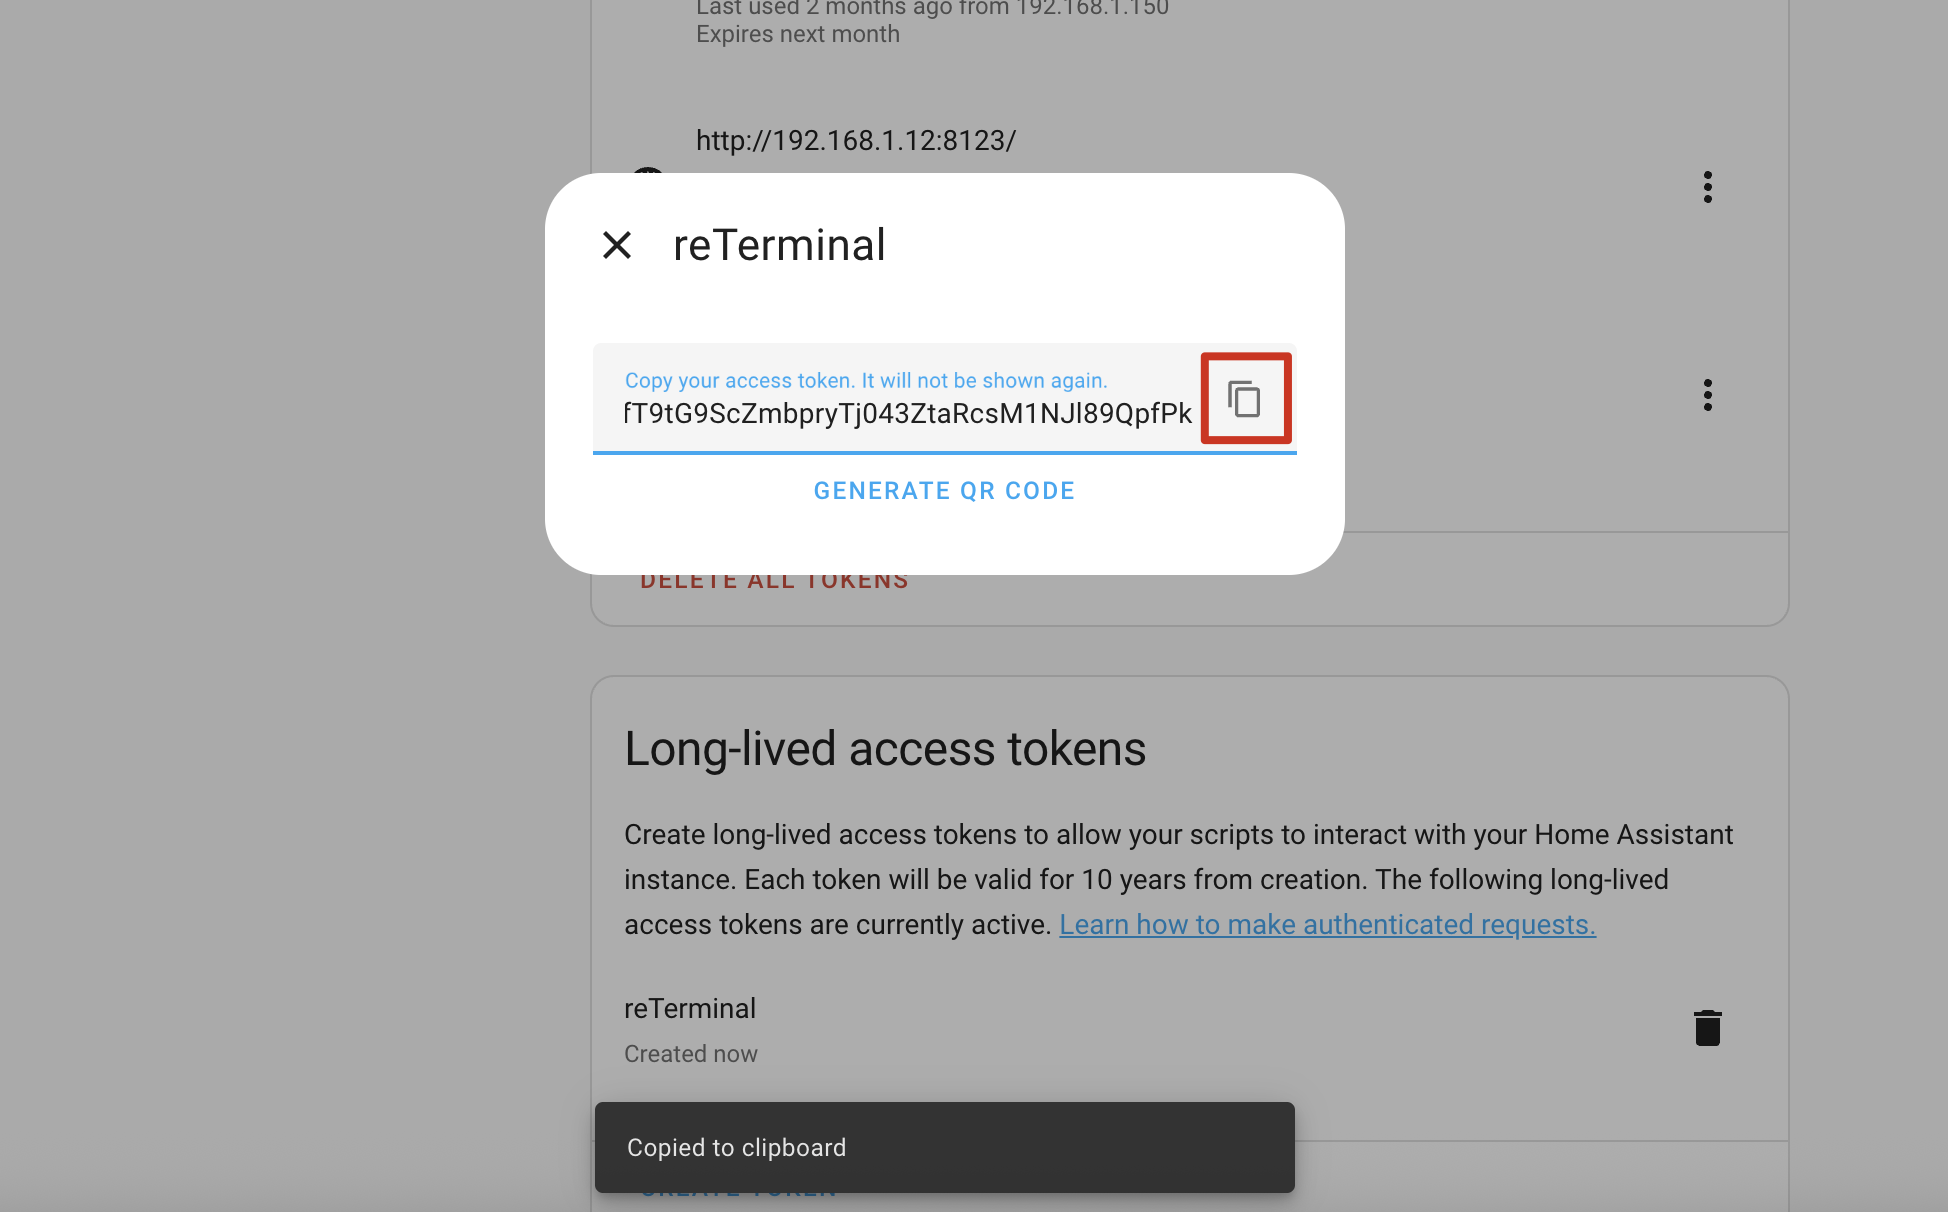
ステップ 6. Puppet アドオンの設定画面に戻り、「Long-Lived Access Token」フィールドにトークンを貼り付けます。
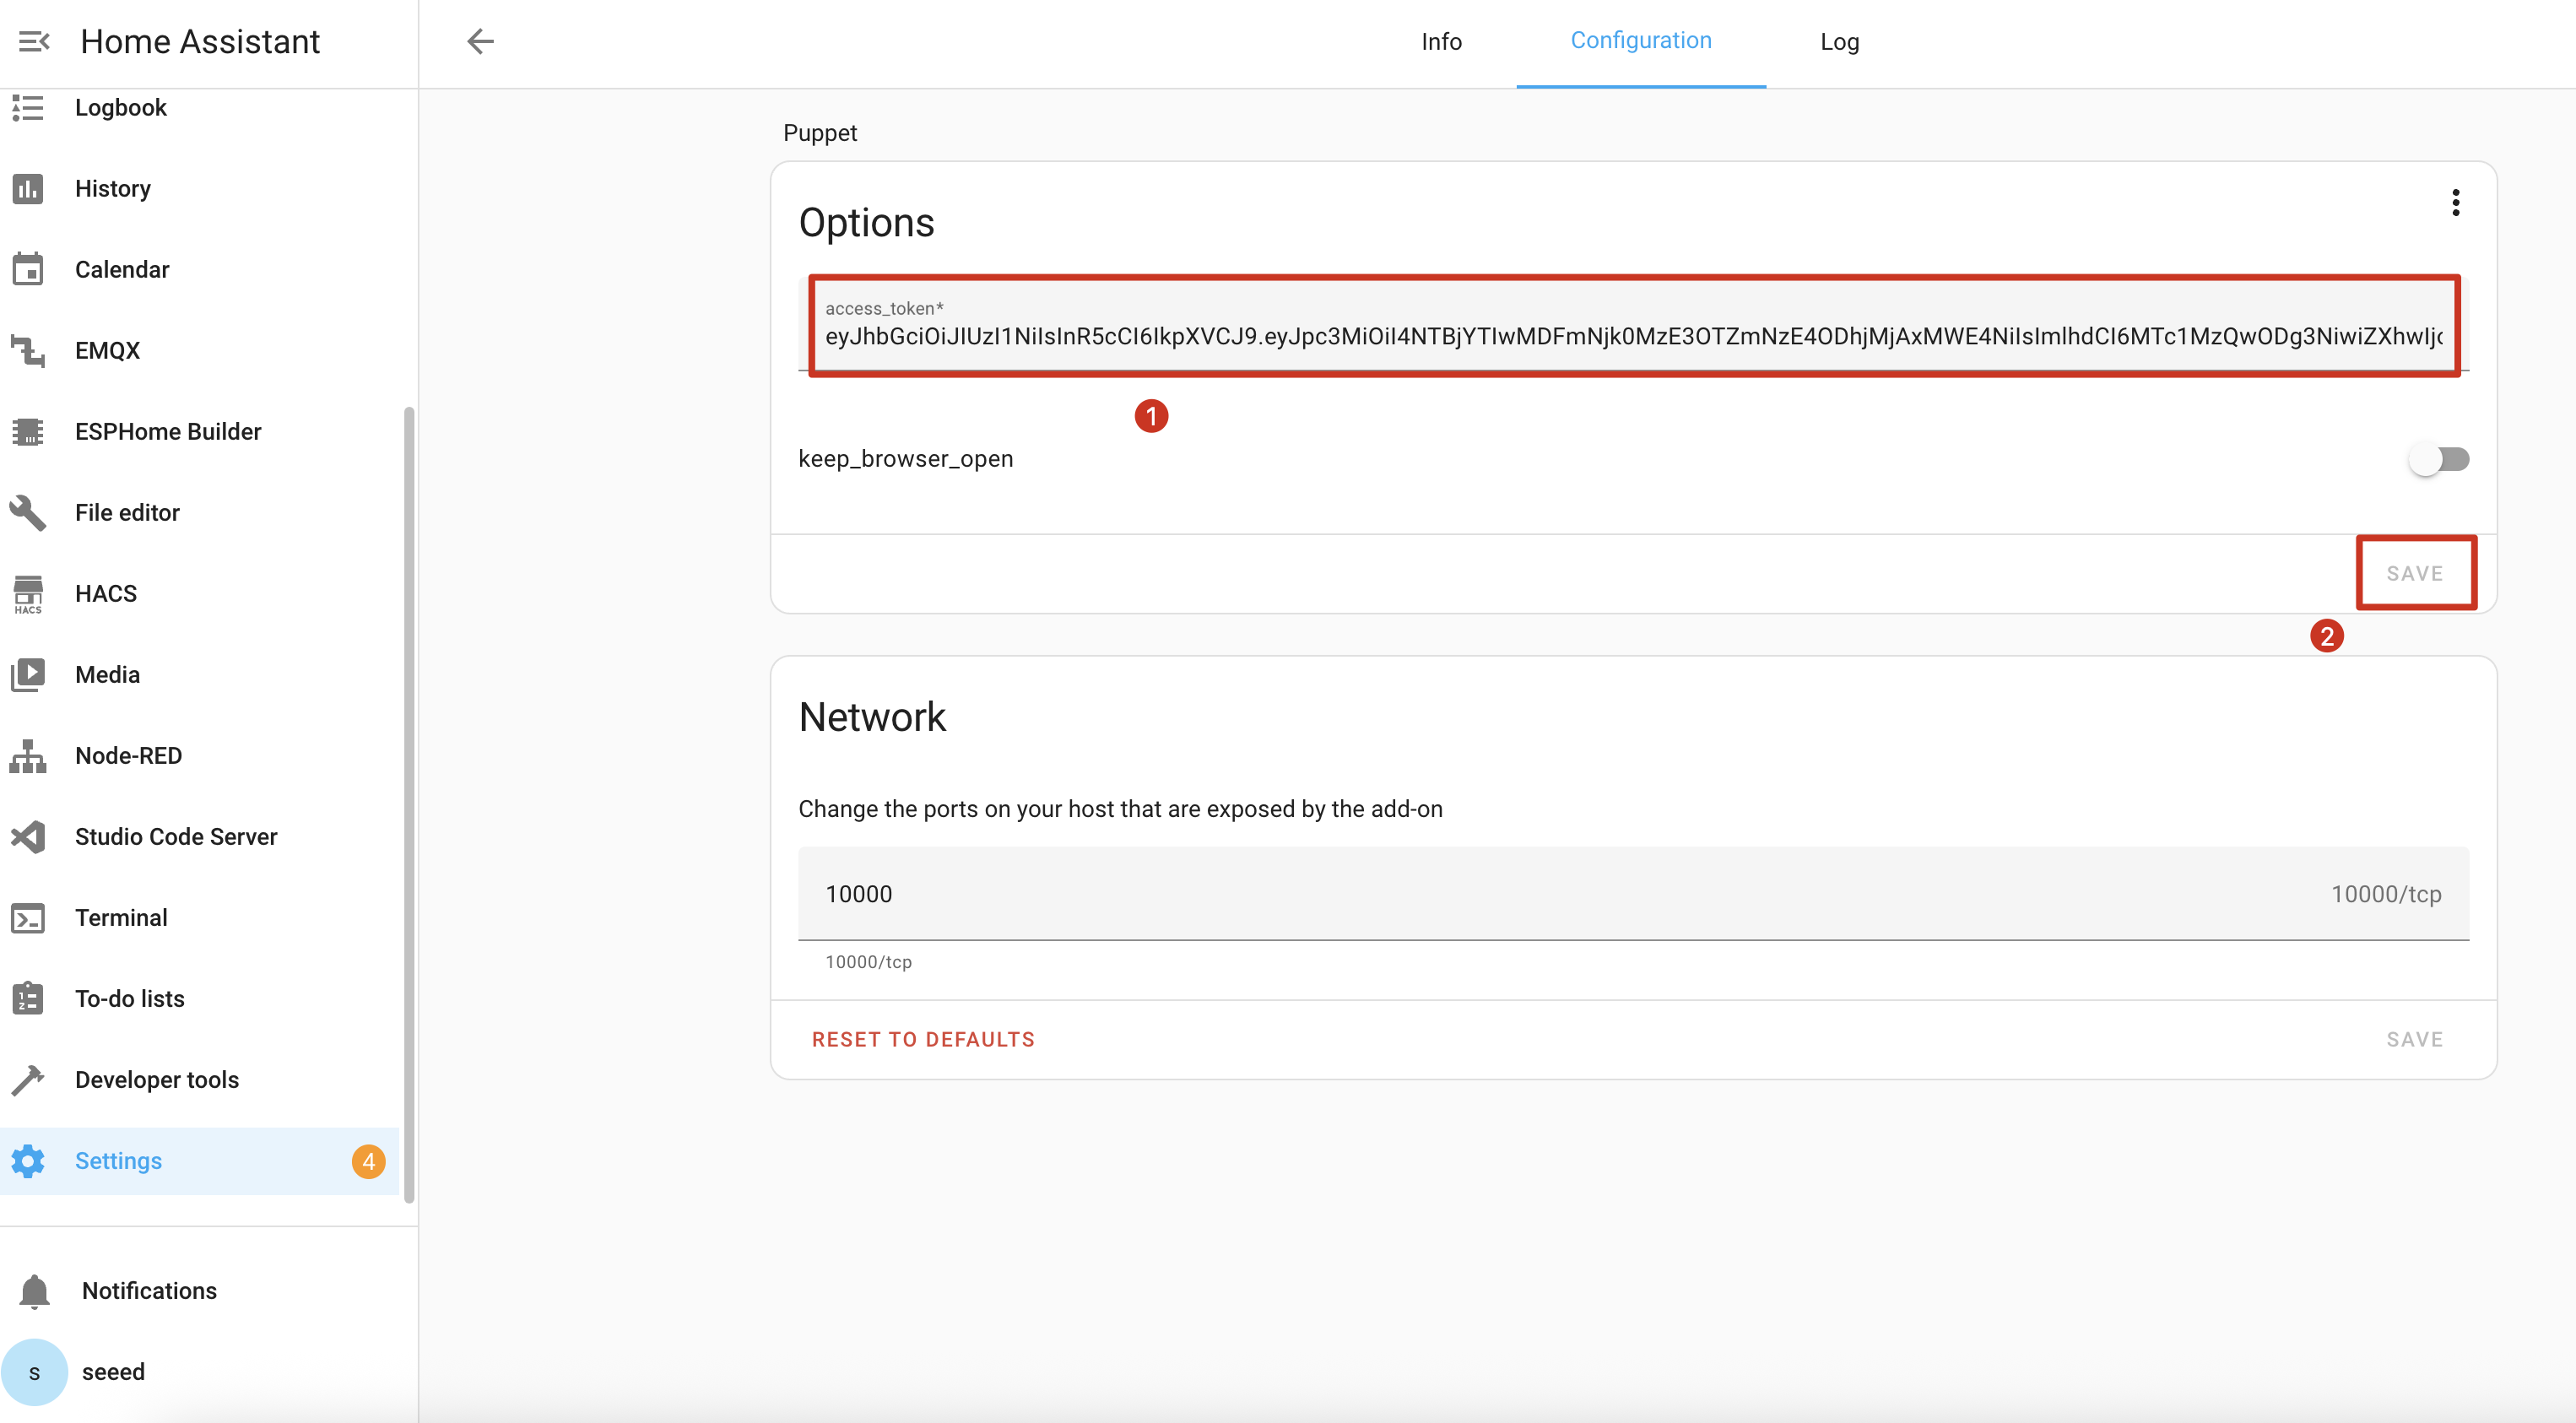
ステップ 7. 設定を保存し、Puppet アドオンを再起動します。

Screenshot API を理解する
Puppet アドオンは、任意の Home Assistant ページのスクリーンショットを生成するサーバーをポート 10000 で起動します。使い方は次のとおりです:
基本的なスクリーンショット URL 形式
http://homeassistant.local:10000/lovelace/0?viewport=800x480
この URL は、デフォルトのダッシュボードを 800x480 の解像度でキャプチャします(reTerminal E シリーズに最適です)。
電子ペーパー向けの最適化
電子ペーパーディスプレイの場合は、eink パラメータを追加してカラーパレットを減らします:
http://homeassistant.local:10000/lovelace/0?viewport=800x480&eink=2
値 2 は 2 色(白黒)のパレットを表します。
色の反転
黒と白を反転するには、invert パラメータを追加します:
http://homeassistant.local:10000/lovelace/0?viewport=800x480&eink=2&invert
別のページをキャプチャする
URL パスを変更することで、任意の Home Assistant ページをキャプチャできます:
http://homeassistant.local:10000/todo?viewport=800x480&eink=2&invert
スクリーンショット用の URL を Web ブラウザに入力してテストします。選択した Home Assistant ページのスクリーンショットが表示されるはずです。

ESPHome の設定
ステップ 11. 次のコードを、ESPHome 設定ファイルの captive_portal セクションの後に追加します:
- For E1001
- For E1002
……
psram:
  mode: octal
  speed: 80MHz

……

captive_portal:

spi:
  clk_pin: GPIO7
  mosi_pin: GPIO9

http_request:
  verify_ssl: false
  timeout: 20s
  watchdog_timeout: 25s

online_image:
  - id: dashboard_image
    format: PNG
    type: GRAYSCALE
    buffer_size: 65536
    url: http://homeassistant.local:10000/lovelace/0?viewport=800x480&eink=2&invert
    update_interval: 1min
    on_download_finished:
      - component.update: epaper_display

display:
  - platform: waveshare_epaper
    id: epaper_display
    model: 7.50inv2 # You can use 7.50inv2alt when you draw complex info and it display not good.
    cs_pin: GPIO10
    dc_pin: GPIO11
    reset_pin:
      number: GPIO12
      inverted: false
    busy_pin:
      number: GPIO13
      inverted: true
    update_interval: 300s
    lambda: |-
      it.image(0, 0, id(dashboard_image));
……
psram:
  mode: octal
  speed: 80MHz

……

captive_portal:

spi:
  clk_pin: GPIO7
  mosi_pin: GPIO9

http_request:
  verify_ssl: false
  timeout: 20s
  watchdog_timeout: 25s

online_image:
  - id: dashboard_image
    format: PNG
    type: RGB565
    buffer_size: 65536
    url: http://192.168.1.12:10000/lovelace/0?viewport=800x480
    update_interval: 1min
    on_download_finished:
      - component.update: epaper_display

display:
  - platform: epaper_spi
    id: epaper_display
    model: Seeed-reTerminal-E1002
    update_interval: never
    lambda: |-
      it.image(0, 0, id(dashboard_image));
ネットワーク内でローカル DNS 解決が機能しない場合は、homeassistant.local を Home Assistant の実際の IP アドレスに置き換えてください。
設定が正常にアップロードされて動作すると、reTerminal E シリーズ ePaper Display に Home Assistant ダッシュボードのスクリーンショットが表示されます:
- For E1001
- For E1002

デモ 3: ディープスリープモード
Deep Sleep プログラムを使い始める場合は、右側の白いボタンと併用し、右側の白いボタンをスリープ解除ボタンとして設定することを強くお勧めします。こうすることで、プログラムを更新したいときに、デバイスがスリープ中でシリアルポート経由でプログラムをアップロードできないという気まずい状況を避けることができます。
この例では、ディープスリープモードを使用して消費電力を大幅に削減し、reTerminal E シリーズ ePaper Display をバッテリー駆動のアプリケーションに適したものにする方法を示します。
以下のコードをコピーして、Yaml ファイル内の captive_portal コード行の後に貼り付けることで、この例を使用できます。
- For E1001
- For E1002
globals:
  - id: sleep_counter
    type: int
    restore_value: yes  # Use RTC storage to maintain counter during sleep
    initial_value: '0'

# Deep sleep configuration
deep_sleep:
  id: deep_sleep_1
  run_duration: 30s  # Device remains awake for 30 seconds
  sleep_duration: 5min  # Then sleeps for 5 minutes
  # Optional: Use a button to wake from sleep
  wakeup_pin: GPIO4
  wakeup_pin_mode: INVERT_WAKEUP

interval:
  - interval: 29s  # Schedule sleep just before run_duration ends
    then:
      - logger.log: "Entering deep sleep now..."

font:
  - file: "gfonts://Inter@700"
    id: font1
    size: 24

spi:
  clk_pin: GPIO7
  mosi_pin: GPIO9

display:
  - platform: waveshare_epaper
    id: epaper_display
    model: 7.50inv2
    cs_pin: GPIO10
    dc_pin: GPIO11
    reset_pin:
      number: GPIO12
      inverted: false
    busy_pin:
      number: GPIO13
      inverted: true
    update_interval: 5min
    lambda: |-
      id(sleep_counter) += 1;
      ESP_LOGD("main", "Wakeup count: %d", id(sleep_counter));
      it.printf(100, 100, id(font1), "Wakeup count: %d", id(sleep_counter));
globals:
  - id: sleep_counter
    type: int
    restore_value: yes  # Use RTC storage to maintain counter during sleep
    initial_value: '0'

# Deep sleep configuration
deep_sleep:
  id: deep_sleep_1
  run_duration: 30s  # Device remains awake for 30 seconds
  sleep_duration: 5min  # Then sleeps for 5 minutes
  # Optional: Use a button to wake from sleep
  wakeup_pin: GPIO4
  wakeup_pin_mode: INVERT_WAKEUP

interval:
  - interval: 29s  # Schedule sleep just before run_duration ends
    then:
      - logger.log: "Entering deep sleep now..."

font:
  - file: "gfonts://Inter@700"
    id: font1
    size: 24

spi:
  clk_pin: GPIO7
  mosi_pin: GPIO9

display:
  - platform: epaper_spi
    id: epaper_display
    model: Seeed-reTerminal-E1002
    update_interval: 5min
    lambda: |-
      const auto BLACK   = Color(0,   0,   0,   0);
      id(sleep_counter) += 1;
      ESP_LOGD("main", "Wakeup count: %d", id(sleep_counter));
      it.printf(100, 100, id(font1), BLACK, "Wakeup count: %d", id(sleep_counter));
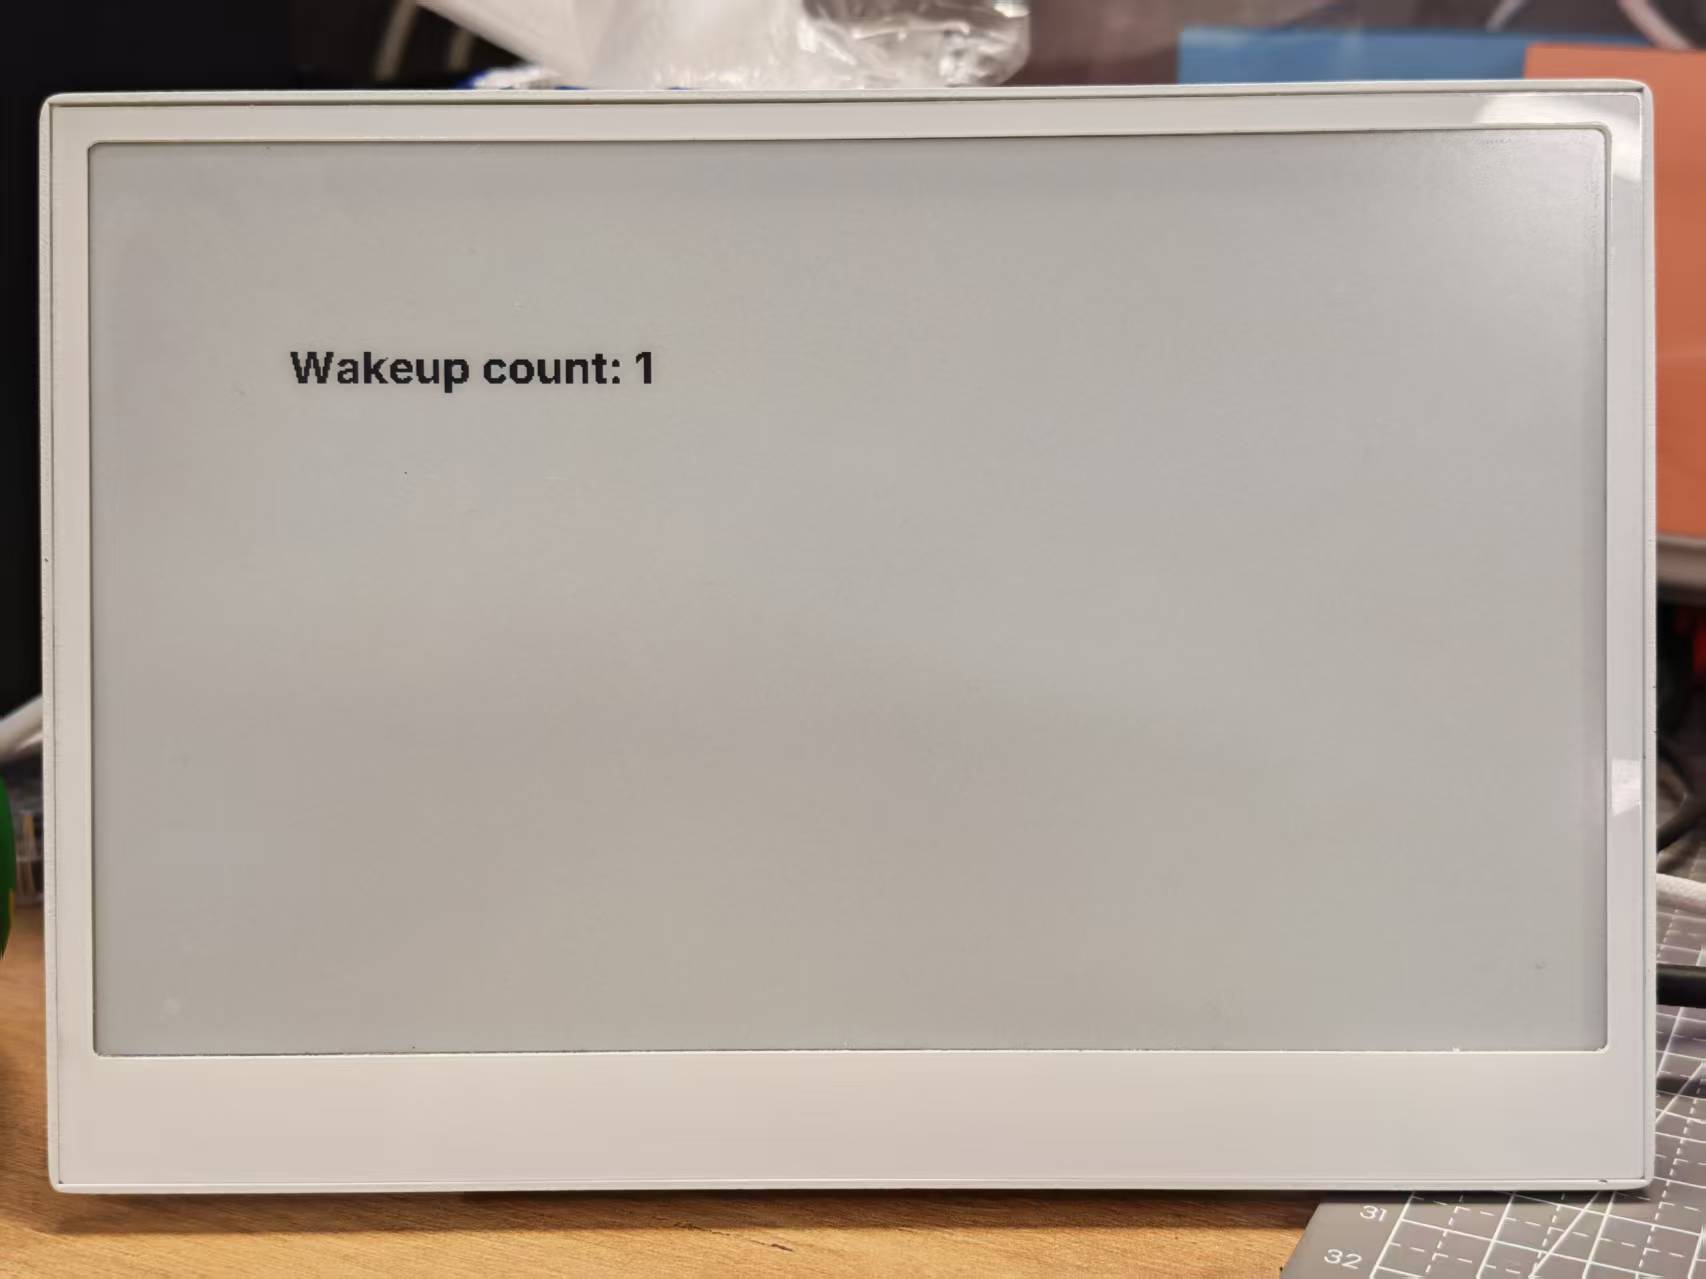
この設定では:
- スリープサイクル間で保持されるカウンタを作成します
- デバイスが 30 秒間起動し、その後 3 分間スリープするように設定します
- 現在の起床回数でディスプレイを更新します
- オプションで、ボタンでデバイスを起床させるように設定します
実行中は、デバイスがスリープから起床するたびにカウンタが 1 ずつ増加するのがわかります:
デモ 4: 総合的なサンプル
よりよく理解するために、この総合的なサンプルを試す前に、まず上記の基本的なサンプルを実行することを強くお勧めします。
この高度なサンプルは、複数の機能を組み合わせて、reTerminal E シリーズ向けの完全なダッシュボードソリューションを構成します。以下を実現します:
- 天気と室内環境の表示
- アイコン付きのバッテリー監視
- 時刻と日付の表示
- ボタンを使ったページ切り替え
- バッテリー監視
完全なコードを表示するにはここをクリック
- For E1001
- E1002 向け
esphome:
  name: reterminal_e1001
  friendly_name: reTerminal_E1001
  on_boot:
    priority: 600
    then:
      - output.turn_on: bsp_sd_enable
      - output.turn_on: bsp_battery_enable
      - delay: 200ms
      - component.update: battery_voltage
      - component.update: battery_level


esp32:
  board: esp32-s3-devkitc-1
  framework:
    type: arduino

# Enable logging
logger:

# Enable Home Assistant API
api:
  encryption:
    key: "REPLACE_WITH_YOUR_API_KEY"

ota:
  - platform: esphome
    password: "REPLACE_WITH_YOUR_OTA_PASSWORD"

wifi:
  ssid: !secret wifi_ssid
  password: !secret wifi_password

  # Enable fallback hotspot (captive portal) in case wifi connection fails
  ap:
    ssid: "reTerminal-E1001"
    password: "ChangeMe123"

captive_portal:

# Deep-sleep, wake by GPIO4
deep_sleep:
  id: deep_sleep_1
  run_duration: 1min
  sleep_duration: 60min
  wakeup_pin: GPIO4          # Right white button
  wakeup_pin_mode: INVERT_WAKEUP

# SPI / I²C
spi:
  clk_pin: GPIO7
  mosi_pin: GPIO9
i2c:
  scl: GPIO20
  sda: GPIO19

# Fonts
font:
  - file: "gfonts://Inter@700"
    id: small_font
    size: 24
  - file: "gfonts://Inter@700"
    id: mid_font
    size: 36
  - file: "gfonts://Inter@700"
    id: big_font
    size: 180
  - file: "gfonts://Inter@700"
    id: time_font
    size: 96      # for the big time display
  - file: 'fonts/materialdesignicons-webfont.ttf'
    id: font_mdi_large
    size: 70
    glyphs:
      - "\U000F050F"  # thermometer
      - "\U000F058E"  # humidity
  - file: 'fonts/materialdesignicons-webfont.ttf'
    id: font_bat_icon
    size: 24
    glyphs:
      - "\U000F007A"  # mdi-battery-10
      - "\U000F007B"  # mdi-battery-20
      - "\U000F007C"  # mdi-battery-30
      - "\U000F007D"  # mdi-battery-40
      - "\U000F007E"  # mdi-battery-50
      - "\U000F007F"  # mdi-battery-60
      - "\U000F0080"  # mdi-battery-70
      - "\U000F0081"  # mdi-battery-80
      - "\U000F0082"  # mdi-battery-90
      - "\U000F0079"  # mdi-battery

globals:
  - id: page_index
    type: int
    restore_value: true
    initial_value: '0'
  - id: battery_glyph
    type: std::string
    restore_value: no
    initial_value: "\"\\U000F0079\""   # default full battery

sensor:
  - platform: sht4x
    temperature:
      name: "Temperature"
      id: temp_sensor
    humidity:
      name: "Relative Humidity"
      id: hum_sensor
  - platform: adc
    pin: GPIO1
    name: "Battery Voltage"
    id: battery_voltage
    update_interval: 60s
    attenuation: 12db
    filters:
      - multiply: 2.0
  - platform: template
    name: "Battery Level"
    id: battery_level
    unit_of_measurement: "%"
    icon: "mdi:battery"
    device_class: battery
    state_class: measurement
    lambda: 'return id(battery_voltage).state;'
    update_interval: 60s
    on_value:
      then:
        - lambda: |-
            int pct = int(x);
            if (pct <= 10)      id(battery_glyph) = "\U000F007A";
            else if (pct <= 20) id(battery_glyph) = "\U000F007B";
            else if (pct <= 30) id(battery_glyph) = "\U000F007C";
            else if (pct <= 40) id(battery_glyph) = "\U000F007D";
            else if (pct <= 50) id(battery_glyph) = "\U000F007E";
            else if (pct <= 60) id(battery_glyph) = "\U000F007F";
            else if (pct <= 70) id(battery_glyph) = "\U000F0080";
            else if (pct <= 80) id(battery_glyph) = "\U000F0081";
            else if (pct <= 90) id(battery_glyph) = "\U000F0082";
            else                id(battery_glyph) = "\U000F0079";
    filters:
      - calibrate_linear:
          - 4.15 -> 100.0
          - 3.96 -> 90.0
          - 3.91 -> 80.0
          - 3.85 -> 70.0
          - 3.80 -> 60.0
          - 3.75 -> 50.0
          - 3.68 -> 40.0
          - 3.58 -> 30.0
          - 3.49 -> 20.0
          - 3.41 -> 10.0
          - 3.30 -> 5.0
          - 3.27 -> 0.0
      - clamp:
          min_value: 0
          max_value: 100

output:
  - platform: gpio
    pin: GPIO6
    id: bsp_led
    inverted: true
  - platform: gpio
    pin: GPIO16
    id: bsp_sd_enable
  - platform: gpio
    pin: GPIO21
    id: bsp_battery_enable

# Onboard LED
light:
  - platform: binary
    name: "Onboard LED"
    output: bsp_led
    id: onboard_led

binary_sensor:
  - platform: gpio    # Next page
    pin:
      number: GPIO3
      mode: INPUT_PULLUP
      inverted: true
    id: key1
    name: "Key1"
    on_press:
      then:
        - lambda: |-
            id(page_index) = (id(page_index) + 1) % 2;
            id(epaper_display).update();

  - platform: gpio     # Prev page
    pin:
      number: GPIO5
      mode: INPUT_PULLUP
      inverted: true
    id: key2
    name: "Key2"
    on_press:
      then:
        - lambda: |-
            id(page_index) = (id(page_index) - 1 + 2) % 2;
            id(epaper_display).update();

  # - platform: gpio
  #   pin:
  #     number: GPIO4
  #     mode: INPUT_PULLUP
  #     inverted: true
  #   id: key2
  #   name: "Key2"
  #   on_press:
  #     then:
  #       - lambda: |-
  #           id(page_index) = (id(page_index) - 1 + 3) % 3;
  #           id(epaper_display).update();

# Home Assistant time
time:
  - platform: homeassistant
    id: ha_time

# e-paper
display:
  - platform: waveshare_epaper
    id: epaper_display
    model: 7.50inv2
    cs_pin: GPIO10
    dc_pin: GPIO11
    reset_pin:
      number: GPIO12
      inverted: false
    busy_pin:
      number: GPIO13
      inverted: true
    update_interval: never
    lambda: |-
      // ----------  PAGE 0  ----------
      if (id(page_index) == 0) {
        const int scr_w = 800;
        const int scr_h = 480;

        // Battery in upper-right corner
        it.printf(670, 13, id(font_bat_icon), "%s", id(battery_glyph).c_str());
        it.printf(700, 10, id(small_font), "%.0f%%", id(battery_level).state);

        //line
        it.filled_rectangle(400, 100, 2, 280);

        // Convert °C to °F
        float temp_f = id(temp_sensor).state * 9.0 / 5.0 + 32.0;

        // ---------------------------------------------------------
        // Horizontal split: two 400 px columns
        const int col_w = scr_w / 2;

        const int icon_y   = 100;   // Icon baseline
        const int value_y  = 220;   // Number baseline
        const int unit_y   = 300;   // Unit baseline
        const int label_y  = 380;   // Text label baseline

        const int icon_size = 70;   // icon font size
        const int val_size  = 120;  // number font size
        const int unit_size = 44;   // unit font size
        const int label_size= 36;   // label font size

        // --- Left column : Temperature -----------------------------
        const int left_mid = col_w / 2 - 30;   // 200 px

        // Icon
        it.printf(left_mid, icon_y, id(font_mdi_large), TextAlign::CENTER, "\U000F050F");
        // Value
        it.printf(left_mid, value_y, id(big_font), TextAlign::CENTER, "%.0f", temp_f);
        // Unit
        it.printf(left_mid + 150, unit_y, id(mid_font), TextAlign::CENTER, "°F");
        // Label
        it.printf(left_mid, label_y, id(mid_font), TextAlign::CENTER, "Temperature");

        // --- Right column : Humidity -------------------------------
        const int right_mid = col_w + col_w / 2;   // 600 px

        // Icon
        it.printf(right_mid, icon_y, id(font_mdi_large), TextAlign::CENTER, "\U000F058E");
        // Value
        it.printf(right_mid, value_y, id(big_font), TextAlign::CENTER, "%.0f", id(hum_sensor).state);
        // Unit
        it.printf(right_mid + 150, unit_y, id(mid_font), TextAlign::CENTER, "%%");
        // Label
        it.printf(right_mid, label_y, id(mid_font), TextAlign::CENTER, "Humidity");
      }
      // ----------  PAGE 1  ----------
      else{
        // Battery top-right
        it.printf(670, 13, id(font_bat_icon), "%s", id(battery_glyph).c_str());
        it.printf(700, 10, id(small_font), "%.0f%%", id(battery_level).state);

        auto now = id(ha_time).now();
        struct tm timeinfo = now.to_c_tm();

        // centering time HH:MM
        char timeStr[6];
        strftime(timeStr, sizeof(timeStr), "%H:%M", &timeinfo);
        it.printf(400, 180, id(time_font), TextAlign::CENTER, timeStr);

        // Date: Day of week
        const char *weekday[] = {"Sun","Mon","Tue","Wed","Thu","Fri","Sat"};
        const char *wday = weekday[timeinfo.tm_wday];

        // Date: month - day
        char dateStr[12];
        strftime(dateStr, sizeof(dateStr), "%b %d", &timeinfo);  // e.g. Jun 15

        // Day of the week + date below the time
        it.printf(400, 280, id(mid_font), TextAlign::CENTER, "%s, %s", wday, dateStr);
      }
esphome:
  name: reterminal_e1002
  friendly_name: reTerminal_E1002
  on_boot:
    priority: 600
    then:
      - output.turn_on: bsp_sd_enable
      - output.turn_on: bsp_battery_enable
      - delay: 200ms
      - component.update: battery_voltage
      - component.update: battery_level


esp32:
  board: esp32-s3-devkitc-1
  framework:
    type: arduino

# Enable logging
logger:

# Enable Home Assistant API
api:
  encryption:
    key: "REPLACE_WITH_YOUR_API_KEY"

ota:
  - platform: esphome
    password: "REPLACE_WITH_YOUR_OTA_PASSWORD"

wifi:
  ssid: !secret wifi_ssid
  password: !secret wifi_password

  # Enable fallback hotspot (captive portal) in case wifi connection fails
  ap:
    ssid: "reTerminal-E1002"
    password: "ChangeMe123"

captive_portal:

# Deep-sleep, wake by GPIO4
deep_sleep:
  id: deep_sleep_1
  run_duration: 1min
  sleep_duration: 60min
  wakeup_pin: GPIO4          # Right white button
  wakeup_pin_mode: INVERT_WAKEUP

# SPI / I²C
spi:
  clk_pin: GPIO7
  mosi_pin: GPIO9
i2c:
  scl: GPIO20
  sda: GPIO19

# Fonts
font:
  - file: "gfonts://Inter@700"
    id: small_font
    size: 24
  - file: "gfonts://Inter@700"
    id: mid_font
    size: 36
  - file: "gfonts://Inter@700"
    id: big_font
    size: 180
  - file: "gfonts://Inter@700"
    id: time_font
    size: 96      # for the big time display
  - file: 'fonts/materialdesignicons-webfont.ttf'
    id: font_mdi_large
    size: 70
    glyphs:
      - "\U000F050F"  # thermometer
      - "\U000F058E"  # humidity
  - file: 'fonts/materialdesignicons-webfont.ttf'
    id: font_bat_icon
    size: 24
    glyphs:
      - "\U000F007A"  # mdi-battery-10
      - "\U000F007B"  # mdi-battery-20
      - "\U000F007C"  # mdi-battery-30
      - "\U000F007D"  # mdi-battery-40
      - "\U000F007E"  # mdi-battery-50
      - "\U000F007F"  # mdi-battery-60
      - "\U000F0080"  # mdi-battery-70
      - "\U000F0081"  # mdi-battery-80
      - "\U000F0082"  # mdi-battery-90
      - "\U000F0079"  # mdi-battery

globals:
  - id: page_index
    type: int
    restore_value: true
    initial_value: '0'
  - id: battery_glyph
    type: std::string
    restore_value: no
    initial_value: "\"\\U000F0079\""   # default full battery

sensor:
  - platform: sht4x
    temperature:
      name: "Temperature"
      id: temp_sensor
    humidity:
      name: "Relative Humidity"
      id: hum_sensor
  - platform: adc
    pin: GPIO1
    name: "Battery Voltage"
    id: battery_voltage
    update_interval: 60s
    attenuation: 12db
    filters:
      - multiply: 2.0
  - platform: template
    name: "Battery Level"
    id: battery_level
    unit_of_measurement: "%"
    icon: "mdi:battery"
    device_class: battery
    state_class: measurement
    lambda: 'return id(battery_voltage).state;'
    update_interval: 60s
    on_value:
      then:
        - lambda: |-
            int pct = int(x);
            if (pct <= 10)      id(battery_glyph) = "\U000F007A";
            else if (pct <= 20) id(battery_glyph) = "\U000F007B";
            else if (pct <= 30) id(battery_glyph) = "\U000F007C";
            else if (pct <= 40) id(battery_glyph) = "\U000F007D";
            else if (pct <= 50) id(battery_glyph) = "\U000F007E";
            else if (pct <= 60) id(battery_glyph) = "\U000F007F";
            else if (pct <= 70) id(battery_glyph) = "\U000F0080";
            else if (pct <= 80) id(battery_glyph) = "\U000F0081";
            else if (pct <= 90) id(battery_glyph) = "\U000F0082";
            else                id(battery_glyph) = "\U000F0079";
    filters:
      - calibrate_linear:
          - 4.15 -> 100.0
          - 3.96 -> 90.0
          - 3.91 -> 80.0
          - 3.85 -> 70.0
          - 3.80 -> 60.0
          - 3.75 -> 50.0
          - 3.68 -> 40.0
          - 3.58 -> 30.0
          - 3.49 -> 20.0
          - 3.41 -> 10.0
          - 3.30 -> 5.0
          - 3.27 -> 0.0
      - clamp:
          min_value: 0
          max_value: 100

output:
  - platform: gpio
    pin: GPIO6
    id: bsp_led
    inverted: true
  - platform: gpio
    pin: GPIO16
    id: bsp_sd_enable
  - platform: gpio
    pin: GPIO21
    id: bsp_battery_enable

# Onboard LED
light:
  - platform: binary
    name: "Onboard LED"
    output: bsp_led
    id: onboard_led

binary_sensor:
  - platform: gpio    # Next page
    pin:
      number: GPIO3
      mode: INPUT_PULLUP
      inverted: true
    id: key1
    name: "Key1"
    on_press:
      then:
        - lambda: |-
            id(page_index) = (id(page_index) + 1) % 2;
            id(epaper_display).update();

  - platform: gpio     # Prev page
    pin:
      number: GPIO5
      mode: INPUT_PULLUP
      inverted: true
    id: key2
    name: "Key2"
    on_press:
      then:
        - lambda: |-
            id(page_index) = (id(page_index) - 1 + 2) % 2;
            id(epaper_display).update();

  # - platform: gpio
  #   pin:
  #     number: GPIO4
  #     mode: INPUT_PULLUP
  #     inverted: true
  #   id: key2
  #   name: "Key2"
  #   on_press:
  #     then:
  #       - lambda: |-
  #           id(page_index) = (id(page_index) - 1 + 3) % 3;
  #           id(epaper_display).update();

# Home Assistant time
time:
  - platform: homeassistant
    id: ha_time

# e-paper
display:
  - platform: epaper_spi
    id: epaper_display
    model: Seeed-reTerminal-E1002
    update_interval: never
    lambda: |-
      const auto BLACK   = Color(0,   0,   0,   0);
      const auto RED     = Color(255, 0,   0,   0);
      const auto GREEN   = Color(0,   255, 0,   0);
      const auto BLUE    = Color(0,   0,   255, 0);
      const auto YELLOW  = Color(255, 255, 0,   0);

      // ----------  PAGE 0  ----------
      if (id(page_index) == 0) {
        const int scr_w = 800;
        const int scr_h = 480;

        // Battery in upper-right corner
        it.printf(670, 13, id(font_bat_icon), GREEN, "%s", id(battery_glyph).c_str());
        it.printf(700, 10, id(small_font), GREEN, "%.0f%%", id(battery_level).state);

        //line
        it.filled_rectangle(400, 100, 2, 280, BLACK);

        // Convert °C to °F
        float temp_f = id(temp_sensor).state * 9.0 / 5.0 + 32.0;

        // ---------------------------------------------------------
        // Horizontal split: two 400 px columns
        const int col_w = scr_w / 2;

        const int icon_y   = 100;   // Icon baseline
        const int value_y  = 220;   // Number baseline
        const int unit_y   = 300;   // Unit baseline
        const int label_y  = 380;   // Text label baseline

        const int icon_size = 70;   // icon font size
        const int val_size  = 120;  // number font size
        const int unit_size = 44;   // unit font size
        const int label_size= 36;   // label font size

        // --- Left column : Temperature -----------------------------
        const int left_mid = col_w / 2 - 30;   // 200 px

        // Icon
        it.printf(left_mid, icon_y, id(font_mdi_large), BLUE, TextAlign::CENTER, "\U000F050F");
        // Value
        it.printf(left_mid, value_y, id(big_font), BLUE, TextAlign::CENTER, "%.0f", temp_f);
        // Unit
        it.printf(left_mid + 150, unit_y, id(mid_font), RED, TextAlign::CENTER, "°F");
        // Label
        it.printf(left_mid, label_y, id(mid_font), RED, TextAlign::CENTER, "Temperature");

        // --- Right column : Humidity -------------------------------
        const int right_mid = col_w + col_w / 2;   // 600 px

        // Icon
        it.printf(right_mid, icon_y, id(font_mdi_large), YELLOW, TextAlign::CENTER, "\U000F058E");
        // Value
        it.printf(right_mid, value_y, id(big_font), YELLOW, TextAlign::CENTER, "%.0f", id(hum_sensor).state);
        // Unit
        it.printf(right_mid + 150, unit_y, id(mid_font), GREEN, TextAlign::CENTER, "%%");
        // Label
        it.printf(right_mid, label_y, id(mid_font), GREEN, TextAlign::CENTER, "Humidity");
      }
      // ----------  PAGE 1  ----------
      else{
        // Battery top-right
        it.printf(670, 13, id(font_bat_icon), BLUE, "%s", id(battery_glyph).c_str());
        it.printf(700, 10, id(small_font), BLUE, "%.0f%%", id(battery_level).state);

        auto now = id(ha_time).now();
        struct tm timeinfo = now.to_c_tm();

        // centering time HH:MM
        char timeStr[6];
        strftime(timeStr, sizeof(timeStr), "%H:%M", &timeinfo);
        it.printf(400, 180, id(time_font), BLUE, TextAlign::CENTER, timeStr);

        // Date: Day of week
        const char *weekday[] = {"Sun","Mon","Tue","Wed","Thu","Fri","Sat"};
        const char *wday = weekday[timeinfo.tm_wday];

        // Date: month - day
        char dateStr[12];
        strftime(dateStr, sizeof(dateStr), "%b %d", &timeinfo);  // e.g. Jun 15

        // Day of the week + date below the time
        it.printf(400, 280, id(mid_font), YELLOW, TextAlign::CENTER, "%s, %s", wday, dateStr);
      }
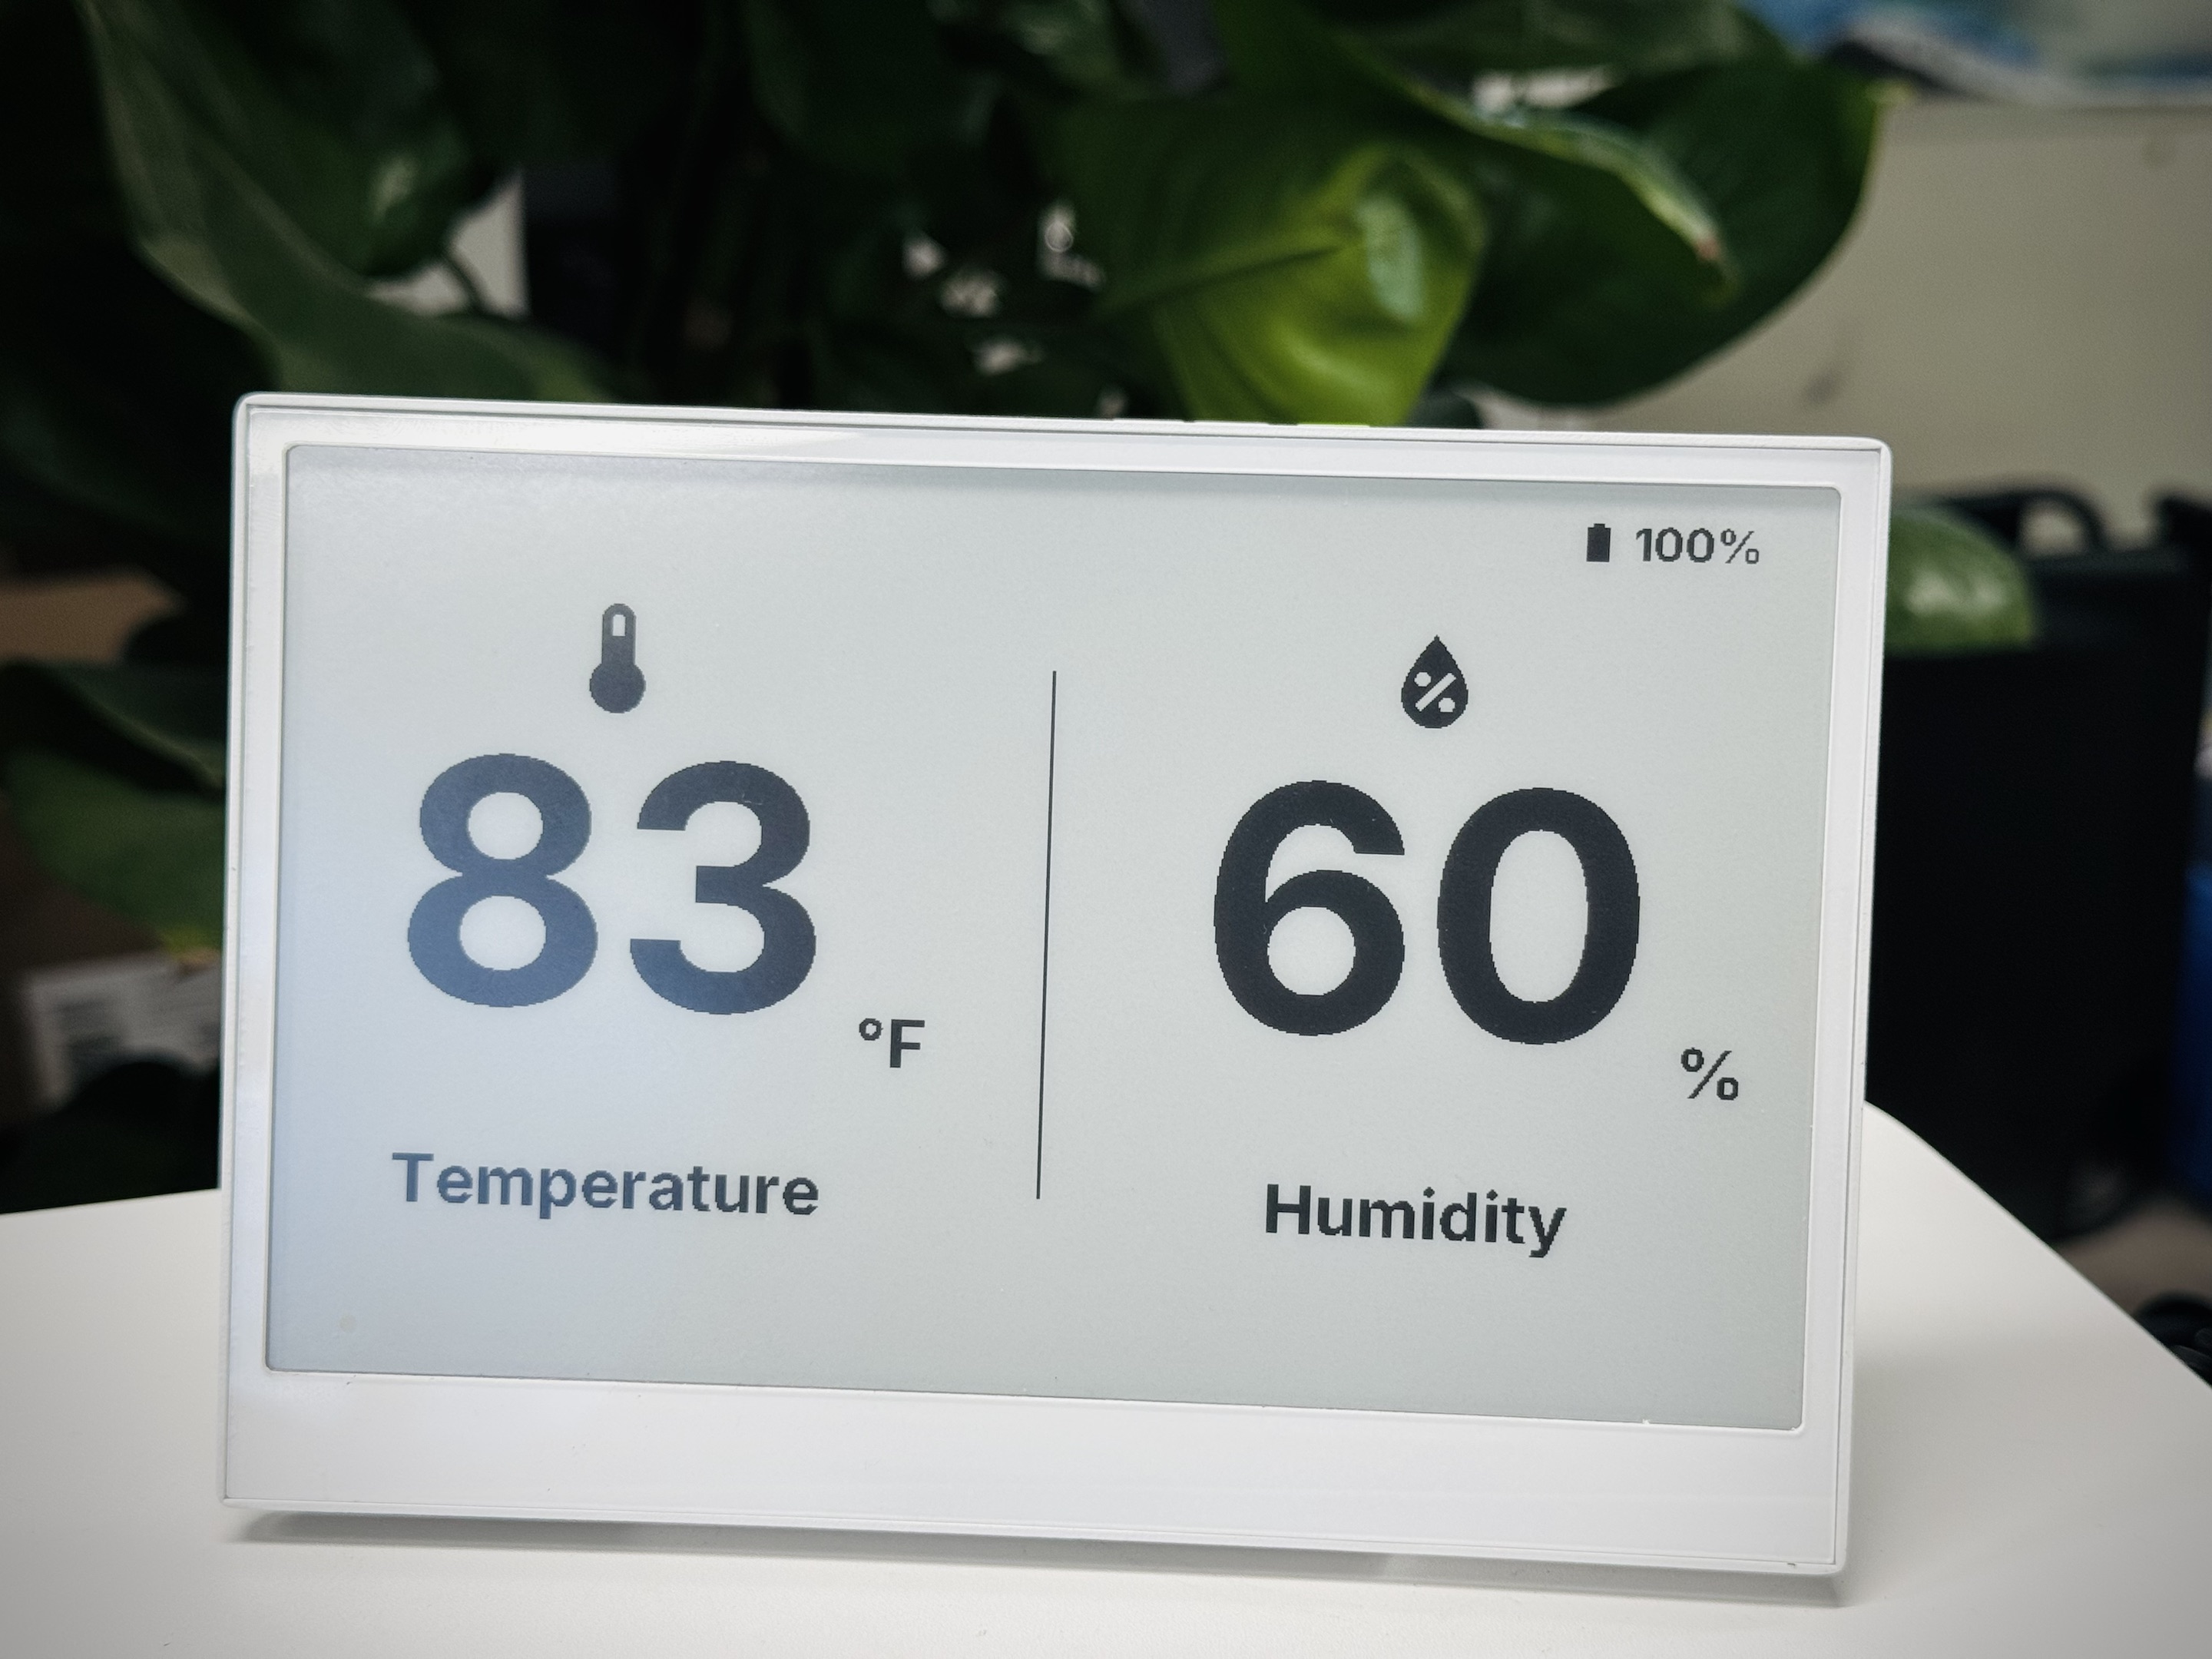
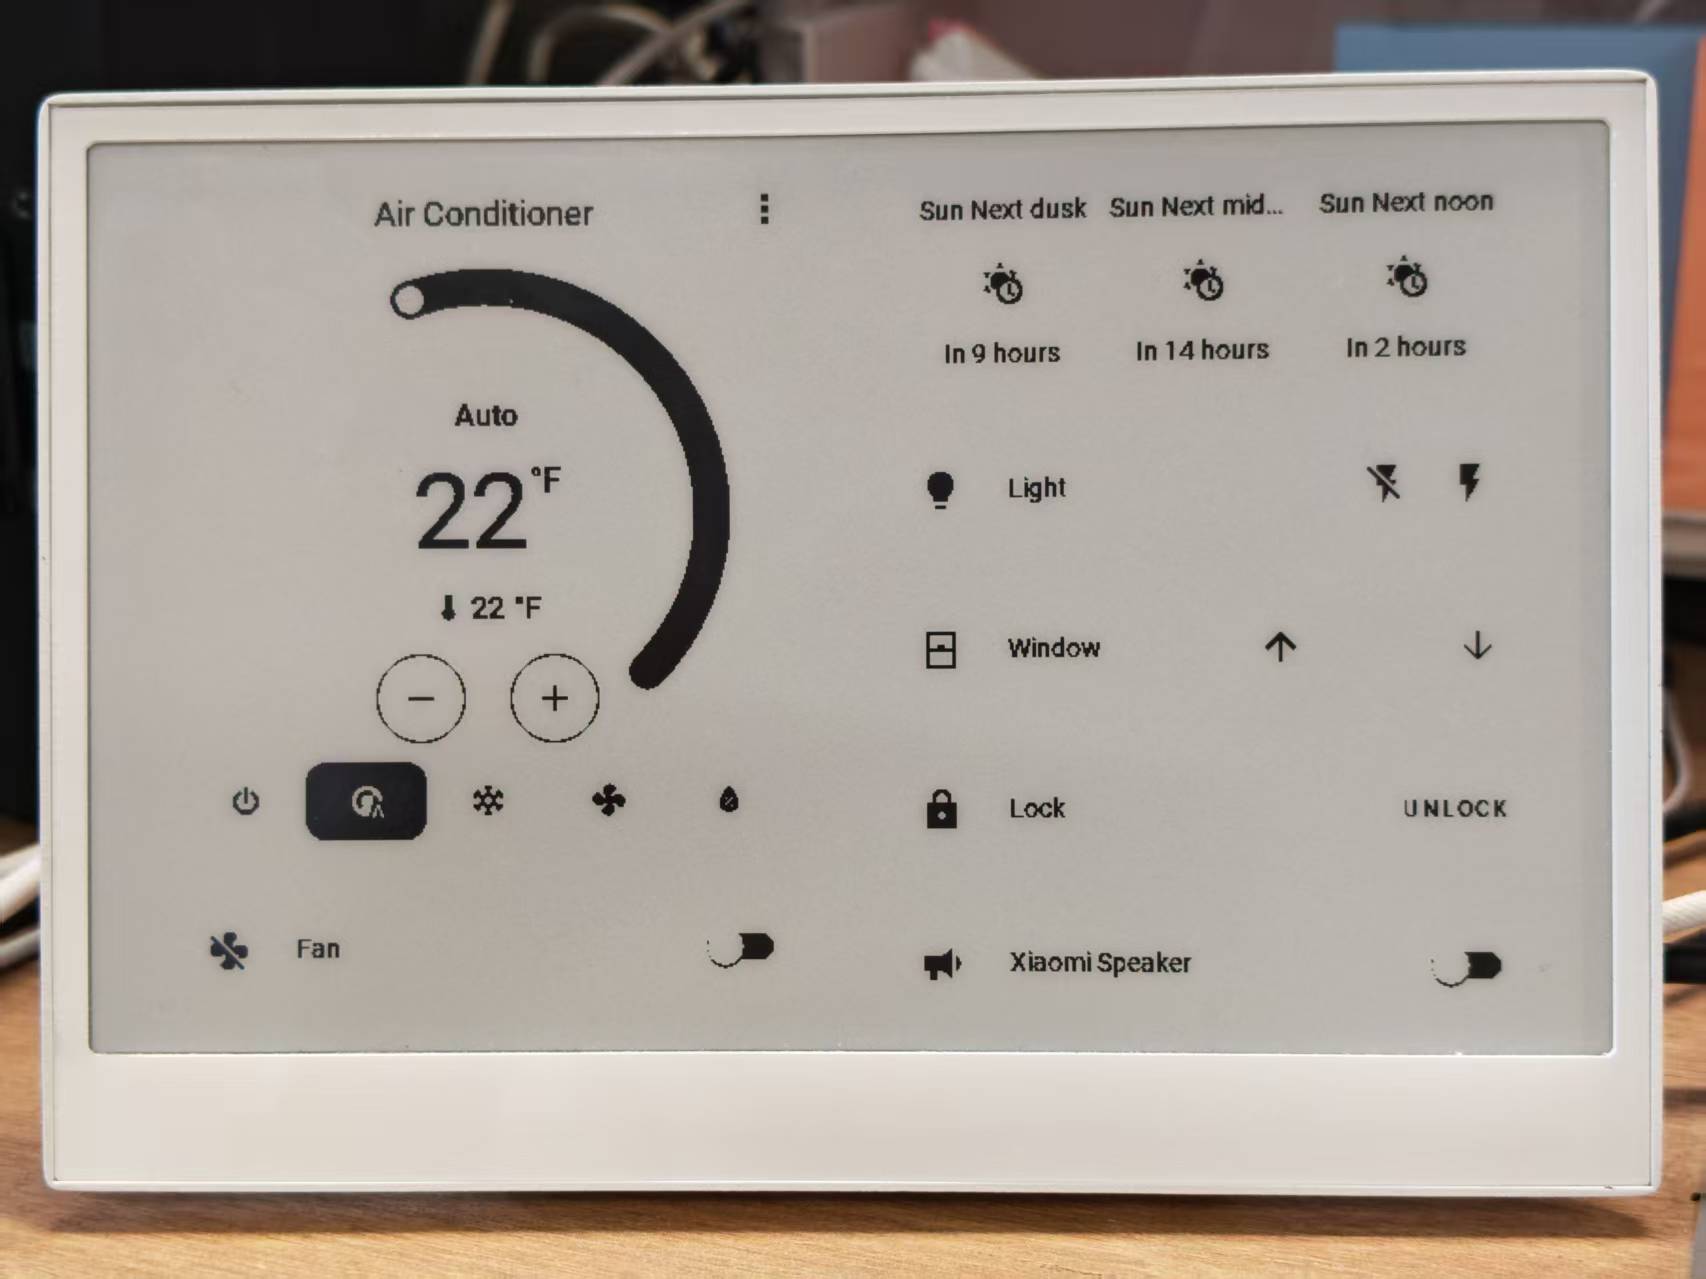
設定が正常にアップロードされ実行されると、reTerminal E シリーズ ePaper ディスプレイに、環境データ、時刻、およびバッテリー状態を含む包括的なダッシュボードが表示されます:
包括的なサンプルの理解
このサンプルでは次のことを実装しています:
- 複数ページ:ディスプレイは、気候ダッシュボードと時刻/日付表示という 2 つのページを切り替えます
- ボタンナビゲーション:GPIO3 と GPIO5 上のボタンを使用してページ間を移動します
- バッテリー監視:バッテリーレベルは、充電レベルに応じて変化する適切なアイコンで表示されます
- ハードウェア初期化:SD カードとバッテリー監視回路は起動時に有効化されます
- 温度と湿度の表示:オンボードの SHT4x センサーを I²C 経由で使用します
- 動的アイコン:Material Design Icons はセンサー値に応じて変化します
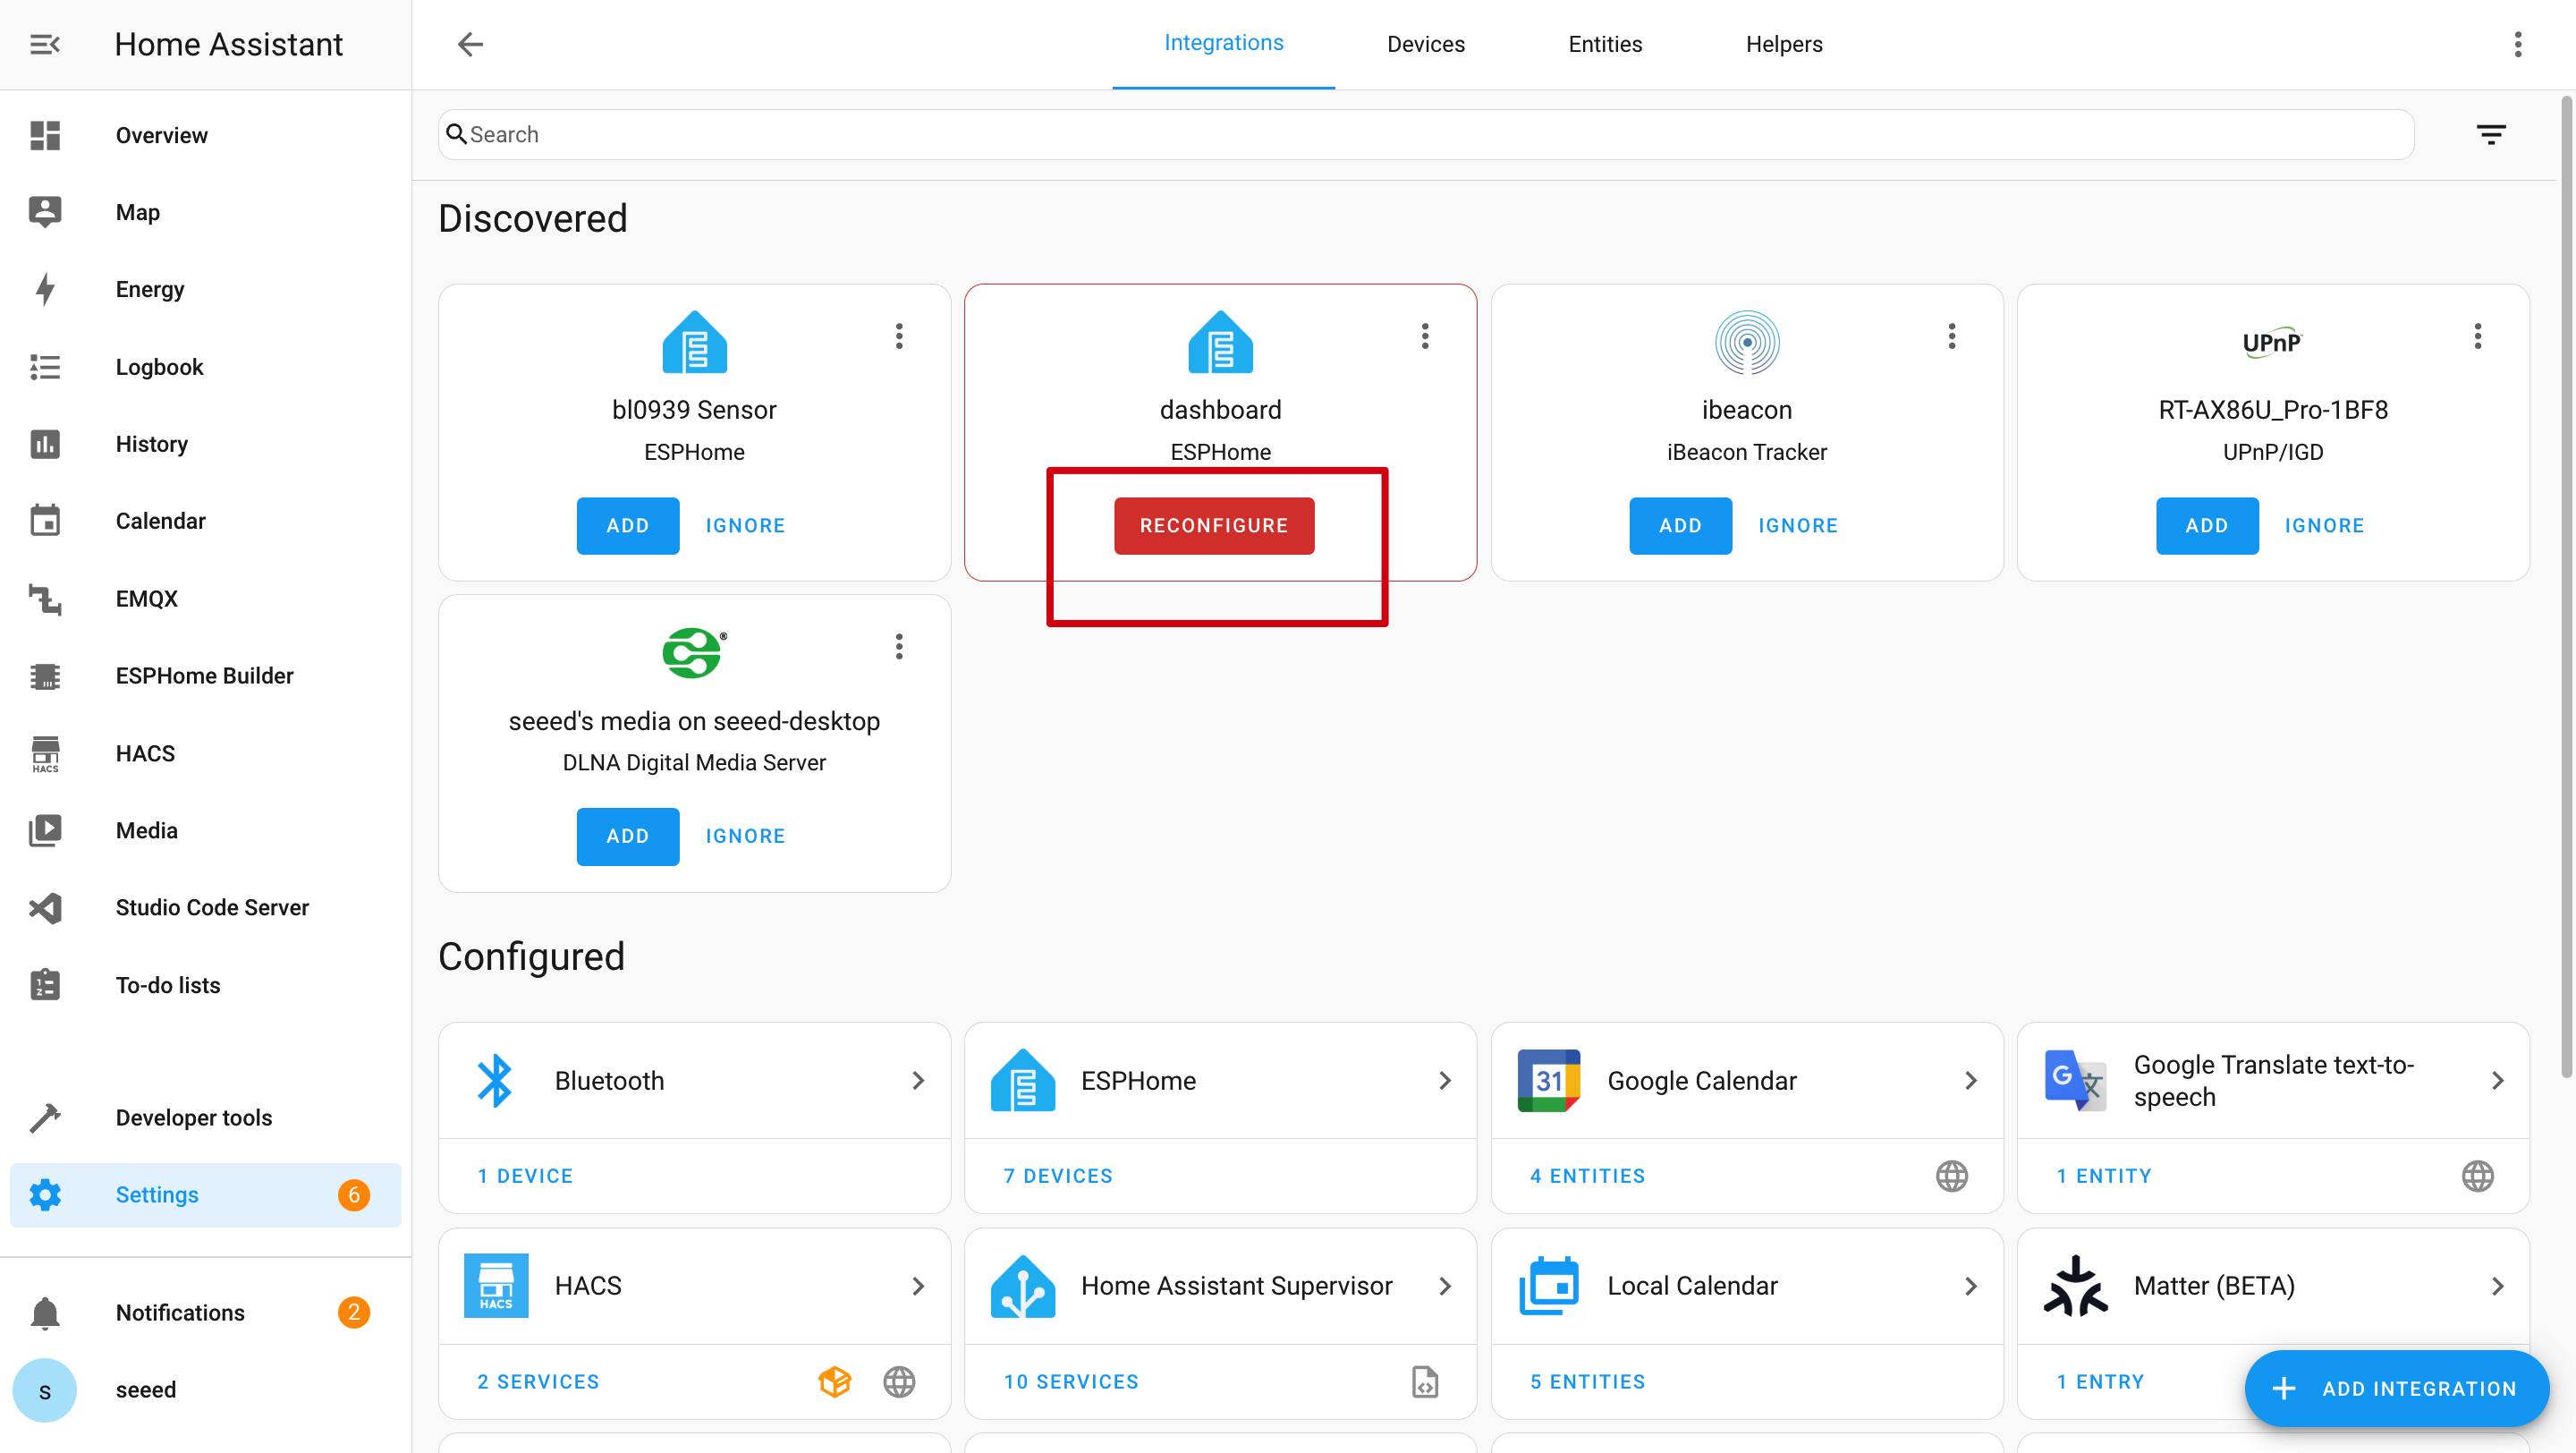
FAQ
Q1: なぜデータが表示されないのですか?
この場合、Settings -> Devices & Services -> Integrations に移動してデバイスを RECONGFIGURE する必要があります。ePaper Panel が見つからない場合は、Home Assistant を再起動してみてください。
Q2: なぜ Home Assistant でこれらのデータを取得できないのですか?
この場合、Settings -> Devices & Services -> Integrations に移動して、デバイスを Home Assistant に追加する必要があります。

Q3: Wi-Fi 経由でのプログラムのアップロードに失敗しますか?

この場合、デバイスがオフラインであるか、ディープスリープモードになっている可能性があります。アップロードを試みる前に、ネットワークに接続されていること、またはスリープモードから復帰していることを確認してください。
Q4: なぜ USB 経由でシリアルログが出力されないのですか?
reTerminal E シリーズは、UART0 上で CH340K USB-UART ブリッジを使用しています。YAML では次の logger 設定を維持してください:
logger:
  hardware_uart: UART0
技術サポートと製品ディスカッション
弊社製品をお選びいただきありがとうございます。私たちは、製品をできるだけスムーズにご利用いただけるよう、さまざまなサポートを提供しています。お好みやニーズに応じて選べる、複数のコミュニケーションチャネルをご用意しています。