Stackforce X シリーズモーター入門ガイド
この記事では、Stackforceシリーズモーターの使い方と、reComputer Jetson SuperでC++とPythonを使用する方法を紹介します。
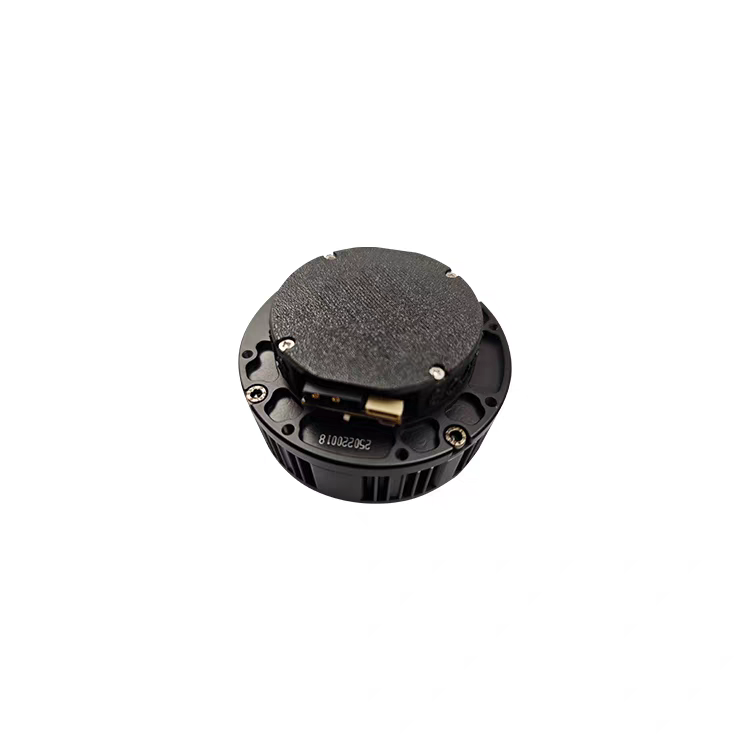
仕様
以下は、すべてのモーターモデルのパラメータが記載された完全な表です:
| パラメータ | 6010 | 8108 |
|---|---|---|
| 定格電圧 | 24V | 24V |
| 定格電流 | 10.5A | 7.5A |
| 定格電力 | 240W | 180W |
| 定格トルク | 5 Nm | 7.5 Nm |
| ピークトルク | 11 Nm | 22 Nm |
| 定格速度 | 120 RPM | 110 RPM |
| 最大速度 | 270 RPM | 320 RPM |
| ギア比 | 8:1 | 8:1 |
| 通信プロトコル | MIT Protocol | MIT Protocol |
| 制御モード | Position, Velocity, Torque Control | Position, Velocity, Torque Control |
| 外径 | 80 mm | 97 mm |
| 厚さ | 47 mm | 46 mm |
| 重量 | 392 g ±10% | 395 g ±5% |
| 相抵抗 | 0.48 Ω ±10% | 0.439 Ω ±10% |
| 相インダクタンス | 368 μH ±10% | 403 μH ±10% |
主な特徴
- 高トルク出力
- MITモード制御
- 磁気エンコーダフィードバック
- コンパクトで軽量な設計
- 高速CAN通信のサポート
- 多用途アプリケーション
入門ガイド
使用前の準備
Windowsシステム搭載のPCで
モーターのCANIDとCANModeは両方ともシリアルポート経由で変更されます。モーターは出荷時にデフォルトのCANID 0x01とCANMode CAN2.0(1Mbps)に設定されています。
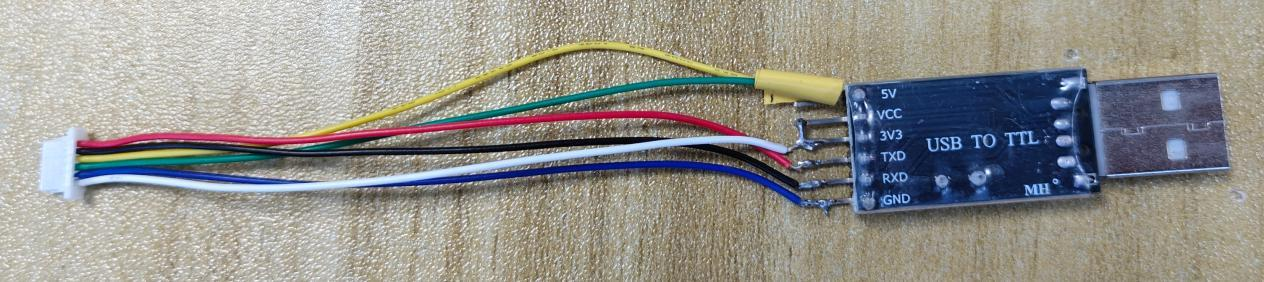
シリアルポート配線
V、G、T、Rをそれぞれシリアル通信モジュールのVCC(3.3V)、GND、RX、TXに接続します(RXとTXはクロス接続する必要があります)。下図のとおりです:
CANIDの変更
シリアルポートのボーレートを1Mbpsに設定します。
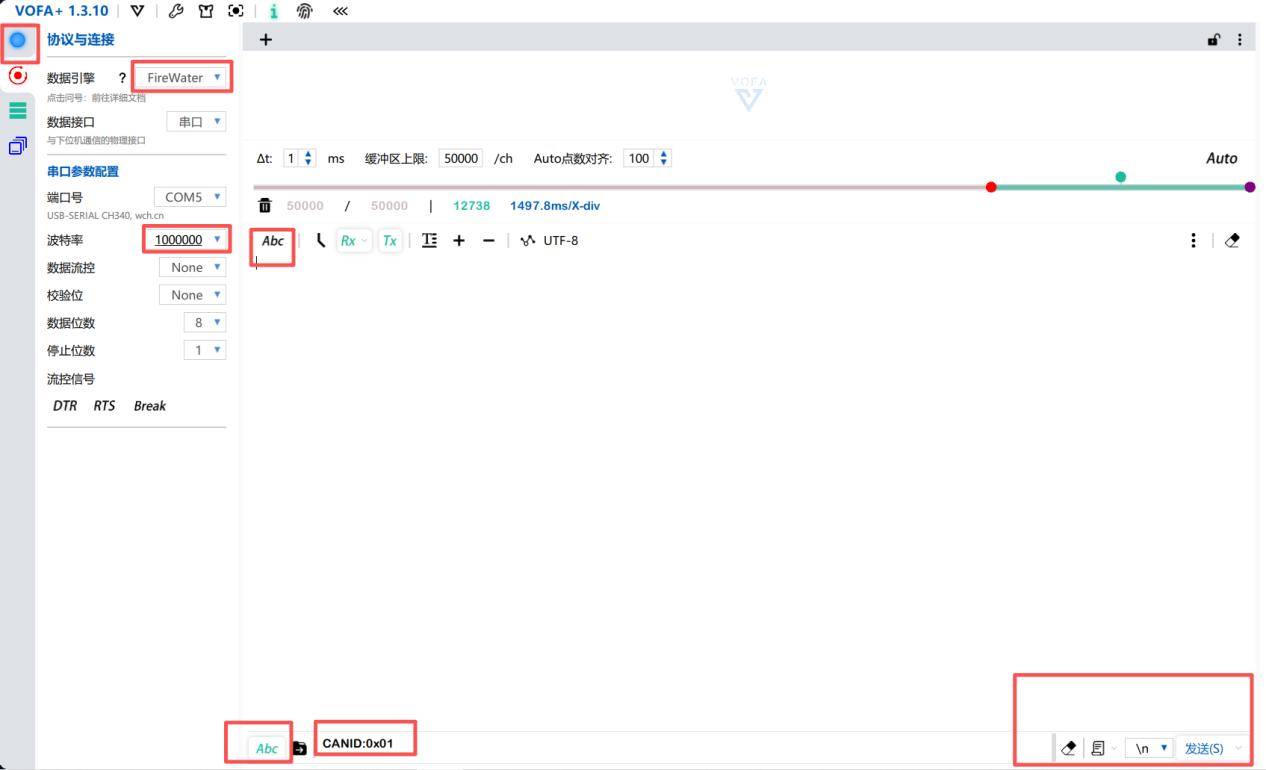
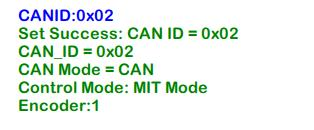
送信するCANIDは0xで、設定するIDは0xです。最大制限は0x7Fです。CANIDの設定が成功すると、以下のログが出力されます:
後続のコードでのテストを簡単にするため、CANID:0x01を設定できます。
CANモードの変更
シリアルポート経由でCANMODE:0またはCANMODE:1を送信します。
CANMODE:0はCAN2.0モード(1Mbps)を表し、CANMODE:1はCANFDモード(5Mbps)を表します。
CANモードの変更が成功した場合は、以下の図のように表示されます:
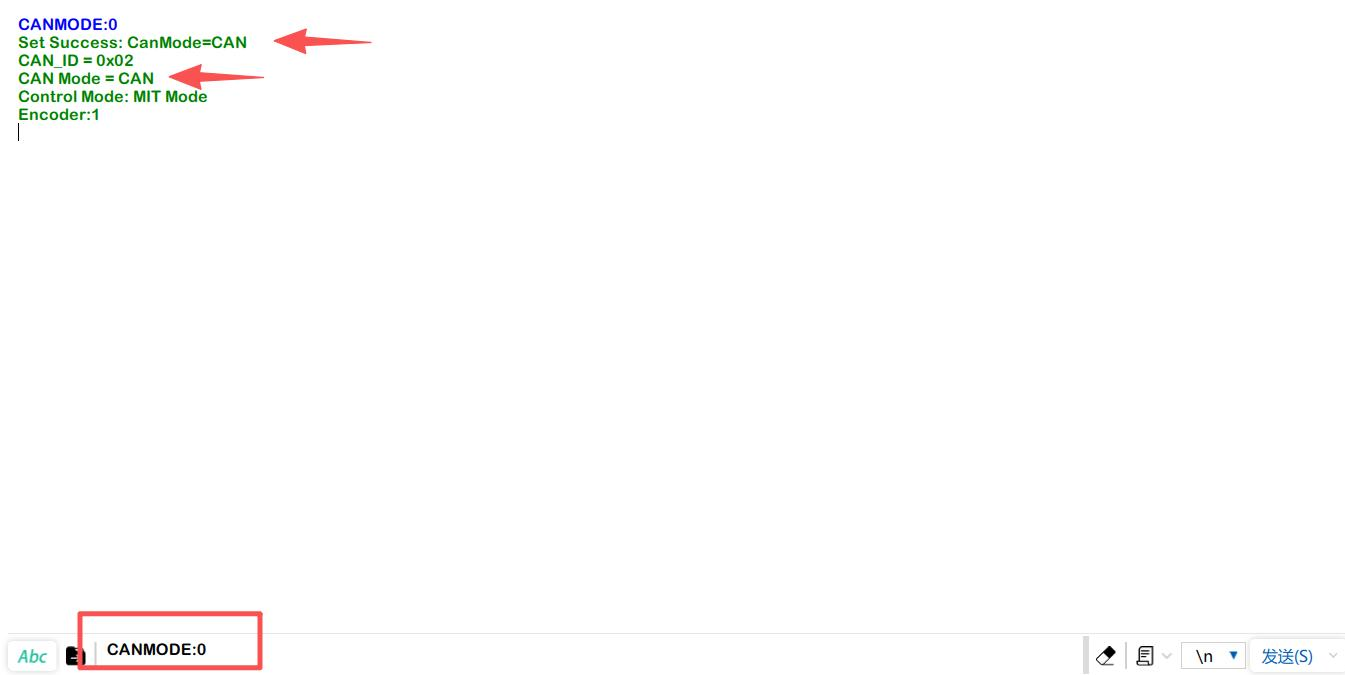
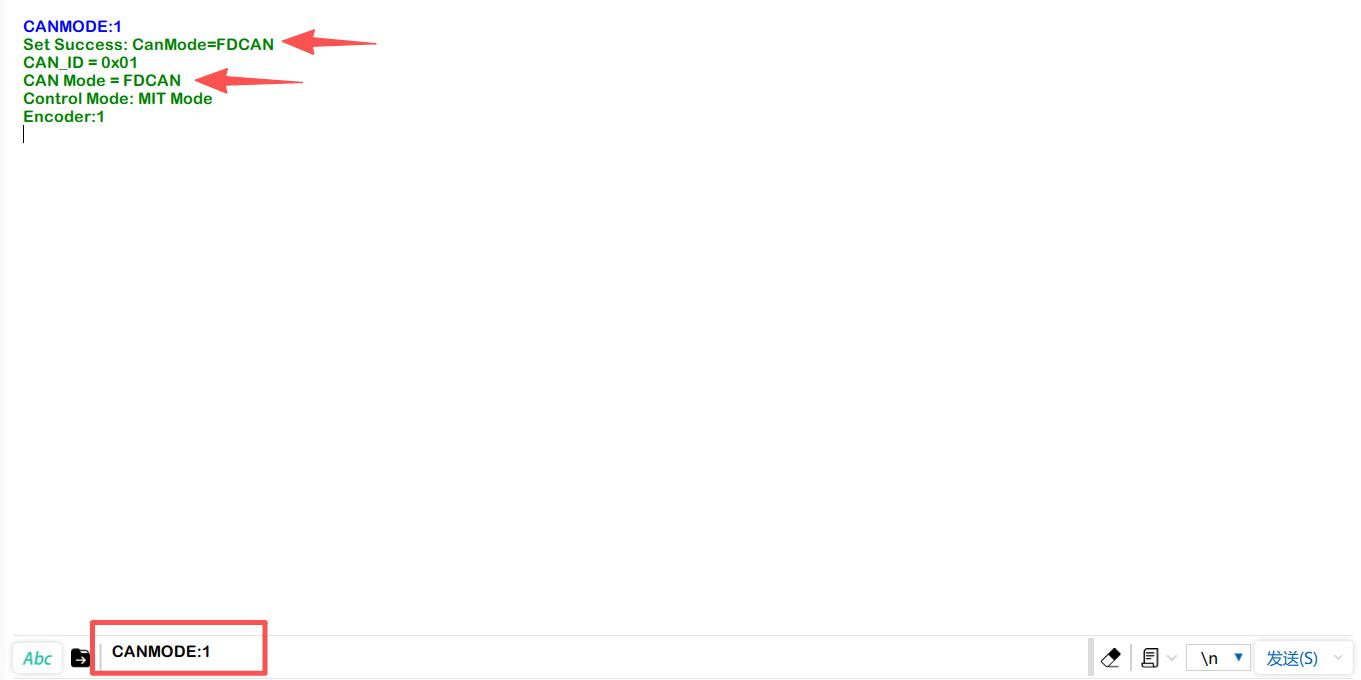
後続のコードでのテストを簡単にするため、CANMODE:0を設定できます。
reComputer Mini Jetson Orinを使用したモーター制御
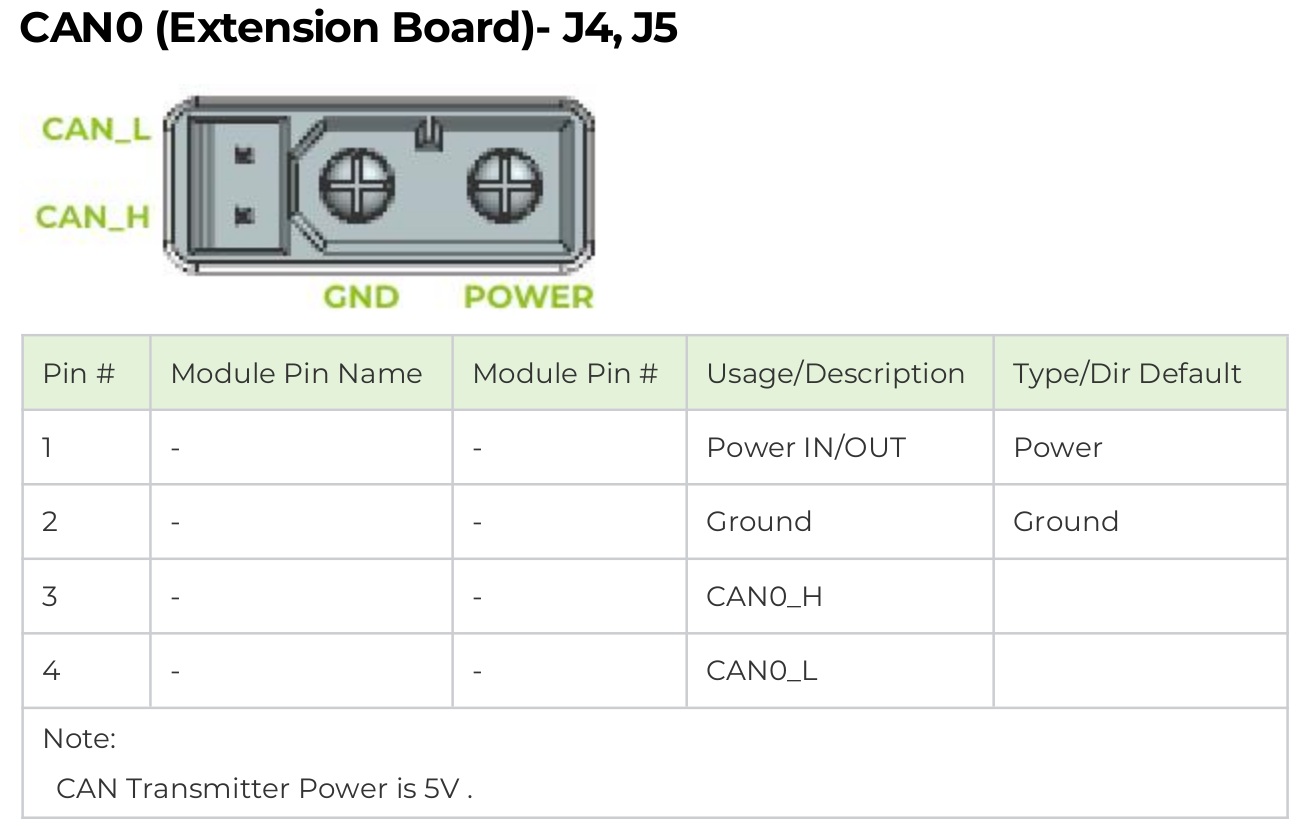
市場で最も一般的なモーター用CAN通信インターフェースはXT30(2+2)とJSTコネクタです。私たちのreComputer Mini Jetson OrinとreComputer RoboticsデバイスにはデュアルXT30(2+2)インターフェースとJSTベースのCANインターフェースが搭載されており、シームレスな互換性を提供します。
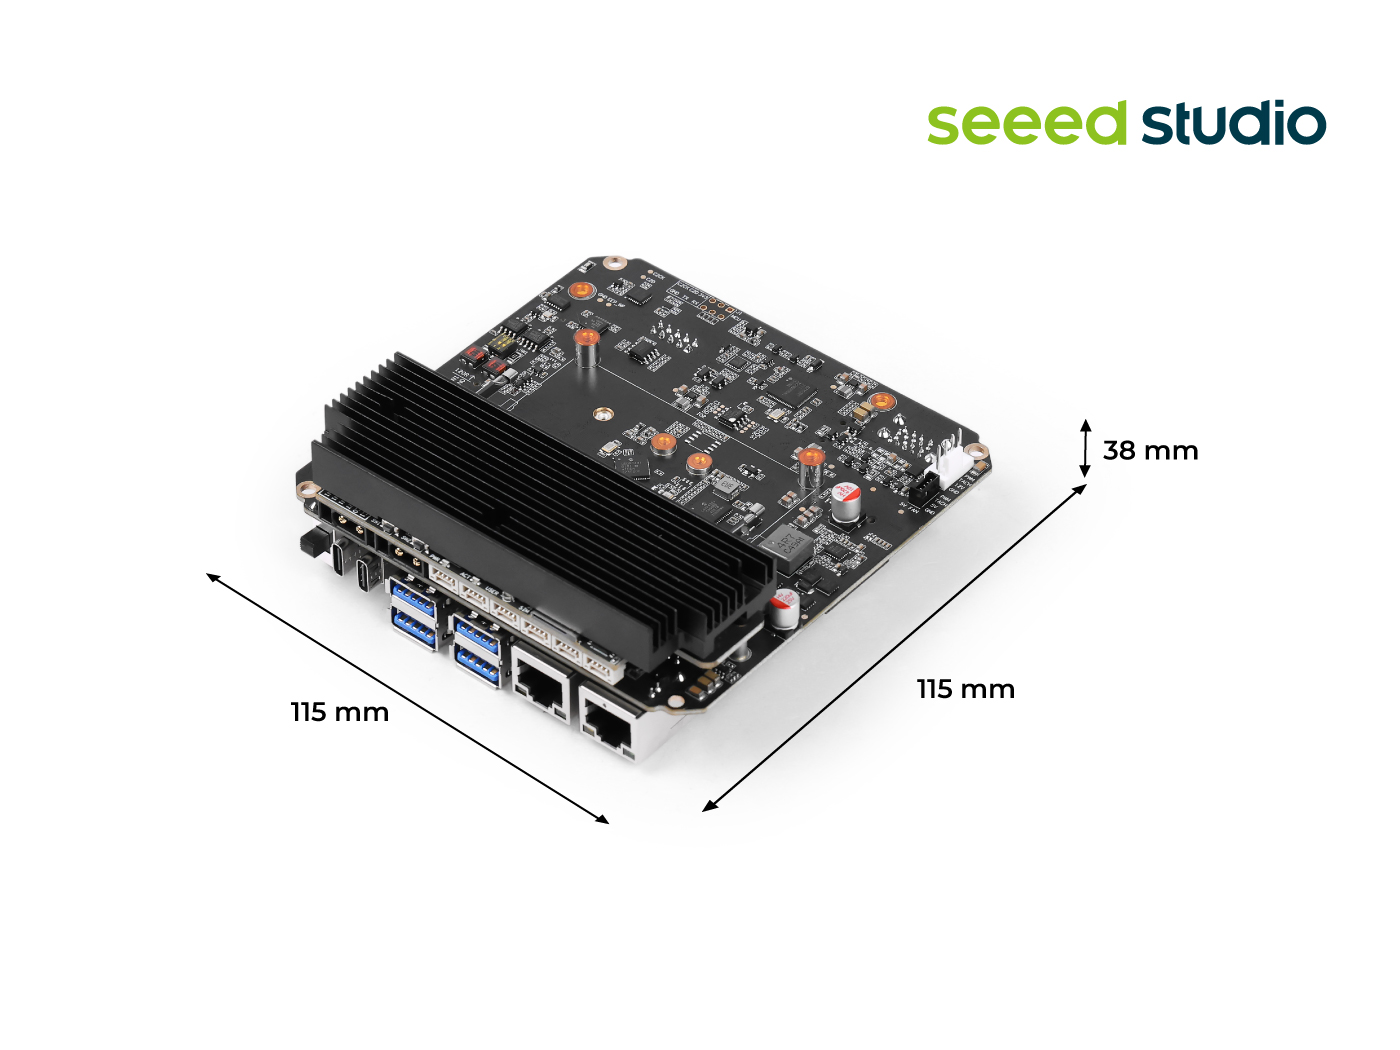
reComputer Mini:

reComputer Robotics
CAN使用の詳細については、このwikiを参照してください。
CANインターフェースの有効化
ステップ1: CAN0とCAN1を使用する前に、底面カバーを取り外し、2つの120Ω終端抵抗をON位置に設定してください。
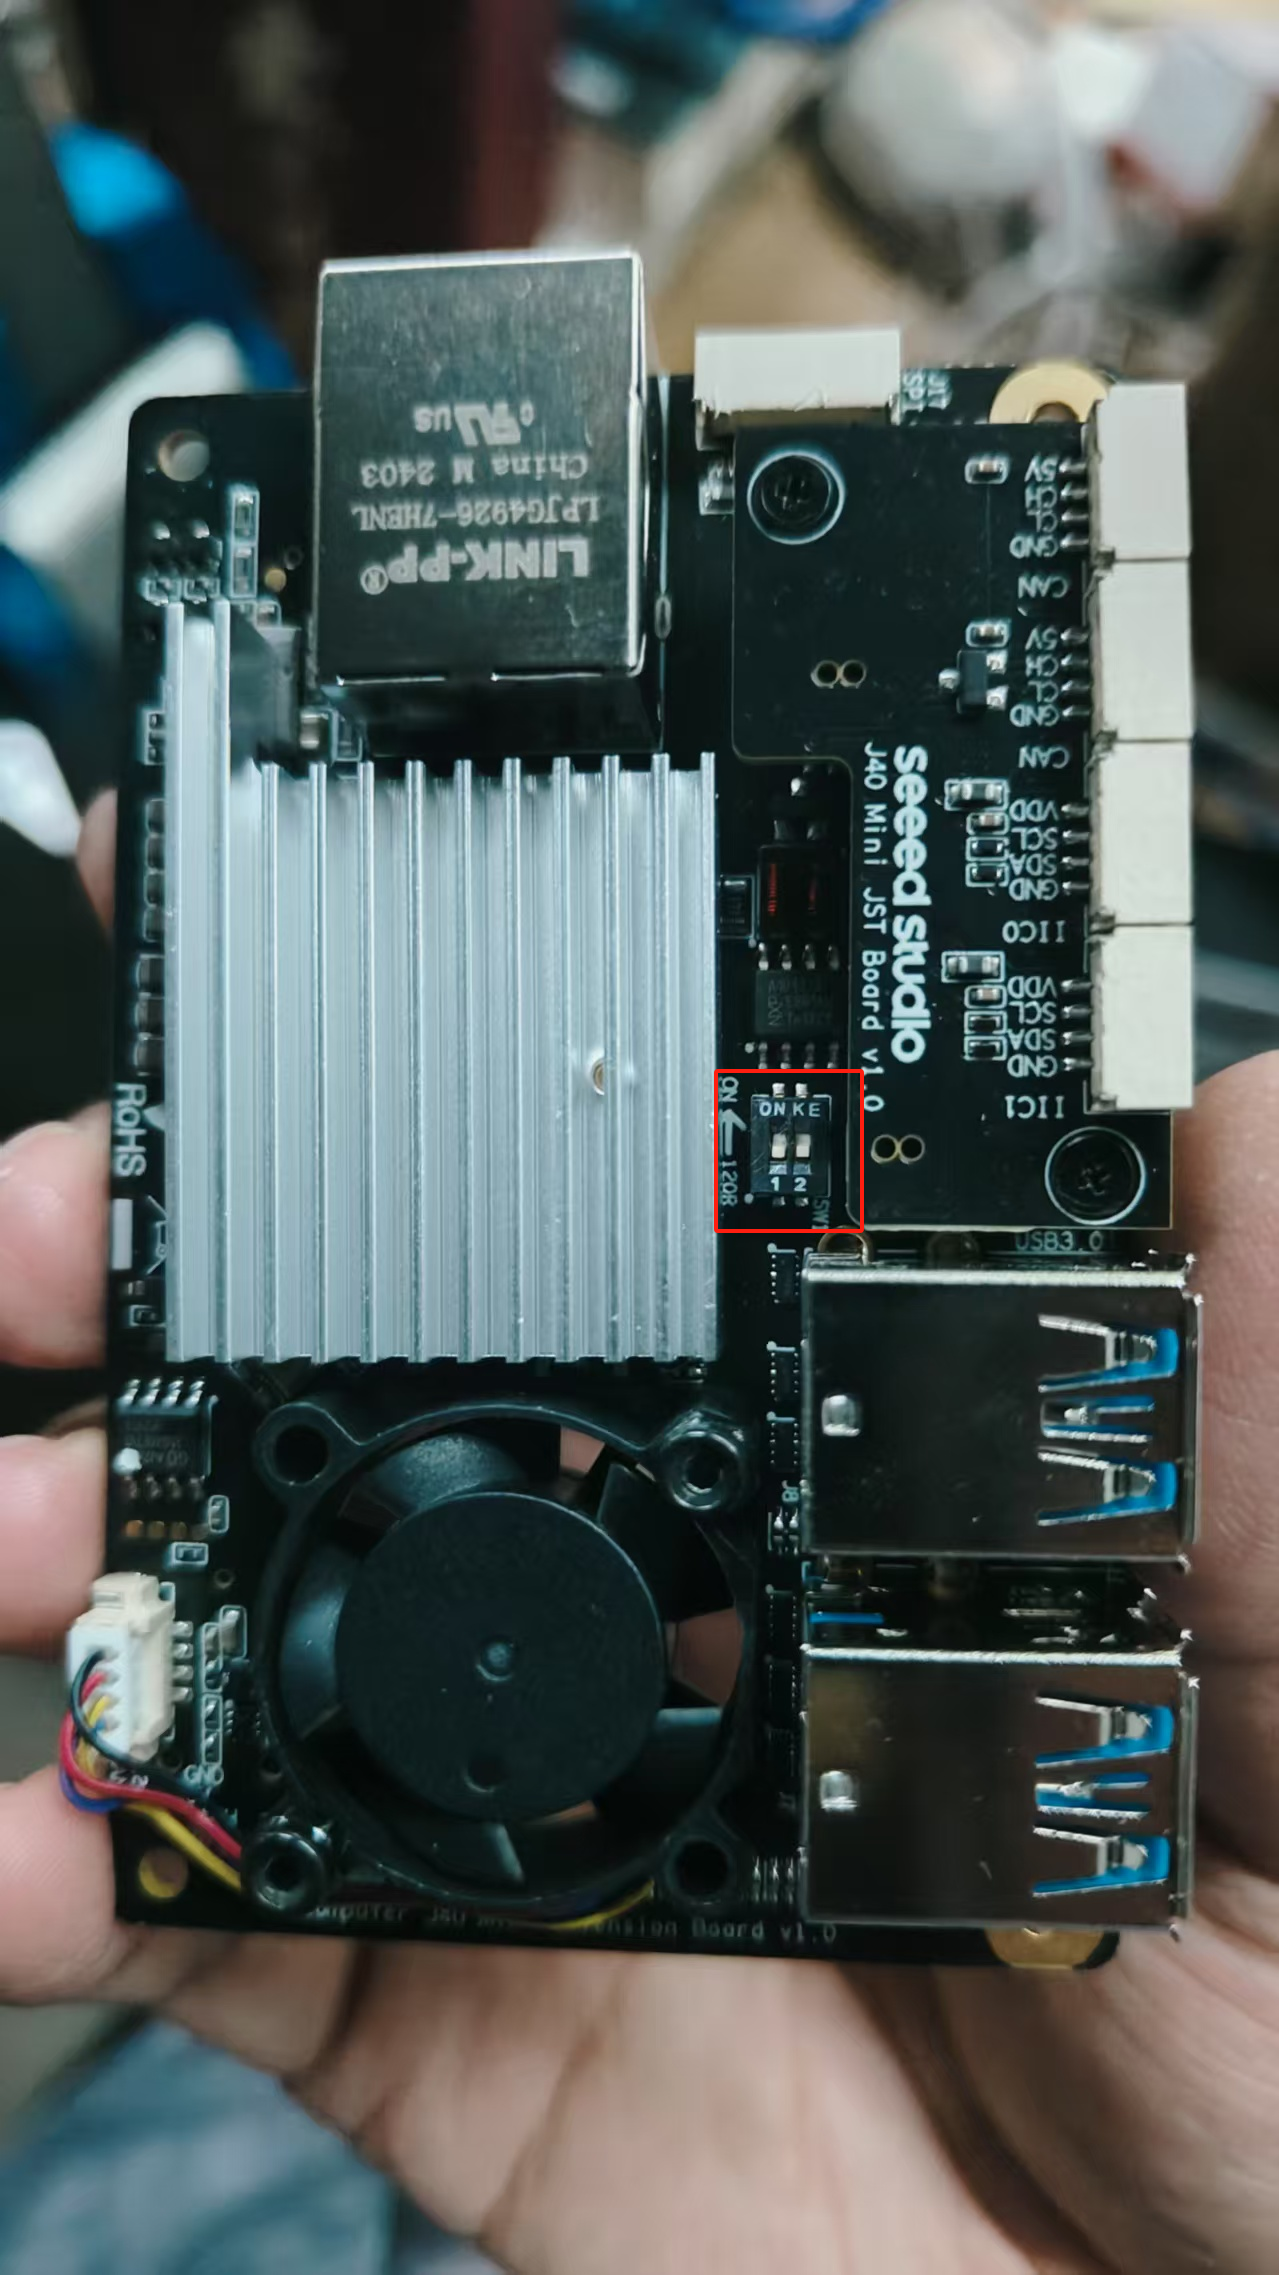
モーターに内蔵された120Ω CAN通信終端抵抗のトグルスイッチをオフにします。
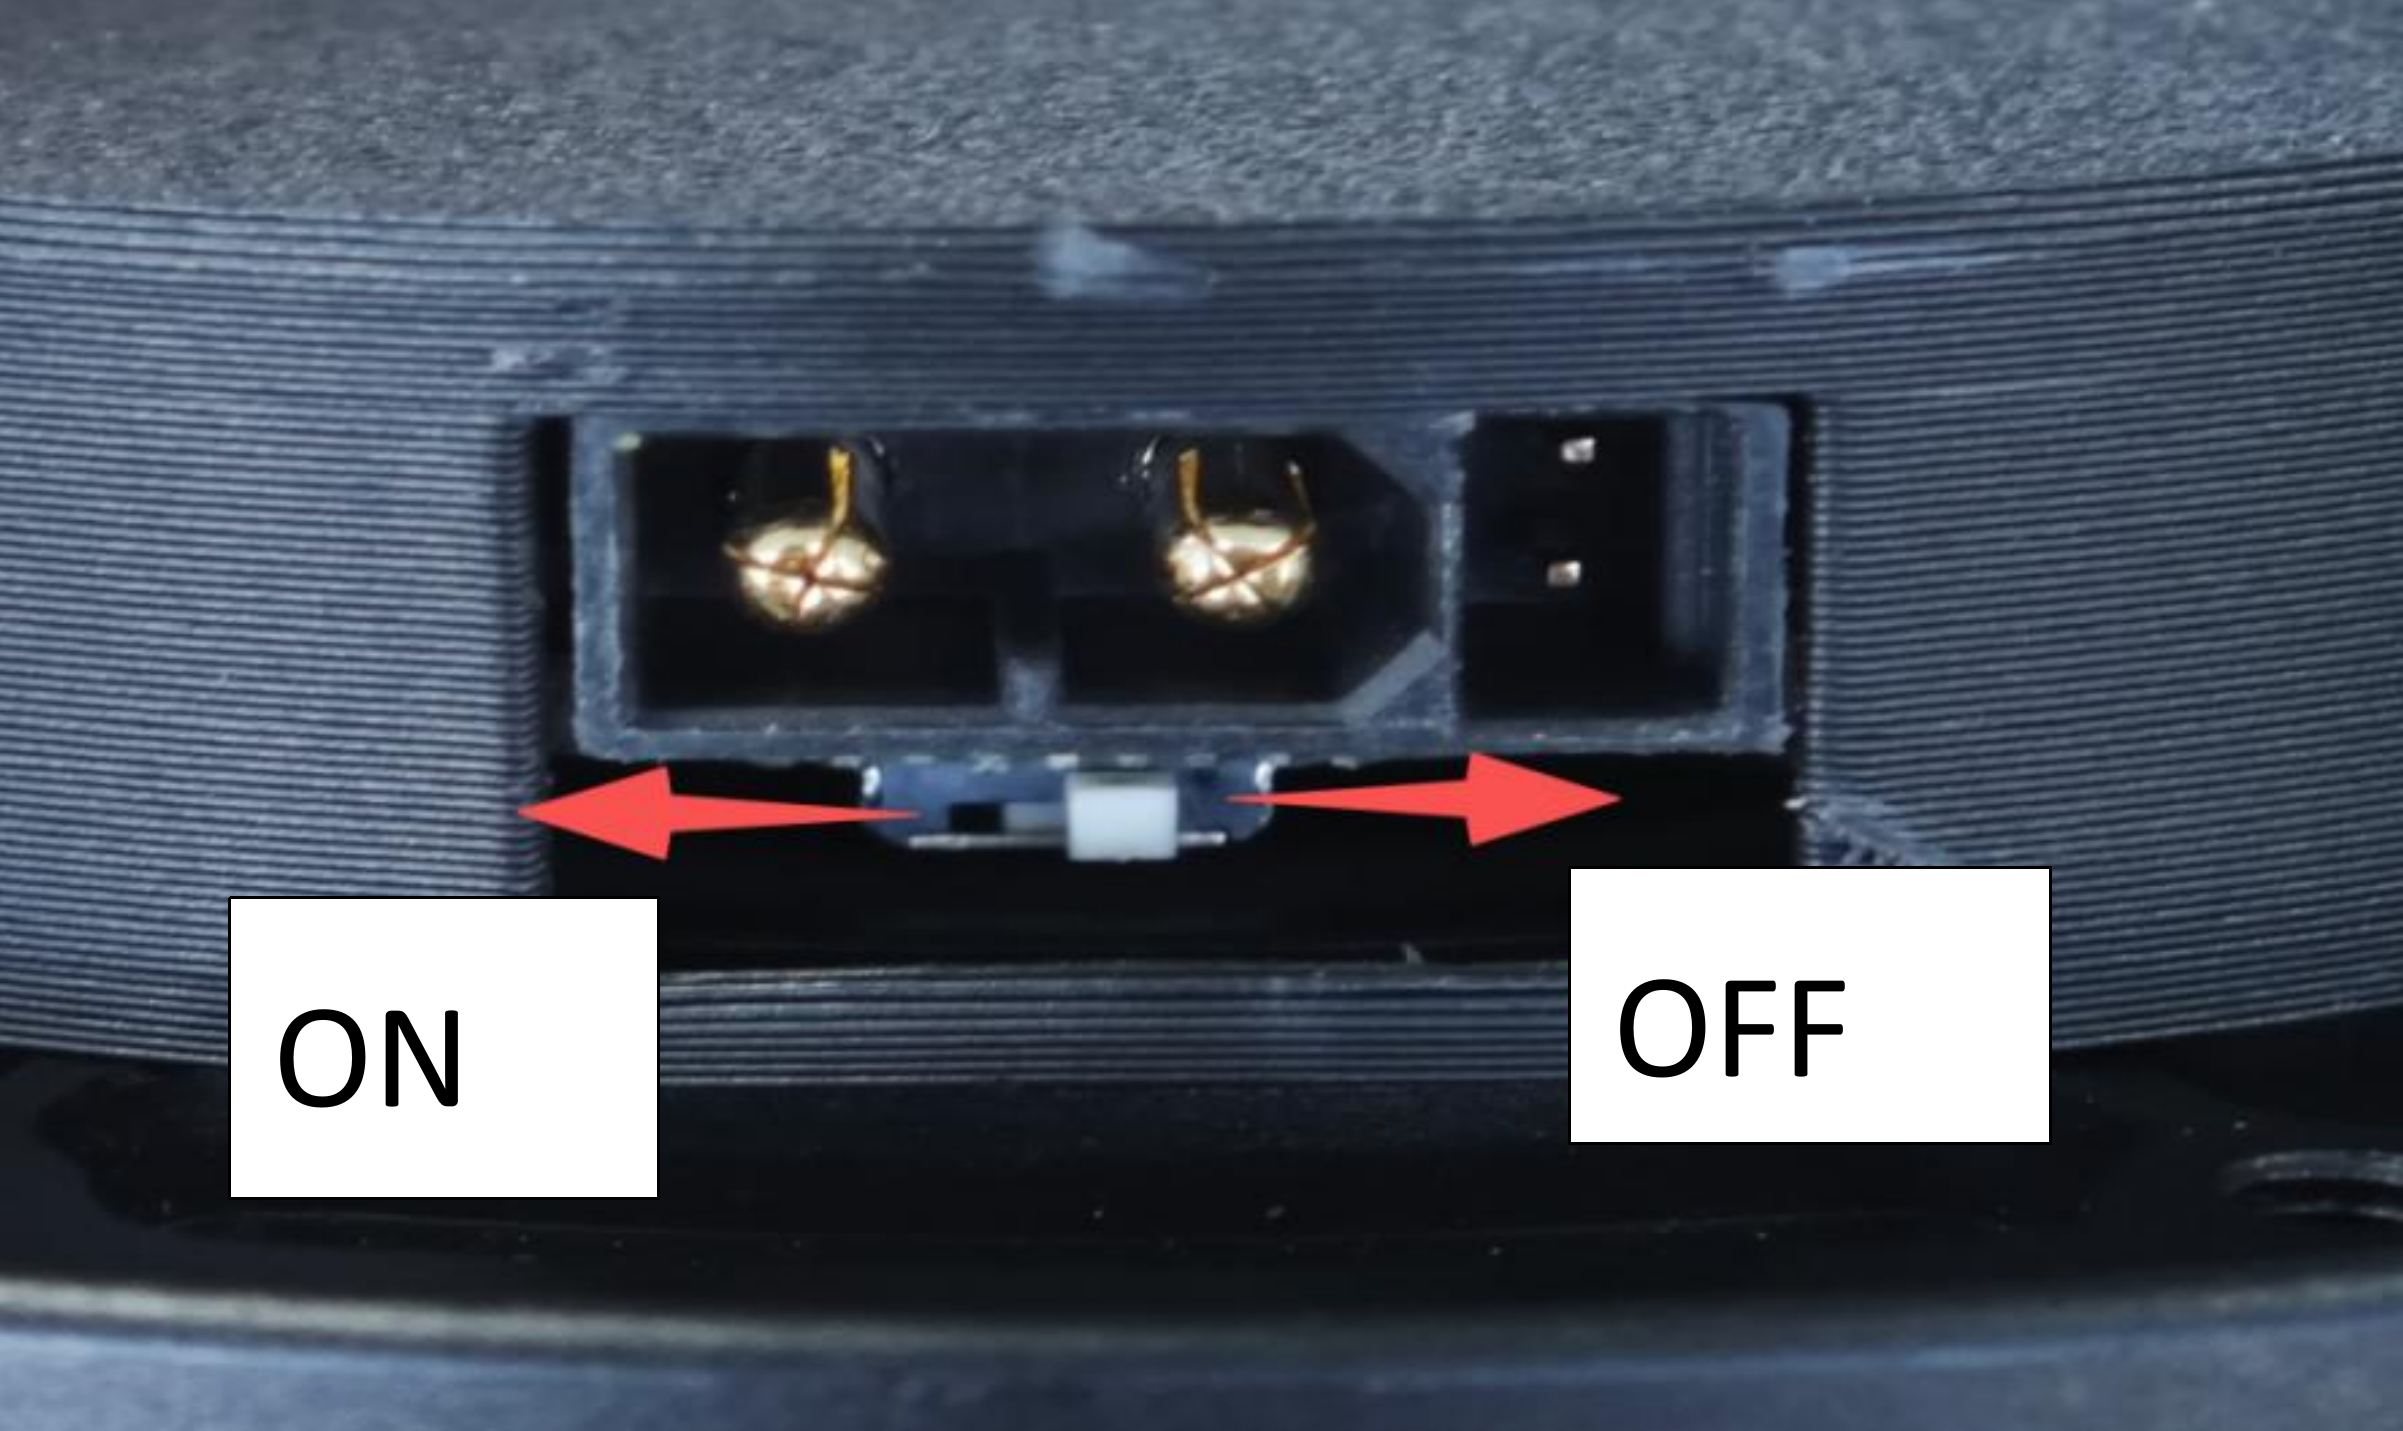
Recomputer Miniで120Ω終端抵抗をONに設定していない場合は、モーターのCAN通信終端抵抗のトグルスイッチをオンにすることができます。
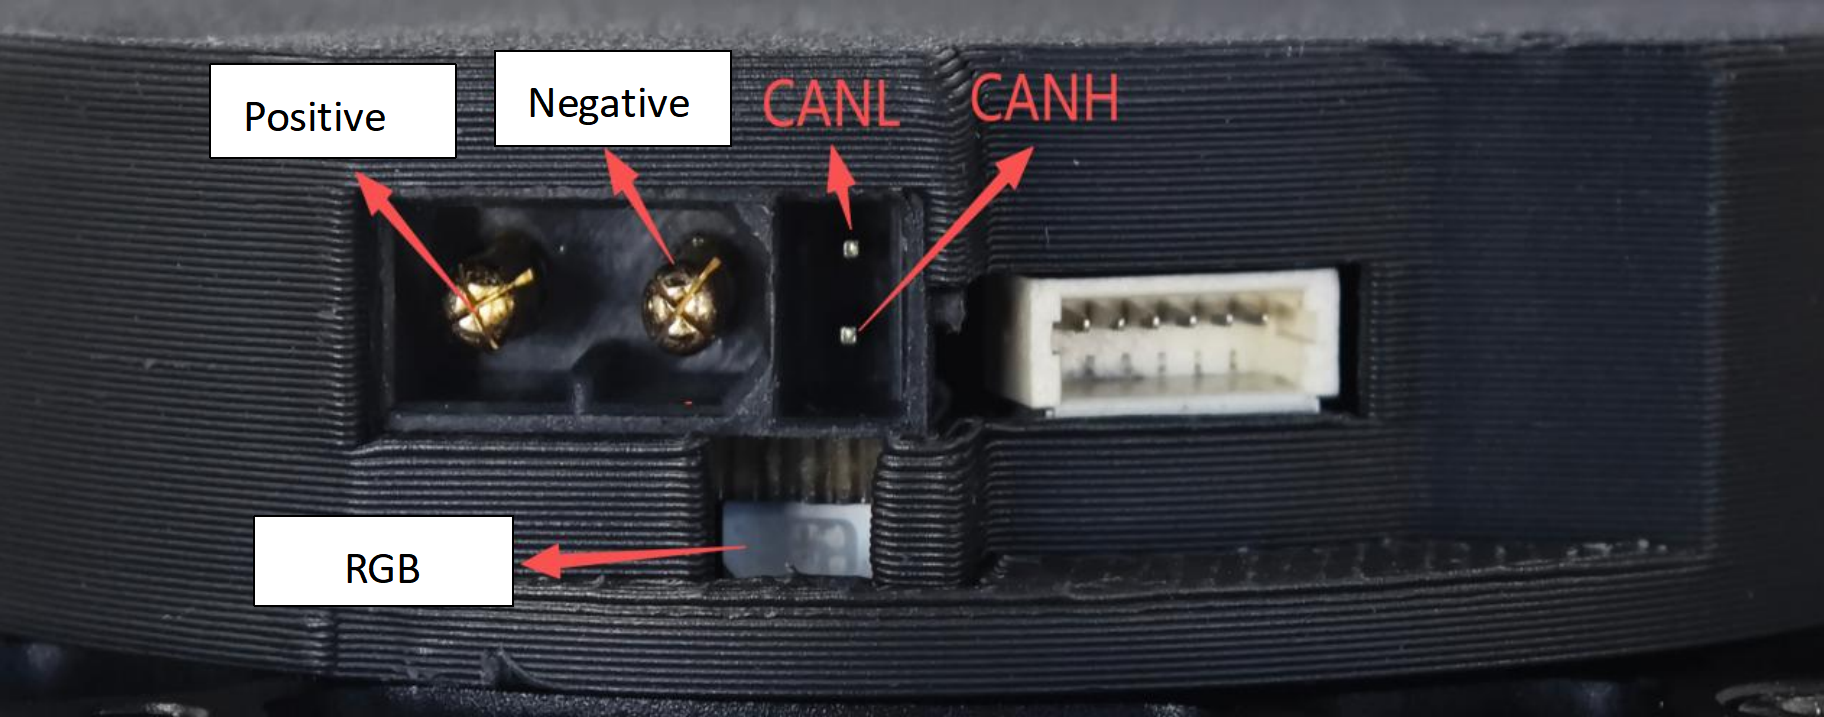
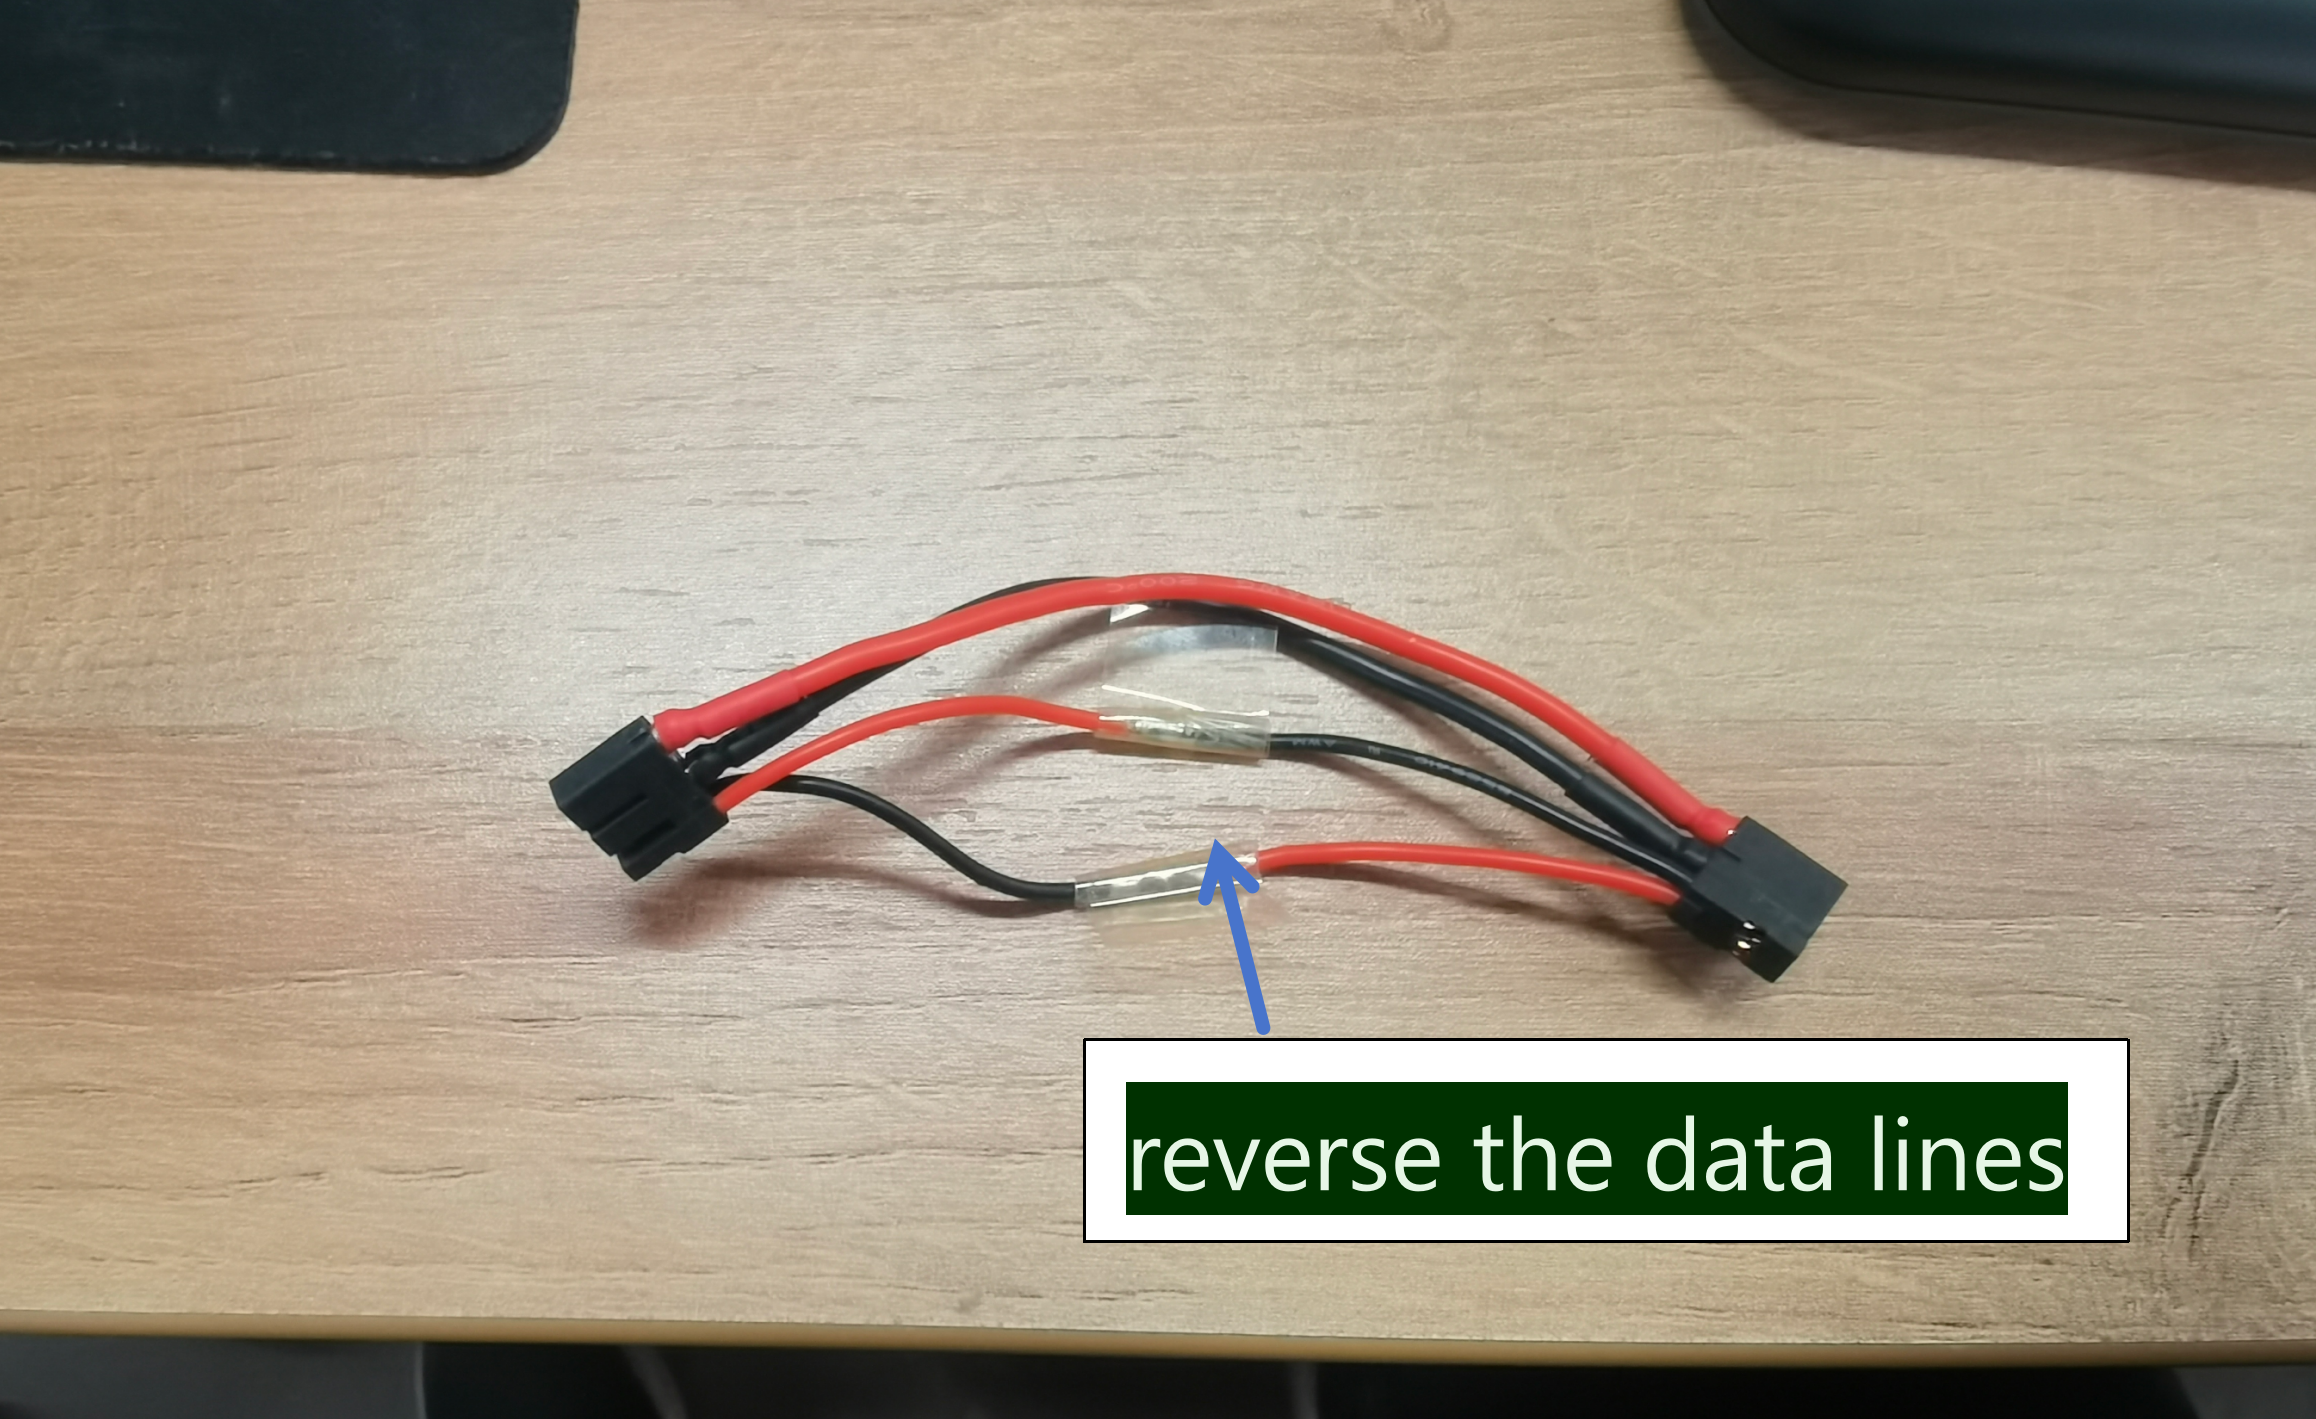
ステップ2: XT30(2+2)インターフェース経由でモーターをreComputer MiniのCAN0に直接接続します。

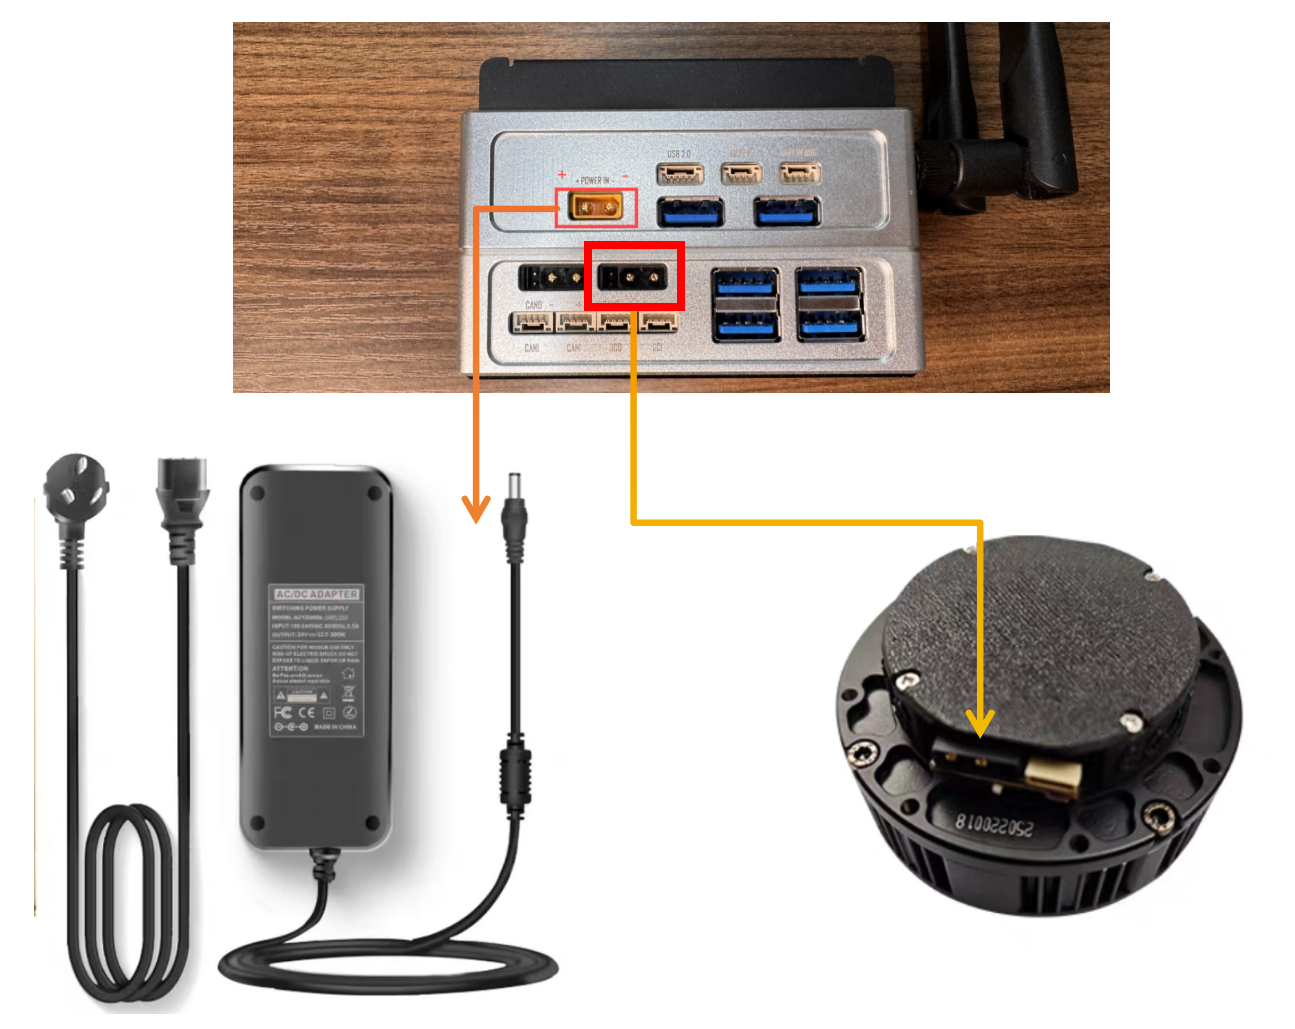
reComputer MiniのCANインターフェース設計がモーターのCANインターフェースと逆になっているため、データラインを逆にするための手動はんだ付けが必要です。
モーターが必要とする高電圧・大電流を考慮し、単一モーターを駆動するためにreComputer Miniに電力を供給する24V 300W電源アダプターの購入を推奨します。より多くのモーターを接続する必要がある場合は、要件に応じてより高出力の電源アダプターを購入できます。
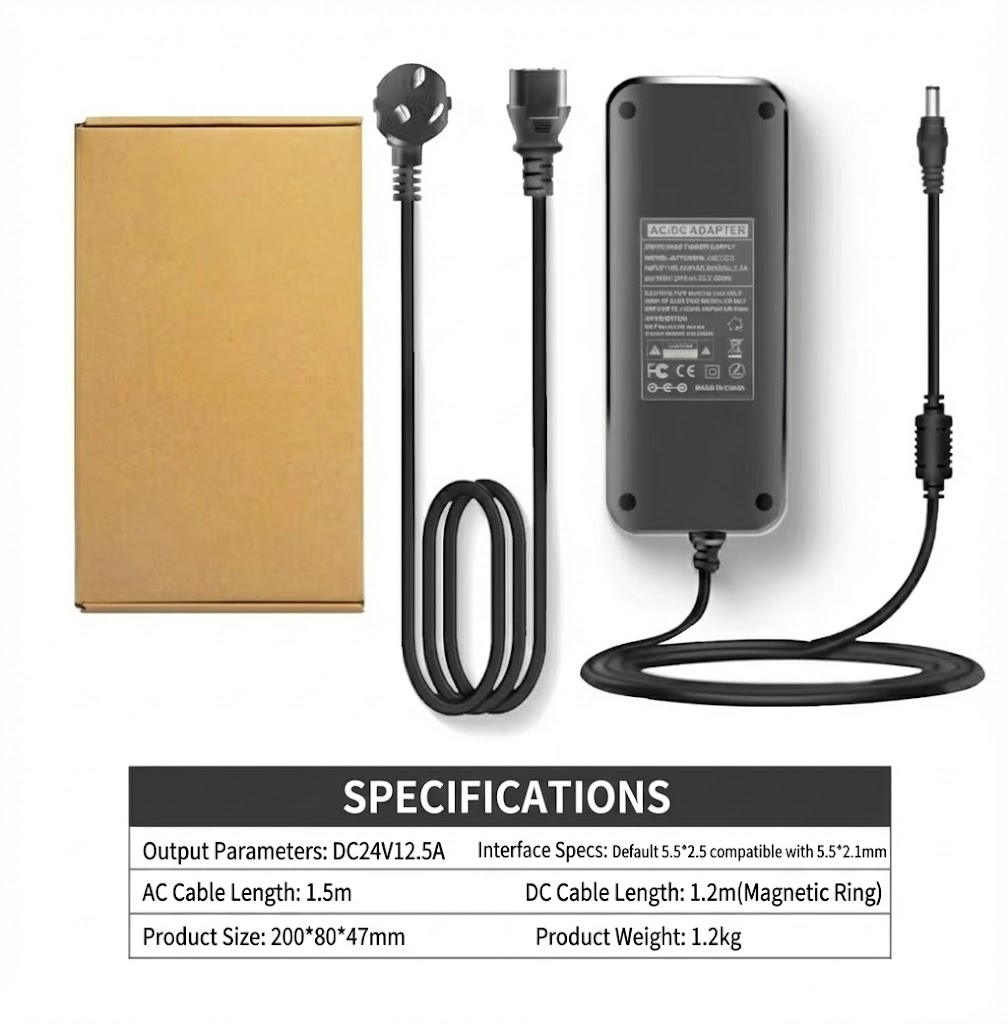
この電源は単一モーターの学習とテスト専用です。複数のモーターの場合は、別途電源ボードを設計し、Jetsonの電源をモーター電源から分離して、大電流がJetsonを直接通過することを避けてください。
Jetson CAN通信の有効化
ターミナルを開き、以下のコマンドを入力してGPIOピンをハイにしてCAN0を有効化します:
gpioset --mode=wait 0 43=0
JSTインターフェースでCAN1を使用する場合は、ピン106をハイにします。
gpioset --mode=wait 0 106=0
このターミナルを開いたまま、新しいターミナルを開始してCAN0を設定します。
sudo modprobe mttcan
sudo ip link set can0 type can bitrate 1000000
sudo ip link set can0 up
C++とPython環境のセットアップ
ステップ1: SDKをクローンします。
git clone https://github.com/Seeed-Projects/Stackforce-Motor-SDK.git
ステップ2: ドライバーSDKには以下の依存関係が必要です。Debian Linuxでは、以下のコマンドでインストールできます:
sudo apt-get install -y build-essential cmake
sudo apt install linux-modules-extra-5.15.0-1025-nvidia-tegra # For Jetson Jetpack 6.0
Pythonバインディングが必要な場合は、さらにPython 3、pip、pybind11をインストールします:
sudo apt-get install -y python3 python3-pip python3-pybind11 python3-setuptools
依存関係をインストールした後、以下の手順に従ってドライバーSDKをC++ライブラリまたはPythonパッケージとしてインストールします。どちらもCMakeを使用してC++コードをコンパイルします。
モーター制御とデータ受信
C++
main.cpp
#include <chrono>
#include <cstdint>
#include <cmath>
#include <cstdio>
#include <thread>
#include "CAN_comm.h"
#include "config.h"

MIT devicesState[4];

uint32_t sendNum; // for testing send speed
uint32_t recNum;

MIT MITCtrlParam;

uint16_t sendCounter = 0;
bool motorEnable = true;
int receivedNumber = 0;
uint64_t prev_ts = 0;
float t = 0.0f;
float targetJointAngle = 0.0f; // Target joint angle (can be modified at runtime via input)

namespace {
uint64_t micros_steady(){
  using namespace std::chrono;
  return duration_cast<microseconds>(steady_clock::now().time_since_epoch()).count();
}
}

void setup() {
  std::printf("SF Motor Control (Jetson) start\n");
  CANInit();
  enable(0x01); // Enable motor with ID 0x01  <- Change ID to control different motors
  prev_ts = micros_steady();
  t = 0.0f;
}

uint16_t printCount = 0;
uint16_t recCount = 0;

void loop() {

  recCANMessage();

  // Check for new joint angle input
  // (Check once every 1000 loops to avoid frequent blocking input calls)
  static uint16_t inputCheckCount = 0;
  if(++inputCheckCount >= 1000){
    inputCheckCount = 0;
    float newAngle;
    if(std::scanf("%f", &newAngle) == 1){
      targetJointAngle = newAngle;
      std::printf("Target joint angle updated: %.3f rad\n", newAngle);
    }
  }

  static int IDswitch = 0x01; // <- Change ID to control different motors
  uint64_t current_ts = micros_steady();

  /*
   * Function:
   *   Update control parameters based on time difference and send MIT command.
   *
   * Parameters:
   *   - current_ts: current timestamp
   *   - prev_ts   : previous timestamp
   *   - t         : time variable used for sine/cosine calculations
   *   - MITCtrlParam:
   *       Control parameter structure including position, velocity,
   *       position gain (Kp), velocity gain (Kd), and torque
   *   - IDswitch  : motor ID selector
   *
   * Return:
   *   None
   */
  if(current_ts - prev_ts >= 1000){ // 1 ms control period
    // Update time variable (increase by 1 ms)
    t += 0.001;

    // Set control parameters:
    // target position, target velocity, position gain, velocity gain, and torque
    MITCtrlParam.pos = targetJointAngle;
    MITCtrlParam.vel = 0;
    MITCtrlParam.kp  = 0.5;
    MITCtrlParam.kd  = 0.3;
    MITCtrlParam.tor = 0;

    // Update previous timestamp
    prev_ts = current_ts;

    // IDswitch++;
    // If IDswitch exceeds 0x04, reset it to 0x01
    // if(IDswitch > 0x04){
    //   IDswitch = 0x01;
    // }

    sendMITCommand(IDswitch, MITCtrlParam); // Send MIT command

    printCount++;
    if(printCount >= 100){
      printCount = 0;
      // Only print when IDswitch is 0x01
      // Print commanded position/velocity and actual motor position/velocity
      if(IDswitch == 0x01){
        std::printf( "[CMD] pos: %6.3f rad vel: %6.3f rad/s | " "[FB] pos: %6.3f rad vel: %6.3f rad/s\n", MITCtrlParam.pos, MITCtrlParam.vel, devicesState[IDswitch - 1].pos, devicesState[IDswitch - 1].vel );
      }
    }
  }

  std::this_thread::sleep_for(std::chrono::milliseconds(1));
}

int main(){
  setup();

  while(true){
    loop();
  }

  disable(0x01); // Disable motor with ID 0x01
  return 0;
}
cd build
cmake ..
make
コンパイルされた実行ファイルは build/sfmotor_control に配置されます。プログラムを実行します:
./sfmotor_control
プログラムはデフォルトでID 0x01のモーターを制御します。動作中は、キーボードから目標角度値(ラジアン単位)を入力できます。また、モーターの角度と角速度のフィードバックデータも受信します。
Python
main.py
import sys
import time
import select

# Import core control module (assumes sf_can_controller.py is in the same directory)
from sf_can_controller import MotorController

# --- Core Configuration ---
IFACE = "can0"
MOTOR_ID = 1         # <- Change ID to control different motors
UPDATE_RATE_HZ = 100.0
PRINT_EVERY = 2
INITIAL_TARGET_DEG = 0.0

# --- Main Control Loop ---
def run_simple_test() -> None:
    """Run a simplified position control loop."""

    # 1. Initialization
    update_period = 1.0 / UPDATE_RATE_HZ
    target_rad = INITIAL_TARGET_DEG

    KP, KD = 0.5, 0.3  # Default MIT parameters

    controller = MotorController(interface=IFACE, motor_id=MOTOR_ID)
    print(f"--- SF Motor Test Start ---")
    print(f"Interface: {IFACE}, ID: {MOTOR_ID}, Rate: {UPDATE_RATE_HZ} Hz")

    # 2. Enable motor
    controller.enable()

    last_send_time = time.perf_counter()
    print_counter = 0

    inputCheckCount = 0

    # 3. Main loop
    while True:
        controller.poll_rx()
        current_state = controller.get_motor_state()

        now = time.perf_counter()

        # --- Periodic input check (every 500 loops) ---
        inputCheckCount += 1
        if inputCheckCount >= 500:
            inputCheckCount = 0

            # Blocking I/O waiting for user input (this will pause the control loop)
            # Note: If the input is not a number, a ValueError will be raised.
            line = input("Please enter target joint angle: ").strip()
            if line:
                angle_deg = float(line)
                target_rad = angle_deg
                print(f"Target joint angle updated: {angle_deg:.3f} deg")

        # Periodically send MIT command
        if now - last_send_time >= update_period:
            last_send_time = now

            # Send target position command
            controller.send_mit_command(
                pos=target_rad,
                vel=0.0,
                kp=KP,
                kd=KD,
                tor=0.0
            )

            # Print motor state
            print_counter += 1
            if print_counter >= PRINT_EVERY:
                print_counter = 0
                print(
                    f"Cmd={target_rad:.2f} | "
                    f"Pos={current_state.pos:.2f} (Vel={current_state.vel:.2f})"
                )

        time.sleep(0.001)


if __name__ == "__main__":
    # Run test
    run_simple_test()
Pythonスクリプトは script/ ディレクトリに配置されており、コンパイルなしで直接実行できます。
python main.py
プログラムはデフォルトでID 0x01のモーターを制御します。動作中は、キーボードから目標角度値(ラジアン単位)を入力できます。また、モーターの角度と角速度のフィードバックデータも受信します。
引用
技術サポート & 製品ディスカッション
弊社製品をお選びいただき、ありがとうございます!弊社製品での体験が可能な限りスムーズになるよう、さまざまなサポートを提供しています。さまざまな好みやニーズに対応するため、複数のコミュニケーションチャンネルを用意しています。